


KDC-X792 KDC-X692 KDC-MP738U KDC-MP638U
CD-RECEIVER
INSTRUCTION MANUAL
AMPLI-TUNER LECTEUR DE CD
MODE D’EMPLOI
REPRODUCTOR DE DISCOS COMPACTOS RECEPTOR DE FM/AM
MANUAL DE INSTRUCCIONES
Take the time to read through this instruction manual.
Familiarity with installation and operation procedures will help you obtain the best performance from your new CD-receiver.
For your records
Record the serial number, found on the back of the unit, in the spaces designated on the warranty card, and in the space provided below. Refer to the model and serial numbers whenever you call upon your Kenwood dealer for information or service on the product. Model KDC-X792/X692/MP738U/MP638U Serial number
US Residence Only
Register Online
Register your Kenwood product at www.Kenwoodusa.com
© B64-4048-00/00 (KW)

Contents
Before use |
3 Other Functions |
19 |
||
|
|
|
|
|
Basic Operation |
4 |
General functions |
|
Tuner functions |
|
Disc & Audio file play functions |
|
Function Control |
6 |
ڥ Read through this page first for the setting of each function.
Display Settings |
8 |
About Display Type
Text Display Selection
Font Color Selection
Station/Disc Naming (SNPS/DNPS)
Auxiliary Input Display Setting
Activating Security Code
Deactivating Security Code
Manual Clock Adjustment
Date Adjustment
AMP Control
Picture downloading
Demonstration mode setting
Theft Deterrent Faceplate
Audio Adjustments |
23 |
Audio Control
Adjusting the detail of Audio Control
Audio Setup
Speaker Setting
Audio Preset Memory
Audio Preset Recall
G-Analyzer Operation
G-Analyzer Control
G-Analyzer Vehicle Setup
G-Analyzer Calibration Setup
G-Analyzer Stop Watch
G-Analyzer Horsepower Analysis
G-Analyzer Reset
12 |
Satellite Radio tuner control |
|
|
(Optional) |
26 |
||
|
Basic Operation
Category and Channel Search
Direct Access Tuning
Preset Memory
Preset Tuning
Music disc/Audio file Operation |
15 |
|
Basic Operations of remote control |
28 |
|
|
|
||
Music Select |
|
|
Appendix |
30 |
Direct Music Search |
|
|
|
|
|
|
|
|
|
Direct Disc Search |
|
|
Accessories/ Installation Procedure |
33 |
Basic Operation of Disc Changer (Optional) |
|
|
|
|
Tuner Operation |
17 |
|
Connecting Wires to Terminals |
34 |
|
|
|
||
Station Preset Memory |
|
|
Installation/Removing the Unit |
35 |
Preset Tuning |
|
|
|
|
|
|
|
|
|
Direct Access Tuning |
|
|
Troubleshooting Guide |
37 |
PTY (Program Type) |
|
|
|
|
|
|
Specifications |
39 |
|
Program Type preset |
|
|
||
Registration of a station as a PTY |
|
|
|
|
|
|
|
|
• iPod is a trademark of Apple, Inc., registered in the U.S. and other countries.
• The “AAC” logo is trademark of Dolby Laboratories.
2 | KDC-X792/KDC-X692/KDC-MP738U/KDC-MP638U
Before use
2 WARNING
To prevent injury while using this product, take the following safety precautions:
•To prevent a short circuit and possible fire, never put any metallic objects (such as coins or metal tools) inside the product.
•If you are the driver and your vehicle is moving, do not watch the product’s display or use its controls for an extended period.
•Do not use this product in any way that prevents you from driving safely.
•Follow all driving laws and use common sense when using this product.
NOTE:
•Like your vehicle’s speedometer, G-Analyzer is no more than a measuring function. The HP or G value measured by this unit may not be
completely accurate due to its simplified method of measurement. The G-Analyzer is only for reference and should not be used to confirm the horsepower specifications of your vehicle.
Before using this unit for the first time
This unit is initially set on the Demonstration mode. When using this unit for the first time, cancel the <Demonstration mode Setting> (page 21).
How to reset your unit
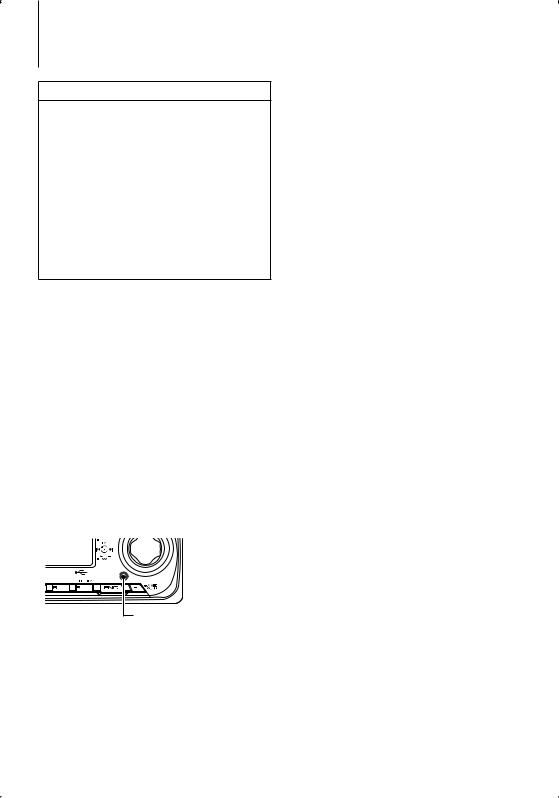
•If this unit or the connected unit (disc auto changer, etc.) fails to operate properly, press the Reset button. The unit returns to factory settings when the Reset button is pressed.
Reset button
Cleaning the Unit
If the faceplate of this unit is stained, wipe it with a dry soft cloth such as a silicon cloth.
If the faceplate is stained badly, wipe the stain off with a cloth moistened with neutral cleaner, then wipe it again with a clean soft dry cloth.
¤
•Applying spray cleaner directly to the unit may affect its mechanical parts. Wiping the faceplate with a hard cloth or using a volatile liquid such as thinner or alcohol may scratch the surface or erases characters.
Cleaning the Faceplate Terminals
If the terminals on the unit or faceplate get dirty, wipe them with a clean soft dry cloth.
Lens Fogging
When you turn on the car heater in cold weather, dew or condensation may form on the lens in the CD player of the unit. Called lens fogging, this condensation on the lens may not allow CDs to play. In such a situation, remove the disc and wait for the condensation to evaporate. If the unit still does not operate normally after a while, consult your Kenwood dealer.
•If you experience problems during installation, consult your Kenwood dealer.
•When you purchase optional accessories, check with your Kenwood dealer to make sure that they work with your model and in your area.
•Characters that conform to ISO 8859-1 can be displayed.
•The RDS feature won’t work where the service is not supported by any broadcasting station.
•In this document, the description indicator will light means a status is displayed. Refer to <About Display Type> (page 8) for the details of the status display.
•The illustrations of the display, the function icon and the panel appearing in this manual are examples used to explain more clearly how the controls are used. Therefore, what appears on the display in the illustrations may differ from what appears on the display on the actual equipment, and some of the illustrations on the display may be inapplicable.
English | 3
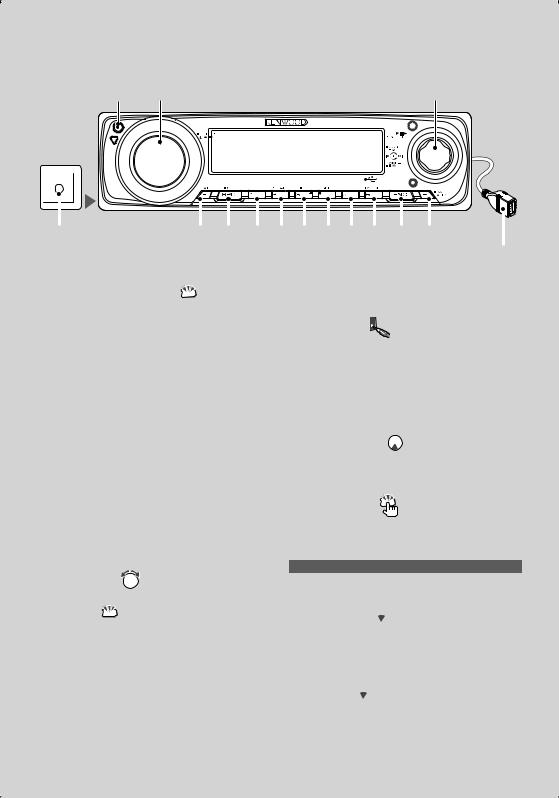
Basic Operation
Release [AUD] |
Control knob |
AUX
|
|
|
|
|
|
|
|
|
|
|
|
|
|
|
|
|
|
|
|
|
|
|
|
|
|
|
|
|
|
|
|
|
|
|
|
|
|
|
|
|
|
|
|
|
|
|
|
Auxiliary input |
[ATT] [SRC] [1] [2] [3] [4] [5] [6] [FNC] [AUTO] |
|
|||||||||||||
(Rear side) |
|
|
|
|
|
|
|
|
|
|
|
|
|
|
|
|
|
|
|
|
|
|
|
|
|
|
|
USB Terminal |
|||
|
|
|
|
|
|
|
|
|
|
|
|
|
|
||
General functions
Power/Source Select button  [SRC]
[SRC]
Turns on the power.
When the power is ON, select a source.
SRC Select mode 1: Press the [SRC] button and then turn the Control knob or push it toward left or right. To determine the selected source, press the Control knob.
SRC Select mode 2: Pressing this button each time switches between sources.
Tuner (“TUNER”) , USB or iPod (“USB” or “iPod”), CD (“Compact Disc”) , Auxiliary input (“AUX”), and Standby (“STANDBY”)
Press at least 1 second to turn off the power.
⁄• The SRC Select mode can be set in “MENU” > “SRC Select” of <Function Control> (page 6).
•When an optional accessory is connected, the source name for each device appears.
•When connection of the iPod is recognized, the source display changes from “USB” to “iPod”.
•USB (iPod) source is recognized as CD source on the connected unit.
Volume control |
[AUD] |
Turn the knob to adjust the volume.
Attenuator  [ATT]
[ATT]
Turning the volume down quickly.
When the volume is reduced, the “ATT” indicator flashes.
ڥ To use the TEL Mute feature, you need to hook up the MUTE wire to your telephone using
a commercial telephone accessory. Refer to <Connecting Wires to Terminals> (page 34).
Auxiliary input |
Auxiliary input |
Connect a portable audio device with mini-plug cable (3.5 ø).
ڥ Use the mini-plug cable which is stereo type and does not have any resistance.
•The auxiliary input requires the setting made in “MENU” > “Built in AUX” of <Function Control> (page 6).
Subwoofer output |
Control knob |
Switches between ON (“SUB WOOFER ON”) and OFF (“SUB WOOFER OFF”) each time pushing toward down for at least 2 seconds.
Function Control |
[FNC] |
Pressing this button allows you to set various functions using the Control knob. Refer to <Function Control> (Page 6).
Category |
Function of setup item |
MENU |
Allows you to set up the environment. |
DISP |
Allows you to set up the display. |
Text/Title scroll  Control knob
Scrolls the CD, audio file, and Radio text display when pushing toward up for at least 2 seconds.
Muting volume upon reception of phone call
When there is a call, “CALL” is displayed and the audio system is paused. When the call ends, “CALL” disappears and the audio system comes back on. The audio system comes back on when [SRC] is pressed during a call.
4 | KDC-X792/KDC-X692/KDC-MP738U/KDC-MP638U
Tuner functions
Band select  Control knob
Switches between FM1, FM2, and FM3 each time pushing toward up.
Switches to AM when pushing toward down.

Tuning  Control knob
Changes the frequency when pushing toward left or right.
⁄ • Duringis ON. reception of stereo stations the “ST” indicator
Tuning mode select |
[AUTO] |
Switches as follows each time this button is pressed.
Tuning mode |
Display |
Operation |
Auto seek |
ÒAuto1Ó |
Automatic search for a station. |
Preset station seek |
ÒAuto2Ó |
Search in order of the stations in the |
|
|
Preset memory. |
Manual |
ÒManualÓ |
Normal manual tuning control. |
Auto memory entry  [AUTO]
Memorizes six stations with good reception automatically when pressed for at least 2 seconds.
Preset memory |
[1] - [6] |
Memorize the station selected when pressing for at least 2 seconds.
Preset tuning |
[1] - [6] |
Recalls the memorized station.
Disc & Audio file play functions
Drop open the faceplate |
Release |
ڥ Push the faceplate on the left side, and return it to its former position.
Disc play |
Disc slot |
Starts playing when a disc is inserted.
When a CD is inserted, the “IN” indicator is ON.
ڥ 3 inch CD cannot be used. Attempt to insert using an adapter can cause malfunction.
Disc ejection |
[0] |
ڥ You can eject the disc for 10 minutes after switching off the engine.
USB device/iPod play |
USB Terminal |
Connecting a USB device starts playback.
ڥ For the playable audio file, media, and devices, refer to <About Audio file> (page 30).
 ,
,  : Indicates the button etc. to operate.
USB device removing |
[0] |
Press this button for 2 seconds or longer to select the remove mode, and the remove the USB device. During the remove mode, The 0 indicator blinks.
Pause and play |
Control knob |
Switches between pause and play each time the center is pressed.
Music search |
Control knob |
Changes the music when pushing toward left or right. Fast reverses or forwards the music while keeping pushing toward left or right. (No sound is output while playing audio file.)
Folder search |
Control knob |
Changes the folder containing the audio file when pushing toward up or down.
Track/ File/ Folder repeat play |
[4] |
Switches between Track Repeat (“Repeat ON”) and OFF when pressed while playing a CD.
Switches between File Repeat (“File Repeat ON”), Folder Repeat (“Folder Repeat ON”), and OFF when pressed while playing an audio file.
ڥ The folder repeat operation cannot be performed while iPod is playing.
Scan play |
[2] |
Successively plays the intro of the music in the disc or folder.
Switches between ON (“Scan ON”/ “File Scan ON”) and OFF each time this button is pressed.
⁄• The Scan paly operation cannot be performed while iPod/ “Media Editer” media is playing.
Random play |
[3] |
Randomly plays the music in the disc or folder. Switches between ON (“Disc Random ON”/ “Folder RDM ON”) and OFF each time this button is pressed.
English | 5

Function Control
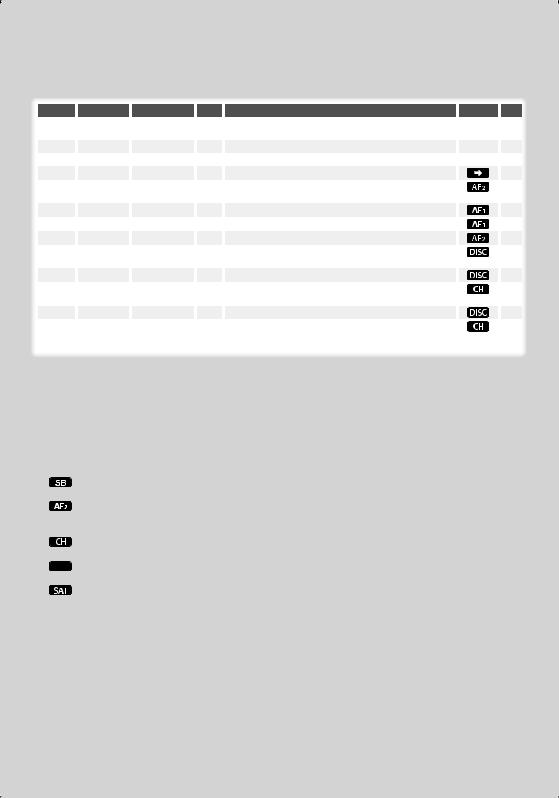
Functions in the table below can be set up by using Function Control.
Category |
|
Item |
|
Setting |
|
|
Entry |
|
MENU |
ÒSecurity SetÓ/ |
|
|
|
|
1 sec. |
|
|
|
|
ÒSecurity ClearÓ |
|
|
|
|
|
|
|
|
ÒSRC SelectÓ |
Ò1Ó*/Ò2Ó |
|
|
|
|
|
|
|
ÒiPod ModeÓ |
|
ÒOFFÓ/ÒONÓ* |
|
|
|
|
|
|
|
|
|
|
|
|
|
|
|
ÒBeepÓ |
|
ÒOFFÓ/ÒONÓ* |
|
|
|
|
|
|
|
|
|
|
|
|
|
|
|
ÒClock AdjustÓ |
|
|
|
|
1 sec. |
|
|
|
|
|
|
|
|
|
|
|
|
ÒDate AdjustÓ |
|
|
|
|
1 sec. |
|
|
|
|
|
|
|
|
|
|
|
|
ÒDate ModeÓ |
|
7 types |
|
|
1 sec. |
|
|
|
|
|
|
|
|
|
|
|
|
ÒSYNCÓ*1 |
|
ÒOFFÓ*/ÒONÓ |
|
|
|
|
|
|
ÒDSIÓ |
|
ÒOFFÓ/ÒONÓ* |
|
|
|
|
|
|
ÒDisplayÓ |
|
ÒOFFÓ/ÒONÓ* |
|
|
|
|
|
|
ÒDimmerÓ |
|
ÒOFFÓ/ÒONÓ* |
|
|
|
|
|
|
|
|
|
|
|
|
|
|
|
ÒILM DimmerÓ |
|
ÒOFFÓ/ÒAUTOÓ* |
|
|
|
|
|
|
|
|
|
|
|
|
|
|
|
ÒILM EffectÓ |
|
ÒOFFÓ/ÒONÓ* |
|
|
|
|
|
|
|
|
|
|
|
|
|
|
|
ÒAMPÓ |
|
ÒOFFÓ/ÒONÓ* |
|
|
|
|
|
|
ÒZone2Ó |
|
ÒRearÓ*/ÒFrontÓ |
|
|
|
|
|
|
|
|
|
|
|
|
|
|
|
ÒSupremeÓ |
|
ÒOFFÓ/ÒONÓ* |
|
|
|
|
|
|
ÒAMS ControlÓ*1, |
|
|
|
|
1 sec. |
|
|
|
2 |
|
|
|
|
|
|
|
|
|
|
|
|
|
|
|
|
|
ÒTIÓ*1 |
|
ÒOFFÓ*/ÒONÓ |
|
|
|
|
|
|
|
|
|
|
|
|
|
|
|
ÒCRSCÓ |
|
ÒOFFÓ/ÒONÓ* |
|
|
|
|
|
|
|
|
|
|
|
|
|
|
|
ÒReceive ModeÓ |
|
ÒAutoÓ*/ÒDigitalÓ/ |
|
|
1 sec. |
|
|
|
|
|
ÒAnalogÓ |
|
|
|
|
|
|
ÒESN=Ó |
|
|
|
|
|
|
|
|
ÒName SetÓ |
|
|
|
|
1 sec. |
|
|
|
|
|
|
|
|
|
|
|
|
ÒScrollÓ |
|
ÒAutoÓ*/ÒManualÓ |
|
|
|
|
|
|
ÒBuilt in AUXÓ |
|
ÒOFFÓ*/ÒONÓ |
|
|
|
|
|
|
ÒCD ReadÓ |
Ò1Ó*/Ò2Ó |
|
|
|
|
|
|
|
ÒDISP Data DLÓ*1 |
|
|
|
|
1 sec. |
|
|
|
|
|
|
|
|
|
|
|
|
ÒAudio PresetÓ |
|
|
|
|
1 sec. |
|
|
|
|
|
|
|
|
|
|
|
|
ÒDEMO ModeÓ |
|
ÒOFFÓ/ÒONÓ* |
|
|
2 sec. |
|
|
|
|
|
|
|
|
|
|
DISP |
> TYPE |
|
A/ B/ C/ D/ E/ F*1 |
|
|
|
|
|
|
|
> MODE |
1/ 2 |
|
|
|
|
|
|
|
> GRAPH |
|
Movie 1 Ð 2/ |
|
|
|
|
|
|
|
|
Downloaded movie*1/ |
|
|
|
|
|
|
|
|
Wallpaper 1 Ð 6/ |
|
|
|
|
|
|
|
|
Downloaded |
|
|
|
|
|
|
|
|
Wallpaper*1/ Wallpaper |
|
|
|
|
|
|
|
|
scan |
|
|
|
|
|
|
> SIDE |
|
Text icon/ Source |
|
|
|
|
|
|
|
|
icon |
|
|
|
|
|
|
> TEXT |
|
|
|
|
|
|
|
|
> COLOR*1, 3 |
|
|
|
|
|
|
Setting overview |
|
Condition Page |
||
Sets/Resets security code. |
|
|
|
19 |
|
|
|
|
|
Sets the source selection method. |
|
|
|
32 |
When set to “ON”, allows you to select music in the manner |
15 |
|||
similar to that of the iPod. |
|
|
|
|
Setting the operation check sound (beep sound) ON/OFF. |
|
|
|
|
Sets the clock. |
|
|
|
20 |
|
|
|
|
|
Sets the date. |
|
|
20 |
|
|
|
|
|
|
Sets the date display mode. |
|
|
|
|
|
|
|
|
|
Synchronizing the RDS station time data and this unit’s clock. |
|
|
|
|
|
|
|
|
|
Turns on/off the Disabled System indicator. |
|
|
|
|
|
|
|
|
|
Turns off the display when no operation is performed. |
Ñ |
32 |
||
Dims the display part in conjunction with the light switch of |
|
|
|
|
the vehicle. |
|
|
|
|
Dims the key Illumination in conjunction with the light |
|
|
32 |
|
switch of the vehicle. |
|
|
|
|
Sets whether the key illumination brightness is changed in |
|
|
|
|
conjunction with the key operation. |
|
|
|
|
Turns on/off the built-in amplifier. |
|
|
|
32 |
Specifies the destination of AUX input sound when the Dual |
|
|
32 |
|
Zone function is turned on. |
|
|
|
|
Turns ON/OFF the Supreme function. |
|
|
|
32 |
Controls the connected LX amplifier. |
Ñ |
20 |
||
|
|
|
|
|
Switches to the traffic information automatically when the |
|
|
|
|
traffic bulletin starts. |
|
|
|
|
Switches to Monaural to decrease noise when reception is |
|
|
|
|
poor. |
|
|
|
|
Sets the receive mode of HD Radio. |
|
|
32 |
|
Displays the Electronic Serial Number of satellite radio. |
|
|
|
|
|
|
|
|
|
Sets the station name (SNPS)/ disc name (DNPS)/ AUX name. |
|
|
|
10,11 |
Specifies whether the text is scrolled automatically. |
Ñ |
|
|
|
Sets whether to display AUX during source selection. |
|
|
|
|
|
|
|
|
|
Sets the CD read mode. |
|
|
|
32 |
Downloads the picture data to be shown on the display. |
|
|
|
21 |
Presets the setting value of the audio control. The preset |
|
|
25 |
|
value is retained after resetting. |
|
|
|
|
Specifies whether to enable demonstration. |
|
Ñ |
|
21 |
Sets the display pattern. |
Ñ |
8 |
||
Sets the text display pattern. |
|
õ‚ |
|
|
Sets the Type A graphic display. |
|
• |
|
|
When Wallpaper scan is selected, displays “SCAN”. |
|
|
|
|
For Download movie and Download Wall Paper, refer to |
|
|
|
|
<Picture downloading> (page 21). |
|
|
|
|
|
|
|
|
|
Sets the Type C side icon display. |
|
‚ |
|
|
|
|
|
|
|
Sets the text display. |
|
•õ‚ë |
|
9 |
Sets the text display color. |
|
•õ‚ |
10 |
|
6 | KDC-X792/KDC-X692/KDC-MP738U/KDC-MP638U
Category Item |
|
Setting |
|
Entry Setting overview |
|
Condition |
|
Page |
||||
|
|
> STATUS |
|
ÒONÓ/ÒOFFÓ |
|
|
|
When set to “ON”, displays the function information for Type |
|
• |
|
|
|
|
|
|
|
|
|
|
A. |
|
|
|
|
|
|
> GMENU*1 |
|
|
|
|
|
Sets the G-Analyzer screen. |
|
ì |
|
12 |
|
|
> GMA*1 |
|
|
|
|
|
Uses the G-Analyzer functions. |
|
ì |
|
12 |
P.MEM |
|
|
|
|
|
Presets a station. |
|
|
17, 27 |
|||
|
|
|
|
|
|
|
|
|
|
|
|
|
SCAN |
|
ÒONÓ/ Ñ |
|
|
|
When set to “ON”, plays the intro of the music in the folder |
|
|
|
|
||
|
|
|
|
|
|
|
|
successively. |
|
|
|
|
RDM |
|
|
|
ÒONÓ/ Ñ |
|
|
|
When set to “ON”, plays the music in the folder randomly. |
|
|
|
|
FiREP |
|
|
|
ÒONÓ/ Ñ |
|
|
|
When set to “ON”, plays the music repeatedly. |
|
|
|
|
FoREP |
|
|
|
ÒONÓ/ Ñ |
|
|
|
When set to “ON”, plays the music in the folder repeatedly. |
|
|
|
|
SCAN |
|
ÒONÓ/ Ñ |
|
|
|
When set to “ON”, plays the intro of the music on the disc |
|
|
|
|
||
|
|
|
|
|
|
|
|
successively. |
|
|
|
|
RDM |
|
|
|
ÒONÓ/ Ñ |
|
|
|
When set to “ON”, plays the music on the disc randomly. |
|
|
|
|
M.RDM |
|
ÒONÓ/ Ñ |
|
|
|
When set to “ON”, plays the music in the disc changer |
|
|
|
|
||
|
|
|
|
|
|
|
|
randomly. |
|
|
|
|
T.REP |
|
ÒONÓ/ Ñ |
|
|
|
When set to “ON”, plays the music repeatedly. |
|
|
|
|
||
|
|
|
|
|
|
|
|
|
|
|
|
|
D.REP |
|
ÒONÓ/ Ñ |
|
|
|
When set to “ON”, plays the music on the disc repeatedly. |
|
|
|
|
||
|
|
|
|
|
|
|
|
|
|
|
|
|
*Factory setting
*1 Function of KDC-X792.
*2 Function of KDC-X692.
*3 Function of KDC-MP738U.
Displayed item is depending on currently selected source or mode. The mark in Condition column shows the condition to which the item is displayed.
 : Can be set in other than standby state.
: Can be set in standby state.
 : Can be set while Audio file source of CD/USB/iPod.
: Can be set while Audio file source of CD/USB (excluding iPod).
 : Can be set while CD/ Disc changer source.
: Can be set while Disc changer source.
 : Can be set during FM reception.
 : Can be set while accessing AUX source.
 : Can be set while HD Radio source.
: Can be set during Satellite radio source.
 : Can be set only during playback of the iPod source. (USB source used when the iPod is connected)
 : Can be set for sources other than the standby source by setting “2 ZONE” of <Audio Setup> (page 24) to “ON”.
 : Refer to the reference page.
•–ì: Can be set when the specified type is selected for Display Type.
— : Can be set during all sources.
⁄
•Refer to the respective page for information on how to set the items with reference page number.
•Only the items available to the current source are displayed.
•Strong electrical fields (such as from power lines) may cause unstable sound quality when CRSC is turned ON. In such a situation, turn it OFF.
Next page 3
English | 7
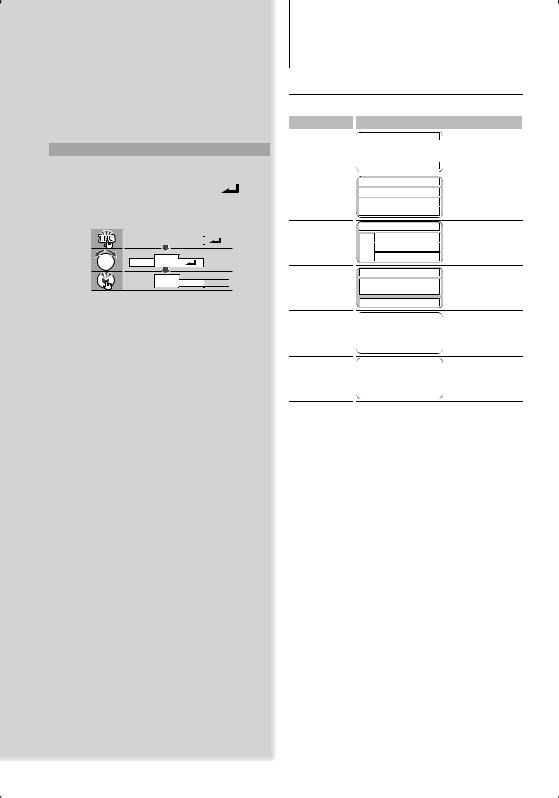
Function Control
1Enter Function Control mode
Press the [FNC] button.
Function icon is displayed.
2 Select your desired setup item
Operation type |
Operation |
|
|
||||
Movement between items |
Turn the Control knob. |
|
|
||||
Selection of item |
Press the Control knob. |
|
|
||||
Return to previous item |
Press the [FNC] button orÒ |
|
Ó icon |
||||
Repeat selection and determination until your |
|||||||
desired setup item is selected. |
|
|
|||||
|
|
|
|
|
|
|
|
Example: |
|
|
|
|
|
|
|
|
MENU |
DISP |
|
|
|
||
MENU DISP |
TYPE TEXT 


3Make a setting
Turn the Control knob to select a setting value, and then press the Control knob.
Some items require you to keep pressing the Control knob for 1 or 2 seconds so that you can make a setting. For these items, the time during which you need to keep pressing the Control knob is displayed in the Entry column in seconds. For the functions accompanied by the description of the setting procedure and so forth, the reference page numbers are displayed.
4Exit Function Control mode
Press the [FNC] button for at least 1 second.
Display Settings
About Display Type
Shown below are examples of display types.
Display |
|
Display Type |
||
ÒTYPE [A]Ó |
|
|
|
|
|
|
|
|
|
|
|
|
|
|
|
|
|
|
|
|
|
|
|
|
ÒTYPE [B]Ó
ÒTYPE [C]Ó
ÒTYPE [D]Ó
ÒTYPE [E]Ó
5
ÒTYPE [F]Ó
7
⁄
•1 Text display part
2 Status display
3 Icon display part
4 Graphic display part
5 Clock display
6 Display (varied depending on the source)
7 G-Analyzer display part
8 | KDC-X792/KDC-X692/KDC-MP738U/KDC-MP638U
Text Display Selection
Changing the text display.
In Tuner source
Information |
|
Display |
Station name |
|
ÒSNPSÓ |
Title & Artist name* (FM) |
|
ÒTitle/ArtistÓ |
Station name* (FM) |
|
ÒStation NameÓ |
Radio text plus* (FM) |
|
ÒRadio Text PlusÓ |
Radio text (FM)*1 |
|
ÒRadio TextÓ |
Frequency |
|
ÒFrequencyÓ |
Clock |
|
ÒClockÓ |
Date |
|
ÒDateÓ |
Blank |
|
ÒBlankÓ |
*Information of Radio text plus is displayed. (KDC-X792 only)/ *1 KDC-X792 only
In CD & External disc source
|
Information |
|
Display |
|
Disc title |
|
ÒDisc TitleÓ |
|
Track title |
|
ÒTrack TitleÓ |
|
Play time & Track number |
|
ÒP-TimeÓ |
|
Disc name |
|
ÒDNPSÓ |
|
Clock |
|
ÒClockÓ |
|
Date |
|
ÒDateÓ |
|
Blank |
|
ÒBlankÓ |
In Audio file source |
|
|
|
|
Information |
|
Display |
|
Music title & Artist name |
|
ÒTitle/ArtistÓ |
|
Album name & Artist name |
|
ÒAlbum/ArtistÓ |
|
Folder name |
|
ÒFolder NameÓ |
|
File name |
|
ÒFile NameÓ |
|
Play time & Music number |
|
ÒP-TimeÓ |
|
Song time progress bar (iPod) |
|
ÒTime BarÓ |
|
Clock |
|
ÒClockÓ |
|
Date |
|
ÒDateÓ |
|
Blank |
|
ÒBlankÓ |
In Standby |
|
|
|
|
Information |
|
Display |
|
Standby |
|
ÒSource NameÓ |
|
Clock |
|
ÒClockÓ |
|
Date |
|
ÒDateÓ |
|
Blank |
|
ÒBlankÓ |
In Auxiliary input source |
|
|
|
|
Information |
|
Display |
|
Auxiliary input name |
|
ÒSource NameÓ |
|
Clock |
|
ÒClockÓ |
|
Date |
|
ÒDateÓ |
|
Blank |
|
ÒBlankÓ |
In HD Radio source (Optional)
Information |
|
Display |
Station name |
|
ÒStation NameÓ |
Title |
|
ÒTitleÓ |
Frequency |
|
ÒFrequencyÓ |
Clock |
|
ÒClockÓ |
Date |
|
ÒDateÓ |
Blank |
|
ÒBlankÓ |
In SIRIUS/ SAT source (Optional)
Information
Channel Name
Music Title
Artist Name
Composer name
Category Name
Label Name
Comment
Band & Channel Number
Clock
Date
Blank
Display
ÒChannel NameÓ
ÒSong TitleÓ
ÒArtist NameÓ
ÒComposer NameÓ
ÒCategory NameÓ
ÒLabel NameÓ
ÒCommentÓ
ÒChannel NumberÓ
ÒClockÓ
ÒDateÓ
ÒBlankÓ
In XM source (Optional)
Information |
|
Display |
Channel Name |
|
ÒCHANNEL NAMEÓ |
Title |
|
ÒTITLEÓ |
Name |
|
ÒNAMEÓ |
Category Name |
|
ÒCATEGORYÓ |
Band & Channel Number |
|
ÒCHANNEL NUMBERÓ |
Clock |
|
ÒClockÓ |
Date |
|
ÒDateÓ |
Blank |
|
ÒBlankÓ |
1Enter Text Display Selection mode (In Display Type A/ B/ C/ D)
Select “DISP” > “TEXT”.
For how to select Function Control item, refer to <Function Control> (page 6).
2Select the text display part (Display Type B/ C only)
Push the Control knob towards up or down.
The cursor (‰) moves to the selected text display part.
3Select the text
Turn the Control knob or push it towards left or right.
4Exit Text Display Selection mode
Press the Control knob.
Next page 3
English | 9

Display Settings
⁄
•If the selected display item does not have any information, alternative information is displayed.
•Some items cannot be selected depending on the display type and row.
•When LX-AMP is connected, the item setup by the Display mode of LX-AMP is displayed.
•When selecting “Folder Name” while playing with iPod, names will be displayed depending on currently selected browsing items.
Function of KDC-X792/MP738U
Font Color Selection
Selecting the display font color.
1Enter Font Color Selection mode (In Display Type A/ B/ C)
Select “DISP” > “COLOR”.
For how to select Function Control item, refer to <Function Control> (page 6).
2Select the text display part (Display Type B/ C only)
Push the Control knob towards up or down.
The cursor (‰) moves to the selected text display part.
3Select the Font Color
Turn the Control knob or push it towards left or right.
4Exit Font Color Selection mode
Press the Control knob.
⁄
•When you selected the Display Type A, select an easy viewable font color.
Station/Disc Naming (SNPS/DNPS)
Attaching a title to a Station or CD.
1Receive/play the station/disc you want to attach a title to
2Select Name set mode item during Menu mode
Select the “Name Set” display.
For how to select Function Control items, refer to <Function Control> (page 6).
3Enter Name set mode
Press the Control knob for at least 1 second.
4 Enter the name
Operation type |
|
Operation |
Move the cursor to the enter |
|
Push the Control knob towards right |
character position |
|
or left. |
Select the character type* |
|
Press the Control knob. |
Select the characters |
|
Turn the Control knob or push it |
|
|
towards up or down. |
*Each time you press the knob, the character type alternates between the types shown in the table below.
Character type |
Alphabet upper case |
|
Alphabet lower case |
|
Numbers and symbols |
|
Special characters (Accent characters) |
⁄
•Enter characters by using a remote control with numbers buttons.
Example: If you are entering “DANCE”.
Character |
ÒDÓ |
ÒAÓ |
ÒNÓ |
ÒCÓ |
ÒEÓ |
Button |
[3] [¢] [2] [¢] [6] [¢] [2] [¢] [3] |
||||
Times pressed |
1 |
1 |
2 |
3 |
2 |
5Exit Menu mode
Press the [FNC] button.
⁄
•A title cannot be attached to Audio file media.
•When operation stops for 10 seconds the name at that time is registered, and Name Set mode closes.
•Memory numbers
-FM/AM: 30 stations
-Internal CD player: 10 discs
-External CD changer/ player: Varies according to the CD changer/ player. Refer to the CD changer/ player manual.
•Change the title of station/CD by the same operation used to name it.
10 | KDC-X792/KDC-X692/KDC-MP738U/KDC-MP638U
Auxiliary Input Display Setting
Selects the display below when changing to Auxiliary input source.
1Select Auxiliary input display setting item during Menu mode (In AUX mode)
Select the “Name Set” display.
For how to select Function Control items, refer to <Function Control> (page 6).
2Enter Auxiliary input display setting mode
Press the Control knob for at least 1 second.
The presently selected Auxiliary input display is displayed.
3Select the Auxiliary input display
Turn the Control knob or push it towards up or down.
“AUX”/ “DVD”/ “PORTABLE”/ “GAME”/ “VIDEO”/ “TV”
4Exit Auxiliary input display setting mode
Press the [FNC] button.
⁄
•When operation stops for 10 seconds, the name at that time is registered, and the Auxiliary input display setting mode closes.
•The Auxiliary input display can be set only when the built-in auxiliary input or the auxiliary input of optional KCA-S220A is used. On the KCA-S220A, “AUX EXT” is displayed by default.
English | 11

Function of KDC-X792
G-Analyzer Operation
G-Analyzer Control
You can adjust following G-Analyzer Control items ;
Item |
|
Setting/ Page |
|
Setting overview |
>ÒGMENUÓ |
|
G- Graphic/ Downloaded |
|
G-Analyzer display |
|
|
G-Graphic*1/ G-Meter*2/ |
|
Selection |
|
|
G-Counter*2 |
|
|
>ÒGMAÓ >ÒSTOP. |
|
(page 13) |
|
G-Analyzer Stop Watch |
WÓ |
|
|
|
|
>ÒGMAÓ >ÒHPÓ |
|
(page 14) |
|
G-Analyzer Horsepower |
|
|
|
|
Analysis |
>ÒGMAÓ >ÒRESETÓ |
|
(page 14) |
|
G-Analyzer Reset |
>ÒGMAÓ >ÒLEVELÓ |
|
Level1 Ð 3*3 |
|
G-Counter Level seting |
>ÒGMAÓ >ÒCALÓ* |
|
(page 13) |
|
G-Analyzer Calibration |
|
|
|
|
setup |
>ÒGMAÓ >ÒHP |
|
(page 12) |
|
G-Analyzer vehicle setup |
SETÓ * |
|
|
|
|
* Can be set in standby state.
*1 G-Graphic can be switched to customized pictures. Refer to <Picture downloading> (page 21).
*2 The value of G-Meter display and G-Counter display can be reset by <G-Analyzer Reset> (page 14).
*3 Calibrating G-Point. Setting the level according to the kinds of vehicles. In the case of driving situations calling for few accelerations, set the G-Point up to “Level1”. In the case of frequent accelerations, set it up to “Level3”.
1Enter Display Control mode (In Display Type F)
Select “DISP”.
For how to select Function Control item, refer to <Function Control> (page 6).
2Enter G-Analyzer item mode
Turn the Control knob or push it towards left or right.
Press the Control knob.
3Select the G-Analyzer item you want to set
Turn the Control knob or push it towards left or right.
4Exit G-Analyzer item mode
Press the Control knob.
In Standby mode
G-Analyzer Vehicle Setup
Enter vehicle weight or class to calculate horsepower.
1Enter G-Analyzer vehicle weight setup mode (In Display Type F)
Select “DISP” > “GMA” > “HP SET” > “WEIGHT”.
For how to select Function Control item, refer to <Function Control> (page 6).
“WEIGHT INPUT” is displayed.
2 Enter weight input
Operation type |
|
Operation |
Select the weight numbers |
|
Turn the Control knob. |
Select the digits to enter |
|
Push the Control knob towards right |
|
|
or left. |
3Exit G-Analyzer vehicle wight setup mode
Press the Control knob.
4Enter G-Analyzer vehicle class setup mode
Select “DISP” > “GMA” > “HP SET” > “CLASS”.
“CLASS SELECT” is displayed.
5Select vehicle class
Turn the Control knob.
“Mid Size”/ “Full Size”/ “SUV”/ “Van/ Mini-Van”/ “Pickup Truck”/ “Sporty”/ “Compact”
6Exit G-Analyzer vehicle class setup mode
Press the Control knob.
12 | KDC-X792/KDC-X692/KDC-MP738U/KDC-MP638U

In Standby mode
G-Analyzer Calibration Setup
G-Analyzer requires calibration for horizontal acceleration and braking.
⁄
•To ensure accurate calibration, go through the following steps at a level place where you can move the vehicle straight ahead.
1 Park the vehicle in a horizontal location
2Enter G-Analyzer Calibration setup mode (In Display Type F)
Select “DISP” > “GMA” > “CAL”.
For how to select Function Control item, refer to <Function Control> (page 6).
“G-CALIBRATION” is displayed.
3Start Calibration of horizontal direction
Press the Control knob.
Once “Move Forward” appears on the display, the vehicle must be advanced.
4Start Calibration of straight direction
Start moving the vehicle ahead.
Calibration of straight direction automatically starts. When the Calibration is finished, “Calibration OK” is displayed.
⁄
•If you fail to complete the calibration, “No Calibration” is displayed. In such a case, repeat steps 1 through 4.
5Exit G-Analyzer Calibration setup mode
Press the [FNC] button.
G-Analyzer Stop Watch
The control of stop watch can be started by G- Analyzer function.
¤
• Do not use G-Analyzer stop watch on the Public roads.
1 Enter G-Analyzer Stop Watch mode (In Display Type F)
Select “DISP” > “GMA” > “STOP.W”.
For how to select Function Control item, refer to <Function Control> (page 6).
“STOP WATCH” is displayed.
2Make the counter ready
Press the Control knob.
“Ready” is displayed.
3Start Count
When G in the vertical direction is detected during the travel, the count automatically starts. “Running” is displayed.
4Stop Count
Press the Control knob.
“Stop” is displayed.
When you Reset the Count (While ÒStopÓ is displayed)
Press the Control knob for at least 1 second.
5Exit G-Analyzer Stop Watch mode
Press the [FNC] button.
⁄
•Pressing the Control knob in step 3 allows you to start counting.
•Pressing the Control knob in step 4 allows you to restart counting.
English | 13

Function of KDC-X792
G-Analyzer Operation
G-Analyzer Horsepower Analysis
This measures the horsepower and displays graph and max power. It automatically saves the highest record.
¤
•Do not use G-Analyzer Horsepower Analysis on the Public roads.
•Do not use this product in any way that prevents you from driving safely.
•Follow all driving laws and use common sense when using this product.
1 Enter G-Analyzer Horsepower Analysis mode (In Display Type F)
Select “DISP” > “GMA” > “HP”.
For how to select Function Control item, refer to <Function Control> (page 6).
“HORSEPOWER” is displayed.
Previous max power and record are displayed.
2Begin measurement
Press the Control knob.
“Ready” is displayed.
3Start the car.
“Measure” is displayed.
After 15 seconds of measurement, the result is displayed.
¤
•Pressing the Control knob also begins the measurement. To prevent danger, push the control knob before starting the car.
4To display the maximum power in the section
Push the Control knob towards right or left.
Each time you push the Control knob, the maximum power in the section is displayed.
5Exit G-Analyzer Horsepower Analysis mode
Press the [FNC] button.
⁄
•Like your vehicle’s speedometer, G-Analyzer is no more than a measuring function. The HP or G value measured by this unit may not be completely accurate due to its simplified method of measurement. The G-Analyzer is only for reference and should not be used to confirm the horsepower specifications of your vehicle.
•Measuring after starting the car lowers the accuracy.
•The record will not be renewed if the measurement is discontinued.
G-Analyzer Reset
Resets the value of G-Meter, G-Counter and G- Analyzer Horsepower Analysis.
1Enter G-Analyzer Reset mode (In Display Type F)
Select “DISP” > “GMA” > “RESET”.
For how to select Function Control item, refer to <Function Control> (page 6).
“G-RESET” is displayed.
2Select the Reset item
Turn the Control knob.
Display |
|
Setting |
ÒMeter ResetÓ |
|
Reset the value of G-Meter. |
ÒPower ResetÓ |
|
Reset the value of G-Analyzer Horsepower |
|
|
Analysis. |
ÒCounter ResetÓ |
|
Reset the value of G-Counter. |
3Determine the item you want to reset
Press the Control knob.
4Reset the value
Turn the Control knob to select “YES”, and then press the Control knob.
“Reset OK” is displayed.
5Exit G-Analyzer Reset mode
Press the [FNC] button.
14 | KDC-X792/KDC-X692/KDC-MP738U/KDC-MP638U

Music disc/Audio file Operation
Function of Audio file/ Internal CD source
Music Select
Selecting the music you want to listen to from the device or media being played now.
1Enter Music Select mode
Turn the Control knob.
The music list is displayed.
2Search for music
Select the category item using the Control knob.
iPod source (ÒiPod Mode : ONÓ)
|
Operation type |
|
Operation |
|
Movement between items |
|
Turn the Control knob. |
|
Selection of item |
|
Press the Control knob. |
|
Return to previous item |
|
Push the Control knob towards up. |
|
Return to first item |
Push the Control knob towards up for at |
|
|
|
|
least 1 second. |
Other source |
|
||
|
Audio file |
|
|
|
|
|
|
|
Operation type |
|
Operation |
|
Movement between items |
Turn the Control knob or push it towards |
|
|
|
|
up or down. |
|
Selection of item |
|
Push the Control knob towards right. |
|
Return to previous item |
|
Push the Control knob towards left. |
|
Return to first item |
Push the Control knob towards left for at |
|
|
|
|
least 1 second. |
|
Internal CD source |
|
|
|
Operation type |
|
Operation |
|
Movement between track |
Turn the Control knob or push it towards |
|
|
|
|
up or down. |
|
Selection of track |
|
Press the Control knob. |
|
Return to first track |
Push the Control knob towards left for at |
|
|
|
|
least 1 second. |
The “2” or “3” symbol shown beside the displayed item indicates that the item is preceded or followed by another item.
Selecting a music will play it from the beginning.
Cancelling Music Select
Press the [FNC] button.
⁄
•Music Select cannot be performed during Random play.
•Set the iPod mode in “MENU” > “iPod Mode” of <Function Control> (page 6).
Function of remote control
Direct Music Search
Searchs the music by entering the track number.
1Enter the music number
Press the number buttons on the remote control.
2Search the music
Press the [4] or [¢] button.
Cancelling Direct Music Search
Press the [38] button.
⁄
•Direct Music Search cannot be performed during playing of iPod, “Music Editor” media, Random play, or scan play.
Function of disc changers with remote control
Direct Disc Search
Searchs the disc by entering the disc number.
1Enter the disc number
Press the number buttons on the remote control.
2Search the disc
Press the [FM] or [AM] button.
Cancelling Direct Disc Search
Press the [38] button.
⁄
•Direct Disc Search cannot be performed during playing of Random play or scan play.
English | 15

Music disc/Audio file Operation
Basic Operation of Disc Changer (Optional)
Selecting CD changer source
Press the [SRC] button.
Select the “CD Changer” display.
For how to select source item, refer to <Power/ Source Select button> of <Basic Operation> (page 4).
Music search
Push the Control knob towards right or left.
Disc Search
Push the Control knob towards up or down.
Playing the Current Song or Disc Repeatedly. (Repeat play)
Press the [4] button.
Pressing the button repeatedly selects Track Repeat play on (“Track Repeat ON”), Disc Repeat play on (“Disc Repeat ON”), and Repeat play off (“Repeat OFF”) sequentially.
Randomly plays the music in the disc changer. (Magazine random play)
Press the [6] button.
Pressing the button toggles the setting between Magazine random play on (“Magazine RDM ON”) and off (“Magazine RDM OFF”).
16 | KDC-X792/KDC-X692/KDC-MP738U/KDC-MP638U

Tuner Operation
Station Preset Memory
Putting a station in the memory.
1Select the frequency to put in the memory
Push the Control knob towards right or left.
2Enter Preset Memory mode
Select “P.MEM”.
For how to select Function Control item, refer to <Function Control> (page 6).
3Select the number to put in the memory
Turn the Control knob.
4Determine the number to put in the memory
Press the Control knob.
5Allow the determined number to take effect
Press the Control knob.
Cancelling the Preset Memory mode
Press the [FNC] button.
⁄
•This function can be operated with [1] — [6] button.
- Press the desired [1] — [6] button for at least 2 seconds.
Preset Tuning
Recalling the stations in the memory.
1Enter Preset Tuning Select mode
Turn the Control knob.
A station list is displayed.
2Select a desired station in the memory
Turn the Control knob.
3Recall the station
Press the Control knob.
Cancelling Preset Tuning
Press the [FNC] button.
⁄
•This function can be operated with [1] — [6] button. - Press the desired [1] — [6] button.
Function of remote control
Direct Access Tuning
Entering the frequency and tuning.
1Enter Direct Access Tuning mode
Press the [DIRECT] button on the remote control.
“– – – –” is displayed.
2Enter the frequency
Press the number buttons on the remote control.
Example:
Desired frequency |
|
Press button |
92.1 MHz (FM) |
|
[0], [9], [2], [1] |
810 kHz (AM) |
[0], [8], [1], [0] |
|
Cancelling Direct Access Tuning
Press the [DIRECT] button on the remote control.
⁄
•You can enter the FM band frequency in steps of a minimum of 0.1 MHz.
English | 17
Tuner Operation
Function of KDC-X792
PTY (Program Type)
Selecting the Program Type below and searching for a station;
Program Type Display
Speech |
|
ÒAll SpeechÓ |
Music |
|
ÒAll MusicÓ |
News |
|
ÒNewsÓ |
Information |
|
ÒInformationÓ |
Sports |
|
ÒSportsÓ |
Talk |
|
ÒTalkÓ |
Rock |
|
ÒRockÓ |
Classic Rock |
|
ÒClassic RockÓ |
Adult Hits |
|
ÒAdult HitsÓ |
Soft Rock |
|
ÒSoft RockÓ |
Top 40 |
|
ÒTop 40Ó |
Country |
|
ÒCountryÓ |
Oldies |
|
ÒOldiesÓ |
Soft |
|
ÒSoftÓ |
Nostalgia |
ÒNostalgiaÓ |
|
Program Type |
Display |
|
Jazz |
|
ÒJazzÓ |
Classical |
|
ÒClassicalÓ |
R & B |
ÒRhythm & |
|
|
|
BluesÓ |
Soft R & B |
|
ÒSoft R & BÓ |
Language |
ÒForeign |
|
|
|
LanguageÓ |
Religious Music |
ÒReligious |
|
|
|
MusicÓ |
Religious Talk |
|
ÒReligious TalkÓ |
Personality |
|
ÒPersonalityÓ |
Public |
|
ÒPublicÓ |
College |
|
ÒCollegeÓ |
Weather |
ÒWeatherÓ |
|
•Speech and Music include the Program type shown below.
Music: Black character item. Speech: White character item.
1 Enter PTY mode
Press the Control knob.
“PTY Select” is displayed.
2Select the Program Type
Turn the Control knob or push it towards up or down.
3Search for the selected Program Type station
Push the Control knob towards right or left.
4Exit PTY mode
Press the Control knob.
⁄
•This function cannot be used during a traffic bulletin or AM reception.
•When the selected Program Type is not found, “No PTY” is displayed. Select another Program Type.
Function of KDC-X792
Program Type preset
Putting the Program Type in the Preset button memory and quick recall.
Presetting the Program Type
1Select the Program Type to preset
Refer to <PTY (Program Type)> (page 18).
2Preset the Program Type
Press the desired [1] — [6] button for at least 2 seconds.
Recalling the preset Program Type
1Enter PTY mode
Refer to <PTY (Program Type)> (page 18).
2Recall the Program Type
Press the desired [1] — [6] button.
Function of KDC-X792
Registration of a station as a PTY
Registering a Program Type for stations with no PTY data.
1 Receive the station you want to register
2Select the Program Type to register
Refer to <PTY (Program Type)> (page 18).
3Register the Program Type
Press the [AUTO] button for at least 2 seconds.
Confirming the Program Type
Press the [AUTO] button.
The Program Type is displayed for 5 seconds.
4Exit PTY mode
Press the Control knob.
18 | KDC-X792/KDC-X692/KDC-MP738U/KDC-MP638U

Other Functions
Activating Security Code
⁄
•You can set the Security Code with a 4 digit number of your choice.
•The Security Code cannot be displayed or referenced. Make a note of the Security Code and treasure it up.
1Select Security Code item during Menu mode (In Standby mode)
“Security Set” is displayed.
For how to select Function Control items, refer to <Function Control> (page 6).
2Enter Security Code mode
Press the Control knob for at least 1 second.
When “Enter” is displayed, “SECURITY SET” is also displayed.
3 Enter Security Code
Operation type |
|
Operation |
Select the digits to enter |
|
Push the Control knob towards right |
|
|
or left. |
Select the Security Code |
|
Turn the Control knob or push it |
numbers |
|
towards up or down. |
4Confirm the Security Code
Press the Control knob for at least 3 seconds.
When “Re-Enter” is displayed, “SECURITY SET” is also displayed.
5Do the step 3 through 4 operation, and reenter the Security Code.
“Approved” is displayed.
The Security Code function activates.
⁄
•If you enter the wrong Code in steps 3 through 4, repeat from step 3.
6Exit Security Code mode
Press the [FNC] button.
Entering Security Code
The Security Code is required to use the audio unit when the unit is first used after removed from the battery power source or the Reset button is pressed.
1 Turn the power ON.
2Do the step 3 through 4 operation, and enter the Security Code.
“Approved” is displayed. Now, you can use the unit.
Deactivating Security Code
To deactivate the Security Code function.
1Select Security Code item during Menu mode (In Standby mode)
Select the “Security Clear” display.
For how to select Function Control items, refer to <Function Control> (page 6).
2Enter Security Code mode
Press the Control knob for at least 1 second.
When “Enter” is displayed, “SECURITY CLEAR” is also displayed.
3 Enter Security Code
Operation type |
|
Operation |
Select the digits to enter |
|
Push the Control knob towards right |
|
|
or left. |
Select the Security Code |
|
Turn the Control knob or push it |
numbers |
|
towards up or down. |
4Press the Control knob for at least 3 seconds.
“Clear” is displayed.
The Security Code function deactivates.
5Exit Security Code mode
Press the [FNC] button.
⁄
•If a wrong security code is entered, “Error” is displayed. Enter a correct security code.
English | 19

Other Functions
Manual Clock Adjustment
1Select Clock Adjustment item during Menu mode (In Standby mode)
Select the “Clock Adjust” display.
For how to select Function Control items, refer to <Function Control> (page 6).
2Enter Clock adjustment mode
Press the Control knob for at least 1 second.
The clock display blinks.
3 Adjusting Clock
Operation type |
|
Operation |
Selecting the item (hours or |
|
Push the Control knob towards right |
minutes) |
|
or left. |
Adjust each item |
|
Turn the Control knob or push it |
|
|
towards up or down. |
4Exit Clock adjustment mode
Press the [FNC] button.
⁄
•You can do this adjustment when “MENU” > “SYNC” in <Function Control> (page 6) is set to “OFF”. (KDC-X792 only)
Date Adjustment
1Select Date Adjustment item during Menu mode (In Standby mode)
Select the “Date Adjust” display.
For how to select Function Control items, refer to <Function Control> (page 6).
2Enter Date adjustment mode
Press the Control knob for at least 1 second.
The date display blinks.
3 Adjusting Date
Operation type |
|
Operation |
Selecting the item (month, day, |
|
Push the Control knob towards right |
or year) |
|
or left. |
Adjust each item |
|
Turn the Control knob or push it |
|
|
towards up or down. |
4Exit Date adjustment mode
Press the [FNC] button.
Function of KDC-X792/KDC-X692
When LX AMP unit connecting
AMP Control
You can control the LX AMP connected to the unit.
1Select AMP Control item during Menu mode
Select the “AMS Control” display.
For how to select Function Control items, refer to <Function Control> (page 6).
2Enter AMP Control mode
Press the Control knob for at least 1 second.
3Select the AMP Control item for adjustment
Push the Control knob towards up or down.
⁄
•For the details on the AMP Control item, see the Instruction manual attached to the LX AMP.
4Adjust the AMP Control item
Push the Control knob towards right or left.
5Exit AMP Control mode
Press the [FNC] button.
20 | KDC-X792/KDC-X692/KDC-MP738U/KDC-MP638U
Function of KDC-X792
Picture downloading
Downloading movies, wallpapers and G-Graphic. You can use downloaded pictures for the display of this unit.
1Connected the USB device
Connect the USB device containing the files to be downloaded into this unit.
Insert a CD-R/CD-RW
Insert a CD-R/CD-RW containing files to be downloaded into this unit.
⁄
•Our URL http://www.kenwood.net-disp.com describes how to make CD-R/CD-RW/USB device.
2Select the picture downloading item during Menu mode (In Standby mode)
Select the “DISP Data DL” display.
For how to select Function Control items, refer to <Function Control> (page 6).
3Enter downloading mode
Press the Control knob for at least 1 second.
4Select a media
Push the Control knob towards right or left. Press the Control knob.
Select a USB device (“USB”) or CD-R/RW (“CD”).
5Enter the downloading mode
Turn the Control knob to select “YES”, and then press the Control knob.
“File Check!!” display blinks.
6Select files to be downloaded
Turn the Control knob or push it towards up or down.
Press the Control knob.
7Start downloading
Turn the Control knob to select “YES”, and then press the Control knob.
When the downloading finishes, “Finished” is displayed.
⁄
• Picture downloading may take as long as 20 minutes.
Cancelling Downloading
Press the [FNC] button.
8Exit the downloading mode
Press the [FNC] button.
⁄
•Do not operate this unit while downloading to prevent data from being damaged.
•The number of files that can be downloaded.
-Downloaded movie: 1 file
-Wallpaper: 1 file
-G-Graphic: 1 file
•When a new wallpaper is downloaded, it is overwritten to the currently downloaded wallpaper.
There is no way to delete the downloaded pictures.
•The downloaded pictures can be used for display. “DISP” > “GRAPH” of <Function Control> (page 6) “DISP” > “GMENU” of <G-Analyzer Control> (page 12)
•When you cannot download the pictures to this unit, there may be a problem with the CD-R/CD-RW/USB device write method.
Refer to the URL http://www.kenwood.net-disp.com.
PICTURE ENGINE
Picture Engine is an application software distributed from Kenwood's official website. Utilizing this software, you can create an original still image file. As for the download of application, please browse “http://www.kenwood.net-disp. com/” for directions.
Demonstration mode setting
Turning the demonstration mode ON/OFF.
1Select Demonstration item during Menu mode
Select the “DEMO Mode” display.
For how to select Function Control items, refer to <Function Control> (page 6).
2Set the Demonstration mode
Press the Control knob for at least 2 seconds.
Pressing this button for 2 seconds or longer toggles the setting between “ON” and “OFF”.
3Exit Demonstration mode
Press the [FNC] button.
English | 21
Other Functions
Theft Deterrent Faceplate
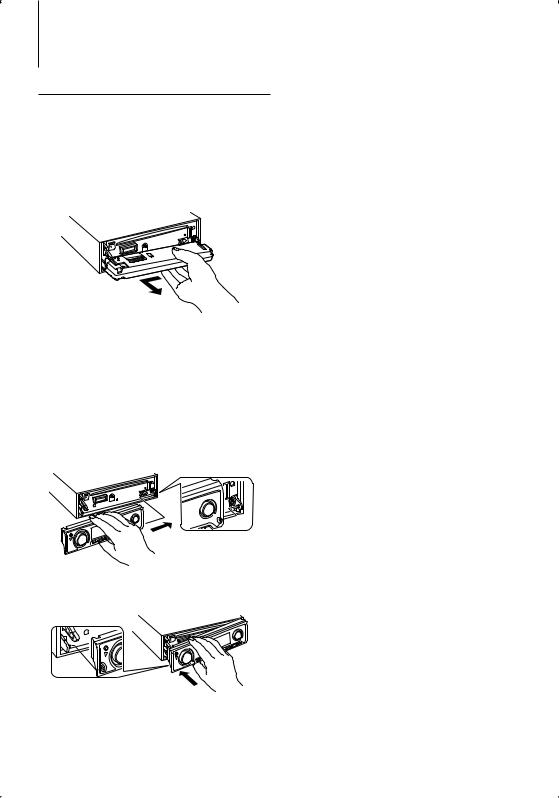
The faceplate of the unit can be detached and taken with you, helping to deter theft.
Removing the Faceplate
1Press the Release button.
Drop open the faceplate.
2Drawing the faceplate to left side pull it to forward and remove it.
¤
•The faceplate is a precision piece of equipment and can be damaged by shocks or jolts.
•Keep the faceplate in its faceplate case while detached.
•Do not expose the faceplate (and the faceplate case) to direct sunlight or excessive heat or humidity. Also avoid places with too much dust or the possibility of water splashing.
Reattaching the Faceplate
1Align the shaft on the unit with the depression on the faceplate.
2Push the faceplate in until it clicks.
The faceplate is locked in place, allowing you to use the unit.
22 | KDC-X792/KDC-X692/KDC-MP738U/KDC-MP638U
Audio Adjustments
Audio Control
You can adjust following Audio Control items ;
Adjustment Item |
|
Display |
|
Range |
Rear volume |
|
ÒREAR VOLUMEÓ |
|
0 Ñ 35 |
Subwoofer level |
|
ÒSUB-W LEVELÓ |
Ð15 Ñ +15 |
|
System Q |
|
ÒNATURALÓ/ |
|
Natural/User setting/Rock/ |
|
|
ÒUSERÓ/ÒROCKÓ/ |
|
Pops/Easy/Top 40/Jazz |
|
|
ÒPOPSÓ/ÒEASYÓ/ |
|
(The indicator turns on |
|
|
ÒTOP40Ó/ÒJAZZÓ/ |
|
according to the setting.) |
Bass level* |
|
ÒBASS LEVELÓ |
|
Ð8 Ñ +8 |
Middle level* |
|
ÒMIDDLE LEVELÓ |
|
Ð8 Ñ +8 |
Treble level* |
|
ÒTREBLE LEVELÓ |
Ð8 Ñ +8 |
|
Balance |
|
ÒBALANCEÓ |
|
Left 15 Ñ Right 15 |
Fader |
|
ÒFADERÓ |
|
Rear 15 Ñ Front 15 |
Exit Audio Control mode (Volume control mode)
*You can adjust these items in detail. Refer to <Adjusting the detail of Audio Control> (Page 23). (Function of KDCX792/X692)
*Source tone memory: Puts the set up value in the memory per source. (Detail Audio item is included)
⁄
•“USER”: The ranges selected lastly for Bass level, Middle level, and Treble level are recalled automatically.
1 Select the source to adjust
For how to select source item, refer to <Power/ Source Select button> of <Basic Operation> (page 4).
2Enter Audio Control mode
Press the [AUD] knob.
3Select the Audio item to adjust
Press the [AUD] knob.
4Adjust the Audio item
Turn the [AUD] knob.
5Exit Audio Control mode
Press any button.
Press a button other than the [AUD] knob and [ATT] button.
Function of KDC-X792/X692
Adjusting the detail of Audio Control
Among the Basic Audio items, you can adjust the Bass level, Middle level, and Treble level in detail.
Bass level
Adjustment Item |
|
Display |
|
Range |
|
Bass Center Frequency |
|
ÒBASS FRQÓ |
40/50/60/70/80/100/ |
||
|
|
|
|
|
120/150 Hz |
Bass Q Factor |
|
ÒBASS Q FACTORÓ |
1.00/1.25/1.50/2.00 |
||
Bass Extend |
|
ÒBASS EXTÓ |
|
OFF/ON |
|
Middle level |
|
|
|
|
|
|
|
|
|
|
|
Adjustment Item |
|
Display |
|
Range |
|
Middle Center Frequency |
|
ÒMIDDLE FRQÓ |
|
0.5/1.0/1.5/2.0 kHz |
|
Middle Q Factor |
|
ÒMIDDLE Q FACTORÓ |
1.00/2.00 |
||
Treble level |
|
|
|
|
|
|
|
|
|
|
|
Adjustment Item |
|
Display |
|
Range |
|
Treble Center Frequency |
|
ÒTREBLE FRQÓ |
10.0/12.5/15.0/17.5 kHz |
||
1Select the Basic Audio item
Select the desired item to be set in detail from followings;
•Bass level
•Middle level
•Treble level
For how to select Basic Audio items, see <Audio Control> (page 23).
2Enter Detail adjustment mode of Audio Control
Press the [AUD] knob for at least 1 second.
3Select the Detail Audio item to adjust
Press the [AUD] knob.
4Adjust the Detail Audio item
Turn the [AUD] knob.
5Exit the Detail Audio Control mode
Press the [AUD] knob for at least 1 second.
⁄
•When you set the Bass Extend to ON, low frequency response is extended by 20%.
•You can exit the Audio Control mode at anytime by pressing any button except for [AUD] knob and [ATT] button.
English | 23

Audio Adjustments
Audio Setup
You can set Sound system , such as follows;
Adjustment Item |
|
Display |
|
Range |
Front High Pass Filter |
|
ÒHPF-FÓ |
|
Through/40*1/ 60*1/80/100/ |
|
|
|
|
120/150/180/220*1 Hz |
Rear High Pass Filter |
|
ÒHPF-RÓ |
|
Through/40*1/ 60*1/80/100/ |
|
|
|
|
120/150/180/220*1 Hz |
Low Pass Filter |
|
ÒLPFÓ |
50*1/60/80/100*1/120/ |
|
|
|
|
|
Through Hz |
Subwoofer Phase |
|
ÒSW PHASEÓ |
|
Reverse (180¡)/ Normal (0¡) |
Volume offset |
|
ÒVOL-OFFSETÓ |
|
Ð8 Ñ ±0 (AUX: -8Ñ +8) |
Loudness |
|
ÒLOUDÓ |
|
OFF/ON |
Dual Zone System |
|
Ò2 ZONEÓ |
|
OFF/ON |
*1 KDC-X792/X692 only.
⁄
•Volume offset: Sets each source’s volume as a difference from the basic volume.
•Loudness: Compensates for low and high tones during low volume. (Only the low tone is compensated for when the tuner is selected as a source.)
•Dual Zone System
Main source and sub source (Auxiliary input) output Front channel and Rear channel separately.
-Set up the channel of sub source by “Zone2” of <Function Control> (page 6).
-Select Main source by [SRC] button.
-Adjust the volume of Front channel by [AUD] knob.
-Adjust the volume of Rear channel by <Audio Control> (page 23) or [5]/[∞] button on the remote control (page 28).
-The Audio Control has no effect on sub source.
1 Select the source to adjust
For how to select source item, refer to <Power/ Source Select button> of <Basic Operation> (page 4).
2Enter Audio Setup mode
Press the [AUD] knob for at least 1 second.
3Select the Audio Setup item to adjust
Press the [AUD] knob.
4Adjust the Audio setup item
Turn the [AUD] knob.
5Exit Audio Setup mode
Press the [AUD] knob for at least 1 second.
Speaker Setting
Fine-tuning so that the System Q value is optimal when setting the speaker type as follows;
Speaker type |
|
Display |
|
OFF |
|
|
ÒOFFÓ |
For 5 |
& 4 in. speaker |
|
Ò5/4inchÓ |
For 6 |
& 6x9 in. speaker |
|
Ò6x9/6inchÓ |
For the OEM speaker |
|
ÒO.E.M.Ó |
|
1Enter Standby
Select the “STANDBY” display.
For how to select source item, refer to <Power/ Source Select button> of <Basic Operation> (page 4).
2Enter Speaker Setting mode
Press the [AUD] knob.
“SP SEL” is displayed.
3Select the Speaker type
Turn the [AUD] knob.
4Exit Speaker Setting mode
Press the [AUD] knob.
24 | KDC-X792/KDC-X692/KDC-MP738U/KDC-MP638U

Audio Preset Memory
Registering the value setup by Sound Control. The memory cannot be erased by the Reset button.
1Setup Sound Control
Refer to the following operations to setup the Sound Control.
-<Audio Control> (page 23)
-<Audio Setup> (page 24)
2Select Audio Preset item during Menu mode (Other than Standby mode)
Select the “Audio Preset” display.
For how to select Function Control items, refer to <Function Control> (page 6).
3Enter Audio Preset mode
Press the Control knob for at least 1 second.
4Select the Audio Preset Memory
Turn the Control knob.
Select the “Memory” display.
5Determine whether to put the Audio Preset in the memory
Press the Control knob.
“Memory?” is displayed.
6Put the Audio Preset in the memory
Turn the Control knob to select “YES”, and then press the Control knob.
“Memory Completed” is displayed.
7Exit Audio Preset mode
Press the [FNC] button.
⁄
•Register 1 pair of Audio Preset Memory. You cannot register by the source.
•When you press the Reset, all the sources will be the setting value which is registered.
•The following items cannot be registered.
Volume, Balance, Fader, Loudness, Volume offset, Dual Zone System, Rear Volume
Audio Preset Recall
Recalling the sound setup registered by <Audio Preset Memory> (page 25).
1Select the source
For how to select source item, refer to <Power/ Source Select button> of <Basic Operation> (page 4).
2Select Audio Preset item during Menu mode (Other than Standby mode)
Select the “Audio Preset” display.
For how to select Function Control items, refer to <Function Control> (page 6).
3Enter Audio Preset mode
Press the Control knob for at least 1 second.
4Select the Audio Preset Recall
Turn the Control knob.
Select the “Recall” display.
5Determine whether to recall the Audio Preset
Press the Control knob.
“Recall?” is displayed.
6Recall the Audio Preset
Turn the Control knob to select “YES”, and then press the Control knob.
“Recall Completed” is displayed.
7Exit Audio Preset mode
Press the [FNC] button.
⁄
•The User memory of “SYSTEM Q” in <Audio Control> (page 23) is changed to the value which was recalled.
•The source tone memory item of <Audio Control> (page
23)is changed to the value which was recalled by the selected source.
English | 25

Satellite Radio tuner control (Optional)
Basic Operation
Selecting Satellite Radio source
Press the [SRC] button.
Select the “SAT”/ “SIRIUS”/ “XM” display.
For how to select source item, refer to <Power/ Source Select button> of <Basic Operation> (page 4).
⁄
•You need to register to the service provider to receive the service by Satellite Radio. Consult the service provider if “CALL … TO SUBSCRIBE” appears.
•The radio may take a little time to start receiving after you select the Satellite Radio source.
•If the signal reception fails, “Acquiring Signal”/ “No Signal” appears.
Switching Seek Mode
Press the [AUTO] button.
Display |
|
Operation |
ÒChannelÓ |
|
Normal manual seeking control. |
ÒPresetÓ |
|
Search in order of the channels in the Preset memory. |
Select the channel
Push the Control knob towards right or left.
Selecting the Preset Band
Push the Control knob toward up.
Each time you push the knob, the preset band alternates between the SR1, SR2, SR3 and SR4.
Channel Scan
Press the [AUTO] button for at least 2 seconds.
Pressing this button for 2 seconds or longer allows you to check individual channel for 10 seconds each. Pressing this button again for 2 seconds or longer allows you to exit this mode.
Preset Memory
Press the desired [1] — [6] button for at least 2 seconds.
Preset Tuning
Press the desired [1] — [6] button.
Category and Channel Search
Selecting the channel and category you want to receive.
1Enter Category and Channel Search mode
Press the Control knob.
2Select the Category
Push the Control knob towards up or down.
3Select the Channel
Push the Control knob towards right or left.
Cancelling Category and Channel Search mode
Press the Control knob.
⁄
•You cannot Channel search until the category information is acquired.
Function of remote control
Direct Access Tuning
Entering the channel and tuning.
1Enter Direct Access Tuning mode
Press the [DIRECT] button on the remote control.
2Enter the channel
Press the number buttons.
3Do Channel Search
Press the [4] or [¢] button.
Cancelling Direct Access Tuning
Press the [DIRECT] button on the remote control.
⁄
•If you make no button operation for 10 seconds, the Direct Access Tuning mode is automatically canceled.
•If you cannot receive any signal in the input Channel due to bad conditions on radio wave or other such problems, “Acquiring Signal”/ “No Signal” appears.
26 | KDC-X792/KDC-X692/KDC-MP738U/KDC-MP638U

Preset Memory
Putting the channel in the memory.
1Select the channel to put in the memory
Push the Control knob towards right or left.
2Enter Preset Memory mode
Select “P.MEM”.
For how to select Function Control item, refer to <Function Control> (page 6).
3Select the number to put in the memory
Turn the Control knob.
4Determine the number to put in the memory
Press the Control knob.
5Allow the determined number to take effect
Press the Control knob.
Cancelling the Preset Memory mode
Press the [FNC] button.
⁄
•Only the channel number is stored. Category information is not stored.
•This function can be operated with [1] — [6] button.
- Press the desired [1] — [6] button for at least 2 seconds.
Preset Tuning
Recalling the channels in the memory.
1Enter Preset Tuning Select mode
Turn the Control knob.
A list is displayed.
2Select a desired station in the memory
Turn the Control knob.
3Recall the station
Press the Control knob.
Cancelling Preset Tuning
Press the [FNC] button.
⁄
•This function can be operated with [1] — [6] button. - Press the desired [1] — [6] button.
English | 27
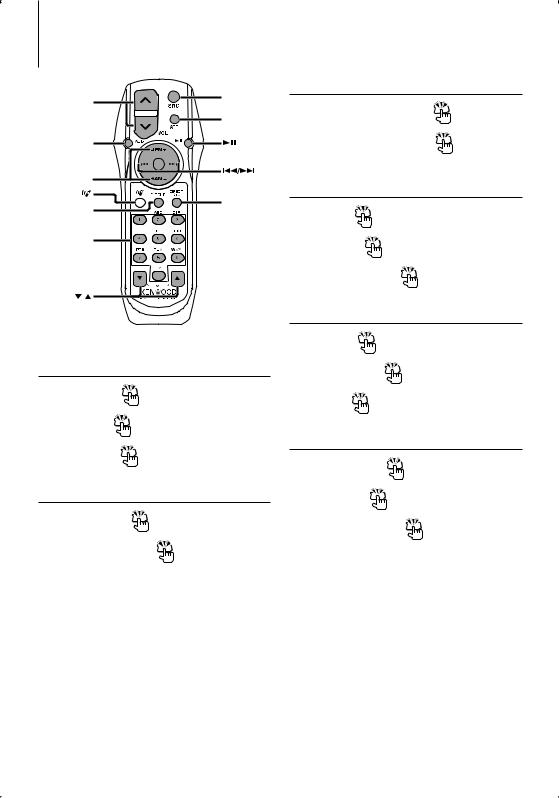
Basic Operations of remote control
SRC
VOL
ATT
AUD
FM/AM/+/–
DIRECT
2-ZONE |
(page 17, 26) |
0 — 9
General control
Volume control |
[VOL] |
|
Source select |
[SRC] |
|
Volume reduce |
[ATT] |
|
In Audio control |
|
|
Audio item select |
[AUD] |
|
Adjusts the Audio item |
[VOL] |
|
⁄
•Refer to <Audio Control> (page 23) for the operation method, such as the procedures for Audio control and others operations.
Dual Zone control
Dual zone system on and off |
[2-ZONE] |
Rear channel volume control |
[5]/ [∞] |
In Tuner/HD Radio source
Band select |
[FM]/[AM] |
|
Station select |
[4]/[¢] |
|
Recall preset stations |
[1] Ñ [6] |
|
In CD/USB source |
|
|
Music select |
[4]/[¢] |
|
Folder/Disc select |
[FM]/[AM] |
|
Pause/Play |
[38] |
|
In Satellite Radio tuner source
Preset band select |
|
[FM] |
Channel select |
[4]/[¢] |
|
Recall preset channels |
[1] Ñ [6] |
|
28 | KDC-X792/KDC-X692/KDC-MP738U/KDC-MP638U
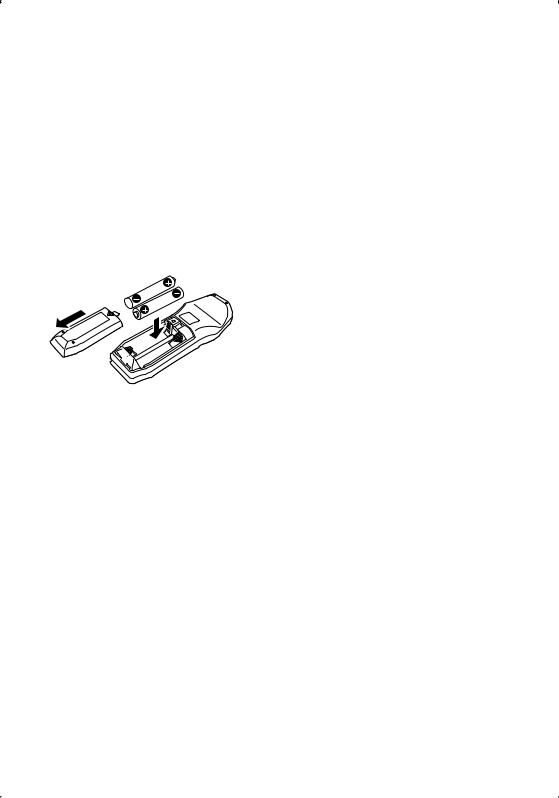
⁄
About [ ]
]
This button is used when Bluetooth HANDS FREE BOX is connected. For more information, refer to the
instruction manual of Bluetooth HANDS FREE BOX.
¤
•Do not set the remote control in hot places such as on the dashboard.
Loading and Replacing battery
Use two “AA”/ “R6”-size batteries.
Slide the cover while pressing downwards to remove it as illustrated.
Insert the batteries with the + and – poles aligned properly, following the illustration inside the case.
English | 29
Appendix
About Audio file
•Playable Audio file
AAC-LC (.m4a), MP3 (.mp3), WMA (.wma)
•Playable disc media
CD-R/RW/ROM
•Playable disc file format
ISO 9660 Level 1/2, Joliet, Romeo, Long file name.
•Playable USB device
USB mass storage class
•Playable USB device file system
FAT16, FAT32
Although the audio files are complied with the standards listed above, the play maybe impossible depending on the types or conditions of media or device.
• Playing order of the Audio file
In the example of folder/file tree shown below, the files are played in the order from to .
CD ( ) |
: Folderer |
|
|
|
: Audiofile |
|
|
|
|
|
|
An online manual about audio files is put on the site, www.kenwood.com/audiofile/. On this online
manual, detailed information and notes which are not written in this manual are provided. Make sure to read through the online manual as well.
⁄
•In this manual, the word “USB device” is used for flash memories and digital audio players which have USB terminals.
•The word “iPod” appearing in this manual indicates the iPod connected with the iPod connection cable (optional accessory). The iPod connected with the iPod connection cable can be controlled from this unit. iPods that can be connected with the iPod connection cable are the iPod nano, Fifth Generation iPod, iPod classic, and iPod touch. Other iPods cannot be connected.
About USB device
•If you start playback after connecting the iPod, the music that has been played by the iPod is played first.
In this case, “RESUMING” is displayed without displaying a folder name, etc. Changing the browse item will display a correct title, etc.
•When the iPod is connected to this unit, “KENWOOD” or “ ” is displayed on the iPod to indicate that you cannot operate the iPod.
•When the USB device is connected to this unit, it can be charged up provided that this unit is powered.
•Install the USB device in the place where it will not prevent you from driving your vehicle properly.
•You cannot connect a USB device via a USB hub and Multi Card Reader.
•Take backups of the audio files used with this unit. The files can be erased depending on the operating conditions of the USB device.
We shall have no compensation for any damage arising out of erasure of the stored data.
•No USB device comes with this unit. You need to purchase a commercially available USB device.
•When connecting the USB device, usage of the CAU1EX (option) is recommended.
Normal playback is not guaranteed when a cable other than the USB compatible cable is used. Connecting a cable whose total length is longer than 5 m can result in abnormal playback.
About KENWOOD ÒMusic EditorÓ of PC application
•“Music Editor” is recorded in the CD-ROM attached to this unit.
•Refer to the user’s manual recorded in the installation CD-ROM and Help of “Music Editor” for the operation method of “Music Editor”.
•The unit can play USB device created by “Music Editor”.
•Information about “Music Editor” upgrade is put on the site, www.kenwood.com.
30 | KDC-X792/KDC-X692/KDC-MP738U/KDC-MP638U
 Loading...