


en
fr
it
PD 32
Mode d’emploi |
27–52 |
Istruzioni d’uso |
53–78 |
Manual de instruções |
79–104 |
Manual de |
|
instrucciones |
105–130 |
*282401* |
282401 |
|
|
|
|
|
|
|
|
|
|
|
|||
|
|
|
|
|
|||
|
|
|
|
|
|
|
|
|
|
|
|
|
|
|
|
5 2
9
10
9
7 |
10 |
4 |
8 |
6
3 1

|
|
PDA 50 |
PDA 80 |
PDA 60 |
PDA 81 |
PDA 61 |
PDAW 80-1 |
PDA 62 |
PDAW 80 / 81-1 |
PDA 70 |
PDAW 80 / 81-2 |
PA 970 |
PDAW 80 / 81-3 |
|
PDAW 81-1 |

PD 32 laser range meter |
Contents |
It is essential that the operating instructions are read before the range meter is used the first time.
Always keep these operating instructions together with the tool.
Ensure that the operating instructions are with the range meter when it is given to other persons.
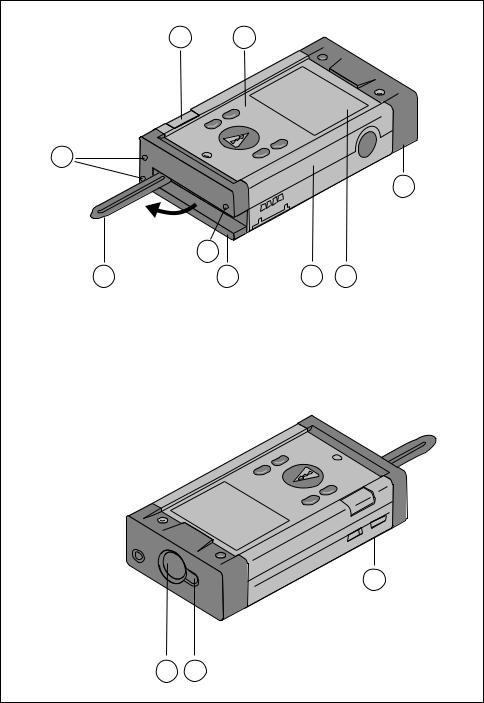
Component parts
Laser exit apertureControl panel
Receiving lensPlastic casing
Horizontal bubbleVertical bubble
Battery compartment
Folding spike
Graphic display of operating status
Metal contact points for precise measurement (3x rear)
Metal supports for precise measurement (3x underneath)
Optical sight
Side measuring key
Contents
1. General information. . . . . . . . . . 3
1.1.Safety notices and their meaning 3
1.2. Pictograms . . . . . . . . . . . . . . . . . 3
1.3.Location of identification data on
the range meter . . . . . . . . . . . . . 3
2. Description. . . . . . . . . . . . . . . . . 4 2.1. Intended use . . . . . . . . . . . . . . . . 4 2.2. Items supplied . . . . . . . . . . . . . . 4 2.3. Measuring principle . . . . . . . . . . 4 2.4. Range meter functions . . . . . . . . 4 2.4.1. General range meter functions . . 4 2.4.2. PD 32 side measurement key . . . 4 2.4.3. PD 32 optical sight . . . . . . . . . . . 4
3. Tools and accessories . . . . . . . . 5 3.1. PDA 50 target plate. . . . . . . . . . . 5 3.2. PDA 80 / 81charging kits . . . . . . 5 3.3. PDAW 80-1 mains adaptor . . . . . 6
3.4.PDAW 80 / 81-2 car battery plug 6
3.5.PDAW 80 / 81-1 charging adaptor6
3.6. PDAW 80 / 81-3 battery pack . . . 6 3.7. PDAW 81-1 mains adaptor . . . . . 6 3.8. PA 970 laser visibility glasses. . . 6
3.9. Belt clip PDA 62 . . . . . . . . . . . . . 6
4. Technical data . . . . . . . . . . . . . . 7
5. Safety information . . . . . . . . . . . 8 5.1. Basic safety information . . . . . . . 8 5.2. Misuse . . . . . . . . . . . . . . . . . . . . 8 5.3. General safety precautions . . . . . 8
5.4.Proper organization of workplace 8
5.4.1. Electromagnetic compatibility. . . 9 5.4.2. Laser classification . . . . . . . . . . . 9
5.4.3. Transport . . . . . . . . . . . . . . . . . . 9
1

Contents
6. Getting started . . . . . . . . . . . . . 10
6.1.Inserting alkaline / rechargeable
batteries . . . . . . . . . . . . . . . . . . 10 6.2. Battery charging . . . . . . . . . . . . 10
6.2.1.Standard charging of batteries . 10
6.2.2. Fast battery charging . . . . . . . . 11
6.3.Switching the range meter On
and Off . . . . . . . . . . . . . . . . . . . 11
6.3.1.Initial distances measurement . 11
6.4. Settings . . . . . . . . . . . . . . . . . . 12 6.4.1. Activating the setting menu . . . 12 6.4.2. Menu / Beep . . . . . . . . . . . . . . . 12 6.4.3. Menu / Units . . . . . . . . . . . . . . . 12 6.4.4. Terminating the menu . . . . . . . . 12
7. Operation . . . . . . . . . . . . . . . . . 12 7.1. General controls . . . . . . . . . . . . 12 7.1.1. Control panel . . . . . . . . . . . . . . 12 7.1.2. On and switch keys. . . . . . . . . . 12 7.1.3. Measure keys . . . . . . . . . . . . . . 13 7.1.4. Function keys . . . . . . . . . . . . . . 13 7.2. Display . . . . . . . . . . . . . . . . . . . 13 7.2.1. Symbols displayed . . . . . . . . . . 14 7.2.2. Display illumination . . . . . . . . . 15 7.3. Optical sight . . . . . . . . . . . . . . . 15 7.4. Measuring distances. . . . . . . . . 15
7.4.1. Measuring references . . . . . . . 15
7.4.2.Measuring distances step by step 16
7.4.3. Measurement mode . . . . . . . . . 16 7.4.4. Measuring from corners . . . . . . 17
7.4.5.Measuring with the aid of
target objects . . . . . . . . . . . . . . 18
7.4.6.Measuring in bright surroundings18
7.4.7.Taking measurements to
rough surfaces . . . . . . . . . . . . . 18
7.4.8.Taking measurements to
round or inclined surfaces . . . . 18
7.4.9.Taking measurements to
wet or shiny surfaces . . . . . . . . 18 7.4.10. Taking measurements to
transparent surfaces . . . . . . . . . 19 7.4.11. Measuring ranges . . . . . . . . . . . 19
8. Applications . . . . . . . . . . . . . . . 19 8.1. Measurement data memory . . . 19 8.1.1. Saving measurements . . . . . . . 19 8.1.2. Historical data memory. . . . . . . 20 8.2. Area measurement . . . . . . . . . . 20 8.3. Volume measurement . . . . . . . . 20 8.4. Adding distances . . . . . . . . . . . 21 8.5. Subtracting distances . . . . . . . . 22 8.6. Indirect measurement. . . . . . . . 22 8.6.1. Measuring criteria. . . . . . . . . . . 23
8.6.2.Selecting indirect measurement
options . . . . . . . . . . . . . . . . . . . 23
8.6.3.Indirect measurement
(combined version). . . . . . . . . . 23
8.6.4.Indirect measurement (simple
version). . . . . . . . . . . . . . . . . . . 24 8.7. Max / Min measurement. . . . . . 24 8.7.1. Max measurement . . . . . . . . . . 24 8.7.2. Min measurement. . . . . . . . . . . 25 8.7.3. Combined measurement. . . . . . 25 8.8. Setting out . . . . . . . . . . . . . . . . 26
9. Calibration and adjustment . . . 26 9.1. Calibration. . . . . . . . . . . . . . . . . 26 9.2. Adjustment . . . . . . . . . . . . . . . . 27 9.3. Hilti calibration service . . . . . . . 27
10. Care and maintenance. . . . . . . 27 10.1. Cleaning and drying . . . . . . . . . 27 10.2. Storage . . . . . . . . . . . . . . . . . . . 27 10.3. Transportation. . . . . . . . . . . . . . 27
11. Disposal . . . . . . . . . . . . . . . . . . 28
12. Warranty. . . . . . . . . . . . . . . . . . 28
13.FCC statement (applicable
in USA) . . . . . . . . . . . . . . . . . . . 29
14. EC declaration of conformity . . 30
2

1. General information
1. General information
1.1 Safety notices and their meaning
- CAUTION -
This word indicates a possibly hazardous situation which could result in slight bodily injuries or damage to property.
- NOTE -
This word indicates information to help the user employ the product efficiently, and other useful notes.
1.2 Pictograms
Warning signs
General warning
Laser class 2
(Do not stare into the beam.)
1.3 Location of identification data on the range meter
The type designation and serial number can be found on the rating plate on the range meter. Make a note of this data in your operating instructions and always refer to it when making an enquiry to your Hilti representative or service department.
Type :
Serial-No.: ___________
|
|
|
|
® |
|
|
|
|
|
AVOID EXPOSURE |
|
Hilti = registered trademark of Hilti Corporation, |
Laser radiation is emitted |
||||
Schaan, Liechtenstein |
from this aperture |
||||
Type: PD 32 |
|||||
|
|||||
LASER RADIATION - DO NOT |
2 |
04.B/1 |
|
|
|||
STARE INTO BEAM |
319549 |
||
620-690nm/0.95mW max. |
|||
|
|||
CLASS II LASER PRODUCT |
|
||
DIN EN 60825-1:2003 |
|
||
|
|
||
|
Made in |
|
|
|
Germany |
1/4 s |
|
|
|
This device complies with part 15 of the FCC Rules. Operation is subject to the following two conditions:
(1) This device may not cause harmful interference,
and (2) this device must accept any interference received, including interference that may cause undesired operation.
Symbols
Read the operating instructions before use.
These numbers refer to the corresponding illustrations. The illustrations can be found on the fold-out cover pages. Keep these pages open when studying the operating instructions. In these operating instructions, the PD 32 laser range meter is referred to as "the range meter".
3
2. Description
2. Description
The distance is determined along an emitted laser beam up to the surface where the laser beam is reflected. The red laser spot clearly identifies the target from which the measurement is taken.
The measuring range depends on the reflectivity and the surface structure of the target surface.
2.1 Intended use
The range meter is designed for the:
–Measurement of distances
–Calculation of areas, volumes and distances
–Addition and subtraction of distances
–Operation and storage in the specified temperatures
2.2 Items supplied
1PD 32 laser range meter
1PDA 50 target plate
1PDA 60 hand strap
2Type AA batteries
1 soft pouch
1 Operating instructions
1 Producer Certificate
2.3 Measuring principle
The range meter emits a visible laser beam with measuring waves, which are reflected returning with a phase shift. The phase shift is used to determine the distance.
This measuring principle permits highly accurate and reliable distance measurements to objects without special reflectors.
2.4 Range meter functions
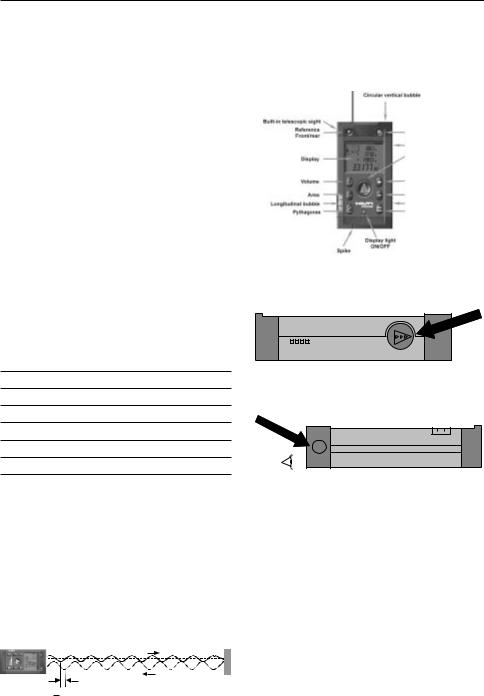
2.4.1 General range meter functions
|
|
|
|
|
|
|
|
|
|
|
|
|
|
|
|
|
Vertical bubble |
|
|||
|
|
|
|
|
|
|
|
|
|
|
|
Optical sight |
|
|
|
|
|
|
|
|
|
|
Measurement reference |
|
|
|
|
|
On / off |
|
||
|
point |
|
|
|
|
|
Side measurement key |
|
||
|
|
|
|
|
|
|
|
|
||
|
Liquid display |
|
|
|
|
|
Measure key |
|
||
|
Volume function |
|
|
|
|
|
Addition of distances |
|
||
|
Area function |
|
|
|
|
|
Subtraction of distances |
|
||
|
Horizontal bubble |
|
|
|
|
|
Battery charging contacts |
|||
|
Pythagoras function |
|
|
|
|
|
Max. / Min. function |
|||
|
(indirect distance) |
|
|
|
|
|
||||
|
|
|
|
|
|
|
|
|
||
|
|
|
|
|
|
|
|
|||
|
|
|
Spike |
|
Display |
illumination |
||||
|
|
|
|
|
|
|
|
|
|
|
|
|
|
|
|
|
|
|
|
|
|
2.4.2PD 32 Side measurement key
2.4.3PD 32 Optical sight
Eye
 phi
phi
4

3. Tools and accessories
3. Tools and accessories
Description |
Designation |
Target plate |
PDA 50 |
Hand strap |
PDA 60 |
Soft pouch |
PDA 61 |
Belt clip |
PDA 62 |
Measuring extension |
PDA 70 |
Charging kit |
PDA 80 |
Charging kit |
PDA 81 |
Mains adaptor |
PDAW 80-1 |
Mains adaptor |
PDAW 81-1 |
Car battery plug |
PDAW 80/81-2 |
Charging adaptor |
PDAW 80/81-1 |
Battery pack |
PDAW 80/81-3 |
Laser visibility glasses* |
PA 970 |
 * These are not laser safety glasses and do not protect the eyes from laser radiation. The laser visibility glasses restrict colour vision. Therefore these are not permitted to be worn by a person driving on a public road, and must not be used look straight into the sun.
3.1 PDA 50 target plate
The PDA 50 target plate is made of durable plastic with a special reflective coating. In poor light conditions, it is advisable to use the target plate for distances above 10 m (30 ft).
- NOTE -
–For reliable distance measurements the laser beam should be perpendicular to the target plate whenever possible. If this not the case, the laser spot on the target plate may not be in the same plane as the target point and the distance measured will be incorrect.
–For very accurate measurements using the target plate, 1.2 mm (1/20 inch) should be added to the measured distances.
3.2 PDA 80 / 81 charging kits
The PDA 80 and PDA 81 charging kits enables the use of the range meters with rechargeable cells. The battery charging time takes approx.12 hours for empty cells. However, sufficient current is charged within the first 15 minutes – for 150 - 200 measurements.
Please also refer to the description of battery charging in section 6. Getting started.
Contents of PDA 80 charging kit
–Mains adaptor 100 – 240 V AC with 2-pole Europlug
–Car battery plug
–Charging adaptor for range meter
–2 chargeable battery cells (NiMH)
Contents of PDA 81 charging kit
–Mains adaptor 100 – 240 V AC
with 4 interchangeable plugs for US, GB, AUS, EU.
5

3. Tools and accessories
–Car battery plug
–Charging adaptor for range meter
–2 chargeable battery cells(NiMH)
3.3 PDAW 80-1 mains adaptor
The mains adaptor is an integral part of the charging kit. It is equipped with a two pin plug. The mains adaptor transforms the power supply from alternating current to direct current which is used to charge the batteries. The mains adaptor automatically adjusts itself to suit an AC voltage between 100 - 240 V and 50 - 60 Hz. The mains adaptor has been specially designed to supply current to the charging adaptor.
- NOTE -
Battery chargers or mains adaptors with other voltage outputs, such as those for mobile phones, may not be used. Use of other battery chargers or mains adaptors may damage the range meter.
3.4 PDAW 80/81-2 car battery plug
The car battery plug is an integral part of the PDA 80/81 charging kit. It can be inserted into a vehicle cigarette lighter or into sockets of the same design. This adaptor has a special design and transforms the 12 - 24 V direct current of a vehicle battery into a voltage suitable for the charging adaptor.
A light-emitting diode (LED) is incorporated in the adaptor to indicate correct connection for charging. An additionalfuse in the adapters front section provides protection against voltage peaks.
- NOTE -
As the car battery plug has been especially
designed to charge the NiMH batteries of the PD 32, it may not be replaced by other types of car battery plugs.
3.5PDAW 80/81-1 charging adaptor
The respective mains adaptor supplies current to the charging adaptor. Prior to charging the battery, the side flange connections should be carefully checked.
3.6PDAW 80/81-3 battery pack
The battery pack consists of two rechargeable, 1.2-V NiMH cells with a capacity of approx.1800 mAh. The battery pack remains in the battery compartment while being charged.
- NOTE -
–A "memory effect" is virtually non-existent with this type of batteries and the charging process used.
The charging process can be interrupted at any time without damaging the battery cells.
–Other brands of rechargeable batteries can be used. It must be ensured, however, that, as far as possible, batteries have a similar capacity of approx. 1800 mAh.
3.7 PDAW 81-1 mains adaptor
This mains adaptor PDAW 81-1 is virtually identical to the PDAW 80-1 mains adaptor. The only difference is the type of mains plugs which are interchangeable plugs.
3.8 PA 970 laser visibility glasses
The laser visibility glasses clearly improve the visibility of the laser beam (spot)
3.9 Belt clip PDA 62
The belt clip is made from durable plastics and is quickly and easily fixed to the belt using the snapper. For carrying the range meter snaps into position and easily detaches when being needed.
6

4. Technical data
4. Technical data
Power supply
3 V DC
Type: AA (LR6, AM3, Mignon) Standard: two alkaline primary cells Optional: rechargeable NiMh cells
Battery status indicator
Battery display with four segments showing 100%, 75%, 50% and 25 % charged
All segments deleted = empty battery
Measuring range
0.05 m to 200 m (2 inch to 600 ft) 0.05 m (2 inch) from the front edge Max. distance resolution 750 m (2,500 ft)
Typical measuring range without target plate:
–Drywall panel, white70 m (210 ft)
–Concrete, dry 50 m (150 ft)
–Brick, dry 50 m (150 ft)
The maximum range depends on:
–Reflectivity of the target surface
–Ambient light conditions
In case measurements are not possible, use the Hilti PDA 50 target plate.
Accuracy
±1.5 mm (±1/16 inch) is typical for individual and continuous measurements **
** The measuring accuracy is affected by ± (1.5 mm + 20 ppm) /
± (1/16 inch + 20 ppm) due to atmospheric conditions. This affect is typically noticeable at distances > 100 m (> 300 ft).
Smallest unit displayed
1 mm (1/16 inch)
Beam diameter
<6mm @ 10m (< 0,2 in @ 30 ft)
<30mm @ 50m (< 1,2 in @ 150 ft)
<60mm @ 100m (< 2,4 in @ 300 ft)
Basic operating modes
Single measurement
Continuous measurement
Calculation / Functions
Display
Illuminated liquid-crystal display showing operating status and battery status
Laser
Visible, 620 – 690 nm, laser class 2 (IEC60825-1: 1993+A1: 1997+A2: 2001/DIN EN60825-1: 2003;
CFR 21 § 1040 [FDA] output power: < 1mW
Automatic time-out
Laser 1 min.
Range meter: 10 min.
Battery life at 25°C (77°F)
Max. number of measurements with single set of batteries. Alkaline: 15’000 - 20’000 NiMH: 8’000 - 10’000
Operating temperature
- 10°C…+ 50°C (14°F… 122°F)
Storage temperature
- 30°C…+ 70°C (- 22°F… 158°F)
Protection class
Dust and splash-proof, IP 54 as per IEC529 standard
Weight
220 g / 0,48 lb (without batteries)
Dimensions
120 (L) x 65 (B) x 28 (H) mm 4,7˝ (L) x 2,5˝ (B) x 1,1˝ (H)
7
5. Safety information
5. Safety information
5.1 Basic safety information
In addition to the safety precautions listed in the individual sections of these operating instructions, the following points must be strictly observed at all times.
5.2 Misuse
The range meter and its accessories can be a source of hazard if they are not used properly or not used for the intended purpose by untrained people.
–Do not use the range meter without suitable prior instruction.
–Do not render any safety devices ineffective and do not remove information and warning notices.
–Have the range meter repaired only at a Hilti service center. Unauthorized opening of the range meter may cause the emission of laser radiation in excess of class 2.
–No changes or manipulations to the range meter are allowed.
–Use only original Hilti accessories and auxiliary tools in order avoid the risk of injury.
–Do not use the range meter in atmospheres where there is a risk of explosion.
–Use only a clean, soft cloth for cleaning. If necessary, moisten the cloth slightly with pure alcohol.
–Keep the range meter out of the reach of children.
–Measurements taken to plastic foam materials, such as polystyrene foam, or to snow or other strongly reflecting surfaces, may be inaccurate.
–Taking measurements to surfaces with low reflectivity surrounded by areas with high reflectivity may lead to measurement errors.
–Measurements taken through panes of glass or other objects may be inaccurate.
–Rapid changes of the measuring conditions, e.g. persons walking through the laser beam, may lead to measurement errors.
–Do not direct the range meter towards the sun or other sources of bright light.
–Do not use the range meter as a levelling tool.
–If you do not check the range meter before taking important measurements and after it has been dropped or subjected to other mechanical stressing.
–No checking of the setting of the measuring reference before measuring.
5.3 General safety precautions
Check the range meter for possible damage before use. If the range meter is found to be damaged, have it repaired at a Hilti service centre. The accuracy of the range meter must be checked after it has been dropped or subjected to other mechanical stressing.
–When the range meter is brought into a warm environment from very cold conditions, or vice versa, allow it to become acclimatised before use.
–Although the range meter is designed for the tough conditions of jobsite use, it should be treated with care, as other optical instruments (binoculars, spectacles, cameras, etc.)
–Although the range meter is protected to prevent entry of dampness, it should be wiped dry each time before being put away in its transport container.
–As a precaution, check the settings you have made before using the range meter.
8
 Loading...