


TE 706 /
TE 706-AVR
Bedienungsanleitung |
de |
||||
Operating instructions |
en |
||||
Mode d’emploi |
fr |
||||
Ръководство за обслужване |
bg |
||||
Upute za uporabu |
hr |
||||
Instrukcja obsługi |
pl |
||||
Инструкция по зксплуатации |
ru |
||||
Návod na obsluhu |
sk |
||||
Navodila za uporabo |
sl |
||||
Návod k obsluze |
cs |
||||
Használati utasítás |
hu |
||||
Instrucţiuni de utilizare |
ro |
||||
|
|
|
|
|
zh |
|
|
|
|
|
|
|
|
|
|
|
ja |
|
|
|
|
|
|
|
|
|
|
|
ko |
|
|
|
|
|
|
|
|
|
|
|
cn |
|
|
|
|
|
|
IНСТРУКЦIЯ З ЕКСПЛУАТАЦIЇ |
uk |
||||
|
|
|
|
|
ar |
Printed: 20.04.2017 | Doc-Nr: PUB / 5136225 / 000 / 01
1
3 |
2 |
4 |
1 |
7 |
6 |
5 |
10 |
9 |
8 |
11 |
Printed: 20.04.2017 | Doc-Nr: PUB / 5136225 / 000 / 01 |

2 |
|
|
3 |
|
|
|
|
|
|
1 |
3 |
|
|
|
|
|
|
1 |
|
|
|
|
|
|
2 |
|
|
|
2,4 |
4 |
1 |
6 |
5 |
|
|
|
|
|
|
1 |
|
|
5 |
|
4 |
|
|
|
|
|
|
||
|
10 |
|
2 |
|
3 |
|
8 |
|
|
|
|
|
|
3 |
|
2 |
|
|
|
|
|
||
|
|
|
|
|
|
9 |
7 |
|
|
|
|
6 |
|
|
7 |
|
1 |
|
|
|
|
2 |
|
Printed: 20.04.2017 | Doc-Nr: PUB / 5136225 / 000 / 01 |
|
|
|
|
|

ORIGINAL OPERATING INSTRUCTIONS
TE 706/TE 706-AVR breaker
It is essential that the operating instructions are read before the tool is operated for the first time.
Always keep these operating instructions together with the tool.
Ensure that the operating instructions are with the tool when it is given to other persons.
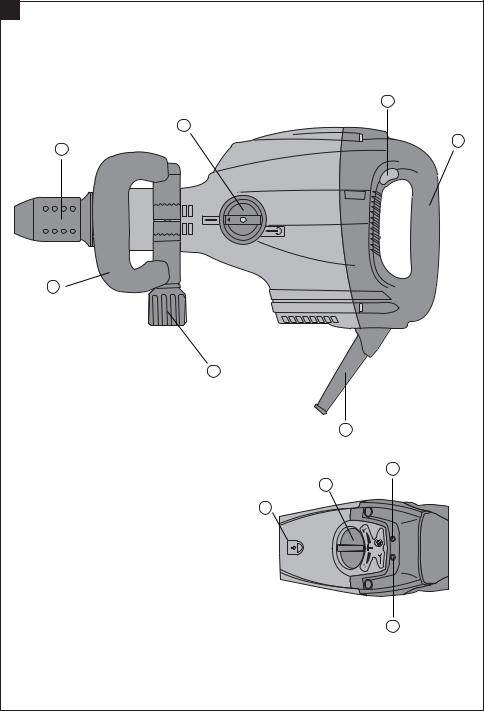
Operating controls and parts
Chuck
Chisel adjustment and locking switchOn/off switch
Grip
Supply cordScrew knob
Side handle Lock symbol
Power level selection switch
Theft protection indicator (option)Service indicator
|
Contents |
Page |
|||
|
1. General information |
11 |
|
|
|
|
2. |
Description |
12 |
|
|
|
3. Tools and accessories |
12 |
|
||
|
4. |
Technical data |
13 |
|
|
5. |
Safety rules |
14 |
|
|
|
|
6. Before use |
16 |
|
|
|
|
7. Operation |
16 |
|
|
|
|
8. Care and maintenance |
17 |
|
|
|
|
9. Troubleshooting |
18 |
|
|
|
|
10. Disposal |
19 |
|
|
|
|
11. Manufacturer’s warranty – tools |
19 |
|
|
|
12. |
EC declaration of conformity (original) |
20 |
|||
|
|
|
|
|
|
1. General information
en
1.1 Safety notices and their meaning
-CAUTION-
Draws attention to a potentially dangerous situation that could lead to minor personal injury or damage to the equipment or other property.
-NOTE-
Draws attention to instructions and other useful information.
1.2 Pictograms
Warning signs
General |
Warning: |
Warning: |
warning |
electricity |
hot surface |
Symbols
Read the |
Equipped with |
Lock- |
Return waste |
operating |
theft protection |
symbol |
material for |
instructions |
system |
|
recycling |
before use. |
|
|
|
These numbers refer to the corresponding illustrations. The illustrations can be found on the fold-out cover pages. Keep these pages open while studying the operating instructions.
In these operating instructions, the TE 706 and / or TE 706-AVR breaker is referred to as “ the power tool ”.
Location of identification data on the power tool.
The type designation can be found on the rating plate and the serial number on the side of the motor housing. Make a note of this data in your operating instructions and always refer to it when making an enquiry to your Hilti representative or service department.
Type:
Serial No.:
11
Printed: 20.04.2017 | Doc-Nr: PUB / 5136225 / 000 / 01

2. Description
2.1 Use of the power tool as intended
The power tool is designed for medium-duty chiseling work. It is suitable for breaking/removing and demolishing concrete, masonry, stone or asphalt. It is intended for use on construction sites of all kinds.
en The power tool may be operated only when connected to a power supply providing a voltage and frequency in compliance with the information given on its rating plate. Changes or modifications to the power tool are not permissible.
2.2 Important features of the power tool
2.2.1Active vibration reduction
●The TE 706-AVR is equipped with an active vibration reduction system which cuts vibration to 40 % of that of the TE 706 (without Active Vibration Reduction).
2.2.2Theft protection system (option)
●The power tool may be equipped with the optional theft protection system. If the power tool is equipped with this feature, it can be activated and made ready for operation only by way of the corresponding activation key.
2.2.3Chuck
●TE-Y (SDSmax) quick-change chuck
2.2.4Switch
●On/off switch
●3-position power level selection switch (100 %, 75 %, 50 %)
●Chisel adjustment and locking switch (for 24 clickstop positions per revolution)
2.2.5Grip (with soft synthetic rubber padding)
●Two-way adjustable (pivoting) and vibration-absorb- ing side handle
●Vibration absorbing grip
2.2.6Safety features
●Electronic interlock to prevent unintentional restarting after interruption of the power supply (see section 9.).
●Casing and grip isolated from interior parts of the tool to reduce transmission of heat and vibration.
●Automatic electronic overheating and overvoltage cutout (see section 9.).
2.2.7Lubrication
●Permanent lubrication with separate lubrication chambers for the gearing section and hammering mechanism.
2.2.8Indicator lamps
●Service indicator lamp (red, see section 8.3).
●Theft protection system indicator (available as an option) (yellow, see section 7.2.1).
2.2.9Items supplied as standard
●Power tool
●Side handle
●Grease dispenser, 50 ml
●Cleaning cloth
●Operating instructions
●Toolbox with overview of insert tools.
3. Tools and accessories
TE 706/TE 706-AVR |
Width (mm) |
Length (mm) |
Width (in) |
Length (in) |
TE-Y chuck (SDSmax) |
|
|
|
|
Pointed chisel |
– – |
280–700 |
– – |
11″–27″ |
Flat chisel |
26 |
280–700 |
3/4″ |
11″–27″ |
Wide-flat chisel |
50–120 |
280–500 |
2″–41/2″ |
11″–19″ |
Hollow chisel |
28 |
280 |
1″ |
11″ |
Channel chisel |
22–36 |
280 |
7/8″–11/2″ |
11″ |
Mortar chisel |
38 |
280 |
15/16″ |
11″ |
Flexible chisel |
150 |
650 |
57/8″ |
251/2″ |
Bushing tool |
40 x 40 |
250 |
57/8″ |
10″ |
Tamping tool |
150 x 150 |
300 |
– – |
– – |
Earth rod rammer |
15–25 |
300 |
– – |
– – |
TPS Theft Protection System with Company |
option |
|
|
|
Card, Company Remote and TPS-K activation key |
|
|
|
|
Use the Hilti tools listed above. With these tools you will achieve a higher breaking and material removal performance and longer service life as the power tool and the insert tool have been optimized as a system.
12
Printed: 20.04.2017 | Doc-Nr: PUB / 5136225 / 000 / 01
 Loading...