


1
User’s Guide

Notations Used in This Guide |
2 |
|
|
|
Attention |
Indicates procedures which may result in damage or injury if sufficient care is not taken. |
|
|
|
|
|
|
q |
Indicates additional information and points which may be useful to know regarding a topic. |
|
|
|
||
|
|
|
|
|
s |
Indicates a page where detailed information regarding a topic can be found. |
|
|
|
|
|
|
g |
Indicates that an explanation of the underlined word or words in front of this symbol appears in the glossary of terms. See |
|
|
the "Glossary" section of the "Appendices". s p.65 |
||
|
|
|
|
|
|
|
Indicates operating methods and the order of operations. |
|
Procedure |
|
|
|
|
The procedure indicated should be carried out in the order of the numbered steps. |
|
|
|
|
|
|
[ (Name) ] |
Indicates the name of the buttons on the remote control or the control panel. |
|
|
Example: [Esc] button |
||
|
|
|
|
|
|
|
|
|
"(Menu Name)" |
Indicates configuration menu items. |
|
|
Example: "Image" - "Brightness" |
||
|
|
|
|
|
|
|
|

Contents |
3 |
|
|
Projector Features...................................................................................... |
4 |
EMP-1715/1705 only............................................................................................ |
5 |
Part Names and Functions ........................................................................ |
6 |
Front/Top.............................................................................................................. |
6 |
Control Panel ....................................................................................................... |
7 |
Rear ..................................................................................................................... |
8 |
Base ..................................................................................................................... |
9 |
Remote Control .................................................................................................. |
10 |
Useful Functions |
|
Changing the Projected Image................................................................ |
13 |
Automatically Detect Incoming Signals and Change the Projected Image |
|
(Source Search) ................................................................................................. |
13 |
Changing Directly from the Remote Control ...................................................... |
14 |
Functions for Enhancing Projection....................................................... |
15 |
Selecting the Projection Quality (Selecting Colour Mode) ................................. |
15 |
Hiding the Image and Sound Temporarily (A/V Mute) ....................................... |
16 |
Freezing the Image (Freeze).............................................................................. |
17 |
Changing the Aspect Ratiog (Resize) ................................................................ |
17 |
Pointer Function (Pointer) .................................................................................. |
18 |
Enlarging Part of the Image (E-Zoom) ............................................................... |
19 |
Using the Remote Control to Operate the Mouse Pointer (Wireless Mouse)..... |
20 |
Adjusting Colour for Several Projectors (Multi-Screen Colour |
|
Adjustment)............................................................................................... |
23 |
Summary of Adjustment Procedure ................................................................... |
23 |
Setting Screen ID ............................................................................................... |
23 |
Image Correction Method................................................................................... |
24 |
Security Functions ................................................................................... |
26 |
Managing Users (Password Protect) ................................................................. |
26 |
Restricting Operation (Operation Lock).............................................................. |
29 |
Configuration Menu |
|
Using the Configuration Menu ................................................................ |
31 |
List of Functions....................................................................................... |
32 |
Image Menu ....................................................................................................... |
32 |
Signal Menu ....................................................................................................... |
33 |
Settings Menu .................................................................................................... |
34 |
Extended Menu.................................................................................................. |
35 |
Network Menu (EMP-1715/1705 Only) .............................................................. |
37 |
Info Menu (Display Only).................................................................................... |
38 |
Reset Menu........................................................................................................ |
39 |
Troubleshooting |
|
Using the Help .......................................................................................... |
41 |
Problem Solving....................................................................................... |
42 |
Reading the Indicators....................................................................................... |
42 |
When the Indicators Provide No Help................................................................ |
45 |
Appendices |
|
Installation Methods ................................................................................ |
53 |
Cleaning .................................................................................................... |
54 |
Cleaning the Projector's Surface ....................................................................... |
54 |
Cleaning the Lens.............................................................................................. |
54 |
Cleaning the Air Filter and Air Intake Vent......................................................... |
54 |
Replacing Consumables ......................................................................... |
55 |
Replacing the Remote Control Batteries ........................................................... |
55 |
Replacing the Lamp........................................................................................... |
56 |
Replacing the Air Filter ...................................................................................... |
59 |
Saving a User’s Logo............................................................................... |
60 |
Screen Size and Distance........................................................................ |
62 |
Connecting to External Equipment ........................................................ |
63 |
Connecting to External Speakers ...................................................................... |
63 |
Optional Accessories and Consumables .............................................. |
64 |
Glossary.................................................................................................... |
65 |
List of ESC/VP21 Commands.................................................................. |
67 |
Command List.................................................................................................... |
67 |
Cable Layouts.................................................................................................... |
67 |
USB Connection Setup...................................................................................... |
68 |
PJLink (EMP-1715/1705 only).................................................................. |
69 |
List of Supported Monitor Displays ....................................................... |
70 |
Specifications........................................................................................... |
71 |
Appearance............................................................................................... |
74 |
Index.......................................................................................................... |
75 |

Projector Features
Small and light
B5 file size (19.3 cm deep, 27.3 cm wide, and 6.8 cm high) with a light and compact body (1.6 to 1.7 kg*)
Carrying is also easy as there is a special pocket for storing cables and so on in the soft carrying case supplied with the projector. s p.71
* EMP-1715/1705: 1.7 kg, EMP-1710/1700: 1.6 kg
No cool down delay
You can disconnect the projector's power cable without having to wait for the projector to cool down first.
Ease of use
fWhen you turn the projector power on and off a "Beep" sounds
A "Beep" sounds when the power is turned on, after the cooling down period has finished the confirmation buzzer beeps twice. Once you hear the confirmation buzzer beep twice, you can unplug the power cable.
fA single foot design means you do not have to make any difficult leveling adjustments
You can easily make height adjustments with one hand. s Quick Start Guide
4
f The A/V mute slide makes it easy to project and store
You can stop and resume projection easily by opening and closing the A/V mute slide which makes giving clear presentations easier.
f Easy to use control panel
For ease of use, buttons are classified and arranged according to their projection and adjustment functions. s p.7
Security Functions
fPassword Protect to restrict and manage users
By setting a password you can restrict who can use the projector. s p.26
fOperation Lock restricts button operation on the control panel
You can use this to prevent people changing projector settings without permission at events, in schools, and so on.
Projector Features
EMP-1715/1705 only
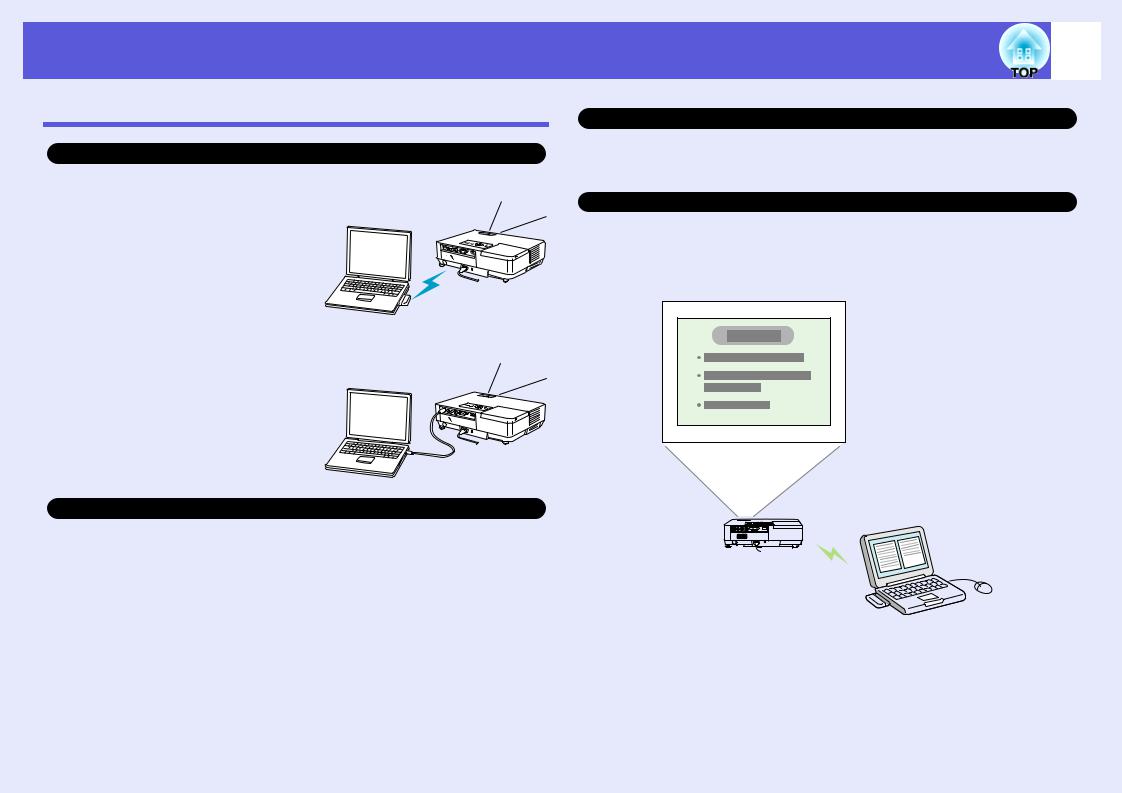
Connect to a computer easily
f Computer and wireless connection
Use a wireless LAN to connect easily 1 to 1 with your computer. s Wireless LAN Quick Connection Guide
You can also connect to the access point. s EasyMP Operation Guide
f Connect using a USB cable (USB display)
Simply by connecting a cable to your computer you can project images from the computer's screen. s EasyMP Operation Guide
Powerful presentation support
fPresentations without a computer
You can record presentation scenarios to media beforehand, and then simply start playback. Presentations are possible without a computer. s EasyMP Operation Guide
f Slide show projection only (Presentation mode)
5
Strengthened security level of wireless LAN
Security is stronger than previous models. You can feel secure using it as part of the network. s EasyMP Operation Guide
Second and third screen projection (Multi-screen display)
You can project each virtual display set on the computer by using two or more projectors. You can use it to make file operations and arrangements for the virtual displays while projecting only the virtual displays.
s EasyMP Operation Guide
Presentation mode only projects images from a PowerPoint slide show. You can give stylish presentations without showing spectators operations or other preparation material. s EasyMP Operation Guide

Part Names and Functions
Front/Top
A |
|
|
K |
J |
|
B |
I |
|
G |
||
|
||
|
L |
|
|
H |
|
|
F |
|
C |
|
|
|
E |
|
|
D |
|
Name |
Function |
|
A Control panel |
s p.7 |
|
B Lamp cover |
Open this cover when replacing the projector's |
|
|
lamp. |
|
|
s p.56 |
|
C Air exhaust vent |
Attention |
|
|
Do not place objects that may become warped |
|
|
or otherwise affected by heat near the air |
|
|
exhaust vent and do not put your face or |
|
|
hands near the air exhaust vent while |
|
|
projection is in progress. |
6
|
Name |
Function |
D Front adjustable |
Extend and adjust the position of the projected |
|
|
foot |
image when the projector is placed on a |
|
|
surface such as a desk. |
|
|
|
E |
Foot adjust lever |
Pull out the foot lever to extend and retract the |
|
|
front foot. |
|
|
s Quick Start Guide |
|
|
|
F A/V mute slide |
Slide shut when not using the projector to |
|
|
|
protect the lens. By closing during projection |
|
|
you can hide the image and the sound (A/V |
|
|
Mute). |
|
|
s Quick Start Guide, p.16 |
|
|
|
G A/V mute slide |
Slide the knob to open and close the A/V mute |
|
|
knob |
slide. |
|
|
|
H Remote receiver |
Receives signals from the remote control. |
|
|
|
s Quick Start Guide |
|
|
|
I Focus ring |
Adjusts the image focus. |
|
|
|
s Quick Start Guide |
|
|
|
J Zoom ring |
Adjusts the image size. |
|
|
|
s Quick Start Guide |
|
|
|
K USB access |
Whether they are flashing or lit indicates the |
|
|
indicator |
access status of USB Type A. |
|
(EMP-1715/1705 |
|
|
only) |
|
L Wireless LAN unit
(EMP-1715/1705 only)
Install this before using the projector. Connects the projector to a computer by a wireless connection.
s Wireless LAN Quick Connection Guide
EasyMP Operation Guide
Part Names and Functions
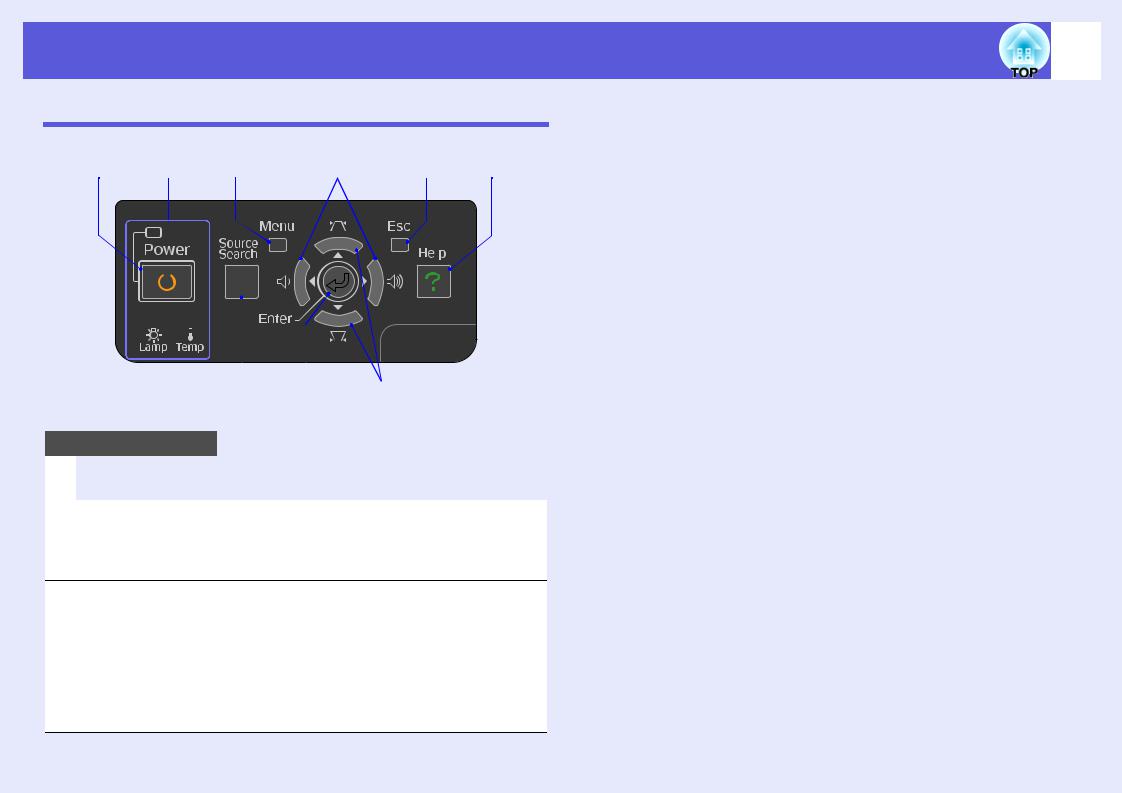
Control Panel
A I H G F E
|
|
|
|
|
|
|
|
|
|
|
|
|
|
|
|
|
|
|
|
|
|
|
|
|
|
|
|
|
|
|
|
|
|
|
|
|
|
|
|
|
|
|
|
|
|
|
|
|
|
|
|
|
|
|
|
|
|
|
|
|
|
|
|
|
|
|
|
|
|
|
|
|
|
|
|
|
|
|
|
|
|
|
|
|
|
|
|
|
|
|
|
|
|
|
|
|
|
|
|
|
|
|
|
|
|
|
|
|
|
|
|
|
|
|
|
|
|
|
|
|
|
|
|
|
|
|
|
|
|
|
|
|
|
|
|
|
|
|
|
|
|
|
|
|
|
|
|
B |
C |
D |
|||
|
|
|
|
|
|
|
|
|
|
|
|
|
|
Name |
|
|
|
|
Function |
||||||||
A [Power] button |
Turns the projector power on or off. |
||||||||||||
|
|
|
|
|
|
|
|
s Quick Start Guide |
|||||
|
|
|
|
|
|
|
|
|
|
|
|
|
|
B [Source Search]
button
Changes to the next input source that is connected to the projector and is sending an image.
s p.13
C [Enter] button If pressed during projection of computer signal images, it automatically adjusts the tracking, synchronization, and position to project the optimum image. When a configuration menu or a help screen is displayed, it accepts and enters the current selection and moves to the next level.
s p.31
7
|
Name |
Function |
D |
[v] [w] buttons |
Corrects keystone distortion. |
|
|
If pressed when a configuration menu or a help |
|
|
screen is displayed, these buttons select menu |
|
|
items and setting values. |
|
|
s Quick Start Guide, p.31 |
|
|
|
E |
[Help] button |
Displays and closes the help screen which |
|
|
shows you how to deal with problems if they |
|
|
occur. |
|
|
s p.41 |
|
|
|
F |
[Esc] button |
Stops the current function. |
|
|
If pressed when a configuration menu is |
|
|
displayed, it moves to the previous menu level. |
|
|
s p.31 |
|
|
|
G |
[a] [b] buttons |
Adjusts the sound volume. |
|
|
If pressed when a configuration menu or a help |
|
|
screen is displayed, these buttons select menu |
|
|
items and setting values. |
|
|
s Quick Start Guide, p.31 |
|
|
|
H |
[Menu] button |
Displays and closes the configuration menu. |
|
|
s p.31 |
|
|
|
I |
Status indicators |
The colour of the indicators and whether they |
|
|
are flashing or lit indicates the status of the |
|
|
projector. |
|
|
s p.42 |
|
|
|
Part Names and Functions
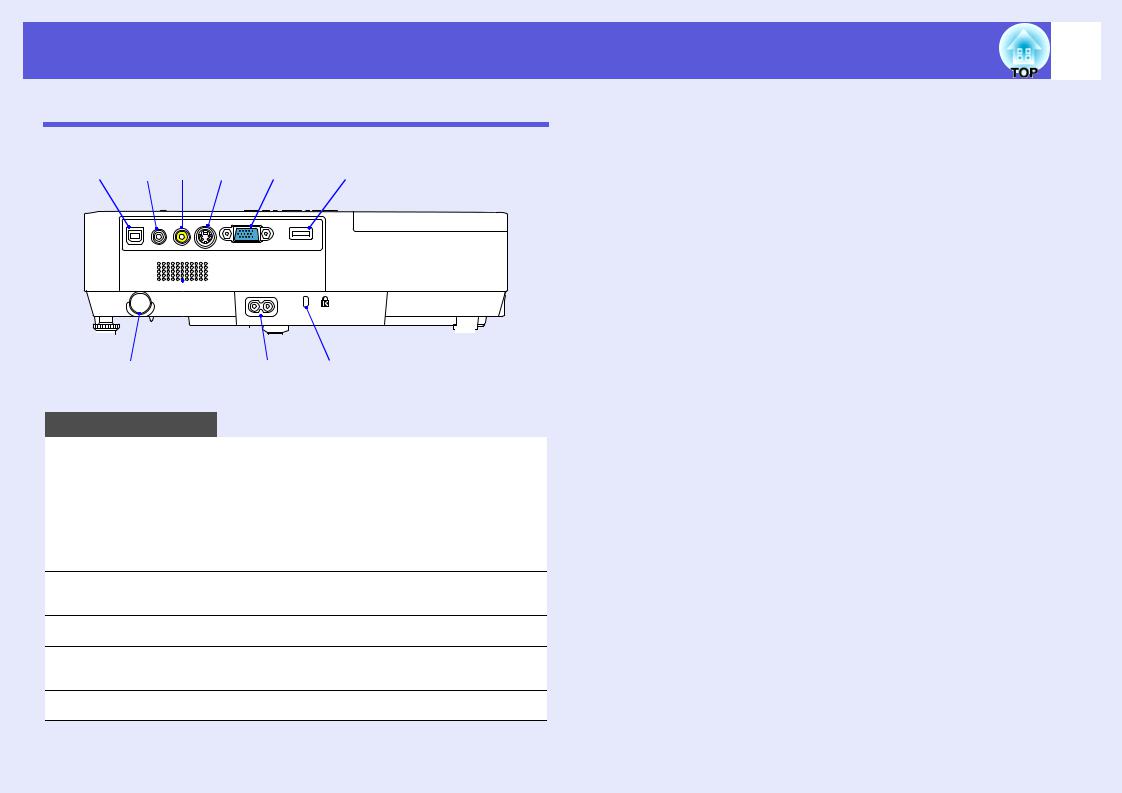
Rear
A J I H G F
|
|
|
|
|
|
|
|
|
|
|
|
|
|
|
|
|
|
|
|
|
|
|
|
|
|
|
|
|
|
|
D E |
||||||||||||||||||
|
|
|
B C |
|
||||||||||||||||||||
|
|
|
|
|
|
|
|
|
|
|
|
|
|
|
|
|
|
|
|
|
|
|
|
|
|
|
Name |
|
|
|
|
|
|
|
|
|
|
|
|
|
|
|
Function |
||||||
|
|
|
|
|
|
|
|
|
|
|
|
|
|
|
|
|
|
|
|
|
|
|
|
|
A USB port Type B Connects the projector to a computer by a USB cable, and the image on the computer is projected (EMP-1715/1705 only).
Also, when using the wireless mouse function, you can connect to a computer by a USB cable.
s Quick Start Guide
B Remote receiver Receives signals from the remote control. s Quick Start Guide
C Speaker
D Power inlet Connects to the power cable. s Quick Start Guide
E Security slot (j) s p.66
8
|
Name |
Function |
F |
USB port Type A |
Connects the memory for compatible digital |
|
(EMP-1715/1705 |
cameras and USBs, and projects image/movie |
|
only) |
files and scenarios with the PC Free of |
|
|
|
|
|
EasyMP. |
|
|
s Quick Start Guide |
|
|
|
G |
Computer |
For video signals from a computer and |
|
(Component |
component videog signals from other video |
|
Video) port |
sources. |
|
|
|
|
|
|
H |
S-Video port |
For S-videog signals from video sources. |
|
|
|
I |
Video port |
For composite videog signals from video |
|
|
sources. |
|
|
|
J |
Audio port |
For the audio in signal of connected |
|
|
equipment. |
|
|
When projecting with the PC Free function of |
|
|
EasyMP, you can output the audio to an |
|
|
external speaker by setting "EasyMP Audio |
|
|
Out" from the configuration menu (EMP-1715/ |
|
|
1705 only). |
|
|
s p.34 |
|
|
|
Part Names and Functions
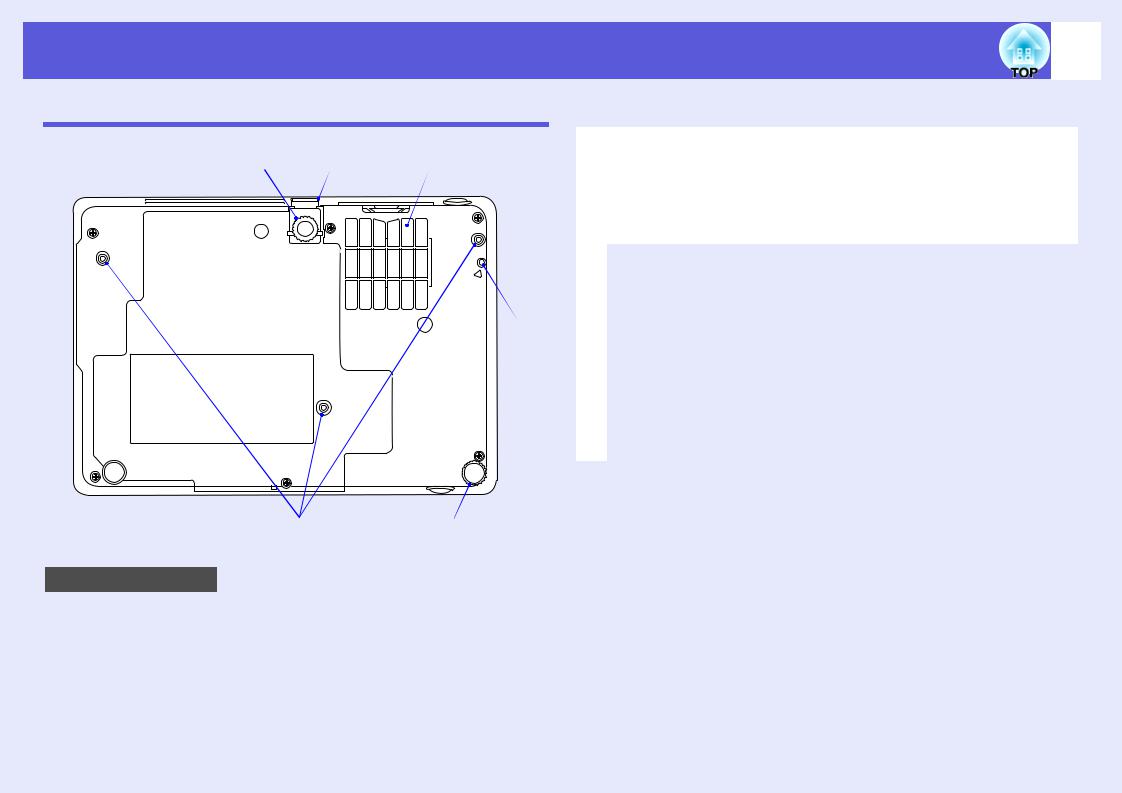
Base
D C B
F
|
A |
E |
|
|
|
Name |
|
Function |
A Suspension |
Attach the optional ceiling mount here when |
|
bracket fixing |
suspending the projector from a ceiling. |
|
points (3 points) |
s p.53, 64 |
|
|
|
|
9
Name |
Function |
|
|
B Air filter (Air intake vent)
This prevents dust and other foreign particles from getting inside the projector when air is drawn in. The projector displays a warning message when it is time to clean or replace the air filter.
s p.54, 59
C |
Foot adjust lever |
s Quick Start Guide |
|
|
|
D |
Front adjustable |
Extend and adjust the position of the projected |
|
foot |
image when the projector is placed on a |
|
|
surface such as a desk. |
|
|
|
E |
Rear foot |
Turn to extend and retract to adjust the |
|
|
horizontal tilt. |
|
|
s Quick Start Guide |
|
|
|
F |
Screw hole to fix |
This hole is for a screw to fix the wireless or |
|
wireless or cable |
cable LAN unit in place. |
|
LAN unit |
s Wireless LAN Quick Connection Guide |
|
|
|
|
|
|
Part Names and Functions |
|
|
10 |
|
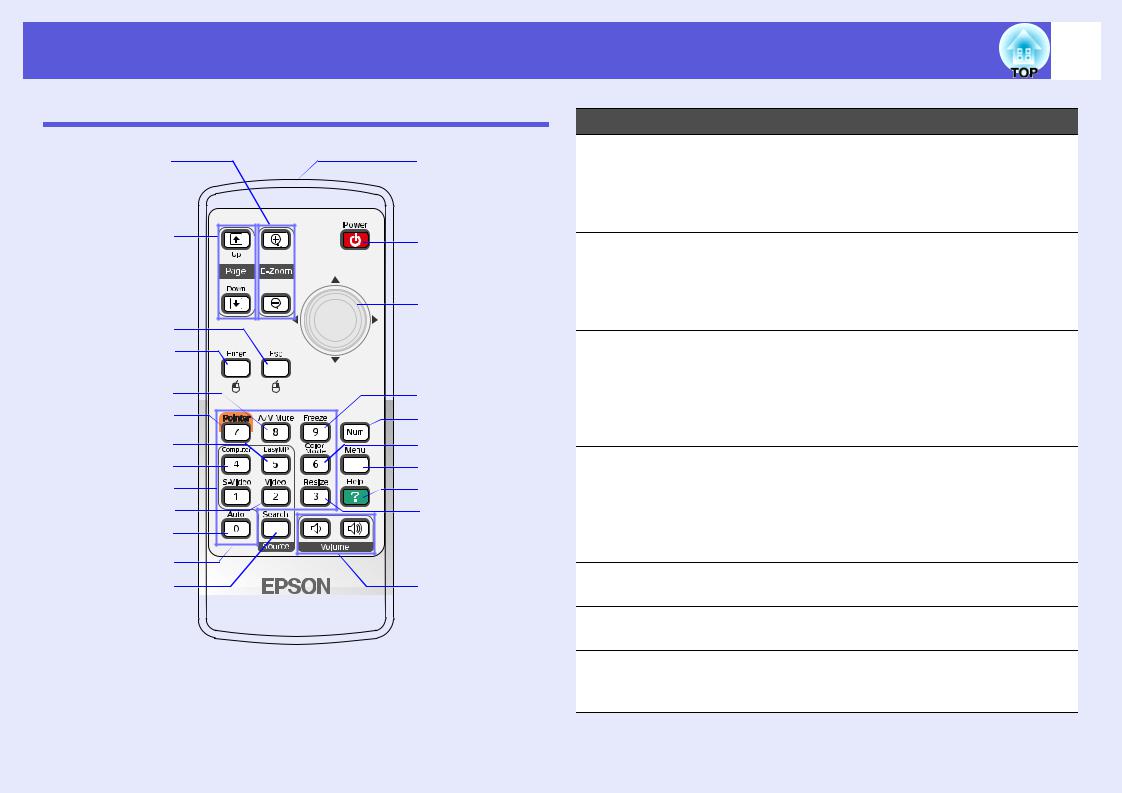
Remote Control |
|
Name |
Function |
|
|
|
|||
A |
W |
A [E-Zoom] button |
(z) Enlarges the image without changing the |
|
(z) (x) |
projection size. |
|||
|
|
|
(x) Reduces parts of images that have been |
|
|
|
|
enlarged using the [z] button. |
|
B |
|
|
s p.19 |
|
V |
B [Page Up] [Page |
When the wireless mouse function and |
||
|
||||
|
|
Down] buttons |
Network presentation are performed (EMP- |
|
|
|
([) (]) |
1715/1705 only), you can change the |
|
|
|
|
||
|
U |
|
PowerPoint file page by pressing the page up/ |
|
C |
|
|
page down buttons. |
|
|
C [Esc] button |
Stops the current function. If pressed when a |
||
D |
|
|||
|
|
configuration menu is displayed, it moves to |
||
|
|
|
||
E |
T |
|
the previous level. Acts as a mouse's right |
|
|
button when using the wireless mouse |
|||
F |
S |
|
function. |
|
G |
R |
|
s p.31 |
|
D [Enter] button |
When a configuration menu or a help screen is |
|||
H |
Q |
|||
|
displayed, it accepts and enters the current |
|||
I |
P |
|
||
|
selection and moves to the next level. Acts as |
|||
J |
O |
|
a mouse's left button when using the wireless |
|
K |
|
|
mouse function. |
|
L |
|
|
s p.31 |
|
|
E [A/V Mute] button |
Turns the video and audio on or off. |
||
M |
N |
|||
|
s p.16 |
|||
|
|
F [Pointer] button |
Press to activate the on screen pointer. |
|
|
|
|
s p.18 |
|
|
|
G [EasyMP] button |
Changes to the EasyMP image. This cannot |
|
|
|
|
be used with the EMP-1710/1700 (EMP-1715/ |
|
|
|
|
1705 only). |
Part Names and Functions |
11 |
|||
|
|
|
|
|
|
|
|
|
|
|
Name |
Function |
|
|
|
H |
[Computer] |
Displays to images from the Computer |
|
button |
(Component Video) port. |
|
|
s p.14 |
|
|
|
I |
[S-Video] button |
Displays to images from the S-Video port. |
|
|
s p.14 |
|
|
|
J |
[Video] button |
Displays to images from the Video port. |
|
|
s p.14 |
|
|
|
K |
[Auto] button |
If pressed during projection of computer signal |
|
|
images, it automatically adjusts the tracking, |
|
|
synchronization, and position to project the |
|
|
optimum image. |
|
|
s p.33 |
|
|
|
L |
Numeric buttons |
Use these buttons when entering a password |
|
|
or screen ID. |
|
|
s p.28 |
|
|
|
M |
[Search] button |
Changes to the next input source that is |
|
|
connected to the projector and is sending an |
|
|
image. |
|
|
s p.13 |
|
|
|
N |
[Volume] buttons |
(a) Decreases the volume. |
|
|
(b) Increases the volume. |
|
|
s Quick Start Guide |
|
|
|
O |
[Resize] button |
The aspect ratiog changes each time the |
|
|
button is pressed. |
|
|
s p.17 |
|
|
|
P |
[Help] button |
Displays and closes the help screen which |
|
|
shows you how to deal with problems if they |
|
|
occur. |
|
|
s p.41 |
|
|
|
|
Name |
Function |
|
|
|
Q |
[Menu] button |
Displays and closes the configuration menu. |
|
|
s p.31 |
|
|
|
R |
[Color Mode] |
Each time the button is pressed, the colour |
|
button |
mode changes. |
|
|
s p.15 |
|
|
|
S |
[Num] button |
Use this button when entering a password or |
|
|
screen ID. |
|
|
s p.28 |
|
|
|
T |
[Freeze] button |
Images are paused or unpaused. |
|
|
s p.17 |
|
|
|
U |
[h] button |
When a configuration menu or help screen is |
|
|
displayed, it selects menu items and setting |
|
|
values. When the wireless mouse function is |
|
|
activated, tilting this button moves the pointer |
|
|
in the direction it is tilted. |
|
|
s p.31 |
|
|
|
V |
[Power] button |
Turns the projector power on or off. |
|
|
s Quick Start Guide |
|
|
|
W |
Remote control |
Outputs remote control signals. |
|
light-emitting |
s Quick Start Guide |
|
area |
|
|
|
|

Useful Functions
This chapter explains useful functions for giving presentations and so on, and the security functions.
Changing the Projected Image .......................... |
13 |
• Automatically Detect Incoming Signals and Change |
|
the Projected Image (Source Search) .............................. |
13 |
• Changing Directly from the Remote Control ................. |
14 |
Functions for Enhancing Projection................. |
15 |
• Selecting the Projection Quality |
|
(Selecting Colour Mode)................................................... |
15 |
• Hiding the Image and Sound Temporarily |
|
(A/V Mute) ......................................................................... |
16 |
• Freezing the Image (Freeze)............................................. |
17 |
• Changing the Aspect Ratiog (Resize) .............................. |
17 |
• Pointer Function (Pointer) ............................................... |
18 |
• Enlarging Part of the Image (E-Zoom) ........................... |
19 |
• Using the Remote Control to Operate the Mouse |
|
Pointer (Wireless Mouse) ................................................. |
20 |
Adjusting Colour for Several Projectors |
|
|
(Multi-Screen Colour Adjustment)..................... |
23 |
|
• Summary of Adjustment Procedure............................... |
23 |
|
• |
Setting Screen ID .............................................................. |
23 |
• |
Image Correction Method ............................................... |
24 |
Security Functions.............................................. |
26 |
|
• Managing Users (Password Protect)............................... |
26 |
|
|
Type of Password Protect .............................................................. |
26 |
|
Setting Password Protect................................................................ |
27 |
|
Entering the password.................................................................... |
28 |
• Restricting Operation (Operation Lock)........................ |
29 |
|

Changing the Projected Image
You can change the projected image in the following two ways.
•Changing by Source Search
The projector automatically detects signals being input from connected equipment, and the image being input from the equipment is projected.
•Changing directly
You can use the remote control buttons to change to the target input port.
Automatically Detect Incoming Signals and Change the Projected Image (Source Search)
You can project the target image quickly as input ports with no image signal being input are ignored when you change by pressing the [Source Search] button.
|
|
|
|
|
Computer |
|
S-Video |
Video |
|
EasyMP |
|||||||||||
|
|
|
|
|
|
(EMP-1715/1705 only) |
|||||||||||||||
|
|
|
|
|
|
|
|
|
|
|
|
|
|
|
|
|
|
|
|||
|
|
|
|
|
|
|
|
|
|
|
|
|
|
|
|
|
|
|
|
|
|
|
|
|
|
|
|
|
|
|
|
|
|
|
|
|
|
|
|
|
|
|
|
|
|
|
|
|
|
|
|
|
|
|
|
|
|
|
|
|
|
|
|
|
|
|
|
|
|
|
|
|
|
|
|
|
|
|
|
|
|
|
|
|
|
|
|
|
|
|
|
|
|
|
|
|
|
|
|
|
|
|
|
|
|
|
|
|
|
|
|
|
|
|
|
|
|
|
|
|
|
|
|
|
|
|
|
|
|
|
|
The input port where no image signal is being input is skipped.
*EasyMP changes when using EMP-1715/1705.
Install the wireless LAN unit supplied (EMP-1715/1705 only).
Procedure
When your video equipment is connected, start playback before beginning this operation.
13
Using the remote control |
Using the control panel |
When two or more pieces of equipment are connected, press the [Source Search] button until the target image is projected.
The following screen showing the status of image signals is q displayed when only the image that the projector is
currently displaying is available, or when no image signal can be found. You can select the input port where the connected equipment you want to use is projecting. If no operation is performed after about 10 seconds, the screen closes.
Changing the Projected Image |
14 |
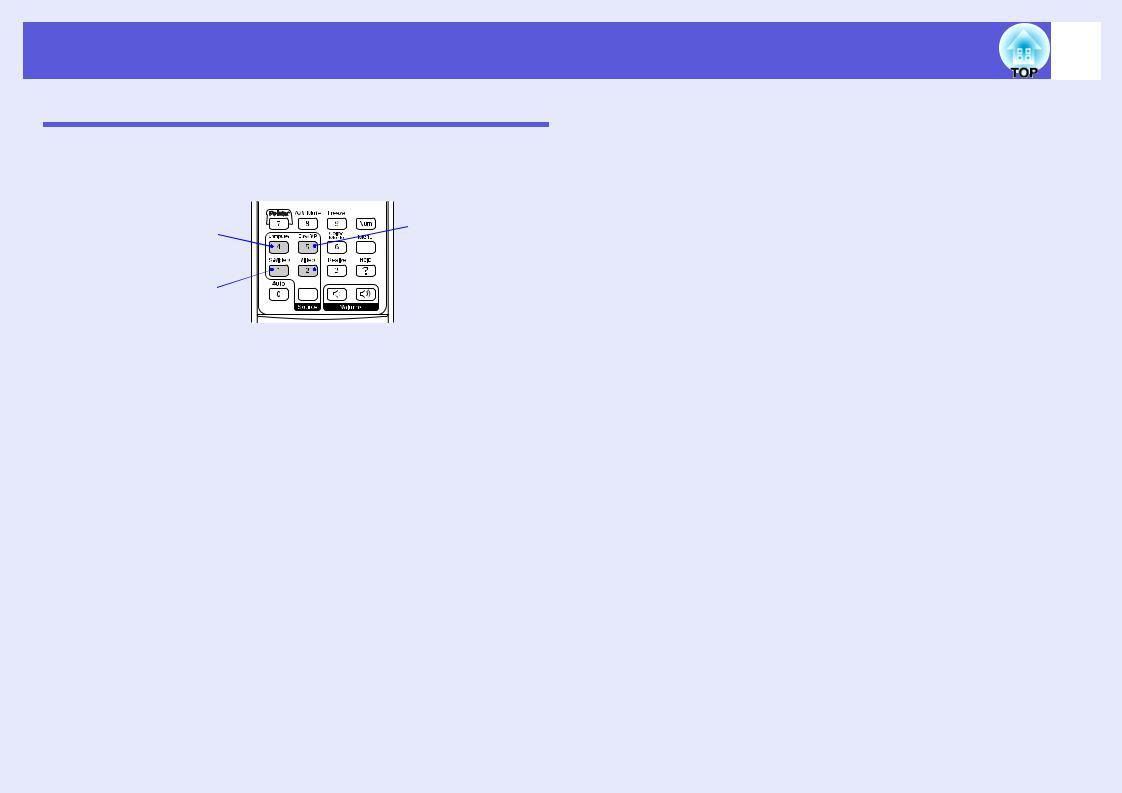
Changing Directly from the Remote Control
You can change directly to the target image by pressing the following buttons on the remote control.
Remote control
Changes to images from the Computer (Component Video) port.
Changes to images from the S-Video port.
Changes to the
EasyMP image.
(EMP-1715/1705 only)


 Changes to images from the Video port.

Functions for Enhancing Projection |
15 |
Selecting the Projection Quality (Selecting Colour
Mode)
You can easily obtain the optimum image quality simply by selecting the setting that best corresponds to your surroundings when projecting. The brightness of the image varies depending on the mode selected.
Mode |
Application |
Photo |
(When computer images are input) |
|
Ideal for projecting still pictures, such as photos, in a |
|
bright room. The images are vivid and brought into |
|
contrast. |
|
|
Sports |
(When component video, S-video, or composite |
|
video images are input) |
|
Ideal for watching TV programmes in a bright room. |
|
The images are vivid and brought to life. |
|
|
Presentation |
Ideal for giving presentations in a bright room. |
|
|
Theatre |
Ideal for watching films in a dark room. Gives |
|
images a natural tone. |
|
|
Game |
Ideal for playing video games in a bright room. |
|
Excels at emphasizing dark gradations. |
|
|
sRGBg |
Ideal for images that conform to the sRGB colour |
|
standard. |
|
|
Blackboard |
Even if you are projecting onto a blackboard |
|
(greenboard), this setting gives your images a natural |
|
tint, just like when projecting onto a screen. |
|
|
Customized |
You can set it to a specific colour. |
|
|
Procedure
Remote control
Each time you press the button, the colour mode name is displayed on the screen and the colour mode changes.
If you press the button while the colour mode name is displayed on the screen, it changes to the next colour mode.
q The colour mode can also be set using "Color Mode" in the "Image" menu from the configuration menu. s p.32

Functions for Enhancing Projection
Hiding the Image and Sound Temporarily (A/V Mute)
You can use this when you want to focus the audience's attention on what you are saying, or if you do not want to show details such as when you are changing between files during presentations from a computer.
Procedure
Remote control |
Projector |
Each time you press the button, or the A/V mute slide is opened or closed, A/V Mute turns on or off.
16
• If you use this function when projecting moving images, q the images and sound continue to be played back by the
source, and you cannot return to the point where A/V Mute was activated.
•You can choose to display black, blue, or logo as the A/V mute display using the "Extended"-"Display"-"A/V Mute" setting from the configuration menu. s p.35
•When the A/V mute slide is closed and A/V mute begins, the power supply can be set to automatically turn off after about 30 minutes by setting "Extended" - "Sleep Mode" from the configuration menu. s p.36

Functions for Enhancing Projection |
17 |
|
|
Freezing the Image (Freeze)
When the moving image on the screen is frozen, the image continues to project, so you can project a moving image one frame at a time like a still photo. Also, you can perform operations such as changing between files during presentations from a computer without projecting any images if the freeze function is activated beforehand.
Procedure
Remote control
Changing the Aspect Ratio (Resize)
When video equipment is connected, images that have been recorded in digital video or onto DVDs can be viewed in 16:9 wide-screen format. You can change the aspect ratio for images in squeeze modeg as follows.
4:3 |
16:9 |
You can change the aspect ratio for computer images as follows.
Each time you press the button, Freeze turns on or off.
Normal (only when RGB) |
4:3 |
16:9 |
q |
• Audio does not stop. |
• The image source continues to playback the moving |
|
|
images even while the screen is frozen, and so it is not |
|
possible to resume projection from the point where it was |
|
paused. |
|
• If the [Freeze] button is pressed while the configuration |
|
menu or a help screen is displayed, the menu or help |
|
screen being displayed is cleared. |
|
• Freeze still works while E-Zoom is being used. |
|
|
Procedure
Remote control

Functions for Enhancing Projection |
18 |
|
|
Each time you press the button, the aspect name is displayed on the screen and the aspect changes.
If you press the button while the aspect name is displayed on the screen, it changes to the next aspect mode.
q |
The colour mode can also be set using "Resize" in the |
"Signal" menu from the configuration menu. s p.33 |
|
|
|
Pointer Function (Pointer)
This allows you to move a pointer icon on the projected image, and helps you draw attention to the area you are talking about.
Procedure
A Display the pointer.
Remote control
Each time you press the button, the pointer appears or disappears.
Functions for Enhancing Projection
B Move the pointer icon.
Remote control
Pointer icon
You can choose from three different kinds of pointer icon q (

 ) in "Settings" - "Pointer Shape" from the
configuration menu. s p.34
19
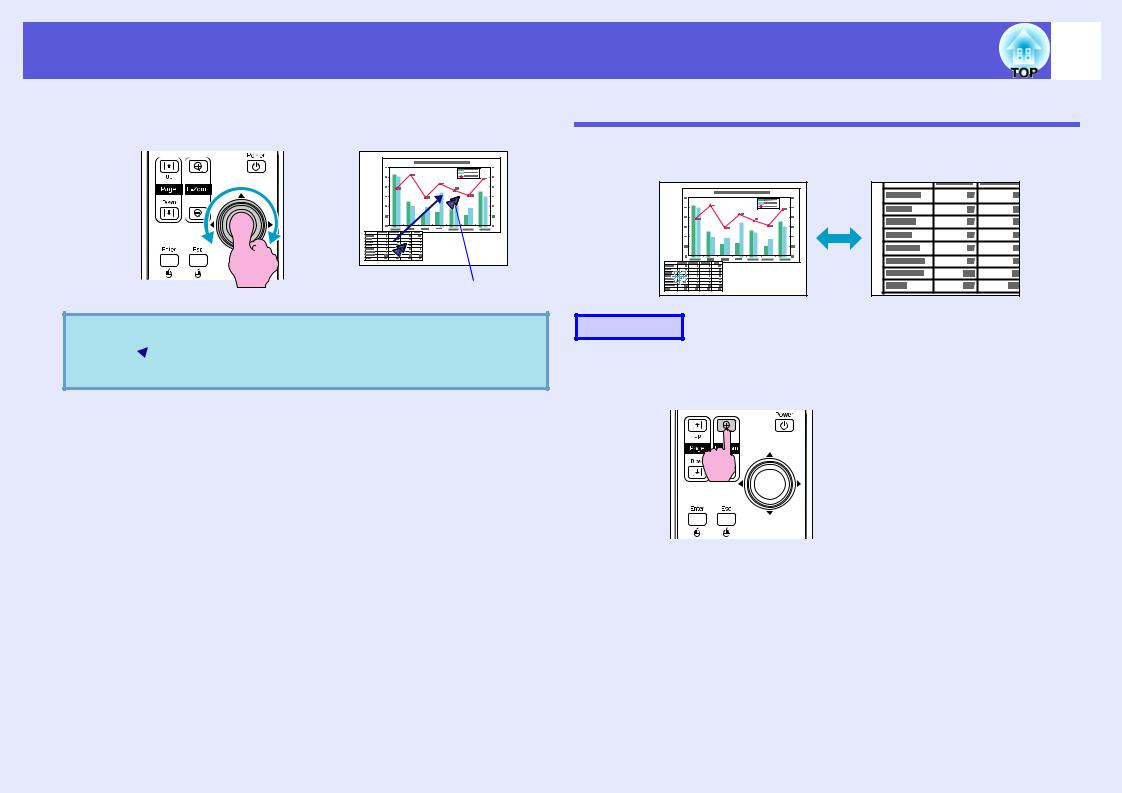
Enlarging Part of the Image (E-Zoom)
This is useful when you want to expand images to see them in greater detail, such as graphs and tables.
Procedure
A Start E-Zoom.
Remote control

Functions for Enhancing Projection
B Move the cross to the area of the image that you want to enlarge.
Remote control
Cross |
C Enlarge.
Remote control
Each time the button is pressed, the area is expanded. You can expand quickly by holding the button down.
You can reduce the enlarged image by pressing the [x] button. Press the [Esc] button to cancel.
• The enlargement ratio appears on the screen. The selected q area can be enlarged to between 1 to 4 times in 25
incremental steps.
20
Using the Remote Control to Operate the Mouse Pointer (Wireless Mouse)
If the USB terminal of a computer and the USB terminal on the back of this projector are connected by a commercially available USB A-B cable, you can use the projector's remote control like a wireless mouse to control the computer's mouse pointer.
Computer
Windows 98/2000/Me/XP Home Edition/XP Professional
Macintosh (OS 8.6–9.2/10.1–10.4)
To USB port 


 To USB port
USB cable
• Tilt the [h] button to scroll the image.
Functions for Enhancing Projection
• The USB cable can only be connected to computers with a q standard USB interface. If using a computer which is
running Windows, the computer must have had a full version of Windows 98/2000/Me/XP Home Edition/XP Professional installed. If the computer is running a version of Windows 98/2000/Me/XP Home Edition/XP Professional that has been upgraded from an earlier version of Windows, correct operation cannot be guaranteed.
•It may not be possible to use the mouse function under some versions of both the Windows and Macintosh operating systems.
•Some computer settings may have to be changed in order for the mouse function to be used. Consult the documentation for the computer for further details.
21
Once the connection has been made, the mouse pointer can be operated as follows.
Moving the mouse pointer |
Mouse clicks |
Left click |
Right click |
Double-click: Press twice in rapid succession.
Drag and drop
1.Hold down the [Enter] button and tilt and drag the [h] button.
2.Release the [Enter] button to drop at the desired location.
This is useful for displaying the previous or next slide in a PowerPoint slideshow.
To previous slide
To next slide

Functions for Enhancing Projection |
22 |
|
|
• If the mouse button settings are set to reverse on the q computer, the operation of the remote control buttons will
also be reversed.
•The wireless mouse function cannot be used while the following functions are being used.
·While a configuration menu is being displayed
·While a help menu is being displayed
·While the E-Zoom function is being used
·While a user's logo is being captured
·Pointer function
·While adjusting sound volume
Adjusting Colour for Several Projectors (Multi-Screen Colour Adjustment)  23
23
When several projectors are lined up and projecting images, you can adjust the brightness and colour tone of each projector's image with multi-screen colour adjustment so that the colours of images from each projector match closely.
In some cases the brightness and colour tone may not match completely even after adjustment.
Summary of Adjustment Procedure
Make adjustments according to the following procedure.
1.Setting screen ID
Before setting up the projectors, set one screen ID for each.
When making adjustments for two or more projectors using the remote control, you can operate them individually by setting individual screen IDs for each projector.
2.Making image corrections
After the projectors are setup, you can adjust the image for each projector.
Using Image Correction you can adjust from black to white in five stages called levels 1 to 5, and in each level 1 to 5 you can adjust the following two points.
•Adjusting brightness
Adjust each image by levels 1 to 5 so that they are all equal.
•Adjusting colour
Adjust each image by levels 1 to 5 so that the colours match using "Color Correct. (G/R)" and "Color Correct. (B/Y)".
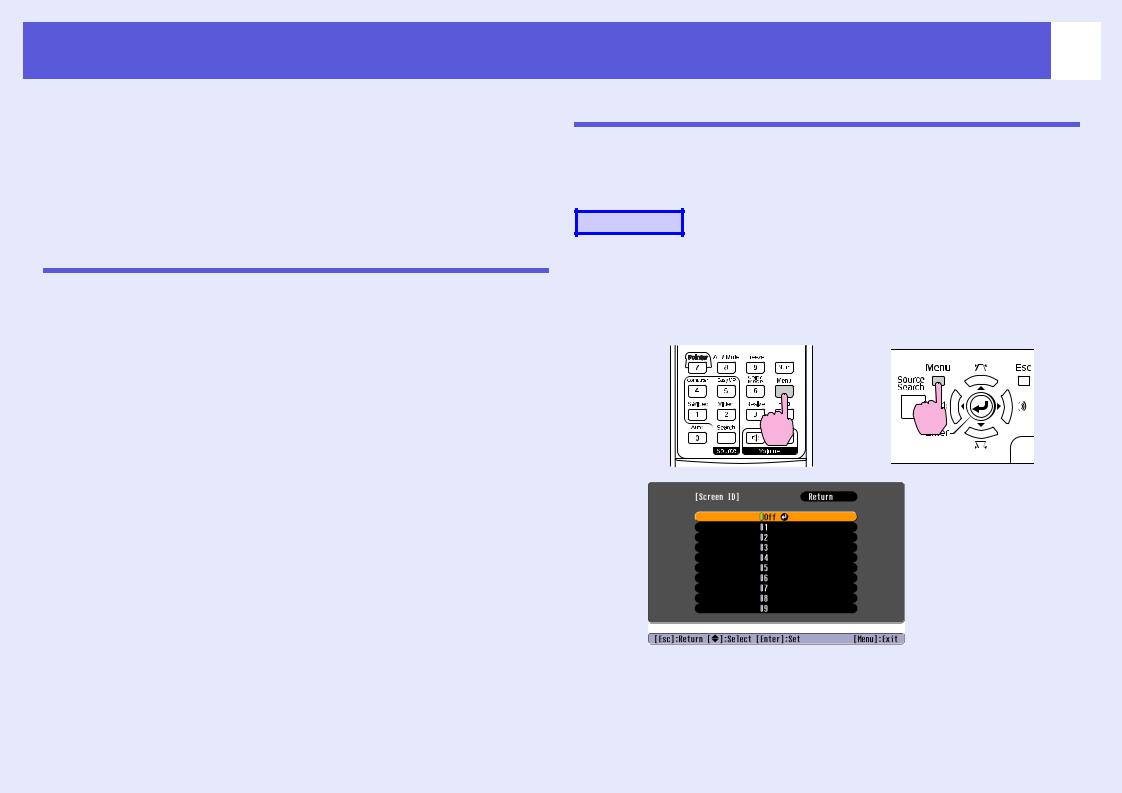
Setting Screen ID
For instance, after setting one projector as screen ID3, when you press button [3] while holding down the [Num] button, even if there is more than one projector setup, you can operate just the one set as screen ID3.
Procedure
A Press the [Menu] button and select "Extended" -
"Multi-screen" - "Screen ID" from the configuration menu. s p.31
Using the remote control |
Using the control panel |
Check the buttons you can use and the operations they perform in the guide under the menu.

Adjusting Colour for Several Projectors (Multi-Screen Colour Adjustment) |
24 |
|
|
B Choosebutton. the ID you want to set and press the [Enter]
C Pressmenu.the [Menu] button to close the configuration
•Point the remote control at the remote receiver on the projector you want to operate, press the numeric button corresponding to the screen ID set while holding down the [Num] button, and then you can operate only the projector specified with the ID number.
•You can operate all projectors regardless of the screen ID settings by pointing the remote control at the remote receiver on the projector, and pressing the [0] button while holding down the [Num] button.
q |
• The screen IDs set here are only effective during "Image |
Correction" for "Multi-screen". |
|
|
• If a projector that is not the object of operation reacts to |
|
the remote control, point the remote control at the remote |
|
receiver on that projector and press the number set as that |
|
projector's screen ID while holding down the [Num] |
|
button. |
|
|
Image Correction Method
After setting up the projectors, adjust the brightness and tone for each image.
Procedure
A Press the [Menu] button and select "Extended" -
"Multi-screen" - "Image Correction" from the configuration menu. s p.31
B SelectLevel".the level to be adjusted in "Adjustment
•Each time a level is selected, the pattern of the level selected is displayed.
•You can start adjusting from any level, usually you can make it darker or lighter by adjusting 1 to 5 or 5 to 1.
C Adjust the brightness with "Brightness Correct.".
•When you select level 5, it adjusts to the darkest image from several projectors.
•When you select level 1, it adjusts to the brightest image from several projectors.
•When you select level 2 to 4, it adjusts to the mid-range brightness image from several projectors.
•Each time the [Enter] button is pressed the image displayed changes between the pattern display and the actual image, and you can check the adjustment results and make corrections in the actual image.
 Loading...