


User's Guide

Organization of the Guide and Notations in the Guide
 Using Each Guide
The guides for this projector are organized as shown below.
Safety Instructions/Support and Service Guide
Contains information on using the projector safely, as well as a support and service guide, troubleshooting check lists, and so on. Make sure you read this guide before using the projector.
User's Guide (this guide)
Contains information on setting up and basic operations before using the projector, using the Configuration menu, and handling problems and performing routine maintenance.
Quick Start Guide
Contains information on the procedures for setting up the projector. Read this first.
3D Glasses User's Guide
Contains information on handling the 3D Glasses and warnings and so on.
WirelessHD Transmitter User's Guide
Contains information on handling the WirelessHD Transmitter and warnings and so on.
1
Organization of the Guide and Notations in the Guide
 Notations Used in This Guide
Safety Indications
The documentation and the projector use graphical symbols to show how to use the projector safely.
The following shows the symbols and their meanings. Please understand and respect these caution symbols in order to avoid injury to persons or property.
 Warning
This symbol indicates information that, if ignored, could possibly result in personal injury or even death due to incorrect handling.
 Caution
This symbol indicates information that, if ignored, could possibly result in personal injury or physical damage due to incorrect handling.
General Information Indications
Attention
Indicates procedures which may result in damage or malfunctions to occur.
c |
Indicates additional information and points which may be useful to know regarding a topic. |
|
|
|
|
s |
Indicates a page where detailed information regarding a topic can be found. |
|
|
|
|
Menu Name |
Indicates Configuration menu items. |
|
|
Example: Image - Color Mode |
|
|
|
|
Button Name |
Indicates the buttons on the remote control or the control panel. |
|
|
Example: |
button |
|
|
|
About the Use of "This Product" or "This Projector"
As well as the main projector unit, supplied items or optional extras may be referred to using the phrase "this product" or "this projector".
2

Contents
Organization of the Guide and
Notations in the Guide
Using Each Guide . . . . . . . . . . . . . . . . . . . . . 1
Notations Used in This Guide . . . . . . . . . . . 2
Safety Indications . . . . . . . . . . . . . . . . . . . . . . . 2
General Information Indications . . . . . . . . . . . . . 2
AbouttheUseof"ThisProduct"or"ThisProjector"
. . . . . . . . . . . . . . . . . . . . . . . . . . . . . . . . . . . . . 2
Introduction
Projector Features . . . . . . . . . . . . . . . . . . . . 6
Dynamic 3D Display . . . . . . . . . . . . . . . . . . . . . . 6
Selecting Modes to Match what you are
Watching (Color Mode) . . . . . . . . . . . . . . . . . . . 6 Absolute Color Adjustment . . . . . . . . . . . . . . . . 6
Conforms to Wireless Transmissions for the WirelessHD Standards (EH-TW6100W Only) . . . . . 7
Other Useful Functions . . . . . . . . . . . . . . . . . . . . 7
Part Names and Functions . . . . . . . . . . . . . 8
Front/Top . . . . . . . . . . . . . . . . . . . . . . . . . . . . . 8
Control Panel . . . . . . . . . . . . . . . . . . . . . . . . . . 9
Remote Control . . . . . . . . . . . . . . . . . . . . . . . . 10
Rear . . . . . . . . . . . . . . . . . . . . . . . . . . . . . . . . 13
Base . . . . . . . . . . . . . . . . . . . . . . . . . . . . . . . . 14
Appearance . . . . . . . . . . . . . . . . . . . . . . . . . 15
Preparing
Installing . . . . . . . . . . . . . . . . . . . . . . . . . . . . 16
Various Projection Methods . . . . . . . . . . . . . . . 16 Adjusting the Projection Size . . . . . . . . . . . . . . 17
Connecting to a Device . . . . . . . . . . . . . . . 18
Connecting to Video Equipment . . . . . . . . . . . . 18 Connecting to a Computer . . . . . . . . . . . . . . . . 19 Connecting to External Devices . . . . . . . . . . . . . 19 Connecting USB devices . . . . . . . . . . . . . . . . 19
Connecting WirelessHD devices (EH-
TW6100W only) . . . . . . . . . . . . . . . . . . . . . . 20 Removing the Interface Cover . . . . . . . . . . . . . . 20 Connecting an HDMI Cable Clamp . . . . . . . . . . . 20
Preparing the Remote Control . . . . . . . . 21
Installing the Remote Control Batteries . . . . . . . 21 Remote Control Operating Range . . . . . . . . . . . 21 Operating range (left to right) . . . . . . . . . . . . 21 Operating range (top to bottom) . . . . . . . . . . 21
Basic Operations
Starting and Ending Projection . . . . . . . 22
Turning on the Projector and Projecting . . . . . . 22 If the Target Image is not Projected . . . . . . . . . . 23 Turning Off . . . . . . . . . . . . . . . . . . . . . . . . . . . 23
Adjusting the Projected Screen . . . . . . . 25
Displaying the Test Pattern . . . . . . . . . . . . . . . . 25 Adjusting the Focus . . . . . . . . . . . . . . . . . . . . . 25
Adjusting the Projection Size (Zoom
Adjustment) . . . . . . . . . . . . . . . . . . . . . . . . . . 25 Adjusting the Projector's Tilt . . . . . . . . . . . . . . . 26 Correcting Keystone Distortion . . . . . . . . . . . . . 26 Correct automatically (Auto V-Keystone) . . . . 26 Correct manually (H-Keystone adjuster) . . . . . 26 Correct manually (H/V-Keystone) . . . . . . . . . . 27 Adjusting the Volume . . . . . . . . . . . . . . . . . . . . 28
Hiding the Image and Muting the Audio
Temporarily . . . . . . . . . . . . . . . . . . . . . . . . . . . 28
Adjusting the Image
Adjusting the Image . . . . . . . . . . . . . . . . . 29
Selecting the Projection Quality (Color Mode)
. . . . . . . . . . . . . . . . . . . . . . . . . . . . . . . . . . . . 29
Switching the Screen Between Wide and Zoom (Aspect) . . . . . . . . . . . . . . . . . . . . . . . . . . . . . 30
Absolute Color Adjustments . . . . . . . . . . 32
Adjusting Hue, Saturation, and Brightness . . . . . 32 Adjusting the Gamma . . . . . . . . . . . . . . . . . . . 33 Select and adjust the correction value . . . . . . 33 Adjust while viewing the image . . . . . . . . . . 33
Adjust using the gamma adjustment graph
. . . . . . . . . . . . . . . . . . . . . . . . . . . . . . . . . . 34 Adjusting the RGB (Offset/Gain) . . . . . . . . . . . . 34 Abs. Color Temp. . . . . . . . . . . . . . . . . . . . . . . . 35 Skin Tone . . . . . . . . . . . . . . . . . . . . . . . . . . . . 35
Detailed Image Adjustments . . . . . . . . . . 36
3

Contents
Adjusting the Sharpness . . . . . . . . . . . . . . . . . . 36
Setting Auto Iris . . . . . . . . . . . . . . . . . . . . . . . . 37
Super-resolution . . . . . . . . . . . . . . . . . . . . . . . 37
Image Processing . . . . . . . . . . . . . . . . . . . . . . . 38
Viewing the Image at the Saved Image
Quality (Memory Function) . . . . . . . . . . . 39
Saving Function . . . . . . . . . . . . . . . . . . . . . . . . 39
Saving a Memory . . . . . . . . . . . . . . . . . . . . . . . 39
Loading a Memory . . . . . . . . . . . . . . . . . . . . . . 40
Deleting a Saved Memory . . . . . . . . . . . . . . . . . 40
Renaming a Memory . . . . . . . . . . . . . . . . . . . . 40
Useful Functions
Enjoying 3D Images . . . . . . . . . . . . . . . . . . 42
Setting 3D Images . . . . . . . . . . . . . . . . . . . . . . 42 If the 3D image cannot be viewed . . . . . . . . . 42 Using 3D Glasses . . . . . . . . . . . . . . . . . . . . . . . 43 Charging the 3D Glasses . . . . . . . . . . . . . . . . 43 Pairing 3D Glasses . . . . . . . . . . . . . . . . . . . . 43 Wearing the 3D Glasses . . . . . . . . . . . . . . . . 44 Range for Viewing 3D Images . . . . . . . . . . . . . . 44 Warnings Regarding Viewing 3D Images . . . . . . 45 Converting 2D Images to 3D and Viewing . . . . . 48
Connecting with WirelessHD (EHTW6100W Only) . . . . . . . . . . . . . . . . . . . . . 49
Installing the WirelessHD Transmitter . . . . . . . . |
49 |
WirelessHD Transmitter part names . . . . . . . . |
50 |
Setting the WirelessHD Transmitter . . . . . . . . |
51 |
Projecting Images . . . . . . . . . . . . . . . . . . . . . . |
52 |
WirelessHD Settings Menu . . . . . . . . . . . . . . . . |
53 |
WirelessHD Transmission Range . . . . . . . . . . . . |
54 |
Useful Functions of the WirelessHD Transmitter |
|
. . . . . . . . . . . . . . . . . . . . . . . . . . . . . . . . . . . . |
55 |
Switching the target image . . . . . . . . . . . . . . |
55 |
Switching the image source . . . . . . . . . . . . . |
57 |
Remote control operating range . . . . . . . . . . |
58 |
Using the HDMI Link Function . . . . . . . . 59
HDMI Link Function . . . . . . . . . . . . . . . . . . . . . |
59 |
HDMI Link Settings . . . . . . . . . . . . . . . . . . . . . . |
59 |
Device Connections . . . . . . . . . . . . . . . . . . . . . |
60 |
Changing Between Two Types of
Images . . . . . . . . . . . . . . . . . . . . . . . . . . . . . . 61
Types of Screen that can be Displayed Simultaneously . . . . . . . . . . . . . . . . . . . . . . . . 61
Projecting on a Split Screen . . . . . . . . . . . . . . . 61 Starting split screen display . . . . . . . . . . . . . 61 Changing the split screen settings . . . . . . . . . 62
Playing Back Image Data (Slideshow)
. . . . . . . . . . . . . . . . . . . . . . . . . . . . . . . . . . . . . . 63
Compatible Data . . . . . . . . . . . . . . . . . . . . . . . 63
Playing a Slideshow . . . . . . . . . . . . . . . . . . . . . 63
Display Settings for Image Files and Slideshow Operation Settings . . . . . . . . . . . . . . . . . . . . . . 64
Configuration Menu
Configuration Menu Functions . . . . . . . . 65
Configuration Menu Operations . . . . . . . . . . . . 65 Configuration Menu Table . . . . . . . . . . . . . . . . 66 Image menu . . . . . . . . . . . . . . . . . . . . . . . . 66 Signal menu . . . . . . . . . . . . . . . . . . . . . . . . 68 Settings menu . . . . . . . . . . . . . . . . . . . . . . . 71 Extended menu . . . . . . . . . . . . . . . . . . . . . . 73 Memory menu . . . . . . . . . . . . . . . . . . . . . . . 74 Info menu . . . . . . . . . . . . . . . . . . . . . . . . . . 75 Reset menu . . . . . . . . . . . . . . . . . . . . . . . . . 75 Split Screen menu . . . . . . . . . . . . . . . . . . . . 76
Troubleshooting
Problem Solving . . . . . . . . . . . . . . . . . . . . . 77
Reading the Indicators . . . . . . . . . . . . . . . . . . . 77 Indicator status during an error/warning . . . . 77 Indicator status during normal operation . . . . 78 When the Indicators Provide No Help . . . . . . . . 79 Check the problem . . . . . . . . . . . . . . . . . . . . 79 Problems relating to images . . . . . . . . . . . . . 80 Problems when projection starts . . . . . . . . . . 84 Problems with the remote control . . . . . . . . . 84 Problems with 3D . . . . . . . . . . . . . . . . . . . . 85 Problems with HDMI . . . . . . . . . . . . . . . . . . 85
Problems with WirelessHD (EH-TW6100W
only) . . . . . . . . . . . . . . . . . . . . . . . . . . . . . . 86
4

Contents
Problems with USB storage devices . . . . . . . . 87 Other problems . . . . . . . . . . . . . . . . . . . . . . 87
Maintenance
Maintenance . . . . . . . . . . . . . . . . . . . . . . . . 88
Cleaning the Parts . . . . . . . . . . . . . . . . . . . . . . 88 Cleaning the air filter . . . . . . . . . . . . . . . . . . 88 Cleaning the main unit . . . . . . . . . . . . . . . . . 89 Cleaning the lens . . . . . . . . . . . . . . . . . . . . . 90 Cleaning the 3D Glasses . . . . . . . . . . . . . . . . 90
Replacement Periods for Consumables . . . . . . . 90 Air filter replacement period . . . . . . . . . . . . . 90 Lamp replacement period . . . . . . . . . . . . . . 90 Replacing Consumables . . . . . . . . . . . . . . . . . . 91 Replacing the air filter . . . . . . . . . . . . . . . . . 91 Replacing the lamp . . . . . . . . . . . . . . . . . . . 92 Resetting lamp hours . . . . . . . . . . . . . . . . . . 93
Appendix
Optional Accessories and
Consumables . . . . . . . . . . . . . . . . . . . . . . . . 95
Optional Items . . . . . . . . . . . . . . . . . . . . . . . . . 95
Consumables . . . . . . . . . . . . . . . . . . . . . . . . . . 95
Supported Resolutions . . . . . . . . . . . . . . . 96
Component Video . . . . . . . . . . . . . . . . . . . . . . 96
Composite Video . . . . . . . . . . . . . . . . . . . . . . . 96
Computer Signals (Analog RGB) . . . . . . . . . . . . 96
HDMI1/HDMI2 Input Signal . . . . . . . . . . . . . . . . 97
3D Input Signal . . . . . . . . . . . . . . . . . . . . . . . . 97
WirelessHD Input Signal . . . . . . . . . . . . . . . . . . 97
Specifications . . . . . . . . . . . . . . . . . . . . . . . 98
Glossary . . . . . . . . . . . . . . . . . . . . . . . . . . . 101
General Notes . . . . . . . . . . . . . . . . . . . . . . 102
Notes when Wearing 3D Glasses . . . . . . . . . . . 102
General Notice . . . . . . . . . . . . . . . . . . . . . . . . |
103 |
5
Introduction
 Projector Features
Dynamic 3D Display
Enjoy 3D contents on Blu-ray and images filmed with a 3D camera through a stunning projection display. s p.42
You need dedicated 3D Glasses based on 3D Active Shutter Eyewear Technology to view 3D images. s p.43
Selecting Modes to Match what you are Watching (Color Mode)
By simply selecting the Color Mode, you can project the optimum image to suit your surroundings. s p.29
Setting Example
|
|
|
|
|
|
|
|
|
|
|
|
|
|
|
|
|
|
|
|
|
|
|
|
|
|
|
|
|
|
|
|
|
|
|
|
|
|
|
|
|
|
|
|
|
|
|
|
|
|
|
|
|
|
|
|
|
|
|
|
|
|
|
|
|
|
|
|
|
|
|
Living Room |
|
|
|
Cinema |
||||
For use in a bright room |
For movies and concerts in a dark room |
||||||||
Absolute Color Adjustment
As well as using Color Mode, you can also adjust the absolute color temperature of the image and skin tones to suit your taste.s p.35
What's more, you can obtain colors that match the image and achieve the colors you want through a combination of gamma adjustment, RGB offset or gain adjustment for each color, and hue, saturation, and brightness adjustment for each RGBCMY color. s p.32
6
Introduction
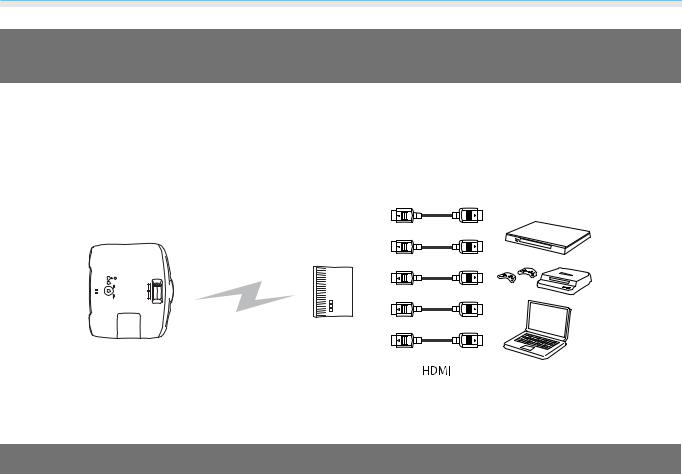
Conforms to Wireless Transmissions for the WirelessHD Standards (EH-TW6100W Only)
The projector can wirelessly receive data for images and audio from WirelessHD compatible AV devices. You do not need to connect a cable directly to the main projector unit.
You can connect up to five AV devices to the WirelessHD Transmitter at the same time, and switch images using the remote control.
You can also connect other output devices such as televisions, and switch the device. This allows other output devices to project images from the connected AV device, even if the projector is off. s p.49
Projector |
Transmitter |
Multi-media players, game consoles, |
|
|
and so on |
Other Useful Functions
In addition, the following useful functions are provided.
•The remote control contains a backlight function allowing for easy use even in dark rooms. Operations are also simplified by only pressing the  button. s p.10
•Audio is played back via the built-in speaker eliminating the need for external speakers. The Inverse Audio function also allows you to switch the left and right audio streams when the projector is suspended from a ceiling. s p.71
•You can view slideshows by simply connecting a USB memory to the projector. When a digital camera is connected, you can view the photos on the camera using Slideshow. s p.63
•The H-Keystone slider allows you to quickly correct keystone distortion when the projector cannot be setup directly in front of the screen. Because it is a slider, you can make corrections intuitively. s p.26
7

Introduction
 Part Names and Functions
Front/Top
|
Name |
|
Function |
|
a |
Lamp cover |
Open when replacing the projector's lamp. s p.92 |
||
|
|
|
||
b |
Air exhaust vent |
Exhaust vent for air used to cool the projector internally. |
||
|
|
|
Caution |
|
|
|
|
|
|
|
|
While projecting, do not put your face or hands near the air exhaust vent, |
||
|
|
and do not place objects that may become warped or damaged by heat near |
||
|
|
the vent. Hot air from the air exhaust vent could cause burns, warping, or |
||
|
|
accidents to occur. |
||
|
|
|
||
c |
Remote receiver |
Receives signals from the remote control. s p.21 |
||
|
|
|
||
d |
Projector's lens |
Images are projected from here. |
||
|
|
|
||
e |
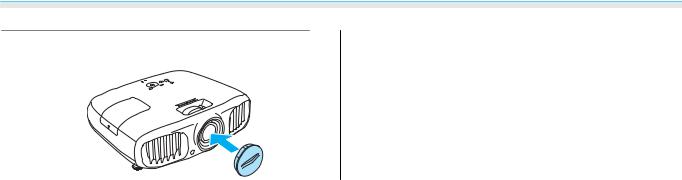
Lens cover |
Install when not using the projector to protect the lens from being scratched or |
||
|
|
soiled. s p.22 |
||
|
|
|
||
f |
Air intake vent |
Intake vent for air used to cool the projector internally. |
||
|
|
|
||
g |
Front adjustable foot |
When setup on a surface such as a table, extend the foot to adjust the horizontal |
||
|
|
tilt. s p.26 |
||
|
|
|
||
h |
Air filter cover |
When cleaning or replacing the air filter, open this cover and remove the air filter. |
||
|
|
s p.88, p.91 |
||
|
|
|
||
i |
Focus ring |
Adjusts the image focus. s p.25 |
||
|
|
|
||
j |
Zoom ring |
Adjusts the image size. s p.25 |
||
|
|
|
||
k |
H-Keystone slider |
Performs horizontal keystone correction. s p.26 |
||
|
|
|
||
l |
Control panel |
Control panel on the projector. s p.9 |
||
|
|
|
|
|
8
Introduction
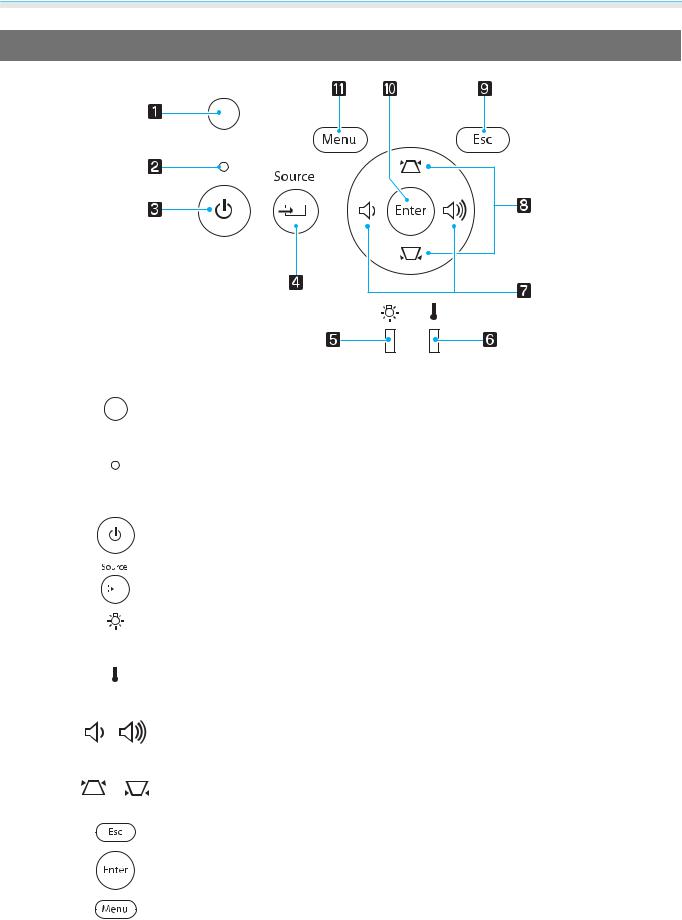
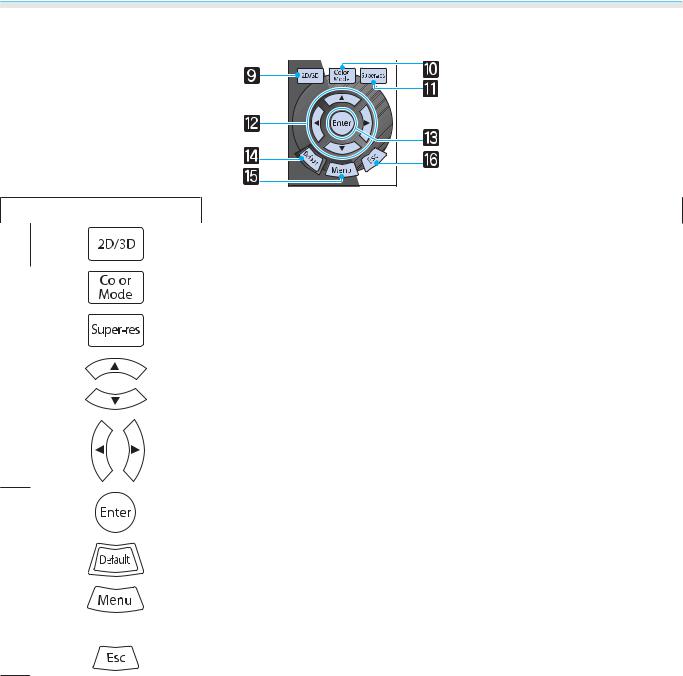
Control Panel
|
Buttons/Indicators |
Function |
||||
a |
|
Detects the brightness of the room. When Color Mode is set to "Auto", the |
||||
|
Brightness sensor |
optimum image quality is set according to the brightness detected by the sen- |
||||
|
sor. s p.29 |
|||||
|
|
|
||||
b |
|
|
|
|
|
Flashes to indicate warm-up in progress or cool-down in progress. Shows the |
|
Operation indicator |
projector's status through a combination of other indicators lit and flashing. |
||||
|
s p.77 |
|||||
|
|
|
||||
c |
|
|
|
|
|
Turns the projector power on or off.s p.22 |
|
|
|
|
|
|
Lit when the projector is on. s p.78 |
|
|
|
||||
d |
|
|
|
|
|
Changes to the image from each input port. s p.23 |
|
|
|
|
|
|
|
|
|
|
||||
e |
|
|
|
|
|
Flashes orange when it is time to replace the lamp. Shows the projector's errors |
|
|
|
|
|
|
through a combination of other indicators lit and flashing. s p.77 |
|
|
|
|
|
|
|
|
|
|
|
|
||
|
|
|
||||
f |
|
|
|
|
|
Flashes orange if the internal temperature is too high. Shows the projector's |
|
|
|
|
|
|
errors through a combination of other indicators lit and flashing. s p.77 |
|
|
|
|
|
|
|
|
|
|
|
|
||
|
|
|
||||
g |
|
|
|
|
|
Selects the adjustment value for the volume and for menu items. s p.28 |
|
|
|
|
|
|
Performs horizontal keystone correction when the Keystone screen is dis- |
|
|
|
|
|
|
played. s p.27 |
|
|
|
||||
h |
|
|
|
|
|
Selects the adjustment value for the keystone correction and for menu items. |
|
|
|
|
|
|
s p.27 |
|
|
|
||||
i |
|
|
|
|
|
Returns to the previous menu level when a menu is displayed. s p.65 |
|
|
|
||||
j |
|
|
|
|
|
Selects functions and settings when a menu is displayed. s p.65 |
|
|
|
||||
k |
|
|
|
|
|
Displays and closes the configuration menu. |
|
|
|
|
|
|
On the configuration menu, you can make adjustments and settings for Signal, |
|
|
|
|
|
|
Image, Input Signal, and so on. s p.65 |
|
|
|
|
|
|
|
9
Introduction
Remote Control
Top section buttons
|
|
|
|
EH-TW6100W |
|
|
|
EH-TW6100/EH-TW5950 |
|||||||||||||||||||||||||||||||||||
|
|
|
|
|
|
|
|
|
|
|
|
|
|
|
|
|
|
|
|
|
|
|
|
|
|
|
|
|
|
|
|
|
|
|
|
|
|
|
|
|
|
|
|
|
|
|
|
|
|
|
|
|
|
|
|
|
|
|
|
|
|
|
|
|
|
|
|
|
|
|
|
|
|
|
|
|
|
|
|
|
|
|
|
|
|
|
|
|
|
|
|
|
|
|
|
|
|
|
|
|
|
|
|
|
|
|
|
|
|
|
|
|
|
|
|
|
|
|
|
|
|
|
|
|
|
|
|
|
|
|
|
|
|
|
|
|
|
|
|
|
|
|
|
|
|
|
|
|
|
|
|
|
|
|
|
|
|
|
|
|
|
|
|
|
|
|
|
|
|
|
|
|
|
|
|
|
|
|
|
|
|
|
|
|
|
|
|
|
|
|
|
|
|
|
|
|
|
|
|
|
|
|
|
|
|
|
|
|
|
|
|
|
|
|
|
|
|
|
|
|
|
|
|
|
|
|
|
|
|
|
|
|
|
|
|
|
|
|
|
|
|
|
|
|
|
|
|
|
|
|
|
|
|
|
|
|
|
|
|
|
|
|
|
|
|
|
|
|
|
|
|
|
|
|
|
|
|
|
|
|
|
|
|
|
|
|
|
|
|
|
|
|
|
|
|
|
|
|
|
|
|
|
|
|
|
|
|
|
|
|
|
|
|
|
|
|
|
|
|
|
|
|
|
|
|
|
|
|
|
|
|
|
|
|
|
|
|
|
|
|
|
|
|
|
|
|
|
|
|
|
|
|
|
|
|
|
|
|
|
|
|
|
|
|
|
|
|
|
|
|
|
|
|
|
|
|
|
|
|
|
|
|
|
|
|
|
|
|
|
|
|
|
|
|
|
|
|
|
|
|
|
|
|
|
|
|
|
|
|
|
|
|
|
|
|
|
|
|
|
|
|
|
|
|
|
|
|
|
|
|
|
|
|
|
|
|
|
|
|
|
|
|
|
|
|
|
|
|
|
|
|
|
|
|
|
|
|
|
|
|
|
|
|
|
|
|
|
|
|
|
|
|
|
|
|
|
|
|
|
|
|
|
|
|
|
|
|
|
|
|
|
|
|
|
|
|
|
|
|
|
|
|
|
|
|
|
|
|
|
|
|
|
|
|
|
|
|
|
|
|
|
|
|
|
|
|
|
|
|
|
|
|
|
|
|
|
|
|
|
|
|
|
|
|
|
|
|
|
|
|
|
|
|
|
|
|
|
|
|
|
|
|
|
|
|
|
|
|
|
|
|
|
|
|
|
|
|
|
|
|
|
|
|
|
|
|
|
|
|
|
|
|
|
|
|
|
|
|
|
|
|
|
|
|
|
|
|
|
|
|
|
|
|
|
|
|
|
|
|
|
|
|
|
|
|
|
|
|
|
|
|
|
|
|
|
|
|
|
|
|
|
|
|
|
|
|
|
|
|
|
|
|
|
|
|
|
|
|
|
|
|
|
|
|
|
|
|
|
|
|
|
|
|
|
|
|
|
|
|
|
|
|
|
|
|
|
|
|
|
|
|
|
|
|
|
|
|
|
|
|
|
|
|
|
|
|
|
|
|
|
|
|
|
|
|
|
|
|
|
|
|
|
|
|
|
|
|
|
|
|
|
|
|
|
|
|
|
|
|
|
|
|
|
|
|
|
|
|
|
|
|
|
|
|
|
|
|
|
|
|
|
|
|
|
|
|
|
|
|
|
|
|
|
|
|
|
|
|
|
|
|
|
|
|
|
|
|
|
|
|
|
Button |
Function |
||
a |
Turns the projector on. s p.22 |
||
|
|
||
b |
Turns the projector off. s p.23 |
||
|
|
||
c |
The remote control buttons light up for approximately 10 seconds. This is useful |
||
|
|
|
when operating the remote control in the dark. |
|
|
|
|
d |
|
|
Splits the screen in two and projects two image sources simultaneously. |
|
|||
|
|||
|
|
|
s p.61 |
|
|
||
e |
Changes to the image from each input port. s p.23 |
||
f |
|
This button displays the settings menu for HDMI Link. |
||
|
||||
|
|
|
|
With the other buttons, you can then start or stop playback, adjust the volume, |
|
|
|
|
and so on for connected equipment that meets the HDMI CEC standards. |
|
|
|
|
s p.59 |
|
|
|
|
|
g |
|
|
Temporarily mutes or plays the audio. s p.28 |
|
|
|
|||
|
|
|||
|
|
|
|
|
h |
|
|
|
Adjusts the volume. s p.28 |
|
|
|||
|
|
|
|
|
|
|
|
|
|
|
|
|
|
|
10
Introduction
Middle section buttons
Button |
Function |
||
i |
Changes between 2D and 3D. s p.42 |
||
|
|
|
|
j |
|
|
Changes the Color Mode. s p.29 |
|
|||
|
|||
|
|
||
k |
Set Super-resolution to reduce blurring in areas such as the edges of the im- |
||
|
|
|
age. s p.37 |
|
|
||
l |
Selects menu items and adjustment values. s p.65 |
||
m |
When a menu is displayed, it accepts and enters the current selection and |
|
moves to the next level. s p.65 |
|
|
n |
The adjustment value returns to its default value when pressed while the me- |
|
nu's adjustment screen is displayed. s p.65 |
|
|
o |
Displays and closes the configuration menu. |
|
On the configuration menu, you can make adjustments and settings for Signal, |
|
Image, Input Signal, and so on. s p.65 |
|
|
p |
Return to the previous menu level when a menu is displayed. s p.65 |
11
Introduction
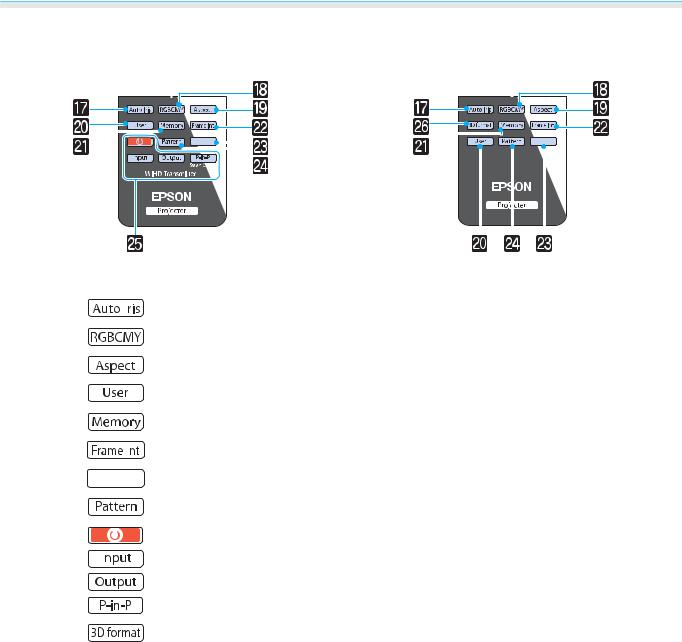
Bottom section buttons
EH-TW6100W |
EH-TW6100/EH-TW5950 |
|
|
|
|
|
|
|
|
|
|
|
|
|
|
|
|
|
|
|
|
|
|
|
|
|
|
|
|
|
|
|
|
|
|
|
|
|
|
|
|
|
|
|
|
|
|
|
|
|
|
|
|
|
|
|
|
|
|
|
|
|
|
|
|
|
|
|
|
|
|
|
|
|
|
|
|
|
|
|
|
|
|
|
|
|
|
|
|
|
|
|
|
|
|
|
|
|
|
|
|
|
|
|
|
|
|
|
|
|
|
|
|
|
|
|
|
|
|
|
|
|
|
|
|
|
|
|
|
|
|
|
|
|
|
|
|
|
|
|
|
|
|
|
|
|
|
|
|
|
|
|
|
|
|
|
|
|
|
|
|
|
|
|
|
|
|
|
|
|
|
|
|
|
|
|
|
|
|
|
|
|
Button |
|
|
|
|
|
Function |
||||||||||||||||||||||
q |
|
|
|
|
|
|
|
|
|
Sets Auto Iris. s p.37 |
|||||||||||||||||||
|
|
||||||||||||||||||||||||||||
|
|
||||||||||||||||||||||||||||
|
|
|
|
|
|
||||||||||||||||||||||||
r |
|
|
|
|
|
|
|
|
|
|
|
|
|
|
|
Adjusts the hue, saturation, and brightness for each RGBCMY color. s p.32 |
|||||||||||||
|
|
|
|
|
|
||||||||||||||||||||||||
s |
|
|
|
|
|
|
|
|
|
|
|
|
|
|
|
Selects the aspect mode according to the input signal. s p.30 |
|||||||||||||
|
|
|
|
|
|
||||||||||||||||||||||||
t |
|
|
|
|
|
|
|
|
|
|
|
|
|
|
|
Performs the function assigned to the user button. s p.71 |
|||||||||||||
|
|
|
|
|
|
||||||||||||||||||||||||
A |
|
|
|
|
|
|
|
|
|
|
|
|
|
|
|
Saves, loads, or erases a memory. s p.39 |
|||||||||||||
|
|
|
|
|
|
|
|
|
|||||||||||||||||||||
B |
|
|
|
|
|
|
|
This button is disabled. |
|||||||||||||||||||||
|
|
||||||||||||||||||||||||||||
|
|
||||||||||||||||||||||||||||
|
|
|
|
|
|
|
|
|
|
|
|||||||||||||||||||
C |
|
|
|
|
|
|
|
|
|
|
|
|
|
Temporarily hides or shows the image and audio. s p.28 |
|||||||||||||||
|
|
|
|
|
|
||||||||||||||||||||||||
|
|
|
|
|
|
||||||||||||||||||||||||
|
|
|
|
|
|
||||||||||||||||||||||||
D |
|
|
|
|
|
|
|
|
|
|
|
|
|
|
|
Displays and closes the test pattern. s p.25 |
|||||||||||||
|
|
|
|
|
|
|
|
||||||||||||||||||||||
E |
|
|
|
|
|
|
WiHD Transmitter control |
||||||||||||||||||||||
|
|
||||||||||||||||||||||||||||
|
|
||||||||||||||||||||||||||||
|
|
|
|
|
|
|
|
|
|
|
|
|
|
|
|
Turns on the WirelessHD Transmitter, or switches the input and output. |
|||||||||||||
|
|
|
|
|
|
|
|
|
|
|
|
|
|
|
|
||||||||||||||
|
|
|
|
|
|
|
|
|
|
|
|
|
|
|
|
Make sure you point the remote control at the WirelessHD Transmitter when |
|||||||||||||
|
|
|
|
|
|
|
|
|
|
|
|
|
|
|
|
performing operations. s p.49 |
|||||||||||||
|
|
|
|
|
|
||||||||||||||||||||||||
F |
|
|
|
|
|
|
|
|
|
|
|
|
|
|
|
Changes the 3D format. s p.68 |
|||||||||||||
|
|
|
|
|
|
|
|
|
|
|
|
|
|
|
|
|
|
|
|
|
|
|
|
|
|
|
|
|
|
12

Introduction
Rear
|
|
|
|
|
|
|
|
|
|
|
|
|
|
|
|
|
|
|
|
|
|
|
|
|
|
|
|
|
|
|
|
|
|
|
|
|
|
|
|
|
|
|
|
|
|
|
|
|
|
|
|
|
|
|
|
|
|
|
|
|
|
|
|
|
|
|
|
|
|
|
|
|
|
|
|
|
|
|
|
|
|
|
|
|
|
|
|
|
|
|
|
|
|
|
|
|
|
|
|
|
|
|
|
|
|
|
|
|
|
|
|
|
|
|
|
|
|
|
|
|
|
|
|
|
|
|
|
|
|
|
|
|
|
|
|
|
|
|
|
|
|
|
|
|
|
Name |
|
|
|
|
|
|
|
Function |
|||||||
a |
Speaker |
|
The projector's built-in speaker. Outputs audio. |
||||||||||||||
|
|
|
|
|
Set Inverse Audio to On to use the built-in speaker when the projector is |
||||||||||||
|
|
|
|
|
suspended from a ceiling. s Settings - Audio - Inverse Audio p.71 |
||||||||||||
|
|
|
|
||||||||||||||
b |
Power inlet |
|
Connects the power cable. s p.22 |
||||||||||||||
|
|
|
|
||||||||||||||
c |
Remote receiver |
|
Receives signals from the remote control. s p.21 |
||||||||||||||
|
|
|
|
||||||||||||||
d |
RS-232C port |
|
When controlling the projector, connect the projector to a computer with an |
||||||||||||||
|
|
|
|
|
RS-232C cable. This port is for control use and should not normally be used. |
||||||||||||
|
|
|
|
|
s p.98 |
||||||||||||
|
|
|
|
||||||||||||||
e |
PC port |
|
Connects to the RGB output port on a computer. s p.19 |
||||||||||||||
|
|
|
|
||||||||||||||
f |
Component port |
|
Connects to the component (YCbCr or YPbPr) output port on video equip- |
||||||||||||||
|
|
|
|
|
ment. s p.18 |
||||||||||||
|
|
|
|
||||||||||||||
g |
Audio (L-R) port |
|
Inputs audio from equipment connected to the Video port, Component port, |
||||||||||||||
|
|
|
|
|
or the PC port. s p.18 |
||||||||||||
|
|
|
|
||||||||||||||
h |
Video port |
|
Connects to the composite video output port on video equipment. s p.18 |
||||||||||||||
|
|
|
|
||||||||||||||
i |
USB port |
|
Connects USB devices such as a USB memory device or a digital camera, and |
||||||||||||||
|
|
|
|
|
projects images as a slideshow. s p.19 |
||||||||||||
|
|
|
|
||||||||||||||
j |
Cable holder |
|
Thick HDMI cables with a large outer diameter and so on, may disconnect |
||||||||||||||
|
|
|
|
|
easily due to the weight of the cable. To prevent the cable from disconnecting, |
||||||||||||
|
|
|
|
|
fix it in place using the HDMI cable clamp supplied. s p.20 |
||||||||||||
|
|
|
|
||||||||||||||
k |
HDMI2 port |
|
Connects HDMI compatible video equipment and computers. s p.18 |
||||||||||||||
|
|
|
|
|
|
|
|
|
|
|
|
|
|
|
|
||
l |
HDMI1 port |
|
|
|
|
|
|
|
|
|
|
|
|
|
|
||
|
|
|
|
|
|
|
|
|
|
|
|
|
|
|
|
|
|
13
Introduction
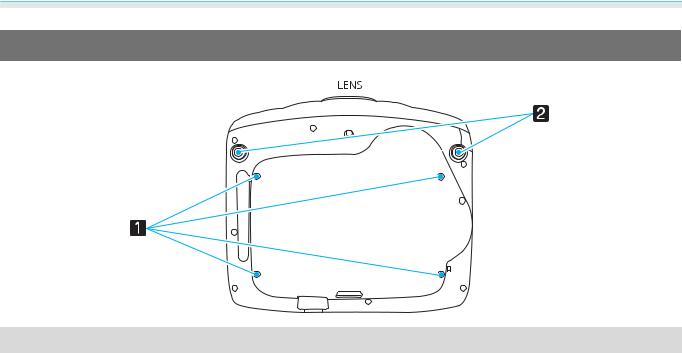
Base
|
Name |
Function |
|
|
|
a |
Ceiling mount fixing |
Attaches the optional ceiling mount here when suspending the projector from a |
|
points (four points) |
ceiling. s p.95 |
|
|
|
b |
Front adjustable foot |
When setup on a surface such as a table, extend the foot to adjust the height. |
|
|
s p.26 |
|
|
|
14
Introduction
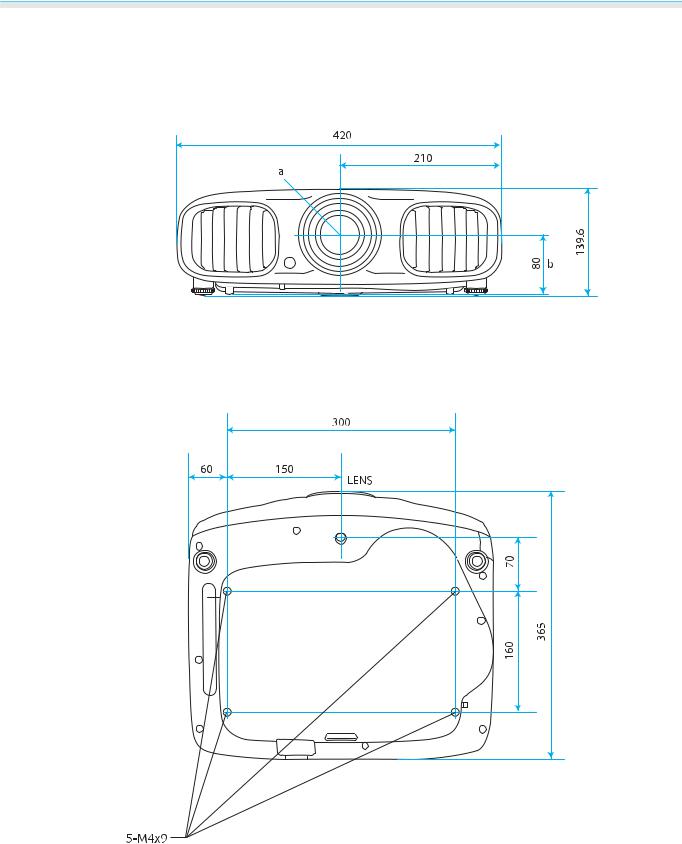
 Appearance
Units: mm
aCenter of lens
bDistance from center of lens to suspension bracket fixing point
15
Preparing
 Installing
Various Projection Methods
 Warning
•A special method of installation is required when suspending the projector from a ceiling (ceiling mount). If it is not installed correctly, it could fall causing an accident and injury.
•If you use adhesives, lubricants, or oil on the ceiling mount fixing points to prevent screws from loosening, or if you use things such as lubricants or oils on the projector, the projector case may crack causing it to fall from its ceiling mount. This could cause serious injury to anyone under the projector and also damage the projector.
•Do not setup the projector on its side. This may cause malfunctions to occur.
•Try not to setup the projector in locations subject to high humidity and dust, or in locations subject to smoke from fires or tobacco smoke.
Attention
Clean the air filter once every three months. Clean it more often if the environment is particularly dusty. s p.91
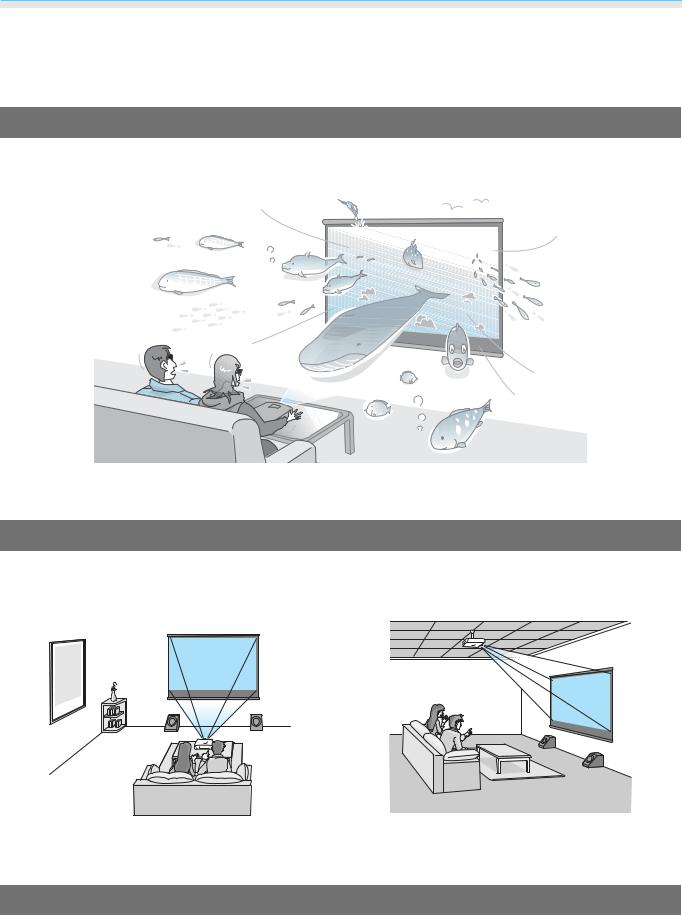
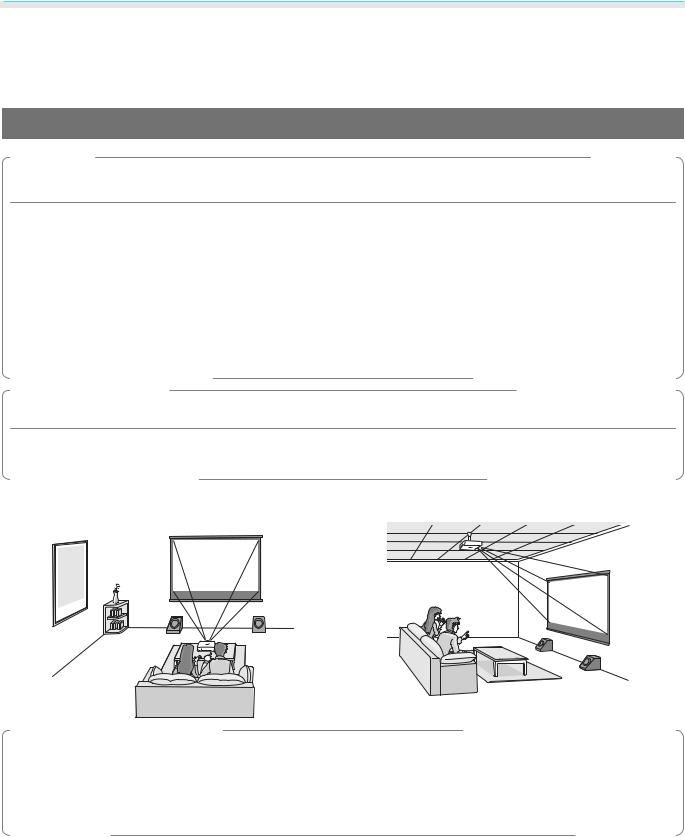
Placing on a table and so on and projecting Suspending from the ceiling and projecting
|
|
|
|
|
|
|
|
|
|
|
|
|
|
|
|
|
|
|
|
|
|
|
|
|
|
|
|
|
|
|
|
|
|
|
|
|
|
|
|
|
|
|
|
|
|
|
|
|
|
|
|
|
|
|
|
|
|
|
|
|
|
|
|
|
|
c |
• |
When projecting from a ceiling, change Projection to a ceiling setting. sSettings - Projection p.71 |
||||||||
• |
Set Inverse Audio to On to use the built-in speaker when the projector is suspended from a ceiling. |
|||||||||
|
|
s Settings - Audio - Inverse Audio p.71 |
||||||||
|
• |
When the projector cannot be setup directly in front of the screen, you can correct keystone distortion |
||||||||
|
|
with the H-Keystone slider. s p.26 |
||||||||
16
Preparing
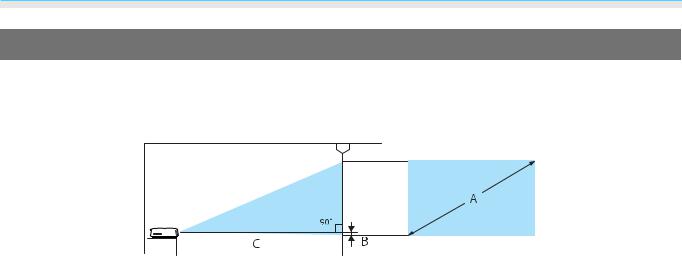
Adjusting the Projection Size
The size of the projection increases as the projector is moved away from the screen.
Use the table below to setup the projector at the optimum position from the screen. The values given here are for your reference only.
BDistance from the center of the lens to the base of the projection screen
|
|
|
|
|
Unit: cm |
|
|
|
|
|
|
|
16:9 Screen Size |
Projection Distance (C) |
Distance (B) |
||
A |
|
W x H |
Minimum (Wide) |
Maximum (Tele) |
|
40" |
|
89 x 50 |
116 |
190 |
0 |
|
|
|
|
|
|
60" |
|
130 x 75 |
176 |
287 |
0 |
|
|
|
|
|
|
80" |
|
180 x 100 |
235 |
383 |
0 |
|
|
|
|
|
|
100" |
|
220 x 120 |
295 |
480 |
0 |
|
|
|
|
|
|
120" |
|
270 x 150 |
354 |
576 |
0 |
|
|
|
|
|
|
150" |
|
330 x 190 |
444 |
721 |
1 |
|
|
|
|
|
|
180" |
|
440 x 250 |
533 |
866 |
1 |
|
|
|
|
|
|
|
|
|
|
|
Unit: cm |
|
|
|
|
||
|
4:3 Screen Size |
Projection Distance (C) |
Distance (B) |
||
A |
|
W x H |
Minimum (Wide) |
Maximum (Tele) |
|
40" |
|
81 x 61 |
143 |
233 |
0 |
|
|
|
|
|
|
60" |
|
120 x 90 |
216 |
352 |
0 |
|
|
|
|
|
|
80" |
|
160 x 120 |
289 |
470 |
0 |
|
|
|
|
|
|
100" |
|
200 x 150 |
361 |
588 |
0 |
|
|
|
|
|
|
120" |
|
240 x 180 |
434 |
706 |
1 |
|
|
|
|
|
|
150" |
|
300 x 230 |
544 |
883 |
1 |
|
|
|
|
|
|
200" |
|
410 x 300 |
726 |
1179 |
1 |
|
|
|
|
|
|
17

Preparing
 Connecting to a Device
Attention
•Turn off the equipment you want to connect before connecting. If the equipment is on when you connect, it could cause a malfunction.
•Check the shape of the cable's connector and the shape of the port, and then connect. If you force a connector of a different shape into the port, it could cause damage and a malfunction to occur.
EH-TW6100W comes with an interface cover allowing you to clearly see the connector section on the rear. Remove the interface cover before connecting any cables. s p.20
Connecting to Video Equipment
To project images from DVD players or VHS video and so on, connect to the projector using one of the following methods.
When using an HDMI cable
Fix the HDMI cable in place using the HDMI cable clamp. s p.20
When using a video cable
When using a component video cable
c• The cable differs depending on the output signal from the connected video equipment.
• Some types of video equipment are capable of outputting different types of signals. Check the user's guide supplied with the video equipment to confirm which signals can be output.
18
Preparing
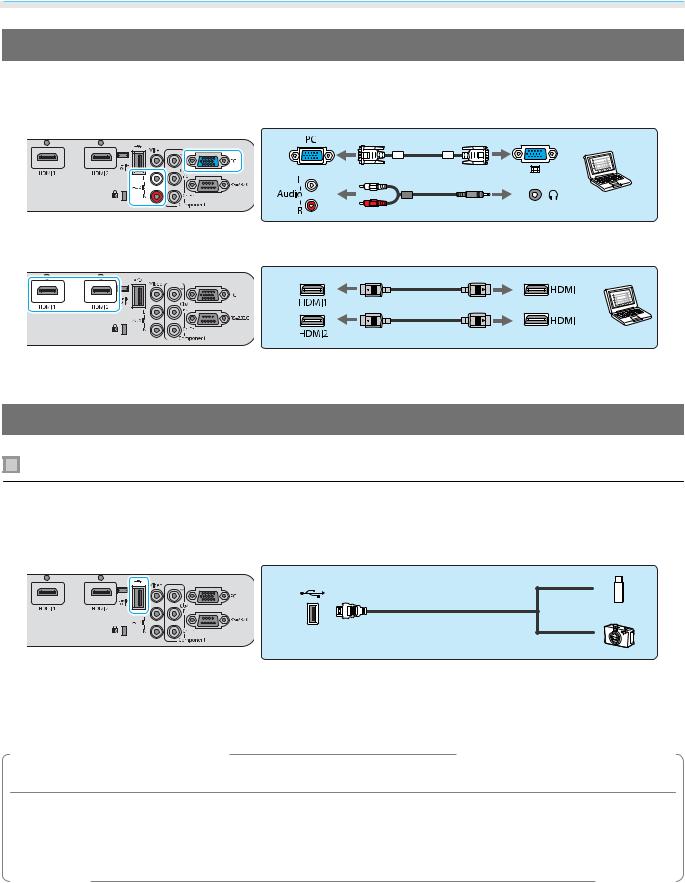
Connecting to a Computer
To project images from a computer, connect the computer using one of the following methods.
When using a computer cable
When using an HDMI cable
Fix the HDMI cable in place using the HDMI cable clamp. s p.20
Connecting to External Devices
Connecting USB devices
You can connect USB devices such as USB memories, and USB compatible digital cameras.
Using the USB cable supplied with the USB device, connect the USB device to the USB (TypeA) port on the projector.
When the USB device is connected, you can project image files on the USB memory or digital camera as a slideshow. s p.63
When you have finished projecting, remove USB devices from the projector. For devices with a power switch, make sure you turn them off before disconnecting the USB device.
Attention
•If you use a USB hub, the connection may not operate correctly. Devices such as digital cameras and USB devices should be connected to the projector directly.
•Connect a digital camera using a USB cable specified for use with the device.
•Use a USB cable less than 3 m in length. If the cable exceeds 3 m, slideshow may not function correctly.
19
Preparing
Connecting WirelessHD devices (EH-TW6100W only)
The projector receives transmissions from the WirelessHD Transmitter, and projects the images. s p.49
Change the projected image by pressing the  button on the remote control or the
  button on the control panel.
c• When receiving WirelessHD images, make sure WirelessHD is set to On. s Settings -
WirelessHD p.71
•You can change which device is displayed by selecting a device from Device Connections in HDMI Link. s HDMI Link-Device Connections p.60
Removing the Interface Cover
The interface cover is attached to the connector section on the rear of EH-TW6100W. Remove this cover when using a cable to connect a device.
There are gaps at the bottom of the interface cover that allows you to pull the cover forward and lift it from the grooves at the top.
c |
• |
When reattaching, first insert the protruding sections into the grooves at the top. |
• |
Make sure you store the interface cover safely, as you need this when transporting the projector. |
Connecting an HDMI Cable Clamp
If the HDMI cable is thick and hangs down, make sure you secure it to the cable holder with an HDMI clamp so that the cable's weight does not disconnect it from the port.
20
Preparing
 Preparing the Remote Control
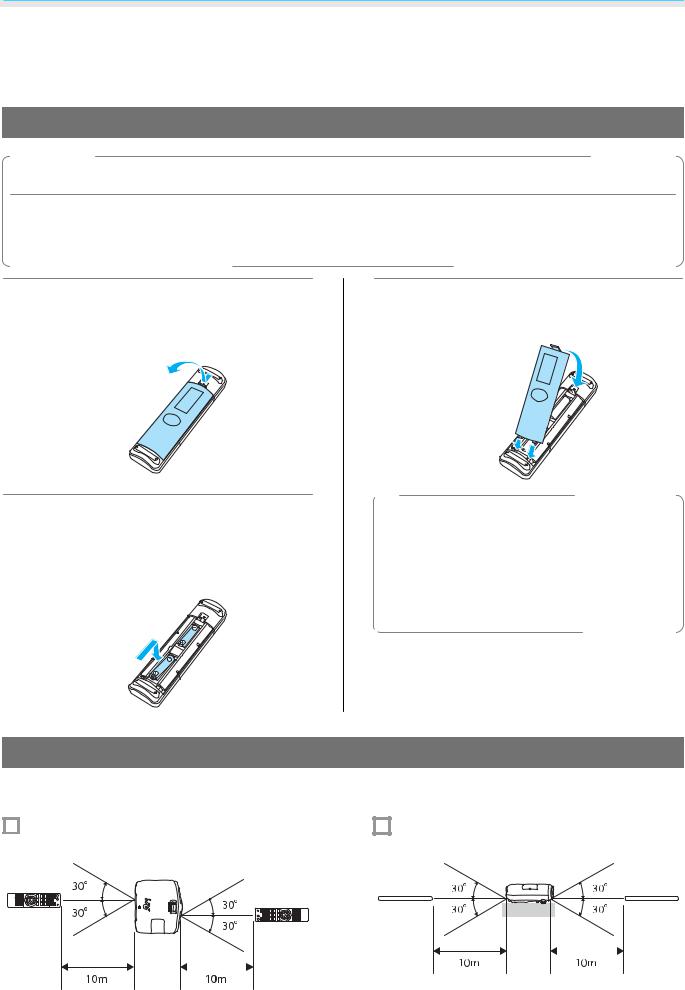
Installing the Remote Control Batteries
Attention
•Check the positions of the (+) and (-) marks inside the battery holder to ensure the batteries are inserted the correct way.
•You cannot use other batteries except for the AA size manganese or alkaline.
a
b
Remove the battery cover.
While pushing the battery compartment cover catch, lift the cover up.
Replace the old batteries with new batteries.
Check the polarity of the batteries (+ and -) before installing.
c |
Reattach the battery cover. |
|
Press the cover until it clicks into place. |
cIf delays in the responsiveness of the remote control occur or if it does not operate, it probably means that the batteries are becoming flat. When this happens, replace them with new batteries. Have two AA size manganese or alkaline batteries ready.
Remote Control Operating Range
The operation range for the WirelessHD Transmitter differs. s p.58
|
|
Operating range (left to right) |
|
|
|
|
Operating range (top to bottom) |
||||||
|
|
|
|
|
|
||||||||
|
|
|
|
|
|
|
|
|
|
|
|
|
|
|
|
|
|
|
|
|
|
|
|
|
|
|
|
|
|
|
|
|
|
|
|
|
|
|
|
|
|
|
|
|
|
|
|
|
|
|
|
|
|
|
|
|
|
|
|
|
|
|
|
|
|
|
|
|
|
|
|
|
|
|
|
|
|
|
|
|
|
|
|
21

Basic Operations
 Starting and Ending Projection
Turning on the Projector and Projecting
a |
Connect the power cable. |
d |
Turn the power on. |
Control panel |
|
|
Connect using the power cable supplied. |
|
Remote control |
||
b Remove the lens cover. |
|
|
|
||
|
|
|
|
When Direct Power On is set to |
|
|
|
|
|
cOn, you can start projecting by |
|
|
|
|
|
simply connecting the power |
|
|
|
|
|
cable to the projector without |
|
c |
Turn on the connected equipment. |
|
having to press any buttons. |
||
|
sExtended - Operation - Direct |
||||
|
|
|
|||
|
|
|
Power On p.73 |
||
|
|
|
|
Warning |
|
|
|
|
Do not look into the lens during projection. |
||
c |
• This projector provides a Child Lock function to prevent children from accidentally turning the power |
||||
on and a Control Panel Lock function to prevent accidental operations and so on. sSettings - Child |
|||||
Lock/Control Panel Lock p.71
•When using at an altitude of 1500 m or more, setHighAltitudeModeto On. sExtended- Operation-
High Altitude Mode p.73
•This projector provides an Auto Setup function to automatically select the optimum settings when the input signal for the connected computer image changes. s Signal - Auto Setup p.68
•Do not attach the lens cover during projection.
•If the projector is suspended from a ceiling, after removing the lens cap, make sure you keep it in a safe place as you will need to attach it when transporting the projector.
22

Basic Operations
If the Target Image is not Projected
If the image is not projected, you can change the source using one of the following methods.
Remote control
Press the button for the target port.
EH-TW6100W EH-TW6100/EH-TW5950
Control panel
Press the  button and select the target port. Press the
  button to confirm the selection.
• For video equipment, start playback first and then change the source.
c• If the color looks unnatural when changing to a Video or Component source, check that the port you have connected to is the same as the Input Signal. s Extended - Input Signal - Video Signal/ Component p.73
Turning Off
a Turn off the connected equipment.
b |
Press the |
|
|
button on the remote |
||||||||||
control or the projector's control |
||||||||||||||
|
panel. |
|
|
|
|
|
|
|
||||||
|
Remote control |
Control panel |
||||||||||||
|
|
|
|
|
|
|
|
|
|
|
|
|
|
|
|
|
|
|
|
|
|
|
|
|
|
|
|
|
|
|
|
|
|
|
|
|
|
|
|
|
|
|
|
|
|
|
|
|
|
|
|
|
|
|
|
|
|
|
|
|
|
|
|
|
|
|
|
|
|
|
|
|
|
|
|
|
|
|
|
|
|
|
|
|
|
|
|
|
|
|
|
|
|
|
|
|
|
|
|
|
|
|
|
|
A confirmation message is displayed.
c Press the |
button again. |
cWhen Standby Confirmation is set to Off, you can turn off the projector by pressing the  button on the remote control once. s Extended - Display - Standby Confirmation p.73
d Wait until cool-down is complete.
The operation indicator on the projector's control panel stops flashing.
e Disconnect the power cable.
cIf the power cable is connected, some electricity is consumed even if no operations are made.
23
Basic Operations
f Reattach the lens cover.
24
Basic Operations
 Adjusting the Projected Screen
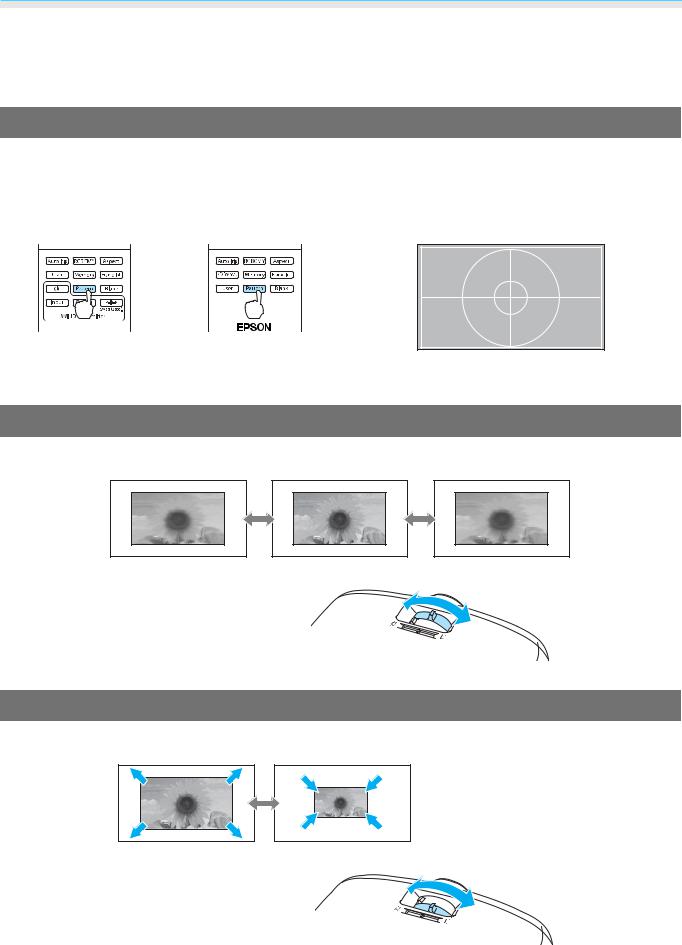
Displaying the Test Pattern
When adjusting the zoom/focus or the projection position just after setting up the projector, you can display a test pattern instead of connecting video equipment.
Press the  button on the remote control to display the test pattern.
EH-TW6100W EH-TW6100/EH-TW5950
Press the  button to close the test pattern, or select Exit.
Adjusting the Focus
Turn the focus ring to adjust the focus.
Adjusting the Projection Size (Zoom Adjustment)
Turn the zoom ring to adjust the size of the projected screen.
25
Basic Operations
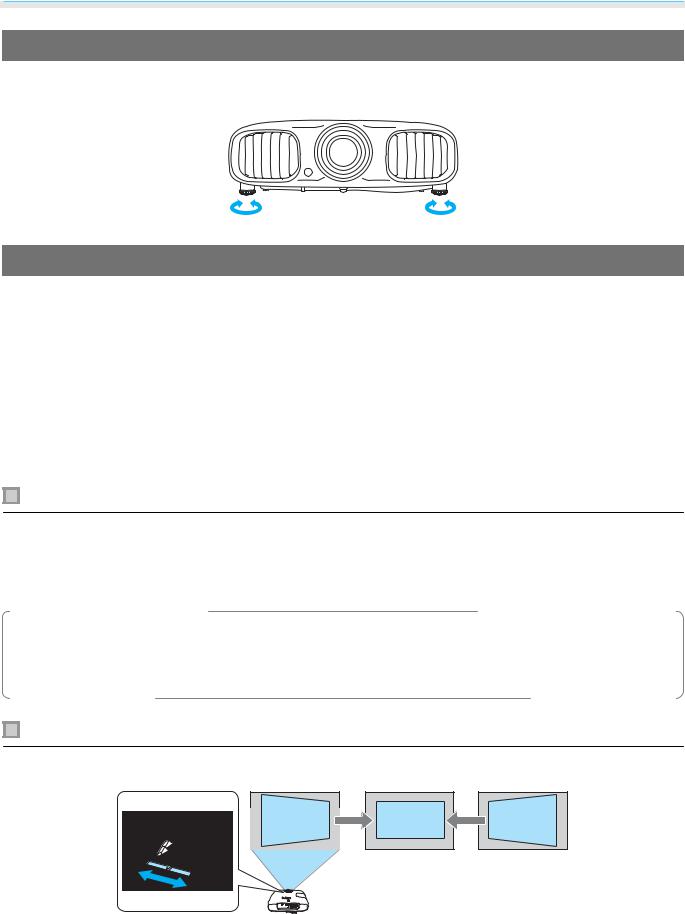
Adjusting the Projector's Tilt
If the projection screen is tilted (the left and right sides of the projector are at different heights) when the projector is setup on a table, adjust the front foot so that both sides are level with each other.
Correcting Keystone Distortion
You can correct keystone distortion using one of the following methods.
Correct automatically |
Auto V-Keystone |
Automatically correct vertical keystone distortion. |
|
|
|
Correct manually |
H-Keystone Adjuster |
Correct horizontal keystone distortion with the H-Keystone |
|
|
slider. |
|
|
|
|
H/V-Keystone |
Manually correct distortion in the horizontal and vertical di- |
|
|
rections independently. |
|
|
|
The projected screen becomes smaller when correcting keystone distortion. Increase the projection distance to fit the projected screen to the screen size.
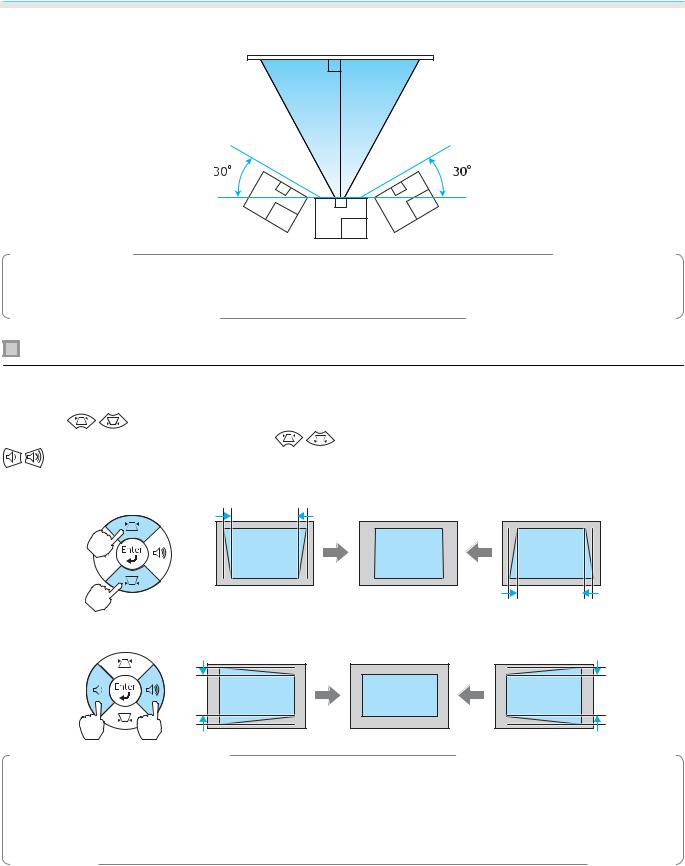
Correct automatically (Auto V-Keystone)
If the the projector detects movement during installation, vertical keystone distortion is corrected automatically. If the projector detects movement after it has been left in the same position for two seconds or more, the adjustment screen is displayed allowing you to make corrections.
Auto V-Keystone can make effective corrections within a projection angle of 30° top to bottom.
c• Auto V-Keystone only functions when Front is selected as the Projection mode. s Settings -
Projection p.71
•If you do not want to use the Auto V-Keystone function, set Auto V-Keystone to Off. s Settings -
Keystone - Auto V-Keystone p.71
Correct manually (H-Keystone adjuster)
Move the H-Keystone Slider to the right or left to perform horizontal keystone correction.
26
Basic Operations
You can make effective corrections within a projection angle of 30° left to right.
cWhen using the H-Keystone Adjuster, set H-Keystone Adjuster to On. s Settings - Keystone - H- Keystone Adjuster p.71
Correct manually (H/V-Keystone)
You can use the 


 buttons on the control panel to correct keystone distortion.
Press the |
buttons to display the V-Keystone/H-Keystone gauges. |
|
When the gauges are displayed, press the |
buttons to perform vertical correction, and press the |
|
buttons to perform horizontal correction. |
|
|
When the top or bottom is too wide
When the left or right is too wide
c• Yous p.28can adjust the volume by pressing the 
 buttons when the gauges are not displayed.
•You can set H/V-Keystone from the configuration menu. sSettings - Keystone - H/V-Keystone - V- Keystone/H-Keystone p.71
•You can make effective corrections within a projection angle of 30° top to bottom and left to right.
27
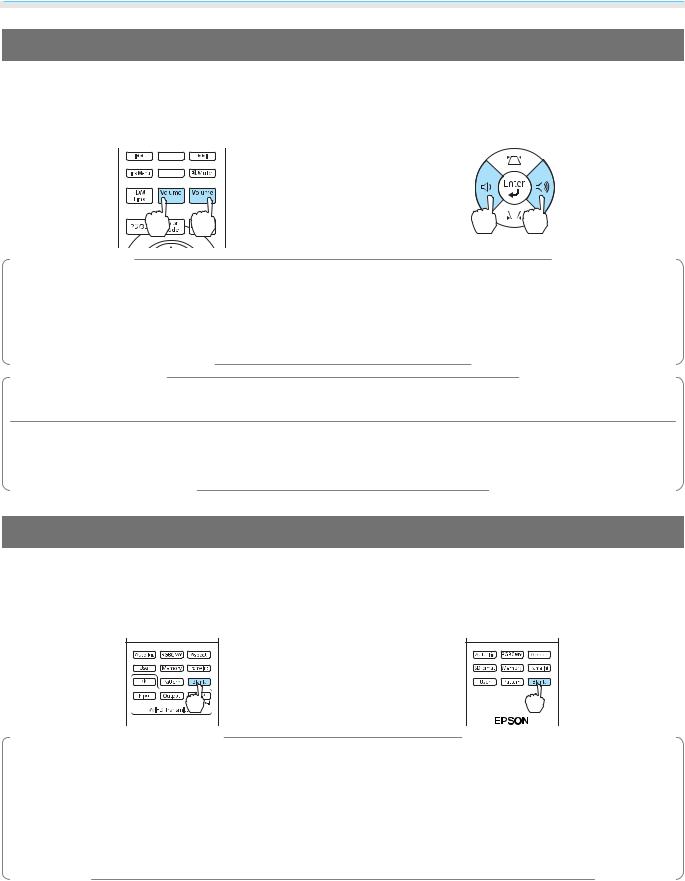
Basic Operations
Adjusting the Volume
You can adjust the volume by using the 
 buttons on the remote control or the
 buttons on the projector's control panel.
Remote control |
Control panel |
|
|
|
|
|
|
|
|
|
|
|
|
|
|
|
|
|
|
|
|
|
|
|
|
|
|
|
|
|
|
|
|
|
|
|
|
|
|
|
|
|
|
|
|
|
|
|
|
|
|
|
|
|
|
c |
• |
You can also adjust the volume from the configuration menu. s Settings - Audio p.71 |
||||||
• |
Under normal conditions, you can adjust the volume of the projector's built-in speaker. However, by |
|||||||
|
|
connecting an AV system to the projector and setting HDMI Link to On and Audio Out Device to AV |
||||||
|
|
System, you can adjust the AV system's volume when projecting from HDMI1, HDMI2, and |
||||||
|
|
WirelessHD sources. s p.59 |
||||||
 Caution
Do not start at high volume.
A sudden excessive volume may cause loss of hearing. Always lower the volume before powering off, so that you can gradually increase the volume when you next turn on the power.
Hiding the Image and Muting the Audio Temporarily
You can use this to temporarily hide the image on the screen and mute the audio.
Press the  button to show or hide the image. The audio is also muted or played.
EH-TW6100W |
EH-TW6100/EH-TW5950 |
•For movies, because the movie continues to play even when it is hidden, you cannot return to the point c at which you hid the image and muted the audio using the  button.
•The  button also switches between muting and playing the audio.
•Under normal conditions, you can adjust the audio of the projector's built-in speaker. However, by connecting an AV system to the projector and setting HDMI Link to On and Audio Out Device to AV System, you can adjust the AV system's audio when projecting from HDMI1, HDMI2, and WirelessHD sources. s p.59
28
Adjusting the Image
 Adjusting the Image
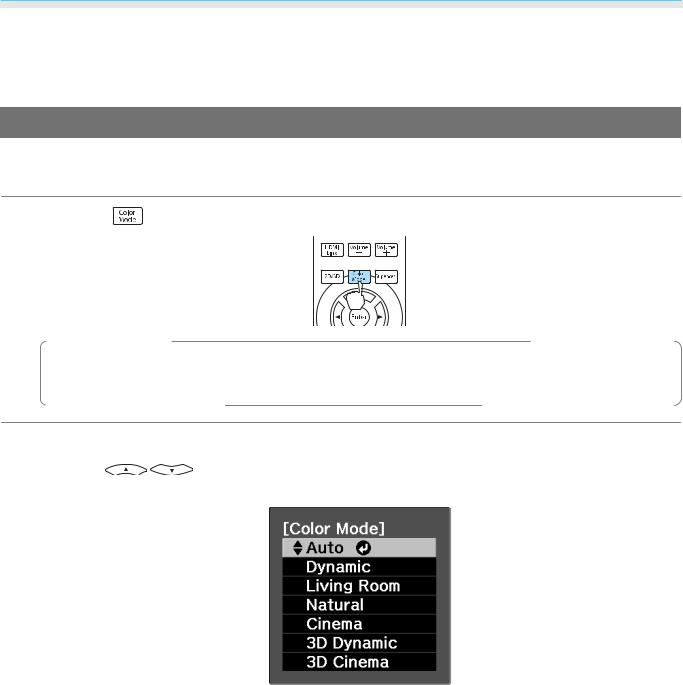
Selecting the Projection Quality (Color Mode)
You can obtain the optimum image quality to suit your surroundings when projecting. The brightness of the image varies depending on the mode selected.
a Press the |
button. |
|
cYou can make settings from the configuration menu. s Image - Color Mode p.66 |
|
b |
Select Color Mode. |
buttons from the displayed menu to select Color Mode, and then press the |
|
Press the |
|
 button to confirm the selection.
When projecting 2D images
You can select Auto, Dynamic, Living Room, Natural, and Cinema.
3D Cinema and 3D Dynamic are grayed out and cannot be selected.
When projecting 3D images
You can select 3D Cinema and 3D Dynamic.
Auto, Dynamic, Living Room, Natural, and Cinema are grayed out and cannot be selected.
29
 Loading...