


 Loading...
User’s Guide |

Projector Features
User’s Guide
1
Colour mode function
The following six preset colour modes are provided so that you can easily obtain optimum images simply by selecting a Colour mode.
In addition, if projecting onto blackboards rather than projection screens in places such as schools, you can select the "Blackboard" setting to allow images to be projected in their natural tints.
sp.47, p.56, p.58
• Dynamic |
• Presentation |
• Theatre |
• Living Room |
• sRGBg |
• Blackboard |
Presentation |
|
|
Brightness Control
The brightness of the lamp can be set to one of two settings.
Fine and clear images can be obtained even in a bright room like a conference room and a classroom.
If projecting images in a dark room or onto a small screen and the images are too bright, change the setting to "Low".
The advantages of the "Low" setting are
•Reduction in power consumption of approximately 20%
•Reduction in operating noise of approximately 12%
•Approximately 1.5 times longer lamp life
sp.62
Blackboard
Automatic keystone correction function
The vertical angle of the projector is detected, so that any vertical keystone distortion in the projected images can be automatically corrected. sp.41
Living Room
Compact and lightweight
The projector is compact B5 size (19.3 (D) × 27.6 (W) × 7 (H) cm) and lightweight (EMP-745/737 : approx. 1.8 kg, EMP-740/732 : approx. 1.7 kg). Easy to carry it with the included Soft carrying case which has a pocket to put cables and other accessories.
Brilliant, attractive images
Despite its compact size, the projector can display images at high resolutions with a high degree of luminance, providing beautifully clear images even in bright environments.
Easy Selection of Projection Images
Automatically detects images input from connected equipment. You can switch between the images with just a single touch of a button. sp.37

User’s Guide
Projector Features |
|
2 |
|
|
|
Easy to Operate
The accessory remote control can be used to carry out operations such as pausing projection (Freeze function sp.51), zooming in on important parts of images (E-Zoom function sp.52) and pointing out important parts of images using a pointer icon (Pointer function sp.53).
In addition, the remote control can be used to move the pointer around on the computer screen during projection (Wireless Mouse Function sp.22).
Password protect function assists administration and theft prevention
Password protection function allows you to limit the use of the projector. This means that the projector cannot be used if it is taken without authorisation, and thus serves as a theft-prevention feature. sp.31
[XXXXXXX] |
|
|
|
|
XXXX XXX XXXXX |
. |
|
|
|
|
|
|
||
#XXXX XX |
XXX "XXXX |
XXXX" XXX |
XX. |
|
|
|
|||
[0-9]:XXXX
Direct Power On
You can make the projector turn on and be ready to project images simply by connecting the power cable. You can also turn the power on for projectors in places such as meeting rooms where the power is centrally controlled, simply by turning the power on at the central control point. sp.65
Operation Lock
This function locks the buttons on the projector's control panel.
This function is useful at times such as during shows and exhibitions, or in places such as schools to limit the range of buttons that can be used. sp.54

Projector Features
Network Support
(EMP-745/737 only)
When something goes wrong with the projector, such as a lamp blowing during projection, the projector can notify you of the error via e-mail.
In addition, by using EasyMP…
• Make easy network connection with a computer via a wireless LAN.
• Project a computer's image over a network.
sFor instructions on how to use EasyMP, refer to EasyMP Network Setup Guide and EasyMP Operation Guide.
Large-volume USB Storage is Available to Use
(EMP-745/737 only)
As well as a USB-compatible digital camera, you can use a USB-compatible hard disc and a USB-compatible memory device. This allows you to make a presentation without having a computer connected to the projector. sp.29, "Showing the Presentation (Using the CardPlayer)" in the EasyMP Operation Guide
User’s Guide
3

Contents
User’s Guide
4
Projector Features.................................................................. |
1 |
Before Using the Projector |
|
Part Names and Functions..................................................... |
7 |
Front/Top .................................................................................... |
7 |
Control Panel .............................................................................. |
8 |
Rear ............................................................................................. |
9 |
Base........................................................................................... |
10 |
Remote Control......................................................................... |
11 |
Before Using the Remote Control ........................................ |
12 |
Inserting the Batteries ............................................................... |
12 |
Using the Remote Control and Remote Operating Range ........ |
13 |
Installation ............................................................................ |
15 |
Setting Up the Projector............................................................ |
15 |
Screen Size and Projection Distance......................................... |
16 |
Inserting and Removing Cards (EMP-745/737 only)............ |
17 |
Installation................................................................................. |
17 |
Removal .................................................................................... |
18 |
Access Lamp Status .................................................................. |
19 |
Connecting to a Computer ................................................... |
20 |
Eligible Computers ................................................................... |
20 |
Projecting Images from a Computer ......................................... |
21 |
Using the Remote Control to Operate the Mouse Pointer |
|
(Wireless Mouse Function) ..................................................... |
22 |
Connecting to a Video Source.............................................. |
24 |
Playing Sound from External Speakers |
|
(EMP-745/737 only) ............................................................. |
28 |
Connecting USB Devices (Digital Camera, |
|
Hard Disk Drive or Memory Devices) |
|
(EMP-745/737 only) ............................................................. |
29 |
Connecting USB Devices.......................................................... |
29 |
Disconnecting a USB Device from the Projector...................... |
30 |
Preventing theft (Password Protect) .................................... |
31 |
When Password Protect is enabled............................................ |
31 |
Setting Password Protect........................................................... |
32 |
Basic Operations |
|
Turning the Projector On...................................................... |
35 |
Connecting the Power Cable ..................................................... |
35 |
Turning the Power On and Projecting Images .......................... |
36 |
Turning the Projector Off...................................................... |
38 |
Adjusting the Screen Image................................................. |
40 |
Adjusting the Image Size (Zoom Function).............................. |
40 |
Focusing the Screen Image ....................................................... |
40 |
Adjusting the Image Angle and Automatic Keystone |
|
Correction Function ................................................................. |
41 |
Manually Correcting Keystone Distortion ................................ |
43 |
Adjusting the Image Quality ................................................. |
44 |
Adjusting Computer Images and RGB Video Images .............. |
44 |
Selecting the Projection Quality |
|
Projecting Composite Video Images ........................................ |
24 |
(Colour Mode Selection).......................................................... |
47 |
Projecting S-Video Images ....................................................... |
25 |
Adjusting the Volume ........................................................... |
48 |
Projecting Component Video Images ....................................... |
25 |
|
|
Projecting RGB Video Images.................................................. |
26 |
|
|
Playing Sound from Video Equipment.................................. |
27 |
|
|

User’s Guide
5
Advanced Operations |
|
Functions for Enhancing Projection...................................... |
50 |
A/V Mute .................................................................................. |
50 |
Freeze........................................................................................ |
51 |
Wide-screen Projection of Images from Video Equipment |
|
(Changing the Aspect Ratio) ................................................... |
51 |
E-Zoom ..................................................................................... |
52 |
Pointer function......................................................................... |
53 |
Operation Button Lock Function .............................................. |
54 |
Using the Configuration Menu Functions ............................. |
55 |
List of Functions ....................................................................... |
56 |
Using the Configuration Menus................................................ |
69 |
Troubleshooting |
|
Using the Help...................................................................... |
73 |
Problems Solving ................................................................. |
75 |
Reading the Indicators .............................................................. |
75 |
When the Indicators Provide No Help ...................................... |
78 |
Appendices |
|
Maintenance ........................................................................ |
99 |
Cleaning .................................................................................... |
99 |
Replacing Consumables .......................................................... |
100 |
Saving a User's Logo ......................................................... |
105 |
Optional Accessories and Consumables ........................... |
108 |
Glossary............................................................................. |
109 |
List of ESC/VP21 Commands............................................ |
113 |
Command List ......................................................................... |
113 |
USB connection....................................................................... |
113 |
USB Connection Setup............................................................ |
114 |
List of Supported Monitor Displays .................................... |
115 |
Specifications..................................................................... |
116 |
Appearance........................................................................ |
118 |

Before Using the Projector
This chapter describes the procedures for setting up the projector before use.
Part Names and Functions................................... |
7 |
• Front/Top ............................................................................... |
7 |
• Control Panel......................................................................... |
8 |
• Rear ........................................................................................ |
9 |
• Base....................................................................................... |
10 |
• Remote Control ................................................................... |
11 |
Before Using the Remote Control ..................... |
12 |
• Inserting the Batteries ........................................................ |
12 |
• Using the Remote Control and Remote Operating |
|
Range.................................................................................... |
13 |
•Using the Remote Control ......................................................... |
13 |
•Remote Operating Range........................................................... |
14 |
Installation........................................................... |
15 |
• Setting Up the Projector ..................................................... |
15 |
• Screen Size and Projection Distance.................................. |
16 |
Inserting and Removing Cards |
|
(EMP-745/737 only) ............................................. |
17 |
• Installation ........................................................................... |
17 |
• Removal................................................................................ |
18 |
• Access Lamp Status ............................................................ |
19 |
•Card Slot Access Lamp Status................................................... |
19 |
•Wireless LAN Card Access Lamp Status .................................. |
19 |
Connecting to a Computer................................. |
20 |
• Eligible Computers ............................................................. |
20 |
• Projecting Images from a Computer ................................ |
21 |
•If the Monitor Port is a Mini D-Sub 15-pin Port (Example)...... |
21 |
• Using the Remote Control to Operate the Mouse Pointer |
|
(Wireless Mouse Function) ................................................ |
22 |
Connecting to a Video Source ........................... |
24 |
• Projecting Composite Video Images ................................. |
24 |
• Projecting S-Video Images................................................. |
25 |
• Projecting Component Video Images ............................... |
25 |
• Projecting RGB Video Images........................................... |
26 |
Playing Sound from Video Equipment .............. |
27 |
Playing Sound from External Speakers |
|
(EMP-745/737 only) ............................................. |
28 |
Connecting USB Devices (Digital Camera, |
|
Hard Disk Drive or Memory Devices) |
|
(EMP-745/737 only) ............................................. |
29 |
• Connecting USB Devices.................................................... |
29 |
• Disconnecting a USB Device from the Projector ............. |
30 |
Preventing theft (Password Protect) ................. |
31 |
• When Password Protect is enabled ................................... |
31 |
•When "Power ON Protect" is enabled (ON) .............................. |
31 |
•If the "Timer" Setting is for One Hour or More......................... |
32 |
•When "User’s Logo Protect" is enabled (ON)............................ |
32 |
• Setting Password Protect ................................................... |
32 |

Part Names and Functions
Front/Top
User’s Guide
7
•Zoom ring sp.40
Adjusts the image size.
•Focus ring sp.40
Adjusts the image focus.
•Air exhaust vent
 Do not touch during or immediately after projection, as it can become hot.
• Card slot (EMP-745/737 only)  sp.17
sp.17
Insert a LAN card or memory card in here when using EasyMP.
•Foot adjust lever sp.41
Pull out the foot lever to extend and retract front foot.
•Control panel sp.8
•Temperature indicator sp.75
Flashes or lights in different colours to indicate problems with the internal temperature of the projector.
•Lamp indicator sp.75
Flashes or lights in different colours to indicate problems with the projection lamp.
• Power indicator sp.75
Flashes or lights in different colours to indicate the operating status of the projector.
 • Remote control light-receiving
area sp.13
Receives signals from the remote control.
• Security lock ( ) sp.110
•Front adjustable foot sp.41
Extend and retract to adjust the projection angle when the projector is placed on a surface such as a shelf.
 • Lens cover
Attach when not using the projector to prevent the lens from becoming dirty or damaged.
Part Names and Functions
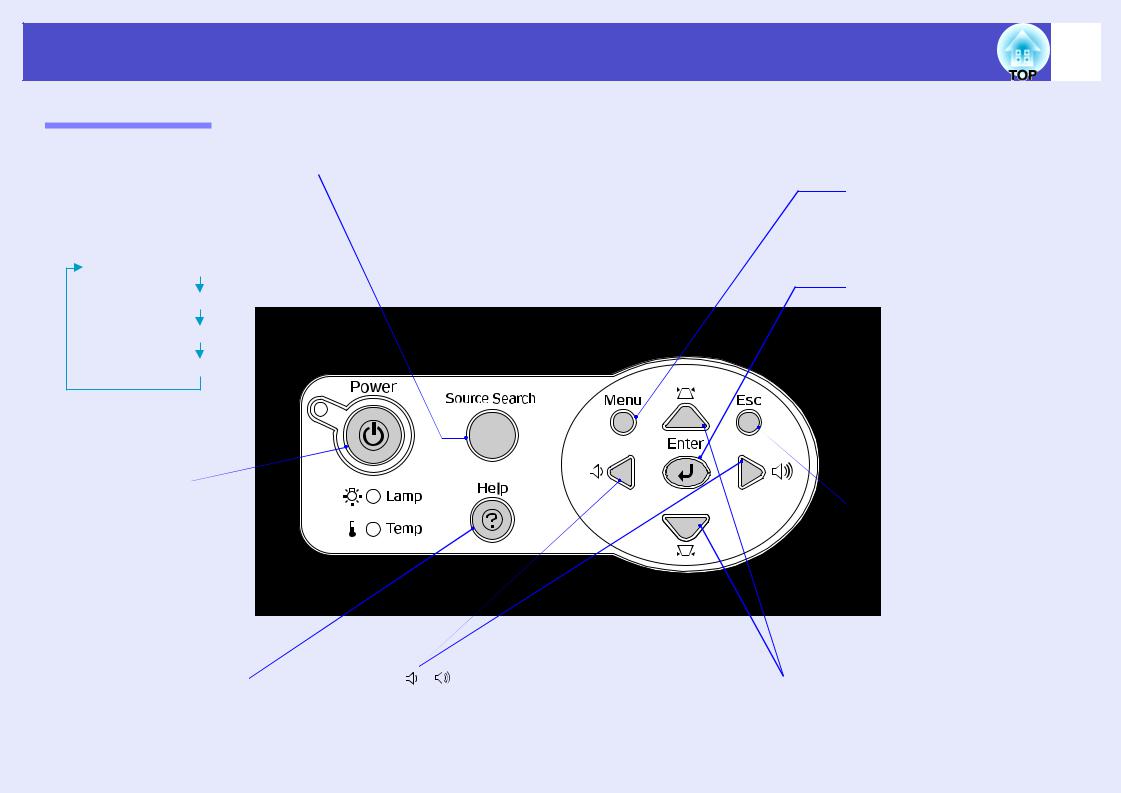
Control Panel
•[Source Search] button sp.37
The next input source is searched for automatically in the following order and image input from the connected equipment projected each time this button is pressed.
[Computer/Component Video] port
[S-Video] port
[Video] port
[EasyMP] (EMP-745/737 only)
• [Power] button sp.36, p.38
Turns the projector power on or off.
•[Help] button sp.73
Each time this button is pressed, it displays or hides the online help menu that can assist you if you have a problem.
button sp.48, p.73
Press to adjust the sound volume. If a configuration menu or help screen is displayed, it selects menu items and setting values.
User’s Guide
8
•[Menu] button sp.69
Displays or hides the configuration menu.
•[Enter] button sp.44, p.69, p.73
Automatically adjusts analogue RGB images from computers and RGB video images to the optimum display.
If a configuration menu or help screen is displayed, it accepts the current selection and moves on to the next-lowest level.
•[Esc] button sp.23
Stops the current function. Displays the previous screen or menu while viewing a configuration menu.
•[
 ] [
] [
 ] button sp.42, p.69, p.73
Press to correct keystone distortion.
If a configuration menu or help screen is displayed, it selects menu items and setting values.

User’s Guide
Part Names and Functions |
|
9 |
|
|
|
Rear
•[USB TypeB] port sp.22, p.113
Connects the projector to a computer via the USBg cable when using the wireless mouse function.
This port cannot be used for receiving images from your computer via USB.
•Remote control light-receiving area sp.13
Receives signals from the remote control.
•Power inlet sp.35
Connects to the power cable.
•Rear adjustable foot  sp.42
sp.42
•[Audio] port sp.27
Input audio signals from connected equipment. When projecting using the CardPlayer function of EasyMP, this port can be used to output the audio signals to
external speakers by setting "EasyMP Audio Out". (EMP-745/737 only) sp.63
•[Computer/Component Video] port sp.21, p.25, p.26
Input analogue RGB video signals from a computer and RGB video signals and component videog signals from other video sources.
• [USB TypeA] port (EMP-745/737 only) sp.29
Connects a digital camera or USB hard disc/ memory device to project image/movie files or scenarios from such media using the CardPlayer function of EasyMP.
• Rear adjustable foot
• [Video] port sp.24 |
|
port sp.25 |
• Speaker |
|
Inputs composite videog signals to the projector from other video sources.
Inputs S-Videog signals to the projector from other video sources.
User’s Guide
Part Names and Functions |
|
10 |
|
|
|
Base
•Foot adjust lever sp.41
•Suspension bracket fixing points (3 points) sp.15, p.108
Install the optional ceiling mount here when suspending the projector from a ceiling.
•Lamp cover sp.101
Open this cover to access the lamp when you need to replace it.
•Front adjustable foot sp.41
•Lens cover string attaching stay
Lace the lens cover string through the lower case to secure the lens cover.
 • Air filter (air intake vent) sp.99, p.104
This prevents dust and other foreign particles from getting inside the projector when air is drawn in. It should be cleaned and replaced periodically.
•Air intake vent sp.99
Clean the air intake vent periodically.
User’s Guide
Part Names and Functions |
|
11 |
|
|
|
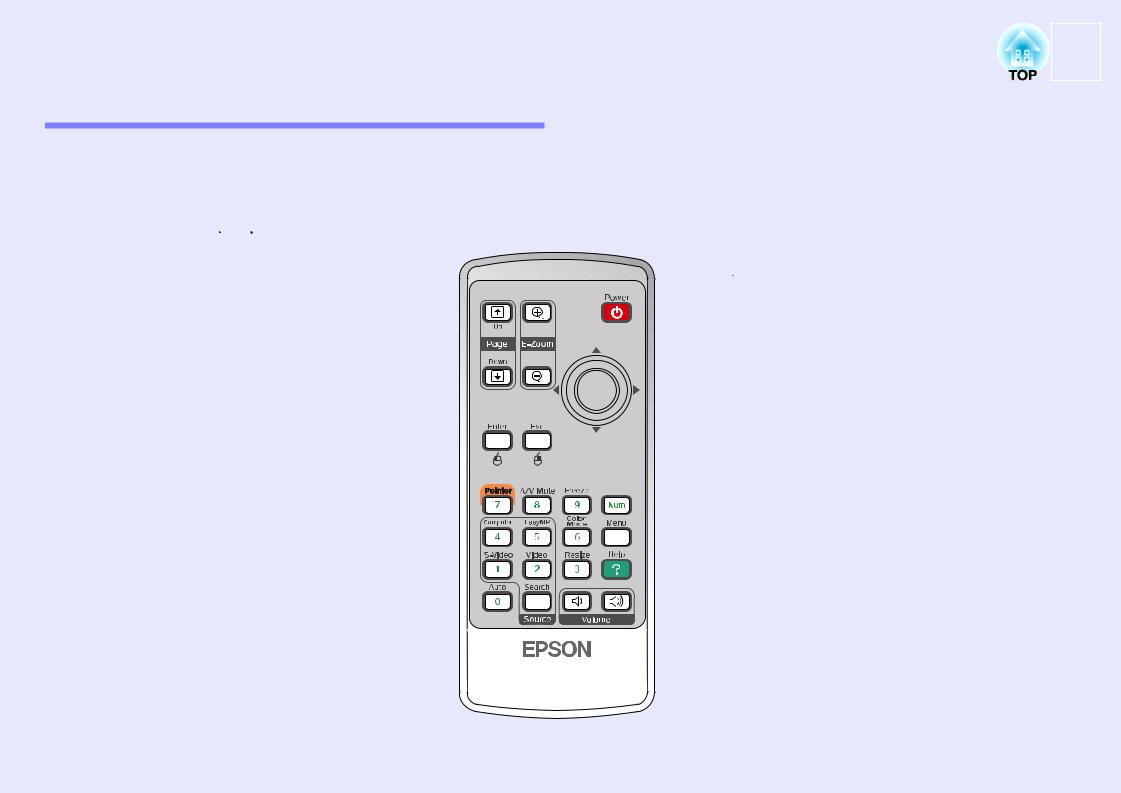
Remote Control
If you position the  over the button icon or button name, a description of that button will appear.
•[Page down] [Page up] buttons sp.22
•[E-Zoom] button ( ) (
) ( ) sp.52
•[Enter] button sp.23, p.69, p.73
• [Esc] button sp.23
• [Pointer] button sp.53
• [A/V Mute] button sp.50
• [Computer] button sp.37
•Remote control light-emitting area sp.13
•[Power] button sp.36, p.38
•[

 ] buttons sp.23, p.69, p.73
•[Freeze] button sp.51
•[Num] button sp.31
•[Color Mode] button sp.47
•[Menu] button sp.69
•[Resize] button sp.51
• [EasyMP] button sp.37 |
• [Help] button sp.73 |
|
|
• [S-Video] button sp.37 |
• [Volume] buttons sp.48 |
|
|
• [Video] button sp.37 |
• [Search] button sp.37 |
• [Auto] button sp.44 |
• Numeric buttons sp.31 |
|
Before Using the Remote Control
User’s Guide
12
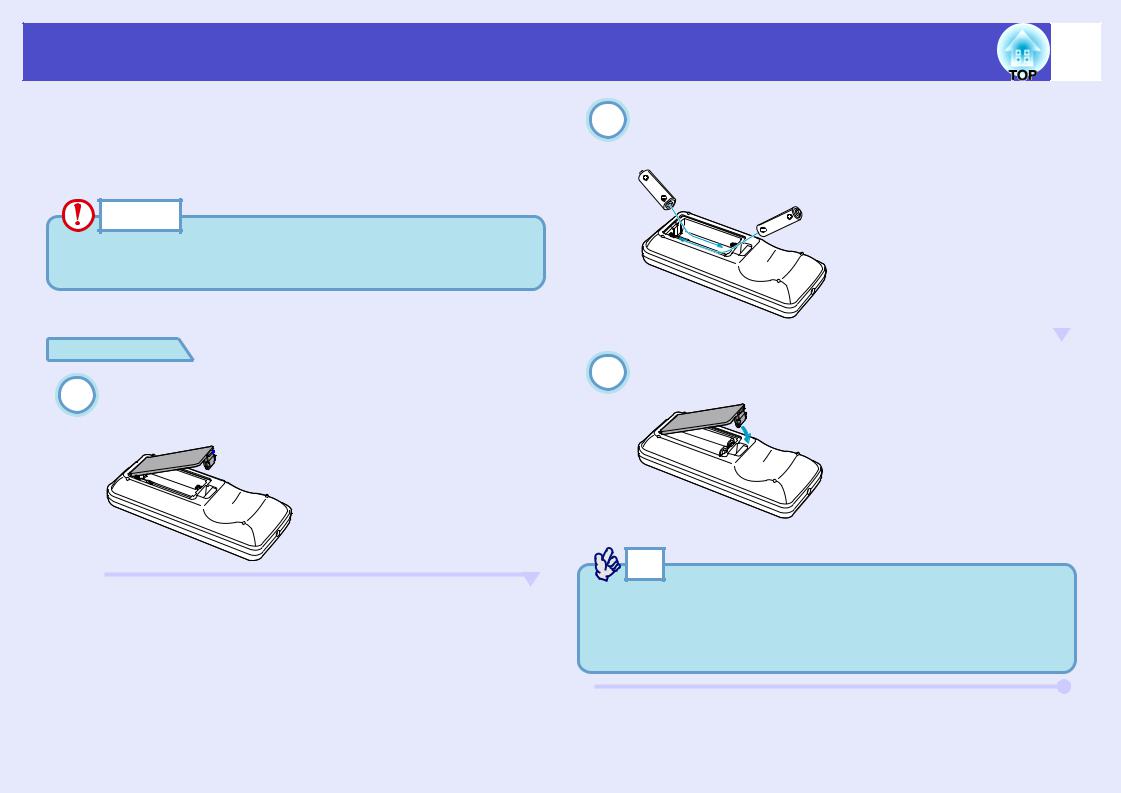
Inserting the Batteries |
2 Insert the batteries. |
||
|
|
||
The batteries are not already inserted into the remote control at the time the |
Check the positions of the (+) and (–) marks inside the battery |
||
holder to ensure that the batteries are inserted the correct way. |
|||
projector is purchased. You will need to insert the batteries that are |
|||
|
|||
provided with the projector before the remote control can be used. |
|
||
CAUTION |
Make sure you read the separate Safety Instructions/World-Wide
Warranty Terms before handling the batteries.
PROCEDURE |
|
|
|
|
|
|
|
|
|
|
Replace the battery cover. |
|
||
3 |
|
|||
1 Remove the battery cover. |
Press the battery compartment cover until it clicks into place. |
|
||
While pushing the catch of the battery compartment cover, lift the cover up.

 Catch
Catch
TIP |
If delays in the responsiveness of the remote control occur or if it does not operate after it has been used for some time, it probably means that the batteries are becoming flat. Have two spare AAA-size alkali batteries ready to use when required.

User’s Guide
Before Using the Remote Control |
|
13 |
|
|
|
Using the Remote Control and Remote Operating
Range
 Using the Remote Control
The remote control is used in the following way.
PROCEDURE
Point the remote control light-emitting area toward one of the remote control light-receiving areas on the projector and operate the remote control buttons.
|
Remote control |
|
Remote control |
light-emitting area |
Remote control |
|
||
light-receiving |
|
light-receiving |
area (front) |
|
area (back) |
TIP |
•Do not allow sunlight or light from fluorescent lamps to shine directly onto the projector's remote control light-receiving areas, otherwise it may interfere with the reception of signals from the remote control.
•If delays in the responsiveness of the remote control occur or if it does not operate after it has been used for some time, it probably means that the batteries are becoming flat. If this happens, replace the batteries with new ones. sp.12
•If any of the buttons on the remote control are pressed down for more than 30 seconds, the remote control stops to send signals (remote control's sleep mode) . The purpose of this is to prevent the batteries from being consumed due to something being placed on top of the remote control.
When the button is released, normal remote control operation will resume.

User’s Guide
Before Using the Remote Control |
|
14 |
|
|
|
 Remote Operating Range
Use the remote control within the ranges indicated below. If the distance or angle between the remote control and the remote control light-receiving area is outside the normal operating range, the remote control may not work.
Operating distance |
Operating angle |
|
Approx. 6 m (20 ft.) |
Approx. ±30º horizontally |
|
Approx. ±15º vertically |
||
|
||
|
|
Operating angle (vertical)
Operating distance |
Operating distance |
approx. 6 m (20 ft.) |
approx. 6 m (20 ft.) |
Approx. 15º |
Approx. 15º |
Approx. 15º |
Approx. 15º |
Operating angle (horizontal) |
When suspended from the ceiling |
Remote control light-receiving area
|
|
Approx. 15º |
Approx. 15º |
Operating |
|
|
|
distance |
|
Operating distance |
Operating distance |
approx. |
|
||
|
approx. 6 m (20 ft.) |
approx. 6 m (20 ft.) |
|
6 m (20 ft.) |
|
||
Approx. 30º |
Approx. 30º Approx. 30º |
Approx. 30º |
|
|
Remote control |
|
|
|
light-emitting area |
|
|
Installation
User’s Guide
15
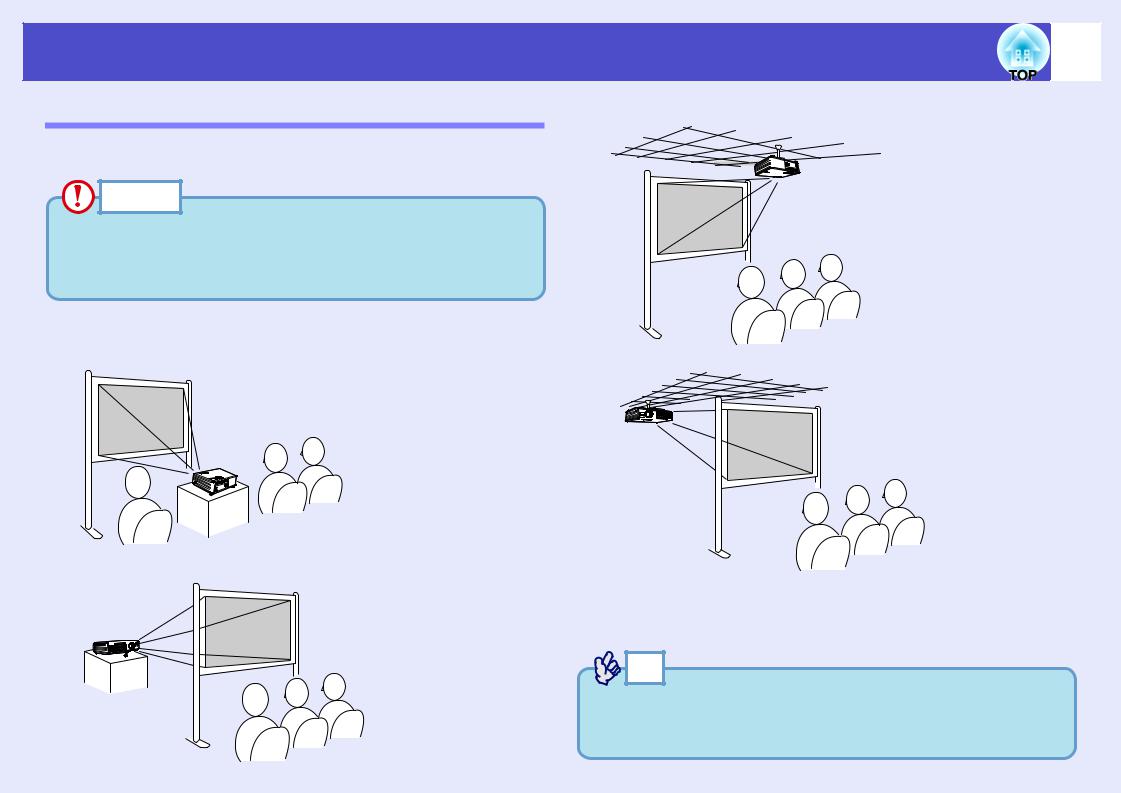
Setting Up the Projector
• Front/ceiling projection
The projector supports the following four different projection methods, allowing you to choose the best method for displaying your images.
CAUTION |
•Before setting up the projector, make sure you read the separate Safety Instructions/World-Wide Warranty Terms first.
•Do not set this projector up on its side to carry out projection, otherwise malfunctions may occur.
• Front projection |
• Rear/ceiling projection using a translucent screen |
||||
|
|
|
|
|
|
|
|
|
|
|
|
• Rear projection using a translucent screen
* A special method of installation is required for suspending the projector from the ceiling. Please contact your supplier if you would like to use this installation method. The optional ceiling mount is required when installing the projector on the ceiling. sp.108
TIP |
When using ceiling projection or projection using a translucent screen, set the "Projection" command in the "Extended" menu to match the installation method. sp.65

User’s Guide
Installation |
|
16 |
|
|
|
Screen Size and Projection Distance
The distance between the projector's lens and the screen determines the actual image size.
Recommended distance |
100–1210 cm (3.2–39.7 ft.) |
|
|
While referring to the following table, position the projector so that the images are projected onto the screen at the optimum size.
The values should be used as a guide for setting up the projector. The actual values will vary depending on projection conditions and the zoom setting.
|
|
Units: cm (in.) |
|
Units: cm (ft.) |
Units: cm (in.) |
||
|
|
|
|
|
|
|
|
|
|
|
|
Projection distance |
Distance from |
||
|
|
|
|
centre of lens |
|||
|
4:3 Screen size |
|
|
|
|||
|
Shortest |
– |
Longest |
to bottom edge |
|||
|
|
|
|
||||
|
|
|
|
(wide) |
(tele) |
of screen |
|
|
|
|
|
|
|||
30" |
|
61 |
× 46 |
100–120 (3.2–3.9) |
6.5 (2.6) |
||
|
(24.0 |
× 18.1) |
|||||
|
|
|
|
|
|
||
|
|
|
|
|
|
|
|
40" |
|
81 |
× 61 |
130–160 (4.4–5.2) |
8.7 (3.4) |
||
|
(31.9 |
× 24.0) |
|||||
|
|
|
|
|
|
||
|
|
|
|
|
|
|
|
50" |
|
100 × 76 |
166–200 (5.5–6.6) |
10.9 (4.3) |
|||
|
(39.4 × 30.0) |
||||||
|
|
|
|
|
|
||
|
|
|
|
|
|
|
|
60" |
|
120 × 90 |
200–240 (6.6–7.9) |
13.1 (5.1) |
|||
|
(47.2 × 35.4) |
||||||
|
|
|
|
|
|
||
|
|
|
|
|
|
|
|
80" |
|
160 |
× 120 |
270–320 (8.8–10.5) |
17.4 (6.9) |
||
|
(63.0 × 47.2) |
||||||
|
|
|
|
|
|
||
|
|
|
|
|
|
|
|
100" |
|
200 × 150 |
340–400 (11.0–13.2) |
21.8 (8.6) |
|||
|
(78.7 |
× 59.1) |
|||||
|
|
|
|
|
|
||
|
|
|
|
|
|
|
|
200" |
|
410 |
× 300 |
670–810 (22.0–26.4) |
43.5 (17.1) |
||
|
(161.4 |
× 118.1) |
|||||
|
|
|
|
|
|
||
|
|
|
|
|
|
|
|
300" |
|
610 |
× 460 |
1010–1210 (33.1–39.7) |
65.3 (25.7) |
||
|
(240.2 |
× 181.1) |
|||||
|
|
|
|
|
|
||
|
|
|
|
|
|
|
|
|
Screen |
90º |
Centre of |
* |
lens |
|
*When installing against a wall, leave a space of about 20 cm (7.9 in.) between the projector and the wall.
TIP |
•The projector's lens allows a zoom ratio of up to about 1.2. The image size at the maximum zoom setting is about 1.2 times bigger than the image size at the minimum zoom setting.
•The image size will be reduced when keystone correction is carried out.
Inserting and Removing Cards (EMP-745/737 only)
User’s Guide
17
You can use PC cards such as wireless LAN cards and memory cards with the EMP-745/737.
Inserting and removing PC cards will be explained using the included wireless LAN card provided as an example. The wireless LAN card provided with the projector will be used as an example in this manual to explain how to insert and remove PC cards.
TIP |
The following PC cards can be inserted into the projector's card slot.
•Wireless LAN card (only the one supplied with the projector)
•Wired LAN card (For details on compatible cards, please visit this web site "http://www.epson.co.uk/".)
•Memory card s"Specifications" p.116
Installation
CAUTION |
•Insert the PC card facing the correct way. Installing the device back to front or upside down may cause failure or damage.
•Make sure you remove the card before transporting the projector.
PROCEDURE
Insert the PC card into the card slot so that it is facing upwards.
Insert firmly into the slot until it is secure.
Top

|
User’s Guide |
|
Inserting and Removing Cards (EMP-745/737 only) |
|
18 |
|
|
|
Removal |
PROCEDURE |
|
CAUTION |
•Do not remove the wireless LAN card while the access lamp on the wireless LAN card is flashing green, this may damage the card.
•Do not remove a memory card while the access lamp of the projector's card slot is flashing green, or while projecting a scenario. Doing so may damage the memory card or data in the card.
•The PC card gets hot during and immediately after projector use. Handle the card carefully when removing it from the card slot to avoid personal injury or burns.
•When you wish to remove a memory card while using CardPlayer, make sure you close CardPlayer before removal. CardPlayer may malfunction if a memory card is removed without closing CardPlayer first. s"Closing CardPlayer" in the EasyMP
Operation Guide
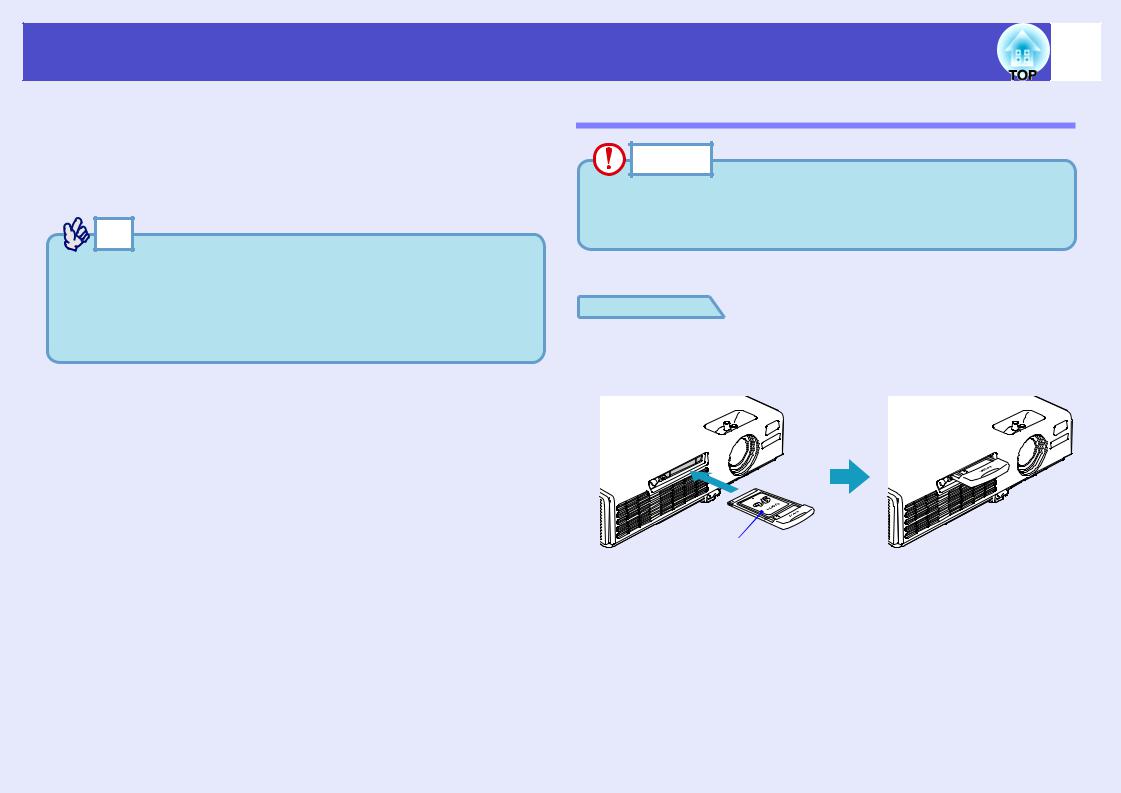
1 Press the eject button to the left of the card slot.
The eject button will pop out.
Eject button
Access lamp
2 Press the eject button again.
Enough of the PC card will be ejected so that you can grasp the edge of the card and pull it straight out of the slot.
CAUTION |
Make sure you press the eject button back in to prevent it from being broken or damaged.

User’s Guide
Inserting and Removing Cards (EMP-745/737 only) |
|
19 |
|
|
|
Access Lamp Status
 Card Slot Access Lamp Status
When a memory card has been inserted into the projector's card slot, you can check the access status of the memory card by noting whether the access lamp is lit and what colour it is, as described below.
|
Lit |
Off |
|
|
|
Status |
Access status |
|
|
|
|
Green |
Data is being read from the memory card. |
|
|
|
|
Off |
The memory card is in standby state. |
|
|
|
|
Red |
An error occurred while data was being read from the memory |
|
|
card. |
|
|
|
|
 Wireless LAN Card Access Lamp Status
The card slot access lamp does not light when a wireless LAN card has been inserted into the projector.
You can check the network communication status by observing the status of the wireless LAN access lamps as described below.
|
|
Lit |
flashing |
Lamp |
Status |
Communication status |
|
LINK |
Green |
The projector is connected to the network and |
|
|
|
communication is possible. |
|
|
Green |
Connection to a valid network is in progress. |
|
ACT |
Green |
Data is being transmitted or received. |
|
Connecting to a Computer
User’s Guide
20
CAUTION |
When connecting the projector to a computer, make sure you check the following.
•Turn the power off for both the projector and the computer before connecting them. If the power for either device is on at the time of connection, damage may result.
•Check the shapes of the cable connectors and the device ports before making the connections. If you try to force a connector to fit a device port with a different shape or number of terminals, damage to the connector or port may result.
•Do not bind the power cable and the connecting cable together. If the power cable and the connecting cable are bound together, image interference or errors in operation may result.
Eligible Computers
The method for connecting the projector to a computer using a cable is explained here.
If using an EMP-745/737, see the EasyMP Network Setup Guide for information on how to connect to a computer over a network.
The projector cannot be connected to some types of computer, or projection of images may not be possible even if actual connection is possible. Make sure that the computer you intend to use satisfies the conditions given below.
•Condition 1: The computer must have an image signal output port.
Check that the computer has a port such as an "RGB port", "monitor port" or "CRT port" which can output image signals.
If the computer has a built-in monitor, or if using a laptop computer, it may not be possible to connect the computer to the projector, or alternatively you may need to purchase a separate external output port. Refer to the documentation for your computer under a heading such as "Connecting an external monitor" or similar for further details.
•Condition 2: The display resolution and frequency of the computer must be listed in the "List of Supported Monitor Displays". s"Appendices: List of Supported Monitor Displays" p.115.
Some computers allow you to change the output resolution, so if necessary, change the resolution to one that matches a setting in the "List of Supported Monitor Displays", while referring to the documentation provided with the computer.
TIP |
•You may need to purchase a separate adapter depending on the shape of the computer's port. Refer to the documentation provided with the computer for further details.
•If the computer and projector are too far away from each other for the accessory computer cable to reach, use the optional VGA-HD15 PC cable. "Appendices: Optional Accessories and Consumables" sp.108
User’s Guide
Connecting to a Computer |
|
21 |
|
|
|
Projecting Images from a Computer
The shape and specifications of the computer's monitor port will determine what type of cable should be used. Check the following to see which type of port your computer has.
 If the Monitor Port is a Mini D-Sub 15-pin Port (Example)
Use the accessory computer cable to make the connection.
TIP |
•The input source is determined automatically based on the input signals.
Some computer signals may be reproduced with different colours from the original images. In such case, set the input source to "Computer". sp.60
•If more than one input source is connected to the projector at the same time, you can use button operations to select the signals to be projected. sp.37
To monitor port
 To [Computer/Component Video] Computer cable port (blue)
(accessory)

User’s Guide
Connecting to a Computer |
|
22 |
|
|
|
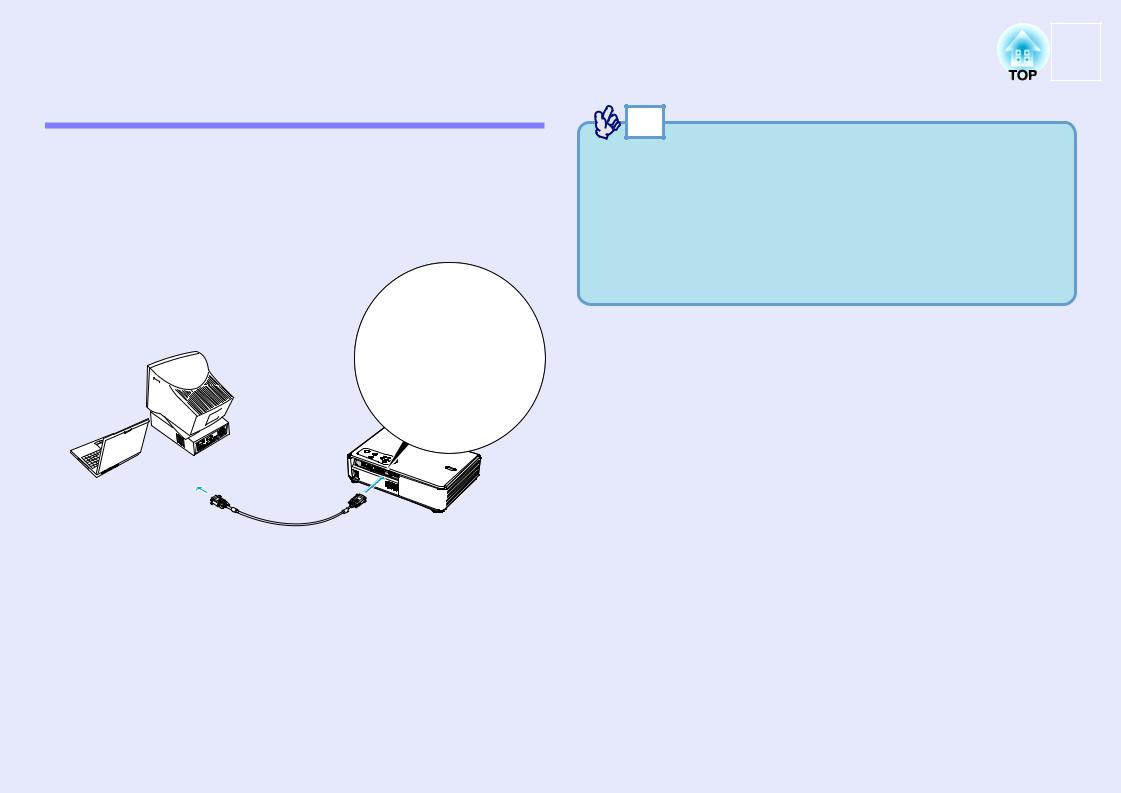
Using the Remote Control to Operate the Mouse Pointer (Wireless Mouse Function)
You can use the remote control as a wireless mouse to control the mouse pointer on the computer screen. To do this, you must use the accessory USBg cable to connect the computer's USB port to the [USB TypeB] port at the rear of the projector.
Computer |
Mouse used |
Applicable cable |
|
Windows 98/2000/Me/ |
USB mouse |
USB cable (accessory) |
|
XP Home Edition/ |
|||
XP Professional |
|
|
|
Macintosh |
USB mouse |
USB cable (accessory) |
|
(OS 8.6–9.2/10.0–10.3) |
|||
|
|
TIP |
•If your projector is an EMP-745/737, the [USB TypeA] port on the back of the projector does not function as a USB hub.
•The USB cable can only be connected to computers with a standard USB interface. If using a computer which is running Windows, the computer must have had a full version of Windows 98/2000/Me/XP Home Edition/XP Professional installed. If the computer is running a version of Windows 98/2000/Me/XP Home Edition/XP Professional that has been upgraded from an earlier version of Windows, correct operation cannot be guaranteed.
•It may not be possible to use the mouse function under some versions of both the Windows and Macintosh operating systems.
•Some computer settings may have to be changed in order for the mouse function to be used. Consult the computer's documentation for further details.
To USB port
USB cable |
To [USB TypeB] port |
(accessory) |
|
*When using the remote control as a wireless mouse, the [Page down] and [Page up] buttons on the remote control can be used to scroll back and forth through slides when projecting a PowerPoint presentation.
User’s Guide
Connecting to a Computer |
|
23 |
|
|
|
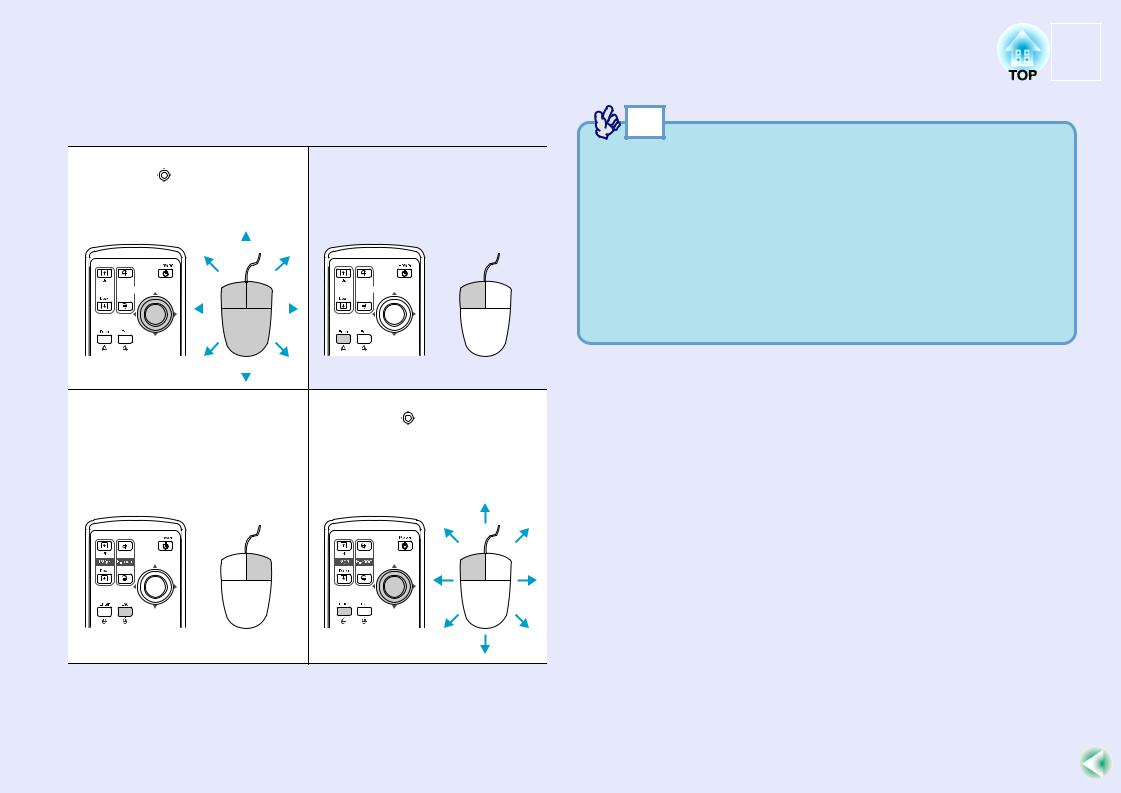
Once the connection has been made, the mouse pointer can be operated as follows.
Moving the mouse pointer |
Left click |
|||||||||||||
If you tilt the [ ] button on the remote |
Press the [Enter] button. |
|||||||||||||
control, the mouse pointer will move in |
If you press the [Enter] button twice in |
|||||||||||||
the direction of tilt. |
rapid succession, it has the effect of a |
|||||||||||||
|
|
|
|
|
|
|
|
|
|
double-click. |
||||
|
|
|
|
|
|
|
|
|
|
|
|
|
|
|
|
|
|
|
|
|
|
|
|
|
|
|
|
|
|
|
|
|
|
|
|
|
|
|
|
|
|
|
|
|
|
|
|
|
|
|
|
|
|
|
|
|
|
|
|
|
|
|
|
|
|
|
|
|
|
|
|
|
|
|
|
|
|
|
|
|
|
|
|
|
|
|
|
|
|
|
|
|
|
|
|
|
|
|
|
|
|
|
|
|
|
|
|
|
|
|
|
|
|
|
|
|
|
|
|
Right click |
Drag and drop |
Press the [Esc] button. |
If you tilt the [ ] button while |
|
keeping the [Enter] button pressed |
|
down, you can carry out drag |
|
operations. Press the [Enter] button at |
|
the desired location to drop the item |
|
being dragged. |
TIP |
•If the mouse button settings have been reversed at the computer, the operation of the remote control buttons will also be reversed.
•The wireless mouse function cannot be used while the following functions are being used.
·While a configuration menu is being displayed
·While a help menu is being displayed
·While the E-Zoom function is being used
·While a user's logo is being captured
·Pointer function
·While adjusting the sound volume
Connecting to a Video Source
User’s Guide
24
CAUTION |
When connecting the projector to video equipment, take the following precautions.
•Turn the power off for both the projector and the video equipment before connecting them. If the power for either device is on at the time of connection, damage may result.
•Check the shapes of the cable connectors and the device ports before making the connections. If you try to force a connector to fit a device port with a different shape or number of terminals, a malfunction or damage to the connector or port may result.
•Do not bind the power cable and the connecting cable together. If the power cable and the connecting cable are bound together, image interference or errors in operation may result.
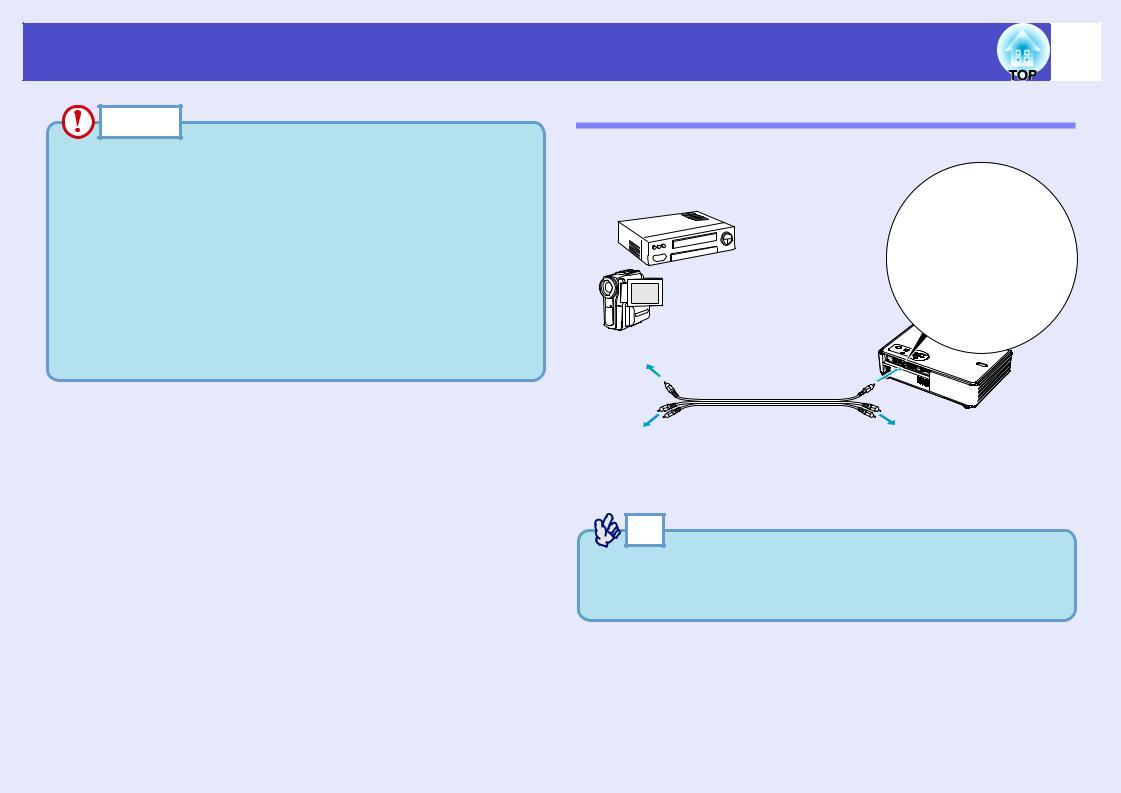
Projecting Composite Videog Images
Use a commerciallyavailable A/V cable to make the connection.
To video output port (yellow)
A/V cable
(commercially-available)
To audio output port sp.27
To [Video] port (yellow)
To [Audio] port
Connect the cable using the audio adapter that is supplied with the projector. sp.27
TIP |
If more than one input source is connected to the projector at the same time, you can use button operations to select the signals to be projected. sp.37

User’s Guide
Connecting to a Video Source |
|
25 |
|
|
|
Projecting S-Video Images
Use a commercially-available S-Videog cable to make the connections.
To S-Video output port
S-Video cable |
To [S-Video] port |
(commercially-available) |
|
TIP |
If more than one input source is connected to the projector at the same time, you can use button operations to select the signals to be projected. sp.37
Projecting Component Video Images
Use the optional component videog cable to make the connection. "Appendices: Optional Accessories and Consumables" sp.108
Use to connect the projector to a commercially available component video cable (RCA × 3, male).
To component


 video output port

Component video cable (optional)
To [Computer/Component Video] port (blue)
TIP |
•The input source is determined automatically based on the input signals.
Some video signals may be reproduced with different colours from the original images. In such case, set the input source to "Component Video". sp.61
•If more than one input source is connected to the projector at the same time, you can use button operations to select the signals to be projected. sp.37

Connecting to a Video Source
Projecting RGB Video Images
Use the accessory computer cable to make the connections.
To RGB output port
 To [Computer/Component Video] Computer cable port (blue)
(accessory)
TIP |
•The input source is determined automatically based on the input signals.
Some video signals may be reproduced with different colours from the original images. In such case, set the input source to "Computer". sp.60
•If more than one input source is connected to the projector at the same time, you can use button operations to select the signals to be projected. sp.37
User’s Guide
26

Playing Sound from Video Equipment
User’s Guide
27
The projector has a built-in speaker with a maximum output of 1 W. You can output sound from connected video equipment (such as a computer or video deck) through the projector's built-in speaker if the video equipment has an audio output port.
Select the audio cable that is used for this connection from the following, depending on the shape of the other equipment's port.
•If connecting to a stereo mini jack (such as the audio output port of a computer): Use a commercially-available stereo mini jack audio cable to make the connection.
•If connecting to an RCA pin jack ×2 (red/white) (such as the audio output port of video equipment): Use the audio adapter that is supplied with the projector and a commercially-available A/V cable to make the connection.
TIP |
•You can adjust the volume after projection has started. sp.48
•If using a commercially-available 2RCA (L/R)/stereo mini-jack audio cable, use one that is marked as "No resistance".
If the image signals are being input to the [Computer/Component Video] port
To audio output port |
|
Stereo mini jack audio cable |
To [Audio] port |
(commercially-available) |
|
If the video signals are being input to the [Video] port
To audio output port
To [Audio] port
Audio adapter
(accessory)
A/V cable (commercially-available)
User’s Guide
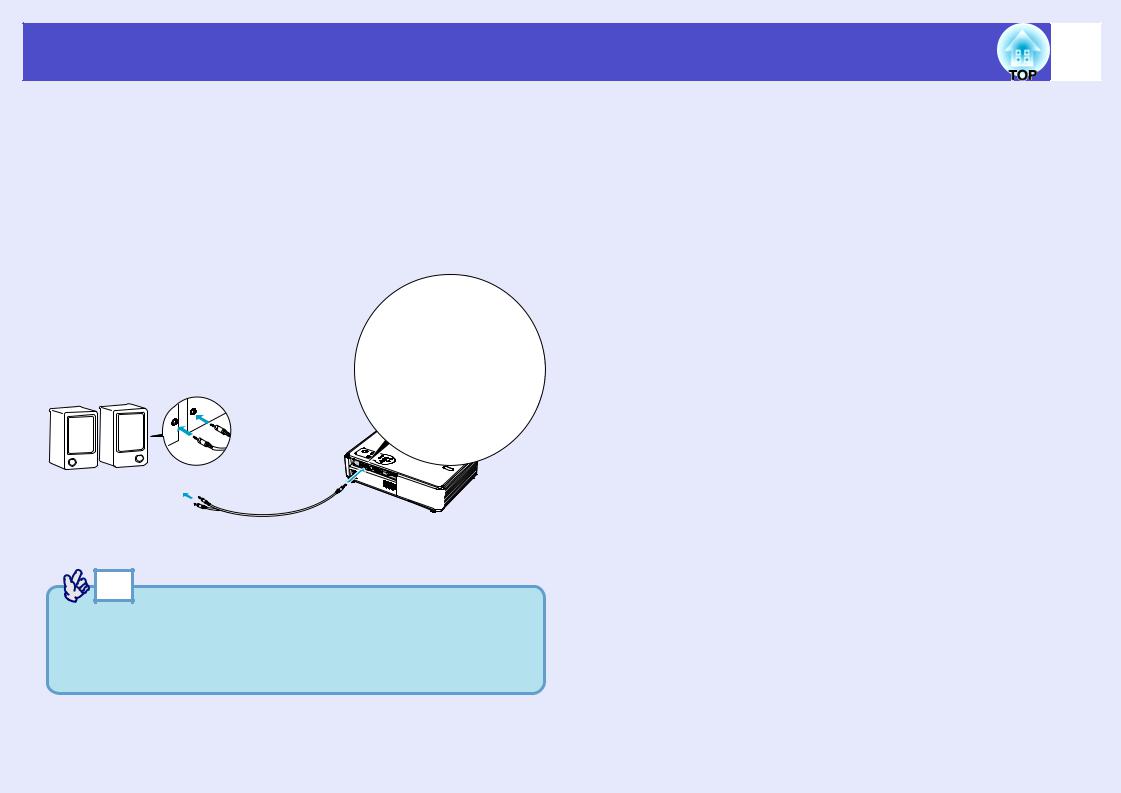
Playing Sound from External Speakers (EMP-745/737 only) |
28 |
|
When projecting using the CardPlayer function of EasyMP, you can output the audio signals to external speakers.
Set the "EasyMP Audio Out" to "External" and connect speakers with built-in amplifiers to the projector's [Audio] port in order to enjoy a fuller quality of sound. sp.63
Use a commercially-available audio cable with pin jack stereo mini jack (3.5 mm) plugs or similar.
Use an audio cable with a plugs that match the ports for the external audio equipment.
To external audio equipment
Audio cable |
To [Audio] port |
|
|
(commercially-available) |
|
TIP |
•When using an external speaker to output the sound, you cannot control the volume.
•When projecting images using the LAN connection function of EasyMP, audio signals cannot be output by the projector.
User’s Guide
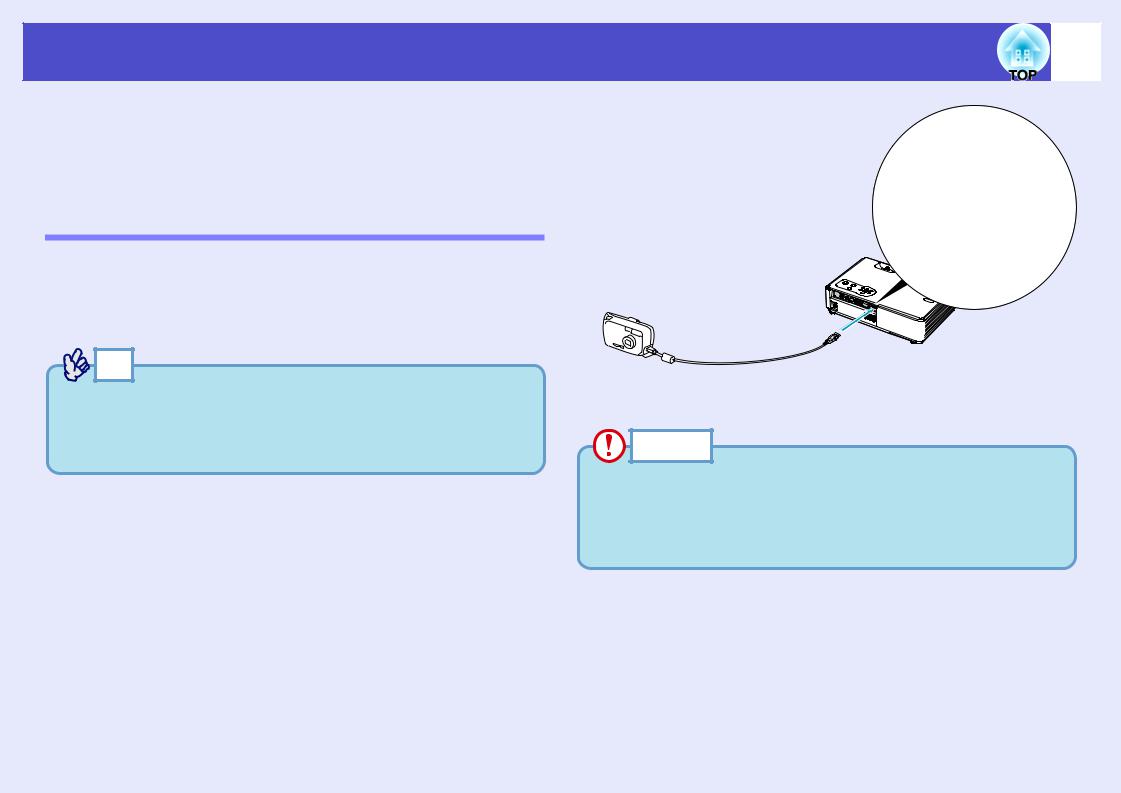
Connecting USB Devices (Digital Camera, Hard Disk Drive or Memory Devices) (EMP-745/737 only) |
29 |
|
USB1.1-compatible digital cameras, hard disk drives and USB storage devices can be connected to the projector. Image files that are stored inside the digital camera and scenarios, images and movies that are stored inside USB storage devices can be played back by EasyMP CardPlayer. s"Showing the Presentation (Using the CardPlayer)" in the EasyMP Operation Guide
Connecting USB Devices
The following procedure describes how to connect USB devices, using a digital camera as an example.
Connect a digital camera to the projector using a USB cable provided with, or specified for use with your digital camera.
TIP |
• Use a USB cable less than 3m in length. If the cable exceeds 3m, CardPlayer may not function correctly.
USB cable
To [USB TypeA] port
To USB port of digital camera
• Check that there is no wireless LAN card or memory card in the projector's card slot before connecting any USB device.
CAUTION |
•If you use a USB hub, the connection may not operate correctly. Devices such as digital cameras and USB storage devices should be connected to the projector directly.
•When using a USB-compatible hard disc, make sure you connect the AC adaptor supplied with the hard disc.
Loading...