


 Loading...

Types of Manual
The documentation for your EPSON projector is divided into the following three manuals. The manuals cover the following topics.
•Safety Instructions/World-Wide Warranty Terms
This manual contains information on using the projector safely, and also includes World-Wide Warranty Terms and a Troubleshooting check sheet.
Be sure to read this manual thoroughly before using the projector.
•Owner’s Manual (this manual)
This Owner’s Manual contains information on installing the projector, basic operation, using the projector menus, troubleshooting and maintenance.
•Quick Reference Guide
Contains an overview of the most commonly-used projector functions for easy reference. You should keep this Quick Reference Guide near the projector at all times and refer to it before starting presentations and while using the projector in order to check details of operation.
®
D A T A / V I D E O P R O J E C T O R
Owner’s Manual
■■ ■  ■ ■ ■ ■ ■ ■ ■ ■ ■ ■ ■ ■
Contents |
|
Contents |
iii |
Introduction |
vii |
Getting the Most Out of Your Projector |
................................ ix |
Optional Accessories................................................................... |
ix |
About This Manual................................................................. |
x |
Where to Get Help ................................................................ |
xi |
World Wide Web site.................................................................. |
xi |
1 Installation |
1 |
Unpacking the Projector......................................................... |
2 |
Additional Components.............................................................. |
3 |
Setting Up the Projector......................................................... |
4 |
Connecting to a Computer ..................................................... |
6 |
Connecting to a PC Desktop Computer ..................................... |
7 |
Connecting to a PC Laptop Computer ..................................... |
10 |
Connecting to a Desktop Macintosh......................................... |
13 |
Connecting to a PowerBook..................................................... |
17 |
Connecting to a Video Source .............................................. |
22 |
Connecting to an External Speaker or |
|
PA System ............................................................................ |
25 |
■ ■ ■ ■ ■
iii

2 Using the Projector |
27 |
Turning the Equipment On and Off ..................................... |
29 |
Turning the Projector On and Off ............................................ |
29 |
Focusing and Positioning the Screen Image .......................... |
31 |
Resize Button........................................................................... |
33 |
Controlling the Projector...................................................... |
34 |
Using the Remote Control ....................................................... |
35 |
Using the Operation Panel ....................................................... |
38 |
Projector Status Indicators .................................................... |
39 |
Operation Indicator.................................................................. |
39 |
Lamp Indicator......................................................................... |
40 |
Temperature Indicator.............................................................. |
40 |
3 Using the Projector Menus |
43 |
Accessing the Main Menu ..................................................... |
44 |
Changing a Menu Setting ..................................................... |
45 |
Menu Options ...................................................................... |
47 |
Video Menu (Image source = Computer) ................................. |
47 |
Video Menu (Image source = Video) ........................................ |
49 |
Audio Menu............................................................................. |
50 |
Effect Menu ............................................................................. |
51 |
Setting Menu ........................................................................... |
51 |
User's Logo Menu ................................................................... |
52 |
Reset All Menu......................................................................... |
54 |
Advanced Menu ....................................................................... |
55 |
About Menu............................................................................. |
56 |
4 Maintenance |
57 |
Cleaning the Lens................................................................. |
58 |
Cleaning the Projector Case.................................................. |
58 |
Cleaning the Air Filter .......................................................... |
59 |
Replacing the Lamp.............................................................. |
60 |
■ ■ ■ ■
iv Contents

5 Troubleshooting |
63 |
Problems with the Projector.................................................. |
64 |
Problems with the Image or Sound....................................... |
66 |
Technical Specifications |
69 |
Supported Monitor Displays ................................................. |
71 |
Computer In connector pin assignments ............................... |
73 |
Glossary |
75 |
Index |
77 |
■ ■ ■ ■ ■
v

■ ■ ■ ■
vi Contents

■■ ■  ■ ■ ■ ■ ■ ■ ■ ■ ■ ■ ■ ■
Introduction
Your compact, lightweight EPSON EMP-713/703/503 projector lets you project full-color images and video onto a large screen for presentations. You can connect it simultaneously to two image sources: one PC or Apple® Macintosh® computer image source, plus one video source such as a video tape deck, camcorder, or digital camera. You can also connect audio for each image source.
Images are displayed in full color (16,670,000 colors) at a XGA resolution of 1024 x 768 pixels (EMP-713/703) and SVGA resolution of 800 x 600 pixels (EMP-503). Your projector produces bright images that can be easily seen in rooms light enough to take notes.
A totally new AVTSS™ (Automatic Video Tracking and Synchronization Sensing, patent pending) provides automatic set-up of image from a computer.
You control your projector through a hand-held remote control unit, with menus being provided for image source switching and image adjustment. The remote control can also act as a wireless mouse to control mouse operations on your computer screen during presentations.
■ ■ ■ ■ ■
vii

Your projector features the newest resizing technology DAR (Digital Active Resizing) which supports VGA~UXGA computer output (The EMP-503 does not support UXGA). No matter what type of computer output is used, the result is a full-size video image of outstanding clarity.
The video source can be NTSC, NTSC4.43, NTSC50, PAL M-PAL, N-PAL, PAL60 or SECAM in composite video or S- Video format. See Chapter 6 for details on supported computers and video formats.
■ ■ ■ ■
viii Introduction
Getting the Most Out of Your Projector
Your projector comes with a full set of features that enable you to control the settings for the image display, video and audio. To get the most out of your projector, read this section for a quick summary of the important features.
Optional Accessories
To enhance your use of the projector, EPSON provides the following optional accessories:
• Image Presentation Camera (XGA) |
ELPDC02 |
• Image Presentation Camera (PAL/NTSC) |
ELPDC03 |
• Computer Cable |
ELPKC02 |
• VGA-HD15 PC Cable (3.0m) |
ELPKC09 |
• VGA-HD15 Extension Computer Cable |
|
(20m) |
ELPKC10 |
• Soft Carrying Case (for PC) |
ELPKS16 |
• Soft Carrying Case |
ELPKS24 |
• Spare Lamp |
ELPLP14 |
• Portable Screen (50") |
ELPSC06 |
• 60" Screen |
ELPSC07 |
• 80" Screen |
ELPSC08 |
• Celling Mount (Silver)* |
ELPMB09 |
You can purchase these accessories from your dealer.
*A special technique is necessary to suspend the projector from the ceiling. Please consult with your dealer if you are planing to suspend the projector from the ceiling when you use it.
■ ■ ■ ■ ■
Getting the Most Out of Your Projector ix

About This Manual
Chapter 1, “Installation”, gives step-by-step instructions on how to set up the projector and connect it to your computer, video source, or other external speaker or PA system. Read the installation procedures that apply to your configuration.
Chapter 2, “Using the Projector”, describes how to switch the projector on/off and control simple projector settings using the remote control or the operation panel.
Chapter 3, “Using the Menus”, describes how to use the menus to adjust the color and image settings, change the display of the projected image, and modify audio settings.
Chapter 4, “Maintenance”, describes how to clean your projector and perform limited maintenance.
Chapter 5, “Troubleshooting”, describes how to interpret your projector’s indicator lights and gives helpful information for avoiding errors, optimizing image quality and solving problems.
Chapter 6, “Technical Specifications,” lists the technical specifications for your projector.
A Glossary and Index are provided at the end of the manual.
■ ■ ■ ■
x Introduction

Where to Get Help
If you are having trouble setting up or running your projector, first see Chapter 5, “Troubleshooting”. If you cannot resolve the problem, contact the appropriate representative listed in the section entitled “International Warranty Conditions” in “Safety Instructions/World-Wide Warranty Terms” included in the package.
Before you call, please have the following information ready:
•Product name
•Product serial number
•Computer configuration
•Description of the problem
World Wide Web site
If you connect to the Internet and have a Web browser, you can access to EPSON’s World Wide Web site at http:// www. epson. com. EPSON’s home page provides you What’s New, EPSON Products, EPSON Connection, Corporate Info and EPSON Contacts. Link to the EPSON Connection for the latest drivers and FAQ’s (Frequently Asked Questions) and the EPSON Chart area. To get in touch with EPSON around the world, EPSON Contacts includes Contact Information for local EPSON subsidiaries.
■ ■ ■ ■ ■
Where to Get Help xi

■■ ■ ■
xiiIntroduction
■ |
■ |
■ |
■ ■ ■ ■ ■ ■ ■ ■ ■ ■ ■ ■ |
1 |
|
|
|
1 |
|
|
|
Installation |
|||
This chapter describes how to unpack and set up your projector, and connect it to other equipment. The projector must be connected to a computer or a video source such as a video tape deck, camcorder, digital camera or laser disc player before it can project any images.
You may also want to set up the projector for one or more of the following:
•Connect the mouse cable to use the remote control as a wireless mouse.
•Provide audio for one or both image sources. The audio source can be the computer, video source, or another device such as a stereo.
•Connect to an external speaker or PA system to amplify the audio.
■ ■ ■ ■ ■
1

Unpacking the Projector
When you unpack the projector, make sure you have all these components:
•Projector
•Remote control
•Two alkaline dry cells LR6 (AA)
•Power cord
•Computer cable
•Audio/Video cable (A/V cable)
•PS/2 mouse cable
•USB mouse cable
•Owner’s manual
•Quick reference guide
•Safety Instructions/World-Wide Warranty Terms
•Softcase
Depending on the configuration of your equipment, you may not need all these components.
Save all packaging materials in case you need to ship the projector in the future. It should be transported in its original packaging or the equivalent.
■ ■ ■ ■
2

Additional Components
Depending on how you plan to use the projector, you may need these additional components:
•To receive an S-Video signal, you need an S-Video cable. (One is usually provided with your video device.) A separate cable is required for each video source.
•To connect the projector to a Macintosh PowerBook, you need a video-out cable.
(One is provided by/or can be purchased from Apple for all new PowerBooks that have video-out capability.) If your PowerBook does not include one, see your Macintosh dealer.
•To connect the mouse cable to your computer, you may require a special connector, cable, or other components. You can obtain these items from your computer dealer. If your computer doesn’t have a mouse connector, you cannot use the mouse cable.
♦Note: You can connect a Kensington MicroSaver® anti-theft device in the hole on the projector’s right side. Contact your computer dealer.
■ ■ ■ ■ ■
Unpacking the Projector 3

Setting Up the Projector
1.Place the projector on a sturdy, level surface within five feet of the computer or video source.
♦Caution: Do not hold the projector by the lens. This can damage the lens.
2.Place the projector at a correct distance from the screen.
The distance between the projector and the screen determines the actual image size. Use the general guidelines below to determine the correct distance.
Screen size |
Horizontal distance from projector to screen |
|||
300 inches (610x460cm) 450.7 inches (11.5m) |
~ |
546.3 inches (13.8m) |
||
200 inches (410x300cm) |
299.5 inches (7.7m) |
~ |
363.3 inches (9.2m) |
|
150 inches (305x228cm) |
223.9 inches (5.7m) |
~ |
271.7 inches (6.9m) |
|
100 inches (200x150cm) |
148.3 inches (3.8m) |
~ |
180.2 inches (4.5m) |
|
80 inches |
(160x120cm) |
118.1 inches (3.0m) |
~ |
143.6 inches (3.6m) |
60 inches |
(120x90cm) |
87.8 inches (2.3m) |
~ |
107.0 inches (2.7m) |
40 inches |
(81x61cm) |
57.6 inches (1.5m) |
~ |
70.4 inches (1.7m) |
30 inches |
(61x46cm) |
42.5 inches (1.1m) |
~ |
52.1 inches (1.3m) |
26 inches |
(53x40cm) |
— |
~ |
44.7 inches (1.1m) |
|
|
|
|
|
3.Turn the projector so that the lens is at right angles to the screen. If the projector is not angled correctly, the screen image will be crooked.
4.Connect one end of the power cable to the projector’s power connector. Connect the other end to an earthed electrical socket.
The projector should be in sleep mode, indicated by an orange power indicator.
♦Warning: Never look into the lens when the projector is on. There is a risk that the projector might come on suddenly even though it is not in use. The light from the lamp can damage your eyes. It is especially important that children should not be allowed to look into the lens.
■ ■ ■ ■
4
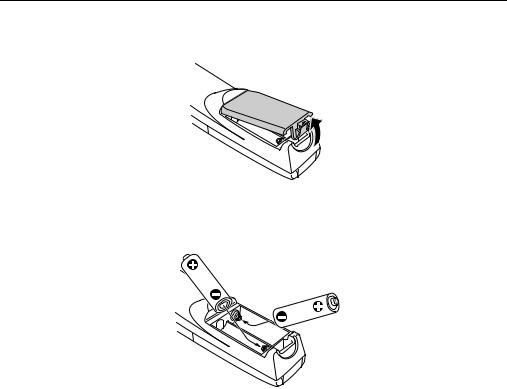
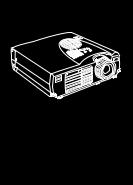
5.To insert the batteries in the remote control device, slide off the battery compartment cover.
6.Insert the two alkaline dry cells LR6 (AA) included with the projector. Make sure the polarity of the batteries is correct.
7. Replace the battery compartment cover.
When replacing batteries, take the following precautions:
•Do not recharge the used batteries or expose to fire or water.
•Replace batteries as soon as they run out. If the batteries leak, wipe away battery fluid with a soft cloth. If fluid gets on your hands, wash them immediately.
•Remove the batteries if you will not be using the projector for a long period of time.
■ ■ ■ ■ ■
Setting Up the Projector 5
Connecting to a Computer
You can connect the projector to a computer capable of VGA, SVGA, XGA, SXGA and UXGA output (The EMP-503 does not support UXGA).
To connect the computer and mouse cables (to use the wireless remote as a mousepointer), see the section in this chapter that applies to your computer.
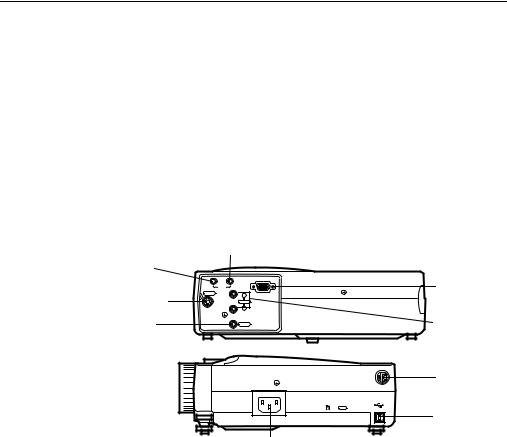
The illustration below identifies all the interface ports on the back of the projector; you may want to refer to this as you connect your computer or other equipment to the projector.
Audio In
Audio Out
Computer
S-Video
Video
Out |
In |
|
Audio |
S-Video |
|
R
Audio
L
Video
Computer
L-Audio-R
Mouse/Com
Mouse/Com
USB Mouse
Power Inlet
■ ■ ■ ■
6
Connecting to a PC Desktop Computer
To connect the projector to your PC desktop computer, you need to:
•Connect the computer cable
•Connect the audio cable (if you’ll be projecting with audio)
Follow the steps in each section for the cables you need to connect. Before beginning, turn off the projector and computer if they are on.
♦Note: Computer configurations vary. See your computer manual for the location of the ports needed to connect your projector.
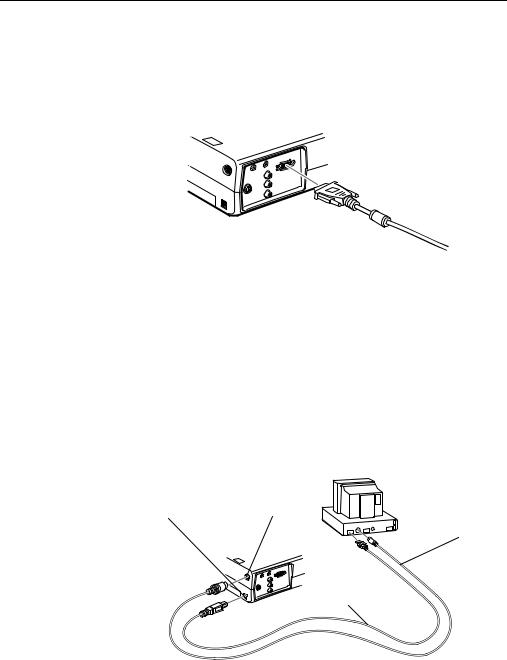
Connecting the Computer
Refer to this illustration while following the steps below.
Computer port
computer cable
■ ■ ■ ■ ■
Connecting to a Computer 7
1.If you will be viewing the video on your computer monitor as well as the projector screen, disconnect the monitor cable from the video port on the back of your computer.
2.Connect one end of the computer cable to the projector’s Computer port.
3.Connect the other end of the computer cable to the computer’s video port.
4.Tighten the screws on all connectors.
Connecting the Mouse Cables
If you want to use the remote control as a mouse, you need to connect the PS/2 mouse cable or USB mouse cable.
♦Note: The USB mouse port on the projector can only be used by connecting a USB mouse. It is not possible to connect other USB equipment for use.
Refer to this illustration while following the steps below.
USB mouse port |
Mouse/Com port |
PS/2 mouse cable
USB mouse cable |
■ ■ ■ ■
8

1.Connect the 9-pin end of the PS/2 mouse cable or, the USB mouse cable to the Mouse/Com or USB mouse port on the projector.
2.Disconnect your mouse from the mouse port on the back of your computer and replace it with the other end of the PS/2 mouse cable or USB mouse cable. (Your computer’s mouse will be disabled while you are using the remote control as a mouse.)
Connecting the Audio Cable
1.If you will be using audio, connect one end of the audio cable to the Audio In jack on the projector.
Audio In jack
audio cable
2.Connect the other end of the audio cable to the speaker or audio out port on the computer’s sound card.
■ ■ ■ ■ ■
Connecting to a Computer 9
Connecting to a PC Laptop Computer
To connect the projector to your PC laptop computer, you need to:
•Connect the computer cable
•Connect the mouse cable (if you want to use the remote control as a mouse)
•Connect the audio cable (if you’ll be projecting with audio)
Follow the steps in each section for the cables you need to connect. Before beginning, turn off the projector and computer if they are on.
♦Note: Laptop configurations vary. See your computer manual for the location of the ports needed to connect your projector.
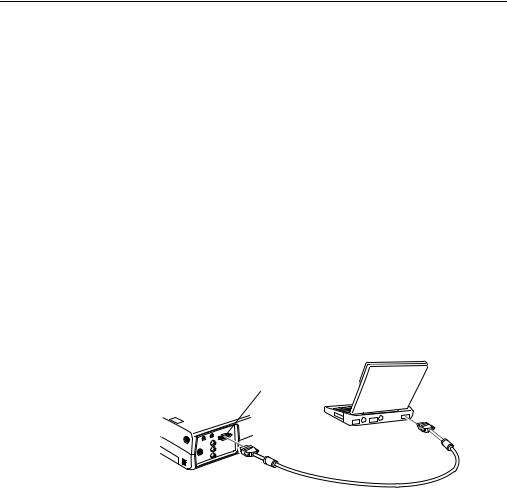
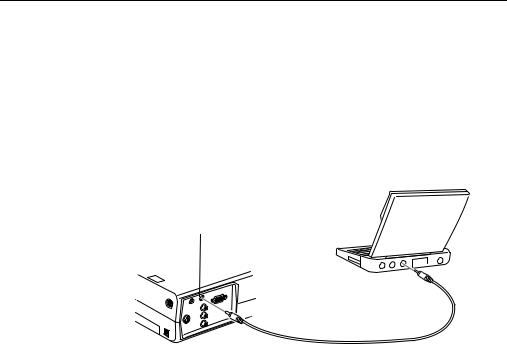
Connecting the Computer Cable
First connect the projector’s computer cable to your laptop.
Computer port
computer cable
1.Connect one end of the computer cable to the projector’s Computer port.
2.Connect the other end of the computer cable to the laptop’s video (monitor) port.
3.Tighten the screws on all connectors.
■ ■ ■ ■
10
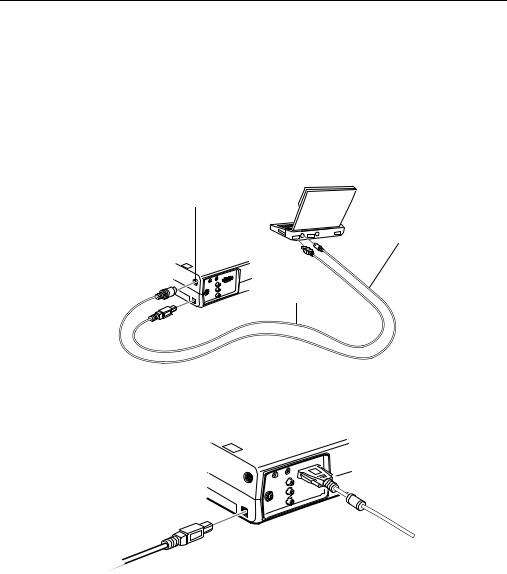
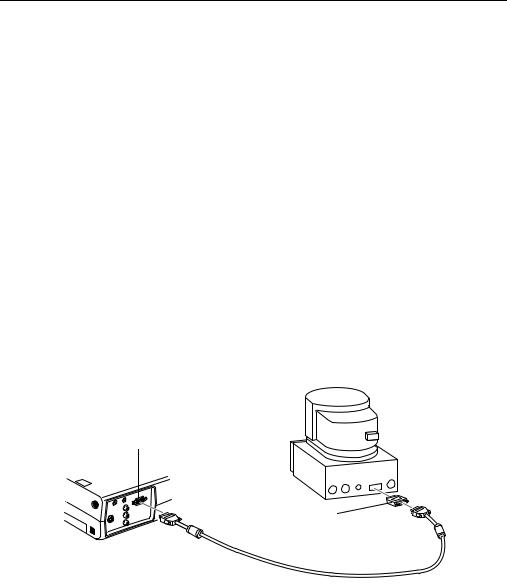
Connecting the Mouse Cables
If you want to use the remote control as a mouse, you need to connect the PS/2 mouse cable or USB mouse cable.
♦Note: The USB mouse port on the projector can only be used by connecting a USB mouse. It is not possible to connect other USB equipment for use.
Refer to this illustration while following the steps below.
Mouse/Com port
PS/2 mouse cable
USB mouse cable |
1.Connect the 9-pin end of the PS/2 mouse cable or USB mouse cable to the Mouse/Com or USB Mouse port on the projector.
2.Connect the 6-pin (mini-DIN) end of the PS/2 mouse cable or USB mouse cable to the external mouse port or USB port on your laptop.
3.Configure your laptop to work with an external mouse.
■ ■ ■ ■ ■
Connecting to a Computer 11
♦Note: You may have to set the display to appear on both the laptop’s screen and the projector. Some laptops let you change this setting with the keyboard’s function keys or by using a setup utility provided by the computer manufacturer. Check your laptop’s manual or online help for instructions.
Connecting the Audio Cable
1.If you will be using audio, connect one end of the audio cable to the Audio In jack on the projector.
Audio In jack
audio cable
2. Connect the other end of the audio cable to your laptop.
■ ■ ■ ■
12
Connecting to a Desktop Macintosh
To connect the projector to your desktop Macintosh, you need to:
•Connect the computer cable
•Connect the mouse cable (if you want to use the remote control as a mouse)
•Connect the audio cable (if you’ll be projecting with audio)
Follow the steps in each section for the cables you need to connect. Before beginning, turn off the projector and computer if they are on.
♦Note: Macintosh configurations vary. See your computer manual for the location of the ports needed to connect your projector.
Connecting the Computer Cable
First connect the computer cable. Refer to this illustration as you follow the steps below.
Computer port
Macintosh desktop adapter
computer cable
■ ■ ■ ■ ■
Connecting to a Computer 13

1.Connect one end of the computer cable to the projector’s Computer port.
2.Remove the small cover on the Macintosh desktop adapter and set its DIP switches in accordance with the resolution you want to use (such as 16-inch mode). See your Macintosh documentation for instructions.
■ ■ ■ ■
14
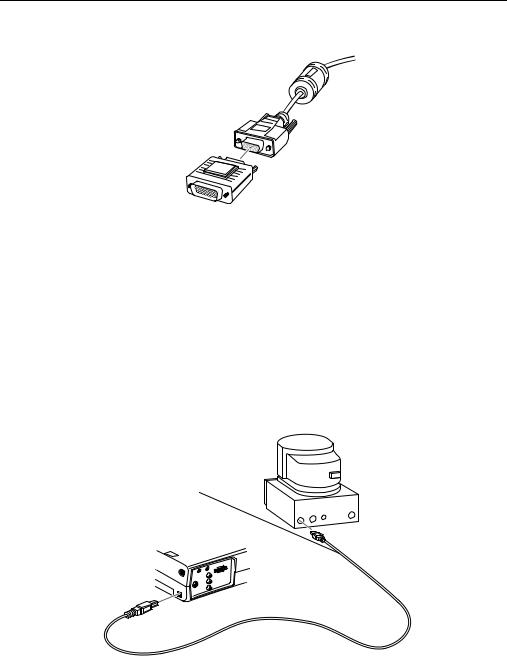
3.Connect the small terminal of the Macintosh desktop adapter to the other end of the computer cable.
4.Connect the computer cable (with the Macintosh desktop adapter attached) to the video-out port on your Macintosh.
Connecting the Mouse Cables
If you want to use the remote control as a mouse, you need to connect the USB mouse cable.
♦Note: The USB mouse port on the projector can only be used by connecting a USB mouse. It is not possible to connect other USB equipment for use.
Refer to this illustration while following the steps below.
USB mouse cable
■ ■ ■ ■ ■
Connecting to a Computer 15
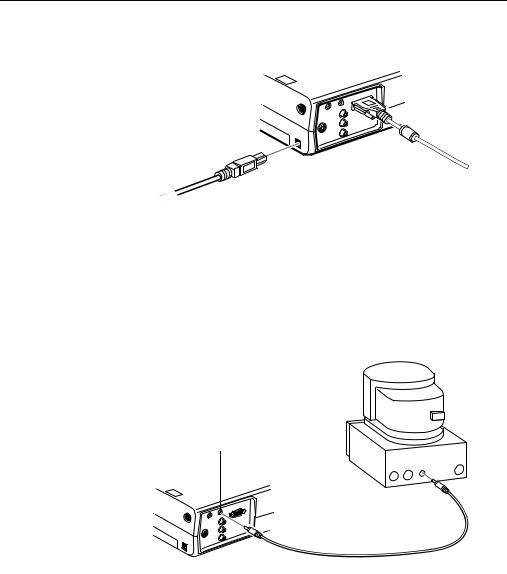
1.Connect one end of the projector’s USB mouse cable to the USB Mouse port on the projector
2.Disconnect your Macintosh’s mouse cable. Connect the other end of the projector’s USB mouse cable to the mouse port on your Macintosh.
Connecting the Audio Cable
1.If you will be using audio, connect one end of the audio cable to the Audio In jack on the projector.
Audio In jack
audio cable
2.Connect the other end of the audio cable to the Audio Out port on your computer.
■ ■ ■ ■
16
Loading...