


Dell™ | Interactive Projector
S520
Laser Touch Setup Guide
Panduan Konfigurasi Sentuhan Laser
Laser Touch

Dell™ | Interactive Projector
S520
Laser Touch Setup Guide

About Notes
NOTE: A NOTE indicates important information that helps you make better use of your projector.
__________________
Information in this document is subject to change without notice. © 2014 Dell Inc. All rights reserved.
Reproduction of these materials in any manner whatsoever without the written permission of Dell Inc. is strictly forbidden.
Trademarks used in this text: Dell and the DELL logo are trademarks of Dell Inc.; Microsoft, Windows 7, and Windows Vista are trademarks or registered trademarks of Microsoft Corporation in the United States and/or other countries.
Other trademarks and trade names may be used in this document to refer to either the entities claiming the marks and names or their products. Dell Inc. disclaims any proprietary interest in trademarks and trade names other than its own.
June 2014 |
P/N 05PF0 |
Rev. A02 |

Set Up Laser Touch on Your Projector
Set Up Laser Touch on Your Projector
NOTE: You computer must have the following minimum system requirements:
Operating System:
•Windows XP Professional service pack 3 32-bit, Windows 7 32-bit/64-bit, and Windows 8 32-bit/64-bit
•Windows .NET Framework 4.0 installation is required (You can download it from the Microsoft site)
•MacOS 10.6 and above
Minimum Hardware:
•Windows processor type: Intel Core i3 or above
•MAC processor type: Intel Core i2 duo or above
•Windows/MAC RAM: 2 GB of RAM required or more are recommended
•Windows/MAC Min. HDD space: 110 MB of available hard-disk space
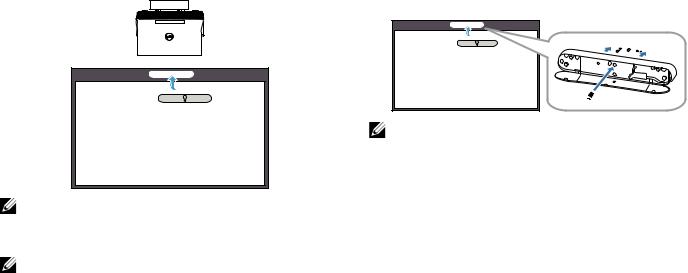
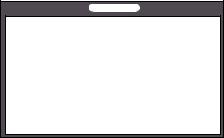
Part A: Install the Whiteboard
1 Install the whiteboard.
NOTE: Refer to "whiteboard installation instructions".
3
Set Up Laser Touch on Your Projector
Part B: Mount the Projector
2 Install the wall mount and the projector.
NOTE: The wall mount is shipped with your projector. Please refer "wall mount installation instructions".
NOTE: Project at 87" for a maximum image size projection or ~84" if you would like to leave a border around the projector image for optimal touch experience.
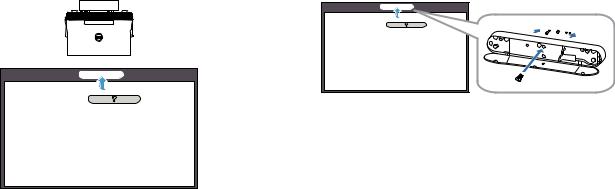
Part C: Attach Laser Curtain Kit
3Attach the laser curtain kit onto the whiteboard.
(a) 
 (b) Screw
NOTES:
aAttachment is aided with locating pin and magnets.
bYou can also lock the kit in place with a security screw.
cThere is a cover for the laser curtain kit.
4
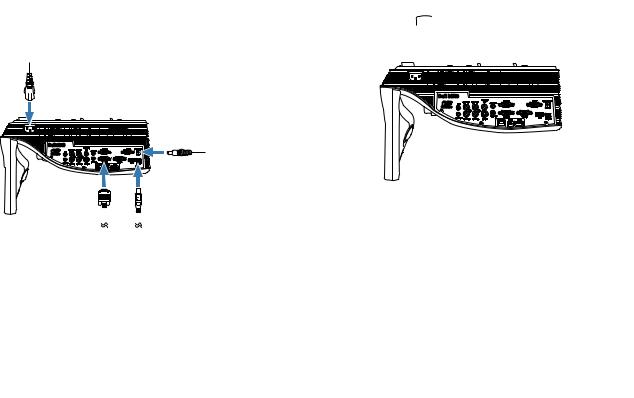
Part D: Connect Necessary
Cables
4Connect power, video, Mini USB, and DC- to-DC cables to the projector.
Set Up Laser Touch on Your Projector
5Connect the power cable to the power outlet.
6Connect the DC-to-DC cable to the laser curtain kit.
2m DC-to-DC cable
5

Set Up Laser Touch on Your Projector
7 Connect the VGA cable to your computer.
8Connect the Mini USB cable to your computer.
5 m Mini USB cable
NOTE: You can also project the image through VGA-B and HDMI. Press the left button on your control panel for auto searching and selecting the correct input source.
9Power on the projector by pressing the power button on the remote control.
6
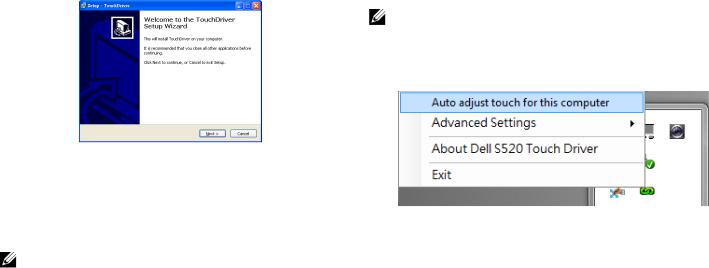
Part E: Install the Touch Driver on Your Computer
10The TouchDriver install message will popup automatically after you plug in the USB cable to your computer. Follow the onscreen instruction to complete setup.
The driver icon  will appear in your computer's notification area if the driver has installed successfully.
If the Touch driver is not automatically installed, go to My Computer and run "TouchDriver.exe".
NOTE: You may require administrator-level access to install the driver. Contact your network administrator for support.
Set Up Laser Touch on Your Projector
Part F: Initialize the Touch
Control Function: Auto Adjust
Touch
This is recommended for first-time use, and necessary when touch screen responds inaccurately or erratically.
NOTE: You have to project in duplicate or projector only modes.
11When executing driver, click the  icon. The following menu appears on-screen.
7
Set Up Laser Touch on Your Projector
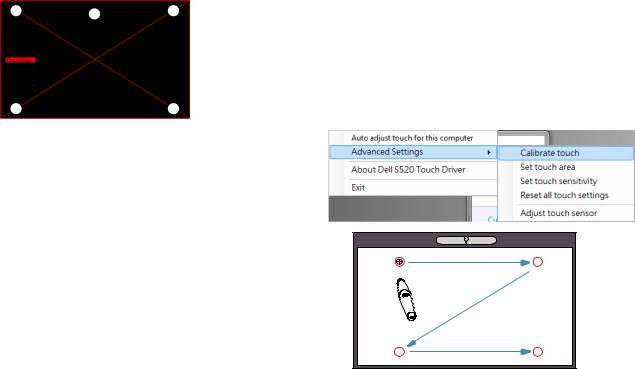
Select "Auto adjust touch for this computer" option to execute the auto "calibration and touch area" procedure.
If the "auto adjust touch failed" message prompts, please take the steps below for troubleshooting, then do auto adjust touch again.
aTurn lights off or reduce stray light to whiteboard
bDo not walk in front of or move the projector
cAdjust focus to sharpen the projected image
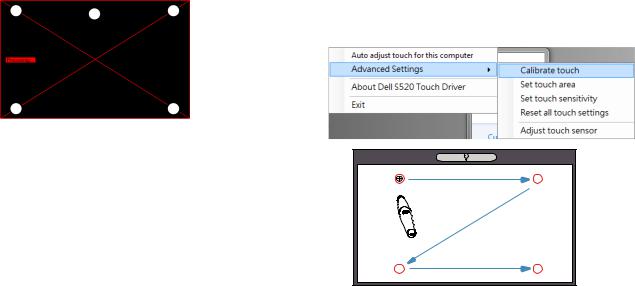
If the "auto adjust touch still failed" message appears on screen, please change to manual calibrate touch and manual touch area.
Calibrate Touch by Manual:
Executing driver, click the  icon, and go to Advanced Settings menu, click the
Calibrate touch option to execute the manual calibrate touch mode.
12
3 |
4 |
Touch the target marks on the screen. (Press the "ESC" key to exit the calibration process). After the 4th point of calibration is finished, please wait for 2 seconds while the calibration data is saved.
8
Touch Area by Manual:
Executing driver, click the  icon, and go to Advanced Settings menu, click the Set touch area option to execute the manual calibrate touch mode.
Set Up Laser Touch on Your Projector
Touch area window will pop up.
Drag the 4 points, in the order of P1 to P4. The green frame should lie slightly outside the projected image area and there should not be any reflected light spot within this frame. Once you have completed this task, click "Exit".
9
Set Up Laser Touch on Your Projector
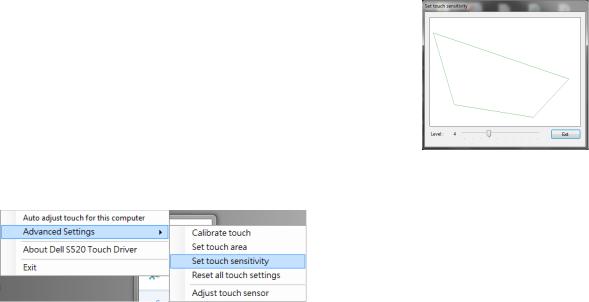
Part G: Touch Sensitivity
Adjust
When laser curtain has been operative for a long period of time, the sensitivity might be slightly reduced. Touch sensitivity functions to re-sensitize the laser curtain by restoring the initial setting.
Executing driver, click the  icon, and go to
Advanced Settings menu, click the Set touch Sensitivity option to re-sensitize laser curtain by restoring the initial setting.
Default value for Touch Sensitivity is 4. Increasing the value increases the Touch Sensitivity and Decreasing the Touch Sensitivity values reduces it.
10

Part H: Reset All Touch
Settings
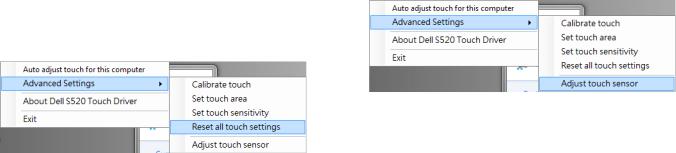
When auto or manual "calibrate touch and touch area" settings still are incorrect, you can to execute the Reset all touch settings option to reset all settings to its factory default.
Executing driver, click the  icon, and go to
Advanced Settings menu, click the Reset all touch settings option to re-sensitize laser curtain by restoring the initial setting.
Set Up Laser Touch on Your Projector
Part I: Touch Sensor Adjust
When your touch sensor setting is incorrect, you can to execute the Adjust touch sensor option to manual adjust touch sensor area.
Executing driver, click the  icon, and go to
Advanced Settings menu, click the Adjust touch sensor option to manual adjust touch sensor area.
11

Set Up Laser Touch on Your Projector
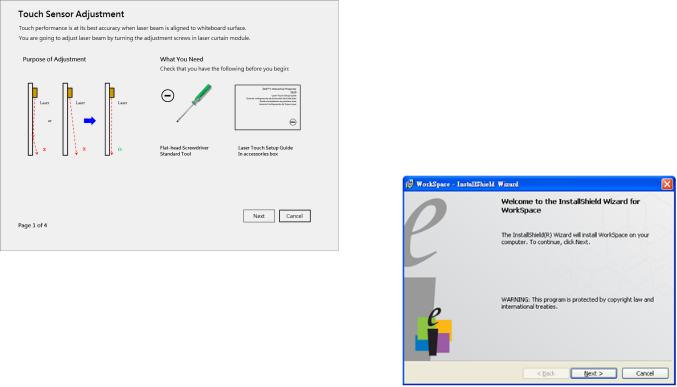
Touch sensor adjustment instruction screen shown below appears, and follow the onscreen instruction to complete settings.
Part J: Install the Workspace Application Software on Your Computer
The WorkSpace Application software is bundled along with the CD that shipped with your projector. Install the WorkSpace Application Software and follow the on-screen instructions to complete the setup. For more instructions, refer to "WorkSpace Getting Started Guide".
12

Troubleshooting
Troubleshooting
If you experience problems with Touch, see the following troubleshooting tips. If the problem persists, contact Dell (see Projector User's Guide Contacting Dell on page 122).
Problem
The touch functionality on the edge or corner of image is not working.
Possible Solution
Please refer to Part F to execute the auto adjust touch or touch area by manual or project at ~84" if whiteboard bezel is affecting touch functionality on the edge of the image.
If there is a big gap between the cursor and touch point.
Please refer to Part F to execute the auto adjust touch.
13
Troubleshooting
Problem (continued) Possible Solution (continued)
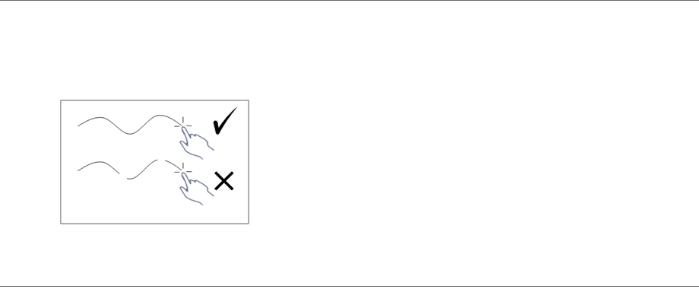
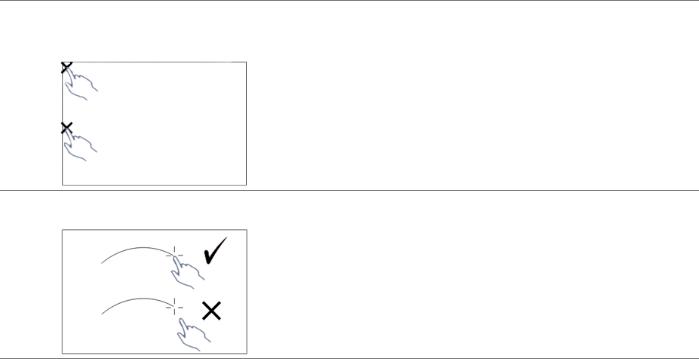
If the line drawn is not continuos, broken, or if you encounter problems with the Touch function in other areas of the projected image.
1Check for presence of foreign objects on the whiteboard.
2Please refer to Part I to execute the Adjust touch sensor area.
3If there is halogen lamp near the projector and whiteboard, light from the halogen lamp may affect touch performance. If so,
a Turn off the halogen lamp.
b Shielding the halogen lamp light to whiteboard or camera.
c Reduce Touch Sensitivity in driver. Doing so may however affect touch performance at whiteboard corners.
14

Dell™ |
S520
 :
:
__________________
© 2014 Dell Inc. All rights reserved.
Dell Inc.
:Dell DELL Dell Inc Microsoft Windows 7 Windows Vista / Microsoft Corporation
Dell Inc.
2014 6 |
P/N 05PF0 |
Rev. A02 |
 :
:
•Windows XP Professional service pack 3 32 Windows 7 32 /
64 Windows 8 32 / 64
•Windows .NET Framework 4.0
(Microsoft)
•MacOS 10.6
•Windows :Intel Core i3
•MAC :Intel Core i2 duo
•Windows/MAC RAM:RAM 2GB
•Windows/MAC HDD : 110 MB
A:
1
 :
:
3
B
 :
:
 : 87 84
C
(a) 
 (b)
(b)

4
D
4USB DC - DC
5 す。
6DC - DC
2 m DC - DC
5

|
|
|
|
|
|
|
|
|
|
|
|
|
|
|
|
|
|
|
|
|
|
|
|
|
|
|
|||||||||||||||||||||||||
7 VGA |
8 USB |
||||||||||||||||||||||||||||||||||||||||||||||||||
|
|
|
|
|
|
|
|
|
|||||||||||||||||||||||||||||||||||||||||||
|
|
|
|
|
|
|
|
|
|
|
|
|
|
|
|
|
|
|
|
|
|
|
|
|
|
|
|
|
|
|
|
|
|
|
|
|
|
|
|
|
|
|
|
|
|
|
|
|
|
|
|
|
|
|
|
|
|
|
|
|
|
|
|
|
|
|
|
|
|
|
|
|
|
|
|
|
|
|
|
|
|
|
|
|
|
|
|
|
|
|
|
|
|
|
|
|
|
|
|
|
|
|
|
|
|
|
|
|
|
|
|
|
|
|
|
|
|
|
|
|
|
|
|
|
|
|
|
|
|
|
|
|
|
|
|
|
|
|
|
|
|
|
|
|
|
|
|
|
|
|
|
|
|
|
|
|
|
|
|
|
|
|
|
|
|
|
|
|
|
|
|
|
|
|
|
|
|
|
|
|
|
|
|
|
|
|
|
|
|
|
|
|
|
|
|
|
|
|
|
|
|
|
|
|
|
|
|
5 m USB
 : VGA-B HDMI
6

E
10USB TouchDriver
|
|
|
|
「TouchDriver.exe
 :
:
F
 :
:
11
7
Auto adjust touch for this computer
auto adjust touch failed
auto adjust touch still failed
:
 Advanced SettingsCalibrate touch
12
3 |
4 |
8

ESC 4 2
:
 Advanced SettingsSet touch area
P1 P4 4Exit
9

G Touch Sensitivity
Touch sensitivity

Advanced SettingsSet touch Sensitivity
Touch Sensitivity4 Touch Sensitivity Touch Sensitivity
10
H
Reset all touch settings

Advanced SettingsReset all touch settings
I
Adjust touch sensor

Advanced SettingsAdjust touch sensor
11
J
CD
12
Dell 122 Dell
|
|
|
|
|
|
|
|
|
84 F |
|
|
|
F |
|
|
13

I
cTouch Sensitivity
14
 Loading...