


S500
Table of contents
 Loading...
Dell™ S500/S500wi Projector
User’s Guide

Notes, Cautions, and Warnings
NOTE: A NOTE indicates important information that helps you
make better use of your computer.
CAUTION: A CAUTION indicates potential damage to hardware
or loss of data if instructions are not followed.
WARNING: A WARNING indicates a potential for property
damage, personal injury, or death.
____________________
Information in this document is subject to change without notice.
© 2010 Dell Inc. All rights reserved.
Reproduction of these materials in any manner whatsoever without the written
permission of Dell Inc. is strictly forbidden.
Trademarks used in this text: Dell and the DELL logo are trademarks of
Dell Inc.; DLP and DLP logo are trademarks of T
NCORPORATED; Microsoft and Windows are either trademarks or registered
I
trademarks of Microsoft Corporation in the United States and/or other countries.
Other trademarks and trade names may be used in this document to refer to either
the entities claiming the marks and names or their products. Dell Inc. disclaims
any proprietary interest in trademarks and trade names other than its own.
Model S500/S500wi
December 2010 Rev. A00
EXAS INSTRUMENTS

Contents
1 Your Dell Projector . . . . . . . . . . . . . . . . . . 7
2 Connecting Your Projector . . . . . . . . . . . . 12
About Your Projector . . . . . . . . . . . . . . . . . 9
About Your Interactive Pen (for S500wi only)
. . . . 10
Installing the Optional Wireless Dongle . . . . . . 13
Install the Cable Cover
. . . . . . . . . . . . . . . 14
Connecting to a Computer
. . . . . . . . . . . . . . . . 15
Connecting a Computer Using a VGA Cable
Monitor Loop-Through Connection Using
VGA Cables . . . . . . . . . . . . . . . . . . . . . 16
Connecting a Computer Using a RS232 cable
Connecting a Computer by USB Cable . . . . . . . 18
Connecting a Computer Using Wireless
Connecting a DVD Player
. . . . . . . . . . . . . . . . 20
. . . . . . 19
Connecting a DVD Player Using an S-Video Cable
Connecting a DVD Player Using a Composite
Video Cable
. . . . . . . . . . . . . . . . . . . . . 21
Connecting a DVD Player Using a Component
Video Cable . . . . . . . . . . . . . . . . . . . . . 22
Connecting a DVD Player Using a HDMI Cable
Connecting to Local Area Network
. . . . . . . . . . . 24
To project an image and control the projector that is
connected to a network through a RJ45 cable.
. . . . 15
. . . 17
. 20
. . 23
. . 24
Contents 3

Professional Installation Options: Installation for
Driving Automatic Screen
Connection With Commercial RS232 Control Box
. . . . . . . . . . . . . 25
. 26
Connecting With Your Interactive Pen
(for S500wi only)
. . . . . . . . . . . . . . . . . . 27
3 Using Your Projector . . . . . . . . . . . . . . . . 29
Turning Your Projector On . . . . . . . . . . . . . . . . 29
Turning Your Projector Off
. . . . . . . . . . . . . . . . 29
Adjusting the Projected Image . . . . . . . . . . . . . 30
Raising the Projector Height
. . . . . . . . . . . . 30
Lowering the Projector Height . . . . . . . . . . . 30
Adjusting the Projector Focus . . . . . . . . . . . . . . 31
Cleaning the Projector's Mirror Process
Adjusting Projection Image Size
Using the Control Panel
Using the Remote Control
. . . . . . . . . . . . 32
. . . . . . . . . . . . . . . . . 34
. . . . . . . . . . . . . . . . 36
Using the Interactive Pen (for S500wi only)
OSD warning messages - low battery
OSD warning messages - out of range
Combinations of buttons
. . . . . . . . . . . . . . 40
Using the Wrist Strap (for S500wi only)
. . . . . 31
. . . . . . 39
. . . . . . . 40
. . . . . . . 40
. . . . . . . . . 42
Installing the Remote Control Batteries . . . . . . . . 43
Charging the Interactive Pen Battery (for S500wi only)
44
4 Contents

Docking Charger Introduction
(Optional, for S500wi only)
. . . . . . . . . . . . . . . . 45
Charging the Interactive Pen Battery
by Docking Charger
. . . . . . . . . . . . . . . . . . . 47
Operating Range with Remote Control
. . . . . . . . . 49
Operating Range with Interactive Pen
(for S500wi only)
Using the On-Screen Display
INPUT SOURCE
AUTO ADJUST
. . . . . . . . . . . . . . . . . . . . . 50
. . . . . . . . . . . . . . 51
. . . . . . . . . . . . . . . . . . . 51
. . . . . . . . . . . . . . . . . . . 52
BRIGHTNESS/CONTRAST . . . . . . . . . . . . . 53
VIDEO MODE
VOLUME
. . . . . . . . . . . . . . . . . . . . 53
. . . . . . . . . . . . . . . . . . . . . . . 54
AUDIO INPUT . . . . . . . . . . . . . . . . . . . . 54
ADVANCED SETTINGS
. . . . . . . . . . . . . . . 54
LANGUAGE . . . . . . . . . . . . . . . . . . . . . 72
HELP
. . . . . . . . . . . . . . . . . . . . . . . . . 72
Wireless Networking Installation
Enable Wireless on the Projector
. . . . . . . . . . . . 73
. . . . . . . . . . 74
Install the Wireless Application Software
on Your Computer
. . . . . . . . . . . . . . . . . . 75
S500 or S500wi Wireless Application Software
Presentation to Go (PtG) Installation
PtG Viewer
. . . . . . . . . . . . . . . . . . . . . 83
. . . . . . . . . . 82
Photo Viewer . . . . . . . . . . . . . . . . . . . . 83
PtG/Photo Function Introduction
PtG Overview
. . . . . . . . . . . . . . . . . . . . 84
. . . . . . . . . . 84
Photo Overview . . . . . . . . . . . . . . . . . . . 85
Buttons Introduction
. . . . . . . . . . . . . . . . 85
. . 78
Contents 5

Set up PtG Converter - Lite . . . . . . . . . . . . . 86
PtG Converter - Lite Application Software . . . . . 86
Managing the Projector From Web Management . . . 88
Configuring the Network Setting
Accessing Web Management
. . . . . . . . . . 88
. . . . . . . . . . . 88
Make Application Token
. . . . . . . . . . . . . . . . 107
4 Troubleshooting Your Projector . . . . . . 108
Troubleshooting your Interactive Pen . . . . . . . . . . 112
Guiding Signals . . . . . . . . . . . . . . . . . . . . . 114
Interactive Pen LED Guiding Signals
Changing the Lamp
. . . . . . . . . . . . . . . . . . . 116
. . . . . . . . . . 115
5 Specifications . . . . . . . . . . . . . . . . . . . . 118
6 Contacting Dell . . . . . . . . . . . . . . . . . . . 125
Contacting eInstruction . . . . . . . . . . . . . . . . . 126
7 Appendix: Glossary . . . . . . . . . . . . . . . . 127
6 Contents
1
Your Dell Projector
Your projector comes with all the items shown below. Ensure that you have all the
items, and contact Dell™ if anything is missing.
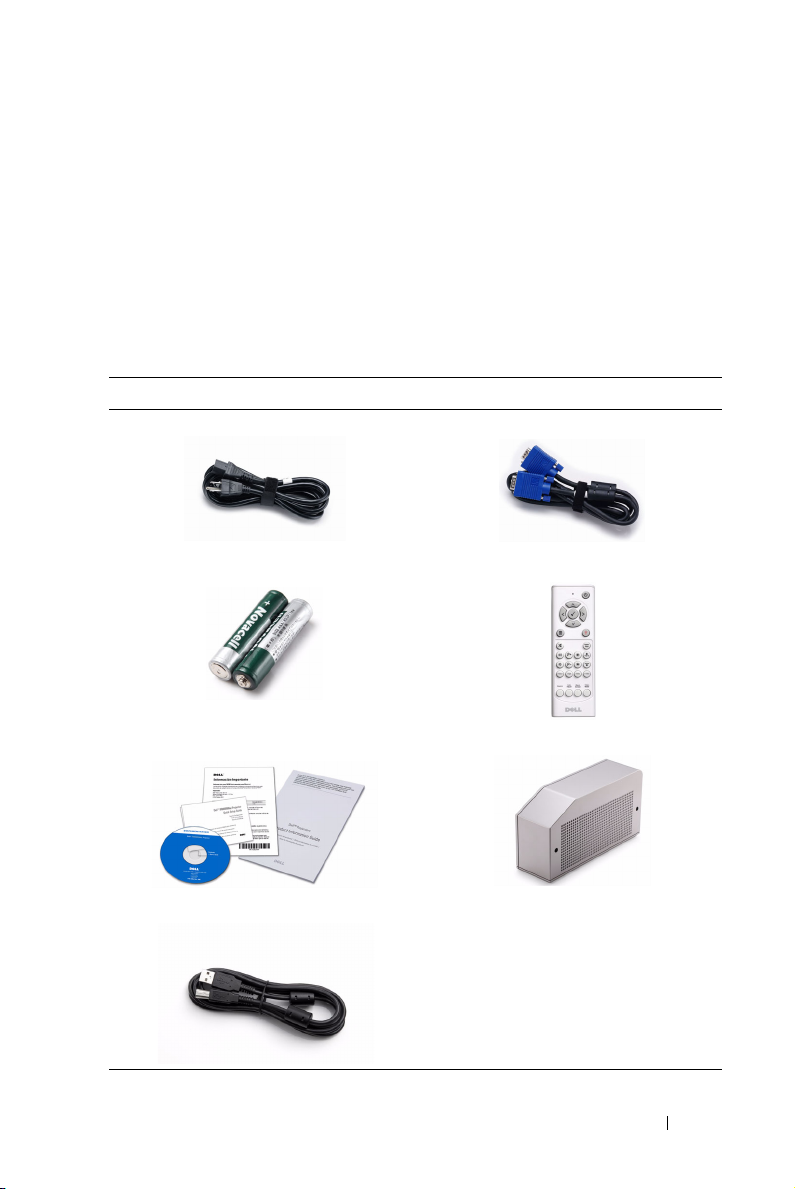
S500/S500wi Package Contents
Power cable 1.8 m VGA cable (VGA to VGA)
AAA Batteries (2) Remote control
CD User’s Guide and Documentation Cable cover
USB cable (USB-A to USB-B)
Your Dell Projector 7

Only for S500wi Package Contents
Interactive Pen
Wri s t stra p
Nib Interwrite Workspace CD
2 m Mini USB cable (USB-A to Mini
USB-B)
8 Your Dell Projector
5 m Mini USB cable (USB-A to Mini
USB-B)
About Your Projector
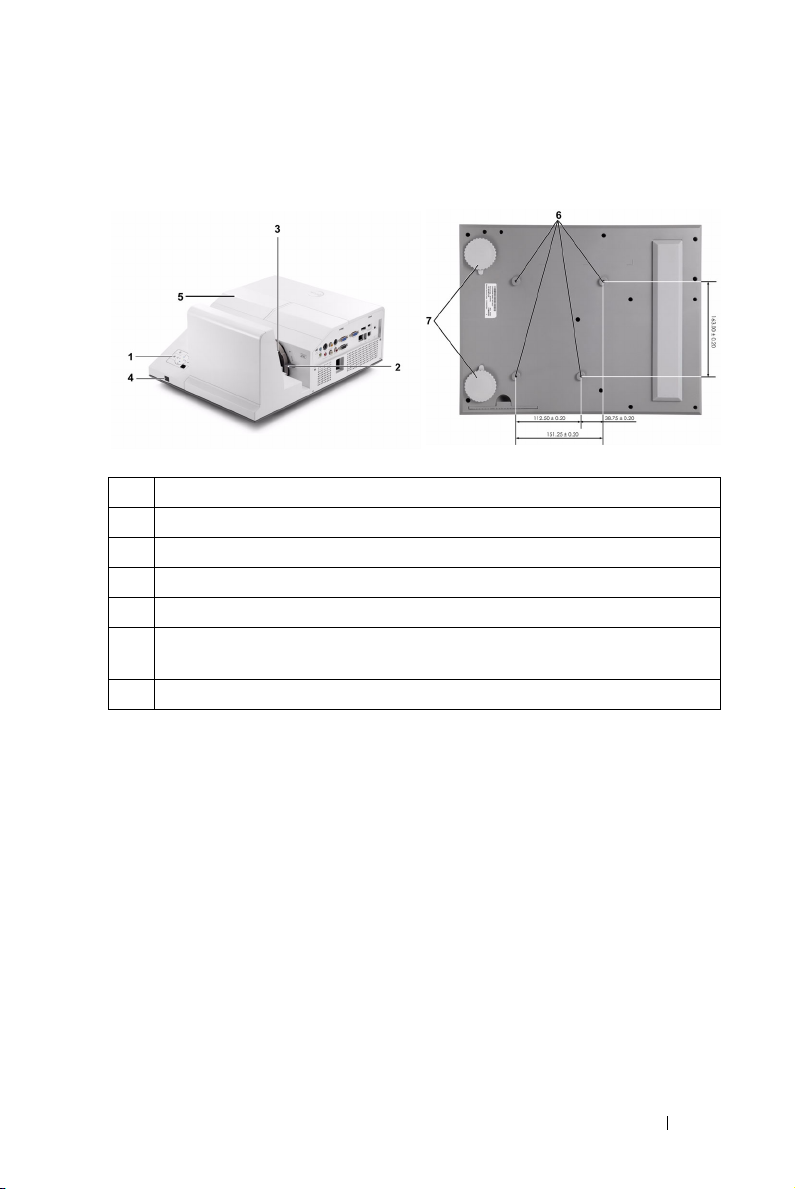
Top View
1 Control panel
2 Focus tab
3 Lens
4 IR receivers
5 Lamp cover
6 Mounting holes for wall mount: Screw hole M4 x 10 mm depth.
Recommended torque <10 kgf-cm
7 Tilt adjustment wheel
Bottom View
Your Dell Projector 9
About Your Interactive Pen (for S500wi only)
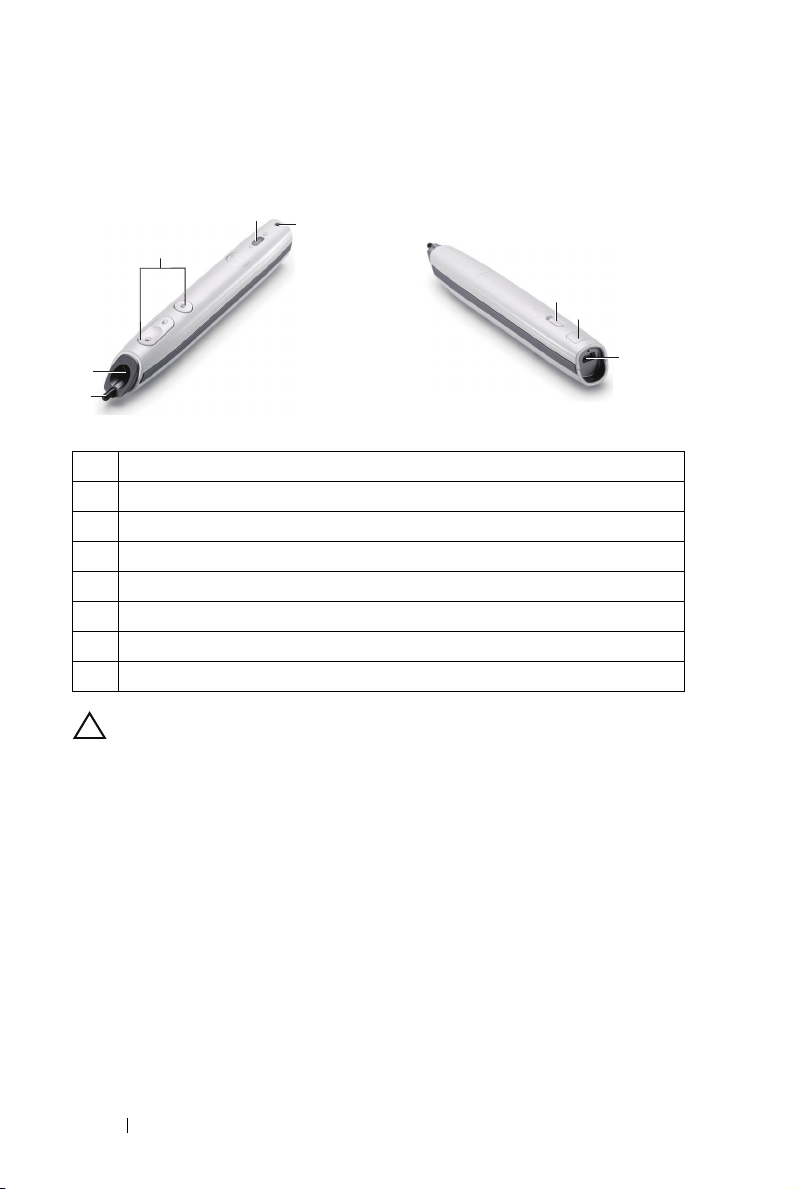
Top View
2
1
4
5
3
Bottom View
6
7
8
1 Replaceable nib
2 Lens
3 Control buttons
4 LED indicators
5 Wri s t s trap holder
6 Power switch
7 Firmware upgrade connector
8 Mini USB charge connector
CAUTION: Safety Instructions
1 Do not use the projector near appliances that generate a lot of heat.
2 Do not use the projector in areas where there is an excessive amount of dust.
The dust may cause the system to fail and the projector will automatically
shutdown.
3 Ensure that the projector is mounted in a well-ventilated area.
4 Do not block the ventilation slots and openings on the projector.
5 Ensure the projector operates between ambient temperatures (5 ºC to 35 ºC).
6 Do not try to touch the ventilation outlet as it can become very hot after the
projector has been turned on or immediately after it is turned off.
7 Do not look into the lens while the projector is on as it may cause injury to your
eyes.
8 Do not place any objects near or in front of the projector or cover its lens while
the projector is on as the heat may cause the object to melt or burn.
10 Your Dell Projector

9 Do not use the wireless projector near cardiac pacemakers.
10 Do not use the wireless projector near medical equipment.
11 Do not use the wireless projector near microwave ovens.
NOTE:
• Do not attempt to wall mount the projector by yourself. It should be
installed by a qualified technician.
• Recommended Projector Wall Mount Kit (P/N: N4MYM). For more
information, see the Dell Support website at support.dell.com.
• For more information, see the Safety Information that shipped with your
projector.
• The S500/S500wi projector can only be used indoors.
Your Dell Projector 11
Connecting Your Projector
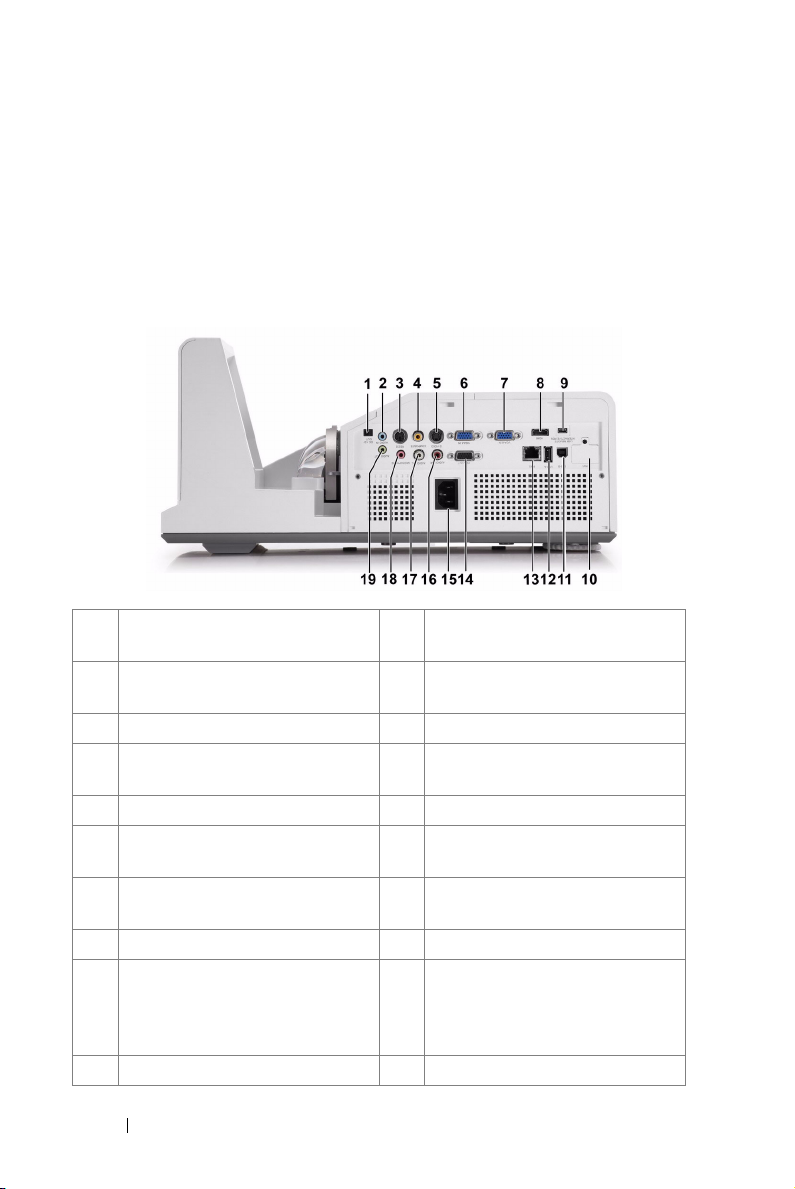
1 +12 V DC out connector 11 USB Type B connector for USB
Display
2 Audio-A input connector 12 USB Type A connector for USB
Viewer
3 RS232 connector 13 RJ45 connector
4 Composite Video connector 14 VGA-A output (monitor loop
through) connector
5 S-Video connector 15 Power cord connector
6 VGA-A input (D-sub) connector 16 Audio-B right-channel input
connector
7 VGA-B input (D-sub) connector 17 Audio-B left-channel input
connector
8 HDMI connector 18 Microphone connector
9 Mini USB (Mini Type B)
connector for remote mouse,
Interactive function and firmware
upgrade
10 WiFi USB (Type A) connector
19 Audio output connector
2
12 Connecting Your Projector
NOTE: The S500 and S500wi connectors are the same.
CAUTION: Before you begin any of the procedures in this section, follow the
Safety Instructions as described on page 10.
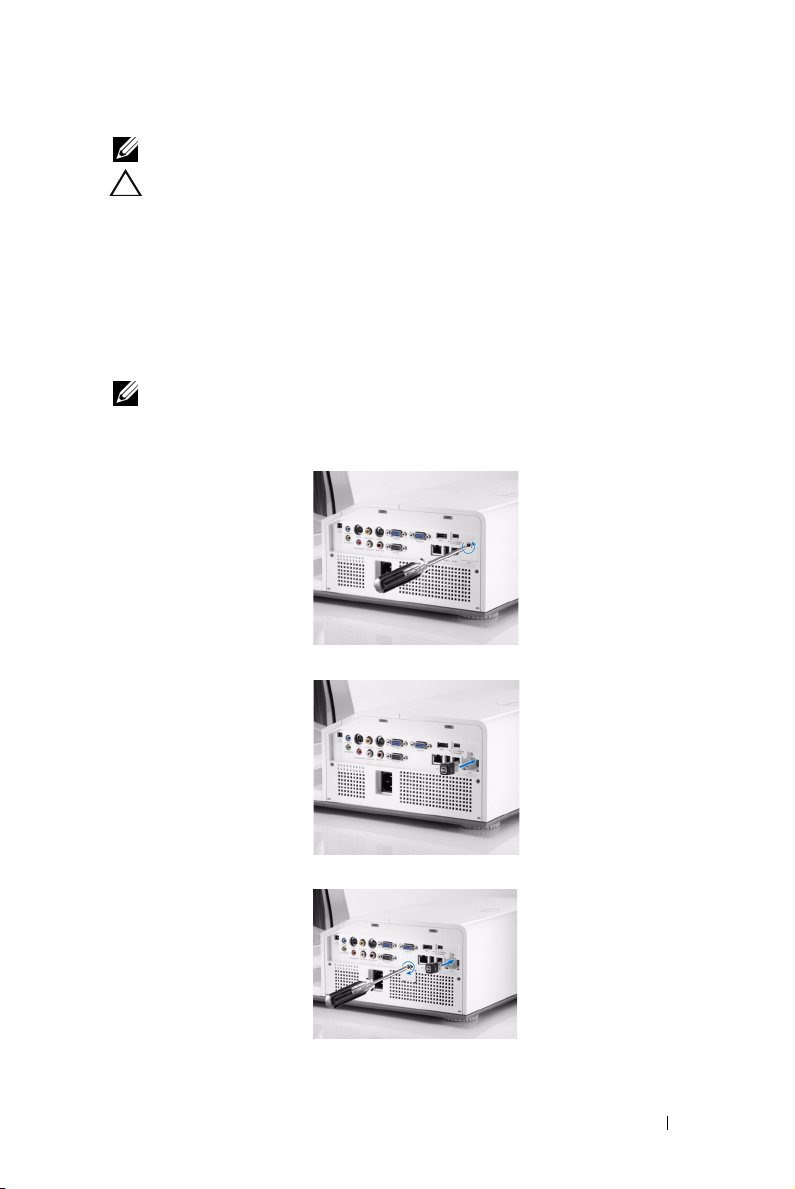
Installing the Optional Wireless Dongle
Your projector must be installed with a wireless dongle if you want to use
the wireless networking option. Refer to "Wireless Networking
Installation" on page 73. The wireless dongle is not shipped with your
S500 projector. You can purchase it on the Dell website at www.dell.com.
NOTE: Wireless dongle embedded for S500wi.
1
Unscrew and take off the wireless cover.
2
Plug in the wireless dongle.
3
Assemble the wireless cover.
Connecting Your Projector 13

Install the Cable Cover
Your projector comes with a cable cover. You can find cable cover in your
projector's box.
Follow the following steps to assemble the cable cover and your projector.
1
Locate the cable cover in the projector's box.
2
Assemble the cable cover to your projector at the Right.
14 Connecting Your Projector
Connecting to a Computer
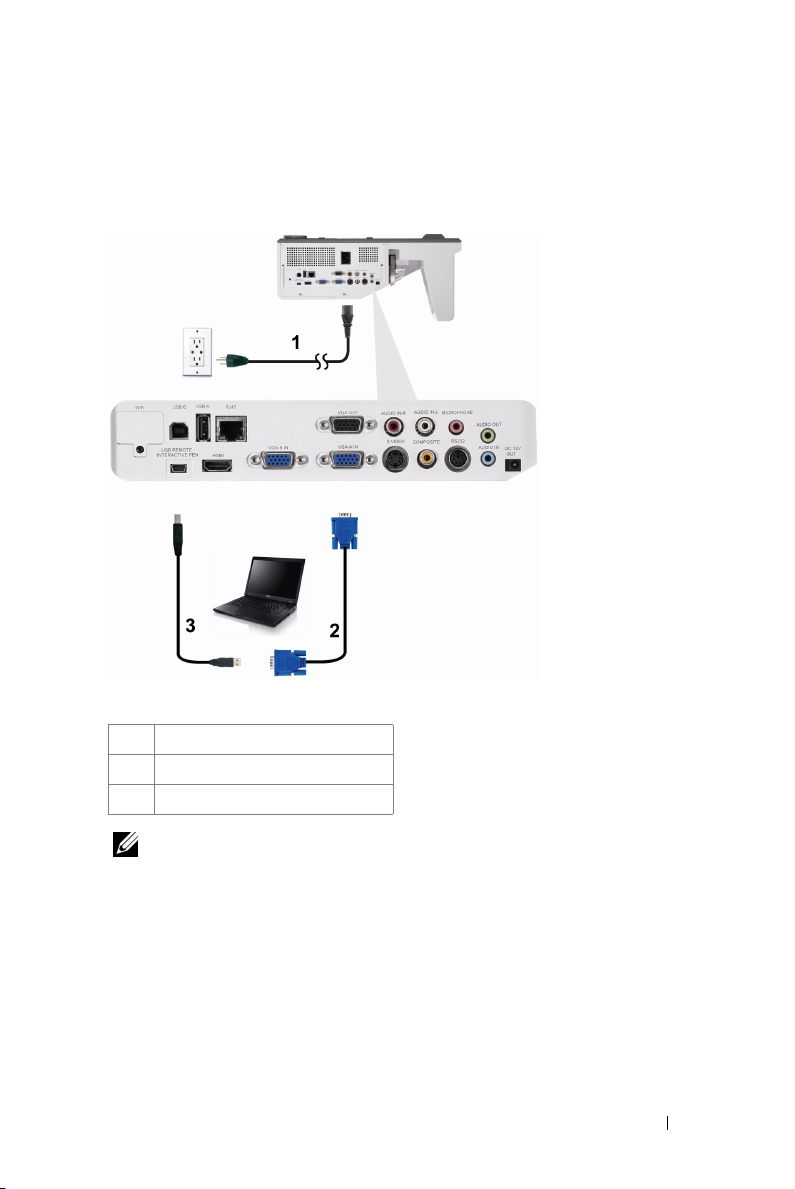
Connecting a Computer Using a VGA Cable
1 Power cord
2 VGA to VGA cable
3 USB-A to Mini USB-B cable
NOTE: The Mini USB cable must be connected if you want to use the Page Up
and Page Down features on the remote control.
Connecting Your Projector 15
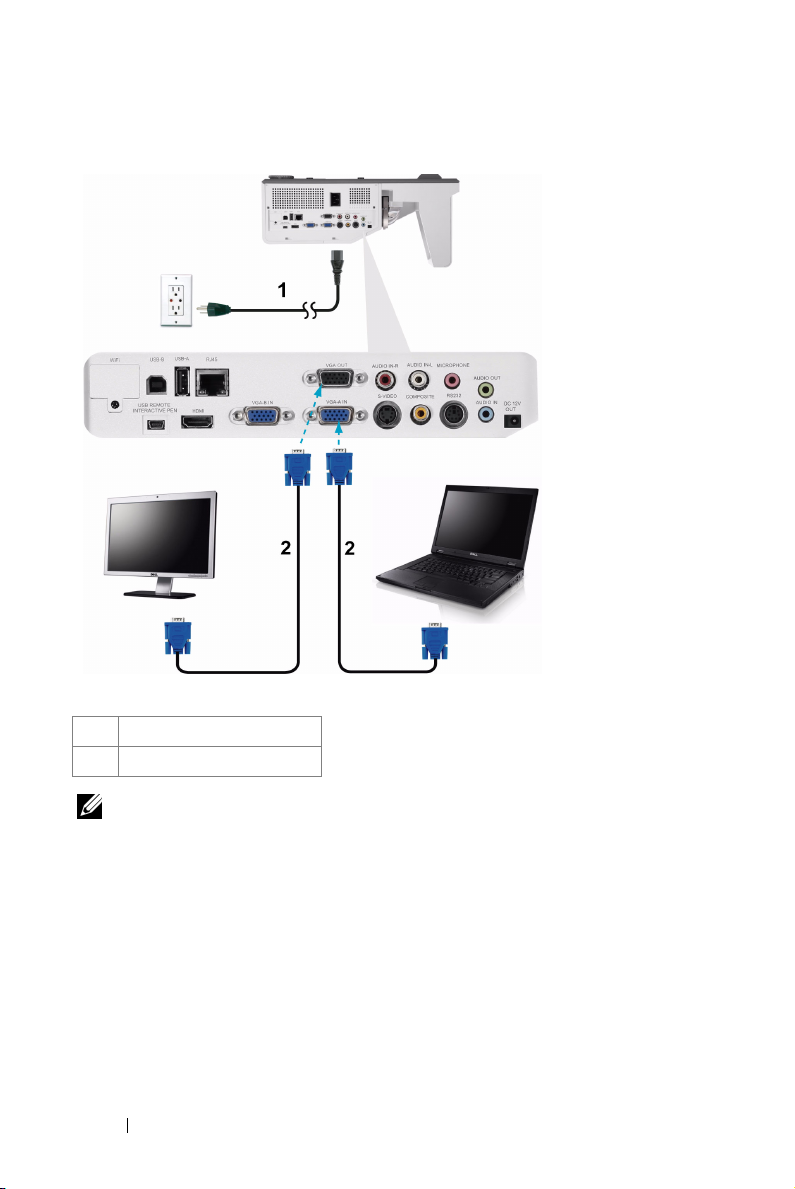
Monitor Loop-Through Connection Using VGA Cables
1 Power cord
2 VGA to VGA cable
NOTE: Only one VGA cable is shipped with your projector. An additional VGA
cable can be purchased on the Dell website at www.dell.com.
16 Connecting Your Projector
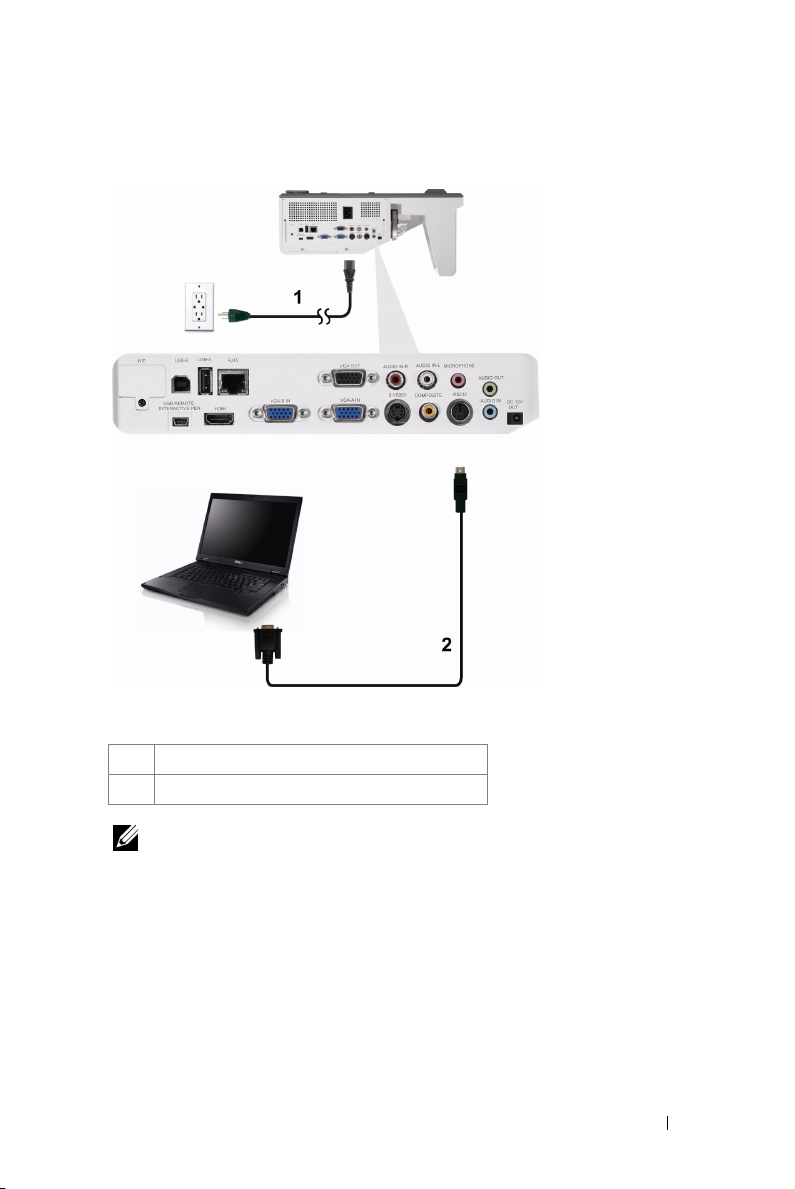
Connecting a Computer Using a RS232 cable
1Power cord
2 RS232 cable
NOTE: The RS232 cable is not shipped with your projector. Consult a
professional installer for the cable and RS232 remote control software.
Connecting Your Projector 17
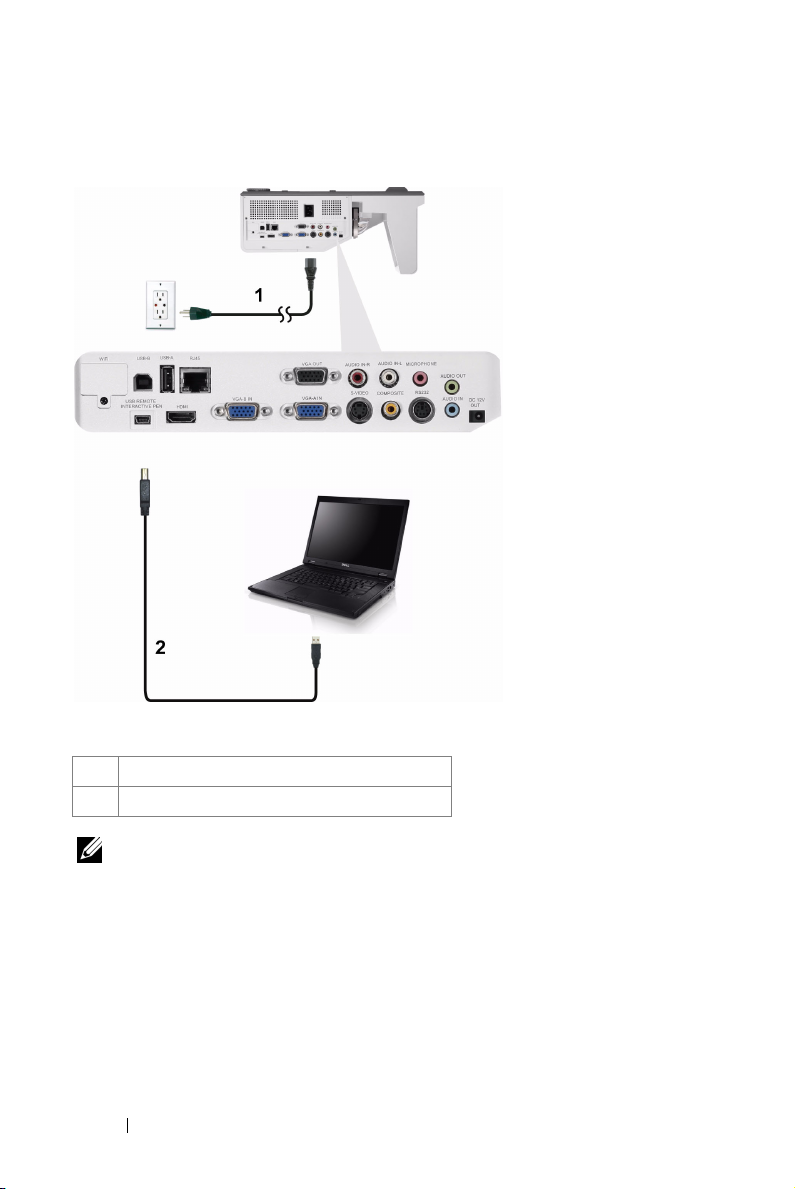
Connecting a Computer by USB Cable
1Power cord
2 USB-A to USB-B cable
NOTE: Plug and Play. Only one USB cable is shipped with your projector. An
additional USB cable can be purchased on the Dell website at www.dell.com.
18 Connecting Your Projector
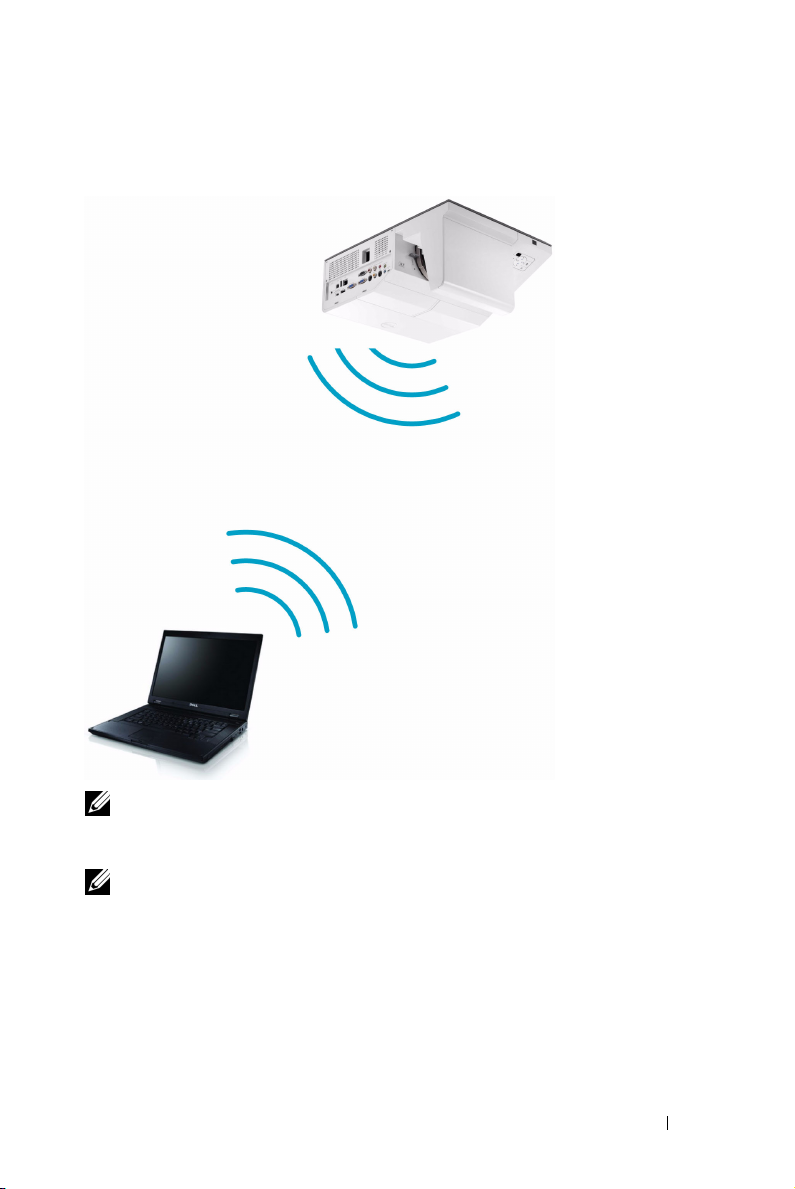
Connecting a Computer Using Wireless
NOTE: Your computer should be equipped with a wireless connector and
properly configured to detect another wireless connection. Refer to your
computer’s documentation on how to configure a wireless connection.
NOTE: Your projector must be installed wireless dongle if you want to use the
wireless networking. Refer to "Wireless Networking Installation" on page 73.
Connecting Your Projector 19
Connecting a DVD Player
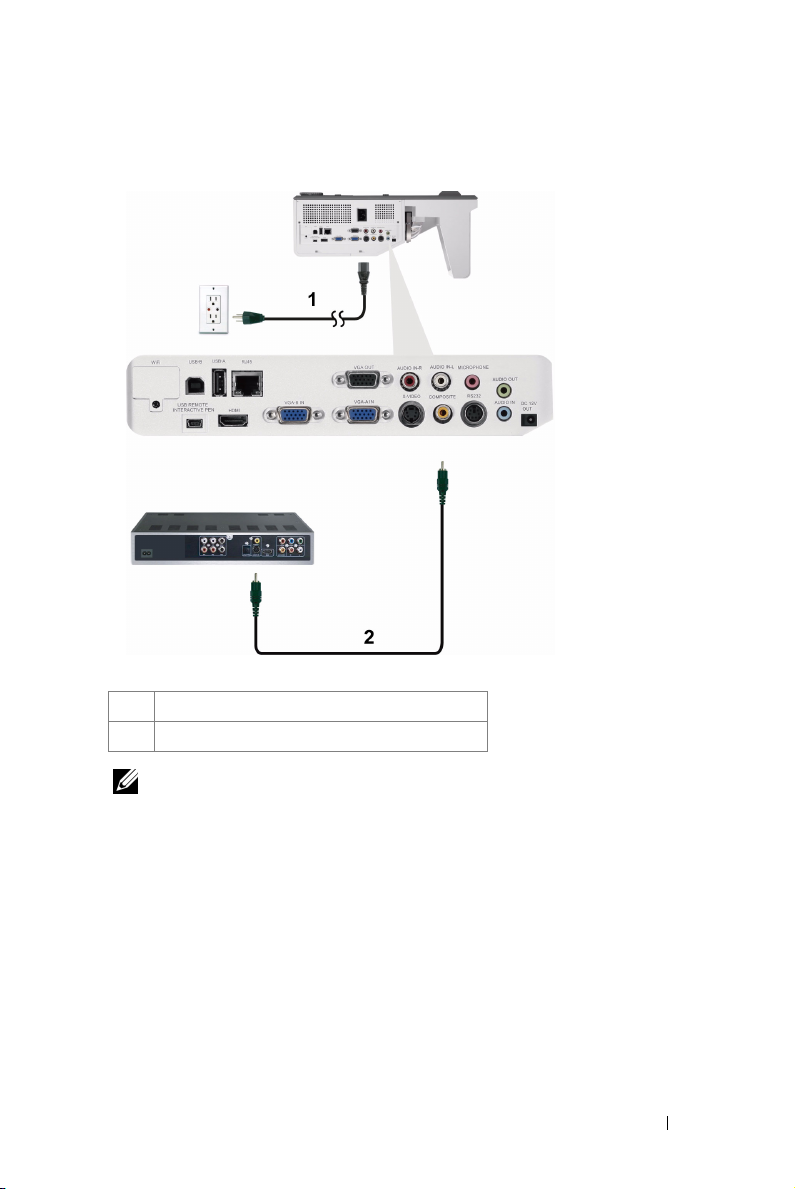
Connecting a DVD Player Using an S-Video Cable
1 Power cord
2 S-Video cable
NOTE: The S-Video cable is not shipped with your projector. You can purchase
the S-Video extension (50 ft/100 ft) cable on the Dell website at www.dell.com.
20 Connecting Your Projector
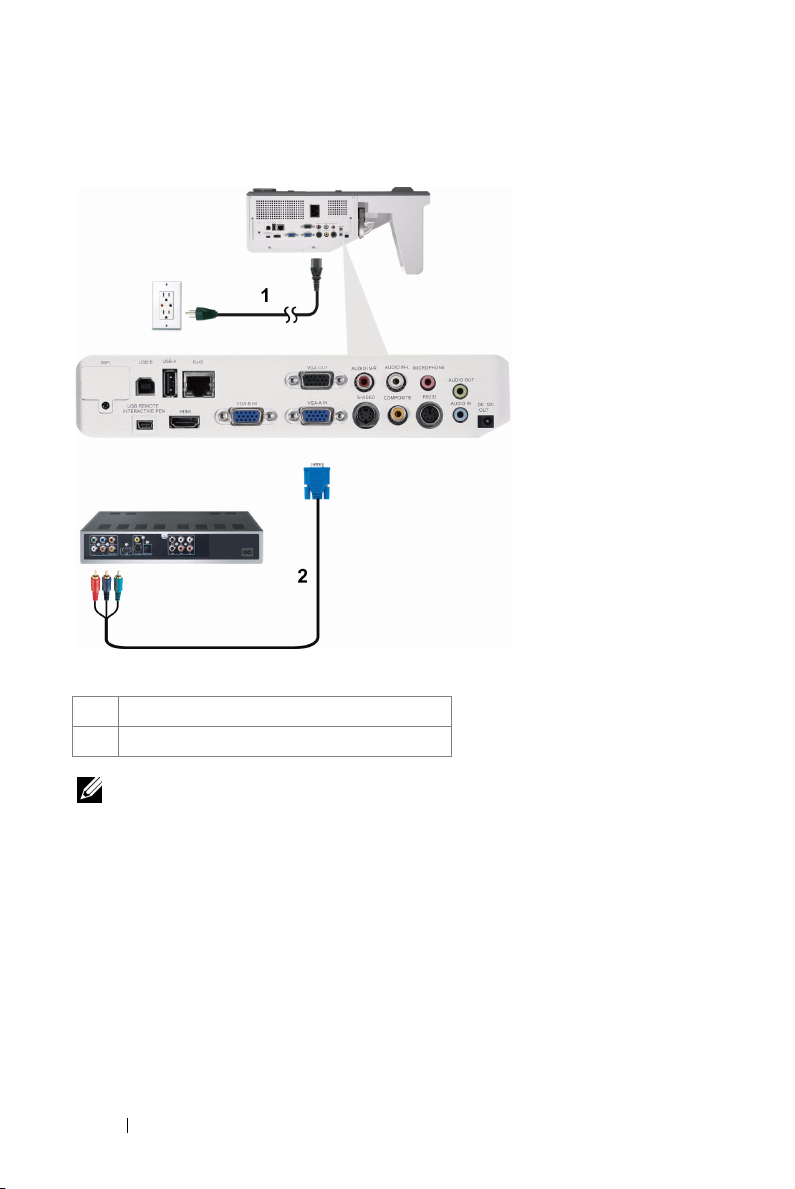
Connecting a DVD Player Using a Composite Video Cable
1 Power cord
2 Composite Video cable
NOTE: The Composite Video cable is not shipped with your projector. You can
purchase the Composite Video Extension (50 ft/100 ft) cable on the Dell website
at www.dell.com.
Connecting Your Projector 21
Connecting a DVD Player Using a Component Video Cable
1 Power cord
2 VGA to Component Video cable
NOTE: The VGA to Component Video cable is not shipped with your projector.
You can purchase the VGA to Component Video Extension (50 ft/100 ft) cable on
the Dell website at www.dell.com.
22 Connecting Your Projector
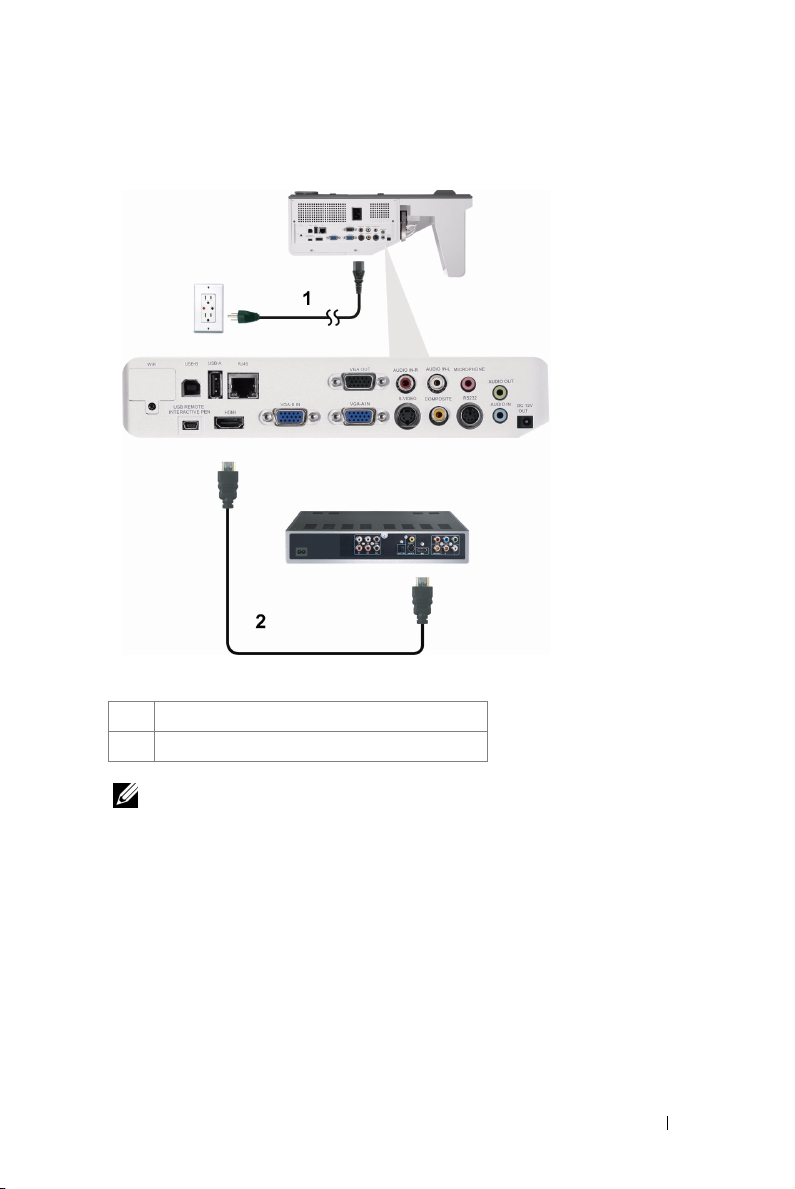
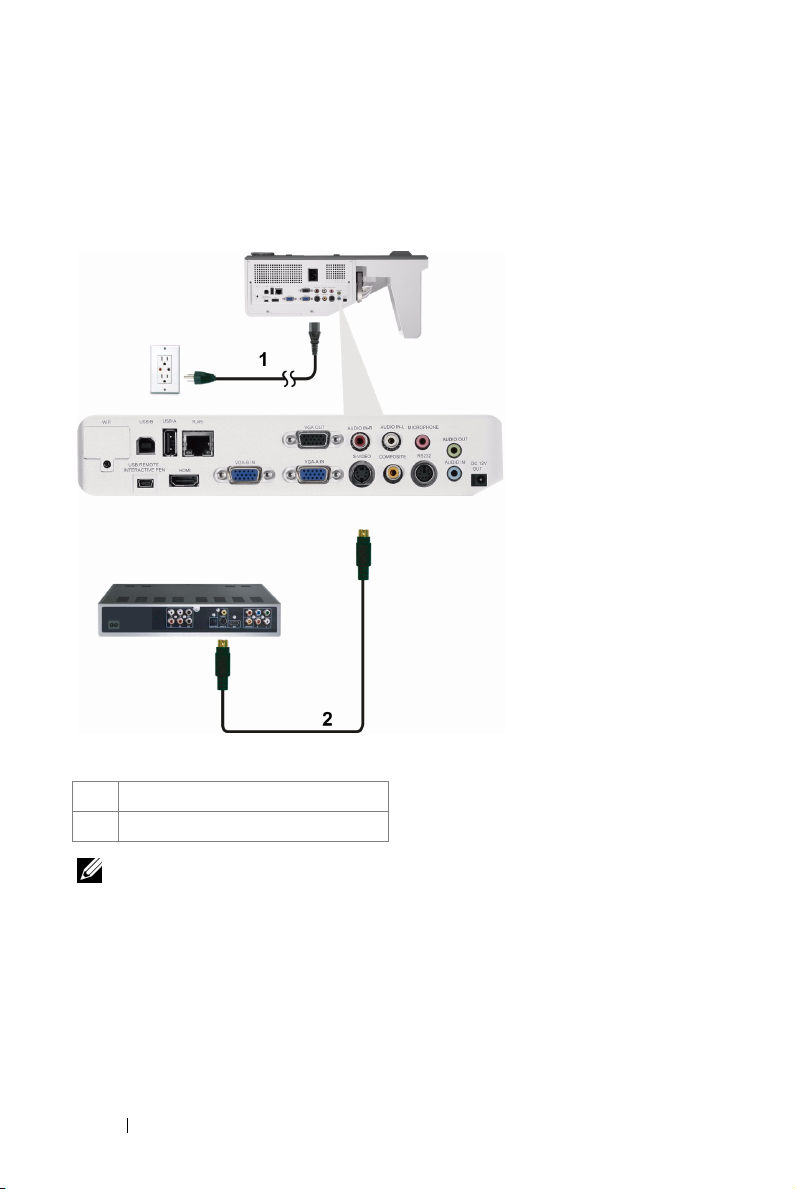
Connecting a DVD Player Using a HDMI Cable
1 Power cord
2 HDMI cable
NOTE: The HDMI cable is not shipped with your projector. You can purchase
the HDMI cable on the Dell website at www.dell.com.
Connecting Your Projector 23
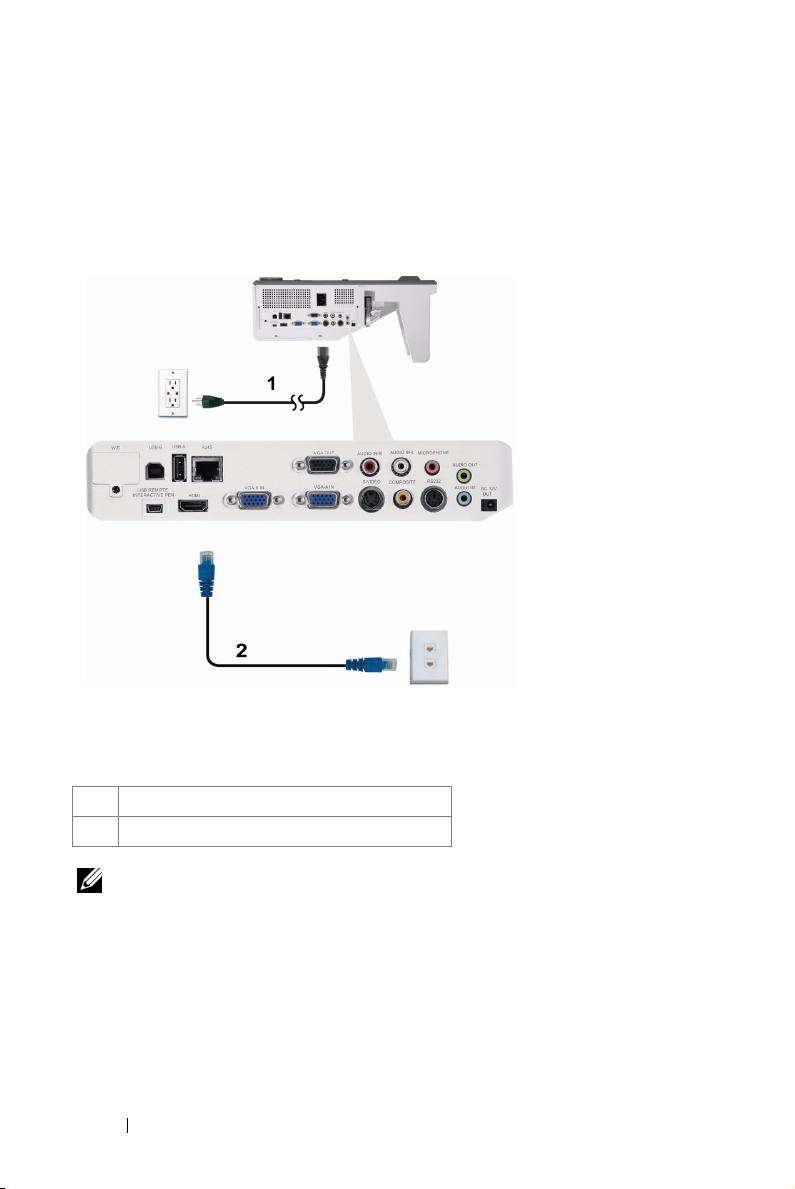
Connecting to Local Area Network
To project an image and control the projector that is connected to a network through a RJ45 cable.
Local Area Network (LAN)
1 Power cord
2 RJ45 cable
NOTE: The RJ45 cable is not shipped with your projector. You can purchase the
RJ45 cable on the Dell website at www.dell.com.
24 Connecting Your Projector
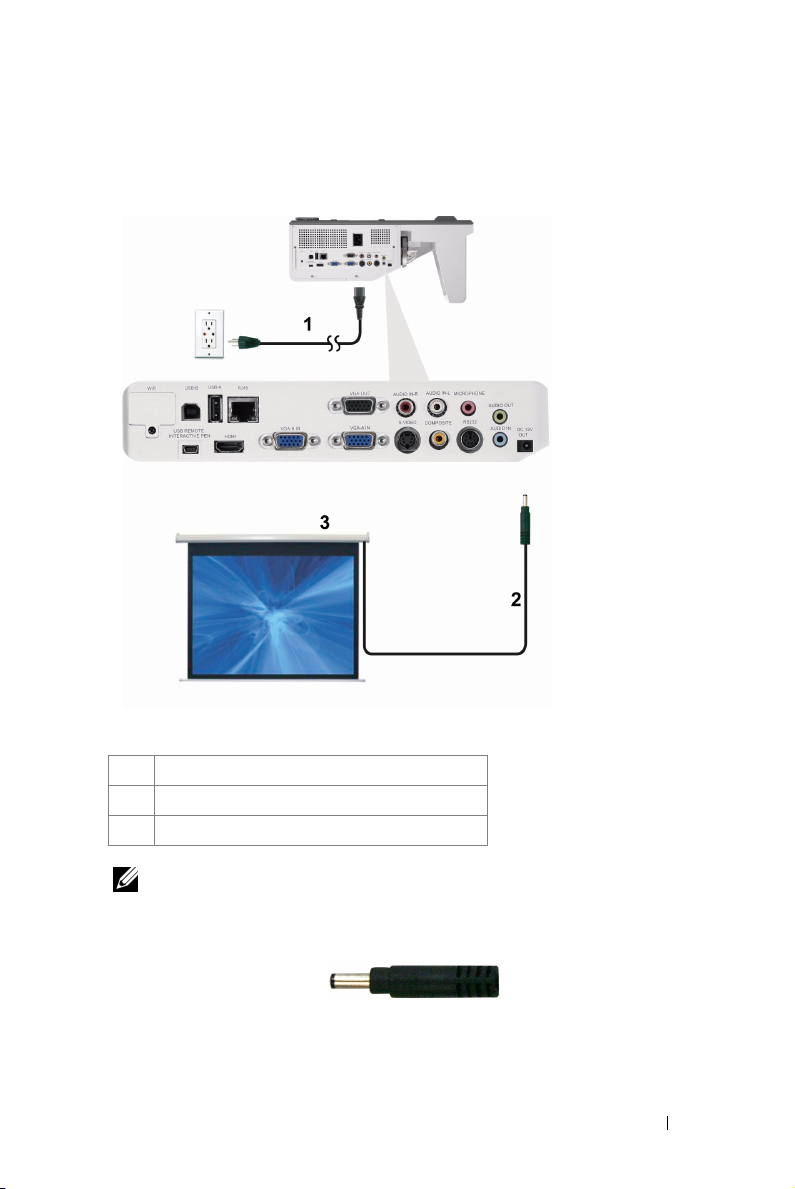
Professional Installation Options: Installation for Driving Automatic Screen
1 Power cord
2 12 V DC Plug
3 Automatic Screen
NOTE: Use a 12 V DC plug in, 1.7 mm (ID) x 4.00 mm (OD) x 9.5 mm (shaft), to
connect the automatic screen to the projector.
12 V DC Plug
Connecting Your Projector 25

Connection With Commercial RS232 Control Box
1 Power cord
2 RS232 cable
3 Commercial RS232 control box
NOTE: The RS232 cable is not shipped with your projector. Consult a
professional technician to obtain the cable.
26 Connecting Your Projector
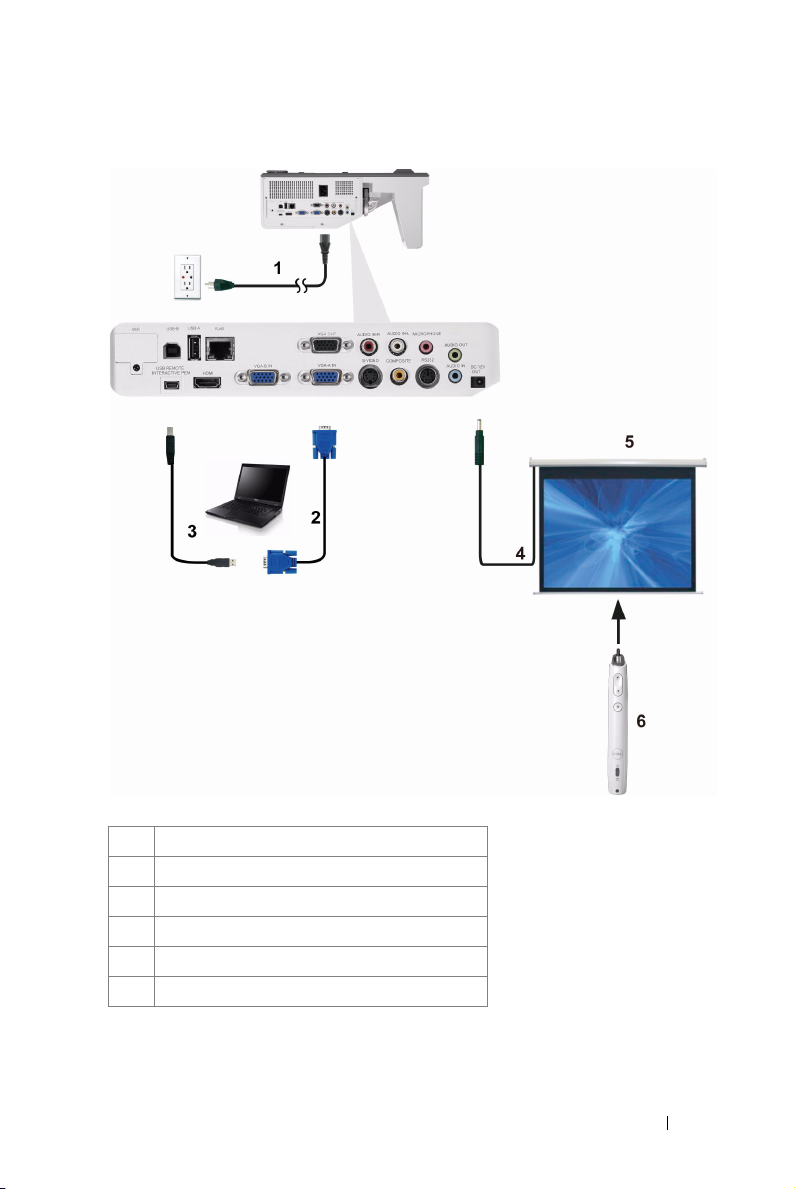
Connecting With Your Interactive Pen (for S500wi only)
1 Power cord
2 VGA to VGA cable
3 USB-A to Mini USB-B cable
4 12 V DC Plug
5 Motorized Projection Screen
6 Interactive Pen
Connecting Your Projector 27

NOTE:
1 Interactivity is supported only in the following input modes: VGA and
HDMI from a PC, and Wireless Display, USB Display, and LAN
Display.
2 To enable Interactive Pen, the 2nd connection between computer
and projector is required. There are three options available for your
computer and projector connections:
a use a Mini USB cable
b use a LAN cable (need to install the Dell Wireless Application
Software)
c use WLAN (need to install the Dell Wireless Application
Software)
If you use a LAN or WLAN connection, ensure that Wireless/LAN is
turned on first.
3 Automation Screen is optional.
4 If the distance between your computer/laptop and projector is over 5
meters, a USB hub is recommended for your installation.
28 Connecting Your Projector

3
Using Your Projector
Turning Your Projector On
NOTE: Turn on the projector before you turn on the source (computer, DVD
player, etc.). The Power button light blinks blue until pressed.
1 Connect the power cord and appropriate signal cables to the projector. For
information about connecting the projector, see "Connecting Your Projector" on
page 12.
2 Press the Power button (see "Using the Control Panel" on page 34 to locate the
Power button).
3 Turn on your source (computer, DVD player, etc.)
4 Connect your source to the projector using the appropriate cable. See
"Connecting Your Projector" on page 12 for instructions to connect your source
to the projector.
5 By default, the input source of the projector is set to VGA-A. Change the input
source of the projector if necessary.
6 If you have multiple sources connected to the projector, press the Source
button on the remote control or control panel to select the desired source. See
"Using the Control Panel" on page 34 and "Using the Remote Control" on
page 36 to locate the Source button.
Turning Your Projector Off
CAUTION: Unplug the projector after properly shutting down as explained in
the following procedure.
1 Press the Power button. Follow the instruction displayed on screen to properly
turn off the projector.
NOTE: The "Press Power Button to Turn off Projector" message will
appear on the screen. The message disappears after 5 seconds or you can
press the Menu button to clear it.
2 Press the Power button again. The cooling fans continue to operate for 120
seconds.
Using Your Projector 29
3 To power off the projector quickly, press the Power button and hold for 1 second
while the projector’s cooling fans are still running.
NOTE: Before you turn on the projector again, wait for 60 seconds to allow the
internal temperature to stabilize.
4 Disconnect the power cord from the electrical outlet and the projector.
Adjusting the Projected Image
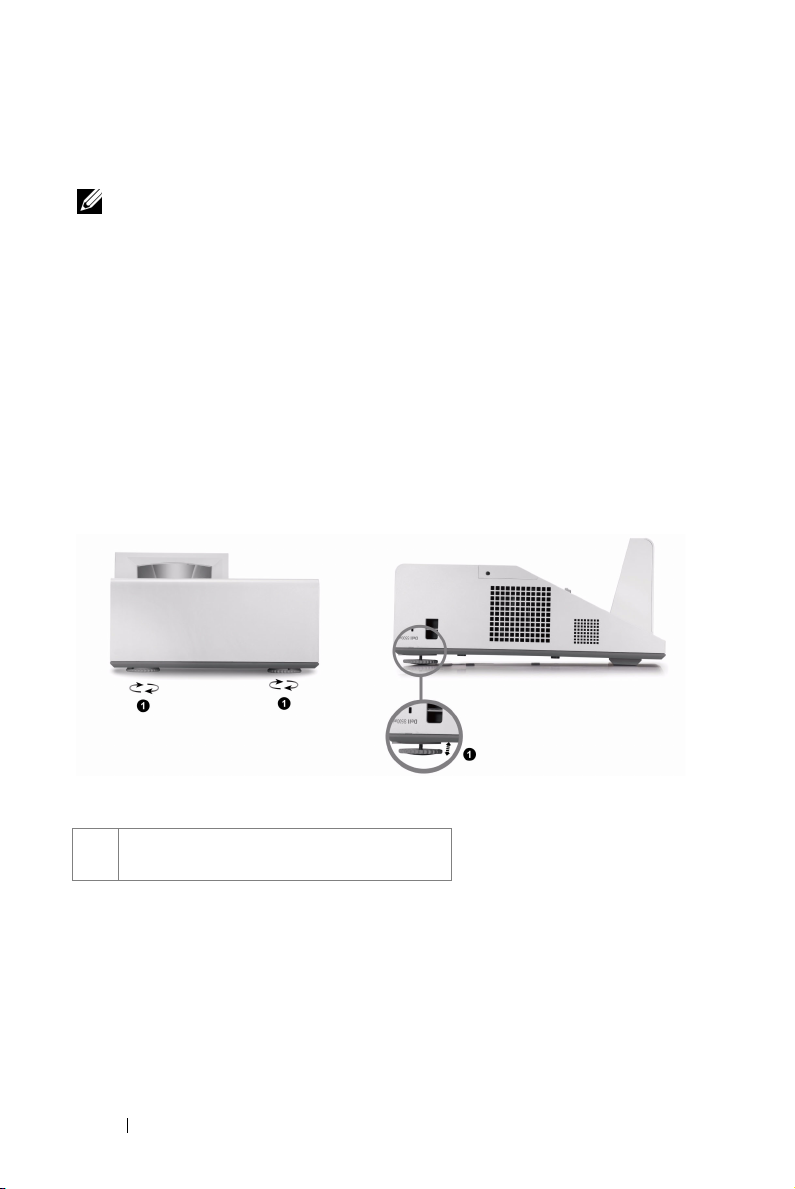
Raising the Projector Height
1 Raise the projector to the desired display angle, and use the two tilt adjustment
wheels to fine-tune the display angle.
Lowering the Projector Height
1 Lower the projector, and use the two tilt adjustment wheels to fine-tune the
display angle.
1 Tilt adjustment wheel
(Angle of tilt: -3 to 0.6 degree)
30 Using Your Projector
Loading...