


 Loading...
Mac OS X Server
Print Service
Administration
For Version 10.3 or Later

Apple Computer, Inc.
© 2003 Apple Computer, Inc. All rights reserved.
The owner or authorized user of a valid copy of Mac OS X Server software may reproduce this publication for the purpose of learning to use such
software. No part of this publication may be reproduced or transmitted for commercial purposes, such as selling copies of this publication or for providing paid-for support services.
Use of the “keyboard” Apple logo (Option-Shift-K) for commercial purposes without the prior written consent of Apple may constitute trademark infringement and unfair competition in violation of federal and state laws.
Apple, the Apple logo, AppleTalk, LaserWriter, Mac, Mac OS, and Macintosh are trademarks of Apple Computer, Inc., registered in the U.S. and other countries. Rendezvous is a trademark of Apple Computer, Inc.
Adobe and PostScript are trademarks of Adobe Systems Incorporated.
UNIX is a registered trademark in the United States and other countries, licensed exclusively through
X/Open Company, Ltd.
034-2347/09-20-03

1 Contents
Chapter 1 |
5 |
About Print Service |
|
5 |
Overview of Network Printing |
|
6 |
Without Print Service |
|
7 |
With Print Service |
|
8 |
Supported Printers |
|
9 |
Supported Clients |
|
10 |
Additional Considerations |
|
10 |
Distributing Workload Using Printer Classes |
|
10 |
Security |
Chapter 2 |
11 |
Setting Up Print Service |
|
11 |
Before You Begin |
|
11 |
Setup Overview |
|
12 |
Setting Up the Service |
|
12 |
Adding a Print Queue |
|
14 |
Choosing a Default LPR Queue |
|
15 |
Setting the Print Log Archival Interval |
|
16 |
Advertising an LPR Queue Using Rendezvous |
|
17 |
Listing an LPR Queue in Open Directory |
|
18 |
Starting Print Service |
|
19 |
Setting Print Quotas |
|
19 |
How Quotas Work |
|
20 |
Setting Quotas |
|
20 |
Specifying User Print Quotas |
|
21 |
Enforcing Print Quotas for a Queue |
|
22 |
Resetting a User’s Print Quotas |
Chapter 3 |
23 |
Setting Up Printing Clients |
|
23 |
About PPD Files |
|
24 |
Mac OS X Clients |
|
24 |
Adding an AppleTalk Print Queue in Mac OS X |
|
24 |
Adding an LPR Print Queue in Mac OS X |
|
25 |
Troubleshooting |
3

|
26 |
Mac OS 8 and Mac OS 9 Clients |
|
26 |
Setting Up an AppleTalk Queue on Mac OS 8 or 9 Clients |
|
26 |
Setting Up an LPR Queue on Mac OS 8 or 9 Clients |
|
26 |
Troubleshooting |
|
27 |
Windows Clients |
|
27 |
Troubleshooting |
|
27 |
UNIX Clients |
Chapter 4 |
29 |
Managing Print Service |
|
30 |
Managing the Service |
|
30 |
Checking the Status of Print Service |
|
31 |
Starting and Stopping Print Service |
|
32 |
Managing Print Queues |
|
32 |
Viewing Print Queue Status |
|
33 |
Stopping a Print Queue |
|
34 |
Restarting a Print Queue |
|
35 |
Changing Print Queue Settings |
|
36 |
Renaming a Print Queue |
|
37 |
Changing the Default LPR Print Queue |
|
38 |
Deleting a Print Queue |
|
39 |
Managing Print Jobs |
|
39 |
Monitoring a Print Job |
|
40 |
Putting a Print Job on Hold |
|
41 |
Releasing a Print Job |
|
42 |
Deleting a Print Job |
|
43 |
Managing Print Quotas |
|
43 |
Suspending Quotas for a Print Queue |
|
44 |
Managing Print Logs |
|
44 |
Viewing Print Service and Queue Logs |
|
45 |
Archiving Print Service Logs |
|
46 |
Deleting Archive Log Files |
|
46 |
CUPS Logs |
Chapter 5 |
47 |
Solving Problems |
|
47 |
Troubleshooting Print Service |
|
47 |
Print Service Doesn’t Start |
|
47 |
Clients Can’t Add Queue |
|
47 |
Users Can’t Print |
|
47 |
Jobs in a Server Queue Don’t Print |
|
48 |
Print Queue Becomes Unavailable |
Glossary |
49 |
|
Index |
51 |
|
4 |
Contents |

1 About Print Service |
1 |
|
Mac OS X Server print service helps you set up a managed printing environment on your network.
You can share printers by setting up print queues for them on a server. When a user prints to a shared queue, the print job waits on the server until the printer is available or until established scheduling criteria are met. For example, you can:
•Change the priority of waiting print jobs
•Hold a job for printing at a later time
•Limit the number of pages individual users can print on specific printers
•Keep logs summarizing printer use
You can use the following applications to set up and administer print service:
•Server Admin to configure print service, set up shared queues, manage print jobs, and monitor the status of print jobs
•Workgroup Manager to set print quotas for users
The Mac OS X Server print service is built on top of the standard Mac OS X client printing architecture, which is, in turn, built on the Common UNIX Printing System (CUPS).
Overview of Network Printing
It’s possible to benefit from some of the advantages of shared network printing without using a server. However, a quick comparison of network printing with and without a server-based print service shows what a print service can do to make things easier for your users and for you as an administrator.
5
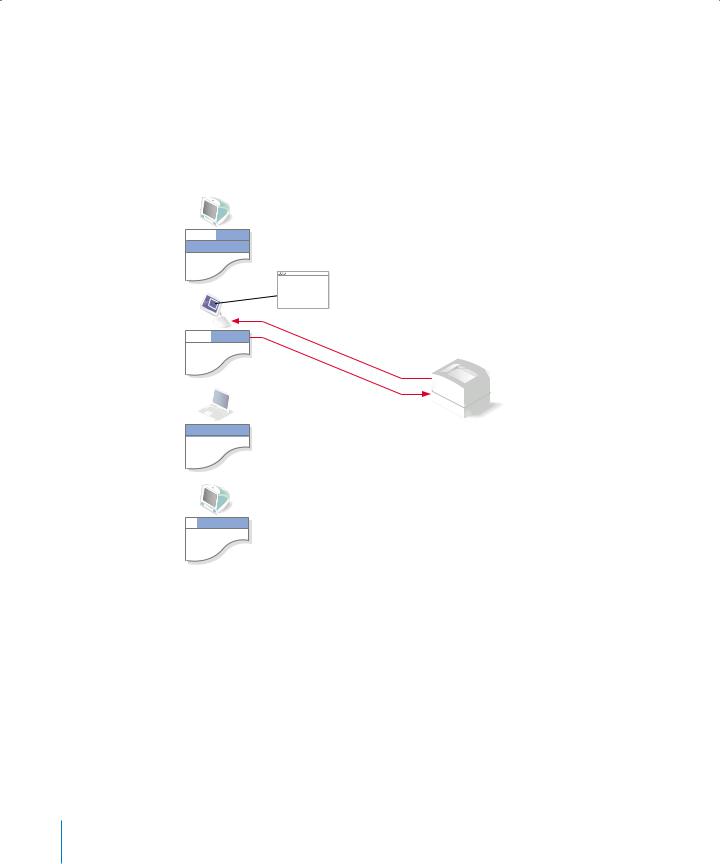
Without Print Service
Providing shared printers to your users, even without using a server, is relatively
easy: connect the printers to your network and let individual users choose the printer that best suits their needs.
When a user prints a document, the resulting print job waits in a queue on the client computer until the printer is ready to accept it (in common printing terminology, you say the job is “spooled to a local queue”).
Wait
Paper jam!
Client must deal with printer error
Wait
Wait
Jobs wait in queues on clients
Although this way of providing access to printers is easy to set up, there are shortcomings:
•Users need to be sure their jobs have finished printing before they can turn off their computers or, in the case of mobile clients, disconnect their computers from the network.
•Error messages from the printer (for example,“out of paper” or “paper jam”) go directly to the user currently printing.
•It is difficult for you, as administrator, to keep track of or control how many pages are printed by individual users.
6 |
Chapter 1 About Print Service |
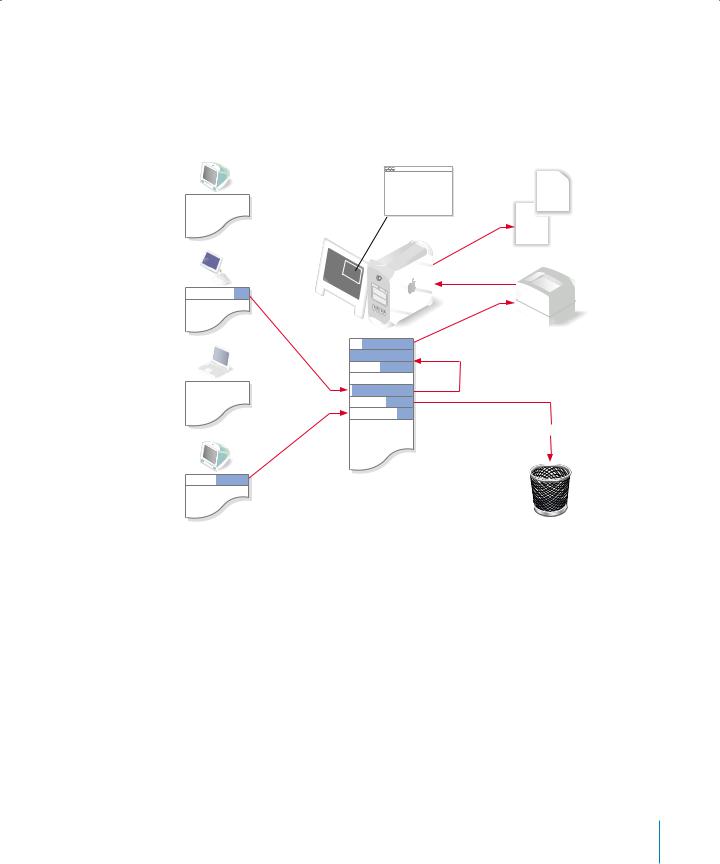
With Print Service
To take advantage of print service, you set up queues for available printers on a server. Users choose from these queues instead of choosing printers directly.
When a user prints a document, the resulting print job moves quickly from the queue on the user’s computer to the queue on the server.
Paper jam!  Service
logs
Ready
Job logs
Printer error
Priority
 Hold management
Ready
Quotas
Jobs wait in queues on server
This way of providing printer access has advantages over simple network printing:
•Print jobs transfer quickly from client computers to the server’s queue, so users can turn off or disconnect their computers soon after printing.
•Printer error conditions are reported on the server rather than on individual client computers.
•You can easily limit and track the number of pages individual users print on specific printers.
•You can control when and in what order individual jobs print.
Chapter 1 About Print Service |
7 |
Supported Printers
Print service in Mac OS X Server supports:
•PostScript-compatible printers connected to your network that use the AppleTalk or Line Printer Remote (LPR) protocol
•PostScript printers connected directly to the server using the Universal Serial Bus (USB)
Mac OS X Server
Ethernet |
USB |
AppleTalk |
LPR PostScript |
PostScript |
PostScript printer |
printer |
printer |
Note: A non-PostScript printer connected to the USB port of a Mac OS X client computer can be shared using the Printer Sharing option in Sharing preferences, but this is outside the scope of Mac OS X Server print service.
8 |
Chapter 1 About Print Service |
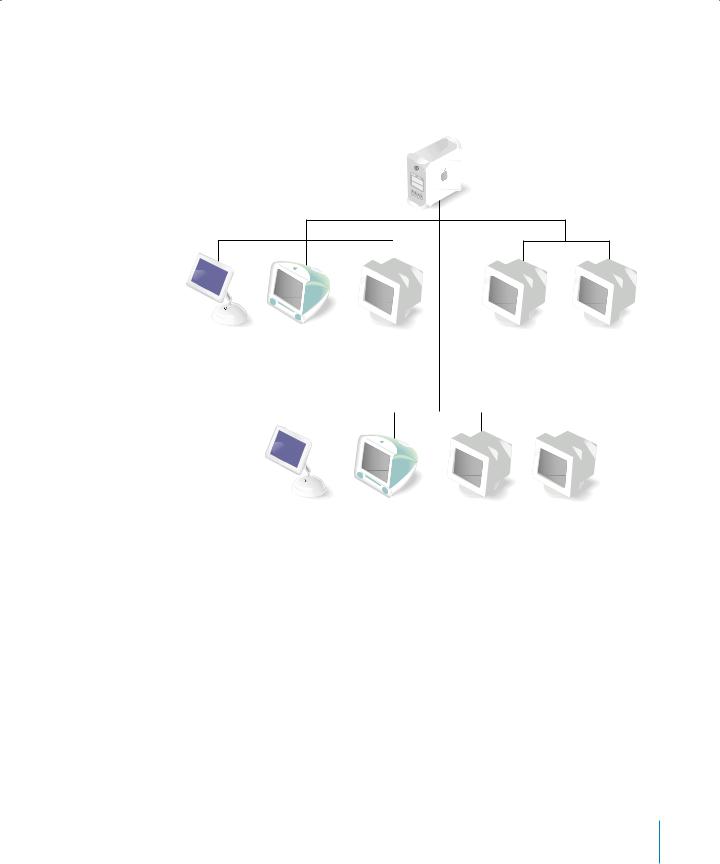
Supported Clients
Any computer using the AppleTalk, LPR, or Server Message Block (SMB) protocol can print to queues shared through the Mac OS X print service.
Mac OS X Server
Mac OS X user (printers selected using Print Center or Printer Setup Utility)
AppleTalk |
|
|
SMB |
Mac OS 8 and |
UNIX user |
Windows NT |
Windows 95, |
Mac OS 9 users |
|
and Windows |
98, and |
(printers selected |
|
2000 users |
ME users |
using Desktop |
|
|
|
Printer Utility) |
|
|
|
|
|
LPR |
|
Mac OS X user |
Mac OS 9 user |
UNIX user |
Windows NT |
(printers selected |
(printers selected |
|
and Windows |
using Print Center or |
using Desktop |
|
2000 users |
Printer Setup Utility) |
Printer Utility) |
|
|
Macintosh computers can communicate with printers using either AppleTalk or LPR. Windows computers use LPR and SMB. UNIX computers use LPR. For more information on printing from a specific kind of client computer, see Chapter 3,“Setting Up Printing Clients,” on page 23.
Chapter 1 About Print Service |
9 |

Additional Considerations
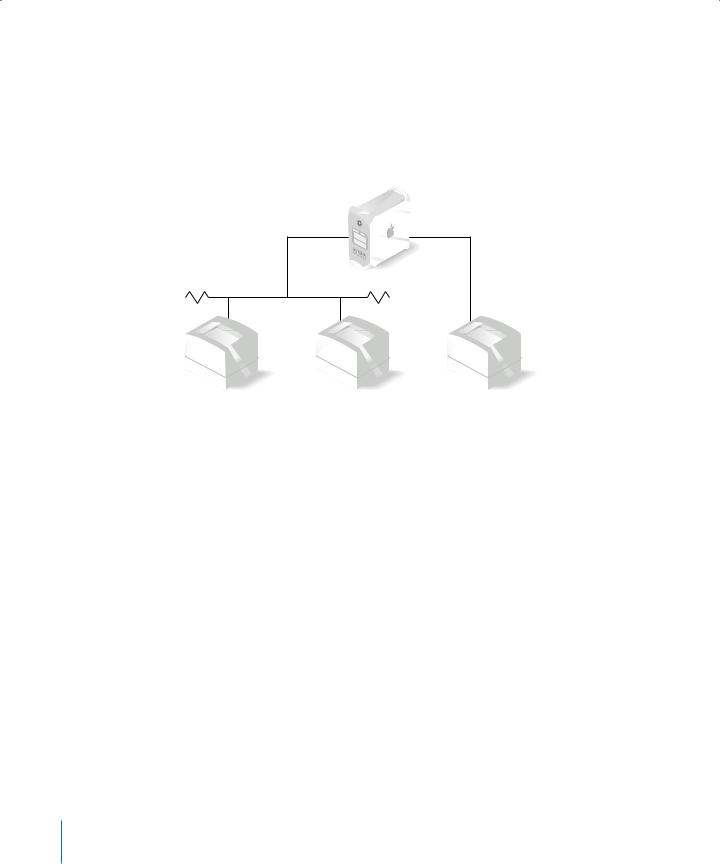
Distributing Workload Using Printer Classes
Each print service queue you set up is assigned to a single printer. The Common UNIX Printing System (CUPS) supports a special queue called a printer class, which is a queue with more than one printer assigned to it.
A printer class offers a number of advantages over single-printer queues in highvolume or high-availability printing environments:
•Print jobs are assigned to the next available printer in the class, so you can have as many jobs printing simultaneously as you have printers assigned to the class.
•If a printer assigned to the class becomes unavailable for any reason, the other printers in the class continue to print waiting jobs.
You can set up a printer class using Printers > Pool Printers in the Printer Setup Utility (in /Applications/Utilities). After the class is created, you can add and manage the resulting class queue in print service as you would any other queue.
You can also create a printer class using commands in Terminal. For more information, see the chapter on print service in the command-line administration guide.
Security
AppleTalk and LPR printer queues do not support secure authentication. Print service relies on the client to provide user information. Although standard Macintosh and Windows clients provide accurate information, a clever user could potentially modify the client to submit false information and thereby avoid print quotas.
Windows service does support authentication, requiring users to log in before using
SMB printers.
The CUPS software on which print service relies supports a print job submission method called Internet Printing Protocol (IPP). Print service clients are usually set up to use AppleTalk, LPR, or SMB to submit print jobs. However, clients that use IPP directly to submit print jobs can bypass print service and its quotas.
Note: IPP is enabled on a Mac OS X client whenever you turn on Printer Sharing in
Sharing preferences.
10 |
Chapter 1 About Print Service |
2 Setting Up Print Service |
2 |
|
This chapter shows how to set up print queues and change print service settings using Server Admin.
Before You Begin
Before you set up print service, note which protocols your clients use for printing. Print service supports AppleTalk, Line Printer Remote (LPR), and Server Message Block (SMB) protocols.
Setup Overview
Here is an overview of the steps for setting up print service:
Step 1: Create queues for your printers
Create queues for your printers on the server using Server Admin. Users see these queues as printers. See “Adding a Print Queue” on page 12.
Step 2: (Optional) Adjust general service settings
Use Server Admin to specify the default LPR queue and turn on print service logs. By default, there is no default LPR queue and logging is off. See “Choosing a Default LPR Queue” on page 14 and “Setting the Print Log Archival Interval” on page 15.
Step 3: Start print service
Use Server Admin to start print service on the server and make the queues available to clients. See “Starting Print Service” on page 18.
Step 4: (Optional) Set print quotas
If you want to limit the number of pages users can print, set print quotas for user accounts and enforce quotas on print queues. See “Setting Print Quotas” on page 19.
Step 5: Set up client computers
Add, or show your users how to add, your server’s queues to the printing setups on their computers. See Chapter 3,“Setting Up Printing Clients,” on page 23.
11
Setting Up the Service
Adding a Print Queue
You can share any PostScript-compatible printer that has a queue set up for it on the server. You create queues for shared printers on the server using Server Admin.
Add button
To create a shared print queue:
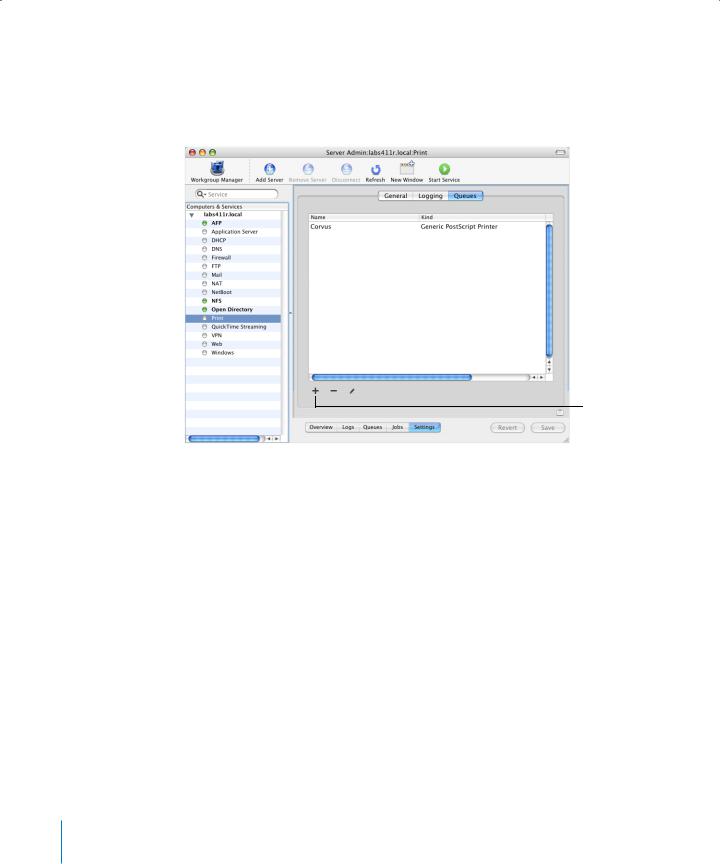
1 In Server Admin, select Print in the Computers & Services list.
2 Click Settings.
3 Click Queues, then click the Add (+) button (below the list).
If you don’t see the Queues button, you might already be looking at queue settings.
Click the Back button (the left-pointing arrow in the upper right).
4 Choose the protocol used by the printer from the pop-up menu.
5For an AppleTalk printer, select the printer in the list and click OK.
For an LPR printer, type the printer IP address or DNS name and click OK. (If you don’t want to use the printer’s default queue, first deselect “Use default queue on server” and type a queue name.)
6Type the queue name you want clients to see in the Sharing Name field. This does not change the Printer Setup Utility queue name on the server.
Make sure the name is compatible with any naming restrictions imposed by your clients. For example, some LPR clients do not support names that contain spaces, and some Windows clients restrict names to 12 characters.
12 |
Chapter 2 Setting Up Print Service |

Queue names shared via LPR or SMB should not contain characters other than A–Z, a–z, 0–9, and _ (underscore).
AppleTalk queue names cannot be longer than 32 bytes (which may be fewer than 32 typed characters). Note that the queue name is encoded according to the language used on the server and may not be readable on client computers using another language.
7Select the protocols used for printing by your client computers.
If you select “Windows printing (SMB),” make sure you start Windows services.
8Select “Enforce quotas for this queue” if you want to enforce the print quotas you establish for users in Workgroup Manager.
9 Click Save, then click the Back button (in the upper right).
Chapter 2 Setting Up Print Service |
13 |

Choosing a Default LPR Queue
You can use print service General settings in Server Admin to specify a default LPR queue for the server.
Setting a default LPR queue makes it easier for LPR clients to print without knowing the names of the queues on the server.
To set the default LPR queue:
1 In Server Admin, select Print in the Computers & Services list.
2 Click Settings, then click General.
3 Choose the default queue from the pop-up menu.
4Click Save.
If the queue you want to use is not in the list, it might not currently be shared using LPR.
A user can add this default LPR queue to his or her computer’s printer list without knowing the queue’s name by choosing “Use default queue on server” when adding the printer.
From the Command Line
You can also set the default LPR queue using the serveradmin command in Terminal. For more information, see the print service chapter of the command-line administration guide.
14 |
Chapter 2 Setting Up Print Service |
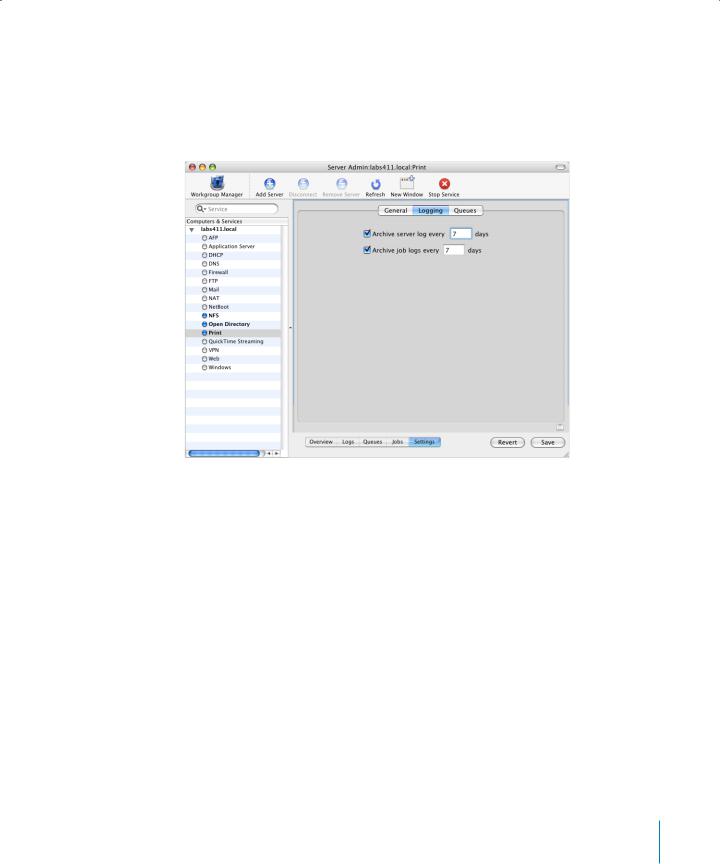
Setting the Print Log Archival Interval
Print service keeps a general service log and individual logs for each shared queue. When a log is archived, new events are recorded in a new, empty log file.
You can use the Logging settings for print service in Server Admin to specify how often the logs are archived.
To set the log archive intervals:
1 In Server Admin, select Print in the Computers & Services list.
2 Click Settings, then click Logging.
3 Select Archive for the log you want to save and type how often the log is archived.
4Click Save.
Both current and archived logs are in /Library/Logs/PrintService.
From the Command Line
You can also set the archival interval using the serveradmin command in Terminal. For more information, see the print service chapter of the command-line administration guide.
Chapter 2 Setting Up Print Service |
15 |

Advertising an LPR Queue Using Rendezvous
You can make it easier for your users to find shared LPR queues by advertising them using Rendezvous.
Back button
To advertise a queue using Rendezvous:
1 In Server Admin, select Print in the Computers & Services list.
2 Click Settings, then click Queues.
3 Double-click the queue you want to advertise.
4 Under LPR in the Protocol section, select “Show name in Rendezvous.”
5 Click Save, then click the Back button (in the upper right).
16 |
Chapter 2 Setting Up Print Service |
Loading...