


 Loading...
K Service Source
LaserWriter II
LaserWriter II SC, LaserWriter II NT, LaserWriter II NTX, LaserWriter IIf, LaserWriter IIg

K Service Source
Basics
LaserWriter II

Basics |
Product Information - 1 |
|
|
Product Information
The printers covered in this manual are
• LaserWriter II SC
• LaserWriter II NT
• LaserWriter II NTX
• LaserWriter IIf
• LaserWriter IIg
Compatibility:
Except for I/O boards components, all parts are compatible among the five models. Refer to Illustrated Parts and Take Apart chapters for more information. Refer to “Print Engine Check” in Flowcharts for Troubleshooting information.
Basics |
Startup Test Page - 2 |
|
|
Startup Test Page
LaserWriter II printers generate a startup test page approximately 2 – 3 minutes after you switch on the printer.
Except for the IISC, the startup test page also shows unit-specific configuration information. The following pages describe each element of the startup test page.
Basics |
|
Startup Test Page - 3 |
|
|
|
|
|
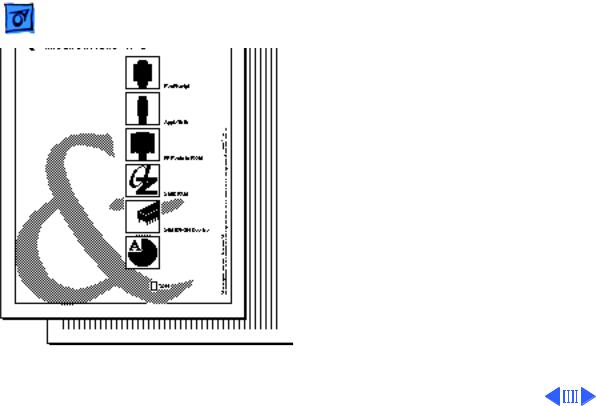
II NT/NTX Startup Test Page |
|
Printer |
|
|
Name |
Configuration |
|
|
|
|
|
PostScript, Diablo 630, or Hewlett Packard |
|
|
LaserJet Plus™ emulation (NTX only) |
I/O Board |
|
Communication Protocol |
Type |
|
RS-232 serial or AppleTalk
Fonts in ROM
Installed RAM
Size of hard drive, if connected, and number of fonts it contains (NTX only)
Version of ROM installed
Number of pages the I/O board has produced
Basics |
Startup Test Page - 4 |
|
|
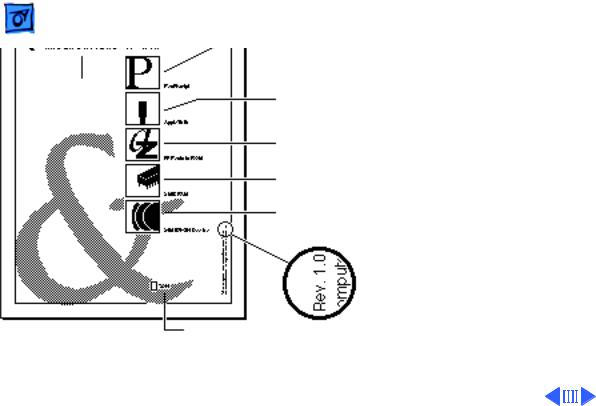
Printer
IIf Startup Test Page
Name
I/O Board
Type
Communication parameters and printer control language selected for an individual printer port
Version of ROM installed
Fonts in ROM
Installed RAM
FinePrint feature enabled
Number of pages the I/O board has produced

Basics |
Startup Test Page - 5 |
|
|
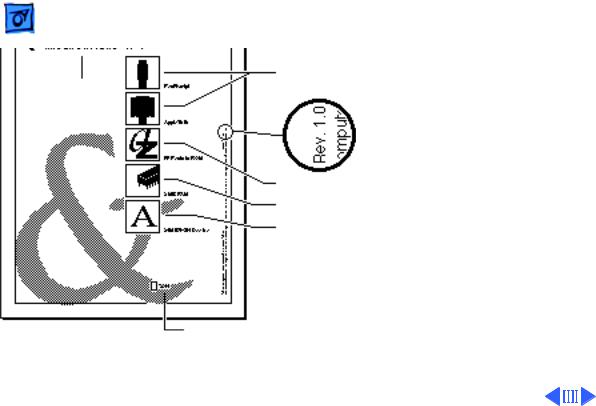
Printer
IIg Startup Test Page
Name
I/O Board
Type
Communication parameters and printer control language selected for an individual printer port
Version of ROM installed
Fonts in ROM
Installed RAM
FinePrint feature enabled
Number of pages the I/O board has produced

Basics |
Startup Test Page - 6 |
|
|
|
IISC Startup Test Page |
The LaserWriter IISC test page consists only of vertical lines. The printer will generate a test page only if its SCSI address has been set to 7 prior to powering up.
Note: Be sure to set the SCSI address back before you resume printing.

Basics |
Service Test Page - 7 |
|
|
Service Test Page
The service test page is generated by the DC controller board and serves to confirm print engine operation. To generate this test page, remove the bottom panel cap located at the rear of the printer. Insert a screwdriver or similar dowel-shaped tool through the quarter inch diameter opening and press the service test page button.

Basics |
Preventive Maintenance - 8 |
|
|
Preventive Maintenance
Before performing any preventive maintenance, be sure to do the following:
1Check the page count on the startup test. If the I/O board has been replaced or upgraded, check the repair log label affixed to the bottom of the printer or consult with the customer to determine page count.
2Power off and unplug the printer.
3Allow the fuser assembly rollers to cool.
4Prepare your work area for electrostatic discharge prevention.
5Spread a drop cloth under the work area to protect the floor from grease and spilled toner.
Caution: Never use an ammonia-based cleaner on the
Basics Preventive Maintenance - 9
LaserWriter II. These cleaners can discolor the plastic.
Caution: Before servicing the fuser rollers, make sure that the printer has been off at least 5 minutes to allow the fuser assembly to cool.
The service provider should clean the following items every 12 months or during each service call.
|
|
Service Point |
Tool/Solvent |
|
|
Primary corona wire |
Cleaning brush supplied with |
|
printer |
|
|
Transfer corona wire |
Cotton swab and isopropyl |
|
alcohol |
|
|
Transfer guide |
Cloth dampened with water |
|
|
Fuser rollers |
Fuser cleaning pad |
|
|

Basics |
Preventive Maintenance - 10 |
||||
|
|
|
|
||
|
|
|
|
||
|
Service Point |
Tool/Solvent |
|
||
|
|
|
|
||
|
Exterior case |
Cloth dampened with water |
|
||
|
|
|
|
||
|
Separation claws |
Cloth dampened with alcohol |
|
||
|
|
|
|
||
|
Paper guide |
Cloth dampened with alcohol |
|
||
|
|
|
|
||
|
Lower delivery guide |
Cloth dampened with alcohol |
|
||
|
|
|
|
||
|
Feeder guide |
Cloth dampened with water |
|
||
|
|
|
|
||
|
Registration rollers |
Cloth dampened with water |
|
||
|
|
|
|
|
|
|
|
|
|
|
|
|
|
|
|
|
|

 Basics Parts Replacement Schedule - 11
Parts Replacement Schedule
Perform the following tasks every 50,000 prints:
• Replace the ozone filter
• Check upper and lower fan operation.
Replace the following parts every 100,000 prints:
• Fuser assembly
• Transfer guide assembly
• Preconditioning exposure assembly
• Paper feed roller assembly
• Transfer corona assembly
The LaserWriter II refurbishment kit (P/N 652-0597) contains one each of the parts listed above.

K Service Source
Specifications
LaserWriter II

Specifications |
General - 2 |
|
|
|
|
Engine
Printing Method
Optical System
Resolution
Imaging Languages
Supported
General
Canon SX engine
Electrophotography using single-component, dry toner
Semiconductor laser and a rotating six-faced prism scanning mirror
300 dpi
SC: QuickDraw
NT: PostScript and a subset of the Diablo 630 printer NTX/NTX-J: PostScript, a subset of the Diablo 630 printer, and a
subset of the Hewlett-Packard LaserJet Plus

Specifications |
General - 3 |
|||
|
|
|
||
|
f/g: PostScript Level 1 and 2 and HP LaserJet IIP (HP PCL4) |
|||
|
Note: NTX-J does not support emulation mode. |
|||
|
|
|
|
|
|
|
|
|
|

Specifications |
Intro Dates - 4 |
|
|
|
|
Intro Dates
SC, NT, and NTX
IIf and IIg
July 1990
October 1991

 Specifications Logic Board - 5
|
Logic Board |
CPU |
SC: Motorola 68000 microprocessor (7.45 MHz) |
|
NT: Motorola 68000 microprocessor (11.16 MHz) |
|
NTX/NTX-J: Motorola 68020 microprocessor (16.67 MHz) |
|
f: Motorola 68030 microprocessor (20.0 MHz) |
|
g: Motorola 68030 microprocessor (25.0 MHz) |
DRAM |
SC: 1 MB |
|
NT: 2 MB |
|
NTX: 2 MB, expandable to 12 MB |
|
NTX-J: 4 MB, expandable to 12 MB |
|
f: 2 MB/5MB, expandable to 32 MB |
|
g: 5 MB/8MB, expandable to 32 MB |

|
Specifications |
Logic Board - 6 |
|||
|
|
|
|
||
ROM |
SC: 16 KB |
||||
|
|
NT: 1 MB |
|||
|
|
NTX/NTX-J: 1 MB, expandable to 8 MB on expansion board |
|||
|
|
f: 2 MB standard; ROM expansion slot provided |
|||
|
|
g: 2 MB standard; ROM expansion slot provided |
|||
I/O |
SC: SCSI, Apple Desktop Bus (ADB) |
||||
|
|
NT: RS-232/422, LocalTalk, ADB |
|||
|
|
NTX/NTX-J: RS-232/422, LocalTalk, SCSI, ADB |
|||
|
|
f: RS-232/422; LocalTalk; SCSI |
|||
|
|
g: RS-232/422; LocalTalk; SCSI; Ethernet |
|||
|
|
|
|
|
|
|
|
|
|
|
|

Specifications |
Performance - 7 |
|
|
|
|
Performance
Printing Speed
8 pages per minute (all paper sizes except legal)
7 pages per minute (legal size)
Note: Actual performance depends on the application.
Duty Cycle
Minimum Life
Expectancy
Major Service
Interval
No limit in pages per month
300,000 pages
100,000 copies
|
Specifications |
|
Performance - 8 |
|
|
|
|
|
|
Printable Area |
All measurements are in inches: |
|||
|
|
SC |
|
|
|
|
US Letter : 8.00 by 10.60 |
||
|
|
Legal: 6.72 by 12.50 |
||
|
|
A4: |
8.00 by 11.27 |
|
|
|
B5: |
6.67 by 9.43 |
|
|
|
#10 Envelopes: 3.84 by 9.10 |
||
|
|
NT, NTX, and NTX-J |
||
|
|
US Letter : 8.00 by 10.78 |
||
|
|
Legal: 8.00 by 13.78 |
||
|
|
A4: |
7.79 by 11.08 |
|
|
|
B5: |
6.45 by 9.76 |
|
|
|
#10 Envelopes: 3.84 by 9.10 |
||

Specifications Performance - 9
IIf
US Letter : 8.11 by 10.79
Legal: 8.00 by 10.78 (Maximum printable area with 2 MB of RAM. Prints up to 8.00 x 13.78 with 5 MB of RAM. Prints up to 8.00 x 13.78 using PhotoGrade with 8 MB of RAM.)
A4: 7.89 by 11.44
B5: 6.72 by 9.81
#10 Envelopes: 3.84 by 9.10
IIg
US Letter : 8.11 by 10.79
Legal: 8.11 by 13.79 (Legal-size documents require 8 MB of
RAM to print with PhotoGrade.)
A4: 7.89 by 11.44
B5: 6.72 by 9.81
#10 Envelopes: 3.84 by 9.10

Specifications |
Paper - 10 |
|
|
|
|
Paper
Paper Weights
Cassette feed:16-24 lb., single-sheet, photocopy bond
Manual feed:16-36 lb., letterhead and colored stock, standardweight transparency material, envelopes, and labels
Cassette Sizes
US letter standard; legal, A4, B5, and envelope cassettes optional
Cassette:200 sheets |
Manual: single sheets |
|
Envelope cassette:15 envelopes |
|
|
Face-down tray:100 sheets |
Face-up tray:20 sheets |
|
Capacity In
Use manual feed for letterhead, colored stock, standard-weight transparency material, and labels.

Specifications |
Built-In Fonts - 11 |
|
|
|
|
SC
NT, NTX, NTX-J
IIf, IIg
Built-In Fonts
Times, Helvetica, Courier, and Symbol
Times, Helvetica, Helvetica Narrow, Courier, Symbol, Palatino, ITC Avant Garde, ITC Bookman, New Century Schoolbook, ITC Zapf Chancery, and ITC Zapf Dingbats
Times, Helvetica, Helvetica Narrow, Courier, Symbol, Palatino, ITC Avant Garde, ITC Bookman, New Century Schoolbook, ITC Zapf Chancery, ITC Zapf Dingbats, and Emulator.
Note: Built-in fonts can be expanded using an optional font expansion board. All LaserWriter II printers support TrueType when using LaserWriter driver 6.1 or greater.

Specifications |
Environmental - 12 |
|
|
|
|
Environmental
Temperature
Humidity
Operating: 50–90.5°F (10–33°C)
Storage:38–95° F (3–35°C)
Operating: 20-80% relative humidity Storage: 10-80% relative humidity
Printing: Under 60 dB(A)
Standby: Under 50 dB(A)

Specifications |
Electrical - 13 |
|
|
|
|
Line Voltage
Power Consumption
Electrical
US/Japan:100-115 V, 50-60 Hz
Europe/Australia:220-240 V, 50 Hz
Standby:
170 W (average)
Operating:
900 W maximum (115 V)
780 W maximum (220 V)
880 W maximum (240 V)

|
Specifications |
Physical - 14 |
|||
|
|
|
|
||
|
|
Physical |
|||
Dimensions |
Width: 20 in. (51 cm) |
||||
|
|
Depth: 18.9 in. (48 cm) |
|||
|
|
Height: 8.5 in. (21.6 cm) |
|||
Weight |
46 lb. (21 kg) |
||||
|
|
|
|
|
|
|
|
|
|
|
|

K Service Source
Troubleshooting
LaserWriter II
Troubleshooting |
IIf/IIg Diagnostic/ - 1 |
|
|
|
|
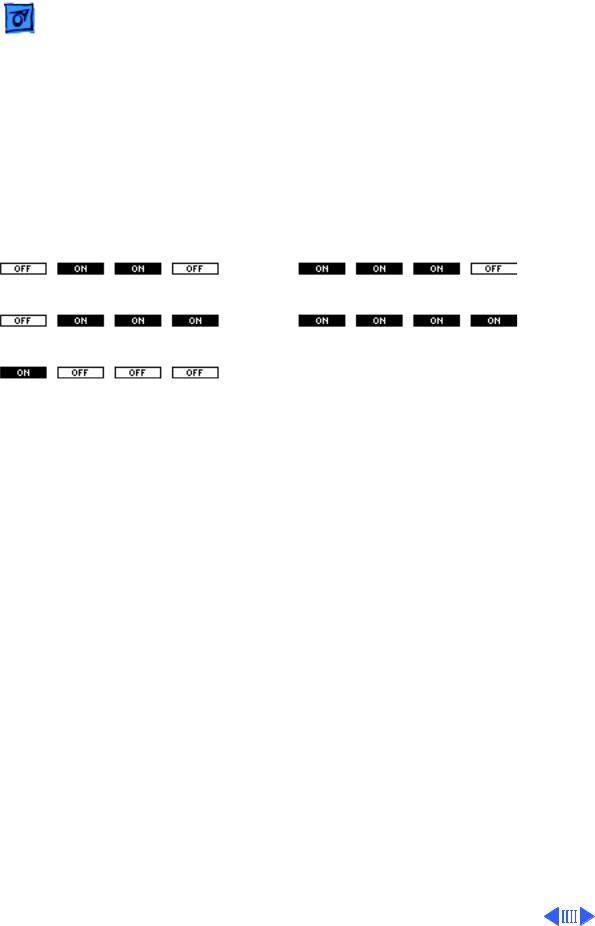
IIf/IIg Diagnostic
Set the rotary switch on the back of the printer to 4 and connect the LaserWriter II Test Connector to the DB-25 serial port (or simply jumper pins 4 and 22). Switch on the printer. Under normal conditions, LEDs should flash during startup, and then fix on the “diagnostic executing” configuration for about 2 minutes. If no error is found, all LEDs flash and a page prints. If the LEDs indicate an error, go to the appropriate topic in Flowcharts.
(Diagnostic Executing) |
(No Error Found) |
Fuser Assembly Error |
Replace SIMM #2 |
Laser/Scanner Error |
Replace SIMM #3 |
I/O Controller Board Error |
Replace SIMM #4 |
Replace ROM #1 |
Replace SIMM #5 |
Replace ROM #2 |
Replace SIMM #6 |
Replace ROM #3 |
Replace SIMM #7 |
Replace ROM #4 |
Replace SIMM #8 |
Replace SIMM #1 |
|
After running this diagnostic, switch off the printer, remove the Test Connector, and reset the rotary switch to its original setting.

Troubleshooting |
Capacitor Discharge - 2 |
|
|
Capacitor Discharge
When there is a failure of the fusing system, the DC controller board shuts off current to the fuser roller heater and charges capacitor C211 to prevent overheating. If there is a failure of the fusing system, you must turn the power off for about 30 minutes or manually discharge the capacitor before switching power back on.
C211
DC Controller Board
Loading...