


 Loading...
Apple Technician Guide
MacBook Pro (15-inch, Late 2008)
Updated:2010-06-15

Apple Inc.
© 2008 Apple Inc. All rights reserved.
Under the copyright laws, this document may not be copied, in whole or in part, without the written consent of Apple.
Every effort has been made to ensure that the information in this document is accurate. Apple is not responsible for printing or clerical errors.
Apple
1 Infinite Loop Cupertino, CA 95014-2084 USA
+ 1 408 996 1010 www.apple.com
Apple, the Apple logo, Mac, MacBook, and Macintosh are trademarks of Apple Inc., registered in the U.S. and other countries.
Please send feedback to smfeedback2@apple.com.
MacBook Pro (15-inch, Late 2008)
Contents
Manual Updates 8
Updated 15 June 2010 8
Updated 14 May 2010 8
Updated 08 February 2010 8
Updated 3 December 2009 8
Updated 16 November 2009 8
Updated 01 July 2009 9
Updated 17 June 2009 9
Updated 15 June 2009 9
Updated 1 June 2009 9
Updated 14 April 2009 9
Updated 18 March 2009 9
Updated 3 March 2009 10
Updated 17 December 2008 10
Updated 14 November 2008 11
Updated 21 October 2008 11
Manual introduced 14 October 2008 11
Basic
Overview 13
Identifying Features 13
Product Configurations 14
Serial Number Location 15
Serial Number On Top Case 15
Transferring the Serial Number 15
General Information 16
Required Tools 16
The Glass Panel 17
Keycap Replacement 18
Troubleshooting
General Troubleshooting 20
Update System Software 20
Apple Service Diagnostics 20
Test Points 20

Troubleshooting Theory |
20 |
|
|
Hardware vs. Software |
21 |
|
|
Clamshell Service Diagnostic Read Me 21 |
|||
Apple Hardware Test |
22 |
|
|
Functional Overview |
23 |
|
|
Block Diagram, MacBook Pro (15-inch, Late 2008) 24 |
|||
Liquid Submersion Indicators |
25 |
||
Common Reset Procedures 25 |
|||
Display Issue:Pixel Anomalies |
27 |
||
Display Hinge Behavior |
28 |
|
|
Symptom Charts |
29 |
|
|
|
|
|
Startup and Power Issues |
29 |
|
|
|
||
No Power 29 |
|
|
|
|
|
|
Won’t Start Up |
32 |
|
|
|
|
|
Intermittent Shutdown 35 |
|
|
|
|
||
No Video/Bad Video 40 |
|
|
|
|
|
|
Battery Isn’t Recognized or Won’t Charge 43 |
|
|||||
Kernel Panic/System Crashes |
46 |
|
|
|||
Battery Run Time Too Short |
49 |
|
|
|||
Won’t Run on Power Adapter Alone |
50 |
|
||||
Power Adapter Issue 51 |
|
|
|
|
|
|
Noise / Hum / Vibration |
52 |
|
|
|
|
|
Burnt Smell / Odor 54 |
|
|
|
|
|
|
Battery Leaking or Swollen |
55 |
|
|
|
||
Uncategorized Symptom |
55 |
|
|
|
||
Communications |
56 |
|
|
|
|
|
Ethernet Port/Device Issue 56 |
|
|
|
|||
AirPort/Bluetooth:Defective Wireless Devices |
58 |
|||||
No/Poor Wireless Signal |
60 |
|
|
|
|
|
Bluetooth Wireless Input Device Loses Connection 61 |
||||||
AirPort Card:Kernel Panic |
63 |
|
|
|
||
Wireless Performance Issue / Slow Connection |
65 |
|||||
Wireless Input Device Doesn’t Pair |
67 |
|
||||
Uncategorized Symptom |
69 |
|
|
|
||
Display 70 |
|
|
|
|
|
|
Display Anomalies 70 |
|
|
|
|
|
|
Defective Camera / Built-in iSight Not Operating Correctly 75 |
||||||
Backlight Issue / No Backlight |
77 |
|
|
|||
Noise / Unstable Flickering |
78 |
|
|
|
||
Mechanical/Physical Damage |
79 |
|
|
|||
Cosmetic Defects 80 |
|
|
|
|
|
|
Uncategorized Symptom |
80 |
|
|
|
||
Mass Storage 81
Hard Drive Read/Write Issue 81
Hard Drive Not Recognized/Not Mounting 82
Hard Drive Noisy 84 |
|
|
|
|
|
Optical Drive Won’t Accept/Reject Media |
85 |
|
|||
Optical Drive Read/Write Data Error |
87 |
|
|
||
Optical Drive Not Recognized/Mount |
89 |
|
|
||
Optical Drive Noisy |
90 |
|
|
|
|
Optical Drive Not Performing to Specs 92 |
|
||||
Uncategorized Symptom |
93 |
|
|
|
|
Input/Output Devices |
94 |
|
|
|
|
USB Port Does Not Recognize Known Devices |
94 |
||||
Built-in Keyboard Does Not Work Properly |
95 |
|
|||
Specific Keys Don’t Work |
96 |
|
|
|
|
Built-in Trackpad Does Not Work 97 |
|
|
|
||
Built-in Keyboard Has Dim or No Keyboard Backlight 99 |
|||||
Built-in Keyboard Is Not Recognized |
100 |
|
|
||
Built-in Trackpad Does Not Track Properly |
101 |
|
|||
Apple Remote Inoperable |
102 |
|
|
|
|
Built-in Speaker Has No Audio 103 |
|
|
|
||
Distorted Sound from Internal Speaker 104 |
|
||||
Express Card Will Not Insert Into Slot |
106 |
|
|
||
Express Card Not Recognized By System |
107 |
|
|||
FireWire Port Not Recognizing Known Devices |
108 |
||||
Uncategorized Symptom |
108 |
|
|
|
|
Mechanical Issues:Thermals and Enclosure 109 |
|||||
Reset/Power Button Stuck |
109 |
|
|
|
|
System Runs Hot 110 |
|
|
|
|
|
Uncategorized Symptom |
112 |
|
|
|
|
Take Apart
General Information 114
Connector Types on Logic Board 114
Access Door 117
Battery 119
Removal 120
Replacement 120
Hard Drive Bracket 122
Removal 123
Replacement 124
Hard Drive 125
Removal 126 Replacement 128
Reinstalling Software that Came with the Computer 130

Installing Applications 130
Bottom Case 131
Bottom Case Information 133
Memory 134
Removal 135
Replacement 136
Midwall 137
Removal 138
Replacement 139
Battery Connector Cover 140
Battery Indicator Light Board 142
Removal 143
Replacement 143
Battery Indicator Cable 144
Removal 145
Replacement 145
Camera/AirPort/BT Cable Guide 146
LVDS Cable Guide 148
Display Assembly 150
Replacement 154
Display Hinge Behavior 154
Display Clutch Cover 155
Removal 156
Replacement 157
AirPort Card 159
Removal 160
Replacement 161
Antenna Board 164
Removal 165
Replacement 165
Optical Drive 166
Replacement 169
Optical Drive Flex Cable 170
Right Speaker / Subwoofer 172
Hard Drive Connector Cable 174
Removal 175
Replacement 176
Fans 177
Logic Board 179
Heatsink 186
Removal 187
Replacement 188
Trackpad 190
Removal 191
Replacement 194
Battery Power Cable 199
Left Speaker 201
Microphone 204
MagSafe Board 206
Center Bracket 208
Cable Clip for AirPort Card 210
HD Front Bracket/Flex Cable with IR and Sleep LED 211
Express Card Cage 215
Kensington Lock 217
Top Case 219
Removal 220
Replacement 220
Top Case Information 221
Views
Exploded Views 223
Main Assembly 1 223
Main Assembly 2 224
Display Assembly 225
External Views 226
Front View 226
Port View 227
Screw Chart 228
Screw Location Diagrams 230
Bottom Case Screws 230
Top Case to Display Assembly Screws 231 Main Modules to Top Case Screws 232

Manual Updates
Updated 15 June 2010
Troubleshooting:
•General Troubleshooting:Resetting the System Management Controller (SMC):Updated text to clarify MagSafe LED behavior; deleted text requiring resetting date and time.
Updated 14 May 2010
Basics:
•General Information:Keycap Replacement:Service packages of 78 replacement keycaps are now available in the U.S. and Canada (U.S. version keyboard only) for designated MacBook and MacBook Pro computers.
Troubleshooting:
•Troubleshooting:I/O Symptom Chart:Built-in Keyboard Does Not Work Properly:Deep Dive: Action:Step 1 updated.
•Troubleshooting:I/O Symptom Chart:Specific Keys Don’t Work:Quick Check:Step 5 updated.
Updated 08 February 2010
Take Apart:
•Bottom Case:Added section with graphics called“Bottom Case Information”that discusses two catches that are no longer present on current production bottom cases
•Logic Board:Added information in step 11 about I/O bracket and screws that are no longer required with current production top cases
•Top Case:Added section with graphic called“Top Case Information”that discusses a bracket that is no longer present on current production top cases
Updated 3 December 2009
Troubleshooting:
•General Troubleshooting:Added new section“Clamshell Service Diagnostic Read Me”
•Symptom Charts:Startup and Power Issues:Revised for Clamshell Service Diagnostic (CSD) considerations
•Symptom Charts:Communications:Revised for CSD considerations
•Symptom Charts:Display:Revised for CSD considerations
Updated 16 November 2009
Basic:
•General Information:Required Tools:Changed Torx T6 screwdriver to require one with a large-diameter handle for a better grip on tight screws
Take Apart:
2010-06-15 |
MacBook (15-inch, Late 2008) Basics — Manual Updates 8 |

•Display Assembly:Added replacement note about installing foam gasket; revised“Tools”to specify a Torx T6 screwdriver with a large-diameter handle for a better grip on tight screws
•Logic Board:Added replacement note about installing foam gasket.
Updated 01 July 2009
Take Apart:
•Display Assembly, Optical Drive, and the Logic Board chapters were updated with information about the shim located behind the camera cable connector. If the shim is not replaced during reassembly, the camera cable could work loose, resulting in no video.
•A replacement shim is now included with replacement logic boards.
Updated 17 June 2009
Take Apart:
•Display Assembly chapter was updated with a topic on“Display Hinge Behavior.”
Troubleshooting:
•General Information chapter was updated with a topic on“Display Hinge Behavior.”
Updated 15 June 2009
Take Apart:
•Revised wording on Replacement step 3 in the AirPort Card chapter.
Updated 1 June 2009
Take Apart:
•Added TrackPad procedure.
•Logic Board:Removed reference to MagSafe screws in graphic, added note to alert techs not to remove MagSafe screws during logic board removal.
Views:
•Added TrackPad kit (922-9008) to exploded view diagram
Updated 14 April 2009
Troubleshooting:
•Display/Display Anomalies:Deep Dive:Vertical/Horizontal Lines table added with graphics showing symptom.
Take Apart:
•Front Bracket/IR/Sleep Indicator cable: Updated procedure, with new text and cable connector graphics
•Logic Board:Updated procedure with IR/Sleep cable connector caution.
Updated 18 March 2009
Troubleshooting:
• General Troubleshooting:Added information on Apple Hardware Test.There are two
2010-06-15 |
MacBook (15-inch, Late 2008) Basics — Manual Updates 9 |

versions of Apple Hardware Test (AHT) for the MacBook Pro (15-inch, Late 2008).To identify which version of AHT to use, check the third, fourth, and fifth digits in the system serial number
•Intermittent Shutdown:Added table“Troubleshooting Shutdown Causes”
Take Apart:
•MagSafe Board:Updated removal procedure and added graphic to port test using unplugged power adapter cable
•Logic Board:Updated cable disconnect procedure (step 8) and added new graphic in step 13
•Optical drive:Updated graphic showing a shim next to connector on AirPort/ Bluetooth/camera cable
•Front Bracket/IR/Sleep Indicator cable:Updated removal procedure, to remove trackpad flex cable first, before disconnecting the IR/Sleep cable from the logic board.
Updated 3 March 2009
General Information:
•New“Replacement Caution”graphics added to Thin, Multi-Pin Horizontal Insert topic
•New topic added:Display Issue:Pixel Anomalies
Take Apart:
•Mag Safe:Replacement Note added. Check the port connection by plugging in a disconnected power adapter cable. If the MagSafe port is off center, the cable will not plug in securely, and you must reinstall the MagSafe board.
•Logic Board:New text and graphics added showing a shim and a new EMI gasket on the AirPort/Camera/Bluetooth cable.
Troubleshooting:
•Updated links in Deep Dive:Pixel Anomalies table
Views:
•Added part numbers to exploded views
•Added two new part numbers to Screw Chart, 922-8994 and 922-8995
Updated 17 December 2008
•General Information:
•Corrected link to Knowledge Base article 50020
•Added Apple Service Diagnostics and Apple Hardware Test diagnostic versions
•Block Diagram:updated memory to DDR3 and Bluetooth to 2.1
•General Troubleshooting
•Added Apple Service Diagnostic heading and a sensor chart with name and location of sensors
•Removed reference to Knowledge Base article HT3221
•Updated text to use a tweezer to insert locking-lever flex cables
•Symptom Charts
•Updated Intermittent Shutdown/Deep Dive/Step 6/Yes Action and Code changed from X03 to M08
2010-06-15 |
MacBook (15-inch, Late 2008) Basics — Manual Updates 10 |
•Updated Display/Blank/No Video/added“Unlikely Cause”
•Updated Display/Backlight Issue/No Backlight/added“Unlikely Cause”
•Updated Display/Noise/ Unstable Flickering/added“Unlikely Cause”
•Updated Display/Added new symptoms for Backlight Issue / No Backlight
•Updated InPut/Output Devices/ Specific Keys Don’t Work /added“Ulikely Cause”
•Take Apart
•Battery:added note to seat the battery connector
•Bottom case:added 2 replacement steps
•Memory:added additional removal information on step 2
•Logic board:updated graphic in step 7; Removal:added screw sizes in step 8, reword camera cable to Camera/AirPort/Bluetooth cable
•Heatsink:added black stick to step 1, added screw part number to step 2.
•HD font bracket/IR/sleep LED:updated graphic in step 4
•AirPort card:updated graphic in replacement step 1, noted using a black stick
•AirPort Antenna board:added removal using a black stick; Replacement:added new graphic showing pink thermal pad on AirPort card.
•Display assembly:added important note reminding technician to install a new thermal pad on the AirPort card whenever the display assembly is replaced and removed replacement note on step 8
•Battery Indicator Cable:added screw part number on step 3
•Camera Cable Guide:Step 2, renamed cable as Camera, AirPort and Bluetooth cable
•Fans:updated screws, 4 identical (922-8754) and 2 longer (near the ODD, no 922-xxxx number offered yet).
•Exploded View
•Added international AirPort Extreme/Airmac part numbers
Updated 14 November 2008
•Take Apart:Added important replacement step in AirPort Card chapter alerting technicians to check that the AirPort cable is inserted in the proper orientation into the AirPort Card connector. If the cable is inserted backwards it will damage the logic board.
•Troubleshooting:Updated Burnt Smell/Odor symptom. Added step 3 in the Quick Check to check AirPort Card cable orientation.
Updated 21 October 2008
•Updated Features and Specs
•Take Apart:Reorganized topic sequence following Display Assembly chapter
•Added Caution notes to the Display Assembly and HD Front Bracket/IR/Sleep Cable chapters.
•Added important replacement note to Logic board section about plugging in audio cable when main logic board is not mounted into top case.
•Added Replacement Troubleshooting tip to HD Front Bracket/IR/Sleep Cable chapter to reseat the IR/Sleep Cable if the system is having trouble going to sleep or stays asleep.
Manual introduced 14 October 2008
2010-06-15 |
MacBook (15-inch, Late 2008) Basics — Manual Updates 11 |

Apple Technician Guide
Basic
MacBook Pro (15-inch, Late 2008)
© 2008 Apple Inc. All rights reserved.
Overview
The MacBook (15-inch, Late 2008) computer features both the NVIDIA GeForce 9400M integrated graphics processor and a high-performance NVIDIA 9600 GT graphics processor. Multi-Touch trackpad, and aluminum body. Refer to more features below.
Identifying Features
The main features and service differences include:
•Aluminum unibody enclosure, machined from a single piece of aluminum
•Ultrathin 15-inch LED-backlit glossy display, 1440 by 900 pixels
•Mini DisplayPort connector
•Express Card slot, 34mm
•Battery indicator button on left side
•Illustrations for removing the battery, hard drive, and memory cards are pictured on the inner side of the access door.
•Product identification label is on top case inside front edge, visible when the access door and battery are removed.
2010-06-15 |
MacBook Pro (15-inch, Late 2008) Basics — Overview 13 |

Product Configurations
The following table shows the MacBook (15-inch, Late 2008) model configurations at introduction:
Feature |
Better (MB470) |
|
Best (MB471) |
Intel Core 2 Duo processor |
2.4 GHz 3MB sharedL2 |
|
2.53 GHz 6MB shared L2 |
|
1066MHz frontside bus |
|
2.8 GHz 6 MB L2 CTO |
|
|
|
1066MHz frontside bus |
Graphics |
NVIDIA GeForce 9400M |
|
NVIDIA GeForce 9400M |
|
(MCP79) + NVIDIA GeForce |
|
(MCP79) + NVIDIA |
|
9600M GT 256MB VRAM |
|
GeForce 9600M GT |
|
|
|
512MB VRAM |
Memory, DDR3 1066, SO-DIMMs |
2 GB (2 x 1 GB) |
|
4 GB (2 x 2 GB) |
|
|
|
|
Hard Drive, Serial ATA 100 5400 |
2.5”SATA, 250 GB, 5400 |
|
2.5”, 320 GB SATA , 5400 |
rpm |
Option:up to 320GB at 7200 |
|
Option:up to 320GB at |
|
|
||
|
rpm or 128GB SSD |
|
7200 rpm or 128GB SSD |
Optical Drive (SATA) |
8x DL Super, 9.5 mm |
|
8x DL Super, 9.5 mm |
Housing |
Aluminum |
|
Aluminum |
Display |
15.4-inch glass LCD, 1440 x 990 pixels, LED backlight, |
||
|
glossy finish |
|
|
I/O |
USB:2- USB 2.0 (1 high powered) |
|
|
|
FireWire:1-FW800 |
|
|
|
Video I/O:Mini Display Port |
|
|
|
Audio I/O: Combo digital.analog in, Combo digital/ |
||
|
analog/iPhone headset out, Microphone, Stereo speakers |
||
|
with subwoofer |
|
|
|
Camera:Wave 4 camera (f2.4, 3 micron pixel (640x480)) |
||
|
Other:IR, Battery Indicator Light, 34mm Express card |
||
Keyboard |
Backlight |
|
|
Battery |
Lithium-polymer battery, up to 5 hours |
||
Power Adapter |
85W MagSafe Power Adapter |
|
|
Note About Images in This Manual
Because a pre-production or very similar model was used for most of the images shown in this manual, you may notice small differences in appearance between the image pictured and the computer you are servicing. However, although the appearance may differ, the steps and sequence are the same unless noted.
2010-06-15 |
MacBook Pro (15-inch, Late 2008) Basics — Overview 14 |
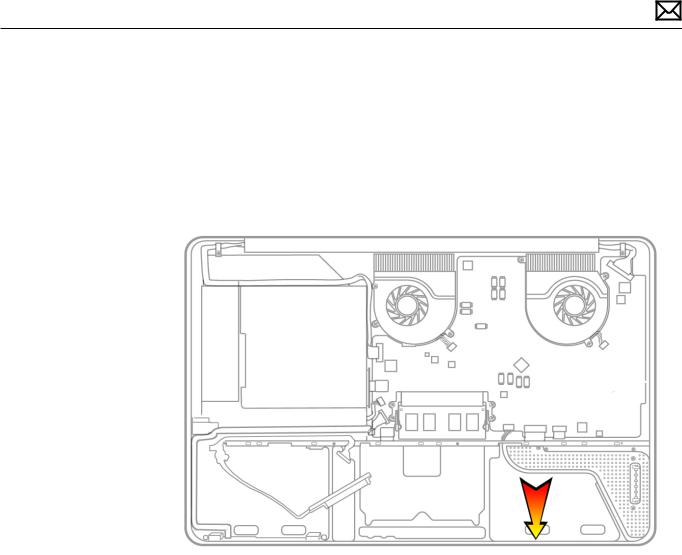
Serial Number Location
Serial Number On Top Case
Remove the access door and battery to see the serial number on the inside front wall of the top case.
Transferring the Serial Number
Before installing the replacement top case, transfer the serial number to the replacement top case. Peel up the original serial number label with a jeweler’s flat blade screw driver and transfer it to the inside edge of the replacement top case (see arrow for location).
2010-06-15 |
MacBook Pro (15-inch, Late 2008) Basics — Serial Number Location 15 |

General Information
Required Tools
Caution: To prevent scratches or other cosmetic damage to the computer housing, use a soft cloth as a protective layer when removing and installing the external screws.
The following tools are required to service the computer:
•Clean, soft, lint-free cloth
•ESD wrist strap and mat
•Magnetic Phillips #0 screwdriver
•Magnetic Phillips #00 screwdriver (preferably with a long handle)
•Torx T6 screwdriver with a large-diameter handle for a better grip on tight screws
•Tri-lobe #0 screwdriver (922-8991), for trackpad removal
•Black stick (Apple probe tool, part number 922-5065) or other nonconductive nylon or plastic flatblade tool
•Thermal grease (Apple thermal compound syringe, part number 922-7144)
•Alcohol wipes
•Foam wedge fixture for display assembly removal (part number 922-8779)
•Kapton tape
•Tweezers, ESD safe, extra fine points, for flat cable replacement
Refer to Knowledge Base article“Hand Tools for Desktop and Portable Repairs--AP/CA/EU/JP/ LA/US”to purchase tools:
http://docs.info.apple.com/article.html?artnum=500200
In addition, the following software programs are required for troubleshooting:
•Apple Service Diagnostic (ASD), version 3S125
•Apple Hardware Test, version 3A148
2010-06-15 |
MacBook Pro (15-inch, Late 2008) Basics — General Information 16 |
The Glass Panel
Warning: The glass panel for this model is not a serviceable part. If the glass is broken or scratched, replace the display assembly. Attempting to remove the glass can permanently shatter the display face and damage other parts.
To clean the glass panel, use the Apple polishing cloth (922-8245) and iKlear Apple Polish or Brillianize anti-static spray cleaning solution. Alternatively, IPA (isopropyl alcohol) can be used.
2010-06-15 |
MacBook Pro (15-inch, Late 2008) Basics — General Information 17 |

Keycap Replacement
Service packages of 78 replacement keycaps are now available in the U.S. and Canada (U.S. version keyboard only) for designated MacBook and MacBook Pro computers.The packages allow you to replace individual keycaps rather than the entire top case.
There are four different keycap packages, based on the color of the key and the type of keyboard (version D and S).
Part number |
Key color |
Keyboard |
922-9277 |
Black |
Version D |
922-9279 |
Black |
Version S |
922-9278 |
White |
Version D |
922-9280 |
White |
Version S |
|
|
|
For step-by-step instructions, refer to the relevant support article:“MacBook/MacBook Pro: Black Keycap Replacement”(HT4002) or “MacBook:White Keycap Replacement”(HT4003).
For an overview of the differences among keycap procedures, refer to “MacBook/MacBook Pro:Keycap Replacement Matrix”(HT4001).
2010-06-15 |
MacBook Pro (15-inch, Late 2008) Basics — General Information 18 |

Apple Technician Guide
Troubleshooting
MacBook Pro (15-inch, Late 2008)
© 2008 Apple Inc. All rights reserved.

General Troubleshooting
Update System Software
Important:Whenever possible before beginning troubleshooting, ensure the latest software and firmware updates have been applied.
Apple Service Diagnostics
Run Apple Service Diagnostic to determine if any of the thermal sensors are malfunctioning. Replace any failing sensors. See chart below for correlation between error code and part.
Name |
Location |
TC0D |
Logic Board |
TC0P |
Logic Board |
TG0D |
Logic Board |
TG0H |
Logic Board |
TG0P |
Logic Board |
TG0T |
Logic Board |
TG1H |
Heatsink |
Th2H |
Logic Board |
TN0D |
Logic Board |
TN0P |
Logic Board |
Tm0P |
Logic Board |
Ts0P |
Trackpad flex |
TB0T |
Battery pack |
TB1T |
Battery pack |
TB2T |
Battery pack |
TB3T |
Battery pack |
Test Points
There is no silkscreen text on final production logic boards.Test points mentioned in troubleshooting charts are solely for reference.
Troubleshooting Theory
For general information on troubleshooting theory, refer to:
http://service.info.apple.com/service_training/en/006/troubleshoot/index.php?page=intro
2010-06-15 |
MacBook Pro (15-inch, Late 2008) General Troubleshooting — Apple Service Diagnostics 20 |
Hardware vs. Software
For information on how to isolate a hardware issue from a software issue, refer to:
http://support.apple.com/kb/TS1388?viewlocale=en_US
TS1394—Mac OS X:Troubleshooting installation and software updates <http://support.apple. com/kb/TS1394>
HT2956—Troubleshooting Mac OS X installation from CD or DVD <http://support.apple.com/ kb/HT2956>
For information on how to troubleshoot a software issue, refer to:
HT1199—Mac OS X:How to troubleshoot a software issue <http://support.apple.com/kb/ HT1199>
Clamshell Service Diagnostic Read Me
Isolating video and wireless issues in portable computers can be time consuming and confusing.The Clamshell Service Diagnostic (CSD) is a new diagnostic tool that checks Apple’s latest portable computers for the presence of AirPort, Bluetooth, LCD and Ambient Light Sensor (ALS) to assist you in quickly making a failure determination.
Troubleshooting benefits of using CSD include:
•Quick way (less than 1 minute) to determine whether clamshell-related modules (AirPort, Bluetooth, LCD and ALS) are electrically connected without taking apart the system.
•Results of CSD can help pinpoint if any clamshell cables may need to be reseated to logic board.
•Diagnostic results can help isolate a video or wireless issue to either the clamshell or the logic board, to avoid unnecessary replacements of these components.
CSD checks for the presence of the computer’s:
•AirPort
•Bluetooth
•LCD
•ALS
CSD does not check for the presence of the computer’s:
•iSight camera
•externally connected hardware components (such as USB or FireWire devices)
CSD does not check for issues with the OS X or other software-related problems such as application or extension conflicts.
2010-06-15 |
MacBook Pro (15-inch, Late 2008) General Troubleshooting — Hardware vs. Software 21 |

Apple Hardware Test
There are two versions of Apple Hardware Test (AHT) for the MacBook Pro (15-inch, Late 2008). To identify which version of AHT to use, check the third, fourth, and fifth digits in the system serial number. See examples below.
•Apple Hardware Test 3A147 to be used on systems with the third, fourth, and fifth serial number digits below 911. Example:Serial number W 8 8 4 0 H Q R I G 0
•Apple Hardware Test 3A163 to be used on systems with the third, fourth, and fifth serial number digits equal to or higher than 911. Example:Serial number W 8 9 1 1 7 0 R I G A
2010-06-15 |
MacBook Pro (15-inch, Late 2008) General Troubleshooting — Apple Hardware Test 22 |
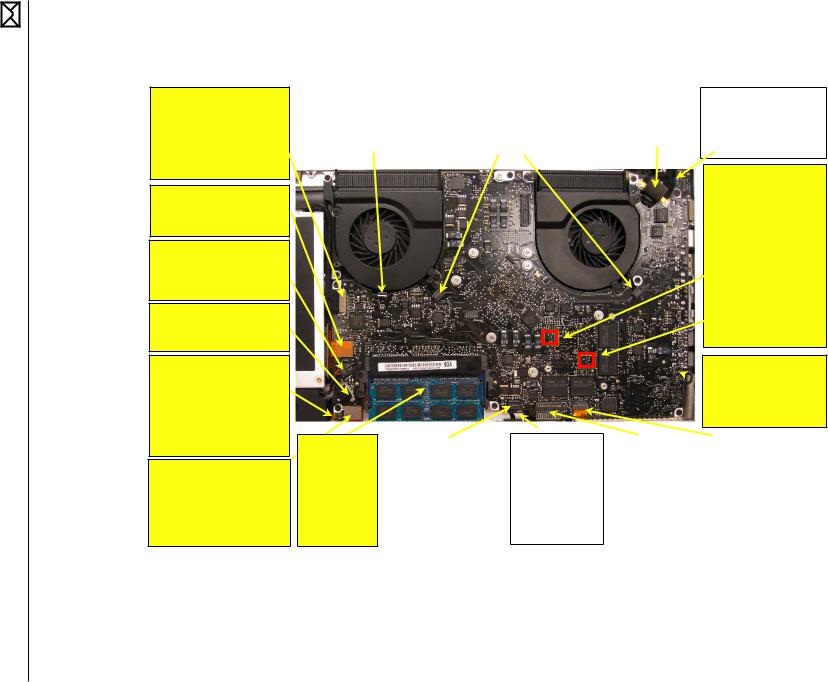
Functional Overview |
Refer to this diagram for symptoms related to MacBook Pro (15-inch, Late 2008) logic board connectors. |
Clamshell to Airport, Bluetooth, webcam and ambient light sensor:
-any of these communications failing -no keyboard backlight -no startup if shorted AP
Sata optical drive:
-no odd visible, -no boot from odd
Right Speaker:
-no sound from right speaker or woofer
-distorted right or center sound
Sata hard drive:
-no hdd visible
- no boot from hd
Sleep led+ Infrared sensor + magnetic sleep sensor:
-no sleep led status, -no infrared reception,
-no sleep when clamshell closed,
-wakes from sleep
-no video on internal display (if
Trackpad + trackpad button thermal sensor:
-no cursor movement, -no click action
-unit running slow (no sensor input)
Keyboard backlight: |
|
Fans: |
|
LCD + backlight: |
|
Magsafe connector |
-no keyboard backlight |
|
-intermittent shutdown |
|
-no video on internal lcd |
|
(underneath mlb): |
|
|
-freezes |
|
-no backlight |
|
-no power on |
|
|
-noisy fan |
|
|
|
-no battery charge |
|
|
|
|
|
|
|
|
|
|
|
|
|
|
Ram:
-no boot, -freezes and kernel panic -video artifacts
Connectors located on the other side of the MLB:
Thermal module sensor no( startup, system shutdown,
or freezes)
Left speaker
no( left sound, distorted left sound)
Microphone
 no- integrated sound inpu t
Battery |
|
Battery |
|
Keyboard + |
|
ExpressCard: |
indicator leds + battery |
|
(underneath mlb): |
|
power on |
|
-Expresscard not |
level test button: |
|
-not running when |
|
button: |
|
recognized |
-no battery error indication, |
|
battery only |
|
-no power |
|
|
-no battery level while |
|
-no power on |
|
-dead keys |
|
|
charging |
|
|
|
|
|
|
-no battery level shown if |
|
|
|
|
|
|
button pressed |
|
|
|
|
|
|
|
|
|
|
|
|
|
|
|
|
|
|
|
|
MacBook Pro (15-inch, Late 2008) General Troubleshooting — Functional Overview 23
2010-06-15

Block Diagram, MacBook Pro (15-inch, Late 2008)
Refer to this diagram to see how modules are interrelated.
2010-06-15 |
MacBookPro(15-inch,Late2008)GeneralTroubleshooting—BlockDiagram,MacBookPro(15-inch,Late2008) 24 |

Liquid Submersion Indicators
Liquid submersion indicators (LSI) have been added to specific locations on current Mac portables to help determine if systems have been damaged by liquid.The sensors are only visible when the bottom case and some of the modules have been removed. Normally represented by small white dots, the LSIs turn red when they have come in contact with liquid, such as an accidental spill.
For more information, refer to Knowledge Base article HT3400: “About Liquid submersion indicators (LSI) on portable computers.”http://support.apple.com/kb/HT3400
Common Reset Procedures
When a reset procedure is required for troubleshooting, follow the applicable steps:
Resetting the System Management Controller (SMC)
To reset power management via the SMC chip:
1.If the computer is on, turn it off.
2.Disconnect the power adapter and remove the main battery.
3.Hold the power button down for five seconds, then release.
4.Install the main battery and connect the power adapter.
5.Press the power button to restart the computer.
Resetting the SMC means you will also need to reset the date and time (using the Date & Time pane of System Preferences).
For more information:
http://www.apple.com/support
HT1411—Apple Portables:Resetting the System Management Controller (SMC) <http:// support.apple.com/kb/HT1411>
Resetting the Parameter RAM (PRAM)
To reset PRAM,
1.If the computer is on, turn it off.
2.Locate the following keys on the keyboard:Command, Option, P, and R.You will need to hold these keys down simultaneously in Step 4.
Note:If the keyboard does not have an Option key, use the Alt key instead.
3.Turn on the computer.
4.Press and hold the Command-Option-P-R keys.
2010-06-15 |
MacBook Pro (15-inch, Late 2008) General Troubleshooting — Liquid Submersion Indicators 25 |

Important:You must press this key combination before the gray screen appears.
5.Hold the keys down until the computer restarts and you hear the startup sound for the second time.
6.Release the keys.
For more information:
http://www.apple.com/support
HT1379—Apple Portables:Resetting the PRAM <http://support.apple.com/kb/HT1379>
Starting Up in Safe Mode
A Safe Boot is a special way to start Mac OS X when troubleshooting.To start up into Safe Mode (Safe Boot),
1.Make sure the computer is shut down.
2.Press the power button.
3.Immediately after you hear the startup tone, press and hold the Shift key.
Note:The Shift key should be held as soon as possible after the startup tone but not before.
4.Release the Shift key when you see the screen with the gray Apple and progress indicator (looks like a spinning gear). During startup, ”Safe Boot”appears on the Mac OS X startup screen.To leave Safe Mode, restart the computer normally, without holding down any keys during startup.
For more information:
http://www.apple.com/support
HT1564—What is Safe Boot, Safe Mode? <http://support.apple.com/kb/HT1564>
TS1884—Safe Boot take longer than normal startup <http://support.apple.com/kb/ TS1884>
2010-06-15 |
MacBook Pro (15-inch, Late 2008) General Troubleshooting — Common Reset Procedures 26 |

Display Issue:Pixel Anomalies
When displaying a single color over the screen area, the LCD panel might show one or more pixels that are not properly lit.To determine if the display has an acceptable number of pixel anomalies, follow the steps below:
1.Set the display image to one of the following colors:all-white, all-red, all-green, all-blue, or all-black display. Knowledge Base article 112125:“Service Diagnostics Matrix”, has the LCD Tester Diagnostic Utility that will generate these patterns on the screen.
2.Using a jeweler’s loupe, pocket microscope, or other magnifying device, identify and count each pixel anomaly:
|
|
Bright subpixel anomaly = subpixel that is always on |
||
|
|
Dark subpixel anomaly = subpixel that is always off |
||
3. |
The number of acceptable pixel anomalies for this computer is: |
|||
|
|
|
|
|
|
|
Bright |
Up to 3 |
|
|
|
Dark |
Up to 5 |
|
|
|
Combination |
Up to 7 |
|
4. |
If the number of subpixel anomalies exceeds the acceptable number shown above, |
|||
|
replace the LCD panel display assembly. Numbers outside the acceptable range would be |
|||
|
|
|
|
|
|
|
Bright |
4 or more |
|
|
|
Dark |
6 or more |
|
|
|
Combination |
8 or more |
|
5. |
If the number of subpixel anomalies is acceptable, explain to the customer that the |
|||
|
pixel anomalies are within specifications, and no repair is necessary. |
|||
Important:Do not release the specifications to customers. Instead, inform them that a certain number of subpixel anomalies are considered acceptable, and these factors apply to all manufacturers using LCD technology—not just Apple products.
When speaking with customers, please use the following explanation:
•Active-matrix LCD technology uses rows and columns of addressable locations (pixels) that render text and images on screen. Each pixel location has three separate subpixels (red, green, and blue) that allow the image to be rendered in full color. Each subpixel has a corresponding transistor responsible for turning the subpixel on or off.
•There are typically millions of these subpixels on an LCD display. For example, the LCD panel used in the Apple Cinema HD display is made up of 2.3 million pixels and 6.9 million red, green, and blue subpixels. Occasionally, a transistor does not work perfectly, which may result in the affected subpixel being turned on (bright) or turned off (dark). With the millions of subpixels on a display, it is quite possible to have a low number of faulty transistors on an LCD.Therefore, a certain number of subpixel anomalies are
considered acceptable. Rejecting all but perfect LCD panels would significantly increase the retail price for products using LCD displays.These factors apply to all manufacturers using LCD technology—not just Apple products.
2010-06-15 |
MacBook Pro (15-inch, Late 2008) General Troubleshooting — Display Issue:Pixel Anomalies 27 |
Display Hinge Behavior
The MacBook Pro models have a unique counterbalanced clutch system.The design provides a smooth, fluid feel when opening, closing, or positioning the display.The counterbalanced clutch system was designed so that when the display is vertical with respect to the ground, it will remain in place regardless of the angle of the base.
Moving the display past vertical allows the hinges to release and the display to close. This is normal behavior and no repair is necessary. Refer to http://support.apple.com/kb/HT3304 for more information and to watch a video of this hinge behavior.
2010-06-15 |
MacBook Pro (15-inch, Late 2008) General Troubleshooting — Display Hinge Behavior 28 |

Symptom Charts
Follow the steps in the order indicated below. If an action resolves the issue, retest the system to verify. Note:A compilation of Quick Check tables is available at http://service.info.apple. com/QRS/en/quickreference.pdf.
Note: There is no silkscreen text on final production logic boards.The photos shown with test points are from pre-production units and are solely for reference.
Startup and Power Issues
No Power
Unlikely cause:display assembly, speakers, optical drive, hard drive
Quick Check
Symptom |
Quick Check |
|||
|
|
|
||
No Power / Dead Unit |
1. |
Verify AC power presence with MagSafe LED |
||
• |
No power |
|
indicating on or charge state. |
|
• |
No image |
2. |
Verify battery status as being partly charged, |
|
• |
No startup chime |
|
charging with AC power. |
|
• No fan or hard drive spin |
3. |
Reset SMC. |
||
• No reset sound from optical |
||||
4. |
Refer to Deep Dive table for battery diagnostic |
|||
|
drive |
|||
|
|
testing. |
||
• No sleep LED activity |
|
|||
|
|
|||
• No light if Caps Lock pressed |
|
|
||
• |
Non-operational |
|
|
|
|
|
|
|
|
2010-06-15 |
MacBook Pro (15-inch, Late 2008) Symptom Charts 29 |

Deep Dive
Check |
Result |
Action |
Code |
|
|
|
|
|
|
1. |
Isolate peripherals as cause. |
Yes |
Suspect peripherals as cause. |
|
|
Disconnect all peripherals and |
|
Reconnect each one at a time, |
|
|
external devices and verify unit |
|
verifying unit operation as |
|
|
starts. |
|
external device is reinstalled. |
|
|
|
|
|
|
|
|
No |
Go to step 2 |
|
|
|
|
|
|
2. |
Reset SMC, and verify unit |
Yes |
Corrupt SMC state preventing |
|
|
starts. (Alternative hardware |
|
power on. Issue resolved with |
|
|
SMC reset can be forced by |
|
SMC reset. |
|
|
shorting R5001 pads on logic |
|
|
|
|
board or removing all system |
|
|
|
|
No |
Go to step 3 |
|
|
|
power for 1 minute.) Can |
|
||
|
|
|
|
|
|
system start up after SMC |
|
|
|
|
reset? |
|
|
|
|
|
|
|
|
3. |
Will system power up with |
Yes |
System can start up from |
P11 |
|
battery only? Check battery |
|
known-good battery -- |
|
|
level LED indicator for status |
|
customer battery possibly at |
|
|
of battery charge or battery |
|
fault or needs to be charged. |
|
|
use error. Inspect battery |
|
Continue to verify customer |
|
|
connector for burn marks or |
|
battery then AC adapter use |
|
|
damaged pins if substituting a |
|
and battery charging. Go to |
|
|
known-good battery to verify |
|
step 4. |
|
|
starting on battery. |
|
|
|
|
No |
System will not power using |
|
|
|
|
|
||
|
|
|
known-good battery only. Go |
|
|
|
|
to step 5 |
|
|
|
|
|
|
4. |
Customer battery may be run |
Yes |
Battery is recognized, |
|
|
down, or not recognized. |
|
charging and health is good. |
|
|
Verify customer battery in |
|
Return to test unit with |
|
|
a known-good system is |
|
customer battery and AC |
|
|
recognized and accepting a |
|
adapter power. Go to step 6. |
|
|
charge. Confirm customer |
|
|
|
|
battery is not consumed nor |
No |
Replace customer battery |
P10 |
|
defective. |
|||
|
|
for not charging (P10) or not |
or |
|
|
|
|
||
|
|
|
recognized (P11). Customer |
P11 |
|
|
|
to purchase a replacement |
|
|
|
|
|
|
|
|
|
battery if consumed. |
|
|
|
|
|
|
2010-06-15 |
MacBook Pro (15-inch, Late 2008) Symptom Charts 30 |
Loading...