


Apple LED Cinema Display

Apple Inc.
© 2010 Apple Inc. All rights reserved.
Under the copyright laws, this manual may not be copied, in whole
or in part, without the written consent of Apple.
The Apple logo is a trademark of Apple Inc., registered in the U.S.
and other countries. Use of the “keyboard” Apple logo (OptionShift-K) for commercial purposes without the prior written consent
of Apple may constitute trademark infringement and unfair
competition in violation of federal and state laws.
Every eort has been made to ensure that the information in
this manual is accurate. Apple is not responsible for printing or
clerical errors.
Apple
1 Innite Loop
Cupertino, CA 95014
408-996-1010
www.apple.com
Apple, the Apple logo, Apple Cinema Display, iChat, iMovie,
iPhone, iPod, iSight, Mac, MacBook, MagSafe, and Photo Booth are
trademarks of Apple Inc., registered in the U.S. and other countries.
Apple Store is a service mark of Apple Inc., registered in the U.S.
and other countries.
ENERGY STAR® is a U.S. registered trademark.
The Bluetooth® word mark and logos are registered trademarks
owned by Bluetooth SIG, Inc. and any use of such marks by Apple
is under license.
Other company and product names mentioned herein may be
trademarks of their respective companies. Mention of third-party
products is for informational purposes only and constitutes
neither an endorsement nor a recommendation. Apple assumes
no responsibility with regard to the performance or use of these
products.

Contents
6 Getting Started
7 Setting Up Your Display
9 Using Your Display
13 Care and Safety
15 Ergonomics
16 Troubleshooting Your Display
17 Learning More, Service, and Support
18 Specications
19 Käyttöönotto
20 Näytön käyttöönotto
22 Näytön käyttäminen
26 Huolto ja turvallisuus
28 Ergonomia
29 Näytön vianmääritys
30 Lisätiedot, huolto ja tuki
31 Tekniset tiedot
3

33 Klargjøre skjermen
35 Bruke skjermen
39 Vedlikehold og sikkerhet
41 Ergonomi
42 Problemløsing
43 Service, support og mer informasjon
44 Spesikasjoner
45 Pierwsze kroki
46 Podłączanie monitora
48 Korzystanie z monitora
52 Dbałość i bezpieczeństwo
54 Ergonomia
55 Rozwiązywanie problemów z monitorem
56 Dodatkowe informacje, serwis i pomoc
57 Dane techniczne
58 Introdução
59 Instalação do monitor
61 Utilização do monitor
65 Cuidado e segurança
67 Ergonomia
68 Resolução de problemas do monitor
69 Mais informações, assistência e suporte
70 Especicações
4

71 Komma igång
72 Installera skärmen
74 Använda skärmen
78 Skötsel och säkerhet
80 Ergonomi
81 Felsöka bildskärmen
82 Mer information, service och support
83 Teknisk information
84 Начало работы
85 Настройка монитора
87 Использование монитора
91 Безопасность и уход
93 Эргономика
94 Устранение неполадок монитора
95 Дополнительная информация, обслуживание и поддержка
96 Спецификации
97 Regulatory Compliance Information
98 Apple and the Environment
5

Getting Started
Your Apple LED Cinema Display is designed to work seamlessly
with Mac computers that have a Mini DisplayPort connector.
It features an LED-backlit widescreen display, a MagSafe
connector to charge your MacBook computer, a built-in iSight
camera, a microphone, and a speaker system.
The instructions on the following pages help you set up and use your new display.
Learn how to:
 Connect your display to your computer
 Use your display’s camera, microphone, speaker system, and USB ports
 Adjust your display’s settings
Note: You can connect your Apple LED Cinema Display to a Mac desktop computer
that has a Mini DisplayPort.
Important: Carefully read all the installation instructions (and the safety information
starting on page 13) before you set up and use your display.
For information about the specic computers and graphics cards that are compatible
with your display, go to www.apple.com/displays.
6 English

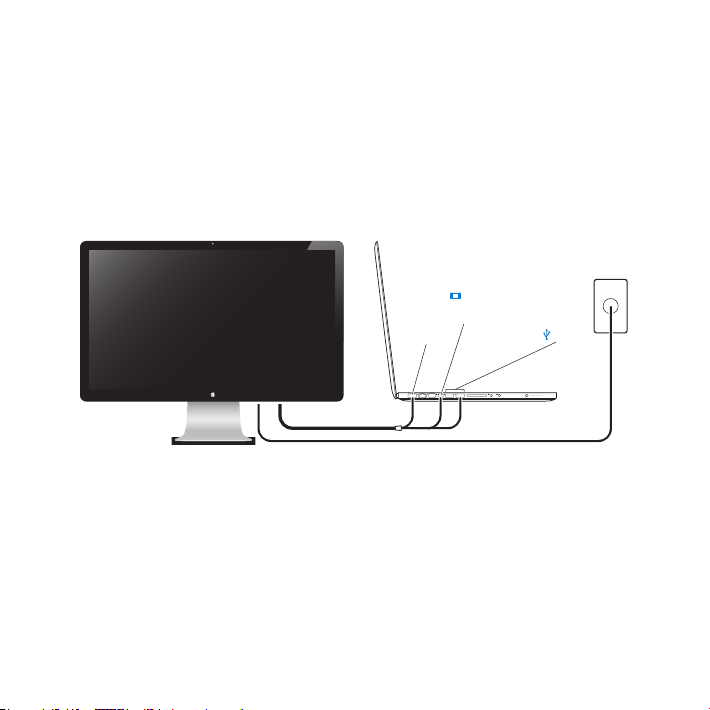
Setting Up Your Display
Apple LED Cinema Display
Follow these steps to set up your Apple LED Cinema Display:
1 Remove the protective lm from the display and cables.
2 Insert the power cord into the display, and then insert the AC plug into a grounded
power outlet.
3 Plug the MagSafe connector into the MagSafe power port on your MacBook to charge
the battery and provide power to your computer.
MacBook
Mini
MagSafe USB
4 Connect the USB cable to your computer to use the display’s built-in iSight camera,
DisplayPort
Grounded
power outlet
microphone, speaker system, and USB ports.
5 Connect the Mini DisplayPort cable to your computer.
6 Press the power (®) button on your computer to start it up. The display turns on
automatically when you start up your computer.
7English

Setting Up Your MacBook with the Lid Closed
You can close the lid of your MacBook and use just your Apple LED Cinema Display.
Follow the setup instructions on the previous page and make sure the MagSafe
connector from the display is plugged into the MagSafe power port on your MacBook.
To use your Apple LED Cinema Display with your MacBook lid closed:
1 Connect an external USB keyboard and mouse to a USB port on your display, or use the
Bluetooth® Setup Assistant to set up a wireless keyboard and mouse.
2 Make sure your MacBook is turned on.
3 Close the lid on your MacBook to put it to sleep.
4 Wait a few seconds, and then press any key on the external keyboard or click the
mouse to wake your MacBook.
8 English

Using Your Display
Built-in
Your Apple LED Cinema Display has a built-in iSight camera, microphone, and speaker
system. The USB connection between the display and your computer is required for
these features.
Microphone
iSight camera
Speaker system
Using the Built-in iSight Camera and Microphone
You can use the built-in iSight camera and microphone to capture still images, video,
and sound using applications such as iChat, iMovie, and Photo Booth.
To set up the camera and microphone with iChat:
1 Click the iChat icon in the Dock to open the iChat application.
2 Choose iChat > Preferences, and then click Audio/Video.
3 Choose Display iSight from the Camera pop-up menu.
4 Choose Display Audio from the Microphone pop-up menu.
9English

Setting Up Sound Input and Output
You can listen to music, movies, games, and multimedia les through the speaker
system on your display. You can use the microphone to record sounds, or talk with
friends using iChat. Use Sound preferences to manage sound input and output.
To set up sound input:
1 Choose Apple () > System Preferences, and then click Sound.
2 Click the Input tab in Sound preferences.
3 Choose Display Audio to input sound through your display’s microphone.
To set up sound output:
1 Choose Apple () > System Preferences, and then click Sound.
2 Click the Output tab in Sound preferences.
3 Choose Display Audio to hear sound through your display’s speaker system.
If your Mac computer supports sound output through the Mini DisplayPort in addition
to the USB port, you can choose either Mini DisplayPort or USB Audio for audio output.
These sound settings are used whenever your computer is connected to your display.
They remain in eect until you change them.
10 English

Setting Up Your Apple LED Cinema Display as an Additional Display
When you leave the lid on your MacBook open, you can mirror the same desktop
image on both displays or use the additional display as an extension of your desktop.
Use Displays preferences to set up video mirroring or extended desktop.
To set up video mirroring or extended desktop:
1 Choose Apple () > System Preferences, and then click Displays.
2 Click the Arrangement tab and follow the onscreen instructions.
Adjusting the Resolution, Brightness, and Color
Your Apple LED Cinema Display can automatically adjust the screen brightness for
current light conditions using the built-in ambient light sensor. You can turn autobrightness on or o in Displays preferences.
To change the resolution or brightness:
1 Choose Apple () > System Preferences, and then click Displays.
2 Choose a resolution or drag the Brightness slider.
You can also use the brightness keys on an external Apple Keyboard to increase ( ) or
decrease ( ) the brightness of your display.
To change the display color prole or calibrate your display:
1 Click the Color tab in Displays preferences.
2 Choose a display color prole, or click Calibrate to open the Display Calibrator Assistant.
For more information about calibrating your display, choose Help > Mac Help in the
menu bar and search for “calibrate.”
11English

Using the USB Ports and Security Slot
Your Apple LED Cinema Display has three powered USB ports on the back. Use these
ports to connect a mouse, keyboard, iPhone, iPod, or other USB peripheral.
Important: You can use these USB ports to charge your iPhone or iPod, even when
your display isn’t connected to a computer. If you use one of these ports to sync
information between your computer and an iPhone or iPod, make sure the display’s
USB cable is connected to your computer.
USB ports
Security slot
To secure your display, attach a locking cable to the security slot.
12 English

Using a VESA Mounting Solution with Your Display
You can attach your display to an alternative mounting solution, using the VESA Mount
Adapter Kit available from the Apple Online Store at www.apple.com/store. Use the
kit to attach your display to any available VESA-compatible mounting solution. Simply
follow the instructions included with the kit.
Care and Safety
Before you lift or reposition your display, you may need to disconnect the cables and
power cord. Use correct lifting techniques when positioning the display. When lifting or
carrying the display, hold it by the edges. Don’t lift the display by the stand or the cord.
To clean the screen on your display:
1 Disconnect the power cord.
2 Use the cloth that came with your display, or another soft, dry cloth, to wipe dust from
the screen.
WARNING: Don’t clean the screen with a cleaner containing alcohol or acetone. Use a
cleaner intended for use with a screen or display. Never spray cleaner directly on the
screen. It may drip inside the display and cause damage.
13English

Don’t operate your display in areas with signicant amounts of airborne dust, or smoke
from cigarettes, cigars, ashtrays, stoves, or replaces, or near an ultrasonic humidier
using unltered tap water. Tiny airborne particles produced by smoking, cooking,
burning, or using an ultrasonic humidier with unltered water may, in rare instances,
enter the ventilation openings of your display and, under certain conditions, result in a
slight haze on the inside surface of the glass panel that covers the display.
Follow these safety guidelines for using your display:
 The only way to completely disconnect power is to unplug the power cord. Be sure to
pull the plug, not the cord.
 Disconnect power immediately if the power cord is frayed or damaged, if you spill
something on the display, or if the display falls or is damaged in some other way.
WARNING: Use only the power cord that came with your display. The power cord has
a three-wire grounding plug (a plug that has a third grounding pin) that ts only a
grounded AC outlet. If you are unable to insert the plug into an outlet because the
outlet is not grounded, contact a licensed electrician to replace the outlet with a
properly grounded outlet.
WARNING: Your display is a high-voltage component and should not be opened for
any reason, even when it’s unplugged. If your display needs service, see “Learning
More, Service, and Support” on page 17.
14 English
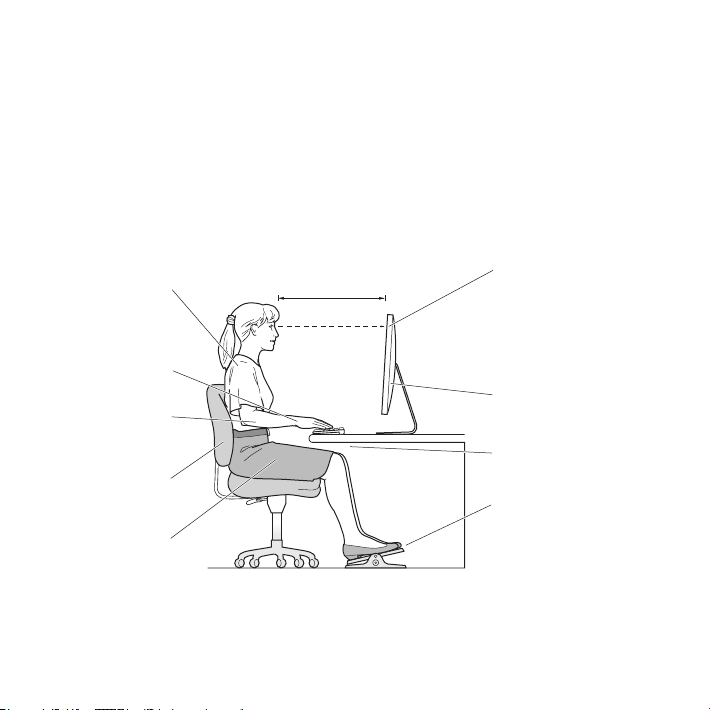
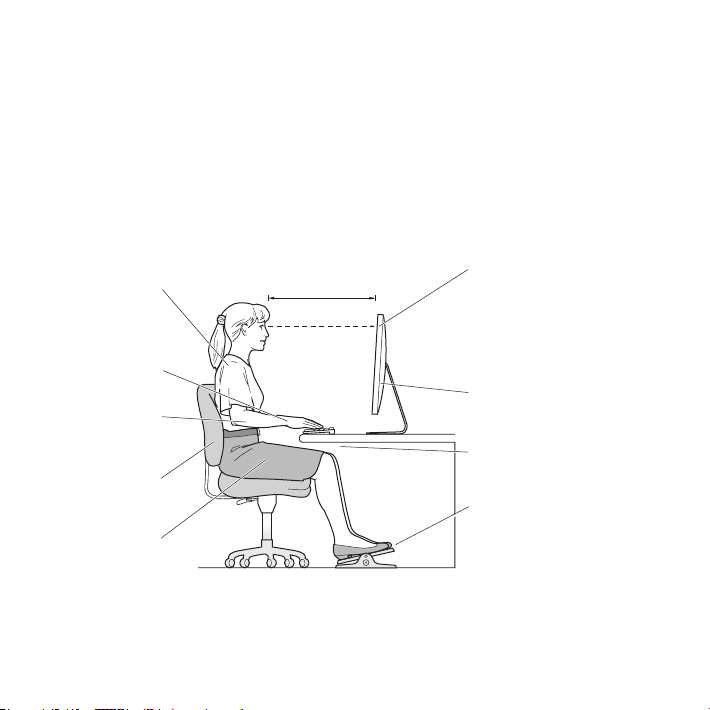
Ergonomics
Top of the screen at or
Here are some guidelines for adjusting your display to reduce glare and to
accommodate your physical size and shape.
 Arrange the display so that the top of the screen is slightly below your eye level
when you’re sitting at the keyboard. The best distance from your eyes to the screen is
up to you, although most people tend to prefer 18 to 28 inches (45 to 70 cm).
 Position the display by tilting it up or down to minimize glare and reections from
overhead lights and nearby windows.
Shoulders
relaxed
Forearms and
hands in a
straight line
Forearms level
or tilted slightly
Lower back
supported
Thighs tilted
slightly
18–28 in. (45–70 cm)
For more information about health, safety, and maintenance, go to the Apple
ergonomic website at www.apple.com/about/ergonomics.
slightly below eye level
(You may need to adjust
the height of your display
by raising or lowering
your work surface)
Screen positioned to
avoid reflected glare
Clearance under
work surface
Feet flat on the floor
or on a footrest
15English

Troubleshooting Your Display
Before performing any of these steps, make sure your computer is turned on, the
display is plugged into an outlet, all the cables are connected properly to your
computer and display, and your computer is not in sleep mode.
If the screen doesn’t have an image:
 Check the cables and connectors again to make sure they are connected properly to
your computer and the display.
 Make sure your computer is turned on and is not in sleep mode. If the lid on your
MacBook is closed, use the external keyboard or mouse to wake the MacBook from
sleep.
 Unplug the display’s power cord from the grounded power outlet, wait a few
minutes, then plug it in again.
 Reset the PRAM by restarting your computer while holding down the Command (x),
Option, P, and R keys until you hear the startup sound a second time.
If the screen is dim:
 Make sure the display brightness is set properly. Choose Apple () > System
Preferences and click Displays. Drag the Brightness slider to adjust the brightness.
 If the colors on the display are too saturated or not correct, you may need to calibrate
your display. Open Displays preferences, click the Color tab, click Calibrate, and follow
the instructions.
If your MacBook isn’t charging:
Make sure the MagSafe connector from your display is seated properly in the MagSafe
power port on your MacBook.
16 English

If the built-in iSight camera, microphone, speaker system, or USB ports on the
display aren’t working:
Make sure the USB cable from the display is rmly plugged into the USB port on your
computer. The display’s camera, microphone, speaker system, and USB ports work only
when this cable is connected to your computer.
More Troubleshooting Information
You can nd more troubleshooting information on the Displays support website at:
www.apple.com/support/displays
Learning More, Service, and Support
You can nd more information about your display on the Apple website and in
Mac Help.
To learn about See
Using your display Mac Help and search for “displays.”
Display service, support,
discussions, troubleshooting,
and software downloads
The latest information about
displays
Registering your display The Apple Product Registration site at www.apple.com/register.
The Displays Support site at www.apple.com/support/displays.
The Apple Display site at www.apple.com/displays.
17English

Specications
 Model number: A1316
 Resolution: 2560 x 1440 @ 60 Hz
 Ports: Three high-speed USB 2.0 ports on the back
 Camera and microphone: Built-in iSight camera with microphone
 Speakers: Built-in 2.1 speakers with 49 W output
Dimensions:
 Weight: 23.5 lb. (10.7 kg)
 Height: 19.2 inches (488.1 mm)
 Width: 25.65 inches (651.7 mm)
 Depth (with stand): 8.2 inches (208.13 mm)
 Viewable: 27 inches (685.8 mm) diagonal
Operating environment:
 Operating temperature: 50° to 95° F (10° to 35° C)
 Relative humidity: 20% to 80% (noncondensing)
 Altitude: 0 to 10,000 feet (0 to 3048 meters)
18 English

Käyttöönotto
Apple LED Cinema Display on suunniteltu toimimaan
saumattomasti mini-DisplayPort-liitännällä varustettujen
Mac-tietokoneiden kanssa. Siinä on LED-taustavalaistu
laajakuvanäyttö, MagSafe-liitäntä MacBook-tietokoneen
lataamiseen, sisäinen iSight-kamera, mikrofoni ja
kaiutinjärjestelmä.
Seuraavien sivujen ohjeet auttavat sinua ottamaan käyttöön ja käyttämään uutta
näyttöäsi. Opit kuinka:
 Liittää näyttö tietokoneeseen
 Käyttää näytön kameraa, mikrofonia, kaiutinjärjestelmää ja USB-portteja
 Säätää näytön asetuksia
Huomaa: Voit liittää Apple LED Cinema Display -näytön Mac-pöytäkoneeseen, jossa on
mini-DisplayPort-liitäntä.
Tärkeää: Lue kaikki asennusohjeet (ja turvallisuustiedot, alkaen sivu 26) huolellisesti
ennen näytön käyttöönottoa ja käyttöä.
Tietoja näytön kanssa yhteensopivista tietokoneista ja näytönohjaimista löytyy
osoitteesta www.apple.com/fi/displays.
19Suomi

Näytön käyttöönotto
Apple LED Cinema Display
Ota Apple LED Cinema Display käyttöön seuraamalla näitä ohjeita:
1 Poista suojakalvot näytöstä ja kaapeleista.
2 Liitä virtajohto näyttöön ja virtapistoke maadoitettuun pistorasiaan.
3 Jos haluat ladata MacBookin akkua ja antaa sille virtaa, liitä MagSafe-liitin MacBookin
MagSafe-porttiin.
MacBook
Mini-DisplayPort
MagSafe USB
Maadoitettu pistorasia
4 Jos haluat käyttää näytön sisäistä iSight-kameraa, mikrofonia, kaiutinjärjestelmää ja
USB-portteja, liitä USB-kaapeli tietokoneeseen.
5 Liitä mini-DisplayPort-kaapeli tietokoneeseen.
6 Käynnistä tietokone painamalla käynnistyspainiketta (®). Näyttö kytkeytyy
automaattisesti päälle, kun tietokone käynnistetään.
20 Suomi

MacBookin käyttöönotto kansi suljettuna
Voit sulkea MacBookin kannen ja käyttää vain Apple LED Cinema Display -näyttöä.
Seuraa edellisen sivun käyttöönotto-ohjeita ja varmista, että näytön MagSafe-liitin on
liitetty MacBookin MagSafe-porttiin.
Apple LED Cinema Display -näytön käyttäminen MacBookin näyttö suljettuna:
1 Liitä ulkoinen USB-näppäimistö ja -hiiri näytön USB-porttiin tai ota käyttöön langaton
näppäimistö ja hiiri Bluetoothin® käyttöönottoapurilla.
2 Varmista, että MacBook on päällä.
3 Laita MacBook nukkumaan sulkemalla sen kansi.
4 Odota muutama sekunti ja herätä MacBook painamalla ulkoisen näppäimistön
näppäintä tai osoittamalla hiirtä.
21Suomi

Näytön käyttäminen
Mikrofoni
Sisäinen iSight-kamera
Apple LED Cinema Display -näytössä on sisäinen iSight-kamera, mikrofoni ja kaiutinjärjestelmä. Nämä ominaisuudet edellyttävät USB-yhteyttä näytön ja tietokoneen välillä.
Kaiutinjärjestelmä
Sisäisen iSight-kameran ja mikrofonin käyttäminen
Voit tallentaa still-kuvia, videota ja ääntä sisäisellä iSight-kameralla ja mikrofonilla
ohjelmissa kuten iChat, iMovie ja Photo Booth.
Kameran ja mikrofonin käyttöönotto iChatissa:
1 Avaa iChat-ohjelma osoittamalla Dockissa olevaa iChat-symbolia.
2 Valitse iChat > Asetukset ja osoita Ääni/video.
3 Valitse Kamera-ponnahdusvalikosta Näytön iSight.
4 Valitse Mikrofoni-ponnahdusvalikosta Näytön ääni.
22 Suomi

Äänen sisäänmenon ja ulostulon käyttöönotto
Voit kuunnella musiikkia, elokuvia, pelejä ja multimediatiedostoja näytössä olevan
kaiutinjärjestelmän kautta. Mikrofonilla voit tallentaa ääntä ja keskustella ystävien
kanssa iChatilla. Voit hallita äänen sisäänmenoa ja ulostuloa Äänet-asetuksissa.
Äänen sisäänmenon käyttöönotto:
1 Valitse Omenavalikko () > Järjestelmäasetukset ja osoita Äänet.
2 Osoita Äänet-asetuksissa Ääni sisään -välilehteä.
3 Valitse Näytön ääni, jolloin näytön mikrofonin äänet tulevat tietokoneeseen.
Äänen ulostulon käyttöönotto:
1 Valitse Omenavalikko () > Järjestelmäasetukset ja osoita Äänet.
2 Osoita Äänet-asetuksissa Ääni ulos -välilehteä.
3 Valitse Näytön ääni, jolloin äänet kuuluvat näytön kaiutinjärjestelmän kautta.
Jos Mac-tietokoneesi tukee äänen ulostuloa USB-portin lisäksi mini-DisplayPortin
kautta, voit valita äänen ulostuloon joko mini-DisplayPortin tai USB:n.
Näitä ääniasetuksia käytetään aina, kun näyttö liitetään tietokoneeseen. Ne pysyvät
voimassa, kunnes muutat niitä.
23Suomi

Apple LED Cinema Display -näytön käyttöönotto lisänäyttönä
Kun jätät MacBookin kannen auki, voit peilata saman kuvan molemmille näytöille tai
laajentaa työpöytää lisänäytöllä. Voit ottaa peilaamisen tai laajennetun työpöydän
käyttöön Näytöt-asetuksissa.
Peilaamisen tai laajennetun työpöydän käyttöönotto:
1 Valitse Omenavalikko () > Järjestelmäasetukset ja osoita Näytöt.
2 Osoita Järjestys-välilehteä ja seuraa näytöllä näkyviä ohjeita.
Tarkkuuden, kirkkauden ja värin säätäminen
Apple LED Cinema Display voi automaattisesti säätää näytön kirkkautta valaistukseen
sopivaksi sisäisellä ympäristön valoisuuden tunnistimella. Voit laittaa automaattisen
kirkkauden säädön päälle tai pois päältä Näytöt-asetuksissa.
Tarkkuuden tai kirkkauden muuttaminen:
1 Valitse Omenavalikko () > Järjestelmäasetukset ja osoita Näytöt.
2 Valitse tarkkuus tai vedä Kirkkaus-liukusäädintä.
Voit myös lisätä ( ) tai vähentää ( ) näytön kirkkautta ulkoisen Applen näppäimistön
kirkkaudensäätönäppäimillä.
Näytön väriprofiilin vaihtaminen tai näytön kalibroiminen:
1 Osoita Näytöt-asetuksissa Väri-välilehteä.
2 Valitse näytön väriproili tai avaa Näytön kalibrointiapuri osoittamalla Kalibroi.
Saat lisätietoja näytön kalibroimisesta valitsemalla valikkoriviltä Ohjeet > Mac-ohjeet ja
etsimällä sanalla ”kalibroi”.
24 Suomi

USB-porttien ja lukituskaapelin paikan käyttäminen
Apple LED Cinema Displayn takana on kolme USB-porttia. Voit liittää näihin portteihin
hiiren, näppäimistön, iPhonen, iPodin tai muun USB-lisälaitteen.
Tärkeää: Voit käyttää USB-portteja iPhonen tai iPodin akun lataamiseen silloinkin, kun
näyttö ei ole yhdistettynä tietokoneeseen. Jos käytät porttia synkronoidaksesi tietoja
tietokoneen ja iPhonen tai iPodin välillä, varmista, että näytön USB-kaapeli on liitetty
tietokoneeseen.
USB-portit
Lukituskaapelin paikka
Jos haluat suojata näyttöä varkauksilta, liitä lukituskaapeli lukituskaapelin paikkaan.
25Suomi

VESA-kiinnitysratkaisun käyttäminen näytön kanssa
Voit kiinnittää näytön vaihtoehtoiseen kiinnitysratkaisuun VESA-kiinnityssovitinpaketin
avulla, joka on ostettavissa Apple Online Storesta osoitteesta store.apple.com/fi. Paketin
avulla voit liittää näytön mihin tahansa VESA-yhteensopivaan kiinnitysratkaisuun.
Noudata vain paketin mukana tulevia ohjeita.
Huolto ja turvallisuus
Ennen näytön nostamista tai siirtämistä voi olla tarpeen irrottaa kaapelit ja virtajohto.
Käytä oikeaa nostotekniikkaa, kun siirrät näyttöä. Kun nostat tai kannat näyttöä, tartu
kiinni sen reunoista. Älä nosta näyttöä sen jalasta tai johdosta.
Näyttöruudun pinnan puhdistaminen:
1 Irrota virtajohto.
2 Pyyhi pölyt näytön pinnasta näytön mukana tulleella liinalla tai muulla pehmeällä,
kuivalla liinalla.
VAROITUS: Älä käytä näytön puhdistukseen alkoholia tai asetonia sisältävää
puhdistusainetta. Käytä näytölle tarkoitettua puhdistusainetta. Älä koskaan ruiskuta
ainetta suoraan näytölle. Se saattaa valua näytön sisään ja vahingoittaa näyttöä.
26 Suomi

Älä käytä näyttöä paikoissa, joissa on paljon lentävää pölyä tai tuhkaa tupakoista,
sikareista, tuhkakupeista, uuneista tai takoista, tai lähellä ultraäänellä toimivaa
ilmankostutinta, joka käyttää suodattamatonta vesijohtovettä. Pienet lentävät
hiukkaset, jotka muodostuvat tupakoinnista, ruoanlaitosta, tupakoinnista tai ultraääniilmankostuttajan käytöstä suodattamattomalla vedellä saattavat harvinaisissa
tapauksissa mennä sisään näytön tuuletusaukoista ja joissakin olosuhteissa aiheuttaa
pienen samentuman näyttöä ympäröivän lasipaneelin sisäpinnalla.
Seuraa näitä turvaohjeita näyttöä käyttäessäsi:
 Ainoa tapa katkaista virta kokonaan on irrottaa virtajohto. Vedä liittimestä, älä
johdosta.
 Irrota virtajohto välittömästi, jos se rispaantuu tai vahingoittuu, jos kaadat nestettä
näytön päälle tai jos näyttö kaatuu tai vahingoittuu jollain muulla tavalla.
VAROITUS: Käytä vain näytön mukana tullutta virtajohtoa. Virtajohto on maadoitettu
ja sopii vain maadoitettuun vaihtovirtapistorasiaan. Jos käytössäsi ei ole maadoitettua
pistorasiaa, pyydä valtuutettua sähköasentajaa asentamaan maadoitettu pistorasia.
VAROITUS: Näyttö on korkeajännitteinen komponentti, eikä sitä saa avata mistään
syystä edes sen ollessa irrotettuna. Jos näyttö on huollon tarpeessa, katso ”Lisätiedot,
huolto ja tuki” sivulla 30.
27Suomi

Ergonomia
Näytön yläreuna
Seuraavassa esitettyjen ohjeiden avulla voidaan vähentää näytön heijastuksia ja säätää
näyttö käyttäjälle sopivaksi.
 Aseta näyttö niin, että näytön yläreuna on näppäimistön edessä istuttaessa hiukan
silmiesi tason alapuolella. Näytön paras katseluetäisyys on yksilöllinen, mutta
useimpien käyttäjien mielestä paras etäisyys on 45 - 70 cm.
 Kallista näyttöä ylös tai alas niin, että kattolamppujen ja ikkunoiden aiheuttamat
heijastukset ovat mahdollisimman vähäisiä.
Rennot
hartiat
Käsivarret
ja kädet
suorassa linjassa
Käsivarret suorassa
tai hieman viistossa
Alaselkä tuettuna
Reidet hieman
viistossa
45–70 cm
Lisätietoa terveydestä, turvallisuudesta ja huollosta on Applen ergonomiasivuilla
osoitteessa www.apple.com/fi/about/ergonomics.
silmien tasolla tai
hieman sen alle
(Näytön korkeutta
on ehkä säädettävä
nostamalla tai
laskemalla työtasoa)
Näyttö sijoitettu niin,
että sen pinnalla ei
näy heijastuksia
Tilaa työpöydän alla
Jalat tasaisesti lattialla
tai jalkatuen päällä
28 Suomi

Näytön vianmääritys
Varmista ennen näiden toimien suorittamista, että tietokone on päällä, näyttö on
liitetty pistorasiaan, kaikki kaapelit ovat kunnolla kiinni tietokoneessa ja näytössä ja
että tietokone ei ole nukkumassa.
Jos näytöllä ei näy kuvaa:
 Tarkista uudelleen, että kaapelit on liitetty kunnolla tietokoneeseen ja näyttöön.
 Varmista, että tietokone on päällä ja että se ei ole nukkumassa. Jos MacBookin kansi
on suljettuna, herätä MacBook ulkoisella näppäimistöllä tai hiirellä.
 Irrota näytön virtajohto maadoitetusta pistorasiasta, odota muutama minuutti ja liitä
se takaisin.
 Nollaa PRAM käynnistämällä tietokone uudelleen pitäen Komento- (x), Optio-, P- ja
R-näppäimiä painettuina, kunnes kuulet käynnistysäänen toisen kerran.
Jos näyttö on himmeä:
 Varmista, että näytön kirkkaus on asetettu asianmukaisesti. Valitse Omenavalikko
() > Järjestelmäasetukset ja osoita Näytöt. Säädä kirkkautta vetämällä Kirkkausliukusäädintä.
 Jos näytön värit ovat liian kylläisiä tai muuten väärin, näyttö on ehkä kalibroitava.
Avaa Näytöt-asetukset, osoita Väri-välilehteä, osoita Kalibroi ja seuraa ohjeita.
Jos MacBook ei lataudu:
Varmista, että näytön MagSafe-liitin on kunnolla MacBookin MagSafe-portissa.
29Suomi

Jos näytön sisäinen iSight-kamera, mikrofoni, kaiutinjärjestelmä tai USB-portit eivät
toimi:
Varmista, että näytön USB-kaapeli on liitetty kunnolla tietokoneen USB-porttiin. Näytön
kamera, mikrofoni, kaiutinjärjestelmä ja USB-portit toimivat vain, kun tämä kaapeli on
liitetty tietokoneeseen.
Lisää vianmääritystietoja
Lisää vianmääritystietoja löytyy näyttöjen tukisivustolta osoitteesta: www.apple.com/fi/
support/displays
Lisätiedot, huolto ja tuki
Lisätietoja näytöstä löytyy Applen verkkosivustolta ja Mac-ohjeista.
Kun haluat lisätietoja
aiheesta
Näytön käyttäminen Mac-ohjeet ja etsi sanalla ”näytöt”.
Näyttöjen huolto, tuki,
keskustelut, vianmääritys ja
ohjelmistolataukset
Tuoreimmat uutiset näytöistä Applen näyttösivusto osoitteessa www.apple.com//displays.
Näytön rekisteröiminen Applen tuoterekisteröinti osoitteessa www.apple.com//register.
30 Suomi
Katso
Näyttöjen tukisivusto osoitteessa www.apple.com//support/
displays.

Tekniset tiedot
 Mallinumero: A1316
 Tarkkuus: 2560 x 1440, 60 Hz
 Portit: Kolme nopeaa USB 2.0 -porttia takana
 Kamera ja mikrofoni: Sisäinen iSight-kamera ja mikrofoni
 Kaiuttimet: Sisäiset 2.1-kaiuttimet 49 W teholla
Mitat:
 Paino: 10,7 kg
 Korkeus: 48,81 cm
 Leveys: 65,17 cm
 Syvyys (jalustan kanssa): 20,813 cm
 Katseluala: lävistäjä 27 tuumaa (68,58 cm)
Käyttöympäristö:
 Käyttölämpötila: 10 - 35° C
 Suhteellinen kosteus: 20 - 80 % (ei-kondensoiva)
 Korkeus: 0 - 3048 m
31Suomi

Komme i gang
Apple LED Cinema Display er utviklet for bruk med Macmaskiner som har en Mini DisplayPort-tilkobling. Skjermen
har en widescreenskjermate med LED-bakbelysning i tillegg
til MagSafe-tilkobling for lading av MacBook-maskinen,
innebygd iSight-kamera, mikrofon og høyttalersystem.
Instruksjonene på de neste sidene hjelper deg med å klargjøre og ta i bruk den nye
skjermen. Finn ut hvordan du:
 kobler skjermen til datamaskinen
 bruker skjermens kamera, mikrofon, høyttalersystem og USB-porter
 endrer skjerminnstillinger
Merk: Du kan koble Apple LED Cinema Display til en stasjonær Mac-maskin som har
Mini DisplayPort-tilkobling.
Viktig: Les klargjøringsinstruksjonene (og sikkerhetsinformasjonen som begynner på
side 39) før du klargjør og tar i bruk skjermen.
På www.apple.com/no/displays nner du informasjon om hvilke maskiner og grakkort
som er kompatible med skjermen.
32 Norsk

Klargjøre skjermen
Apple LED Cinema Display-skjerm
Følg disse trinnene for å klargjøre Apple LED Cinema Display:
1 Fjern den beskyttende plastlmen fra skjermen og kablene.
2 Koble den ene enden av strømkabelen til skjermen, og den andre til en jordet
strømkontakt.
3 Hvis du vil lade batteriet og koble den bærbare MacBook-maskinen til strøm, kobler du
MagSafe-pluggen til MagSafe-strøminntaket på maskinen.
MacBook
MagSafe USB
4 Hvis du vil bruke skjermens innebygde iSight-kamera, mikrofon, høyttalersystem
Mini DisplayPort
og USB-porter, kobler du USB-kabelen til datamaskinen.
5 Koble Mini DisplayPort-kabelen til datamaskinen.
6 Trykk på på/av-knappen (®) på datamaskinen for å slå den på. Skjermen slås på
automatisk når du slår på maskinen.
Jordet strøm-
uttak
33Norsk

Bruke MacBook-maskinen med skjermen lukket
Du kan lukke skjermen på MacBook-maskinen og bare bruke Apple LED Cinema
Display. Følg klargjøringsinstruksjonene på forrige side, og kontroller at MagSafepluggen fra skjermen er koblet til MagSafe-strøminntaket på MacBook-maskinen.
Slik bruker du Apple LED Cinema Display mens MacBook-skjermen er lukket:
1 Koble et eksternt USB-tastatur og en USB-mus til USB-porten på skjermen, eller bruk
Bluetooth®-oppsettassistent for å klargjøre et trådløst tastatur og en trådløs mus.
2 Kontroller at MacBook-maskinen er slått på.
3 Lukk skjermen på MacBook-maskinen, slik at maskinen går i dvale.
4 Vent noen sekunder, og trykk deretter på en hvilken som helst tast på det eksterne
tastaturet eller klikk med musen, slik at du vekker MacBook-maskinen.
34 Norsk

Bruke skjermen
Innebygd
Apple LED Cinema Display har innebygd iSight-kamera, mikrofon og høyttalersystem.
Skjermen og datamaskinen må være koblet sammen via USB-tilkoblingen for at disse
funksjonene skal fungere.
Mikrofon
iSight-kamera
Høyttalersystem
Bruke det innebygde iSight-kameraet og mikrofonen
Du kan bruke det innebygde iSight-kameraet og den innebygde mikrofonen til å ta
stillbilder og lage lyd- og videoopptak ved hjelp av programmer som for eksempel
iChat, iMovie og Photo Booth.
35Norsk

Slik klargjør du kamera og mikrofon for bruk med iChat:
1 Klikk på iChat-symbolet i Dock for å åpne iChat-programmet.
2 Velg iChat > Valg, og klikk deretter på Lyd/video.
3 Velg «iSight i skjermen» fra Kamera-lokalmenyen.
4 Velg Skjermlyd fra Mikrofon-lokalmenyen.
Klargjøre lyd inn og lyd ut
Gjennom høyttaleranlegget på skjermen kan du spille lyd fra musikk, lmer, spill og
multimedieler. Du kan bruke mikrofonen til å ta opp lyd og snakke med venner via
iChat. Bruk Lyd-valgpanelet for å endre lyd inn og lyd ut.
Slik klargjør du lyd inn:
1 Velg Apple () > Systemvalg, og klikk deretter på Lyd.
2 Klikk på Lyd inn-fanen i Lyd-valgpanelet.
3 Velg Skjermlyd for å angi at lyd inn skal komme fra skjermmikrofonen.
Slik klargjør du lyd ut:
1 Velg Apple () > Systemvalg, og klikk deretter på Lyd.
2 Klikk på Lyd ut-fanen i Lyd-valgpanelet.
3 Velg Skjermlyd for å angi at lyd skal spilles via skjermens høyttaleranlegg.
Hvis Mac-maskinen har støtte for utsending av lyd via Mini DisplayPort i tillegg til via
USB-porten, kan du velge at lyden skal sendes ut via Mini DisplayPort eller USB-lyd.
Disse lydinnstillingene brukes hver gang datamaskinen er koblet til skjermen.
Innstillingene beholdes til du endrer dem.
36 Norsk

Klargjøre Apple LED Cinema Display som en skjerm nummer to
Når du lar skjermen på MacBook-maskinen stå åpen, kan du vise det samme skrivebordsbildet på begge skjermene eller bruke tilleggsskjermen som en utvidelse av
skrivebordet. Bruk Skjermer-valgpanelet for å ta i bruk like skjermer eller utvidet
skrivebord.
Slik velger du like skjermer eller utvidet skrivebord:
1 Velg Apple () > Systemvalg, og klikk deretter på Skjermer.
2 Klikk på Organisering-fanen, og følg instruksjonene på skjermen.
Justere oppløsning, lysstyrke og farge
Apple LED Cinema Display har en lysmåler og kan justere lysstyrken automatisk basert
på lysforholdene. Automatisk justering av lysstyrken kan slås på og av i Skjermervalgpanelet.
Slik endrer du oppløsning eller lysstyrke:
1 Velg Apple () > Systemvalg, og klikk deretter på Skjermer.
2 Velg en oppløsning, eller ytt Lysstyrke-skyveknappen.
Du kan også øke ( ) eller redusere ( ) lysstyrken på skjermen ved hjelp av
lysstyrketastene på et eksternt Apple Keyboard-tastatur.
Slik endrer du skjermfargeprol eller kalibrerer skjermen:
1 Klikk på Farger-fanen i Skjermer-valgpanelet.
2 Velg en skjermfargeprol, eller klikk på Kalibrer for å åpne Skjermkalibreringsassistent.
Hvis du vil ha mer informasjon om hvordan du kalibrerer skjermen, velger du Hjelp >
Mac-hjelp i menylinjen. Søk deretter etter «kalibrere».
37Norsk

Bruke USB-portene og sikkerhetsfestet
Apple LED Cinema Display har tre USB-porter med strømtilførsel på baksiden.
Du kan bruke disse portene til å koble til mus, tastatur, iPhone, iPod eller annet USBtilleggsutstyr.
Viktig: Du kan bruke disse USB-portene til å lade iPhone eller iPod, selv når skjermen
ikke er koblet til en datamaskin. Hvis du bruker en av disse portene til å synkronisere
informasjon mellom datamaskinen og en iPhone eller iPod, må du forsikre deg om at
skjermens USB-kabel er koblet til datamaskinen.
USB-porter
Sikkerhetsfeste
Hvis du vil sikre skjermen mot tyveri, fester du en låsekabel i sikkerhetsfestet.
38 Norsk

Bruke en VESA-monteringsløsning sammen med skjermen
Du kan montere skjermen på et annet stativ ved hjelp av VESA Mount Adapter Kit som
kan kjøpes fra Apple Online Store på www.apple.com/no/store. Du kan bruke settet til
å montere skjermen på alle tilgjengelige VESA-kompatible stativløsninger.
Følg instruksjonene som følger med settet.
Vedlikehold og sikkerhet
Før du løfter eller ytter skjermen, må du koble fra skjermkablene og strømkabelen.
Bruk ergonomisk riktige løfteteknikker når du løfter skjermen. Ta tak i sidene på
skjermen hvis du skal ytte eller bære den. Ikke løft skjermen ved å ta tak i kabler eller
stativet.
Slik rengjør du skjermaten på skjermen:
1 Koble fra strømkabelen.
2 Tørk av skjermaten med rengjøringskluten som fulgte med skjermen, eller bruk en
annen tørr, myk klut.
ADVARSEL: Du må aldri bruke rengjøringsmidler som inneholder alkohol eller aceton,
på skjermaten. Bruk et rengjøringsmiddel som er utviklet spesielt for bruk på
skjermer. Spray aldri rengjøringsmiddel direkte på skjermaten. Gjør du det,
kan væske komme inn i skjermen og forårsake skade.
39Norsk

Ikke bruk skjermen på steder med store mengder støv i luften eller røyk fra sigaretter,
askebegre, komfyrer eller peiser eller i nærheten av ultrasoniske luftfuktere som bruker
ultrert springvann. Små luftbårne partikler som produseres av røyking, matlaging,
brenning eller bruk av ultrasoniske luftltre med ultrert springvann, kan i sjeldne
tilfeller komme inn i ventilasjonsåpningene på skjermen og under bestemte forhold
gjøre glasspanelet som dekker skjermen, uklart.
Følg disse retningslinjene for sikkerhet når du bruker skjermen:
 Den eneste måten å koble fra strøm fullstendig på, er å koble fra strømkabelen.
Trekk i støpselet, ikke i kabelen.
 Koble fra strømkabelen øyeblikkelig hvis kabelen er skadet, hvis du søler noe på
skjermen eller hvis skjermen faller i gulvet eller skades på annen måte.
ADVARSEL: Bruk kun strømkabelen som fulgte med skjermen. Strømkabelen har et
støpsel som kun kan brukes i en jordet kontakt. Hvis du ikke får støpselet til å passe i
en kontakt fordi kontakten ikke er jordet, kontakter du en elektriker som kan installere
en jordet kontakt.
ADVARSEL: Skjermen er en komponent med høy spenning som ikke under noen
omstendigheter skal åpnes. Ikke engang når den ikke er koblet til strømnettet. Hvis
skjermen må leveres inn til service, leser du «Service, support og mer informasjon» på
side 43.
40 Norsk
Ergonomi
Øvre kant av skjermen på
Her er noen retningslinjer for hvordan du kan justere skjermen slik at du kan jobbe
mest mulig behagelig, og slik at det blir minst mulig reeks på skjermen.
 Plasser skjermen slik at skjermens øvre kant er like under øyenivå når du sitter ved
tastaturet. Du kjenner selv hvilken avstand til skjermen som er behagelig for deg,
men de este foretrekker en avstand på 45 til 70 cm.
 Juster skjermen ved å vinkle den opp eller ned for å få minst mulig reekser fra taklys
og eventuelle vinduer.
Avslappede
skuldre
Underarmer
og hender
i en rett linje
Underarmene
rette eller
svakt vinklet
Støtte for
korsryggen
Lårene svakt
vinklet
45–70 cm
Hvis du vil vite mer om helse, sikkerhet og vedlikehold, kan du besøke Apples nettsted
for ergonomi på www.apple.com/no/about/ergonomics.
nivå med øynene eller litt
lavere (du må kanskje
justere høyden på skjermen
ved å legge noe under den
eller ved å justere høyden
på skrivebordet)
Skjermen plassert for å
unngå reflekser
God plass til bena
Føttene hviler flatt på
gulvet eller på en
fotskammel
41Norsk

Problemløsing
Før du prøver forslagene nedenfor, kontrollerer du at datamaskinen er slått på, at
skjermen er koblet til en stikkontakt, at alle kabler er riktig og ordentlig koblet til
maskinen og skjermen og at maskinen ikke er i dvalemodus.
Hvis det ikke vises noe bilde på skjermen:
 Kontroller kablene og kontaktene én gang til for å forsikre deg om at de er koblet
riktig til maskinen og skjermen.
 Kontroller at datamaskinen er slått på og at den ikke er i dvalemodus. Hvis skjermen
på MacBook-maskinen er lukket, bruker du det eksterne tastaturet eller musen for å
vekke MacBook-maskinen fra dvale.
 Koble skjermens strømkabel fra den jordede kontakten, vent i noen minutter, og
koble den til igjen.
 Nullstill PRAM ved å starte maskinen på nytt mens du holder nede Kommando- (x),
Tilvalg- (z), P- og R-tasten til du hører oppstartssignalet for andre gang.
Hvis skjermen er lyssvak:
 Kontroller at lysstyrken på skjermen er justert riktig. Velg Apple () > Systemvalg,
og klikk deretter på Skjermer. Flytt Lysstyrke-skyveknappen for å justere lysstyrken.
 Hvis fargene på skjermen er for mettet eller ikke er riktige, er det mulig at du må
kalibrere skjermen. Åpne Skjermer-valgpanelet, klikk på Farger-fanen, og klikk på
Kalibrer. Følg deretter instruksjonene.
Hvis MacBook-maskinen ikke lades:
Kontroller at MagSafe-pluggen fra skjermen er koblet til MagSafe-strøminntaket
på MacBook-maskinen.
42 Norsk

Hvis det innebygde iSight-kameraet, den innebygde mikrofonen eller det innebygde
høyttalersystemet eller USB-portene på skjermen ikke virker:
Kontroller at USB-kabelen fra skjermen er skikkelig koblet til USB-porten på datamaskinen. Kameraet, mikrofonen, høyttalersystemet og USB-portene på skjermen
fungerer kun når denne kabelen er koblet til datamaskinen.
Mer problemløsingsinformasjon
Du nner mer problemløsingsinformasjon på supportnettstedet for skjermer:
www.apple.com/no/support/displays
Service, support og mer informasjon
Du nner mer informasjon om skjermen på Apple-nettstedet og i Mac-hjelp.
Hvis du vil vite mer om nner du informasjon her
Bruk av skjermen Søk etter «skjermer» i Mac-hjelp.
Service og support,
diskusjonsforumer,
problemløsing og
programvarenedlastinger
Den nyeste informasjonen
om skjermer
Registrering av skjermen Apple-produktregistrering på www.apple.com/no/register.
Nettstedet for skjermsupport på
www.apple.com/no/support/displays.
Apples skjermnettsider på www.apple.com/no/displays.
43Norsk

Spesikasjoner
 Modellnummer: A1316
 Oppløsning: 2560 x 1440 ved 60 Hz
 Porter: Tre USB 2.0-porter (high-speed) på baksiden
 Kamera og mikrofon: Innebygd iSight-kamera med mikrofon
 Høyttalere: Innebygde 2.1-høyttalere med eekt på 49 W
Størrelse:
 Vekt: 10,7 kg
 Høyde: 48,81 cm
 Bredde: 65,17 cm
 Dybde (med stativ): 20,81 cm
 Visningsområde: 27 tommer (68,58 cm) målt diagonalt
Bruksmiljø:
 Temperatur ved bruk: 10 til 35 °C
 Relativ luftfuktighet: 20 til 80 % (ikke-kondenserende)
 Høyde over havet: 0 til 3048 meter
44 Norsk

Pierwsze kroki
Apple LED Cinema Display zaprojektowany jest do pracy
zkomputeramiMac,wyposażonymiwzłączeMiniDisplayPort.
JegoekranpodświetlanyjestzapomocątechnologiiLED.
PosiadatakżezłączeMagSafepozwalająceładowaćbaterie
MacBooka,wbudowanąkameręiSight,mikrofonorazgłośniki.
Instrukcje na kolejnych stronach pomogą podłączyć monitor i pokażą jak z niego
korzystać. Dowiesz się jak:
 podłączyć monitor do komputera,
 korzystać z kamery, mikrofonu, głośników oraz gniazd USB,
 korygować ustawienia monitora.
Uwaga: Monitor Apple LED Cinema Display można podłączyć do stacjonarnego Maca
wyposażonego w gniazdo Mini DisplayPort.
Ważne: Przed pierwszym użyciem monitora przeczytaj uważnie instrukcję instalowania
(a także „Dbałość i bezpieczeństwo” na stronie 52).
Aby dowiedzieć się więcej o komputerach i kartach graficznych zgodnych z tym
monitorem, należy zajrzeć na stronę www.apple.com/pl/displays.
45Polski

Podłączaniemonitora
Apple LED Cinema Display
Jak skonfigurować Apple LED Cinema Display?
1 Zdejmij folię ochronną z ekranu i przewodów.
2 Podłącz przewód zasilania do monitora, po czym włóż wtyczkę do uziemionego
gniazdka elektrycznego.
3 Podłącz wtyczkę MagSafe do gniazda MagSafe w MacBooku, aby naładować baterię
i zapewnić zasilanie komputera.
Uziemione
MacBook
Mini
MagSafe USB
4 Podłącz przewód USB do komputera, aby móc korzystać z wbudowanej kamery iSight,
DisplayPort
mikrofonu, głośników i gniazd USB.
5 Podłącz przewód Mini DisplayPort do komputera.
6 Naciśnij przycisk włącznika na komputerze (®), aby go uruchomić. Monitor włączy się
automatycznie po uruchomieniu komputera.
gniazdko
elektryczne
46 Polski

Korzystanie z MacBooka po zamknięciu ekranu komputera
Można zamknąć ekran MacBooka i używać tylko Apple LED Cinema Display. Aby
podłączyć monitor do komputera, należy wykonać wszystkie kroki opisane na
poprzedniej stronie i upewnić się, że wtyczka MagSafe jest podłączona do gniazda
MagSafe w MacBooku.
Jak używać Apple LED Cinema Display z MacBookiem z zamkniętym ekranem?
1 Podłącz zewnętrzną klawiaturę i mysz do gniazda USB w monitorze lub użyj Asystenta
ustawień Bluetooth® do skonfigurowania bezprzewodowej klawiatury i myszy.
2 Upewnij się, że MacBook jest włączony.
3 Zamknij ekran MacBooka, aby go uśpić.
4 Zaczekaj parę sekund, po czym wciśnij dowolny klawisz na zewnętrznej klawiaturze lub
kliknij myszą, aby obudzić MacBooka.
47Polski

Korzystanie z monitora
Wbudowana
Apple LED Cinema Display jest wyposażony we wbudowaną kamerę iSight, mikrofon
oraz zestaw głośników. Do uruchomienia tych elementów niezbędne jest połączenie
monitora oraz komputera za pomocą przewodu USB.
Mikrofon
kamera iSight
Głośniki monitora
Korzystanie z wbudowanej kamery iSight oraz mikrofonu
Za pomocą kamery iSight i mikrofonu można robić zdjęcia i nagrywać ujęcia wideo
z dźwiękiem, używając do tego celu takich programów, jak iChat, iMovie i Photo Booth.
Jak skonfigurować kamerę i mikrofon do użycia w programie iChat?
1 Kliknij w ikonę iChat w Docku, aby uruchomić ten program.
2 Wybierz z menu iChat > Preferencje, po czym kliknij w Audio/wideo.
3 Rozwiń menu Kamera i wybierz Kamera iSight monitora.
4 Rozwiń menu Mikrofon i wybierz Audio monitora.
48 Polski

Konfigurowanie wejścia i wyjścia dźwięku
Głośniki wbudowane w monitor pozwalają na słuchanie muzyki, filmów, gier i plików
multimedialnych. Mikrofon umożliwia nagrywanie dźwięków i rozmowy ze znajomymi
za pomocą programu iChat. Wyjście i wejście dźwięku można wybrać za pomocą
preferencji dźwięku.
Jak wybrać wejście dźwięku?
1 Wybierz polecenie menu Apple () > Preferencje systemowe, po czym kliknij w Dźwięk.
2 Kliknij w kartę Wejście.
3 Wybierz Audio monitora, aby dźwięk rejestrowany był przez mikrofon wbudowany
w monitor.
Jak wybrać wyjście dźwięku?
1 Wybierz polecenie menu Apple () > Preferencje systemowe, po czym kliknij w Dźwięk.
2 Kliknij w kartę Wyjście w preferencjach dźwięku.
3 Wybierz Audio monitora, aby dźwięk dobiegał z głośników wbudowanych w monitor.
Jeśli poza gniazdem USB Mac obsługuje wyjście dźwięku przez Mini DisplayPort, jako
wyjście audio można wybrać Mini DisplayPort lub USB Audio.
Te ustawienia dźwięku będą używane po każdym podłączeniu komputera do monitora
i pozostaną do momentu ich zmiany.
49Polski

Konfigurowanie Apple LED Cinema Display jako dodatkowego
monitora
Gdy ekran MacBooka pozostanie otwarty, może wyświetlać ten sam obraz, co
monitor zewnętrzny (tzw. kopia ekranu) lub inną część rozszerzonego w ten sposób
biurka. Funkcję wyświetlania kopii ekranu lub rozszerzania biurka można włączyć
w preferencjach monitorów.
Jak skonfigurować wyświetlanie kopii ekranu lub rozszerzenie biurka?
1 Wybierz polecenie menu Apple () > Preferencje systemowe, po czym kliknij
w Monitory.
2 Kliknij w Ułożenie i postępuj zgodnie ze wskazówkami wyświetlanymi na ekranie.
Korygowanie rozdzielczości, jasności oraz koloru
Apple LED Cinema Display może automatycznie korygować jasność, dostosowując
ją do zastanego oświetlenia za pomocą wbudowanego czujnika światła. Funkcję
automatycznego dostosowywania jasności można włączyć lub wyłączyć
w preferencjach monitora.
Jak zmienić rozdzielczość lub jasność?
1 Wybierz polecenie menu Apple () > Preferencje systemowe, po czym kliknij
w Monitory.
2 Wybierz rozdzielczość lub przeciągnij suwak jasności.
Możesz także użyć klawiszy jasności na zewnętrznej klawiaturze Apple, aby zwiększyć
(
) lub zmniejszyć ( ) jasność ekranu
Jak zmienić profil monitora lub skalibrować monitor?
1 Kliknij w kartę Kolor (w preferencjach monitorów)
.
50 Polski

2 Wybierz profil kolorów monitora lub kliknij w przycisk Kalibruj, aby otworzyć Asystenta
kalibratora monitora.
Jeżeli chcesz dowiedzieć się więcej o kalibrowaniu monitora, wybierz z menu Pomoc >
Pomoc Macintosha i poszukaj hasła „kalibrowanie”.
Korzystanie z gniazd USB i otworu zabezpieczenia
Apple LED Cinema Display wyposażony jest w trzy zasilane gniazda USB, znajdujące
się z tyłu. Do tych gniazd można podłączyć mysz, klawiaturę, iPhone’a, iPoda lub inne
urządzenie USB.
Ważne: Gniazda USB w monitorze mogą służyć do ładowania iPhone’a lub iPoda,
nawet wtedy, gdy monitor nie jest podłączony do komputera. Aby użyć jednego z tych
gniazd do synchronizowania danych pomiędzy komputerem a iPhonem lub iPodem,
należy sprawdzić, czy przewód USB monitora podłączony jest do komputera.
Gniazda USB
Gniazdo zabezpieczające
51Polski

Aby zabezpieczyć monitor przed kradzieżą, należy podłączyć specjalną linkę
zabezpieczającą do otworu zabezpieczenia.
Zawieszanie monitora za pomocą uchwytu VESA
Monitor można zamocować w inny sposób za pomocą specjalnego uchwytu
mocującego VESA. Informacje o jego dostępności można znaleźć na stronie www.
apple.com/pl/store. Zestaw ten pozwala na przymocowanie monitora do dowolnego
uchwytu zgodnego ze standardem VESA. Postępuj zgodnie z instrukcją dołączoną do
zestawu.
Dbałośćibezpieczeństwo
Odłącz przewody od monitora przed jego przeniesieniem w inne miejsce. Przenoś
monitor chwytając go we właściwy sposób. Podczas przenoszenia lub podnoszenia
monitora trzymaj go za brzegi. Nie podnoś monitora za podstawkę ani za przewód.
Jak wyczyścić ekran monitora?
1 Odłącz przewód zasilania.
2 Użyj dołączonej do monitora ściereczki lub innej miękkiej i suchej tkaniny, aby oczyścić
ekran z kurzu.
OSTRZEŻENIE: Nie używaj preparatów do czyszczenia, zawierających alkohol
lub aceton. Używaj tylko preparatów przeznaczonych do czyszczenia ekranu lub
monitora. Nigdy nie rozpylaj preparatu bezpośrednio na ekran. Mógłby on dostać się
do środka monitora i spowodować jego uszkodzenie.
52 Polski

Nie należy włączać monitora w miejscu, gdzie znajdują się znaczne ilości pyłu, dymu
z papierosów, cygar, popielniczki, pieca, kominka lub w pobliżu ultradźwiękowych
nawilżaczy używających niefiltrowanej wody z kranu. Drobne cząsteczki powstałe
w wyniku palenia papierosów, gotowania, spalania lub korzystania z ultradźwiękowych
nawilżaczy z niefiltrowaną wodą mogą w rzadkich przypadkach dostać się do
otworów wentylacyjnych monitora i w pewnych warunkach spowodować zamglenie
wewnętrznej powierzchni panelu szklanego pokrywającego monitor.
Podczas korzystania z monitora postępuj wg poniższych wskazówek dotyczących
bezpieczeństwa
 Jedynym sposobem całkowitego wyłączenia zasilania jest odłączenie przewodu
zasilania. Pamiętaj, aby odłączając go, trzymać za wtyczkę, nie za kabel.
 Odłącz natychmiast zasilanie, jeżeli przewód zasilania jest przerwany lub uszkodzony,
jeżeli rozlejesz jakiś płyn na monitor lub gdy monitor zostanie w jakikolwiek sposób
uszkodzony.
OSTRZEŻENIE: Używaj tylko przewodu zasilania dołączonego do monitora.
Przewód ten posiada wtyczkę z bolcem uziemienia, pasującą jedynie do gniazdka
uziemionego. Jeżeli nie możesz włożyć wtyczki do gniazdka, ponieważ nie ma ono
uziemienia, skontaktuj się z elektrykiem w celu wymiany gniazdka na gniazdko
z uziemieniem.
OSTRZEŻENIE: Monitor jest urządzeniem elektrycznym i nie powinien być otwierany
z żadnego powodu, nawet gdy jest odłączony od zasilania. Jeśli monitor będzie
wymagał usługi serwisowej, zajrzyj do rozdziału „Dodatkowe informacje, serwis
i pomoc” na stronie 56.
53Polski

Ergonomia
Oto kilka porad dotyczących takiego ustawienia monitora, które pomoże zmniejszyć
odbicia światła i pozwoli dostosować jego ułożenie do indywidualnej budowy ciała.
 Ustaw monitor tak, aby górna krawędź ekranu znajdowała się nieco poniżej poziomu
wzroku (gdy siedzisz przed klawiaturą i patrzysz na wprost). Odległość ekranu od
oczu jest sprawą indywidualną użytkownika, ale większość osób pracuje w odległości
od 45 do 70 cm od ekranu.
 Ustaw nachylenie monitora, aby zmniejszyć odbicia powodowane przez pobliskie
źródła światła i okna.
pleców podparta
54 Polski
Ramiona
rozluźnione
Przedramiona
i dłonie
w linii prostej
Przedramiona
poziomo
Dolna część
Uda prawie
poziomo
45–70 cm
Górny brzeg ekranu
na poziomie oczu
lub nieco niżej
(Można regulować
wysokość monitora
podnosząc lub obniżając
blat biurka)
Ekran ustawiony tak, aby
unikać odbić światła
Wolne miejsce pod
blatem biurka
Stopy płasko na
podłodze lub podnóżku

Więcej informacji o zdrowiu, bezpieczeństwie i konserwacji można znaleźć na witrynie
Apple dotyczącej ergonomii: www.apple.com/pl/about/ergonomics.
Rozwiązywanieproblemówzmonitorem
Przed wykonaniem poniższych kroków należy upewnić się, że komputer jest włączony,
monitor jest podłączony do prądu, wszystkie przewody są prawidłowo podłączone do
komputera i monitora, a sam komputer nie jest uśpiony.
Gdy na ekranie nie widać obrazu:
 Sprawdź wszystkie przewody, aby upewnić się, że są prawidłowo podłączone do
komputera i do monitora.
 Upewnij się, że komputer jest włączony i nie jest uśpiony. Jeżeli ekran MacBooka jest
zamknięty, użyj zewnętrznej klawiatury lub myszy, aby obudzić komputer.
 Odłącz kabel zasilający monitor od uziemionego gniazdka elektrycznego, odczekaj
kilka minut, po czym podłącz go ponownie.
 Wyzeruj PRAM, uruchamiając ponownie komputer i trzymając wciśnięte klawisze
Command (x), Opcja, P i R, aż usłyszysz dźwięk uruchamiania po raz drugi.
Gdy ekran jest zbyt ciemny:
 Upewnij się, że jasność monitora jest ustawiona prawidłowo. Wybierz polecenie menu
Apple () > Preferencje systemowe, po czym kliknij w Monitory. Przeciągnij suwak
jasności, aby wyregulować jasność obrazu na ekranie.
 Jeżeli kolory na ekranie są zbyt przesycone lub nieprawidłowe, niezbędne może
okazać się skalibrowanie monitora. Otwórz preferencje monitorów, kliknij w kartę
Kolor, następnie w Kalibruj, po czym postępuj według wskazówek wyświetlanych na
ekranie.
55Polski

Gdy bateria MacBooka nie ładuje się:
Upewnij się, że wtyczka MagSafe monitora jest prawidłowo umieszczona w gnieździe
MagSafe MacBooka.
Gdy nie działają wbudowana kamera iSight, głośniki, mikrofon lub gniazda USB:
Upewnij się, że przewód USB monitora jest prawidłowo podłączony do gniazda USB
w komputerze. Wbudowane głośniki, kamera, mikrofon i gniazda USB działają tylko
wtedy, gdy monitor podłączony jest do gniazda USB w komputerze.
Więcej informacji o rozwiązywaniu problemów
Więcej informacji o rozwiązywaniu problemów możesz znaleźć na witrynie wsparcia
dla użytkowników monitorów Apple: www.apple.com/pl/support/displays
Dodatkoweinformacje,serwisipomoc
Więcej informacji o tym monitorze można znaleźć na witrynie Apple oraz w Pomocy
Macintosha.
Temat Zobacz
Korzystanie z monitora
Obsługa monitora, wsparcie
techniczne, dyskusje,
rozwiązywanie problemów
i programy do pobrania
Najnowsze informacje
o monitorach
Rejestrowanie monitora
Pomoc Macintosha: poszukaj hasła „monitory”.
Witryna pomocy technicznej dla użytkowników monitorów pod
adresem www.apple.com/pl/support/displays.
Witryna poświęcona monitorom Apple:
www.apple.com/pl/displays.
Witryna rejestrowania produktów Apple:
www.apple.com/pl/register.
56 Polski

Danetechniczne
 Model: A1316
 Rozdzielczość: 2560 x 1440 @ 60 Hz
 Gniazda: Z tyłu trzy dużej szybkości gniazda USB 2.0
 Kamera i mikrofon: Wbudowana kamera iSight z mikrofonem
 Głośniki: Wbudowane głośniki 2.1 o mocy 49 W
Wymiary:
 Waga: 0,7 kg (23,5 lb)
 Wysokość: 488,1 mm (19,2 cala)
 Szerokość: 651,7 mm (25,65 cala)
 Głębokość (z podstawką): 208,13 mm (8,2 cala)
 Ekran: 27 cali (685,8 mm) wzdłuż przekątnej
Środowisko pracy:
 Temperatura pracy: 10° - 35° C
 Wilgotność względna: od 20% do 80% (bez kondensacji)
 Wysokość: 0 do 3048 metrów npm
57Polski

Introdução
O monitor Apple LED Cinema Display é concebido para
funcionar integrado com computadores Mac que possuam
um conector Mini DisplayPort. Inclui um ecrã panorâmico
com retroiluminação LED, um conector MagSafe para carregar
o computador MacBook, uma câmara iSight integrada, um
microfone e um sistema de altifalantes.
As instruções nas páginas seguintes ajudam a instalar e utilizar o seu novo monitor,
incluindo passos para:
 ligar o monitor ao computador;
 usar a câmara, o microfone, o sistema de altifalantes e as portas USB do monitor;
 ajustar as denições do monitor.
Nota: Pode ligar o monitor Apple LED Cinema Display a um computador de secretária
Mac com Mini DisplayPort.
Importante: Leia atentamente todas as instruções de instalação (e as informações
sobre segurança a partir da página 65), antes de instalar e utilizar o monitor.
Para obter informações acerca de computadores especícos e placas grácas
compatíveis com o seu monitor, visite www.apple.com/pt/displays.
58 Português
Instalação do monitor
Monitor Apple LED Cinema Display
Siga estes passos para instalar o monitor Apple LED Cinema Display:
1 Remova a película protectora do monitor e dos cabos.
2 Introduza o cabo de alimentação no monitor e a cha CA numa tomada de corrente.
3 Ligue o conector MagSafe à porta de alimentação MagSafe no MacBook para carregar
a bateria e fornecer energia ao computador.
MacBook
Conector
Conector
MagSafe
Mini DisplayPort
USB
4 Ligue o cabo USB ao computador para utilizar a câmara iSight integrada do monitor,
o microfone, o sistema de altifalantes e as portas USB.
5 Ligue o cabo Mini DisplayPort ao computador.
6 Prima o botão de alimentação (®) no computador para que arranque.O monitor
liga-se automaticamente quando inicia o computador.
Tomada de
corrente
59Português

Instalação do MacBook com a tampa fechada
Pode fechar a tampa do MacBook e utilizar apenas o monitor Apple LED Cinema Display.
Siga as instruções de instalação na página anterior e certique-se de que o conector
MagSafe do monitor está ligado à porta de alimentação MagSafe no MacBook.
Para utilizar o monitor Apple LED Cinema Display com a tampa do MacBook fechada:
1 Ligue um teclado e um rato USB externos a uma porta USB no monitor, ou utilize o
Assistente de Conguração Bluetooth® para congurar um teclado e rato sem os.
2 Certique-se de que o MacBook está ligado.
3 Feche a tampa do MacBook para o colocar em modo de pausa.
4 Aguarde alguns segundos, e depois prima qualquer tecla no teclado externo ou clique
no rato para reactivar o MacBook.
60 Português

Utilização do monitor
Câmara iSight
O monitor Apple LED Cinema Display inclui uma câmara iSight integrada, um
microfone e um sistema de altifalantes. Estas funcionalidades requerem uma ligação
USB entre o monitor e o computador.
Microfone
integrada
Sistema de altifalantes
Utilização da câmara iSight integrada e do microfone
Pode utilizar a câmara iSight integrada e o microfone para captar imagens,
vídeo e som através de aplicações como o iChat, iMovie e Photo Booth.
Para congurar a câmara e o microfone com o iChat:
1 Clique no ícone do iChat na Dock para abrir a aplicação iChat.
2 Seleccione iChat > Preferências, e clique em Áudio/Vídeo.
3 Seleccione “iSight do monitor” no menu instantâneo Câmara.
4 Seleccione “Áudio do monitor” no menu instantâneo Microfone.
61Português

Conguração da entrada e saída de som
É possível ouvir música, lmes, jogos e cheiros multimédia através do sistema de
altifalantes incorporados no monitor. Pode utilizar o microfone para gravar sons, ou
falar com amigos através do iChat. Utilize o painel de preferências Som para gerir a
entrada e saída de som.
Para congurar a entrada de som:
1 Seleccione Apple () > Preferências do Sistema, e depois clique em Som.
2 Clique no separador Entrada no painel de preferências Som.
3 Seleccione “Áudio do monitor” para que a entrada do som seja feita através
do microfone do monitor.
Para congurar a saída de som:
1 Seleccione Apple () > Preferências do Sistema, e depois clique em Som.
2 Clique no separador Saída no painel de preferências Som.
3 Seleccione “Áudio do monitor” para ouvir o som através do sistema de altifalantes.
Se o seu computador Mac suporta a saída de som não só através da porta USB como
também via Mini DisplayPort, pode escolher qualquer uma destas opções para a saída
de áudio.
Estas congurações de som são utilizadas sempre que o computador estiver ligado
ao monitor, e permanecerão activas até que as altere.
62 Português

Conguração do monitor Apple LED Cinema Display como monitor
adicional
Deixando a tampa do MacBook aberto, pode replicar a mesma imagem da Secretária
em ambos os ecrãs ou utilizar o monitor adicional como uma ampliação da Secretária.
Utilize o painel de preferências Ecrãs para congurar os múltiplos monitores ou a
Secretária ampliada.
Para congurar os múltiplos monitores ou a Secretária ampliada:
1 Seleccione Apple () > Preferências do Sistema, e depois clique em Monitores.
2 Clique no separador Organização e siga as instruções apresentadas.
Ajuste da resolução, do brilho e da cor
O monitor Apple LED Cinema Display pode ajustar o brilho do ecrã às condições de luz,
automaticamente, através do sensor de luz ambiente incorporado. É possível activar ou
desactivar o brilho automático no painel de preferências Monitores.
Para alterar a resolução ou o brilho:
1 Seleccione Apple () > Preferências do Sistema, e depois clique em Monitores.
2 Escolha uma resolução ou mova o nivelador de Brilho.
Pode também utilizar as teclas de brilho num teclado Apple externo para aumentar
(
) ou diminuir ( ) o brilho do ecrã.
Para alterar o perl de cores do monitor ou calibrar o monitor:
1 Clique no separador Cor no painel de preferências Monitores.
2 Escolha um perl de cores, ou clique em Calibrar para abrir o Assistente
de Calibração do Monitor.
63Português

Para obter mais informações acerca da calibração do monitor, seleccione Ajuda >
“Ajuda Mac” na barra de menus e pesquise “calibrar”.
Utilização das portas USB e da ranhura de segurança
O monitor Apple LED Cinema Display dispõe de três portas USB na parte de trás.Use
estas portas para ligar um rato, teclado, iPhone, iPod ou outro periférico USB.
Importante: Estas portas USB podem ser utilizadas para carregar o seu iPhone ou iPod,
mesmo que o monitor não esteja ligado a um computador. Caso utilize uma destas
portas para sincronizar informação entre o seu computador e um iPhone ou iPod,
certique-se de que o cabo USB do monitor está ligado ao computador.
Portas USB
Ranhura de segurança
Para proteger o monitor, prenda um cabo de bloqueio à ranhura de segurança.
64 Português

Utilização de uma solução de montagem VESA no monitor
É possível prender o monitor a uma solução de montagem alternativa, utilizando
o kit adaptador de montagem VESA disponível na Apple Online Store em
www.apple.com/pt/store. Utilize o kit para prender o monitor a qualquer solução
de montagem compatível com VESA. Basta seguir as instruções incluídas no kit.
Cuidado e segurança
Antes de levantar ou reposicionar o monitor, poderá ser necessário desligar os cabos
e o cabo de alimentação. Utilize as técnicas de elevação apropriadas para posicionar
o monitor. Ao levantar ou transportar o monitor, segure-o pelas extremidades. Não
levante o monitor pelo suporte ou pelo cabo.
Para limpar o ecrã do monitor:
1 Desligue o cabo de alimentação.
2 Utilize o pano fornecido com o monitor ou outro pano macio e seco para limpar
o pó do ecrã.
AVISO: Não limpe o ecrã com um detergente que contenha álcool ou acetona. Utilize
um detergente especíco para ecrãs ou monitores. Nunca pulverize o detergente
directamente sobre o ecrã. Ele poderá gotejar para dentro do monitor e causar danos.
65Português

Não utilize o monitor em áreas com quantidades signicativas de poeiras transportadas
pelo ar, ou fumo proveniente de cigarros, charutos, cinzeiros, fogões ou lareiras, nem
perto de um humidicador ultra-sónico com água não ltrada. As minúsculas partículas
transportadas pelo ar que são produzidas ao fumar, cozinhar, queimar ou utilizar um
humidicador ultra-sónico com água não ltrada podem, em casos raros, entrar nas
aberturas para ventilação do monitor, e resultar, em determinadas circunstâncias,
numa ligeira névoa na superfície interior do painel de vidro que cobre o ecrã.
Siga estas directrizes de segurança durante a utilização do monitor:
 A única forma de desligar a corrente completamente é desligar o cabo de
alimentação. Assegure-se que puxa a cha e não o cabo.
 Desligue a corrente imediatamente, se o cabo de alimentação estiver gasto ou
danicado, se verter algo no monitor, ou se o monitor cair ou car danicado de
qualquer forma.
AVISO: Utilize apenas o cabo de alimentação fornecido com o monitor. O cabo de
alimentação tem uma cha com ligação à terra de três os (uma cha com um terceiro
pino de terra) adequada apenas para uma tomada CA de terra. Se não conseguir
introduzir a cha numa tomada porque a tomada não tem ligação à terra, contacte um
electricista qualicado para substituir a tomada por uma tomada de terra adequada.
AVISO: O monitor é um componente de alta tensão e não deve ser aberto seja
por que motivo for, mesmo quando está desligado. Se o seu monitor precisar
de assistência, consulte “Mais informações, assistência e suporte en la página 69.
66 Português

Ergonomia
Topo do ecrã ao nível dos
Estas são algumas directrizes para ajustar o monitor de forma a reduzir o brilho intenso
e adaptá-lo ao seu tamanho e forma.
 Disponha o monitor de forma a que o topo do ecrã esteja ligeiramente abaixo do
nível dos olhos quando estiver sentado a trabalhar no teclado. A melhor distância
entre os olhos e o ecrã deve ser decidida por si, embora a maioria das pessoas prera
uma distância de 45 a 70 cm.
 Posicione o monitor, inclinando-o para cima ou para baixo para minimizar o brilho
intenso e os reexos de luzes suspensas e de janelas próximas.
Ombros
descontraídos
Antebraços
e mãos em
linha recta
Antebraços
nivelados ou
ligeiramente
inclinados
Zona lombar
inferior apoiada
Coxas
ligeiramente
inclinadas
45–70 cm
olhos ou ligeiramente
abaixo (Poderá ter de
ajustar a altura do ecrã,
levantando ou baixando
a superfície de trabalho.)
Ecrã posicionado de
forma a evitar reflexos
Folga sob a superfície
de trabalho
Pés assentes no chão ou
num descanso para pés
67Português

Para obter mais informações acerca de saúde, segurança e manutenção, visite o
website da Apple sobre ergonomia em www.apple.com/about/ergonomics.
Resolução de problemas do monitor
Antes de realizar qualquer dos seguintes passos, certique-se de que o computador
está ligado, que o monitor está ligado a uma tomada, que os cabos estão ligados
correctamente ao computador e ao monitor, e que o computador não se encontra
em modo de suspensão.
Se o ecrã não tiver imagem:
 Verique novamente os cabos e conectores para garantir que estão bem ligados
ao computador e ao monitor.
 Certique-se de que o computador está ligado e não se encontra em modo de
suspensão. Se a tampa do MacBook estiver fechada, utilize o teclado externo ou
o rato para despertar o computador do modo de pausa.
 Desligue o cabo de alimentação do monitor da tomada de corrente, aguarde alguns
minutos e, em seguida, volte a ligá-lo.
 Reinicialize a PRAM, reiniciando o computador, enquanto mantém premidas as teclas
Comando (x), Opção, P e R até ouvir o som de arranque pela segunda vez.
Se o ecrã estiver pouco perceptível:
 Certique-se de que o brilho do monitor está bem denido. Seleccione Apple () >
Preferências do Sistema, e depois clique em Monitores. Desloque o nível em Brilho
para ajustar o brilho.
 Se as cores no monitor estiverem demasiado saturadas ou incorrectas, poderá ser
necessário calibrar o monitor. Abra o painel de preferências Monitores, clique no
separador Cor, clique em Calibrar e siga as instruções.
68 Português

Se o seu MacBook não carregar:
Certique-se de que o conector MagSafe do monitor está colocado correctamente
na porta de alimentação MagSafe do MacBook.
Se a câmara iSight integrada, o microfone, o sistema de altifalantes ou as portas
USB do monitor não estiverem a funcionar:
Certique-se de que o cabo USB do monitor está completamente ligado à porta USB
no computador. A câmara, o microfone, o sistema de altifalantes e as portas USB do
monitor só funcionam quando este cabo está ligado ao computador.
Mais informações para resolução de problemas
Pode aceder a mais informações para resolução de problemas no website de suporte
de monitores em: www.apple.com/pt/support/displays
Mais informações, assistência e suporte
Pode encontrar mais informações acerca do seu monitor no website da Apple
e na Ajuda Mac.
Para obter informações sobre Consulte
Utilização do monitor
Assistência a monitores,
suporte, fóruns de debate,
resolução de problemas
e descarga de software
As informações mais
recentes sobre monitores
Registo do monitor
A Ajuda Mac e pesquise “monitores”.
O site de suporte a monitores em
www.apple.com/pt/support/displays.
O site da Apple sobre monitores em www.apple.com/pt/displays.
O site de registo de produtos Apple em www.apple.com/pt/register.
69Português

Especicações
 Número do modelo: A1316
 Resolução: 2560 x 1440 a 60 Hz
 Portas: Três portas USB 2.0 de alta velocidade na parte de trás
 Câmara e microfone: Câmara iSight integrada com microfone
 Altifalantes: Altifalantes 2.1 incorporados com saída de 49 W
Dimensões:
 Peso: 10,7 kg
 Altura: 488,1 mm
 Largura: 651,7 mm
 Profundidade (com suporte): 208,13 mm
 Visualizável: 685,8 mm (diagonal)
Ambiente de funcionamento:
 Temperatura de funcionamento: 10° a 35° C
 Humidade relativa: 20% a 80% (sem condensação)
 Altitude: 0 a 10.000 pés (0 a 3.048 metros)
70 Português

Komma igång
Apple LED Cinema Display är utformad så att den fungerar
perfekt tillsammans med Mac-datorer som har en Mini
DisplayPort-utgång. Den har en LED-bakgrundsbelyst
widescreenskärm, en MagSafe-kontakt som laddar MacBook,
en inbyggd iSight-kamera, mikrofon och högtalare.
Anvisningarna på följande sidor hjälper dig att installera och använda din nya skärm.
Lär dig att:
 Ansluta skärmen till datorn
 Använda skärmens kamera, mikrofon, högtalare och USB-portar
 Justera bildskärmens inställningar
Obs! Du kan ansluta en Apple LED Cinema Display till en stationär Mac som har en
Mini DisplayPort-utgång.
Viktigt: Läs noga igenom installationsanvisningarna (och informationen om säkerhet
som börjar på sidan 78) innan du installerar eller använder bildskärmen.
På www.apple.com/se/displays hittar du mer information om vilka datorer och
grakkort som är kompatibla med skärmen.
71Svenska

Installera skärmen
Apple LED Cinema Display
Installera Apple LED Cinema Display genom att följa dessa steg:
1 Ta bort skyddslmen från bildskärmen och kablarna.
2 Anslut strömkabeln till bildskärmen och anslut sedan strömkontakten till ett jordat
eluttag.
3 Anslut MagSafe-kontakten till MagSafe-strömkontakten på MacBook så att den får
ström och dess batteri laddas upp.
MacBook
MagSafe USB
4 Anslut USB-kabeln till datorn så att du kan använda bildskärmens inbyggda iSight-
Mini DisplayPort
kamera, mikrofon, högtalare och USB-portar.
5 Anslut Mini DisplayPort-kabeln till datorn.
6 Starta datorn genom att trycka på dess strömbrytare (®). Skärmen slås automatiskt
på när du startar datorn.
72 Svenska
Jordat
eluttag

Använda MacBook med locket stängt
Du kan stänga locket på MacBook och bara använda Apple LED Cinema Display.
Följ installationsanvisningarna på föregående sida och se till att MagSafe-kontakten
från bildskärmen är ansluten till MagSafe-strömkontakten på MacBook.
Så här gör du när du vill använda Apple LED Cinema Display med locket stängt
på MacBook:
1 Anslut ett externt USB-tangentbord och -mus till en USB-port på bildskärmen, eller ställ
in ett trådlöst tangentbord och mus med hjälp av Bluetooth Inställningsassistent.
2 Kontrollera att MacBook är påslagen.
3 Stäng locket på MacBook så att den försätts i viloläge.
4 Vänta några sekunder och tryck sedan på valfri tangent på det externa tangentbordet
– eller klicka med musen – så att MacBook vaknar ur viloläget.
73Svenska

Använda skärmen
Högtalarsystem
Inbyggd
Apple LED Cinema Display har en inbyggd iSight-kamera, en mikrofon och ett
högtalarsystem. USB-anslutningen mellan bildskärmen och datorn krävs för dessa
funktioner.
Mikrofon
iSight-kamera
Använda den inbyggda iSight-kameran och mikrofonen
Du kan använda den inbyggda iSight-kameran och mikrofonen till att ta stillbilder
och video samt spela in ljud med program som iChat, iMovie och Photo Booth.
Så här ställer du in kameran och mikrofonen för iChat:
1 Klicka på iChat-symbolen i Dock så öppnas programmet iChat.
2 Välj iChat > Inställningar och klicka på Ljud/video.
3 Välj iSight – Bildskärm från popupmenyn Kamera.
4 Välj Bildskärmsljud från popupmenyn Mikrofon.
74 Svenska

Göra inställningar för in- och utljud
Du kan lyssna på musik, lmer, spel och multimedieler genom högtalarna på
bildskärmen. Med mikrofonen kan du spela in ljud eller prata med vänner via iChat.
Du ställer in in- och utljud i inställningspanelen Ljud.
Så här ställer du in inljudet:
1 Välj Apple () > Systeminställningar och klicka sedan på Ljud.
2 Klicka på iken ”Ljud in” i inställningspanelen Ljud.
3 Välj Bildskärmsljud om du vill ta upp ljud via bildskärmens mikrofon.
Så här ställer du in utljudet:
1 Välj Apple () > Systeminställningar och klicka sedan på Ljud.
2 Klicka på iken ”Ljud ut” i inställningspanelen Ljud.
3 Välj Bildskärmsljud om du vill spela upp ljud via bildskärmens högtalare.
Om datorn stöder ljud ut via Mini DisplayPort-utgången, förutom via USB-porten, kan
du välja mellan Mini DisplayPort och USB-ljud för ljud ut.
De här ljudinställningarna används när datorn är ansluten till bildskärmen. De gäller tills
du ändrar dem.
75Svenska

Ställa in Apple LED Cinema Display som extra bildskärm
Om du lämnar locket på MacBook öppet kan du spegla samma skärmbild på
båda skärmarna, eller använda den extra skärmen som ett utökat skrivbord.
I inställningspanelen Bildskärmar kan du ställa in bildskärmsdubblering eller
utökat skrivbord.
Så här ställer du in skärmbildsdubblering eller utökat skrivbord:
1 Välj Apple () > Systeminställningar och klicka sedan på Bildskärmar.
2 Klicka på iken Uppställning och följ anvisningarna på skärmen.
Justera upplösning, ljusstyrka och färg
Apple LED Cinema Display kan automatiskt justera skärmens ljusstyrka baserat på
aktuella ljusförhållanden med hjälp av den inbyggda sensorn för omgivningsljus. Du
kan slå av och på automatisk justering av ljusstyrkan i inställningspanelen Bildskärmar.
Så här ändrar du upplösningen eller ljusstyrkan:
1 Välj Apple () > Systeminställningar och klicka sedan på Bildskärmar.
2 Välj en upplösning eller dra i skjutreglaget Ljusstyrka.
Du kan också använda tangenterna för ljusstyrka på ett externt Apple-tangentbord
för att öka ( ) eller minska ( ) bildskärmens ljusstyrka.
Så här ändrar du bildskärmens färgprol eller kalibrerar bildskärmen:
1 Klicka på iken ”Färg” i inställningspanelen Bildskärmar.
2 Välj en bildskärmsfärgprol, eller klicka på Kalibrera så att bildskärmskalibrerings-
assistenten öppnas.
Du hittar mer information om kalibrering av bildskärmen genom att välja Hjälp >
Mac Hjälp i menyraden och söka efter ”kalibrera”.
76 Svenska

Använda USB-portarna och stöldskyddsfästet
Apple LED Cinema Display har tre strömförsörjda USB-portar som sitter på baksidan.
Till de här portarna kan du ansluta en mus, tangentbord, iPhone, iPod eller andra
externa USB-enheter.
Viktigt: Du kan använda de här USB-portarna till att ladda din iPhone eller iPod även
om bildskärmen inte är ansluten till en dator. Om du använder någon av de här
portarna till att synkronisera information mellan din dator och en iPhone eller iPod
ser du till att bildskärmens USB-kabel är ansluten till datorn.
USB-portar
Fäste för stöldskydd
Du kan säkra bildskärmen genom att ansluta en låskabel till stöldskyddsfästet.
77Svenska

Montera din bildskärm på en VESA-monteringslösning
Du kan ansluta bildskärmen till en annan fästanordning med paketet VESA Mount
Adapter som kan köpas från Apple Online Store på www.apple.com/se/store. Använd
paketet till att ansluta skärmen till en tillgänglig VESA-kompatibel fästanordning.
Följ anvisningarna i paketet.
Skötsel och säkerhet
Innan du lyfter eller yttar på bildskärmen kanske du måste koppla loss kablarna och
strömsladden. Använd rätt lyftteknik när du yttar på bildskärmen. Håll i kanterna när
du lyfter eller bär den. Lyft inte skärmen i stativet eller sladden.
Så här rengör du själva bildytan på skärmen:
1 Koppla loss strömsladden.
2 Torka bort damm från skärmen med rengöringsduken som följde med skärmen eller en
annan mjuk och torr tygbit.
VARNING: Rengör inte skärmen med rengöringsmedel som innehåller alkohol eller
aceton. Använd ett rengöringsmedel avsett för bildskärmar. Spreja aldrig rengöringsmedel direkt på skärmen. Det kan rinna in i skärmen och orsaka skada.
78 Svenska

Använd inte skärmen där det nns stora mängder luftburna partiklar, eller rök från
cigaretter, cigarrer, askfat, kaminer eller eldstäder, eller nära en ultrasonisk luftfuktare
som använder oltrerat kranvatten. Små luftburna partiklar från rökning, matlagning,
eld eller en ultrasonisk luftfuktare med oltrerat vatten kan, i sällsynta fall, tränga in
genom skärmens ventilationsöppningar och under vissa förhållanden skapa en lätt
dimma på insidan av glaspanelen som täcker skärmen.
Följ de här säkerhetsriktlinjerna för bildskärmen:
 Det enda sättet att bryta strömmen helt är att lossa strömsladden från eluttaget.
Lossa strömsladden genom att dra i kontakten, inte i sladden.
 Bryt strömmen omedelbart om strömsladden är sliten eller skadad, om du spiller
något på skärmen eller om skärmen faller eller skadas på något sätt.
VARNING: Använd endast den strömsladd som följde med bildskärmen. Strömsladden
har en kontakt som endast ska anslutas till ett jordat eluttag. Om du inte har tillgång
till något jordat uttag bör du kontakta en elektriker som kan installera ett sådant.
VARNING: Bildskärmen är en högspänningskomponent och ska aldrig öppnas, inte
ens när den inte är elansluten. Om skärmen behöver service, se ”Mer information,
service och support” på sidan 82.
79Svenska

Ergonomi
Överdelen av skärmen
Här följer några tips om hur du justerar bildskärmen för att undvika reexer och
anpassa den till just dig.
 Placera bildskärmen så att dess överkant benner sig i ögonhöjd eller en aning lägre
när du sitter vid tangentbordet. Du bestämmer själv vilket avstånd som känns bäst,
men 45–70 cm är normalt.
 Undvik reexer och glans från lampor eller fönster genom att vrida skärmen uppåt
eller nedåt.
Avslappnade
axlar
Händer och
handleder rakt
utsträckta
Underarmar
raka eller
lätt böjda
Stöd för nedre
delen av ryggen
Benen i rät vinkel
45–70 cm
Mer information om ergonomi, hälsa och säkerhet nns på Apples ergonomiwebbplats
på www.apple.com/se/about/ergonomics.
ska vara i eller en bit
under ögonnivå
(Du kan behöva justera
skärmhöjden genom
att höja eller sänka
arbetsytan)
Skärmen placerad så
att störande reflexer
undviks
Fritt utrymme
under skrivbordet
Båda fötterna på golvet
eller på en fotplatta
80 Svenska

Felsöka bildskärmen
Innan du vidtar något av dessa steg kontrollerar du att datorn är påslagen, att
bildskärmen är ansluten till ett eluttag, att alla kablar har anslutits på rätt sätt till datorn
och bildskärmen och att datorn inte är i viloläge.
Om skärmen inte visar någon bild:
 Kontrollera kablarna och kontakterna igen så att du är säker på att de är ordentligt
anslutna till datorn och till skärmen.
 Kontrollera att datorn är påslagen och att den inte benner sig i viloläge. Om locket
på MacBook är stängt trycker du på valfri tangent på det externa tangentbordet eller
musen så att den vaknar ur viloläget.
 Ta loss skärmens strömsladd från det jordade nätuttaget, vänta några minuter och
sätt in den igen.
 Nollställ PRAM genom att starta om datorn medan du håller ned tangenterna
kommando (x), alternativ (z), P och R tills du hör startljudet en andra gång.
Om skärmens ljud är svagt:
 Kontrollera att bildskärmens ljusstyrka är rätt inställd. Välj Apple () > System-
inställningar och klicka på Bildskärmar. Dra i skjutreglaget för ljusstyrka för att ställa
in skärmens ljusstyrka.
 Om bildskärmens färger är för mättade eller på annat sätt felaktiga kan du behöva
kalibrera bildskärmen. Öppna inställningspanelen Bildskärmar och klicka på iken
Färg. Klicka sedan på Kalibrera och följ anvisningarna.
Om MacBook inte laddas:
Se till att MagSafe-kontakten från skärmen sitter på rätt sätt i MacBooks MagSafe-port.
81Svenska

Så här gör du om den inbyggda iSight-kameran, mikrofonen, högtalarna eller
bildskärmens USB-portar inte fungerar:
Se till att USB-kabeln från bildskärmen sitter på rätt sätt i datorns USB-port.
Bildskärmens kamera, mikrofon, högtalare och USB-portar fungerar bara när USBkabeln är ansluten till datorn.
Mer information om felsökning
Du hittar mer felsökningsinformation på supportsidan för bildskärmar på:
www.apple.com/se/support/displays
Mer information, service och support
Det nns mer information om skärmen på Apples webbplats och i Mac Hjälp.
Om du vill veta mer om Se
Att använda skärmen Mac Hjälp och sök efter ”bildskärmar”.
Bildskärmsservice, support,
diskussionsforum, felsökning
och programhämtningar
Den senaste informationen
om bildskärmar
Registrera bildskärmen Apples webbplats för produktregistrering på
Supportwebbplatsen för bildskärmar på
www.apple.com/se/support/displays.
Apples webbplats för bildskärmar på
www.apple.com/se/displays.
www.apple.com/se/register
82 Svenska

Teknisk information
 Modellnummer: A1316
 Upplösning: 2560 x 1440 vid 60 Hz
 Portar: Tre USB 2.0-portar med hög hastighet på baksidan
 Kamera och mikrofon: Inbyggd iSight-kamera med mikrofon
 Högtalare: Inbyggda 2.1-högtalare med 49 W uteekt
Mått:
 Vikt: 10,7 kg
 Höjd: 48,8 cm
 Bredd: 65,2 cm
 Djup (med stativ): 20,8 cm
 Visningsyta: 27 tum diagonalt
Omgivning:
 Arbetstemperatur: 10 till 35 °C
 Relativ luftfuktighet: 20 till 80 % (icke-kondenserande)
 Höjd över havet: 0 till 3048 m
83Svenska

Начало работы
Монитор Apple LED Cinema великолепно работает
со всеми компьютерами Mac, оснащенными разъемом Mini
DisplayPort. Монитор имеет широкоформатный экран
со светодиодной подсветкой, разъем MagSafe для зарядки
MacBook, встроенную камеру iSight, микрофон и систему
динамиков.
В инструкциях ниже Вы узнаете, как настроить и использовать монитор.
Узнайте, как:
 подключать монитор к компьютеру;
 использовать камеру монитора, микрофон, систему динамиков, порты USB;
 задать индивидуальные настройки монитора.
Примечание. Монитор Apple LED Cinema можно подключить к настольному
компьютеру Mac, оснащенному портом Mini DisplayPort.
Важно. Перед началом настройки и использования монитора внимательно
прочитайте инструкции по установке (и информацию по безопасности, начиная
состр.91).
Для получения подробной информации об определенных компьютерах
и графических картах, совместимых с Вашим монитором, посетите страницу
www.apple.com/ru/displays.
Русский
84

Настройка монитора
Чтобы настроить монитор Apple LED Cinema, следуйте данным инструкциям.
1 Удалите защитную пленку с монитора и кабелей.
2 Подключите кабель питания к монитору, а затем подсоедините его к заземленной
розетке питания.
3 Чтобы зарядить аккумулятор и обеспечить компьютер питанием, подключите
разъем MagSafe к порту MagSafe компьютера.
Монитор Apple LED Cinema
Портативный Mac
Розетка с заземлением
MagSafe USB
Порт Mini DisplayPort
4 Для использования камеры iSight, микрофона, динамиков и портов USB
подсоедините кабель USB к компьютеру.
5 Подключите кабель Mini DisplayPort к компьютеру.
6 Нажмите кнопку питания (®) на компьютере, чтобы загрузить его. При загрузке
компьютера монитор включается автоматически.
Русский
85

Настройка MacBook при закрытой крышке
Можно закрыть крышку MacBook и пользоваться только монитором Apple LED
Cinema.Следуйте инструкциям по настройке на предыдущей странице и убедитесь
в том, что разъем MagSafe монитора подсоединен к порту MagSafe на MacBook.
Как использовать монитор Apple LED Cinema при закрытой крышке MacBook
1 Подсоедините внешнюю клавиатуру и мышь USB к порту USB на мониторе или
используйте Ассистент настройки Bluetooth® для настройки беспроводной
клавиатуры или мыши.
2 Убедитесь, что MacBook включен.
3 Закройте крышку MacBook, чтобы ввести его в режим сна.
4 Подождите несколько секунд, затем нажмите любую клавишу на внешней
клавиатуре или нажмите мышью, чтобы вывести MacBook из режима сна.
Русский
86

Использование монитора
Монитор Apple LED Cinema оснащен встроенной камерой iSight, микрофоном
и системой динамиков. Для использования всех этих возможностей необходимо
подсоединить его к компьютеру через порт USB.
Микрофон
Использование встроенной камеры iSight и микрофона
Встроенную камеру iSight и микрофон можно использовать для съемки изображений,
видео и записи звука в таких программах, как iChat, iMovie и Photo Booth.
Как настроить камеру и микрофон с помощью iChat
1 Нажмите значок iChat на панели Dock, чтобы открыть программу iChat.
2 Выберите пункт меню «iChat» > «Настройки» и нажмите «Аудио/Видео».
3 Во всплывающем меню камеры выберите iSight.
4 Во всплывающем меню микрофона выберите «Звук монитора».
Встроенная камера iSight
Система динамиков
Русский
87

Настройка звукового входа и выхода
Можно воспроизводить музыку, звуковые дорожки фильмов и игр и другие файлы
мультимедиа через систему динамиков монитора. Можно записывать звук или
общаться с друзьями в iChat с помощью встроенного микрофона. Для управления
параметрами звукового входа и выхода используйте настройки звука.
Как настроить звуковой вход
1 Выберите пункт меню «Apple» () > «Системные настройки» и затем нажмите
«Звук».
2 В настройках звука выберите вкладку «Вход».
3 Выберите «Звук монитора», чтобы записывать звук через микрофон монитора.
Как настроить звуковой выход
1 Выберите пункт меню «Apple» () > «Системные настройки» и нажмите «Звук».
2 В настройках звука выберите вкладку «Выход».
3 Выберите «Звук монитора», чтобы воспроизводить звук через систему динамиков
монитора.
Если Ваш компьютер Mac поддерживает звуковой выход через порт Mini
DisplayPort в дополнение к порту USB, в качестве аудиовыхода можно выбрать порт
Mini DisplayPort или аудиовыход USB.
Эти настройки звука используются всегда, когда компьютер подключен к монитору.
Они действуют до тех пор, пока Вы не измените их.
Русский
88

Настройка монитора Apple LED Cinema в качестве
дополнительного монитора
При открытой крышке MacBook на его экране отображается то же самое, что
и на мониторе настольного компьютера (режим зеркального отображения); ноутбук
можно также использовать для расширения поля рабочего стола настольного
компьютера. Чтобы настроить зеркальное отображение видео или расширенный
рабочий стол, используйте настройки монитора.
Как настроить зеркальное отображение видео или расширенный рабочий стол
1 Выберите пункт меню «Apple» () > «Системные настройки» и нажмите
«Мониторы».
2 Выберите вкладку «Расположение» и следуйте инструкциям на экране.
Настройка разрешения, яркости и цвета
Ваш монитор Apple LED Cinema Display может автоматически настраивать
яркость экрана в соответствии с текущими условиями освещенности, используя
встроенный датчик внешней освещенности. Вы можете включить или выключить
автоподстройку яркости в настройках монитора.
Как изменить разрешение или яркость
1 Выберите пункт меню «Apple» () > «Системные настройки» и нажмите
«Мониторы».
2 Выберите нужное разрешение или передвиньте бегунок «Яркость»
Для увеличения (
воспользоваться клавишами настройки яркости на внешней клавиатуре Apple.
Как изменить цветовой профиль и откалибровать монитор
1 В настройках экрана выберите вкладку «Цвет».
2 Выберите цветовой профиль монитора или нажмите «Калибровать», чтобы открыть
Ассистент Калибратора монитора.
) или уменьшения ( ) яркости монитора можно также
Русский
89

Для получения дополнительной информации о калибровке монитора выберите
пункт меню «Справка» > «Справка Mac» в строке меню и введите «калибровать»
в поле поиска.
Использование портов USB и слота безопасности
На задней панели монитора Apple LED Cinema находятся три высокомощных порта
USB.Они используются для подключения мыши, клавиатуры, iPhone, iPod и других
периферийных устройств USB.
Важно. Эти порты USB можно использовать для зарядки iPhone или iPod, даже если
монитор не подключен к компьютеру. Если Вы используете один из этих портов для
синхронизации информации между компьютером и iPhone или iPod, убедитесь, что
USB-кабель монитора подсоединен к компьютеру.
Порты USB
Слот безопасности
Чтобы обезопасить монитор, используйте слот безопасности для подключения
соединительного кабеля.
Русский
90
Использование монтажного комплекта VESA с Вашим монитором
Вы можете установить монитор в любом положении с помощью комплекта
установки VESA, который можно приобрести в интернет-магазине Apple на сайте
www.apple.com/ru/store. Благодаря данному комплекту можно установить монитор
везде, где можно использовать VESA. Просто следуйте инструкциям, прилагаемым
к комплекту.
Безопасность и уход
Прежде чем поднимать или перемещать монитор, возможно, придется отсоединить
все кабели и отключить его от электропитания. Следуйте всем рекомендациям при
перемещении монитора. При подъеме или переносе монитора держите его за края.
Не поднимайте монитор за подставку или провод.
Как очистить экран монитора
1 Отсоедините кабель питания.
2 Для протирания и удаления пыли с экрана используйте специальную салфетку,
входящую в комплект поставки монитора, или другую мягкую сухую ткань.
ПРЕДУПРЕЖДЕНИЕ. Для протирания экрана не используйте чистящие
средства, содержащие спирт или ацетон. Пользуйтесь только средствами,
предназначенными для очистки дисплеев и мониторов. Не распыляйте средство
для очистки непосредственно на экран монитора. Средство может попасть внутрь
монитора и повредить его.
Русский
91

Не включайте монитор в местах, где в воздухе содержится значительное
количество пыли, дыма от сигарет, сигар или пепельниц, испарений от плит
или очагов, а также возле ультразвуковых увлажнителей, использующих
нефильтрованную воду из-под крана. Мелкие частицы воздушной пыли, связанные
с дымом, испарениями от приготовления пищи, огня или ультразвуковых
увлажнителей, использующих нефильтрованную воду из-под крана, в редких
случаях могут попасть в вентиляционные отверстия монитора и при определенных
услових вызвать легкое замутнение внутренней поверхности стеклянного покрытия
монитора.
При использовании монитора следуйте данным инструкциям по безопасности
 Единственный способ полностью отключить питание — это отключить монитор
от розетки питания. Всегда тяните вилку, а не кабель.
 Немедленно отключите питание, если кабель изношен или поврежден; если на
монитор была пролита жидкость; если монитор упал или был поврежден какимлибо другим образом.
ПРЕДУПРЕЖДЕНИЕ. Используйте только кабель, входящий в комплект поставки
монитора. Кабель питания оснащен трехпроводной заземляющей вилкой (вилкой
с третьим заземляющим контактом), которая подходит только к розетке
с заземлением. Если Вам не удается вставить вилку в розетку, так как она
не заземлена, обратитесь к квалифицированному электрику, который заменит
ее подходящей розеткой с заземлением.
ПРЕДУПРЕЖДЕНИЕ. Монитор является прибором высокого напряжения, и его
не следует разбирать ни при каких обстоятельствах, даже когда он отключен от
сети питания. Если монитор нуждается в техническом обслуживании, обратитесь
к разделу «Дополнительная информация, обслуживание и поддержка» на стр.95.
Русский
92

Эргономика
Ниже приведены некоторые рекомендации по устранению бликов и настройке
физических параметров.
 Установите монитор так, чтобы верхний край экрана была чуть ниже уровня
глаз, когда Вы сидите за клавиатурой. Наиболее приемлемое расстояние от глаз
зависит от Ваших предпочтений, в большинстве случаев оно составляет
от 45 до 70 см (от 18 до 28 дюймов).
 Наклоняйте монитор вверх или вниз, располагая его таким образом, чтобы
избежать бликов и отражения света от источников света или из окон.
Плечи
расслаблены
Предплечья и кисти
образуют прямую
линию
Предплечья держатся
прямо или слегка
отведены
Нижный отдел спины
поддерживается
Бедра слегка
опущены
45–70 см (18–28 дюймов)
Для получения более подробной информации об избежании вреда для здоровья,
безопасности и обслуживании посетите раздел веб-сайта Apple об эргономике
по адресу: www.apple.com/ru/about/ergonomics.
Верхняя часть экрана
на уровне глаз или чуть
ниже (для настройки
высоты монитора
может потребоваться
регулировка высоты
рабочего места)
Экран отрегулирован
так, чтобы избежать
отсвечивания
Свободное
пространство
под рабочим
столом
Ступни полностью
на полу или
на подставке
Русский
93

Устранение неполадок монитора
Прежде чем предпринимать какие-либо из следующих действий, убедитесь, что
Ваш компьютер включен и не находится в режиме сна, монитор подключен к сети
питания, а все кабели подсоединены к компьютеру и монитору должным образом.
На экране нет изображения
 Проверьте кабели и разъемы еще раз и убедитесь, что они подсоединены
к компьютеру и монитору должным образом.
 Убедитесь, что компьютер включен и не находится в режиме сна. Если крышка
Вашего MacBook закрыта, выведите его из режима сна с помощью внешней
клавиатуры или мыши.
 Отсоедините кабель питания монитора от заземленной розетки, подождите
несколько минут, затем снова подсоедините кабель.
 Сбросьте параметры PRAM, перезагрузив компьютер при нажатых клавишах
Command (x), Option, P и R, пока сигнал загрузки не прозвучит во второй раз.
Темный экран
 Убедитесь, что яркость экрана настроена должным образом. Выберите пункт
меню «Apple» () > «Системные настройки» и нажмите «Мониторы». Передвиньте
бегунок «Яркость», чтобы настроить яркость.
 Если цвета дисплея слишком насыщенные или отображаются неверно, возможно,
требуется калибровка монитора. Откройте настройки монитора, выберите «Цвет»,
нажмите «Калибровать» и следуйте инструкциям.
MacBook не заряжается
Убедитесь, что разъем MagSafe монитора должным образом подсоединен к порту
MagSafe на MacBook.
Русский
94

Встроенная камера iSight, микрофон, система динамиков или USB-порты
монитора не работают
Убедитесь, что USB-кабель монитора надежно подсоединен к USB-порту
компьютера. Камера, микрофон, динамики и USB-порты монитора работают только
тогда, когда этот кабель подключен к компьютеру.
Дополнительная информация по устранению неполадок
Дополнительную информацию по устранению неполадок можно найти на разделе
веб-сайта Apple о поддержке мониторов по адресу:
www.apple.com/ru/support/displays
Дополнительная информация, обслуживание и поддержка
Дополнительную информацию о Вашем мониторе можно найти на веб-сайте Apple
и в Справке Mac.
Тема См.
Использование монитора
Обслуживание мониторов,
поддержка, обсуждения,
устранение неполадок и
загрузка ПО
Новейшая информация о
мониторах
Регистрация монитора
В Справке Mac введите «мониторы» в поле поиска.
Раздел веб-сайта Apple о поддержке мониторов:
www.apple.com/ru/support/displays.
Раздел веб-сайта Apple о мониторах:
www.apple.com/ru/displays.
Раздел веб-сайта Apple о регистрации продуктов:
www.apple.com/register.
Русский
95

Спецификации
 Номер модели: A1316
 Разрешение: 2560 x 1440 при 60 Гц
 Порты: три высокоскоростных порта USB 2.0 на задней панели
 Камера и микрофон: встроенная камера iSight с микрофоном
 Динамики: встроенные динамики 2.1 с выходной мощностью 49 Вт
Размеры
 Вес: 10,7 кг (23,5 фунта)
 Высота: 488,1 мм (19,2 дюйма)
 Ширина: 651,7 мм (25,65 дюйма)
 Глубина (с подставкой): 208,13 мм (8,2 дюйма)
 Размер экрана: диагональ 27 дюймов (685,8 мм)
Требования к среде эксплуатации
 Температура при эксплуатации: от 10° до 35° C (от 50° до 95° F)
 Относительная влажность: от 20% до 80% (без конденсации)
 Высота над уровнем моря: от 0 до 3048 метров (от 0 до 10 000 футов)
Русский
96

Regulatory Compliance Information
FCC Compliance Statement
This equipment has been tested and found to comply with the
limits for a Class B digital device, pursuant to part 15 of the FCC
Rules. These limits are designed to provide reasonable protection
against harmful interference in a residential installation.
This equipment generates, uses, and can radiate radio
frequency energy and, if not installed and used in accordance
with the instructions, may cause harmful interference to radio
communications. However, there is no guarantee that interference
will not occur in a particular installation. If this equipment does
cause harmful interference to radio or television reception, which
can be determined by turning the equipment o and on, the user
is encouraged to try to correct the interference by one or more of
the following measures:
• Reorient or relocate the receiving antenna.
• Increase the separation between the equipment and receiver.
• Connect the equipment into an outlet on a circuit dierent from
that to which the receiver is connected.
• Consult the dealer or an experienced radio/T V technician for
help.
If necessary, consult an Apple Authorized Service Provider or
Apple. See the service and support information that came with
your Apple product. Or, consult an experienced radio/television
technician for additional suggestions.
Important: Changes or modications to this product not
authorized by Apple Inc. could void the EMC compliance and
negate your authority to operate the product.
This product has demonstrated EMC compliance under conditions
that included the use of compliant peripheral devices and shielded
cables between system components. It is important that you use
compliant peripheral devices and shielded cables between system
components to reduce the possibility of causing interference to
radios, television sets, and other electronic devices.
Responsible party (contact for FCC matters only):
Apple Inc. Corporate Compliance
1 Innite Loop, MS 26-A
Cupertino, CA 95014
Industry Canada Statement
This equipment complies with the Canadian ICES-003 Class B
specications. Cet appareil numérique de la classe B est conforme
à la norme NMB-003 du Canada.
VCCI Class B Statement
Russia
Korea KCC Statement
Korea Class B Statement
97

Europe–EU Declaration of Conformity
See www.apple.com/euro/compliance.
High-Risk Activities Warning
This display is not intended for use in the operation of nuclear
facilities, aircraft navigation or communications systems, or air
trac control machines, or for any other uses where the failure of
the computer system could lead to death, personal injury or severe
environmental damage.
ENERGY STAR®
As an ENERGY STAR® partner, Apple has determined that this
product meets the ENERGY STAR® requirements for energy
eciency. The ENERGY STAR® program is a partnership with
electronic equipment manufacturers to promote energy-ecient
products. Improving energy eciency of products saves money
and helps conserve valuable resources.
This display is shipped with power management enabled, which
allows the display to save power by decreasing luminance
when used in a room with low ambient lighting. This automatic
brightness control feature is enabled as a default setting in
Displays preferences. To adjust your display luminance manually,
use the display brightness keys on your keyboard or the brightness
adjustment in Displays preferences.
For more information about ENERGY STAR®, visit: www.energystar.gov
Apple and the Environment
Apple Inc. recognizes its responsibility to minimize the
environmental impacts of its operations and products. More
information is available on the web:
www.apple.com/environment
Turkey
98

Disposal and Recycling Information
This symbol indicates that your product must be disposed of
properly according to local laws and regulations. When your
product reaches its end of life, contact Apple or your local
authorities to learn about recycling options.
For information about Apple’s recycling program, go to
www.apple.com/recycling.
Brasil: Informações sobre descarte e reciclagem
O símbo indica que este produto e/ou sua bateria não devem
ser descartadas no lixo doméstico. Quando decidir descartar
este produto e/ou sua bateria, faça-o de acordo com as leis e
diretrizes ambientais locais. Para informações sobre o programa de
reciclagem da Apple, pontos de coleta e telefone de informações,
visite: www.apple.com/br/environment
European Union—Disposal Information
The symbol above means that according to local laws and
regulations your product should be disposed of separately from
household waste. When this product reaches its end of life, take
it to a collection point designated by local authorities. Some
collection points accept products for free. The separate collection
and recycling of your product at the time of disposal will help
conserve natural resources and ensure that it is recycled in a
manner that protects human health and the environment.
Union Européenne: informations sur l’élimination
Le symbole ci-dessus signie que vous devez vous débarasser
de votre produit sans le mélanger avec les ordures ménagères,
selon les normes et la législation de votre pays. Lorsque ce produit
n’est plus utilisable, portez-le dans un centre de traitement des
déchets agréé par les autorités locales. Certains centres acceptent
les produits gratuitement. Le traitement et le recyclage séparé
de votre produit lors de son élimination aideront à préserver les
ressources naturelles et à protéger l’environnement et la santé
des êtres humains.
Europäische Union – Informationen zur Entsorgung
Das Symbol oben bedeutet, dass dieses Produkt entsprechend den
geltenden gesetzlichen Vorschriften und getrennt vom Hausmüll
entsorgt werden muss. Geben Sie dieses Produkt zur Entsorgung
bei einer oziellen Sammelstelle ab. Bei einigen Sammelstellen
können Produkte zur Entsorgung unentgeltlich abgegeben
werden. Durch das separate Sammeln und Recycling werden die
natürlichen Ressourcen geschont und es ist sichergestellt, dass
beim Recycling des Produkts alle Bestimmungen zum Schutz von
Gesundheit und Umwelt beachtet werden.
Unione Europea: informazioni per lo smaltimento
Il simbolo qui sopra signica che, in base alle leggi e alle norme
locali, il prodotto dovrebbe essere smaltito separatamente dai
riuti casalinghi. Quando il prodotto diventa inutilizzabile, portalo
nel punto di raccolta stabilito dalle autorità locali. Alcuni punti di
raccolta accettano i prodotti gratuitamente. La raccolta separata e
il riciclaggio del prodotto al momento dello smaltimento aiutano
a conservare le risorse naturali e assicurano che venga riciclato nel
rispetto della salute umana e dell’ambiente.
Europeiska unionen – uttjänta produkter
Symbolen ovan betyder att produkten enligt lokala lagar och
bestämmelser inte får kastas tillsammans med hushållsavfallet. När
produkten har tjänat ut måste den tas till en återvinningsstation
som utsetts av lokala myndigheter. Vissa återvinningsstationer
tar kostnadsfritt hand om uttjänta produkter. Genom att låta den
uttjänta produkten tas om hand för återvinning hjälper du till att
spara naturresurser och skydda hälsa och miljö.
99

 Loading...