


 Loading...
Logic Pro 8
Getting Started
Apple Inc.
© 2007 Apple Inc. All rights reserved.
Under the copyright laws, this manual may not be copied, in whole or in part, without the written consent of Apple. Your rights to the software are governed by the accompanying software licence agreement.
The Apple logo is a trademark of Apple Inc., registered in the U.S. and other countries. Use of the “keyboard” Apple logo (Option-Shift-K) for commercial purposes without the prior written consent of Apple may constitute trademark infringement and unfair competition in violation of federal and state laws.
Every effort has been made to ensure that the information in this manual is accurate. Apple Inc. is not responsible for printing or clerical errors.
Note: Because Apple frequently releases new versions and updates to its system software, applications, and Internet sites, images shown in this book may be slightly different from what you see on your screen.
Apple Inc.
1 Infinite Loop Cupertino, CA 95014-2084 408-996-1010 www.apple.com
Apple, FireWire, iMovie, iPod, iTunes, Logic, Mac, Mac OS, Macintosh, and QuickTime are trademarks of Apple Inc., registered in the U.S. and other countries.
Finder and Spotlight are trademarks of Apple Inc.
AppleCare is a service mark of Apple Inc., registered in the U.S. and other countries.
Other company and product names mentioned herein are trademarks of their respective companies. Mention of third-party products is for informational purposes only and constitutes neither an endorsement nor a recommendation. Apple assumes no responsibility with regard to the performance or use of these products.

1 Contents
Preface |
5 |
Welcome to Logic |
|
6 |
Conventions of This Manual |
Chapter 1 |
7 |
Starting Your Project and Importing Media Files |
|
9 |
A Quick Note About Templates |
|
9 |
Getting to Know the Arrange Window |
|
10 |
Creating Tracks |
|
13 |
Adding Media Files |
|
18 |
Navigating Your Project |
|
21 |
Undoing Operations |
|
22 |
Selecting Tracks and Regions |
Chapter 2 |
25 |
Recording |
|
25 |
Preparing to Record Audio |
|
28 |
Recording Audio Regions |
|
30 |
Recording an Instrument Part |
Chapter 3 |
33 |
Creating Your Arrangement |
|
34 |
Choosing Tools |
|
36 |
Muting and Soloing Tracks and Regions |
|
38 |
Editing Regions |
|
44 |
Using the Inspector |
Chapter 4 |
47 |
Editing MIDI Events |
|
47 |
Getting to Know the MIDI Editors |
|
50 |
Editing and Creating Events |
Chapter 5 |
53 |
Using Instruments and Effects |
|
56 |
Using the Library |
|
58 |
Editing Instruments and Effects |
Chapter 6 |
59 |
Working With Audio Files |
|
59 |
Editing Audio Files |
|
61 |
Managing Your Audio Files |
3
Chapter 7 |
63 |
Mixing and Exporting Your Project |
|
64 |
Using the Channel Strip Controls |
|
65 |
Changing the Routing of Channel Strips |
|
67 |
Automating Your Mix |
|
70 |
Exporting Your Project |
Chapter 8 |
71 |
Speeding Up Your Workflow |
|
71 |
Using Key Commands |
|
72 |
Using Screensets |
|
73 |
Using Control Surfaces |
Appendix A |
75 |
Audio and MIDI Basics |
|
75 |
MIDI |
|
76 |
Audio |
Appendix B |
79 |
Audio and MIDI in Mac OS X |
|
79 |
Core Audio |
|
80 |
Core MIDI |
Appendix C |
81 |
Optimizing Your Computer Audio System |
|
83 |
Troubleshooting |
Glossary |
89 |
|
Index |
107 |
|
4 |
Contents |
|
|

Welcome to Logic
Preface
This guide is designed to get you up and running with Logic in the shortest possible time.
It does not cover all areas of the program. What you will find are descriptions of the most essential aspects of Logic’s interface, commands, and menus—the “tip of the iceberg,” if you will. In most cases, one method will be shown. As you become more familiar with Logic, you’ll discover that there are often several ways to achieve an end result.
The descriptions are laid out in a “what you see” fashion, and are generally paired with step-by-step instructions for accomplishing specific tasks. Follow these instructions to quickly learn how to handle MIDI and audio information via a series of examples.
It goes without saying that you will be introduced to a number of new terms and concepts. The first rule: Don’t panic!
Just follow the steps, look at the screenshots (and Logic itself), and take your time while trying things. The second rule: You can’t break anything, so feel free to experiment. Do, however, pay attention to notes and warnings in the guide.
In general, methods that work in one window will work identically (or similarly) throughout the application. Once you have a handle on the basics covered in this guide, you’ll find that the more “advanced” functions are just as easy to master.
If you’d like to learn more about digital audio and the elements of a music project, read Appendix A,“Audio and MIDI Basics.” Appendix B provides information about Audio and MIDI in Mac OS X. Appendix C will help you to optimize your computer for music production.
Additional, more comprehensive information can be found in the other Logic manuals. Some come as printed guides, but the complete collection is included in electronic form in the Documentation folder of the Logic Install DVD. The most important electronic books are also accessible from the Logic Help menu.
5

Conventions of This Manual
The following conventions are used in this manual:
Menu Functions
For functions that can be reached via hierarchical menus, the different menu levels are illustrated as follows: Menu > Menu entry > Function.
Important Entries
Some text will be shown as follows:
Important: Information on function or parameter.
These entries discuss a key concept or technical information that should, or must, be followed or taken into account. Please pay special attention to these entries.
Notes
Some sections provide additional information or tips that will assist your use of Logic. These are displayed as shown below:
Note: Information on function or parameter.
Key Commands
Many Logic functions can be activated or accessed with key commands—computer keyboard shortcuts. The key commands mentioned in this guide are based on the English Standard key command set.
Tips
A number of shortcuts, alternative methods, or general working tips are included throughout the documentation. These may help your workflow, or provide additional information on other uses for functions. Tips are shown as below:
∏Tip: Information on function or parameter.
Warnings
A few warning messages are included for functions that are destructive, and could result in irretrievable data loss, or could cause damage to your equipment. Warnings are displayed as follows:
Warning: Information on function or parameter.
Please pay special attention to these entries, as they can save you from making costly mistakes.
6 |
Preface Welcome to Logic |
|
|
1 Starting Your Project and |
1 |
Importing Media Files |
The basic Logic file (or document) type is the project.
A project can contain audio recordings, MIDI performances, and your personal working preferences.
A project must be open before you can work in Logic.
To launch Logic, open and save a new project:
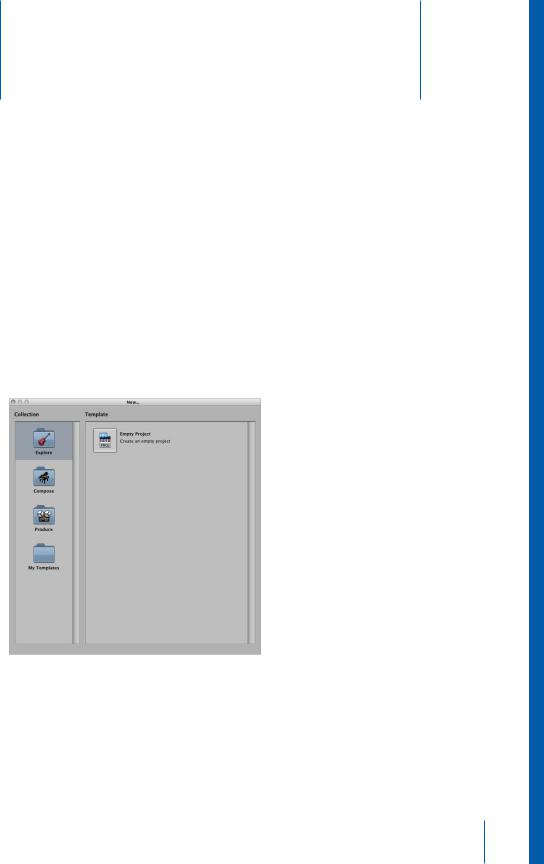
1Double-click the Logic icon in the Applications folder. The Templates dialog appears.
2Choose the Empty Project item in the Templates dialog. If not visible, click the Explore folder icon in the Collection column.
7
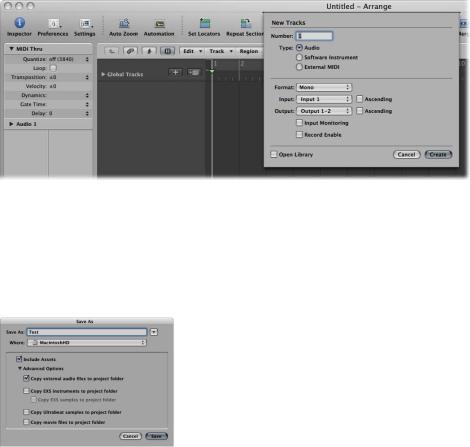
The empty project will open, and you will see the New Tracks dialog.
3 Ensure that the Audio button is highlighted. If not, click it.
4For now, simply click the Create button at the lower-right corner of the New Tracks dialog.
The main Logic window—the Arrange—is shown, with one audio track visible.
5 Choose File > Save As, which will open the Save As dialog.
6Type in a new name, such as “test.” Choose the desired folder path (or create a new one).
7Ensure that the Include Assets and “Copy external audio files to project folder” checkboxes are enabled. Click the disclosure triangle to see the Advanced Options, if not visible.
Note: The project assets may include audio files, video files, EXS instrument files, and more. Dependent on your choices in the advanced options, these files can be saved in the project folder. This simplifies archiving, and makes it easy to transport entire projects to other Logic-based studios (or computers).
8 Click the Save button at the lower-right corner.
8 |
Chapter 1 Starting Your Project and Importing Media Files |
|
|

A Quick Note About Templates
When you first open Logic, it looks for a project file. If no suitable files are found, the Templates dialog automatically opens. You can also open it at any time by choosing File > New.
The Templates dialog contains a number of “ready-to-wear” projects that have been customized for particular jobs; creating a printed score, working with film, creating a hip-hop track, and so on. Take a look at each of them, after you’ve read the guide.
You can use these as starting points for your own projects, or can customize these (or create completely new) templates. Once you have spent a little time with Logic, you’ll discover how you like to work, and how to set up and personalize Logic—to make it behave the way you like to work. For now, keep your customizations to a minimum.
Getting to Know the Arrange Window
After loading and saving your new project, and creating an audio track, you will see the following on screen:
|
|
|
|
|
|
|
|
|
|
|
|
|
|
|
|
Click these buttons to display |
|||||
Arrange window |
|
|
|
|
|
|
Track list |
Bar ruler |
|
Local menu bar |
|
|
|
the Lists or Media area. |
|||||||
|
|
|
|||||||||||||||||||
Toolbar |
|
|
|
|
|
|
|
|
|
|
|
|
|
|
|
|
|
|
|
|
Click this button to |
|
|
|
|
|
|
|
|
|
|
|
|
||||||||||
|
|
|
|
|
|
|
|
|
|
|
|
|
|
|
|
|
|
|
|
||
|
|
|
|
|
|
|
|
|
|
|
|
|
|
|
|
|
|
|
|
hide the Toolbar. |
|
Click this button to |
|
|
|
|
|
|
|
|
|
|
|
|
|
|
|
|
|
|
|
|
Tool menu |
|
|
|
|
|
|
|
|
|
|
|
|
|
|
|
|
|
|
|
|
||
|
|
|
|
|
|
|
|
|
|
|
|
|
|
|
|
|
|
|
|
|
|
|
|
|
|
|
|
|
|
|
|
|
|
|
|
|
|
|
|
|
|
|
|
display the Inspector. |
|
|
|
|
|
|
|
|
|
|
|
|
|
|
|
|
|
|
|
|
|
|
|
|
|
|
|
|
|
|
|
|
|
|
|
|
|
|
|
|
|
|
|
Inspector |
|
|
|
|
|
|
|
|
|
|
|
|
|
|
|
|
|
|
|
|
Arrange area |
|
|
|
|
|
|
|
|
|
|
|
|
|
|
|
|
|
|
|
|
||
Playhead |
|
|
|
|
|
|
|
|
|
|
|
|
|
|
|
|
|
|
|
|
|
|
|
|
|
|
|
|
|
|
|
|
|
|
|
|
|
|
|
|
|
||
|
|
|
|
|
|
|
|
|
|
|
|
|
|
|
|
|
|
|
|
|
|
|
|
|
|
|
|
|
|
|
|
|
|
|
|
|
|
|
|
|
|
|
|
Arrange channel strips |
|
|
|
|
|
|
|
|
|
|
|
|
|
|
|
|
|
|
|
|
Vertical zoom control |
|
|
|
|
|
|
|
|
|
|
|
|
|
|
|
|
|
|
|
|
||
|
|
|
|
|
|
|
|
|
|
|
|
|
|
|
|
|
|
|
|
|
|
|
|
|
|
|
|
|
|
|
|
|
|
|
|
|
|
|
|
|
|
|
|
|
|
|
|
|
|
|
|
|
|
|
|
|
|
|
|
|
|
|
|
|
Horizontal zoom |
|
|
|
|
|
|
|
|
|
|
|
|
|
|
|
|
|
|
|
|
|
|
Transport bar |
|
|
|
|
|
|
|
|
|
|
|
|
|
|
|
|
|
|
|
|
control |
|
|
|
|
|
|
|
|
|
|
|
|
|
|
|
|
|
|
|
|
||
|
|
|
|
|
|
|
|
|
|
|
|
|
|
|
|
|
|
|
|
|
|
|
|
|
|
|
|
|
|
|
|
|
|
|
|
|
|
|
|
|
|
|
|
Click these buttons to display one of the editors.
ÂArrange window: This is the main window of Logic. It can incorporate all working areas and editors.
ÂMain menu (not shown in image): Used for global file and edit operations, and to access program-wide options, including screenset functions (see “Using Screensets” on page 72). The Window menu is used to open different editor, and other, windows.
Chapter 1 Starting Your Project and Importing Media Files |
9 |
|
|
ÂToolbar: Toolbar buttons execute several major functions. The Media and Lists buttons open/close the Media and Lists areas (shown below the buttons, when open).
ÂLocal menu bar: Provides access to window-specific functions.
ÂTool menu: Provides access to tools, used for selection and editing tasks.
ÂBar ruler: Horizontally displays Logic’s time axis—from left to right. It is also used for navigation, playback, and recording tasks.
ÂTrack list: This is where you select, create, move, and delete tracks.
ÂArrange area: This is the arrangement workspace. It can contain any number of MIDI or audio regions, aligned on horizontal track lanes (shown in the track list).
ÂPlayhead: The playhead indicates the current project position, and moves from left to right as the project is playing. The playhead can also be used as a target for paste operations.
ÂInspector: The Inspector is used to adjust various aspects of track or region playback. Channel strips—for the selected track, and its destination channel—are displayed at the bottom of the Inspector.
ÂEditor buttons: The Mixer, Sample Editor, Piano Roll, Score, and Hyper Editor buttons open or close the corresponding editor window above the Transport bar—the Arrange area is resized to accommodate the editor.
ÂTransport bar: Used to control playback and recording operations.
ÂZoom controls: Drag the Zoom control sliders to change the horizontal and vertical magnification factor of the window contents.
Creating Tracks
Logic works on the basis of tracks, much like a multi-track tape machine. You can see and access these tracks in the Arrange window track list.
If you followed the steps outlined above when opening Logic, the project will contain a single audio track, called Audio 1. There are two other track types that can be used to create arrangements; instrument and external MIDI tracks.
To create a few new tracks:
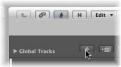
1 Click the + button directly above the track list.
2 In the New Tracks dialog, click the Audio button (if not already active).
3 Highlight the number “1” in the numeric field at the top of the dialog, and type in “3”.
10 |
Chapter 1 Starting Your Project and Importing Media Files |
|
|
Check out the Format, Input, and other options available while the dialog is open.
4Click the Create button.
The dialog closes, and three new audio tracks (“Audio 2,”“Audio 3,” and “Audio 4”) are created in the Arrange track list.
5Repeat the steps above, but click the Software Instrument button, and type “4” in the numeric field of the New Tracks dialog to create four new software instrument tracks (“Inst 1,”“Inst 2,” and so on).
Important: Now would be a great time to save your project. Presuming you followed the steps when you first launched Logic, and have already “saved as,” you can choose File > Save (or use the default Save key command: Command-S).
You can also follow the steps above to create External MIDI tracks, which are used for the recording and playback of external MIDI synthesizers. Use of external MIDI tracks (and hardware) is discussed in the Logic user manual.
You should be looking at something like this:
Library
The last of the new tracks (Inst 4) is highlighted in the track list, and the Library window is shown to the right of the Arrange window.
You can use the Library to insert an instrument (plus effects) into a channel strip:
1Click any of the categories shown in the Library: 01 Pianos, 02 Electric Pianos, 03 Clavinets, and so on.
2Click any of the sub-categories shown in the second column of the Library (if applicable). A third column is shown.
Chapter 1 Starting Your Project and Importing Media Files |
11 |
|
|

3Click on any of the entries (known as settings) shown in the second or third column. Play your keyboard after loading each setting.
You will see that the left Arrange channel strip automatically updates—usually with at least two or more (blue) Insert slots, plus the Instrument slot—being activated. These are known as channel strip settings, rather than individual instrument settings. Not only is an instrument plug-in loaded, but also all effect plug-ins used by the channel strip. Even better, the setting of each plug-in (instrument and effect) is automatically loaded. You will soon be making a recording with this instrument, but your project needs a “bed.”
Channel strip settings
Insert slot
Instrument slot
12 |
Chapter 1 Starting Your Project and Importing Media Files |
|
|

Adding Media Files
When you record or add MIDI or audio files (media, in other words) to the Arrange window, narrow rectangles called regions appear—horizontally aligned on track lanes. An audio region represents an underlying audio file (or a portion of it). This can be an existing or new audio recording. A MIDI region represents an individual recording, or take of MIDI data. Again, this can be an existing or new recording.
Audio region |
|
|
|
MIDI region |
|
|
|||
|
|
|
|
|
|
|
|
|
|
ÂYou can only record, import, and play back MIDI regions on software instrument or external MIDI tracks. MIDI regions actually contain MIDI events.
ÂYou can only record, import, and play back audio regions on audio tracks. Audio regions are simply placeholders or pointers to underlying audio files.
Chapter 1 Starting Your Project and Importing Media Files |
13 |
|
|
To add an audio region by importing an audio Apple Loop to an audio track:
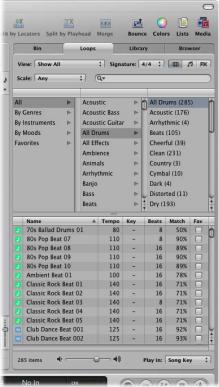
1In the Media area to the right of the Arrange window, click the Loops tab. The Loop Browser replaces the Library.
 Column View button
2 Click the Column View button towards the top right of the Loop Browser.
3Click All in the left column, at the top of the Loops Browser. A list of sub-categories appears in the center column.
4Click All Drums in the center column, and click All Drums in the right column, when it appears.
A list of Apple Loops is shown at the bottom of the Loop Browser.
5Click on any loop name in the list (with a blue icon, and preferably with “16” shown in the Beats column), and it will immediately begin playback. Click the name a second time to stop playback.
6Once you’ve found a loop you’d like to use, grab it, and drag it to the very beginning of Bar 1 (shown in the Bar ruler)—on the track called “Audio 1” in the Arrange area.
7Release the mouse button, and you’ve successfully imported your first audio region into Logic.
14 |
Chapter 1 Starting Your Project and Importing Media Files |
|
|

To add other audio file types with the Browser:
1Click the Browser tab at the top of the Media area. The Browser replaces the Loop Browser.
Back and Forward |
Path menu |
|
Bookmark buttons |
|
|
|
|
|
View buttons |
||||
|
|
|
|||||||||||
|
|
|
|
|
|
|
|
|
|
|
|
|
|
|
|
|
|
|
|
|
|
|
|
|
|
|
|
|
|
|
|
|
|
|
|
|
|
|
|
|
|
|
|
|
|
|
|
|
|
|
|
|
|
|
|
buttons |
|
|
|
|
|
|
|
|
|
|
Search field |
||
|
|
|
|
|
|
|
|
|
|
||||
|
|
|
|
|
|
|
|
|
|
|
|
|
Search filters |
|
|
|
|
|
|
|
|
|
|
|
|
|
|
|
|
|
|
|
|
|
|
|
|
|
|
|
|
File list
Play button
2Locate the desired file in the Browser.
Navigation in the Browser is much like using the Mac OS X Finder. The method of navigation is the same for all file types. The bookmark buttons, Path menu, and Back and Forward buttons aid navigation. The search functions make it easy to find any file. These work much like Spotlight.
3Once you have found the desired file, you can drag it directly to any position in the Arrange area.
Chapter 1 Starting Your Project and Importing Media Files |
15 |
|
|
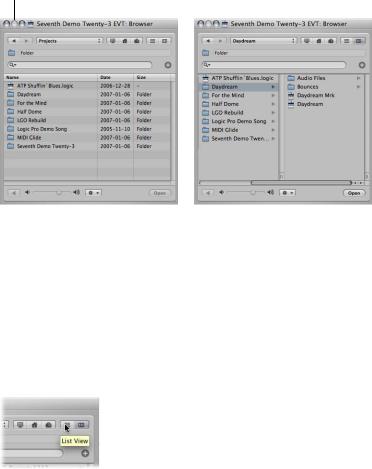
You can switch the Browser between two views: List and Browser view.
List view |
|
Browser view |
|
||
|
|
|
ÂList view displays folders and their contents in a list. You enter a folder by doubleclicking it.
ÂBrowser view exposes the contents of a folder in new frames to the right of the selected folder. You only need to click once on a folder to enter it.
To switch between List and Browser view:
mClick on the Browser button to access the Browser view. Click on the List button to access List view.
List button |
|
|
|
Browser button |
|
|
|||
|
|
|
|
|
To add a MIDI region by importing a Software Instrument Apple Loop to an instrument track:
1Click the Loops tab in the Media area, and click Bass in the center column (if not visible, click the All entry in the left column).
2Choose Bass in the right column.
A list of Apple Loops is shown at the bottom of the Loops tab.
3Click on any of the loop names with a green icon (ideally, also showing 16 in the Beats column). It will automatically start playing.
4Once you’ve found a loop you like, drag it to bar 1 of the “Inst 1” track. Congratulations! You have imported a MIDI region to the track.
16 |
Chapter 1 Starting Your Project and Importing Media Files |
|
|
You can consider the MIDI region a container for MIDI information. This can include— either individually or in combination—note events, controllers, program changes, or even SysEx for your MIDI tone generators. All MIDI event types are discussed in the Logic user manual.
Important: The Arrange window only deals with regions—it does not allow you to edit the MIDI events or audio information in regions! If you need to make precise changes to the region content, you can do so in the editor windows. See “Editing MIDI Events” on page 47 and “Editing Audio Files” on page 59.
These procedures (and the track creation method covered earlier) can be repeated numerous times, allowing you to build huge arrangements—with hundreds of tracks, and thousands of regions. You may freely drag and drop regions to any position in the project, but remember that audio regions only play on audio tracks. MIDI regions only play on software instrument or external MIDI tracks.
Apple Loop Types
As you’ve found out, there are two types of Apple Loops.
ÂApple Loop audio files (blue icon) contain audio data and identification information; time and date, category, mood, key and tempo, amongst others. They also contain transient markers, which break them down into small time slices. The advantage of Apple Loop audio files is their ability to automatically match the tempo and key of a Logic project. You can only add these file types to audio tracks.
Â(SIAL) Software Instrument Apple Loop files (green icon) also contain MIDI note information—that triggers a musical phrase or riff. The motif will be played, as is, when these types of Apple Loops are added to an audio track (in other words, they behave just like the blue Apple Loop audio files). When added to an instrument track, however, the MIDI note information can be edited, as you would with any MIDI region. SIALs also contain instrument and effect setting information. When these loop types are added to a blank instrument track (one with an empty channel strip), a software instrument is automatically inserted into the Instrument slot.
Automatic Track Creation From Media Area Windows
The Loop Browser and Browser have a trick up their sleeve that can accelerate your workflow.
To create a track and import a loop in one step:
mDirectly drag an Apple Loop (of either type) from the Loop Browser into:
ÂAn empty Arrange window (obviously, not applicable at this point).
ÂTo the blank space below existing tracks.
A new audio or instrument track will be created, and the Apple Loop region will appear in the Arrange area, at the dropped position.
Chapter 1 Starting Your Project and Importing Media Files |
17 |
|
|

To create a track and import an audio file in one step, either:
mDouble-click on an audio file name in the Browser.
mDrag an audio file from the Finder into the Arrange window.
A new audio track is created at the bottom of the track list. An audio region is created at the playhead position on the new track.
Navigating Your Project
Navigation—and playback—of Logic projects can be achieved in several ways: with the Transport, in the Bar ruler, or by using markers or locators. This section outlines some basic techniques that will help you to get around your projects. Further, advanced navigation topics are covered in the Logic user manual.
Using the Transport Bar
The Transport bar spans the entire lower edge of the Arrange window. You can use it to move through your project and to start/stop recordings—using Play, Rewind, Pause, Record, and other buttons. The Transport bar also incorporates features that simplify tasks you will perform in Logic, such as recording over a continuously repeated section of your project, or listening to a part in isolation.
|
|
Transport buttons |
|
Display area |
|
|
|
Mode buttons |
|||
|
|
|
|||||||||
|
|
|
|
|
|
|
|
|
|
|
|
|
|
|
|
|
|
|
|
|
|
|
|
Click to stop |
|
|
|
Click to play |
|
|
|
The Transport bar consists of the following areas:
ÂTransport buttons: Used to navigate your project.
ÂDisplay area: Provides information that helps with project navigation.
ÂMode buttons: Enable advanced recording and playback functions.
Note: The Master Level slider—which sets the master output volume level for the project—may be visible at the right-hand end of the Transport, if there’s enough horizontal screen space.
To start and stop playback:
1Simply click the Play button on the Transport (or use the default Play key command:
Enter—on the numeric keypad of your computer keyboard), to play the project.
2Press the Stop button on the Transport to stop the project (or use the default Stop key command: “0” on the numeric keypad).
3To return to the beginning of the project, click the Stop button (or “0” key) again.
Note: Alternatively, you can use the Space bar to toggle Start and Stop operations.
18 |
Chapter 1 Starting Your Project and Importing Media Files |
|
|

Using the Bar Ruler
The Bar ruler displays the project timeline, from left to right. It is broken down into bar and beat divisions, indicated by vertical lines and numbers. You can also view actual time values by clicking on the note icon at the right-hand end of the Bar ruler, and choosing a suitable option from the pop-up menu.
Playhead
The Bar ruler and Transport are closely tied to each other, with several functions accessible in both. These include the play and stop commands, plus activation of Cycle mode, and setting the cycle length. The Bar ruler also changes color when the Transport Record, Solo, or Sync buttons are active—providing clear visual feedback on the current mode. Keep an eye on the different fields in the Transport bar while trying out the following Bar ruler techniques. If you click-drag vertically on the corresponding numerical values in the Transport, your change will be reflected in the Bar ruler.
Setting the Playhead Position and Controlling Playback
The playhead indicates the current project position. You can directly interact with the playhead by dragging it in the Arrange area, or in the Bar ruler. The latter option is safer because there’s no chance that you’ll accidentally alter any regions.
To move the playhead to any position:
mClick at any position in the lower half of the Bar ruler.
The playhead will instantly move to the clicked position. You can also click-drag the playhead, if preferred.
To start or stop playback at any project position:
mDouble-click at any position in the lower half of the Bar ruler.
The playhead will instantly move to the clicked position, and playback will begin from this point. If Logic is already in play (or record) mode, a double-click in the Bar ruler will stop playback at the clicked position.
Chapter 1 Starting Your Project and Importing Media Files |
19 |
|
|
Setting and Using the Cycle
The upper portion of the Bar ruler contains the cycle stripe—shaded gray when inactive, or green when active. The cycle acts as a set of playback markers (or locators). When Logic is in Cycle mode, the playhead will continuously loop between the start and end points of the cycle. The cycle can be placed anywhere in your project, and can be of any length. Beyond playback duties, the cycle can also be used to define a section of your project for editing operations. Details can be found in the Logic user manual.
Left locator |
|
|
|
Right locator |
|
|
|||
|
|
|
|
|
Click here to activate the cycle.
To activate or deactivate the cycle, do one of the following:
mClick the shaded gray cycle area in the top half of the Bar ruler (the cycle is green when active).
A second click deactivates the cycle (returns to gray shading).
mClick the Cycle button on the Transport (green when active).
To move the cycle:
mMove the mouse over the middle of the cycle in the Bar ruler (the cursor will change to a hand icon), and drag it to the right or left.
20 |
Chapter 1 Starting Your Project and Importing Media Files |
|
|
To change the cycle length:
mMove the mouse over the right or left-hand end of the cycle in the Bar ruler (the cursor will change to a resize icon), and drag it to the right or left.
Keep an eye on the locator display in the Transport bar while changing the cycle length.
Left locator
Playhead Position display
Right locator
Undoing Operations
Before getting too far into the “hands-on” portion of this guide, you should know about the Logic safety net—the Undo function. It’s inevitable that you will make an occasional error, perform an operation that doesn’t deliver the results you were after, or simply change your mind, when using Logic.
Most operations in Logic can be reversed, but not all! As you work with the application, you will discover what can, and cannot, be undone with the Undo functions. For operations that can’t be undone in this way—such as region playback parameters (which you’ll learn about in a little while)—you will generally need to change a value back to its former (or the default) value.
To undo the last operation, command, or function:
mChoose Edit > Undo [the name of operation, command, or function]. The Undo command can also be executed by pressing Command-Z.
If you’ve made a couple of changes, and decide that you want to revert to an earlier state, Logic offers the Undo History. This is a catalogue, if you will, of all editing operations. It is saved with the project.
Chapter 1 Starting Your Project and Importing Media Files |
21 |
|
|

To reverse a number of operations, commands, or functions:
1 Choose Edit > Undo History (or press Option-Z) to open the Undo History window.
The Undo History window shows a list of all operations. All operations are listed from the bottom up—with the most recent operation shown at the foot of the list.
2Click on any step to reverse all operations, starting with the most recent (bottom of the list), and working backwards (up the list).
To undo or redo an isolated step: m Command-click on the desired step.
Selecting Tracks and Regions
Track or region selection is essential for all recording, editing, and arranging tasks. You can’t move a region unless you’ve selected it. Similarly, you can’t adjust track channel strip functions (such as volume or pan changes) unless the track name is selected in the track list.
Selecting Tracks
You’ve probably noticed that one of the track names is always highlighted in the track list. This indicates that it is the selected track. As you’ve discovered, you can freely drag regions onto tracks, regardless of whether or not they are selected. You can not, however, record to a track unless it is first selected, and armed for recording. More on this shortly.
To select tracks for editing:
1Click the Inst 1 track (the fifth track in the list, which will now have a different name), and see how the Arrange channel strip updates, to reflect the current track selection.
Note: The region on the track is also highlighted, indicating that it is selected. By default, when you select a track, all regions aligned on the track lane are automatically selected.
2Click the Piano Roll button at the bottom of the Arrange area to view, and edit, the contents of the selected region.
22 |
Chapter 1 Starting Your Project and Importing Media Files |
|
|

Selecting Regions
Regions can be freely selected on any track, at any time—regardless of whether or not the parent track is selected.
To select a region:
mClick directly on the audio region on the Audio 1 track.
Selected regions are easily identified by a black name bar that spans the top of the region.
To select several regions, do one of the following:
mClick-hold on the Arrange area background, and drag across several regions.
As you do so, you’ll see a rubber band selection area. Each region is automatically highlighted (selected) as it is touched by the rubber band.
mShift-click on the desired regions. Use this method when the regions you want to move are not aligned side-by-side, or laid out above/below each other.
The multiple selection methods outlined above (rubber banding or shift-clicking) can be used for any region editing operation—when you want to alter several regions in the same way.
Chapter 1 Starting Your Project and Importing Media Files |
23 |
|
|

2 |
Recording |
2 |
|
||
|
|
|
Both audio and MIDI information can be recorded directly in the Arrange area.
The procedure is more or less the same for any recordings you make: select (and arm) a track, start recording, perform, stop recording. Recordings can even automatically start and end at predefined positions (punch recording), can be comp-ed, offset, and much more. See the Logic user manual for full details.
Preparing to Record Audio
Before any audio can be recorded, you must first set a recording path and file name—a location on your computer’s hard disk, and a name for your recorded audio files.
If you followed the steps when first launching Logic, use of the Save As dialog, and activation of the Assets checkboxes, did two things: it provided a recording file path— the project folder—and ensured that the track name would be used for each new audio recording.
There are dozens of preferences and settings that can affect the way Logic handles recordings. These are accessed by clicking the Preferences or Settings buttons on the Arrange Toolbar. As you spend more time with Logic, you will find particular methods that best suit your working style. In many cases, you can alter a preference or setting that will automatically default to a desired view, change the appearance of windows, or result in a particular behavior when editing or recording. The outcome of making such changes is a faster, smoother, and simpler workflow.
The four main things to check, and set, before making any recordings (MIDI or audio) in your project are covered below. These settings are saved with the project.
25
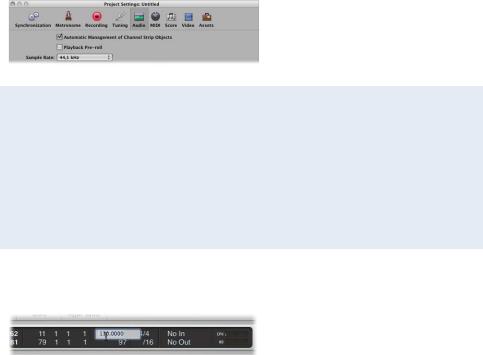
To set the project sample rate:
mChoose File > Project Settings > Audio (or use the Open Audio Project Settings key command), and choose the desired sample rate in the Sample Rate menu.
The Importance of the Sample Rate
Digital audio needs to play at its original sample rate, or be converted to a different one, before playback at another sample rate. To explain; when a file which was created by sampling 96,000 times per second (96 kHz sampling rate), is played back in an application that is set to a sample rate of 48,000 samples per second, it will play back slowly (half the speed).
Commonly used sample rates include 44.1 kHz for CD quality audio and 48 kHz for audio files used in digital video productions.
To set the basic project tempo, do one of the following:
mClick-hold the Transport tempo value and drag up or down.
mDouble-click on the Tempo field in the Transport, and type in a new value. Press Return/ Enter, or click outside the Tempo field to exit the dialog.
The project tempo is primarily of interest for MIDI recording, but it also impacts on the metronome, which generates the click sound heard during the count-in.
26 |
Chapter 2 Recording |
|
|
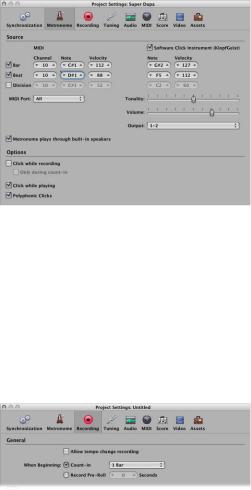
To alter the metronome settings:
1Click the Settings button in the Arrange Toolbar, and choose Metronome from the menu.
In general, you won’t need to alter the Metronome settings, but some people prefer to only hear the click during the count-in.
2Do one of the following
ÂCheck the “Only during count-in” checkbox to limit the click to the count-in.
ÂUncheck the “Click while recording” checkbox to disable the metronome while recording.
To set the count-in time:
1 Click the Settings button in the Arrange Toolbar, and choose Recording from the menu.
2In the Recording Project Settings window, click the Count-in menu, and choose the desired number of bars or beats.
A series of clicks—the count-in (of the set length)—is heard before you begin recording, so you’ll know when to start your performance.
Chapter 2 Recording |
27 |
|
|

Recording Audio Regions
The following assumes you have correctly connected a microphone, guitar, or some other audio source that you can record. For more information on doing this, see the Logic user manual.
To make a standard audio recording: 1 Turn off Cycle mode, if enabled.
2Click the Record Enable button on the Audio 2 track (or another region-free audio track, if you added a few Apple Loops or other files earlier). This arms the track.
If you sing into your microphone or play your guitar, you should hear it, and see the level meters of the Arrange channel strip moving.
Click to enable input monitoring
∏Tip: You can activate the Input Monitoring button at any time on audio tracks (and can generally leave it enabled). This allows you to hear incoming audio, even when the track is not armed, which is useful for setting audio levels or practicing parts before committing to recording.
3Click the Record button on the Transport (or use the Record key command,
default: *—on the numeric keypad) to start recording on the selected track—following a count-in.
4 Play or sing.
5When you are finished, click Stop on the Transport (or press the 0 key on the numeric keypad, or the Space bar) to end recording.
This recording will appear as an audio region (on the Audio 2 track) in the Arrange area.
28 |
Chapter 2 Recording |
|
|
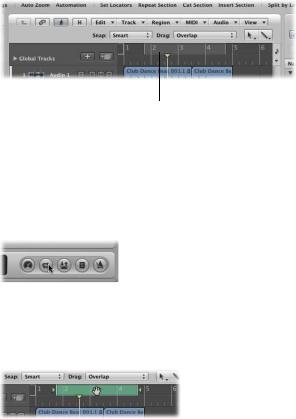
Recording Takes
Logic provides advanced take management facilities. A take is a part (a guitar solo, for example) that is performed and recorded multiple times. You can record several consecutive versions of a solo, and pick the best take, for example. Takes are usually created by recording in Cycle mode, but can also be created by simply recording over existing regions.
Takes also form the basis for comping tasks, where the best performances (from several takes) are compiled into a single “super take.”This comp(ilation) will be used as the final version of your take. Full details on comping are found in the Recording chapter of the Logic user manual.
The preparation for take recording is identical to that for audio recording. No special setup is required, so you can start take recording as you would for any audio recording.
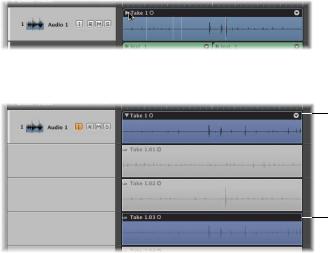
The first take appears as an audio region, as per usual. Once a recording takes place over an existing region (the second pass of a cycle recording ends, and the third cycle begins, or you manually stop recording after the first bar, for example), a take folder is created.
To open a take folder, do one of the following
mClick the disclosure triangle on the upper left corner of a take folder.
mDouble-click the take folder.
Take folder
The selected take will be heard during playback.
The contents of the take folder will be displayed on temporary Arrange track sub lanes—below the take folder itself. The most recently completed (or nearly completed) take is selected by default. The selected take will be heard during playback.
Chapter 2 Recording |
29 |
|
|
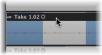
To select different takes when viewing an open take folder: m Click on the corresponding take header.
All take editing operations are covered in the Recording chapter of the Logic user manual.
Recording an Instrument Part
Earlier on, you used the Library to load an instrument into the Inst 4 track, and chose a setting.
To record an instrument region:
1Click the Inst 4 track name in the track list. The name shown in the track list is that of the active channel strip setting.
ÂSelecting an instrument track automatically prepares it for recording—but you must send a live MIDI event (as examples: play a note on your keyboard, move the modulation wheel, press the sustain pedal) to switch software instruments into live mode. Once in live mode (or pressing the record button), the software instrument is automatically armed for recording.
ÂSelecting an external MIDI track automatically arms it for recording.
2 Feel free to choose another sound (setting), by activating the Library in the Media area.
3 Click the Record button on the Transport, or press the * key on the numeric keypad.
You will hear a one bar count-in, and a constant metronome click. If not, revisit “To alter the metronome settings:” on page 27. Most people find it easier to make a musical instrument recording to a click.
4 Play your keyboard.
5Click the Stop button on the Transport once you’re done.
A (selected) MIDI region appears on the instrument track lane.
If you’re happy with your recording, click the Play button (Enter on the numeric keypad or the Space bar) to hear it, and the other regions, play back.
If your part is close, but you messed up a note or two, you can edit them—rather than redoing the whole thing. This is covered in “Editing and Creating Events” on page 50.
If the timing of your recording isn’t as you’d like it to be, you can quantize the region.
30 |
Chapter 2 Recording |
|
|
Loading...