


7 inch portable DVD player
With DVB-T and USB
HSD 7570
OPERATION MANUAL
BEDIENUNGSANLEITUNG
MANUEL D'EMPLOI
MANUAL DE OPERACIÓN

Deutsch
2

Inhalt
Vorsichtsmaßnahmen / Sicherheitsinformationen 4
Einleitung 8
Schnellstartanleitung 9
Fernbedienung 10
Anschluss eines Fernsehers 11
Tasten der Fernbedienung 13
Abspielen einer Disc 14
Bilder-CDs und JPEG-Dateien 16
Komprimierte Audioformate 17
Suchen von Titeln, Kapiteln oder Audiospuren 17
Wiederholung 18
Bildvergrößerung 19
Untertitelauswahl 19
Informationen 19
Ändern des Kamerawinkels 20
Einrichten der Kindersicherung 20
Einstellungen 21
DVB-Installation 23
DVB-Menü 24
USB-Funktion 25
Einlegen und Benutzung des Akkus 26
Akkuaufbewahrung 27
Fehlerbehebung 28
Technische Daten 29
Deutsch
3
Sicherheitsinformationen
ACHTUNG
STROMSCHLAGGEFAHR!
NICHT ÖFFNEN!
Das Dreieckszeichen mit Blitzsymbol verweist auf gefährliche Spannungen
im Gerätegehäuse, die so hoch sein können, dass sie eine Gefahr von
Stromschlägen bilden.
Das Dreieckszeichen mit Ausrufungszeichen verweist auf wichtige Funkti-
Deutsch
WARNUNG: ZUR VERMEIDUNG VON FEUER- ODER STROMSCHLAGGEFAHR, SETZEN SIE DIESES PRODUKT BITTE NIEMALS REGEN ODER STARKER FEUCHTIGKEIT
AUS. ÖFFNEN SIE NIEMALS DAS GEHÄUSE. IM INNERN DES GERÄTS SIND GEFÄHRLICHE SPANNUNGEN VORHANDEN. ÜBERLASSEN SIE SOLCHE ARBEITEN IMMER
SPEZIELL AUSGEBILDETEM WARTUNGSPERSONAL. ACHTUNG: WÄHREND DER
WIEDERGABE DREHT SICH DIE DISC BEI EINER BESONDERS HOHEN GESCHWINDIGKEIT. VERSUCHEN SIE DESHALB ZU DIESEM ZEITPUNKT NIEMALS DEN PLAYER
ZU BEWEGEN. DADURCH KANN DIE DISC BESCHÄDIGT WERDEN.
ACHTUNG: Dieser digitale Disc-Player verwendet ein Lasersystem. Vergewissern Sie sich,
dass das Gerät vor dem Öffnen ausgeschaltet ist. Sichtbare Laserstrahlung bei Öffnung des
Geräts und entsichertem Gehäuseverschluss.
Die Verwendung von Bedienungsweisen, die nicht in dieser Anleitung beschrieben werden,
kann zudem zur Aussetzung von gefährlicher Strahlung führen.
Das Dreieckszeichen mit Blitzsymbol verweist auf gefährliche Spannungen im Gerätegehäuse, die so hoch sein können, dass sie eine Gefahr von Stromschlägen bilden. Das Dreieckszeichen mit Ausrufungszeichen verweist auf wichtige Funktions- und Wartungshinweise
(Reparatur) in der dem Gerät beigelegten Bedienungsanleitung.
NICHT IN DEN LASERSTRAHL BLICKEN!
Vergewissern Sie sich, dass Sie das Gerät auf korrekte Weise benutzen. Lesen Sie sich die
Bedienungsanleitung sorgfältig durch und bewahren Sie sie für die spätere Benutzung auf.
Sollte das Gerät Wartung benötigen, wenden Sie sich bitte an ein autorisiertes Wartungszentrum oder wenden Sie sich an uns. Das Gehäuse sollte nur von speziell ausgebildetem
Wartungspersonal geöffnet werden.
ons- und Wartungshinweise (Reparatur) in der dem Gerät beigelegten Bedienungsanleitung.
DIESES GERÄT ERFÜLLT DIE ANFORDERUNGEN DES PARAGRAFEN
15 DER FCC-VERORDNUNG. ZUM BETRIEB DES GERÄTS MÜSSEN
FOLGENDE BEDINGUNGEN ERFÜLLT SEIN: (1) DIESES GERÄT DARF
KEINE SCHÄDLICHE INTERFERENZ VERURSACHEN, UND (2) DIESES
GERÄT MUSS SÄMTLICHE EMPFANGENDE INTERFERENZ AUFNEHMEN, MIT EINGESCHLOSSEN INTERFERENZ DIE MÖGLICHERWEISE
FUNKTIONSSTÖRUNGEN VERURSACHEN KÖNNTE.
4

Sicherheitsinformationen
WARNWINWEIS ZUR AKKUBENUTZUNG:
Dieser DVD-Player verwendet ein Li-Ionen-Akkupack. Wenn das Akkupack unsachgemäß
behandelt wird, besteht Feuer- und Verbrennungsgefahr. Akku nicht auseinandernehmen,
zerdrücken, durchlöchern, kurzschließen oder Wasser bzw. Feuer aussetzen! Versuchen Sie
nicht das Akkupack zu öffnen oder eigenhändig zu reparieren. Benutzen Sie nur ausdrücklich für dieses Gerät vorgesehene Akkus. Entsorgen Sie unbrauchbare Batterien entsprechend den Anweisungen des Herstellers.
ACHTUNG: Die Verwendung von Bedienungsweisen, die nicht in dieser Anleitung beschrieben werden, kann zudem zur Aussetzung von gefährlicher Strahlung führen.
Lesen Sie sich bitte diese Anleitung sorgfältig durch und halten Sie sich ständig zum Nachschlagen bereit. Achten Sie zur Benutzung des Geräts bitte auf folgende Sicherheitshinweise
zur Aufstellung und Benutzung.
1. Lesen Sie die Anweisungen – Alle Sicherheits- und Bedienungshinweise sollten vor
der Inbetriebnahme durchgelesen werden.
2. Bewahren Sie die Anleitung auf – Die Sicherheitshinweise und die Bedienungsanleitung sollten Sie für den späteren Gebrauch aufbewahren.
3. Beachten Sie die Warnhinweise – Alle in der Anleitung befindlichen Warnhinweise
sollten beachtet werden.
4. Befolgen Sie die Anweisungen – Alle Bedienungsanweisungen sollten befolgt werden.
5. Reinigung – Ziehen Sie vor der Reinigung des Geräts den Stecker aus der Steckdose. Benutzen Sie keine Flüssig- oder Aerosolreiniger. Benutzen Sie zur Reinigung
ein leicht angefeuchtetes Tuch.
6. Zubehöraufsätze – Benutzen Sie kein Zubehör, dass nicht durch den Hersteller empfohlen wurde. Dieses kann zu Gefahren führen.
Deutsch
5

Sicherheitsinformationen
7. Wasser und Feuchtigkeit – Benutzen Sie das Gerät nicht in der Nähe von Wasser, z. B. in der
Nähe von Badewannen, Waschbecken, Spülen, Wäschekammern, in nassen Kellern oder in der
Nähe von Swimmingpools.
8. Zubehör – Benutzen Sie zur Aufstellung Geräts keine instabilen Wagen, Gestelle, Stative, Haltevorrichtungen oder Tische. Das Gerät könnte herunterfallen und schwere Sach- oder Personenschäden zur Folge haben.
Das Gerät darf nur dann mit Wagen, Gestellen, Stativen, Haltevorrichtungen oder Tischen verwendet werden, wenn diese vom Hersteller entsprechend angegeben wurden oder zusammen
mit dem Gerät verkauft wurden. Befolgen Sie bei der Befestigung unbedingt die Herstelleranweisungen und benutzen Sie nur vom Hersteller empfohlenes Zubehör.
9. Eine Gerät/Wagen-Kombination sollte immer mit Vorsicht bewegt werden. Schnelles Stoppen,
Gewalt und unebener Boden können dazu führen, dass der Wagen mit dem Gerät umkippen.
10. Ventilation – Die Öffnungen an der Unter- und Rückseite des Geräts sind zur Ventilation gedacht
und sichern ein einwandfreies Funktionieren des Geräts. Diese Öffnungen sollten niemals blo-
Deutsch
ckiert oder abgedeckt werden. Die Öffnungen sollten niemals dadurch blockiert werden, indem
das Gerät auf ein Bett, eine Bettvorlage oder ähnliche weiche Unterlagen, gelegt wird. Das
Gerät sollte niemals in Einbauschränken aufgestellt werden, es sei denn es wurde für ausreichende Ventilation gesorgt oder es wurde entsprechend der Herstellerangaben aufgestellt.
11. Stromversorgung – Dieses Produkt sollte nur an Stromnetze angeschlossen werden, die den
Spezifikationen auf dem Typenschild entsprechen. Falls Sie sich nicht sicher über die Spezifikationen Ihres Stromnetzes sind, wenden Sie sich bitte an Ihren Händler oder Ihren Stromnetzbetreiber. Bei Produkten, die über Batterien mit Strom versorgt werden, lesen Sie bitte die Bedienungshinweise.
12. Netzkabelschutz – Das Netzkabel sollte immer so verlegt werden, dass es unwahrscheinlich ist
darauf zu treten oder dass Gegenstände darauf gestellt werden. Achten Sie beim Kabel insbesondere auf den Netzstecker, Steckdosen und den Ausgangspunkt des Kabels am Gerät.
13. Schutzstecker – Dieses Gerät ist mit einem Stecker mit Schutzvorrichtung versehen, der das
Gerät gegen Überlastung schützt. Es handelt sich dabei um eine Sicherheitsvorrichtung. Lesen
Sie bitte die entsprechenden Abschnitte in der Bedienungsanleitung, um diese Sicherheitsvorrichtung zu resetten oder auszutauschen. Wenn es notwendig sein sollte den Stecker auszutauschen, vergewissern Sie sich bitte, das der Wartungstechniker einen Stecker mit den gleichen
Spezifikationen benutzt wie der Originalstecker.
14. Erdung einer Außenantenne – Sollte eine Außenantenne mit dem Produkt verbunden sein,
gehen Sie sicher, dass die richtig geerdet sind, um vernünftigen Schutz gegen Stromschwankungen oder statische Aufladungen zu gewährleisten.
15. Gewitter – Für zusätzlichen Schutz des Geräts bei Gewittern bzw. wenn das Gerät vorübergehend nicht benutzt wird, ziehen Sie bitte den Netzstecker aus der Steckdose und trennen Sie
das Antennenkabel vom Gerät. Damit wird verhindert, dass das Gerät bei Spannungsunterschieden oder Blitzeinschlägen beschädigt wird.
16. Stromleitungen – Eine Außenantenne sollte sich nicht in der Nähe oberirdisch verlaufender
Stromleitungen, elektrischer Lampen oder von Stromkreisen bzw. Orten wo sie in diese Leitungen oder Stromkreise fallen kann, befinden. Achten Sie bei der Installation einer Außenantenne
insbesondere darauf, dass sie diese Stromleitungen und Stromkreise nicht berührt. Das wäre
lebensgefährlich.
17. Überlastung – Überlasten Sie niemals Steckdosen, Verlängerungskabel oder Geräteanschlüsse,
da dies zu Feuer- oder Stromschlaggefahr führen kann.
6

Sicherheitsinformationen
18. Fremdgegenstände – Versuchen Sie niemals Gegenstände irgendwelcher Art in das Gerät zu
stecken. Hochspannungsteile könnten berührt werden und zu Feuer oder Stromschlag führen.
Lassen Sie niemals Flüssigkeiten irgendwelcher Art auf das Gerät kommen.
19. Wartung – Versuchen Sie niemals das Produkt selbst zu warten. Das Öffnen oder Entfernen des
Gehäuses kann zur Aussetzung von gefährlicher Spannung oder anderen Gefahren führen.
Wenden Sie sich nur an ausgebildetes Wartungspersonal.
20. Schäden, die eine Reparatur erfordern – Ziehen Sie den Stecker aus der Steckdose und wenden
Sie sich an ausgebildetes Wartungspersonal, wenn folgende Umstände eintreten:
a. Wenn Netzkabel oder Netzstecker beschädigt sind.
b. Wenn Flüssigkeiten auf das Gerät geschüttet wurden oder Fremdgegenstände in das Gerätein-
nere gelangt sind.
c. Wenn das Gerät Regen oder Wasser ausgesetzt wurde.
d. Wenn das Gerät trotz Befolgung der Bedienungsanweisungen nicht richtig funktioniert. Bedie-
nungsschritte, die nicht von dieser Anleitung abgedeckt sind, können zu Schäden am Gerät
führen, die oft nur durch langwierige Arbeit durch ausgebildete Fachkräfte behoben werden
können.
e. Wenn das Gerät heruntergefallen oder auf irgendwelche Weise beschädigt wurde.
f. Wenn das Gerät einen deutlichen Performanceabfall zeigt.
21. Ersatzteile – Wenn es notwendig sein sollte Bauteile auszutauschen, vergewissern Sie sich bitte,
dass der verantwortliche Wartungstechniker vom Hersteller zugelassene Ersatzteile oder Ersatzteile mit den gleichen Spezifikationen wie die Originalteile benutzt . Nicht zugelassene Ersatzteile
können zu Feuer, Stromschlägen oder anderen Gefahren führen.
Dieses Produkt verwendet Kopierschutzmechnismen der Firma Macrovision und anderen
Firmen, die durch bestimmte US-Patente und andere Rechte für geistiges Eigentum geschützt sind. Die Benutzung dieser Kopierschutztechnologie muss durch die Firma Macrovision autorisiert werden und ist nur für die Benutzung zu Hause und anderen eingeschränkten Benutzungsweisen gedacht, solange es nicht ausdrücklich von der Firma Macrovision
anders angegeben wird. Reverse-Engineering oder Auseinanderbauen sind nicht gestattet.
Es ist gesetzlich untersagt urheberrechtlich geschütztes Material ohne ausdrückliche Genehmigung zu kopieren, senden, vorzuführen oder zu verleihen.
DVD-Videodiscs sind kopiergeschützt und Aufnahmen, die davon gemacht werden, sind
verzerrt.
Hergestellt unter Lizenz von Dolby Laboratories. „Dolby“ und das Doppel-D-Symbol sind
Warenzeichen der Firma Dolby Laboratories.
„DTS“ und „DTS Digital Out“ sind Markennamen der Firma Digital Theater Systems, Inc.
Hinweis:
• Stellen Sie die Lautstärke des Geräts auf ein angenehmes Maß, um Schäden an
den Lautsprechern zu vermeiden.
• Wenn Sie einen DVD-Player am Verstärker anschließen oder abtrennen, schalten
Sie das Geräte bitte zunächst aus, um Schäden an den Lautsprechern zu vermeiden.
Deutsch
7
Einleitung
Ihr neuer tragbarer DVD-Player wurde für die Benutzung mit alle Arten von Discs konzipiert.
Aufgrund seiner komfortablen Abmessungen, ist es besonders einfach ihn überall mitzunehmen, um Videos und Musik jederzeit genießen zu können. Ihr Player verwendet die neueste
digitale Audio/Videotechnologie (AV), um Ihnen das ultimative Multimedia-Erlebnis zu ermöglichen.
Der Player verfügt über mehrere einzigartige Eigenschaften, einen großen Aktiv-LCDBildschirm, Kamerawinkel- und Sprachfunktionen, Alterseinstufungen (um Kinder Zugriff auf
bestimmte Discs zu verwehren) und Bilder-CD-Funktionen (zur Wiedergabe von Diashows).
Das perfekte Multimedia-Gerät für alle Multimedia-Enthusiasten.
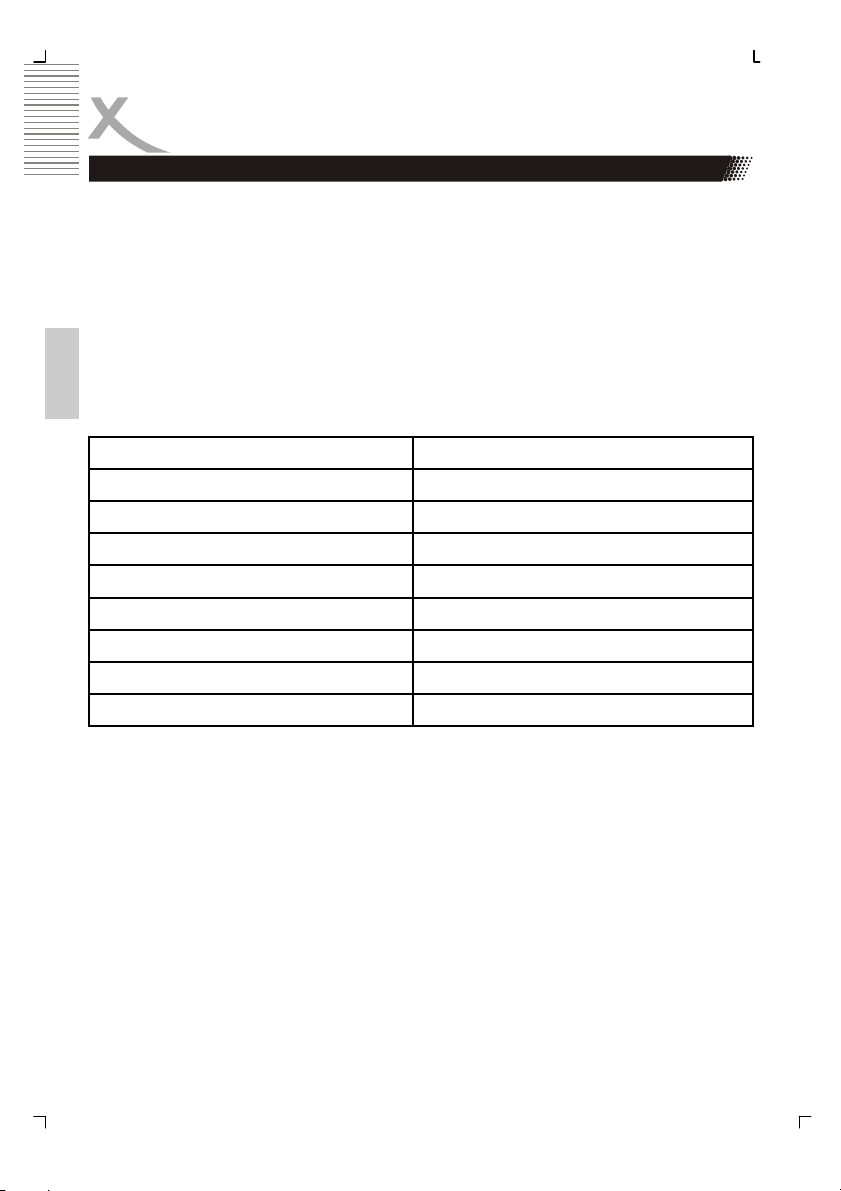
VERPACKUNGSINHALT
Überprüfen Sie bitte den Inhalt der Verpackung Ihres tragbaren DVD-Players:
Deutsch
Tragbarer DVD-Player 1
Audiokabel 1
Koaxiales Videokabel 1
Li-Polymer-Akkupack 1
Fernbedienung 1
Externes Netzteil 1
Zigarettenanzünderadapter 1
Bedienungsanleitung 1
Stereokopfhörer 1
Sollte eines der Teile fehlen oder beschädigt sein, wenden Sie sich bitte umgehend an
Ihren Händler.
Bewahren Sie die Verpackungsmaterialien bitte auf. Wenn Sie den Player später transportieren, werden Sie sie brauchen.
WARNUNG:
• Veränderungen oder Modifikationen an diesem Gerät, die nicht ausdrücklich vom
Hersteller oder autorisierten Stellen genehmigt wurden, machen die Herstellergarantie ungültig.
8
Schnellstartanleitung
1. Anschluss an eine externe Stromversorgung: Verbinden Sie das Netzkabel (im Lieferumfang) mit Adaptereingang und einer Steckdose. Benutzen Sie nur Geräte, die von Ihrem Händler angegeben wurden.
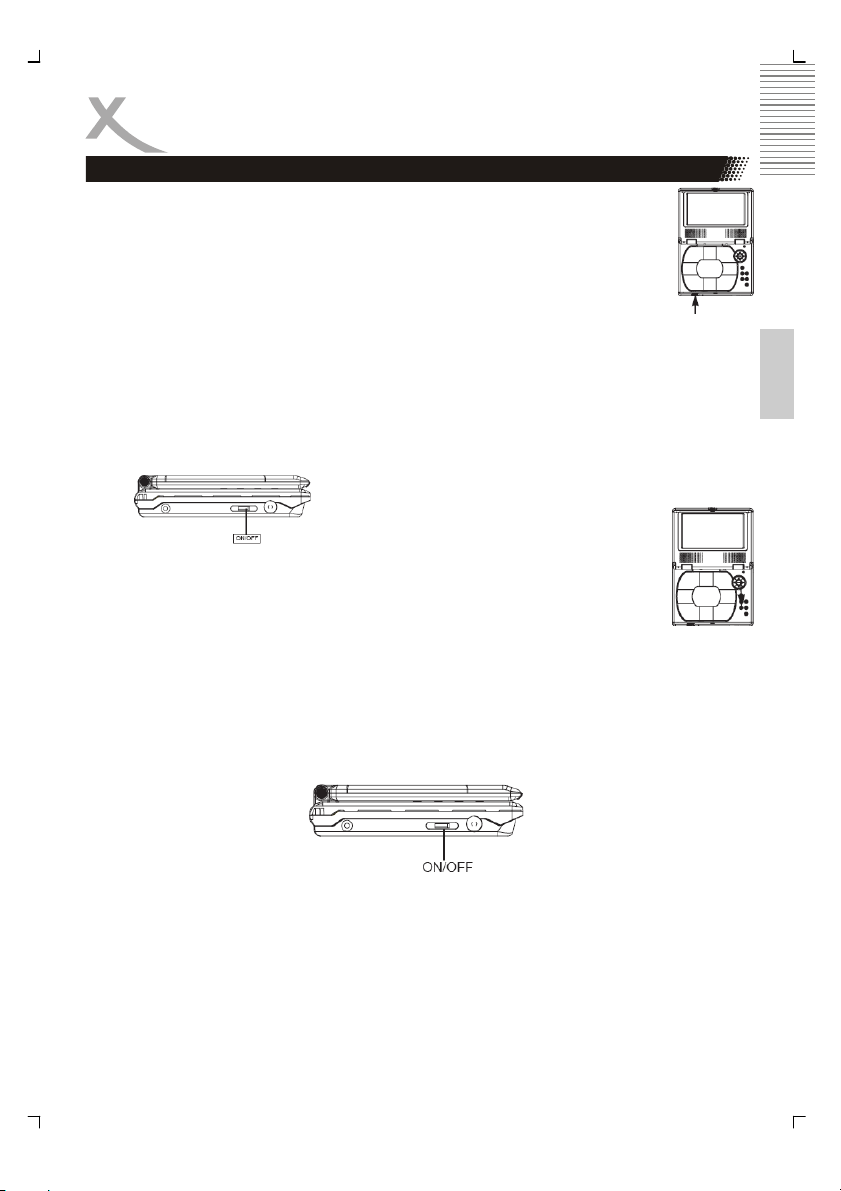
2. Öffnen Sie das Gerät. Das Gerät kann maximal auf 135° aufgeklappt
werden. Versuchen Sie es bitte nicht noch weiter zu öffnen.
3. Betätigen Sie die OPEN-Taste auf der linken Seite zum Öffnen des
Disc-Ladefachs. Betätigen Sie die OPEN-Taste niemals während der
Wiedergabe.
4. Legen Sie eine DVD ein: Richten Sie die Mitte der Disc entsprechend dem DiscLadefach aus. Drücken Sie die DVD sanft nach unten, bis sie einrastet. Danach
können Sie das Disc-Ladefach schließen.
5. Schieben Sie den Schalter in die ON-Position. Wenn Sie eine andere Disc einlegen
oder die eingelegte Disc herausnehmen wollen, betätigen Sie die STOP-Taste bitte
zweimal. Sobald die Disc aufgehört hat sich zu drehen, können Sie die OPEN-Taste
betätigen und die Disc herausnehmen.
6. Betätigen Sie die PLAY-Taste auf dem Gerät (und betätigen Sie je nach
Disc die ENTER-Taste): Normalerweise wird eine gerade eingelegte
DVD automatisch vom Gerät eingelesen.
Hinweis:
• Der DVD-Player beginnt sofort damit die DVD wiederzugeben. Wenn Sie die Wieder-
gabe stoppen wollen, betätigen Sie bitte die STOP-Taste. Zum Ausstellen des Geräts schieben Sie den ON/OFF-Schalter einfach in die OFF-Position. Der DVDPlayer schaltet sich nach 20 Minuten im Bildschirmschonermodus automatisch ab.
Um einen Systemreset durchzuführen, schieben Sie den ON/OFF-Schalter in die
OFF-Position und dann wieder in die ON-Position.
Deutsch
9
Fernbedienung
Bedienung der Fernbedienung
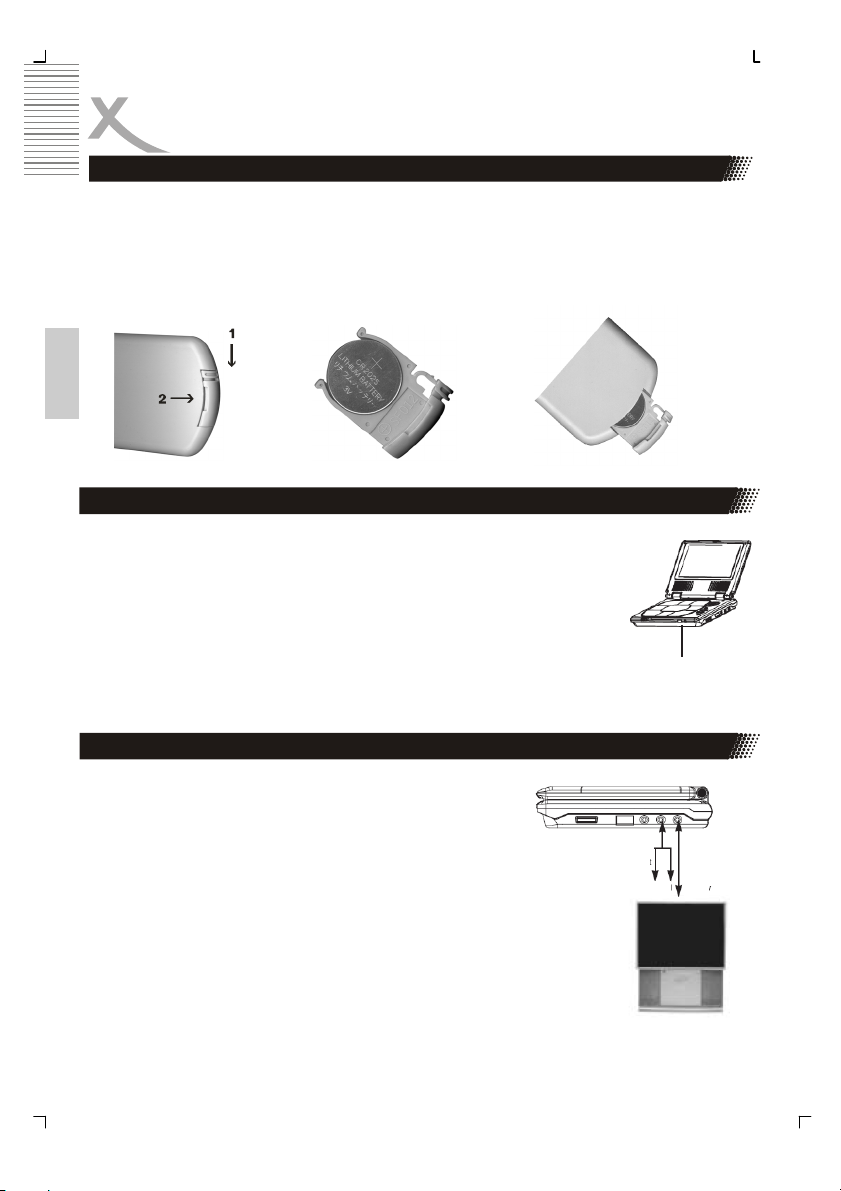
1. Öffnen Sie das Batteriefach.
2. Drücken Sie die mit 1 markierte Stelle herunter (siehe Abbildung) und ziehen Sie
den Batteriehalter in Pfeilrichtung (2) heraus (siehe Abbildung).
3. Legen Sie die Batterie in den Batteriehalter. Vergewissern Sie sich dabei, dass die
Polarität korrekt ist (+ / -).
4. Setzen Sie den Batteriehalter zurück in die Fernbedienung.
Deutsch
Benutzung des DVD-Players mit der Fernbedienung
Richten Sie die Fernbedienung direkt auf den IR-Sensor des DVDPlayers.
INBETRIEBNAHME DES DVD-PLAYERS
IR-SENSOR
1. Schließen Sie die Audiokabel an den AUDIOAUSGANG des DVD-Players.
2. Schließen Sie das gelbe Kabel an den VIDEO-
Ausgang an der Seite des Geräts.
TV-Audioeingang
Weiß Rot Gelb
TV-Videoeingang
10
Anschluss eines Fernsehers
ANSCHLUSS DER KOPFHÖRER
1. Schließen Sie die Kopfhörer an. Kopfhörer mit einem
3,5 mm Klinkenstecker können am Gerät angeschlossen werden.
2. Stellen Sie die Lautstärke mithilfe des Lautstärkereg-
lers ein.
Hinweis:
• Vermeiden Sie Lautstärken, die für Ihr Gehör schäd-
lich sein können.
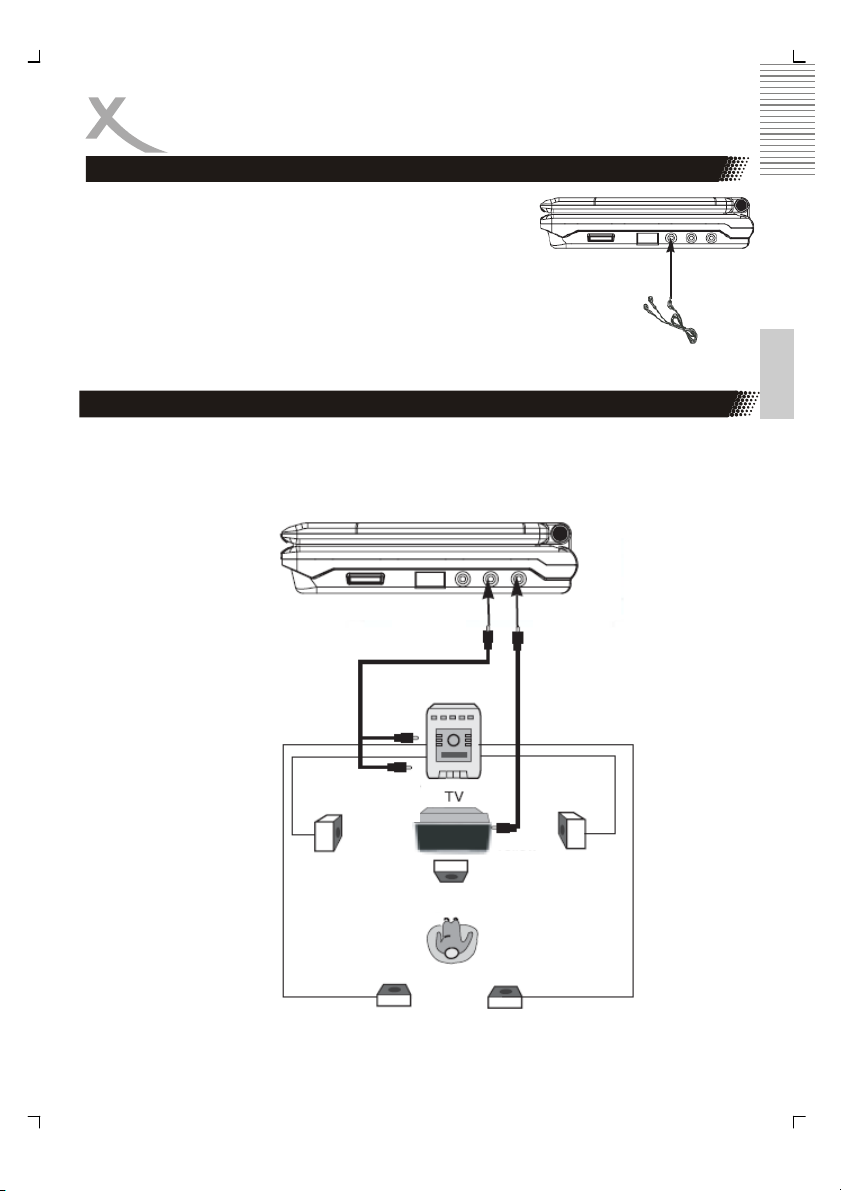
Stereo-RCA-Anschluss eines Soundsystems
Dies ermöglicht Ihnen Dolby Pro Logic Surround Sound. Schließen Sie einen Verstärker und
ein Lautsprechersystem (Frontlautsprecher, Mittellautsprecher und Surround-Lautpsrecher)
am Gerät an, um dynamischen, realistischen Sound im Dolby Pro Logic Surround Format zu
hören.
Beispielansc
hluss
Deutsch
Zum
Audioeinga
Front
lautsprecher
(Links)
Zum
AUDIOAUSG
ng
Mittellautsprecher
Surround-
Lautsprecher
Gelb
lautsprecher
(Rechts)
Zum
VIDEOAUSG
ANG
Dolby Pro Logic
Surround-fähiger
Verstärker
Front
11

Anschluss von optionalen Geräten
Dolby Digital oder DTS (besser)
Mit Dolby Digital und DTS programmierte Discs können Surroundsound mit fünf getrennten
Kanälen plus Subwooferkanal ausgeben. Dieser Player unterstützt solche Discs. Sie brauchen lediglich den DVD-Player mit einem Dolby Digital/DTS-Empfangsgerät oder einem
Dolby Digital Ready-Empfangsgerät mit externem Dekoder, anschließen.
Deutsch
• Wenn Sie Dolby Digital benutzen, stellen Sie das Gerät bitte auf SPDIF/PCM oder
• Wenn Sie DTS benutzen, stellen Sie das Gerät bitte auf SPDIF/RAW.
GERÄTESEITE
SPDIF/RAW.
Front
lautsprecher
(Links)
Zu PCM/BITSTREAM
Orange
Zum VIDEOAUSGANG
Gelb
Schwarz
TV
Front
lautsprecher
(Rechts)
12
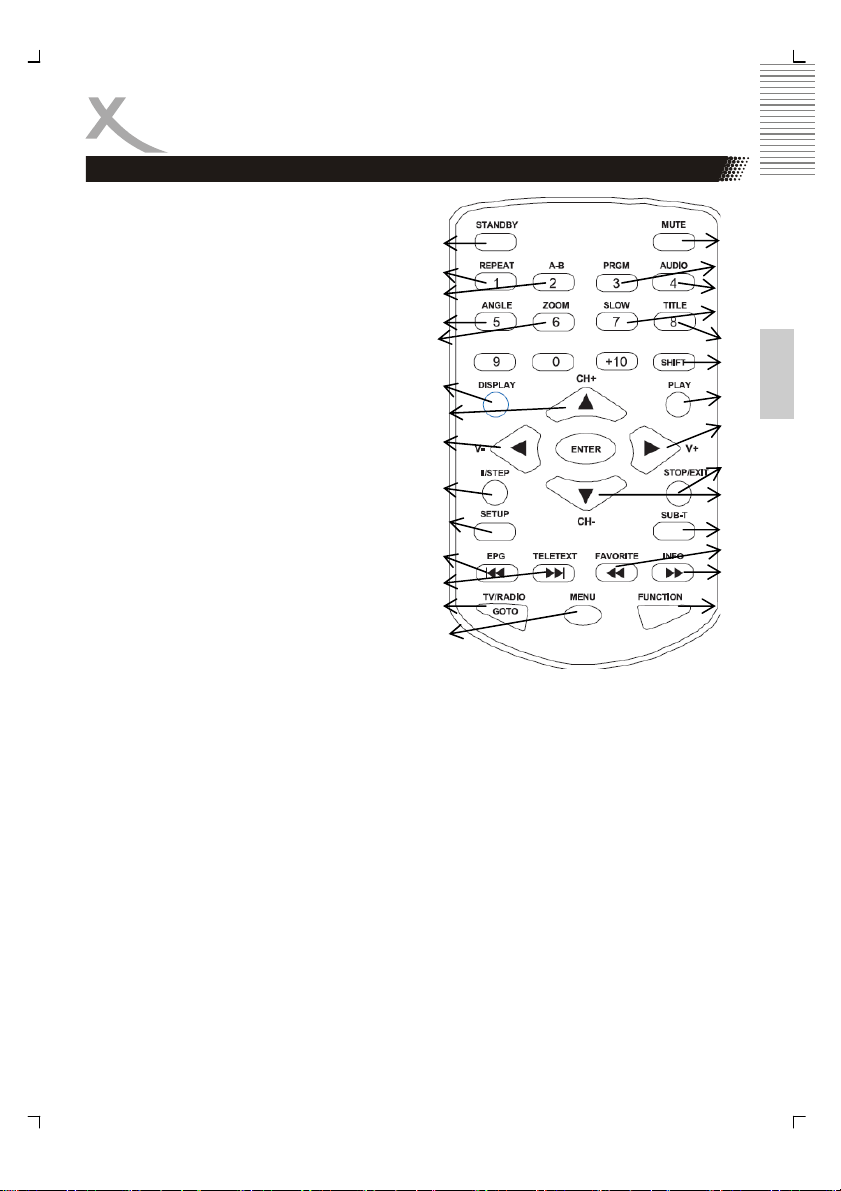
TASTEN DER FERNBEDIENUNG
Taste auf der Fernbedienung:
1. Bereitschaft (StandBy)
2. Ton aus (Mute)
3. 1/ Wiederholung (Repeat)
4. 2 / A-B Abschnittswiederholung (A-B)
5. 3 / Programm (PRGM)
6. 4 / Audio (Audio)
7. 5 / Kamerawinkel (Angle)
8. 6 / Bildvergrößerung (Zoom)
9. 7 / Zeitlupe (Slow)
10. 8 / Titel (Title)
11. Umschalt (Shift)
12. Anzeige (Display)
13. Wiedergabe (Play)
14. Auf / DVB-T (CH + (Kanal))
15. Links / DVB-T (V - (Lautstärke))
16. Rechts / DVB-T (V + (Lautstärke))
17. Stopp / Verlassen (Stop / Exit)
18. Runter / DVB-T (CH - (Kanal))
19. || / Einzelbild (Step)
20. Einstellungen (Setup)
21. |<< (Vorheriges) / DVB-T (EPG)
22. >>| (Nächstes) / DVB-T (Teletext)
23. Suchen (Goto) / DVB-T (TV/Radio)
24. Menü (Menu)
25. Untertitel (SUB-T)
26. << (Rücklauf) /DVB-T (Favoriten)
27. >> (Vorlauf) / DVB-T (Info)
28. Funktion (Wechsel zu DVD, DVB-T
und USB) (Function)
Hinweis:
• Die meisten der Zifferntasten haben
eine zweite Funktion. Aktivieren Sie
die zweite Funktion mithilfe der
Shift-Taste. Beispiel: Wenn Sie
während der DVD-Wiedergabe ein
Kapitel wiederholen möchten, betätigen Sie bitte während der Wiedergabe die Umschalttaste gefolgt von der
Taste „1“. Danach befindet sich der
Player im Wiederholungsmodus.
• Bestimmte Tasten auf der Fernbedie-
nung sind rot markiert. Diese Funktionen sind nur im DVB-T-Modus
verfügbar (z. B. EPG, Fernsehtext
oder Kanalauswahl.
1.
3.
4.
7.
8.
12.
14.
15.
19.
20.
21.
22.
23.
24.
2.
5.
6.
9.
10.
11.
13.
16.
17.
18.
25.
26.
27.
28.
Deutsch
13
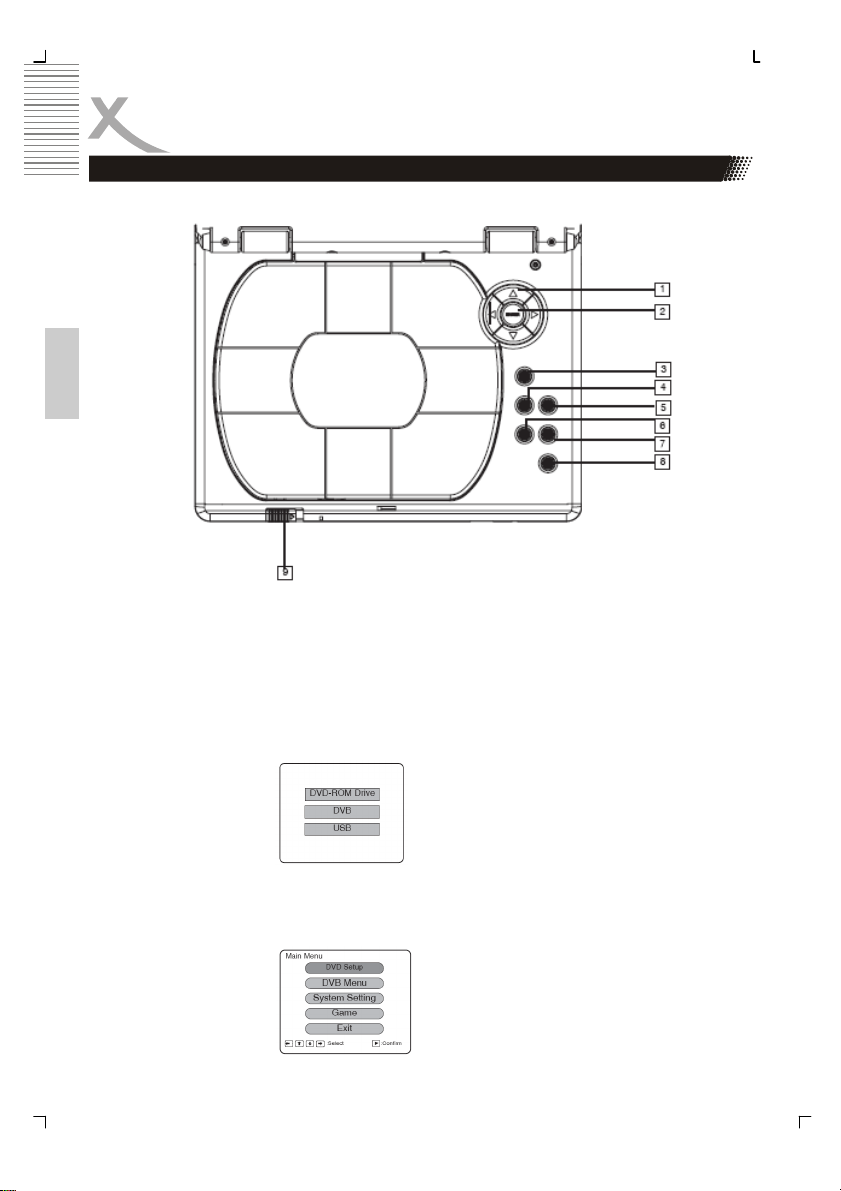
Abspielen einer Disc
GRUNDLEGENDE WIEDERGABEFUNKTIONEN
Deutsch
1. NAVIGATIONSTASTEN
2. EINGABE
3. EINSTELLUNGEN
4. TITEL
5. DISCMENÜ
Dieses Gerät zeigt folgendes Menü an, wenn es das erste Mal ausgeschaltet wird. Wählen
Sie die gewünschte Funktion.
Wenn Sie DVD-ROM Drive wählen, begibt sich das Gerät in den DVD-Modus. Wenn eine
Disc eingelegt wurde, überprüft der Player das Format und startet die Wieder automatisch.
Betätigen Sie die SETUP-Taste, um ins Einstellungsmenü zu gelangen.
6. WIEDERGABE
7. PAUSE
8. STOPP
9. ÖFFNEN
14

Abspielen einer Disc
STARTEN DER WIEDERGABE VOM MENÜ AUS
Schließen Sie das Netzkabel am Gerät an und die Bereitschafts-LED leuchtet auf. Betätigen
Sie die POWER-Taste, um das Gerät anzuschalten. Wenn Sie das Gerät ausschalten wollen, betätigen Sie die POWER-Taste erneut.
ÖFFNEN UND SCHLIESSEN DES LADEFACHS
Schalten Sie das Gerät ein. Wenn sich eine Disc im Ladefach befindet, überprüft der Player
das Format und startet die Wiedergabe automatisch.
Wenn sich keine Disc im Ladefach befindet, betätigen Sie bitte die EJECT-Taste, um das
Disc-Ladefach zu öffnen. Legen Sie eine Disc ein und betätigen Sie die EJECT-Taste erneut. Nachdem das Disc-Ladefach geschlossen wurde, überprüft der Player das Format und
startet die Wiedergabe automatisch.
STOPPEN DER WIEDERGABE
Betätigen Sie die STOP-Taste. Die Wiedergabe wird dann gestoppt.
SCHNELLVORLAUF / SCHNELLRÜCKLAUF
Sie können die Wiedergabe einer Disc als Schnellvorlauf oder Schnellrücklauf auf das 232fache der normalen Geschwindigkeit erhöhen.
Betätigen Sie während der Wiedergabe die Schnellsuchlauftasten. Die Wiedergabegeschwindigkeit wird auf die doppelte Geschwindigkeit erhöht. Mit jeder Betätigung der
Schnellsuchlauftasten wird die Wiedergabegeschwindigkeit verändert.
Hinweis:
Diese Funktion ist nicht für alle DVDs verfügbar.
Deutsch
ZEITLUPE
Sie können eine Disc auch in Zeitlupe wiedergeben.
1. Betätigen Sie die SHIFT-Taste, um die SLOW-Taste zu aktivieren.
2. Betätigen Sie während der Wiedergabe die SLOW-Taste, um die
Wiedergabegeschwindigkeit auf 1/2 , 1/4, 1/ 8, 1/16 oder 1/32 der
normalen Geschwindigkeit zu reduzieren.
Hinweis:
• Während des Schnellsuchlaufs und der Zeitlupe ist der Ton stumm gestellt.
• Diese Funktion ist nicht für alle DVDs verfügbar.
15
Abspielen einer Disc
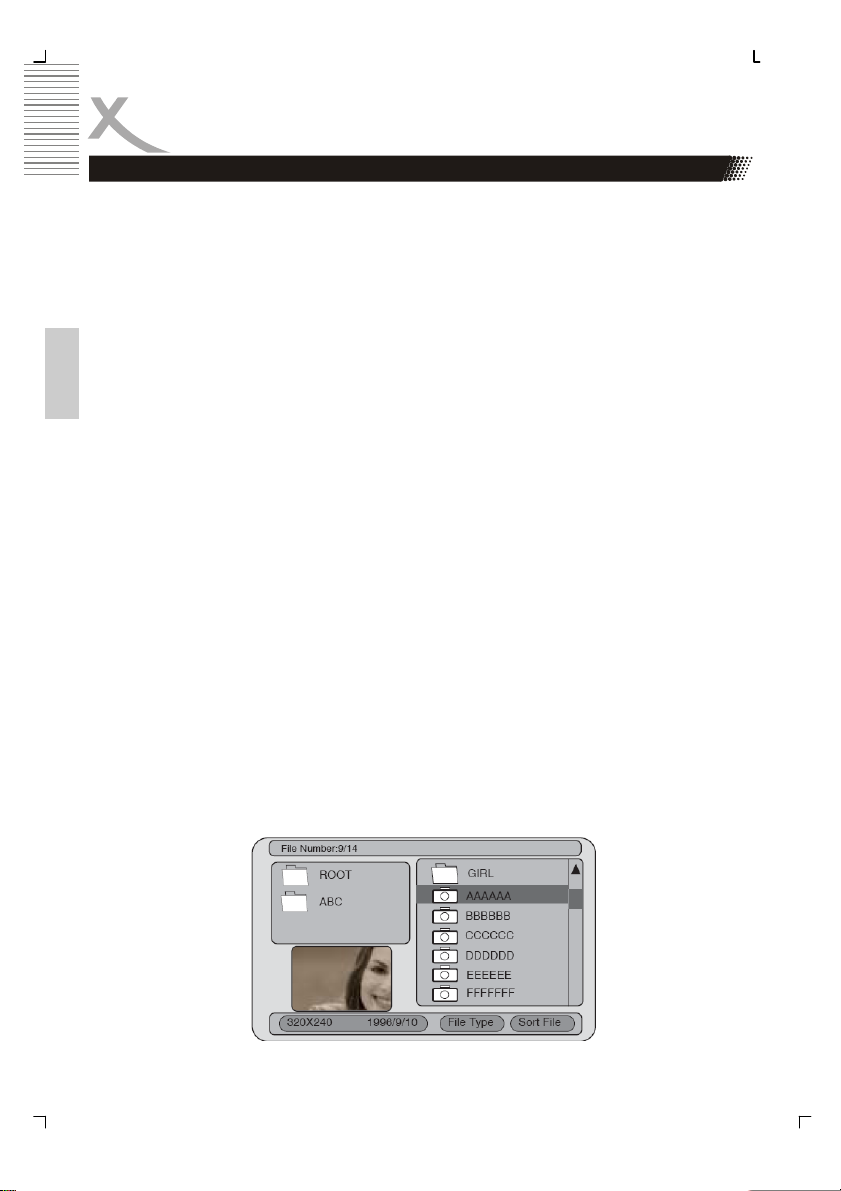
Wiedergabe von Bilder-CDs und JPEG-Dateien
Sie können Ihren DVD-Player zur Wiedergabe von Bildern auf CD-Rs benutzen. Die gespeicherten Bilder müssen dazu im JPEG-Dateiformat auf der Disc gespeichert werden.
1. Legen Sie eine CD in das Disc-Ladefach.
2. Wählen ein Verzeichnis oder ein Bild auf der CD. Nach dem Einlesen der CD
erscheint ein Menü auf dem Bildschirm. Benutzen Sie die Navigationstasten OBEN
oder UNTEN zur Auswahl eines Verzeichnisses und betätigen Sie die ENTER/PLAYTaste zur Anzeige des Verzeichnisinhalts.
3. Starten der Wiedergabe. Wenn eine JPEG-CD eingelegt wurde, startet die Diashow
automatisch. Alle Bilder im jeweiligen Verzeichnis werden in Reihenfolge, wie bei
einer normalen Diashow, auf dem Bildschirm angezeigt. Dabei werden sie der Bild-
Deutsch
schirmgröße angepasst. Betätigen Sie die STOP-Taste zur Anzeige von 20 verschiedenen Bildwechselarten. Die Bilder werden in verschiedenen Bildwechselarten angezeigt. Dazu gehören: Überblenden hoch / runter / links / rechts, Unterblenden hoch /
runter / links / rechts, Einschieben hoch / runter / links / rechts, Wegschieben hoch /
runter / links / rechts, Zufällig, Kein Effekt, etc. Benutzen Sie die ANGLE-Taste zum
Verändern der Bildwechselart.
4. Bildrotation. Während der Diashow können Sie die Navigationstasten zum drehen
des Bildes benutzen:
• Betätigen Sie die Navigationstaste Links für eine 90°-Drehung nach links.
• Betätigen Sie die Navigationstaste Rechts für eine 90°-Drehung nach rechts.
• Betätigen Sie die Navigationstaste Oben zum Spiegeln des Bildes.
1 Betätigen Sie die Navigationstaste Unten, um das Bild auf den Kopf zu stellen.
5. Bildvergrößerung. Mit dieser Funktion können Sie die Bildgröße auf 25%, 50%,
100%, 150% oder 200% der Originalgröße verändern. Betätigen Sie die ZOOM-
Taste. Auf dem Bildschirm erscheint Zoom On zur Bestätigung. Benutzen Sie die
Navigationstasten zum Steuern des Vergrößerungsfaktors.
Betätigen Sie die Navigationstasten zum Bewegen des Bildausschnitts. Wenn auf
dem Bildschirm Zoom Off erscheint, wird das Bild wieder der Fernsehbildschirmgröße angepasst.
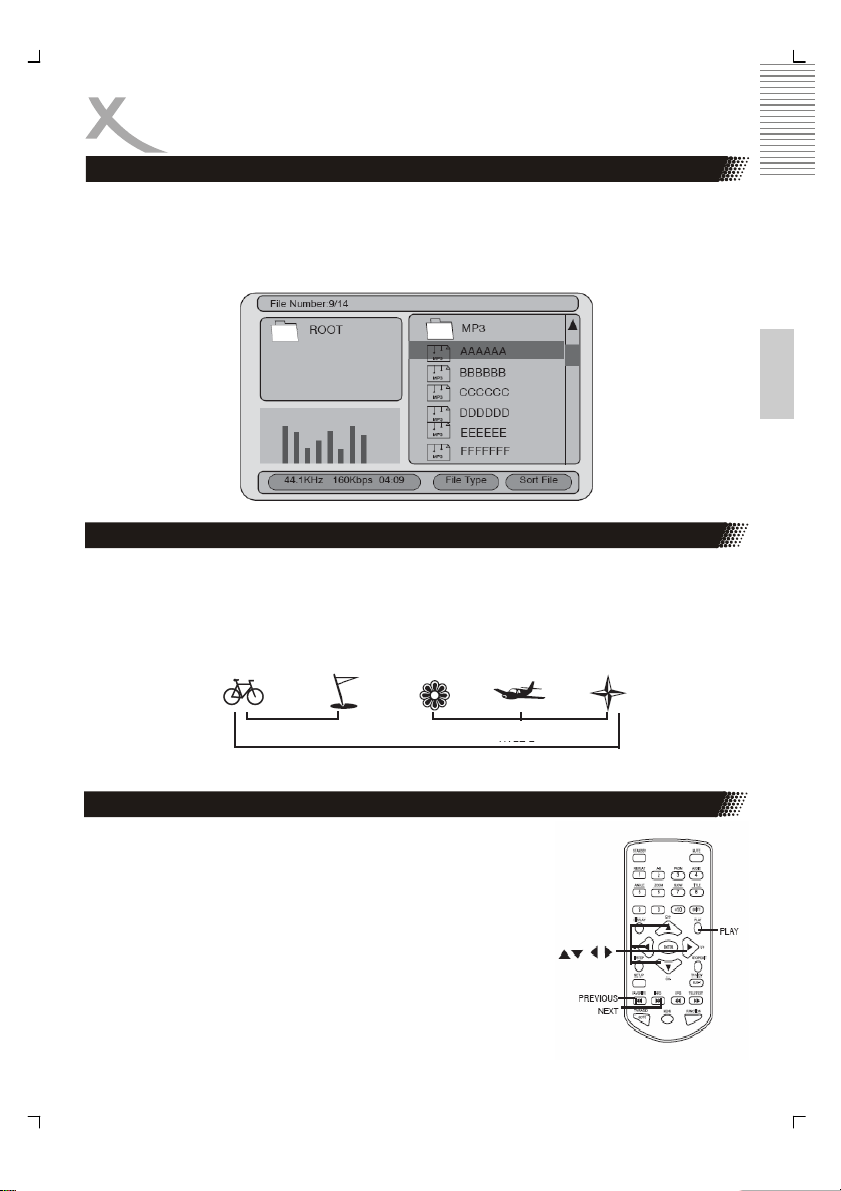
6. Menü. Betätigen Sie die MENU-Taste, um während der Wiedergabe auf das Vor-
schaumenü zuzugreifen. Betätigen Sie die MENU-Taste und ein Vorschaumenü
erscheint auf dem Bildschirm. Benutzen Sie die Navigationstasten OBEN oder UNTEN zur Auswahl eines Verzeichnisses und betätigen Sie die ENTER/PLAY-Taste
zur Anzeige des Verzeichnisinhalts (auf der linken Seite, siehe Abbildung).
16
Wiedergabe von Picture-CDs
Musikwiedergabe komprimierter Audioformate
1. Legen Sie eine CD mit komprimierter Musik ein und der DVD-Player liest die Disc
automatisch ein, wenn das Disc-Ladefach geschlossen wird. Das Verzeichnis wird
dann in einem Menü auf dem Bildschirm angezeigt.
2. Betätigen Sie Navigationstasten OBEN/UNTEN zur Auswahl einer Datei.
3. Betätigen Sie die ENTER-Taste zum Starten der Wiedergabe.
Suchen von Titeln, Kapiteln oder Audiospuren
Video-DVDs werden normalerweise in Titel unterteilt, die wiederum in Kapitel unterteilt sind.
Desweiteren werden ISO-kompatible Discs mit Videoinhalt, Bildern oder Audiodateien in
Dateien unterteilt angezeigt.
Kapitel 1 Kapitel 2 Kapitel 1 Kapitel 2 Kapitel 3
TITEL 1
Video-DVD
TITEL 2
Deutsch
TITELSUCHE ÜBER DAS TITELMENÜ
Sie können einen bestimmten Titel über das Titelmenü finden,
wenn eine DVD ein Titelmenü enthält.
1. Betätigen Sie die TITLE-Taste und das Titelmenü erscheint auf dem Bildschirm.
2. Benutzen Sie die Taste zur Auswahl des gewünschten
Titels. Sie können einen Titel auch direkt über die Zifferntasten auswählen.
3. Betätigen Sie die PLAY-Taste. Dadurch wird die Wieder-
gabe am Anfang des ersten Titels gestartet. Benutzen
Sie die SKIP-Tasten zur Auswahl des gewünschten Kapitels bzw. Audiospur. Betätigen Sie die Taste so lange,
bis das gewünschte Kapitel angezeigt wird.
17

Wiederholung
DIESER DVD-PLAYER ERMÖGLICHT DIE WIEDERHOLUNGSWIEDERGABE VON TITELN, KAPITELN, AUDIOSPUREN ODER ABSCHNITTEN. (TITELWIEDERHOLUNG, KAPITEL/SPURWIEDERHOLUNG, A-B ABSCHNITTSWIEDERHOLUNG)
WIEDERHOLUNG VON TITELN/DISCS/KAPITELN
Während der normalen Wiedergabe von Video-DVDs, betätigen Sie bitte die REPEAT-Taste
(SHIFT-Taste gefolgt von 1 / REPEAT). Der Wiederholungsmodus geht dann mit wiederholter Betätigung der Taste auf Chapter, Title, ALL und OFF.
Während der Wiedergabe einer ISO-Disc mit Dateien können Sie ebenfalls die REPEAT-
Taste benutzen. Der Wiederholungsmodus wechselt dann von SINGLE auf ALL und OFF.
Deutsch
ABSCHNITTSWIEDERHOLUNG
Zur Wiederholung eines bestimmten Abschnitts können Sie die A-B Abschnittswiederholung
benutzen. Betätigen Sie die SHIFT-Taste + 2 (A-B).
1. Benutzen Sie die A-B-Taste (mit SHIFT-Taste) zum Markieren des Anfangspunkts
des gewünschten Abschnitts, den Sie wiederholen wollen (Punkt A).
2. Betätigen Sie die A-B-Taste erneut, um den Endpunkt (Punkt B) des gewünschten
Abschnitts zu markieren. Die Wiederholung des markierten Abschnitts (A-B) startet
dann automatisch.
3. Betätigen Sie die A-B-Taste, um die Abschnittswiederholung zu stoppen. Der DVD-
Player fährt dann mit der normalen Wiedergabe fort.
PROGRAMMWIEDERGABE
Mit dieser Funktion können Sie die Wiedergabereihenfolge verändern. Schalten Sie den
Navigationsmodus aus und betätigen Sie während der Wiedergabe die PRGM-Taste zur
Anzeige des Programmmenüs.
Benutzen Sie die Zifferntasten zum Setzen der
gewünschten Reihenfolge und betätigen Sie die
Navigationstasten zum Starten der Wiedergabe
in benutzerdefinierter Reihenfolge.
Hinweis: Sie können maximal 20 Einträge vornehmen. Betätigen Sie die PROGRAM-Taste zur Anzeige des Programmmenüs.
18
Wiederholung
Bildvergrößerung
Dieser DVD-Player ermöglicht Ihnen das Videobild zu vergrößern und den jeweiligen Ausschnitt zu bewegen. Benutzen Sie dazu die SHIFT-Taste gefolgt von 6 / ZOOM.
Sie können die ZOOM-Taste während der normalen Wiedergabe oder der Zeitlupe betätigen.
Die Mitte des Bilds wird dann vergrößert. Durch Betätigung der Navigationstasten können
Sie den Bildausschnitt bewegen. Mögliche Vergrößerungsfaktoren sind 2fach und 4fach.
Hinweis:
Betätigen Sie die ZOOM-Taste erneut, um die Bildvergrößerungsfunktion wieder abzuschalten.
Untertitelauswahl
Sie können mithilfe der SUB-T Untertitel einer DVD in der gewünschten Sprache anzeige,
sofern diese von der DVD unterstützt wird.
• Betätigen Sie während der Wiedergabe die SUB-T.
• Betätigen Sie während der Wiedergabe die SUB-T, bis die Untertitel verschwinden.
Für MPEG-4-Dateien steht diese Funktion in Kombination mit SRT-Untertiteldateien zur
Verfügung. Die Dateinamen sollten folgendermaßen beschaffen sein:
• Movie.avi
• Movie.eng.srt
• Movie.ger.srt
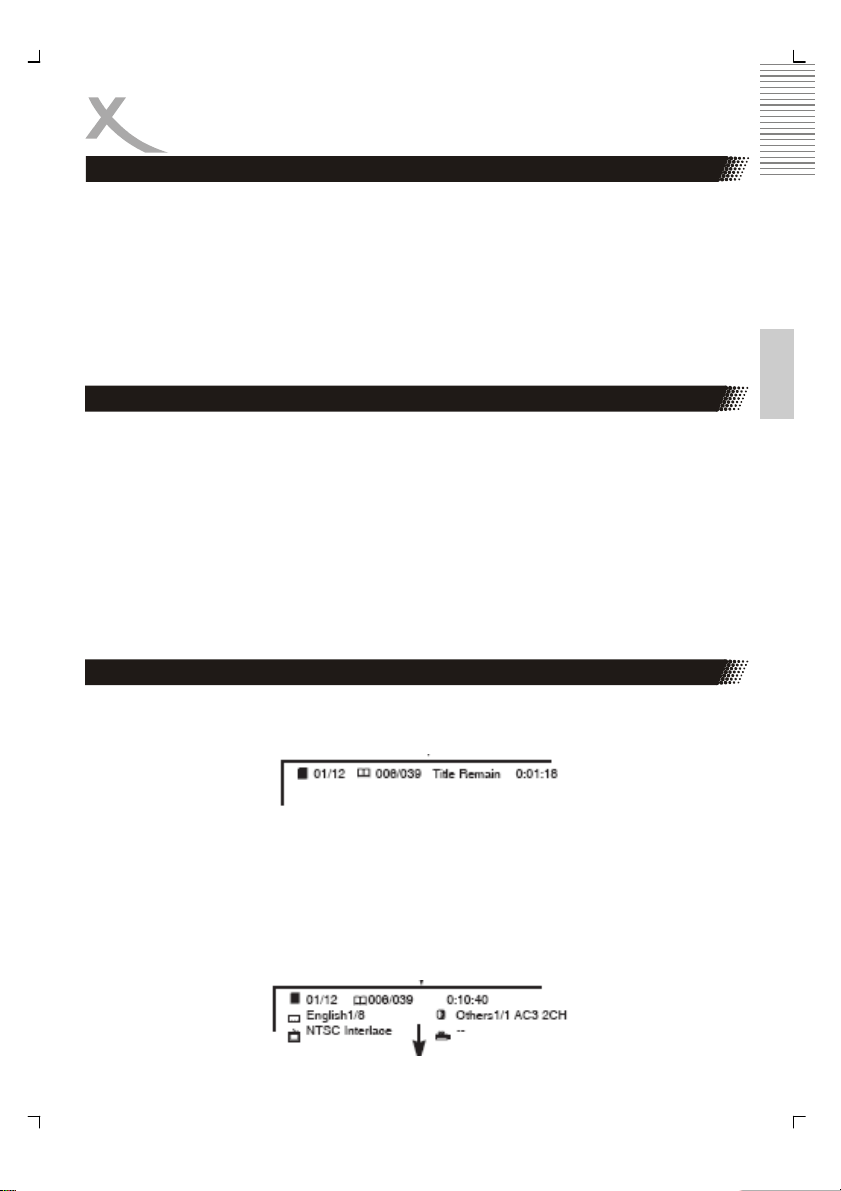
INFORMATIONEN
Dieses Gerät ermöglicht die Anzeige des Betriebszustands und von Discinformationen auf
dem Bildschirm durch Betätigung der DISPLAY-Taste. Mir dieser Funktion werden folgende
Informationen auf dem Bildschirm angezeigt:
• Titelinformationen, z. B. der erste Titel von 12 ist aktiv.
• Kapitelnummer, z. B. das sechste Kapitel von 39 wird wiedergegeben.
• Zeitinformationen für Titel und Kapitel werden angezeigt, wenn die DISPLAY-Taste
erneut betätigt wird (Abspielzeit, verbleibende Abspielzeit, Kapitelabspielzeit, verbleibende Kapitelabspielzeit).
• Die hinten stehenden Informationen neben Titel, Kapitel und Zeit sind die jeweilige
Sprache (im Beispiel Englisch), Audioformat (hier AC3 2CH), Farbsystem (hier NTSC)
und Verfügbarkeit der Kamerawinkeloption.
Deutsch
19
Ändern des Kamerawinkels
ÄNDERN DES KAMERAWINKELS
Dieser DVD-Player ermöglicht es Ihnen von verschiedenen auf einer DVD zur Verfügung
stehenden Kamerawinkeln zu wählen.
Wenn die eingelegte DVD mit verschiedenen Kamerawinkeln aufgenommen wurde, können
Sie den Kamerawinkel der jeweiligen Filmszene verändern.
Betätigen Sie während der Wiedergabe einer Szene die über mehrere Kamerawinkel verfügt
Deutsch
die ANGLE-Taste (mit SHIFT-Taste).
• Die ANGLE-Taste kann nur dann betätigt werden, wenn das
• Kamerawinkelsymbol in der DVD-Anzeige aufblinkt.
• Mit jeder Betätigung der ANGLE-Taste wird der Kamerawinkel verändert.
Hinweis:
Die Kamerawinkelfunktion funktioniert nur mit DVD-Discs, die mit mehrfachen Kamerawinkelszenen aufgenommen wurden.
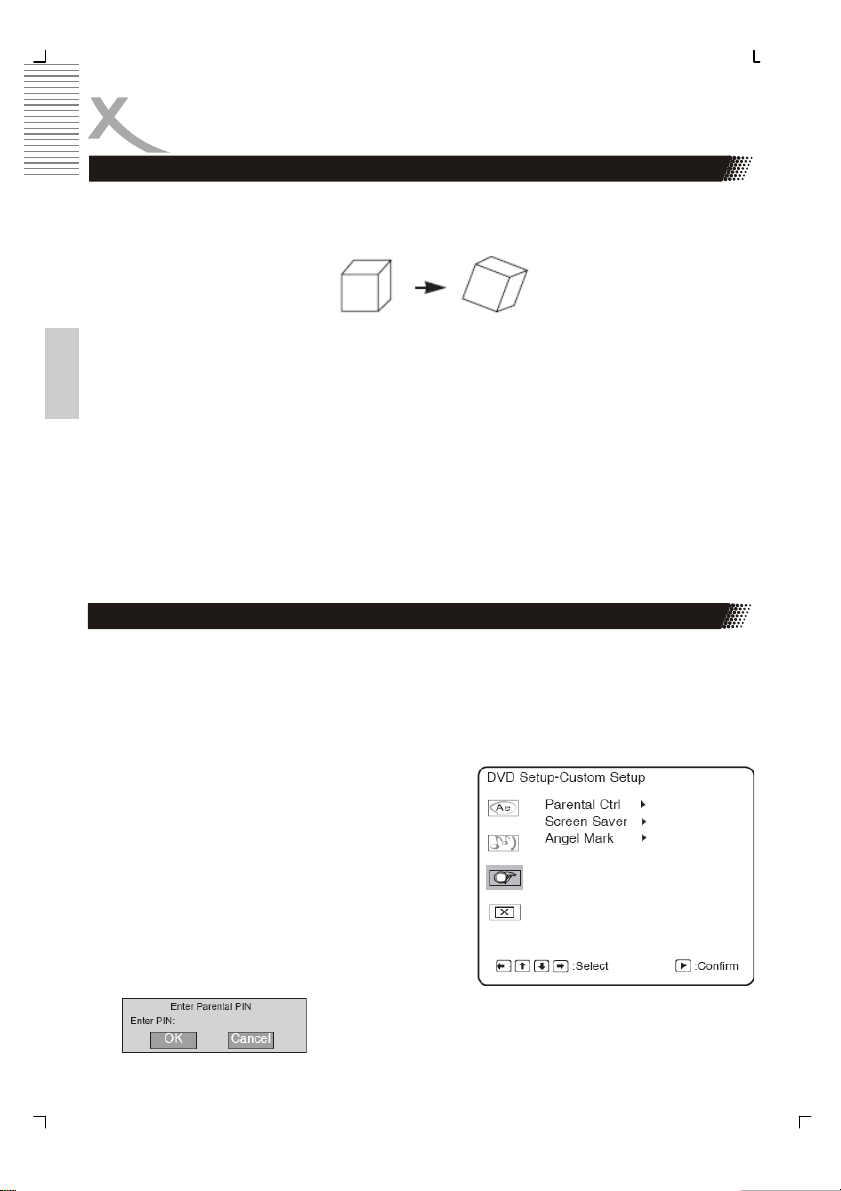
Sie können die Kindersicherungsfunktion nur mit DVDs benutzen, die über eine Altersstufe
verfügen.
Kindersicherung
Solche DVDs werden entsprechend ihres Inhalts mit einer Einstufung versehen. Der Wiedergabeinhalt einer Disc, die mit einer Einstufung versehen ist, ist u. U. Von Disc zu Disc
verschiedenen. Die das Setzen einer Altersstufe können Sie z. B. Gewaltszenen aus dem
Film entfernen, die dann durch weniger gewalttätige Szenen ersetzt werden bzw. die Wiedergabe des gesamten Films unterbinden.
1. Betätigen Sie die STOP-Taste zweimal während der Wiedergabe.
2. Betätigen Sie die SETUP-Taste zur Anzeige
des SETUP MENU.
3. Wählen Sie „Custom Setup“.
4. Wählen Sie dann „Parental Ctrl“.
5. Wählen Sie eine ratings und betätigen Sie
die ENTER-Taste zur Bestätigung.
6. Geben Se Ihr Passwort ein und betätigen
Sie die ENTER-Taste.
Das werksmäßig eingestellte Passwort ist
8888.
7. Benutzen Sie die SETUP und betätigen Sie
die ENTER-Taste.
WINKEL 1 WINKEL 2
20

EINSTELLUNGEN
DIESES GERÄT ERMÖGLICHT IHNEN DIE PERFORMANCE IHREN VORSTELLUNGEN
ENTSPRECHEND EINZUSTELLEN.
7. Betätigen Sie die SETUP-Taste.
8. Benutzen Sie die Navigationstasten zur Auswahl einer Kategorie und betätigen
9. Betätigen Sie die SETUP-Taste zum Verlassen des Einstellungsmenüs.
DVD Setup-Custom Setup
LANGUAGE SETUP
Sie die ENTER-Taste.
Menu
Audio
Subtitle
External Subtitle
SELECT CONFIRM
SETUP MENU
AUDIO SETUP
Western European
Central European
CUSTOM SETUP
English
Chinese
Japanese
French
German
Italian
Spanish
Portuguese
Indian
Thai
Russian
Korean
Others
English
Chinese
Japanese
French
German
Italian
Spanish
Portuguese
Indian
Thai
Russian
Korean
Others
Off
Deutsch
21
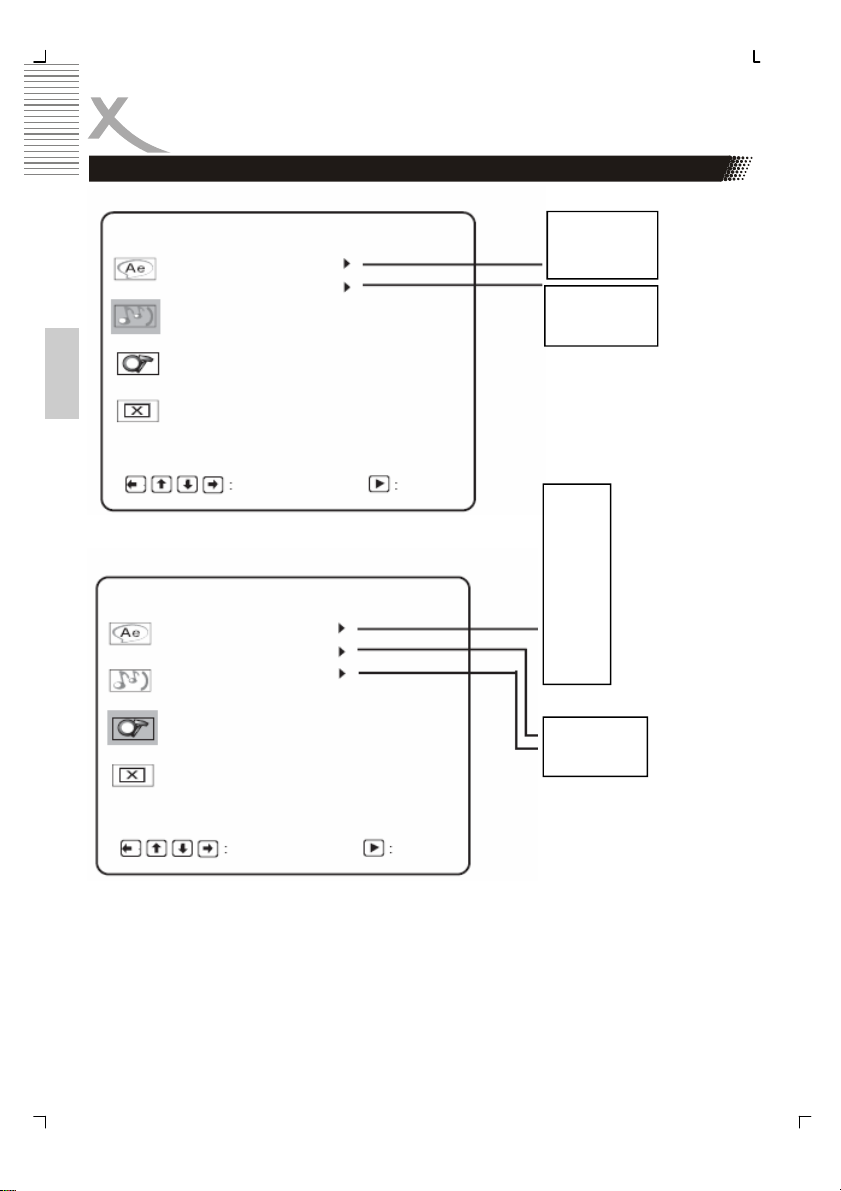
Funktionseinstellungen
DVD Setup-Audio Setup
Deutsch
DVD Setup-Custom Setup
Digital out
Downmix
SELECT CONFIRM
Parental Ctrl
Screen Saver
Angel Mark
SPDIF/PCM
SPDIF/RAW
Off
Lo/Ro
Lt/Rt
1
2
3
4
5
6
7
8
Off
On
Off
SELECT
CONFIRM
22
DVB-Installation
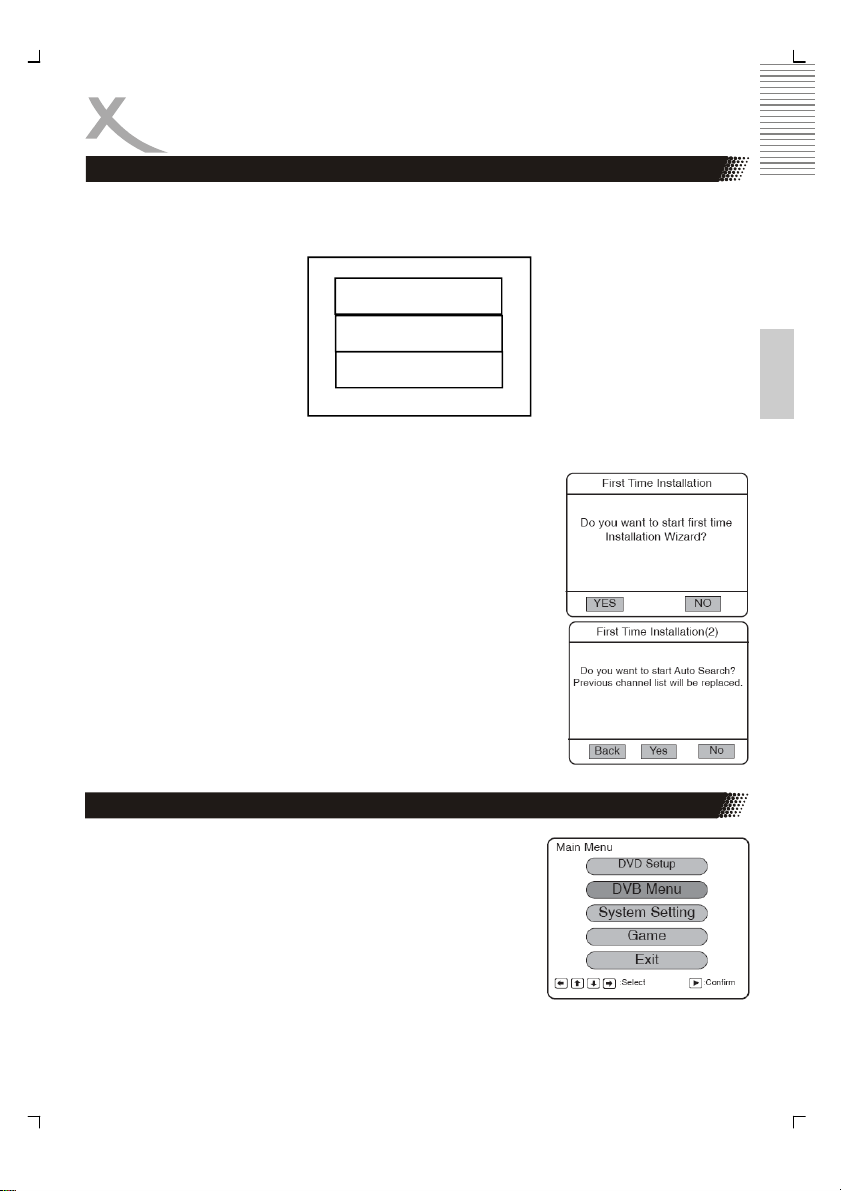
Betätigen Sie die FUNCTION-Taste zum Verändern der Grundfunktion des Geräts. Es stehen Ihnen drei Optionen zur Verfügung: DVD-ROM Drive, DVB und USB.
Grundeinstellungen (Installation)
Wenn dies das erste Mal ist, dass Sie das DVB-Menü aufrufen,
erscheint folgendes Bild:
1. Gehen Sie auf „YES“ und betätigen Sie die PLAY-Taste.
Das System führt dann eine Selbstinstallation durch.
2. Geben Sie Ihre Benutzerinformationen, wie z. B. Land,
Sprache und Zeitzone ein. Das DVB-System wird dann
diese Informationen zur Kanalsuche verwenden.
3. Wählen YES damit das System mit der Suche beginnt.
4. Nach der Suche geht das Gerät automatisch in den DVB-
Modus und zeigt den letzten gefundenen Kanal an. Während der Wiedergabe können Sie mithilfe der SETUP-
Taste das Hauptmenü aufrufen. Dort können Sie über
DVB MENU in das DVB setup menu gelangen.
DVD-ROM Drive
DVB
USB
Deutsch
DVB-Menu
Programmliste / TV-Programme
Sie können Ihre Kanalliste selber programmieren. Dadurch
können Sie favorisierte Kanäle sortieren, Kanäle verschieben
oder löschen. Alle Kanäle werden dann in der Kanalliste aufgelistet. Die Nummer vor dem Kanal ist der jeweilige Kanalcode.
23
DVB-Menü
Favoriten (Favor)
Wenn Sie Kanäle als favorisiert markieren, erscheint ein Herzsymbol in der Favor-Spalte des
jeweiligen Kanals. Wenn Sie einen Kanal von der
Favoritenlisten entfernen wollen, bewegen Sie
einfach den Cursor in die Favor-Spalte des jeweiligen Kanals und betätigen Sie die die ENTERTa st e .
Verschieben (Move)
Benutzen Sie diese Funktion zum Verändern der
Kanalreihenfolge. Betätigen Sie die PLAY-Taste
zum Verändern der Reihenfolge.
Deutsch
Löschen (Del)
Wenn Sie einen Kanal löschen wollen, bewegen
Sie den Cursor auf die Del-Spalte des jeweiligen
Kanals und der Kanal wird nach dem Speichern nicht mehr in der Liste angezeigt.
Anmerkungen:
Wenn Sie gelöschte Programme wieder hinzufügen möchten, führen Sie einfach ein neue
Kanalsuche aus.
No Program Name Favor Move Del
1
2
3
4
5
6
7
8
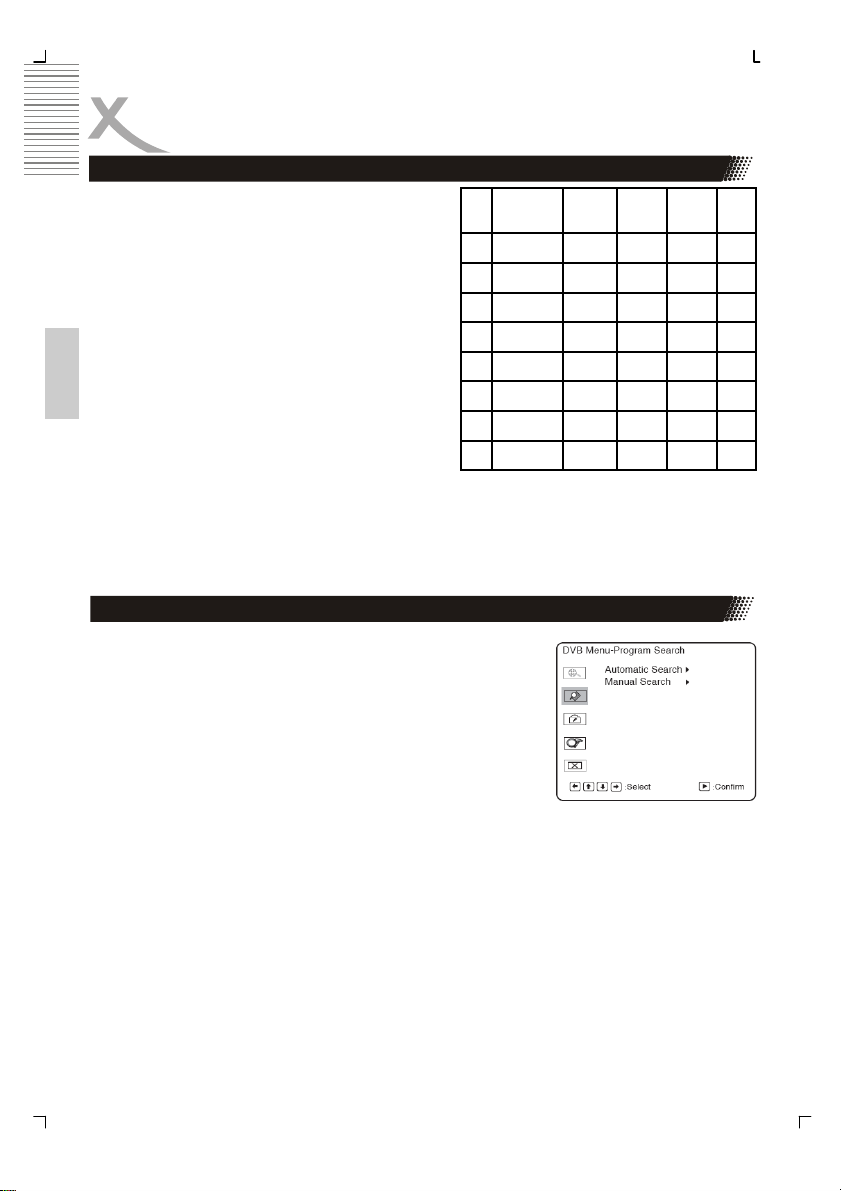
Program Search
Automatische Suche (Automatic Search)
Das Gerät führt bei der Inbetriebnahme eine automatische Kanalsuche entsprechend der Land- und Zeitzoneneinstellung
durch. Vor der automatischen Suchen werden Sie gefragt, ob
Sie die alte Kanalliste löschen oder beibehalten möchten. Wenn
Sie YES wählen, wird die alte Liste gelöscht. Wenn Sie NO
wählen werden neu gefundene Kanäle der alten Liste hinzugefügt.
Nach der automatischen Suche geht das DVB-System zurück in
den Wiedergabemodus. Der zuletzt gefundene Kanal wird angezeigt. Betätigen Sie nach der
Suche EXIT. Die gefundenen Kanäle werden der Kanalliste hizugefügt und der zuletzt gefundene Kanal wird angezeigt.
Hinweis:
Sie können mithilfe der TV/RADIO-Taste zwischen TV- und Musikliste wechseln.
Manuelle Suche (Manual Search)
Benutzen Sie diese Funktion zur Suche bestimmter Kanäle. Zuerst müssen Sie dazu einen
Kanalcode wählen und das System danach suchen lassen. Wenn der Kanal gefunden wird,
kann er zur Kanalliste hinzugefügt werden. Das System geht nach der Suche nicht automatisch in den Wiedergabemodus zurück.
24

DVB-Menü
Channel Lock
Sie können einstellen, ob ein Kanal über die Kindersicherung gesperrt wird. Wenn Sie einen
Kanal sperren, kann auf ihn nur nach Eingabe des Passworts zugegriffen werden.
Passwort: 8888
Grundlegende Bedienung
1. Ein/Ausschalten - Betätigen Sie die POWER-Taste zum ein- bzw. Ausschalten des
Geräts.
2. Kanal wechseln
• Benutzen Sie die Navigationstasten OBEN oder UNTEN zur Auswahl des ge-
wünschten Kanals.
• Benutzen Sie die Zifferntasten zur direkten Auswahl des gewünschten Kanals.
• Im Wiedergabemodus betätigen Sie bitte die PLAY-Taste und auf der rechten Bild-
schirmseite wird die Programmliste angezeigt. Benutzen Sie die Navigationstasten
OBEN oder UNTEN zur Auswahl des gewünschten Kanals und betätigen Sie zum
Starten der Wiedergabe die PLAY-Taste erneut.
• Im Wiedergabemodus betätigen Sie bitte die DIGEST-Taste, um den Verarbeitungs-
modus aufzurufen. Bilder zu jedem Kanal erscheinen auf dem Bildschirm. Benutzen
Sie die Navigationstasten OBEN oder UNTEN zur Auswahl des gewünschten Kanals und betätigen Sie zum Starten der Wiedergabe die PLAY-Taste.
• Wenn Sie den Kanal wechseln, werden die Kanalinformationen am unteren Bild-
schirmrand angezeigt.
USB-Funktion
Deutsch
Wiedergabe von USB-Dateien
Dieses Gerät kann Dateien, die auf einer USB-Disc gespeichert werden, wiedergeben. Betätigen Sie die FUNCTION-
Taste und das nebenstehende Menü wird angezeigt. Benut-
zen Sie die Navigationstasten OBEN oder UNTEN zur Auswahl von USB.
Nachdem Sie USB gewählt haben, überprüft das Gerät ob
ein USB-Laufwerk angeschlossen ist. Wenn kein Laufwerk
gefunden werden konnte erscheint als Fehlermeldung „NO USB DEVICE“.
Wenn ein USB-Laufwerk angeschlossen ist, erscheint auf dem Bildschirm
„Read“. Wenn die darauf enthaltenen Daten wiedergegeben werden können
erscheint auf dem Bildschirm „USB“. Zur Bedienung des USB-Modus lesen Sie
bitte die Anweisungen zur DVD-Wiedergabe.
Hinweis:
DVD-ROM Drive
DVB
USB
• Vermeiden Sie Schäden, indem Sie die USB-Disc nicht während der
Wiedergabe herausziehen. Betätigen Sie bitte zuerst die STOP-Taste,
bevor Sie das USB-Laufwerk entfernen.
FUNCTION-
TASTE
25
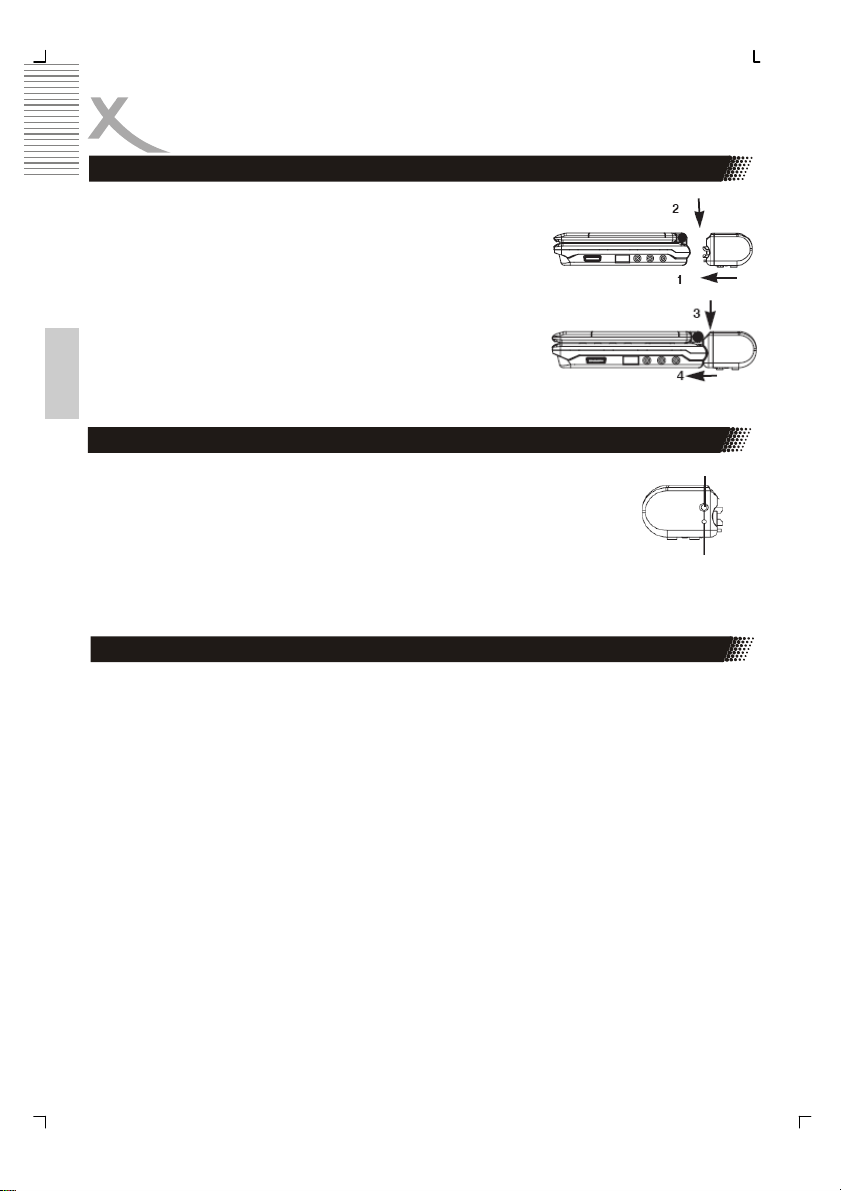
Einlegen und Benutzung des Akkus
Einlegen und Entfernen des Akkupacks
1. Vergewissern Sie sich, dass das Gerät ausgeschaltet
ist und von anderen Geräten abgetrennt wurde.
2. Verbinden Sie das Akkupack am entsprechenden Anschluss des Geräts (siehe Abbildung 1). Richten Sie
beide Teile aufeinander aus bis Sie ein Klick hören
(siehe Abbildung 2).
Entfernen des Akkupacks
1. Vergewissern Sie sich, dass das Gerät ausgeschaltet
ist und von anderen Geräten abgetrennt wurde.
2. Ziehen Sie das Akkupack in Richtung des Pfeils (3)
Deutsch
während Sie den Schieber (4) an der Unterseite des
Geräts nach vorne drücken.
BENUTZUNG UND WARTUNG
DIESES GERÄT WIRD MIT EINEM HOCHEFFEKTIVEN AKKU (LIPOLYMER) AUSGELIEFERT. EIN SOLCHES AKKUPACK VERFÜGT ÜBER EINE HOHE KAPAZITÄT UND KANN BESONDERS LANGE BENUTZT WERDEN. DAS BEDEUTET UNTER ANDEREM, DASS DER AKKU
AUCH AUFGELADEN WERDEN KANN, WENN ER NICHT VOLLSTÄNDIG
LEER IST.
Verbinden Sie das Netzteil mit dem Akku. Laden Sie das Akkupack bitte vor der Inbetriebnahme vollständig auf.
Netzteil / Aufladeanschluss
Ladekontrolllampe
AUFLADEN DES AKKUPACKS
Das Akkupack kann auf zwei verschiedene Weisen aufgeladen werden:
1. Direktes Aufladen des Akkus.
• Aufladen des Akkus während er am DVD-Player angeschlossen ist.
• Um das Akkupack direkt aufzuladen, schließen Sie das Netzteil an den Stromversor-
gungsanschluss an der linken Seite des Akkupacks. Stecken Sie das Netzteil in eine
Steckdose. Die Ladekontrolllampe auf dem Akkupack leuchtet rot auf und das Akkupack wird aufgeladen. Wenn das Akkupack vollständig aufgeladen ist, leuchtet die
Ladekontrolllampe grün auf.
2. Zum Aufladen des Akkus während er am DVD-Player angeschlossen ist, vergewissern Sie sich, dass der DVD-Player ausgeschaltet ist. Verbinden Sie das Netzteil mit
dem Stromversorgungsanschluss an der linken Seite des DVD-Players oder des
Akkupacks. Stecken Sie das Netzteil in eine Steckdose. Der mitgelieferte Akku kann
etwa 300 Mal aufgeladen werden. Zum Aufladen des Akkus benötigen Sie etwa 7
Stunden. Dann geht die rote Ladekontrolllampe aus und die grüne Lampe leuchtet
auf. Mit vollständig aufgeladenem Akku können Sie das Gerät etwa 2 Stunden lang
benutzen. Der Stromverbrauch und die Benutzungsdauer sind abhängig von Benutzungseinstellungen, wie z. B. Helligkeit und Lautstärke etc.
Hinweis:
• Wenn Sie den Akku erst aufladen, wenn er leer ist, können Sie seine Lebens-
dauer verlängern.
26

Einlegen und Benutzung des Akkus
Laden Sie den Akku niemals auf, wenn er schon vollständig aufgeladen ist. Für eine
Langzeitbenutzung, vergewissern Sie sich, dass das Netzteil zuerst aus der Steckdose herausgezogen wird, wenn Sie das Akkupack nach dem Aufladen vom Gerät trennen möchten.
Bewahren Sie auf keinen Fall das Akkupack in Metallbehältern oder an besonders feuchten
Orten. Das Akkupack darf nicht kurzgeschlossen werden. Lagern Sie das Akkupack, wenn
möglich, in einem luftdichten Behälter.
Die Effektivität des Ladevorgangs nimmt ab, wenn das Akkupack bei einer Umgebungstemperatur unter 10ºC oder über 35ºC aufgeladen wird. Benutzen Sie zum Aufladen niemals
den Autoadapter.
Akkuaufbewahrung
Aufbewahrungstemperatur und -luftfeuchtigkeit (Kurzzeit)
Nur an trockenen Orten mit geringer Luftfeuchtigkeit (max. 85%), keine korrosiven Gase,
Temperaturbereich von -20ºC bis 45ºC.
An Orten mit besonders hoher Luftfeuchtigkeit oder Temperaturen unter -20ºC bzw. über
45ºC können die Metallteile des Akkus anfangen zu rosten und der Elektrolyt kann aufgrund
der Materialdehnung auslaufen.
Langzeitaufbewahrung (2 Jahre, 10ºC bis 30ºC)
Bei Langzeitaufbewahrung kann der Akku sich vollständig entladen und damit zur Deaktivierung der Reagenzien führen. Zur Langzeitaufbewahrung sind Orte mit einem Temperaturbereich von 10ºC bis 30ºC zulässig.
Wenn Sie das Akkupack das erste Mal nach der Langzeitaufbewahrung aufladen, kann eine
fortgeschrittene Deaktivierung der Reagenzien dazu führen, dass der Akku eine höhere
Spannung und geringere Kapazität hat. Akkus können in diesem Fall durch mehrere Ladeund Entladevorgänge auf ihre ursprüngliche Performance gebracht werden. Wenn Sie den
Akku für mehr als 1 Jahr aufbewahren, laden Sie ihn mindestens einmal im Jahr auf, um
Auslaufen und Verfallserscheinungen durch Selbstentladung entgegen zu wirken. Wenn Sie
einen Schnelllader mit Spannungsdetektor verwenden, laden Sie das Akkupack mindestens
einmal alle 6 Monate auf.
Hinweis:
• Um eine bestmögliche Akkuleistung zu erreichen, laden Sie das Akkupack beim
ersten Aufladen bitte für mindestens 12 Stunden auf und führen Sie 3 Lade- und
Entladevorgänge und normalen Umständen durch.
Deutsch
27
Fehlerbehebung
Unser Kundendienst hilft Ihnen gerne bei Problemen. Haben Sie schon die Hinweise zur Problemlösungen gelesen?
• Technischer Kundendienst von Xoro/MAS: Tel.:: 040/77 11 09 17
• Internet: www.xoro.de/support.htm
Hinweis:
In bestimmten Gebieten mit schwachen DVB-T-Signalen empfiehlt sich der Einsatz von Verstärkerantennen zum Empfang aller verfügbaren TV-Kanäle.
Erscheinungsbild Behebung
Gerät schaltet nicht an Überprüfen Sie, ob das Netzteil richtig angeschlossen ist.
Deutsch
Kein Bild oder Ton Vergewissern Sie sich, dass alle Anschlüsse richtig verbunden
Interferenz oder laufendes Bild
Wiedergabe startet nicht Entfernen Sie den Plastikschutz auf dem Laserkopf.
Kein Signal bei DVB-T Bitte kontrollieren Sie ob der Player sich im DVB-T Modus befindet.
Schlechte Empfangsqualität
Keine TV Programme
mehr
Fernbedienung reagiert
nicht
Überprüfen Sie, ob der Akku leer ist.
wurden und ob die Lautstärke hoch genug ist. Überprüfen Sie auf,
ob eventuell angeschlossene Geräte richtig funktionieren und ob
deren Audioeinstellungen korrekt sind.
Überprüfen Sie, ob das Fernsehformat korrekt ist: PAL/NTSC.
Dieser Effekt ist eventuell kopierschutzbedingt. Vermeiden Sie
gleichzeitigen Anschluss von Videorekorder und Fernseher.
Stellen Sie die Vertikalfrequenz Ihres Fernsehers richtig ein.
DVD+/-RW müssen zur Wiedergabe finalisiert werden. Leere Discs
können nicht wiedergegeben werden.
Legen Sie die Disc mit der bedruckten Seite nach oben und vergewissern Sie sich, dass sie richtig eingelegt werden.
Vergewissern Sie sich, dass die Disc nicht durch Kratzer und Fingerabdrücke beschmutzt ist.
Legen Sie eine abspielbare Disc (überprüfen Sie Disctyp und Farbsystem) ein.
Benutzen Sie keine Discs, die nicht den Regionsvorgaben Ihres
Players entsprechen.
Reinigen Sie die Disc.
Deaktivieren oder verändern Sie die Alterseinstufung. (Das werksmäßig eingestellte Passwort ist 8888.)
Führen Sie einen Systemreset aus.
Falls nicht, bitte wechseln Sie in diesem Modus.
Bitte richten Sie Ihre Antenne optimal in Richtung des Sendemastes
aus. Nutzen Sie eine Antenne mit aktiven Verstärker oder eine
Haus-/Dachantenne. Falls Sie mit dem HSD 7570 den Raum gewechselt haben, richten Sie entweder die Antenne neu aus oder
schließen Sie eine aktive Antenne an.
Falls Sie keine TV Programme mehr in ihrer Kanalliste haben, bitte
führen Sie den Suchlauf nochmals aus.
• Bitte richten Sie die Fernbedienung auf das Gerät.
• Wechseln Sie die Batterien.
28

Technische Daten
Stromversorgung des Netzteils 100-240V AC 50/50 Hz
Stromverbrauch 9 W
Gewicht 2 kg
Außenabmessungen 205 x 38 x 163,5 mm (L x H x T)
Externes Farbsystem NTSC / PAL
Laser Halbleiter-Laser, Wellenlänge 650 nm
Videoausgang 1,0V (p-p), 75 Watt
Digitaler Audioausgang 0,5V (p-p), 75Watt
Analoger Audioausgang 2,0V (rms) 10Watt
Deutsch
29

Deutsch
30

Table of Contents
Safety Precautions/Information 2
Introduction 6
Quick Starting Guide 7
Remote Control 8
Connecting to a TV 9
Remote Control Buttons 11
Playing Back a Disc 12
Picture CD and JPEG files 14
Compressed Audio Formats 15
Locating a Specific Title, Chapter or Track 15
Playing Repeatedly 16
Zooming a Picture 17
Selecting Subtitles 17
Information 17
Selecting the Camera Angle 18
Setting the Parental Lock 18
Settings 19
DVB installation 21
DVB menu 22
USB function supported 23
Rechargeable Battery Installation & Use 24
Battery Storage 25
Troubleshooting 26
Specification 27
English
1

Safety Information
The lightning flash with an arrowhead symbol within an equilateral triangle is
intended to alert the user of the presence of uninsulated
"dangerous voltage" within the product's enclosure that may be of sufficient
magnitude to constitute a risk of electric shock to persons.
The exclamation point within an equilateral triangle is intended to alert the
user of the presence of important operating and
English
WARNING: DO NOT EXPOSE THIS APPLIANCE TO RAIN OR MOISTURE, DUE TO THE
HIGH RISK OF FIRE OR ELECTRIC SHOCK, DO NOT OPEN THE CABINET
DANGEROUS HIGH VOLTAGES ARE PRESENT INSIDE THE ENCLOSURE. ONLY
QUALIFIED SERVICE PERSONNEL SHOULD ATTEMPT THIS. CAUTION: DURING
PLAYBACK, THE DISC SPINS AT HIGH SPEED, SO DO NOT LIFT OR MOVE THE
PLAYER, DOING SO MAY DAMAGE THE DISC.
CAUTION:This Digital Video Disc Player employs a Laser System. Make sure the device is
shut down prior to opening player lid. Visible laser radiation when open and interlocks
defeated. Use of controls or adjustments or performance of procedures other than those
specified herein may result in hazardous radiation exposure.
The lightning flash with an arrowhead symbol within an equilateral triangle is intended to
alert the user of the presence of uninsulated "dangerous voltage" within the product's
enclosure that may be of sufficient magnitude to constitute a risk of electric shock to
persons. The exclamation point within an equilateral triangle is intended to alert the user of
the presence of important operating and maintenance (servicing) instructions in the literature
accompanying the appliance.
DO NOT STARE INTOBEAM.
To ensure proper use of this product, please read this owner's manual carefully and retain
for future reference. Should the unit require maintenance, contact an authorized service
location, or contact us. Only qualified service personnel should remove the cover.
maintenance (servicing) instructions in the literature accompanying the
appliance.
THIS DEVICE COMPLIES WITH PART 15 OF THE FCC RULES.
OPERATION IS SUBJECT TO THE FOLLOWING TWO CONDITIONS: (1)
THIS DEVICE MAY NOT CAUSE HARMFUL INTERFERENCE, AND (2)
THIS DEVICE MUST ACCEPT ANY INTERFERENCE RECEIVED.
INCLUDING INTERFERENCE THAT MAY CAUSE UNDESIRED
OPERATION.
2

Safety Information
FCC NOTICE: This equipment has been tested and found to comply with the limits for a
Class B digital device. Pursuant with the FCC Rules, Part 15. These limits are designed to
provide reasonable protection against harmful interference in a residential installation.
This equipment generates, uses and can radiate radio frequency energy and, if not installed
and used in accordance with the instructions, may cause harmful interference to radio
communication, However, this is no guarantee that interference will not occur in a particular
installation. If this equipment does cause harmful interference to radio or television reception,
which can be determined by turning the equipment off and on, he user is encouraged to try
to correct the interference by one of the following measures:
• Reorient or relocate the receiving antenna.
• Increase the separation between the equipment and receiver.
• Connect the equipment into an outlet on a circuit different from that to which the
receiver is connected.
• Consult the dealer or an experienced radio/TV technician for help.
FCC Caution:To assure continued compliance, (example-use only shielded interface cables
when connecting to computer or peripheral devices). Any changes or modifications not
expressly approved by the party responsible for compliance could void the user's authority to
operate this equipment.
BATTERYWARNING:
The DVD player contains a Li-Ion battery pack. There is a risk of fire and burns if the battery
pack is handled improperly. Do not disassemble, crush, puncture, short external contacts, or
dispose of in fire or water. Do not attempt to open or service the battery pack. Replace only
with the battery pack designated for this product. Discard used batteries according to the
manufacturer's instructions.
CAUTION: Use of controls or adjustments or performance of procedures other than those
specified herein may result in hazardous radiation exposure.
Please carefully study this manual and always keep it available. There are, however, some
installation and operation precautions which you should be aware of.
1. Read Instructions - All the safety and operating instructions should be read before
the product is operated.
2. Retain Instructions - The safety and operating instructions should be retained for
future reference.
3. Heed Warnings - All warnings on the product and in the operating instructions should
be adhered to.
4. Follow Instructions - All operating and use instructions should be followed.
5. Cleaning - Unplug this product from the wall outlet before cleaning. Do not use liquid
cleaners or aerosol cleaners. Use a damp cloth for cleaning.
6. Attachments - Do not use attachments not recommended by the product manufactu
rer as they may cause hazards.
English
3

Safety Information
7. Water and Moisture - Do not use this product near water for example, near a bath tub, wash
bowl, kitchen sink, or laundry tub; in a wet basement; or near a swimming pool; and the like.
8. Accessories - Do not place this product on an unstable cart, stand, tripod, bracket, or table. The
product may fall, causing serious injury to a child or adult, and serious damage to the product.
Use only with a cart, stand, tripod, bracket, or table recommended by the manufacturer, or sold
with the product. Any mounting of the product should follow the manufacturer's instructions, and
should use a mounting accessory recommended by the manufacturer.
9. A product and cart combination should be moved with care. Quick stops, excessive
force, and uneven surfaces may cause the product and cart combination to overturn.
10. Ventilation - Slots and openings in the cabinet are provided for ventilation and to ensure reliable
operation of the product and to protect it from overheating, and these openings must not be
blocked or covered. The openings should never be blocked by placing the product on a bed,
English
sofa, rug, or other similar surface. This product should not be placed in a built-in installation such
as a bookcase or rack unless proper ventilation is provided or the manufacturer's instructions
have been adhered to.
11. Power Sources - This product should be operated only from the type of power source indicated
on the marking label. If you are not sure of the type of power supply to your home, consult your
product dealer or local power company. For products intended to operate from battery power, or
other sources, refer to the operating instructions.
12. Grounding or Polarization - This product may be equipped with a polarized alternating-current
line plug (a plug having one blade wider than the other). This plug will fit into the power outlet
only one way. This is a safety feature. If you are unable to insert the plug fully into the outlet, try
reversing the plug. If the plug should still fail to fit, contact your electrician to replace your
obsolete outlet. Do not defeat the safety purpose of the polarized plug. Alternate Warnings - This
product is equipped with a three-wire grounding-type plug, a plug having a third (grounding) pin.
This plug will only fit into a grounding-type power outlet. This is a safety feature, If you are
unable to insert the plug into the outlet, contact your electrician to replace your obsolete outlet.
Do not defeat the safety purpose of the grounding-type plug.
13. Power-Cord Protection - Power-supply cords should be routed so that they are not likely to be
walked on or pinched by items placed upon or against them, paying particular attention to cords
at plugs, convenience receptacles, and the point where they exit from the product.
14. Protective Attachment Plug - The product is equipped with an attachment plug having overload
protection. This is a safety feature. See Instruction Manual for replacement or resetting of
protective device. If replacement of the plug is required, be sure the service technician has used
a replacement plug specified by the manufacturer that has the same overload protection as the
original plug.
15. Outdoor Antenna Grounding - If an outside antenna or cable system is connected to the product,
be sure the antenna or cable system is grounded so as to provide some protection against
voltage surges and built-up static charges. Article 810 of the National Electrical Code, ANSI/
NFPA 70, provides information with regard to proper grounding of the mast and supporting
structure, grounding of the lead-in wire to an antenna discharge unit, size or grounding
conductors, location of antenna-discharge unit, connection to grounding electrodes, and
requirements for the grounding electrode.
16. Lightning - For added protection for this product during a lightning storm, or when it is left
unattended and unused for long periods of time, unplug it from the wall outlet and disconnect the
antenna or cable system. This will prevent damage to the product due to lightning and powerline surges.
17. Power Lines - An outside antenna system should not be located in the vicinity of overhead
power lines or other electric light or power circuits, or where it can fall into such power lines or
circuits. When installing an outside antenna system, extreme care should be taken to keep from
touching such power lines or circuits as contact with them might be fatal.
18. Overloading - Do not overload wall outlets, extension cords, or integral convenience receptacles
as this can result in a risk of fire or electric shock.
4

Safety Information
19. Object and Liquid Entry - Never push objects of any kind into this product through openings as
they may touch dangerous voltage points or short-out parts that could result in a fire or electric
shock. Never spill liquid of any kind on the product.
20. Servicing - Do not attempt to service this product yourself as opening or removing covers may
expose you to dangerous voltage or other hazards. Refer all servicing to qualified service
personnel.
21. Damage Requiring Service - Unplug this product from the wall outlet and refer servicing to
qualified service personnel under the following conditions:
a. When the power-supply cord or plug is damaged.
b. If liquid has been spilled, or objects have fallen into the product.
c. If the product has been exposed to rain or water.
d. If the product does not operate normally by following the operating instructions. Adjust only those
controls that are covered by the operating instructions as an improper adjustment of other
controls may result in damage and will often require extensive work by a qualified technician to
restore the product to its normal operation.
e. If the product has been dropped or damaged in any way, and
f. When the product exhibits a distinct change in performance this indicates a need for
service.
22. Replacement Parts - When replacement parts are required, be sure the service technician has
used replacement parts specified by the manufacturer or have the same characteristics as the
original part. Unauthorized substitutions may result in fire, electric shock, or other hazards.
This product incorporates copyright protection technology that is protected by method claims
of certain U.S. patents and other intellectual property rights owned by Macrovision
Corporation and other rights owners. Use of this copyright protection technology must be
authorized by Macrovision Corporation, and is intended for home and other limited viewing
uses only unless otherwise authorized by Macrovision Corporation. Reverse engineering or
disassembly is prohibited.
It is forbidden by law to copy, broadcast, show, play in public, and rent copyrighted material
without permission.
DVD video discs are copy protected, and any recordings made from these discs will be
distorted.
Manufactured under license from Dolby Laboratories. “Dolby” and the double-D symbol are
trademarks of Dolby Laboratories.
“DTS” and “DTS Digital Out” are trademarks of Digital Theater Systems, Inc.
Note:
• Adjust the volume of your receiver to a comfortable listening level to avoid any
speaker damage.
• When connecting and disconnecting the DVD video player, turn off the amplifier to
avoid any speaker damage.
English
5

Introduction
Your new portable DVD player is designed for you to enjoy all forms of disc media. Its slim
shape allows you to easily carry it with you and enjoy movies and music anywhere. Your
player incorporates the latest digital audio/video (AV) technologies to give you the ultimate
in listening and viewing pleasure.
Your player also has several unique features, large active LCD screen, multi-angle and
multi-language, Parental Control (to prevent children from viewing inappropriate content),
and Picture CD compatibility (so you can show photos on your TV). This is a truly
multimedia machine designed for the multimedia world to enjoy.
UNPACKING
English
First inventory the contents of your Portable DVD player package:
Portable DVD Player 1
Audio Cable 1
Video & Coaxial Cable 1
Li-Polymer Battery Pack 1
Remote Control 1
External Power Adapter 1
Cigarette Lighter Adapter 1
Operating Manual 1
Stereo Earphone 1
If any item should be damaged or missing, please contact your dealer without delay.
Keep the packaging materials, you may need them to transport your player in the
future.
WARNING:
• Changes or modifications made to this equipment, not expressly approved by us or
parties authorized by us will void all manufacture warranties.
6

Quick Starting Guide
1. Connecting to an External Power Source: Connect the power cord
(supplied with the player) to the side input plug and to a wall outlet. Do
not use any other device otherwise specified by your dealer.
2. Open the protective cover: The cover opens to a maximum 135° only, so
please do not try to open it any further.
3. Press the open button on the left to open the discover: Never press the
OPEN button on the left during playback.
4. Inserting a DVD disc: Align the center of the DVD disc with the center of the disc
guide. Press gently down on the DVD to snap the disc into place, then close the disc
cover.
5. Slide the side power switch to ‘ON’: If you want to replace another disc or if you want
to pull out disc, you should press STOP twice, then after finish spinning disc, then
press OPEN button, then take out it.
6. Press the PLAY button on the player face (Depends on the DVD title,
press the ENTER button): In general, the DVD already inserted into the
player will start reading automatically when power is turned on.
Note:
• The DVD player will immediately start rendering the DVD program. When you want
to stop, press the STOP button, it will return to the logo. To power off the unit, slide
the ON/OFF switch to the OFF. The DVD player will automatically power off in 20
minutes after entering screen saver mode. To reset the unit, first slide power switch
to ‘OFF’, and then slide it to ‘ON’.
English
7

Remote Control
Introduction of the remote control
1. Open the battery drawer
2. Hold in addition the equipment by point 1 (see picture) and push the cover into the
direction 2 (see picture).
3. Please insert the battery into the drawer. Pay attention when inserting the battery to
the correct polarity (/-).
4. Push the drawer back into the remote control
English
Operation of the DVD Players with the remote control
Always direct the remote control toward the sensor field of the DVD
Players
SETTING UP YOUR PLAYER
1. Connect the audio cables to AUDIO OUT of the DVD
player.
2. Connect the yellow cable to the VIDEO on the side of
your player.
8

Connecting to a TV
CONNECTING EARPHONES
1. Connect the earphones. Earphones with a 3.5 mm
stereo plug can be connected.
2. Adjust the volume by turning the dial.
Note:
• Avoid listening to sound at levels which may be
harmful to your ears.
CONNECTING Stereo RCA to a Sound System
Enjoying Dolby Pro Logic Surround Sound (GOOD) Dolby Pro Logic Surround. Enjoy the
dynamic realistic sound of Dolby Pro Logic Surround by connecting an amplifier and speaker
system (right and left front speakers, a center speaker, and one or two rear speakers).
English
9

Connecting to Optional Equipment
Enjoy Dolby Digital or DTS (BETTER)
Dolby Digital and DTS programming can deliver surround sound with five discrete full range
channels plus a sixth channel for a subwoofer. You can enjoy your DVD with a Dolby Digital
or DTS Digital Surround Sound System. All you need is to connect your DVD player to a
Dolby Digital/DTS receiver or a Dolby Digital Ready receiver with an external decoder.
English
• In case of Dolby Digital, you should setup to "SPDIF/PCM" or "SPDIF/RAW".
• In case of DTS, you should setup to "SPDIF/RAW".
10

1.
3.
4.
7.
8.
12.
14.
15.
19.
20.
21.
22.
23.
24.
REMOTE CONTROL BUTTONS
Buttons on the remote control:
2.
1. StandBy
5.
2. Mute
3. 1 / Repeat
6.
4. 2 / A-B Segment Repeat
9.
5. 3 / PRGM (Program)
10.
6. 4 / Audio
7. 5 / Angle
11.
8. 6 / Zoom
13.
9. 7 / Slow
10. 8 / Title
16.
11. Shift
12. Display
13. Play
17.
14. Up / DVB-T (CH + (Channel))
18.
15. Left / DVB-T (V - (Volume))
16. Right / DVB-T (V + (Volume))
25.
17. Stop / Exit
26.
18. Down / DVB-T (CH - (Channel))
27.
19. || / Step
20. Setup
28.
21. |<< (Skip-) / DVB-T (EPG)
22. >>| (Skip +) / DVB-T (Teletext)
23. Goto / DVB-T (TV/Radio)
24. Menu
25. SUB-T
26. FBW / DVB-T (Favorite)
27. FFW / DVB-T (Info)
28. Function (Changes the mode)
English
Note:
• The most of the numerical buttons have a double function. The second function
could be activated by the Shift button. For example, by playback of a Video-DVD I
want to repeat a Chapter, so I press during playback the button combination “Shift” +
“1” and than the player is has the Repeat mode.
• On the remote control are some button labels in red colour. Only in the DVB-T mode
are these function like EPG, Teletext or CH+ available.
11

Playing Back a Disc
CONTROLS FOR BASIC PLAYBACK
English
1. DIRECTION BUTTONS
2. ENTER
3. SETUP
4. SUB TITLE
5. DISC MENU
The system will display the following menu if turn off for first time, you can select one of the
functions.
If you select DVD-ROM Drive, the system will enter DVD mode, if there is a disc in the unit,
the unit will identify the format of the disc and play it automatically.
In DVD mode, press SETUP to enter setup menu.
6. PLAY
7. PAUSE
8. STOP
9. OPEN / PUSH
12

Playing Back a Disc
HOW TO START PLAYBACK FROM THE MENU SCREEN
Connect the power cable and the unit, the standby LED will be illumed, press POWER to
turn on the unit, if you want to turn off the unit, press POWER again.
HOW TO OPEN/CLOSE THE DISC TRAY
Turn on the unit, if there is a disc in the disc door, the unit will sense the format of the disc
and play it automatically.
If there is no disc, Press EJECT to open to disc tray, then place a disc on it and press
EJEST again, the unit will read and play the disc automatically after the disc door is closed.
HOW TO STOP PLAYBACK
Press the STOP button. The player is stopped.
FAST FORWARD & REWIND
You can playback a disc at x2, x4, x8, x16 or x32 the normal speed for fast forward or
rewind. Press the REV or FWD button during playback. The playback speed becomes
double the normal speed. The playback speed changes, each time you press the REV or
FWD button.
Note:
• The function is invalid on some DVD discs.
English
PLAYING IN SLOW-MOTION
A disc can also be played back in slow-motion.
1. Press SHIFT to set shift on so as to use the SLOW button
2. Press the SLOW button during playback The playback speed
becomes 1/2, 1/4, 1/8, 1/16 or 1/32 of the normal speed each time
you press the SLOW button.
Note:
• During REV, FWD and slow-motion playback, the sound is muted.
• The function is invalid on some DVD discs.
13

Playing Back a Disc
Playing Back Your Picture CD or JPEG files
You can use your DVD player to view photographs stopped on a CD-R. the photographs on
the disc need to be saved in the jpeg file format.
1. Place the CD on the disc tray.
2. Select a folder or a picture contained on the CD. After the CD is loaded, a menu
will appear on the screen. Press UP or DOWN to select a folder, and pres ENTER/
PLAY to view folder contents
3. Start playback When a JPEG CD is loaded, an automated slide show is launched,
Each picture in the current directory will be displayed consecutively in a slide-show
fashion and will be scaled to fit most of the screen. Press "STOP", you can see
English
twenty slideshow transition modes are provided. The pictures will be displayed in a
style of a slideshow, there are many styles of transition effects such as Cover Up,
Cover Down, Cover Left, Cover Right, UnCover Up, UnCover Down, UnCover Left,
UnCover Right, Wipe Up, Wipe Down, Wipe Left, Wipe Right, Push Up, Push Down,
Push Left, Push Right, Random, No Effect etc., use the ANGLE button to change
the slide style.
4. Rotate an image During the slide show, you can use arrow keys to rotate an image:
• Press left to rotate the picture to left for 90°
• Press right to rotate the picture to right for 90°
• Press UP, the left side of the picture will turn to right.
1 Press down, the picture will be upside down.
5. Zoom This feature allows you to view a picture at 25%, 50%, 100%, 150% or 200%
in several increments. Press the ZOOM button. An on screen message (“Zoom On”)
will verify your selection. Use narrow keys to control the amount of zoom in and out.
Press the direction keys to shift the zoom point. With Zoom Off, the picture is scaled
to fit most of your TV screen.
6. Menu During the playback, press MENU to access thumbnail menu. For previewing
JPEG files, press MENU, a menu will appear on the screen. Press UP or DOWN to
select a folder, and press ENTER/PLAY to view folder contents (shown in left
column as below).
14

Playing Back Your Picture CD
PLAYING Music with compressed Audio-Formats
1. Insert an CD with compressed music files, the DVD player will initialize the disc
when the tray is closed and the directory (folder) will be shown in an MENU on
screen.
2. Press UP/DOWN to select and highlight an file (song).
3. Press ENTER to play the file.
Locating a Specific Title, Chapter or Track
Video-DVD Disc are normally divided into Titles which are sub-divided into Chapters.
Moreover, ISO compatible data disc with video contents, JPEG, compressed audio formats
or CD-DA are divided into files or tracks.
LOCATING A TITLE USING THE TITLE MENU
English
You can locate a specific title using the title menu function, if a
DVD video disc contains a title menu.
1. Press the TITLE button On the LCD or TV screen, the
title menu will appear.
2. Press the button to select the title you want. You can
also directly locate a specific title by pressing its
assigned number with the number buttons.
3. Press the PLAY button This will cause the DVD video
player to start playback from chapter 1 of the title
selected. You also can use skip buttons to select a title
or track desired: Press or button repeatedly till the one
displays.
15

Playing Repeatedly
THIS DVD VIDEO PLAYER ALLOWS YOU TO PLAYBACK A SPECIFIC TITLE, CHAPTER,
TRACK, OR SEGMENT REPEATEDLY. (TITLE REPEAT, CHAPTER/TRACK REPEAT, AB REPEAT)
HOW TO REPEAT A TITLE, CHAPTER, OR DISC
During normal playback of a Video-DVD, press the REPEAT button (To be set SHIFT on
and press 1 / REPEAT). The repeat mode changes from Chapter, to Title, to ALL and to
OFF, each time you press the REPEAT button.
During playback of a ISO data disc with files, press the REPEAT button. The repeat mode
changes from SINGLE, to ALL and to OFF.
English
HOW TO REPEAT A SPECIFIC SEGMENT
To repeat a specific segment you can use the A-B repopeat function. The function is by
pressing SHIFT + 2 (A-B) available.
1. Press the A-B button at the beginning of the segment in which you want to repeat
playback (point A) (To be set SHIFT on).
2. Press the A-B button again at the end of the segment (point B) The DVD video
player will automatically return to point A and start to repeat playback of the selected
segment (AB).
3. Press the A-B button to cancel the A-B repeat function The DVD video player will
resume to normal playback.
HOW TO SET TITLES, CHAPTERS, OR TRACKS IN A FAVORITE ORDER
This function allow you to setup the order you want to play. During playing, set the
NAVIGATION to off, then press PRGM, the program menu will display.
Press number button or to set the order you want,
then press ARROW buttons the unit will play the
titles as the titles as the order you setup.
Note: You can select less than 20 titles. Press
PROGRAM, the programme menu will display.
16

Playing Repeatedly
Zooming a picture
This DVD video player allows you to zoom into a picture as well as shift the zoom point. To
be set SHIFT on and press 6 (ZOOM).
Press ZOOM during normal playback or slow - motion. The player magnifies in the center of
the picture. If you press during zoom playback, the zoom point shifts. The ZOOM factors are
x2 and x4.
Note:
To cancel the zoom function, press ZOOM again.
Selecting Subtitles
You have the option to select a preferred subtitle from those included on the DVD video disc
by pressing the SUB-T button.
• Press the SUB-T button during playback.
• Press the SUB-T button during playback until the subtitles disappears.
By using the subtitle function in MPEG-4 video in combination of SRT subtitles, the
filenames should be in this way:
• Movie.avi
• Movie.eng.srt
• Movie.ger.srt
INFORMATION
This unit allows you to view the operational status and disc information on your screen by
pressing the DISPLAY button. With this function you can view on your screen the following
by a Video-DVD:
• Title Information, for example the 1st title of 12 is active
• Chapter number, for example the 6th chapter of 39 is in playback
• Time information for title and chapter are displayed when the DISPLAY button is
pressed again (Title Elapsed, Title Remain, Chapter Elapsed, Chapter Remain)
• The last information shows besides the title, chapter and time the following
additional information like the active language (here English), which audio format
(here AC3 2CH), which TV system (here NTSC) and if the angle option is available.
English
17

Selecting the Camera Angle
HOW TO CHANGE THE CAMERA ANGLE
This DVD player allows you to select from several different angles on a Video-DVD.
If the DVD video disc was recorded with multiple angles, you have the option to change the
camera angle of the scene you are watching.
Press the ANGLE button while playing back a scene recorded with multiple angles (To be
English
set SHIFT on).
• You may only press the ANGLE button when the angle
• Icon is flashing on the DVD display.
• Each time you press the ANGLE button, the angle will change.
Note:
The angle function will not work on DVD video discs that does not contains recorded with
multiple angles.
Parental Lock
You can use the parental lock function only with DVD Video discs equipped with the
parental lock feature.
DVD video discs equipped with the parental lock function are rated according to their
content. The contents allowed by a parental lock level and the way a DVD video disc can be
controlled may vary from disc to disc. For example, if the disc allowed, you could edit out
violent scenes unsuitable for children and replace them with more suitable scenes, or lock
out playback of the disc all together.
1. Press STOP twice during playback
2. Press SETUP The SETUP MENU appears
on the screen.
3. Select Custom Setup.
4. Select Parental Ctrl.
5. Select ratings, press ENTER
6. Enter your password then press ENTER.
The pre-set password 8888
7. Press SETUP to exit setup, press ENTER to
start.
18
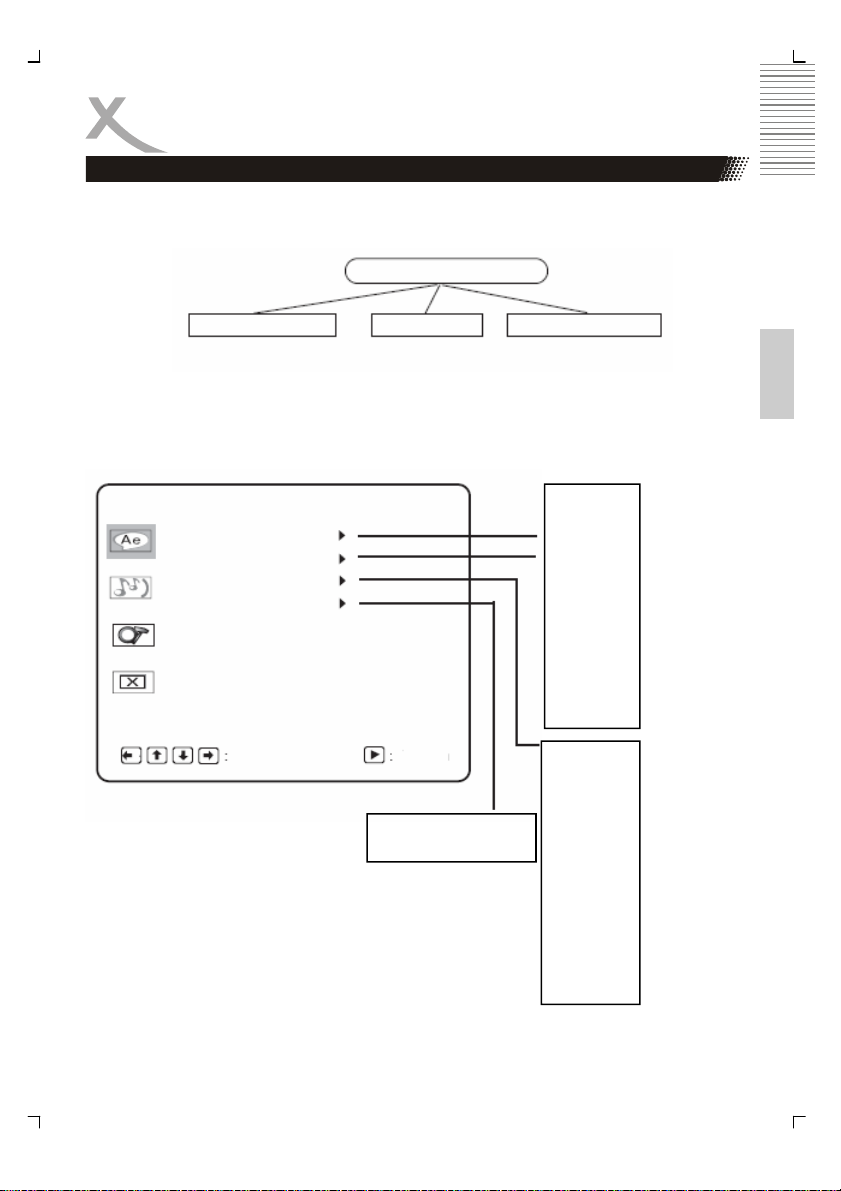
SETTIGNS
THIS UNIT ALLOWS YOU TO CUSTOMIZE THE PERFORMANCE TO YOUR PERSONAL
PREFERENCE.
7. Press SETUP.
8. Press arrow buttons to select category (highlight), then press ENTER.
9. Press SETUP to quit the menu.
DVD Setup-Custom Setup
LANGUAGE SETUP
Menu
Audio
Subtitle
External Subtitle
SELECT CONFIRM
SETUP MENU
AUDIO SETUP
Western European
Central European
CUSTOM SETUP
English
Chinese
Japanese
French
German
Italian
Spanish
Portuguese
Indian
Thai
Russian
Korean
Others
English
Chinese
Japanese
French
German
Italian
Spanish
Portuguese
Indian
Thai
Russian
Korean
Others
Off
English
19

Customizing the Function Settings
English
DVD Setup-Audio Setup
Digital out
Downmix
SELECT CONFIRM
DVD Setup-Custom Setup
Parental Ctrl
Screen Saver
Angel Mark
SPDIF/PCM
SPDIF/RAW
Off
Lo/Ro
Lt/Rt
1
2
3
4
5
6
7
8
Off
On
Off
SELECT
CONFIRM
20

DVB installation
Press FUNCTION to change the function of the unit ,the options including DVD-ROM Drive,
DVB and USB.
DVD-ROM Drive
DVB
USB
Installation
After setup, if this is the first time you use DVB, the screen will
display the following picture
1. First select YES, then press PLAY, the system will install
itself.
2. Input the information about the region of the customer
including country, language and time zone, the DVB
system will use the information to scan the channels
3. Select YES, the system will begin scanning.
4. After scanning, the system will enter DVB mode, and play
the last channel that has scanned. 4 In play mode ,press
SETUP to enter main menu, in the main menu, you can
not select DVD SETUP, you should select DVB MENU
and enter DVB setup menu.
English
DVB Menu
Program List / TV Program
You can program your channel list, the options including favor,
move and del. All channels that can watch will be listed in the
channel list, the
number before the channel name is the code of the channel.
21

DVB menu
Favorites
You can select your favorite channels, and a heart
logo will appear in the favorite row of the selected
channels. If you want to remove a channel from
my favorite channels, move the cursor to the favor
row, then press ENTER.
Move
Use the function ,you can change the channel
order, use to adjust the order then press PLAY.
English
Del
If you want to delete a channel, move the cursor to
the del row of the channel, the deleted channel will
not display after the setup been saved.
Notes:
No Program Name Favor Move Del
1
2
3
4
5
6
7
8
• You can use program search to resume the information of the deleted channel.
Program Search
Automatic Search
The system will begin automatic search after the country and
time zone is setup. Before automatic search, the system will ask
you wether to erase the previous channel list, if you select yes,
the previous channel list will be erased. if you select no, the
searched channels will added to the previous channel list.
After automatic search, DVB will return to play mode and play
the last channel that search, if you press EXIT after search, the
searched channels will added to the channel list and the system will return to play mode and
play the last channel that search.
Note:
• You can press TV/RADIO to switch the function between TV List and Music List.
Manual Search
Use this function, you can search a special channel. First, you must select the channel code,
then the system will search it, the searched channel will added to the channel list, and the
system will not switch to play mode.
22
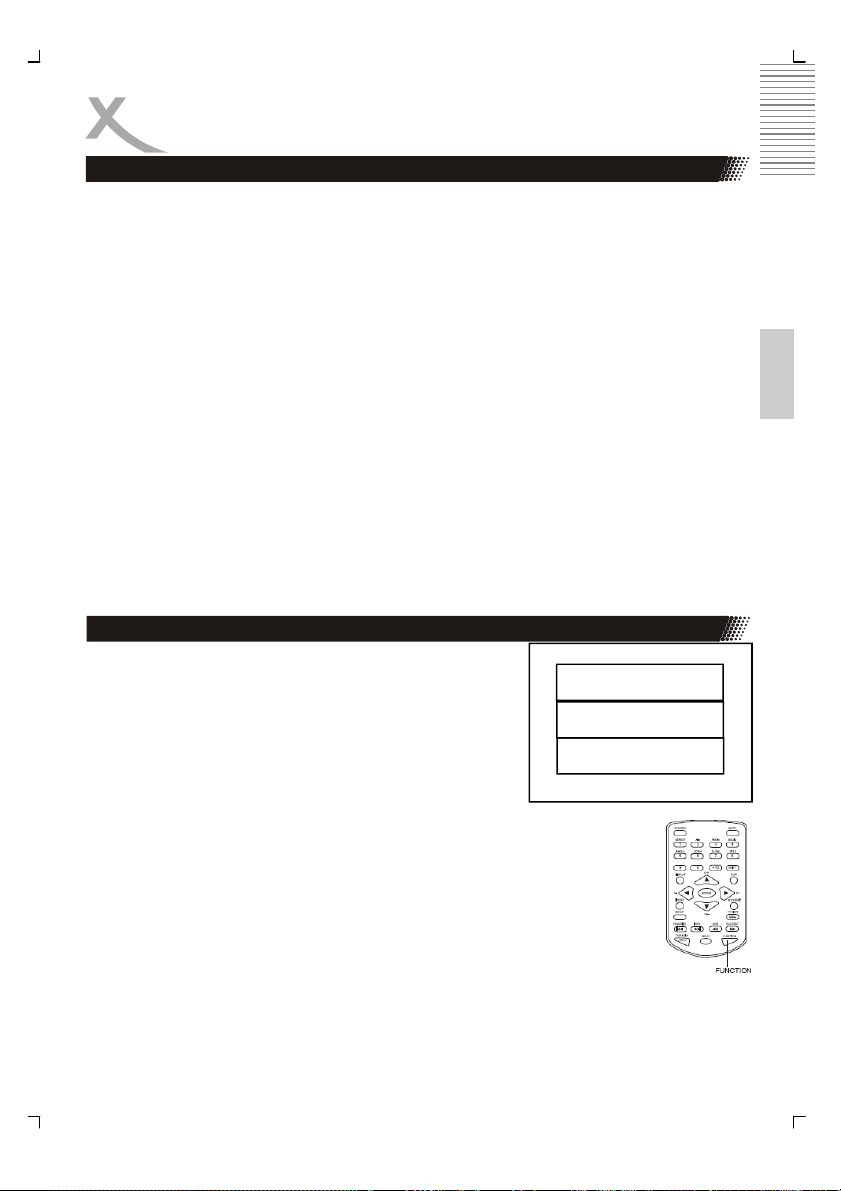
DVB menu
Channel Lock
You can setup wether to lock a channel that are locked in parental setting If you lock it, the
channel that are locked in parental setting can only play after you input the correct
password.
Password: 8888
Basic operation
1. Turn on/off Press POWER to turn on or turn off .
2. change channel
• Press UP or DOWN to select the channel.
• Press the number button to select the channel.
• In play mode, press PLAY again, the right side of the screen will display the program
list ,use up or down to select the channel, then press PLAY again to play.
• In play mode, press DIGEST to enter digest mode ,in digest mode, the images of
every channel will display , use up or down to select the channel, then press PLAY
again to play.
• When you change the channel, the information of the channel will display on the
down side of the screen.
USB function
English
Play usb disc
The system can play USB disc. Press FUNCTION, the
below menu will display, use up and down to select USB.
After select USB, the system will detect wether the USB disc
is connect, if the usb disc is not connected, the screen will
display “NO USB DEVICE”. If the usb disc is connected, the
screen will display “read”; if the disc is playable, the up right
corner of the screen will
display “USB” The operation about the files in USB can consult part of the
ways and means about DVD manual.
Note:
DVD-ROM Drive
DVB
USB
• To avoid damage, do not pull out the USB when you playback the files
in the USB. If you want to pull out the USB, please press STOP button
first.
23

Rechargeable Battery Installation & Use
INSTALLING & REMOVING THE BATTERY PACK
1. Make sure the unit is powered off and unplugged.
2. Attach the battery pack to the outlet of the unit as
illustration 1, and align them with each other till you
hear a click sound as illustration 2.
Removing the Battery Pack
1. Make sure the unit is powered off and unplugged.
2. Pull the battery pack backward as arrowhead 3 while
sliding the latch as 4 (at the bottom of the unit).
English
USE AND MAINTENANCE
THIS UNIT IS SUPPLIED WITH HIGHLY-EFFECTIVE RECHARGEABLE
BATTERY (LI-POLYMER). SUCH BATTERY PACK A HIGH STORAGE
CAPACITY AND LOW LEVEL OF DEGRADATION. THE LATTER MEANS
THAT THE BATTERY CAN ALSO BE RECHARGED WHEN ONLY
PARTLY SPENT.
Plug the AC adapter into the battery. Please fully charge the battery
prior to firs
CHARGING THE BATTERY PACK
The battery pack can be charged in two ways::
1. Charge the battery directly.
• Charge the battery while it is connected to the DVD player.
• To charge the battery pack directly, connect the AC/DC adapter to the DC IN jack on
the left side of the battery pack. Connect the power plug into the outlet . The battery
pack charge indicator will turn red and the battery pack will start to charge. When the
battery pack is fully charged, the battery pack charge indicator will turn green.
2. To charge the battery pack while it is connected to the DVD player, make sure the
POWER OFF of DVD player. Connect the AC/DC adapter to the DC IN jack on the
left side of the DVD player or battery. Connect the power plug into the outlet. The
provided battery can be recharged for about 300 times. It takes about 7 hours to
recharge the battery, then the red indicator is put out and the green one flashes. A
fully charged battery can power the unit for about 2 hours. Power consumption and
the time depends on the operations of the player such as brightness of the screen,
volume level, etc.
Note:
• Recharge the battery in time when fully spent in order to maximize its life.
24

Rechargeable Battery Installation & Use
Never recharge the battery which is already fully charged. For the longterm using of
customer, when fully charged in the 2. mode, make sure unplug the AC/DC adapter
from the DVD player first, then disconnect the battery from the unit.
Under no circumstance should you short out the battery, store it in a metal container, or
leave it in a humid or damp environment. Store the battery in an airtight container if possible.
Recharge effectiveness will degrade when environmental temperatures drop below 10 ºC or
exceed 35 ºC. Do not use car adapter for battery recharging.
Battey Storage
Storage Temperature and Humidity (Short-term)
In a dry location with low humidity(Max.85%), no corrosive gases, at a temperature range of
-20 ºC to 45ºC.
In a location where humidity is extremely high or with temperature below -20ºC or above
45ºC, the metallic parts of battery will rust and result in electrolyte leakage due to expansion
or contraction in parts composed of organic materials.
Long-term Storage (2 years,-20ºC to 35ºC)
As long-term storage can accelerate battery self-discharge and lead to the deactivation of
reactants, locations where the temperature ranges between 10ºC and 30ºC are suitable for
long-term storage.
When charge for the first time after long-term storage, deactivation of reactants may have
led to increased battery voltage and decreased battery capacity. Restore such batteries to
original performance through repeating several cycles of
charge and discharge. When storing battery for more than 1 year, charge at least once a
year to prevent leakage and deterioration in performance due to self-discharge. When using
a rapid charger of voltage detection type, carry out charge and discharge at least once every
6 months.
Note:
• To get the best performance, charge your battery for more than 12 hours at the first
time after unpacking, and carry out 3 cycles of charge and discharge under proper
conditions.
English
25

Troubleshooting
Our custom service will help you. Did you already read the notes for Troubleshooting?
• Technical custom service of Xoro/MAS : Phone: +49404 77 11 09 17
• Internet: www.xoro.de/support.htm
No DVB-T Signals?
Please check if the HTC1900D is in DVB-T mode ? If not please switch to this mode.
Bad reception quality?
Please, align your antenna optimally in direction of the mast. Use a antenna with active amplifier or
a house antenna and roof antenna. If you have changed the HTC1900D area, adjust the antenna
new or connect an active antenna
No TV programs ?
English
If there are no more programs shown in the Channel list. Please start automatic searching again.
Remote control works not ?
Please, direct the remote control upon the device. If the problem is not repaired yet, then change
the batteries.
NOTE:
In areas with less DVB t signals the application of amplifier aerials is recommended to the
reception of all available TV channels.
Symptom Correction
No power Check if AC adapter of power is connected securely.
If powered with the battery, check if it is exhausted.
No picture / sound Make sure the connection is in good condition; volume is not
Interference or
scrolling
The player doesn’t
start playback
too low; audio receiver or TV work normally; audio setting is in
proper.
Check TV type is correct: PAL/NTSC.
Due to the effect of copy protection. Avoid connecting to a VCR
or TV/Vcr combination.
Adjust the vertical hold on your TV.
Remove the plastic laser pickup protection on the disk tray.
The DVD+/-RW you played should be finalized, and not be an
empty disc.
Place the disc with the graphic side up and make sure it’s
inside the guide.
Make sure the disc is free from scratches & fingerprints.
Insert a playable disc. (Check the disc type and color system).
Do not playback a disc which region code is different from that
of your player.
Clean the disc.
Cancel the parental lock function or change the parental lock
level. (The Pre-set password is 8888).
Reset the player.
26

Specification
AC Adapter Power Supply 100-240V AC 50/50 Hz
Power Consmption 9 W
Weight 2.0 Kg
External dimenson 205 x 38 x 163.5 mm (L / H / A)
External System NTSC / PAL
Laser Laser emiconductor, wavelength 650nm
Video output 1.0V (p-p), 75 W
Audio output (digital) 0.5V (p-p), 75 W
Audio output (analog) 2.0V (rms) 10 W
English
27

English
28

Table des matières
Mesures de sécurité/Informations 2
Introduction 6
Guide de démarrage rapide 7
Télécommande 8
Brancher sur le TV 9
Boutons de la télécommande 11
Lire un disque 12
CD de photos et fichiers JPEG 14
Formats audio compressés
Localiser un titre, chapitre ou piste spécifique 15
Lecture répétée 16
Zoomer une photo 17
Sélectionner des sous-titres
Informations 17
Sélectionner l’angle de la caméra 18
Régler le contrôle parental 18
Réglages 19
Installation DVB 21
DVB Menu 22
Fonction USB supportée 23
Installation & utilisation des piles rechargeables 24
Rangement des piles 25
Guide de dépannage 26
Caractéristiques techniques
15
17
27
Français
1

Mesures de sécurité
ATTENTION
RISQUE DE CHOC ELECTRIQUE
NE PAS OUVRIR
Ce symbole éclair fléché, dans un triangle équilatéral, avertit l’usager de la
présence d’une tension non isolée dangereuse dans l’enceinte du produit
d’une amplitude suffisante pour constituer un risque d’électrocution sur
l’individu.
Le point d’exclamation dans un triangle équilatéral avertit l’usager de la
Français
PRODUIT LASER
DE CLASSE 1
AVERTISSEMENT : POUR REDUIRE LES RISQUE D'ELECTROCUTION OU D'INCENDIE,
N'EXPOSEZ PAS CET APPAREIL A LA PLUIE OU A L'HUMIDITE. N’OUVREZ PAS LE
CHÄSSIS, UNE TENSION DANGEREUSE EST PRESENTE 0 L’INTERIEUR DU CHÄSSIS.
SEUL LE PERSONNEL QUALIFIE EST A MEME D'EFFECTUER CETTE OPERATION.
ATTENTION: LE DISQUE TOURNERA TRES VITE PENDANT LA LECTURE, NE
SOULEVEZ PAS OU NE DEPLACER PAS LE LECTEUR, LE DISQUE ET LE LECTEUR EN
SERAIENT ENDOMMAGES.
ATTENTION : Ce lecteur de disque vidéo numérique fonctionne avec un système Laser.
Assurez-vous que le lecteur est bien éteint avant d’ouvrir le couvercle du compartiment à
disque. Il y a des radiations laser visibles et invisibles si le châssis est ouvert et si les
dispositifs de sécurité déjoués. L'utilisation des commandes, des réglages ou des
performances de procédure autres que celles spécifiées dans dudit document peut résulter
an un risque d'exposition aux radiations.
Ce symbole éclair fléché, dans un triangle équilatéral, avertit l’usager de la présence d’une
tension non isolée dangereuse dans l’enceinte du produit d’une amplitude suffisante pour
constituer un risque d’électrocution sur l’individu. Le point d’exclamation dans un triangle
équilatéral avertit l’usager de la présence de consignes importantes pour le fonctionnement
ou l’entretien (maintenance) dans la documentation qui accompagne l’appareil.
NE REGARDEZ PAS DIRECTEMENT LES RAYONS.
Pour assurer une utilisation correcte de cet appareil, veuillez lire ce manuel de l'utilisateur
attentivement et le conserver pour références ultérieures. Si l'appareil doit être réparé, faites
appel à un centre de réparation agréé ou faites nous appel. de réparation agréé. Seul le
personnel qualifié est à même de retirer le couvercle du compartiment à disque.
présence de consignes importantes pour le fonctionnement ou l’entretien
(maintenance) dans la documentation qui accompagne l’appareil.
CET APPAREIL EST CONFORME À LA SECTION 15 DES RÈGLES FCC.
LE FONCTIONNEMENT EST SOUMIS AUX DEUX CONDITIONS
SUIVANTES: (1) CET APPAREIL PEUT NE PAS PROVOQUER DES
INTERFÉRENCES DANGEREUSES ET (2) CET APPAREIL DOIT
ACCEPTER TOUTES LES INTERFÉRENCES REÇUES, Y COMPRIS LES
INTERFÉRENCES QUI POURRAIENT PROVOQUER UN
DYSFONCTIONNEMENT.
2

Mesures de sécurité
AVERTISSEMENT PILE :
Le lecteur DVD contient un élément de piles Li-Ion. Il existe un risque d’incendie ou de brûlures si
l’élément est mal manipulé. Ne démontez pas, n’écrasez pas, ne trouez pas les contacts externes
ou ne les jetez pas au feu ou dans l’eau. Ne tentez pas d’ouvrir ou de réparer cet élément de piles.
Remplacez uniquement avec un élément de piles conçu pour ce produit. Jetez les piles usagées
en respectant les consignes du fabricant.
ATTE NTI ON : L'utilisation des commandes, des réglages ou des performances de procédure
autres que celles spécifiées dans dudit document peut résulter an un risque d'exposition aux
radiations.
Veuillez étudier attentivement ce manuel et gardez-le à disposition. Il existe par ailleurs des
précautions pour l'installation et pour le fonctionnement dont vous devez être averti.
1. Lisez ces instructions - Toutes les instructions de sécurité et d’utilisation doivent êtres lues
avant de faire fonctionner l’appareil.
2. Conservez ces instructions - Toutes les instructions de sécurité et d’utilisation doivent
êtres conservées pour références ultérieures.
3. Respectez les avertissements - Tous les avertissements indiqués dans ce manuel
d’instructions et sur l’appareil doivent êtres respectés.
4. Suivez les instructions - Toutes les instructions d’utilisation et de fonctionnement doivent
êtres suivies.
5. Nettoyage- Débranchez cet appareil de la prise murale avant de le nettoyer. N'utilisez pas
de nettoyants liquides ou d'aérosols. Utilisez un linge humidifié pour le nettoyage.
6. Pièce détachées- L'utilisation de pièces détachées non recommandées par le fabricant du
produit peut provoquer des risques.
7. Eau et humidité - N’utilisez pas ce produit près de point d’eau comme une baignoire,
bassine, évier, lessiveuse, dans un sous-sol humide ou près d’une piscine.
8. Accessoires- Ne placez pas cet appareil sur un chariot, support, trépied, crochet ou
une table instable. L'appareil pourrait tomber, provoquant ainsi des blessures graves
sur un enfant ou un adulte et également de sérieux dommages sur l'appareil. Utilisez
uniquement cet appareil avec un chariot, support, trépied, crochet ou une table
recommandés par le fabricant ou vendu avec l’appareil. Le montage de l’appareil
doit être effectué en respectant les instructions du fabricant et il doit être effectué
avec des accessoires recommandés par le fabricant.
9. Si un chariot est utilisé pour déplacer l’appareil, faîtes attention de ne pas renverser
le chariot avec l’appareil afin d’éviter tout risque de blessure corporelle. De brusques
arrêts, un déplace ment effect tué avec trop de force et des surfaces accidentées
peuvent provoquer la chute et le renversement de l’appareil et du chariot.
10. Ventilation- Les trous et les fentes dans le châssis sont conçus pour la ventilation
afin d’assurer un fonctionnement correct de l’appareil et pour éviter qu’il ne
surchauffe. N’obstruez pas ou ne couvrez pas ces ouvertures pour la ventilation. Les
ouvertures ne doivent pas être bloquées en plaçant l'appareil sur un lit, sofa, tapis ou
autres surfaces similaires. Cet appareil ne doit pas être placé dans une armoire ou
étagère encastrée à moins qu’une ventilation correcte ne soit correctement assurée
en respectant les instructions du fabricant.
Français
3

Mesures de sécurité
11. Sources d’alimentation - Cet appareil doit uniquement être utilisé avec la même
source d’alimentation que celle indiquée sur l’étiquette. Si vous n’êtes pas certain du
type d’alimentation dans votre habitation, consultez le revendeur de votre appareil
ou la compagnie distributrice d’électricité. Pour les appareils qui sont conçus pour
fonctionner avec des piles ou une autre source, référez-vous au manuel d’utilisation.
12. Protection du cordon d'alimentation- Les câbles doivent être acheminés afin que l'on
ne puisse pas marcher dessus ou afin qu'ils ne soient pas pincés par des éléments
placés dessus ou contre eux, faites particulièrement attention aux cordons au
niveau des prises, rallonges et à l'endroit où ils sortent de l'unité.
13. Accessoire pour prise de protection - ce produit est équipé d’un accessoire pour
Français
prise avec une protection contre les surcharges. Ceci est un dispositif de sécurité.
Consultez le mode d’emploi pour le remplacement ou le réglage du dispositif de
protection. Lorsque le remplacement des composants est nécessaire, assurez-vous
que le technicien de service utilise les composants de remplacements
recommandés par le fabricant ou qu'ils possèdent les mêmes caractéristiques que
les composants d'origine.
14. Mise à la masse d'une antenne extérieure -si une antenne extérieure est branchée
sur l'appareil, assurez-vous que l'antenne est mise à la masse afin d'offrir une
protection contre les surtensions et les accumulations d'élétricité statique.
15. Orage- Pour une protection supplémentaire de cet appareil pendant un orage ou s’il
n’est pas surveillé ou non utilisé pendant une longue période de temps, débranchezle de la prise murale et déconnectez l’antenne ou le système de câbles. Ceci évitera
les dommages sur l’appareil dus aux surtensions et aux orages.
16. Lignes électriques à haute tension - Le système d’antenne extérieur ne doit pas être
situé près des pylônes des lignes électriques à haute tension, près de lumières
électriques ou de circuits électriques, ou à un endroit où il pourrait tomber dans l’une
de ces lignes ou circuits électriques. Quand vous installez un système d’antenne
extérieure, soyez extrêmement vigilants afin de ne pas toucher de telles lignes ou
circuits électriques car le point de contact pourrait être fatal.
17. Surcharge- Ne surchargez pas les prises électriques murales, les rallonges ou les
multi prises, cela pourrait provoquer un risque d’incendie ou d’électrocution.
18. Intrusion de liquide ou de corps étrangers dans l’appareil- Ne laissez pas de corps
étranger ou de liquide se glisser dans l’appareil par les ouvertures ou les fentes, car
ils pourraient entrer en contact avec des composants sous haute tension et
dangereux à l’intérieur ou provoquer un court-circuit, ce qui pourrait engendrer une
électrocution ou un incendie. N’éclaboussez pas ou ne répandez pas de liquide
dans l’appareil.
19. Réparation - Ne tentez pas de réparer cet appareil vous-même, car ouvrir ou
enlever le châssis vous exposerait à une haute tension dangereuse ou à d’autres
risques. Veuillez vous référer pour toute réparation à du personnel de réparation
qualifié.
4

Mesures de sécurité
20. Dommages nécessitant une réparation- Débranchez l’appareil de la prise murale et
consultez le personnel de réparation qualifié dans les circonstances suivantes:
a. Quand le cordon d'alimentation ou la prise est endommagé.
b. Si un liquide a été projeté sur l’appareil ou si un objet est tombé dans l’appareil.
c. Si l’appareil a été exposé à la pluie ou à l’eau.
d. Si l’appareil ne fonctionne pas normalement après avoir suivi les instructions du
manuel d’utilisation. Réglez uniquement les réglages mentionnés dans le manuel
d’utilisation car de mauvais réglages de ces commandes pourrait endommager
l’appareil et constituera probablement du travail supplémentaire pour le technicien
qualifié qui devra remettre l’appareil en bon fonctionnement.
e. Si le produit est tombé ou si le châssis a été endommagé de quelque manière quese
soit.
f. Si le produit indique un changement radical dans son fonctionnement habituel, cela
indique qu'une réparation est nécessaire.
21. Remplacement des composants- Lorsque le remplacement des composants est
nécessaire, assurez-vous que le technicien de service utilise les composants de
remplacements recommandés par le fabricant ou qu'ils possèdent les mêmes
caractéristiques que les composants d'origine. Des modifications non autorisées
peuvent résulter en un incendie, électrocution ou d'autres risques.
Ce produit inclut une technologie de protection des droits d’auteur qui est protégée par des
méthodes de réclamations de certains brevet US et d’autres droits de propriétés intellectuels
détenus par Macrovision Corporation et d’autres propriétaires de droits. L’utilisation de cette
technologie de protection des droits d’auteur doit être autorisée par Macrovision Corporation
et est conçue uniquement pour l’utilisation à domicile et d’autres visualisations limitées
uniquement sauf autrement autorisé par Macrovision Corporation. Une mécanique inversée
ou le démontage est interdit.
Il est interdit par la loi de copier, diffuser, montrer, diffuser sur le câble, lire en publique et
louez des media copiés sans la permission des auteurs.
Les disques DVD vidéo sont protégés contre les copies et tous les enregistrements
effectués à partir de ces disques seront distordus.
Fabriqué sous licence des Laboratoires Dolby. «Dolby» et le symbole double-D sont des
marques commerciales de Dolby Laboratories.
‘’DTS’’ et ‘’DTS Digital Out‘’ sont des marques commerciales de Digital Theater Systems,
Inc.
Remarque:
• Réglez le volume de votre récepteur pour qu’il soit confortable et pour éviter tout
dommage sur les haut-parleurs.
• Lorsque vous branchez ou débranchez le lecteur DVD vidéo, éteignez
l’amplificateur pour éviter tout dommage sur les haut-parleurs.
Français
5

Introduction
Votre nouveau lecteur DVD portable a été conçu pour que vous puissiez profiter de tous les
formats de disques. Sa conception compacte vous permet de le transporter avec vous et de
pouvoir ainsi regarder des films et écouter de la musique n’importe où. Votre lecteur
comprend les dernières technologies numériques audio/vidéo (AV) pour vous offrir les
derniers avantages en matière d’écoute et de visualisation.
Votre lecteur possède également plusieurs fonctions uniques : écran LCD large, angle
multiples et langues multiples, Contrôle parental (pour éviter que les enfants ne regardent
des contenus visuels non appropriés) et une compatibilité avec les CD de photos (pour
Français
regarder vos photos sur votre TV). Ce produit est un véritable appareil multi média conçu
pour obtenir le meilleur des produits actuels.
DEBALLAGE
Vérifiez dans un premier temps que tous les accessoires vendus avec votre lecteur DVD
portable sont bien là:
Lecteur DVD portable 1
Câble Audio 1
Câble Vidéo & coaxial
Élément de piles Li-Polymer
Télécommande
Adapter d'alimentation externe
Adaptateur pour Allume cigare
Mode d’emploi
Écouteurs stéréo
1
1
1
1
1
1
1
S'il venait à manquer un accessoire ou si un accessoire est endommagé, veuillez
contacter votre revendeur immédiatement.
Conservez les papiers d’emballage, vous en aurez besoin pour transporter votre
lecteur à l’avenir.
AVERTISSEMENT:
• Les changements ou les modifications effectués sur cet équipement et non
expressément approuvés par nos soins ou une autre partie agréée annuleront toute
garantie du produit.
6

Guide de démarrage rapide
1. Brancher sur une source d’alimentation externe : Branchez le cordon
d’alimentation (fourni avec le lecteur) sur le côté sur la prise d’entrée et
sur une prise murale. N’utilisez aucun autre périphérique autrement que
spécifié par le revendeur.
2. Ouvrez le couvercle du compartiment à piles. Le couvercle s’ouvre à un
maximum de 135°C seulement, essayez de ne pas forcer dessus.
3. Appuyez sur la gauche pour ouvrir le couvercle du compartiment
supérieur. Ne jamais appuyer sur le bouton OPEN sur la gauche pendant la lecture.
4. Insérer un disque. Alignez le centre du disque DVD sur le guide centrale du lecteur.
Appuyez doucement sur le DVD pour mettre le disque en place puis fermez le
couvercle.
5. Poussez l’interrupteur sur ‘ON’. Si vous souhaitez placer un autre disque ou si vous
souhaitez l’enlever, vous devez d’abord appuyer deux fois sur le bouton STOP puis
attendre que le disque s’arrête de tourner. Puis appuyez sur le bouton OPEN et
sortez le disque.
6. Appuyez sur le bouton PLAY sur le lecteur (selon le titre du DVD
appuyez sur le bouton ENTER). En règle générale, le lecteur DVD avec
un disque déjà inséré démarrera la lecture automatiquement lorsque
l’alimentation sera allumée.
Remarque:
• Le lecteur DVD vous donnera immédiatement le programme du DVD. Lorsque vous
souhaitez arrêter le disque, appuyez sur le bouton STOP et le logo apparaîtra de
nouveau. Pour éteindre l’unité, poussez l’interrupteur ON/OFF sur la position OFF.
Le lecteur DVD s’éteindra automatiquement 20 minutes après être entré en mode
d’économie d‘écran. Pour réinitialiser l’unité, poussez dans u premier temps
l’interrupteur d’alimentation sur OFF puis sur la position ON.
ON/OFF
Français
ON/OFF
7

Télécommande
Introduction de la télécommande
1. Ouvrez le tiroir du compartiment à piles.
2. Reprenez les instructions point par point1 (voir l’image) et poussez le couvercle
dans la direction 2 (voir l’image).
3. Veuillez insérer la pile dans le tiroir à piles. Assurez-vous de bien faire attention à la
position de la pile, respectez les polarités (+/-).
4. Poussez le tiroir dans la télécommande.
Français
Fonctionnement du lecteur DVD avec la télécommande
Toujours diriger la télécommande vers le capteur du lecteur DVD.
CAPTEUR DE LA
TELECOMMANDE
CONFIGURER LE LECTEUR DVD
1. Branchez les câbles audio sur les sorties AUDIO du
lecteur DVD.
2. Branchez le câble jaune sur VIDEO sur le côté de
votre lecteur.
Entrée Audio TV
Blanc Rouge
Entrée
Vidéo TV
Jaune
8

Brancher sur le TV
CONNECTING EARPHONES
1. Brancher les écouteurs Les écouteurs avec une prise
de 3.5mm peuvent être branchés.
2. Réglez le volume en tournant le bouton numéroté.
Remarque :
• Évitez d’écouter à un niveau sonore élevé cela
pourrait être dangereux pour vos oreilles.
BRANCHER le RCA Stéréo sur un Sound System
Profitez du son Dolby Pro Logic Surround Sound (GOOD) Dolby Pro Logic Surround.
Profitez du son dynamique réel du son Dolby Pro Logic Surround en branchant un
amplificateur et un système d’enceintes (haut-parleurs de gauche et de droite, haut-parleur
central et un ou deux haut-parleurs arrière).
Exemple
branchement
Français
VERS SORTIE AUDIO
Vers entrée
audio
Haut-parleurs
avant (gauche)
Haut-parleur
central
Haut-parleurs
VERS SORTIE
VIDEO
Amplificateur
équipé de Dolby
pro Logic Surround
Amarillo
Haut-parleurs
avant (droite)
arrière
9

Brancher sur un équipement en option
Profiter du son Dolby Digital ou DTS (DE MEILLEUR QUALITE)
La programmation Dolby Digital and DTS peut offrir un son surround avec cinq canaux
séparés en plein gamme avec un sixième canal pour le subwoofer. Vous pouvez profiter de
votre lecteur DVD avec un Système Son Dolby Digital ou DTS Digital Surround. Tout ce
dont vous avez besoin, c’est de brancher votre lecteur DVD sur un récepteur Dolby Digital/
DTS ou un récepteur Dolby Digital Ready avec un décodeur externe.
Français
• Pour les Dolby Digital, vous pouvez configurer le système sur "SPDIF/PCM" ou
• Pour le DTS, vous pouvez configurer le système sur "SPDIF/RAW".
COTE DVD
"SPDIF/RAW".
Haut-parleurs
avant (gauche)
Vers PCM/BITSTREAM
Orange
Vers SORTIE VIDEO
Jaune
TV
Noir
Haut-parleurs
avant (droite)
10

BOUTONS DE LA TELECOMMANDE
Boutons de la télécommande
1. STANDBY (VEILLE)
2. Silencieux (Mute)
3. Répétition 1 (1 / Repeat)
4. Répétition de la Section A-B 2 (A-B)
5. 3/ PRG (Programme) (PRGM)
6. 4/ Audio (Audio)
7. 5/ Angle (Angle)
8. 6 / Zoom (Zoom)
9. 7/ Ralenti (Slow)
10. 8/ Titre (Title)
11. Shift (Shift)
12. Affichage (Display)
13. Lecture (Play)
14. Dans / TNT (CH + (Chaîne))
15. Gauche / TNT (V - (Volume))
16. Droit / TNT (V + (Volume))
17. Arrêt / Sortie (Stop/Exit)
18. Bas / TNT (CH - (Chaîne))
19. II / Étape (II/Step)
20. Configuration (Setup)
21. |<< / TNT (EPG)
22. >>| / TNT (Télétexte)
23. Aller sur (Goto) / TNT (TV/Radio)
24. Menu (Menu)
25. Sous-titre (SUB-T)
26. << / TNT (Favoris)
27. >> / TNT (Info)
28. Fonction (Changer de mode DVD,
TNT (DVB-T) et USB)
Remarque :
• La plupart des boutons numérotés
possèdent une fonction double La
deuxième fonction peut être activée
avec le bouton Shift. Par exemple,
pendant la lecture d’un DVD Vidéo,
je souhaite répéter un chapitre.
J’appuie, pendant la lecture, sur le
bouton ‘Shift+ 1’, le lecteur passera
alors au mode Répétition.
• Sur la télécommande, certains
boutons sont en rouge. Ces
fonctions ne sont disponibles
seulement en mode DVB-T comme
par exemple le EPG, Télétexte ou
CH+.
1.
3.
4.
7.
8.
12.
14.
15.
19.
20.
21.
22.
23.
24.
2.
5.
6.
9.
10.
11.
13.
16.
17.
18.
25.
26.
27.
28.
Français
11

Lire un disque
TOUCHES DE CONTROLE POUR UNE LECTURE SIMPLE
Français
1. BOUTONS DIRECTIONNELS
2. ENTREE
3. CONFIGURATION
4. SOUS-TITRE
5. MENU DU DISQUE
Le système affichera le menu suivant lorsque vous allumerez le lecteur la première fois,
vous pouvez sélectionner l’une des fonctions.
Si vous sélectionnez DVD-ROM Drive, le système entrera en mode DVD, s’il y a un disque
dans l’unité, l’unité identifiera le format du disque et le lira automatiquement.
En mode DVD, appuyez sur le bouton SETUP pour entrer dans le menu de configuration.
6. PLAY
7. PAUSE
8. SARRET
9. OUVRIR/APPUYER
12

Lire un disque
COMMENT DEMARRER LA LECTURE A PARTIR DU MENU A L’ECRAN
Branchez le câble d’alimentation et l’unité, la DEL standby s’allumera. Appuyez sur le
bouton POWER pour allumer l‘unité, si vous souhaitez éteindre l’unité, appuyez sur le
bouton POWER de nouveau.
COMMENT OUVRIR/FERMER LE TIROIR PUR DISQUE
Allumez l’unité, s’il y a un disque dans le compartiment, l’unité repérera le format du disque
et le lira automatiquement.
S’il n’y a pas de disque, appuyez sur EJECT pour ouvrir le compartiment à disque. Placez
ensuite un disque et appuyez sur EJECT de nouveau, l’unité lira le disque automatiquement
une fois le clapet refermé.
COMMENT ARRETER LA LECTURE
Appuyez sur le bouton STOP. Le lecteur s’arrêtera.
AVANCE & RETOUR RAPIDE
Vous pouvez lire des disques à la vitesse x2, x4, x8, x16 ou x32, la vitesse normale pour le
retour ou l’avance rapide. Appuyez sur les boutons REV ou FWD pendant la lecture. La
vitesse de lecture doublera. La vitesse de lecture changera à chaque fois que vous appuyez
sur le bouton REV ou FWD.
Remarque :
• Cette fonction n’est pas valide sur tous les disques DVD.
LECTURE AU RALENTI
Vous pouvez également lire un disque en mode Ralenti.
1. Appuyez sur le bouton SHIFT pour l’allumer afin de
pouvoir utiliser la fonction.
2. Appuyez sur le bouton SLOW pendant la lecture. La vitesse de lecture
passera à 1/2, 1/4, 1/8, 1/16 ou 1/32 de la vitesse normale. A chaque
fois que vous appuyez sur le bouton SLOW la vitesse changera
comme indiqué.
Remarque :
SLOW
SHIFT
PLAY
• En mode REV, FWD et lecture au ralenti, le son sera éteint (mute).
• Cette fonction n’est pas valide sur tous les disques DVD.
Français
13

Lire un disque
Lecture de CD photo ou de fichiers JPEG
Vous pouvez utiliser votre lecteur DVD pour visualiser des photos enregistrées sur un CD-R.
Les photos sur le disque devront avoir été sauvegardées en format JPEG.
1. Placez le disque sur la platine.
2. Sélectionnez un dossier ou une image du CD. Si un disque est chargé, un menu
s'affichera à l'écran. Appuyez sur les touches HAUT ou BAS pour sélectionner un
fichier et appuyez sur le bouton ENTER/PLAY pour visualiser les contenus du
dossier.
3. Démarrer la lecture : lorsqu’un CD JPEG est chargé, une visualisation en
diaporama commencera. Chaque image dans le répertoire actuel sera affichée en
Français
séquence en mode diaporama et sera affichée pour convenir à la taille de l’écran.
Appuyez sur STOP, vous pourrez voir vingt modes de transition en diaporama. Les
images seront affichées en diaporama, il existe plusieurs effets de transition : rabat
vers le haut, bas, gauche ou droite, découvrir vers le haut, bas, gauche ou droite,
fondu haut, bas, gauche ou droite, appui vers haut, bas, gauche ou droite, aléatoire,
pas d’effet etc. Utilisez le bouton ANGLE pour changer le style des diaporamas.
4. Tourner une image Pendant le diaporama, vous pouvez utilisez les touches
fléchées pour tourner une image:
• Appuyez sur le bouton de gauche pour faire pivoter l’image vers la gauche à 90°C.
• Appuyez sur le bouton de droite pour faire pivoter l’image vers la droite à 90°C.
• Appuyez sur le bouton du HAUT et le côté gauche de l’image se tournera vers la
droite.
1 Appuyez sur le bouton du BAS (DOWN) et l’image se tournera à l’envers.
5. Zoom Cette fonction vous permet de visualiser l’image à 25%, 50%, 100%, 150%
ou 200% à plusieurs tranches. Appuyez sur le bouton ZOOM. Un message
apparaîtra à l’écran (ZOOM ON), cela vous permettra de vérifier votre sélection.
Utilisez les touches étroites pour contrôler la taille du zoom avant ou arrière.
6. Menu - Pendant la lecture, appuyez sur le bouton MENU pour accéder au menu en
miniature. Pour pré visualiser les fichiers JPEG, appuyez sur le bouton MENU, un
menu apparaîtra à ‘écran. Appuyez sur les touches HAUT ou BAS pour sélectionner
un fichier et appuyez sur le bouton ENTER/PLAY pour visualiser les contenus du
dossier (indiqué dans la colonne de gauche comme illustré dans
ci-dessous).
14

Lire un CD d’images
LIRE des fichiers musique avec des formats audio compressés
1. Insérez un CD, le lecteur DVD initialisera le disque une fois le tiroir fermé et le
répertoire (dossier) affiché à l’écran dans le MENU.
2. Appuyez sur les boutons HAUT/BAS pour sélectionner et mettre en surbrillance le
fichier chanson.
3. Appuyez sur le bouton ENTER pour lire le fichier.
Localiser un titre, chapitre ou piste spécifique
Les disques vidéo DVD sont normalement divisés en titres qui sont eux-mêmes divisé en
chapitre. De plus, la norme ISO concernant la compatibilité des données entre les différents
disques, JPEG, formats audio ou CD-DA divise le contenu des disques en fichiers ou en
pistes.
Chapitre 1 Chapitre 2 Chapitre 1 Chapitre 2 Chapitre 3
TITRE 1
Disque vidéo DVD
TITRE 2
Français
LOCALISER UN TITRE EN UTILISANT LE MENU DU TITRE
Vous pouvez localiser un titre spécifique en utilisant la fonction du
menu, si un disque vidéo DVD contient un menu avec des titres.
1. Appuyez sur le bouton TITLE sur le LCD ou l’écran TV, le
menu du titre apparaîtra.
2. Appuyez sur le bouton pour sélectionner le titre que vous
souhaitez. Vous pouvez également localiser directement
un titre spécifique en appuyant sur le numéro assigné
avec les boutons numérotés.
3. Appuyez sur le bouton PLAY. Cela provoquera le
démarrage de la lecture à partir du chapitre 1 du titre
sélectionné. Vous pouvez également utiliser les boutons
de saut pour sélectionner un titre ou un chapitre. Appuyez
sur les boutons plusieurs pour obtenir l'élément désiré.
PREVIOUS
NEXT
PLAY
15

Lecture répétée
CE LECTEUR VIDEO DVD VOUS PERMET UNE LECTURE REPETEE D’UN TITRE,
CHAPITRE, PISTE OU SEGMENT SPECIFIQUE. (REPETITION TITRE, REPETITION
CHAPITRE/PISTE, REPETITION A-B)
COMMENT REPETER UN TITRE, CHAPITRE OU UN DISQUE
En mode de lecture normale de DVD vidéo, appuyez sur le bouton REPEAT (pour régler la
fonction SHIFT sur On et appuyez une fois sur REPEAT). Le mode de répétition changera à
chaque fois que vous appuierez sur le bouton REPEAT entre Répétition de chapitre, titre,
tout et off.
Pendant la lecture de disque avec des données ISO, appuyez sur le bouton REPEAT. Le
Français
mode de répétition changera entre SINGLE (un fichier), ALL (tous les fichiers) et OFF.
COMMENT REPETER UN SEGMENT SPECIFIQUE
Pour répéter un segment spécifique, vous pouvez utiliser la fonction A-B. Vous pouvez
obtenir la fonction en appuyant sur SHIFT + 2 (A-B).
1. Appuyez sur le bouton A-B au début du segment à partir duquel vous souhaitez
répéter la lecture (point A) (Régler SHIFT sur On).
2. Appuyez sur le bouton A-B de nouveau à la fin du segment (point B). Le lecteur
vidéo DVD retournera automatiquement au point A et commencera la lecture
répétée du segment A-B.
3. Appuyez sur le bouton A-B pour annuler la fonction de répétition A-B. Le lecteur
vidéo DVD reprendra une lecture normale.
COMMENT REGLER LES TITRES, CHAPITRES OU PISTES DANS VOTRE ORDRE PREFERE
Cette fonction vous permet de changer l’ordre des éléments à lire. Pendant la lecture, réglez
NAVIGATION sur Off. Puis appuyez sur PRGM, le menu du programme s'affichera.
Appuyez sur les boutons numérotés ou
réglez l’ordre souhaité. Puis appuyez
sur les touches fléchées, l’unité lira les
titres dans l’ordre que vous avez
programmé.
Remarque : Vous pouvez sélectionner moins de 20
titres. Appuyez sur le bouton PROGRAM pour
afficher le menu du programme.
16

Lecture répétée
Zoomer une photo
Ce lecteur vidéo DVD vous permet de zoomer sur une image tout en zoomant sur le point
de zoom. Régler SHIFT sur ON et appuyez sur le bouton 6 (ZOOM).
Appuyez sur le bouton ZOOM en mode de lecture normale ou en lecture au ralenti. Le
lecteur augmente le centre de l’image. Si vous appuyez sur le zoom pendant la lecture, le
point de zoom bougera. Les différents facteurs de zoom sont X2 et X 4.
Remarque :
Pour annuler la fonction Zoom, appuyez de nouveau sur le bouton ZOOM.
Sélectionner des sous-titres
Vous avez l’option de sélectionner un sous-titre que vous préférez y compris ceux inclus dans le disque
vidéo DVD en appuyant sur le bouton SUB-T.
• Appuyez sur le bouton SUB-T pendant la lecture.
• Appuyez sur le bouton SUB-T pendant la lecture jusqu’à ce que les sous-titres disparaissent.
En utilisant la fonction des sous-titres en vidéo MPEG-4 avec les sous-titres SRT, les noms de fichier
seront dans cet ordre:
• Movie.avi
• Movie.eng.srt
• Movie.ger.srt
INFORMATION
Cette unité vous permet de visualiser les statuts en option et les informations du disque à l’écran juste en
appuyant sur le bouton DISPLAY. Avec cette fonction vous pouvez visualiser sur votre écran ce qui suit
sur un disque vidéo DVD:
• Informations du titre, par exemple, le 1ier titre sur les 12 sont actifs.
• Le numéro du titre, par exemple, le 6ième chapitre sur les 39 est en lecture.
• Les informations du temps concernant les titres et chapitres sont affichés lorsque vous appuyez
une autre fois que le bouton DISPLAY (temps écoulé, titre restant, chapitre écoulé, chapitre
restant).
• Les dernières informations indiqueront à côté du titre, chapitre et temps, les informations
supplémentaires suivantes comme la langue active (ici l’anglais), avec un format audio (ici AC3
2CH), avec le système TV (ici NTSC) et si l’option de l’angle est disponible ou pas.
Français
17

Sélectionner l’angle de la caméra
COIMMENT CHANGER L’ANGLE DE LA CAMERA
Ce lecteur DVD vous permet de sélectionner parmi les différents angles de la caméra sur le
disque vidéo DVD.
Si le disque vidéo DVD a été enregistré avec des angles multiples, vous avez l’option de
changer l’angle de la caméra de la scène que vous regardez.
Appuyez sur le bouton ANGLE pendant la lecture d’une scène enregistrée avec plusieurs
Français
angles (SHIFT réglé sur ON).
• Vous ne pouvez appuyer sur le bouton ANGLE seulement lorsque
• L’icône clignote sur l'affichage du DVD.
• Chaque fois que vous appuyez sur le bouton ANGLE, l’angle changera
Remarque:
La fonction de l'angle ne fonctionnera pas sur des disques DVD qui ne contiennent pas des
enregistrements à angles multiples.
Contrôle parental
Vous pouvez utiliser la fonction de contrôle parental uniquement sur les disques DVD vidéo équipés
de la fonction Contrôle Parental.
Les disques DVD vidéo équipés de la fonction Contrôle Parental sont classifiés en fonction de leurs
contenus.
Les contenus permis par le niveau du contrôle parental et la manière dont sont contrôlés les disques
vidéo DVD peuvent varier d'un disque à un autre. Par exemple, sur le disque autorisé, vous pouvez
éditer et retirer les scènes violentes non appropriées pour les enfants et les remplacer avec des
scènes plus appropriées ou verrouiller l’accès du disque.
1. Appuyez deux fois sur le bouton STOP pendant la
lecture.
2. Appuyez sur SETUP, le SETUP MENU apparaîtra
à l’écran.
3. Sélectionnez Custom Setup
4. Sélectionnez Parental Ctrl
5. Sélectionnez restrictions, appuyez sur ENTER.
6. Entrez votre mot de passe puis appuyez sur
ENTER.
Le mot de passe pré réglé est 8888
7. Appuyez sur le bouton SETUP pour sortir de la
configuration, appuyez sur ENTER pour
commencer.
ANGLE 1 ANGLE 2
18

RÉGLAGES
CETTE UNITE VOUS PERMET DE PERSONNALISER LA PERFORMANCE EN
FONCTION DE VOS BESOINS.
7. Appuyez sur SETUP.
8. Appuyez sur les boutons fléchés pour sélectionner la catégorie (surlignée) et
9. Appuyez sur SETUP pour sortir du menu.
DVD Setup-Custom Setup
LANGUAGE SETUP
appuyez sur ENTER.
Menu
Audio
Subtitle
External Subtitle
SELECT CONFIRM
SETUP MENU
AUDIO SETUP
Western European
Central European
CUSTOM SETUP
English
Chinese
Japanese
French
German
Italian
Spanish
Portuguese
Indian
Thai
Russian
Korean
Others
English
Chinese
Japanese
French
German
Italian
Spanish
Portuguese
Indian
Thai
Russian
Korean
Others
Off
Français
19

Personnaliser les réglages de la fonction
Français
DVD Setup-Audio Setup
Digital out
Downmix
SELECT CONFIRM
DVD Setup-Custom Setup
Parental Ctrl
Screen Saver
Angel Mark
SPDIF/PCM
SPDIF/RAW
Off
Lo/Ro
Lt/Rt
1
2
3
4
5
6
7
8
Off
On
Off
SELECT
CONFIRM
20

Installation TNT
Appuyez sur la FONCTION pour changer la fonction de l'unité, les options incluent DVDROM Drive, DVB et USB.
DVD-ROM Drive
DVB
USB
Installation
Après la configuration, si c’est la première fois que vous utilisez
le DVB, l’écran affichera l’image suivante.
1. Sélectionnez dans un premier temps YES, puis appuyez
2. Entrez les informations concernant la région de l’utilisateur,
3. Sélectionnez YES, le système commencera la recherche.
4. Après la recherche, le système entrera en mode DVB et
sur le bouton PLAY, le système s’installera de lui-même.
y compris le pays, la langue, le fuseau horaire, le système
DVB utilisera les informations pour recherchera les
chaînes.
lira la dernière chaîne qui aura été recherchée. En mode
de lecture, appuyez sur SETUP pour entrer dans le menu
principal, dans le menu, vous ne pouvez pas sélectionner
DVD SETUP. Vous pourrez sélectionner le DVB MENU et
entrez dans le menu de configuration DVB.
Français
DVB Menu
Liste des programmes/ Programmes TV
Vous pouvez programmer votre liste des chaînes, les options
incluent Favor., Dépl. et Supp. Toutes les chaînes qui peuvent
être visualisées seront listées dans la liste des chaînes, le
numéro avant le nom de la chaîne représente le code de la
chaîne.
21
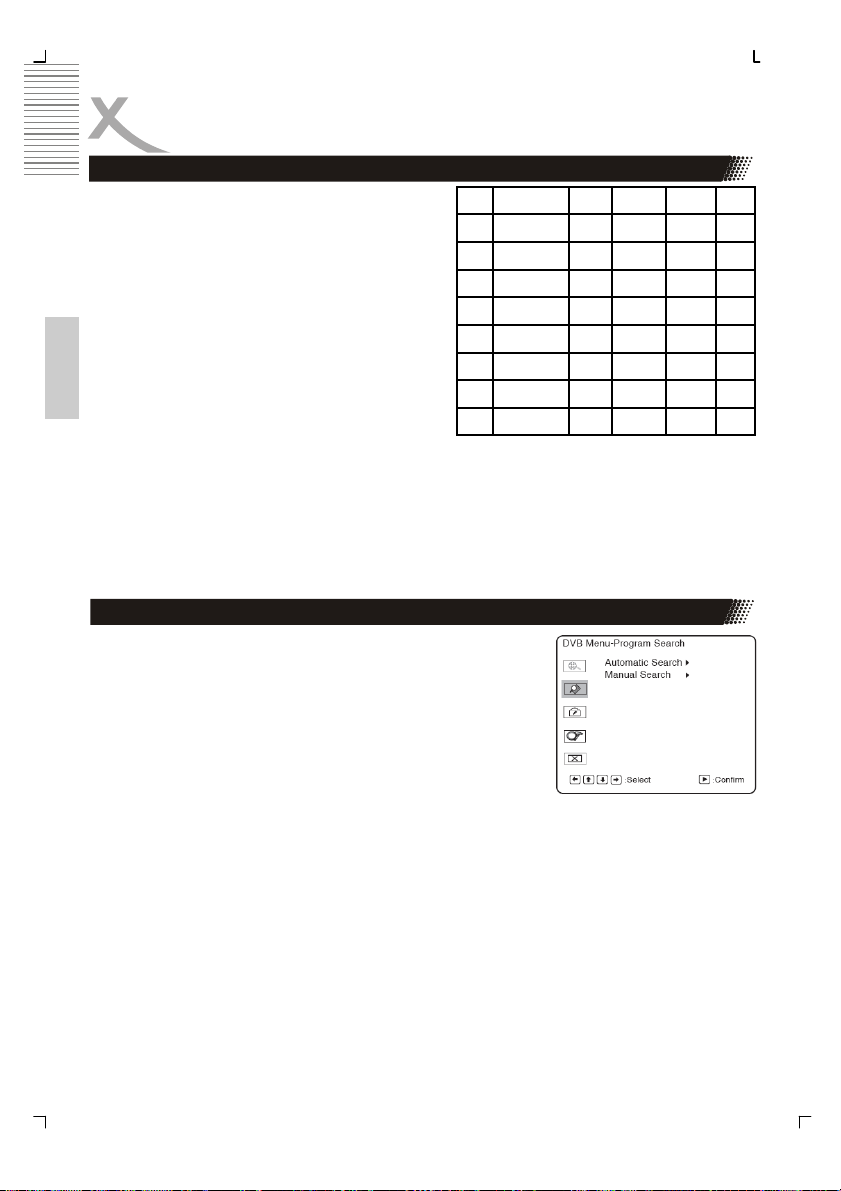
Menu TNT
Favoris
Vous pouvez sélectionner vos chaînes préférées,
et un logo avec en forme de cœur apparaîtra
dans la rangée des chaînes sélectionnées. Si
vous souhaitez retirer une chaîne de mes chaînes
préférées, déplacez le curseur sur la rangée
préférée puis appuyez sur ENTER.
Déplacer
Utilisez la fonction pour changer l’ordre des
chaînes, appuyez ensuite sur PLAY.
Français
Supp
No Programme Nom Favor Dépl. Sup.
1
2
3
4
5
6
7
8
Si vous souhaitez supprimer une chaîne,
déplacez le curseur sur la rangée de la suppression (Supp.) des chaînes, la chaîne effacée
ne s'affichera pas une fois que la configuration aura été sauvegardée.
Remarque :
• Vous pouvez utiliser la recherche de programmes pour reprendre les informations
de la chaîne suprimée.
Program Search
Automatic Search
Le système commencera une recherché automatique une fois
que le pays et le fuseau horaire auront été configurés. Avant la
recherche automatique, le système vous demandera s’il faut
effacer la liste des chaînes précédente, si vous sélectionnez
Yes, la liste des chaînes précédentes sera effacée. Si vous
sélectionnez No, les chaînes recherchées seront ajoutées à la
liste des chaînes précédentes.
Après la recherche automatique, le DVB retournera au mode de lecture et lira la dernière
chaîne recherchée. Si vous appuyez sur EXIT (SORTIE) après la recherche, les chaînes
recherchées seront ajoutées sur la liste des chaînes et le système retournera au mode de
lecture et lira la dernière chaîne recherchée.
Remarque :
• Vous pouvez appuyer sur TV/RADIO pour commuter de fonction entre la liste TV et
la liste de la Musique.
Manual Search
Utilisez cette fonction pour rechercher une chaîne spécifique. Tout d’abord, vous devez
sélectionner le code de la chaîne, puis le système la recherchera, la chaîne recherchée sera
ajoutée à la liste des chaînes et le système ne passera pas au mode de lecture.
22

Menu TNT
Verrouillage des chaînes
Vous pouvez configurer les chaînes verrouillées dans le contrôle parental. Si vous bloquez
une chaîne, vous ne pourrez la visualiser qu’une fois que vous aurez entré le mot de passe
correcte.
Mot de passe: 8888
Fonctionnement simple
1. Allumer/étreindre - Appuyez sur le bouton POWER pour allumer ou éteindre l'unité.
2. Changer de chaîne
• Utilisez la touche HAUT et BAS pour sélectionner la chaîne.
• Utilisez les touches numérotées pour sélectionner la chaîne.
• En mode de lecture, appuyez de nouveau sur le bouton PLAY, le côté droit de
l’écran affichera la liste des programmes, utilisez les touches haut et bas pour
sélectionner la chaîne, puis appuyez sur le bouton PALY de nouveau pour
commencer la lecture.
• En mode de lecture, appuyez de nouveau sur le bouton DIGEST, le côté droit de
l’écran affichera la liste des programmes, utilisez les touches haut et bas pour
sélectionner la chaîne, puis appuyez sur le bouton PLAY de nouveau pour
commencer la lecture.
• Lorsque vous changerez de chaîne, les informations de la chaîne s’afficheront en
bas de l’écran.
Fonction USB
Français
Lecture de disque USB
Le système peut lire les disques USB. Appuyez FONCTION,
le menu ci-dessous s’affichera, utilisez les boutons du haut
ou du bas pour sélectionner USB.
Après avoir sélectionné USB, le système détectera si le
disque USB est branché. Si le disque USB n’est pas
branché, l'écran affichera ‘NO USB DEVICE’. Si le disque
USB est branché, l’écran affichera ‘read’. Si le disque peut être lu, le coin à
droite de l’écran affichera ‘USB’. Vous trouverez des informations concernant
le fonctionnement des fichiers USB dans le mode d’emploi du DVD.
Remarque :
DVD-ROM Drive
DVB
USB
• Pour éviter les dommages, ne retirez pas le périphérique USB lorsque
vous lisez les fichiers USB. Si vous souhaitez arrêter le périphérique
USB, appuyez sur le bouton STOP dans un premier temps.
FONCTION
23

Installation & utilisation des piles rechargeables
INSTALLATION & RETIRER L’ELEMENT DES PILES
1. Assurez-vous que l'unité est hors tension et
débranchée.
2. Fixez l'élément des piles sur la prise de l’unité comme
dans l’illustration 1 et alignez-les pour entendre un
déclic comme dans l’illustration 2.
Retirer l’élément des piles
1. Assurez-vous que l'unité est hors tension et
débranchée.
2. Tirez l’élément des piles vers l’arrière en suivant les
Français
flèches (3) tout en tirant la languette comme dans
l’illustration 4 (en bas de l’unité).
UTILISATION ET ENTRETIEN
CETTE UNITE EST FOURNIE PAR UNE HAUTE ALIMENTATION DES
PILES RECHARGEABLES (LI-POLYMER). CE GENRE D’ELEMENT DE
PILES A HAUTE CAPACITE ET BAS NIVEAU DE DEGRADATION. CECI
SIGNIFIE QUE LA PILE PEUT EGALEMENT ETRE RECHARGEE
LORSQU'ELLE EST PARTIELLEMENT EPUISEE.
Branchez l’adaptateur CA sur la pile. Veuillez recharger la pile avant ce
faire.
CHARGING THE BATTERY PACK
L’élément des piles peut être rechargée de deux matières:
1. Changer les piles directement.
• Chargez les piles lorsqu'elles sont branchées sur le lecteur DVD.
• Pour charger l’élément des piles directement, branchez l’adaptateur CA/DC sur la
prise ENTREE DC sur la côté gauche de l’élément des piles. Insérez le cordon
d‘alimentation dans la prise murale. Le témoin de charge des piles passera au rouge
et l’élément des piles commencera à charger. Lorsque l’élément des piles est
entièrement chargé, le témoin de charge passera au vert.
2. To charge the battery pack while it is connected to the DVD player, make sure the
POWER OFF of DVD player. Connect the AC/DC adapter to the DC IN jack on the
left side of the DVD player or battery. Connect the power plug into the outlet. The
provided battery can be recharged for about 300 times. It takes about 7 hours to
recharge the battery, then the red indicator is put out and the green one flashes. A
fully charged battery can power the unit for about 2 hours. Power consumption and
the time depends on the operations of the player such as brightness of the screen,
volume level, etc.
Remarque:
• Rechargez la pile à temps lorsqu’elle est complètement épuisée afin de
maximiser sa durée de vie.
Entrée Adapter CA/
chargeur
Voyant de charge
24

Installation & utilisation des piles rechargeables
Ne jamais recharger une pile qui est déjà chargée. Pour une utilisation prolongée de
l’appareil, lorsque l’unité est chargée, assurez-vous de débrancher dans un premier
temps l'adaptateur CA/DC du lecteur DVD puis débranchez la pile de l’unité.
Dans aucun cas vous ne pouvez court-circuiter la pile, la ranger dans un contenaire en
métal ou la laisser dans un environnement humide ou légèrement humide. Rangez la pile
dans un récipient sous vide si possible. L’efficacité de la recharge se dégradera lorsque les
températures environnantes tomberont en-dessous de 10°C ou dépasseront les 35°C.
N'utilisez pas l’adaptateur pour recharger des piles.
Rangement des piles
Température de rangement et humidité (court-terme)
Dan un endroit sec avec une faible humidité (Max 85%), aucun gaz corrosif dans un
environnement entre -20 ºC et 45ºC.
Dans un endroit où l’humidité est très haute ou dans un environnement aux températures
comprises entre -20ºC et supérieure à 45ºC, les parties métalliques de la pile pourraient
rouiller et résulteront en une fuite d'électrolyte à cause de la dilatation ou de la réduction des
parties composés de matières organiques.
Rangement à long terme (2 ans, entre 10ºC et 30ºC)
Le rangement à long terme peut accélérer le déchargement des piles et conduire à une
désactivation des réactifs, dans les endroits où les températures sont comprises entre 10ºC
et 30ºC sont appropriées pour un rangement à long terme.
Lorsque vous chargez la pile pour la première fois après un rangement à long terme, la
désactivation des réactifs peut avoir conduit à une tension accrue des piles ainsi qu’une
capacité moindre. Restaurer la capacité des ces piles avec plusieurs cycles de chargement
et de déchargement. Lorsque vous rangez les piles pendant plus d’un an, chargez-la au
moins une fois par an pour éviter les fuites et les détériorations au niveau de la performance
dû à une auto décharge. Lorsque vous utilisez un chargeur avec détection de tension,
menez à terme le chargement et déchargez le au moins tous les six mois.
Remarque:
• Pour obtenir la meilleure performance, chargez votre pile pendant 12 heures la
première fois après le déballage et accomplissez les 3 cycles de chargement et de
déchargement dans les conditions correctes.
Français
25

Guide de dépannage
Veuillez consulter ce tableau pour détecter la cause probable d’un problème avant de contacter un
réparateur.
Support technique Xoro/MAS:
• Tél.: 0825 889441
• Internet: www.xoro.fr/Service.aspx
Pas de signal TNT ?
Vérifiez que le HTL 1910w se trouve bien en mode TNT. Dans le cas contraire, mettez-vous sur ce
mode.
Mauvaise qualité de réception ?
Orientez votre antenne le plus possible en direction de l´émetteur. Utilisez une antenne avec un
Français
augmentateur actif ou une antenne de maison/ de toît. Dans le cas où vous avez changé de pièce
avec le 1910w, il faut soit réorienter l´antenne ou brancher une antenne active.
Plus de programme TV ?
Si vous n´avez plus de programme TV dans votre liste de chaînes, mettez la recherche de
chaînes de nouveau en marche.
La télécommande ne répond plus !
Orientez la télécommande vers l´appareil. Si le problème persiste, changez les batteries.
Indication :
Dans certains lieux où les signaux TNT sont peu puissants, il est recommandé d´ajouter une
antenne active dans la pièce pour recevoir toutes les chaînes disponibles.
Problèmes Solutions
Pas d’alimentation Vérifiez que l'adaptateur CA d’alimentation est correctement
Pas d’image /pas de son Assurez-vous que le branchement est correct, que le volume n’set
Interférence ou
déroulement
Le lecteur ne commence
pas la lecture
branché.
S’il est branché sur la pile, vérifiez si la pile n’est pas épuisée.
pas trop faible, que le récepteur audio ou le TV fonctionne
normalement. Vérifiez également le réglage audio.
Vérifiez que le type du TV est correct. PAL/ NTSC
A cause de la protection contre les copies de CD, Éviter le
branchement sur un VCR ou la combinaison TV/VCR.
Réglez le verrou vertical sur votre TV.
Retirez la protection du pickup laser en plastique sur le plateau du
disque.
Le DVD+/-RW en lecture doit être finalisé et ne pas être vide.
Placez le disque avec le côté écrit vers le haut et assurez-vous qu’il
se tienne bien le guide.
Assurez-vous que le disque n’a pas de rayures ou de trace de
doigts.
Insérez un disque qui peut être lu (vérifiez le type du disque, le
système couleur).
Ne lisez pas un disque avec un code région différent de celui de
votre lecteur.
Nettoyez le disque
Annulez la fonction de Restriction ou changez le niveau de
restriction. Le mot de passe pré réglé est 8888
Réinitialisez le lecteur.
26

Caractéristiques techniques
Alimentation avec adaptateur CA 100-240V AC 50/50 Hz
Consommation d’électricité 9 W
Poids 2.0 Kg
Dimensions externes 205 x 38 x 163.5 mm (L / H / A)
Système externe NTSC / PAL
Laser Laser semi conducteur, longueur d’ondes 650nm
Sortie Vidéo
Sortie Audio (numérique) 0.5V (p-p), 75 W
Sortie Audio (analogique) 2.0V (rms) 10 W
1.0V (p-p), 75 W
Français
27

Français
28

Índice
Precauciones/Información de seguridad 2
Introducción 6
Guía de inicio rápido 7
Mando a distancia 8
Conexión a una TV 9
Botones del mando a distancia 11
Reproducción de un disco 12
Picture CD y archivos JPEG 14
Formatos de audio comprimido 15
Localizar un título, capítulo o pista específico
Reproducir repetidamente 16
Aumentar una imagen
Selección de subtítulos 17
Información 17
Selección de ángulo de cámara 18
Establecer el bloqueo paterno 18
Configuración 19
Instalación DVB 21
Menú DVB 22
Soporte función USB 23
Instalación y uso de la batería recargable 24
Capacidad de batería 25
Solución de problemas 26
Especificaciones 27
17
15
Español
1

Información de seguridad
PRECAUCIÓN
RIESGO DE
ELECTROCUCIÓN NO
El relámpago con punta de flecha dentro de un triángulo equilátero advierte
al usuario de la presencia de “voltaje peligroso” no aislado dentro del chasis
del producto, que puede ser de la magnitud suficiente para presentar un
riesgo de electrocución a personas.
El símbolo de exclamación en un triángulo equilátero advierte al usuario de
la presencia de instrucciones importantes de uso y mantenimiento en la
Español
PRODUCTO LÁSER
CLASE 1
ATENCIÓN: NO EXPONGA ESTE APARATO A LA LLUVIA NI LA HUMEDAD, DEBIDO AL
ELEVADO RIESGO DE ELECTROCUCIÓN, NO ABRA EL CHASIS; VOLTAJE ELEVADO
PELIGROSO EN EL INTERIOR. SÓLO DEBE HACERLO PERSONAL DE SERVICIO
CUALIFICADO. PRECAUCIÓN: DURANTE LA REPRODUCCIÓN, EL DISCO GIRA A
ALTA VELOCIDAD, NO LEVANTE NI MUEVA EL REPRODUCTOR; HACERLO PUEDE
DAÑAR EL DISCO.
PRECAUCIÓN: Este reproductor vídeo digital de discos utiliza un sistema láser. Asegúrese
de que el dispositivo esté apagado antes de abrir la tapa del disco. Radiación láser visible
cuando esté abierto con los cierres forzados. El uso de controles, ajustes o realización de
procedimientos distintos a los aquí especificados puede resultar en una exposición
peligrosa a radiación.
El relámpago con punta de flecha dentro de un triángulo equilátero advierte al usuario de la
presencia de “voltaje peligroso” no aislado dentro del chasis del producto, que puede ser de
la magnitud suficiente para presentar un riesgo de electrocución a personas. El símbolo de
exclamación en un triángulo equilátero advierte al usuario de la presencia de instrucciones
importantes de uso y mantenimiento en la literatura que acompaña al aparato.
NO MIRE AL RAYO.
Para asegurar un uso adecuado de este producto, lea atentamente este manual del
propietario y consérvelo como referencia en el futuro. Si la unidad precisa mantenimiento,
póngase en contacto con un centro de servicio autorizado o con nosotros. La cubierta sólo
debe ser abierta por personal de servicio cualificado.
literatura que acompaña al aparato.
ESTE DISPOSITIVO CUMPLE CON EL APARTADO 15 DE LAS NORMAS
FCC. EL USO ESTÁ SUJETO A LAS DOS CONDICIONES SIGUIENTES:
(1) ESTE DISPOSITIVO PUEDE GENERAR INTERFERENCIAS DAÑINAS,
Y (2) ESTE DISPOSITIVO DEBE ACEPTAR CUALQUIER
INTERFERENCIA RECIBIDA. INCLUYENDO INTERFERENCIAS QUE
PUEDAN PROVOCAR UN FUNCIONAMIENTO NO DESEADO.
2

Información de seguridad
ADVERTENCIA SOBRE BATERÍAS:
Este reproductor DVD contiene un paquete de baterías Li-Ión. Existe riesgo de incendio y
quemaduras si se manipula incorrectamente el paquete de baterías. No desmonte, aplaste,
perfore, cortocircuite los contactos externos, ni tire al fuego o al agua. No intente abrir ni
reparar el paquete de baterías. Cambie solamente con el paquete de baterías designado
para este producto. Deseche las baterías usadas de acuerdo con las instrucciones del
fabricante.
PRECAUCIÓN: El uso de controles, ajustes o realización de procedimientos distintos a los
aquí especificados puede resultar en una exposición peligrosa a radiación.
Estudie cuidadosamente este manual y manténgalo disponible. Existen, sin embargo,
ciertas precauciones de instalación y uso que debería conocer.
1. Lea las instrucciones –Todas las instrucciones de seguridad y uso deben leerse
2. Conserve las instrucciones – Las instrucciones de seguridad y uso deben
3. Siga las advertencias – Todas las advertencias del aparato y las instrucciones de
4. Siga las instrucciones – Deben seguirse todas las instrucciones de uso.
5. Limpieza –Desconecte este producto de la toma de corriente antes de limpiarlo. No
6. Accesorios – No use accesorios no recomendados por el fabricante del producto,
7. Agua y humedad - El aparato no debe usarse cerca del agua, por ejemplo cerca de
8. Accesorios – No ponga este producto sobre un carro, pie, trípode, soporte o mesa
9. La combinación de producto y carro debe moverse con cuidado. Las detenciones
10. Ventilación – las ranuras y aperturas del chasis se incluyen para ventilación y para
antes de usar el producto.
conservarse como referencia en el futuro.
uso deben obedecerse.
use limpiadores líquidos ni en aerosol. Use un trapo suave humedecido para
limpiarlo.
pueden causar riesgos.
una bañera, un lavabo, un fregadero de cocina, un lavadero, una piscina o un
sótano húmedo y similares.
inestable. El producto podría caer, causando heridas graves a niños o adultos, y
graves daños al producto. Úselo solamente con un carro, pie, trípode, soporte o
mesa recomendado por el fabricante o vendido junto con el producto. Cualquier
montaje del productor debería seguir las instrucciones del fabricante, y debe usar un
accesorio de montaje recomendado por el fabricante.
súbitas, la fuerza excesiva y las superficies irregulares pueden hacer que la
combinación de carro y producto vuelque.
garantizar un funcionamiento fiable del producto y protegerlo de sobrecalentamiento,
y estas aperturas no deben obturarse ni cubrirse. Las aperturas no deben obturarse
nunca colocando el producto en una cama, sofá, alfombra o superficie similar. Este
producto no debe colocarse en una instalación integrada, como una librería o
estante, a menos que se proporcione una ventilación adecuada o se hayan seguido
las instrucciones del fabricante.
Español
3

Información de seguridad
11. Fuentes de alimentación – El producto debe usarse solamente con el tipo de
alimentación indicado en la etiqueta identificadora. Si no está seguro del tipo de
alimentación de su casa, consulte con su vendedor o compañía eléctrica local. Para
productos pensados para funcionar con alimentación por baterías u otras fuentes,
consulte las instrucciones de funcionamiento.
12. Protección del cable de alimentación -Los cables de alimentación deben colocarse
de modo que no sea probable que se pisen o enganchen con objetos colocados
sobre o contra ellos, con especial atención a los cables en los enchufes, tomas de
corriente, y el lugar en el que salen del producto.
13. Enchufe accesorio de protección – El producto está equipado con un enchufe
accesorio con protección frente a sobrecarga. Se trata de una medida se seguridad.
Español
Consulte el manual de instrucciones para información sobre el reemplazo o
restablecimiento del dispositivo protector. Cuando se precise un recambio del
enchufe, asegúrese de que el técnico de servicio haya usado un enchufe de
repuesto especificado por el fabricante o que tenga la misma protección de
sobrecarga que el enchufe original.
14. Toma de tierra de antena exterior – Si se conecta una antena exterior al producto,
asegúrese de que la antena tenga toma de tierra para proporcionar cierta
protección frente a subidas de tensión y cargas electroestáticas acumuladas.
15. Relámpagos - Para una protección añadida del producto durante una tormenta
eléctrica, o cuando esté sin uso ni supervisión durante periodos prolongados de
tiempo, desconéctelo de la toma y desconecte la antena o el sistema de cable. Esto
evitará dañar el producto debido a rayos y subidas de tensión.
16. Líneas de tensión - Un sistema de antena exterior no debe colocarse cerca de
líneas de tensión colgantes u otros circuitos de luz eléctrica o tensión, ni donde
pueda caer sobre estas líneas de tensión o circuitos. Cuando instale un sistema de
antena exterior, debe tomarse una precaución extrema para evitar tocar las líneas
de tensión o circuitos, ya que el contacto con ellos puede ser mortal.
17. Sobrecarga - No sobrecargue las tomas de pared, los cables extensores, ni los
receptáculos eléctricos integrales, lo que puede resultar en riesgo de incendio o
electrocución.
18. Entrada de objetos y líquidos - No introduzca nunca objetos de ningún tipo en el
producto mediante las aperturas, ya que podrían tocar puntos de voltaje peligrosos
o cortocircuitar piezas, lo que podría resultar en incendio o electrocución. No vierta
nunca líquidos de ningún tipo en el producto.
19. Asistencia - No intente reparar usted mismo el producto, ya que abrir o sacar las
tapas puede exponerse a voltajes peligrosos u otros riesgos. Dirija todas las
reparaciones a personal de servicio cualificado.
4

Información de seguridad
20. Daños que precisan de asistencia – Desconecte este producto de la toma de
corriente y dirija su reparación a personal de servicio cualificado en las condiciones
siguientes:
a. Cuando el cable de alimentación o el enchufe hayan sufrido daños .
b. Si se ha derramado líquido o introducido objetos en el aparato.
c. Si el aparato se ha visto expuesto a la lluvia o agua.
d. Si el producto no funciona normalmente al seguir las instrucciones de uso. Ajuste
solamente los controles que estén cubiertos por las instrucciones de uso, ya que un
ajuste inadecuado de otros controles puede resultar en daños y precisará de un
trabajo extenso por parte de un técnico cualificado para devolver al aparato su
funcionamiento normal.
e. Si el producto ha caído, o se ha dañado de cualquier modo, y
f. Cuando el producto muestre un cambio notable de rendimiento, indica la necesidad
de asistencia.
21. Recambios - Cuando se precisen piezas de recambio, asegúrese de que el técnico
de servicio haya usado piezas de recambio especificadas por el fabricante o que
tengan las mismas características que la pieza original. Las sustituciones no
autorizadas pueden provocar incendio, electrocución u otros riesgos.
Este producto incluye tecnología de protección de copyright protegida por la aplicación de
patentes de EE.UU. y otros derechos de propiedad intelectual de Macrovision Corporation y
otros poseedores de derechos. El uso de esta tecnología de protección de copyright debe
ser autorizado por Macrovison Corporation, y está limitado a un uso doméstico u otros usos
de visión limitada, a menos que se autorice explícitamente por parte de Macrovision
Corporation. Prohibidas la ingeniería inversa o el desmontaje.
Está prohibido por la ley copiar, emitir, mostrar, emitir por cable, reproducir en público y
alquilar material con copyright sin permiso.
Los discos DVD están protegidos contra copia, y las grabaciones de estos discos se
distorsionarán.
Fabricado bajo licencia de Dolby Laboratories. “Dolby”, “Pro Logic” y el símbolo de la doble
D son marcas de Dolby Laboratories.
“DTS” y “DTS Digital Out” son marcas de Digital Theater Systems, Inc.
Nota:
• Ajuste el volumen de su receptor a un nivel cómodo de escucha para evitar dañar el
altavoz.
• Cuando conecte y desconecte el reproductor vídeo DVD, apague el amplificador
para evitar dañar los altavoces.
Español
5

Introducción
Su nuevo reproductor portátil DVD está diseñado para que disfrute con todo tipo de discos
de medios. Su forma delgada le permite llevarlo fácilmente y disfrutar de películas y música
en cualquier lugar. Su reproductor incluye la última tecnología audiovisual (AV) digital para
ofrecerlo la experiencia definitiva de escucha y visionado.
Su reproductor también incluye diversas características únicas, una pantalla LCD activa
grande, multi ángulo y multi idioma, control paterno (para evitar que los niños vean
contenido inadecuado) y compatibilidad con CD de imágenes (de modo que pueda ver fotos
en su TV). Es una auténtica máquina multimedia diseñada para que el mundo multimedia
Español
disfrute.
DESEMBALAJE
Inventaríe primero los contenidos del embalaje de su reproductor DVD portátil:
Reproductor DVD portátil
Cable audio 1
Cable vídeo y coaxial
Paquete de baterías Li-Polymer
Mando a distancia
Adaptador de potencia externo
Adaptador para encendedor
Manual de uso
Auricular estéreo
1
1
1
1
1
1
1
1
Si cualquier elemento está dañado o ausente, póngase en contacto con su vendedor
lo antes posible. Conserve los materiales de embalaje, puede necesitarlos para
transportar su reproductor en el futuro.
ATENCIÓN:
• Los cambios o modificaciones realizados en este equipo que no estén
específicamente aprobados por nosotros o por terceros autorizados anularán todas
las garantías de fabricación.
6

Guía de inicio rápido
1. Conexión a fuente de alimentación externa. Conecte el cable de
alimentación (incluido con el reproductor) a la toma de entrada lateral y a
una toma de corriente. No use ningún otro dispositivo a menos que sea
especificado por su vendedor.
2. Abra la tapa protectora: La tapa se abre hasta un máximo de 135º, no
intente abrirla más.
3. Pulse el botón de apertura a la izquierda para OPEN la tapa del disco. No
presione nunca el botón de apertura a la izquierda durante la reproducción.
4. Introducir un disco DVD: Alinee el centro del disco DVD con el centro de la guía del
disco. Presione suavemente el DVD hacia abajo para encajar el disco en su lugar, y
cierre la tapa del disco.
5. Ponga el interruptor lateral de encendido en ‘ON': Si desea poner otro disco o sacar
uno, debe pulsar STOP dos veces y, cuando el disco deje de girar, pulsar el botón
OPEN, y luego sacarlo.
6. Pulse el botón PLAY en la parte frontal del reproductor (según el título
DVD, pulse ENTER). Normalmente, el DVD ya introducido en el
reproductor empezará a leer automáticamente cuando se encienda.
Nota:
• El reproductor DVD comenzará de inmediato a mostrar el programa DVD. Cuando
desee detener, pulse el botón STOP, y volverá al logo. Para apagar la unidad,
ponga el interruptor de ON /OFF en posición OFF. El reproductor DVD se apagará
automáticamente a los 20 minutos de acceder al modo salva pantallas. Para
reiniciar la unidad, ponga el interruptor de encendido en ‘OFF’, y luego póngalo en
‘ON’.
On /Off
Español
On /Off
7

Mando a distancia
Introducción al mando a distancia
1. Abra el compartimiento de baterías
2. Aguante el equipo por el punto 1 (ver imagen) y presione la tapa en dirección 2 (ver
imagen).
3. Introduzca la batería en el compartimiento. Preste atención a la polaridad correcta
(+/-) cuando introduzca la batería.
4. Vuelva a poner el compartimiento en el mando a distancia.
Español
Uso del reproductor DVD con el mando a distancia
punte siempre el mando a distancia al sensor del reproductor DVD.
SENSOR REMOTO
CONFIGURAR EL REPRODUCTOR
1. Conecte los cables audio a SALIDA AUDIO del
reproductor DVD.
2. Conecte el cable amarillo a VIDEO en el lado de su
reproductor.
Entrada audio TV
Blanco Rojo
Entrada
vídeo TV
Amarillo
8

Conexión a una TV
CONEXIÓN DE AURICULARES
1. Conecte los auriculares. Pueden conectarse
auriculares con una toma estéreo de 3,5 mm.
2. Ajuste el volumen girando el dial.
Nota:
• Evite escuchas sonidos a volúmenes que puedan ser
dañinos para sus oídos.
CONEXIÓN de RCA estéreo a un sistema de sonido
Disfrute del sonido envolvente Dolby Pro Logia (BUENO) Dolby Pro Logic Surround. Disfrute
del sonido dinámico realista de Dolby Pro Logic Surround conectando un amplificador y
sistema de altavoces (altavoces frontales derecho e izquierdo, un altavoz central, y uno o
dos altavoces traseros).
Ejemplo de
conexión
Español
A entrada
audio
Altavoz frontal
(izquierdo)
A SALIDA
AUDIO
Altavoz
central
Altavoz
trasero
Amplificador
equipado con
Dolby Pro
Logic Surround
Amarillo
Altavoz frontal
(derecho)
A SALIDA
VÍDEO
9
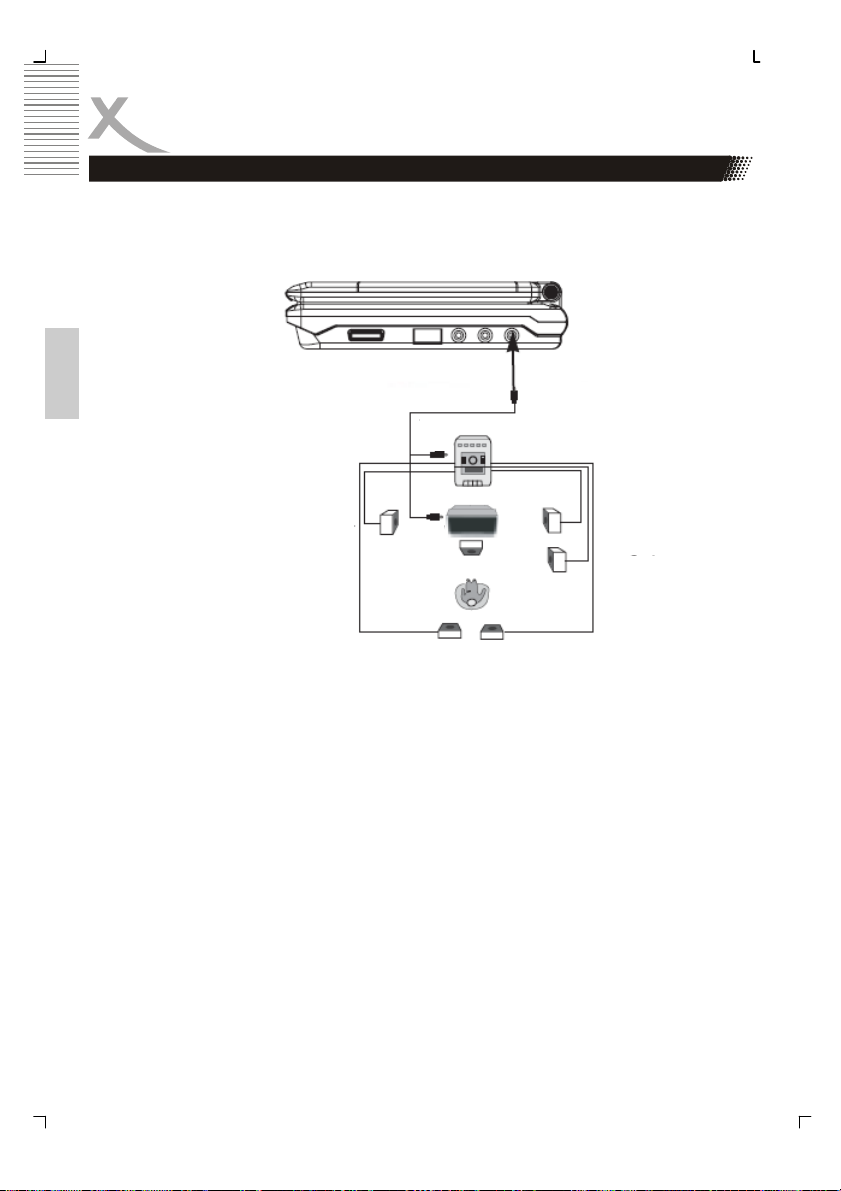
Conexión a equipos opcionales
Disfrute de Dolby Digital o DTS (MEJOR)
La programación Dolby Digital y DTS puede ofrecer sonido envolvente con cinco canales
completos más un sexto canal para subwoofer. Puede disfrutar de su DVD con un sistema
de sonido envolvente Dolby Digital o DTS. Todo lo que necesita es conectar su reproductor
DVD a un receptor Dolby Digital/DTS o un receptor Dolby Digital Ready con descodificador
externo.
Español
• En caso de Dolby Digital, debería configurar en "SPDIF/PCM" o "SPDIF/RAW".
• En caso de DTS, debería configurar en "SPDIF/RAW".
LADO DVD
Altavoz
frontal
(izquierdo)
A PCM/BITSTREAM
Naranja
A SALIDA VÍDEO
Amarillo
TV
Negro
Altavoz
frontal
(derecho)
10

BOTONES DEL MANDO A DISTANCIA
Botones en el mando a distancia
1. Espera (StandBy)
2. Silencio (Mute)
3. 1 / Repetir (Repeat)
4. 2 / Repetir segmento A-B (A-B)
5. 3 / PRGM (Programa) (PRGM)
6. 4 / Audio (Audio)
7. 5 / Ángulo (Angle)
8. 6 / Zoom (Zoom)
9. 7 / Ralentizar (Slow)
10. 8 / Título (Title)
11. Cambiar (Shift)
12. Pantalla (Display)
13. Reproducir (Play)
14. Para / DVB-T (CH + (Canal))
15. Izquierda / DVB-T (V- (Volumen))
16. Derecha / DVB-T (V+ (Volumen))
17. Detener / Salir (Stop / Exit)
18. Bajo / DVB-T (CH - (Canal))
19. II / Fotograma (II / Step)
20. Configuración (Setup)
21. |<< / DVB-T (EPG)
22. >>| / DVB-T (Teletexto)
23. Ir a (Goto) / DVB-T (TV/Radio)
24. Menú (Menu)
25. SUB-T (SUB-T)
26. << / DVB-T (Favoritos)
27. >> / DVB-T (Info)
28. Función (Cambia el modo DVD, DVB-
T y USB)
Nota:
• La mayoría de botones numéricos
tienen una doble función. La segunda
función se puede activar con el botón
Shift. Por ejemplo, para reproducir
un DVD vídeo se desea repetir un
capítulo, con lo que se pulsa durante
la reproducción la combinación de
botones “Cambio” + “l” y el
reproductor se pone en modo
repetición.
• En el mando a distancia hay ciertas
etiquetas de botones de color rojo.
Estas teclas sólo funcionan en modo
DVB-T, como EPG, Teletexto o CH+.
1.
3.
4.
7.
8.
12.
14.
15.
19.
20.
21.
22.
23.
24.
2.
5.
6.
9.
10.
11.
13.
16.
17.
18.
25.
26.
27.
28.
Español
11

Reproducción de un disco
CONTROLES PARA REPRODUCCIÓN BÁSICA
Español
1. BOTONES DE DIRECCIÓN
2. ENTER
3. CONFIGURACIÓN
4. SUBTÍTULOS
5. MENÚ DISCO
El sistema mostrará el menú siguiente si se apaga por primera vez, puede seleccionar una
de las funciones.
Si selecciona la unidad DVD-ROM, el sistema accederá al modo DVD, si hay un disco en la
unidad, ésta identificará el formato del disco y lo reproducirá automáticamente.
En modo DVD, pulse STEUP para acceder al menú de configuración.
6. REPRODUCIR
7. PAUSA
8. DETENER
9. ABRIR / PRESIONE
12

Reproducción de un disco
CÓMO COMENZAR LA REPRODUCCIÓN DESDE LA PANTALLA DE MENÚ
Conecte el cable de alimentación y la unidad, el LED de espera se encenderá, pulse
POWER para encender la unidad; si desea apagar la unidad, pulse POWER de nuevo.
Encienda la unidad, si hay un disco bajo la tapa, la unidad detectará el formato del disco y
lo reproducirá automáticamente.
CÓMO ABRIR/CERRAR LA BANDEJA DE DISCO
Si no hay disco, pulse EJECT para abrir la bandeja del disco, y ponga un disco dentro y
pulse EJECT de nuevo, la unidad leerá y reproducirá el disco automáticamente después de
cerrar la tapa.
CÓMO DETENER LA REPRODUCCIÓNCómo acceder
Pulse STOP. El reproductor se detendrá.
FAST FORWARD & REWIND
Puede reproducir un disco a x2, x4, x8, x16 o x32 de la velocidad normal para avance
rápido o rebobinado.
Pulse REB o AR durante la reproducción. La velocidad de reproducción normal se doblará.
La velocidad de reproducción cambia cada vez que pulse REB o AR.
Nota:
• La función no es válida en algunos discos DVD.
También se puede reproducir a cámara lenta.
Español
REPRODUCIR A CÁMARA LENTA
1. Pulse SHIFT para activar el cambio y poder usar el botón SLOW.
2. Pulse SLOW durante la reproducción. La velocidad de reproducción
será 1/2, 1/4, 1/8, 1/16 o 1/32 de la velocidad normal cada vez que
pulse SLOW.
Nota:
• Durante el REB, AR y reproducción a cámara lenta se silencia el
sonido.
• La función no es válida en algunos discos DVD.
SLOW
SHIFT
PLAY
13

Reproducción de un disco
Reproducir sus CD de imagen o archivos JPEG
Puede usar su reproductor DVD para ver fotografías fijas en un CD-R. Las fotografías del
disco necesitan guardarse en formato de archivo JPEG.
1. Ponga el CD en la bandeja del disco.
2. Seleccione una carpeta o imagen contenida en el CD. Tras la carga del CD,
aparecerá un menú en pantalla. Pulse UP o DOWN para seleccionar una carpeta, y
pulse ENTER/PLAY para ver el contenido de la carpeta.
3. Iniciar reproducción Cuando se cargue un CD JPEG, se ejecuta una presentación
de diapositivas automática. Cada imagen del directorio actual se mostrará
consecutivamente en presentación y se adaptará para cubrir el máximo de la
Español
pantalla. Pulse “STOP” para ver los veinte tipos de transición de presentación
incluidos. Las imágenes se presentarán en una proyección, y hay muchos estilos de
efecto de transición, como Cubrir arriba, Cubrir abajo, Cubrir a izquierda, Cubrir a
derecha, Descubrir arriba, Descubrir abajo, Descubrir izquierda, Descubrir derecha,
Barrido arriba, Barrido abajo, Barrido a izquierda, Barrido a derecha, Empujar arriba,
Empujar abajo, Empujar a izquierda, Empujar a derecha, Aleatorio, Sin efecto, etc.
Use el botón ANGLE para cambiar el estilo de diapositiva.
4. Rotar una imagen Durante la presentación, puede usar las teclas de flecha para
girar una imagen:
• Pulse izquierda para girar la imagen a la izquierda en 90º
• Pulse derecha para girar la imagen a la derecha en 90º
• Pulse ARRIBA, el lado izquierdo de la imagen se girará a la derecha.
1 Pulse abajo, la imagen se girará cabeza abajo.
5. Zoom Esta característica le permite ver una imagen al 25%, 50%, 100%, 150% o
200% en distintos incrementos. Pulse el botón ZOOM. Un mensaje en pantalla
(“Zoom On”) confirmará su selección. Use las teclas delgadas para controlar la
cantidad de aumento o disminución. Pulse las teclas de dirección para cambiar el
punto de aumento. Con Zoom Off, la imagen se adapta para cubrir el máximo de su
pantalla de TV.
6. Menú Durante la reproducción, pulse MENÚ para acceder al menú de miniaturas.
Para ver archivos JPEG, pulse MENÚ, aparecerá un menú en pantalla. Pulse
ARRIBA o ABAJO para seleccionar una carpeta, y pulse ENTER/PLAY para ver el
contenido de la carpeta (mostrados en la columna izquierda como a continuación).
14
 Loading...