


3-858-174-22 (1)
Digital Video
Camera Recorder
Operating Instructions
Before operating the unit, please read this manual thoroughly, and retain it for future reference.
Manual de instrucciones
Antes de utilizar la unidad, lea este manual por completo y consérvelo para consultar.
Owner’s Record
The model and serial numbers are located on the bottom. Record the serial number in the space provided below. Refer to these numbers whenever you call upon your Sony dealer regarding this
product. |
|
|
|||
Model No. DCR-PC7 |
Model No. AC-V100 |
||||
Serial No. |
Serial No. |
||||
|
|
|
|
|
|
DCR-PC7
©1996 by Sony Corporation
DCR-PC7.3-858-174-22(E,S)

English
WARNING
To prevent fire or shock hazard, do not expose the unit to rain or moisture.
CAUTION
RISK OF ELECTRIC SHOCK
DO NOT OPEN
CAUTION : TO REDUCE THE RISK OF ELECTRIC SHOCK,
DO NOT REMOVE COVER (OR BACK).
NO USER•SERVICEABLE PARTS INSIDE.
REFER SERVICING TO QUALIFIED SERVICE PERSONNEL.
This symbol is intended to alert the user to the presence of uninsulated “dangerous voltage” within the product’s enclosure that may be of sufficient magnitude to constitute a risk of electric shock to persons.
This symbol is intended to alert the user to the presence of important operating and maintenance (servicing) instructions in the literature accompanying the appliance.
For the customers in the United States and Canada
DISPOSAL OF LITHIUM ION BATTERY. LITHIUM ION BATTERY.
DISPOSE OF PROPERLY.
You can return your unwanted lithium ion batteries to your nearest Sony Service Center or Factory Service Center.
Note: In some areas the disposal of lithium ion batteries in household or business trash may be prohibited.
For the Sony Service Center nearest you call 1-800-222-SONY (United States only).
For the SONY Factory Service Center nearest you call 416-499-SONY (Canada only).
Caution: Do not handle damaged or leaking lithium ion batteries.
For the Customers in the U.S.A.
WARNING
This equipment has been tested and found to comply with the limits for a Class B digital device, pursuant to Part 15 of the FCC Rules. These limits are designed to provide reasonable protection against harmful interference in a residential installation. This equipment generates, uses, and can radiate radio frequency energy and, if not installed and used in accordance with the instructions, may cause harmful interference to radio communications. However, there is no guarantee that interference will not occur in a particular installation. If this equipment does cause harmful interference to radio or television reception, which can be determined by turning the equipment off and on, the user is encouraged to try to correct the interference by one or more of the following measures:
—Reorient or relocate the receiving antenna.
—Increase the separation between the equipment and receiver.
—Connect the equipment into an outlet on a circuit different from that to which the receiver is connected.
—Consult the dealer or an experienced radio/TV technician for help.
CAUTION
You are cautioned that any changes or modifications not expressly approved in this manual could void your authority to operate this equipment.
For the Customers in CANADA
CAUTION
TO PREVENT ELECTRIC SHOCK, DO NOT USE THIS POLARIZED AC PLUG WITH AN EXTENSION CORD, RECEPTACLE OR OTHER OUTLET UNLESS THE BLADES CAN BE FULLY INSERTED TO PREVENT BLADE EXPOSURE.
Español
ADVERTENCIA
Para evitar riesgos de incendio o descargas, no exponga la unidad a la lluvia ni a la humedad.
Para evitar descargas eléctricas, no abra la unidad y solicite asistencia técnica sólo a personal cualificado.
2
DCR-PC7.3-858-174-22 (E,S)

Table of contents
Before you begin
Using this manual 4
Checking supplied accessories 6
Getting started
Charging and installing the battery pack 7 Inserting a cassette 11
Basic operations
Camera recording 12 Using the zoom feature 15
Shooting with the LCD screen 16 Hints for better shooting 19 Playing back a tape 21
Searching for the end of the picture 24
Advanced operations
Using alternative power sources 25 Using the house current 25
Changing the mode settings 28
—for camera recording—
Letting the subject monitor the shot 32 Shooting scenery in several short takes 33 Fade-in and fade-out 34
Locking the exposure 35 Photo recording 36
Releasing the SteadyShot function 38 Using the PROGRAM AE function 40 Focusing manually 42
Adjusting the white balance 44
—for playing back/editing—
Watching on a TV screen 46
Displaying recording data – data code function 48 Returning to a pre-registered position 49 Locating the beginning of each scene 50
Editing onto another tape 51
Replacing recording on a tape – insert editing 54 Audio dubbing 55
Additional Information
Charging the vanadium-lithium battery in the camcorder 57
Resetting the date and time 58
Usable cassettes and playback modes 60 Tips for using the battery pack 62 Maintenance information and precautions 66 Using your camcorder abroad 70
Trouble check 71 Specifications 79 Identifying the parts 81 Warning indicators 91 Index Back cover
Indice
Antes de empezar |
|
|
|
|
|
|
|
Uso del manual 4 |
|
|
|
Comprobación de accesorios suministrados 6 |
|
Before |
|
Puesta en marcha |
|
|
|
|
|
|
|
Carga e instalación del paquete de baterías 7 |
|
you |
|
Inserción de videocassettes 11 |
|
|
|
Grabación con la cámara 12 |
|
/begin |
|
Operaciones básicas |
|
|
|
Uso de la función de zoom 15 |
|
Antes |
|
Filmación con la pantalla LCD 16 |
|
|
|
|
|
|
|
Consejos para videofilmar mejor 19 |
|
de |
|
Reproducción de cintas 21 |
|
|
|
Búsqueda del final de la imagen 24 |
|
empezar |
|
Operaciones avanzadas |
|
|
|
|
|
|
|
Uso de fuentes de alimentación alternativas 25 |
|
|
|
Uso de corriente doméstica 25 |
|
|
|
Cambio de los ajustes de modo 28 |
|
|
|
—para videofilmación con la cámara— |
|
|
|
Control de videofilmación por el sujeto 32 |
|
|
|
Videofilmación de escenarios en varias tomas |
|
|
|
cortas 33 |
|
|
|
Aparición y desaparición gradual de imágenes 34 |
|
|
|
Bloqueo de la exposición 35 |
|
|
|
Grabación fotográfica 36 |
|
|
|
Desactivación de la función STEADYSHOT 38 |
|
|
|
Uso de la función PROGRAM AE 40 |
|
|
|
Enfoque manual 42 |
|
|
|
Ajuste del balance de blancos 44 |
|
|
|
—para reproducción/edición— |
|
|
|
Reproducción en pantallas de televisor 46 |
|
|
|
Visualización de datos de grabación |
|
|
|
– función DATA CODE 48 |
|
|
|
Localización de posiciones registradas de |
|
|
|
antemano 49 |
|
|
|
Localización del principio de cada escena 50 |
|
|
|
Edición en otra cinta 51 |
|
|
|
Sustitución de una grabación en una cinta – edición |
|
|
|
de inserción 54 |
|
|
|
Copia de audio 55 |
|
|
|
Información adicional |
|
|
|
Carga de la pila de vanadio-litio en la videocámara |
|
|
|
57 |
|
|
|
Reajuste de fecha y hora 58 |
|
|
|
Videocassettes utilizables y modos de reproducción |
|
|
|
60 |
|
|
|
Consejos para usar el paquete de baterías 62 |
|
|
|
Información y precauciones de mantenimiento 66 |
|
|
|
Uso de la videocámara en el extranjero 70 |
|
|
|
Comprobación de errores 75 |
|
|
|
Especificaciones 80 |
|
|
|
Identificación de componentes 81 |
|
|
|
Indicadores de aviso 91 |
|
|
|
Indice Tapa posterior |
|
|
|
3
DCR-PC7.3-858-174-22 (E,S)

Before you begin
Using this manual
Welcome !
Congratulations on your purchase of this Sony Handycam VisionΤΜ camcorder. With your Handycam Vision, you can capture life’s precious moments with superior picture and sound quality. Your Handycam Vision is loaded with advanced features, but at the same time it is very easy to use. You will soon be producing home video that you can enjoy for years to come.
As you read through this manual, buttons and settings on the camcorder are shown in capital letters.
e.g., Set the POWER switch to CAMERA.
As indicated with  in the illustrations, you can hear the beep sound to confirm your operation.
Note on TV color systems
TV color systems differ from country to country. To view your recordings on a TV, you need an NTSC system-based TV.
Precaution on copyright
Television programs, films, video tapes, and other materials may becopyrighted. Unauthorized recording of such materials may be contrary to the provision of the copyright laws.
Antes de empezar
Uso del manual
Bienvenido !
Enhorabuena por la adquisición de la videocámara Sony Handycam VisionΤΜ. Esta videocámara es la herramienta ideal para captar los mejores momentos con una calidad de imagen y sonido superiores. Handycam Vision está equipada con funciones avanzadas y se caracteriza por su fácil uso. Ya puede realizar videos caseros y disfrutar de ellos en años futuros.
Al leer este manual observará que los botones y ajustes de la videocámara se indican en mayúsculas.
Por ejemplo, Ajuste el interruptor POWER en CAMERA.
Tal como se indica con  en las ilustraciones, la cámara emitirá un pitido para confirmar la operación.
Nota sobre sistemas de color de
televisión
Los sistemas de color de televisión difieren de un país a otro. Para visualizar las grabaciones en un televisor, éste debe basarse en el sistema NTSC.
Precauciones sobre los derechos
de autor
Los derechos de autor de programas de televisión, películas, cintas de vídeo y otros materiales pueden estar registrados. La grabación no autorizada de dichos materiales puede infringir las disposiciones de la legislación sobre derechos de autor.
4
DCR-PC7.3-858-174-22 (E,S)
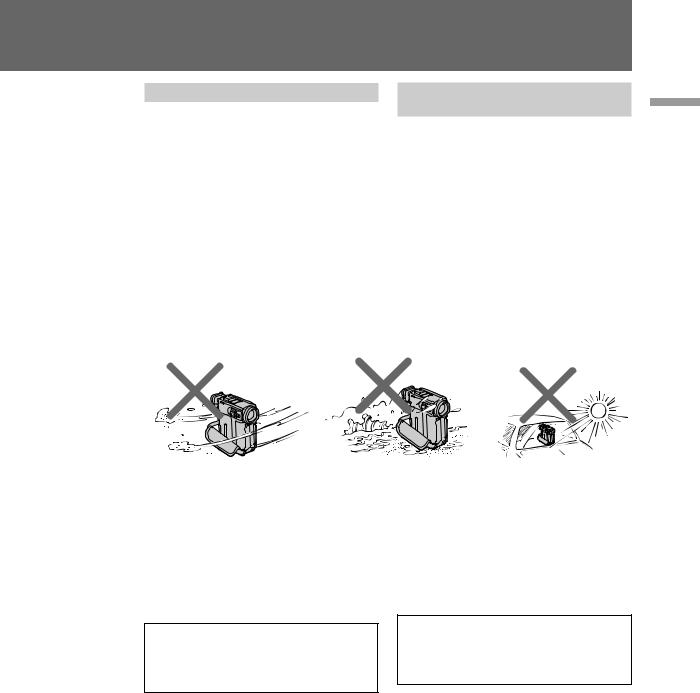
Precautions on camcorder care
•Do not let sand get into the camcorder. When you use the camcorder on a sandy beach or in a dusty place, protect it from the sand or dust. Sand or dust may cause the unit to malfunction, and sometimes this malfunction cannot be repaired [a].
•Do not let the camcorder get wet. Keep the camcorder away from rain and sea water. Letting the camcorder get wet may cause the unit to malfunction, and sometimes this malfunction cannot be repaired [b].
•Never leave the camcorder exposed to temperatures above 140°F (60°C), such as in a car parked in the sun or under direct sunlight [c].
Precauciones sobre el cuidado
de la videocámara
•Impida que entre arena en la videocámara. Si utiliza la videocámara en playas de arena o en lugares polvorientos, protéjala de la arena y el polvo. La arena y el polvo pueden provocar anomalías en el funcionamiento de la unidad que a veces no pueden repararse [a].
•Impida que la videocámara se moje. Manténgala alejada de la lluvia y el agua del mar. El agua puede ocasionar anomalías en el funcionamiento de la unidad que a veces no pueden repararse [b].
•No deje nunca la videocámara expuesta a temperaturas superiores a 140°F (60°C), como en un automóvil aparcado al sol o bajo la luz solar directa [c].
[a] |
[b] |
[c] |
Note on the color viewfinder and the LCD screen
The color viewfinder and the LCD screen are made with high-precision technology. However, black points or bright points of light (red, blue, or green) may appear constantly on the color viewfinder or the LCD screen. These points are not recorded on the tape. This is not a malfunction. (Effective dots: more than 99.99%)
Contents of the recording cannot be compensated if recording or playback is not made due to a malfunction of the camcorder, video tape, etc.
Nota sobre la pantalla LCD y el visor electrónico en color
Aunque el visor electrónico y la pantalla LCD en color están fabricados con tecnología de alta precisión, es posible que aparezcan en ellos puntos negros o brillantes de luz (rojos, azules o verdes). Estos puntos no se graban en la cinta o no suponen ningún fallo de funcionamiento. (Puntos efectivos: más del 99,99%)
El contenido de la grabación no puede corregirse si no es posible grabar o reproducir debido al mal funcionamiento de la videocámara, la cinta de vídeo, etc.
empezar de Antes / begin you Before
5
DCR-PC7.3-858-174-22 (E,S)
Comprobación de Checking supplied accesorios accessories suministrados
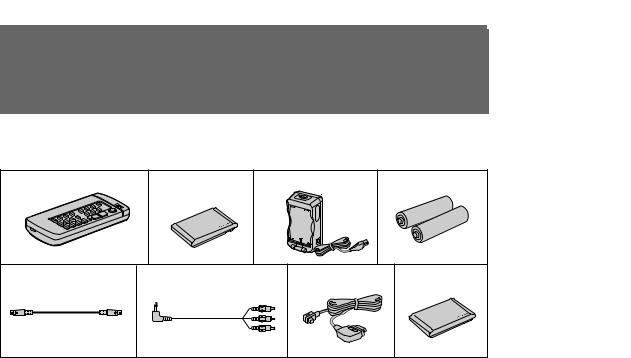
Check that the following accessories are supplied with your camcorder.
Compruebe que con la cámara se suministran los siguientes accesorios.
1 |
2 |
3 |
|
4 |
5 |
6 |
|
7 |
8 |
1Wireless Remote Commander (1) (p. 85)
2NP-F100 battery pack (1) (p. 7)
3AC-V100 AC power adaptor (1) (p. 7, 25)
4Size AA (R6) battery for Remote Commander (2) (p. 86)
5S video connecting cable (1) (p. 46, 52)
6A/V connecting cable (1) (p. 46, 52)
7DK-626 connecting cord (1) (p. 25)
8Battery terminal cover (1) (p. 10)
1Mando a distancia inalámbrico (1) (p. 85)
2Paquete de baterías NP-F100 (1) (p. 7)
3Adaptador de alimentación de CA AC-V100
(1) (p. 7, 25)
4Pilas de tamaño AA (R6) para el mando a distancia (2) (p. 86)
5Cable de vídeo S (1) (p. 46, 52)
6Cable de conexión A/V (1) (p. 46, 52)
7Cable de conexión DK-626 (1) (p. 25)
8Tapa del terminal de la batería (1) (p. 10)
6
DCR-PC7.3-858-174-22 (E,S)
|
|
|
|
|
|
Getting started |
Puesta en marcha |
|
|
||
|
|
Charging and installing |
Carga e instalación del |
|
|
the battery pack |
paquete de baterías |
|
|
|
|
Before using your camcorder, you first need to charge and install the battery pack. To charge the battery pack, use the supplied AC power adaptor.
This camcorder operates with the NP-F100/NP- F200 “InfoLITHIUM” battery pack.
“InfoLITHIUM” is a trademark of Sony Corporation.
Antes de emplear la videocámara, primero es necesario cargar e instalar el paquete de baterías. Para cargarlo, utilice el adaptador de alimentación de CA suministrado.
Esta videocámara funciona con el paquete de baterías “InfoLITHIUM” NP-F100/NP-F200.
“InfoLITHIUM” es una marca comercial de Sony Corporation.
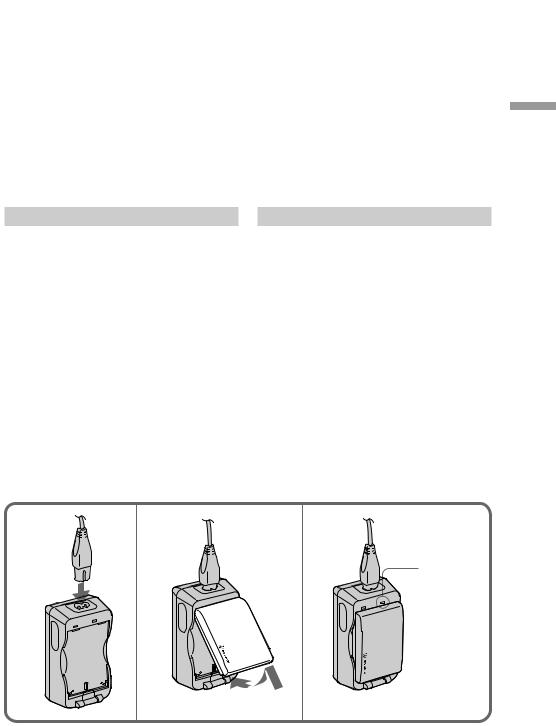
Charging the battery pack
(1)Connect the power cord to the AC power adaptor.
(2)Fit the hooks of the battery pack to the AC power adaptor. Then place the battery pack down in the direction of the arrow.
(3)Connect the AC power cord to a wall outlet. The CHARGE lamp (orange) lights up. Charging begins.
When the CHARGE lamp goes out, normal charge is completed (Normal charge). For a full charge, which allows you to use the battery longer than usual, leave the battery pack in place for approximately one hour (Full charge). Unplug the cord from the wall outlet, then remove the battery pack and install it into the camcorder. You can also use the battery pack before it is completely charged.
Carga del paquete de baterías
(1)Conecte el cable de alimentación al adaptador de alimentación de CA.
(2)Sujete los ganchos del paquete con el adaptador de CA. A continuación, fije dicho paquete en la dirección de la flecha.
(3)Conecte el cable de alimentación de CA a una toma de red. Se iluminará el indicador CHARGE (naranja) y comenzará la carga.
El indicador CHARGE se apaga cuando el proceso normal de carga finaliza (carga normal). Para una carga total, que permite usar la batería durante más tiempo del habitual, deje el paquete de baterías cargando durante aproximadamente una hora (carga total). Desenchufe el cable de la toma de red, retire el paquete de baterías e instálelo en la videocámara. El paquete de baterías también puede utilizarse antes de estar totalmente cargado.
marcha en Puesta / started Getting
1 |
2 |
3 |
CHARGE
CHARGE
Continued to the next page |
Continúa en la página siguiente |
7 |
DCR-PC7.3-858-174-22 (E,S)

Charging and installing the battery pack
Charging time
Battery pack |
Charging time * |
|
NP-F100 (supplied) |
130 |
(70) |
|
|
|
NP-F200 |
170 |
(110) |
|
|
|
Numbers in parentheses indicate the time for a normal charge. (Normal charge)
*Approximate number of minutes to charge an empty battery pack fully using the supplied AC power adaptor. (Full charge) (Lower temperatures require a longer charging time.)
Battery life
While using with viewfinder
Battery |
Continuous |
Typical |
|
pack |
recording |
recording |
|
|
time ** |
time *** |
|
|
|
|
|
NP-F100 |
55 (45) |
30 (25) |
|
(supplied) |
|
|
|
|
|
|
|
NP-F200 |
100 (85) |
50 (45) |
|
|
|
|
|
While using with LCD |
|
|
|
|
|
|
|
Battery |
Continuous |
Typical |
Playing |
pack |
recording |
recording |
time |
|
time ** |
time *** |
with LCD |
|
|
|
|
NP-F100 |
45 (40) |
25 (20) |
50 (45) |
(supplied) |
|
|
|
|
|
|
|
NP-F200 |
75 (70) |
40 (35) |
90 (80) |
|
|
|
|
Numbers in parentheses indicate the time when you use a normal charged battery pack.
When using both the viewfinder and the LCD screen, the battery life is shorter.
When recording in a cold environment, the battery life is shorter
**Approximate number of minutes to record at normal temperature
***Approximate number of minutes when recording with repeated recording start/stop, standby, zooming and turning the power on/ off. The actual battery life may be shorter.
Note on remaining battery time indication during recording
Remaining battery time is displayed on the LCD screen or in the viewfinder. It may not be displayed properly, however, depending on the conditions and circumstances of use.
8
Carga e instalación del paquete de baterías
Tiempo de carga
Paquete de baterías |
Tiempo de carga * |
|
NP-F100 (suministrado) |
130 |
(70) |
|
|
|
NP-F200 |
170 |
(110) |
|
|
|
Los números entre paréntesis indican el tiempo de carga normal. (carga normal)
*Minutos aproximados necesarios para cargar un paquete de baterías agotado mediante el adaptador de alimentación de CA suministrado. (carga total) (A temperaturas más bajas es preciso un tiempo de carga más prolongado.)
Duración de la batería
Si utiliza el visor electrónico
Paquete de |
Tiempo de |
Tiempo de |
baterías |
grabación |
grabación típica |
|
continua ** |
*** |
|
|
|
NP-F100 |
55 (45) |
30 (25) |
(suminis- |
|
|
trado) |
|
|
|
|
|
NP-F200 |
100 (85) |
50 (45) |
|
|
|
Si utiliza la pantalla LCD
Paquete |
Tiempo de |
Tiempo de |
Tiempo de |
de |
grabación |
grabación |
reproducción |
baterías |
continua ** |
típica *** |
en LCD |
|
|
|
|
NP-F100 |
45 (40) |
25 (20) |
50 (45) |
(suminis- |
|
|
|
trado) |
|
|
|
|
|
|
|
NP-F200 |
75 (70) |
40 (35) |
90 (80) |
|
|
|
|
Los números entre paréntesis indican el tiempo cuando se utiliza un paquete de baterías con carga normal.
Si emplea el visor electrónico y la pantalla LCD, la duración de la batería será inferior.
Si graba en ambientes fríos, la duración de la batería será inferior.
**Número aproximado de minutos para grabar con temperatura normal
***Número aproximado de minutos cuando se graba con operaciones repetidas de inicio/ detención de la grabación, modo de espera, zoom y encendido y apagado de la unidad. La duración real de la batería puede ser inferior.
Nota sobre la indicación de tiempo restante de la batería durante la grabación
La pantalla LCD o el visor electrónico muestra el tiempo restante de la batería. Sin embargo, la indicación puede ser incorrecta según las condiciones y circunstancias de uso.
DCR-PC7.3-858-174-22 (E,S)
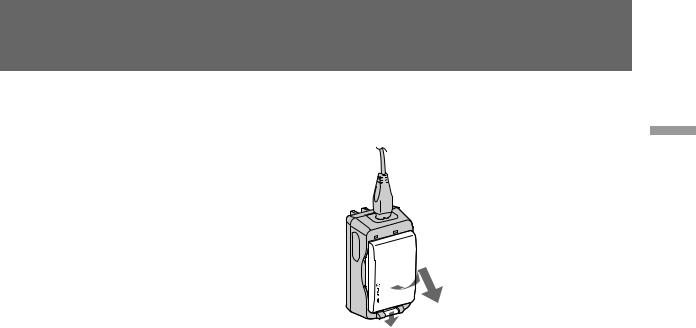
To remove the battery pack
While holding the battery pack firmly, press the button on the AC power adpator and take out the battery pack in the direction of the arrow.
Para extraer el paquete de baterías
Mientras sujeta firmemente el paquete de baterías pulse el botón en el adaptador de CA y saque siguiendo la dirección de la flecha.
marcha en Puesta / started Getting
When removing the battery pack
Be careful not to drop it.
Notes on charging the battery pack
•The CHARGE lamp will remain lit for a while even if the battery pack is removed and the power cord is unplugged after charging the battery pack. This is normal.
•If the CHARGE lamp does not light, disconnect the power cord. After about one minute, reconnect the power cord again.
•You cannot charge the battery pack while operating the camcorder using the AC power adaptor.
•When a fully charged battery pack is installed, the CHARGE lamp will light once, then go out.
Al extraer el paquete de baterías
Tenga cuidado para que no se caiga.
Notas sobre la carga del paquete de baterías
•El indicador CHARGE permanece iluminado unos momentos incluso si se ha retirado el paquete de baterías y se ha desenchufado el cable de alimentación después de cargar el paquete de baterías. Es normal.
•Si el indicador CHARGE no se ilumina, desconecte el cable de alimentación. Vuelva a conectarlo después de aproximadamente un minuto.
•No es posible cargar el paquete de baterías mediante el adaptador de alimentación de CA mientras se utiliza la videocámara.
•Cuando se instala un paquete de baterías totalmente cargado, el indicador CHARGE se ilumina una vez y luego se apaga.
9
DCR-PC7.3-858-174-22 (E,S)
|
|
|
|
Charging and installing the |
Carga e instalación del |
|
|
battery pack |
paquete de baterías |
|
|
|
|
|
|
|
|
|
|
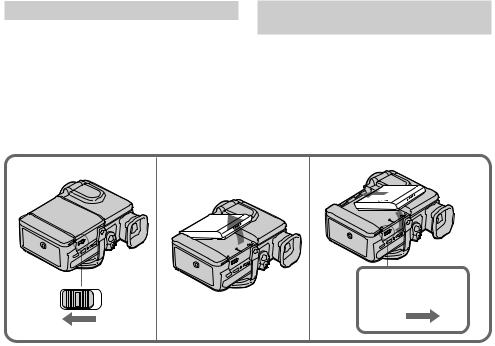
Installing the battery pack
(1) Set the BATT LOCK/RELEASE switch to RELEASE.
(2) Remove the battery terminal cover.
(3) Align the hooks of the battery pack with the catches of the camcorder and place the battery pack in place.
(4) Set the BATT LOCK/RELEASE switch to LOCK.
Instalación del paquete de
baterías
(1)Ponga el interruptor BATT LOCK/RELEASE en RELEASE.
(2)Retire la tapa del terminal de la batería. (3)Alinee los ganchos del paquete de baterías
con los pasadores de la videocámara y coloque la pila en su sitio.
(4)Ponga el interruptor BATT LOCK/RELEASE en LOCK.
1 |
2 |
3 |
RELEASE |
LOCK |
4 |
RELEASE |
|
LOCK
To remove the battery pack
Follow the procedure above and in step 3, remove the battery pack. When removing the battery pack, be careful not to drop it.
Note on battery terminal cover
To protect the battery terminals, install the battery terminal cover after the battery pack is removed.
Note on BATT LOCK/RELEASE switch
Be sure that the BATT LOCK/RELEASE switch is set to LOCK when the battery pack is installed. Otherwise, it may drop out when you use the camcorder.
To prevent malfunction
In the following cases, make sure that the POWER switch is set to OFF first. •Installing and removing the battery pack. •Inserting and ejecting a cassette.
Para extraer el paquete de baterías
Siga el procedimiento anterior y, en el paso 3, extraiga dicho paquete. Al sacarlo, tenga cuidado para que no se caiga.
Nota sobre la cubierta de los terminales de batería
Para proteger los terminales de batería, instale la cubierta de los terminales de batería una vez haya extraído el paquete de baterías.
Nota sobre el interruptor BATT LOCK/RELEASE
Compruebe que este interruptor está ajustado en la posición LOCK cuando el paquete de baterías esté instalado. En caso contrario, éste puede caerse al utilizar la videocámara.
Para evitar fallos de funcionamiento
En los siguientes casos, compruebe en primer lugar que el interruptor POWER está ajustado en OFF.
•Instalación y extracción del paquete de batería. •Inserción y expulsión de videocassettes.
10
DCR-PC7.3-858-174-22 (E,S)

|
|
|
|
Inserción de |
|
|
Inserting a cassette |
|
videocassettes |
|
|
You can use mini DV cassette with |
logo* |
Sólo pueden emplearse los minicassettes |
* |
||
only. |
|
que tengan el logotipo MiniDV. |
|
||
Make sure that the power source is installed. |
Asegúrese de que la fuente de alimentación está |
||||
(1) Place the grip strap away from the lid of the |
instalada. |
|
|||
|
cassette compartment to avoid damaging the |
(1)Aleje la correa de fijación de la tapa del |
|
||
|
lid. |
|
|
compartimiento de videocassettes para evitar |
|
(2)Open the lid of the cassette compartment and |
|
que dicha tapa se dañe. |
|
||
|
push 6EJECT inside the lid. The cassette |
(2)Abra la tapa del compartimiento de cassettesy |
|||
|
compartment automatically lifts up and |
|
pulse 6EJECT en el interior de la tapa. El |
|
|
|
opens. |
|
|
compartimiento de cassettes sale y se abre |
|
(3)Insert a cassette with the window facing out. |
|
automáticamente. |
|
||
(4)Push the cassette compartment. The cassette |
(3)Inserte un cassette con la ventana hacia fuera. |
||||
|
compartment is automatically pulled down. |
(4)Presione el compartimiento de cassettes. El |
|
||
(5)Close the lid until it clicks. |
|
|
compartimiento de videocassettes desciende |
||
|
|
|
|
automáticamente. |
|
* |
is a trademark. |
|
(5)Cierre la tapa hasta que oiga un “clic”. |
|
|
|
|
|
|
||
|
|
|
* |
es una marca comercial. |
|
|
1, 2 6EJECT |
3 |
|
4, 5 |
|
|
1 |
3 |
|
4 |
|
|
|
|
|
||
|
2 |
|
|
5 |
|
|
|
|
|
|
|
marcha en Puesta / started Getting
Note
Before you close the lid of the cassette compartment, make sure the cassette compartment is completely pulled down.
To eject the cassette
Follow the procedure above and in step 3, take out the cassette.
To Prevent Accidental Erasure
Slide and open the tab on the cassette to expose the red mark. If you try to record with the red mark exposed, the Land 6 indicators flash on the LCD screen or in the viewfinder, and you cannot record on the tape. To rerecord on this tape, slide and close the tab to cover the red mark.
Nota
Antes de cerrar la tapa del compartimiento de videocassettes, compruebe que éste se encuentra completamente bajado.
Para expulsar el cassette
Siga el procedimiento anterior y, en el paso 3, extraiga el cassette.
Para evitar borrar grabaciones de forma accidental
Deslice y abra la lengüeta del videocassette para que la marca roja quede visible. Si una vez hecho esto intenta grabar la cinta, los indicadores y 6parpadearán en el visor electrónico o en la pantalla LCD y no podrá realizar la grabación. Para volver a grabar en esta cinta, deslice y cierre la lengüeta para cubrir la marca roja.
11
DCR-PC7.3-858-174-22 (E,S)

Basic operations
Camera recording
Make sure that the power source is installed and a cassette is inserted. When you use the camcorder for the first time, turn on it and reset the date and time to your local date and time before you start recording (p. 58).
Before you record one-time events, you may want to make a trial recording to make sure that the camcorder is working correctly.
(1) Remove the lens cap and hook it onto the grip strap.
(2) While pressing the small green button on the POWER switch, set it to CAMERA. The camcorder is set to Standby mode.
(3) Slide START/STOP MODE to  . (4) Press START/STOP.
The camcorder starts recording. “REC” appears in the viewfinder. The camera recording lamp on the front of the camcorder also lights up.
Do not press START/STOP strongly; if you do, the switching tone will be recorded.
Operaciones básicas
Grabación con la cámara
Cerciórese de haber instalado la fuente de alimentación y de haber insertado un videocassette. Cuando utilice la videocámara por primera vez, enciéndala y eajuste la fecha y la hora actuales antes de empezar a grabar (p. 58). Antes de grabar eventos únicos, quizá desee realizar una grabación de prueba para asegurarse de que la videocámara funciona correctamente. (1)Retire la tapa del objetivo y fíjela a la correa
de sujeción.
(2)Ajuste el interruptor POWER en CAMERA mientras pulsa el botón verde pequeño del interruptor. La videocámara quedará ajustada en modo de espera.
(3)Deslice START/STOP MODE hasta  . (4)Pulse START/STOP.
La videocámara comenzará a grabar y “REC” aparecerá en el visor electrónico. El indicador de grabación con la cámara de la parte frontal de la videocámara también se iluminará.
No pulse START/STOP con demasiada fuerza; si lo hace, el tono de conmutación se grabará.
2 |
STBY |
1 |
POWER |
0:00:00 |
|
VTR |
60min |
|
OFF |
|
|
CAMERA |
|
|
PHOTO |
20min |
|
4 |
REC |
POWER |
0:00:00 |
VTR |
60min |
OFF |
|
CAMERA |
|
PHOTO |
20min |
3
5 SEC |
MODE START/STOP |
To stop recording momentarily [a]
Press START/STOP. The “STBY” indicator appears in the viewfinder (Standby mode).
12
Para detener momentáneamente la grabación [a]
Pulse START/STOP. El indicador “STBY” aparecerá en el visor electrónico (modo de espera).
DCR-PC7.3-858-174-22 (E,S)

To finish recording [b]
Press START/STOP again to stop recording. Set the POWER switch to OFF. Then, eject the cassette and remove the battery pack.
[a]
POWER |
STBY |
VTR |
0:35:20 |
OFF |
25min |
CAMERA |
|
PHOTO |
|
|
20min |
To focus the viewfinder lens
If you cannot see the indicators in the viewfinder clearly, or after someone else has used the camcorder, focus the viewfinder lens. Turn the viewfinder lens adjustment dial so that the indicators in the viewfinder come into sharp focus.
Note on Standby mode
If you leave the camcorder in Standby mode for 5 minutes while the cassette is inserted, the camcorder turns off automatically. This prevents wearing down the battery and wearing out the tape. To resume Standby mode, while pressing the small green button on the POWER switch, set it to OFF once, and then to CAMERA. To start recording, press START/STOP.
Para finalizar la grabación [b]
Vuelva a pulsar START/STOP para detener la grabación. Ajuste el interruptor POWER en OFF. A continuación extraiga el videocassette y retire el paquete de baterías.
[b]
POWER |
POWER |
VTR |
VTR |
OFF |
OFF |
CAMERA |
CAMERA |
PHOTO |
PHOTO |
Para enfocar el objetivo del visor electrónico
Si no puede ver claramente los indicadores del visor electrónico, o si otro usuario ha utilizado la videocámara, enfoque el objetivo de dicho visor. Gire el mando de ajuste del objetivo del visor electrónico hasta enfocar con nitidez los indicadores del mismo.
Nota sobre el modo de espera
Si deja la videocámara en modo de espera durante 5 minutos mientras el videocassette está insertado, la videocámara se apagará automáticamente para evitar que se desgasten la batería y la cinta. Para reanudar el modo de espera, ajuste el interruptor POWER en OFF mientras pulsa el botón verde pequeño del interruptor; a continuación, ajústelo en CAMERA. Para comenzar a grabar, pulse START/STOP.
básicas Operaciones / operations Basic
13
DCR-PC7.3-858-174-22 (E,S)
Camera recording |
Grabación con la cámara |
|
|
Note on recording mode
This camcorder records and plays back in SP (standard play) mode and in LP (long play) mode. Select SP or LP in the menu system.
Notes on LP mode
•We recommend to use this camcorder to play back a tape recorded on this camcorder. If a tape recorded on other camcorder is played back on this camcorder, or vice versa, mosaicpattern noise may appear.
•When you record in SP and LP modes on one tape or you record some scenes in LP mode, the playback picture may be distorted or the time code may not be written properly between scenes.
•We recommend to use a Sony ME cassette. •Use the SP mode for the tape to be audio
dubbed. You cannot make audio dubbing on a tape recorded in LP mode.
Notes on the time code
•The time code indicates the recording or playback time, "0:00:00" (hours : minutes : seconds) in CAMERA mode and "0:00:00:00" (hours : minutes : seconds : frames) in VTR mode.
•Be sure not make a blank portion when recording, because the time code will start from “0:00:00:00” again. You cannot rewrite the time code on the tape if there is a blank portion between pictures.
Note on connecting an external microphone
You can record audio sound by connecting the VMC-LM7 adaptor (not supplied) and an external microphone. Connect the microphone to the MIC jack of the VMC-LM7 adaptor. While recording through an external microphone, the built-in microphone of the camcorder does not work.
Note on the beep sound
As indicated with  in the illustrations, a beep sounds when you turn the power on or when you start recording, and two beeps sound when you stop recording, confirming the operation. Several beeps also sound as a warning of any unusual condition of the camcorder.
Note that the beep sound is not recorded on the tape. If you do not want to hear the beep sound, select “OFF” in the menu system.
Note on remaining tape indicator
The indicator may not be displayed accurately depending on the tape. Though the indicator does not appear at the time of recording, it will
14 appear in a few seconds.
Nota sobre el modo de grabación
Esta videocámara graba y reproduce en modo SP (reproducción estándar) y en modo LP (larga duración). Seleccione SP o LP en el sistema de menús.
Notas sobre modo LP
•Se recomienda emplear esta videocámara para reproducir cintas grabadas en la misma. Si reproduce en esta videocámara una cinta grabada en otra, o viceversa, es posible que se produzca ruido de patrón mosaico.
•Si graba una cinta en los modos SP y LP o si graba determinadas escenas en modo LP, es posible que la imagen de reproducción se distorsione o que el código de tiempos no se registre correctamente entre escenas.
•Se recomienda emplear videocassettes ME Sony.
•Utilice el modo SP para cintas que desee usar para audioduplicación. Usted no podrá realizar la audioduplicación con una cinta grabada en el modo LP.
Notas sobre el código de tiempos
•El código de tiempos indica la duración de la grabación o de la reproducción, “0:00:00” (horas : minutos : segundos) en modo CAMERA y “0:00:00:00” (horas : minutos : segundos : fotogramas) en modo VTR.
•Asegúrese de que no queda ningún espacio en blanco entre imágenes cuando grabe, ya que en ese caso el código de tiempos volverá a comenzar desde “0:00:00:00” y no podrá volver a registrarlo en la cinta.
Nota sobre la conexión de un micrófono externo
Puede grabar sonido audio mediante la conexión del adaptador VMC-LM7 (no suministrado) y un micrófono externo. Conecte el micrófono a la toma MIC del adaptador VMC-LM7. Durante la grabación con micrófono externo, no funciona el micrófono incorporado de la videocámara.
Nota sobre el pitido
Como indica el signo  en las ilustraciones, cuando se enciende la unidad o se empieza a grabar suena un pitido que confirma la operación; al detener la grabación suenan dos pitidos. También suenan varios pitidos como aviso de cualquier condición anormal en la videocámara.
Observe que el pitido no se graba en la cinta. Si no desea oírlo, seleccione “OFF” en el sistema de menús.
Nota sobre el indicador de cinta restante
Es posible que la información del indicador no sea exacta en función de las cintas que se utilicen. Aunque el indicador no aparece en el momento de la grabación, se mostrará en unos segundos posteriormente.
DCR-PC7.3-858-174-22 (E,S)
Using the zoom feature |
Uso de la función de zoom |
Zooming is a recording technique that lets you change the size of the subject in the scene.
For more professional-looking recordings, use the zoom function sparingly.
“T” side: for telephoto (subject appears closer) “W” side: for wide-angle (subject appears farther
away)
El zoom es una técnica de grabación que permite cambiar el tamaño de los objetos en la imagen. Si desea conferir a las grabaciones un toque profesional, utilice el zoom con moderación. Posición “T”: para telefoto (los objetos se acercan) Posición “W”: para gran angular (los objetos se
alejan)
T
W |
T |
|
ZOOM
T
W
W
Zooming speed (Variable speed zooming)
Press the power zoom switch a little for a relatively slow zoom; press it still more for a high-speed zoom. Zooming speed while the camcorder is in the Standby mode is faster than that in the recording mode making it easier to compose the scene.
When you shoot a subject using a telephoto zoom
If you cannot get a sharp focus while in extreme telephoto zoom, press the “W” side of the power zoom switch until the focus is sharp. You can shoot a subject that is at least about 2 5/8 feet (about 80 cm) away from the lens surface in the telephoto position, or about 1/2 inch (about 1 cm) away in the wide-angle position.
Velocidad de zoom (Zoom de velocidad variable)
Pulse el interruptor de zoom ligeramente para un zoom más lento, o con más fuerza para un zoom de alta velocidad. La función de zoom es más rápida cuando la videocámara se encuentra en modo de espera, y más lenta en el modo de grabación facilitando así la composición de la escena.
Cuando se videofilma un sujeto con un zoom telefoto
Si no puede enfocar nítidamente cuando utiliza el zoom telefoto en su posición extrema, presione el lado “W” del interruptor de alimentación del zoom hasta que el enfoque sea nítido. Pueden videofilmarse sujetos situados al menos a unos 80 cm de la superficie del objetivo en posición de telefoto, o a 1 cm en posición de gran angular.
básicas Operaciones / operations Basic
15
DCR-PC7.3-858-174-22 (E,S)
Camera recording |
Grabación con la cámara |
|
|
Notes on digital zoom
•More than 10x zoom is performed digitally if you set the D ZOOM function to ON in the menu system, and the picture quality deteriorates as you go toward the “T” side.
•The horizontal bar in the power zoom indicator separates the digital zooming zone (above the bar [a]) and the optical zooming zone (under the bar [b]). If you set the D ZOOM function to OFF, the part above the bar disappears.
•When using the digital zoom function, zooming power is up to 120x.
T
[a]
[b]
W
Notas sobre el zoom digital
•La ampliación del zoom superior a 10x se realiza de forma digital si ajusta la función D ZOOM en ON en el sistema de menús y la calidad de la imagen se deteriora conforme se acerca a la posición “T”.
•La barra horizontal que aparece en el indicador de alimentación del zoom separa la zona digital (sobre la barra [a]) y la óptica (debajo de la barra [b]). Si ajusta la función D ZOOM en OFF, la parte que se encuentra sobre la barra desaparece.
• Si utiliza la función de zoom digital, la potencia del zoom será de un máximo de 120x.
T
W
Shooting with the LCD screen |
Filmación con la pantalla LCD |
You can also record the picture while looking at the LCD screen.
When using the LCD screen, the viewfinder screen turns off automatically. You cannot monitor the sound from the speaker during recording.
(1) Open the LCD panel.
(2) Adjust angle of the LCD panel
The LCD panel moves about 90 degrees to this side and about 180 degrees to the other side.
To adjust the brightness of the LCD screen, press LCD BRIGHT.
+ side: to brighten the LCD screen
– side: to dim the LCD screen
The battery life is longer when the LCD panel is closed. Use the viewfinder instead of the LCD screen to save the battery power.
También puede grabar la imagen mirando la pantalla LCD.
Al utilizar la pantalla LCD, la pantalla del visor se desactiva de forma automática. No es posible controlar el sonido del altavoz durante la grabación.
(1)Abra el panel LCD.
(2)Ajuste el ángulo del panel LCD.
El panel LCD se desplaza unos 90 grados hacia este lado y unos 180 grados hacia el lado opuesto.
Para ajustar el brillo de la pantalla LCD, pulse LCD BRIGHT.
lado + : para aumentar el brillo de la pantalla LCD.
lado – : para atenuar la pantalla LCD.
La pila tendrá una vida útil más larga si se cierra el panel LCD. Utilice el visor electrónico en lugar de la pantalla LCD para ahorrar la energía de la pila.
1 |
2 |
180˚ |
LCD BRIGHT |
|
|
90˚
16
DCR-PC7.3-858-174-22 (E,S)
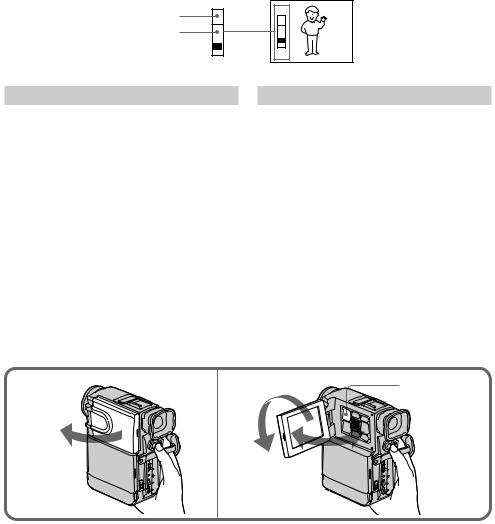
To let the subject monitor the shot
Turn the LCD panel 180 degrees (p. 32).
Notes on the LCD panel
•When closing the LCD panel, turn it vertically until it clicks [a].
•When turning the LCD panel, turn it always vertically; otherwise, the camcorder body may be damaged or the LCD panel may not close properly [b].
•Close the LCD panel completely when not in use.
•Do not push nor touch the LCD when moving the LCD panel.
•You may find it difficult to view the LCD screen due to glare when using the camcorder outdoors.
[a]
Para que el sujeto controle la videofilmación
Gire el panel LCD 180 grados (p. 32).
Notas sobre el panel LCD
•Al cerrar el panel LCD, gírelo en sentido vertical hasta que haga un “clic” [a].
•El panel LCD siempre debe girarse en sentido vertical; de lo contrario, el exterior de la videocámara puede surir daños, o el panel LCD puede no cerrarse correctamente [b].
•Cierre el panel LCD completamente siempre que no esté en uso.
•No empuje ni toque el LCD al mover el panel LCD.
•Es posible que resulte difícil ver la pantalla LCD debido a reflejos al utilizar la videocámara en exteriores.
[b]
básicas Operaciones / operations Basic
17
DCR-PC7.3-858-174-22 (E,S)

|
|
|
|
Camera recording |
Grabación con la cámara |
|
|
|
|
|
|
|
|
|
|
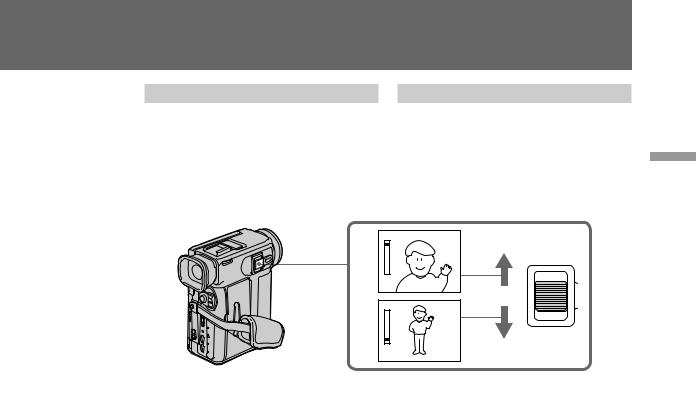
Selecting the start/stop mode
 : When you press START/STOP, the camcorder starts recording. When you press the button again, the camcorder stops recording. (factory setting)
 : As long as you keep pressing START/STOP, the camcorder records. When you release the button, the camcorder stops recording.
5SEC: When you press START/STOP, the camcorder records for 5 seconds and stops. (p. 33)
When you select  or 5SEC, you cannot use the fade-in/fade-out function.
When you select 5SEC, the remaining tape indicator is not displayed.
Selección del modo de inicio/
detención
 : La videocámara empieza a grabar cuando se pulsa START/STOP. La videocámara detiene la grabación cuando se vuelve a pulsar este botón. (ajuste de fábrica)
 : La videocámara graba mientras se mantiene pulsado el botón START/STOP. La videocámara deja de grabar cuando se suelta el botón.
5SEC: Cuando se pulsa START/STOP, la videocámara graba durante 5 segundos y se detiene. (p. 33)
Si selecciona  o 5SEC, no podrá utilizar la función de aparición y desaparición gradual.
Si selecciona 5SEC, el indicador de cinta restante no aparecerá.
5 SEC |
MODE START/STOP |
To attach an accessory |
Instalación de accesorios |
Attach an accessory (not supplied) to the accessory shoe.
Fije el accesorio (no suministrado) a la zapata para accesorios.
18
DCR-PC7.3-858-174-22 (E,S)
|
|
|
|
|
|
Hints for better |
Consejos para |
|
|
shooting |
videofilmar mejor |
|
|
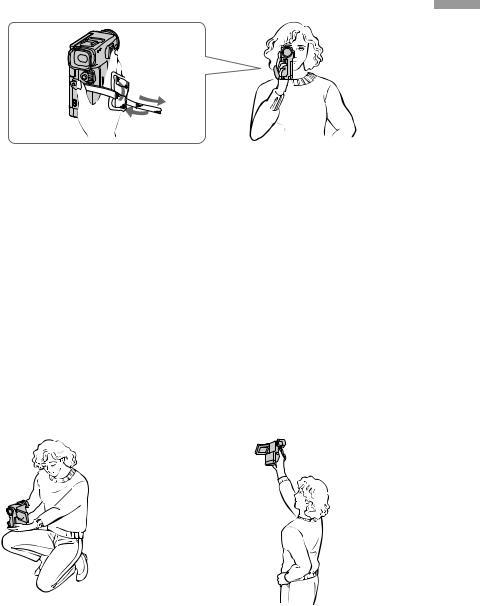
For hand-held shots, you will get better results |
Para videofilmaciones con la cámara en las |
|
|
||
|
|
by holding the camcorder according to the |
manos, obtendrá mejores resultados si sujeta la |
|
|
following suggestions: |
videocámara según estas sugerencias: |
|
|
•Hold the camcorder firmly and secure it with |
•Sujete la videocámara firmemente y fíjela con la |
|
|
the grip strap so that you can easily manipulate |
correa para poder manejar los controles |
|
|
the controls with your thumb. [a] |
fácilmente con el pulgar. [a] |
[a]
1
2
3
•Place your elbows against your side.
•Hold the camcorder with your left hand to keep it steadier.
•Adjust the LCD panel angle.
•Keep your fingers away from the lens. •Place your eye firmly against the viewfinder
eyecup.
•Be sure not to touch the built-in microphone. •Be sure not to touch the FOCUS button by
accident.
•Use the LCD panel frame or the viewfinder frame as a guide to determine the horizontal plane.
•You can record in a low position to get an interesting recording angle. Lift the LCD panel up to record from a low position. [b]
•You can also record in a high position. Lift the LCD panel down to record from a high position. [c]
•Pegue los codos a los lados del cuerpo. •Coja la videocámara con la mano izquierda
para sujetarla con mayor seguridad. •Ajuste el ángulo del panel LCD. •Mantenga los dedos alejados del objetivo. •Apoye el ojo firmemente contra el ocular del
visor electrónico.
•Tenga cuidado para no tocar el micrófono incorporado.
•Procure no tocar accidentalmente el botón FOCUS.
•Use el marco del panel LCD o del visor electrónico como orientación para determinar el plano horizontal.
•Si graba desde una posición baja obtendrá un ángulo de grabación interesante. Para ello, eleve el panel LCD. [b]
•También puede grabar desde posiciones altas. Para ello, mueva el panel LCD hacia abajo. [c]
básicas Operaciones / operations Basic
[b] |
[c] |
Continued to the next page |
Continúa en la página siguiente |
19 |
DCR-PC7.3-858-174-22 (E,S)
|
|
|
|
Hints for better shooting |
Consejos para videofilmar |
|
|
mejor |
|
|
|
|
|
|
|
|
|
|
|
Place the camcorder on a flat surface or use a tripod
Try placing the camcorder on a table top or any other flat surface of suitable height. If you have a tripod for a still camera, you can also use it with the camcorder. When attaching a non-Sony tripod, make sure that the length of the tripod screw is less than 9/32 inches (6.5 mm). Otherwise, the screw may damage the inner parts of the camcorder.
If you wear glasses
You can bend back the eyecup to get a better view of viewfinder [d].
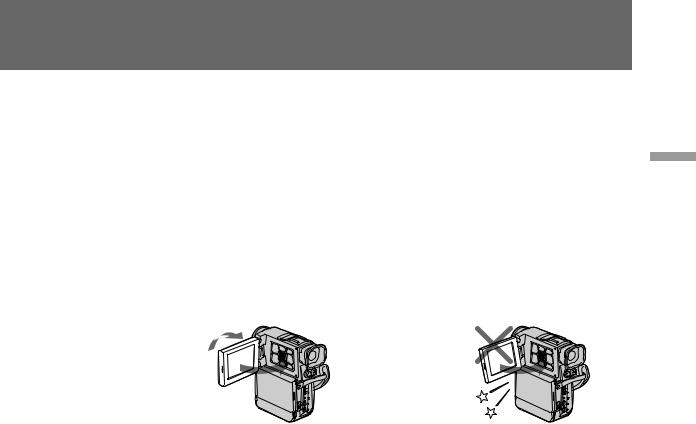
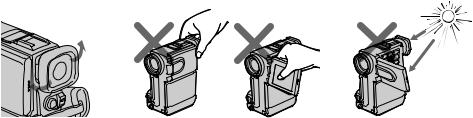
Cautions on the LCD panel and on the viewfinder
•Do not pick up the camcorder by the viewfinder or the LCD panel [e].
•Do not place the camcorder so as to point the viewfinder or the LCD panel toward the sun. The inside of the viewfinder or the LCD panel may be damaged. Be careful when placing the camcorder under sunlight or by a window [f].
•Do not point the lens toward the sun with a close-up lens attached. Doing so may damage the camcorder.
Sitúe la videocámara en una superficie plana o use un trípode
Coloque la videocámara en la superficie de una mesa o en otra superficie plana de la altura adecuada. Si dispone de un trípode para una cámara fija, también puede usarlo con la videocámara. Cuando utilice trípodes que no sean Sony, cerciórese de que la longitud del tornillo del trípode es inferior a 6,5 mm, pues en caso contrario el tornillo puede dañar los componentes internos de la videocámara.
Si lleva gafas
Puede doblar el ocular hacia atrás para visualizar mejor el visor electrónico [d].
Precauciones sobre el panel LCD y el visor electrónico
•No agarre la videocámara por el visor electrónico o el panel LCD [e].
•Sitúe la videocámara de forma que el visor electrónico o la pantalla LCD no quede orientado hacia el sol, ya que el panel LCD o el interior de dicho visor puede dañarse. Tenga cuidado cuando sitúe la videocámara a la luz del sol o junto a una ventana [f].
•No oriente el objetivo hacia el sol con un objetivo de primeros planos instalado, ya que puede dañar la videocámara.
[d] |
[e] |
[f] |
20
DCR-PC7.3-858-174-22 (E,S)
|
|
|
|
|
|
|
Reproducción de |
|
|
Playing back a tape |
cintas |
|
|
|
|
You can monitor the playback picture on the LCD screen or in the viewfinder.
(1) Insert the recorded tape with the window facing out.
(2) Open the LCD panel.
(3) While pressing the small green button on the POWER switch, set it to VTR. The tape transport buttons light up.
(4) Press 0to rewind the tape. (5) Press áto start playback.
(6) Adjust the volume using VOLUME +/– and the brightness of the LCD screen using LCD BRIGHT +/–.
You can also monitor the picture on a TV screen, after connecting the camcorder to a TV or VCR.
1
LCD BRIGHT
La imagen de reproducción puede controlarse en la pantalla LCD o en el visor electrónico.
(1)Inserte la cinta grabada con la ventana hacia afuera.
(2)Abra el panel LCD.
(3)Ajuste el interruptor POWER en VTR mientras pulsa el botón verde pequeño del interruptor. Los botones de transporte de cinta se iluminan.
(4)Pulse 0para rebobinar la cinta.
(5)Pulse ápara empezar la reproducción.
(6)Ajuste el volumen mediante VOLUME +/– y el brillo de la pantalla LCD mediante LCD BRIGHT +/–.
La imagen también puede controlarse en una pantalla de televisor después de conectar la videocámara a un televisor o una videograbadora.
VOLUME
básicas Operaciones / operations Basic
|
4 STOP |
REW |
PLAY |
FF |
PAUSE |
3 |
2 |
|
|
|
|
5 STOP |
|
|
|
|
|
POWER |
REW |
PLAY |
FF |
PAUSE |
|
VTR |
|||||
OFF |
|
|
|
|
|
CAMERA |
|
|
|
|
|
PHOTO |
|
|
|
|
|
To stop playback, press p.
To rewind the tape, press 0.
To fast-forward the tape rapidly, press ).
Using the Remote Commander
You can control playback using the supplied Remote Commander. Before using the Remote Commander, insert the size AA (R6) batteries .
To display the LCD screen/viewfinder screen indicators
Press DISPLAY.
To erase the indicators, press again.
Pulse ppara detener la reproducción. Pulse 0para rebobinar la cinta. Pulse )para que la cinta avance rápidamente.
Uso del mando a distancia
La reproducción puede controlarse con el mando a distancia suministrado. Antes de utilizarlo, inserte las pilas de tamaño AA (R6).
Para visualizar los indicadores de pantalla del visor electrónico/pantalla LCD en el televisor
Pulse DISPLAY.
Vuelva a pulsar este botón para que
desaparezcan los indicadores.
21
DCR-PC7.3-858-174-22 (E,S)

Playing back a tape |
Reproducción de cintas |
|
|
Using headphones
Connect headphones (not supplied) to the AUDIO VIDEO OUT/2jack (p. 83). You can adjust the volume of the headphones using VOLUME +/–.
To view the playback picture in the viewfinder
Close the LCD panel. The viewfinder turns on automatically.
When using the viewfinder, you can monitor the sound only by using headphones.
To view on the LCD screen again, open the LCD panel. The viewfinder turns off automatically.
Uso de auriculares
Conecte los auriculares (no suministrados) a la toma AUDIO VIDEO OUT/2(p. 83). El volumen de los auriculares se ajusta con VOLUME +/–.
Para visualizar la imagen reproducida en el visor electrónico
Cierre el panel LCD. El visor electrónico se activa de forma automática. Al utilizar el visor electrónico, sólo puede controlar el sonido con auriculares. Para volver a visualizar la imagen en la pantalla LCD, abra el panel LCD. El visor electrónico se desactiva automáticamente.
Various playback modes |
Varios modos de reproducción |
To view a still picture (playback pause)
Press P during playback. To resume playback, press P or á.
To locate a scene (picture search)
Keep pressing 0or )during playback. To resume normal playback, release the button.
To monitor the high-speed picture while advancing the tape or rewinding (skip scan)
Keep pressing 0while rewinding or ) while advancing the tape. To resume normal rewinding or fast-forward, release the button.
To view the picture at 1/3 speed (slow playback)
Press &on the Remote Commander during playback. For slow playback in reverse direction, press <, then press &. To resume normal playback, press á.
To view the picture at double speed
For double speed playback in the reverse direction, press <, then press ×2 on the Remote Commander during playback. For double speed playback in the forward direction, press >, then press ×2 during playback. To resume normal playback, press á.
22
Para ver una imagen fija (pausa de reproducción)
Pulse Pdurante la reproducción. Pulse P o á para reanudar la reproducción.
Para buscar una escena (búsqueda de imágenes)
Mantenga pulsado 0 o )durante la reproducción. Suelte el botón para reanudar la reproducción normal.
Para controlar la imagen a alta velocidad durante el avance rápido o el rebobinado de la cinta (exploración de omisión)
Mantenga pulsado 0 mientras rebobina o ) durante el avance rápido. Suelte el botón para reanudar el rebobinado o el avance normal.
Para visualizar la imagen a 1/3 de la velocidad (reproducción lenta)
Pulse &en el mando a distancia durante la reproducción. Para una reproducción lenta en sentido inverso, pulse <, a continuación &. Para volver a la reproducción normal, pulse á.
Para ver la imagen al doble de la velocidad normal
Para reproducir la imagen al doble de la velocidad normal en sentido regresivo, pulse < y, a continuación, ×2 en el mando a distancia durante la reproducción. Para reproducir la imagen al doble de la velocidad normal en sentido progresivo, pulse >y, a continuación, ×2 durante la reproducción. Para reanudar la reproducción normal, pulse á.
DCR-PC7.3-858-174-22 (E,S)

To view the picture frame-by-frame
Press 'or 7 on the Remote Commander in playback pause mode. If you keep pressing the button, you can view the picture at 1/30 speed. To resume normal playback, press á.
To change the playback direction
Press <on the Remote Commander for reverse direction or > on the Remote Commander for forward direction during playback. To resume normal playback, press á.
Notes on playback
•The sound is muted in the various playback modes.
•During playback other than normal playback, the previous recording may appear in mosaic image. This is not malfunction.
•When playback pause mode lasts for 5 minutes, the camcorder automatically enters stop mode. To resume playback, press á.
Note on slow playback
The slow playback can be performed smoothly on this camcorder; however, this function does not work for an output signal from the DV IN/ OUT jack.
Para ver la imagen fotograma a fotograma
Pulse 'o 7en el mando a distancia en el modo de pausa de reproducción. Si continúa pulsando el botón, podrá ver la imagen a una velocidad de 1/30.
Para reanudar la reproducción normal, pulse á.
Para cambiar el sentido de reproducción
Durante la reproducción, pulse < en el mando a distancia para el sentido inverso o >para el sentido normal. Para reanudar la reproducción normal, pulse á .
Notas sobre la reproducción
•El sonido se desconecta en los distintos modos de reproducción.
•Al reproducir en un modo que no sea el normal, la grabación anterior puede aparecer como una imagen mosaico, lo cual no indica un funcionamiento defectuoso.
•Cuando el modo de pausa de reproducción dura más de 5 minutos, la videocámara entra
automáticamente en modo de parada. Para reanudar la reproducción, pulse á.
Nota sobre la reproducción lenta
La reproducción lenta puede efectuarse satisfactoriamente con esta videocámara; sin embargo, esta función no puede emplearse con señales de salida procedentes de la toma DV IN/ OUT.
básicas Operaciones / operations Basic
23
DCR-PC7.3-858-174-22 (E,S)
|
|
|
|
Searching for the end |
Búsqueda del final |
|
|
of the picture |
de la imagen |
|
|
|
|
||
|
|
You can go to the end of the recorded portion after you record and play back the tape. The tape starts rewinding or fast-forwarding and the last about 5 seconds of the recorded portion plays back. Then the tape stops at the end of the recorded picture (End Search).
Open the LCD panel and press END SEARCH during recording standby.
This function works when the POWER switch is set to CAMERA, VTR or PHOTO.
Después de grabar y reproducir la cinta puede desplazarse al final de la porción grabada. La cinta se rebobina o avanza rápidamente y se reproducen aproximadamente los últimos 5 segundos de la porción grabada. Después la cinta se detiene al final de la imagen grabada
(búsqueda de imágenes finales).
Abra el panel LCD y pulse END SEARCH durante el modo de espera de grabación. Esta función se activa cuando el interruptor POWER está ajustado en CAMERA i VTR o PHOTO.
ENDSEARCH
Note on End Search
The End Search function does not work once you have ejected the cassette after you recorded in the tape or if you do not record after you have inserted a tape.
Nota sobre búsqueda de imágenes
La función de búsqueda de imágenes o si no graba después de haber insertado una cinta finales no se activa una vez extraído el videocassette después de grabar en la cinta.
24
DCR-PC7.3-858-174-22 (E,S)
Advanced operations |
Operaciones avanzadas |
Using alternative |
Uso de fuentes de |
power sources |
alimentación alternativas |
You can choose any of the following power sources for your camcorder: battery pack, house current, and 12/24 V car battery. Choose the appropriate power source depending on where you want to use your camcorder.
Place |
Power |
Accessory to be used |
|
source |
|
|
|
|
Indoors |
House |
Supplied AC power adaptor |
|
current |
|
|
|
|
Outdoors |
Battery |
Battery pack NP-F100 |
|
pack |
(supplied), NP-F200 |
|
|
|
In the car |
12 V or |
Sony car battery charger DC- |
|
24 V car |
V515 |
|
battery |
|
|
|
|
Note on power sources
Disconnecting the power source or removing the battery pack during recording or playback may damage the inserted tape. If this happens, restore the power supply again immediately.
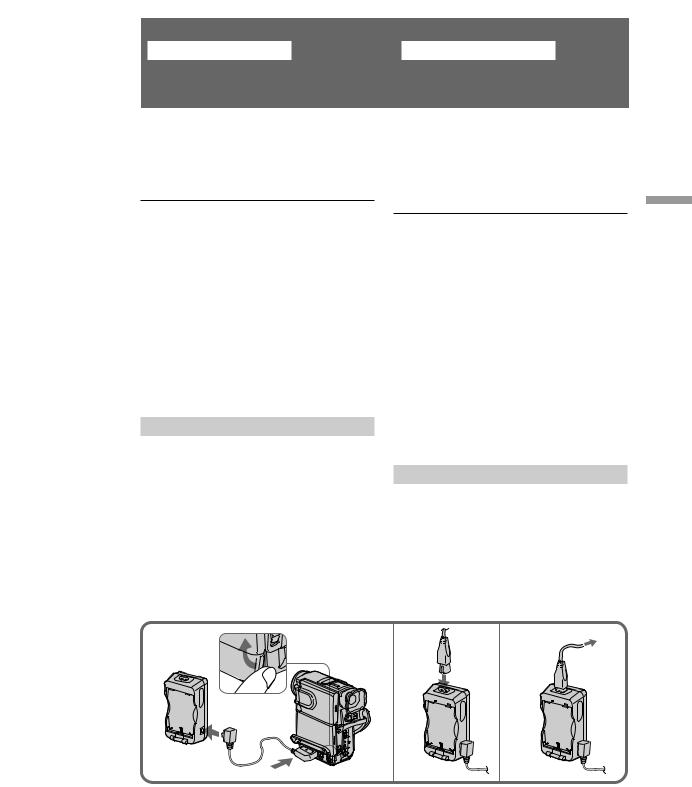
Using the house current
To use the supplied AC power adaptor: (1)Connect the connecting plug on the
camcorder to the DC OUT jack on the AC power adaptor using the supplied connecting cord.
(2)Connect the AC power cord to the AC power adaptor.
(3)Connect the AC power cord to the wall outlet.
Es posible elegir cualquiera de las siguientes fuentes de alimentación para la videocámara: paquete de baterías, corriente doméstica y batería de automóvil de 12/24 V. Elija la fuente de alimentación adecuada al lugar en que vaya a usar la videocámara.
Lugar |
Fuente de |
Accesorio necesario |
|
alimentación |
|
|
|
|
Interiores |
Corriente |
Adaptador de |
|
doméstica |
alimentación de CA |
|
|
suministrado |
|
|
|
Exteriores Paquete de |
Paquete de baterías |
|
|
baterías |
NP-F100 (suministrado), |
|
|
NP-F200 |
|
|
|
En el |
Batería de |
Cargador de batería de |
automóvil automóvil de |
automóvil Sony DC- |
|
|
12 V o 24 V |
V515 |
|
|
|
Nota sobre fuentes de alimentación
La desconexión de la fuente de alimentación o la extracción del paquete de baterías durante la grabación o reproducción puede dañar la cinta insertada. Si esto sucede, restablezca inmediatamente el suministro de alimentación.
Uso de corriente doméstica
Para usar el adaptador de alimentación de CA suministrado:
(1)Abra la cubierta de la toma y conecte el enchufe de conexión de la videocámara a la toma DC OUT del adaptador de alimentación de CA con el cable de conexión suministrado.
(2)Conecte el cable de alimentación al adaptador de alimentación de CA.
(3)Conecte el cable de alimentación a una toma de red.
avanzadas Operaciones / operations Advanced
1 |
2 |
3 |
Continued to the next page |
Continúa en la página siguiente |
25 |
DCR-PC7.3-858-174-22 (E,S)

Using alternative power sources
Charging the battery pack
You can charge the battery pack installed in the camcorder by connecting the AC power adaptor to the camcorder and setting the POWER switch to OFF. The CHARGE lamp lights up, and goes out when normal charge is completed. For a full charge, leave the battery pack in place for approximately one hour. Charging time of the supplied NP-F100 battery pack is as follows: Full charge: approx. 2 hours and 30 minutes Normal charge: approx. 1 hours and 30 minutes
Charging two battery packs at the same time
Install one battery pack in the camcorder and another one on the AC power adaptor. The CHARGE lamps on the camcorder and on the AC power adaptor light up, and go out when normal charge is completed. For a full charge, leave the battery pack in place for approximately one hour. If either of the CHARGE lamps remains lit, charging both battery packs is not completed. Time taken to charge two NP-F100 battery packs simultaneously is as follows:
Full charge: approx. 2 hours and 40 minutes Normal charge: approx. 1 hours and 40 minutes
Notes on the CHARGE lamp
•The CHARGE lamp will remain lit for a while even if the unit is unplugged after use. This is normal.
•If the CHARGE lamp does not light, disconnect the AC power cord. After about one minute, reconnect the AC power cord.
Uso de fuentes de alimentación alternativas
Carga del paquete de baterías
El paquete de baterías instalado en la videocámara puede cargarse conectando el adaptador de alimentación de CA a la videocámara y ajustando el interruptor POWER en OFF. El indicador CHARGE se ilumina, y se apaga cuando el proceso de carga normal finaliza. Para una carga total, deje el paquete de baterías insertado durante una hora aproximadamente. El tiempo de carga del paquete de baterías NP-F100 suministrado es el siguiente:
Carga total: aprox. 2 horas y 30 minutos Carga normal: aprox. 1 hora y 30 minutos
Carga de dos paquetes de baterías a la vez
Instale un paquete de baterías en la videocámara y otro en el adaptador de alimentación de CA. El indicador CHARGE de la videocámara y del adaptador de alimentación de CA se ilumina, y se apaga cuando el proceso de carga normal finaliza. Para una carga total, deje el paquete de baterías cargando durante aproximadamente una hora. Si alguno de los indicadores CHARGE permanece iluminado, la carga de ambos paquetes de baterías no ha finalizado. El tiempo de carga simultánea de dos paquetes de baterías NP-F100 es el siguiente:
Carga total: aprox. 2 horas y 40 minutos Carga normal: aprox. 1 hora y 40 minutos
Notas sobre el indicador CHARGE
•El indicador CHARGE permanece iluminado unos momentos aunque la unidad se haya desenchufado después de usarla. Es normal.
•Si el indicador CHARGE no se ilumina, desconecte el cable de alimentación. Vuelva a conectarlo después de aproximadamente un minuto.
26
DCR-PC7.3-858-174-22 (E,S)

To remove the connecting cord
While pressing the button on the connecting plug, pull out the connecting cord. Never pull the connecting cord itself.
When you use the AC power with the connecting cord, the battery pack installed in the camcorder is not used because the AC power has priority over the battery pack.
WARNING
The power cord must only be changed at a qualified service shop.
PRECAUTION
The set is not disconnected from the AC power source (mains) as long as it is connected to the wall outlet, even if the set itself has been turned off.
Para retirar el cable de conexión
Tire del cable mientras pulsa el botón del enchufe de conexión. Nunca tire del cable propiamente dicho. Cuando se usa la alimentación de CA con el cable de conexión, no se emplea el paquete de baterías instalado en la videocámara, ya que la alimentación de CA tiene prioridad sobre el paquete de baterías.
AVISO
El cable de alimentación sólo debe cambiarse en una tienda de servicio técnico autorizada.
PRECAUCION
El aparato no se desconecta de la fuente de alimentación de CA (corriente doméstica) mientras esté enchufado a la toma de red, incluso aunque el aparato en sí esté apagado.
Using a car battery |
Uso de baterías de automóvil |
Use a car battery charger such as Sony DC-V515 (not supplied). Connect the car battery cord to the cigarette lighter socket of a car (12 V or 24 V). Connect the car battery charger and the camcorder using the supplied DK-626 connecting cord.
Note on the battery pack
You cannot charge the battery pack (NP-F100, NP-F200) using the car battery charger DC-V515.
This mark indicates that this product is a genuine accessory for Sony video product.
When purchasing Sony video products, Sony recommends that you purchase accessories with this “GENUINE VIDEO ACCESSORIES” mark.
Utilice un cargador de batería de automóvil como Sony DC-V515 (no suministrado). Conecte el cable de la batería de automóvil a la clavija del encendedor de un automóvil (12 V o 24 V). Conecte el cargador de batería de automóvil y la videocámara con el cable de conexión suministrado DK-626.
Nota sobre el paquete de baterías
No es posible cargar la el paquete de baterías (NP-F100, NP-F200) mediante el cargador de batería de automóvil DC-V515.
Esta marca indica que este producto es un accesorio genuino para un producto de vídeo Sony. Cuando se adquieren productos de vídeo Sony, se recomienda que los accesorios adquiridos lleven la marca “GENUINE VIDEO ACCESSORIES”.
avanzadas Operaciones / operations Advanced
27
DCR-PC7.3-858-174-22 (E,S)
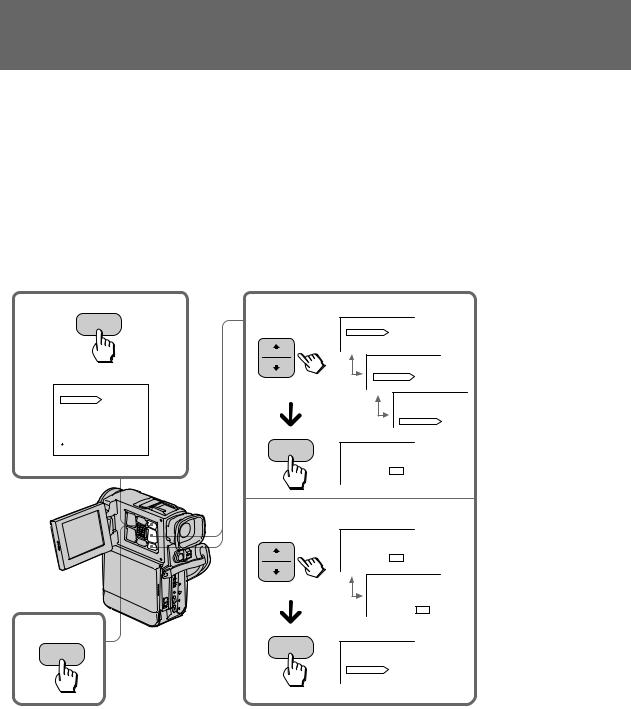
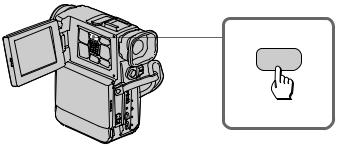
Changing the mode settings
You can change the mode settings in the menu system to further enjoy the features and functions of the camcorder.
(1) Press MENU to display the menu on the LCD screen.
(2) Press vor Vto select the desired item, then press EXECUTE. Only the selected item is displayed.
(3) Press vor Vto select the desired mode, then press EXECUTE. If you want to change the other modes, repeat steps 2 and 3.
(4) Press MENU to erase the menu display.
1
MENU
MENU |
|
PGM AE |
AUTO |
WHT BAL |
|
D ZOOM |
|
S SHOT |
|
COMMANDER |
|
REC MODE |
|
BEEP |
|
[MENU]:END |
|
Cambio de los ajustes de modo
Los ajustes de modo pueden cambiarse en el sistema de menús para obtener mayor provecho de las características y funciones de la videocámara.
(1)Pulse MENU para ver el menú en la pantalla LCD.
(2)Pulse vo Vpara seleccionar el elemento que desee y después pulse EXECUTE. Sólo aparecerá el elemento seleccionado.
(3)Pulse vo Vpara seleccionar el modo que desee y después pulse EXECUTE. Si desea cambiar los demás modos, repita los pasos 2 y 3.
(4)Pulse MENU para que el menú desaparezca de la pantalla.
2 |
MENU |
|
|
PGM AE |
AUTO |
|
WHT BAL |
|
|
D ZOOM |
|
MENU
PGM AE
WHT BAL AUTO
D ZOOM
MENU |
|
PGM AE |
|
WHT BAL |
|
D ZOOM |
ON |
EXECUTE MENU
D ZOOM |
ON |
|
OFF |
3
|
MENU |
|
|
|
D ZOOM |
ON |
|
|
|
OFF |
|
|
|
MENU |
|
|
|
D ZOOM |
ON |
|
|
|
OFF |
4 |
MENU |
|
|
EXECUTE |
|
|
|
MENU |
PGM AE |
|
|
|
WHT BAL |
|
|
|
D ZOOM |
OFF |
|
28
DCR-PC7.3-858-174-22 (E,S)
 Loading...