


HB875, 871


Tanning lamps Philips HPA 400-500
Infrared lamps type Philips IRK 15020 R (HB875)
I
L
C
A
B
N
Ptype no HB072 service no 4822 690 80147


5
ENGLISH 6
POLSKI 17
РУССКИЙ 28
EESTI 41
LATVISKI 52
LIETUVIŠKAI 63
HB875, HB871

6 ENGLISH
(UV) |
|
|
|
ULTRAVIOLET |
|
|
|
VISIBLE |
LIGHT |
(IR) |
|
INFRARED |
|||
|
|||
|
|
Introduction
The sun
The sun supplies various types of energy.Visible light enables us to see, ultraviolet (UV) gives us a tan and infrared (IR) in sunrays provides the heat in which we like to bask.
The solarium
With this solarium you can suntan comfortably at home.The tanning lamps emit visible light, heat and ultraviolet, giving you the impression you are sunbathing in real sunlight.The special UV filter only passes the radiation that is required to get a tan.
The tanning lamps emit sufficient infrared to provide comfortable warmth.
Type HB875 only: besides a tanning session, you can take a relax session by just switching on the special infrared lamps.
A timer ensures that each session does not last longer than 30 minutes. Just as with natural sunlight, overexposure must be avoided (see section 'UV, tanning and your health' and 'IR, relaxation and your health').
Important
Check if the voltage indicated on the appliance corresponds to the mains voltage in your home before you connect the appliance.
If the used wall socket has poor connections, the plug of the solarium will become hot.Therefore only use a properly connected wall socket.
The appliance must be connected to a circuit that is protected with a 16A standard fuse or a slow-blow automatic fuse.
Always unplug the appliance after use.
Water and electricity are a dangerous combination! Therefore do not use the appliance in wet surroundings (e.g. in the bathroom or shower, or near a swimming pool).
If you have just been swimming or have just taken a shower, dry yourself thoroughly before using the appliance.
Let the appliance cool down after use for approx. 15 minutes before folding it back into transport position and storing it.
Make sure the vents in the centre and in side lamp units and in the base remain open during use.
The appliance has been fitted with an automatic protection against overheating. If the appliance is insufficiently cooled (e.g. because the vents are covered), the appliance will switch off automatically. Once the cause of overheating has been removed and the appliance has cooled down, the appliance will switch on automatically again.
The UV filters become very hot when using the appliance. Do not touch them.
The appliance contains moving parts, so be careful not to get your fingers stuck between the parts.
Never use the appliance when a UV filter is damaged, broken or missing.Never use the appliance when the timer switch is defective.
Take care that children cannot play with the appliance.
Do not exceed the advised session times or the maximum amount or "tanning hours" (see "Tanning sessions: How often? How long?").
Do not take a tanning and/or relax session if you have a disease and/or if you use a medication or cosmetics that increase the sensitivity of your skin. Be extra careful if you are hypersensitive to UV or IR. Consult your doctor in case of doubt.
ENGLISH 7
Do not tan a particular part of your body more than once a day. Avoid excessive exposure to natural sunlight on the same day.
Consult your doctor if ulcers, moles or persistent lumps develop on the skin.
The appliance is not to be used by people who get sunburnt without tanning when exposed to the sun, by persons suffering from sunburn, by children, or by persons who suffer (or have previously suffered) from skin cancer or who are predisposed to skin cancer.
Always wear the protective eye goggles while tanning to protect your eyes against excessive doses of ultraviolet, visible light and infrared. (Also refer to section UV and your health.)
Remove creams, lipstick and other cosmetics well in advance of a tanning session.
Do not use any quick-tan lotions or creams meant to speed up the tanning process.
Do not use suncreams or lotions meant to protect your skin against sunburn.
If your skin should feels taut after the tanning session, you may apply a moisturising cream.
To acquire an even tan you should lie directly below the lamp units.Do not choose a tanning distance of less than 65 cm.
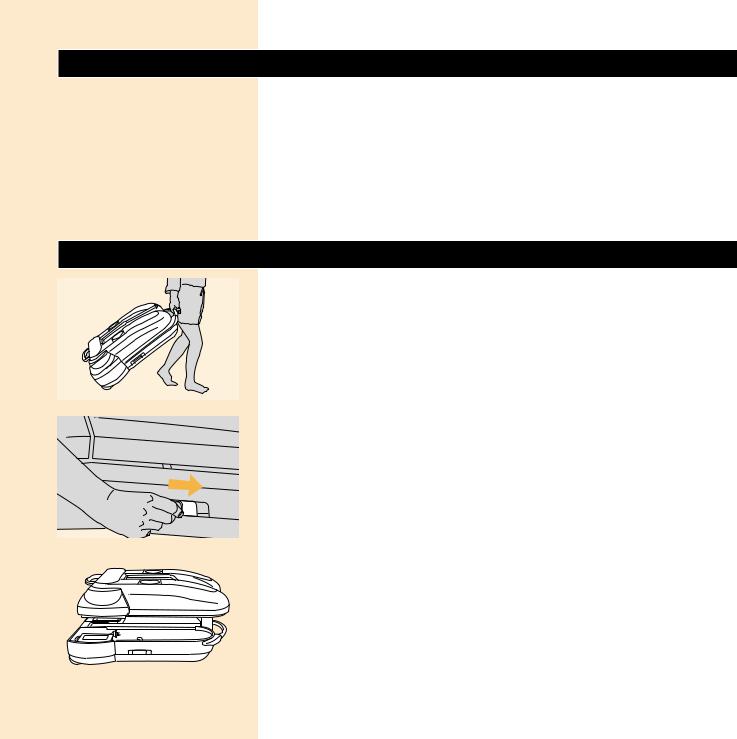
Only move the appliance when it is in transport position. Make sure that the two parts of the appliance have been properly fastened before you move it. Do not attempt to lift the appliance on your own.
Colours may fade under the influence of the sun.The same effect may occur when using the appliance.
Do not expect the appliance to yield better results than the natural sun.
UV, tanning and your health
Just as with natural sunlight, the tanning process will take some time.The first effect will only become visible after a few sessions (see section "UV tanning sessions: how often, how long?").
Overexposure to ultraviolet (natural sunlight or artificial light from your solarium) can cause sunburn.
Besides many other factors, such as overexposure to natural sunlight, incorrect and excessive use of a solarium may increase the risk of skin and eye problems.The degree to which these effects occur is determined by the nature, intensity and duration of the radiation on the one hand and the sensitivity of the person involved on the other hand.
The more the skin and the eyes are exposed to UV, the higher the risk of keratisis, conjunctivitis, damage to the retina, cataracts, premature skin ageing and the development of skin tumours will be. Some medications and cosmetics increase the sensitivity of the skin.
Therefore it is highly important:
Bthat you follow the instructions in sections "Important" and "UV tanningsessions: how often? And how long?";
Bthat the tanning distance (distance between the UV filters and the body) is 65 cm.
Bthat you do not exceed the maximum amount of tanning hours per year (i.e. 21 hours or 1260 minutes);
B that you always wear the provided goggles while tanning.
8 ENGLISH
IR, relaxation and your health (HB875 only)
Warmth has a relaxing effect.Think of what a hot bath or lazing in the sunshine does to you.You can enjoy the same relaxing effect by switching on the infrared lamps.
Bear in mind the following when you have a relax session:
-Avoid getting too hot. Increase the distance between yourself and the lamps, if necessary.
-If your head gets too hot, cover it or move your body so that less heat is radiated towards your head.
-Close your eyes during a relax session.
-Do not let the relax session last too long (see section 'Relax sessions: how often and how long?').
UV tanning sessions: how often and how long?
You may have one tanning session per day, over a period of five to ten days.
Allow at least 48 hours between the first two sessions.
After this 5 to 10 day course, you may rest the skin for a while.
Approx. one month after a course your skin will have lost much of the tan. You might than decide to start a new course.
On the other hand, it is also possible to have one or two tanning sessions per week after a course has elapsed in order to keep up the tan.
Whatever you may prefer, make sure that you do not exceed the maximum amount of tanning hours.
For this appliance the maximum is 21 hours (=1260 minutes) per year.
Example
Imagine that you take a 10 day tanning course, with a 8 minute session on the first day and a 20 minutes session on the nine following days.
The entire course then includes (1 x 8 minutes) + (9x 20 minutes) = 188 minutes.
Over a year you may have 6 of these courses (as 6 x 188 minutes = 1128 minutes).
Of course the maximum number of tanning hours applies to each part or side of the body that is tanned separately (e.g. the back and front of the body).
From the table it will be seen that the first session of a course should always have a duration of 8 minutes.This is not dependent upon individual skin sensitivity.
BIf you think that the sessions are too long for you (e.g. if the skin gets taut and tender after the session), we advise you to reduce the sessions by e.g. 5 minutes.
BFor a beautiful all-over tan, turn your body slightly during the session so that the sides of your body are better exposed to the tanning rays.
|
|
|
ENGLISH 9 |
|
|
|
|
Duration of the UV session |
For persons with very |
For persons with normal |
For persons with less |
|
sensitive skin |
sensitive skin |
sensitive skin |
|
|
|
|
1st session |
8 minutes |
8 minutes |
8 minutes |
|
|
|
|
rest of min. 48 hours |
|
|
|
|
|
|
|
2nd session |
10 minutes |
20-25 minutes |
30 minutes* |
|
|
|
|
3rd session |
10 minutes |
20-25 minutes |
30 minutes* |
|
|
|
|
4th session |
10 minutes |
20-25 minutes |
30 minutes* |
|
|
|
|
5th session |
10 minutes |
20-25 minutes |
30 minutes* |
|
|
|
|
6th session |
10 minutes |
20-25 minutes |
30 minutes* |
|
|
|
|
7th session |
10 minutes |
20-25 minutes |
30 minutes* |
|
|
|
|
8th session |
10 minutes |
20-25 minutes |
30 minutes* |
|
|
|
|
9th session |
10 minutes |
20-25 minutes |
30 minutes* |
|
|
|
|
10th session |
10 minutes |
20-25 minutes |
30 minutes* |
* If your skin feels slightly taut after tanning, you can apply a moisterising cream.
Relax sessions: how often and how long?
Type HB875 only
If you do not want to get up right away after the tanning session, you can switch on the infrared lamps for a relax session, during which the infrared lamps keep you warm.
You can also take a relax session without a tanning session.You can do this several times a day (e.g. 30 minutes in the morning and in the evening).
Preparing for use
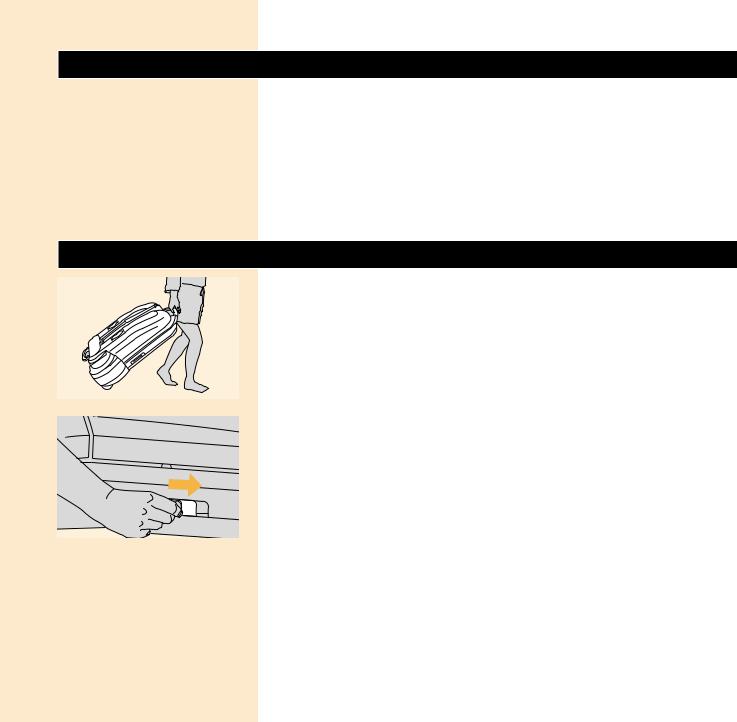
C In the transport position you can easily move and store the appliance.
C |
|
To open the appliance, move the slides of the slide lock in the |
1 |
||
|
|
direction of the arrow. |
The upper part of the appliance is now unlocked.
|
|
|
C |
|
The upper part comes slightly up (by itself or with a little help). |
|
|
|
|
||
2 |
|||||
|
|||||
|
|
|
|
|
|
|
|
|
|
|
|

10 ENGLISH
C |
|
Grab the handle with both hands and put one foot against the |
3 |
||
|
|
appliance to prevent it from sliding away.Tilt the upper part by |
|
|
pulling the handle and tracing an arc with it. |
Do not tilt the upper part too far.
C 4 Pull the upper part up and pull it at the same time towards you.
This requires some effort.
85
65
20
C |
|
Move both side lamp units sideways as far as possible, until they are |
5 |
||
|
|
in line with each other. |
|
C |
|
The distance between the UV filters and your body must be 65 cm. |
6 |
|||
|
|
|
The distance between the UV filters and the surface on which you |
|
|
|
are lying down (for example the bed), must be 85 cm. |
|
|
|
|
|
|
|
|
C 7 |
Support the upper part of the stand when you set or adjust the |
|
height of the appliance. |
Loosen knob (A) by turning it anti-clockwise (two or three turns).
|
C |
|
Put your hand under the horizontal part of the stand and extend |
|
|
||
8 |
|||
|
|
|
the stand to the required height. |
|
|
|
|
|
C |
|
Firmly fasten knob (A) again and release the stand. |
|
|
||
9 |
|||
|
|||
|
|
|
|
ENGLISH 11
C You can determine whether the appliance has been set to the required height by pulling out the distance measure.
 C The distance measure will automatically rewind if you move the red tab sideways.
C |
|
Turn the centre lamp unit 90 |
|
until you hear a ' click'. |
|
10 |
|
||||
|
|
||||
|
Note that the centre lamp unit can |
only be turned in the direction of the |
|||
|
|
c |
|
||
arrow!
The solarium can only be switched on if both the side lamp units and the centre lamp unit have been fully extended and have been put in the right
positions.This applies to tanning sessions as well as to relax sessions.
C Right position.
The appliance is now ready for use.
Using the appliance
1Fully unwind the mains cord.
2Put the plug in the wall socket.
C The pilot light on the remote control will go on.
The pilot light will stay on as long as the appliance is connected to the mains.
Tanning or relaxing (type HB875 only)
3Set the selector switch to the desired position:
;for a tanning session.
l for a relax session.
Setting the time for a tanning or relax session
C |
|
Set the time of the tanning or relax session by pushing the + |
4 |
||
|
|
button to put the time forward or by pushing the - button to put |
|
|
the time backward. |
Keep the button pressed in to adjust the time more quickly.
5Lie down under the appliance, right below the lamp units to make sure that the sides of your body are also tanned properly.

12 ENGLISH
|
C |
6 |
Put on the protective goggles provided. |
|
|
Switch on the tanning lamps or the infrared lamps by pressing the |
|
7 |
|||
|
|
|
start button (I). |
|
|
|
|
C A blinking signal will appear; the set time is shown on the display (25 minutes in this case).
The countdown of the set tanning or relax session time will now start.
C During the last minute of the session you will hear a audible signal.
C During this minute, you can press the pause/repeat button fi to repeat the set time.
It is also possible to set a new time.
This way you can avoid a waiting time of 3 minutes before the tanning lamps can be used again, as the tanning lamps have to cool down for 3 minutes after they have been switched off.
This waiting time does not apply to the infrared lamps (type HB875 only).
C |
|
Set a new time by pushing button (-+).Then push the start button |
8 |
||
|
|
(I). |
The audible signal stops and the new set time starts running.
Only type HB875: During the last minute you can also switch from the tanning setting to the relax setting by switching the selector to l.
Pausing the tanning or relax session
C 9 Pause the tanning or relax session by pushing the pause button.
The tanning or IR lamps will be switched off.
Type HB871 only: the remaining time of the session will start to blink on the display. After 3 minutes it will stop blinking.You can then switch the tanning lamps back on again by pressing the start button.The remaining time will then appear on the display.
Type HB875 only: the remaining time is visible on the display but does not blink; you will have to watch the 3 minutes yourself.The waiting time does not apply to the infrared lamps.
C |
|
Restart the tanning or relax session by pushing the start button |
10 |
||
|
|
again. |

ENGLISH 13
The remaining tanning or relax time will appear on the display.
Shorten the tanning or relax time
C 11 Shorten the tanning or relax session by pushing the start button (I).
The tanning lamps or infrared lamps will now be switched off.
12 Set a new time by means of the '-+' button.Wait until the time indication on the display has stopped blinking and subsequently press the start button (I).
HB875 only:The new time is visible on the display but does not blink.You will have to watch the three minutes yourself (this only applies to the tanning lamps; the infrared lamps come on right away.
|
Switching from a relax to a tanning session (type HB875 only) |
|||
|
When you switch from a relax session to a tanning session, bear in mind |
|||
|
that the tanning lamps will not go out right away. It will take a little while |
|||
C |
before they go on. |
|
|
|
To be able to use the infrared lamps (' |
|
relax' setting), both side lamp |
||
|
units and the centre lamp unit should |
have been put in the right position. |
||
|
|
l |
|
|
|
Before you switch on the solarium, check whether the selector switch (B) |
|||
|
has been set to the desired position (' |
; |
sun' for a tanning session or ' |
|
|
relax' for a relax session). |
l |
||
Make sure the right lamps are switched on:
|
B |
For the tanning session: 4 lamps (one in every lamp unit) that emit bluish light; |
|
||
|
B |
For the relax session: 2 lamps (one in every side lamp unit) that emit red light. |
Cleaning
1Always unplug the appliance and let it cool down before you start cleaning it.
2Clean the outside of the appliance with a damp cloth.
Do not let any water run into the appliance.
3 Do not use any scouring agents or scouring pads.
Never use abrasive liquids like scourers, petrol or acetone to clean the
appliance.
You can clean the outside of the UV filters with a soft cloth sprinkled with some methylated spirits.
Storing
1Let the appliance cool down for 15 minutes before you put it in transport position and store it.
In the meanwhile you can roll up the cord and put it in the base of the appliance, together with the remote control.
C |
|
Store the cord and remote control carefully, as they might get |
2 |
||
|
|
stuck when you put the appliance in transport position. |

14 ENGLISH
C
C
C
 C
C
3Turn the centre lamp unit 90c to put it in a line with the side lamp units.
4Firmly hold the upper part of the stand with one hand and loosen the height adjustment knob (A) by turning it anti-clockwise.
5 Slide in the stand.
6Firmly fasten the height adjustment knob (A) by turning it clockwise.
C
C
7 Turn the two side lamp units towards each other.
8Grab the handle with both hands, put one foot against the appliance to prevent it from sliding away and tilt the upper part with the stand backward.
The automatic unlocking system will only work if you tilt the upper part with the stand backward far enough. However you should be careful not to tilt it backward too far because you might lose your balance if you do.
The automatic unlocking system will only work if you tilt the upper part with the stand backward far enough. However you should be careful not to tilt it backward too far because you might lose your balance if you do.
C |
|
Push the upper part down. |
9 |
||
|

ENGLISH 15


 C 10 Lower it slowly onto the base.
|
C |
|
Fasten the lamp units to the base by pushing both slides in the |
|
|
||
11 |
|||
|
|
|
direction of the arrow. |
|
|
|
|
Replacement
In time (after a few years in case of normal use) the light emitted by the tanning lamps will become less bright. When this happens, you will notice a decrease in the tanning capacity of the solarium.You can overcome this problem by setting a slightly longer tanning time or by having the tanning lamps replaced.
For type HB875 only: Have the infrared lamps replaced when they stop functioning.
The UV filters protect against undesired radiation. It is therefore important to have a damaged or broken filter replaced right away.
Have the tanning lamps, infrared lamps and UV filters replaced by an authorised Philips Service Centre. Only they have the knowledge and skills
required for this job and the original spare parts for the appliance.
Environment
The lamps of the appliance contain substances that can be harmful to the environment. When you discard the lamps, make sure they are not thrown away with the normal household waste but are handed in at an official collection point.
Guarantee & service
If you need service or information or if you have a problem, please visit the Philips Web site at www.philips.com or contact the Philips Customer Care Centre in your country (you will find its phone number in the worldwide guarantee leaflet). If there is no Customer Care Centre in your country, turn to your local Philips dealer or contact the Service Department of Philips Domestic Appliances and Personal Care BV.
Trouble shooting
If the appliance does not work properly, this may be due to a defect. In that case we advise you to contact your dealer or a Philips Service Centre.
The appliance may also fail to work properly because it has not been installed or is not used in accordance with the instructions. In that case you are able to solve the problem yourself by following the troubleshooting tips

16 ENGLISH
below. Read the instructions below to check whether you can solve the problem yourself before contacting your dealer or the Philips Service Centre.
Problem |
Possible cause |
Appliance does not start |
Plug has not been (properly) inserted into the wall socket. |
|
|
|
There is a power failure. Check by means of another appliance. |
|
|
|
The lamps are still too hot to go on. Let them cool down for 3 minutes first. |
|
|
|
The appliance was not sufficiently cooled and the overheating protection switched |
|
appliance off automatically. Remove the cause of overheating (e.g. remove a towel |
|
that is blocking one or more vents). Wait for 10 minutes and switch the appliance |
|
back on. |
|
|
|
The two side lamp units and the centre lamp unit have not been put in the right |
|
position (see 'Preparing for use'). |
|
|
The fuse cuts off the power when you |
Check the fuse of the circuit to which the solarium is connected.The correct fuse |
switch on the solarium or during use. |
type is 16A standard fuse or a slow-blow automatic fuse.The fuse may also blow |
|
because you have connected (too many) different appliances to the same circuit. |
|
|
Poor tanning capacity |
You are using an extension cord that is too long, that is wound up and/or does not |
|
have the correct rating (16A). Consult your dealer. Our general advice is not to use |
|
an extension cord. |
|
|
|
You are not following the tanning schedule suitable for your skin type. |
|
|
|
The distance between the lamps and the surface you lie on is greater than |
|
prescribed. |
|
|
|
When the lamps have been used for a long time, the UV emitted will decrease. |
|
This effect only becomes noticeable after several years.You can overcome this |
|
problem by selecting a longer tanning time or by having the lamps replaced. |
|
|
The solarium cannot be placed back in the |
You have not pushed the upper part of the appliance backward far enough. Make |
transport position. |
sure you first push the upper part backward before pushing it down (see 'Storing'). |
|
|
|
The appliance fails to unlock automatically. In that case you first have to press |
|
unlocking button (C), after which you can fold the appliance back into its transport |
|
position in the manner indicated in the section 'Transport position'. If the appliance |
|
fails to unlock several times, contact your dealer or a Philips Service Centre. |
|
|
|
|
|
|

POLSKI 17
Wstęp
Słońce
Słońce dostarcza różnego typu energii.Widzialne światło umożliwia nam widzenie, promienie utlrafioletowe (UV) zapewniają opaleniznę, a promienie podczerwone (IR) dostarczają ciepła, które tak bardzo lubimy.
Solarium
Dzięki temu solarium możesz opalać się wygodnie w domu. Lampy opalające emitują widzialne światło, ciepło i promienie ultrafioletowe, dając wrażenie, że opalamy się w słońcu. Specjalny filtr promieni UV przepuszcza jedynie te promienie, które są niezbędne do uzyskania opalenizny.
Lampy opalające emitują wystarczająco dużo promieni podczerwonych, by zapenić wrażenie przyjemnego ciepła.
Tylko typ HB875: zamiast opalać się, możesz odpocząć podczas sesji, włączając jedynie lampy emitujące promienie podczerwone.
Dzięki timerowi masz pewność, że żadna sesja nie będzie trwała dłużej niż 30 minut.Tak jak w przypadku naturalnego światła słonecznego, należy unikać przedawkowania (patrz fragment "UV, opalanie i zdrowie" oraz "IR, odpoczynek i zdrowie").
Ważne
Sprawdź, czy napięcie wskazane na tabliczce znamionowej urządzenia odpowiada napięciu sieciowemu w Twoim domu.
Jeśli używane gniazdko ścienne ma słabe połączenia, wtyczka solarium będzie się nagrzewać. Należy używać wyłącznie gniazdek z odpowiednimi połączeniami.
Urządzenie musi być podłączone do obwodu wyposażonego w standardowy bezpiecznik 16A lub automatyczny bezpiecznik zwłoczny (topikowy).
Po użyciu, wyłącz urządzenie z sieci.
Woda i elektryczność stanowią niebezpieczne połączenie! Nie używaj urządzenia w miejscu wilgotnym (np. w łazience, pod prysznicem, ani w podbliżu basenu).
Jeśli właśnie wyszedłeś z basenu lub przed chwilą brałeś prysznic, wytrzyj się dokładnie zanim skorzystasz z urządzenia.
Po użyciu odczekaj około 15 minut, aż urządzenie ostygnie, zanim złożysz je i schowasz.
Sprawdź, czy otwory środkowej, bocznej i spodniej części lampowej są otwarte podczas korzystania z urządzenia.
Urządzenie zostało wyposażone w automatyczne zabezpieczenie przed przegrzaniem. Jeśli solarium nie chłodzi się wystarczająco (np. z powodu przysłoniętych otworów), urządzenie wyłączy się automatycznie. Z chwilą usunięcia przyczyny przegrzania i schłodzenia urządzenia, solarium włączy się ponownie automatycznie.
Podczas działania urządzenia, filtry UV mocno się nagrzewają. Nie dotykaj ich.
Urządzenie posiada części ruchome, uważaj więc, by nie zaklinować między nimi palców.
Nigdy nie używaj urządzenia, jeśli filtr UV jest uszkodzony, stłuczony lub jeśli go w ogóle nie ma.
Nie używaj urządzenia, jeśli uszkodzony jest przełącznik czasowy (timer).Uważaj, by dzieci nie bawiły się urządzeniem.
18 POLSKI
Nie przekraczaj liczby zalecanych sesji ani czasu trwania czy "godzin opalania" (patrz "Sesje opalające: jak często? jak długo?").
Nie korzystaj z solarium, gdy masz jakiekolwiek objawy choroby lub jeśli przyjmujesz lekarstwa lub używasz kosmetyków, które zwiększają wrażliwość skóry na promieniowanie UV lub IR. Zalecana jest także specjalna ostrożność w przypadku wyraźnej wrażliwości na promieniowanie ultrafioletowe (nadfioletowe) lub podczerwone.W razie wątpliwości zasięgnij rady lekarza.
Nie opalaj danej części ciała częściej niż raz dziennie.W dniu sesji opalającej unikaj kontaktu z naturalnymi promieniami słonecznymi.
Skontaktuj się ze swym lekarzem, jeśli masz na skórze wrzody, krostki lub trwałe narośla.
Urządzenie nie powinno być używane przez osoby, które w słońcu łatwo - zamiast opalać się - doznają poparzeń, przez osoby, które mają poparzenia słoneczne, przez dzieci, ani przez osoby, które cierpią (lub cierpiały w przeszłości) na raka skóry lub są zagrożone rakiem skóry.
Na czas opalania zawsze zakładaj okulary ochronne zabezpieczające oczy przez światłem ultrafioletowym, światłem widzialnym i podczerwonym (patrz także fragment : "UV i zdrowie").
Przed sesją opalającą zetrzyj z twarzy kremy, szminkę i inne kosmetyki.Nie stosuj żadnych preparatów ani kremów przyspieszających opalanie.Nie używaj żadnych kremów do opalania, mających za zadanie ochronę
przed poparzeniami słonecznymi.
Jeśli po sesji opalającej skóra jest napięta, możesz zastosować krem nawilżający.
Aby uzyskać równomierną opaleniznę, połóż się dokładnie pod częścią lampową.
Odległość ciała od lamp opalających nie powinna być mniejsza niż 65cm.Przenoś urządzenie jedynie w złożonej pozycji. Upewnij się, czy obydwie części są dobrze do siebie dopasowane. Nie próbuj podnosić urządzenia
samodzielnie.
Pod wpływem słońca kolory mogą płowieć.Tak samo dzieje się przy korzystaniu z solarium.
Nie oczekuj lepszych efektów opalania solarium niż naturalnym światłem słonecznym.
UV, opalanie i zdrowie
Tak jak w przypadku naturalnych promieni słonecznych, proces opalania wymaga czasu. Dopiero po kilku sesjach będą widoczne pierwsze efekty (patrz fragment: "Sesje opalające UV: jak często, jak długo?").
Przedawkowanie promieniowania ultrafioletowego (czy to naturalnego słonecznego czy sztucznego z solarium) może powodować poparzenia.
Oprócz wielu innych czynników, takich jak nadmierne wystawienie na naturalne światło słoneczne, niewłaściwe lub nadmierne użycie solarium może spowodować problemy związane ze skórą lub oczami. Nasilenie takich problemów zależy od naturalnych predyspozycji, intensywności i czasu naświetlania z jednej strony, a wrażliwości danej osoby z drugiej strony.
Im bardziej oczy i skóra są narażone na promieniowanie UV, tym większe ryzyko wystąpienia zapalenia rogówki, zapalenia spojówek, uszkodzenia siatkówki, wystąpienia zaćmy, przedwczesnego starzenia się skóry oraz raka skóry. Niektóre kosmetyki i lekarstwa zwiększają wrażliwość skóry.
Zatem niezwykle istotne jest:

POLSKI 19
Bprzestrzeganie wskazówek podanych w części " Ważne" oraz "Sesje opalające: jak często i jak długo?";
Bzachowanie zalecanej odległości opalania (odległości pomiędzy filtrami UV a ciałem) około 65cm.
Bnieprzekraczanie maksymalnej rocznej liczby godzin opalania (tzn. 21 godzin lub 1260 minut);
B zakładanie okularów ochronnych podczas każdego opalania.
IR, odpoczynek i Twoje zdrowie (tylko typ HB875)
Ciepło daje poczucie odprężenia. Pomyśl o rozkoszach ciepłej kąpieli lub wylegiwania się w słońcu. Możesz uzyskać ten efekt, włączając lampy podczerwone.
Podczas sesji relaksacyjnych pamiętaj:
-Unikaj przegrzania.W razie potrzeby zwiększ odległość pomiędzy ciałem a lampami.
-Jeśli będzie Ci za gorąco w głowę, zasłoń ją lub przesuń się tak, by mniej promieni padało na głowę.
-Podczas sesji relaksacyjnych miej zamknięte oczy.
-Nie przeciągaj sesji relaksacyjnych za długo (patrz fragment "sesje relaksacyjne: jak często i jak długo?").
Sesje opalające UV: jak często i jak długo?
Przez okres od 5 do 10 dni możesz odbywać jedną sesję opalającą dziennie.
Pomiędzy dwoma pierwszymi sesjami zrób co najmniej 48-godzinną przerwę.
Po 5-10 -ciodniowym cyklu możesz przerwać opalanie, by dać odpocząć skórze.
Po upływie około miesiąca od cyklu opalania, opalenizna znacznie zblednie. Wówczas możesz zacząć nowy cykl opalania.
Z drugiej strony, po zakończonym cyklu możesz także utrwalać opaleniznę, stosując jedną lub dwie sesje tygodniowo.
Bez względu na wybraną metodę opalania, upewnij się, czy nie przekraczasz maksymalnej rocznej liczby godzin opalania.
W przypadku tego solarium maksymalna liczba godzin wynosi 21 (= 1260 minut) rocznie.
Przykład
Załóżmy, że decydujesz się na 10-dniowy cykl opalania, na który składa się 8 minutowa sesja pierwszego dnia i po 20 minut każdego następnego. Zatem cały cykl trwa (1x8 minut) + (9 x 20 minut) = 188 minut.
W ciągu roku możesz odbyć 6 takich cykli (6 x 188 minut = 1228 minut). Oczywiście maksymalna liczba godzin opalania doytyczy każdej części lub strony ciała osobno (np. pleców czy przodu).
Z tabeli wynika, że pierwsza sesja danego cyklu zawsze powinna trwać 8 minut. Nie jest to związane z indywidualną wrażliwością skóry.
BJeśli uważasz, że sesje są dla Ciebie za długie (np. skóra staje się napięta i podrażniona po sesji), radzimy skrócić sesje np. o 5 minut.
BAby uzyskać piękną równomierną opaleniznę, obracaj nieco ciało podczas sesji, tak by każda strona była odpowiednio wystawiona na działanie promieni opalających.
20 POLSKI
Czas trwania sesji UV |
Dla osób o bardzo wrażliwej |
Dla osób o normalnej skórze |
Dla osób o mniej wrażliwej |
|
skórze |
|
skórze |
|
|
|
|
Pierwsza sesja |
8 minut |
8 minutes |
8 minut |
|
|
|
|
Pozostałe z 48 godzin |
|
|
|
|
|
|
|
Druga sesja |
10 minut |
20-25 minut |
30 minut* |
|
|
|
|
Trzecia sesja |
10 minut |
20-25 minut |
30 minut* |
|
|
|
|
Czwarta sesja |
10 minut |
20-25 minut |
30 minut* |
|
|
|
|
Piąta sesja |
10 minut |
20-25 minut |
30 minut* |
|
|
|
|
Szósta sesja |
10 minut |
20-25 minut |
30 minut* |
|
|
|
|
Siódma sesja |
10 minut |
20-25 minut |
30 minut* |
|
|
|
|
Ósma sesja |
10 minut |
20-25 minut |
30 minut* |
|
|
|
|
Dziewiąta sesja |
10 minut |
20-25 minut |
30 minut* |
|
|
|
|
Dziesiąta sesja |
10 minut |
20-25 minut |
30 minut* |
* Jeśli Twoja skóra jest nieco napięta po opalaniu, możesz zastosować krem nawilżający.
Sesje relaksacyjne: jak często i jak długo?
Tylko typ HB875
Jeśli nie chcesz od razu wstawać po sesji opalającej, możesz włączyć lampy podczerwone i zacząć sesję relaksacyjną, podczas której lampy podczerwone dostarczą Ci ciepło.
Możesz także korzystać z sesji relaksacyjnej bez uprzedniego opalania.
Możesz robić to kilka razy dziennie (np. 30 minut rano i wieczorem).
Przygotowanie do użycia
C Możesz z łatwością przenosić i przechowywać urządzenie w pozycji złożonej.
C |
|
Aby otworzyć urządzenie, przesuń suwak w zamku w kierunku |
1 |
||
|
|
wskazanym przez strzałkę. |
W tym momencie górna część urządzenia zostaje odblokowana.
POLSKI 21
|
|
|
C |
|
Górna część przesuwa się lekko w górę (samodzielnie lub z |
|
|
|
|
||
2 |
|||||
|
|
|
|
|
niewielką pomocą). |
|
|
|
|
|
|
C |
|
Obydwiema rękami schwyć uchwyt i przytrzymaj jedną stopą |
3 |
||
|
|
urządzenie, by zapobiec jego przesuwaniu się. Odegnij górną część, |
|
|
pociągając za uchwyt i zakreślając łuk. |
Nie odginaj górnej części za daleko.
C 4 Pociągnij górną część jednocześnie do góry i w kierunku siebie.
Wymaga to nieco wysiłku.
85
65
20
C |
|
Przesuń jak najdalej obydwie części lampowe, aż znajdą się one |
5 |
||
|
|
wobec siebie w jednej linii. |
|
C |
|
Odległość pomiędzy filtrami UV a ciałem musi wynosić 65cm. |
6 |
|||
|
|
|
Odległość pomiędzy filtrami UV a powierzchnią, na której leżysz |
|
|
|
(np. łóżkiem) musi wynosić 85cm. |
|
|
|
|
|
|
|
|
C 7 |
Podczas regulowania wysokości urządzenia, podtrzymuj górną część |
|
stojaka. |
Obluzuj pokrętło (A) przekręcając w kierunku przeciwnym do ruchu wskazówek zegara (dwa lub trzy obroty).
C |
|
Ręką przytrzymaj poziomą część stojaka i ustaw go na |
8 |
||
|
|
odpowiedniej wysokości. |

22 POLSKI
|
C |
|
Mocno zaciśnij pokrętło (A) i puść stojak. |
|
|
||
9 |
|||
|
|||
|
|
|
|
C Możesz określić, czy urządzenie zostało ustawione na odpowiedniej wysokości, wyciągając miarkę.
 C Miarka automatycznie rozwinie się, gdy pociągniesz za czerwony koniuszek.
C 10 |
Przekręć środkową lampę 90 |
c |
aż usłyszysz charakterystycznie |
kliknięcie. |
|
Zwróć uwagę, że środkową lampę można obracać tylko w kierunku wskazanym przez strzałkę.
Solarium można włączyć jedynie wówczas, gdy środkowa i boczne lampy zostały w pełni rozciągnęte i ustawione we właściwych pozycjach. Dotyczy to
zarówno sesji opalających jak i relaksacyjnych.
C Właściwa pozycja.
Urządzenie jest gotowe do użytku.
Użycie urządzenia
1Rozwiń całkowicie przewód zasilający.
2 Włóż wtyczkę do gniazdka ściennego.
C Zaświeci się wówczas lampka kontrolna na pilocie zdalnego sterowania. Lampka kontrolna świeci się cały czas, gdy urządzenie jest podłączone do sieci.
Opalanie i relaks
3Ustaw przełącznik na wybranej pozycji:
;dla sesji opalającej
l dla sesji relaksacyjnej

POLSKI 23
Ustawienie czasu opalania lub sesji relaksacyjnej
C |
|
Ustaw czas sesji opalającej lub relaksacyjnej przez wciskanie |
4 |
||
|
|
przycisku + w celu przesuwania czasu do przodu i przycisku - w |
celu przesuwania czasu do tyłu.
Przytrzymuj wciśnięty przycisk, aby szybciej ustawić odpowiedni czas.
5Połóż się pod solarium, dokładnie pod lampami, tak by móc opalać całe ciało równomienrie.
6Załóż okulary ochronne, które dostałaś wraz z solarium.
C |
|
Włącz lampy opalające lub podczerwone, wciskając przycisk start |
7 |
||
|
|
(I). |
C Pojawi się wówczas przerywany sygnał, na wyświetlaczu zobaczysz ustawiony czas (w tym przypadku 25 minut).
Teraz zaczyna się odliczanie czasu opalania lub relaksu.
C Podczas ostatniej minuty sesji usłyszysz sygnał dźwiękowy.
C W ciągu tej minuty możesz nacisnąć przycisk pause/repeat (pauza/powtórka), aby powtórzyć sesję fi.
Możesz też ustawić inny czas.
W ten sposób unikniesz czekania przez 3 minuty, aż urządzenie będzie ponownie gotowe do użytku, gdyż po wyłączeniu solarium lampy schładzają się właśnie przez 3 minuty .
Okres oczekiwania nie dotyczy lamp podczerwonych (tylko typ HB 875).
C |
|
Ustaw nowy czas, wciskając przycisk "-+", następnie wciśnij przycisk |
8 |
||
|
|
"start" (I). |
Sygnał dźwiękowy ustanie i zacznie być odliczany nowy czas.
Tylko typ HB875: Podczas ostatniej minuty sesji możesz także przełączyć solarium z ustawienia opalającego na relaksujące, przestawiając regulator l.
 Loading...