


8000 series
GC8261, GC8260, GC8220, GC8210

2
3
1

4

ENGLISH 6
DANSK 18
DEUTSCH 30
42
ESPAÑOL 55
SUOMI
FRANÇAIS 79
ITALIANO
NEDERLANDS 103
NORSK
PORTUGUÊS
SVENSKA 139
TÜRKÇE
67
91
115
127
150
GC8261, GC8260, GC8220, GC8210

6
ENGLISH
Introduction
Thank you for buying this Philips ironing system. Please read these
instructions for use, as they contain information about the surprising
features of this ironing system and some tips to make ironing easier and
more enjoyable.
The powerful pressurised ironing system produces non-stop steam to
make ironing easier. Thanks to the large water tank you can iron without
interruption. When the water tank is empty you can detach it and rell it
immediately.
We hope you will enjoy using this ironing system.
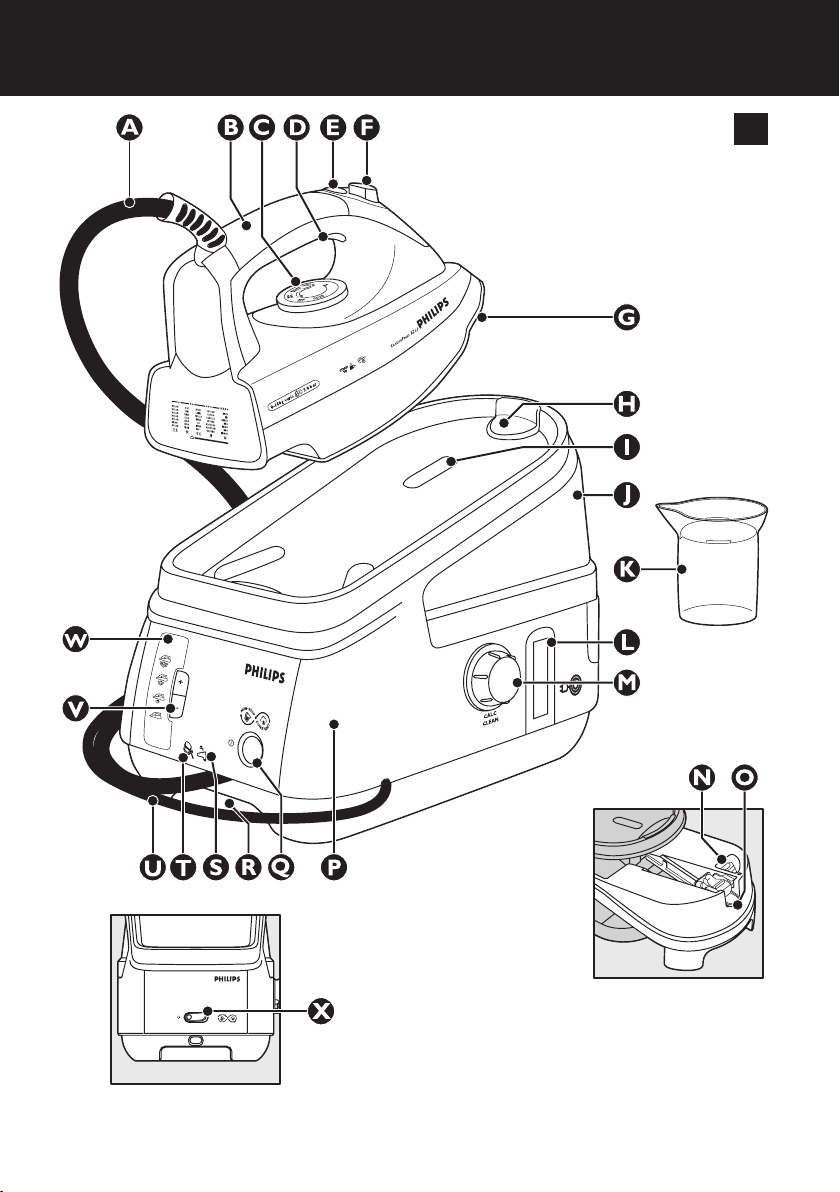
General description (Fig. 1)
A Supply hose
B Handle with soft grip (GC8261/GC8260 only)
C Temperature dial
D Steam activator
E Steam lock
F Shot-of-steam button (GC8261/GC8260/GC8220 only)
G Soleplate
H Safe storage lock (GC8261/GC8260 only)
I Iron stand
J Detachable water tank
K Filling cup
L Cord & hose storage hook
M Calc-Clean rinsing cap
N Filling opening
O Water tank release lever
P Steam tank
Q On/off button with power-on light (GC8261/GC8260/GC8220 only)
R Transport handgrip
S Water tank rell light (GC8261/GC8260/GC8220 only)
T Calc-Clean light (GC8261/GC8260 only)
U Mains cord
V Steam buttons (+/-) (GC8261/GC8260/GC8220 only)
W Steam tank control panel with steam light (GC8261/GC8260/GC8220
only)
p = maximum steam
[ = moderate steam
] = minimum steam
a = no steam
-
X On/off switch (GC8210 only)
Important
Read these instructions for use carefully before using the appliance and
save them for future reference.
Check if the voltage indicated on the type plate corresponds to the
,
local mains voltage before you connect the appliance.
Only connect the appliance to an earthed wall socket.
,
Do not use the appliance if the plug, the cord, the supply hose or
,
the appliance itself shows visible damage, or if the appliance has been
dropped or is leaking.

ENGLISH 7
Check the cord and the supply hose regularly for possible damage.
,
If the mains cord or the supply hose is damaged, it must be replaced
,
by Philips, a service centre authorised by Philips or similarly qualied
persons in order to avoid a hazard.
Never leave the appliance unattended when it is connected to the
,
mains.
Never immerse the iron or the steam tank in water.
,
This appliance is not intended for use by persons (including children)
,
with reduced physical, sensory or mental capabilities, or lack of
experience and knowledge, unless they have been given supervision
or instruction concerning use of the appliance by a person
responsible for their safety.
Children should be supervised to ensure that they do not play with
,
the appliance.
The soleplate of the iron can become extremely hot and may cause
,
burns if touched.
Do not allow the mains cord and supply hose to come into contact
,
with the soleplate when it is hot.
Always place and use the iron and the steam tank on a stable, level
,
and horizontal surface. Do not put the steam tank on the soft part of
the ironing board.
When you have nished ironing, when you clean the appliance, when
,
you ll or empty the water tank and also when you leave the iron
even for a short while: put the iron on the stand, switch the appliance
off and remove the mains plug from the wall socket.
If steam escapes from under the Calc-Clean rinsing cap when the
,
appliance is heating up, switch the appliance off and tighten the CalcClean rinsing cap. If steam continues to escape when the appliance
is heating up, switch the appliance off and contact a service centre
authorised by Philips.
Do not use any other cap on the steam tank than the cap that has
,
been supplied with the appliance, as this cap also functions as a safety
valve.
Rinse the steam tank regularly according to the instructions in the
,
chapter ‘Cleaning’.
Never remove the Calc-Clean rinsing cap when the steam tank is
,
hot.
This appliance is intended for household use only.
,
This Philips appliance complies with all standards regarding electromagnetic
elds (EMF). If handled properly and according to the instructions in this
user manual, the appliance is safe to use based on scientic evidence
available today.
Note: The iron may give off some smoke when you use it for the rst time. This
is normal and will stop after a short while.
Note: Some particles may come out of the soleplate when you use the iron for
the rst time. This is normal; the particles are harmless and will stop coming
out of the iron after a short while.

ENGLISH8
Note: When you switch the appliance on, the steam tank may produce a
pumping sound. This is normal; the sound tells you that water is being pumped
into the steam tank.
1 Remove any sticker or protective foil from the soleplate and clean
the soleplate with a soft cloth.
Preparing for use
1
Place the steam tank on a stable and level surface, i.e. on the hard
part of the ironing board or on a table.
Filling the detachable water tank
The water tank can be relled at any time during use.
,
Do not put hot water, perfume, vinegar, starch, descaling agents, ironing
aids or other chemicals in the water tank.
Do not overll the water tank, otherwise water may spill out of the
lling opening when you reinsert the water tank.
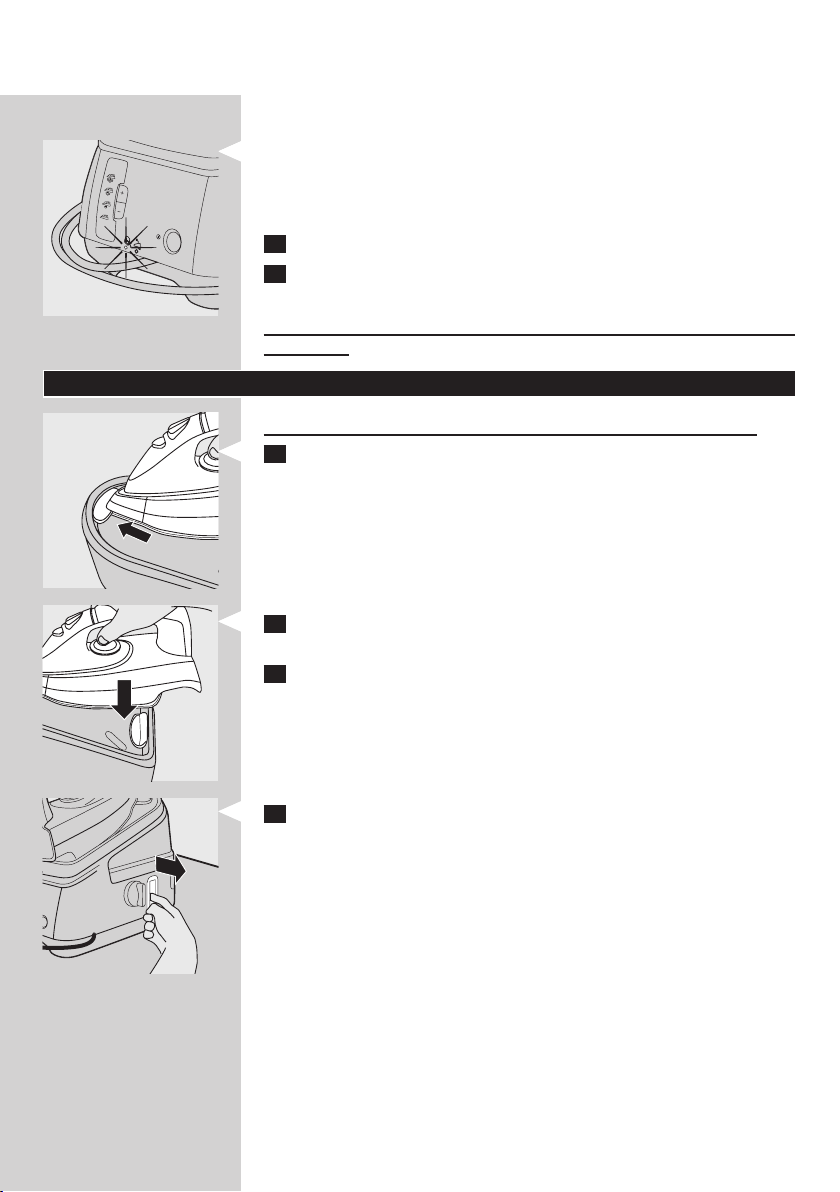
1 Remove the detachable water tank from the steam tank.
If the tap water in your area is very hard, we advise you to mix it with an
equal amount of distilled water.
2 Fill the water tank up to the MAX indication.
3 Slide the water tank rmly back into the steam tank (‘click’).
If the water tank is not properly placed, the iron does not produce any
steam.
When the water tank is empty, the water tank rell light starts
,
blinking (GC8261/GC8260/GC8220 only) and steam ironing is no
longer possible.
Rell the water tank. The iron starts steaming again as soon as the
,
water tank has been properly reinserted into the steam tank.
Setting the temperature
1 Check the garment label for the required ironing temperature
1 Synthetic fabrics ( e.g. acryl, viscose, polyamide) and silk
2 Wool
3 Cotton
MAX Linen
-

OnOn
OnOn
ENGLISH 9
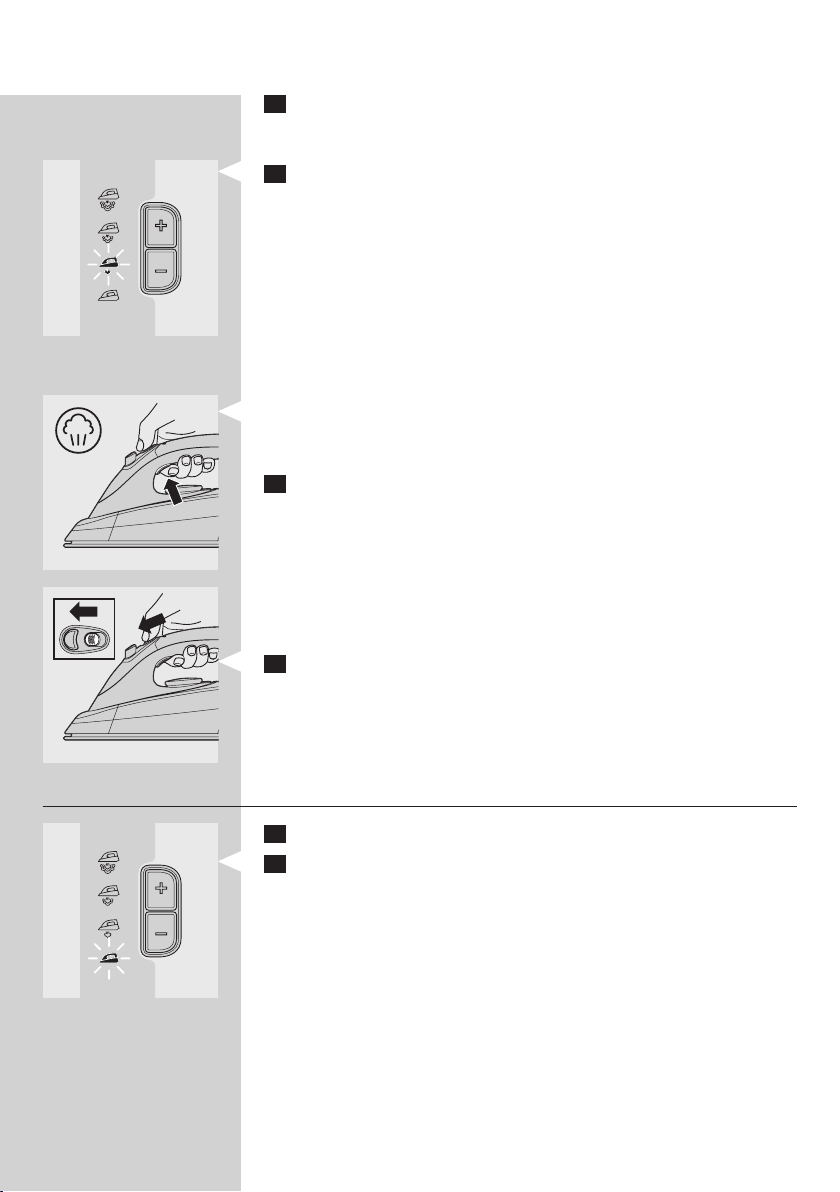
2 Set the temperature dial to the required ironing temperature by
turning it to the appropriate temperature indication.
3 GC8261/GC8260/GC8220 only: Put the mains plug in an earthed
wall socket and press the on/off button once.
The steam light starts blinking.
After approx. 2 minutes the steam light stays on continuously to indicate
that the steam tank is ready for steam ironing.
4 GC8210 only: Put the mains plug in an earthed wall socket and set
the on/off switch to ‘on’.
Tips
If the article consists of various kind of bres, always select the
-
temperature required by the most delicate bre, i.e. the lowest
temperature. If, for example, the fabric consists of 60% polyester and
40% cotton, it should be ironed at the temperature indicated for
polyester ( 2).
If you do not know what kind or kinds of fabric an article is made of,
determine the right ironing temperature by ironing a part that will not
be visible when you wear or use the article.
Silk, woollen and synthetic materials: iron the reverse side of the fabric
to prevent shiny patches.
Fabrics that tend to acquire shiny patches should be ironed in one
direction only (along with the nap) while applying very little pressure.
Start ironing the articles that require the lowest ironing temperature,
i.e. those made of synthetic materials.
To make the iron cool down faster, simply apply steam or iron a
,
piece of cloth.
Using the appliance
Steam ironing
The supply hose may become hot during a long ironing session.
Note: The system may occasionally produce a pumping sound during steam
ironing. This is normal and tells you that water is being pumped into the steam
tank.
1 Make sure there is enough water in the water tank.
ENGLISH10
2 Switch the appliance on and select the recommended ironing
temperature.
Steam ironing is only possible at ironing temperatures higher than 2.
3 GC8261/GC8260/GC8220 only: Select the required steam setting by
means of the + and - buttons on the steam tank control panel.
p for maximum steam (temperature setting MAX).
[ for moderate steam (temperature settings 3 to MAX).
] for minimum steam (temperature settings 2 to MAX).
a for no steam (temperature settings 1 to MAX).
The steam light blinks to indicate that the steam tank is heating up.
,
After approx. 2 minutes the steam light stays on continuously to indicate
that the steam tank is ready for steam ironing.
During steam ironing the steam light starts blinking from time to time, to
indicate that the steam tank is heating up to maintain the right temperature
and pressure.
During ironing you can adjust the steam setting by means of the +
,
and - steam buttons.
It will take a few moments before the amount of steam is adjusted.
4 Start steam ironing by pressing the steam activator.
When you put the iron down during ironing, put it on its heel or on the
iron stand.
The opening and closing of the steam valve in the steam tank will
,
cause a clicking sound. This is perfectly normal.
Steam lock function
The steam lock allows you to steam iron non-stop without having to press
the steam activator continuously.
1 Slide the steam lock to position ‘on’. To stop steaming, slide it back to
position ‘off’. When the steam lock has been set to ‘off’, the iron will
only steam when you press the steam activator.
Release the steam lock when you put the iron on its heel or on the iron
stand. This prevents hot steam from escaping from the iron or from wetting
the iron stand.
Ironing without steam
1 Start ironing without pressing the steam activator.
2 GC8261/GC8260/GC8220 only: You can also select steam setting a
(no steam) and start ironing.

OffOff
ENGLISH 11
Features
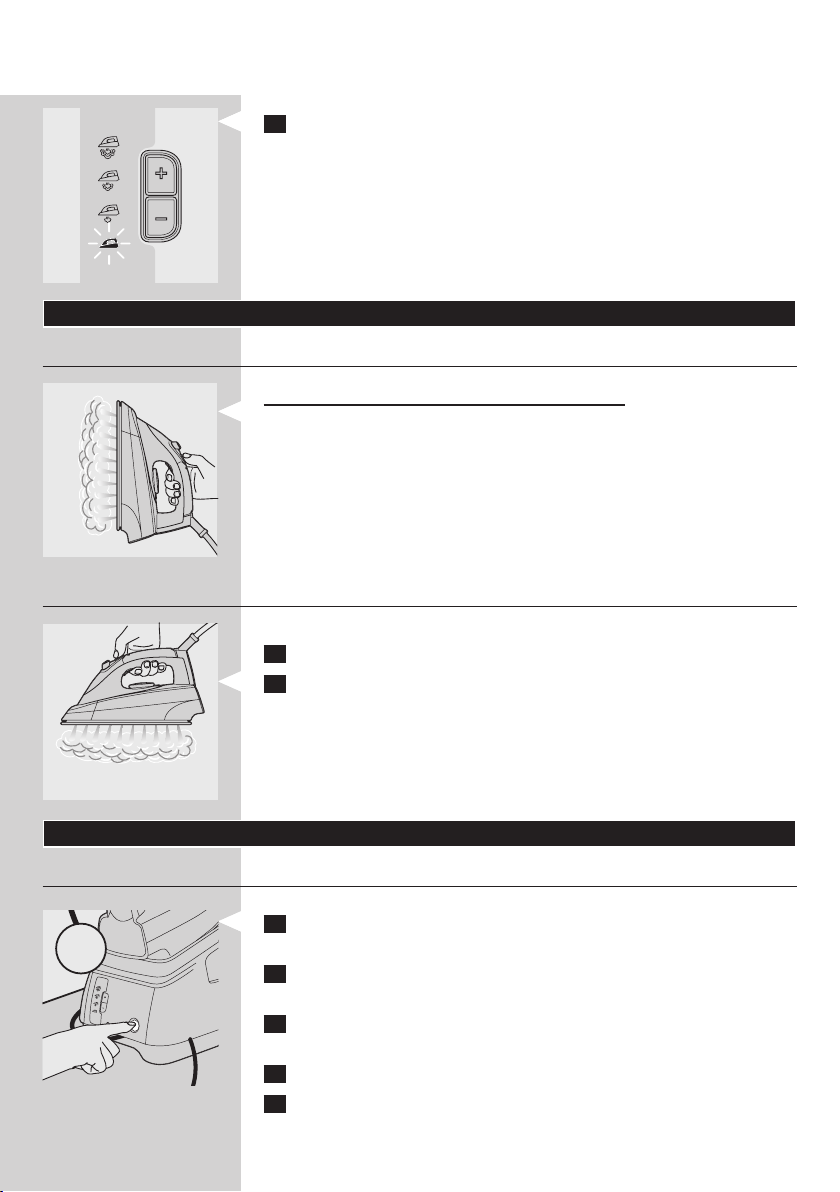
Vertical steaming
Never direct the steam at people.
You can steam iron hanging curtains and clothes (jackets, suits,
,
coats) by holding the iron in vertical position and pressing the steam
activator.
Shot of steam (GC8261/GC8260/GC8220 only)
A powerful shot of steam helps to remove stubborn creases.
1 Set the temperature dial to a position between 3 and MAX.
2 Press the shot-of-steam button.
The shot-of-steam function must be used intermittently. If water
,
droplets come out of the soleplate, let the iron heat up for at least
one minute before using the shot-of-steam function again.
Cleaning and maintenance
After ironing
1 Put the iron on the stand and switch the iron off.
2 Remove the mains plug from the wall socket and let the iron cool
down.
3 Wipe scale and any other deposits off the soleplate with a damp
cloth and a non-abrasive (liquid) cleaner.
4 Clean the upper part of the appliance with a damp cloth.
5 Empty the water tank after cleaning.
Calc-Clean function
Never remove the Calc-Clean rinsing cap when the steam tank is hot.
VERY IMPORTANT: Rinse the steam tank once a month or after every
10 times of use, to prevent damage to the appliance and for optimal
steaming performance.
1 Make sure that the appliance has been unplugged and has cooled
down for more than 2 hours.
ENGLISH12
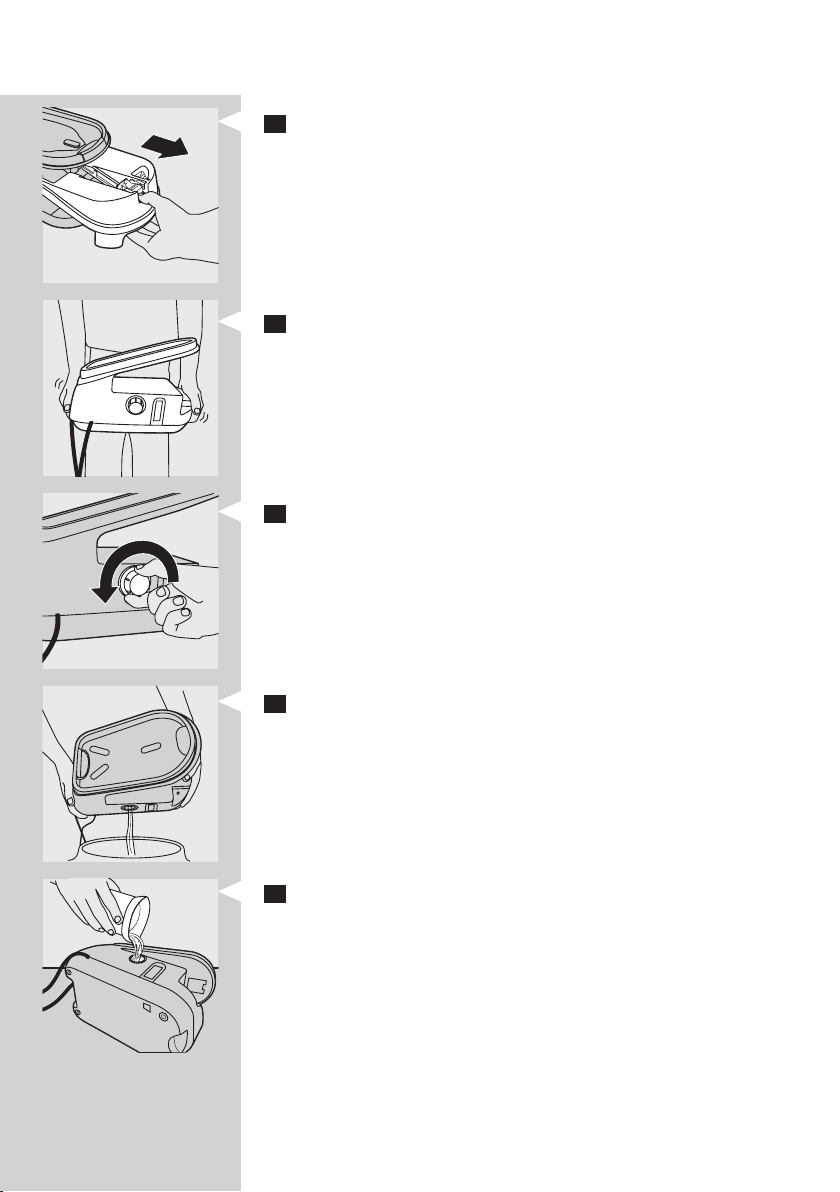
2 Remove the detachable water tank.
3 Hold the steam tank with both hands and shake well.
4 Turn the steam tank on its side and remove the Calc-Clean rinsing
cap.
5 Empty the steam tank by pouring out the water into the sink.
6 Fill the steam tank with fresh water by means of the lling cup and
shake again.

ENGLISH 13
7 Empty the steam tank into the sink again.
Repeat steps 6 & 7 twice to obtain the best result.
8 Screw the Calc-Clean rinsing cap tightly back onto the steam tank.
Calc-Clean reminder (GC8261/GC8260 only)
When the steam tank is due to be rinsed, the Calc-Clean light blinks
,
for 30 seconds.
The steam tank will not be heated up during these 30 seconds.
1 Switch the appliance off immediately.
2 Use the Calc-Clean function as described above.
Do not use the Calc-Clean function when the steam tank is hot.
Storage
Always let the iron cool down before storing it.
1 GC8261/GC8260 only: Insert the tip of the iron into the safe storage
lock on the stand.
2 GC8261/GC8260 only: Press the back of the iron rmly down
(‘click’).
3 Empty the water tank.

ENGLISH14
4 Pull out the cord & hose storage hook.
5 Secure the supply hose and mains cord.
6 There are handgrips on either side of the steam tank for easy
transport.
Environment
Do not throw the appliance away with the normal household waste
,
at the end of its life, but hand it in at an ofcial collection point for
recycling. By doing this you will help to preserve the environment.
Guarantee & service
If you need information or if you have a problem, please visit the Philips
website at www.philips.com or contact the Philips Customer Care
Centre in your country (you will nd its phone number in the worldwide
guarantee leaet). If there is no Customer Care Centre in your country,
turn to your local Philips dealer or contact the Service Depar tment of
Philips Domestic Appliances and Personal Care BV.

Troubleshooting
This chapter summarises the most common problems you could encounter
with your iron. Please read the different sections for more details. If you
are unable to solve the problem, please contact the Philips Customer Care
Centre in your country.
Problem Cause Solution
ENGLISH 15
The appliance does
not become hot.
Smoke comes out
of my new iron
when I switch it on.
The iron does not
produce any steam.
Water droplets
come out of the
soleplate.
There is a connection problem. Check the mains cord, the plug and
the wall socket.
The appliance has not been switched on. Press the on/off button (types
GC8261/GC8260/GC8220) or set
the on/off switch to ‘on’ (GC8210).
The selected temperature is too low. Select a higher temperature.
Some parts of the appliance have been
lightly greased in the factory and may
initially give off some smoke when heated.
There is not enough water in the water
tank.
The steam tank has not heated up
sufciently.
The selected ironing temperature is too
low for steam ironing.
Steam setting a (no steam) has been
selected (GC8261/GC8260/GC8220 only).
The water tank has not been placed
properly in the steam tank.
When the iron has been set to a very high
temperature, the steam produced is dry
and hardly visible. It will be even less visible
when the ambient temperature is relatively
high and it will be entirely invisible when
the temperature has been set to MAX.
The selected temperature is too low for
steam ironing.
This phenomenon is perfectly
normal and will cease after a short
while.
Fill the water tank (see ‘Preparing for
use’, section ‘Filling the detachable
water tank’).
Wait for approx. 2 minutes
(GC8261/GC8260/GC8220 only:
until the steam light stays on
continuously).
Select a temperature of 2 or
higher.
Select steam setting ] (minimum
steam), [ (moderate steam) or p
(maximum steam).
Place the water tank properly in the
steam tank (‘click’).
Set the iron to a lower temperature,
e.g. 2, to check if the iron is
actually producing steam.
Select a temperature of 2 or
higher.

ENGLISH16
Problem Cause Solution
Flakes and
impurities come
out of the soleplate
or the soleplate is
dirty.
The appliance
produces a
pumping sound.
The iron produces
steam continuously.
Dirty water comes
out of the soleplate.
Steam escapes from
under the CalcClean rinsing cap
when the appliance
is heating up.
The iron does not
produce enough
steam/the amount
of steam decreases
and increases
during steam
ironing.
Wet spots appear
on the garment
during ironing.
When you start steam ironing and when
you have stopped steam ironing for a
while, the steam that was still present in
the supply hose will have cooled down
and condensed into water, which causes
water droplets to come out of the
soleplate.
Impurities or chemicals present in the
water have deposited in the steam vents
and/or on the soleplate.
Water is being pumped into the steam
tank.
The pumping sound does not stop. Unplug the iron immediately and
The steam lock has been set to ‘on’. Set the steam lock to ‘off’ if you only
Too much scale and minerals have
accumulated inside the steam tank.
The Calc-clean rinsing cap has not been
tightened properly.
When the appliance pumps water into
the boiler, the steam amount sometimes
decreases. This is probably when you think
that the iron does not produce enough
steam. However, this is a completely
normal phenomenon and the steam
output normalises within a few seconds.
The wet spots that appear on your
garment after you have steam ironed for
some time may be caused by steam that
has condensed onto the ironing board.
Iron the wet spots without steam for
some time to dry them. If the underside
of the ironing board is wet, wipe it with a
piece of dry cloth.
This is perfectly normal. Hold the
iron over an old cloth and press
the steam activator when you start
ironing (again). Wait until steam
instead of water comes out of the
soleplate.
Clean the soleplate with a damp
cloth.
This is normal.
contact an authorised Philips service
centre.
want to obtain steam when pressing
the steam activator (see section
‘Steam lock function’).
Rinse the steam tank. See chapter
‘Cleaning and maintenance’.
Switch the appliance off, tighten the
Calc-Clean rinsing cap and switch
the appliance on again. If steam
continues to escape when the
appliance is heating up, switch the
appliance off and contact a service
centre authorised by Philips.
To optimise the steam output,
release the steam lock when you do
not need steam and when you put
the iron down.
To prevent steam from condensing
onto the ironing board, use an
ironing board with a wire mesh top.

Problem Cause Solution
ENGLISH 17
Water droplets
come out of the
soleplate when I
use the shot-ofsteam function
(GC8261/GC8260/
GC8220 only).
Steam may have condensed in the hose,
the temperature may have been set below
3 or the appliance may not be ready
for steam ironing.
Make sure the temperature is set to
3 or higher. Steam iron for a few
seconds before you use the shot-of-
steam function.

18
DANSK
Introduktion
Tak fordi du har købt dette Philips-strygesystem. Venligst læs
brugsvejledningen igennem, da den indeholder oplysninger om
strygesystemets overraskende funktioner samt nogle gode råd, der gør
strygningen lettere og mere behagelig.
Dette kraftfulde strygesystem med tryk producerer konstant damp, hvilket
gør strygningen lettere. Takket være den store vandtank kan du stryge uden
afbrydelse. Når vandtanken er tom, tages den blot af og fyldes igen.
Vi håber, at du vil få glæde af dette strygesystem.
A Dampslange
B Håndtag med blødt greb (kun GC8261/GC8260)
C Temperaturvælger
D Dampaktiveringsknap
E Damplås
F Dampskudsknap (kun GC8261/GC8260/GC8220)
G Strygesål
H Lås til sikker opbevaring (kun GC8261/GC8260)
I Holder til strygejernet
J Aftagelig vandtank
K Påfyldningsbæger
L Krog til opbevaring af ledning og slange
M Calc-Clean-dæksel
N Påfyldningsåbning
O Udløser til vandtank
P Damptank
Q On/off-knap med lys (kun GC8261/GC8260/GC8220)
R Transporthåndtag
S Indikator for påfyldning af vandtank (kun GC8261/GC8260/GC8220)
T Indikator for Calc-Clean (kun GC8261/GC8260)
U Netledning
V Dampknapper (+/-) (kun GC8261/GC8260/GC8220)
W Betjeningspanel på damptank med lysindikator for damp (kun GC8261/
GC8260/GC8220)
p = maksimal dampmængde
[ = moderat dampmængde
] = minimal dampmængde
a = ingen damp
-
X On/off-kontakt (kun GC8210)
Vigtigt
Læs brugsvejledningen omhyggeligt igennem, inden apparatet tages i brug,
og gem den til eventuel senere brug.
Kontrollér, om spændingsangivelsen på typeskiltet svarer til den
,
lokale netspænding, før du tilslutter apparatet.
Apparatet må kun sluttes til en stikkontakt med jordforbindelse.
,
Brug ikke apparatet, hvis stik, ledning, dampslange eller selve
,
apparatet viser tegn på beskadigelse, eller hvis apparatet er blevet
tabt, eller det er utæt.

DANSK 19
Kontrollér med jævne mellemrum, at ledningen og dampslangen er
,
hel og ubeskadiget.
Hvis ledningen eller dampslangen beskadiges, må de kun udskiftes af
,
Philips, et autoriseret Philips-serviceværksted eller af en kvaliceret
fagmand for at undgå enhver risiko ved efterfølgende brug.
Hold altid apparatet under opsyn, når det er sluttet til lysnettet.
,
Hverken strygejern eller damptank må kommes ned i vand.
,
Dette apparat er ikke beregnet til at blive brugt af personer
,
(herunder børn) med nedsatte fysiske og mentale evner, nedsat
følesans eller manglende erfaring og viden, medmindre de er blevet
vejledt eller instrueret i apparatets anvendelse af en person, der er
ansvarlig for deres sikkerhed.
Apparatet bør holdes uden for børns rækkevidde for at sikre, at de
,
ikke kan komme til at lege med det.
Strygesålen kan blive utrolig varm og forårsage brandsår ved
,
berøring.
Netledning og dampslange må ikke komme i kontakt med
,
strygesålen, når denne er varm.
Placér og brug altid strygejern og damptank på et stabilt, plant og
,
vandret underlag. Damptanken må ikke stilles på den bløde del af
strygebrættet.
Når du er færdig med at stryge, når du rengør apparatet, når du
,
fylder eller tømmer vandtanken, og når du forlader strygejernet
– selv om det kun er i et kort øjeblik – skal du placere strygejernet i
standeren, slukke for apparatet og tage stikket ud af stikkontakten.
Hvis der slipper damp ud under Calc-Clean-dækslet, mens apparatet
,
varmer op, skal du slukke for apparatet og stramme Calc-Cleandækslet. Slipper der fortsat damp ud, mens apparatet varmer op, skal
du slukke for apparatet og kontakte din Philips-forhandler.
Brug ikke andre låg til damptanken end det medleverede, da det
,
samtidig fungerer som sikkerhedsventil.
Skyl damptanken med jævne mellemrum ifølge anvisningerne i
,
afsnittet “Rengøring”.
Calc-Clean-dækslet må aldrig fjernes, når damptanken er varm.
,
Dette apparat er kun beregnet til almindelig husholdningsbrug.
,
Elektromagnetiske felter (EMF)
Dette Philips-apparat overholder alle standarder for elektromagnetiske
felter (EMF). Ved korrekt anvendelse i overensstemmelse med
instruktionerne i denne brugsvejleding, er apparatet sikkert at anvende,
ifølge den videnskabelige viden, der er tilgængelig i dag.
Før apparatet tages i brug første gang
Bemærk: Der kan komme lidt røg fra strygejernet, når det tændes første gang.
Dette er helt normalt og vil hurtigt forsvinde.
Bemærk: Når strygejernet bruges første gang, kan der drysse lidt partikler ud
fra strygesålen. Dette er helt normalt. Partiklerne er uskadelige og forsvinder
efter et kort øjeblik.
Bemærk: Idet apparatet tændes, høres der måske en pumpelyd fra
damptanken. Dette er helt normalt. Lyden indikerer, at der pumpes vand ind i
damptanken.

DANSK20
1 Fjern eventuelle mærkater eller beskyttelseslm fra strygesålen, og
rengør den med en blød klud.
Klargøring
1
Placér damptanken på et stabilt, jævnt underlag, dvs. på den hårde del
af strygebrættet eller et bord.
Påfyldning af den aftagelige vandtank
Vandtanken kan påfyldes på et hvilket som helst tidspunkt.
,
Kom aldrig varmt vand, parfume, eddike, stivelse, afkalkningsmiddel,
strygemiddel eller andre kemikalier i vandtanken.
Overfyld ikke vandtanken, da der kan løbe vand ud af
påfyldningsåbningen, når du sætter vandtanken tilbage.
1 Tag den aftagelige vandtank af damptanken.
Er vandet i dit område meget hårdt, anbefales det at anvende lige dele
postevand og lige dele destilleret vand.
2 Fyld vand i vandtanken op til MAX-markeringen.
3 Sæt vandtanken tilbage på damptanken (“klik”).
Hvis vandtanken ikke er isat korrekt, kan strygejernet ikke producere
damp.
Indikator for påfyldning af vandtank
Når vandtanken er tom, begynder indikatoren for påfyldning
,
af vandtank at blinke (kun GC8261/GC8260/GC8220), og
dampstrygning er ikke længere mulig.
Fyld vand i vandtanken. Strygejernet begynder at producere damp, så
,
snart vandtanken er sat korrekt på damptanken igen.
Temperaturindstilling
1 Se den rette strygetemperatur på tøjets vaskemærke.
1 Syntetiske materialer (f.eks. akryl, viskose, polyamid) og silke
2 Uld
3 Bomuld
MAX linned
-

OnOn
OnOn
DANSK 21
2 Drej temperaturvælgeren til den ønskede strygetemperatur.
3 Kun GC8261/GC8260/GC8220: Sæt stikket i en jordet stikkontakt,
og tryk én gang på on/off-kontakten.
Dampindikatoren begynder at blinke.
Efter ca. 2 minutter lyser dampindikatoren konstant for at indikere, at
damptanken er klar til dampstrygning.
4 Kun GC8210: Sæt stikket i en jordet stikkontakt, og sæt on/off-
kontakten på “on”.
Gode råd
Hvis tøjet er fremstillet af ere forskellige materialer, vælges
strygetemperaturen for det sarteste materiale, dvs. den laveste
temperatur. Hvis et stykke tøj f.eks. er fremstillet af 60 % polyester og
40 % bomuld, vælges strygetemperaturen for polyester ( 2).
Er du i tvivl om, hvilket materiale et stykke tøj er fremstillet af, må du
-
nde den rette strygetemperatur ved at prøve dig frem et sted, som
ikke er synligt, når du har tøjet på.
Silke, uld eller kunststof: Str yg tøjet på vrangen for at undgå blanke
skjolder.
Materialer, der har tendens til at blive blanke, stryges hele tiden i
samme retning (med luven) og kun med ganske let tryk.
Stryg først det tøj, der kræver den laveste temperatur, f.eks. syntetiske
materialer.
Strygejernet afkøles hurtigere, hvis man damper eller stryger en klud
,
eller et stykke stof.
Sådan bruges apparatet
Dampstrygning
Dampslangen kan blive varm under en længere strygeperiode.
Bemærk: Under dampstrygning høres en pumpelyd fra tid til anden. Dette er
helt normalt og betyder blot, at der pumpes vand ind i damptanken.
1 Sørg for, at der er tilstrækkeligt med vand i vandtanken.
2 Tænd apparatet, og vælg den anbefalede strygetemperatur.
Dampstrygning er kun mulig ved strygetemperaturer, der er højere end
2.

DANSK22
3 Kun GC8261/GC8260/GC8220: Vælg den ønskede dampindstilling
ved hjælp af + og - tasterne på damptankens betjeningspanel.
p maksimal dampmængde (temperaturindstilling MAX).
[ moderat dampmængde (temperaturindstillinger 3 til MAX).
] minimum dampmængde (temperaturindstillinger 2 til MAX).
a ingen damp (temperaturindstillinger 1 til MAX).
Dampindikatoren blinker for at indikere, at damptanken varmer op.
,
Efter ca. 2 minutter lyser dampindikatoren konstant for at indikere, at
damptanken er klar til dampstrygning.
Under dampstrygningen blinker dampindikatoren fra tid til anden. Dette
indikerer, at damptanken er under opvarmning til korrekt temperatur og
tryk.
Under strygningen kan du justere dampindstillingen ved hjælp af + og
,
- damp-tasterne.
Det tager et par sekunder, inden dampmængden er justeret.
4 Start dampstrygning ved at trykke på dampaktiveringsknappen.
Når du stiller strygejernet fra dig efter endt strygning, skal det enten stilles
på højkant eller i holderen.
Når dampventilen i damptanken åbner og lukker, høres en klikkende
,
lyd. Dette er helt normalt.
Damplåsfunktion
Damplåsen gør det muligt for dig at dampstryge uden hele tiden at skulle
trykke på dampaktiveringsknappen.
1 Skub damplåsen til position “on”. Dampproduktionen afbrydes ved
at skubbe damplåsen tilbage til “off”, hvorefter strygejernet kun
producerer damp, når du trykker på dampaktiveringsknappen.
Slip damplåsen, når du stiller strygejernet på hælen eller i holderen. Dette
forhindrer, at der slipper varm damp ud fra strygejernet, eller at holderen til
strygejernet bliver våd.
Tørstrygning (uden damp)
1 Start med at stryge uden at trykke på dampaktiveringsknappen.
2 Kun GC8261/GC8260/GC8220: Du kan også vælge dampindstillingen
a (ingen damp) og begynde at stryge.

OffOff
DANSK 23
Funktioner
Lodret damp
Ret aldrig dampstrålen mod personer.
Du kan dampe gardiner og tøj på bøjle (jakker, kjoler, frakker) ved at
,
holde strygejernet lodret og trykke på dampaktiveringsknappen.
Dampskud (kun GC8261/GC8260/GC8220)
Et kraftigt dampskud gør det nemmere at udglatte ekstra besværlige folder.
1 Drej temperaturvælgeren til en position mellem 3 og MAX.
2 Tryk og slip dampskudsknappen.
Dampskudsfunktionen kan kun bruges i kortere perioder ad
,
gangen. Hvis der drypper vanddråber ud fra strygesålen, skal du
lade strygejernet varme op i mindst et minut, inden du bruger
dampskudsfunktionen igen.
Rengøring og vedligeholdelse
Efter brug
1 Stil strygejernet i holderen, og sluk strygejernet.
2 Tag stikket ud af stikkontakten, og lad strygejernet afkøle.
3 Tør strygesålen af med en fugtig klud med lidt ikke-ridsende
(ydende) rengøringsmiddel.
4 Den øverste del af strygejernet rengøres med en fugtig klud.
5 Tøm vandtanken efter rengøring.
Calc-Clean-funktion
Calc-Clean-dækslet må aldrig fjernes, når damptanken er varm.
MEGET VIGTIGT: Skyl damptanken én gang om måneden eller efter
10 ganges brug for at forhindre, at apparatet beskadiges og for at sikre
optimal dampfunktion.
1 Kontrollér, at stikket er taget ud af stikkontakten, og strygejernet er
kølet af i mere end 2 timer.

DANSK24
2 Løft den aftagelige vandtank af.
3 Tag fat om damptanken med begge hænder, og ryst den godt.
4 Læg damptanken på siden, og fjern Calc-Clean-dækslet.
5 Tøm damptanken ved at hælde vandet ud i vasken.
6 Fyld damptanken med friskt vand ved hjælp af bægeret, og ryst igen.

DANSK 25
7 Tøm damptanken ved at hælde vandet ud i vasken igen.
Gentag trin 6 og 7 to gange for at opnå det bedste resultat.
8 Skru Calc-Clean-dækslet ordentligt fast på damptanken.
Calc-Clean-påmindelse (kun GC8261/GC8260)
Når damptanken skal rengøres, blinker indikatoren for Calc-Clean i
,
30 sekunder.
Damptanken opvarmes ikke i disse 30 sekunder.
1 Sluk straks for apparatet.
2 Brug Calc-Clean-funktionen, som beskrevet ovenfor.
Brug aldrig Calc-Clean-funktionen, når damptanken er varm.
Opbevaring
Lad altid strygejernet afkøle, inden det stilles væk.
1 Kun GC8261/GC8260:Sæt spidsen af strygejernet i låsen til sikker
opbevaring i holderen.
2 Kun GC8261/GC8260: Tryk strygejernets bageste del fast ned
(“klik”).
3 Tøm vandtanken.

DANSK26
4 Træk krogen til opbevaring af ledning og slange ud.
5 Fastgør dampslangen og netledningen.
6 Damptanken løftes/yttes nemt ved at tage fat i håndtagene i begge
sider.
Miljøhensyn
Apparatet må ikke smides ud sammen med det almindelige
,
husholdningsaffald, når det til sin tid kasseres. Aevér det i stedet
på den kommunale genbrugsstation. På den måde er du med til at
beskytte miljøet.
Reklamationsret og service
For alle yderligere oplysninger eller ved eventuelle problemer med
apparatet henvises til Philips’ hjemmeside på adressen www.philips.com
eller det lokale Philips Kundecenter (telefonnumre ndes i vedlagte
“World-Wide Guarantee”-folder). Hvis der ikke ndes et kundecenter
i dit land, bedes du venligst kontakte din lokale Philips-forhandler eller
Serviceafdelingen i Philips Domestic Appliances and Personal Care BV.

Dette kapitel opsummerer de mest almindelige problemer, der kan
forekomme ved brug af strygejernet. Læs venligst de enkelte afsnit for
detaljerede oplysninger. Hvis du efterfølgende ikke er i stand til selv at løse
problemet, bedes du kontakte nærmeste Philips Kundecenter.
Problem Årsag Løsning
DANSK 27
Apparatet bliver ikke
varmt.
Det ryger fra mit nye
strygejern, når jeg
tænder det.
Strygejernet producerer
ingen damp.
Der drypper vand ud fra
strygesålen.
Der kan være problemer med
tilslutningen.
Der er ikke tændt for apparatet. Tryk på on/off-knappen (GC8261/
Den valgte temperatur er for lav. Vælg en højere temperatur.
Nogle af de indre dele i strygejernet
er smurt med olie fra fabrikkens side,
og det kan afgive lidt røg, når det
bruges første gang.
Der er ikke nok vand i vandtanken. Fyld vandtanken (se afsnittet
Damptanken er ikke varmet
tilstrækkeligt op.
Den valgte strygetemperatur er for
lav til dampstrygning.
Dampindstilling a (ingen damp)
er valgt (kun GC8261/GC8260/
GC8220).
Vandtanken er ikke sat rigtigt på
damptanken.
Når strygejernet er indstillet på
en meget høj temperatur, er den
producerede damp tør og næsten
usynlig. Dampen bliver mere og mere
usynlig, jo højere temperaturen er - og
helt usynlig, når temperaturvælgeren
står på MAX.
Den valgte temperatur er for lav til
dampstrygning.
Kontrollér netledning, stik og
stikkontakt.
GC8260/GC8220), eller sæt on/offkontakten på “on” (GC8210).
Dette er helt normalt og forsvinder
efter kort tid.
“Klargøring” under “Påfyldning af den
aftagelige vandtank”).
Vent ca. 2 minutter (kun
GC8261/GC8260/GC8220: indtil
dampindikatoren lyser konstant).
Vælg en temperatur på 2 eller
højere.
Vælg dampindstilling ] (minimum
damp), [ (moderat damp) eller p
(maksimal damp).
Sæt vandtanken korrekt på
damptanken (“klik”).
Vælg en lavere temperatur, f.eks. 2,
for at kontrollere, om strygejernet
producerer damp.
Vælg en temperatur på 2 eller
højere.

DANSK28
Problem Årsag Løsning
Der kommer partikler
og urenheder ud
fra strygesålen, eller
strygesålen er snavset.
Der høres en pumpelyd
fra apparatet.
Strygejernet producerer
damp konstant.
Der kommer snavset
vand ud fra strygesålen.
Der slipper damp ud
under Calc-Cleandækslet, mens apparatet
varmer op.
Strygejernet producerer
ikke nok damp/
mængden af damp
mindskes og øges under
dampstrygning.
Der kommer våde
pletter på stoffet under
strygning.
Når du begynder at dampstryge og
holder en pause, bliver den damp, der
stadig var i dampslangen, kølet ned og
omdannet til kondensvand, som kan
dryppe ud fra strygesålen.
Urenheder eller kemikalier i vandet
kan have aejret sig i damphullerne
og/eller på strygesålen.
Der pumpes vand ind i damptanken. Dette er normalt.
Pumpelyden holder ikke op igen. Tag øjeblikkeligt stikket ud af
Damplåsen står på “on”. Sæt damplåsen på “off”, hvis du kun
Der er aejret for meget kalk og
mineraler inde i damptanken.
Calc-Clean-dækslet sidder ikke
korrekt fast.
Når apparatet pumper vand
ind i vandkogeren, mindskes
dampmængden til tider. Det er
sikkert i den situation, du synes, at
strygejernet ikke producerer nok
damp. Dette er dog et helt normalt
fænomen, og dampmængden
normaliseres inden for få sekunder.
De våde pletter, der kommer på
stoffet, når du har dampstrøget
i nogen tid, skyldes muligvis, at
dampen har dannet kondensvand på
strygebrættet. Stryg de våde pletter
uden damp for at tørre dem. Hvis
undersiden af strygebrættet er våd,
kan du tørre den med en tør klud.
Dette er helt normalt. Hold
strygejernet ind over en
gammel klud, og tryk på
dampaktiveringsknappen, når du
fortsætter dampstrygningen. Vent,
indtil der kommer damp i stedet for
vand ud fra strygesålen.
Rengør strygesålen med en fugtig
klud.
stikkontakten, og kontakt din Philipsforhandler.
ønsker at få damp, når du trykker på
dampaktiveringsknappen (se afsnittet
“Damplåsfunktion”).
Skyl damptanken. Se afsnittet
“Rengøring og vedligeholdelse”.
Sluk for apparatet, stram Calc-Cleandækslet, og tænd for apparatet
igen. Slipper der fortsat damp ud,
mens apparatet varmer op, skal du
slukke for apparatet og kontakte din
Philips-forhandler.
Hvis du vil optimere dampmængden,
kan du slippe damplåsen, når du ikke
har brug for damp, og når du stiller
strygejernet fra dig.
Hvis du vil undgå, at dampen danner
kondens på strygebrættet, kan
du bruge et strygebræt med et
trådnetsunderlag.

Problem Årsag Løsning
DANSK 29
Der drypper vand
ud fra strygesålen,
når jeg anvender
dampskudsfunktionen
(kun GC8261/GC8260/
GC8220).
Dampen kan have dannet kondens
i slangen, temperaturen kan være
indstillet lavere end 3 eller
måske er apparatet ikke klar til
dampstrygning.
Kontrollér, at temperaturen er
indstillet til 3 eller højere.
Dampstryg et par sekunder, før du
bruger dampskudsfunktionen.

30
DEUTSCH
Einführung
Herzlichen Glückwunsch zu Ihrem neuen Philips Bügelsystem! Lesen
Sie diese Bedienungsanleitung bitte sorgfältig durch, da sie nützliche
Informationen zu den Funktionen dieses innovativen Bügelsystems sowie
Tipps für schnelleres und komfortableres Bügeln enthält.
Das leistungsstarke Bügelsystem sorgt mit konstanter Dampfproduktion
für leichteres Bügeln. Der große Wassertank macht Bügeln ohne
Unterbrechung möglich. Wenn der Tank leer ist, können Sie ihn abnehmen
und sofort wieder auffüllen.
Wir wünschen Ihnen viel Freude mit Ihrem neuen Bügelsystem!
Allgemeine Beschreibung (Abb. 1)
A Verbindungsschlauch
B Soft-Touch-Handgriff (nur GC8261/GC8260)
C Temperaturregler
D Dampftaste
E Dampfsperre
F Dampfstoßtaste (nur GC8261/GC8260/GC8220)
G Bügelsohle
H Sicherheitsverriegelung (nur GC8261/GC8260)
I Abstelläche für Bügeleisen
J Abnehmbarer Wassertank
K Einfüllbecher
L Kabel- und Schlauchaufwicklung
M Calc-Clean-Verschluss
N Einfüllöffnung
O Entriegelung für den Wassertank
P Boiler
Q Ein-/Ausschalter mit Betriebsanzeige (nur GC8261/GC8260/GC8220)
R Tragegriff
S Anzeige “Wassertank nachfüllen” (nur GC8261/GC8260/GC8220)
T Calc-Clean-Anzeige (nur GC8261/GC8260)
U Netzkabel
V Tasten zur Regulierung der Dampfmenge (+/-) (nur GC8261/GC8260/
GC8220)
W Boiler-Bedienfeld mit Dampfanzeige (nur GC8261/GC8260/GC8220)
p = starker Dampf
[ = mäßiger Dampf
] = wenig Dampf
a = kein Dampf
-
X Ein-/Ausschalter (nur GC8210)
Wichtig
Lesen Sie diese Bedienungsanleitung vor dem ersten Gebrauch des Geräts
sorgfältig durch, und bewahren Sie sie für eine spätere Verwendung auf.
Prüfen Sie vor Inbetriebnahme des Geräts, ob die auf dem
,
Typenschild angegebene Betriebsspannung mit der örtlichen
Netzspannung übereinstimmt.
Schließen Sie das Gerät nur an eine geerdete Steckdose an.
,

DEUTSCH 31
Verwenden Sie das Gerät nicht, wenn der Netzstecker, das Netzkabel
,
oder das Gerät selbst beschädigt ist oder das Gerät heruntergefallen
ist bzw. leckt.
Überprüfen Sie das Netzkabel und den Verbindungsschlauch
,
regelmäßig auf mögliche Beschädigungen.
Wenn das Netzkabel oder der Verbindungsschlauch defekt oder
,
beschädigt ist, darf das Kabel bzw. der Schlauch nur von einem Philips
Service-Center oder einer von Philips autorisierten Werkstatt durch
ein Original-Ersatzteil ausgetauscht werden, um Gefährdungen zu
vermeiden.
Lassen Sie das Gerät nicht unbeaufsichtigt, solange es mit dem
,
Stromnetz verbunden ist.
Tauchen Sie das Bügeleisen oder den Boiler niemals in Wasser.
,
Dieses Gerät ist für Benutzer (einschl. Kinder) mit eingeschränkten
,
physischen, sensorischen oder psychischen Fähigkeiten bzw. ohne
jegliche Erfahrung oder Vorwissen nur dann geeignet, wenn eine
angemessene Aufsicht oder ausführliche Anleitung zur Benutzung des
Geräts durch eine verantwortliche Person sichergestellt ist.
Achten Sie darauf, dass Kinder nicht mit dem Gerät spielen.
,
Achten Sie darauf, dass Sie die heiße Bügelsohle nicht berühren, um
,
Verbrennungen zu vermeiden.
Achten Sie darauf, dass das Netzkabel und der Verbindungsschlauch
,
nicht mit der heißen Bügelsohle in Kontakt kommen.
Stellen Sie das Bügeleisen und den Boiler stets auf eine feste, ebene
,
und waagerechte Unterlage. Stellen Sie den Boiler nicht auf die
weiche, gepolsterte Fläche des Bügelbretts.
Wenn Sie das Bügeln beenden, das Gerät reinigen, den Wassertank
,
füllen oder leeren oder den Raum nur kurz verlassen, stellen Sie
das Bügeleisen auf die Abstelläche, schalten Sie das Gerät aus und
ziehen Sie den Netzstecker aus der Steckdose.
Sollte Dampf aus dem Calc-Clean-Verschluss austreten, während das
,
Gerät aufheizt, schalten Sie es aus und drehen Sie den Calc-CleanVerschluss fest. Sollte weiterhin während des Aufheizens Dampf
austreten, schalten Sie das Gerät aus, und setzen Sie sich mit einem
Philips Service-Center in Verbindung.
Verwenden Sie zum Verschließen des Boilers ausschließlich die
,
mitgelieferte Verschlusskappe. Dieser Verschluss dient auch als
Sicherheitsventil.
Spülen Sie den Boiler regelmäßig entsprechend den Anweisungen im
,
Kapitel “Reinigung und Wartung” aus.
Nehmen Sie den Calc-Clean-Verschluss nicht ab, solange der Boiler
,
heiß ist.
Dieses Gerät ist nur für den Gebrauch im Haushalt bestimmt.
,
Elektromagnetische Felder (EMF; Electro Magnetic Fields)
Dieses Philips Gerät erfüllt sämtliche Normen bezüglich
elektromagnetischer Felder (EMF). Nach aktuellen wissenschaftlichen
Erkenntnissen ist das Gerät sicher im Gebrauch, sofern es ordnungsgemäß
und entsprechend den Anweisungen in dieser Bedienungsanleitung
gehandhabt wird.

DEUTSCH32
Vor dem ersten Gebrauch
Hinweis: Beim ersten Gebrauch gibt das Bügeleisen möglicherweise etwas
Rauch ab. Das ist ganz normal und geht nach kurzer Zeit vorüber.
Hinweis: Beim ersten Gebrauch können Schmutzpartikel aus der Bügelsohle
treten. Das ist ganz normal. Diese Partikel sind unbedenklich und erscheinen
nach mehreren Einsätzen des Bügeleisens nicht mehr.
Hinweis: Möglicherweise macht der Boiler beim Einschalten des Geräts ein
Pumpgeräusch. Das ist normal und ein Zeichen dafür, dass Wasser in den
Boiler gepumpt wird.
1 Entfernen Sie Schutzfolie bzw. Aufkleber von der Bügelsohle, und
reinigen Sie die Bügelsohle mit einem weichen Tuch.
Für den Gebrauch vorbereiten
1
Stellen Sie den Boiler auf eine stabile, ebene Fläche, z. B. die
Abstelläche des Bügelbretts oder einen Tisch.
Den abnehmbaren Wassertank füllen
Sie können den Wassertank während des Bügelns jederzeit
,
nachfüllen.
Füllen Sie niemals heißes Wasser, Parfüm, Essig, Wäschesteife,
Entkalkungsmittel, Bügelzusätze oder andere Chemikalien in den
Wassertank.
Achten Sie darauf, nicht zu viel Wasser in den Wassertank zu füllen.
Andernfalls kann beim Einsetzen des Tanks Wasser aus der Einfüllöffnung
treten.
1 Nehmen Sie den Wassertank vom Boiler.
Sollte das Leitungswasser in Ihrer Gegend sehr hart sein, empehlt es
sich, es zu gleichen Teilen mit destilliertem Wasser zu mischen.
2 Füllen Sie den Wassertank bis zur MAX-Markierung mit Wasser.
3 Schieben Sie den Wassertank wieder in den Boiler, bis er mit einem
“Klick” hörbar einrastet.
Wenn der Wassertank nicht richtig eingesetzt ist, produziert das
Bügeleisen keinen Dampf.
Anzeige “Wassertank nachfüllen”
Wenn der Wassertank leer ist, beginnt die Anzeige “Wassertank
,
nachfüllen” zu blinken (nur GC8261/GC8260/GC8220) und es ist
kein Dampfbügeln mehr möglich.

OnOn
OnOn
DEUTSCH 33
Füllen Sie den Wassertank nach. Sobald Sie ihn wieder richtig in
,
den Boiler eingesetzt haben, beginnt das Bügeleisen erneut mit der
Dampfproduktion.
Die Temperatur einstellen
1 Prüfen Sie die erforderliche Bügeltemperatur anhand des Etiketts im
Kleidungsstück.
1 Synthetik (z. B. Acryl, Viskose, Polyamid) und Seide
2 Wolle
3 Baumwolle
MAX Leinen
-
2 Drehen Sie den Temperaturregler auf die geeignete Bügeltemperatur.
3 Nur GC8261/GC8260/GC8220: Stecken Sie den Netzstecker in eine
geerdete Steckdose und drücken Sie einmal den Ein-/Ausschalter.
Die Dampfanzeige beginnt zu blinken.
Nach ca. 2 Minuten leuchtet die Dampfanzeige konstant und zeigt damit an,
dass das Wasser im Boiler heiß genug zum Dampfbügeln ist.
4 Nur GC8210: Stecken Sie den Netzstecker in eine geerdete
Steckdose und schalten Sie das Gerät ein (Ein-/Ausschalter in
Position “On” (Ein)).
Tipps
Wenn sich das Gewebe aus verschiedenen Fasern zusammensetzt,
-
sollten Sie stets die Temperatureinstellung für das empndlichste
Gewebe wählen, also die niedrigste Temperatur. Besteht das Gewebe
z. B. aus 60 % Polyester und 40 % Baumwolle, sollten Sie es bei der
Temperatur für Polyester (
Wenn Sie nicht wissen, um welche Art von Gewebe es sich handelt,
ermitteln Sie die richtige Temperatur durch Bügeln einer Stelle, die
normalerweise nicht sichtbar ist.
Seide, Wolle und Synthetikfasern: Bügeln Sie den Stoff von links, um
glänzende Stellen zu vermeiden.
Textilien, die leicht glänzende Flecken bekommen, sollten Sie nur in eine
Richtung (mit dem Fadenlauf) und nur bei leichtem Druck bügeln.
Beginnen Sie mit dem Bügeln von Textilien, die eine sehr niedrige
Temperatur erfordern, z. B. Synthetikfasern.
Um das Bügeleisen schneller abzukühlen, wenden Sie Dampf an oder
,
bügeln Sie ein Stück Stoff.
2) bügeln.

DEUTSCH34
Das Gerät benutzen
Dampfbügeln
Der Verbindungsschlauch kann bei längerem Bügeln heiß werden.
Hinweis: Das Gerät kann beim Dampfbügeln gelegentlich ein Pumpgeräusch
machen. Das ist ganz normal und ein Zeichen dafür, dass Wasser in den Boiler
gepumpt wird.
1 Sorgen Sie dafür, dass sich genügend Wasser im Wassertank bendet.
2 Schalten Sie das Gerät ein und stellen Sie die empfohlene
Bügeltemperatur ein.
Dampfbügeln ist nur bei höheren Temperaturen möglich (über 2).
3 Nur GC8261/GC8260/GC8220: Stellen Sie auf dem Boiler-Bedienfeld
mit den Tasten + und - die gewünschte Dampfmenge ein.
p für starken Dampf (Temperatureinstellung MAX).
[ für mäßigen Dampf (Temperatureinstellungen 3 bis MAX).
] für wenig Dampf (Temperatureinstellungen 2 bis MAX).
a kein Dampf (Temperatureinstellungen 1 bis MAX).
Die Dampfanzeige blinkt und zeigt damit an, dass der Boiler
,
aufgeheizt wird.
Nach ca. 2 Minuten leuchtet die Dampfanzeige konstant und zeigt damit an,
dass das Wasser im Boiler heiß genug zum Dampfbügeln ist.
Während des Dampfbügelns leuchtet die Dampfanzeige gelegentlich
auf. Dadurch wird angezeigt, dass der Boiler aufgeheizt wird, um die
erforderliche Temperatur und den notwendigen Druck aufrechtzuerhalten.
Während des Bügelns können Sie mithilfe der Tasten + und - die
,
Dampfeinstellung anpassen.
Es dauert einige Augenblicke, bis sich die Dampfmenge angepasst hat.
4 Beginnen Sie mit dem Dampfbügeln, indem Sie die Dampftaste
drücken.
Wenn Sie das Bügeleisen während des Bügelns abstellen möchten, stellen
Sie es senkrecht oder auf der Abstelläche ab.
Das Öffnen und Schließen des Dampfventils im Boiler verursacht ein
,
Klicken. Das ist völlig normal.
Die Dampfsperre
Mit der Dampfsperre können Sie ununterbrochen dampfbügeln, ohne die
Dampftaste ständig drücken zu müssen.
1 Schieben Sie die Dampfsperre auf “On” (Ein). Um den Dauerdampf
zu unterbrechen, schieben Sie die Dampfsperre zurück auf “Off ”
(Aus). Steht die Dampfsperre auf “Off”, produziert das Bügeleisen
nur dann Dampf, wenn Sie die Dampftaste drücken.
Deaktivieren Sie die Dampfsperre, wenn Sie das Bügeleisen senkrecht oder
auf die Abstelläche stellen. Dadurch wird verhindert, dass Dampf aus dem
Bügeleisen austritt oder die Abstelläche nass wird.
Trockenbügeln
1 Beginnen Sie mit dem Bügeln, ohne die Dampftaste zu drücken.
OffOff
DEUTSCH 35
2 Nur GC8261/GC8260/GC8220: Sie können auch die
Dampfeinstellung a (kein Dampf) auswählen und mit dem Bügeln
beginnen.
Produktmerkmale
Senkrechtes Dämpfen
Richten Sie den Dampfstoß niemals auf Personen!
Zum Dampfbügeln hängender Vorhänge und Kleidungsstücke (Jacken,
,
Anzüge, Mäntel) halten Sie das Bügeleisen senkrecht und drücken Sie
die Dampftaste.
Dampfstoß (nur GC8261/GC8260/GC8220)
Ein kräftiger Dampfstoß beseitigt selbst hartnäckige Falten aus den Textilien.
1 Stellen Sie den Temperaturregler zwischen 3 und MAX.
2 Drücken Sie die Dampfstoßtaste.
Die Dampfstoßfunktion kann nur in Intervallen benutzt werden.
,
Lassen Sie, sobald Wassertröpfchen aus der Bügelsohle austreten,
das Bügeleisen mindestens eine Minute lang aufheizen, bevor Sie die
Dampfstoßfunktion erneut benutzen.
Reinigung und Wartung
Nach dem Bügeln
1 Stellen Sie das Bügeleisen auf die Abstelläche und schalten Sie es
aus.
2 Ziehen Sie den Netzstecker aus der Steckdose, und lassen Sie das
Bügeleisen abkühlen.
3 Wischen Sie Kalkreste und andere Rückstände mit einem feuchten
Tuch und etwas Spülmittel von der Bügelsohle.
4 Reinigen Sie den oberen Teil des Geräts mit einem feuchten Tuch.
5 Leeren Sie nach dem Reinigen den Wassertank.

DEUTSCH36
Calc-Clean-Funktion
Nehmen Sie den Calc-Clean-Verschluss nicht ab, solange der Boiler heiß
ist.
WICHTIG: Spülen Sie den Boiler einmal monatlich bzw. nach
zehnmaligem Einsatz aus, um Schäden am Gerät zu vermeiden und eine
optimale Dampeistung zu gewährleisten.
1 Ziehen Sie den Stecker aus der Steckdose und lassen Sie das Gerät
mindestens 2 Stunden lang abkühlen.
2 Nehmen Sie den Wassertank vom Gerät.
3 Halten Sie den Boiler mit beiden Händen fest und schütteln Sie ihn
gut.
4 Legen Sie den Boiler auf die Seite und entfernen Sie den Calc-Clean-
Verschluss.
5 Leeren Sie den Boiler, indem Sie das Wasser einfach über dem
Spülbecken ausgießen.
6 Füllen Sie mit dem Einfüllbecher frisches Wasser in den Boiler und
schütteln Sie ihn erneut.

DEUTSCH 37
7 Leeren Sie den Boiler noch einmal über dem Spülbecken aus.
Um ein optimales Ergebnis zu erhalten, empehlt es sich, die Schritte 6 und
7 noch zweimal zu wiederholen.
8 Drehen Sie den Calc-Clean-Verschluss wieder fest auf den Boiler.
Calc-Clean-Erinnerung (nur GC8261/GC8260)
Wenn der Boiler ausgespült werden muss, blinkt die Calc-Clean-
,
Anzeige 30 Sekunden lang.
Während dieser 30 Sekunden wird der Boiler nicht erhitzt.
1 Schalten Sie das Gerät sofort aus.
2 Aktivieren Sie wie oben beschrieben die Calc-Clean-Funktion.
Aktivieren Sie die Calc-Clean-Funktion nicht, solange der Boiler heiß ist.
Aufbewahrung
Lassen Sie das Bügeleisen stets abkühlen, bevor Sie es wegstellen.
1 Nur GC8261/GC8260: Schieben Sie das Bügeleisen mit der Spitze in
die Sicherheitsverriegelung der Abstelläche.
2 Nur GC8261/GC8260: Drücken Sie die Rückseite des Bügeleisens
fest nach unten, bis sie mit einem “Klick” hörbar einrastet.
3 Leeren Sie den Wassertank.

DEUTSCH38
4 Ziehen Sie die Kabel- und Schlauchaufwicklung heraus.
5 Sichern Sie den Verbindungsschlauch und das Netzkabel.
6 Mit den beiden Griffen an den Seiten des Boilers lässt sich das Gerät
bequem transportieren.
Umweltschutz
Werfen Sie das Gerät am Ende der Lebensdauer nicht in den
,
normalen Hausmüll. Bringen Sie es zum Recycling zu einer ofziellen
Sammelstelle. Auf diese Weise helfen Sie, die Umwelt zu schonen.
Garantie und Kundendienst
Benötigen Sie weitere Informationen oder treten Probleme auf,
wenden Sie sich bitte an Ihren Philips-Händler oder setzen Sie sich
mit einem Philips Service-Center in Ihrem Land in Verbindung
(Telefonnummer siehe Garantieschrift). Besuchen Sie auch die Philips
Website (www.philips.com). Sie können auch direkt die Service-Abteilung
von Philips Domestic Appliances and Personal Care BV kontaktieren.

Fehlerbehebung
In diesem Kapitel sind die am häugsten bei diesem Gerät auftretenden
Probleme zusammengestellt. Lesen Sie bitte die ausführlichen Hinweise
in den einzelnen Abschnitten. Sollte sich ein Problem nicht lösen lassen,
wenden Sie sich bitte an das Philips Service Center in Ihrem Land.
Problem Ursache Lösung
DEUTSCH 39
Das Gerät heizt nicht
auf.
Wenn ich mein neues
Bügeleisen einschalte,
tritt Rauch aus dem
Gerät.
Das Bügeleisen erzeugt
keinen Dampf.
Wasser tropft aus der
Bügelsohle.
Es gibt ein Problem mit der
Stromversorgung.
Das Gerät wurde nicht eingeschaltet. Drücken Sie den Ein-/Ausschalter
Die gewählte Temperatur ist zu niedrig. Wählen Sie eine höhere Temperatur.
Einige Teile des Geräts sind bei der
Herstellung leicht eingefettet worden
und können beim erstmaligen
Aufheizen etwas Rauch entwickeln.
Der Wassertank ist leer. Füllen Sie den Wassertank (siehe
Der Boiler wurde nicht ausreichend
aufgeheizt.
Die gewählte Temperatur ist zu niedrig
zum Dampfbügeln.
Die Dampfeinstellung
wurde gewählt (nur GC8261/GC8260/
GC8220).
Der Wassertank wurde nicht
ordnungsgemäß in den Boiler
eingesetzt.
Wenn Sie eine sehr hohe Temperatur
eingestellt haben, ist der erzeugte
Dampf sehr trocken und fast unsichtbar.
Er wird noch weniger sichtbar, wenn
die Umgebungstemperatur hoch ist.
Der Dampf ist völlig unsichtbar, wenn
Sie die Temperatur auf MAX eingestellt
haben.
Die gewählte Temperatur ist zum
Dampfbügeln zu niedrig.
a (kein Dampf)
Überprüfen Sie das Netzkabel, den
Netzstecker und die Steckdose.
(Gerätetypen GC8261/GC8260/
GC8220) bzw. schieben Sie den Ein/Ausschalter auf Position “On” (Ein)
(Gerätetyp GC8210).
Dies ist ganz normal und geht nach
kurzer Zeit vorüber.
“Für den Gebrauch vorbereiten”,
Abschnitt “Den abnehmbaren
Wassertank füllen”).
Warten Sie ca. 2 Minuten (nur
GC8261/GC8260/GC822: bis die
Dampfanzeige konstant leuchtet).
Wählen Sie eine andere Temperatur
(2 oder höher).
Wählen Sie eine andere
Dampfeinstellung (] für wenig
Dampf, [ für mäßigen Dampf oder
p für starken Dampf).
Setzen Sie den Wassertank richtig in
den Boiler ein (er rastet mit einem
“Klick” hörbar ein).
Stellen Sie eine niedrigere
Temperatur ein, z. B.
prüfen, ob das Gerät tatsächlich
Dampf produziert.
Wählen Sie eine andere Temperatur
(2 oder höher).
2, um zu

DEUTSCH40
Problem Ursache Lösung
Kalkpartikel und
Verunreinigungen
treten aus der
Bügelsohle aus oder
die Bügelsohle ist
verschmutzt.
Das Gerät macht ein
Pumpgeräusch.
Das Bügeleisen
produziert
ununterbrochen
Dampf.
Schmutziges Wasser
tritt aus der Bügelsohle
aus.
Während das Gerät
aufheizt, tritt unter
dem Calc-CleanVerschluss Dampf
hervor.
Das Bügeleisen erzeugt
nicht genügend Dampf
bzw. die Dampfmenge
wechselt während des
Bügelns ständig.
Wenn Sie mit dem Dampfbügeln
beginnen oder das Dampfbügeln eine
Weile unterbrochen haben, hat sich
der noch im Verbindungsschlauch
verbliebene Dampf abgekühlt und ist
kondensiert. Dieses Wasser tropft dann
aus der Bügelsohle.
Verunreinigungen und Chemikalien
aus dem Wasser haben sich in den
Dampfaustrittsdüsen bzw. an der
Bügelsohle abgesetzt.
Wasser wird in den Boiler gepumpt. Das ist normal.
Das Pumpgeräusch hört nicht auf. Ziehen Sie sofort den Stecker aus
Die Dampfsperre wurde auf “On” (Ein)
gestellt.
Es haben sich zu viele Kalkablagerungen
und Mineralien im Boiler angesammelt.
Der Calc-Clean-Verschluss wurde nicht
richtig festgeschraubt.
Wenn das Gerät Wasser in den
Boiler pumpt, wird die Dampfmenge
manchmal geringer. Möglicherweise
liegt es daran, wenn das Bügeleisen
scheinbar nicht genügend Dampf
produziert. Das ist jedoch völlig normal,
und der Dampfausstoß normalisiert
sich innerhalb weniger Sekunden.
Das ist ganz normal. Halten Sie
das Bügeleisen über ein Tuch und
drücken Sie die Dampftaste, wenn
Sie das Bügeln (wieder) aufnehmen.
Warten Sie, bis Dampf statt Wasser
aus der Bügelsohle tritt.
Reinigen Sie die Bügelsohle mit
einem feuchten Tuch.
der Steckdose und setzen Sie sich
mit einem Philips Service-Center in
Verbindung.
Stellen Sie die Dampfsperre auf
“Off” (Aus), wenn Sie nur dann
Dampf haben möchten, wenn Sie die
Dampftaste drücken (siehe Abschnitt
“Die Dampfsperre”).
Spülen Sie den Boiler aus (siehe
“Reinigung und Wartung”).
Schalten Sie das Gerät aus,
schrauben Sie den Calc-CleanVerschluss fest und schalten Sie das
Gerät wieder ein. Tritt während des
Aufheizens des Geräts weiterhin
Dampf aus, schalten Sie das Gerät
aus und setzen Sie sich mit einem
Philips Service-Center in Verbindung.
Zur Optimierung des
Dampfausstoßes lösen Sie die
Dampfsperre, wenn Sie keinen
Dampf benötigen und das Bügeleisen
abstellen.

Problem Ursache Lösung
DEUTSCH 41
Während des Bügelns
erscheinen feuchte
Stellen auf dem
Kleidungsstück.
Wasser tropft aus der
Bügelsohle, wenn ich
die Dampfstoßfunktion
verwende (nur
GC8261/GC8260/
GC8220).
Die feuchten Stellen auf den mit
Dampf gebügelten Kleidungsstücken
wurden möglicherweise vom Dampf
verursacht, der sich auf dem Bügelbrett
niedergeschlagen hat. Bügeln Sie die
feuchten Stellen zum Trocknen einige
Zeit ohne Dampf. Falls die Unterseite
des Bügelbretts nass ist, wischen Sie sie
mit einem trockenen Tuch ab.
Dampf ist ggf. im Schlauch zu Wasser
kondensiert, die Temperatur wurde
niedriger als 3 eingestellt oder
das Gerät ist nicht bereit zum
Dampfbügeln.
Um zu verhindern, dass sich Dampf
auf dem Bügelbrett niederschlägt,
verwenden Sie ein Bügelbrett mit
einer Oberäche aus Drahtgeecht.
Stellen Sie sicher, dass die
Temperatur mindestens auf 3
eingestellt ist. Dampfbügeln Sie
einige Sekunden lang, bevor Sie die
Dampfstoßfunktion verwenden.

42
Σας ευχαριστούμε για την αγορά του συγκεκριμένου συστήματος
σιδερώματος της Philips. Παρακαλούμε διαβάστε αυτές τις
οδηγίες χρήσης, διότι περιέχουν πληροφορίες για τα εκπληκτικά
χαρακτηριστικά αυτού του συστήματος σιδερώματος και μερικές
συμβουλές που κάνουν το σιδέρωμα ευκολότερο και πιο ευχάριστο.
Αυτό το ισχυρό σύστημα σιδερώματος με πίεση παράγει ατμό χωρίς
διακοπές για ευκολότερο σιδέρωμα. Χάρη στη μεγάλη δεξαμενή
νερού μπορείτε να σιδερώνετε χωρίς διακοπή. Όταν η δεξαμενή
νερού αδειάσει, μπορείτε να την αφαιρέσετε και να την επαναγεμίσετε
αμέσως.
Ελπίζουμε ότι θα απολαύσετε τη χρήση αυτού του συστήματος
σιδερώματος.
A Σωλήνας τροφοδοσίας
B Αντιολισθητική λαβή (μόνο στους τύπους GC8261/GC8260)
C Διακόπτης ρύθμισης θερμοκρασίας
D Κουμπί ενεργοποίησης ατμού
E Κουμπί κλειδώματος ατμού
F Κουμπί βολής ατμού (μόνο στους τύπους GC8261/GC8260/
GC8220)
G Πλάκα
H Κλείδωμα ασφαλούς αποθήκευσης (μόνο στους τύπους GC8261/
GC8260)
I Βάση του σίδερου
J Αποσπώμενη δεξαμενή νερού
K Δοσομετρητής
L Γαντζάκι αποθήκευσης καλωδίου και σωλήνα τροφοδοσίας
M Καπάκι καθαρισμού αλάτων
N Στόμιο πλήρωσης νερού
O Μοχλός απασφάλισης δεξαμενής νερού
P Δεξαμενή ατμού
Q Κουμπί on/off με ενδεικτική λυχνία λειτουργίας (μόνο στους τύπους
GC8261/GC8260/GC8220)
R Λαβή μεταφοράς
S Λυχνία πλήρωσης δεξαμενής νερού (μόνο στους τύπους GC8261/
GC8260/GC8220)
T Λυχνία καθαρισμού αλάτων (μόνο στους τύπους GC8261/GC8260)
U Καλώδιο
V Κουμπιά ατμού (+/-) (μόνο στους τύπους GC8261/GC8260/
GC8220)
W Πίνακας ελέγχου δεξαμενής ατμού με λυχνία ατμού (μόνο στους
τύπους GC8261/GC8260/GC8220)
p = μέγιστος ατμός
-
[ = μέτριος ατμός
-
] = ελάχιστος ατμός
-
a = χωρίς ατμό
-
X Διακόπτης on/off (μόνο στον τύπο GC8210)

43
Διαβάστε αυτές τις οδηγίες χρήσης προσεκτικά πριν χρησιμοποιήσετε
τη συσκευή και φυλάξτε τις για μελλοντική αναφορά.
Ελέγξτε αν η τάση που αναγράφεται στο πινακίδιο στοιχείων
,
του προϊόντος αντιστοιχεί στην τοπική τάση ρεύματος πριν
συνδέσετε τη συσκευή.
Συνδέετε τη συσκευή μόνο σε πρίζα με γείωση.
,
Μην χρησιμοποιείτε τη συσκευή αν το φις, το καλώδιο, ο
,
σωλήνας τροφοδοσίας ή η ίδια η συσκευή παρουσιάζει κάποια
ορατή φθορά ή αν η συσκευή έχει πέσει κάτω ή έχει διαρροή.
Ελέγχετε τακτικά το καλώδιο και το σωλήνα τροφοδοσίας για
,
πιθανή φθορά.
Αν το καλώδιο ή ο σωλήνας τροφοδοσίας έχει υποστεί
,
φθορά, πρέπει να αντικατασταθεί από ένα κέντρο σέρβις
εξουσιοδοτημένο από τη Philips ή από εξίσου εξειδικευμένα
άτομα προς αποφυγή κινδύνου.
Μην αφήνετε ποτέ τη συσκευή χωρίς επίβλεψη όταν είναι
,
συνδεδεμένη στο ρεύμα.
Μην βυθίζετε ποτέ το σίδερο ή τη δεξαμενή ατμού σε νερό.
,
Αυτή η συσκευή δεν προορίζεται για χρήση από άτομα
,
(συμπεριλαμβανομένων των παιδιών) με περιορισμένες
σωματικές, αισθητήριες ή διανοητικές ικανότητες ή από άτομα
χωρίς εμπειρία και γνώση, εκτός και εάν τη χρησιμοποιούν
υπό επιτήρηση ή έχουν λάβει οδηγίες σχετικά με τη χρήση της
συσκευής από άτομο υπεύθυνο για την ασφάλειά τους.
Τα παιδιά θα πρέπει να επιβλέπονται προκειμένου να
,
διασφαλιστεί ότι δεν θα παίζουν με τη συσκευή.
Η πλάκα του σίδερου μπορεί να φτάσει σε εξαιρετικά υψηλή
,
θερμοκρασία και ενδέχεται να σας προκαλέσει εγκαύματα εάν την
αγγίξετε.
Μην αφήνετε το καλώδιο και το σωλήνα τροφοδοσίας να έρθουν
,
σε επαφή με την πλάκα όταν είναι ζεστή.
Τοποθετείτε και χρησιμοποιείτε πάντα το σίδερο και τη δεξαμενή
,
ατμού σε σταθερή, επίπεδη και οριζόντια επιφάνεια. Μην
τοποθετείτε τη δεξαμενή ατμού πάνω στο μαλακό μέρος της
σιδερώστρας.
Όταν τελειώνετε το σιδέρωμα, όταν καθαρίζετε τη συσκευή, όταν
,
γεμίζετε ή αδειάζετε τη δεξαμενή νερού και επίσης όταν αφήνετε
το σίδερο ακόμη και για λίγο: τοποθετήστε το σίδερο στη βάση,
απενεργοποιήστε τη συσκευή και αποσυνδέστε το φις από την
πρίζα.
Αν διαφύγει ατμός από το καπάκι καθαρισμού αλάτων ενώ
,
θερμαίνεται η συσκευή, απενεργοποιήστε τη συσκευή και σφίξτε
το καπάκι. Αν συνεχίσει να διαφεύγει ατμός ενώ θερμαίνεται η
συσκευή, απενεργοποιήστε τη συσκευή και επικοινωνήστε με ένα
κέντρο σέρβις εξουσιοδοτημένο από τη Philips.
Μην χρησιμοποιείτε κανένα άλλο καπάκι στη δεξαμενή ατμού
,
εκτός από αυτό που διατίθεται με τη συσκευή, καθώς αυτό το
καπάκι λειτουργεί και ως βαλβίδα ασφαλείας.
Ξεπλένετε τη δεξαμενή ατμού τακτικά σύμφωνα με τις οδηγίες
,
του κεφαλαίου ‘Καθαρισμός’.

44
Μην αφαιρείτε ποτέ το καπάκι καθαρισμού αλάτων ενώ η
,
δεξαμενή ατμού είναι ζεστή.
Αυτή η συσκευή προορίζεται για οικιακή χρήση μόνο.
,
Η συγκεκριμένη συσκευή της Philips συμμορφώνεται με όλα τα
πρότυπα που αφορούν τα ηλεκτρομαγνητικά πεδία (EMF). Εάν γίνει
σωστός χειρισμός και σύμφωνος με τις οδηγίες του παρόντος
εγχειριδίου χρήσης, η συσκευή είναι ασφαλής στη χρήση βάσει των
επιστημονικών αποδείξεων που είναι διαθέσιμες μέχρι σήμερα.
Σημείωση: Το σίδερο μπορεί να βγάλει λίγο καπνό όταν το χρησιμοποιήσετε
για πρώτη φορά. Αυτό είναι φυσιολογικό και θα σταματήσει μετά από λίγο.
Σημείωση: Μπορεί να βγουν μερικά σωματίδια από την πλάκα όταν
χρησιμοποιήσετε το σίδερο για πρώτη φορά. Αυτό είναι φυσιολογικό. Τα
σωματίδια είναι αβλαβή και θα σταματήσουν να βγαίνουν από το σίδερο
μετά από λίγο.
Σημείωση: Όταν ενεργοποιήσετε τη συσκευή, η δεξαμενή ατμού μπορεί
να παράγει έναν ήχο άντλησης. Αυτό είναι φυσιολογικό. Ο ήχος σας
υποδεικνύει ότι το νερό αντλείται μέσα στη δεξαμενή ατμού.
1 Αφαιρέστε οποιοδήποτε αυτοκόλλητο ή προστατευτική μεμβράνη
από την πλάκα και καθαρίστε τη με ένα μαλακό πανί.
1
Τοποθετήστε τη δεξαμενή ατμού σε σταθερή και επίπεδη
επιφάνεια, δηλ. στο σκληρό τμήμα της σιδερώστρας ή σε ένα
τραπέζι.
Μπορείτε να ξαναγεμίσετε τη δεξαμενή νερού οποτεδήποτε κατά
,
τη χρήση.
Μην βάζετε ζεστό νερό, άρωμα, ξύδι, κόλλα κολλαρίσματος, ουσίες
αφαλάτωσης, υγρά σιδερώματος ή άλλα χημικά μέσα στη δεξαμενή
νερού.
Μην παραγεμίζετε τη δεξαμενή νερού, διαφορετικά μπορεί να χυθεί
νερό από το στόμιο πλήρωσης όταν τοποθετήσετε ξανά τη δεξαμενή
νερού στη θέση της.

OnOn
OnOn
45
1 Αφαιρέστε την αποσπώμενη δεξαμενή νερού από τη δεξαμενή
ατμού.
Αν το νερό βρύσης στην περιοχή σας είναι πολύ σκληρό, σας
συνιστούμε να το αναμίξετε με ίση ποσότητα απεσταγμένου νερού.
2 Γεμίστε τη δεξαμενή νερού έως την ένδειξη ΜΑΧ.
3 Επανατοποθετήστε σωστά τη δεξαμενή νερού στη δεξαμενή
ατμού (‘κλικ’).
Εάν η δεξαμενή νερού δεν έχει τοποθετηθεί σωστά, το σίδερο δεν
παράγει καθόλου ατμό.
Όταν η δεξαμενή νερού είναι άδεια, η λυχνία πλήρωσης
,
δεξαμενής νερού αρχίζει να αναβοσβήνει (μόνο στους τύπους
GC8261/GC8260/GC8220) και δεν είναι πλέον δυνατό το
σιδέρωμα με ατμό.
Ξαναγεμίστε τη δεξαμενή νερού. Το σίδερο αρχίζει και πάλι να
,
παράγει ατμό όταν η δεξαμενή νερού τοποθετηθεί ξανά σωστά
στη δεξαμενή ατμού.
1 Ελέγξτε την ετικέτα του ρούχου για την απαιτούμενη
θερμοκρασία σιδερώματος.
1 Συνθετικά (π.χ. ακρυλικά, βισκόζ, πολυαμίδια) και μεταξωτά
-
2 Μάλλινα
-
3 Βαμβακερά
-
MAX Λινά
-
2 Ρυθμίστε τον διακόπτη θερμοκρασίας στην επιθυμητή
θερμοκρασία σιδερώματος γυρίζοντας τον προς την κατάλληλη
ένδειξη θερμοκρασίας.
3 Μόνο στους τύπους GC8261/GC8260/GC8220: Συνδέστε το φις
σε γειωμένη πρίζα και πατήστε μια φορά το κουμπί on/off.
Η λυχνία ατμού αρχίζει να αναβοσβήνει.
Μετά από περίπου 2 λεπτά, η λυχνία ατμού παραμένει αναμμένη
συνεχώς υποδεικνύοντας ότι η δεξαμενή ατμού είναι έτοιμη για
σιδέρωμα με ατμό.
4 Μόνο στον τύπο GC8210: Συνδέστε το φις σε γειωμένη πρίζα και
ρυθμίστε το διακόπτη on/off στη θέση ‘on’.
Αν το ρούχο αποτελείται από διάφορα είδη υφασμάτων, να
-
επιλέγετε πάντα τη θερμοκρασία που απαιτείται για το πιο
ευαίσθητο ύφασμα, δηλ. τη χαμηλότερη θερμοκρασία. Αν, για
παράδειγμα, το ύφασμα περιέχει 60% πολυέστερ και 40% βαμβάκι,
θα πρέπει να σιδερωθεί στη θερμοκρασία που ενδείκνυται για το
πολυέστερ ( 2).

46
Αν δεν γνωρίζετε από τι ύφασμα είναι φτιαγμένο ένα ρούχο,
-
καθορίστε τη σωστή θερμοκρασία σιδερώματος, σιδερώνοντας ένα
σημείο που δεν θα είναι ορατό όταν φοράτε ή χρησιμοποιείτε το
ρούχο.
Μεταξωτά, μάλλινα και συνθετικά: σιδερώστε τα από την ανάποδη
-
πλευρά για να αποφύγετε τις γυαλάδες.
Τα υφάσματα που τείνουν να αποκτούν γυαλάδες θα πρέπει
-
να σιδερώνονται μόνο προς μία κατεύθυνση (κατά μήκος του
χνουδιού) ενώ εφαρμόζετε πολύ μικρή πίεση.
Αρχίστε το σιδέρωμα με τα ρούχα που απαιτούν τη χαμηλότερη
-
θερμοκρασία σιδερώματος, δηλ. αυτά που είναι κατασκευασμένα
από συνθετικά υλικά.
Για να κρυώσει πιο γρήγορα το σίδερο, απλά πιέστε τον ατμό ή
,
σιδερώστε ένα κομμάτι ύφασμα.
Ο σωλήνας τροφοδοσίας μπορεί να θερμανθεί όταν το σιδέρωμα
διαρκέσει πολύ.
Σημείωση: Το σύστημα μπορεί ανά διαστήματα να παράγει έναν ήχο
άντλησης κατά τη διάρκεια του σιδερώματος με ατμό. Αυτό είναι
φυσιολογικό και σας υποδεικνύει ότι νερό αντλείται μέσα στη δεξαμενή
ατμού.
1 Βεβαιωθείτε ότι υπάρχει αρκετό νερό στη δεξαμενή νερού.
2 Ενεργοποιήστε τη συσκευή και επιλέξτε την προτεινόμενη
θερμοκρασία σιδερώματος.
Το σιδέρωμα με ατμό μπορεί να πραγματοποιηθεί μόνο σε
θερμοκρασίες σιδερώματος υψηλότερες από 2.
3 Μόνο στους τύπους GC8261/GC8260/GC8220: Επιλέξτε την
απαιτούμενη ρύθμιση ατμού μέσω των κουμπιών + και - στον
πίνακα ελέγχου της δεξαμενής ατμού.
p για μέγιστο ατμό (ρύθμιση θερμοκρασίας MAX).
[ για μέτριο ατμό (ρυθμίσεις θερμοκρασίας 3 έως MAX).
] για ελάχιστο ατμό (ρυθμίσεις θερμοκρασίας 2έως MAX).
a για χωρίς ατμό (ρυθμίσεις θερμοκρασίας 1 έως ΜΑΧ).
Η λυχνία ατμού αναβοσβήνει υποδεικνύοντας ότι η δεξαμενή
,
ατμού θερμαίνεται.
Μετά από περίπου 2 λεπτά, η λυχνία ατμού παραμένει αναμμένη
συνεχώς υποδεικνύοντας ότι η δεξαμενή ατμού είναι έτοιμη για
σιδέρωμα με ατμό.
Κατά τη διάρκεια του σιδερώματος με ατμό, η λυχνία ατμού αρχίζει να
αναβοσβήνει ανά διαστήματα υποδεικνύοντας ότι η δεξαμενή ατμού
θερμαίνεται για να διατηρήσει τη σωστή θερμοκρασία και πίεση.

47
Κατά τη διάρκεια του σιδερώματος μπορείτε να προσαρμόσετε
,
τη ρύθμιση ατμού μέσω των κουμπιών ατμού + και -.
Θα χρειαστούν λίγα λεπτά προτού προσαρμοστεί η ποσότητα ατμού
στη νέα ρύθμιση.
4 Ξεκινήστε το σιδέρωμα με ατμό πατώντας το κουμπί
ενεργοποίησης ατμού.
Εάν θέλετε να ακουμπήσετε κάπου το σίδερο κατά τη διάρκεια του
σιδερώματος, τοποθετήστε το όρθιο ή στη βάση του σίδερου.
Κατά το άνοιγμα και το κλείσιμο της βαλβίδας ατμού στη
,
δεξαμενή ατμού θα ακούγεται ένα κλικ. Αυτό είναι απολύτως
φυσιολογικό.
Το κλείδωμα ατμού σας επιτρέπει να σιδερώνετε αδιάκοπα με ατμό
και χωρίς να χρειάζεται να πατάτε συνεχώς το κουμπί ενεργοποίησης
ατμού.
1 Ρυθμίστε το κουμπί κλειδώματος ατμού στη θέση ‘on’. Για να
σταματήσετε τη συνεχόμενη εξαγωγή ατμού, ξαναρυθμίστε
το στη θέση ‘off’. Όταν το κλείδωμα ατμού έχει ρυθμιστεί στο
‘off’, το σίδερο θα παράγει ατμό μόνο όταν πατάτε το κουμπί
ενεργοποίησης ατμού.
Απασφαλίστε το κουμπί κλειδώματος ατμού όταν τοποθετείτε το
σίδερο όρθιο ή στη βάση του. Με τον τρόπο αυτό ο καυτός ατμός δεν
διαφεύγει από το σίδερο ούτε αφήνει υγρά στη βάση του σίδερου.
1 Αρχίστε το σιδέρωμα χωρίς να πατάτε το κουμπί ενεργοποίησης
ατμού.
2 Μόνο στους τύπους GC8261/GC8260/GC8220: Μπορείτε επίσης
να επιλέξετε τη ρύθμιση ατμού a (χωρίς ατμό) και να αρχίσετε το
σιδέρωμα..
Μην κατευθύνετε ποτέ τον ατμό προς ανθρώπους.
Μπορείτε να σιδερώσετε με ατμό κουρτίνες και ρούχα (μπουφάν,
,
σακάκια, παλτά) κρατώντας το σίδερο σε κάθετη θέση και
πιέζοντας το κουμπί ενεργοποίησης ατμού.

OffOff
48
Μια δυνατή βολή ατμού βοηθάει στην αφαίρεση έντονων τσακίσεων.
1 Ρυθμίστε το διακόπτη θερμοκρασίας σε μια θέση μεταξύ 3 και
MAX.
2 Πατήστε το κουμπί βολής ατμού.
Η λειτουργία βολής ατμού θα πρέπει να χρησιμοποιείται ανά
,
διαστήματα. Αν βγουν σταγόνες νερού από την πλάκα, αφήστε
το σίδερο να ζεσταθεί για τουλάχιστον ένα λεπτό προτού
χρησιμοποιήσετε τη λειτουργία βολής ατμού ξανά.
1 Τοποθετήστε το σίδερο στη βάση και απενεργοποιήστε το.
2 Βγάλτε το φις από την πρίζα και αφήστε το σίδερο να κρυώσει.
3 Σκουπίστε τυχόν άλατα και άλλα υπολείμματα από την πλάκα με
ένα υγρό πανί και ένα απαλό υγρό καθαρισμού.
4 Καθαρίστε το επάνω μέρος της συσκευής με ένα υγρό πανί.
5 Αδειάστε τη δεξαμενή νερού μετά τον καθαρισμό.
Μην αφαιρείτε ποτέ το καπάκι καθαρισμού αλάτων ενώ η δεξαμενή
ατμού είναι ζεστή.
ΠΟΛΥ ΣΗΜΑΝΤΙΚΟ: Ξεπλένετε τη δεξαμενή ατμού μία φορά το
μήνα ή μετά από 10 φορές χρήσης, για να αποφύγετε βλάβες στη
συσκευή και για την καλύτερη απόδοση ατμού.
1 Βεβαιωθείτε ότι η συσκευή είναι εκτός πρίζας και ότι έχει
κρυώσει για περισσότερες από 2 ώρες.
2 Αφαιρέστε την αποσπώμενη δεξαμενή νερού.
3 Κρατήστε τη δεξαμενή ατμού με τα δύο χέρια και κουνήστε την
καλά.

49
4 Γυρίστε τη δεξαμενή ατμού στο πλάι και αφαιρέστε το καπάκι
καθαρισμού αλάτων.
5 Αδειάστε τη δεξαμενή ατμού χύνοντας το νερό στο νεροχύτη.
6 Γεμίστε τη δεξαμενή ατμού με καθαρό νερό με το δοσομετρητή
και ξανακουνήστε την.
7 Αδειάστε τη δεξαμενή ατμού στο νεροχύτη ξανά.
Επαναλάβετε τα βήματα 6 & 7 δύο φορές για να επιτύχετε το καλύτερο
αποτέλεσμα.
8 Βιδώστε το καπάκι καθαρισμού αλάτων σφιχτά πάνω στη
δεξαμενή ατμού.
50
Όταν πρέπει να καθαριστεί η δεξαμενή ατμού, η λυχνία
,
καθαρισμού αλάτων αναβοσβήνει για 30 δευτερόλεπτα.
Η δεξαμενή ατμού δεν θα θερμαίνεται κατά τη διάρκεια αυτών των 30
δευτερολέπτων.
1 Απενεργοποιήστε τη συσκευή αμέσως.
2 Χρησιμοποιήστε τη λειτουργία Calc-Clean όπως περιγράφεται
παραπάνω.
Μην χρησιμοποιείτε τη λειτουργία Calc-Clean όταν η δεξαμενή ατμού
είναι ζεστή.
Να αφήνετε πάντα το σίδερο να κρυώσει πριν το αποθηκεύσετε.
1 Μόνο στους τύπους GC8261/GC8260: Τοποθετήστε το άκρο του
σίδερου στο κλείδωμα ασφαλούς αποθήκευσης της βάσης.
2 Μόνο στους τύπους GC8261/GC8260: Πιέστε το πίσω μέρος του
σίδερου δυνατά προς τα κάτω (‘κλικ’).
3 Αδειάστε τη δεξαμενή νερού.
4 Τραβήξτε προς τα έξω το γαντζάκι αποθήκευσης καλωδίου και
σωλήνα τροφοδοσίας.

51
5 Ασφαλίστε το σωλήνα τροφοδοσίας και το καλώδιο.
6 Υπάρχουν λαβές στην κάθε πλευρά της δεξαμενής ατμού για
εύκολη μεταφορά.
Στο τέλος της ζωής της συσκευής μην την πετάξετε μαζί με τα
,
συνηθισμένα απορρίματα του σπιτιού σας, αλλά παραδώστε την
σε ένα επίσημο σημείο συλλογής για ανακύκλωση. Με αυτόν τον
τρόπο θα βοηθήσετε στην προστασία του περιβάλλοντος.
Εάν χρειάζεστε κάποιες πληροφορίες ή αντιμετωπίζετε κάποιο
πρόβλημα, παρακαλούμε επισκεφτείτε την ιστοσελίδα της Philips
στη διεύθυνση www.philips.com ή επικοινωνήστε με το Τμήμα
Εξυπηρέτησης Πελατών της Philips στη χώρα σας (θα βρείτε το
τηλέφωνο στο διεθνές φυλλάδιο εγγύησης). Εάν δεν υπάρχει Τμήμα
Εξυπηρέτησης Πελατών στη χώρα σας, απευθυνθείτε στον τοπικό
αντιπρόσωπο σας της Philips ή επικοινωνήστε με ένα εξουσιοδοτημένο
κέντρο σέρβις των Οικιακών Συσκευών και Ειδών Προσωπικής
Φροντίδας της Philips.
Αυτό το κεφάλαιο συνοψίζει τα πιο συνηθισμένα προβλήματα που
μπορεί να αντιμετωπίσετε με το σίδερο σας. Παρακαλούμε διαβάστε
τις διαφορετικές παραγράφους για περισσότερες λεπτομέρειες. Αν δεν
μπορείτε να λύσετε το πρόβλημα, παρακαλούμε επικοινωνήστε με το
Τμήμα Εξυπηρέτησης Πελατών της Philips στη χώρα σας.

52
Πρόβλημα Αιτία Λύση
Η συσκευή δεν
θερμαίνεται.
Βγαίνει
καπνός από το
καινούργιο μου
σίδερο όταν το
ανάβω.
Το σίδερο δεν
βγάζει καθόλου
ατμό.
Υπάρχει πρόβλημα στη σύνδεση. Ελέγξτε το καλώδιο, το φις και την
πρίζα.
Δεν έχετε ενεργοποιήσει τη συσκευή. Πατήστε το κουμπί on/off (τύποι
GC8261/GC8260/GC8220) ή
ρυθμίστε το διακόπτη on/off στη
θέση ‘on’ (GC8210).
Η επιλεγμένη θερμοκρασία είναι πολύ
χαμηλή.
Μερικά μέρη της συσκευής έχουν
λιπανθεί ελαφρά στο εργοστάσιο και
μπορεί αρχικά να προσδώσουν λίγο
καπνό όταν θερμαίνονται.
Δεν υπάρχει αρκετό νερό στη
δεξαμενή νερού.
Η δεξαμενή ατμού δεν έχει ζεσταθεί
επαρκώς.
Η επιλεγμένη θερμοκρασία
σιδερώματος είναι πολύ χαμηλή για
σιδέρωμα με ατμό.
Επιλέξτε υψηλότερη θερμοκρασία.
Αυτό το φαινόμενο είναι απολύτως
φυσιολογικό και θα σταματήσει μετά
από λίγο.
Γεμίστε τη δεξαμενή νερού
(δείτε ‘Προετοιμασία για χρήση’,
παράγραφος ‘Πλήρωση της
αποσπώμενης δεξαμενής νερού’).
Περιμένετε για περίπου 2 λεπτά
(μόνο στους τύπους GC8261/
GC8260/GC8220: μέχρι η λυχνία
ατμού να παραμένει συνεχώς
αναμμένη).
Επιλέξτε μια θερμοκρασία από 2 ή
υψηλότερα..
Σταγόνες νερού
βγαίνουν από την
πλάκα.
Έχει επιλεγεί η ρύθμιση ατμού a
(χωρίς ατμό) (μόνο στους τύπους
GC8261/GC8260/GC8220).
Η δεξαμενή νερού δεν έχει
τοποθετηθεί σωστά στη δεξαμενή
ατμού.
Όταν το σίδερο έχει ρυθμιστεί σε
πολύ υψηλή θερμοκρασία, ο ατμός που
παράγεται είναι ξηρός και σχεδόν
αόρατος. Θα γίνει ακόμη πιο αόρατος
όταν η θερμοκρασία περιβάλλοντος
είναι σχετικά υψηλή και θα είναι
εντελώς αόρατος όταν η θερμοκρασία
έχει ρυθμιστεί στη θέση ΜΑΧ.
Η επιλεγμένη θερμοκρασία είναι πολύ
χαμηλή για σιδέρωμα με ατμό.
Επιλέξτε ρύθμιση ατμού ]
(ελάχιστος ατμός), [ (μέτριος
ατμός) ή p (μέγιστος ατμός).
Τοποθετήστε τη δεξαμενή νερού
σωστά στη δεξαμενή ατμού (‘κλικ’).
Ρυθμίστε το σίδερο σε χαμηλότερη
θερμοκρασία, π.χ. 2 για να
ελέγξετε αν το σίδερο παράγει
πραγματικά ατμό.
Επιλέξτε μια θερμοκρασία από 2 ή
υψηλότερα..

Πρόβλημα Αιτία Λύση
53
Νιφάδες αλάτων
και ακαθαρσίες
βγαίνουν από την
πλάκα ή η πλάκα
είναι βρώμικη.
Η συσκευή
παράγει έναν ήχο
άντλησης.
Το σίδερο
παράγει ατμό
συνεχώς.
Βγαίνει βρώμικο
νερό από την
πλάκα.
Ατμός διαφεύγει
από το καπάκι
καθαρισμού
αλάτων, ενώ
θερμαίνεται η
συσκευή.
Το σίδερο δεν
παράγει αρκετό
ατμό/η ποσότητα
ατμού μειώνεται
και αυξάνεται
κατά τη διάρκεια
του σιδερώματος
με ατμό.
Κατά την έναρξη του σιδερώματος με
ατμό και τη διακοπή του σιδερώματος
με ατμό για μικρό χρονικό διάστημα,
ο ατμός που βρισκόταν στον σωλήνα
τροφοδοσίας θα κρυώσει και θα
μετατραπεί σε νερό, προκαλώντας την
έξοδο σταγόνων νερού από την πλάκα.
Ακαθαρσίες ή χημικά που περιέχονται
στο νερό έχουν παραμείνει πάνω
στους αγωγούς ατμού και/ή στην
πλάκα.
Το νερό αντλείται μέσα στη δεξαμενή
ατμού.
Ο ήχος άντλησης δεν σταματά. Αποσυνδέστε αμέσως το σίδερο
Το κουμπί κλειδώματος ατμού έχει
ρυθμιστεί στη θέση ‘on’.
Έχουν συσσωρευτεί πολλά άλατα μέσα
στη δεξαμενή ατμού.
Δεν έχετε σφίξει καλά το καπάκι
καθαρισμού αλάτων.
Όταν η συσκευή αντλεί νερό μέσα στο
μπόιλερ, η ποσότητα ατμού μειώνεται
κάποιες φορές. Τότε πιθανόν να
σκεφτείτε ότι το σίδερο δεν παράγει
αρκετό ατμό. Ωστόσο, πρόκειται για
ένα απολύτως φυσιολογικό φαινόμενο
και η παροχή ατμού ομαλοποιείται
μέσα σε λίγα δευτερόλεπτα.
Αυτό είναι απολύτως φυσιολογικό.
Κρατήστε το σίδερο πάνω από ένα
παλιό πανί και πιέστε το κουμπί
ενεργοποίησης ατμού μόλις
αρχίσετε το σιδέρωμα (ξανά).
Περιμένετε μέχρι να βγει ατμός αντί
για νερό από την πλάκα.
Καθαρίστε την πλάκα με ένα υγρό
πανί.
Αυτό είναι φυσιολογικό.
από την πρίζα και επικοινωνήστε με
ένα εξουσιοδοτημένο κέντρο σέρβις
της Philips.
Ρυθμίστε το κουμπί κλειδώματος
ατμού στη θέση ‘off’ εάν θέλετε
να έχετε ατμό μόνο όταν πατάτε
το κουμπί ενεργοποίησης ατμού
(δείτε την ενότητα ‘Λειτουργία
κλειδώματος ατμού’).
Ξεπλύνετε τη δεξαμενή ατμού.
Δείτε το κεφάλαιο ‘Καθαρισμός και
συντήρηση’.
Απενεργοποιήστε τη συσκευή,
σφίξτε το καπάκι καθαρισμού
αλάτων και ενεργοποιήστε τη
συσκευή ξανά. Αν συνεχίσει να
διαφεύγει ατμός ενώ θερμαίνεται
η συσκευή, απενεργοποιήστε τη
συσκευή και επικοινωνήστε με ένα
κέντρο σέρβις εξουσιοδοτημένο από
τη Philips.
Για βελτιστοποίηση της παροχής
ατμού, απασφαλίστε το κλείδωμα
ατμού όταν δεν χρειάζεστε ατμό και
όταν αφήνετε κάτω το σίδερο.

54
Πρόβλημα Αιτία Λύση
Υγρά στίγματα
εμφανίζονται στα
ρούχα σας κατά
το σιδέρωμα.
Σταγόνες νερού
βγαίνουν από
την πλάκα όταν
χρησιμοποιώ τη
λειτουργία βολής
ατμού (μόνο
στους τύπους
GC8261/GC8260/
GC8220).
Τα υγρά στίγματα που εμφανίζονται
στα ρούχα σας, αφού έχετε σιδερώσει
με ατμό για κάποιο χρονικό διάστημα,
ενδέχεται να προκαλούνται από
ατμό που έχει συγκεντρωθεί πάνω
στη σιδερώστρα. Σιδερώστε τα υγρά
στίγματα χωρίς ατμό για λίγη ώρα
ώστε να στεγνώσουν. Εάν η κάτω
πλευρά της σιδερώστρας είναι υγρή,
σκουπίστε τη με ένα στεγνό πανί.
Ενδέχεται ατμός να έχει συγκεντρωθεί
στο σωλήνα, η θερμοκρασία να έχει
ρυθμιστεί κάτω από 3 ή η συσκευή
να μην είναι έτοιμη για σιδέρωμα με
ατμό.
Για να αποτρέψετε τη συγκέντρωση
ατμού πάνω στη σιδερώστρα,
χρησιμοποιήστε σιδερώστρα με
μεταλλικό πλέγμα.
Βεβαιωθείτε ότι η θερμοκρασία
έχει ρυθμιστεί στους 3 ή
υψηλότερα. Σιδερώστε με ατμό
για μερικά δευτερόλεπτα προτού
χρησιμοποιήσετε τη λειτουργία
βολής ατμού.

ESPAÑOL
Introducción
Gracias por adquirir este sistema de planchado Philips. Por favor, lea
estas instrucciones de uso, ya que contienen información sobre las
sorprendentes características de este sistema de planchado, así como
algunos consejos para hacer que el planchado resulte más fácil y agradable.
Este potente sistema de planchado a presión produce vapor continuo para
que el planchado le resulte más fácil. Gracias a su gran depósito de agua
podrá planchar sin interrupción. Cuando el depósito de agua esté vacío,
podrá quitarlo y rellenarlo de forma inmediata.
Esperamos que disfrute utilizando este sistema de planchado.
55
A Manguera
B Empuñadura de tacto suave (sólo modelos GC8261/GC8260)
C Control de temperatura
D Activador del vapor
E Bloqueo del vapor
F Botón de golpe de vapor (sólo modelos GC8261/GC8260/GC8220)
G Suela
H Bloqueo para guardar de forma segura (sólo modelos GC8261/
GC8260)
I Soporte de la plancha
J Depósito de agua extraíble
K Vaso de llenado
L Pinza para recoger el cable y la manguera
M Tapón de limpieza Calc-Clean
N Abertura de llenado
O Palanca para liberar el depósito de agua
P Depósito de vapor
Q Botón de encendido/apagado con piloto de encendido (sólo modelos
GC8261/GC8260/GC8220)
R Zona de agarre para transpor tar
S Piloto de rellenado del depósito de agua (sólo modelos GC8261/
GC8260/GC8220)
T Piloto Calc-Clean (sólo modelos GC8261/GC8260)
U Cable de alimentación
V Botones de vapor (+/-) (sólo modelos GC8261/GC8260/GC8220)
W Panel de control del depósito de vapor con piloto de vapor (sólo
modelos GC8261/GC8260/GC8220)
p = vapor máximo
[ = vapor moderado
] = vapor mínimo
a = sin vapor
-
X Interruptor de encendido/apagado (sólo modelo GC8210)
Importante
Antes de usar el aparato, lea atentamente estas instrucciones de uso y
consérvelas por si necesitara consultarlas en el futuro.
Antes de enchufar el aparato, compruebe si el voltaje indicado en la
,
placa de modelo se corresponde con el voltaje de red local.
Conecte el aparato sólo a un enchufe con toma de tierra.
,

ESPAÑOL56
No utilice el aparato si la clavija, el cable, la manguera o el propio
,
aparato tienen daños visibles, o si el aparato se ha caído o está
goteando.
Compruebe el cable y la manguera con regularidad por si estuvieran
,
dañados.
Si el cable de alimentación o la manguera están dañados, deben ser
,
sustituidos por Philips o por un centro de servicio autorizado por
Philips, con el n de evitar situaciones de peligro.
No deje nunca el aparato desatendido cuando esté enchufado a la
,
toma de corriente.
No sumerja nunca la plancha o el depósito del vapor en agua.
,
Este aparato no debe ser usado por personas (adultos o niños) con
,
su capacidad física, psíquica o sensorial reducida, ni por quienes no
tengan los conocimientos y la experiencia necesarios, a menos que
sean supervisados o instruidos acerca del uso del aparato por una
persona responsable de su seguridad.
Asegúrese de que los niños no jueguen con este aparato.
,
La suela de la plancha puede calentarse mucho y, si se toca, puede
,
causar quemaduras.
No permita que el cable de alimentación ni la manguera entren en
,
contacto con la suela cuando ésta esté caliente.
Coloque y utilice siempre la plancha y el depósito del vapor en una
,
supercie estable, plana y horizontal. No coloque el depósito de
vapor en la parte blanda de la tabla de planchar.
Cuando haya acabado de planchar, cuando limpie el aparato, cuando
,
llene o vacíe el depósito del agua o cuando deje la plancha aunque
sólo sea por un momento, ponga la plancha en el soporte, apague el
aparato y desenchúfelo de la toma de corriente.
Si sale vapor por debajo del tapón de limpieza Calc-Clean mientras
,
el aparato se está calentando, apáguelo y apriete el tapón de limpieza
Calc-Clean. Si sigue saliendo vapor mientras el aparato se está
calentando, apáguelo y diríjase a un centro de servicio autorizado
por Philips.
No utilice ningún otro tapón para el depósito de vapor que no sea
,
el que se suministra con el aparato, ya que este tapón actúa también
como válvula de seguridad.
Enjuague el depósito de vapor con regularidad siguiendo las
,
instrucciones del capítulo “Limpieza”.
No quite nunca el tapón de limpieza Calc-Clean cuando el depósito
,
de vapor esté caliente.
Este aparato es sólo para uso doméstico.
,
Campos electromagnéticos (CEM)
Este aparato Philips cumple todos los estándares sobre campos
electromagnéticos (CEM). Si se utiliza correctamente y de acuerdo con las
instrucciones de este manual, el aparato se puede usar de forma segura
según los conocimientos cientícos disponibles hoy en día.
Antes de utilizar el aparato por primera vez
Nota: Puede que salga un poco de humo de la plancha cuando la use por
primera vez. Esto es normal y cesará al cabo de un rato.
Nota: Puede que salgan algunas partículas por la suela cuando use la plancha

ESPAÑOL 57
por primera vez. Esto es normal, las partículas son inofensivas y dejarán de
salir al cabo de un rato.
Nota: Cuando encienda el aparato, es posible que el depósito de vapor
produzca un sonido de bombeo. Es normal; el sonido le indica que se está
bombeando agua al depósito de vapor.
1 Quite cualquier pegatina o lámina protectora de la suela de la
plancha y límpiela con un paño suave.
Preparación para su uso
1
Coloque el depósito de vapor en una supercie plana y estable, por
ejemplo, sobre una tabla de planchar o sobre una mesa.
Llenado del depósito de agua desmontable
El depósito de agua se puede rellenar en cualquier momento durante
,
el planchado.
No eche en el depósito de agua perfume, vinagre, almidón, productos
desincrustantes, productos que ayuden al planchado ni otros productos
químicos.
No llene en exceso el depósito de agua, de lo contrario el agua podría
salirse por la abertura de llenado cuando vuelva a colocarlo.
1 Quite el depósito de agua desmontable del depósito de vapor.
Si el agua del grifo de su zona es muy dura, le aconsejamos que la mezcle
a partes iguales con agua destilada.
2 Llene el depósito de agua hasta la indicación MAX.
3 Vuelva a colocar rmemente el depósito de agua en el depósito de
vapor (“clic”).
Si el depósito de agua no está colocado correctamente, la plancha no
produce vapor.
Piloto de rellenado del depósito de agua
Cuando el depósito de agua está vacío, el piloto de rellenado del
,
depósito de agua comienza a parpadear (sólo modelos GC8261/
GC8260/GC8220) y ya no es posible planchar con vapor.
Rellene el depósito de agua. La plancha comienza a producir vapor
,
de nuevo tan pronto como el depósito de agua se vuelve a colocar
en el depósito de vapor.
Ajuste de la temperatura
1 Compruebe en la etiqueta de la prenda la temperatura de planchado
adecuada.

OnOn
OnOn
ESPAÑOL58
1 Fibras sintéticas (por ej. acrílico, viscosa, poliamida) y seda
2 Lana
3 Algodón
Lino MAX
-
2 Ajuste el control de temperatura a la temperatura de planchado
apropiada girándolo hasta la posición correcta.
3 Sólo modelos GC8261/GC8260/GC8220: Conecte la clavija a un
enchufe con toma de tierra y pulse una vez el botón de encendido/
apagado.
El piloto de vapor comienza a parpadear.
Después de unos 2 minutos, el piloto de vapor permanece iluminado de
manera continua para indicar que el depósito de vapor está listo para
planchar con vapor.
4 Sólo modelo GC8210: Conecte la clavija a un enchufe con toma de
tierra y ponga el interruptor de la plancha en ‘on’.
Consejos
Si la prenda está compuesta de varios tipos de bras, elija siempre
-
la temperatura adecuada para la bra más delicada, es decir, la
temperatura más baja. Si, por ejemplo, la prenda tiene un 60% de
poliéster y un 40% de algodón, deberá plancharla a la temperatura
indicada para poliéster (2).
Si no sabe de qué tipos de tejido está compuesta la prenda, determine
la temperatura correcta planchando una par te de la prenda que no se
vea cuando la use o la lleve puesta.
Seda, lana y bras sintéticas: planche las prendas por el revés para
evitar que aparezcan brillos en la tela.
Las prendas que tiende a quedar con brillos deben plancharse en una
sola dirección (siguiendo el hilo de la tela) y ejerciendo muy poca
presión.
Comience a planchar las prendas que necesiten la temperatura más
baja, es decir, las de materiales sintéticos.
Para que la plancha se enfríe antes, sólo tiene que aplicar vapor o
,
planchar un trozo de tela.
Uso del aparato
Planchado con vapor
Puede que la manguera se caliente si se plancha durante mucho tiempo.
Nota: El sistema puede producir de vez en cuando un sonido de bombeo
durante el planchado con vapor. Esto es normal y le indica que se está
bombeando agua al depósito de vapor.
1 Asegúrese de que hay suciente agua en el depósito de agua.

ESPAÑOL 59
2 Encienda el aparato y seleccione la posición de temperatura de
planchado adecuada.
Sólo se puede planchar con vapor a temperaturas de planchado superiores
a 2.
3 Sólo modelos GC8261/GC8260/GC8220: Seleccione la posición de
vapor adecuada mediante los botones + y - en el panel de control
del depósito de vapor.
p para vapor máximo (posición de temperatura MAX).
[ para vapor moderado (posiciones de temperatura de 3 a MAX).
] para vapor mínimo (posiciones de temperatura de 2 a MAX).
a para planchar sin vapor (posiciones de temperatura de 1 a MAX).
El piloto de vapor parpadea para indicar que el depósito de vapor se
,
está calentando.
Después de unos 2 minutos, el piloto de vapor permanece iluminado de
manera continua para indicar que el depósito de vapor está listo para el
planchado con vapor.
Durante el planchado con vapor, el piloto de vapor comienza a parpadear
cada cierto tiempo para indicar que el depósito de vapor se está
calentando para mantener la temperatura y la presión adecuadas.
Durante el planchado puede ajustar la posición de vapor mediante
,
los botones de vapor + y -.
Pasarán unos segundos antes de que la cantidad de vapor se ajuste.
4 Comience a planchar con vapor pulsando el activador del vapor.
Cuando deje la plancha durante el planchado, colóquela sobre su base de
apoyo o en el soporte de la plancha.
Puede que al abrirse y cerrarse la válvula de vapor del depósito de
,
vapor se oiga un clic. Esto es totalmente normal.
Función de bloqueo del vapor
El bloqueo del vapor le permite planchar con vapor continuo sin tener que
pulsar el activador del vapor continuamente.
1 Coloque el bloqueo del vapor en la posición ‘on’. Para dejar de
producir vapor, vuelva a colocarlo en la posición ‘off’. Cuando el
bloqueo del vapor se ha ajustado en la posición ‘off’, la plancha sólo
producirá vapor cuando pulse el activador del vapor.
Libere el bloqueo del vapor cuando coloque la plancha sobre su base de
apoyo o en el soporte. Esto evita que el vapor caliente salga de la plancha
o que el soporte se moje.
Planchado sin vapor
1 Comience a planchar sin pulsar el activador del vapor.
2 Sólo modelos GC8261/GC8260/GC8220: También puede seleccionar
la posición de vapor a (sin vapor) y comenzar a planchar.

OffOff
ESPAÑOL60
Características
Vapor vertical
No dirija nunca el vapor hacia las personas.
Puede planchar con vapor cortinas y prendas colgadas (chaquetas,
,
trajes, abrigos) colocando la plancha en posición vertical y pulsando
el activador del vapor.
Golpe de vapor (sólo modelos GC8261/GC8260/GC8220)
Un potente chorro de vapor ayuda a eliminar las arrugas rebeldes.
1 Coloque el control de temperatura en una posición entre 3 y
MAX.
2 Pulse el botón de golpe de vapor.
La función de golpe de vapor debe usarse de forma intermitente.
,
Si salen gotitas de agua por la suela, deje que la plancha se caliente
durante al menos un minuto antes de volver a utilizar la función de
golpe de vapor.
Limpieza y mantenimiento
Después del planchado
1 Coloque la plancha sobre el soporte y apáguela.
2 Desenchufe el aparato de la red y deje que se enfríe.
3 Limpie con un paño húmedo y un limpiador líquido no abrasivo los
restos de cal y las impurezas que puedan haber quedado en la suela.
4 Limpie la parte superior del aparato con un paño húmedo.
5 Vacíe el depósito de agua después de la limpieza.
Función Calc-Clean
No quite nunca el tapón de limpieza Calc-Clean cuando el depósito de
vapor esté caliente.
MUY IMPORTANTE: Enjuague el depósito de vapor una vez al mes o
cada 10 planchados, para evitar daños en el aparato y para conseguir un
rendimiento de vapor óptimo.
1 Asegúrese de que ha desenchufado el aparato y que éste se ha
enfriado durante más de 2 horas.

ESPAÑOL 61
2 Quite el depósito de agua desmontable.
3 Coja el depósito de vapor con las dos manos y agítelo bien.
4 Incline el depósito de vapor hacia un lado y quite el tapón de
limpieza Calc-Clean.
5 Vacíe el agua del depósito de vapor en el fregadero.
6 Llene el depósito de vapor con agua fría, utilizando para ello el vaso
de llenado, y vuelva a agitarlo.

ESPAÑOL62
7 Vuelva a vaciar el depósito de vapor en el fregadero.
Repita los pasos 6 y 7 dos veces para conseguir el mejor resultado.
8 Enrosque el tapón de limpieza Calc-Clean rmemente en el depósito
de vapor.
Recordatorio Calc-Clean (sólo modelos GC8261/GC8260)
Cuando sea necesario enjuagar el depósito de vapor, el piloto de
,
Calc-Clean parpadea durante 30 segundos.
El depósito de vapor no se calentará durante esos 30 segundos.
1 Apague el aparato inmediatamente.
2 Utilice la función Calc-Clean según las indicaciones anteriores.
No utilice la función Calc-Clean cuando el depósito de vapor esté
caliente.
Almacenamiento
Deje siempre que la plancha se enfríe antes de guardarla.
1 Sólo modelos GC8261/GC8260: Introduzca la punta de la plancha en
el bloqueo para guardar de forma segura que hay en el soporte.
2 Sólo modelos GC8261/GC8260: Empuje rmemente hacia abajo la
parte de atrás de la plancha (‘clic’).
3 Vacíe el depósito de agua.

ESPAÑOL 63
4 Saque el gancho para recoger el cable y la manguera.
5 Sujete la manguera y el cable de alimentación.
6 El aparato dispone de zonas de agarre a cada lado del depósito de
vapor para transportarlo con facilidad.
Medio ambiente
Al nal de su vida útil, no tire el aparato junto con la basura normal
,
del hogar. Llévelo a un punto de recogida ocial para su reciclado. De
esta manera ayudará a conservar el medio ambiente.
Garantía y servicio
Si necesita información o tiene algún problema, visite la página Web de
Philips en www.philips.com, o póngase en contacto con el Servicio de
Atención al Cliente de Philips en su país (hallará el número de teléfono en
el folleto de la garantía). Si no hay Servicio de Atención al Cliente de Philips
en su país, diríjase a su distribuidor local Philips o póngase en contacto con
el Service Depar tment de Philips Domestic Appliances and Personal Care
BV.

ESPAÑOL64
Guía de resolución de problemas
En este capítulo se resumen los problemas más habituales que se puede
encontrar al utilizar la plancha. Lea los distintos apartados para obtener
más información. Si no puede solucionar el problema, póngase en contacto
con el Servicio de Atención al Cliente de Philips en su país.
Problema Causa Solución
El aparato no se
calienta.
Sale humo
de la plancha
nueva cuando la
enciendo.
La plancha no
produce vapor.
Salen gotitas de
agua por la suela.
Hay un problema de conexión. Compruebe el cable de alimentación,
la clavija y el enchufe.
No se ha encendido el aparato. Pulse el botón de encendido/
apagado (tipos GC8261/GC8260/
GC8220) o ajuste el interruptor de
encendido/apagado a la posición ‘on’
(GC8210).
La temperatura seleccionada es demasiado
baja.
Algunas piezas del aparato se han
engrasado ligeramente en fábrica y puede
que al principio desprendan un poco de
humo al calentarse.
No hay suciente agua en el depósito. Llene el depósito de agua (consulte
El depósito de vapor no se ha calentado lo
suciente.
La temperatura seleccionada es demasiado
baja para planchar con vapor.
Se ha seleccionado la posición de vapor
a (sin vapor) (sólo modelos GC8261/
GC8260/GC8220).
El depósito de agua no se ha colocado
correctamente en el depósito de vapor.
Cuando se selecciona una temperatura
de planchado muy alta, el vapor que se
produce es seco y difícilmente visible. Será
menos visible aún cuando la temperatura
ambiente sea relativamente alta, y será
completamente invisible cuando la
temperatura seleccionada esté en MAX.
La temperatura seleccionada es demasiado
baja para planchar con vapor.
Seleccione una temperatura más alta.
Este fenómeno es totalmente normal
y cesará al cabo de un rato.
el capítulo “Preparación para su uso”,
apartado “Llenado del depósito de
agua desmontable”).
Espere unos 2 minutos (sólo
modelos GC8261/GC8260/GC8220:
hasta que el piloto de vapor se
ilumine de manera continua).
Seleccione una temperatura de 2
o superior.
Seleccione la posición de vapor
] (vapor mínimo), [ (vapor
moderado) o p (vapor máximo).
Coloque correctamente el depósito
de agua en el depósito de vapor
(“clic”).
Baje la temperatura, por ejemplo a
2, para comprobar si está saliendo
vapor de la plancha.
Seleccione una temperatura de 2
o superior.

Problema Causa Solución
ESPAÑOL 65
Salen partículas
de cal e impurezas
por la suela o la
suela está sucia.
El aparato produce
un sonido de
bombeo.
La plancha
produce vapor
continuamente.
Sale agua sucia por
la suela.
Sale vapor por
debajo del tapón
de limpieza CalcClean mientras el
aparato se está
calentando.
La plancha
no produce
suciente vapor
o la cantidad de
vapor aumenta y
disminuye durante
el planchado.
Cuando comienza a planchar con vapor y
deja de planchar durante un rato, el vapor
que había en la manguera se enfría y se
condensa en forma de agua. Esto es lo que
hace que salgan gotitas por la suela.
Las impurezas o los componentes
químicos del agua se han depositado en los
oricios de salida del vapor o en la suela.
Se está bombeando agua al depósito de
vapor.
El sonido de bombeo no cesa. Desenchufe inmediatamente la
El bloqueo del vapor se ha ajustado a la
posición ‘on’.
Se ha acumulado demasiada cal y partículas
minerales en el depósito de vapor.
El tapón de limpieza Calc-Clean no se ha
apretado bien.
Cuando el aparato bombea agua a la
caldera, en ocasiones la cantidad de
vapor disminuye. Es probablemente en
estos momentos cuando usted considera
que la plancha no produce suciente
vapor. Sin embargo, este fenómeno es
completamente normal y la salida de vapor
se normaliza en pocos segundos.
Esto es totalmente normal. Ponga la
plancha sobre un trozo de tela viejo
y pulse el activador del vapor cuando
comience a planchar (de nuevo).
Espere hasta que salga vapor en vez
de agua por la suela.
Limpie la suela con un paño húmedo.
Esto es normal.
plancha y póngase en contacto con
un centro de servicio autorizado por
Philips.
Ajuste el bloqueo de vapor a la
posición “off” (desactivado) si sólo
desea obtener vapor cuando pulse
el activador del vapor (consulte la
sección “Función de bloqueo del
vapor”).
Enjuague el depósito de vapor.
Consulte el capítulo “Limpieza y
mantenimiento”.
Apague el aparato, apriete el tapón
de limpieza Calc-Clean y vuelva a
encender el aparato. Si sigue saliendo
vapor mientras el aparato se está
calentando, apáguelo y diríjase a un
centro de servicio autorizado por
Philips.
Para optimizar la salida de vapor,
libere el bloqueo del vapor cuando
no necesite vapor y cuando deje la
plancha.

ESPAÑOL66
Problema Causa Solución
Aparecen manchas
de agua en la
prenda durante el
planchado.
Salen gotas de
agua por la suela
cuando utilizo la
función de golpe
de vapor (sólo
modelos GC8261/
GC8260/GC8220).
Las manchas de agua que aparecen en la
prenda después de haberla planchado con
vapor durante cierto tiempo pueden estar
causadas por el vapor condensado en la
tabla de planchar. Planche las manchas de
agua sin vapor durante un tiempo para
secarlas. Si la parte inferior de la tabla de
planchar está mojada, séquela con un paño.
Puede que se haya condensado vapor en
la manguera, que la temperatura se haya
establecido por debajo de 3 o que el
aparato no esté listo para planchar con
vapor.
Para evitar que el vapor se condense
en la tabla de planchar, utilice una
tabla con una supercie de malla de
alambre.
Asegúrese de establecer una
temperatura de 3 o superior.
Planche con vapor durante unos
segundos antes de utilizar la función
de golpe de vapor.

SUOMI
Johdanto
Kiitos, että ostit Philips-silityskeskuksen. Lue nämä käyttöohjeet, sillä ne
sisältävät tietoa silityskeskuksen ominaisuuksista ja vinkkejä, jotka helpottavat
silittämistä sekä tekevät siitä mukavampaa.
Tehokas paineistettu silityskeskus tuottaa jatkuvasti höyryä, joten silittäminen
on helppoa. Suuren vesisäiliön ansiosta voit silittää keskeytyksettä. Kun
vesisäiliö on tyhjä, voit irrottaa sen heti täyttämistä varten.
Toivomme, että nautit höyrysilityskeskuksen käytöstä.
Laitteen osat (Kuva 1)
67
A Höyryletku
B Pehmeä kädensija (vain malleissa GC8261/GC8260)
C Lämpötilanvalitsin
D Höyrypainike
E Höyrypaineen lukitus
F Höyrysuihkauspainike (vain malleissa GC8261/GC8260/GC8220)
G Pohja
H Turvalukitus (vain malleissa GC8261/GC8260)
I Höyrysilitysraudan laskualusta
J Irrotettava vesisäiliö
K Täyttökuppi
L Johdon ja letkun säilytyskela
M CalcClean-huuhteluaukon tulppa
N Täyttöaukko
O Vesisäiliön irrotusvipu
P Höyrysäiliö
Q Virtapainike ja virran merkkivalo (vain malleissa GC8261/GC8260/
GC8220)
R Kuljetuskädensija
S Vesisäiliön täyttövalo (vain malleissa GC8261/GC8260/GC8220)
T CalcClean-valo (vain malleissa GC8261/GC8260)
U Virtajohto
V Höyrypainikkeet (+/-) (vain malleissa GC8261/GC8260/GC8220)
W Höyrysäiliön ohjauspaneeli ja höyryvalo (vain malleissa GC8261/
GC8260/GC8220)
p = paljon höyryä
[ = normaali höyry
] = vähän höyryä
a = ei höyryä
-
X Virtakytkin (vain mallissa GC8210)

SUOMI68
Tärkeää
Lue tämä käyttöohje huolellisesti ennen laitteen käyttöönottoa ja säilytä
ohje vastaisen varalle.
Tarkista, että laitteen arvokilven jännitemerkintä vastaa paikallista
,
verkkojännitettä, ennen kuin liität laitteen pistorasiaan.
Yhdistä laite vain maadoitettuun pistorasiaan.
,
Älä käytä laitetta, jos sen johto, pistoke, liitin tai jokin muu osa on
,
viallinen tai jos laite on pudonnut tai vuotaa.
Tarkista virtajohdon ja liittimen kunto säännöllisesti.
,
Jos virtajohto tai liitin on vaurioitunut, se on vaaratilanteiden
,
välttämiseksi vaihdatettava Philipsin valtuuttamassa huoltoliikkeessä
tai muulla ammattitaitoisella korjaajalla.
Laitetta ei saa koskaan jättää ilman valvontaa silloin kun se on liitetty
,
sähköverkkoon.
Älä upota höyrysilitysrautaa tai höyrysäiliötä veteen.
,
Laitetta ei ole tarkoitettu lasten tai sellaisten henkilöiden käyttöön,
,
joiden fyysinen tai henkinen toimintakyky on rajoittunut tai joilla
ei ole kokemusta tai tietoa laitteen käytöstä, muuten kuin heidän
turvallisuudestaan vastaavan henkilön valvonnassa ja ohjauksessa.
Pienten lasten ei saa antaa leikkiä laitteella.
,
Silitysraudan pohja tulee hyvin kuumaksi ja koskettaessa se voi
,
aiheuttaa palovamman.
Pidä huoli, ettei höyrysilitysraudan kuuma pohja kosketa johtoa tai
,
liitintä.
Aseta höyrysilitysrauta ja höyrysäiliö tukevalle, tasaiselle ja
,
vaakasuoralle alustalle. Älä laita höyrysäiliötä silityslaudan pehmeälle
osalle.
Aseta höyrysilitysrauta telineeseen ja katkaise laitteesta virta ja irrota
,
pistoke pistorasiasta aina, kun lopetat silittämisen, kun puhdistat
laitetta, kun täytät tai tyhjennät vesisäiliötä tai kun hetkeksikin poistut
höyrysilitysraudan luota.
Jos huuhteluaukon tulpan alta purkautuu höyryä laitteen lämmityksen
,
aikana, sammuta laite ja kiristä Calc-Clean-huuhteluaukon tulppaa.
Jos höyryä purkautuu edelleen laitteen lämmityksen aikana, sammuta
laite ja ota yhteys Philipsin valtuuttamaan huoltoliikkeeseen.
Älä käytä höyrysäiliössä muuta kuin laitteen mukana toimitettua
,
korkkia, sillä korkki toimii samalla turvaventtiilinä.
Huuhtele höyrysäiliö säännöllisesti noudattamalla kohdassa
,
Puhdistaminen annettuja ohjeita.
Älä koskaan irrota CalcClean-huuhteluaukon tulppaa, kun höyrysäiliö
,
on kuuma.
Tämä laite on tarkoitettu vain kotitalouksien käyttöön.
,
Sähkömagneettiset kentät (EMF)
Tämä Philips-laite vastaa kaikkia sähkömagneettisia kenttiä (EMF) koskevia
standardeja. Jos laitetta käytetään oikein ja tämän käyttöohjeen ohjeiden
mukaisesti, sen käyttäminen on turvallista tämänhetkisten tieteellisten
tutkimusten perusteella.

SUOMI 69
Käyttöönotto
Huomautus: Höyrysilitysraudasta voi tulla hieman käryä ensimmäisellä
käyttökerralla. Tämä on normaalia ja lakkaa hetken kuluttua.
Huomautus: Käytettäessä höyrysilitysrautaa ensimmäistä kertaa sen pohjasta
saattaa tulla valkoisia hiukkasia. Tämä on normaalia. Hiukkaset ovat
vaarattomia ja niiden tulo lakkaa jonkin ajan kuluttua.
Huomautus: Kun käynnistät laitteen, höyrysäiliöstä saattaa kuulua pumppaava
ääni. Tämä on normaalia. Ääni kertoo, että vettä pumpataan höyrysäiliöön.
1 Poista pohjassa mahdollisesti oleva tarra tai suojakalvo ja puhdista
pohja pehmeällä kankaalla.
Käyttöönotto
1
Aseta höyrysäiliö tukevalle ja tasaiselle alustalle, eli silityslaudalle tai
pöydälle.
Irrotettavan vesisäiliön täyttäminen
Vesisäiliö voidaan täyttää milloin tahansa käytön aikana.
,
Älä pane vesisäiliöön kuumaa vettä, hajusteita, etikkaa, tärkkiä,
kalkinpoistoaineita, silitysaineita tai muitakaan kemikaaleja.
Älä täytä vesisäiliötä liian täyteen, koska vettä saattaa läikkyä
täyttöaukosta säiliötä kiinnitettäessä.
1 Poista irrotettava vesisäiliö höyrysäiliöstä.
Jos paikallinen vesijohtovesi on hyvin kovaa, suosittelemme sekoittamaan
vesijohtoveteen puolet tislattua vettä.
2 Täytä vesisäiliö vedellä MAX-merkkiin asti.
3 Työnnä vesisäiliö takaisin höyrysäiliöön niin, että se napsahtaa
paikalleen.
Jos vesisäiliö ei ole kunnolla paikallaan, höyrysilitysraudasta ei tule höyryä.
Vesisäiliön täyttövalo
Kun vesisäiliö on tyhjä, merkkivalo alkaa vilkkua (vain malleissa
,
GC8261/GC8260/GC8220) ja höyrysilitys ei ole mahdollista.
Täytä vesisäiliö. Silitysrauta alkaa tuottaa höyryä heti, kun vesisäiliö
,
on kiinnitetty takaisin höyrysäiliöön.
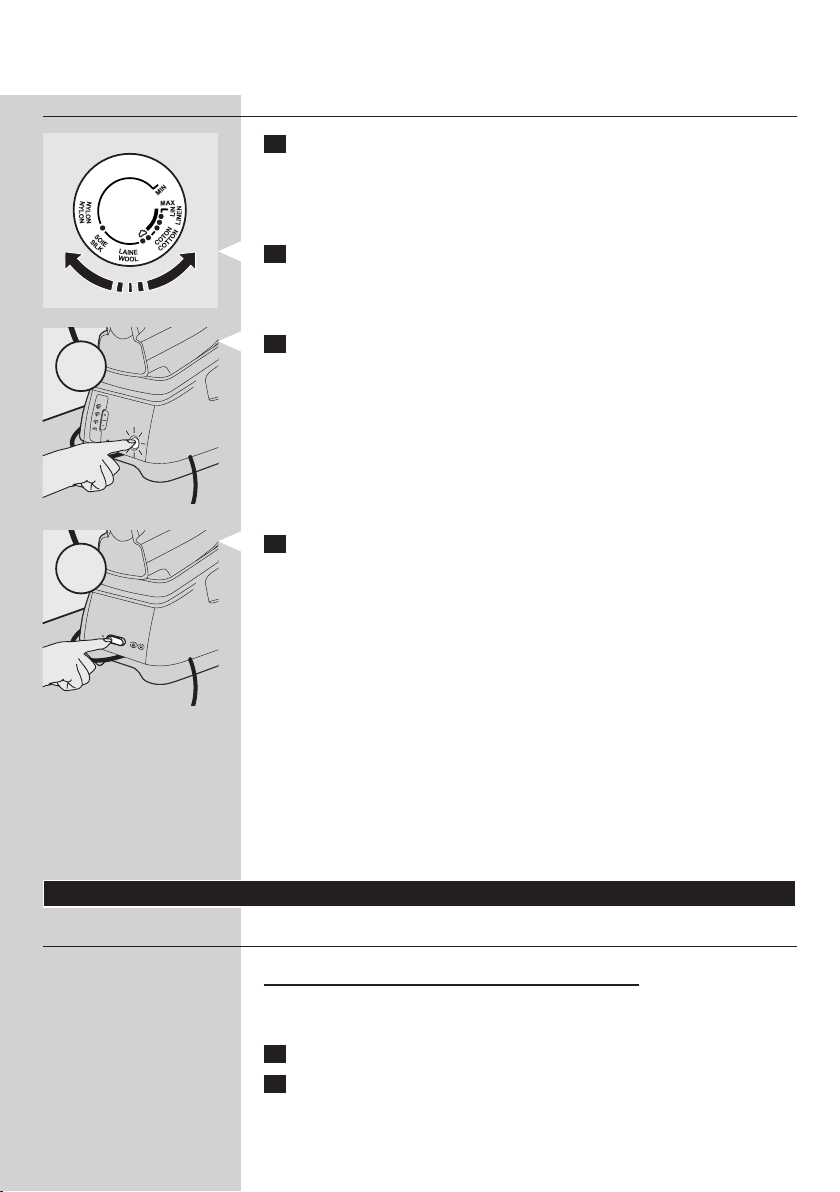
On
On
SUOMI70
Lämpötilan valinta
1 Varmista oikea silityslämpötila vaatteen silitysohjeesta.
1 Tekokuidut (esim. akryyli, viskoosi, polyamidi) ja silkki
2 Villa
3 Puuvilla
MAX Pellava
-
2 Valitse haluamasi silityslämpötila kiertämällä lämpötilanvalitsin
vastaavan merkin kohdalle.
3 Vain mallit GC8261/GC8260/GC8220: Liitä pistoke maadoitettuun
pistorasiaan ja paina virtapainiketta kerran.
Höyryvalo alkaa vilkkua.
Noin kahden minuutin kuluttua höyryvalo lopettaa vilkkumisen ja palaa
jatkuvasti. Tällöin höyrysäiliö on valmis höyrysilitystä varten.
4 Vain malli GC8210: Liitä pistoke maadoitettuun pistorasiaan ja aseta
virtapainike ON-asentoon.
Vinkkejä
Jos vaate on valmistettu erilaisista materiaaleista, valitse silityslämpötila
-
arimman materiaalin mukaan eli alin lämpötila. Esimerkki: jos vaatteessa
on 60 % polyesteriä ja 40 % puuvillaa, se kannattaa silittää polyesterille
tarkoitetulla lämmöllä ( 2).
Jos et tiedä mitä materiaalia tekstiili on, kokeile silittämistä varovasti
sellaisesta kohdasta, joka ei näy päällepäin.
Silkki, villa ja tekokuidut: silitä nurjalta puolelta, ettei pinta ala kiiltää.
Helposti kiiltävät materiaalit tulisi silittää vain yhteen suuntaan (nukan
suuntaan) ja painamalla silitysrautaa mahdollisimman vähän.
Aloita silittäminen matalinta lämpötilaa vaativista, esimerkiksi
tekokuituisista tekstiileistä.
Voit nopeuttaa höyrysilitysraudan jäähtymistä käyttämällä höyryä tai
,
silittämällä jotain kangasta.
Käyttö
Höyrysilitys
Höyryletku saattaa kuumentua pitkään käytettäessä.
Huomautus: Höyrysilityksen aikana laitteesta voi ajoittain kuulua pumppaava
ääni. Tämä on normaalia ja kertoo sen, että vettä pumpataan höyrysäiliöön.
1 Varmista, että höyrysäiliössä on riittävästi vettä.
2 Kytke laitteeseen virta ja valitse sopiva silityslämpötila.
Höyrysilitys on mahdollista vain lämpötiloissa, jotka ovat korkeampia kuin
2.

SUOMI 71
3 Vain mallit GC8261/GC8260/GC8220: Valitse haluamasi höyryasetus
höyrysäiliön ohjauspaneelin painikkeilla + ja -.
p paljon höyryä (lämpötila-asetus MAX).
[ kohtuullisesti höyryä (lämpötila-asetukset 3 – MAX).
] vähän höyryä (lämpötila-asetukset 2 - MAX).
a paljon höyryä (lämpötila-asetukset 1 - MAX).
Höyryvalon vilkkuminen osoittaa, että höyrysäiliö kuumenee.
,
Noin kahden minuutin kuluttua höyryvalo lopettaa vilkkumisen ja palaa
jatkuvasti. Tällöin höyrysäiliö on valmis höyrysilitystä varten.
Höyrysilityksen aikana höyrysäiliön lämpenemisen merkkivalo syttyy aika
ajoin osoitukseksi siitä, että höyrysäiliö kuumenee säilyttääkseen oikean
lämpötilan ja paineen.
Silittämisen aikana höyryasetuksia voi muuttaa painikkeilla + ja -.
,
Höyryn määrä muuttuu pienellä viiveellä.
4 Aloita höyrysilitys painamalla höyrypainiketta.
Kun lasket höyrysilitysraudan kädestäsi silityksen aikana, aseta se
pystyasentoon tai laskualustalle.
Höyrysäiliön höyryventtiilin avautuminen ja sulkeutuminen saa aikaan
,
napsahduksen. Tämä on täysin normaalia.
Höyrypaineen lukitus
Höyrypaineen lukituksen avulla voit käyttää höyrysilitystoimintoa
keskeytyksettä, eikä sinun tarvitsee painaa höyrypainiketta jatkuvasti.
1 Siirrä lukitus ON-asentoon. Kun lopetat höyrysilityksen, siirrä lukitus
takaisin OFF-asentoon. Kun lukitus on OFF-asennossa, silitysraudasta
tulee höyryä vain painamalla höyrypainiketta.
Vapauta höyrypaineen lukitus, kun asetat silitysraudan pystyasentoon
tai laskualustalle. Näin kuuma höyry ei pääse ilmaan tai kastelemaan
laskualustaa.
Silittäminen ilman höyryä
1 Aloita silittäminen painamatta höyrypainiketta.
2 Vain mallit GC8261/GC8260/GC8220: Voit valita höyryasetuksen a
(ei höyryä) ja aloittaa silittämisen.

Off
SUOMI72
Ominaisuudet
Höyrysilitys pystyasennossa
Älä koskaan suuntaa höyrysuihkua ihmisiä kohti.
Voit höyrysilittää ripustetut verhot ja vaatteet (takit, puvut
,
yms.) pitämällä höyrysilitysrautaa pystyasennossa ja painamalla
höyrypainiketta.
Höyrysuihkaus (vain mallit GC8261/GC8260/GC8220)
Voimakas höyrysuihkaus auttaa poistamaan itsepintaiset laskokset/rypyt.
1 Aseta lämpötilanvalitsin välille 3 - MAX.
2 Paina höyrysuihkauspainiketta.
Höyrysuihkaustoimintoa on käytettävä vain ajoittain. Jos pohjasta
,
tippuu vettä, anna silitysraudan kuumentua vähintään minuutin ajan,
ennen kuin käytät höyrysuihkaustoimintoa uudelleen.
Puhdistus ja hoito
Silityksen jälkeen
1 Aseta silitysrauta laskualustalle ja katkaise virta.
2 Irrota pistoke pistorasiasta ja anna silitysraudan jäähtyä.
3 Pyyhi pohjaan tarttunut kalkki ja muu lika kostealla liinalla ja
naarmuttamattomalla (nestemäisellä) puhdistusaineella.
4 Puhdista höyrysilitysraudan yläosa kostealla liinalla.
5 Tyhjennä vesisäiliö puhdistuksen jälkeen.

SUOMI 73
CalcClean-toiminto
Älä koskaan irrota CalcClean-huuhteluaukon tulppaa, kun höyrysäiliö on
kuuma.
ERITTÄIN TÄRKEÄÄ: Huuhtele höyrysäiliö kerran kuussa tai aina 10
käyttökerran jälkeen, jotta laite ei vahingoitu ja höyrytoiminto toimii
moitteettomasti.
1 Varmista, että laite on irrotettu verkkovirrasta ja että se on jäähtynyt
yli 2 tuntia.
2 Poista irrotettava vesisäiliö.
3 Tartu höyrysäiliöön kahdella kädellä ja ravista kunnolla.
4 Käännä höyrysäiliö kyljelleen ja irrota CalcClean-huuhteluaukon
tulppa.
5 Tyhjennä höyrysäiliö kaatamalla vesi pesualtaaseen.
6 Täytä säiliö puhtaalla vedellä kupin avulla ja ravista uudelleen.

SUOMI74
7 Tyhjennä vesi höyrysäiliöstä uudelleen pesualtaaseen.
Parhaan tuloksen saat toistamalla vaiheet 6 ja 7 kaksi kertaa.
8 Kierrä CalcClean-huuhteluaukon tulppa tiukasti höyrysäiliöön.
CalcClean-muistutustoiminto (vain mallit GC8261/GC8260)
,
Kun höyrysäiliö on huuhtelun tarpeessa, CalcClean-valo vilkkuu 30
sekunnin ajan.
Höyrysäiliö ei lämpene näiden 30 sekunnin aikana.
1 Katkaise laitteesta heti virta.
2 Käytä CalcClean-toimintoa yllä kuvatulla tavalla.
Älä käytä CalcClean-toimintoa, kun höyrysäiliö on kuuma.
Säilytys
Anna höyrysilitysraudan jäähtyä, ennen kuin laitat sen säilytykseen.
1 Vain mallit GC8261/GC8260: Työnnä höyrysilitysraudan kärki
laskualustan turvalukitukseen.
2 Vain mallit GC8261/GC8260: Paina laitteen takaosaa tiukasti alas,
kunnes kuulet napsahduksen.
3 Tyhjennä vesisäiliö.

SUOMI 75
4 Vedä johdon ja letkun säilytyskela ulos.
5 Kiinnitä höyryletku ja virtajohto.
6 Höyrysäiliön kummallakin sivulla olevat kädensijat helpottavat
kantamista.
Ympäristöasiaa
Älä hävitä vanhoja laitteita tavallisen talousjätteen mukana, vaan
,
toimita ne valtuutettuun kierrätyspisteeseen. Näin autat vähentämään
ympäristölle aiheutuvia haittavaikutuksia.

SUOMI76
Takuu & huolto
Jos haluat lisätietoja tai laitteen suhteen on ongelmia, käy Philipsin Internetsivuilla osoitteessa www.philips.com tai ota yhteys Philipsin asiakaspalveluun
(puhelinnumero löytyy takuulehtisestä). Voit myös ottaa yhteyden Philipsmyyjään tai Philips Kodinkoneiden valtuuttamaan huoltoliikkeeseen tai
suoraan Philips Domestic Appliances and Personal Care BV:n huoltoosastoon.
Vianmääritys
Tähän kohtaan on koottu tavallisimmat ongelmat, joita höyrysilitysrautaa
käytettäessä saattaa tulla esiin. Katso tarkemmat ohjeet vastaavista
tekstikohdista. Ellei ongelma ratkea, ota yhteys Philipsin asiakaspalveluun.
Ongelma Syy Ratkaisu
Laite ei kuumene. Virtaa ei tule. Tarkasta virtajohto, pistoke ja
pistorasia.
Laitteen virta ei ole kytketty. Paina virtapainiketta (mallit GC8261/
GC8260/GC8220) tai siirrä virtakytkin
ON-asentoon (GC8210).
Valittu lämpötila on liian matala. Valitse korkeampi lämpötila.
Uudesta
höyrysilitysraudasta
tulee käryä, kun siihen
kytketään virta.
Höyrysilitysraudasta ei
tule höyryä.
Jotkut laitteen osat on öljytty
tehtaalla ja niistä voi alussa tulla
hieman käryä.
Vesisäiliössä ei ole tarpeeksi vettä. Täytä vesisäiliö (ks. Käyttöönotto,
Höyrysäiliö ei lämpene tarpeeksi
kuumaksi.
Valittu silityslämpötila on liian matala
höyrysilitykseen.
Ilmiö on täysin normaali ja se häviää
hetken kuluttua.
Irrotettavan vesisäiliön täyttö).
Odota noin 2 minuuttia. (vain mallit
GC8261/GC8260/GC8220: odota,
kunnes höyryvalo palaa tasaisesti).
Valitse lämpötilaksi 2 tai korkeampi.
Höyryasetus a (ei höyryä) on
valittuna (vain mallit GC8261/
GC8260/GC8220).
Vesisäiliötä ei ole kiinnitetty kunnolla
höyrysäiliöön.
Valitse höyryasetus ] (vähän höyryä),
[ (kohtuullisesti höyryä) tai p (paljon
höyryä).
Kiinnitä vesisäiliö höyrysäiliöön niin,
että kuulet napsahduksen.

Ongelma Syy Ratkaisu
SUOMI 77
Pohjasta tippuu
vesipisaroita.
Pohjasta tulee hiutaleita
ja epäpuhtauksia tai
pohja on likainen.
Laitteesta kuuluu
pumppaava ääni.
Silitysrauta tuottaa
höyryä jatkuvasti.
Pohjasta tulee likaista
vettä.
Höyryä purkautuu
CalcCleanhuuhteluaukon tulpan
juuresta, kun laite
kuumenee.
Kun on valittu hyvin korkea
lämpötila, muodostuva höyry on
kuivaa ja tuskin näkyvää. Se näkyy
vielä vähemmän, jos ympäristön
lämpötila on suhteellisen korkea,
ja se on täysin näkymätöntä, jos
lämpötila-asetukseksi on valittu
MAX.
Valittu silityslämpötila on liian matala
höyrysilitykseen.
Kun aloitat höyrysilitystä ja kun olet
välillä keskeyttänyt höyrysilityksen,
höyryletkussa oleva höyry on
jäähtynyt ja tiivistynyt vedeksi, minkä
vuoksi pohjasta tulee vesipisaroita.
Vedessä olevia epäpuhtauksia
tai kemikaaleja on kertynyt
höyrysilitysraudan höyryaukkoihin
ja/tai pohjaan.
Vettä pumpataan höyrysäiliöön. Tämä on normaalia.
Pumppaava ääni ei lakkaa. Irrota pistotulppa pistorasiasta heti
Höyrypainikkeen lukitus on käytössä. Aseta höyrypaineen lukituskytkin
Höyrysäiliöön on kertynyt liikaa
kalkkia ja epäpuhtauksia.
CalcClean-huuhteluaukon tulppa ei
ole kunnolla kiinni.
Voit tarkistaa, että höyryä todella
tulee, valitsemalla matalamman
lämpötila-asetuksen, esim. 2.
Valitse lämpötilaksi 2 tai korkeampi.
Tämä on täysin normaalia. Pidä
höyrysilitysrautaa vanhan kankaan
päällä ja paina höyrypainiketta, kun
aloitat (uudelleen) silittämisen. Odota
niin kauan kunnes pohjasta alkaa
veden asemesta tulla höyryä.
Puhdista pohja kostealla liinalla.
ja ota yhteys Philipsin valtuuttamaan
huoltoliikkeeseen.
asentoon OFF, jos haluat, että höyryä
tulee ainoastaan höyrypainiketta
painamalla (katso kohta Höyrypaineen
lukitus).
Huuhtele höyrysäiliö. Katso kohtaa
Puhdistus ja hoito.
Katkaise laitteesta virta, kiristä
CalcClean-huuhteluaukon tulppa ja
kytke laitteeseen uudelleen virta. Jos
höyryä purkautuu edelleen laitteen
kuumentuessa, katkaise laitteesta virta
ja ota yhteys Philipsin valtuuttamaan
huoltoon.

SUOMI78
Ongelma Syy Ratkaisu
Höyryä ei tule tarpeeksi
tai höyryn määrä
vaihtelee silityksen
aikana.
Vaatteeseen tulee
märkiä läikkiä silityksen
aikana.
Pohjasta tulee
vesipisaroita
höyrysuihkaustoimintoa
käytettäessä (vain mallit
GC8261/GC8260/
GC8220).
Höyryn määrä voi vähentyä laitteen
pumpatessa vettä boileriin. Tällöin
luultavasti vaikuttaa siltä, että höyryä
ei tule tarpeeksi. Ilmiö on kuitenkin
täysin normaali, ja höyryn määrä
palautuu normaaliksi muutamassa
sekunnissa.
Höyrysilityksen aikana vaatteeseen
ilmestyvät märät läikät voivat johtua
silityslaudalla tiivistyneestä höyrystä.
Kuivaa märät läikät silittämällä
niitä jonkin aikaa ilman höyryä. Jos
silityslaudan alapuoli on märkä, pyyhi
se kuivalla kankaalla.
Letkussa saattaa olla tiivistynyttä
höyryä, lämpötila saattaa olla alle
3, tai laite ei ehkä ole valmis
höyrysilitystä var ten.
Parhaan määrän höyryä saat
vapauttamalla höyrypaineen
lukituksen, kun et tarvitse höyryä ja
kun lasket höyrysilitysraudan kädestäsi.
Voit estää höyryn tiivistymisen
silityslaudalla käyttämällä silityslautaa,
jossa on metalliverkkopinnoite.
Varmista, että lämpötila on 3
tai korkeampi. Silitä muutaman
sekunnin ajan, ennen kuin käytät
höyrysuihkaustoimintoa.

FRANÇAIS
Introduction
Vous avez acheté une centrale vapeur Philips et nous vous en remercions.
Veuillez lire ces instructions, qui contiennent des informations concernant
les étonnantes fonctionnalités de cette centrale vapeur, ainsi que des
conseils de repassage.
La centrale vapeur pressurisée produit de la vapeur en continu an de
faciliter le repassage. Grâce à la grande capacité du réservoir d’eau, vous
pouvez repasser sans aucune interruption. Lorsque le réservoir est vide,
vous pouvez le retirer et le remplir.
Nous espérons que votre centrale vapeur vous donnera entière
satisfaction !
A Cordon d’arrivée de la vapeur
B Poignée ergonomique (GC8261/GC8260 uniquement)
C Thermostat
D Activateur de vapeur
E Verrou de vapeur
F Bouton de jet vapeur (GC8261/GC8260/GC8220 uniquement)
G Semelle
H Verrou de sécurité de rangement (GC8261/GC8260 uniquement)
I Support fer
J Réservoir d’eau amovible
K Godet de remplissage
L Crochet de rangement cordon et câble
M Bouchon Calc-Clean
N Orice de remplissage
O Levier de dégagement du réservoir d’eau
P Chaudière à vapeur
Q Bouton marche/arrêt avec voyant d’alimentation (GC8261/GC8260/
GC8220 uniquement)
R Poignée de transport
S Voyant de remplissage du réservoir d’eau (GC8261/GC8260/GC8220
uniquement)
T Voyant Calc-Clean (GC8261/GC8260 uniquement)
U Cordon d’alimentation
V Boutons vapeur (+/-) (GC8261/GC8260/GC8220 uniquement)
W Bloc de commande de la chaudière avec voyant de vapeur (GC8261/
GC8260/GC8220 uniquement)
p = vapeur maximale
[ = vapeur modérée
] = vapeur minimale
a = pas de vapeur
-
X Interrupteur marche/arrêt (GC8210 uniquement)
79
Important
Avant d’utiliser l’appareil, lisez les instructions ci-dessous et conservez ce
mode d’emploi pour un usage ultérieur.
Vériez que la tension indiquée sur la plaque signalétique correspond
,
bien à la tension secteur locale avant de brancher l’appareil.

FRANÇAIS80
Branchez l’appareil uniquement sur une prise murale avec mise à la
,
terre.
N’utilisez pas le fer à repasser si la che, le câble, le cordon
,
d’alimentation ou l’appareil lui-même est endommagé, si le fer est
tombé et/ou si de l’eau s’écoule de l’appareil.
Vériez régulièrement l’état du cordon d’alimentation et du cordon
,
d’arrivée de la vapeur.
Si le câble ou le cordon d’alimentation est endommagé, il doit être
,
remplacé par Philips ou par un Centre Service Agréé an d’éviter
tout accident.
Ne laissez jamais le fer à repasser sans surveillance pendant qu’il est
,
branché.
Ne plongez jamais le fer ni la chaudière dans l’eau.
,
Cet appareil n’est pas destiné à être utilisé par des personnes
,
(notamment des enfants) dont les capacités physiques, sensorielles
ou intellectuelles sont réduites, ou par des personnes manquant
d’expérience ou de connaissances, à moins que celles-ci ne soient
sous surveillance ou qu’elles aient reçu des instructions quant à
l’utilisation de l’appareil par une personne responsable de leur
sécurité.
Veillez à ce que les enfants ne puissent pas jouer avec l’appareil.
,
La semelle du fer à repasser peut devenir très chaude et peut par
,
conséquent provoquer des brûlures si vous la touchez.
Évitez tout contact entre le câble ou le cordon d’alimentation et la
,
semelle lorsqu’elle est chaude.
Veillez à toujours placer et utiliser le fer à repasser et la chaudière
,
sur une surface stable, plane et nivelée. Ne posez jamais la chaudière
sur la partie de la planche à repasser non prévue à cet effet.
Lorsque vous avez ni de repasser, pendant que vous nettoyez
,
l’appareil, que vous remplissez ou videz le réservoir d’eau, ou même
si vous laissez le fer sans surveillance pendant un bref instant, posez
le fer sur son support, éteignez l’appareil, puis débranchez-le du
secteur.
Si de la vapeur s’échappe du bouchon Calc-Clean lorsque
,
l’appareil chauffe, éteignez celui-ci et resserrez le bouchon. Si la
vapeur continue de s’échapper, éteignez l’appareil et contactez un
Centre Service Agréé Philips.
Ne fermez jamais la chaudière avec un autre bouchon que celui
,
fourni avec l’appareil, car il fonctionne également comme soupape de
sûreté.
Rincez régulièrement la chaudière en suivant les instructions du
,
chapitre « Nettoyage ».
Ne retirez jamais le bouchon Calc-Clean tant que la chaudière est
,
chaude.
Cet appareil est destiné à un usage domestique uniquement.
,
Champs électromagnétiques (CEM)
Cet appareil Philips est conforme à toutes les normes relatives aux champs
électromagnétiques (CEM). Il répond aux règles de sécurité établies
sur la base des connaissances scientiques actuelles s’il est manipulé
correctement et conformément aux instructions de ce mode d’emploi.

FRANÇAIS 81
Avant la première utilisation
Remarque : Le fer peut fumer légèrement lors de la première utilisation. Ce
phénomène est normal et cesse après un bref instant.
Remarque : Des particules peuvent s’échapper de la semelle lors de la
première utilisation. Ce phénomène est normal. Ces particules sont inoffensives
et disparaîtront après quelque temps.
Remarque : Lorsque vous allumez l’appareil, la chaudière à vapeur peut faire
un léger bruit, le temps du remplissage. Ce phénomène est normal. Ce bruit
vous indique que l’eau est pompée dans la chaudière.
1 Ôtez tout lm de protection ou étiquette de la semelle et nettoyez-
la avec un chiffon doux.
Avant utilisation
1
Placez la chaudière sur une surface stable et plane, par exemple sur
la partie solide d’une planche à repasser ou sur une table.
Remplissage du réservoir d’eau amovible
Le réservoir d’eau peut être rempli à tout moment pendant le
,
repassage.
Ne mettez pas d’eau chaude, de parfum, de vinaigre, d’amidon, de
détartrants ou d’autres agents chimiques dans le réservoir d’eau.
Ne remplissez pas le réservoir au-delà de la capacité maximale, sinon de
l’eau pourrait s’écouler de l’orice de remplissage lors de la réinsertion
du réservoir.
1 Retirez le réservoir d’eau amovible de la chaudière.
Si l’eau du robinet de votre région est très calcaire, il est conseillé de la
mélanger avec de l’eau distillée.
2 Remplissez le réservoir d’eau jusqu’au niveau MAX.
3 Repositionnez correctement le réservoir d’eau sur la chaudière (clic).
Si le réservoir n’est pas installé correctement, le fer ne produit aucune
vapeur.
Voyant de remplissage du réservoir d’eau
Dès que le réservoir est vide, le voyant se met à clignoter (GC8261/
,
GC8260/GC8220 uniquement) et il est impossible de continuer le
repassage à la vapeur.
Remplissez le réservoir d’eau. Le fer commence à dégager de la
,
vapeur dès que le réservoir a été replacé sur la chaudière.

On
On
FRANÇAIS82
Réglage de la température
1 Consultez l’étiquette d’instructions de repassage pour vérier la
température recommandée.
1 Fibres synthétiques (par ex. acrylique, viscose, polyamide) et soie
2 Laine
3 Coton
MAX Lin
-
2 Réglez le thermostat sur la position adéquate en le tournant vers
l’indication de température de votre choix.
3 GC8261/GC8260/GC8220 uniquement : branchez le cordon
d’alimentation sur la prise secteur et appuyez sur le bouton marche/
arrêt.
Le voyant de vapeur se met à clignoter.
Après environ 2 minutes, le voyant vapeur reste allumé de manière
continue : il indique que la chaudière est prête pour le repassage à la
vapeur.
4 GC8210 uniquement : branchez le cordon d’alimentation sur
une prise secteur, puis réglez l’interrupteur marche/arrêt sur On
(Marche).
Conseils
Si l’article est composé de bres différentes, sélectionnez toujours
-
la température exigée par la bre la plus délicate, c’est-à-dire la
température la plus basse. Si, par exemple, le tissu est composé de
60 % de polyester et de 40 % de coton, il doit être repassé à la
température indiquée pour le polyester ( 2).
Si vous ne connaissez pas la composition du tissu, repassez en
commençant par la température la plus basse sur une partie interne de
l’article et invisible de l’extérieur.
Soie, laine et autres bres synthétiques : repassez à l’envers an d’éviter
les taches.
Les tissus qui ont tendance à lustrer doivent être repassés dans un seul
sens (et au moyen d’une faible pression).
Commencez toujours par le repassage des articles en bres
synthétiques nécessitant la température la plus basse.
Pour refroidir le fer plus rapidement, appuyez sur le bouton vapeur
,
ou repassez un chiffon.
Utilisation de l’appareil
Repassage à la vapeur
Le câble peut devenir très chaud après une longue période de repassage.
Remarque : L’appareil peut parfois produire un bruit de pompe pendant le
repassage à la vapeur. Ce phénomène est normal. Ce bruit vous indique que
l’eau est pompée dans la chaudière.

FRANÇAIS 83
1 Assurez-vous qu’il y a sufsamment d’eau dans le réservoir.
2 Allumez l’appareil, puis sélectionnez la température de repassage
recommandée.
Vous pouvez repasser à la vapeur uniquement à des températures de
repassage supérieures à 2.
3 GC8261/GC8260/GC8220 uniquement : sélectionnez le réglage
de vapeur nécessaire au moyen des boutons + et - du bloc de
commande de la chaudière.
p pour une vapeur maximale (réglage de température MAX).
[ pour une vapeur modérée (réglages de température 3 à MAX).
] pour une vapeur minimale (réglages de température 2 à MAX).
a pour aucune vapeur (réglages de température 1 à MAX).
Le voyant de vapeur clignote an d’indiquer que la chaudière est en
,
train de chauffer.
Après environ 2 minutes, le voyant vapeur reste allumé de manière
continue : il indique que la chaudière est prête pour le repassage à la
vapeur.
Pendant le repassage à la vapeur, le voyant de vapeur se met à clignoter de
temps en temps : il indique que la chaudière est en train de chauffer an de
maintenir les niveaux adéquats de température et de pression.
Pendant le repassage, vous pouvez régler la quantité de vapeur au
,
moyen des boutons de vapeur + et -.
Quelques essais peuvent être nécessaires avant que la quantité de vapeur
ne soit correctement réglée.
4 Commencez le repassage à la vapeur en appuyant sur l’activateur de
vapeur.
Mettez le fer sur le talon ou posez-le sur son support lorsque vous ne
l’utilisez pas.
L’ouverture et la fermeture de la soupape de vapeur de la chaudière
,
produisent un son (clic). Ce phénomène est normal.
Fonction de verrou de vapeur
Le verrou de vapeur vous permet de repasser en continu sans qu’il vous
soit nécessaire d’appuyer sur l’activateur de vapeur.
1 Positionnez le verrou de vapeur sur On (Marche). Pour arrêter la
production de vapeur, repositionnez-le sur Off (Arrêt). Une fois que
le verrou de vapeur a été réglé sur Off, le fer produit de la vapeur
uniquement si vous appuyez sur l’activateur de vapeur.
Lorsque vous mettez le fer sur son talon ou sur le support, désactivez le
verrou de vapeur an d’empêcher que de la vapeur brûlante s’échappe du
fer et d’éviter de mouiller le support du fer.
Repassage sans vapeur
1 Commencez le repassage sans appuyer sur l’activateur de vapeur.

Off
FRANÇAIS84
2 GC8261/GC8260/GC8220 uniquement : vous pouvez également
sélectionner le réglage a (pas de vapeur), puis commencer votre
repassage.
Caractéristiques
Défroissage vertical
Ne dirigez en aucun cas le jet de vapeur sur des personnes.
Vous pouvez repasser les rideaux et les vêtements (vestes, costumes,
,
manteaux) en tenant le fer en position verticale et en appuyant sur
l’activateur de vapeur.
Jet vapeur (GC8261/GC8260/GC8220 uniquement)
Un jet de vapeur puissant est utile pour enlever les faux plis difciles à
éliminer.
1 Réglez le thermostat sur une position située entre 3 et MAX.
2 Appuyez sur le bouton de jet vapeur.
La fonction jet de vapeur doit être utilisée de temps en temps. Si des
,
gouttes d’eau s’écoulent de la semelle, faites chauffer le fer pendant
au moins une minute avant d’utiliser à nouveau la fonction jet de
vapeur.
Nettoyage et entretien
Après le repassage
1 Posez le fer sur le support, puis éteignez-le.
2 Assurez-vous que l’appareil a été débranché et que le fer a refroidi.
3 Nettoyez la semelle avec un chiffon humide et un détergent (liquide)
non abrasif.
4 Nettoyez la partie supérieure du fer à repasser avec un chiffon
humide.
5 Videz le réservoir après le nettoyage.

FRANÇAIS 85
Fonction Calc-Clean (anti-calcaire)
Ne retirez jamais le bouchon Calc-Clean tant que la chaudière est
chaude.
TRÈS IMPORTANT : rincez la chaudière une fois par mois ou toutes les
10 utilisations an d’éviter toute détérioration de l’appareil et garantir
un fonctionnement optimal.
1 Assurez-vous que l’appareil a été débranché et qu’il a refroidi
pendant au moins 2 heures.
2 Retirez le réservoir d’eau amovible.
3 Tenez bien la chaudière entre vos deux mains et secouez-la.
4 Faites basculer la chaudière sur le côté et retirez le bouchon Calc-
Clean.
5 Videz la chaudière en versant l’eau qu’elle contient dans l’évier.
6 Remplissez la chaudière avec de l’eau claire en utilisant le godet
prévu à cet effet, puis secouez-la de nouveau.

FRANÇAIS86
7 Videz de nouveau l’intérieur de la chaudière dans l’évier.
Répétez deux fois les étapes 6 et 7 pour un résultat optimal.
8 Vissez fermement le bouchon Calc-Clean sur la chaudière.
Voyant Calc-Clean (GC8261/GC8260 uniquement)
Lorsque la chaudière doit être rincée, le voyant Calc-Clean clignote
,
pendant 30 secondes.
La chaudière ne chauffera pas pendant ces 30 secondes.
1 Éteignez immédiatement l’appareil.
2 Utilisez la fonction Calc-Clean comme décrit ci-dessus.
N’utilisez pas la fonction Calc-Clean si la chaudière est chaude.
Rangement
Laissez toujours refroidir le fer avant de le ranger.
1 GC8261/GC8260 uniquement : insérez la tête du fer dans le verrou
de sécurité de rangement sur le support.
2 GC8261/GC8260 uniquement : appuyez fermement sur l’arrière du
fer (clic).
3 Videz le réservoir d’eau.

FRANÇAIS 87
4 Retirez le crochet de rangement.
5 Enroulez le câble et le cordon d’alimentation.
6 La chaudière est dotée de poignées pour faciliter le transport.
Environnement
Lorsqu’il ne fonctionnera plus, ne jetez pas l’appareil avec les ordures
,
ménagères mais déposez-le à un endroit assigné à cet effet, où
il pourra être recyclé. Vous contribuerez ainsi à la protection de
l’environnement.
Garantie et service
Si vous souhaitez obtenir des informations supplémentaires ou si vous
rencontrez un problème, visitez le site Web de Philips à l’adresse
www.philips.com ou contactez le Service Consommateurs Philips de
votre pays (vous trouverez le numéro de téléphone correspondant
sur le dépliant de garantie internationale). S’il n’existe pas de
Service Consommateurs Philips dans votre pays, renseignez-vous auprès
de votre revendeur local ou contactez le « Service Department of
Philips Domestic Appliances and Personal Care BV ».

FRANÇAIS88
Dépannage
Cette rubrique présente les problèmes les plus courants que vous pouvez
rencontrer avec votre fer à repasser. Veuillez consulter les différentes
sections pour plus d’informations. Si vous n’arrivez pas à résoudre le
problème, veuillez contacter le Service Consommateurs Philips de votre
pays.
Problème Cause Solution
L’appareil ne
chauffe pas.
De la fumée
s’échappe du fer
lors de la première
mise en marche de
l’appareil.
L’appareil ne
produit pas de
vapeur.
Il s’agit d’un problème de branchement. Vériez le cordon d’alimentation, la
che et la prise secteur.
Vous n’avez pas mis l’appareil sous
tension.
La température sélectionnée est trop
basse.
Certaines parties ont été légèrement
graissées et peuvent dégager un peu de
fumée lors de la première utilisation.
Il n’y a pas assez d’eau dans le réservoir
d’eau.
La chaudière n’a pas sufsamment chauffé. Patientez 2 minutes environ (GC8261/
La température de repassage sélectionnée
est trop basse pour le repassage à la
vapeur.
Le paramètre a (pas de vapeur) a été
sélectionné (GC8261/GC8260/GC8220
uniquement).
Le réservoir d’eau n’a pas été
correctement xé sur la chaudière.
Si le fer est réglé sur une température
très élevée, la vapeur produite est sèche
et quasiment invisible. Plus la température
ambiante est haute, moins la vapeur est
visible : elle sera complètement invisible si
la température est réglée sur MAX.
Appuyez sur le bouton marche/arrêt
(types GC8261/GC8260/GC8220) ou
réglez l’interrupteur marche/arrêt sur
On (Marche) (GC8210).
Sélectionnez une température plus
élevée.
Ce phénomène est normal et
s’arrêtera après un court instant.
Remplissez le réservoir d’eau
(voir « Avant utilisation », section
« Remplissage du réservoir d’eau
amovible »).
GC8260/GC8220 uniquement :
jusqu’à l’allumage continu du voyant
de vapeur).
Sélectionnez une température de 2
ou supérieure.
Sélectionnez le paramètre ] (vapeur
minimale), [ (vapeur modérée) ou p
(vapeur maximale).
Placez le réservoir d’eau sur la
chaudière (clic).
Pour vérier si le fer produit de
la vapeur, réglez le fer sur une
température inférieure, par ex. 2.

Problème Cause Solution
FRANÇAIS 89
Des gouttes d’eau
s’écoulent de la
semelle.
Des particules
de calcaire et
des impuretés
s’échappent de
la semelle ou la
semelle est sale.
Le fer produit un
bruit de pompe.
Le fer produit
de la vapeur en
continu.
L’eau s’écoulant de
la semelle est sale.
De la vapeur
s’échappe du
bouchon CalcClean lorsque
l’appareil chauffe.
L’appareil ne
produit pas
sufsamment de
vapeur/la quantité
de vapeur produite
varie pendant le
repassage à la
vapeur.
La température sélectionnée est trop
basse pour le repassage à la vapeur.
Lorsque vous commencez le repassage
à la vapeur ou si vous vous êtes arrêté
pendant un instant, la vapeur se condense
dans le cordon, laissant des gouttes d’eau
s’écouler de la semelle.
Des impuretés ou dépôts de calcaire se
sont formés sur les évents à vapeur et/ou
à l’intérieur de la semelle.
L’eau est pompée dans la chaudière. Ce phénomène est normal.
Le bruit de pompe ne s’arrête pas. Débranchez le fer
Le verrou de vapeur a été réglé sur On
(Marche).
La chaudière contient trop de calcaire/
minéraux.
Le bouchon Calc-Clean n’a pas été
correctement vissé.
Lorsque l’eau est pompée dans la
chaudière, il peut arriver que la quantité
de vapeur produite diminue. Ce
phénomène est probablement la raison
pour laquelle vous pensez que le fer ne
produit pas assez de vapeur, mais c’est
un phénomène parfaitement normal et la
production de vapeur se régularise après
quelques secondes.
Sélectionnez une température de 2
ou supérieure.
Ce phénomène est normal. Tenez le
fer au-dessus d’un chiffon et appuyez
sur l’activateur de vapeur dès que
vous commencez (ou recommencez)
le repassage. Patientez jusqu’à ce que
de la vapeur, et non plus de l’eau,
s’échappe de la semelle.
Nettoyez la semelle avec un chiffon
humide.
immédiatement et contactez un
Centre Service Agréé Philips.
Réglez le verrou de vapeur sur Off
(Arrêt) pour produire de la vapeur
uniquement si vous appuyez sur
l’activateur de vapeur (voir la section
« Fonction de verrou de vapeur »).
Rincez la chaudière. Voir le chapitre
« Nettoyage et entretien ».
Éteignez l’appareil, vissez
correctement le bouchon CalcClean et rallumez la centrale. Si
la vapeur continue de s’échapper,
éteignez l’appareil et contactez un
Centre Service Agréé Philips.
Pour optimiser la production de
vapeur, désactivez le verrou de vapeur
lorsque vous n’utilisez pas la fonction
Vapeur ou lorsque vous placez le fer
sur le talon.

FRANÇAIS90
Problème Cause Solution
Des zones
humides
apparaissent sur
le tissu pendant le
repassage.
Des gouttes
d’eau s’écoulent
de la semelle
lorsque j’utilise
la fonction Jet de
vapeur (GC8261/
GC8260/GC8220
uniquement).
Il peut arriver que la vapeur se condense
sur la planche à repasser, entraînant
l’apparition de zones humides sur vos
tissus lorsque vous repassez à la vapeur.
Repassez sans vapeur ces zones humides
le temps nécessaire à leur disparition.
Si l’envers de la planche à repasser est
également humide, séchez-le à l’aide d’un
chiffon sec.
De la vapeur s’est peut-être condensée
dans le cordon, la température réglée est
peut-être inférieure à 3 ou l’appareil
n’est peut-être pas prêt pour le repassage
à la vapeur.
Pour empêcher la condensation sur la
planche à repasser, utilisez une planche
à repasser métallique.
Assurez-vous que la température
est réglée sur 3 au minimum.
Repassez à la vapeur pendant
quelques secondes avant d’utiliser la
fonction Jet de vapeur.

ITALIANO
Introduzione
Vi ringraziamo per aver scelto questo sistema di stiratura di Philips. Vi
preghiamo di leggere queste istruzioni per l’uso, che contengono utili
informazioni sulle funzionalità dell’apparecchio e alcuni suggerimenti per
rendere la stiratura più semplice e agevole.
Per facilitare la stiratura questo potente sistema pressurizzato emette
costantemente il vapore e, grazie all’ampio serbatoio dell’acqua, vi consente
di stirare senza interruzioni. Quando il serbatoio è vuoto lo potete staccare
e riempire immediatamente.
Ci auguriamo che il prodotto sia di vostro gradimento.
91
A Tubo del vapore
B Impugnatura morbida (solo GC8261/GC8260)
C Termostato
D Pulsante vapore
E Blocco del vapore
F Pulsante Colpo di vapore (solo GC8261/GC8260/GC8220)
G Piastra
H Blocco di sicurezza (solo GC8261/GC8260)
I Supporto del ferro
J Serbatoio dell’acqua estraibile
K Misurino di riempimento
L Gancio di ssaggio del cavo e del tubo essibile
M Tappo del sistema Calc-Clean
N Foro di riempimento
O Pulsante di sgancio del serbatoio dell’acqua
P Serbatoio del vapore
Q Pulsante On/Off con spia di accensione (solo GC8261/GC8260/
GC8220)
R Impugnatura per il trasporto
S Spia di riempimento del serbatoio dell’acqua (solo GC8261/GC8260/
GC8220)
T Spia della funzione Calc-Clean (solo GC8261/GC8260)
U Cavo di alimentazione
V Pulsanti del vapore (+/-) (solo GC8261/GC8260/GC8220)
W Pannello di controllo del serbatoio del vapore con spia del vapore
(solo GC8261/GC8260/GC8220)
p = vapore massimo
[ = vapore moderato
] = vapore minimo
a = assenza di vapore
-
X Interruttore On/Off (solo GC8210)
Importante
Prima di utilizzare l’apparecchio, leggete attentamente le istruzioni e
conservatele per eventuali riferimenti futuri.
Prima di collegare l’apparecchio, controllate che la tensione indicata
,
sulla placchetta corrisponda a quella della rete locale.
Collegate l’apparecchio esclusivamente a una presa di messa a terra.
,

ITALIANO92
Non utilizzate l’apparecchio nel caso in cui la spina, il cavo di
,
alimentazione, il tubo del vapore o l’apparecchio stesso siano
danneggiati o in presenza di rotture o perdite dall’apparecchio.
Vericate periodicamente le condizioni del cavo di alimentazione e
,
del tubo del vapore.
Nel caso in cui il cavo di alimentazione o il tubo del vapore fossero
,
danneggiati devono essere sostituiti presso i centri autorizzati Philips,
i rivenditori specializzati oppure da personale opportunamente
qualicato, per evitare situazioni pericolose.
Non lasciate mai l’apparecchio incustodito quando è collegato alla
,
presa di corrente.
Non immergete mai il ferro o il serbatoio del vapore nell’acqua.
,
L’apparecchio non è destinato a persone (inclusi bambini) con
,
capacità mentali, siche o sensoriali ridotte, fatti salvi i casi in cui
tali persone abbiano ricevuto assistenza o formazione per l’uso
dell’apparecchio da una persona responsabile della loro sicurezza.
Adottate le dovute precauzioni per evitare che i bambini giochino
,
con l’apparecchio.
La piastra del ferro può surriscaldarsi eccessivamente e provocare
,
scottature se a contatto con la pelle.
Evitate che il cavo di alimentazione o il tubo del vapore vengano a
,
contatto con la piastra surriscaldata.
Appoggiate e utilizzate sempre sia il ferro che il serbatoio di vapore
,
su una supercie stabile e perfettamente piana. Non appoggiate il
serbatoio sulla parte morbida dell’asse da stiro.
Dopo aver utilizzato l’apparecchio, durante le operazioni di pulizia,
,
riempimento o svuotamento del serbatoio dell’acqua, oppure se
lasciate l’apparecchio incustodito anche per un breve periodo,
mettete il ferro sul supporto e scollegate la spina dalla presa a muro.
Nel caso di fuoriuscita di vapore dal tappo Calc-Clean durante la fase
,
di riscaldamento, spegnete l’apparecchio e stringete il tappo CalcClean. Nel caso il vapore continuasse a fuoriuscire durante la fase
di riscaldamento, spegnete l’apparecchio e rivolgetevi a un Centro
autorizzato Philips.
Per il serbatoio di vapore, utilizzate esclusivamente il tappo fornito
,
con l’apparecchio: il tappo originale funziona anche da valvola di
sicurezza.
Pulite il serbatoio del vapore regolarmente, seguendo le istruzioni
,
riportate nel capitolo “Pulizia”.
non togliete mai il tappo del sistema Calc-Clean quando il serbatoio
,
del vapore è caldo.
Questo apparecchio è destinato esclusivamente a uso domestico.
,
Campi elettromagnetici (EMF)
Questo apparecchio Philips è conforme a tutti gli standard relativi ai campi
elettromagnetici (EMF). Se utilizzato in modo appropriato seguendo le
istruzioni contenute nel presente manuale utente, l’apparecchio consente
un utilizzo sicuro come confermato dai risultati scientici attualmente
disponibili.

ITALIANO 93
Prima di utilizzare l’apparecchio per la prima volta
Nota: la prima volta che usate il ferro, potreste notare la fuoriuscita di vapore.
Si tratta di un fenomeno del tutto normale, destinato a scomparire in poco
tempo.
Nota: la prima volta che usate il ferro potrebbero fuoriuscire dalla piastra
alcune particelle bianche. Si tratta di un fenomeno del tutto normale, le
particelle sono innocue e la loro fuoriuscita cesserà nel giro di poco tempo.
Nota: quando accendete l’apparecchio, dal serbatoio del vapore potrebbe
fuoriuscire un rumore di pompaggio, che non è sintomo di alcuna anomalia
poiché indica che l’acqua viene pompata nel serbatoio del vapore.
1 Rimuovete eventuali adesivi o fogli di protezione dalla piastra e pulite
quest’ultima con un panno morbido.
Predisposizione dell’apparecchio
1
Appoggiate il serbatoio del vapore su una supercie stabile e
perfettamente piana, ad esempio sulla parte rigida dell’asse da stiro o
sul tavolo.
Riempimento del serbatoio dell’acqua estraibile
Il serbatoio dell’acqua può essere riempito in qualsiasi momento
,
durante la stiratura.
non aggiungete acqua calda, profumo, aceto, amido, agenti disincrostanti,
prodotti per la stiratura o altre sostanze chimiche al serbatoio dell’acqua.
non riempite eccessivamente il serbatoio dell’acqua per evitare che
l’acqua fuoriesca dal foro di riempimento quando reinserite il serbatoio.
1 Estraete il serbatoio dell’acqua dal serbatoio del vapore.
nel caso l’acqua della vostra zona fosse particolarmente dura, vi
consigliamo di miscelarla con la stessa quantità di acqua distillata.
2 Riempite d’acqua il serbatoio no al livello massimo.
3 Reinserite il serbatoio dell’acqua nel serbatoio del vapore facendolo
scattare in posizione.
se il serbatoio dell’acqua non è in posizione corretta il ferro non emette
vapore.
Spia di riempimento del serbatoio dell’acqua
Quando il serbatoio dell’acqua è vuoto, la relativa spia lampeggia
,
(solo GC8261/GC8260/GC8220) e non è più possibile stirare a
vapore.

On
On
ITALIANO94
Riempite il serbatoio dell’acqua. Il ferro inizierà a erogare vapore
,
non appena il serbatoio dell’acqua verrà reinserito correttamente nel
serbatoio del vapore.
Impostazione della temperatura
1 Vericate sull’etichetta del capo la temperatura di stiratura richiesta.
1 Tessuti sintetici (ad esempio acrilico, viscosa, poliammide) e seta
2 Lana
3 Cotone
Lino MAX
-
2 Impostate la temperatura richiesta ruotando il termostato nella
posizione appropriata.
3 Solo GC8261/GC8260/GC8220: inserite la spina in una presa di
corrente con messa a terra e premete una volta il pulsante On/Off.
La spia del vapore inizia a lampeggiare.
Dopo circa 2 minuti, la spia del vapore rimane accesa a luce ssa, a indicare
che il serbatoio del vapore è pronto per la stiratura.
4 Solo GC8210: inserite la spina nella presa di corrente e accendete
l’interruttore del ferro.
Consigli
Se l’articolo è composto da vari tipi di bre, selezionate sempre la
-
temperatura richiesta per la bra più delicata, ovvero la temperatura
più bassa. Se, ad esempio, il tessuto è costituito per il 60% da poliestere
e il 40% da cotone, deve essere stirato alla temperatura indicata per il
poliestere ( 2).
Se non si conosce il tessuto del capo da stirare, si consiglia di stirare un
angolo nascosto per determinare la temperatura più indicata.
Seta, lana e bre sintetiche: stirate il capo a rovescio per evitare aloni
lucidi.
I tessuti che tendono a formare aloni bianchi dovrebbero essere stirati
solamente in una direzione (servendosi di un panno) esercitando
inoltre pochissima pressione.
Iniziate a stirare i capi che richiedono una temperatura di stiratura più
bassa, ad esempio i tessuti sintetici.
Per far raffreddare più rapidamente il ferro, fate fuoriuscire il vapore
,
oppure passate il ferro su un panno.
Modalità d’uso dell’apparecchio
Stiratura a vapore
il tubo del vapore può diventare bollente se la stiratura si prolunga per
diverso tempo.

ITALIANO 95
Nota: a volte, durante la stiratura a vapore, dal sistema fuoriesce un rumore di
pompaggio, che non è sintomo di alcuna anomalia poiché indica che l’acqua
viene pompata nel serbatoio del vapore.
1 Controllate che ci sia abbastanza acqua nel serbatoio.
2 Accendete il ferro e selezionate la temperatura di stiratura
consigliata.
La stiratura a vapore è possibile solo a temperature superiori a 2.
3 Solo GC8261/GC8260/GC8220: selezionate l’impostazione di vapore
richiesta tramite i pulsanti + e - situati nel pannello di controllo del
serbatoio del vapore.
p per il vapore massimo (temperatura impostata su MAX).
[ per un vapore moderato (temperatura compresa tra 3 e MAX).
] per il vapore minimo (temperatura compresa tra 2 e MAX).
a per stirare in assenza di vapore (temperatura compresa tra 1 e MAX).
La spia del vapore lampeggia per indicare che il serbatoio del vapore
,
si sta riscaldando.
Dopo circa 2 minuti, la spia del vapore rimane accesa a luce ssa, a indicare
che il serbatoio del vapore è pronto per la stiratura.
Durante la stiratura a vapore, la spia del vapore si accende di quando in
quando a indicare che il serbatoio si sta riscaldando per mantenere la
pressione e la temperatura corrette.
Durante la stiratura potete regolare le impostazioni del vapore
,
utilizzando gli appositi pulsanti + e -.
La regolazione della quantità di vapore richiederà qualche minuto.
4 Per iniziare a stirare a vapore premete il pulsante del vapore.
Quando appoggiate il ferro durante la stiratura, mettetelo in posizione
verticale o sull’apposito suppor to.
L’apertura e la chiusura della valvola del vapore nel serbatoio vapore
,
provoca un ticchettio. Si tratta di un fenomeno del tutto normale.
Funzione di blocco del vapore
Il blocco del vapore consente di stirare a vapore senza dover premere
continuamente il relativo pulsante.
1 Portate il blocco del vapore in posizione “on”. Per interrompere il
vapore, riportate il blocco in posizione “off”. Se il blocco del vapore
è impostato su “off”, il ferro emette vapore solo quando premete
l’apposito pulsante.
Quando appoggiate il ferro verticalmente o sull’apposito suppor to,
rilasciate il blocco del vapore. In questo modo evitate che dal ferro
fuoriesca inavvertitamente del vapore o che il suppor to del ferro venga
bagnato.
Stiratura senza vapore
1 Iniziate a stirare senza premere il pulsante del vapore.

Off
ITALIANO96
2 Solo GC8261/GC8260/GC8220: volendo potete anche selezionare
l’impostazione di vapore a (assenza di vapore) e iniziare a stirare.
Caratteristiche
Stiratura a vapore in verticale
non puntate mai il getto di vapore verso le persone.
Potete stirare a vapore tende e vestiti appesi (giacche, abiti, cappotti)
,
tenendo il ferro in posizione verticale e premendo il pulsante del
vapore.
Pulsante Colpo di vapore (solo GC8261/GC8260/GC8220)
Un potente getto di vapore consente di eliminare le pieghe più ostinate.
1 Impostate il termostato a una temperatura compresa fra 3 e
MAX.
2 Premete e rilasciate il pulsante Colpo di vapore.
La funzione Colpo di vapore non deve essere utilizzata senza
,
interruzione. Se dalla piastra fuoriescono goccioline d’acqua,
lasciate riscaldare il ferro per almeno un minuto prima di utilizzare
nuovamente questa funzione.
Pulizia e manutenzione
Al termine della stiratura
1 Appoggiate il ferro sul supporto e spegnetelo.
2 Togliete la spina dalla presa e lasciate raffreddare il ferro.
3 Eliminate il calcare ed eventuali altri residui dalla piastra con un
panno umido e un detergente (liquido) non abrasivo.
4 Pulite la parte superiore del ferro con un panno umido.
5 Svuotate il serbatoio dell’acqua dopo la pulizia.

ITALIANO 97
Funzione Calc-Clean
non togliete mai il tappo del sistema Calc-Clean quando il serbatoio del
vapore è caldo.
MOLTO IMPORTANTE: risciacquate il serbatoio del vapore una volta al
mese o dopo 10 utilizzi per evitare danni all’apparecchiatura e assicurare
prestazioni ottimali.
1 Assicuratevi che il ferro sia stato scollegato dalla presa di corrente e
che si sia raffreddato per oltre due ore.
2 Estraete il serbatoio dell’acqua.
3 Afferrate il serbatoio del vapore con entrambe le mani e scuotetelo.
4 Girate il serbatoio del vapore su un lato e togliete il tappo del
sistema Calc-Clean.
5 Svuotate il serbatoio del vapore versando l’acqua residua nel lavello.
6 Riempite il serbatoio del vapore con acqua corrente utilizzando
l’apposito misurino, quindi scuotetelo di nuovo.

ITALIANO98
7 Svuotate nuovamente il serbatoio nel lavello.
Per un risultato ottimale, ripetete per due volte i passaggi 6 e 7.
8 Riavvitate a fondo il tappo del sistema Calc-Clean sul serbatoio del
vapore.
Spia della funzione Calc-Clean (solo GC8261/GC8260)
Quando occorre pulire il serbatoio del vapore la spia della funzione
,
Calc-Clean lampeggia per 30 secondi.
Durante questi 30 secondi il serbatoio del vapore non viene riscaldato.
1 Spegnete subito l’apparecchio.
2 Utilizzate la funzione Calc-Clean secondo la procedura descritta
sopra.
non utilizzate la funzione Calc-Clean quando il serbatoio del vapore è
caldo.
Come riporre l’apparecchio
lasciate raffreddare sempre il ferro prima di riporlo.
1 Solo GC8261/GC8260: inserite la punta del ferro dentro il blocco di
sicurezza del supporto.
2 Solo GC8261/GC8260: premete energicamente verso il basso la
parte posteriore del ferro facendola scattare in posizione.
3 Svuotate il serbatoio dell’acqua.

ITALIANO 99
4 Estraete il gancio di ssaggio del cavo e del tubo essibile.
5 Fissate il tubo del vapore e il cavo di alimentazione.
6 Per facilitare il trasporto, il serbatoio del vapore è dotato di maniglie
su entrambi i lati.
Tutela dell’ambiente
Per contribuire alla tutela dell’ambiente, non smaltite l’apparecchio
,
tra i riuti domestici ma consegnatelo a un centro di raccolta
ufciale.
Garanzia e assistenza
Per ulteriori informazioni o eventuali problemi visitate il sito di Philips
all’indirizzo www.philips.com o contattate il Centro Assistenza Clienti
Philips locale (il numero di telefono è riportato nell’opuscolo della
garanzia). Qualora non fosse disponibile un Centro Assistenza Clienti locale,
rivolgetevi al rivenditore autorizzato Philips oppure contattate il Reparto
assistenza Philips Domestic Appliances & Personal Care BV.

ITALIANO100
Risoluzione dei guasti
In questo capitolo vengono riportati i problemi più ricorrenti riscontrati
durante l’uso del ferro. Per ulteriori dettagli, vi preghiamo di leggere i diversi
capitoli. Nel caso non riusciste a risolvere il problema, vi preghiamo di
contattare il Centro Assistenza Clienti Philips locale.
Problema Causa Soluzione
L’apparecchio non
si scalda.
Quando accendo
il ferro nuovo, esce
del fumo.
Il ferro non emette
vapore.
È presente un problema di alimentazione. Vericate il cavo di alimentazione, lo
spinotto e la presa a muro.
L’apparecchio non è stato acceso. Premete il pulsante On/Off (modelli
GC8261/GC8260/GC8220) o
impostate l’interruttore On/Off su On
(GC8210).
La temperatura selezionata è troppo
bassa.
Alcune parti dell’apparecchio sono
state leggermente lubricate in fabbrica
e le prime volte possono provocare
una leggera fuoriuscita di fumo quando
vengono riscaldate.
Non c’è abbastanza acqua nel serbatoio. Riempite il serbatoio dell’acqua
Il serbatoio del vapore non è
sufcientemente caldo.
La temperatura selezionata è troppo
bassa per la stiratura a vapore.
È stata selezionata l’impostazione di
vapore a (assenza di vapore) (solo
GC8261/GC8260/GC8220).
Il serbatoio dell’acqua non è stato inserito
correttamente nel serbatoio del vapore.
Se il ferro è stato impostato su una
temperatura molto elevata, il vapore
prodotto risulterà secco e poco visibile.
Sarà ancora meno visibile in caso di
temperatura ambiente relativamente
elevata e diventerà del tutto invisibile nel
caso la temperatura sia stata impostata
su MAX.
Selezionate una temperatura più alta.
Si tratta di un fenomeno del tutto
normale, destinato a scomparire in
poco tempo.
(vedere il capitolo “Predisposizione
dell’apparecchio”, sezione
“Riempimento del serbatoio
dell’acqua”).
Attendete circa 2 minuti (solo
GC8261/GC8260/GC8220: nché la
spia del vapore rimane accesa a luce
ssa).
Selezionate una temperatura pari a
2 o superiore.
Selezionare l’impostazione di vapore
] (vapore minimo), [ (vapore
moderato) o p (vapore massimo).
Inserite correttamente il serbatoio
dell’acqua nel serbatoio del vapore
facendolo scattare in posizione.
Per controllare che il ferro stia
effettivamente erogando vapore,
impostate l’apparecchio su una
temperatura inferiore, ad esempio 2.
 Loading...