


HD 7259/60
HD 7259/60

English Page 3
Français Page 8
Deutsch Seite 13
Nederlands Pagina 18
Italiano Pagina 23
Español Página 28
Português Página 33
2
• Before connecting the appliance, please
check if the voltage indicated on the
appliance corresponds with the mains
voltage in your home.
• Do not place the appliance on a hot surface.
• Remove the mains plug from the wall
socket:
- if problems occur during making coffee;
- before cleaning the appliance.
• Do not allow the mains cord to come into
contact with hot surfaces.
• Use the appliance out of children's reach.
Prevent them from pulling the mains cord.
• Never use the appliance if the mains plug,
the mains cord or the appliance itself is
damaged.
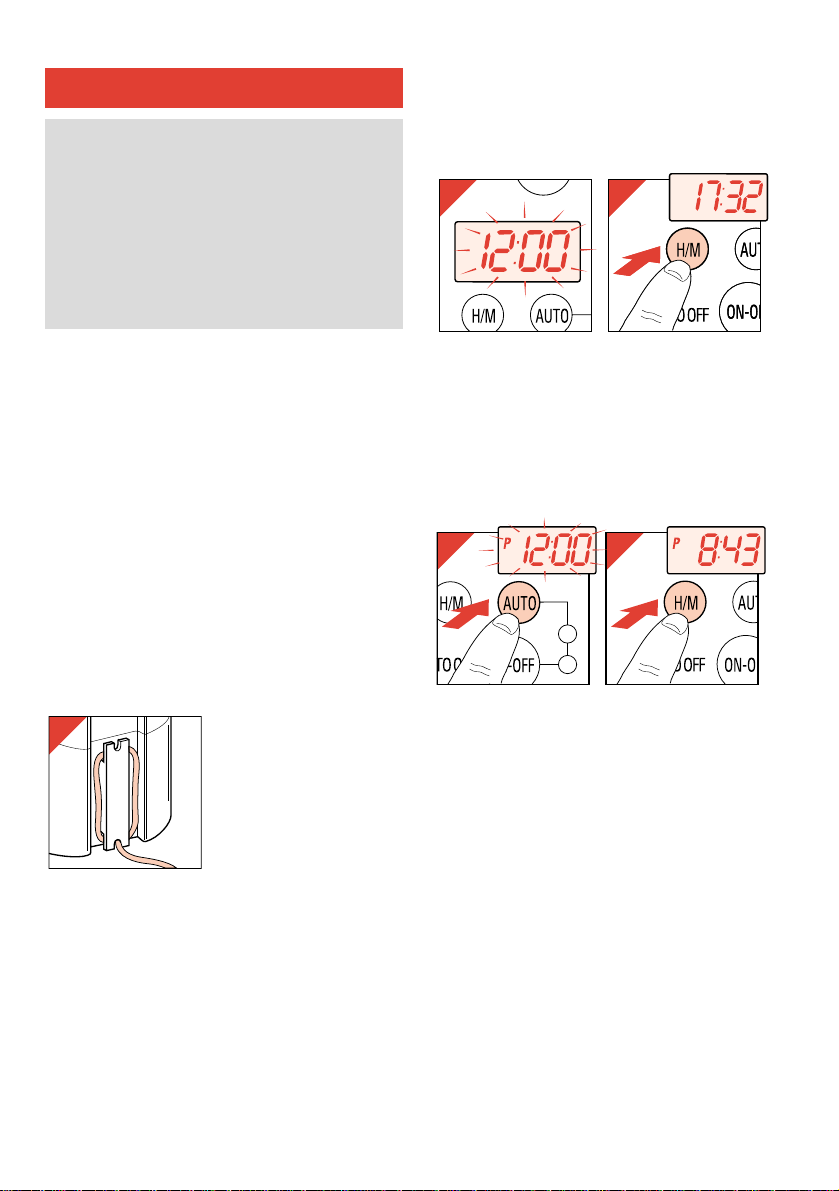
Mains cord storage
Excess mains cord can
be stored at the back of
the coffee maker (fig.1).
Setting the time of day
You can choose either a 24-hour scale or a
12-hour scale.
24-hour scale
- Insert the mains plug into a mains outlet. In the
display 12:00 will be blinking (fig. 2).
- Press button H/M to set the actual time (fig. 3).
The time indication will scroll rapidly.
- For fine setting/adjustment: depress button H/M
shortly a number of times.
12-hour scale
- Insert the mains plug into a mains outlet while
keeping button AUTO depressed.
In the display P12:00 will be blinking (fig. 4).
- Press button H/M to set the actual time (fig. 5).
The time indication will scroll rapidly.
- For fine setting/adjustment: depress button H/M
shortly a number of times.
Note: P (for "Post Meridiem") will only be
displayed between midday and midnight.
English
3
This coffee maker features automatic switch-
on at a preset time. To obtain this, the time of
day and the automatic switch-on time must
be set and the AUTO mode must be
selected. (The corresponding yellow pilot
light will illuminate.)
But it is also possible to start brewing right-
away by pressing the ON/OFF button. (The
corresponding red pilot light will illuminate.)
54
2
3
3
1
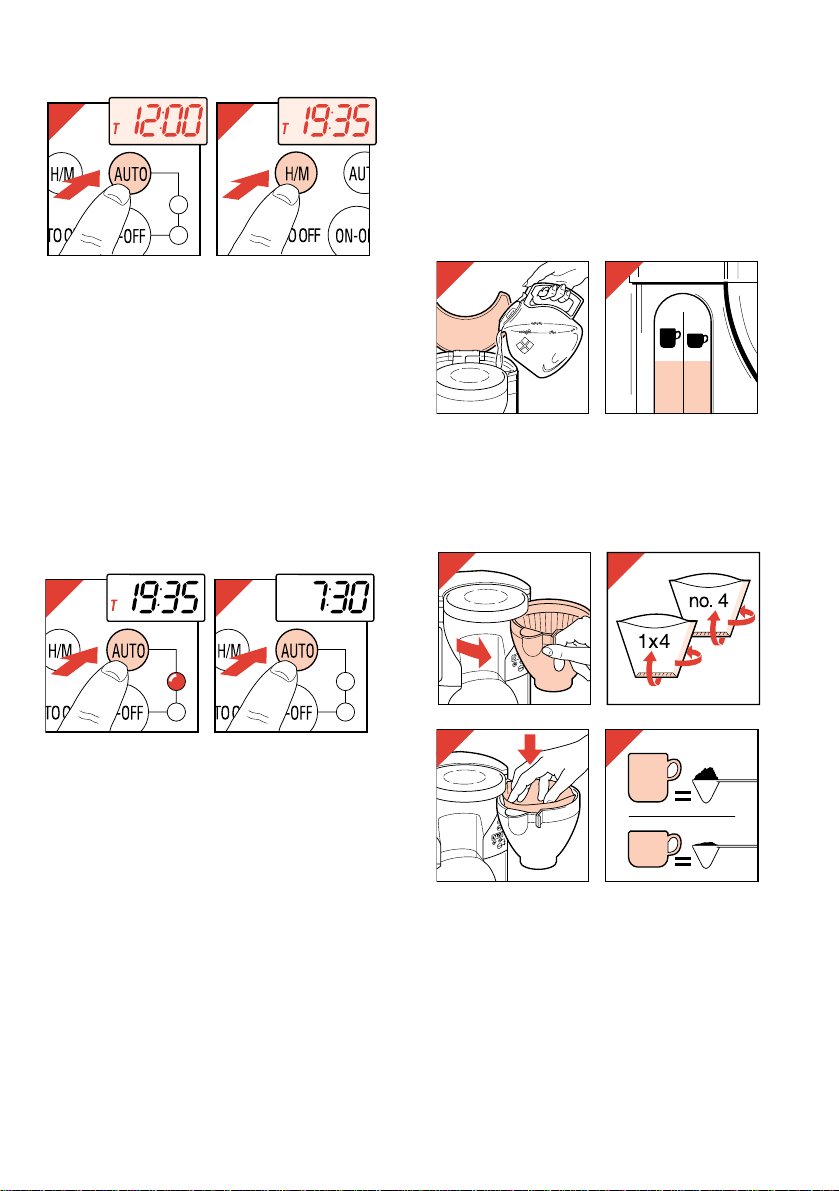
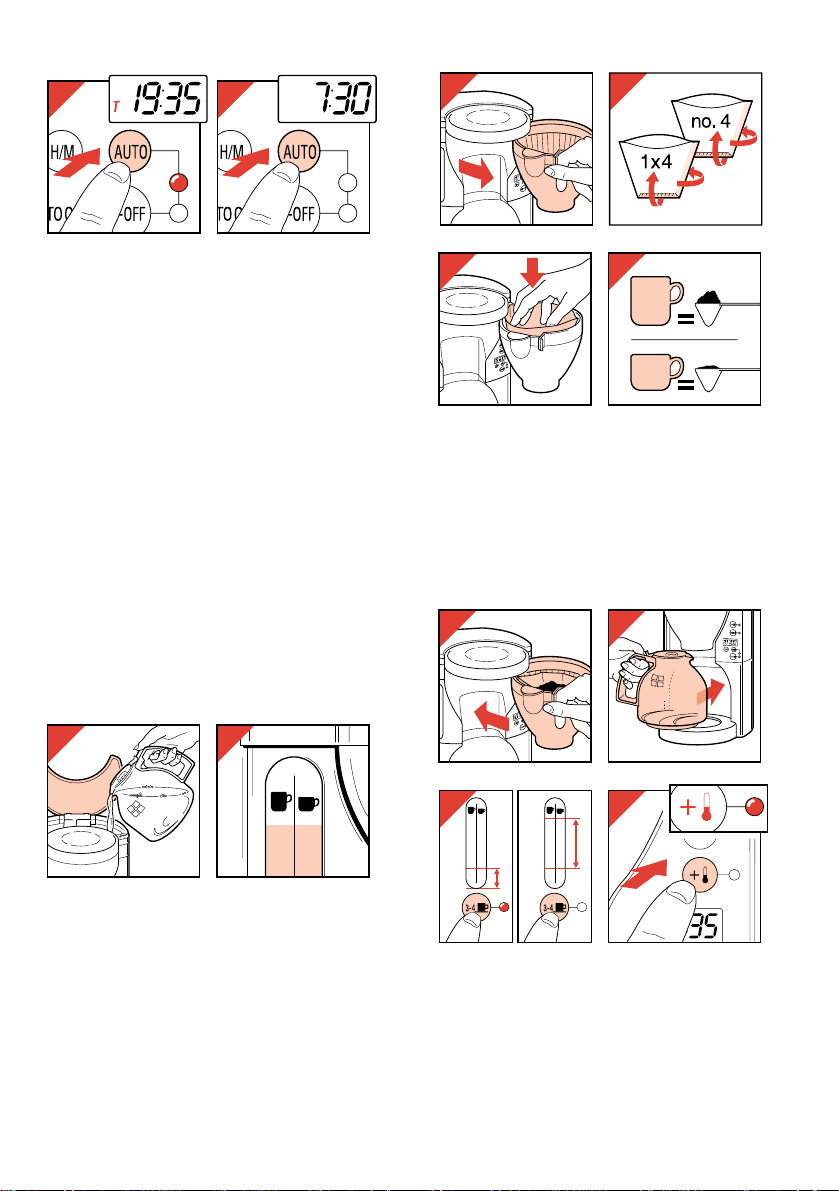
Setting the automatic switch-on time
- Press button AUTO (fig. 6).
In the display T 12.00 will be visible.
- Press button H/M to set the automatic switch-on
time (fig. 7). The time indication will scroll
rapidly.
- For fine setting/adjustment: depress button H/M
shortly a number of times.
- Release the H/M button when ready. The time
of day (without T) will become visible again
after 10 seconds.
• The colon (:) will not blink while the automatic
switch-on time is being displayed.
• If you wait too long (i.e.longer than about 10
seconds) before entering the automatic switch-
on time, the clock will automatically switch back
to the time of day reading.
• You can always check the automatic switch-on
time by pressing button AUTO (fig. 8). The
yellow pilot light comes on and T appears.
Unless you want the appliance to start operating
at the set time, do not forget to press button
AUTO again to leave the automatic switch-on
mode (fig. 9). (Yellow pilot light goes out.)
• You need not reset the automatic switch-on time
each time you wish to operate the coffee maker
automatically: the setting is stored until you
change it.
• Reset the time of day and the timer after an
electricity breakdown or when the appliance has
been unplugged.
Before first use
- Operate the appliance without adding ground
coffee to the filter. (See section “Making coffee”.)
- Next, clean the removable parts as described in
section “Cleaning”.
Making coffee (fig. 10 - 26)
- To fill the water tank use fresh cold water only
(fig 10).
The left hand side level indications correspond
to large cups (125 ml or 0.22 pint).
The right hand side level indications correspond
to smaller cups (85 ml or 0.15 pint) (fig 11).
- Use filter paper type “1x4 “ or “no. 4”. Do not
forget to fold the bottom and side seals (fig. 13).
With some models a permanent filter is supplied.
Paper filters are then not required.
- For large cups: take one full (heaped) measuring
spoonful of ground coffee (“fast filter” type) for
each cup.
For smaller cups: one level measuring spoonful
for each cup (fig 15).
4
15
14
13
12
10
11
14
13
12
15
8
9
10
8 9
6 7
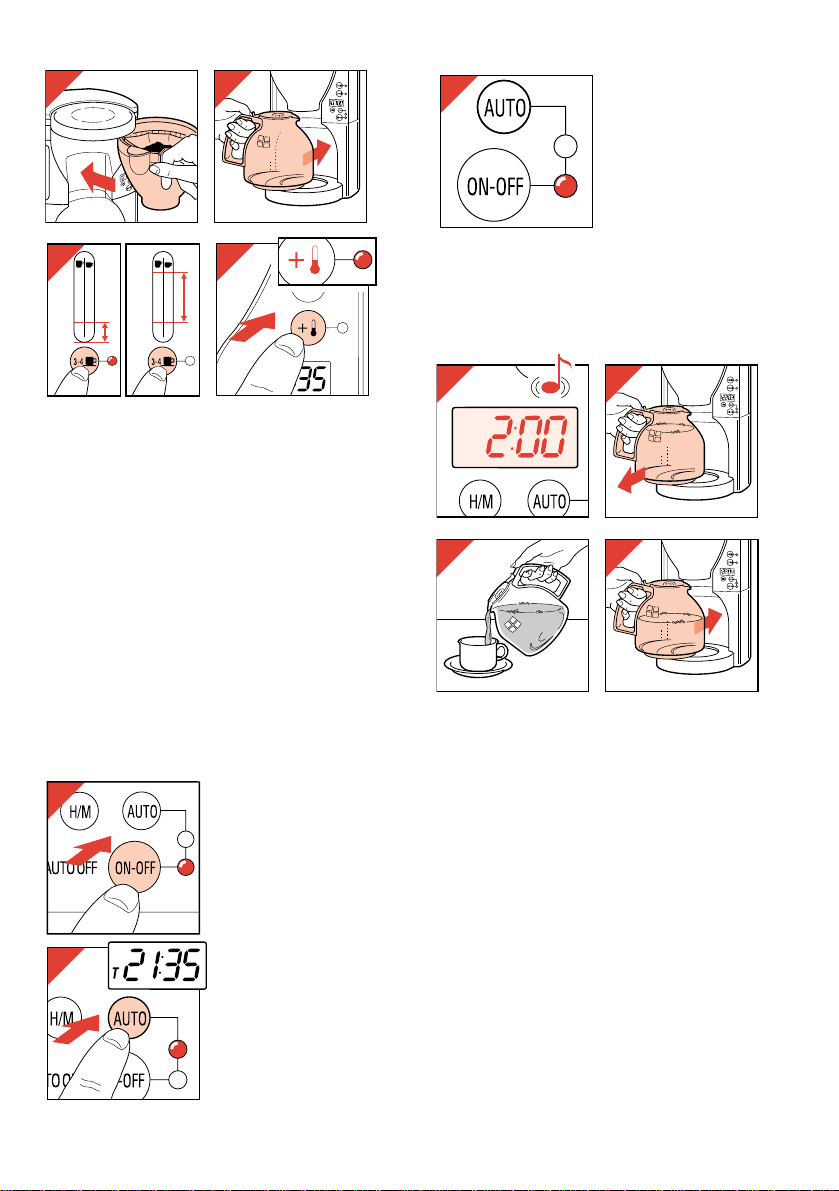
- Up to 4 large (or 6 small) cups of coffee: press
button 3-4 k to make the corresponding red
pilot light come on.
More than 4 large (or 6 small) cups of coffee:
press button 3-4 k to make the corresponding
red pilot light go out (fig. 18).
Note: After setting the appliance to brewing a
small quantity (red pilot light on), do not forget to
reset this button if you want to make a larger
quantity (red pilot light off). If this has been
forgotten, the appliance may incorrectly indicate
that it needs descaling. (See section "Descaling".)
- You may press button EXTRA $ to adjust the
hotplate temperature to your personal
preference (fig. 19). The hotplate temperature is
at maximum if the pilot light is on.
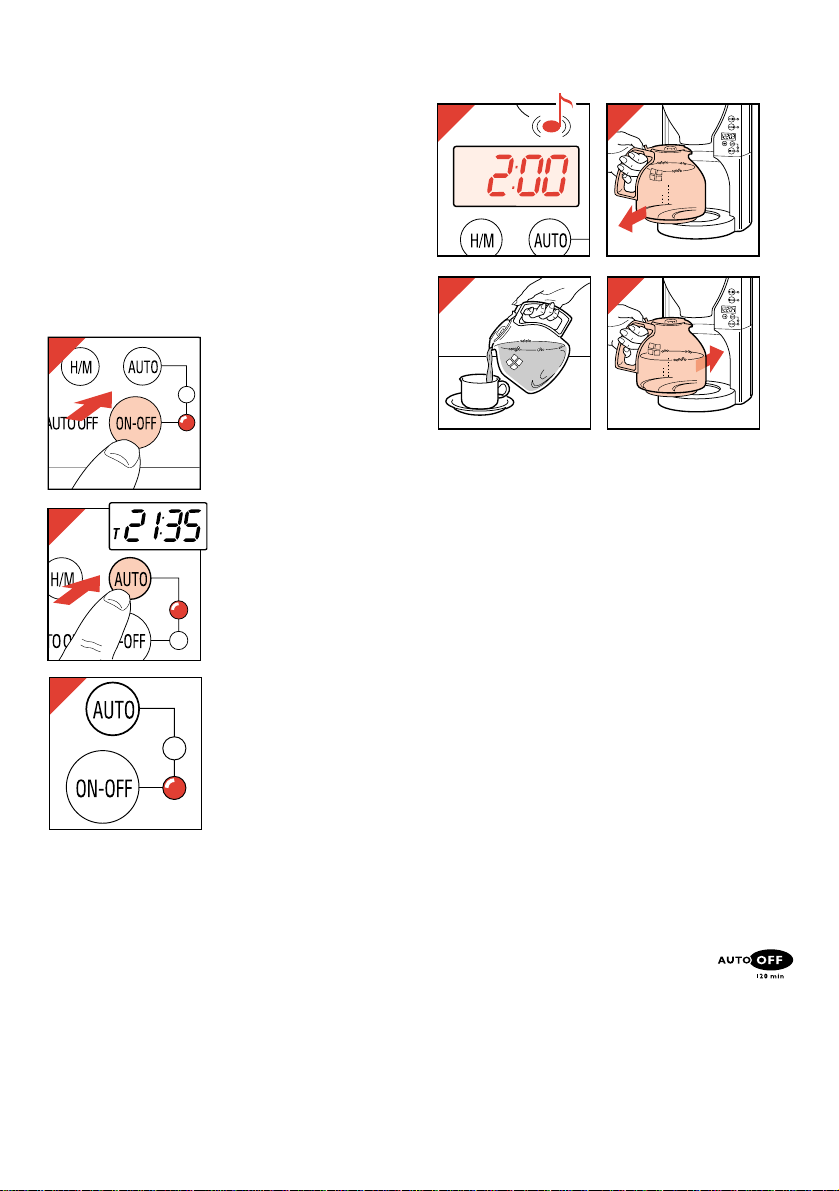
• Switching on
Press button ON/OFF if
you want the coffee
maker to start brewing
rightaway. (Thus without
using the timer) (fig.
20).The corresponding
red pilot light will come
on .
Press button AUTO if
you want the coffee
maker to switch on
automatically at the
set time (within 24 hrs)
(fig. 21). The
corresponding yellow
pilot light will come on.
When the appliance is
switched on automati-
cally, the corresponding
red pilot light will come
on and the yellow light
will go out (fig. 22).
• Hotkeeping time
- As long as the appliance is plugged in, the
display will show the time of day reading (after
you have set this).
- However, when the coffee maker has finished
brewing the time of day reading will be
replaced by 2:00. You can then hear a sound
signal (fig. 23).
The hotkeeping time (max. 2 hours) is counted
down: so the display will inform you how fresh
your coffee is.
After 0:01 the coffee maker switches off
automatically and the normal time of day is
displayed again.
Special features
• “Pre-moistening”. After about a minute of
brewing the coffee maker will stop pumping hot
water. The first amount of hot water then is
allowed to act on the ground coffee (= “simmer-
ing”). The aromatic substances of the ground
coffee are then better released, which
considerably enhances the taste and flavour of
the coffee.
5
25
26
23
24
22
21
20
19
16
17
18
14
13
12
11
10
9
8
7
6
5
4
15
3
4
5
6
7
8
9
10
14
13
12
11
10
9
8
7
6
5
4
15
3
4
5
6
7
8
9
10
• “Drip-stop”. The automatic stop-valve ensures
that no coffee will drip on to the hotplate if the
jug is removed from the appliance for a moment
during the brewing process or if the jug is
removed after making coffee.
Note: the drip-stop will only allow coffee to
flow into the jug if the jug lid has been placed.
• Automatic power shut-off.
For your convenience, and also for
extra safety: if you have not switched
off the coffee maker, it will switch off
automatically after 2 hours.
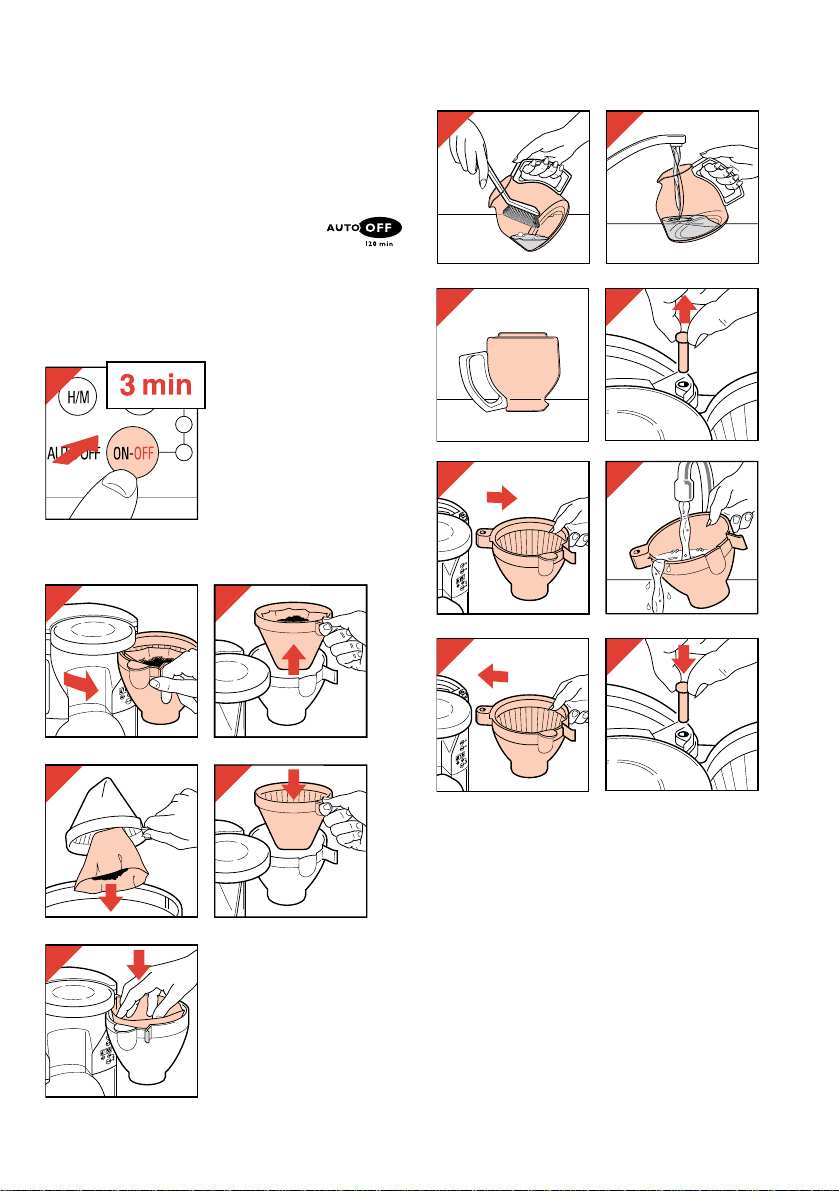
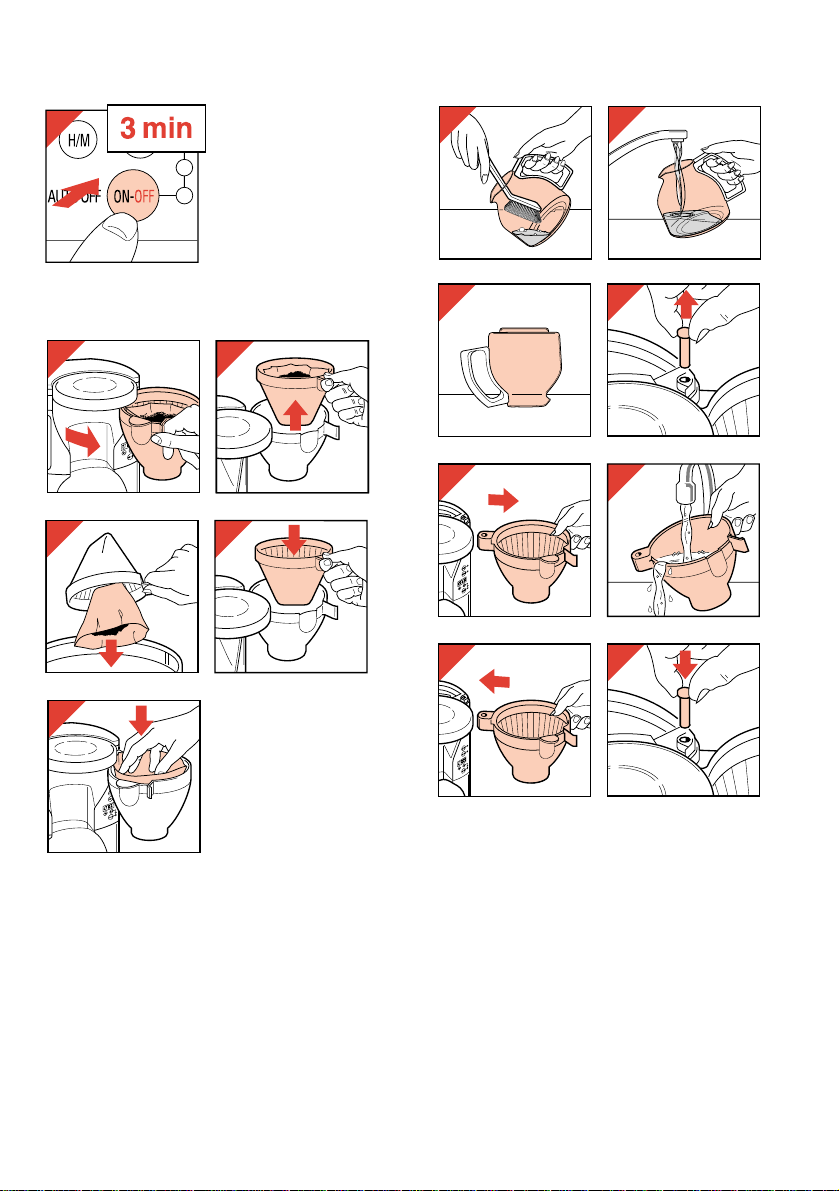
Making more coffee straight away?
If you have made one jug
of coffee and wish to
make some more
straight away, please
switch the coffee maker
off (fig. 27) and allow
about three minutes for it
to cool down. Then you
can refill the water tank.
After use
Cleaning (fig. 33 - 40)
- Always remove the mains plug from the wall
socket before cleaning the appliance.
• Never immerse the appliance in water. You
should clean it with a damp cloth.
• The removable items should be washed in hot
soapy water. Rinse with clean hot water and dry.
These items can also be cleaned in a
dishwasher.
To take out the outer filter holder first remove
the axis (fig. 36). Do not mislay the axis!
6
39
40
37
38
36
35
33
34
32
31
30
28
29
27
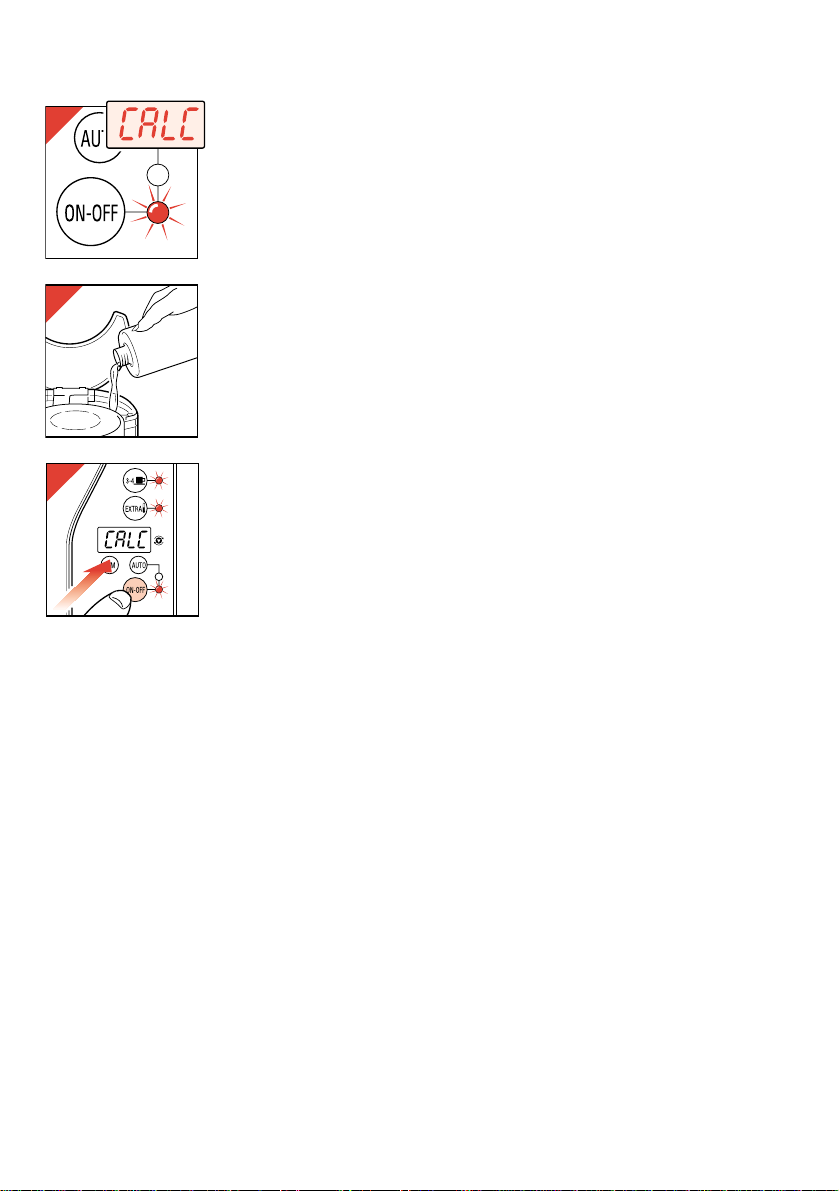
Descaling
If pilot light ON/OFF
starts blinking and the
word CALC alternates
with the actual time
reading (fig. 41), your
appliance needs
descaling.
Fill the water tank with
ordinary vinegar and do
not place a filter with
ground coffee (fig. 42).
Press and hold the on/off
switch for three seconds
when switching on. The
three red pilot lights will
start blinking (fig. 43).
Subsequently the descaling programme begins,
which spans approx. 20 minutes.
- After descaling, let the appliance work twice
more with only water to rinse away the vinegar
and scale remainders.
- Wash the coffee jug, lid and filter holder.
Jug broken? Extra jug wanted?
You can order a jug from your dealer or
Philips Service Centre under type nr. HD 7909.
Replacing the mains cord
If the mains cord of this appliance is damaged, it
must be replaced by the special cord.
Apply to your Philips dealer or to the Philips
organization in your country.
Guarantee: please refer to separate card.
■■■ Delicious coffee recipes
Irish coffee
Put one dinner spoonful of brown sugar into a
special Irish Coffee glass. Add one shot glass of
(Irish) whisky. Pour one cup of hot extra strong
coffee onto this. Top with whipped cream. If you
wish you can garnish this with a biscuit horn and
shredded chocolate.
Café Roma
Pour extra strong coffee into a coffee cup. Stir one
dinner spoonful of Cognac (French brandy)
through the coffee. Pour 5 dinner spoonfuls of
frothed (whisked) milk onto the mixture. Sprinkle
with some cocoa powder.
Granita
Make strong coffee using 850 ml (= 8 large or
10 small cups) of water and 70 g (=10 heaped
measuring spoonfuls) of ground coffee.
Pour the coffee into a shallow bowl and add 125 g
of castor sugar. Put a piece of lemon skin into the
mixture and let it cool down. Then place it into the
freezer and let it freeze. With intervals of approx.
half an hour stir the mixture well until it has
become syrupy. Serve in long drinking glasses; if
you wish with a topping of whipped cream.
7
41
43
3 sec
42

• Assurez-vous avant de brancher l'appareil
que le voltage indiqué sur la plaque
signalétique du dessous de l'appareil
correspond au voltage du réseau de votre
habitation.
• Ne placez pas l'appareil sur une surface
chaude.
• Débranchez l'appareil:
- si un problème survient pendant la
préparation du café
- avant de le nettoyer
• Faites attention à ce que le cordon
d'alimentation ne vienne pas en contact
avec les surfaces chaudes.
• Utilisez l'appareil hors de portée des
enfants. Faites attention qu'ils ne tirent pas
sur le cordon d'alimentation.
• N'utilisez jamais l'appareil si la fiche, le
cordon d'alimentation ou l'appareil sont
endommagés.
Rangement du cordon
Vous pouvez ranger
l’excédent de cordon à
l’arrière de l’appareil
(fig. 1).
Réglage de l’heure
- Branchez l’appareil. Dans le cadran l’affichage
12:00 se met à clignoter (fig. 2).
- Appuyez sur le bouton H/M pour régler l’heure
actuelle (fig. 3). Les heures défilent rapidement.
- Pour un réglage précis: appuyez sur le bouton
H/M brièvement plusieurs fois.
Réglage de la mise en marche automatique
- Appuyez sur le bouton AUTO (fig. 4).
Dans le cadran s’affiche T 12.00.
- Appuyez sur le bouton H/M pour régler l’heure
de la mise en marche automatique (fig. 5). Les
heures défilent rapidement.
- Pour un réglage précis: appuyez sur le bouton
H/M brièvement plusieurs fois.
- Relâchez le bouton H/M. L’heure actuelle
(sans T) réapparaît au bout de 10 secondes.
• Les (:) ne clignotent pas tant que l’heure de
mise en marche automatique est affichée.
• Si vous attendez plus de 10 secondes pour
régler l’heure de mise en marche automatique,
l’horloge revient automatiquement à l’heure
actuelle du jour.
4 5
2
3
3
1
Français
8
Cette cafetière se met en marche à une
heure pré-sélectionnée. Pour ce faire, vous
devez régler auparavant l’heure ainsi que la
mise en marche automatique, et sélectionner
le mode AUTO. (Le voyant jaune s’allume.)
Il est cependant possible de faire du café en
appuyant simplement sur le bouton ON/OFF.
(Le voyant rouge s’allume.)
• Vous pouvez toujours contrôler l’heure de mise
en marche automatique en appuyant sur le
bouton AUTO (fig. 6). Le voyant jaune s’allume
et T apparaît.
N’oubliez pas d’appuyer sur le bouton AUTO à
nouveau pour retirer le mode automatique
(fig. 7). (Le voyant jaune s’éteint.)
• Il n’est pas nécessaire de réajuster le dispositif
de mise en marche automatique chaque fois
que vous voulez faire fonctionner la cafetière
automatiquement: le réglage est conservé en
mémoire.
• Réglez l’heure et la mise en marche
automatique après une coupure d’électricité ou
après avoir débranché l’appareil.
Avant la première utilisation
- Faites fonctionner l’appareil deux fois sans
café. (Voir paragraphe “Préparation du café”.)
- Ensuite, nettoyez les parties amovibles comme
décrit dans le paragraphe “Nettoyage”.
Préparation du café (fig. 8 - 24)
- Remplissez d’eau fraîche uniquement le
réservoir d’eau (fig. 8).
Les indications de niveau sur le côté gauche
correspondent à de grandes tasses (125 ml).
Les indications de niveau sur le côté droit
correspondent à de petites tasses (85 ml)
(fig 9).
- Utilisez des filtres papier type “1x4” ou “n° 4”.
N'oubliez pas de replier les bords.
Suivant les modèles, un filtre permanent peut
être utilisé. Dans ce cas les filtres papier ne
sont pas nécessaires.
- Pour de grandes tasses, il est recommandé de
mettre une cuillère doseuse bien pleine par
tasse. Pour de petites tasses, il est
recommandé de mettre une cuillère doseuse
rase par tasse (fig. 13).
- Pour 3 grandes tasses (ou 4 petites) de café:
appuyez sur le bouton 3-4 k pour allumer le
voyant rouge.
Plus de 3 grandes tasses (ou 4 petites) de
café: appuyez sur le bouton 3-4 k pour
éteindre le voyant rouge (fig. 16).
Nota - Après avoir réglé l’appareil pour préparer
une petite quantité de café (témoin lumineux
17
16
14
13
12
11
10
9
8
7
6
5
4
15
3
4
5
6
7
8
9
10
14
13
12
11
10
9
8
7
6
5
4
15
3
4
5
6
7
8
9
10
14
15
13
12
11
10
8
9
14
13
12
15
8
9
10
9
6 7
rouge) n’oubliez pas d’appuyer à nouveau sur
ce bouton si vous voulez préparer une quantité
de café supplémentaire (témoin éteint).
Si vous avez oublié de le faire, l’appareil peut
indiquer de manière erronée qu’il a besoin
d’être détartré. (Voir paragraphe “Détartrage”).
- Vous pouvez appuyer sur le bouton EXTRA $
pour ajuster la température de la plaque
chauffante (fig. 17). La température est à son
maximum quand le voyant est allumé.
• Mise en marche
Appuyez sur le bouton
ON/OFF si vous voulez
faire du café. (Sans
utilisation du program-
mateur.) (Fig. 18.)
Le voyant rouge
s’allume.
Appuyez sur le bouton
AUTO si vous désirez
que la mise en marche
de l’appareil se fasse
automatiquement à une
heure pré-sélectionnée
(dans les 24 heures)
(fig. 19).
Le voyant jaune
s’allume. Quand
l’appareil est mis en
marche automatique-
ment, le voyant rouge
s’allume et le jaune
s’éteint (fig. 20).
• Durée de maintien à température
- Tant que l’appareil est branché, le cadran
indique l’heure du jour (après l’avoir réglée).
- Cependant, lorsque le café est prêt, l’heure
normale est remplacée par l’indication 2:00.
Vous entendez alors un signal sonore (fig. 21).
Le temps de maintien à température (max.
2 heures) est affiché vous indiquant la fraîcheur
du café.
Après 0:01 la cafetière s’arrête
automatiquement et l’heure du jour est à
nouveau affichée.
Caractéristiques particulières
•“Pré-humidification”. Au bout d’une minute de
fonctionnement, l’écoulement de l’eau chaude
s’arrête. Le café ainsi humidifié dégage un
meilleur arôme et augmente le goût.
• Système “anti-goutte”. Il empêche le café de
couler sur la plaque chauffante, si vous enlevez
la verseuse le temps de vous servir ou en fin de
préparation.
Nota : le système “anti-goutte” ne fonctionne
correctement qu’avec le couvercle placé sur la
verseuse.
• Dispositif de coupure automatique.
Pour des raisons de sécurité,
l’appareil se coupe automatique-
ment au bout de 2 heures, si vous
avez oublié de l’arrêter.
10
21
22
20
23
24
18
19
Refaire du café immédiatement ?
Si vous voulez refaire du
café, arrêtez l’appareil
(fig. 25) et laissez-le
refroidir environ 3
minutes. Vous pouvez à
nouveau remplir le
réservoir d’eau.
Après l'emploi
Nettoyage
• Débranchez toujours votre appareil avant de le
nettoyer.
• N’immergez jamais l’appareil dans l’eau. Vous
pouvez le nettoyer avec un chiffon humide.
• Les parties amovibles peuvent être nettoyées à
l’eau chaude savonneuse. Rincez à l’eau
chaude et séchez. Ces éléments peuvent
également être nettoyés dans un lave-vaisselle.
Pour retirer le porte-filtre, enlevez
préalablement l’axe (fig. 34). Ne perdez pas
l’axe.
11
31
32
37
38
35
36
34
33
25
29
28
26
27
30

Détartrage
Votre appareil a besoin
d’être détartré lorsque le
voyant “ON/OFF” se
met à clignoter et que le
mot “CALC” alterne
avec l’heure (fig.39).
Remplissez le réservoir
avec du vinaigre blanc
sans mettre de café
dans le filtre (fig.40).
Maintenez appuyé le
bouton marche/arrêt
pendant 3 secondes.
Les 3 voyants rouges
clignotent (fig. 41).
Le programme détartrage commence et va durer
environ 20 minutes.
- Lorsque le détartrage est terminé, faites
fonctionner l’appareil deux fois avec de l’eau
fraîche afin d’éliminer les restes de vinaigre et
de tartre.
Lavez la verseuse, le couvercle et le porte-filtre.
Votre verseuse est cassée?
Vous pouvez la commander chez votre revendeur
ou un réparateur indépendant agréé Philips sous
la référence HD 7909.
Remplacement du cordon
Si le cordon d’alimentation de votre appareil est
endommagé, vous devez vous adresser à un
revendeur ou un réparateur indépendant agréé
Philips de votre région.
Délicieuses recettes
Irish coffee
Mettez une cuillère à soupe de sucre brun dans
un verre spécial pour Irish Coffee. Ajoutez un petit
verre de whisky. Versez dessus une tasse de café
chaud extra fort. Garnissez de crème fouettée.
Vous pouvez garnir avec un biscuit et du chocolat
en paillettes.
Café Roma
Versez du café fort dans une tasse. Ajoutez une
cuillère à soupe de Cognac et mélangez. Versez
5 cuillères à soupe de lait. Saupoudrez de poudre
de cacao.
Granita
Préparez du café fort avec 850 ml d’eau et 70 g
de café. Versez le café dans un bol et ajoutez
125 g de sucre brun. Mettez un zeste de citron
dans le mélange et laissez celui-ci refroidir.
Placez ensuite dans le freezer. Laissez environ
une demi-heure et mélangez jusqu’à ce qu’il
devienne sirupeux. Servez dans des verres hauts,
avec un peu de crème fouettée sur le dessus à
votre goût.
12
40
39
41
3 sec
 Loading...