How it Works
Log In / Sign Up
Buy Points
How it Works
FAQ
Contact Us
Questions and Suggestions
Users
Philips
Loading...
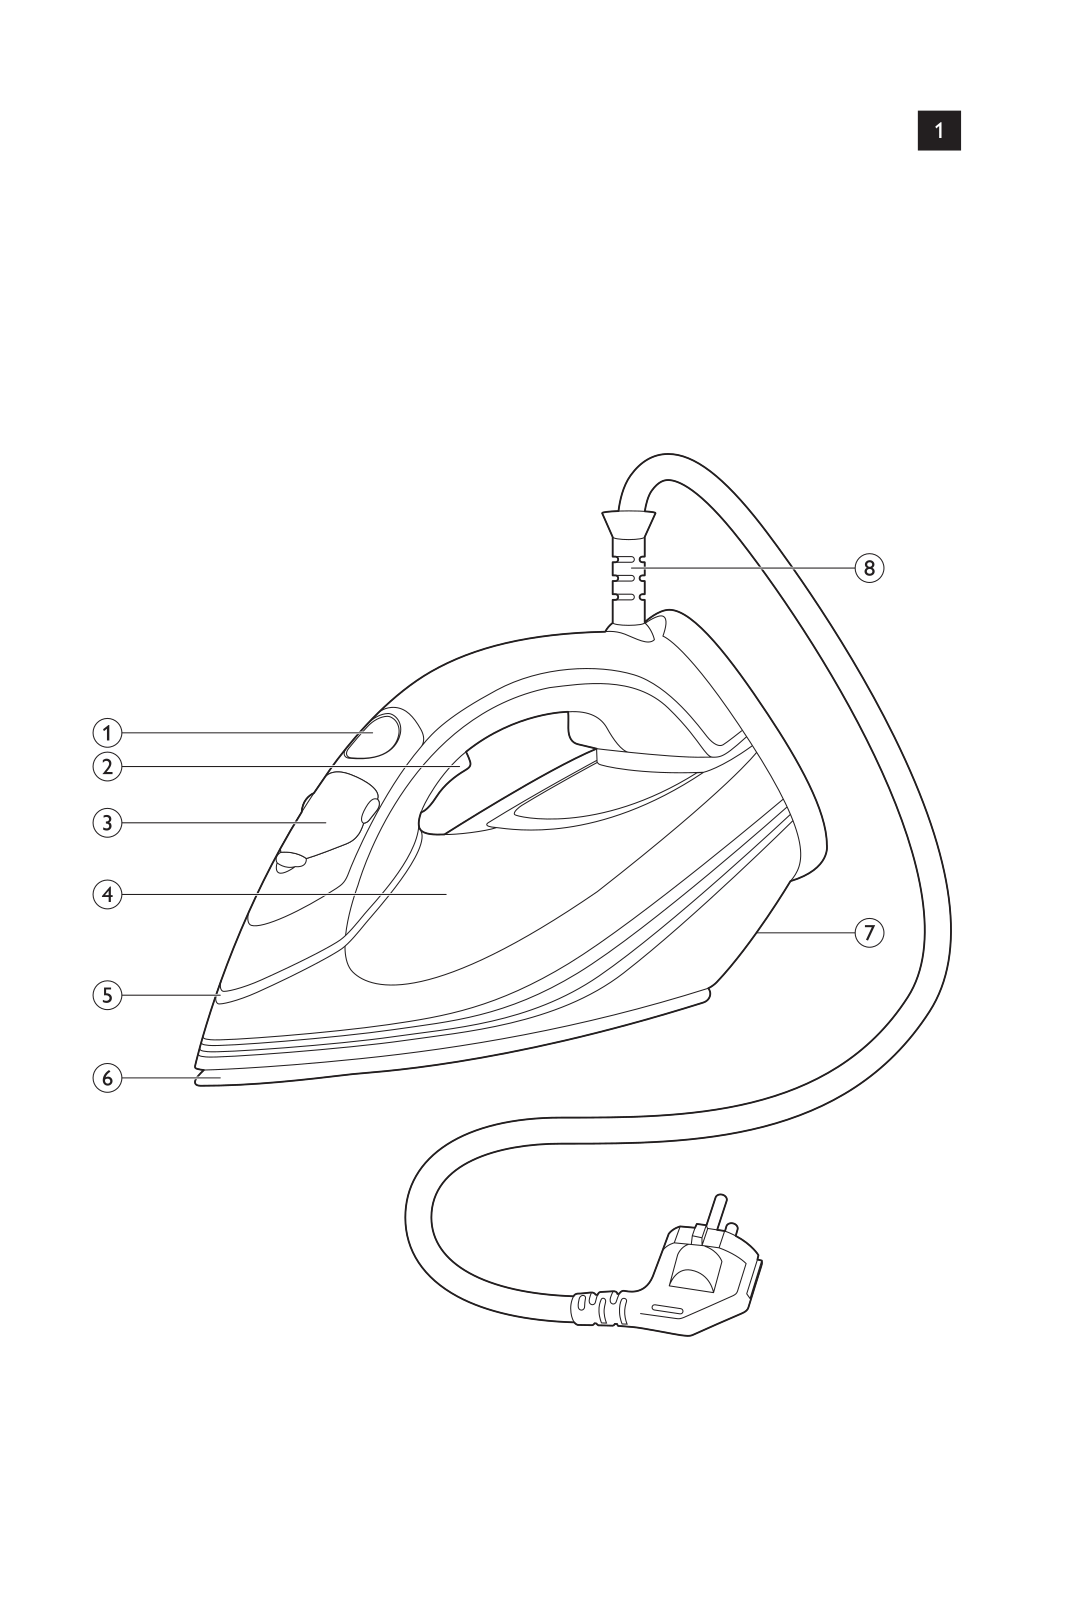
G
GC502/29
GC502/30
2
GC502/36
GC502/78
GC5030
3
GC5030/20
GC5030 series
4
GC5031
GC5031-20
2
GC5031/21
GC5032
GC5032/20
GC5033
3
GC503/38
GC5033/80
5
GC5033/80R1
GC5034
3
GC5034/20
GC5034/28
2
GC5036
6
GC5036/20
GC5036/20R1
GC5037
3
GC5037/80
6
GC5037/80R1
GC5039
3
GC5039/30
GC5039/30R1
4
GC504
2
GC504/30
3
GC504/33
GC504/35
GC504/38
GC504/39
GC5049/02
GC5049/07
GC505
GC5050
6
GC5050/00
GC5050/02
8
GC5050/07
2
GC5050/27
GC5050/28
GC505/05
GC5054/02
GC5054/07
GC505/48
GC5055
5
GC5055/02
GC5057
6
GC505/70
GC5057/02
GC5057/27
GC5057/28
GC506
4
GC5060
7
GC5060/02
2
GC506/30
GC506/33
GC506/38
2
GC506/39
GC506/48
GC507
2
GC507/60
3
GC507/63
2
GC507/68
GC507/98
2
GC508
GC508/38
GC509
GC509/18
GC510
2
GC510/05
5
GC510/25
3
GC511
GC511/05
GC511/25
GC512
GC512/40
4
GC512/48
GC513/48
GC514
4
GC514/36
GC514/40
3
GC514/43
GC514/49
GC515
5
GC515/05
3
GC515/15
GC515/25
2
GC515/27
GC516/20
2
GC516/28
GC517/28
2
GC518
4
GC518/20
3
GC518/22
GC518/23
GC518/24
2
GC518/26
Loading...
Loading...
Nothing found
GC5057
User Manual
78 pgs
8.05 Mb
0
User Manual
74 pgs
4.63 Mb
0
User Manual
210 pgs
14.06 Mb
0
User Manual
54 pgs
4.99 Mb
0
User Manual
54 pgs
8.1 Mb
0
User Manual [ru]
230 pgs
24.77 Mb
0
Table of contents
Loading...
Philips GC5057, GC5055, GC5060, GC5050 User Manual [ru]
...
Philips User Manual [ru]
Download
Specifications and Main Features
Frequently Asked Questions
User Manual
Download
Loading...
+
hidden pages
Unhide
You need points to download manuals.
1 point = 1 manual.
You can buy points or you can get point for every manual you upload.
Buy points
Upload your manuals
 Loading...