


HD 3274-75

HD 3274/75

2
English Page 4
• Keep page 3 open when reading these
operating instructions.
Français Page 7
• Dépliez la page 3 en lisant le mode d'emploi.
Deutsch Seite 10
• Schlagen Sie beim Lesen der Gebrauchs-
anweisung Seite 3 auf.
Nederlands Pagina 13
• Sla bij het lezen van de gebruiksaanwijzing
pagina 3 op.
Italiano Pagina 16
• Prima di usare l'apparecchio, aprite le pagina 3
e leggete attentamente le istruzioni per l'uso.
Español Página 19
• Desplegar la página 3 al leer las instrucciones
de manejo.
Português Página 22
• Durante a leitura do modo de emprêgo,
desdobre e verifique a pág. 3.
Dansk Side 25
• Hold side 3 opslået mens De læser
brugsanvisningen.
Norsk Side 28
• Slå opp på side 3 før De leser videre.
Svenska Sid 31
• Ha sidan 3 utvikt när ni läser bruksanvisningen.
Suomi Sivu 34
• Pidä sivu 3 auki samalla kun luet käyttöohjetta.
Ελληνικά Σελίδα 37
• Ανοίξτε την σελίδα 3 για τισ οδηγίεσ
χρήσεωσ.

3
Hotairsystem
ECO
B
EC D
F
G
A
1
HD 3274
HD 3275
4
General description (fig. 1 on page 3)
A Air inlet grille
B Air outlet grille
C Selector switch
D Thermostat knob
E Pilot light
F Mains cord storage
G Stand / wall bracket (only type HD 3275)
Safe positioning
• The heater must not be located immediately
below a socket outlet.
• Only use the fan heater when it is standing
(fig. 1) or mounted (only type HD 3275, fig. 4-8)
in an upright position.
• For your own safety and that of others: water
and electricity are a dangerous combination!
When using the heater in the free standing
mode do not place it in the immediate
surroundings of a bath, a shower or a
swimming pool.
Ensure that the appliance cannot fall into water
(bath, wash basin, shower cubicle, etc.).
• Do not use the heater in rooms with explosive
gas (e.g. petrol) or while using inflammable glue
or solvent (e.g. when glueing or varnishing
parquet floors, PVC etc.).
• Allow ample space around the heater.
A safe area to be left free is 50 cm / 20” at the
top and at the sides, and 120 cm / 47” at the
front.
• Prevent overheating of the appliance by
keeping the air inlet and outlet grilles free: do
not hang anything in front of it or above it -
otherwise there is a risk of fire.
Check the grilles from time to time for
accumulated dust.
If overheating should occur, the built-in
overheating safety device will switch off the
appliance.
• Keep the mains cord at a safe distance from the
air inlet and outlet grilles.
• Do not allow aerosols, inflammable substances
or materials sensitive to heat to be in the flow of
hot air.
• Do not use the heater on extremely deep-pile
carpets.
Important
• Before connecting the appliance check that the voltage indicated on the type plate
corresponds to the mains voltage in your home.
• Read these instructions carefully, in conjunction with the illustrations, before using the
appliance.
• The appliance is double insulated and need not be connected to an earthed mains outlet.
If you wish to use an extension cord, a 2-wire type is suitable. However, ensure that the
plugs and cord allow high power (16A-220V / 13A-240V AC).
If a reel type is employed, please unroll completely to prevent overheating.
• It may happen, especially if the heater operates on position 2 and another electrical device
is switched on as well, that a fuse or circuit breaker cuts off the mains power. In such a case,
the fuse or circuit breaker may not allow this high electrical power.
You may connect one of the involved appliances to another circuit (employing another fuse
or circuit breaker) or have the electrical installation revised by an authorized electrician.
• The heater is not designed for use as the main form of heating. Use the appliance only for
the intended use, i.e. extra heating in the house.
• To avoid the risk of fire and electrical shock select a safe place for the heater. (See section
“Safe positioning”.)
• Do not insert any objects into the heater.
• Ensure that children cannot play with the appliance.
• Attention: the front grille gets hot during use.
• Only touch the heater with dry hands.
English
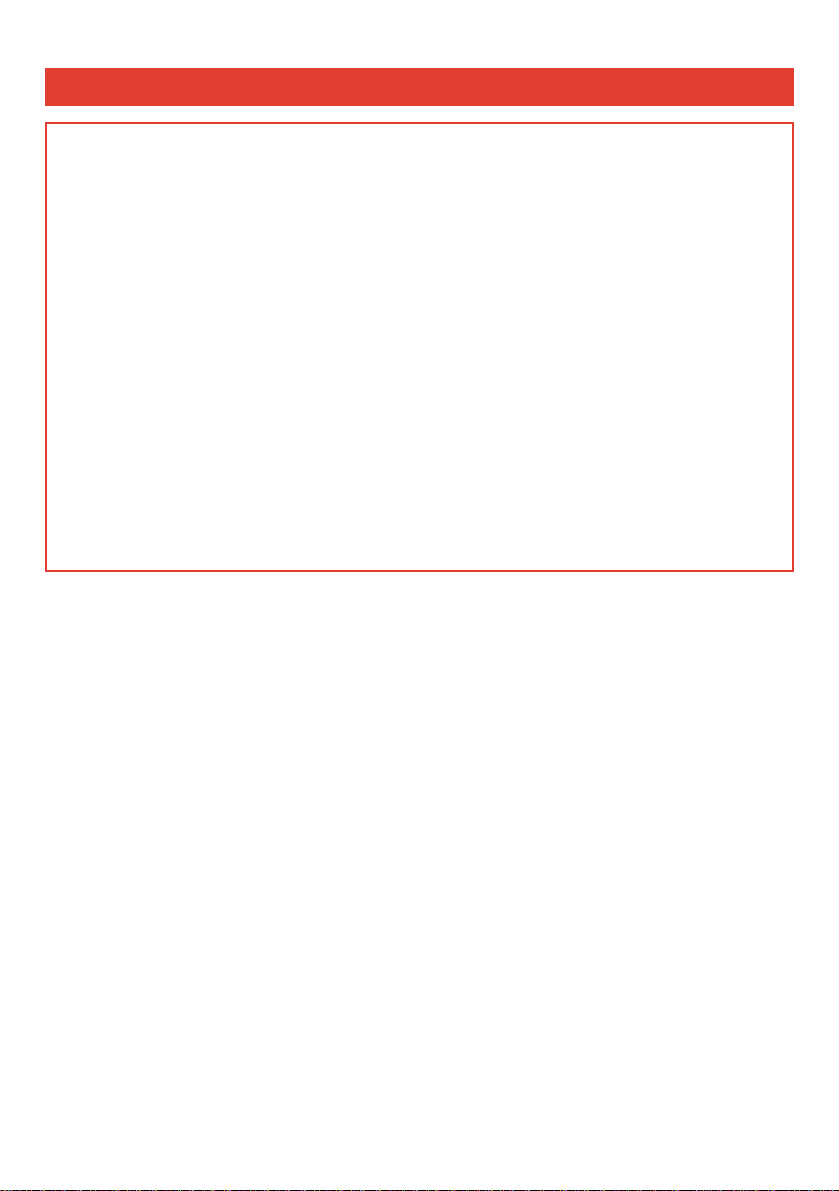
Only for type HD 3275:
If the heater is going to be used in the bathroom, it
must be installed...
- so that switches and other controls cannot be
touched by a person in the bath or shower;
- outside the colour indicated areas (figs. 2
and 3).
Storing the mains cord
Excess mains cord can be stored by pushing it
into the storage compartment at the back of the
heater.
Please Note: Do not use the appliance when the
mains cord is kept inside the appliance.
Type HD 3274:
- You can fix the mains cord by pressing it into
one of the three slots (F).
Type HD 3275:
- Using a small screwdriver push the small lip
downwards (fig. 4) and remove the heater from
the stand / wall bracket (G) (fig. 5).
- You can fix the mains cord by pressing it into
one of the three slots (F).
- Slide the appliance correctly onto the stand /
wall bracket (“Click!”) (fig. 8).
Wall-mounting (only for type HD 3275)
This model can be used as a free-standing unit,
but it can also be mounted to a wall using the
stand / wall bracket (G).
This wall should be solid, flat and fireproof.
- Using a small
screwdriver push the
small lip downwards
(fig. 4) and remove
the heater from the
stand / wall bracket
(fig. 5).
- Use the stand / wall
bracket as a template
to mark the drilling
holes (fig. 6).
- Drill the holes and fix the stand / wall bracket to
the wall using screws and rawlplugs (fig. 7).
- Slide the appliance correctly onto the stand /
wall bracket (“Click!”) (fig. 8).
How to use
The selector switch (C) and the thermostat knob
(D) enable you to select the following functions:
Selector switch (C)
O = "Off”. Both the fan and the two heating
elements are switched off.
> = “Cool air”. Only the fan is switched on.
1 = "Warm air"for gradual heating-up.
ECO positon (half power): the fan and one of
the two heating elements are switched on.
2 = "Hot air" for quick heating-up.
Full power: the fan and the two heating
elements are switched on.
5
3
60 cm
60 cm
6
60 cm
60 cm
2
5
4
8
7

6
Thermostat knob (D)
With the thermostat knob you can set a constant
room temperature.
When the selector switch is set to position 1 or
position 2, the heater will automatically switch
on (using half power or full power respectively) as
soon as the room temperature falls below the set
temperature.
As soon as the set temperature is reached, the
heater will switch off.
Rotate the knob anti-clockwise to obtain a higher
temperature setting or clockwise for a lower
temperature setting.
You may adjust the thermostat during use.
To find the ideal thermostat setting:
- First set the knob to maximum position. (Rotate
anti-clockwise until the knob stops.)
- As soon as the temperature is comfortable, turn
the knob clockwise slowly until the heater goes
off.
y = "Frost-free" position. This position
corresponds with the minimum thermostat
setting (i.e. approx. +5 °C / +41 °F) and can
be used to keep the immediate vicinity of the
heater free from frost. E.g. to prevent pipes
from freezing, position the heater close to the
pipe and select this position.
Please note: When using the cool air setting >,
the thermostat knob should be in its highest
position.
Pilot light
- When the appliance is connected to the mains
and switched on by selecting >, 1 or 2 the
pilot light (E) will come on.
- The light will stay on until the appliance is
switched off by setting the selector switch (C) to
position O or by disconnecting from the mains.
- To indicate that the heater is still connected and
in "switched-on" position (>, 1 or 2), the pilot
light will remain on when the set temperature is
reached and the thermostat switches the
appliance off.
For the same reason the pilot light will remain
on when the overheating safety device switches
the appliance off.
Overheating safety device
To prevent damage and risks due to overheating,
the built-in overheating safety device cuts off the
power as soon as the heating elements become
too hot.
If this should happen:
- First ensure that it was not the thermostat which
has switched off the heater. Set the thermostat
to maximum position.
If the heater does not switch on, the safety device
has been activated.
- Remove the mains plug from the wall socket.
- Let the heater cool down for 30 minutes.
- Check if the heater had been placed correctly.
- Check if anything is obstructing the air flow.
If necessary, clean the grilles with a vacuum
cleaner.
- Replace the plug into the wall socket and switch
the heater on again.
If the safety device again switches off the heater:
- Remove the mains plug from the wall socket.
- Have the heater inspected by a Philips Service
Centre or by your dealer.
Cleaning
- Set the selector switch (C) to position O to
switch off.
- Remove the mains plug from the wall socket.
- Wait for the heater to cool down sufficiently.
- You may clean the outside of the heater with a
damp cloth. Do not allow water to come into the
appliance.
- Clean the air inlet and outlet grilles regularly
(with normal use at least twice a year) with a
vacuum cleaner, using the brush attachment.

7
Description générale (fig. 1, page 3)
A Grille entrée d'air
B Grille sortie d'air
C Commutateur
D Thermostat
E Témoin lumineux
F Rangement du cordon
G Base / support mural (Type HD 3275
uniquement)
Positionnement de sécurité
• Positionnez l'appareil éloigné de la prise
murale.
• L'appareil ne doit être utilisé que debout (fig. 1)
ou monté en position verticale (uniquement
type HD 3275 ; fig. 4-8 ).
• Pour votre propre sécurité et celle des autres :
eau et électricité sont une combinaison
dangereuse !
Si l'appareil est utilisé en mode libre, ne le
placez pas à proximité d'une baignoire, d'une
douche ou d'une piscine.
Assurez-vous que l'appareil ne puisse pas
tomber dans l'eau.
• N'utilisez pas l'appareil dans des pièces où il y
aurait présence de gaz explosif (par ex.
essence) ou pendant l'utilisation de colle
inflammable ou de solvant (par ex. quand vous
collez ou vernissez des parquets, PVC, etc.).
• Laissez toujours un espace libre autour de
l'appareil, soit 50 cm au-dessus et sur les côtés,
et 120 cm en façade.
• Evitez toute surchauffe de l'appareil en
maintenant les entrée et sortie d'air libres : ne
suspendez rien devant, ni au-dessus (risque de
feu).
Retirez la poussière des grilles de temps en
temps.
En cas de surchauffe, le dispositif de sécurité
automatique intégré coupe l'appareil.
• Maintenez le cordon d'alimentation à une
distance suffisante des grilles d'entrée et de
sortie d'air.
• Ne laissez pas à proximité de l'appareil
d'aérosols, substances inflammables ou
matières sensibles à la chaleur.
• N'utilisez pas l'appareil sur des moquettes à
poils longs.
Important
• Avant de brancher l'appareil, assurez-vous que la tension spécifiée sur celui-ci correspond
bien à la tension du secteur de votre logement.
• Lisez les instructions en même temps que les illustrations avant toute utilisation pour la
première fois.
• L'appareil est à double isolation et n'a pas besoin d'être raccordé à une prise de terre.
Si vous désirez utiliser une rallonge, un modèle à 2 conducteurs est préférable. Cependant,
assurez-vous que les prises et la fiche permettent une puissance élevée (16A-220V /
13A-240V CA).
• Si un enrouleur de cordon est employé, déroulez-le complètement afin d'éviter toute
surchauffe.
Il peut arriver, surtout si l'appareil fonctionne sur la position
22
et qu'un autre appareil
électrique est en marche, qu'un fusible ou disjoncteur coupe le secteur. Dans un tel cas, le
fusible ou le disjoncteur ne permettent pas une puissance élevée.
Vous pouvez brancher l'un des appareils sur une autre prise (en employant un autre fusible
ou disjoncteur) ou faire réviser l'installation électrique par un professionnel.
• Le radiateur n'a pas été conçu en tant qu'appareil de chauffage principal. Utilisez le radiateur
uniquement comme chauffage d'appoint dans votre logement.
• Pour éviter tout risque de feu ou de choc électrique, placez le radiateur dans un endroit sûr.
(Voir chapitre "Positionnement de sécurité").
• Ne mettez jamais d'objets dans le radiateur.
• Surveillez les enfants. Ne les laissez pas jouer avec l'appareil.
• Attention : la grille devient chaude durant l'utilisation.
• Ne touchez le radiateur qu'avec des mains sèches.
Français
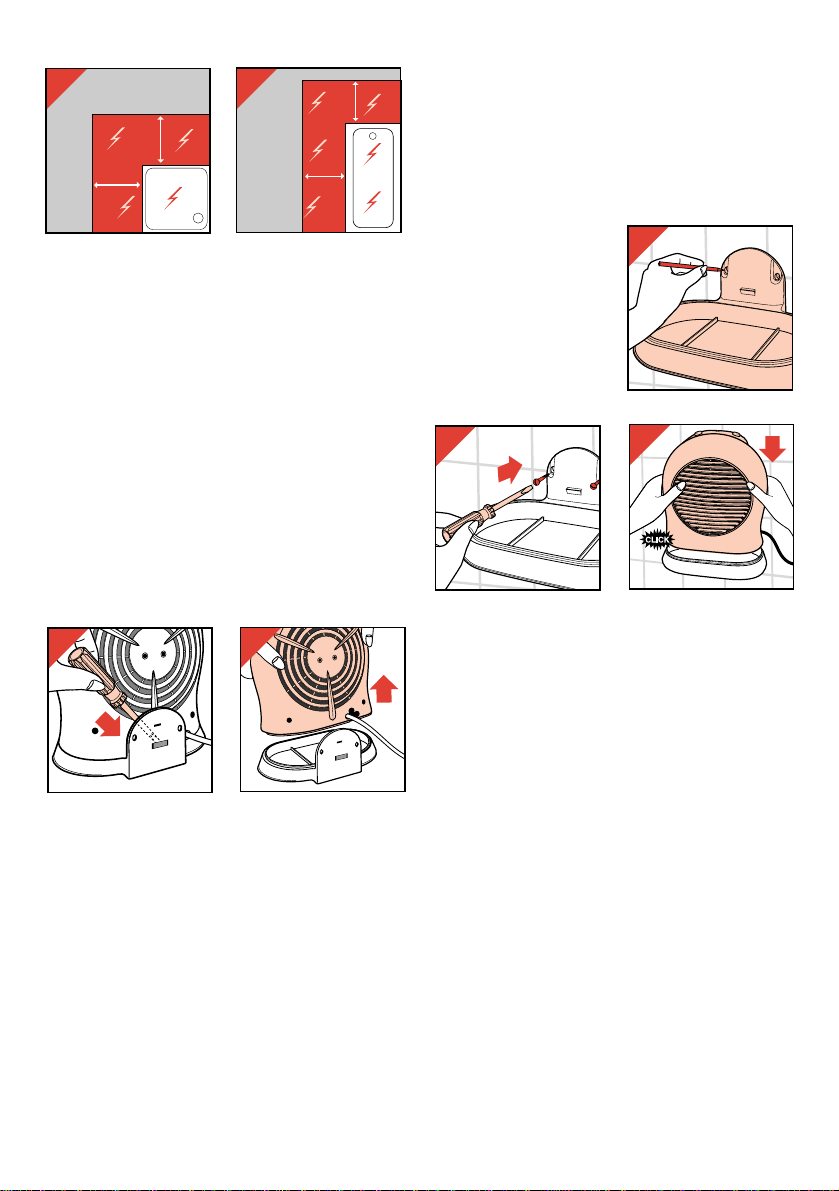
Type HD 3275 uniquement :
Si l'appareil est utilisé dans une salle de bains, il
doit être installé :
- de telle sorte que les commutateurs et autres
commandes ne puissent pas être touchés par
une personne dans le bain ou la douche ;
- en dehors des zones colorées (fig. 2 et 3).
Rangement du cordon
Le cordon peut être rangé dans le compartiment
rangement à l'arrière de l'appareil.
Attention : Ne laissez pas le cordon à l'intérieur
de l'appareil lors de l'utilisation.
Type HD 3274 :
- Vous pouvez fixer le cordon en le poussant
dans une des 3 fentes (F).
Type HD 3275 :
- A l'aide d'un petit tournevis, poussez la petite
lèvre vers le bas (fig. 4) et retirez l'appareil de
son support mural (G) (fig. 5).
- Vous pouvez fixer le cordon en le poussant
dans une des 3 fentes (F).
- Mettez en place correctement l'appareil sur son
support mural ("clic") (fig. 8).
Montage mural (Type HD 3275 uniquement)
L'appareil peut être utilisé comme un appareil à
poser, mais il peut également être fixé sur un mur
solide, plat et incombustible.
- A l'aide d'un petit tournevis, poussez la petite
lèvre vers le bas (fig. 4) et retirez l'appareil de
son support mural (G)
(fig. 5).
- Utilisez le support mural pour marquer les trous
de perçage (fig. 6).
- Percez les trous et
fixez le support au mur
en utilisant les vis et
les chevilles (fig. 7).
- Faites glisser l'appareil
correctement sur son
support ("clic") (fig. 8).
Utilisation
Le commutateur (C) et le thermostat (D) vous
permettent de sélectionner les fonctions
suivantes.
Commutateur (C)
O = "arrêt"
> = "air froid". Seul le ventilateur est en
marche.
1 = "Air tiède" pour un chauffage progressif.
Position "ECO" (demi puissance) : le
ventilateur et un des deux éléments
chauffants sont en marche.
2 = "Air chaud" pour un chauffage rapide.
Pleine puissance : le ventilateur et les deux
éléments chauffants sont en marche.
Thermostat (D)
Vous pouvez régler une température de pièce
constante à l'aide du thermostat.
Quand le commutateur est sur la position 1 ou 2
l'appareil se met automatiquement en marche (en
utilisant la demi-puissance ou le pleine puissance
respectivement) dès que la température de la
pièce descend descend en-dessous de la
température sélectionnée.
Dès que la température est atteinte, l'appareil
s'arrête.
8
3
60 cm
60 cm
6
60 cm
60 cm
2
5
4
8
7

9
Tournez le bouton dans le sens des aiguilles
d’une montre pour obtenir un réglage de
température plus faible ; tournez le bouton dans le
sens inverse des aiguilles d’une montre pour
obtenir un réglage de température plus fort.
Vous pouvez ajuster le thermostat en cours de
fonctionnement.
Pour trouver le règlage de thermostat idéal :
- Tournez d'abord le bouton jusqu'à la position
maximum. (Tournez dans le sens inverse des
aiguilles d’une montre jusqu'à blocage).
- Dès que la température est idéale, tournez le
bouton dans le sens des aiguilles d’une montre
jusqu'à ce que le radiateur s'arrête.
y = "Position hors gel". Cette position
correspond à un règlage du thermostat
minimum (soit environ 5°) et peut être utilisée
pour maintenir hors gel le voisinage immédiat
de l'appareil. Par exemple, pour éviter à des
tuyaux de geler, placez le radiateur à côté et
sélectionnez cette position.
Ventilation: Pour une utilisation en ventilation
froide > uniquement; placez le thermostat sur la
position la plus élevée.
Témoin lumineux
- Le témoin lumineux (E) s'allume quand
l'appareil est branché sur le secteur et en
marche en sélectionnant l'une des positions > ,
1 ou 2.
- Le témoin reste allumé jusqu'à ce que l'appareil
soit arrêté en plaçant le sélecteur ( C ) sur la
position O ou en le débranchant.
- Pour indiquer que l'appareil est encore branché
et en "position" marche (> , 1 ou 2), le témoin
lumineux reste allumé quand la température
désirée est atteinte et le thermostat coupe
l'alimentation de l'appareil.
Pour la même raison le témoin lumineux reste
allumé quand le dispositif de sécurité aura
coupé l'alimentation de l'appareil.
Dispositif de sécurité thermique
Pour prévenir les risques et dommages dus à la
surchauffe, le dispositif de sécurité thermique
interne coupe l'alimentation dès que les éléments
de chauffage deviennent trop chauds.
Si cela arrive :
- Assurez-vous d'abord que ce n'est pas le
thermostat qui a coupé le radiateur. Pour cela,
positonnez le thermostat au maximum.
Si le chauffage ne se met pas en marche, c'est
que le dispositif de sécurité a bien été sollicité.
- Retirez la fiche d'alimentation de la prise
murale.
- Laissez l'appareil refroidir pendant 30 minutes.
- Vérifiez le bon positionnement de l'appareil.
- Vérifiez qu'il n'y a pas de poussière ou autre
chose pouvant obstruer la circulation de l'air. Si
nécessaire, nettoyez les grilles avec un
aspirateur.
- Remettez la fiche dans la prise murale et
mettez en route l'appareil à nouveau.
Si la sécurité thermique coupe à nouveau
l'appareil :
- Retirez la fiche d'alimentation de la prise
murale.
- Rapportez votre appareil pour vérification chez
votre revendeur Philips ou à un Centre Service
Agréé.
Nettoyage
- Réglez le commutateur (C) sur la position
arrêt O.
- Retirez la fiche d'alimentation de la prise
murale.
- Attendez que l'appareil refroidisse
suffisamment.
- Vous pouvez nettoyer l'extérieur de l'appareil
avec un chiffon humide. Faites attention de ne
pas faire pénétrer d'eau dans l'appareil.
- Nettoyez les entrées et sorties d'air
régulièrement (2 fois par an au moins pour un
usage normal) avec un aspirateur, en utilisant
le suceur à poils.

10
Allgemeine Beschreibung (Abb. 1 auf Seite 3)
A Lufteinlaß
B Luftauslaß, Frontgitter
C Geräteschalter
D Thermostatschalter
E Kontrollampe
F Kabelfach
G Halterung (nur Type HD 3275)
Sichere Aufstellung
• Stellen Sie das Gerät nie direkt unter einer
Steckdose auf.
• Verwenden Sie den Heizlüfter nur in aufrechter
Stellung (Vgl. Abb. 1) oder in aufrechter Stellung
montiert (nur Type HD 3275: Abb. 4 bis 8).
• Beachten Sie zur persönlichen und zu fremder
Personen Sicherheit, daß jede Kombination von
Wasser und Elektrizität gefährlich ist! Benutzen
Sie das Gerät niemals in einem Feuchtraum,
z.B. einem Badezimmer oder in der Nähe eines
Schwimmbeckens, wenn es nicht fest installiert
ist.
Stellen Sie sicher, daß ein nicht fest installiertes
Gerät nicht in Wasser fallen kann, z.B. in ein
Waschbecken, eine Badewanne oder eine
Duschkabine.
• Verwenden Sie den Heizlüfter nicht in einem
Raum, in dem sich explosive Gase entwickeln
könnten, auch nicht beim Gebrauch von
Benzin, von Lösungsmitteln und Klebern, etwa
beim Verlegen von Fußböden.
• Lassen Sie ausreichend Platz rund um den
Heizlüfter: 50 cm über und 120 cm vor dem
Gerät.
• Vermeiden Sie eine Überhitzung des Geräts.
Halten Sie Lufteinlaß und -auslaß frei, und
hängen Sie nichts davor bzw. darüber. Sonst
besteht Brandgefahr!
Prüfen Sie von Zeit zu Zeit, ob sich Staub in
den Öffnungen angesammelt hat.
Im Falle einer Überhitzung schaltet der
eingebaute Überhitzungsschutz das Gerät aus.
• Halten Sie das Netzkabel von Lufteinlaß und
-auslaß fern.
• Lassen Sie keine Sprays, keine
hitzeempfindlichen oder explosiven Dämpfe in
die eingesaugte oder die erhitzte Luft gelangen.
• Stellen Sie den Heizlüfter nicht auf sehr
langflorigen Teppich.
Wichtig
• Prüfen Sie vor Inbetriebnahme, ob die Spannungsangabe auf dem Typenschild mit der
örtlichen Netzspannung übereinstimmt.
• Lesen Sie die Gebrauchsanweisung sorgfältig durch, und sehen Sie sich dabei die
Abbildungen an, bevor Sie das Gerät zum ersten Mal benutzen.
• Das Gerät ist doppelt isoliert und braucht nicht unbedingt an eine Schuko-Steckdose
angeschlossen zu werden. Deshalb kann das Gerät auch über ein zweiadriges
Verlängerungskabel angeschlossen werden. Achten Sie aber darauf, daß es für höhere
Stromstärken (16 A bei 220 V) geeignet ist.
Wenn Sie eine Kabeltrommel verwenden, wickeln Sie das Kabel ganz ab, um Überhitzung zu
vermeiden!
• Es kann vorkommen, daß die Sicherung den Strom unterbricht, besonders wenn der
Heizlüfter auf Position 2 betrieben wird und ein weiteres Gerät an denselben Stromkreis
angeschlossen ist. Die Stromentnahme ist dann höher als zulässig.
Sie können in diesem Fall eines der Geräte ausschalten und über eine andere Sicherung an
einen anderen Stromkreis anschließen; oder Sie beauftragen einen geprüften Elektriker, die
Anlage entsprechend anzupassen.
• Der Heizlüfter ist nicht als Hauptheizquelle geeignet. Verwenden Sie ihn ausschließlich als
Zusatz- oder Ersatzheizung.
• Wählen Sie einen sicheren Platz für das Gerät, um Brandgefahr zu vermeiden. Vgl. den
Abschnitt "Sichere Aufstellung".
• Stecken Sie keinerlei Gegenstände in den Heizlüfter.
• Halten Sie Kinder von dem Gerät fern.
• Vorsicht! Das Frontgitter wird beim Betrieb heiß!
• Fassen Sie den Heizlüfter nur mit trockenen Händen an.
Deutsch
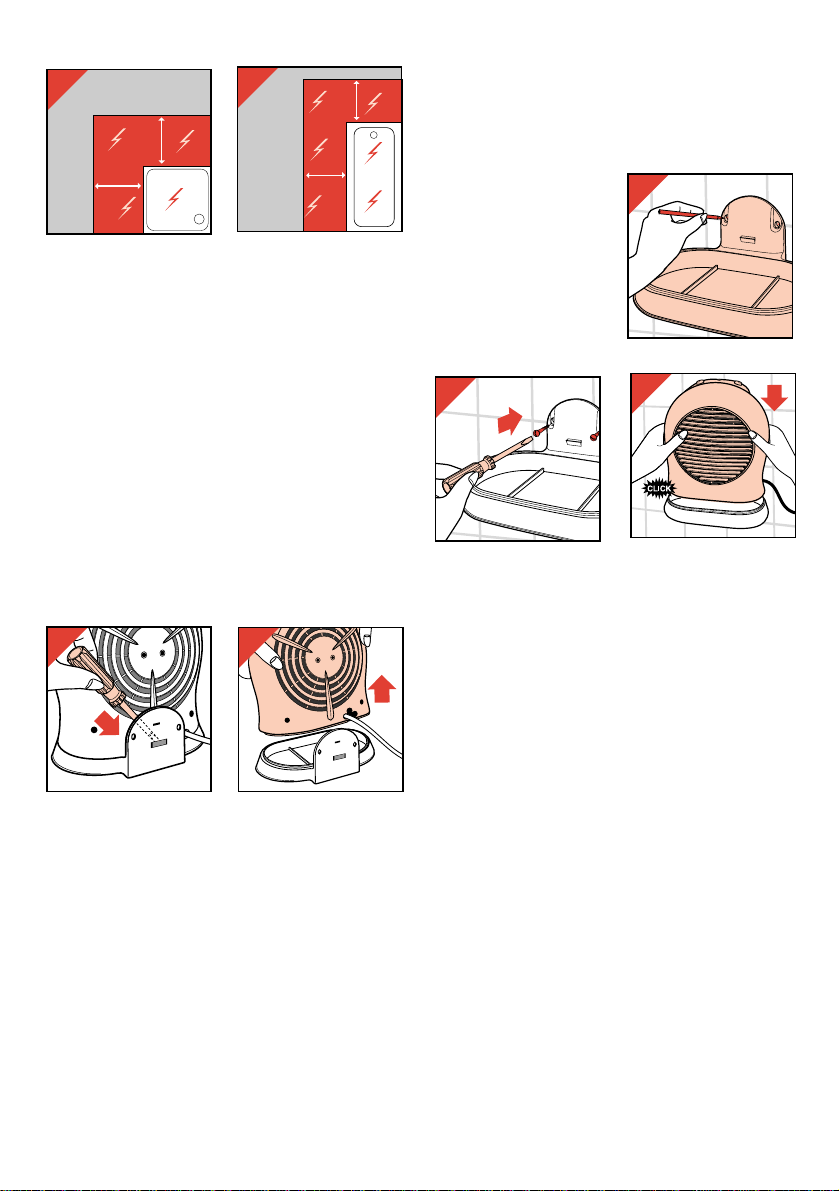
(Nur Type HD 3275:)
Das Gerät ist in einem Badezimmer oder einem
anderen Feuchtraum so zu installieren, daß ...
- Personen im Bad bzw. unter der Dusche das
Gerät und die Schalter nicht erreichen können
und
- es sich außerhalb der auf Abb. 2 und 3 farbig
markierten Bereiche befindet.
Unterbringung des Netzkabels
Überschüssiges Netzkabel kann zur
Aufbewahrung in das Kabelfach an der Rückseite
des Geräts zurückgeschoben werden.
Wichtig: Ziehen Sie aber Netzkabel immer
vollständig heraus, bevor Sie das Gerät in Betrieb
nehmen.
Type HD 3274:
- Sie können das Netzkabel arretieren, indem Sie
es in eine der drei Aussparungen am Kabelfach
(F) drücken.
Type HD 3275:
- Drücken Sie mit einem kleinen
Schraubendreher die Arretierung hinunter
(Abb. 4), und nehmen Sie das Gerät von der
Halterung (G) ab (Abb. 5).
- Sie können das Netzkabel arretieren, indem Sie
es in eine der drei Aussparungen am Kabelfach
(F) drücken.
- Setzen Sie das Gerät fest in die Halterung ein
("Klick", Abb. 8)
Befestigung an der Wand (nur Type HD 3275)
Das Gerät läßt sich in der Halterung (G)
freistehend aufstellen oder an der an einer Wand
montieren.
Die Wand muß fest, eben und feuerfest sein.
- Drücken Sie mit einem
kleinen
Schraubendreher die
Arretierung hinunter
(Abb. 4), und nehmen
Sie das Gerät von der
Halterung (G) ab
(Abb. 5).
- Markieren Sie die
Bohrlöcher mit Hilfe
der Halterung (Abb. 6).
- Bohren Sie die beiden Löcher und befestigen
Sie die Halterung mit Dübel und Schrauben
(Abb. 7) an der Wand.
- Setzen Sie das Gerät fest in die Halterung ein
("Klick", Abb. 8).
Die Anwendung des Geräts
Mit dem Geräteschalter (C), und dem
Thermostatschalter (D) können Sie die folgenden
Einstellungen vornehmen:
Geräteschalter (C)
O = Aus. Der Ventilator und die beiden
Heizelemente sind ausgeschaltet.
> = Kaltluft. Nur der Ventilator ist eingeschaltet.
1 = Warmluft zur allmählichen Erwärmung.
ECO-Position = halbe Leistung: Der Ventilator
und eines der beiden Heizelemente ist
eingeschaltet.
2 = Heißluft zum schnellen Aufheizen.
Volle Leistung: Der Ventilator und beide
Heizelemente sind eingeschaltet.
Thermostatschalter (D)
Mit dem Thermostatschalter kann eine konstante
Raumtemperatur eingestellt werden.
Sinkt die Raumtemperatur unter den eingestellten
Wert, wird das Gerät automatisch eingeschaltet.
11
3
60 cm
60 cm
6
60 cm
60 cm
2
5
4
8
7

12
Steht der Thermostatschalter auf Position 1, wird
die halbe Leistung, auf Position 2 die ganze
Leistung abgegeben.
Sobald die Raumtemperatur den eingestellten
Wert erreicht, wird das Gerät ausgeschaltet.
Durch Drehen des Schalters gegen den
Uhrzeigersinn stellen Sie einen höheren, durch
Drehen im Uhrzeigersinn einen niedrigeren Wert
für die Raumtemperatur ein.
Der Thermostat kann bei eingeschaltetem Gerät
bedient werden.
Sie erreichen die gewünschte Temperatur wie
folgt:
- Stellen Sie zunächst den Thermostaten durch
Drehen gegen den Uhrzeigersinn bis zum
Anschlag auf die höchste Temperatur.
- Sobald eine angenehme Raumtemperatur
erreicht ist, drehen Sie den Schalter langsam
im Uhrzeigersinn zurück, bis sich das Gerät
ausschaltet.
y = Frostschutzeinstellung. Diese Position
entspricht der Minimaleinstellung des
Thermostaten (ca. +5 °C) und kann verwendet
werden, die unmittelbare Umgebung des
Geräts frostfrei zu halten, z.B. wenn Sie dafür
sorgen wollen, daß eine Wasserleitung nicht
einfriert.
Stellen Sie das Gerät dicht an die
Wasserleitung, und schalten Sie es auf.
Hinweis: Steht der Geräteschalter auf Kaltluft >,
muß der Thermostatschalter (D) auf der
höchsten Position stehen!
Kontrollampe
- Die Kontrollampe (E) leuchtet auf, wenn das
Gerät am Netz angeschlossen und der
Geräteschalter auf einer der Positionen >, 1
oder 2 steht.
- Die Kontrollampe leuchtet solange, bis der
Geräteschalter (C) auf O gestellt oder der
Stecker aus der Steckdose gezogen wird.
- Die Kontrollampe zeigt an, daß das Gerät am
Netz angeschlossen und eingeschaltet ist
(Position >, 1 oder 2). Die Kontrollampe
leuchtet auch weiter, wenn die eingestellte
Temperatur erreicht ist und der Thermostat das
Gerät ausgeschaltet hat.
Auch wenn der Überhitzungsschutz das Gerät
ausgeschaltet hat, zeigt die Kontrollampe an,
daß das Gerät am Netz angeschlossen ist.
Überhitzungsschutz
Um Risiken und Schäden zu vermeiden, die durch
zu starke Erhitzung entstehen, schaltet der
Überhitzungsschutz das Gerät aus, sobald die
Heizelemente sich zu stark erhitzen.
Sollte dies geschehen, so verfahren Sie wie folgt:
- Vergewissern Sie sich zunächst, ob nicht der
Thermostat das Gerät ausgeschaltet hat.
Stellen Sie dazu den Thermostatschalter (D)
auf die höchste Position.
Wird das Gerät dann nicht eingeschaltet, hat
tatsächlich der Überhitzungsschutz das Gerät
ausgeschaltet.
- Ziehen Sie den Netzstecker aus der Steckdose.
- Lassen Sie das Gerät 30 Minuten abkühlen.
- Prüfen Sie, ob der Heizlüfter vorschriftsmäßig
aufgestellt ist.
- Prüfen Sie weiter, ob die Luft durch die
Lufteinlaß- und -auslaßöffnungen zirkulieren
kann. Reinigen Sie die Öffnungen, falls
erforderlich, mit einem Staubsauger.
- Stecken Sie den Netzstecker wieder in die
Steckdose und schalten Sie das Gerät ein.
Wenn der Überhitzungsschutz das Gerät dann
wieder ausschaltet, so ...
- ziehen Sie den Netzstecker aus der Steckdose,
und
- lassen Sie das Gerät von Ihrem Philips-Händler
oder vom Philips Service Centre in Ihrem Lande
überprüfen.
Reinigung
- Stellen Sie den Geräteschalter (C) auf
Position
OO
, um das Gerät auszuschalten.
- Ziehen Sie den Netzstecker aus der Steckdose.
- Warten Sie, bis das Gerät ausreichend
abgekühlt ist.
- Sie können das Äußere des Gehäuses mit
einem angefeuchteten Tuch abwischen, auf das
Sie bei Bedarf ein wenig Spülmittel aufgetragen
haben. Achten Sie darauf, daß kein Wasser in
das Innere des Geräts eindringt.
- Reinigen Sie regelmäßig (bei normalem
Gebrauch zweimal jährlich) die Lufteinlaß- und
Luftauslaßöffnungen mit einem Staubsauger,
unter Verwendung des Bürstenaufsatzes.
 Loading...