


Provapor GC6026, 6024, 6022, 6020, 6019

2

3
J G I N
M
H
A
 C
C
K
B
F 
E
L D

4

5
ENGLISH 6
ITALIANO 14
NORSK 23
SVENSKA 31
SUOMI 39
DANSK 47
55
GC6026, GC6024, GC6022, GC6020, GC6019

6 ENGLISH
General description
ACap of the steam tank
BSteam tank
CIron stand
DOn/off switch with built-in pilot light
E'Steam tank heating up' pilot light (types GC6024/6026 only).The pilot light goes out when the appliance is ready for steam ironing
FSteam control (types GC6024/6026 only). q = moderate steam
R = maximum steam
GTemperature pilot light
HSteam activator button
ITemperature control
JSupply hose
KSoleplate
LMains cord
MAnti-calc funnel (type GC6026 only)
NShot of steam (type GC6026 only)
Important
For optimal safety, read these instructions carefully and look at the illustrations before you start using the appliance.
-Do not put perfume, vinegar, descaling agents or other chemicals in the water tank.
-Never use the appliance if it is damaged in any way. Regularly check if the mains cord and the supply hose are still undamaged and safe.
-If the mains cord of this appliance is damaged, it must always be replaced by Philips or a service centre authorised by Philips, as special tools and/or parts are required.
-Do not use any other cap on the steam tank than the cap that has been supplied with the appliance, as this cap also functions as a safety valve.
-Check if the voltage indicated on the bottom of the steam tank corresponds to the mains voltage in your home before you connect the appliance.
-Only connect the appliance to an earthed wall socket.
-Never immerse the iron or the steam tank in water.
-Never leave the iron unattended when it is connected to the mains.
-When you have finished ironing and even when you leave the iron
for a short while, unplug the iron and put it on the iron stand.
-Always place the steam tank on a stable, level and horizontal surface. Do not put the steam tank on the soft part of the ironing board.
-Always place the iron on the iron stand. Do not put the hot iron on the supply hose or the mains cord. Make sure the cord does not come into contact with the hot soleplate.
-The iron stand and the soleplate of the iron can become extremely hot and may cause burns if touched. If you want to move the steam tank, do not touch the iron stand.
-Do not allow the cord to come into contact with the hot soleplate.

ENGLISH 7
-Infirm persons should not be allowed to use the appliance without supervision. Keep an eye on children to make sure that they do not play with the appliance.
-If steam escapes from under the steam tank cap when the appliance is heating up, switch the appliance off and contact a service centre authorised by Philips.
-Do not remove the cap from the steam tank when the steam tank is under pressure. Follow the instructions under 'Fast refill'.
Preparing the appliance for use
1Check if the voltage indicated on the type plate corresponds to the mains voltage in your home.
2Remove any sticker or protective foil from the soleplate and clean the soleplate with a soft cloth.
3Fully unwind the mains cord (L) and supply hose (J).
4Place the steam tank (B) on a stable, level surface.
5Place the iron on the iron stand (C).
Filling the steam tank
Never immerse the steam tank in water.
1Make sure the on/off switch (D) has been set to 'off' and remove the plug from the wall socket.
C |
|
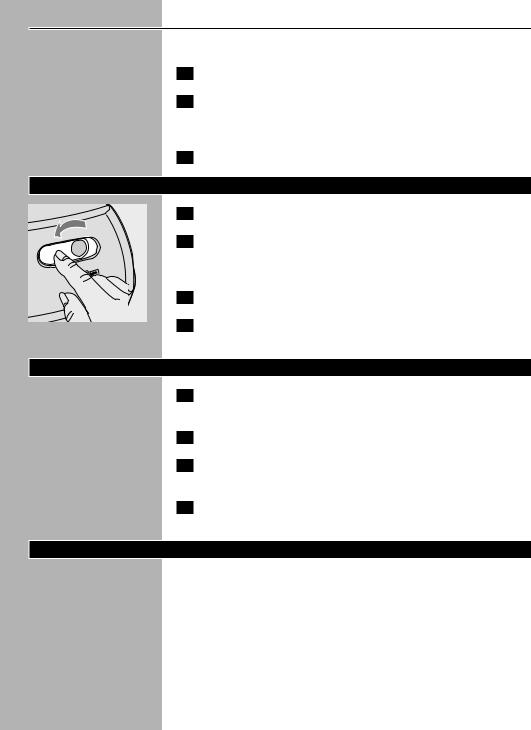
Slowly unscrew the cap (A) of the steam tank. |
||
2 |
||||
|
You may hear a sound when you remove the cap.This sound is caused |
|||
|
by the cold tank being under vacuum.This is perfectly normal. |
|
||
|
|
Pour water into the steam tank (max. 1 litre). |
|
|
3 |
||||
Use cold tap water to fill the tank up to the maximum level.
If the tap water in your area is very hard, we advise you to mix tap water with an equal portion of distilled water, or to use distilled water only.
Do not use perfume, vinegar, starch or chemically descaled water.
4 Screw the cap onto the filling aperture of the steam tank.

8 ENGLISH
|
|
|
|
XAM |
|
|
|
|
|
|
|
|
|
|
|
NENI |
|
|
|
F |
|
|
|
|
|
|
OLI |
L |
|
|
|
|
|
O |
C |
|
|
H |
|
|
|
F |
|
|
I |
|
|
|
|
O |
||||
|
T |
|
G |
A |
|
|
|
|
|
/ |
T |
O |
|
|
|
|
|
|
O |
||
D |
|
|
|
|
|
|
|
|
||
O |
|
|
|
|
|
|
|
|
|
|
N |
O |
|
|
|
|
|
|
|
|
|
|
N |
|
|
|
|
|
|
O |
|
N |
|
L |
|
|
|
|
|
|
|||
WA |
|
|
|
|
|
|
O |
|||
ON |
|
|
|
|
H |
IL |
L |
|||
|
A |
|
|
|
|
|
||||
O |
|
|
|
|
|
N |
Y |
|
||
|
L |
|
A |
|
N |
|
|
|
||
|
|
|
|
|
LGODO |
|
|
|
|
|
|
|
|
|
|
SILK |
|
|
|
|
|
Fast refill
C 1 First set the on/off switch (D) to 'off'.
2Press the steam activator button until you no longer hear any steam escaping from the appliance.
3Keep the steam activator button pressed in and slowly unscrew the cap of the steam tank by turning it anti-clockwise.This will depressurise the steam tank.
4Remove the mains plug from the wall socket.
5Fill the steam tank as described in section 'Filling the steam tank' and let the appliance heat up again.
Label with ironing |
Type of fabric |
Temperature |
Steam |
instructions |
|
dial |
control |
B |
Synthetic fabrics, e.g. acetate, acrylic, |
|
|
|
viscose, polyamide, polyester, and silk |
1 |
- |
C |
Wool |
2 |
q |
D |
Cotton, linen |
3 |
R |
ZPlease note: Z in the table means that the article cannot be ironed.
Setting the temperature
Always place the steam tank on a stable, level and horizontal surface
Do not put the steam tank on the soft part of he ironing board.
Always place the iron on the iron stand. Do not put the hot iron on the supply hose or the mains cord. Make sure the cord does not come into contact with the hot soleplate.
C |
|
Set the temperature dial to the required ironing temperature |
1 |
||
|
|
by turning it to the appropriate temperature indication. |
-Check the garment label for the required ironing temperature:
-1 Synthetic fabrics (e.g. acrylic, viscose, polyamide, polyester)
- 1 Silk
-2 Wool
-3 Cotton, linen
-When you do not know what kind of fabric the article is made of, try to iron a spot which will be invisible when you wear it.
-Silk, woollen and synthetic materials: iron the reverse side of the fabric to prevent shiny patches.
-Start ironing the articles that require the lowest ironing temperature, such as those made of synthetic fibres.

|
|
|
ENGLISH |
9 |
|
C |
|
Put the plug in the wall socket and let the appliance heat up by |
|
|
|
|
||
2 |
|
|||
|
|
|
setting the on/off switch (D) to 'on'. |
|
|
|
|
Cold start: the steam tank and the soleplate will now be heated |
|
3 |
||||
|
|
|
up. Heating up of the soleplate takes approximately 2 minutes |
|
|
|
|
and heating up of the steam tank takes approximately 8 minutes. |
|
|
|
|
Quick reheat: in case of refilling during the ironing process, the |
|
4 |
|
|||
|
|
|
heating up of the steam tank takes approximately 6 minutes. |
|
5Types GC6024/6026 only:As soon as the steam tank is hot enough for steaming, the pilot light (E) will go out.You can now start ironing.
Tips
If the fabric consists of various kinds of fibres, always select the temperature required by the most delicate fibre, i.e. the lowest temperature. For example: if an article consists of 60% polyester and 40% cotton, it should be ironed at the temperature indicated for polyester (1) and without steam.
When steam ironing woollen fabrics, shiny patches may occur.You can prevent this by using a dry pressing cloth or by turning the article inside out and ironing the reverse side.
Velvet and other fabrics that tend to acquire shiny patches should be ironed in one direction only (along with the nap) while applying very little pressure.
Do not use steam when you are ironing coloured silk.This could cause stains.
Steam ironing
Make sure that there is enough water in the steam tank.
Steam ironing is only possible at higher ironing temperatures:
1 Set the temperature dial to the recommended position.
See 'Setting the temperature'.
C 2 Keep the steam activator button (H) pressed in while you are steam ironing.
3 Wait until the 'steam tank heating up' pilot light has gone out.
B Steaming will start as soon as the set temperature has been reached.
Types GC6024/6026 only: During steam ironing, pilot light G will come on from time to time to indicate that the steam tank and the iron are being heated up to the right temperature and pressure.You can simply continue ironing while this happens.

10 ENGLISH
If you have not used the steaming facility for some time, the steam that was still present in the supply hose will have condensed into water. When you start steam ironing again, this may cause some spluttering in the appliance and a few droplets of water may escape from the soleplate.
BTo prevent droplets from falling onto your garments, hold the iron over an old cloth and press the steam activator button (H) until the steam production has normalised before you start steam ironing again.
Ironing without steam
1Set the temperature dial to the recommended position.
See 'Setting the temperature'.
2Do not press the steam activator button (H).
Some steam will escape if you press the steam button by accident while you are ironing. If the steam tank is empty or has not heated up yet, you will hear a clicking sound inside the tank.This phenomenon is caused by the opening of the steam valve and is perfectly harmless.
If you have been ironing at a high temperature and subsequently set the temperature dial (I) to a lower setting, wait until the temperature pilot light (G) goes on again before you continue ironing.This will prevent damage to your fabrics.
Other features
Steaming in vertical position.
C 1 Hanging curtains and clothes (jackets, suits, coats) can be steam ironed by holding the iron in vertical position.
Never direct the steam at people.
|
|
|
|
XAM |
|
|
|
|
|
|
|
NENIL |
|
|
O |
C |
|
OLI |
H |
|
|
|
I |
|
|
||
|
T |
|
G |
A |
|
|
T |
O |
|
|
|
||
D |
|
|
|
|
||
O |
|
|
|
|
|
|
N |
O |
|
|
|
|
|
|
N |
|
|
|
|
|
|
L |
|
|
|
|
|
WA |
|
|
|
|
||
ON |
|
|
|
|||
OA |
|
|
|
|||
|
L |
|
A |
|
N |
|
|
|
|
|
|
LGODO |
|
|
|
|
|
|
SILK |
|
H
I
LO N
Y
ENGLISH 11
Shot of steam (Type GC6026 only)
A powerful 'shot' of steam helps remove stubborn creases.
C |
|
For a shot of steam: set the steam control (F) to R (the large |
1 |
||
F |
cloud) and set the temperature dial (l) to position 3 or |
|
F |
MAX. |
|
O |
|
|
/ |
|
|
O |
|
|
|
N |
L |
O |
C 2 Press both steam activator button (H) and shot of steam button (N).
Variable steam (Types GC6024/6026 only)
F) Steam control (types GC6024/6026 only). q = moderate steam R = maximum steam.
Anti-Calc (Type GC6026 only)
To ensure a longer lifetime of the iron.
1Use the anti-calc funnel when you fill the steam tank with water.
Cleaning and maintenance
1Remove the mains plug from the wall socket and let the iron cool down, or use the first four steps of the "fast-refill" procedure.
Iron
1Clean the iron with a damp cloth.
2Wipe scale and any other deposits off the soleplate with a damp cloth and a non-abrasive (liquid) cleaner.
Never immerse the iron in water nor rinse it under the tap.
12 ENGLISH
Steam tank
Clean the steam tank after having used it 10 times.
1Remove the cap carefully.
2Rinse the steam tank with only 500 ml of fresh water. Pour out the water by holding the steam tank upside down over the sink.
3Screw the cap back onto the steam tank.
After ironing
C 1 Switch the appliance off by setting the on/off switch (D) to 'off'.
2 Depressurise the steam tank by pressing the steam activator button until you no longer hear any steam escaping from the appliance.
3 Remove the mains plug from the wall socket.
4Put the iron on the iron stand (C) and let it cool down before you put the appliance away.
Storage
1Remove the mains plug from the wall socket, let the iron cool down and set the steam control to position O.
2Empty the water tank.
3There are handgrips on either side of the steam tank for easy transport.
4Regularly check if the mains cord and the supply hose are still undamaged and safe.
Information & service
If you need information or if you have a problem, please visit the Philips Web site at www.philips.com or contact the Philips Customer Care Centre in your country (you will find its phone number in the worldwide guarantee leaflet). If there is no Customer Care Centre in your country, turn to your local Philips dealer or contact the Service Department of Philips Domestic Appliances and Personal Care BV.

ENGLISH 13
Troubleshooting
This chapter summarises the most common problems you could encounter with your iron. Please read the different sections for more details. If you are unable to solve the problem, please contact the Philips Customer Care Centre in your country (you will find its phone number in the worldwide guarantee leaflet). If there is no Customer Care Centre in your country, turn to your local Philips dealer or the nearest Philips Service Centre.
Problem
Some smoke comes out of the appliance after you have switched the appliance on for the first time.
Possible cause(s) |
Solution |
This is normal. Some parts of the iron |
This phenomenon will cease after a |
have been greased lightly in the |
short while. |
factory. |
|
Droplets of water escape from the |
The temperature dial (I) has been set |
Select the required ironing |
soleplate |
to a temperature that is too low for |
temperature as indicated in these |
|
steam ironing. |
instructions and the table. |
|
|
|
The steam tank has been placed on an unstable and/or uneven surface.
Put the steam tank on a stable and even surface.
|
When you start steam ironing, the |
This is normal. Hold the iron over an |
|
hose is cold. Steam condenses in the |
old cloth and press the steam activator |
|
hose, causing droplets of water to |
button (H).The cloth will absorb the |
|
escape from the soleplate. |
drops. After a few seconds the steam |
|
|
production will have normalised. |
The appliance does not produce |
The steam tank has not been switched |
Set the on/off switch (D) to 'on'. |
steam. |
on. |
|
|
|
|
|
The 'steam tank heating up' pilot light |
Wait until the pilot light has gone out. |
|
is still on (types GC6024/6026 only). |
|
|
|
|
There is no steam coming out of the soleplate.
Superheated (i.e. high-quality) steam is hardly visible, especially when the temperature dial has been set to maximum position and even less so when the ambient temperature is relatively high.
The soleplate is dirty. |
Impurities or chemicals present in the |
|
water have deposited on the soleplate. |
|
You have been ironing at too high |
|
temperatures. |
To check if the iron is really producing steam, hold a (cold) mirror in front of the soleplate vents.
Clean the soleplate with a damp cloth.
Clean the soleplate with a damp cloth. Select the recommended ironing temperature.

14 ITALIANO
Descrizione generale
ATappo del serbatoio vapore
BSerbatoio vapore
CSupporto ferro
DInterruttore on/off con spia incorporata
ESpia "Riscaldamento serbatoio vapore" (solo mod. GC6024/6026). La spia si spegne quando l'apparecchio è pronto per la stiratura a vapore.
FRegolatore vapore (solo mod. GC6024/6026). q = vapore moderato
R = vapore massimo.
GSpia termostato
HPulsante attivatore vapore
ITermostato
JCavo di alimentazione
KPiastra
LCavo di alimentazione
MImbuto anticalcare (solo mod. GC6026)
NGetto di vapore (solo mod. GC6026)
Importante
Per maggior sicurezza, leggete attentamente le istruzioni e osservate le illustrazioni prima di usare l'apparecchio.
-Non mettete profumo, aceto o sostanze disincrostanti nel serbatoio dell'acqua.
-Non usate l'apparecchio nel caso risultasse danneggiato in qualsiasi modo. Controllare periodicamente le condizioni del cavo di alimentazione e del cavo collegato alla presa elettrica.
-Nel caso in cui il cavo fosse danneggiato, dovrà essere sostituito con un cavo originale disponibile presso i centri Assistenza o i rivenditori autorizzati Philips in quanto sono necessari pezzi e/o utensili speciali.
-Per il serbatoio di vapore, utilizzate esclusivamente il tappo fornito con l'apparecchio, che funziona anche da valvola di sicurezza.
-Prima di collegare l'apparecchio, controllate che la tensione indicata sulla parte inferiore del serbatoio di vapore corrisponda a quella della rete locale.
-Collegate sempre l'apparecchio ad una presa provvista di messa a terra.
-Non immergete mai il ferro o il serbatoio del vapore nell'acqua.
-Non lasciate mai il ferro incustodito mentre è collegato alla presa di corrente.
-Quando avete finito di stirare o quando dovete allontanarvi anche solo per un attimo, togliete la spina dalla presa e mettete il ferro sull'apposito supporto.
-Appoggiate sempre il serbatoio di vapore su una superficie stabile e perfettamente piana. Non appoggiare il serbatoio sulla parte morbida dell'asse da stiro.
-Appoggiate sempre il ferro sull'apposito supporto. Non appoggiate il ferro sul cavo di alimentazione o su quello del vapore.

ITALIANO 15
-Il supporto del ferro e la piastra possono diventare roventi e causare ustioni se toccati. Se volete togliere il serbatoio, fate attenzione a non toccare il supporto.
-Fate in modo che il cavo non venga a contatto con la piastra bollente.
-L'apparecchio non deve essere usato da persone inferme senza la supervisione di un adulto. Fate in modo che i bambini non possano giocare con l'apparecchio.
-Nel caso di fuoriuscita di vapore dal tappo del serbatoio durante la fase di riscaldamento dell'apparecchio, spegnete subito il ferro e rivolgetevi ad un Centro Autorizzato Philips.
-Non togliete il tappo dal serbatoio mentre quest'ultimo è ancora sotto pressione. Seguite le istruizioni riportate in "Riempimento veloce".
Come preparare l'apparecchio per l'uso
1Controllate che la tensione indicata sulla targhetta corrisponda a quella della rete locale.
2Togliete eventuali fogli adesivi o protettivi dalla piastra e pulite quest'ultima con un panno morbido.
3Srotolate completamente il cavo collegato alla presa (L) e il cavo di alimentazione (J).
4Appoggiate il serbatoio del vapore (B) su una superficie piatta e stabile.
5Appoggiare il ferro sul suo supporto (C).
Come riempire il serbatoio
Non immergete mai il serbatoio nell'acqua.
1Controllate che l'interruttore on/off (D) sia in posizione "off" e togliete la spina dalla presa.
C |
|
Svitate lentamente il tappo (A) del serbatoio vapore. |
||
2 |
||||
|
Svitando il tappo potreste sentire uno strano rumore, dovuto al fatto |
|||
|
che il serbatoio freddo è sotto vuoto. Si tratta di un fenomeno del |
|||
|
tutto normale. |
|
|
|
|
|
Versate l'acqua nel serbatoio (max. 1 litro). |
||
3 |
||||
Per riempire il serbatoio fino al livello massimo, usate acqua fredda del rubinetto.
Nel caso l'acqua della vostra zona fosse particolarmente dura, vi consigliamo di mescolarla con la stessa quantità di acqua distillata o di usare solo acqua distillata.

16 ITALIANO
|
|
|
|
XAM |
|
|
|
|
|
|
|
|
|
|
|
NENI |
|
|
|
F |
|
|
|
|
|
|
OLI |
L |
|
|
|
|
|
O |
C |
|
|
H |
|
|
|
F |
|
|
I |
|
|
|
|
O |
||||
|
T |
|
G |
A |
|
|
|
|
|
/ |
T |
O |
|
|
|
|
|
|
O |
||
D |
|
|
|
|
|
|
|
|
||
O |
|
|
|
|
|
|
|
|
|
|
N |
O |
|
|
|
|
|
|
|
|
|
|
N |
|
|
|
|
|
|
O |
|
N |
|
L |
|
|
|
|
|
|
|||
WA |
|
|
|
|
|
|
O |
|||
ON |
|
|
|
|
H |
IL |
L |
|||
|
A |
|
|
|
|
|
||||
O |
|
|
|
|
|
N |
Y |
|
||
|
L |
|
A |
|
N |
|
|
|
||
|
|
|
|
|
LGODO |
|
|
|
|
|
|
|
|
|
|
SILK |
|
|
|
|
|
Non usate profumi, aceto, amido o acqua decalcificata chimicamente.
4 Avvitate il tappo sull'apertura di riempimento del serbatoio.
Riempimento rapido
C 1 Per prima cosa mettete l'interruttore on/ff (D) in posizione "off".
2Premete il pulsante dell'attivatore di vapore fino a quando non avvertite più la fuoriuscita di vapore dall'apparecchio.
3Tenendo premuto il pulsante di attivatore vapore, svitate lentamente il tappo del serbatoio, ruotando in senso antiorario, per depressurizzare il serbatoio.
4Togliete la spina dalla presa di corrente.
5Riempite il serbatoio come indicato nella sezione "Come riempire il serbatoio" e fate riscaldare nuovamente l'apparecchio.
Etichetta con le istruzioni per la stiratura.
B
C
D
Z
Tipo di tessuto |
Termostato |
Regolator |
|
|
e vapore |
Tessuti sintetici, ad es. |
1 |
- |
acetato, acrilico, viscosa, |
|
|
poliammide, poliestere e |
|
|
seta. |
|
|
Lana |
2 |
q |
Cotone, lino |
3 |
R |
Nota: Z nella tabella indica che il capo non può essere stirato.
Come impostare la temperatura
Appoggiate sempre il serbatoio su una superficie stabile e perfettamente piana. NOn appoggiate il serbatoio sulla parte morbida
dell'asse da stiro.
Appoggiate sempre il ferro sull'apposito supporto. Non appoggiate il ferro sul cavo di alimentazione o su quello del vapore.
C |
|
Impostate la temperatura richiesta ruotando il termostato nella |
1 |
||
|
|
posizione corretta. |
-Leggete l'etichetta apposta sui vestiti per conoscere l'esatta temperatura di stiratura.
-1 Fibre sintetiche (es. acrilico, viscosa, poliammide, poliestere)
-1 Seta

ITALIANO 17
- 2 Lana
-3 Cotone, lino
-Se non conoscete la composizione di un tessuto, per stabilire la temperatura giusta, fate una prova su un angolo del capo non visibile quando indossato.
-Seta, lana e materiali sintetici: stirate il capo al rovescio per evitare tracce di lucido.
-Iniziate a stirare i capi che richiedono una temperatura più bassa, come ad esempio quelli in fibra sintetica.
C |
|
Inserite la spina nella presa di corrente e lasciate riscaldare |
2 |
||
|
|
l'apparecchio mettendo l'interruttore on/off (D) in posizione |
"on".
3Il serbatoio e la piastra dovrebbero essersi riscaldate. Per riscaldare la piastra occorrono all'incirca 2 minuti mentre per il serbatoio occorrono all'incirca 8 minuti.
4Nel caso in cui occorra reintrodurre acqua nel serbatoio durante la stiratura, occorrerà aspettare all'incirca 6 minuti affinchè il serbatoio raggiunga la temperatura.
5Solo mod. GC6024/6026: la spia (E) si spegne non appena il serbatoio è sufficientemente caldo per la stiratura a vapore. A questo punto potete iniziare a stirare.
Consigli
Nel caso di tessuti composti da fibre diverse, scegliete sempre la temperatura richiesta per la fibra più delicata, quindi la più bassa. Ad esempio: un capo composto per il 60% di poliestere e per il 49% di cotone deve essere stirato alla temperatura consigliata per il poliestere (1), e senza vapore.
Se stirati a vapore, i capi in lana possono risultare macchiati di lucido. Per evitare questo inconveniente, mettete un panno asciutto fra il capo da stirare e il ferro oppure stiratelo al rovescio.
Il velluto e gli altri tessuti che tendono a diventare lucidi devono essere stirati sempre nella stessa direzione (quella del pelo), esercitando una leggerissima pressione.
Non usate il vapore per stirare la seta colorata, per evitare di macchiare il tessuto.
Stiratura a vapore
Controllate che ci sia una quantità d'acqua sufficiente nel serbatoio.
La stiratura a vapore è possibile solo alle alte temperature:
1 Impostate il termostato alla temperatura desiderata.
Vedere la sezione "Come impostare la temperatura".

18 ITALIANO
C 2 Durante la stiratura a vapore, tenete premuto il pulsante dell'attivatore di vapore (H).
3 Aspettate fino a quando non si spegnerà la spia "riscaldamento serbatoio vapore".
B Il vapore inizierà a fuoriuscire non appena verrà raggiunta la temperatura impostata.
Solo mod. GC6024/6026: durante la stiratura a vapore, la spia G si accenderà di tanto in tanto per indicare che il serbatoio e il ferro si stanno riscaldando per raggiungere la temperatura e la pressione corrette. In ogni caso, potete continuare a stirare.
Dopo un certo periodo di inattività, il vapore ancora presente nel cavo si sarà condensato sotto forma di acqua. Quando ricomincerete a stirare, quindi, dalla piastra potrebbero fuoriuscire alcune gocce d'acqua, con un leggero gorgoglio.
BPer evitare che queste gocce finiscano sui vostri capi, tenete il ferro su uno straccio e premete alcune volte il pulsante dell'attivatore di vapore
(H)fino a quando la produzione di vapore non si sarà normalizzata. A questo punto, potete iniziare a stirare normalmente.
Stiratura senza vapore.
1Impostate il termostato alla temperatura desiderata.
Vedere la sezione "Come impostare la temperatura".
2Non premete il pulsante dell'attivatore di vapore (H).
Premendo per sbaglio il pulsante del vapore mentre state stirando, potrebbe fuoriuscire del vapore. Se il serbatoio è vuoto o non è stato sufficientemente riscaldato, potreste sentire un rumore metallico all'interno del serbatoio. Si tratta di un fenomeno del tutto innocuo, causato dall'apertura della valvola del vapore.
Se dopo aver stirato ad un'alta temperatura decidete di ridurre quest'ultima usando l'apposito termostato (I), aspettate fino a quando non si sarà riaccesa la spia della temperatura (G) prima di continuare a stirare, per evitare di rovinare i tessuti.

ITALIANO 19
Altre caratteristiche
Come stirare in posizione verticale
C 1 Per stirare a vapore le tende e i capi appesi (giacche, cappotti), tenete il ferro in posizione verticale.
Non puntate mai il getto di vapore verso le persone.
|
|
|
|
XAM |
|
|
|
|
|
|
|
NENIL |
|
|
O |
C |
|
OLI |
H |
|
|
|
I |
|
|
||
|
T |
|
G |
A |
|
|
T |
O |
|
|
|
||
D |
|
|
|
|
||
O |
|
|
|
|
|
|
N |
O |
|
|
|
|
|
|
N |
|
|
|
|
|
|
L |
|
|
|
|
|
WA |
|
|
|
|
||
ON |
|
|
|
|||
OA |
|
|
|
|||
|
L |
|
A |
|
N |
|
|
|
|
|
|
LGODO |
|
|
|
|
|
|
SILK |
|
F
F
O
/ O
|
|
O |
|
N |
|
|
|
O |
|
H |
I |
L |
L |
|
|
N |
Y |
|
Getto di vapore (solo mod. GC6026)
Il potente getto di vapore è utilissimo per eliminare le pieghe più ostinate.
C 1 Per utilizzare il getto di vapore: impostate il regolatore di vapore (F) in posizione R (la nuvoletta più grande) e il termostato (I) in posizione 3 oppure MAX.
C 2 Premete contemporaneamente il pulsante attivatore vapore
(H) e il pulsante getto di vapore (N).
Vapore variabile (solo mod. GC6024/6026).
F) Regolatore vapore (solo mod. GC6024/6026). q = vapore moderato R = vapore massimo.
Dispositivo anticalcare (solo mod. GC6026).
Garantisce una maggior durata del ferro.
1Quando riempite il serbatoio con l'acqua, usate l'imbuto anticalcare.
Pulizia e manutenzione
1Togliete la spina dalla presa e lasciate raffreddare il ferro, oppure seguite le prime quattro fasi della procedura "Riempimento rapido".

20 ITALIANO
Ferro
1Pulite il ferro con un panno umido.
2Togliete i residui di calcare dalla piastra usando un panno umido e un detergente (liquido) non abrasivo.
Non immergete mai il ferro nell'acqua, nè risciacquatelo sotto il rubinetto.
Serbatoio del vapore
Pulite il serbatoio del vapore dopo averlo usato una decina di volte.
1Togliete il tappo con la massima attenzione.
2Risciacquate il serbatoio con 500 ml di acqua pulita e svuotatelo tenendolo capovolto sopra il lavandino.
3Riavvitate il tappo sul serbatoio del vapore.
Al termine della stiratura
C 1 Spegnete l'apparecchio mettendo l'interruttore on/off (D) in posizione "off".
2 Depressurizzate il serbatoio del vapore tenendo premuto il pulsante dell'attivatore di vapore fino a quando non avvertirete più la fuoriuscita di vapore dall'apparecchio.
3 Togliete la spina dalla presa di corrente.
4Appoggiate il ferro sul supporto (C) e lasciatelo raffreddare prima di riporlo.
Come riporre il ferro
1Togliete la spina dalla presa, lasciate raffreddare il ferro e mettete il regolatore del vapore in posizione O.
2Svuotate il serbatoio.
3Per facilitare il trasporto, il serbatoio del vapore è provvisto di maniglie su entrambi i lati.
4Controllate periodicamente le condizioni del cavo di alimentazione e del cavo collegato alla presa.
 Loading...