


Always here to help you
Register your product and get support at www.philips.com/welcome
HC9450

1
1 |
9 |
8
2
3 |
|
7 |
10 |
4 |
5 |
6 |
|
|
|
11
12
13 |
14 |

ENGLISH 4 INDONESIA 13
22
BAHASA MELAYU 32
41
TIẾNGVIỆT 50
59
67
83 91
HC9450

4 ENGLISH
Introduction
Congratulations on your purchase and welcome to Philips!
To fully benefit from the support that Philips offers, register your product at
www.philips.com/welcome.
General description (Fig. 1)
1Cutting unit
2Memory button
3Touch area
4On/off button
5Length setting lock
6Charging light
7Memory settings
8Display
9Trimming comb 1-7mm
10Trimming comb 7-24mm
11Trimming comb 24-42mm
12Adapter
13Small plug
14Cleaning brush
Important
Read this user manual carefully before you use the appliance and save it for future reference.
Danger
-- Keep the appliance and the adapter dry.
Warning
-- The adapter contains a transformer. Do not cut off the adapter to replace it with another plug, as this causes a hazardous situation.
-- This appliance is not intended for use by persons (including children) with reduced physical, sensory or mental capabilities, or lack of experience and knowledge, unless they have been given supervision or instruction concerning use of the appliance by a person responsible for their safety.
-- Children should be supervised to ensure that they do not play with the appliance.
Caution
-- This appliance is not washable. Never immerse the appliance in water, nor rinse it under the tap.
-- Always check the appliance before you use it.
-- Do not use the appliance, adapter or any other part if it is damaged, as this may cause injury.
-- Always replace a damaged adapter or part with one of the original type. -- Only use this appliance for its intended purpose as shown in the user
manual.
-- Never use compressed air, scouring pads, abrasive cleaning agents or aggressive liquids such as petrol or acetone to clean the appliance.

ENGLISH 5
Electromagnetic fields (EMF)
This Philips appliance complies with all applicable standards and regulations regarding exposure to electromagnetic fields.
General
-- The appliance is equipped with an automatic voltage selector and is suitable for mains voltages ranging from 100 to 240 volts.
-- The adapter transforms 100-240 volts to a safe low voltage of less than 24 volts.
Charging
Charge the appliance fully before you use it for the first time or after a long period of disuse.
When it is charged for 1 hour, the appliance has a cordless operating time of up to 120 minutes.
Note:After charging the appliance fully for the first time,you can also use the appliance directly from the mains.Simply connect the appliance to the mains.
Charging indications
Battery low indication
-- When the battery is almost empty, the charging light starts to flash orange.
Charging
-- When the appliance is charging, the charging light flashes blue.
Battery fully charged
-- When the battery is fully charged, the charging light lights up blue continuously.
Note:After 30 minutes,the charging light goes out.
Charging the appliance
1Make sure the appliance is switched off.
2Insert the small plug into the appliance.
3Put the adapter in the wall socket.
4After charging, remove the adapter from the wall socket and pull the small plug out of the appliance.

6 ENGLISH
Optimising the lifetime of the rechargeable battery
When you have charged the appliance for the first time, we advise you to use it until the battery is completely empty. Continue to use the appliance until the motor almost stops operating during a session.Then recharge the battery. Follow this procedure at least twice a year.
Using the appliance
The hair length settings are indicated in millimeters.The settings correspond to the remaining hair length after trimming.
Be careful when you trim for the first time.Do not move the trimmer too fast. Make smooth and gentle movements.
Tip:Start trimming at a high length setting and reduce the length setting gradually until you have reached the desired hair length.
Using the display
This appliance has a swipe and tap display that you can use in three different ways:
1 Quickly swipe your thumb or a finger across the touch area to scroll through the length settings quickly.
2 Slowly swipe your thumb or a finger across the touch area to scroll through the length settings slowly.
3 Tap on the bottom or top part of the touch area to go through the length settings one by one.To scroll through the length settings
automatically in steps of 0.1mm, tap and hold the bottom or top part of the touch area.

ENGLISH 7
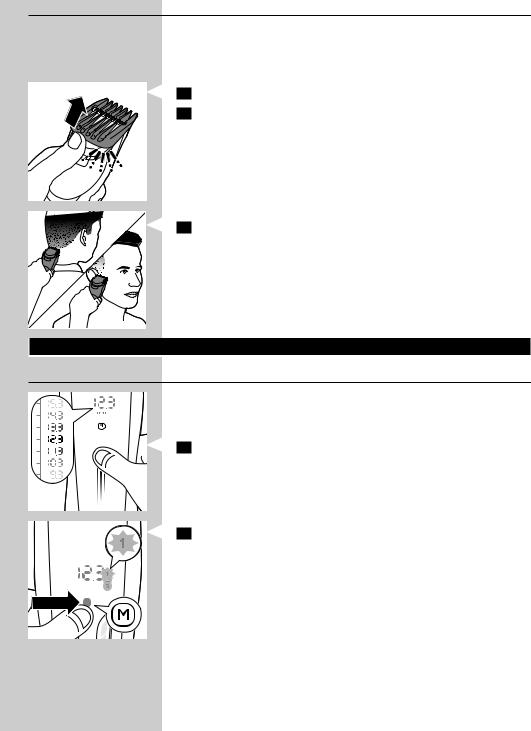
Trimming with comb
There are 3 different combs: -- 1-7mm
-- 7-24mm -- 24-42mm
1Attach one of the combs to the appliance.
2Swipe upwards or downwards to select the desired length setting.
Note:When you trim for the first time,start at the highest length setting to familiarise yourself with the appliance.
3Switch on the appliance.
4To trim most effectively, move the trimmer against the hair growth direction. Make sure that the surface of the comb always stays in contact with the skin.
8 ENGLISH
Trimming without comb
Use the trimmer without the trimming comb to trim hair close to the skin (0.5mm) or to contour the neckline and sideburns.
Be careful when you trim without comb because the cutting element removes every hair it touches.
1Push the comb off the appliance.
2Switch on the appliance.
3 Touch the hair lightly with the trimmer. Make well-controlled movements.
Features
Memory
The appliance has a memory which allows you to save three frequently used length settings for each comb. Each comb has different length ranges.
Saving a setting
1Swipe upwards or downwards to select the desired length setting.
2To enter the memory, press the ‘M’ button for 2 seconds.
,, Number 1 starts to flash.
2 sec.

ENGLISH 9
Note:If you want to save a length setting as number 2 or 3 in the memory, press the‘M’button again (once for number 2 and twice for number 3).
3 To save a length setting as number 1, 2 or 3 of the memory, press the ‘M’ button for 2 seconds.
,, The display shows the word ‘SEt’ when the length setting is correctly saved. Memory setting number 1,2 or 3 lights up continuously.
2 sec.
Selecting a memory setting
1 To enter the memory, press the ‘M’ button once.
,, Number 1 starts to flash.
Note:To select number 2 or 3 in the memory,press the‘M’button again (once for number 2 and twice for number 3).
Length setting lock
This feature prevents accidental changing of the length setting during trimming. Every time you switch on the appliance, the length setting lock is activated.You can only change the length setting if you switch off the appliance.
1 Swipe upwards or downwards to select the desired length setting.
2 Switch on the appliance.
,, The lock symbol starts to flash.You cannot change the length setting anymore.
Note:If you want to select a different length setting,switch off the appliance. Swipe on the display to select the desired length setting and switch on the appliance again.

10 ENGLISH
Cleaning
Never use scouring pads, abrasive cleaning agents or aggressive liquids such as alcohol, petrol or acetone to clean the appliance.
Never immerse the appliance in water or rinse it under the tap.
1Make sure the appliance is switched off and disconnected from the mains.
2Wipe the housing of the appliance with a dry cloth.
3 Remove the comb and clean it with the brush.
2 |
4 Press the release button (1).The cutting unit comes off the |
|
appliance (2). |
||
|
1
5 Clean the cutting unit with the brush.
6 Clean the inside of the appliance with the cleaning brush. Never immerse the appliance in water or rinse it under the tap.
ENGLISH 11
7 Insert the lug of the cutting unit into the guiding slot (1) and push the cutting unit back onto the appliance (2).
Note:If the message‘CL’is shown on the display,too much hair has collected between the comb and the cutting unit.Remove the comb and cutting unit and clean them with the cleaning brush supplied.Also clean the top edge of the handle with the cleaning brush supplied.
Replacement
Only replace a worn or damaged cutting unit with an original Philips cutting unit, available from authorised Philips service centre.
2 |
1 Press the release button (1).The cutting unit comes off the |
appliance (2). |
1
2 Insert the lug of the new cutting unit into the guiding slot (1) and push the cutting unit onto the appliance (2).
Ordering accessories
To buy accessories or spare parts, visit www.shop.philips.com/service or go to your Philips dealer.You can also contact the Philips Consumer
Care Centre in your country (see the worldwide guarantee leaflet for contact details).
Recycling
Do not throw away the appliance with the normal household waste at the end of its life, but hand it in at an official collection point for recycling.
By doing this, you help to preserve the environment.

12 ENGLISH
Removing the rechargeable battery
Note:We strongly advise you to have a professional remove the rechargeable
2battery.
Only remove the rechargeable battery if it is completely empty.
1 Disconnect the appliance from the mains and let the appliance
|
1 |
|
operate until the motor stops. |
|
2 |
Press the release button (1) and remove the cutting unit (2). |
|
|
|
||
|
|
3 |
Insert the screwdriver between the motor unit and the back panel of |
|
|
|
the appliance. Press down the screwdriver as far as it will go. |
2 |
|
4 |
Tilt the handle of the screwdriver downwards (1) and separate the |
|
|
back panel from the appliance (2). |
|
|
|
|
1
5Remove the side panels. Pull the bottom part of the printed circuit board with the rechargeable battery attached from the appliance.
6Cut the wires to separate the rechargeable battery from the
appliance.
Do not connect the appliance to the mains again after you have opened it.
Guarantee and support
If you need information or support, please visit www.philips.com/ support or read the separate worldwide guarantee leaflet.

INDONESIA 13
Pendahuluan
Selamat atas pembelian Anda dan selamat datang di Philips!
Untuk memanfaatkan sepenuhnya dukungan yang ditawarkan Philips, daftarkan produk Anda di www.philips.com/welcome.
Gambaran umum (Gbr. 1)
1Unit pemotong
2Tombol memori
3Area sentuh
4Tombol on/off
5Kunci setelan panjang
6Lampu pengisian daya
7Setelan memori
8Layar
9Sisir pemangkas 1-7 mm
10Sisir pemangkas 7-24 mm
11Sisir pemangkas 24-42 mm
12Adaptor
13Steker kecil
14Sikat pembersih
Penting
Bacalah petunjuk pengguna ini secara saksama sebelum Anda menggunakan alat dan simpan untuk referensi di kemudian hari.
Bahaya
-- Jagalah agar alat dan adaptor selalu kering.
Peringatan
-- Adaptor berisi trafo. Jangan memotong adaptor dan menggantinya dengan steker lain, karena dapat membahayakan.
-- Alat ini tidak dimaksudkan untuk digunakan oleh orang (termasuk anakanak) dengan cacat fisik, indera atau kecakapan mental yang kurang, atau kurang pengalaman dan pengetahuan, kecuali jika mereka diberikan pengawasan atau petunjuk mengenai penggunaan alat oleh orang yang bertanggung jawab bagi keselamatan mereka.
-- Anak kecil harus diawasi untuk memastikan mereka tidak bermain-main dengan alat ini.
Perhatian
-- Alat ini tidak dapat dicuci. Jangan sekali-kali merendam alat di dalam air atau membilasnya di bawah keran.
-- Selalu periksa alat sebelum Anda menggunakannya.
-- Jangan gunakan alat, adaptor, atau komponen lainnya jika telah rusak, karena dapat menyebabkan cedera.
-- Selalu ganti adaptor atau komponen yang rusak dengan yang asli. -- Hanya gunakan alat ini untuk keperluan yang dimaksud di petunjuk
pengguna.
-- Jangan sekali-kali menggunakan udara bertekanan, sabut gosok, bahan pembersih abrasif atau cairan agresif seperti bensin atau aseton untuk membersihkan alat.

14 INDONESIA
Medan elektromagnet (EMF)
Alat Philips ini mematuhi semua standar dan peraturan yang berlaku terkait paparan terhadap medan elektromagnet.
Umum
-- Alat ini dilengkapi pemilih voltase otomatis dan cocok untuk voltase listrik antara 100 hingga 240 volt.
-- Adaptor mengubah tegangan 100-240 volt menjadi tegangan rendah yang aman di bawah 24 volt.
Pengisian daya
Isilah daya alat sampai penuh sebelum digunakan untuk pertama kali atau jika sudah lama tidak digunakan.
Bila diisi daya selama 1 jam, alat memiliki waktu operasi tanpa kabel hingga
120 menit.
Catatan:Setelah mengisi daya alat sepenuhnya untuk pertama kalinya, Anda juga bisa menggunakan alat langsung dari sumber listrik.Cukup sambungkan alat ke sumber daya listrik.
Indikasi pengisian daya
Indikator baterai lemah
-- Apabila baterai hampir kosong, lampu pengisian mulai berkedip jingga.
Pengisian daya
-- Saat pengisian daya, lampu pengisian daya akan berkedip biru.
Baterai terisi penuh
-- Saat baterai terisi penuh, lampu pengisian daya akan terus menyala biru.
Catatan:Setelah 30 menit,lampu pengisian daya akan padam.
Mengisi baterai pencukur
1Pastikan alat telah dimatikan.
2Masukkan steker kecil ke dalam alat.
3 Masukkan adaptor ke stopkontak dinding.
4 Setelah pengisian daya selesai, cabut adaptor dari stopkontak dinding dan lepaskan steker kecil dari alat.

INDONESIA 15
Mengoptimalkan masa pakai baterai isi-ulang
Setelah mengisi daya alat untuk pertama kalinya, kami sarankan Anda untuk menggunakannya hingga baterainya benar-benar kosong. Lanjutkan penggunaan alat hingga motor hampir berhenti beroperasi dalam sesi pemangkasan. Kemudian isi ulang baterai. Ikuti prosedur ini setidaknya dua kali setahun.
Menggunakan alat
Setelan panjang rambut menggunakan ukuran milimeter. Setelan ini menunjukkan panjang rambut yang tersisa setelah pemangkasan.
Hati-hati saat pertama kali memangkas. Jangan menggerakkan pemangkas terlalu cepat. Lakukan gerakan yang halus dan perlahan.
Tip:Mulai pemangkasan di setelan panjang yang tinggi dan kurangi setelan panjang sedikit demi sedikit hingga Anda mencapai panjang rambut yang diinginkan.
Menggunakan layar
Alat ini memiliki layar usap dan ketuk yang dapat Anda gunakan dengan tiga cara berbeda:
1Usapkan ibu jari atau satu jari dengan cepat pada area sentuh untuk menggulir antar setelan panjang dengan cepat.
2Usapkan ibu jari atau satu jari secara perlahan pada area sentuh untuk menggulir antar setelan panjang perlahan.
3Ketuk bagian bawah atau atas area sentuh untuk melihat setelan panjang satu per satu. Untuk menggulir antar setelan panjang secara otomatis dalam langkah 0,1mm, ketuk dan tahan bagian bawah atau atas area sentuh.

16 INDONESIA
Pemangkas dengan sisir
Terdapat 3 sisir yang berbeda: -- 1-7 mm
-- 7-24 mm -- 24-42 mm
1 Pasang salah satu sisir ke alat.
2 Usap ke atas atau ke bawah untuk memilih setelan panjang yang diinginkan.
Catatan:Saat pertama kalinya memangkas,mulailah dengan setelan tertinggi agar Anda terbiasa dengan alat ini.
3 Hidupkan alat.
4 Untuk pemangkasan paling efektif, gerakkan pemangkas berlawanan dengan arah tumbuh rambut. Pastikan bahwa permukaan sisir selalu bersentuhan dengan kulit.

INDONESIA 17
Memangkas tanpa sisir
Gunakan alat tanpa sisir pemangkas untuk memangkas rambut yang paling dekat dengan kulit (0,5 mm) atau untuk membentuk lekukan garis leher dan cambang.
Hati-hati saat memangkas tanpa sisir, karena elemen pemangkas memotong setiap rambut yang tersentuh.
1Lepaskan sisir dari alat.
2Hidupkan alat tersebut.
3 Sentuh rambut perlahan menggunakan pemangkas. Buat gerakan yang teratur dan terkendali.
Fitur
Memori
Alat memiliki memori yang memungkinkan Anda menyimpan tiga setelan panjang yang sering digunakan untuk tiap sisir.Tiap sisir memiliki rentang panjang yang berbeda.
Menyimpan setelan
1Usap ke atas atau ke bawah untuk memilih setelan panjang yang diinginkan.
2Untuk memasukkan memori, tekan tombol ‘M’ selama 2 detik.
,, Nomor 1 mulai berkedip.
2 sec.

18 INDONESIA
Catatan:Apabila Anda ingin menyimpan setelan sebagai nomor 2 atau 3 pada memori,tekan tombol‘M’lagi (satu kali untuk nomor 2 dan dua kali untuk nomor 3).
3 Untuk menyimpan setelan panjang sebagai nomor 1, 2, atau 3 pada memori, tekan tombol ‘M’ selama 2 detik.
,, Layar akan menampilkan kata ‘SET’ bila setelan panjang tersimpan dengan benar. Setelan memori nomor 1, 2, atau 3 akan terus menyala.
2 sec.
Memilih setelan memori
1 Untuk memasukkan memori, tekan tombol ‘M’ satu kali. ,, Nomor 1 mulai berkedip.
Catatan:Untuk memilih nomor 2 atau 3 pada memori,tekan tombol‘M’lagi (satu kali untuk nomor 2 dan dua kali untuk nomor 3).
Kunci setelan panjang
Fitur ini mencegah perubahan setelan panjang yang tidak disengaja saat memangkas. Setiap kali Anda menghidupkan alat, kunci setelan panjang akan aktif. Anda hanya bisa mengubah setelan panjang apabila alat dimatikan.
1Usap ke atas atau ke bawah untuk memilih setelan panjang yang diinginkan.
2 Hidupkan alat tersebut.
,, Simbol kunci mulai berkedip.Anda tidak lagi dapat mengubah setelan panjang.
Catatan:Apabila Anda ingin memilih setelan panjang yang berbeda,matikan alat.Usap layar untuk memilih setelan panjang yang diinginkan dan hidupkan alat kembali.

INDONESIA 19
Membersihkan
Jangan sekali-kali menggunakan sabut gosok, bahan pembersih abrasif atau cairan agresif seperti alkohol, bensin atau aseton untuk membersihkan alat.
Jangan merendam alat dalam air atau membilasnya di bawah keran.
1Pastikan alat sudah dimatikan dan dicabut dari listrik.
2Seka rangka luar alat dengan kain kering.
3 Lepaskan sisir dan bersihkan dengan sikat.
2 |
4 Tekan tombol pelepas (1). Unit pemotong lepas dari alat (2). |
|
1
5 Bersihkan unit pemotong dengan sikat.
6 Bersihkan bagian dalam alat dengan sikat pembersih.
Jangan merendam alat dalam air atau membilasnya di bawah keran.

20 INDONESIA
7 Masukkan cuping unit pemotong ke dalam selot pemandu (1) dan dorong unit pemotong kembali ke dalam alat (2).
Catatan:Apabila pesan‘CL’muncul di layar,berarti rambut yang menumpuk di antara sisir dan unit pemotong sudah terlalu banyak.Lepaskan sisir dan unit pemotong,lalu bersihkan keduanya menggunakan sikat pembersih yang disertakan.Bersihkan juga tepi atas gagang dengan sikat pembersih yang disertakan.
Penggantian
Ganti unit pemotong yang sudah aus atau rusak hanya dengan unit pemotong Philips asli, tersedia di pusat servis resmi Philips.
1 Tekan tombol pelepas (1). Unit pemotong lepas dari alat (2).
2
1
2 Masukkan cuping unit pemotong baru ke dalam selot pemandu (1) dan dorong unit pemotong kembali ke dalam alat (2).
Memesan aksesori
Untuk membeli aksesori atau suku cadang, kunjungi
www.shop.philips.com/service atau pergi ke dealer Philips Anda.
Anda juga dapat menghubungi Pusat Layanan Konsumen Philips di negara
Anda (lihat pamflet garansi internasional untuk rincian kontak).
Mendaur ulang
Jangan membuang alat bersama limbah rumah tangga biasa jika alat sudah tidak bisa dipakai lagi, tetapi serahkan ke tempat pengumpulan barang bekas yang resmi untuk didaur ulang. Dengan melakukan ini, berarti Anda ikut membantu melestarikan lingkungan.
INDONESIA 21
Melepas baterai isi ulang
Catatan:Kami sangat menyarankan agar baterai isi ulang hanya dilepaskan
2oleh seorang ahli.
Hanya keluarkan baterai yang dapat diisi ulang ini jika sudah benar-benar kosong.
|
1 Lepaskan alat dari sumber listrik dan biarkan alat berjalan sampai |
1 |
motornya berhenti sendiri. |
2 Tekan tombol pelepas (1) lalu keluarkan unit pemotong (2).
3Masukkan obeng di antara unit motor dan panel belakang alat. Tekan obeng sedalam mungkin.
2 |
4 Miringkan gagang obeng ke bawah (1) dan pisahkan panel belakang |
|
dari alat (2). |
1
5Lepaskan panel samping.Tarik bagian bawah papan sirkuit bercetak dengan baterai isi ulang yang terpasang dari alat.
6 Potong kabel untuk memisahkan baterai isi-ulang dari alat. Jangan lagi menghubungkan alat ke listrik setelah Anda membukanya.
Garansi dan dukungan
Jika Anda membutuhkan informasi atau dukungan, harap kunjungi
www.philips.com/support atau bacalah pamflet garansi internasional.

22
!www.philips.co.kr.
( 1)
1 |
|
2 |
|
3 |
|
4 |
|
5 |
|
6 |
|
7 |
|
8 |
|
9 |
(1-7mm) |
10 |
(7-24mm) |
11 |
(24-42mm) |
.
-- .
-- . .
-- .
-- .
-- ..
-- .
-- , .
-- .
-- .
-- , , ,.
EMF( )
EMF( ).

23
-- 100-240V.
-- 100-240V 24V.
,.
1 120 .
: ..
-- .
-- .
-- .
: 30 .
1 .
2 .
3 .
4,.
. .. 1 .

24
..
. .
: .
.
1.
2 .
3 . 0.1mm .

25
.
-- 1-7mm -- 7-24mm -- 24-42mm
1 .
2 .
: .
3 .
4..

26
(0.5mm) .
.
1.
2.
3 .
. .
1.
2‘M’ 2 .
,, 1 .
2 sec.

27
: 2 3 ‘M’( 2 , 3 ).
3 1 , 2 3 ‘M’2 .
,, ‘Set’. 1 , 2 , 3
.
2 sec.
1 ‘M’ . ,, 1 .
: 2 3 ‘M’( 2 , 3 ).
...
1 .
2 .
,, ..
: ..

28
, , ,.
.
1.
2.
3 .
2 |
4 (1) . (2) |
|
. |
||
|
1
5 .
 6 ..
6 ..
 Loading...