


 Loading...
Owner’s Manual for advanced features
Digital Camera
Model No. DMC-LX100
Please read these instructions carefully before using this product, and save this manual for future use.
|
Message Display |
→299 |
|
|
|
|
Q&A Troubleshooting |
→310 |
|
|
|
|
|
|
|
Finding the information you need |
→2 |
|
|
|
|
Contents |
→4 |
|
|
|
|
Contents by Function |
→10 |
|
|
|
|
Menu list |
→303 |
Register online at |
SQW0021 |
www.panasonic.com/register |
M0914KZ0 |
(U.S. customers only) |
|

Finding the information you need
In this “Owner’s Manual for advanced features”, you can find the information you need from the following pages.
By clicking a page number, you can jump to the linked page and quickly find the information.
Search from “Contents” |
P.4 - |
|
|
|
|
Search from the list of function |
|
names |
P.10 - |
“Contents by Function”
Search from “Names and |
P.14 - |
|||
Functions of Main Parts” |
||||
|
||||
|
|
|
|
|
Search from “List of monitor/ |
P.293 - |
|||
viewfinder displays” |
|
|||
|
|
|||
|
|
|
||
Search from the list of |
|
|
||
on-screen messages |
|
P.299 - |
||
“Message displays” |
|
|
||
|
|
|||
Search from the menu list |
P.303 - |
|||
“Menu list” |
|
|
||
|
|
|
||
[Rec].......................... |
P.303 |
[Setup] ...................... |
P.308 |
|
[Motion Picture]......... |
P.305 |
[Playback].................. |
P.309 |
|
[Custom].................... |
P.306 |
|
|
|
|
|
|
|
|
Search from “Q&A |
P.310 - |
|
Troubleshooting” |
||
|
For details on how to use this manual, see the next page.
Wi-Fi® function →224
2
SQW0021

How to use this manual
Recording mode icons
Recording mode: 


In Recording Modes that show icons in black, you can select and execute indicated menus and functions.
••Click a cross reference in the text to jump to the corresponding page.
••By entering keywords in the search field at the top of the Adobe Reader screen, you can run a keyword search and jump to the corresponding page.
••Operations and other details of this manual may vary depending on the Adobe Reader version you are using.
■■About the symbols in the text
Indicates that the menu can be set by pressing [MENU/SET] button. Indicates that the Wi-Fi setting can be made by pressing [Wi-Fi] button.
Configurations that can be performed in the [Custom] menu.
Tips for skillful use and points for recording.
Conditions in which a particular function cannot be used.
(→00) Indicates the reference page. Click to go to the corresponding page.
Click to view the description on the next page.
In this Owner’s Manual, steps for setting a menu item are described as follows:
 →
→  [Rec] → [Quality] → [
  ]
]
 Click this icon to jump to “Finding the information you need”.
 Click this icon to jump to “Contents”.
 Click this icon to jump to “Menu list”.
 Click this icon to return to the previously displayed page.
3 

SQW0021

Contents
■■Finding the information you need...... |
2 |
■■Contents by Function........................ |
10 |
■■How to use this manual...................... |
3 |
|
|
Before Use
■■Before use.......................................... |
12 |
■■Standard Accessories....................... |
13 |
■■Names and Functions of |
|
Main Parts.......................................... |
14 |
[MENU/SET] button / Cursor button / |
|
Control dial................................................. |
18 |
Preparations
■■Attaching the lens cap and |
|
shoulder strap.................................... |
19 |
■■Charging battery................................ |
20 |
Remaining battery...................................... |
21 |
Guidelines for number of recordable |
|
pictures and operating time........................ |
22 |
■■Inserting and removing the battery/ |
|
the card (optional)............................. |
24 |
■■About the Card................................... |
25 |
Formatting the card (initialization).............. |
26 |
Recording capacity guidelines |
|
(pictures/recording time)............................. |
27 |
■■Setting the clock................................ |
29 |
Changing time settings............................... |
30 |
■■Setting the menu............................... |
31 |
Setting the menu screen background......... |
33 |
■■Calling frequently-used menus |
|
instantly (Quick Menu)..................... |
34 |
Change the Quick Menu to your |
|
preferred item............................................. |
35 |
■■Assigning frequently used |
|
functions to the buttons |
|
(Function buttons)............................. |
37 |
■■Changing settings using the |
|
control ring......................................... |
39 |
Changing the settings assigned to the |
|
control ring.................................................. |
40 |
■■Using the [Setup] menu.................... |
41 |
[Clock Set].................................................. |
41 |
[World Time]............................................... |
41 |
[Travel Date]............................................... |
42 |
[Wi-Fi]......................................................... |
42 |
[Beep]......................................................... |
43 |
[Live View Mode]........................................ |
43 |
[Monitor Display] / [Viewfinder]................... |
44 |
[Monitor Luminance]................................... |
45 |
[Sleep Mode].............................................. |
46 |
[USB Mode]................................................ |
47 |
[TV Connection].......................................... |
47 |
[Menu Resume].......................................... |
49 |
[Menu Background].................................... |
49 |
[Menu Information]..................................... |
49 |
[Language]................................................. |
49 |
[Version Disp.]............................................ |
50 |
[Self Timer Auto Off]................................... |
50 |
[No.Reset].................................................. |
50 |
[Reset]........................................................ |
50 |
[Reset Wi-Fi Settings]................................. |
51 |
[Format]...................................................... |
51 |
■■Entering Text...................................... |
52 |
4
SQW0021

Contents
Basics
■■Holding the camera........................... |
53 |
■■Recording pictures using the |
|
viewfinder .......................................... |
54 |
Switching between the monitor and |
|
viewfinder................................................... |
54 |
About Eye Sensor AF................................. |
55 |
■■Taking pictures.................................. |
56 |
■■Recording motion pictures............... |
58 |
■■Select the recording mode............... |
59 |
■■Switching the display information |
|
on the recording screen.................... |
62 |
■■Viewing your pictures....................... |
67 |
Viewing motion pictures............................. |
70 |
■■Switching the display information |
|
on the playback screen..................... |
71 |
■■Deleting pictures............................... |
73 |
[Delete Single]............................................ |
73 |
To delete multiple (up to 100)/ |
|
To delete all pictures................................... |
74 |
Recording mode
■■Taking pictures with |
|
automatic settings |
|
[Intelligent Auto] Mode...................... |
75 |
Taking pictures using a handheld camera |
|
([iHandheld Night Shot])............................. |
78 |
Combining pictures into a single still |
|
picture with rich gradation ([iHDR])............ |
79 |
■■Taking pictures after setting the |
|
aperture value and shutter speed.... |
80 |
Taking pictures after automatically setting |
|
the aperture value and shutter speed |
|
([Program AE] Mode).................................. |
81 |
Taking pictures by setting the aperture |
|
value ([Aperture-Priority] Mode)................. |
83 |
Taking pictures by setting the shutter |
|
speed ([Shutter-Priority] Mode).................. |
84 |
Taking pictures by setting the aperture |
|
value and shutter speed |
|
([Manual Exposure] Mode)......................... |
86 |
Checking the effects of the aperture value |
|
and shutter speed ([Preview] Mode).......... |
88 |
Picture effects (Filter) |
|
■■Taking pictures using picture |
|
effects (Filter).................................... |
89 |
5
SQW0021

Contents
Picture Quality and coloring Settings
■■Adjusting the picture quality with |
|
effects [Photo Style]....................... |
100 |
■■Adjusting highlights and shadows |
|
[Highlight Shadow].......................... |
102 |
■■Adjusting the White Balance.......... |
103 |
■■Setting the picture quality and |
|
size.................................................... |
107 |
Changing the aspect ratio of the still |
|
pictures..................................................... |
107 |
Setting the picture size............................. |
108 |
Setting the compression rate of pictures |
|
([Quality]).................................................. |
109 |
■■Using the picture correction |
|
functions effectively......................... |
111 |
Correcting contrast and exposure |
|
([i.Dynamic])............................................. |
111 |
Enhancing the impression of |
|
high-resolution ([i.Resolution]).................. |
111 |
Combining still pictures with different |
|
exposures ([HDR]).................................... |
112 |
Suppressing the noise of a long |
|
exposure ([Long Shtr NR])....................... |
113 |
Setting the color space............................. |
113 |
Adjusting the focus and brightness (exposure)
■■Taking pictures with Auto Focus... 114
Select the focus mode |
|
(AFS, AFF, AFC)....................................... |
114 |
Switching [AF Mode]................................ |
115 |
Changing the position and size of the |
|
AF area..................................................... |
121 |
Setting your preferred focusing method.... |
124 |
■■Taking close-up pictures |
|
(Macro recording)............................ |
126 |
Focus range............................................. |
126 |
■■Taking pictures with |
|
Manual Focus................................... |
128 |
MF Assist.................................................. |
131 |
■■Taking pictures by locking the |
|
focus and/or exposure |
|
[AF/AE Lock].................................... |
133 |
■■Taking pictures with Exposure |
|
Compensation.................................. |
135 |
■■Setting the ISO Sensitivity.............. |
136 |
Setting the upper limit of |
|
ISO Sensitivity.......................................... |
137 |
Setting the incremental value of |
|
ISO Sensitivity.......................................... |
138 |
Extending the ISO Sensitivity setting....... |
138 |
■■Setting the metering mode............. |
139 |
Shutter and Drive Settings
■■Setting the Shutter Type................. |
140 |
■■Selecting a Drive Mode................... |
141 |
■■Burst function.................................. |
142 |
■■Recording while exposure is |
|
changed automatically |
|
[Auto Bracket].................................. |
145 |
■■Automatically changing the |
|
aspect ratio while taking pictures |
|
[Aspect Bracket].............................. |
147 |
■■Taking pictures with self-timer....... |
148 |
■■Recording panorama pictures........ |
150 |
6
SQW0021

|
|
Contents |
|
Functions for specific subjects and purposes |
|
||
■■Taking pictures automatically |
|
■■Recording with the |
|
at set intervals |
|
Face Recognition function |
|
[Time Lapse Shot]........................... |
153 |
[Face Recog.]................................... |
162 |
■■Creating stop motion animation |
|
■■Setting the profile for a baby |
|
[Stop Motion Animation]................. |
156 |
or pet to record in a picture............ |
165 |
■■Performing multiple exposures |
|
■■Displaying the appropriate screen |
|
for a single picture [Multi Exp.]..... |
159 |
for specific recording conditions... |
166 |
■■Disabling the beeps and flash |
|
|
|
at the same time |
|
|
|
[Silent Mode].................................... |
161 |
|
|
Stabilizer, Zoom and Flash |
|
|
|
■■Correcting jitter ............................... |
168 |
■■Taking pictures using the flash |
|
■■Using Zoom...................................... |
170 |
(supplied)......................................... |
176 |
Zoom types and use................................. |
171 |
Attaching the flash.................................... |
176 |
|
|
Changing the firing mode |
|
|
|
(Manual flash)........................................... |
179 |
|
|
Changing Flash Mode.............................. |
180 |
|
|
Setting the 2nd curtain sync..................... |
182 |
|
|
Adjusting the flash output......................... |
183 |
|
|
Synchronizing the flash output |
|
|
|
with the camera during |
|
|
|
Exposure Compensation.......................... |
183 |
|
|
Performing wireless flash settings............ |
184 |
Recording motion pictures
■■Recording motion pictures............. |
187 |
|||||
|
Setting the format, picture size and |
|
||||
|
recording frame rate................................. |
187 |
||||
|
Adjusting the focus while recording |
|
||||
|
motion pictures ([Continuous AF])............ |
189 |
||||
|
Recording motion pictures........................ |
190 |
||||
|
Recording 4K motion pictures.................. |
194 |
||||
|
Creating a high-resolution still picture |
|
||||
|
from a 4K motion picture [4K PHOTO]..... |
195 |
||||
■■Taking still pictures while a motion |
||||||
picture is being recorded................ |
198 |
|||||
7 |
|
|
|
|
|
|
|
|
|
|
|
|
|
|
|
|
|
|
|
|
■■Using the [Motion Picture] menu...199
[4K PHOTO]............................................. |
199 |
[Rec Format]............................................. |
199 |
[Rec Quality]............................................. |
199 |
[Picture Mode].......................................... |
199 |
[Continuous AF]........................................ |
199 |
[Mic Level Disp.]....................................... |
200 |
[Mic Level Adj.]......................................... |
200 |
[Wind Cut]................................................. |
200 |
SQW0021

|
|
|
Contents |
|
Playing Back and Editing Pictures |
|
|
||
■■Viewing the group picture.............. |
201 |
[Time Lapse Video]................................... |
215 |
|
■■Capturing still pictures from |
|
[Stop Motion Video].................................. |
215 |
|
motion pictures................................ |
203 |
[Resize].................................................... |
216 |
|
■■Using the [Playback] menu |
204 |
[Cropping]................................................. |
217 |
|
[Rotate] / [Rotate Disp.] |
218 |
|||
[Slide Show] |
204 |
|||
[Favorite] |
219 |
|||
[Playback Mode] |
206 |
|||
[Print Set] |
220 |
|||
[Location Logging] |
207 |
|||
[Protect] |
221 |
|||
[RAW Processing] |
208 |
|||
[Face Rec Edit] |
222 |
|||
[Title Edit] |
211 |
|||
[Picture Sort] |
223 |
|||
[Text Stamp] |
212 |
|||
[Delete Confirmation] |
223 |
|||
[Video Divide] |
214 |
|||
|
|
|||
Wi-Fi
■■Wi-Fi® Function and |
|
NFC Function................................... |
224 |
■■What you can do with the |
|
Wi-Fi function................................... |
227 |
■■Operating the camera by |
|
connecting it to a smartphone....... |
228 |
Installing the smartphone/tablet app |
|
“Panasonic Image App”............................ |
228 |
Connecting to a smartphone.................... |
229 |
Connecting to a smartphone using |
|
NFC function............................................ |
233 |
Taking pictures via a smartphone |
|
(remote recording).................................... |
234 |
Playing back pictures in the camera on |
|
a smartphone........................................... |
235 |
Saving pictures in the camera to the |
|
smartphone.............................................. |
235 |
Easily transferring pictures in |
|
the camera............................................... |
236 |
Sending pictures in the camera to |
|
social networking services........................ |
237 |
Adding location information to pictures |
|
in the camera from a smartphone............ |
237 |
Operating the camera to send pictures |
|
to a smartphone....................................... |
239 |
■■Displaying still pictures on a TV.... |
242 |
■■Wireless printing............................. |
243 |
■■Sending pictures to AV device....... |
244 |
■■Sending pictures to a PC................ |
247 |
■■Using WEB services........................ |
251 |
When sending images to WEB service.... |
251 |
When sending images to |
|
[Cloud Sync. Service]............................... |
255 |
■■Using “LUMIX CLUB”...................... |
258 |
About the [LUMIX CLUB]......................... |
258 |
■■About connections.......................... |
263 |
[Via Network] |
|
Connecting via a wireless access point.... |
264 |
[Direct] |
|
Connecting directly................................... |
267 |
Connecting quickly with the same settings |
|
as used previously |
|
([Select a destination from History] / |
|
[Select a destination from Favorite])......... |
268 |
Settings for sending pictures.................... |
270 |
■■[Wi-Fi Setup].................................... |
272 |
8
SQW0021

Contents
Connecting with other devices
■■Enjoying 4K motion pictures.......... |
274 |
Viewing 4K motion pictures...................... |
274 |
Storing 4K motion pictures....................... |
275 |
■■Viewing on TV screen..................... |
276 |
VIERA Link (HDMI) (HDAVI Control™).... |
278 |
■■Storing recorded still pictures and |
|
motion pictures on your PC........... |
280 |
About supplied software........................... |
281 |
Installing supplied software...................... |
283 |
Copying still pictures and |
|
motion pictures......................................... |
284 |
■■Storing recorded still pictures and |
|
motion pictures in the recorder..... |
286 |
Copying by inserting the card into the |
|
recorder.................................................... |
286 |
Dubbing playback pictures via AV cables |
|
(optional).................................................. |
286 |
■■Printing............................................. |
287 |
Printing multiple pictures.......................... |
288 |
Printing with date and text........................ |
289 |
Making print settings on the camera........ |
290 |
Others
■■Optional accessories...................... |
291 |
External Flash (optional).......................... |
291 |
Using the AC adaptor (optional) and |
|
DC coupler (optional) instead |
|
of the battery............................................ |
292 |
■■List of monitor/viewfinder |
|
displays............................................ |
293 |
■■Message displays............................ |
299 |
■■Menu list........................................... |
303 |
■■Q&A Troubleshooting..................... |
310 |
■■Usage cautions and notes.............. |
326 |
9
SQW0021

Contents by Function
Recording |
|
Recording |
|
Recording mode............................................ |
59 |
[Preview]....................................................... |
88 |
Picture effects (Filter).................................... |
89 |
Macro recording.......................................... |
126 |
Recording panorama pictures..................... |
150 |
[Time Lapse Shot]....................................... |
153 |
[Stop Motion Animation].............................. |
156 |
[Multi Exp.].................................................. |
159 |
[Silent Mode]............................................... |
161 |
Focus (AF/MF) |
|
Focus Mode................................................ |
114 |
AF Mode...................................................... |
115 |
Adjusting the AF area position.................... |
121 |
Manual Focus.............................................. |
128 |
AF/AE Lock................................................. |
133 |
Exposure |
|
AF/AE Lock................................................. |
133 |
Exposure Compensation............................. |
135 |
ISO sensitivity............................................. |
136 |
[Metering Mode].......................................... |
139 |
[Auto Bracket].............................................. |
145 |
Drive |
|
Drive Mode.................................................. |
141 |
[Aspect Bracket].......................................... |
147 |
[Self Timer].................................................. |
148 |
Picture Quality and Color Tone |
|
[Photo Style]................................................ |
100 |
[Highlight Shadow]...................................... |
102 |
White Balance............................................. |
103 |
[Picture Size]............................................... |
108 |
[Quality]....................................................... |
109 |
[i.Dynamic].................................................. |
111 |
[i.Resolution]............................................... |
111 |
[HDR].......................................................... |
112 |
[Long Shtr NR]............................................ |
113 |
[Color Space].............................................. |
113 |
Flash |
|
[Flash Mode]............................................... |
180 |
2nd curtain synchro..................................... |
182 |
[Flash Adjust.].............................................. |
183 |
Wireless flash settings................................ |
184 |
Screen settings |
|
[Monochrome Live View]............................. |
167 |
[Mic Level Disp.].......................................... |
200 |
 Motion Picture
Motion Picture |
|
Audio |
|
[Rec Format]............................................... |
187 |
[Mic Level Adj.]............................................ |
200 |
[Rec Quality]................................................ |
187 |
[Wind Cut]................................................... |
200 |
Motion pictures in 4K................................... |
194 |
|
|
[4K PHOTO]................................................ |
195 |
|
|
Taking still pictures while a |
|
|
|
motion picture is being recorded................. |
198 |
|
|
Setup/Custom |
|
Basic settings |
|
[Format]......................................................... |
26 |
[Clock Set]..................................................... |
29 |
How to set menu items.................................. |
31 |
[Q.MENU]...................................................... |
34 |
[Beep]............................................................ |
43 |
[Sleep Mode]................................................. |
46 |
[Reset] (initialization)..................................... |
50 |
Diopter adjustment........................................ |
55 |
Display switching..................................... |
62, 71 |
Customization |
|
[CUSTOM] in the Quick Menu |
.......................35 |
Function buttons............................................ |
37 |
Control ring.................................................... |
40 |
Custom Set................................................... |
60 |
[Custom] menu............................................ |
306 |
[Cursor Button Lock]..................................... |
38 |
Motion picture button................................... |
192 |
10
SQW0021
Playback |
|
Playback |
|
[Auto Review]................................................ |
57 |
Picture playback............................................ |
67 |
Playback Zoom............................................. |
68 |
Multi Playback............................................... |
68 |
Motion picture playback................................ |
70 |
Delete............................................................ |
73 |
Display/playback settings |
|
[Slide Show]................................................ |
204 |
[Rotate]/[Rotate Disp.]................................. |
218 |
|
Contents by Function |
Edit |
|
[RAW Processing]....................................... |
208 |
[Resize]....................................................... |
216 |
[Cropping].................................................... |
217 |
Adding information |
|
[Location Logging]....................................... |
207 |
[Title Edit].................................................... |
211 |
[Text Stamp]................................................ |
212 |
Image settings |
|
[Favorite]..................................................... |
219 |
[Print Set].................................................... |
220 |
[Protect]....................................................... |
221 |
Wi-Fi |
|
Connect |
|
“Image App”................................................. |
228 |
NFC............................................................. |
233 |
[WPS (Push-Button)]........................... |
264, 267 |
Direct connection........................................ |
267 |
Image App |
|
Remote recording........................................ |
234 |
Saving images............................................. |
235 |
Sending images.................................. |
236, 239 |
Sending and adding location information....237 |
|
[Touch Sharing]........................................... |
272 |
In combination with other devices
Playing back pictures on a TV..................... |
242 |
Printing images........................................... |
243 |
Sending images to an AV device................. |
244 |
Sending images to a PC............................. |
247 |
Sending images to a WEB service.............. |
251 |
Using [Cloud Sync. Service]........................ |
255 |
 Connecting with other devices
PC |
|
Recorder |
|
“PHOTOfunSTUDIO”................................... |
281 |
Dubbing....................................................... |
286 |
SILKYPIX.................................................... |
282 |
Printer |
|
TV |
|
PictBridge.................................................... |
287 |
[VIERA Link]................................................ |
278 |
|
|
11
SQW0021
 Before Use
Before use
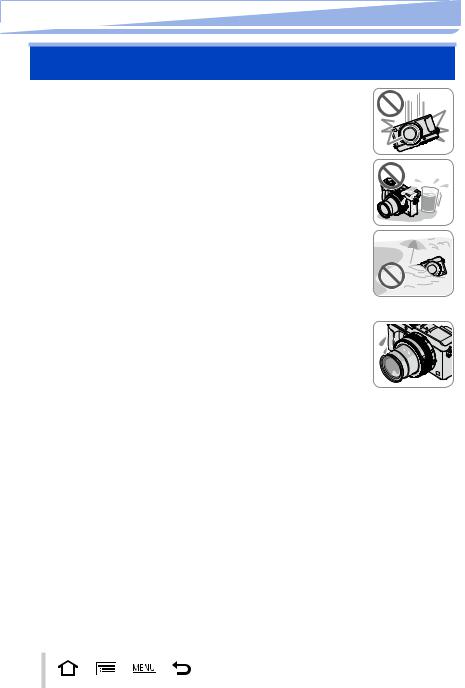
■■Camera handling
Keep the camera away from excessive vibration, force, or pressure.
●●Avoid using the camera under the following conditions, which may damage the lens, monitor, viewfinder, or camera body. This may also cause the camera to malfunction or prevent recording.
••Dropping or hitting the camera against a hard surface ••Pushing with excessive force on the lens or monitor
The camera is not dust resistant, splash resistant, or waterproof.
Avoid using the camera in places with excessive dust or sand, or where water can come into contact with the camera.
●●Avoid using the camera under the following conditions, which present a risk that sand, water, or foreign material may enter the camera through the lens or openings around buttons. Be especially careful because these conditions may damage the camera, and such damage may not be repairable.
••In extremely dusty or sandy places
••In the rain or by the shore, where the camera may be exposed to water
■■Condensation (When the lens, the monitor, or viewfinder, is fogged up)
●●Condensation may occur when the camera is exposed to sudden changes of temperature or humidity. Avoid these conditions, which may make the lens, monitor, or viewfinder, dirty, cause mold, or damage the camera.
●●If condensation does occur, turn off the camera and wait about two hours before using it. Once the camera adjusts to the surrounding temperature, the fogging will clear naturally.
■■Always take a test shot first
Before important events when you will use the camera (at weddings, for example), always take a test shot to make sure that pictures and sound record correctly.
■■No compensation for missed shots
We cannot compensate for missed shots if technical problems with the camera or card prevent recording.
■■Carefully observe copyright laws
Unauthorized use of recordings that contain works with copyright for purposes other than personal use is prohibited under copyright law. Recording of certain material may be restricted even for the purpose of personal use.
■■Also refer to “Usage cautions and notes” (→326)
12
SQW0021

Before Use
Standard Accessories
Check that all the accessories are supplied before using the camera.
●●The accessories and their shape will differ depending on the country or area where the camera was purchased.
For details on the accessories, refer to Basic Owner’s Manual. ●●Battery Pack is indicated as battery pack or battery in the text.
●●SD Memory Card, SDHC Memory Card and SDXC Memory Card are indicated as card in the text.
●●Please dispose of all packaging appropriately.
●●Keep small parts in a safe place out of the reach of children.
■■Optional accessories ••Cards are optional.
13
SQW0021
Before Use
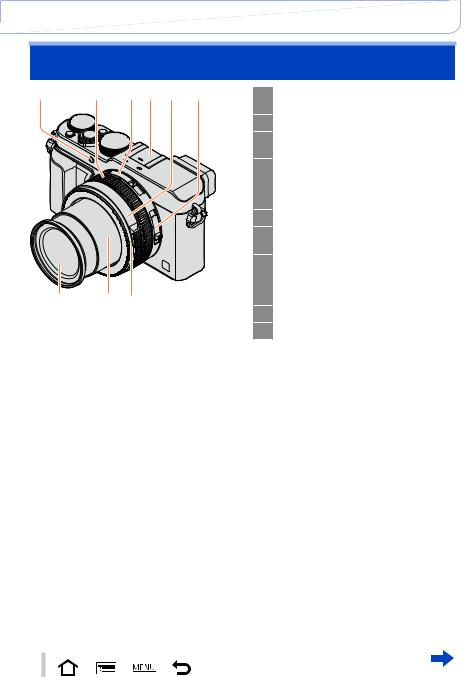
Names and Functions of Main Parts
1 |
2 |
3 |
4 |
5 |
6 |
9 |
8 |
7 |
1Self-timer indicator (→148) / AF Assist Lamp (→53, 125)
2 Control ring (→39)
3Aspect ratio selector switch
(→107)
4 Hot shoe (Hot shoe cover) (→176) The hot shoe cover is already attached to the hot shoe at the time of purchase.
5 Aperture ring (→59)
6Focus selector switch
(→114, 126, 128)
7 Lens front ring
To attach the auto lens cap (optional), remove the lens front ring.
8 Lens barrel
9 Lens (Filter diameter Φ43 mm)
14
SQW0021

Before Use
|
|
|
|
Names and Functions of Main Parts |
|
(Top) |
|
|
10 |
Stereo microphone (→53, 200) |
|
10 11 12 |
13 |
14 |
|
Be careful not to cover the |
|
|
microphone with your finger. Doing |
||||
|
|
|
|
so may make sound difficult |
|
|
|
|
|
to record. |
|
|
|
|
11 |
Shutter speed dial (→59) |
|
|
|
|
12 |
Shutter button |
|
|
|
|
13 |
Zoom lever (→170) |
|
|
|
|
14 |
[FILTER] button (→89) |
|
|
|
|
15 |
Exposure compensation dial |
|
17 |
16 |
15 |
|
(→135) |
|
16 |
[iA] button (→59) |
||||
|
|
|
|||
|
|
|
17 |
Camera [ON/OFF] switch |
(Bottom) |
|
18 |
Speaker |
18 |
19 |
20 21 22 |
Be careful not to cover the speaker |
with your finger. Doing so may |
|||
|
|
|
make sound difficult to hear. |
|
|
19 |
Tripod mount (→329) |
|
|
|
Do not attach to a tripod with a |
|
|
|
5.5 mm (0.22 inch) or longer screw. |
|
|
|
Doing so may damage this unit. |
|
|
|
It may not be possible to attach |
|
|
|
certain types of tripods properly. |
|
|
20 |
DC coupler cover |
|
|
|
Open this cover to use an AC |
|
|
|
adaptor (optional) and DC coupler |
|
|
|
(optional) in place of the battery. |
|
|
|
When using an AC adaptor |
|
|
|
(optional), ensure that the |
|
|
|
Panasonic DC coupler (optional) |
|
|
|
and AC adaptor are used. (→292) |
|
|
21 |
Release lever (→24) |
|
|
22 |
Card/Battery door (→24) |
15
SQW0021
Before Use
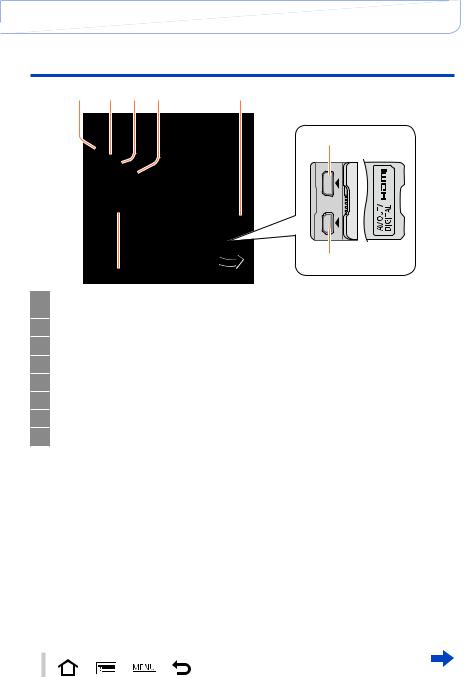
Names and Functions of Main Parts
23 |
24 |
25 |
26 |
27 |
29
30
28
23 Viewfinder (LVF) (→54)
In this manual, “viewfinder” is used to indicate the LVF.
24Eye Sensor (→54)
25Diopter adjustment dial (→55)
26[LVF] button (→54) / [Fn3] button (→37)
27Strap eyelet (→19)
28Monitor
29[HDMI] socket (→276)
30[AV OUT/DIGITAL] socket (→276, 284, 286, 287)
16
SQW0021

Before Use
Names and Functions of Main Parts
27 31 32 33 34 35
|
37 |
38 |
36 |
39 |
40 |
|
|
|
|
|
41 |
27 Strap eyelet (→19)
31Wi-Fi® antenna
32Wi-Fi connection lamp (→225)
33[Wi-Fi] button (→225) / [Fn2] button (→37)
34Motion picture button (→58)
35[AF/AE LOCK] button (→133)
36NFC antenna (→233)
37[Q.MENU] button (→34)
38Playback button (→67)
39[Fn1] button (→37) / [ 
 ] (Delete/Cancel) button (→32, 73)
40[DISP.] button (→62, 71)
41[MENU/SET] button / Cursor button / Control dial (→18)
●●The illustrations and screens in this manual may differ from the actual product.
17
SQW0021

Before Use
Names and Functions of Main Parts
 [MENU/SET] button / Cursor button / Control dial
[MENU/SET] button
Use this button to display the menus, enter the settings, etc. (→31)


 Cursor button
This button is used to move the cursor on the menu screens and for
other functions. (→32)
You can perform the following operations while recording.
[ISO] button ( ) (→136)
[WB] (White Balance) button ( ) (→103)
[ 
 ] (Drive Mode) button ( )
Single (→141), Burst (→142), Auto Bracket (→145),
Aspect Bracket (→147), Self-timer (→148), Panorama (→150)
[  ] (AF Mode) button (
  ) (→115, 131)
Control dial
Turn the dial to select setting items and change setting values. (→32, 67)
 Disabling the button and dial operation (while recording)
When the [Cursor Button Lock] is assigned to the function button, operation of the [MENU/SET] button, cursor button, and control dial is disabled. (→38)
 Enabling/disabling the operation guide display
 →
→  [Custom] → [Dial Guide] → [ON] / [OFF]
••When you set the operation guide to [ON], the operation guide for the control ring ([  ]), control dial ([
  ]), and other parts appear on the recording screen.
●●In this manual, the button that is to be used is indicated by
 .
.
18
SQW0021

 Preparations
Attaching the lens cap and shoulder strap
Cover the lens with the lens cap to protect it when you are not taking pictures. We recommend attaching the lens cap to the camera using the lens cap string to prevent loss of the lens cap. We also recommend attaching the shoulder strap to prevent the camera from being dropped.
1 Usecamerathe lens cap string (supplied) to attach the lens cap to the
Make sure that the thicker portion of the string is not hanging over the lens cap or the shoulder strap eyelet.
2 Attach the lens cap
To attach and remove the lens cap, press the areas shown by arrows in the illustration.
3 Attach the shoulder strap
Shoulder strap eyelet
••Attach the other end of the shoulder strap.
••Make sure that the shoulder strap does not come loose.
••Attach the shoulder strap with the LUMIX logo on the strap facing out. ••Use the shoulder strap around your shoulder.
––Do not wrap the strap around your neck. It may result in injury or accident. ••Do not leave the shoulder strap where an infant can reach it.
––It may result in an accident by mistakenly wrapping around the neck.
19
SQW0021

Preparations
Charging battery
Always charge before first use! (battery shipped uncharged)
About batteries that you can use with this unit
It has been found that counterfeit battery packs which look very similar to the genuine products are made available to purchase in some markets. Some of these battery packs are not adequately protected with internal protection to meet the requirements of appropriate safety standards. There is a possibility that these battery packs may lead to fire or explosion. Please be advised that we are not liable for any accident or failure occurring as a result of use of a counterfeit battery pack. To ensure that safe products are used we recommend that a genuine Panasonic battery pack is used.
••Use the dedicated charger and battery.
1 |
Attach the battery paying attention to the |
||
direction of the battery |
|
||
2 |
Connect the charger to the electrical outlet |
||
|
Plug-in type |
Inlet type |
Charging light |
|
Battery |
|
|
|
|
([CHARGE]) |
|
|
|
|
On: Charging in progress |
|
|
|
Off: Charging complete |
|
|
If light is flashing: |
|
|
|
••Battery temperature is |
|
|
••The AC cable |
too high or too low. We |
|
Charger |
recommend charging in a |
||
does not fit |
location where the ambient |
||
(model-specific) |
|||
entirely into |
|||
|
temperature is between 10 °C |
||
|
the AC input |
||
|
and 30 °C (50 °F to 86 °F). |
||
|
terminal. A |
||
|
gap will remain. |
••Battery/charger connector is |
|
••Charge the battery with the charger indoors. |
dirty. Clean with a dry cloth. |
||
|
|||
3 |
Detach the battery after charging is completed |
••The battery charger is in the standby condition when the AC power is supplied. |
The primary circuit is always “live” as long as the battery charger is connected to an electrical outlet.
20
SQW0021
Preparations
Charging battery
Notes on charging time
Charging time |
Approx. 190 min |
••The charging time indicated above is the time required for charging in case when the battery is completely used up. The time required for charging differs depending on conditions of battery usage. Charging takes longer in cases when temperatures are either high or low and when the battery has not been used for a long period of time.
 Remaining battery
When using the camera, the remaining battery capacity is displayed.
 Remaining battery (only when using battery)
(flashes red)
If the battery mark flashes red, recharge or replace a fully charged battery.
●●Always use genuine Panasonic batteries.
●●If you use other batteries, we cannot guarantee the quality of this product.
●●Remove battery from camera after use.
••Keep the battery in a plastic bag, making sure that it is kept away from metallic objects (such as clips) when carrying or storing it.
●●To remove the battery, turn the camera off and wait until the LUMIX indicator on the monitor goes off. (Failure to wait may cause the camera to malfunction and may damage the card or recorded data.)
21
SQW0021

Preparations
Charging battery
Guidelines for number of recordable pictures and operating time
Recording still pictures (When using monitor)
Number of recordable pictures |
Approx. 350 pictures |
|
|
(Approx. 300 pictures) |
By CIPA standard |
||
|
|||
Recording time |
Approx. 175 min |
||
|
|||
(Approx. 150 min) |
|
||
|
|
Recording still pictures (When using viewfinder (LVF))
Number of recordable pictures |
Approx. 320 pictures |
|
|
(Approx. 270 pictures) |
By CIPA standard |
||
|
|||
Recording time |
Approx. 160 min |
||
|
|||
(Approx. 135 min) |
|
||
|
|
••The values when the flash (supplied) is used are provided in parentheses.
■■Recording conditions by CIPA standard
CIPA is an abbreviation of “Camera & Imaging Products Association”.
••[Program AE] Mode
••Temperature: 23 °C (73.4 °F)/Humidity: 50%RH when monitor is on. ••Using a Panasonic SDHC Memory Card.
••Using the supplied battery.
••Starting recording 30 seconds after the camera is turned on (when [Stabilizer] is set to [  ]). ••Recording once every 30 seconds with full flash every second recording.
••Rotating the zoom lever from Tele to Wide or vice versa in every recording.
••Turning the camera off every 10 recordings and leaving it until the temperature of the battery decreases.
Number reduced if intervals are longer (e.g. to approx. one quarter for 2-minute intervals under the above conditions).
22
SQW0021

Preparations
|
|
|
Charging battery |
|
|
|
|
|
|
|
|
Recording motion pictures (When using monitor) |
|
||
|
|
|
|
[Rec Format] |
[AVCHD] |
[MP4] |
[MP4] |
[Rec Quality] |
[FHD/17M/60i] |
[FHD/20M/30p] |
[4K/100M/30p] |
Available recording time |
Approx. 125 min |
Approx. 135 min |
Approx. 90 min |
Actual available recording time* |
Approx. 60 min |
Approx. 65 min |
Approx. 45 min |
*The time you can actually record when repeatedly turning the camera on and off, starting and stopping recording and using zoom.
■■Recording conditions
••Temperature 23 °C (73.4 °F), humidity 50%RH ●●[AVCHD] motion pictures:
Recording stops when the continuous recording time exceeds 29 minutes and 59 seconds. ●●Motion pictures with their file size set to [FHD], [HD] or [VGA] in [MP4]:
Recording stops when the continuous recording time exceeds 29 minutes and 59 seconds or the file size exceeds 4 GB.
••Since the file size becomes larger with [FHD], recording with [FHD] will stop before 29 minutes 59 seconds.
●●Motion pictures with their file size set to [4K] in [MP4]:
Recording stops when the continuous recording time exceeds 15 minutes. (You can continue recording without interruption even if the file exceeds 4 GB, but the motion picture file will be recorded and played back in separate files.)
Viewing pictures (When using monitor)
Playback time |
Approx. 260 min |
●●The operating times and number of recordable pictures will differ according to the environment and the operating conditions.
For example, in the following cases, the operating times shorten and the number of recordable pictures is reduced.
••In low-temperature environments, such as on ski slopes.
••When operations such as the flash and zoom are used repeatedly.
●●If available battery power is significantly reduced, battery is reaching end of lifespan. Please purchase a new battery.
23
SQW0021

Preparations
Inserting and removing the battery/the card (optional)
••Make sure that the camera is turned off.
1Slide the release lever to the [OPEN] position and open the card/battery door
2Insert the battery and card, making sure that their orientation is correct
••Battery:
Insert the battery all the way firmly until a locking sound is heard, and check that the lever is hooked over the battery.
••Card:
Insert the card all the way firmly until it clicks.
3Close the card/battery door and slide the release lever to the [LOCK] position
[OPEN] [LOCK]
Release lever


 Lever
Lever
Do not touch the terminal
Charged battery (check orientation) Card
(check orientation: terminals face monitor)
■■To remove |
|
••To remove battery: |
••To remove card: |
Move lever in direction of arrow. |
Press the center of the card. |


 Lever
Lever
●●Remove battery from camera after use.
●●Keep the Memory Card out of reach of children to prevent swallowing.
●●To remove the card or battery, turn the camera off and wait until the LUMIX indicator on the monitor turns off. (Failure to wait may cause the camera to malfunction and may damage the card or recorded data.)
●●The unusable battery should be discarded in accordance with battery recycling laws. Call the RBRC hotline at 1-800-822-8837 for information.
24
SQW0021
Preparations
About the Card
The following SD standard-based cards (Panasonic brand recommended) can be used.
Type of Card |
Capacity |
Notes |
|
SD Memory Cards |
8 MB – 2 GB |
••Can be used with devices compatible with the |
|
SDHC Memory Cards |
4 GB – 32 GB |
respective formats. |
|
••Before using SDXC Memory Cards, check that your |
|||
SDXC Memory Cards |
48 GB, 64 GB |
||
computer and other devices support this type of card. |
|||
|
|
http://panasonic.net/avc/sdcard/information/SDXC.html |
|
|
|
••This unit is compatible with UHS-ΙUHS Speed Class |
|
|
|
3 standard SDHC/SDXC memory cards. |
|
|
|
••Only the cards listed on the left with the given capacities |
|
|
|
are supported. |
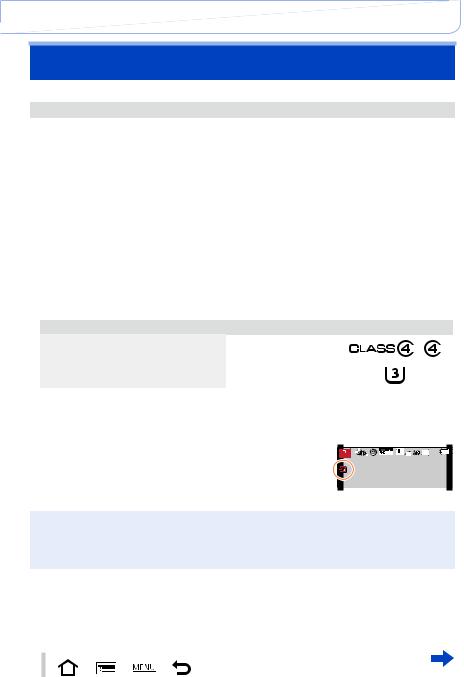
■■About the motion picture recording and speed class
According to the [Rec Format] (→187) and [Rec Quality] (→187) of a motion picture, the required card differs. Use a card that meets the following ratings of the SD Speed Class or UHS Speed Class.
••SD Speed Class and UHS Speed Class are the speed standards regarding continuous writing. Confirm the SD speed by checking the card label or other card related materials.
[Rec Format] |
[Rec Quality] |
Speed class |
Label example |
[AVCHD] |
All |
Class 4 or higher |
|
[MP4] |
FHD/HD/VGA |
|
|
|
|
||
[MP4] |
4K |
UHS Speed Class 3 |
|
|
|
|
|
••Latest information: http://panasonic.jp/support/global/cs/dsc/ (This site is available in English only.)
Access to the card
The access indication displays red when pictures are being recorded on the card.
60i |
●●While the camera is accessing the card (for an operation such as picture writing, reading, deletion, or formatting), do not turn off the camera or remove the battery, card, AC adaptor (optional) or DC coupler (optional). Do not subject the camera to vibrations, impact, or static electricity. The card or the data on the card may be damaged, and this unit may no longer operate normally. If operation fails due to vibration, impact or static electricity, perform the operation again.
25
SQW0021

Preparations
About the Card
●●If you set the write-protect switch to “LOCK”, you may not be able to write, delete or format the data or display it by recording date. These operations become available again when you unlock the switch.
●●It is recommended that you copy important pictures to your computer
(as electromagnetic waves, static electricity, or faults may cause data to be damaged).
Write-protect switch
 Formatting the card (initialization)
Format the card before recording a picture with this unit. Since data cannot be recovered after formatting, make sure to back up necessary data in advance.
1Set the menu

 →
→  [Setup] → [Format]
••A confirmation screen is displayed. If you select [Yes], the operation is executed.
●●This requires a sufficiently charged battery, or an AC adaptor (optional) and DC coupler (optional). ●●Do not turn off the camera or perform other operations during formatting.
●●Always format cards with this camera. Please reformat the card with this camera if it has already been formatted with a computer or another device.
●●If the card cannot be formatted, please try another card before contacting Panasonic.
26
SQW0021

Preparations
About the Card
 Recording capacity guidelines (pictures/recording time)
The number of pictures you can take and the recording time vary in proportion to card capacity (and depending on recording conditions and type of card).
Recording picture capacity (still pictures)
When aspect ratio is set to [4:3] and [Quality] is set to [  ]
]
[Picture Size] |
8 GB |
16 GB |
32 GB |
64 GB |
||||
|
|
L (12.5M) |
1090 |
2200 |
4420 |
8820 |
||
|
|
|
M (6.5M) |
1880 |
3810 |
7630 |
14970 |
|
|
|
|
||||||
|
|
|
|
|
|
|
|
|
|
|
|
|
S (3M) |
3220 |
6500 |
13030 |
24700 |
|
|
|
|
|||||
|
|
|
|
|
|
|
|
|
When aspect ratio is set to [4:3] and [Quality] is set to [  ]
]
[Picture Size] |
8 GB |
16 GB |
32 GB |
64 GB |
L (12.5M) |
340 |
700 |
1400 |
2800 |
M (6.5M) |
400 |
810 |
1620 |
3230 |
S (3M) |
440 |
890 |
1780 |
3530 |
●●When the number of recordable pictures exceeds 9,999, “9999+” is displayed.
Recording time capacity (motion pictures)
••The recordable time is the total time of all the motion pictures which have been recorded.
([h], [m] and [s] indicate “hour”, “minute” and “second”.)
When [Rec Format] is [AVCHD]
[Rec Quality] |
8 GB |
16 GB |
32 GB |
64 GB |
[FHD/28M/60p] |
37m00s |
1h15m00s |
2h30m00s |
5h00m00s |
[FHD/17M/60i] |
1h00m00s |
2h00m00s |
4h05m00s |
8h15m00s |
[FHD/24M/30p] |
43m00s |
1h25m00s |
2h55m00s |
5h50m00s |
[FHD/24M/24p] |
43m00s |
1h25m00s |
2h55m00s |
5h50m00s |
27
SQW0021

Preparations
|
|
|
|
About the Card |
|
|
|
|
|
When [Rec Format] is [MP4] |
|
|
|
|
|
|
|
|
|
[Rec Quality] |
8 GB |
16 GB |
32 GB |
64 GB |
[4K/100M/30p] |
9m00s |
20m00s |
42m00s |
1h20m00s |
[4K/100M/24p] |
9m00s |
20m00s |
42m00s |
1h20m00s |
[FHD/28M/60p] |
37m00s |
1h15m00s |
2h30m00s |
5h00m00s |
[FHD/20M/30p] |
49m00s |
1h40m00s |
3h20m00s |
6h40m00s |
[HD/10M/30p] |
1h30m00s |
3h10m00s |
6h25m00s |
12h50m00s |
[VGA/4M/30p] |
3h25m00s |
7h00m00s |
14h10m00s |
28h15m00s |
●●If the surrounding temperature is high, or a motion picture is recorded continuously, [  ] is displayed and recording may be stopped halfway through to protect the camera.
●●[AVCHD] motion pictures:
Recording stops when the continuous recording time exceeds 29 minutes and 59 seconds. ●●Motion pictures with their file size set to [FHD], [HD] or [VGA] in [MP4]:
Recording stops when the continuous recording time exceeds 29 minutes and 59 seconds or the file size exceeds 4 GB.
••Since the file size becomes larger with [FHD], recording with [FHD] will stop before 29 minutes 59 seconds.
●●Motion pictures with their file size set to [4K] in [MP4]:
Recording stops when the continuous recording time exceeds 15 minutes. (You can continue recording without interruption even if the file exceeds 4 GB, but the motion picture file will be recorded and played back in separate files.)
●●The maximum available continuous recording time is displayed on the screen.
Switching the display between the number of recordable pictures that you can take and the available recording time
 →
→  [Custom] →[Remaining Disp.]
[ 
 ] (Remaining shots):
Displays the number of pictures that can be recorded.
[ 

 ] (Remaining time):
Displays the remaining recording time.
Number of |
Available |
recordable |
recording time |
pictures |
|
28
SQW0021

Preparations
Setting the clock
The clock is not set when the camera is shipped.
1 |
Turn the camera on |
|
••If the language select screen is not displayed, proceed |
||
2 |
to step 4. |
|
Press [MENU/SET] while the message is |
||
displayed |
|
|
3 |
Press |
to select the language, and press [MENU/SET] |
••The [Please set the clock] message appears. |
||
4
5
Press [MENU/SET]
Press
 to select the items (year, month, day, hour, minute), and press
 to set
••To cancel → Press [ 
 ] button.
To set the display order or time display format
••Select [Style] and press [MENU/SET] to display the setting screen for display order and time display format.
 : Home time
 : Destination time
Style
Display order
Time display format
6 Press [MENU/SET]
••A confirmation screen is displayed. Press [MENU/SET].
7When [Please set the home area] is displayed, press [MENU/SET]
29
SQW0021

Preparations
|
|
|
|
Setting the clock |
|
|
|
|
|
8 |
Press |
to set your home area and |
City or area name |
|
press [MENU/SET] |
|
Current time |
||
|
|
|
|
|
Difference from GMT (Greenwich Mean Time)
●●If the clock is not set, the correct date cannot be printed when you order a photo studio to print the picture, or when you stamp the date on the pictures with [Text Stamp].
 Changing time settings
Select [Clock Set] from the [Setup] menu to change the current time settings.
••Clock settings will be saved for approx. 3 months even after the battery is removed, provided a fully charged battery was installed in the camera for 24 hours beforehand.
1Select [Clock Set] from the [Setup] menu
••For details about how to set the menu (→31)
2 Set the date and time (Perform steps 5 - 6. (→29))
30
SQW0021
Loading...