


DMC-LC40PPS
Table of contents
 Loading...
Digital Camera
Operating Instructions
Model No.
DMC-LC40PP
Before use, please read these
instructions completely.
For USA assistance, please call: 1-800-272-7033 or send e-mail to : consumerproducts@panasonic.com
For Canadian assistance, please call: 1-800-561-5505 or visit us at www.panasonic.ca
VQT9861

Dear Customer,
We would like to take this opportunity to
thank you for purchasing this Panasonic
Digital Camera. Please read these
Operating Instructions carefully and keep
them handy for future reference.
Information for Your Safety
WARNING
TO REDUCE THE RISK OF FIRE OR
SHOCK HAZARD AND ANNOYING
INTERFERENCE, USE ONLY THE
RECOMMENDED ACCESSORIES AND
DO NOT EXPOSE THIS EQUIPMENT TO
RAIN OR MOISTURE. DO NOT
REMOVE THE COVER (OR BACK);
THERE ARE NO USER SERVICEABLE
PARTS INSIDE. REFER SERVICING TO
QUALIFIED SERVICE PERSONNEL.
Notice:
This product has parts that contain a small
amount of mercury. It also contains lead in
some components. Disposal of these
materials may be regulated in your
community due to environmental
considerations. For disposal or recycling
information please contact your local
authorities, or the Electronics Industries
Alliance: <http://www.eiae.org.>
Carefully observe copyright laws.
Recording of pre-recorded tapes or
discs or other published or broadcast
material for purposes other than your
own private use may infringe copyright
laws. Even for the purpose of private
use, recording of certain material may
be restricted.
• Please note that the actual controls and
components, menu items, etc. of your
Digital Camera may look somewhat
different from those shown in the
illustrations in these Operating
Instructions.
• SD Logo is a trademark.
• Other names, company names, and
product names printed in these
instructions are trademarks or registered
trademarks of the companies
concerned.
RBRC
Li-ion
A lithium ion/polymer battery that is recyclable powers the
product you have purchased. Please call 1-800-8-BATTERY
TM
for information on how to recycle this battery.
2

FCC Note: (U.S. only)
This equipment has been tested and
found to comply with the limits for a Class
B digital device, pursuant to Part 15 of the
FCC Rules. These limits are designed to
provide reasonable protection against
harmful interference in a residential
installation. This equipment generates,
uses, and can radiate radio frequency
energy and, if not installed and used in
accordance with the instructions, may
cause harmful interference to radio
communications. However, there is no
guarantee that interference will not occur
in a particular installation. If this
equipment does cause harmful
interference to radio or television
reception, which can be determined by
turning the equipment off and on, the user
is encouraged to try to correct the
interference by one or more of the
following measures:
• Reorient or relocate the receiving
antenna.
• Increase the separation between the
equipment and receiver.
• Connect the equipment into an outlet on
a circuit different from that to which the
receiver is connected.
• Consult the dealer or an experienced
radio/TV technician for help.
Trade Name: Panasonic
Model No.: DMC-LC40
Responsible party: Matsushita Electric
Corporation of
America One
Panasonic Way,
Secaucus, NJ 07094
Support Contact: Panasonic
Consumer
Electronics
Company 1-800272-7033
This device complies with Part 15 of the
FCC Rules. Operation is subject to the
following two conditions: (1) This device
may not cause harmful interference, and
(2) this device must accept any
interference received, including
interference that may cause undesired
operation.
This Class [B] digital apparatus complies
with Canadian ICES-003.
DMC-LC40
FCC Caution: To assure continued
compliance, follow the
attached installation
instructions and use only
shielded interface cables
with ferrite core when
connecting to computer
or peripheral devices.
Any changes or modifications not
expressly approved by the party
responsible for compliance could void the
user’s authority to operate this equipment.
3

USB Driver End User License Agreement
You (
“Licensee”) are granted a license for the Software defined in this End User Soft
Agreement (“Agreement”) on condition that you agree to the terms and conditions of
this Agreement. If Licensee does not agree to the terms and conditions of this
Agreement, promptly return the Software to Matsushita Electric Industrial Co., Ltd
(“Matsushita”), its distributors or dealers from which you made the purchase.
Article 1 License
Licensee is granted the right to use the software, including the information recorded or
described on the CD-ROM, instruction manuals, and any other media provided to
Licensee (collectively “Software”), but all applicable rights to patents, copyrights,
trademarks and trade secrets in the Software are not transferred to Licensee.
Article 2 Use by a Third Party
Licensee may not use, copy, modify, transfer or allow any third party, whether free of
charge or not, to use, copy or modify the Software, except as expressly provided for in
this Agreement.
Article 3 Restrictions on Copying the Software
Licensee may make a single copy of the Software in whole or a part solely for back-up
purpose.
Article 4 Computer
Licensee may use the Software only on the computer, and may not use it on more than
one computer.
Article 5 Reverse Engineering, Decompiling or Disassembly
Licensee may not reverse engineer, decompile, or disassemble the Software, except to
the extent either of them is permitted under law or regulation of the country where
Licensee resides. Matsushita, or its distributors will not be responsible for any defects in
the Software or damage to Licensee caused by Licensee’s reverse engineering,
decompiling, or disassembly of the Software.
Article 6 Indemnification
The Software is provided “AS-IS” without warranty of any kind, either expressed or
implied, including, but not limited to, warranties of non-infringement, merchantability
and/or fitness for a particular purpose. Further, Matsushita does not warrant that the
operation of the Software will be uninterrupted or error free. Matsushita or any of its
distributors will not be liable for any damage suffered by Licensee arising from or in
connection with Licensee’s use of the Software.
Article 7 Export Control
Licensee agrees not to export or re-export to any country the Software in any form
without the appropriate export licenses under regulations of the country where Licensee
resides, if necessary.
Article 8 Termination of License
The right granted to Licensee hereunder will be automatically terminated if Licensee
contravenes of any of the terms and conditions of this Agreement. In the event, Licensee
must destroy the Software and related documentation together with all the copies
thereof at Licensee’s own expense.
4

565


Contents
Safety
Information for Your Safety ................ 2
USB Driver End User License
Agreement ......................................... 4
Preparation
Standard Accessories ........................ 7
Names of the Components ................ 8
LCD Monitor Display ........................ 10
Quick Guide ..................................... 12
Inserting the Battery......................... 13
Charging the Battery........................ 14
Connecting to an Electrical Outlet.... 15
Inserting the Card ............................ 16
Turning Power on/off........................ 18
Adjusting the Optical Finder
(Diopter Adjustment) ........................ 19
Attaching the Strap/Attaching the
Lens Cap ......................................... 20
Using the Tripod............................... 21
Using the LCD Monitor..................... 22
The Indicators .................................. 23
The Shutter Button
(Pressing halfway/Pressing fully) ..... 24
The Operational Mode Dial and the
REC Mode Dial ................................ 25
Operating the Menu ......................... 27
Setting the Date/Time (Clock Set) ... 28
Recording images (basic)
Taking Pictures (AUTO Mode) ......... 29
Checking the Last Picture
(Review)........................................... 30
Recording Motion Images ................ 31
Using the Optical Zoom ................... 32
Using the Digital Zoom..................... 33
Taking Pictures with the Built-in
Flash ................................................ 34
Taking Pictures with the
Self-timer.......................................... 36
Recording images (advanced)
Taking Pictures with Audio ............... 37
Changing the Picture Size................ 38
Changing the Quality
(Data Compression Ratio)................ 39
Taking Pictures with Program AE
Mode ................................................ 40
Taking Pictures with Aperture-priority
AE .................................................... 41
Taking Pictures with Shutter-priority
AE .................................................... 42
Taking Pictures with the Portrait
Mode ................................................ 43
Taking Pictures with the Landscape
Mode ................................................ 44
Taking Pictures with the Sports
Mode ................................................ 45
Taking Pictures with the Night Portrait
Mode ................................................ 46
Taking Pictures with the Spot
Mode ................................................ 47
Compensating the Exposure ............ 48
Taking Pictures with Auto (AE)
Bracket ............................................. 49
Using the AF/AE Lock...................... 50
Picture Adjustment
(Contrast/Sharpness/Saturation)...... 51
Setting the White Balance................ 52
Setting ISO Sensitivity...................... 54
Using the Spot AF............................ 55
Taking Pictures with Macro Mode .... 56
Taking Pictures with Burst Mode...... 57
Using the Conversion Lens .............. 58
Playback
Playing Back Still Pictures ................ 59
Playing Back Still Pictures with
Audio ................................................ 60
9 Images Multi Playback .................. 61
Using the Playback Zoom ................ 62
Playing Back Motion Images ............ 63

Editing
Deleting Images ............................... 64
Writing the Print Information in the
Card (DPOF Setting)........................ 66
Protecting Images on the Card ........ 69
Technical use
Playing Back with Slide Show
(Automatic Playback) ....................... 70
Adding Audio to Recorded Pictures
(Audio Dubbing) ............................... 72
Resizing the Recorded Pictures....... 73
Trimming the Recorded Pictures ..... 74
Formatting the Card ......................... 76
Adjusting the LCD Monitor
Brightness........................................ 77
Using the Auto Review..................... 78
Setting up the Operational Sound .... 79
Setting up the Power Save Mode .... 80
Resetting the File Number ............... 81
Playing Back Images with a TV
Monitor ............................................. 82
After Use .......................................... 83
Connecting to a PC .......................... 84
Others
The Menu Items............................... 85
Cautions for Use .............................. 87
Warning Indications ......................... 91
Troubleshooting ............................... 92
Specifications................................... 93
Digital Camera Accessory System... 96
Digital Camera Accessory Order
Form................................................. 97
Request for Service Notice .............. 98
Limited Warranty (For USA Only) .... 99
Customer Services Directory (For USA
Only) .............................................. 101
Index .............................................. 102
Spanish Quick Use Guide/Guía
española para el uso rápido........... 103
6
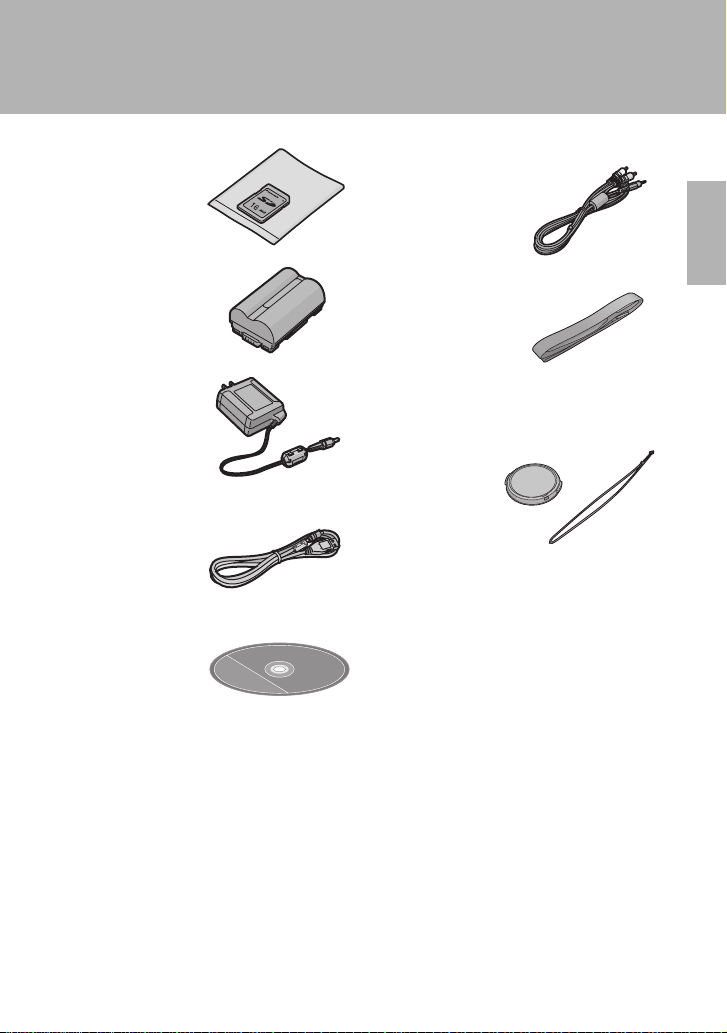
Standard Accessories
Before using your camera, check the contents.
1
SD Memory Card (16 MB)
RP-SD016B
2
Battery Pack
CGR-S602A
3
AC Adaptor
DE-877B
4
USB Connection Kit
(Consists of)
USB Connection Cable
K1HA05CD0001
5
6
7
A/V Cable
K1V204C20002
Strap
VFC3868
Lens Cap
VYK0B77
Lens Cap String
VFC3893
CD-ROM
VFF0144
7
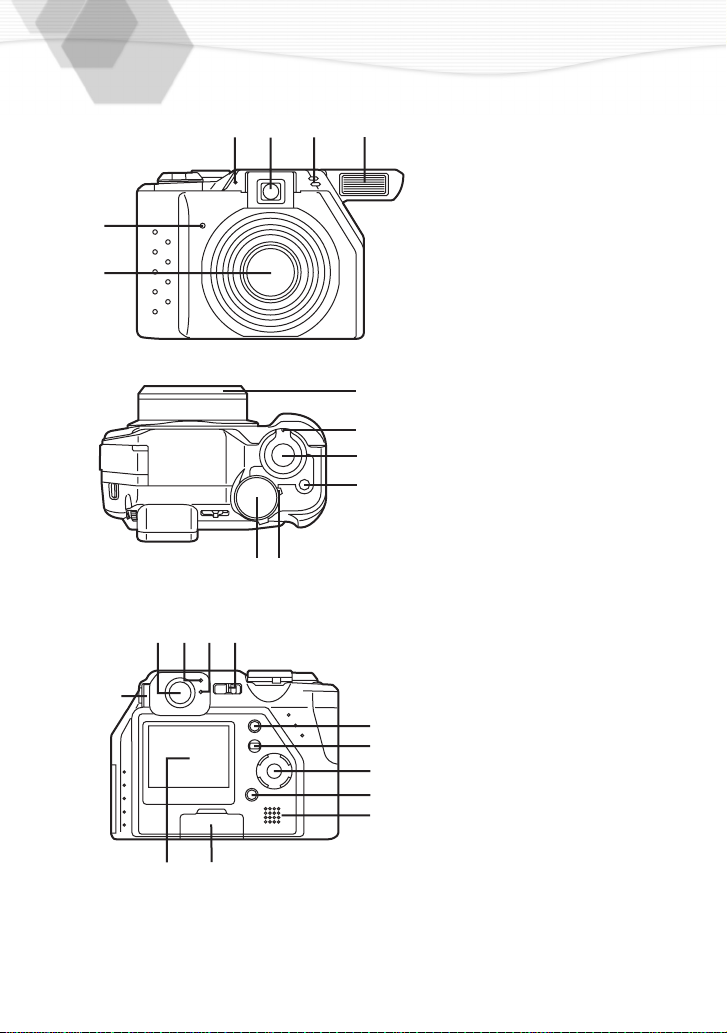
Names of the Components
[Front View]
1
12
11
10
9
18
19
20
21
22
2
3
4
5
6
[Up View]
7
8
9
10
11
12
[Back View]
13
14
15
16
17
18
19
20
21
22
23
24
5
6
13
14 15 16 17
1
23 4
78
Flash Sensor (P35)
Optical Finder (P19)
Microphone (P37, P72)
Flash
Self-timer Indicator (P36)
Lens
REC Mode Dial (P25)
Operational Mode Dial (P25)
Flash Mode Button (P34)
Shutter Button (P24)
Zoom Lever (P32, P33)
Lens Ring (P58)
Diopter Adjustment Dial (P19)
Optical Finder (P19)
Status Indicator (P23)
Flash/Access Indicator (P17,
P23)
Power Switch (P18)
DISPLAY Button (P22)
MENU Button (P27)
Cursor (
3/ 4/ 2/ 1
REVIEW/SET Button (P30)
Speaker (P60)
Memory Card Door (P16)
LCD Monitor (P10)
) Buttons
2324
8
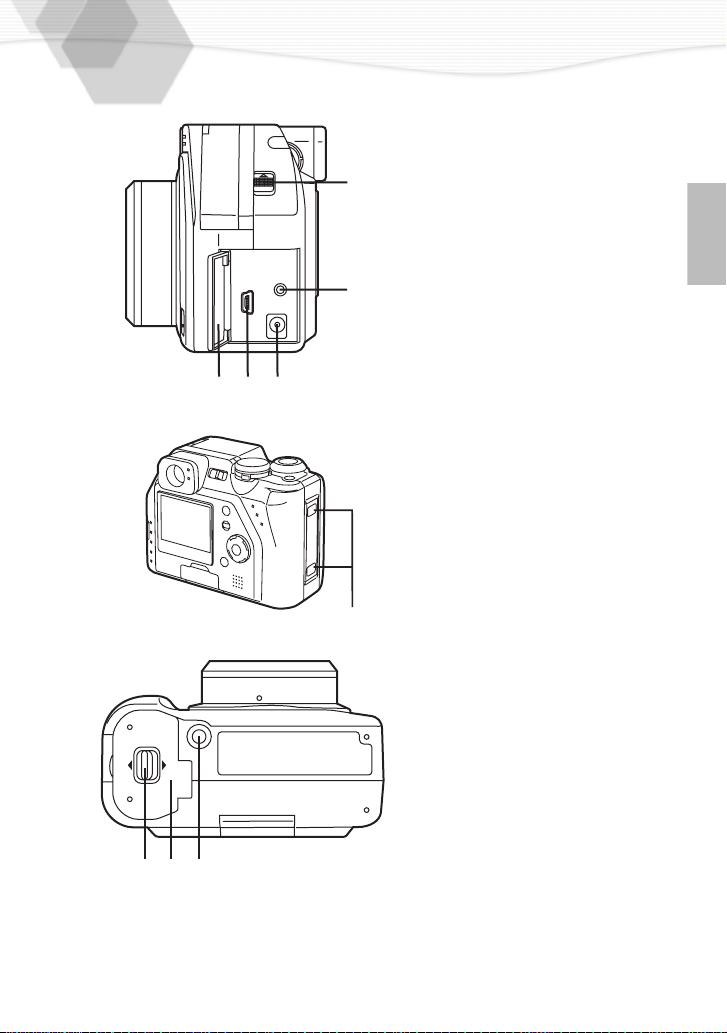
[Left View]
Flash Open Lever (P34)
25
26
A/V OUT Socket (P82)
27
DC IN Socket (P14)
28
USB Socket (5pin) (P84)
29
Terminal Door (P14)
25
26
272829
[Right View]
30
Strap Hole (P20)
LOCK
31 32 33
OPEN
30
[Bottom View]
31
Battery Door Open/Lock Lever
(P13)
32
Battery Door (P13)
33
Tripod Receptacle (P21)
9
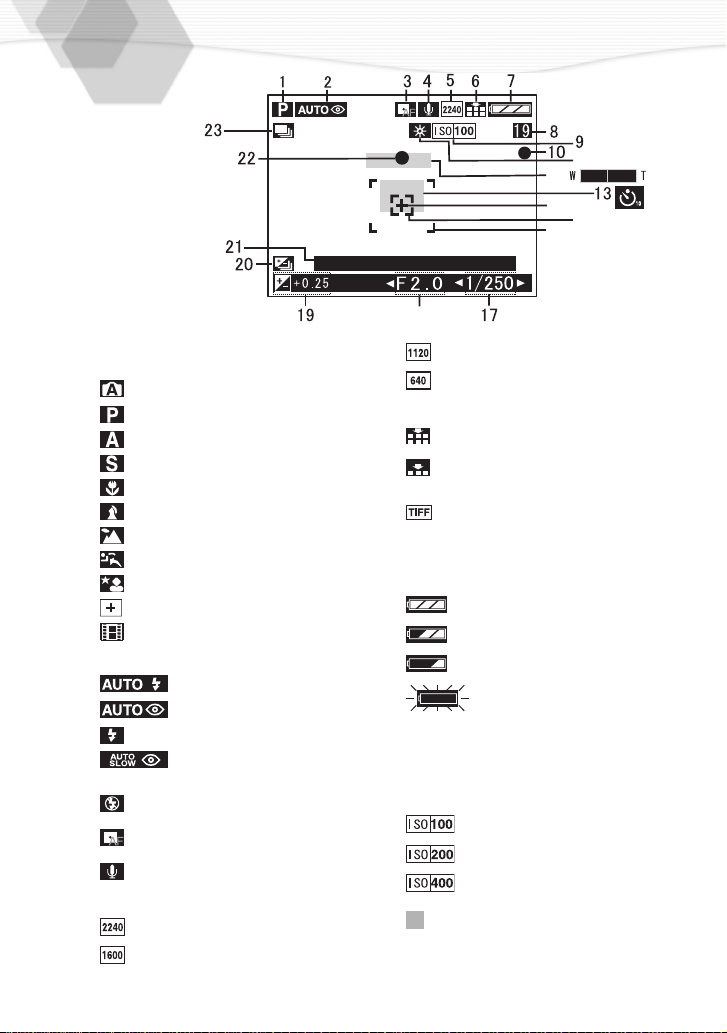
LCD Monitor Display
10:00 MAR. 1. 2002
[In recording]
1
REC mode
: AUTO (P29)
: Program AE (P40)
: Aperture-priority AE (P41)
: Shutter-priority AE (P42)
: Macro mode (P56)
: Portrait mode (P43)
: Landscape mode (P44)
: Sports mode (P45)
: Night portrait mode (P46)
: Spot mode (P47)
: Motion image mode (P31)
2
Flash mode (P34)
: AUTO
: AUTO/Red-eye reduction
:Forced ON
reduction
3
: Slow sync./Red-eye
:Forced OFF
:Spot AF (P55)
11
12
14
15
16
18
840
a
:1120
:
640 a 480
6
Quality (data compression ratio) (P39)
: Fine (low compression)
: Standard
(standard compression)
: TIFF (incompression)
7
Battery indicator (P14)
(When using AC adaptor this is not
displayed)
8
Frame/Time remain
In motion image mode: XXXS
9
ISO sensitivity (P54)
No: AUTO
4
5
10
: Audio REC (P37)
Picture size (P38)
:2240
a
1680
a
1200
:1600
10
: Recording indication
11
White balance (P52)
No: AUTO
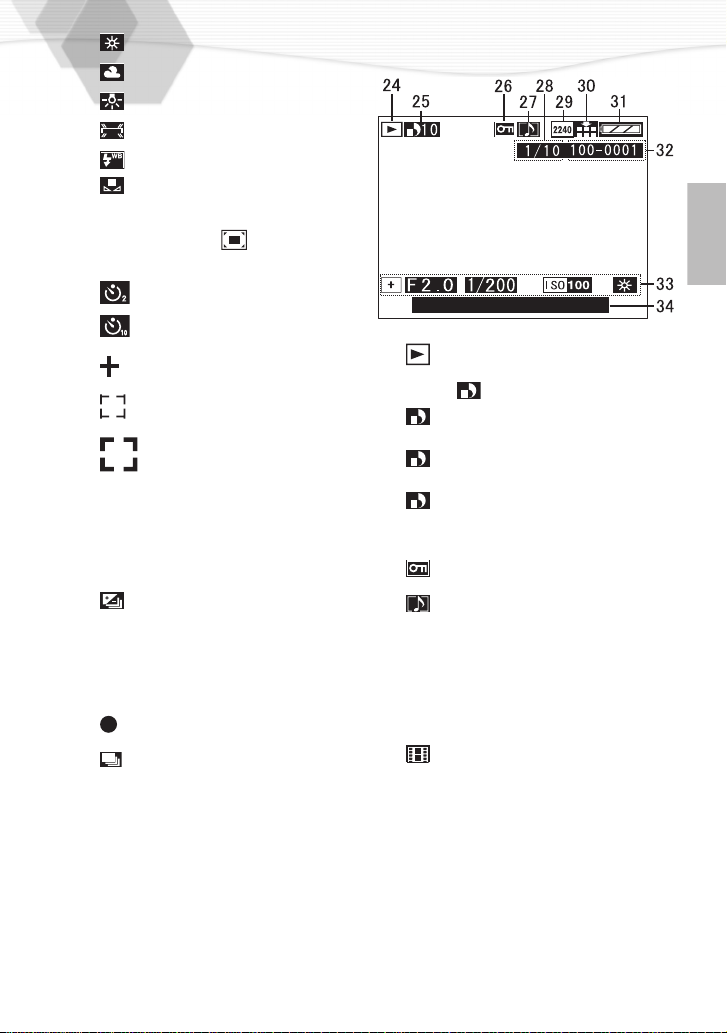
: Daylight
: Cloudy
: Halogen
: Fluorescent
: Flash
: White set
12
Zoom (P32, P33)
(digital zoom ON: )
13
Self-timer mode (P36)
: 2 seconds
: 10 seconds
14
: Spot metering target (P47)
15
: Spot AF area (P47, P55)
16
17
18
19
20
21
22
23
: Focus area (P29)
Shutter speed indication (P42)
Aperture indication (P41)
Exposure compensation (P48)
Auto bracket (P49)
: Auto (AE) bracket
Current date and time (P28)
It is displayed for about 5 seconds
when starting/after setting the REC
mode/after setting the time.
: Focus indication (P29)
: Burst mode (P57)
[In playback]
10:00 MAR. 1. 2002
24
: Playback mode
25
DPOF [ ] (P66)
(White):
DPOF setting for printing
(Green):
DPOF setting for Slide Show
(Green with DPOF number):
DPOF setting for printing and
Slide Show
26
: Protected image (P69)
27
: Image with audio (P60)
28
Page/Total images
29
Picture size (P38)
(Reference 5)
30
Quality (data compression ratio) (P39)
(Reference 6)
: In motion image mode
31
Battery indicator (P14)
(Reference 7)
32
Folder/File number
33
REC data
It will be displayed when the
[DISPLAY] button is pressed.
34
Recorded date and time
11
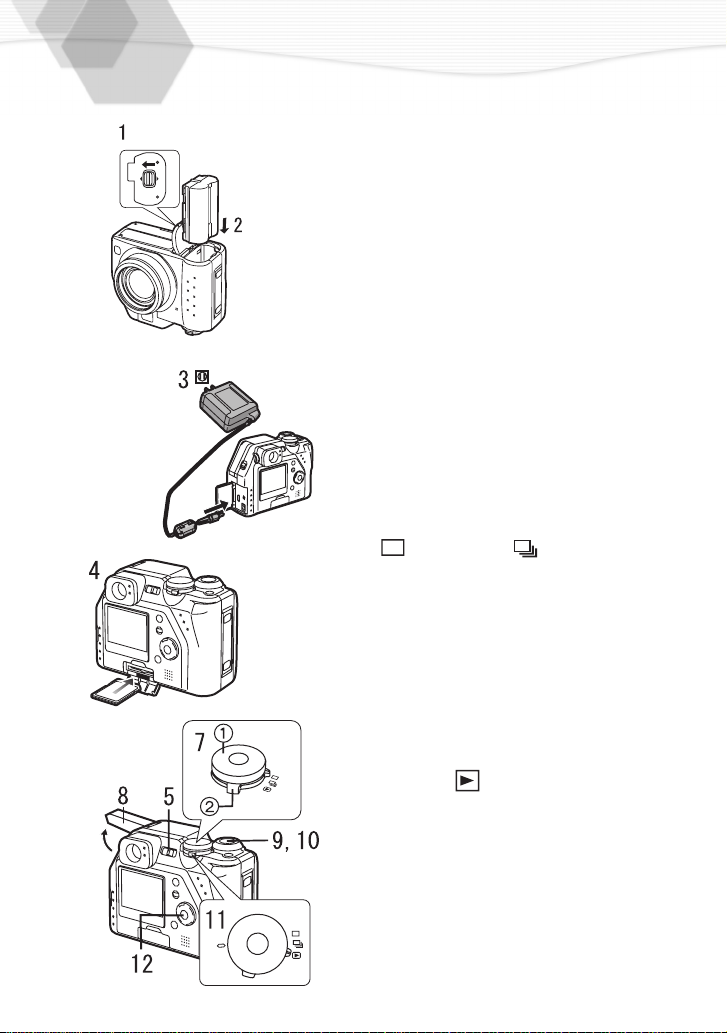
Quick Guide
OPEN
LOCK
Prepare the following items.
• Camera
• Battery
• Memory card
• AC adaptor
Check that the power switch is set to [OFF].
Slide the lever in the direction of the
1
arrow to open the battery door.
Insert the battery into the camera.
2
(P13)
Connect the AC adaptor to the
3
camera to charge the battery. (P14)
Insert the memory card into the
4
camera. (P16)
Set the power switch to [ON]. (P18)
5
Set date/time. (P28)
6
Set the operational mode dial 2
7
the REC mode dial 1111. (P25)
• Set the operational mode dial to single mode
[ ] or burst mode [ ].
Slide the flash open lever to open the
8
Flash. (P34)
Press the shutter button halfway to
9
set the focus. (P24)
Press the shutter button fully to take
10
a picture. (P24)
[Playback]
Set the operational mode dial to
11
playback [ ]. (P59)
Press 2/1 to select the picture you
12
want to view.
2 and
2 2
12
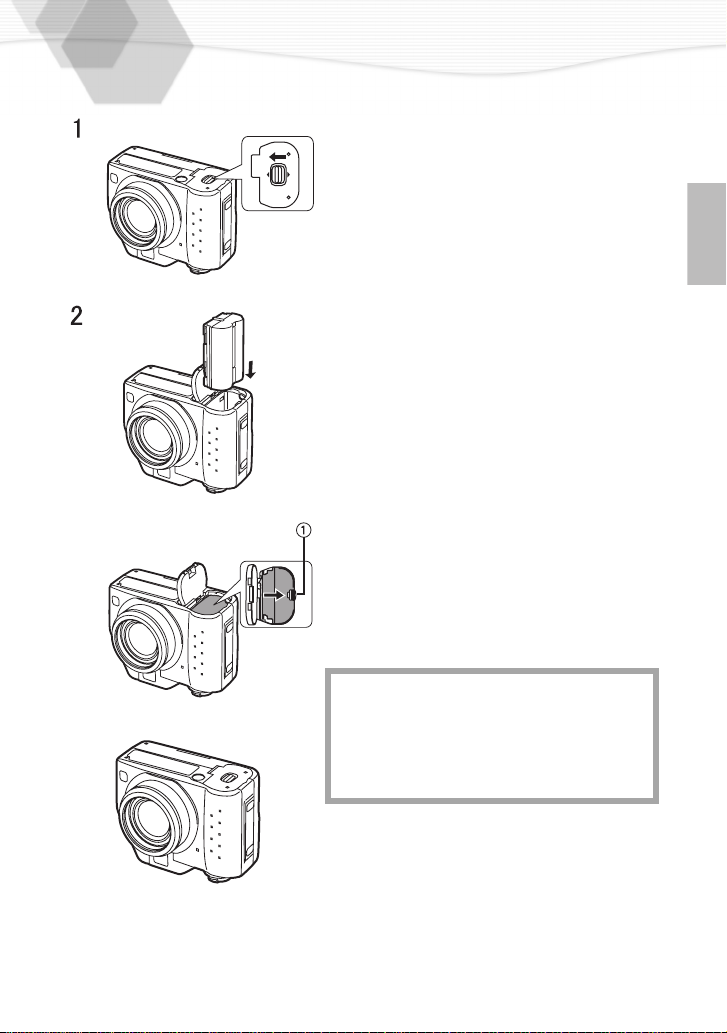
Inserting the Battery
[Preparation]
• Set the power switch to [OFF].
1
OPEN
LOCK
2
3
4
[Inserting]
[Removing]
3
[Removing the battery]
1
2
3
4
• If you will not be using the camera for a long
time, remove the battery. (When you insert the
battery again, set the date)
• Before removing the battery from the camera, set
the power switch to [OFF].
• The battery supplied with this camera is
exclusively designed for this camera. Do not use
with any other equipment.
Slide the lever in the direction of the
arrow to open the battery door.
Insert the battery all the way in, until
it is locked.
Close the battery door.
Slide the lever to lock the battery
door.
Slide the lever in the direction of the
arrow to open the battery door.
Press the lock 1 in the direction of
the arrow to remove the battery.
Close the battery door.
Slide the lever to lock the battery
door.
CAUTION
Danger of explosion if battery is incorrectly
replaced. Replace only with the same or
4
equivalent type recommended by the
manufacturer. Dispose of used batteries
according to the manufacturer’s instructions.
13
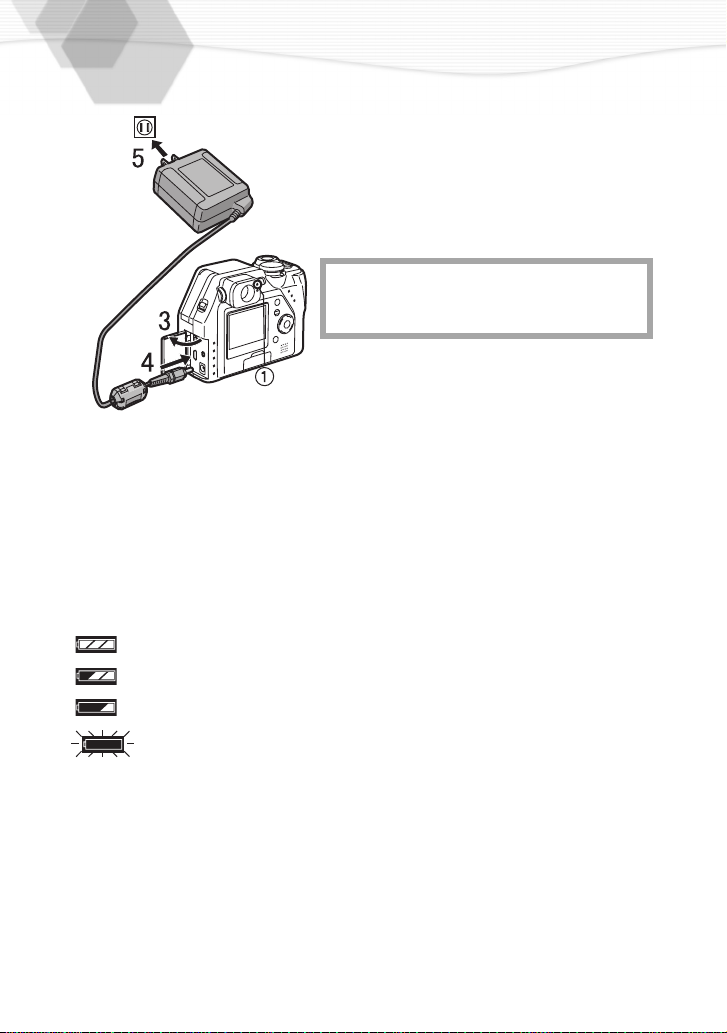
Charging the Battery
Set the power switch to [OFF].
1
Insert the battery into the camera.
2
(P13)
Open the terminal door.
3
Insert the connection plug of the AC
4
adaptor into the DC IN socket of the
camera.
THE SOCKET OUTLET SHALL BE
INSTALLED NEAR THE EQUIPMENT AND
SHALL BE EASILY ACCESSIBLE.
Plug the AC adaptor into the
5
electrical outlet.
• The green status indicator 1 blinks and
charging starts.
When the
6
blinking, charging is complete.
• After charging is finished, remove the AC
adaptor from the electrical outlet and then
remove the connecting plug from the DC IN
socket.
ª Battery indicator
The remaining battery power is displayed on the LCD monitor. (This is not displayed
when using AC adaptor)
: The battery power is sufficient
: The remaining power is a little low
: The remaining power is low
: Recharge or replace the battery
status indicator
stops
14

ª Charging time and available recording time
(LCD on, shooting once every 30 seconds, flash every other shot. Measured using
supplied 16 MB SD Memory Card)
In setting LCD monitor to ON
Supplied
battery pack
A Charging time
B Continuous recording time (recordable number)
ª Charging environment and charging error
• Charge the battery in a place with a temperature of 50 - 95 F (10 - 35 °C). (The battery
should also be the same temperature)
• When charging starts, the status indicator blinks at about 2 second cycles. If, after charging
starts, the status indicator blinks quicker, this indicates a charging error.
In this case, remove the AC adaptor from the electrical outlet, remove the battery and check
if both room and battery temperature is too low or high and then charge it again. (It is not
possible to cancel the error by only turning the power off/on.) If the problem persists,
consult the dealer or your nearest servicentre.
Approx.
120 min.
Approx. 150 min.
(equal to 300 still pictures)
In setting LCD monitor to OFF
Approx. 180 min.
(equal to 360 still pictures)
Connecting to an Electrical Outlet
If you use an AC adaptor and connect it to an electrical outlet, you can use the camera
without worrying about battery discharge. The connection method is the same as
explained in “Charging the Battery”. (P14)
• During use, the camera becomes warm; this is not a malfunction.
15

Inserting the Card
[Preparation]
• Set the power switch to [OFF].
Open the memory card door.
1
Insert the card all the way in until it
2
clicks.
• Check the direction of the card.
Close the memory card door.
3
[Removing the card]
Open the memory card door.
1
Press the card to release.
2
Pull the card out.
3
Close the memory card door.
4
• Do not touch the connection terminals on the
back side of the card.
• If the memory card door cannot completely close,
take the card out and insert it again.
• If the card cannot be fully inserted, verify whether
the direction of the card is correct.
• We recommend that you use a Panasonic
branded SD Memory Card. (Use only the
genuine card)
16
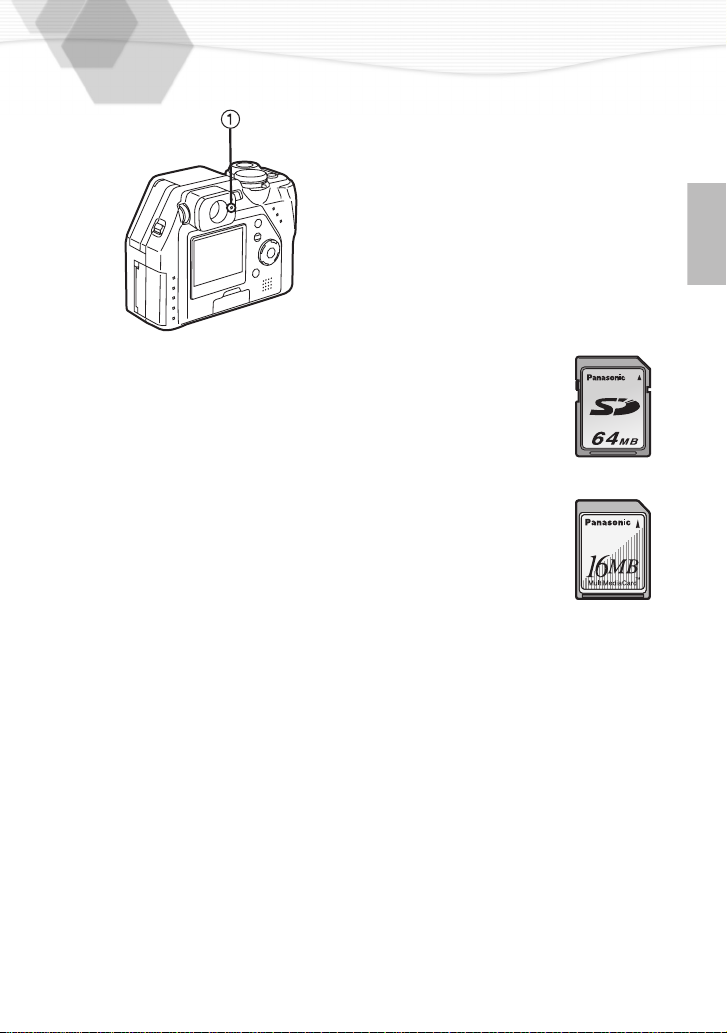
ª Access to the card
When the card is being accessed, the
red flash/access indicator 1 lights.
When the flash/access indicator lights,
do not remove the battery, open the
memory card door, or pull out the card.
The card and the card contents may be
destroyed and the camera may not
operate normally.
There is a risk that the data on the card
may be damaged or erased due to the
electrical noise, static electricity or the
defects of camera/card, please back up
your data to your PC using USB
connection. (P84)
ª SD Memory Card (supplied) and
MultiMediaCard (optional)
The SD Memory Card and
MultiMediaCard are small, lightweight,
removable external cards. The SD
Memory Card is equipped with a write
protection switch that can inhibit writing
and formatting. (When the switch is
moved towards the [LOCK] side, it is not
possible to write or delete data on the
card and format it. When the switch is
unlocked, these functions become
available)
SD Memory Card
• RP-SDH512 (512MB)
• RP-SDH256 (256MB)
• RP-SD128 (128MB)
• RP-SD064B (64MB)
• RP-SD032B (32MB)
• RP-SD016B (16MB)
• RP-SD008B (8MB)
MultiMediaCard
• After recording motion images using the
MultiMediaCard, the screen may appear
grey, but this is not a malfunction.
17

Turning Power on/off
Set the power switch to [ON].
1
• The status indicator lights.
Set
2
• When switching the power on/off, do not put any obstacle in front of the lens.
• Please be sure to remove the lens cap (P20) before you switch on the camera in recording
mode. If not, the message “REMOVE LENS CAP AND PRESS SET BUTTON” appears on
the LCD monitor. Please remove the lens cap and press [REVIEW/SET] button
the power switch to [OFF].
1
.
18

Adjusting the Optical Finder (Diopter Adjustment)
This camera’s optical view finder offers a
diopter adjustment. It allows the user to make
adjustments related to each users individual
vision characteristics. Please adjust this
feature before using the camera.
Adjust the diopter, rotating the diopter
1
adjustment dial.
• If you take the picture of the subject at the
distance between 2.3 feet (70 cm) - 3.3 feet (1 m)
with the zoom in tele position, make the top of the
subject match with the parallax compensation
, in order not to cut it. When accurate
1
mark
framing is necessary, use the LCD monitor.
19
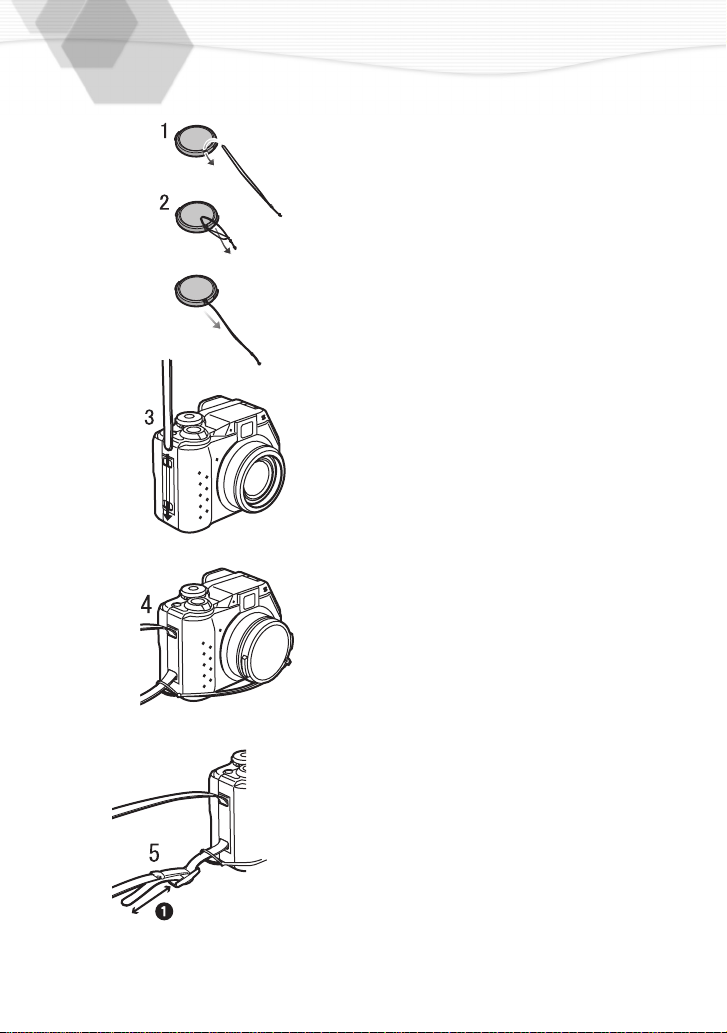
Attaching the Strap/Attaching the Lens Cap
When the camera is switched off or used in
playback mode, protect the lens surface by
attaching the supplied lens cap.
Pass the end of the string through the
1
lens cap eyelet.
Pass
2
3
4
5
the knotted end of the string
through the other end of the string
and pull it firmly.
Pass the strap through the strap
hole.
Pass
the end of the strap through the
small loop at the knotted end of the
string.
Fold the tip of the strap, run it
through the strap length adjuster,
and pull it.
• Pull it out more than 0.07 feet (2 cm) 1 from
the strap length adjuster so that it cannot slip
off.
• Remove the lens cap before turning the
camera on. (P18)
20

Using the Tripod
Using a tripod (customer supplied), can
minimize or eliminate picture motion jitter
associated with physical movement. This is
especially true when in the tele position or
when using slow shutter speeds.
Align the camera holder
1
tripod receptacle
attach.
Install the camera holder into the
2
tripod.
• To avoid damaging the camera, be careful not to
over tighten the tripod.
• Read the tripod operating instructions carefully.
1111
with the
2222
of the camera and
21

Using the LCD Monitor
Every time you press the [DISPLAY] button,
the display of the LCD monitor changes as
shown below.
DISPLAY
• These settings are retained in the Record mode, even if the power is turned off.
• When setting the digital zoom to [ON], you can not turn off the LCD monitor.
• When Auto Review function is set to [ON], LCD monitor turns on after taking picture for
reviewing even if you use the camera in LCD off mode.
• You can also use Review function (P30) in LCD off mode. Press [REVIEW/SET] button
after taking the picture, the last picture you have taken is displayed on the LCD monitor.
[In recording]
[In playback]
22

The Indicators
ª Status Indicator (Green) 1
[Blinking]
Warning indication
[Lighting]
When turning the power switch to [ON]
ª Flash/Access Indicator (Red) 2
[Blinking]
When charging the flash
When setting the flash mode to forced off and
recording in dark places
[Lighting]
When accessing the card
Indicating the flash fires in next capture (It
lights when the shutter is pressed halfway)
23
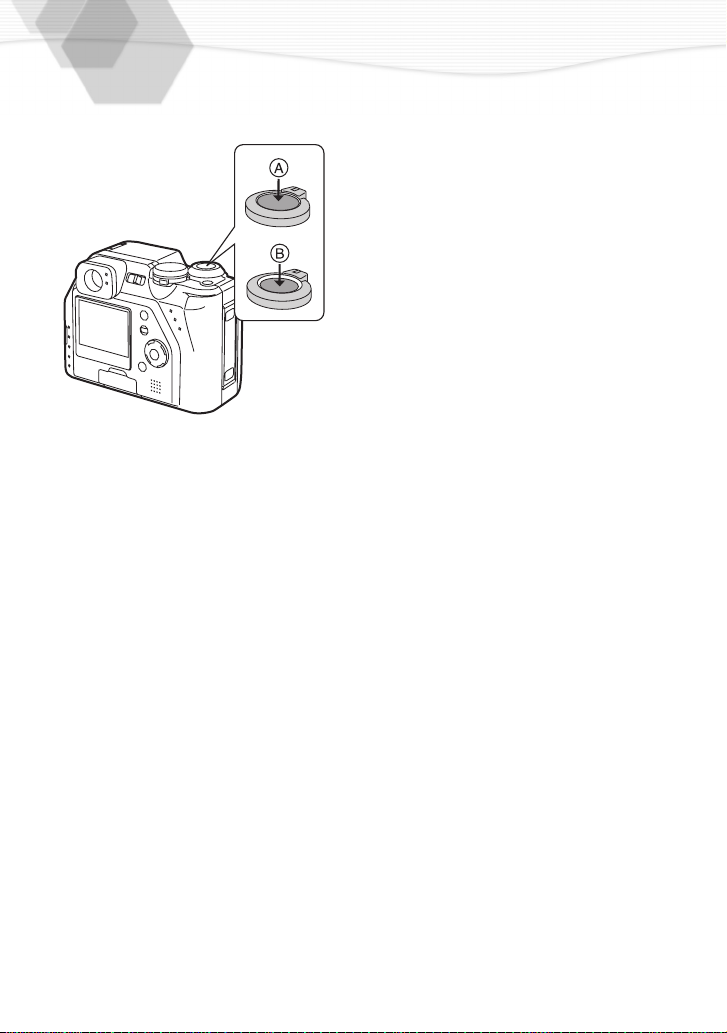
The Shutter Button (Pressing halfway/Pressing fully)
The shutter button is pressed in 2 steps:
“pressing halfway” and “pressing fully”.
Pressing halfway (Press lightly) A
• Focus and exposure are locked.
Pressing fully (Press all the way) B
• The picture is captured. In motion image mode,
the recording starts.
• You can adjust volume of the operational sound
in the menu. (P79)
• If you press the shutter button fully in a single
stroke, the captured picture may appear shaken
or unfocused. (The camera may be moved
during capturing)
24
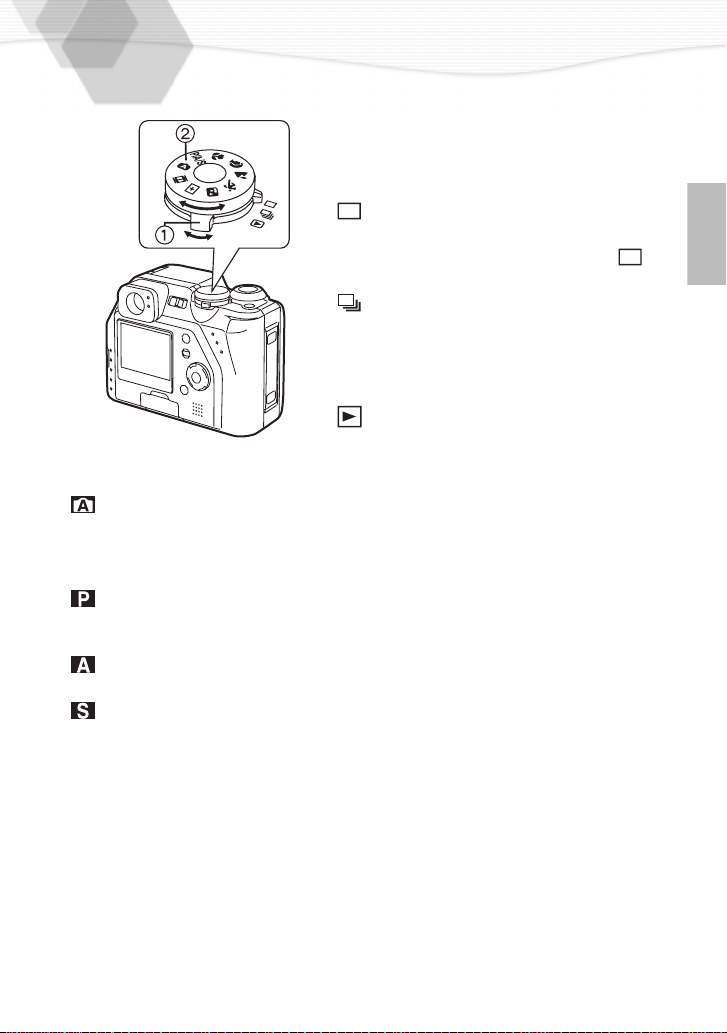
The Operational Mode Dial and the REC Mode Dial
ª Operational mode dial 1
With this dial you can set REC (single mode
or burst mode) and playback modes.
[In recording]
: Single mode
Pressing the shutter button once, a single
picture is captured. Set to single mode [ ]
also when you record motion images.
: Burst mode (P57)
If you keep pressing the shutter button, you
can take several
4 fps/8 frames)
[In playback]
: Playback (P59)
Playback recorded images.
ª REC mode dial 2
You can choose among 9 REC modes, as shown below.
: AUTO (P29)
The shutter speed and the aperture value are automatically adjusted. Also the settings
can be adjusted is limited. This mode is for beginners.
P/A/S
: Program AE: (P40)
The shutter speed and the aperture value are automatically adjusted. In addition, more
settings can be adjusted.
: Aperture-priority AE: (P41)
The shutter speed is adjusted automatically, according to the aperture value you set.
:Shutter-priority AE: (P42)
The aperture value is adjusted automatically, according to the shutter speed you set.
picture
s in sequence. (MAX
25

The Operational Mode Dial and the REC
Mode Dial (Continued)
: Macro mode: (P56)
When you take the pictures from a distance closer than 1.64 feet (50 cm), set the
camera in macro mode. This allows you to get closer to the subject up to 0.2 feet (6 cm).
: Portrait mode: (P43)
Portrait mode lets you achieve the depth of focus effect easily when you take portrait
photos. The subject looks sharp and outstanding with an unfocused background. You
can place the subject much closer and allow proper distance between subject and
background.
: Landscape mode: (P44)
You can capture sharp and crisp landscape photos easily. Please note that this mode is
suitable for the landscapes farther than 32.8 feet (10 m) and in daylight situations.
: Sports mode: (P45)
When you take photos of outdoor sports, this mode let you capture the still action photo
easily. Please note that this mode is suitable to capture subjects from distances more
than 16.4 feet (5 m) and in daylight situations.
: Night portrait mode: (P46)
When you take pictures of, for example, your friends in front of beautiful night
illumination scenery, this mode let you get the appropriate exposure for your subject as
well as the background, using flash and slow shutter. Since slow shutter is set, use of
tripod is recommended. Subject should be placed within the range of flash light.
: Spot mode: (P47)
When this mode is selected, both autofocus area and exposure will be set to spot mode.
This is suitable when you take pictures in delicate lighting conditions and intend to set
the exposure for a limited area.
:Motion images (P31)
Recording motion images.
26
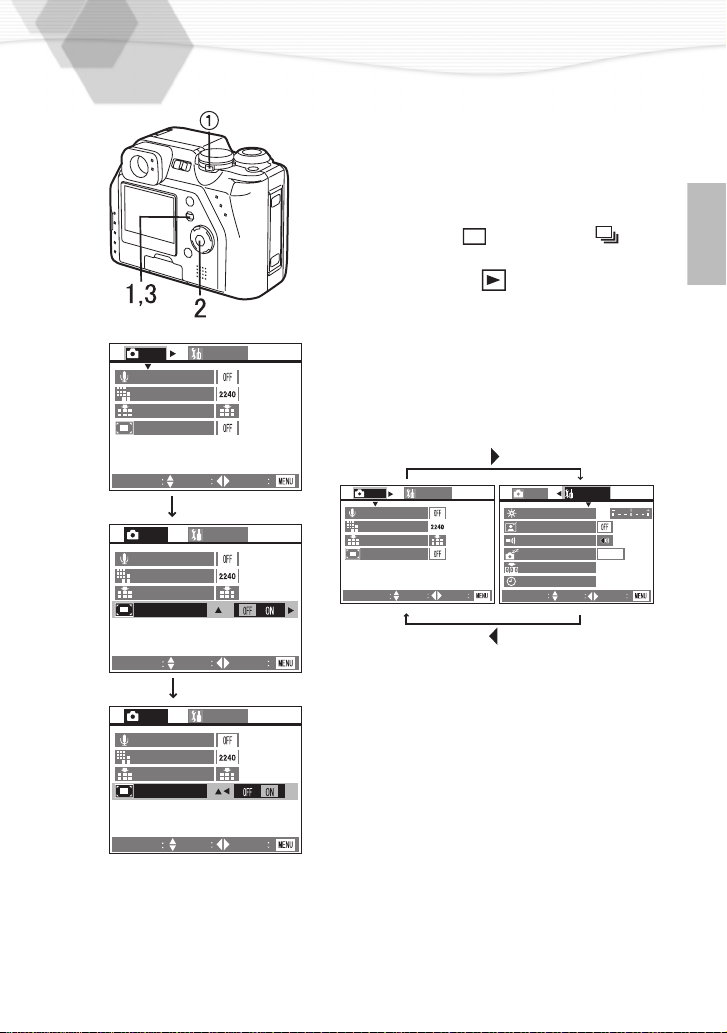
Operating the Menu
By operating the menu you can set the
settings of REC or playback mode. You can
also set the date and time, the operational
sound and various other settings. Follow
these instructions.
1
2
REC
AUDIO REC.
PICT.SIZE
QUALITY
D.ZOOM
SETUP
Press the [MENU] button.
• If you set the operational mode dial 1 to the
single mode [ ] or burst mode [ ], the
REC menu is displayed; if you set it to the
playback mode [ ], the playback menu is
displayed.
Press 3/4 to choose the item and
press 2/1 to confirm this setting
.
• With step 2, by pressing 1, you can access
2,
the setup menu. (If you press
you can go
back)
SELECT
REC
AUDIO REC.
PICT.SIZE
QUALITY
D.ZOOM
SELECT
REC
AUDIO REC.
PICT.SIZE
QUALITY
D.ZOOM
SELECT
SET
SET
SET
SETUP
SETUP
EXIT
EXIT
EXIT
SETUP
REC
AUDIO REC.
PICT.SIZE
QUALITY
D.ZOOM
SELECT SET
Press the [MENU] button
3
EXIT
• The menu will disappear.
REC SETUP
MONITOR
AUTO REVIEW
BEEP
POWER SAVE
NO.RESET
CLOCK SET
SELECT
SET
.
2 MIN.
EXIT
27

Setting the Date/Time (Clock Set)
You can set the year from 2001 to 2099. The
24-hour system is used.
Press the [MENU] button.
1
Press 1 to make the setup menu
2
appear.
Press 3/4 to select [CLOCK SET],
3
and then press 1.
Press 3/4/2/1 to set date and time,
4
and then press 1.
Press 3/4 to select [M/D/Y], [D/M/Y]
5
or [Y/M/D].
REC
MONITOR
AUTO REVIEW
BEEP
POWER SAVE
NO.RESET
CLOCK SET
SELECT
SET
SETUP
2 MIN.
EXIT
Press the [
6
• The menu will disappear.
Check if the date/time setting is
7
displayed correctly, after turning the
camera [OFF] and [ON].
• If the message [PLEASE SET THE DATE/TIME]
appears, charge the battery about 2 hours and
set the date and time again.
MENU] button twice.
28
SELECT
CLOCK SET
M/D/Y
SET
EXIT
Loading...