


 Loading...
Operating and installation instructions
Steam combination oven
To prevent the risk of accidents or damage to the appliance, it is essential to read these instructions before it is installed and used for the first time.
en-AU, NZ |
M.-Nr. 09 652 130 |

Contents |
|
Warning and Safety instructions.......................................................................... |
7 |
Caring for the environment ................................................................................ |
17 |
Overview............................................................................................................... |
18 |
Steam oven front view........................................................................................... |
18 |
Accessories supplied ............................................................................................ |
19 |
Controls................................................................................................................ |
20 |
Function selector .................................................................................................. |
21 |
Rotary selector ...................................................................................................... |
21 |
Sensor controls ..................................................................................................... |
22 |
Display................................................................................................................... |
23 |
Symbols............................................................................................................ |
24 |
Description of the functions............................................................................... |
25 |
Water container ..................................................................................................... |
25 |
Condensate tray .................................................................................................... |
25 |
Grease filter ........................................................................................................... |
25 |
Temperature .......................................................................................................... |
25 |
Moisture content ................................................................................................... |
26 |
Duration ................................................................................................................. |
26 |
Noises.................................................................................................................... |
26 |
Heating-up phase.................................................................................................. |
27 |
Cooking phase ...................................................................................................... |
27 |
Steam reduction .................................................................................................... |
27 |
Oven interior lighting ............................................................................................. |
27 |
Using for the first time ........................................................................................ |
28 |
General settings .................................................................................................... |
28 |
Cleaning for the first time ...................................................................................... |
29 |
Setting the water hardness level ........................................................................... |
30 |
Setting the correct boiling point for water............................................................. |
30 |
Heating up the appliance ...................................................................................... |
31 |
Main and sub-menus .......................................................................................... |
32 |
Operation: Steam cooking.................................................................................. |
34 |
Basic operation ..................................................................................................... |
34 |
Interrupting operation............................................................................................ |
35 |
Further functions ................................................................................................... |
36 |
Switching on and off automatically .................................................................. |
36 |
Sequence of an automatic cooking process.................................................... |
37 |
Changing settings during a cooking process................................................... |
37 |
Cancelling cooking................................................................................................ |
38 |
2

|
Contents |
Operation: Combi mode...................................................................................... |
39 |
Basic operation ..................................................................................................... |
39 |
Interrupting operation............................................................................................ |
41 |
Further functions ................................................................................................... |
42 |
Switching on and off automatically .................................................................. |
42 |
Sequence of an automatic cooking process.................................................... |
43 |
Changing settings during a cooking process................................................... |
43 |
Cancelling cooking................................................................................................ |
43 |
Operation: Functions without steam ................................................................. |
44 |
Basic operation ..................................................................................................... |
44 |
Interrupting operation............................................................................................ |
45 |
Further functions ................................................................................................... |
46 |
Switching off automatically .............................................................................. |
47 |
Switching on and off automatically .................................................................. |
47 |
Sequence of an automatic cooking process.................................................... |
48 |
Changing settings during a cooking process................................................... |
48 |
Cancelling cooking................................................................................................ |
49 |
Automatic programmes ...................................................................................... |
50 |
List of food types................................................................................................... |
50 |
Using Automatic programmes............................................................................... |
50 |
User programmes................................................................................................ |
52 |
Creating a User programme .................................................................................. |
52 |
Starting a User programme ................................................................................... |
54 |
Changing User programmes ................................................................................. |
54 |
Changing cooking stages................................................................................. |
54 |
Changing the name .......................................................................................... |
55 |
Deleting User programmes ................................................................................... |
56 |
Minute minder ................................................................................................. |
57 |
Setting the minute minder ..................................................................................... |
57 |
Changing the time set for the minute minder........................................................ |
57 |
Cancelling the time set for the minute minder ...................................................... |
57 |
General notes....................................................................................................... |
58 |
The advantages of cooking with steam ................................................................ |
58 |
Suitable containers................................................................................................ |
58 |
Cooking containers .......................................................................................... |
58 |
Your own containers......................................................................................... |
58 |
Shelf level .............................................................................................................. |
59 |
Non-tip safety notches.......................................................................................... |
59 |
Frozen.................................................................................................................... |
59 |
3

Contents |
|
Temperature .......................................................................................................... |
59 |
Duration ................................................................................................................. |
59 |
Cooking with liquid................................................................................................ |
60 |
Your own recipes - steam cooking........................................................................ |
60 |
Steam cooking..................................................................................................... |
61 |
Vegetables............................................................................................................. |
61 |
Meat ...................................................................................................................... |
64 |
Sausages............................................................................................................... |
66 |
Fish........................................................................................................................ |
66 |
Shellfish ................................................................................................................. |
69 |
Mussels ................................................................................................................. |
70 |
Rice ....................................................................................................................... |
71 |
Pasta / Noodles..................................................................................................... |
72 |
European dumplings ............................................................................................. |
73 |
Grains .................................................................................................................... |
74 |
Dried pulses .......................................................................................................... |
75 |
Hen's eggs ........................................................................................................... |
77 |
Fruit ....................................................................................................................... |
78 |
Menu cooking........................................................................................................ |
79 |
Sous-vide (vacuum) cooking.............................................................................. |
81 |
Reheating .............................................................................................................. |
87 |
Special applications ............................................................................................ |
89 |
Reheat ................................................................................................................... |
89 |
Defrost................................................................................................................... |
91 |
Bottling .................................................................................................................. |
94 |
Extracting juice...................................................................................................... |
97 |
Drying food............................................................................................................ |
98 |
Making yoghurt ..................................................................................................... |
99 |
Proving yeast dough............................................................................................ |
100 |
Dissolving gelatine .............................................................................................. |
101 |
Melting chocolate................................................................................................ |
101 |
Skinning fruit and vegetables .............................................................................. |
102 |
Preserving apples ............................................................................................... |
102 |
Blanching............................................................................................................. |
103 |
Sweating onions.................................................................................................. |
103 |
Rendering fat....................................................................................................... |
104 |
Disinfecting items ............................................................................................... |
104 |
Heating damp towels .......................................................................................... |
105 |
Decrystallising honey .......................................................................................... |
105 |
Preparing custard royale ..................................................................................... |
105 |
4

|
Contents |
Roasting ............................................................................................................. |
106 |
Baking................................................................................................................. |
110 |
Settings .............................................................................................................. |
114 |
Calling up the "Settings" menu ........................................................................... |
114 |
Changing and saving settings ........................................................................ |
114 |
Settings overview ................................................................................................ |
115 |
Language ......................................................................................................... |
116 |
Time of day.......................................................................................................... |
116 |
Display............................................................................................................ |
116 |
Clock format................................................................................................... |
116 |
Setting ............................................................................................................ |
116 |
Date ..................................................................................................................... |
116 |
Lighting................................................................................................................ |
117 |
Display brightness............................................................................................... |
117 |
Acoustic information ........................................................................................... |
117 |
Melody............................................................................................................ |
117 |
Solo tone ........................................................................................................ |
117 |
Keypad tone ........................................................................................................ |
118 |
Units .................................................................................................................... |
118 |
Weight ............................................................................................................ |
118 |
Temperature ................................................................................................... |
118 |
Keeping warm function ....................................................................................... |
118 |
Steam reduction .................................................................................................. |
119 |
Recommended temperatures.............................................................................. |
119 |
System lock .................................................................................................... |
120 |
Water hardness ................................................................................................... |
120 |
Showroom programme........................................................................................ |
121 |
Demo mode.................................................................................................... |
121 |
Factory default settings ....................................................................................... |
121 |
Cleaning and care ............................................................................................. |
122 |
Notes on cleaning and care................................................................................. |
122 |
Appliance front .................................................................................................... |
123 |
PerfectClean........................................................................................................ |
124 |
Oven compartment ............................................................................................. |
125 |
Water container ................................................................................................... |
127 |
Accessories ........................................................................................................ |
129 |
Shelf runners ....................................................................................................... |
129 |
Maintenance........................................................................................................ |
130 |
Soak ............................................................................................................... |
130 |
Drying ............................................................................................................. |
130 |
Descaling........................................................................................................ |
130 |
5

Contents |
|
Door..................................................................................................................... |
132 |
Problem solving guide ...................................................................................... |
136 |
Optional accessories ........................................................................................ |
140 |
Cooking containers ............................................................................................. |
140 |
Cleaning and care products ................................................................................ |
142 |
Other accessories ............................................................................................... |
142 |
Safety instructions for installation................................................................... |
144 |
Detailed dimensions of oven front................................................................... |
145 |
Building-in dimensions ..................................................................................... |
146 |
Installation in a tall unit........................................................................................ |
146 |
Installation in a base unit..................................................................................... |
148 |
Installation in a tall unit in combination with an oven.......................................... |
150 |
Installation.......................................................................................................... |
152 |
Electrical connection ........................................................................................ |
153 |
After sales service, data plate, warranty......................................................... |
154 |
6

Warning and Safety instructions
The steam combination oven is referred to in the following instructions as a
steam oven.
This appliance conforms to current safety requirements. Inappropriate use can, however, lead to personal injury and damage to property.
To avoid the risk of accidents and damage to the appliance, please read these instructions carefully before using it for the first time. They contain important notes on installation, safety, use and maintenance. Miele cannot be held liable for damage caused by non-compliance with these instructions.
Keep these instructions in a safe place and ensure that new users are familiar with the contents. Pass them on to any future owner.
7

Warning and Safety instructions
Correct application
This steam oven is designed for domestic use and for use in similar environments by guests in hotel or motel rooms, bed & breakfasts and other typical living quarters. This does not include common/shared facilities or commercial facilities within hotels, motels or bed & breakfasts.
The steam oven is not suitable for outdoor use.
This steam oven must only be used as described in these instructions.
Any other usage is at the owner's risk and could be dangerous.
This appliance is not intended for use by persons (including children) with reduced physical, sensory or mental capabilities, or lack of experience and knowledge, unless they have been given supervision or instruction concerning its use by a person responsible for their safety, and are able to recognise the dangers of misuse.
This steam oven is supplied with a special lamp to cope with particular conditions (e.g. temperature, moisture, chemical resistance, abrasion resistance and vibration). This special lamp must only be used for the purpose for which it is intended. It is not suitable for room lighting. Replacement lamps may only be replaced by a Miele authorised technician.
8

Warning and Safety instructions
Safety with children
Activate the system lock to ensure that children cannot switch on the steam oven inadvertently.
Young children must not be allowed to use this appliance.
Older children may only use the steam oven when its operation has been clearly explained to them and they are able to use it safely, recognising the dangers of misuse.
Cleaning may only be carried out by older children under the supervision of an adult.
Please supervise children in the vicinity of the steam oven and do not let them play with it.
Danger of suffocation! Children may be able to wrap themselves in packing material or pull it over their heads with the risk of suffocation. Keep children away from any packing material.
Danger of burning! Children's skin is far more sensitive to high temperatures than that of adults. The door glass, the control panel and the ventilation outlet above the oven door all get hot. Make sure that children do not touch the steam oven or attempt to open the door when it is in operation. Keep children well away from the appliance until it has cooled down and there is no danger of burning.
Danger of injury! The maximum load capacity for the door is 8 kg. Children can hurt themselves on an open door.
Ensure that children do not sit on or swing on the door.
9

Warning and Safety instructions
Technical safety
Repairs and other work by unqualified persons could be dangerous. Installation, maintenance work and repairs to electrical appliances must only be carried out by a Miele approved service technician.
A damaged appliance is dangerous. Check the appliance for any visible damage. Never install or attempt to use a damaged appliance.
Reliable and safe operation of this oven can only be assured if it has been connected to the mains electricity supply.
The electrical safety of this appliance can only be guaranteed when continuity is complete between it and an effective earthing system. It is most important that this basic safety requirement is present and tested regularly and, where there is any doubt, the household wiring system should be inspected by a qualified electrician.
Before connecting the appliance to the mains supply, ensure that the connection data on the data plate (voltage and frequency) matches the mains electricity supply. This data must correspond in order to avoid the risk of damage to the appliance. Consult a qualified electrician if in any doubt.
Do not connect the appliance to the mains electricity supply by a multi-socket adapter or an extension lead. These do not guarantee the required safety of the appliance (e.g. danger of overheating).
For safety reasons, this appliance may only be used after it has been built in.
This appliance must not be installed and operated in mobile installations (e.g. on a ship).
Tampering with electrical connections or components and mechanical parts is highly dangerous to the user and can cause operational faults. Do not open the outer casing of the appliance.
10
Warning and Safety instructions
The manufacturer's warranty will be invalidated if the appliance is not repaired by a Miele approved service technician.
Faulty components must only be replaced by genuine Miele spare parts. The manufacturer can only guarantee the safety of the appliance when Miele replacement parts are used.
If the plug has been removed or the connection cable is not supplied with a plug, the steam oven must be connected to the mains supply by a suitably qualified electrician.
If the connection cable is damaged, it must be replaced with a special connection cable of type H 05 VV F (pvc insulated), available from Miele, in order to avoid a hazard.
During installation, maintenance and repair work, the appliance must be disconnected from the mains electricity supply. It is only completely isolated from the electricity supply when:
–it is switched off at the mains circuit breaker, or
–it is switched off at the wall socket and the plug is withdrawn from the socket. Do not pull the mains connection cable but the mains plug to disconnect your appliance from the mains electricity supply.
If the steam oven is installed behind a furniture panel (e.g. a door), ensure that the door is never closed whilst the steam oven is in use. Heat and moisture can build up behind a closed furniture panel and cause subsequent damage to the steam oven, the housing unit and the floor. Do not close the door until the steam oven has cooled down completely.
Warning: If the lamp needs to be replaced, ensure it is replaced by a Miele approved service technician and that the appliance is switched off beforehand to avoid the possibility of an electric shock.
11

Warning and Safety instructions
In areas which may be subject to infestation by cockroaches or other vermin, pay particular attention to keeping the appliance and its surroundings clean at all times. Any damage caused by cockroaches or other vermin will not be covered by the warranty.
12

Warning and Safety instructions
Correct use
Danger of burning! The steam oven becomes hot when in use. Exercise care when handling food and trays so as not to burn yourself on heating elements, the walls of the steam oven, shelf runners, trays, steam and hot food itself.
Use oven gloves when placing food in the steam oven, turning or removing it and when adjusting shelves etc. in a hot oven.
When putting cooking containers into the steam oven or taking them out, take care not to spill the contents.
Do not use the steam oven to heat up or bottle food in sealed tins. Pressure will build up inside them and they can explode causing damage to the appliance, as well as the risk of injury and scalding.
Plastic containers which are not heat-resistant will melt, and may ignite, at high temperatures and can damage the steam oven.
Use only heat-resistant plastic containers. Please follow the container manufacturer's instructions. If you want to use plastic containers in your steam oven, make sure they can resist temperatures (up to 100°C) and steam. Other plastic containers may melt, distort or break.
Food which is left in the steam oven can dry out and the escaping moisture can lead to corrosion in the appliance. Do not leave cooked food in the oven compartment and do not use any cooking containers which are susceptible to corrosion as this could lead to corrosion in the appliance.
Do not leave the appliance door open unnecessarily as someone may trip over it or be injured by it.
The door can support a maximum load of 8 kg. Do not sit on or lean against an open door, and do not place heavy objects on it. Also make sure that nothing can get trapped between the door and the oven compartment. The steam oven could get damaged.
13

Warning and Safety instructions
Oil and fat can ignite if overheated. Never leave the steam oven unattended when cooking with oil and fat.
If it does ignite, do not put the flames out with water. Switch the steam oven off immediately and then suffocate the flames by keeping the oven door closed.
Due to the high temperatures radiated, objects left near the steam oven when it is in use could catch fire.
Do not use the steam oven to heat up the room.
To avoid fuelling any flames, do not open the oven door if smoke occurs in the oven interior. Cancel the cooking process by switching the appliance off, then switch off at the socket and remove the plug. Do not open the appliance door until the smoke has dispersed.
If using alcohol in your recipes, please be aware that high temperatures can cause the alcohol to vaporise and even to ignite on the hot heating elements.
Never cover the floor of the oven with aluminium foil, or place oven dishes, pans, saucepans or trays directly onto the floor of the oven.
When using an electrical appliance, e.g. a hand-held mixer, near the steam oven, ensure that the connection cable doesn't get caught in the door. The insulation on the cable could become damaged, giving rise to an electric shock hazard.
Do not operate the appliance without the lamp cover. Steam could attack the electrical components and cause a short circuit. Steam could also damage the electrical components.
The steam oven is designed in such a way that there will always be a little residual water left in the water container after use. If there is no residual water, there is something wrong. Call Miele.
Do not immerse the water container in water, or clean it in a dishwasher. Connecting the water container in the appliance when wet could cause an electric shock.
14

Warning and Safety instructions
For reasons of hygiene and to prevent the build-up of moisture in the appliance, the water container should be emptied after each use.
Danger of burning! There may be some residual hot water in the water container at the end of a cooking process. Take care not to spill the contents when taking the water container out of the appliance.
15

Warning and Safety instructions
Cleaning and care
Do not use a steam cleaning appliance to clean this steam oven. Pressurised steam could reach the electrical components and cause a short circuit.
Scratches on the door glass can result in the glass breaking.
Do not use abrasive cleaners, hard sponges, brushes or sharp metal
tools to clean the door glass.
The shelf runners can be removed for cleaning purposes (see "Cleaning and care - Accessories").
Ensure they are correctly fitted after cleaning and never operate the steam oven without the shelf runners fitted.
Try to avoid the interior walls being splashed with food or liquids containing salt. If it does happen, wipe these away thoroughly to avoid corrosion on the stainless steel surface.
Accessories
Use only genuine original Miele spare parts. If spare parts or accessories from other manufacturers are used, the warranty will be invalidated, and Miele cannot accept liability.
16

Caring for the environment
Disposal of the packing
material
The transport and protective packaging has been selected from materials which are environmentally friendly for disposal, and can normally be recycled.
Recycling the packaging reduces the use of raw materials in the manufacturing process and also reduces the amount of waste in landfill sites. Ensure that any plastic wrappings, bags etc. are disposed of safely and kept out of the reach of babies and young children. Danger of suffocation.
Disposing of your old
appliance
Electrical and electronic appliances often contain valuable materials. They also contain specific materials, compounds and components, which were essential for their correct function and safety. These could be hazardous to human health and to the environment if disposed of with your domestic waste or if handled incorrectly. Please do not, therefore, dispose of your old appliance with your household waste.
Please dispose of it at your local community waste collection / recycling centre for electrical and electronic appliances. You are also responsible for deleting any personal data that may be stored on the appliance prior to disposal. Please ensure that your old appliance poses no risk to children while being stored prior to disposal.
17

Overview
Steam oven front view
|
|
|
|
|
|
|
|
|
|
|
|
|
|
|
|
|
|
|
|
|
|
|
|
|
|
|
|
|
|
|
|
|
|
|
|
|
|
|
|
|
|
|
|
|
|
|
|
|
|
|
|
|
|
|
|
|
|
|
|
|
|
|
|
|
|
|
|
|
|
|
|
|
|
|
|
|
|
|
|
|
|
|
|
|
|
|
|
|
|
|
|
|
|
|
|
|
|
|
|
|
|
|
|
|
|
|
|
|
|
|
|
|
|
|
|
|
|
|
|
|
|
|
|
|
|
|
|
|
|
|
|
|
|
|
|
|
|
|
|
|
|
|
|
|
|
|
|
|
|
|
|
|
|
|
|
|
|
|
|
|
|
|
|
|
|
|
|
|
|
|
|
|
|
|
|
|
|
|
|
|
|
|
|
|
|
|
|
|
|
|
|
|
|
|
|
|
|
|
|
|
|
|
|
|
|
|
|
|
|
|
|
|
|
|
|
|
|
|
|
|
|
|
|
|
|
|
|
|
|
|
|
|
|
|
|
|
|
|
|
|
|
|
|
|
|
|
|
|
|
|
|
|
|
|
|
|
|
|
|
|
|
|
|
|
|
|
|
|
|
|
|
|
|
|
|
|
|
|
|
|
|
|
|
|
|
|
|
|
|
|
|
|
|
|
|
|
|
|
|
|
|
|
|
|
|
|
|
|
|
|
|
|
|
|
|
|
|
|
|
|
|
|
|
|
|
|
|
|
|
|
|
|
|
|
|
|
|
|
|
|
|
|
|
|
|
|
|
|
|
|
|
|
|
|
|
|
|
|
|
|
|
|
|
|
|
|
|
|
|
|
|
|
|
|
|
|
|
|
|
|
|
|
|
a Oven controls |
i Shelf runners with shelf levels 1-6 |
||||||||||||||||||||||
b Ventilation outlet |
j Steam inlet |
||||||||||||||||||||||
c Door seal |
k Drip channel |
||||||||||||||||||||||
d Grease filter in oven ceiling |
l Grease filter in back wall |
||||||||||||||||||||||
e Steam channel |
m Floor heating element |
||||||||||||||||||||||
f Water container with insert |
n Oven interior lighting |
||||||||||||||||||||||
g Compartment for water container |
o Temperature sensor |
||||||||||||||||||||||
h Water container connection point |
p Outlet for air from oven interior |
||||||||||||||||||||||
18
Overview
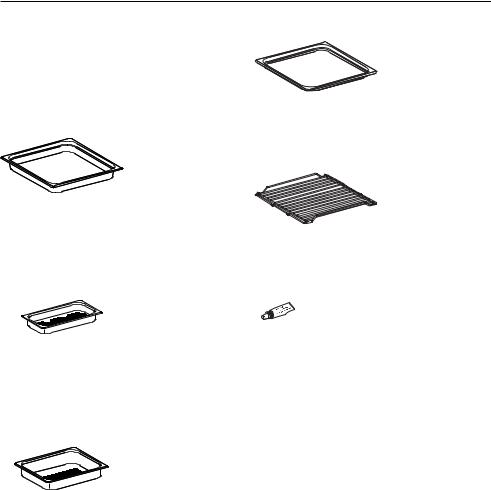
Accessories supplied |
DGG 11 |
The accessories supplied with your appliance, as well as a range of optional ones, are available to order from Miele (see "Optional accessories").
DGG 17
1 condensate tray for catching excess moisture; can also be used as a cooking container
325 x 350 x 40 mm (W x D x H)
DGGL 1
1 perforated cooking container Gross capacity 1.5 litres / Useable capacity 0.9 litres
325 x 175 x 40 mm (W x D x H)
DGGL 8
1 perforated cooking container Gross capacity 2.0 litres / Useable capacity 1.7 litres
325 x 265 x 40 mm (W x D x H)
1 baking tray
325 x 350 x 20 mm (W x D x H)
Rack
1 rack for placing your own cooking containers on and for roasting
Silicone grease
1 tube for lubricating the coupling seal on the water container
Descaling tablets
For descaling the appliance
Miele steam combination oven cookbook - DGC 6000
A selection of the best recipes from the Miele test kitchen.
19
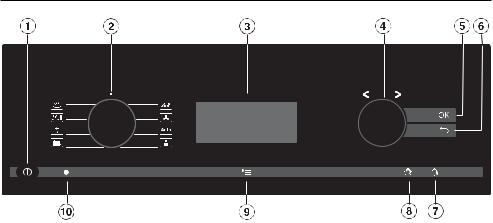
Controls
a Recessed On/Off button
For switching the appliance on and off
b Function selector
For selecting oven functions
cDisplay
Displays time of day and information for operation
dRotary selector
For scrolling through lists and for changing values
eOK sensor
For calling up functions and saving settings
fsensor
To go back one step at a time
gsensor
For setting the minute minder
hsensor
For switching the oven interior lighting on and off
isensor
For accessing settings
jOptical interface
(for service technician use only)
20
Controls
Function selector
For selecting oven functions.
The function selector can be turned clockwise or anti-clockwise and, in the position, can be retracted by pressing it in.
Oven functions
Steam cooking
Reheat
Defrost
Further programmes
Combi mode
Fan Plus
Automatic programmes
User programmes
Rotary selector
The rotary selector
–is used for scrolling up or down through lists of options. Each option is highlighted as you scroll through them. The option you want must be highlighted before you can select it.
–is used for increasing values by turning it clockwise and decreasing values by turning it anti-clockwise.
The rotary selector can be turned clockwise or anti-clockwise. It can be
retracted in any position by pressing it in.
21

Controls
Sensor controls
The sensors react to touch. Each touch is confirmed with a keypad tone. This keypad tone can be switched off (see "Settings – Keypad tone").
Sensor |
Function |
Notes |
|
For accessing |
When the steam oven is switched on, the settings |
|
settings |
list will appear in the display when the sensor is |
|
|
touched. |
|
|
If the display is dark, this sensor will not react until |
|
|
the steam oven is switched on. |
|
|
During a cooking process you can alter the |
|
|
temperature or set a cooking duration after |
|
|
touching this sensor. |
|
|
|
|
For switching the |
If the time of day is visible, you can switch the |
|
oven interior |
oven compartment lighting on and off (e.g. for |
|
lighting on and off |
cleaning) by touching . |
|
|
If the display is dark, the sensor will not react until |
|
|
the steam oven is switched on. |
|
|
The oven compartment lighting will either switch |
|
|
off after 15 seconds or stay on permanently, |
|
|
depending on the setting selected. |
|
|
|
|
For setting the |
If the time of day is visible, you can enter a minute |
|
minute minder |
minder duration at any time, e.g. when boiling |
|
|
eggs on the cooktop (see "Minute minder "). |
|
|
If the display is dark, the sensor will not react until |
|
|
the steam oven is switched on. |
|
|
|
|
To go back a step |
|
|
|
|
OK |
For calling up |
Functions highlighted in the display can be |
|
functions and |
selected by touching OK. The selected function |
|
saving settings |
can then be changed. Confirm with OK to save the |
|
|
changes. |
|
|
If information appears in the display, select OK to |
|
|
confirm the message. |
|
|
|
22

Controls
Display
The display is used for showing the time of day or information about functions, temperatures, cooking durations, Automatic programmes, User programmes and settings.
Information or a list of options will appear in the display depending on the function selected and/or by touching the sensor.
After switching the steam oven on with the On/Off sensor, you will be prompted
to Select function.
If you have not selected a function, the settings option list will appear in the display when you touch the sensor.
If a function has been selected (except for Automatic programmes ) and the settings have been entered for the cooking programme, the list of options for that cooking programme will appear when you touch the sensor.
To select an option, scroll through the list with the rotary selector until the option you want is highlighted.
Then confirm the selection with OK.
23

Controls
Symbols
The following symbols may appear in the display:
Symbol |
Meaning |
|
If two or three options are available, arrows will appear on the |
|
right-hand side of the display. Use these to scroll through the list. |
|
Available options are highlighted in white one after the other. |
|
If more than three options are available, a bar will appear on the |
right-hand side of the display. Use this to scroll through the list. |
|
|
The end of a list is indicated by a dotted line. By scrolling down |
|
further, you reach the beginning of the list again. |
|
A tick indicates the option which is currently selected. |
|
This symbol indicates that there is additional information and |
|
advice about using the oven. Select OK to access the |
|
information. |
|
Minute minder |
|
|
Some settings, e.g. display brightness and buzzer volume, are |
|
|
selected using a bar chart. |
24

Description of the functions
Water container
The maximum water level is 1.2 litres, the minimum 0.75 litre. These levels are indicated on the interior and exterior of the container. Do not exceed the maximum level.
The amount of water used will depend on the type of food and the duration of cooking. Water will sometimes need to be replenished during the cooking process. Water consumption is increased if the door is opened during cooking.
Grease filter
The grease filter in the oven ceiling must be fitted for every programme.
Fit the grease filter in the back wall for all roasting programmes.
It should be removed when using steam programmes.
It must be removed when baking, as otherwise results can be uneven (Exception: fit the grease filter in the back wall when baking open, deep fresh fruit flans, e.g. plum or damson, or pizza with lots of topping).
Condensate tray
When using perforated containers, place the condensate tray on the lowest shelf level to collect any drops of liquid and allow them to be removed easily.
You can also use the condensate tray as a cooking container if necessary.
Temperature
Some functions have a default recommended temperature. This temperature can be altered within the given range for the programme or programme stage in use, or for every time that programme is used (see "Settings - Recommended temperatures"). Recommended temperatures can be changed in 5 °C steps, or in 1 °C steps for Sous-vide cooking.
25

Description of the functions
Moisture content
The Combi mode and Reheat
functions use a combination of oven function and moisture. You can alter the moisture/humidity level within a given range for an individual cooking programme or a cooking stage.
Depending on the moisture setting, either moisture or fresh air is injected into the oven compartment. If the moisture setting is 20%, the maximum supply of fresh air is fed into the oven compartment and no moisture is used. If the moisture setting is 100%, only moisture is injected into the oven compartment.
Some food gives off moisture during the cooking process. This moisture from the food also controls the amount of moisture needed. If the required amount of moisture is very low and the food already contains a lot of water, the steam generator may not be activated at all.
Duration
Depending on the function, you can set a cooking duration of between 1 minute and 10 or 12 hours.
The duration of the Automatic and Maintenance programmes is set at the factory and cannot be altered.
With Steam cooking and with
functions and programmes that use steam alone, the set cooking duration does not start to count down until the set temperature has been reached. It begins immediately with all other functions and programmes.
Noises
You can hear the noise of the fan when the appliance is operating. Noises similar to those of a kettle can be heard when steam is being generated.
26

Description of the functions
Heating-up phase
During the heating-up phase the display will show the temperature in the cooking compartment as it rises and
Aufheizphase in all programmes except
for Automatic programmes and
Maintenance.
When cooking with steam, the duration of the heating-up phase will depend on the quantity and the temperature of the food. In general the heating-up phase will last for approx. 7 minutes. The duration will be longer if you are preparing refrigerated or frozen food.
Cooking phase
The cooking phase begins when the set temperature is reached. During the cooking phase, the duration remaining will be shown in the display.
Steam reduction
With steam programmes the steam reduction function will switch on automatically at the end of a cooking programme which uses a certain temperature range. This reduces the amount of steam which escapes when the door is opened. Steam reduction will appear in the display in addition to
Process finished.
You can switch off the steam reduction function (see "Settings - Steam reduction").
Oven interior lighting
For energy saving reasons, the oven interior lighting has been set at the factory to go out after the programme has begun.
If you want the lighting to remain on during cooking, the relevant factory default setting needs to be changed (see "Settings - Lighting").
If the door is left open at the end of a cooking programme, the oven lighting will switch off automatically after 5 minutes.
The oven lighting gives off heat. If you are operating the steam oven at a temperature below 50 °C, the oven compartment lighting switches off automatically.
If the sensor on the control panel is touched, the oven compartment lighting will come on for 15 seconds.
27

Using for the first time
General settings
The steam oven must not be operated until it has been correctly installed in its housing unit.
The steam oven will switch on automatically when it is connected to the electricity supply.
Welcome screen
A welcome greeting is displayed. You will then be asked to select some basic settings which are needed before the appliance can be used.
Follow the instructions in the display.
Setting the language
Scroll through the list until the language you want is highlighted.
Confirm with OK.
Selecting the country
Scroll through the list until the country you want is highlighted.
Confirm with OK.
Setting the date
Set the year, month and then the day.
Confirm each with OK.
Setting the time of day
Set the hours and the minutes.
Confirm with OK.
The time of day can be displayed in the 12-hour format (see "Settings - Time of day - Clock format").
28

Using for the first time
Time of day display
You will then be asked how you want the time of day to appear in the display when the steam oven is switched off (see "Settings - Time of day - Display"):
– On
The time is always visible in the display.
– Off
The display appears dark to save energy. Some functions are limited.
– Night dimming
The time only appears in the display between 5:00 and 23:00. It switches off at night to save energy.
Scroll through the list until the option you want is highlighted.
Confirm with OK.
Some information about energy consumption will appear in the display.
Confirm with OK.
Set up successfully completed will appear.
Confirm with OK.
The steam oven is ready for use.
If you have selected the wrong language by mistake, proceed as described in "Settings - Language ".
Please stick the extra data plate for the appliance supplied with this documentation in the space provided in the "After sales service, data plate, warranty" section of this booklet. Alternatively, the additional label can be stuck near the appliance if the appliance markings are not visible after installation.
Remove any protective wrapping and stickers (but not the data plate).
The appliance has undergone a function test in the factory. Residual water from this testing may have trickled back into the cabinet during transportation.
Cleaning for the first time
Water container
Take the water container out of the steam oven and remove the insert (see "Cleaning and care - Water container").
Rinse the water container and the insert thoroughly by hand using hot water. Do not use any washing-up liquid or detergent.
Risk of damage to the water container!
Do not clean the water container or the insert in the dishwasher and do not immerse them in water.
29

Using for the first time
Accessories / Oven compartment
Remove all accessories from the oven compartment.
Wash the accessories in a mild solution of washing-up liquid and hot water or in the dishwasher.
The interior of the steam oven has been treated at the factory with a conditioning agent.
To remove this, clean the oven interior with a mild solution of washing-up liquid and warm water and then dry thoroughly with a soft cloth.
Setting the water hardness
level
The water hardness level of the steam oven is set to Hard at the factory. For trouble-free operation of the steam oven, and to ensure that it is descaled at the appropriate time, it is important to set the water hardness level for your area. The harder the water, the more often the steam oven must be descaled.
Check the hardness of your local water supply and adjust the water hardness as necessary (see "Settings - Water hardness").
Setting the correct boiling
point for water
Before cooking with the steam oven for the first time, it must be set to the correct boiling point for water in your area. This is determined by the altitude at which you live. This procedure also flushes out the water pipework.
This procedure must be carried out to ensure efficient functioning of your appliance.
Only use tap water. Never use distilled or mineral water or other liquids.
Remove the water container and fill it to the "max" marker.
Push the water container into the appliance until it connects.
You should then run the Steam cooking programme at 100 °C for 15 minutes. Proceed as described in "Operation: Steam cooking".
Setting the correct boiling point for water following a house move
If you move house, the appliance will need to be reset for the new altitude if this differs from the old one by 300 m or more. To do this, descale the appliance (see "Cleaning and care - Maintenance - Descaling").
30
Loading...