


Operating and Installation instructions
Steam oven
DG 5050
DG 5060
To avoid the risk of accidents or |
en - GB |
damage to the appliance it is |
|
essential to read these |
|
instructions before it is installed |
|
and used for the first time. |
M.-Nr. 07 207 610 |

Contents
Warning and Safety instructions . . . . . . . . . . . . . . . . . . . . . . . . . . . . . . . . . . . . . 5
Caring for the environment . . . . . . . . . . . . . . . . . . . . . . . . . . . . . . . . . . . . . . . . . 10
Guide to the appliance . . . . . . . . . . . . . . . . . . . . . . . . . . . . . . . . . . . . . . . . . . . . 11 Front view. . . . . . . . . . . . . . . . . . . . . . . . . . . . . . . . . . . . . . . . . . . . . . . . . . . . . . . . 11 Accessories supplied . . . . . . . . . . . . . . . . . . . . . . . . . . . . . . . . . . . . . . . . . . . . . . 12 Control panel . . . . . . . . . . . . . . . . . . . . . . . . . . . . . . . . . . . . . . . . . . . . . . . . . . . . . 14
Description of the functions . . . . . . . . . . . . . . . . . . . . . . . . . . . . . . . . . . . . . . . . 15 Controls . . . . . . . . . . . . . . . . . . . . . . . . . . . . . . . . . . . . . . . . . . . . . . . . . . . . . . . . . 15 Function selector . . . . . . . . . . . . . . . . . . . . . . . . . . . . . . . . . . . . . . . . . . . . . . . 15 Temperature selector . . . . . . . . . . . . . . . . . . . . . . . . . . . . . . . . . . . . . . . . . . . . 15 Sensors . . . . . . . . . . . . . . . . . . . . . . . . . . . . . . . . . . . . . . . . . . . . . . . . . . . . . . . 15 Display . . . . . . . . . . . . . . . . . . . . . . . . . . . . . . . . . . . . . . . . . . . . . . . . . . . . . . . . . . 16 Condensate tray . . . . . . . . . . . . . . . . . . . . . . . . . . . . . . . . . . . . . . . . . . . . . . . . . . 17 Water container . . . . . . . . . . . . . . . . . . . . . . . . . . . . . . . . . . . . . . . . . . . . . . . . . . . 17 Temperature . . . . . . . . . . . . . . . . . . . . . . . . . . . . . . . . . . . . . . . . . . . . . . . . . . . . . 17 Cooking duration (time) . . . . . . . . . . . . . . . . . . . . . . . . . . . . . . . . . . . . . . . . . . . . . 17 Noises . . . . . . . . . . . . . . . . . . . . . . . . . . . . . . . . . . . . . . . . . . . . . . . . . . . . . . . . . . 17 Heating-up phase . . . . . . . . . . . . . . . . . . . . . . . . . . . . . . . . . . . . . . . . . . . . . . . . . 18 Cooking phase. . . . . . . . . . . . . . . . . . . . . . . . . . . . . . . . . . . . . . . . . . . . . . . . . . . . 18
Before using for the first time. . . . . . . . . . . . . . . . . . . . . . . . . . . . . . . . . . . . . . . 19 Setting up the appliance for using for the first time . . . . . . . . . . . . . . . . . . . . . . . . 19 Cleaning for the first time . . . . . . . . . . . . . . . . . . . . . . . . . . . . . . . . . . . . . . . . . . . . 21 Setting the correct boiling point for water . . . . . . . . . . . . . . . . . . . . . . . . . . . . . . . 22
Operation . . . . . . . . . . . . . . . . . . . . . . . . . . . . . . . . . . . . . . . . . . . . . . . . . . . . . . . 23 Functions . . . . . . . . . . . . . . . . . . . . . . . . . . . . . . . . . . . . . . . . . . . . . . . . . . . . . . . . 23 Preparing the appliance for use . . . . . . . . . . . . . . . . . . . . . . . . . . . . . . . . . . . . . . 24 Selecting a function . . . . . . . . . . . . . . . . . . . . . . . . . . . . . . . . . . . . . . . . . . . . . . . . 24 Setting the temperature . . . . . . . . . . . . . . . . . . . . . . . . . . . . . . . . . . . . . . . . . . . . . 24 Setting a cooking duration . . . . . . . . . . . . . . . . . . . . . . . . . . . . . . . . . . . . . . . . . . . 25 At the end of the duration . . . . . . . . . . . . . . . . . . . . . . . . . . . . . . . . . . . . . . . . . . . 25 After use. . . . . . . . . . . . . . . . . . . . . . . . . . . . . . . . . . . . . . . . . . . . . . . . . . . . . . . . . 26
2

Contents
During operation . . . . . . . . . . . . . . . . . . . . . . . . . . . . . . . . . . . . . . . . . . . . . . . . . . 27 Interrupting operation . . . . . . . . . . . . . . . . . . . . . . . . . . . . . . . . . . . . . . . . . . . . 27 Changing the temperature . . . . . . . . . . . . . . . . . . . . . . . . . . . . . . . . . . . . . . . . 27 Changing the duration . . . . . . . . . . . . . . . . . . . . . . . . . . . . . . . . . . . . . . . . . . . 28 Insufficient water. . . . . . . . . . . . . . . . . . . . . . . . . . . . . . . . . . . . . . . . . . . . . . . . 28
Additional functions . . . . . . . . . . . . . . . . . . . . . . . . . . . . . . . . . . . . . . . . . . . . . . 29 Start time . . . . . . . . . . . . . . . . . . . . . . . . . . . . . . . . . . . . . . . . . . . . . . . . . . . . . . . . 29 Minute minder . . . . . . . . . . . . . . . . . . . . . . . . . . . . . . . . . . . . . . . . . . . . . . . . . . . . 30 Pre-heat . . . . . . . . . . . . . . . . . . . . . . . . . . . . . . . . . . . . . . . . . . . . . . . . . . . . . . . . . 31 System lock . . . . . . . . . . . . . . . . . . . . . . . . . . . . . . . . . . . . . . . . . . . . . . . . . . . . . . 32
Settings . . . . . . . . . . . . . . . . . . . . . . . . . . . . . . . . . . . . . . . . . . . . . . . . . . . . . . . . . 33 Language J. . . . . . . . . . . . . . . . . . . . . . . . . . . . . . . . . . . . . . . . . . . . . . . . . . . . . . 33 Time of day . . . . . . . . . . . . . . . . . . . . . . . . . . . . . . . . . . . . . . . . . . . . . . . . . . . . . . 33 Pre-heat . . . . . . . . . . . . . . . . . . . . . . . . . . . . . . . . . . . . . . . . . . . . . . . . . . . . . . . . . 34 Recommended temperatures . . . . . . . . . . . . . . . . . . . . . . . . . . . . . . . . . . . . . . . . 34 Water hardness . . . . . . . . . . . . . . . . . . . . . . . . . . . . . . . . . . . . . . . . . . . . . . . . . . . 34 Display . . . . . . . . . . . . . . . . . . . . . . . . . . . . . . . . . . . . . . . . . . . . . . . . . . . . . . . . . . 34 Volume . . . . . . . . . . . . . . . . . . . . . . . . . . . . . . . . . . . . . . . . . . . . . . . . . . . . . . . . . . 34 Safety . . . . . . . . . . . . . . . . . . . . . . . . . . . . . . . . . . . . . . . . . . . . . . . . . . . . . . . . . . . 35 Temperature format . . . . . . . . . . . . . . . . . . . . . . . . . . . . . . . . . . . . . . . . . . . . . . . . 35 Showroom programme . . . . . . . . . . . . . . . . . . . . . . . . . . . . . . . . . . . . . . . . . . . . . 35 Factory default . . . . . . . . . . . . . . . . . . . . . . . . . . . . . . . . . . . . . . . . . . . . . . . . . . . . 35
Cleaning and care . . . . . . . . . . . . . . . . . . . . . . . . . . . . . . . . . . . . . . . . . . . . . . . . 36 General notes . . . . . . . . . . . . . . . . . . . . . . . . . . . . . . . . . . . . . . . . . . . . . . . . . . . . 36 Appliance front . . . . . . . . . . . . . . . . . . . . . . . . . . . . . . . . . . . . . . . . . . . . . . . . . . . 37 Oven interior . . . . . . . . . . . . . . . . . . . . . . . . . . . . . . . . . . . . . . . . . . . . . . . . . . . . . 38 Drip tray, rack and cooking containers . . . . . . . . . . . . . . . . . . . . . . . . . . . . . . . . . 38 Water container . . . . . . . . . . . . . . . . . . . . . . . . . . . . . . . . . . . . . . . . . . . . . . . . . . . 39
Coupling seal . . . . . . . . . . . . . . . . . . . . . . . . . . . . . . . . . . . . . . . . . . . . . . . . . . 40 Descaling . . . . . . . . . . . . . . . . . . . . . . . . . . . . . . . . . . . . . . . . . . . . . . . . . . . . . . . . 41 Removing and refitting the door . . . . . . . . . . . . . . . . . . . . . . . . . . . . . . . . . . . . . . 43
Problem solving guide . . . . . . . . . . . . . . . . . . . . . . . . . . . . . . . . . . . . . . . . . . . . 44
3

Contents
Optional accessories . . . . . . . . . . . . . . . . . . . . . . . . . . . . . . . . . . . . . . . . . . . . . . 47 Cooking containers . . . . . . . . . . . . . . . . . . . . . . . . . . . . . . . . . . . . . . . . . . . . . . . . 47 Cleaning and care products . . . . . . . . . . . . . . . . . . . . . . . . . . . . . . . . . . . . . . . . . 49
Safety instructions for installation . . . . . . . . . . . . . . . . . . . . . . . . . . . . . . . . . . . 51
Appliance and building-in dimensions . . . . . . . . . . . . . . . . . . . . . . . . . . . . . . . 52 Installation in a tall unit. . . . . . . . . . . . . . . . . . . . . . . . . . . . . . . . . . . . . . . . . . . . . . 52 Installation in a base unit . . . . . . . . . . . . . . . . . . . . . . . . . . . . . . . . . . . . . . . . . . . . 53 Installation in a tall unit in combination with an oven . . . . . . . . . . . . . . . . . . . . . . . 54
Installing the appliance . . . . . . . . . . . . . . . . . . . . . . . . . . . . . . . . . . . . . . . . . . . . 55
Electrical connection . . . . . . . . . . . . . . . . . . . . . . . . . . . . . . . . . . . . . . . . . . . . . . 56
After sales service, data plate . . . . . . . . . . . . . . . . . . . . . . . . . . . . . . . . . . . . . . 58
4

Warning and Safety instructions
This steam oven conforms to current safety requirements. Inappropriate use can, however, lead to personal injury and damage to property.
To avoid the risk of accidents and damage to the steam oven, please read these instructions carefully before installation and before using it for the first time. They contain important notes on the installation, safety, operation and care of the appliance.
Keep these instructions in a safe place and ensure that new users are familiar with the content. Pass them on to any future owner.
Correct application
~This steam oven is intended for domestic use only, and must only be used as described in these instructions. Any other usage is at the owner's risk and could be dangerous. The manufacturer cannot be held liable for damage resulting from incorrect or improper use or operation.
~This steam oven is not intended for use by persons (including children) with reduced physical, sensory or mental capabilities, or lack of experience and knowledge, unless they are supervised while using it or have been given instruction concerning its use by a person responsible for their safety.
5

Warning and Safety instructions
Safety with children
~Activate the safety lock to ensure that children cannot switch on the appliance inadvertently.
~Keep children away from the steam oven at all times. It is not a toy! To avoid the risk of injury do not allow them to play with it or to play with the controls. Supervise children whilst you are using it.
~Older children may use the appliance only when its operation has been clearly explained to them and they are able to use it safely, recognising the dangers of incorrect use.
~Make sure that children do not attempt to open the door when the appliance is in operation. To safeguard against burning, keep children well away from the appliance at all times.
~Do not allow children to lean against the open oven door, nor to sit on it or swing on it.
~Packaging, e.g. cling film, polystyrene and plastic wrappings, must be kept out of the reach of babies and young children. Danger of suffocation. Dispose of or recycle all packaging safely as soon as possible.
Technical safety
~Before installation, check the steam oven for visible signs of damage. Do not install and use a damaged appliance. A damaged appliance is dangerous.
~Before connecting the appliance to the mains supply, ensure that the connection data on the data plate (voltage and connected load) match the mains supply. Consult a qualified electrician if in any doubt.
~The electrical safety of this appliance can only be guaranteed when continuity is complete between it and an effective earthing system which complies with current local and national safety regulations. It is most important that this basic safety requirement is present and regularly tested, and where there is any doubt, the household wiring system should be inspected by a qualified electrician. The manufacturer cannot be held liable for the consequences of an inadequate earthing system (e.g. electric shock).
6

Warning and Safety instructions
~This appliance is supplied with a moulded plug ready for connection to a switched socket. If you wish to connect it to a double-pole fused spur connection unit, or to an isolator switch or if the appliance is supplied without a plug, it must be installed by a suitably qualified and competent person in strict accordance with current local and national safety regulations. The manufacturer cannot be held liable for damage caused by incorrect installation or connection.
~For safety reasons, this appliance may only be used when it has been built in. This is necessary to ensure that all electrical components are shielded.
~Never open the casing of the appliance.
Tampering with electrical connections or components and mechanical parts is highly dangerous to the user and can cause operational faults.
~Installation, maintenance and repairs may only be carried out by a suitably qualified and competent person in strict accordance with current national and local safety regulations. Repairs and other work by unqualified persons could be dangerous. The manufacturer cannot be held liable for unauthorised work.
~If the connection cable is damaged, it must be replaced with a special connection cable of type H 05 V V-F (pvc insulated), available from the Miele Spare Parts Department.
~Faulty components must only be replaced by genuine Miele original spare parts. The manufacturer can only guarantee the safety of the appliance when Miele replacement parts are used.
~During installation, maintenance and repair work, the appliance must be disconnected from the mains electricity supply. It is only completely isolated from the electricity supply when:
–the mains fuse is disconnected,
–the screw-out fuse is removed (in countries where this is applicable),
–it is switched off at the wall socket and the plug is withdrawn from the socket, or it is switched off at the isolator.
~While the appliance is under guarantee, repairs should only be undertaken by a service technician authorised by the manufacturer. Otherwise the guarantee is invalidated.
~Do not connect the steam oven to the mains electricity supply by a multi-socket unit or an extension lead. These do not guarantee the required safety of the appliance (e.g. danger of overheating).
~In countries where there are areas which may be subject to infestation by cockroaches or other vermin, pay particular attention to keeping the appliance and its surroundings in a clean condition at all times. Any damage caused by cockroaches or other vermin will not be covered by the guarantee.
7

Warning and Safety instructions
Correct use
~For added protection, it is advisable to use heat-resistant pot holders or gloves when using the appliance. Do not let them get damp or wet, as this causes heat to transfer through the material more quickly with the risk of scalding or burning yourself.
~When putting cooking containers or the condensate tray into the oven or taking them out, take care not to spill the contents. Avoid contact with hot steam, and do not touch the hot oven interior walls. Danger of burning and scalding.
~If using plastic cooking containers, make sure that they are heatand steam-resistant to 100 °C. Otherwise they may melt, distort or break.
~Do not use the appliance to heat up food in sealed jars and tins. Pressure will build up inside them and they can explode causing damage to the appliance, as well as the risk of injury and scalding.
~Always ensure that food is sufficiently cooked or reheated. Some foods may contain micro-organisms which are only destroyed by thorough cooking at a sufficiently high temperature for long enough. Therefore, when cooking or reheating food such as poultry, it is particularly important that the food is
completely cooked through. If in doubt, select a longer cooking or reheating time.
~Do not leave cooked food in the oven and do not use any cooking containers which are susceptible to corrosion as this could lead to corrosion in the appliance.
~The appliance is designed in such a way that there will always be a little residual water left in the water container after use. If there is no residual water, there is something wrong. Call the Service Department.
~Do not immerse the water container in water, or clean it in a dishwasher. Connecting the water container into the appliance when wet could cause an electric shock.
~For reasons of hygiene and to prevent the build-up of moisture in the appliance, the water container should be emptied after each use.
~Take care not to tip the water container when taking it out of the appliance. Hot water can scald.
8

Warning and Safety instructions
~When using an electric socket near the steam oven, care should be taken that the cable of the appliance cannot get trapped by the steam oven door.
The insulation on the cable could become damaged, giving rise to an electric shock hazard.
~Do not place heavy objects on the open door. The door can support a maximum weight of 8 kg.
~If the appliance is not going to be used for a longer period of time, e.g. whilst on holiday, it should be thoroughly cleaned and dried beforehand to prevent the build-up of odours etc. Make sure that the water container is empty. Leave the door open.
The manufacturer cannot be held liable for damage caused by non-compliance with these Warning and Safety instructions.
9

Caring for the environment
Disposal of the packing material
The transport and protective packing has been selected from materials which are environmentally friendly for disposal, and can normally be recycled.
Ensure that any plastic wrappings, bags, etc. are disposed of safely and kept out of the reach of babies and young children. Danger of suffocation.
Rather than just throwing these materials away, please ensure they are recycled.
Disposing of your old appliance
Electrical and electronic appliances often contain materials which, if handled or disposed of incorrectly they could be potentially hazardous to human health and to the environment. They are, however, essential for the correct functioning of your appliance. Please do not therefore dispose of it with your household waste.
Please dispose of it at your local community waste collection/recycling centre or contact your dealer for advice. Ensure that it presents no danger to children while being stored for disposal.
10
Guide to the appliance
Front view
a Control panel
b Ventilation outlet
c Door seal
d Steam channel
e Compartment for water container
f Water container (with insert)
g Contact point for water container
h Shelf levels
i Steam inlet
j Drip channel in the oven
k Floor heater
l Temperature sensor
m Outlet for air from oven interior
11
Guide to the appliance
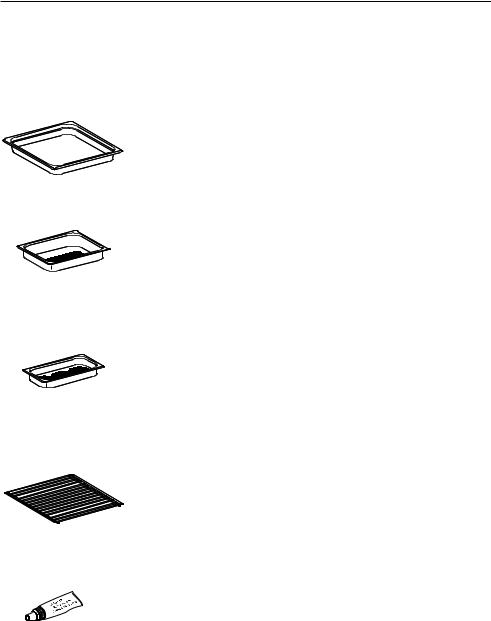
Accessories supplied
The accessories supplied with your appliance as well as a range of optional ones are available to order from Miele (see "Optional accessories").
Condensate tray
To catch excess moisture Gastronorm size GN 2/3 325x350x40 mm (WxDxH)
DGGL 8
1 perforated cooking container
gross capacity 2.0 litres / useable capacity 1.7 litres Gastronorm size GN 1/2
325x265x40 mm (WxDxH)
DGGL 1
2 perforated cooking containers
gross capacity 1.5 litres / useable capacity 0.9 litres Gastronorm size GN 1/3
325x175x40 mm (WxDxH)
Rack
For placing your own cooking containers on
Silicone grease
For lubricating the coupling seal on the water container
12

Guide to the appliance
Descaling tablets
For descaling the water container.
Miele steam oven cookbook
A selection of the best recipes from the Miele test kitchen.
13
Guide to the appliance
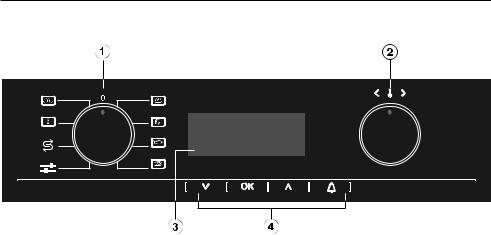
Control panel
a Function selector
b Temperature selector
c Display
d Sensors
14

Description of the functions
Controls
Function selector
You select the function you want by turning the function selector (see "Operation / Functions").
Temperature selector
You can use the temperature selector to alter the recommended temperature for the function selected in 1° steps within the permitted range (see "Operation / Setting the temperature")
The function selector and the temperature selector can be turned both clockwise and anti-clockwise. Push them in to retract them.
Sensors
Lightly touch the sensors to operate the appliance. An audible tone will sound each time a sensor is pressed. You can alter the volume of the tone or switch the tone off in the Settings menu (see "Settings / Volume").
Sensor |
Function |
|
|
? |
For setting the cooking duration. |
|
For scrolling through the menus. |
|
|
; |
For setting the cooking duration. |
|
For scrolling through the menus. |
|
|
OK |
For confirming a selection. |
|
|
l |
For activating and deactivating the minute minder. |
|
For selecting the minute minder time. |
|
|
15

Description of the functions
Display
The following symbols will appear in the display in addition to the text:
Symbol |
Meaning |
|
|
- |
A maximum of 2 options can be shown in the |
e |
display. |
|
These arrows indicate if more than two options |
|
are available. |
|
|
- - - |
A dotted line will appear under the last option |
|
available. The beginning of the list will appear |
|
under the dotted line. |
|
|
L |
A tick will appear beside the option which is |
|
currently selected. |
|
|
|
Water level in the water container: |
< |
full |
= |
half full |
? |
nearly empty. |
|
|
T |
Entered cooking duration (time) |
|
|
R |
Start time |
|
|
$ |
System lock activated |
|
|
16

Description of the functions
Condensate tray
When you are using perforated containers, place the condensate tray on the floor of the appliance to collect any drops of liquid and allow them to be removed easily.
Water container
The maximum water level is 1.2 litres, the minimum 0.75 litres. The water level markers are located inside and outside the container. On no account exceed the upper or maximum level marker.
The maximum quantity of 1.2 litres of water is sufficient to run a cooking programme at 100 °C for approx. 2 hours, and the minimum quantity of 0.75 litres of water is sufficient to run a cooking programme at 100 °C for approx. 30 minutes, providing the door is not opened.
The water level in the water container is represented by a symbol in the display.
Temperature
Some of the functions are allocated with a recommended temperature. You can alter the recommended temperature for an individual cooking process or permanently (see "Settings / Recommended temperature").
Cooking duration (time)
A duration of between 1 minute (0:01) and 9 hours 59 minutes (9:59) can be set.
Noises
You can hear the noise of the fan when the appliance is operating.
Noises similar to those of a kettle can be heard when steam is being generated.
17

Description of the functions
Heating-up phase
During the heating-up phase the oven compartment is heated to the set temperature. The display will show the temperature of the cooking compartment as it rises.
The duration of the heating-up phase will depend on the quantity and the temperature of the food. In general the heating-up phase will last for approx. 7 minutes. The duration will be longer if you are preparing frozen or refrigerated food. Filling the water container with hot water will shorten the heating-up time.
Cooking phase
The cooking phase begins when the set temperature is reached. During the cooking phase the duration remaining (time left) will be shown in the display.
Please refer to the "User instructions" booklet supplied with your appliance for more information and tips on how to use your steam oven.
18
 Loading...