


Operating instructions
Built-in steam oven DG 155-1
DG 163
It is essential to read these operating instructions before installing or using the machine, to avoid the risk of accident
or damage to the machine.
WO
M.-Nr. 05 246 571

Contents
Description of the appliance. . . . . . . . . . . . . . . . . . . . . . . . . . . . . . . . . . . . . . . . . 4 Illustration of the appliance . . . . . . . . . . . . . . . . . . . . . . . . . . . . . . . . . . . . . . . . . . . 4 Control panel . . . . . . . . . . . . . . . . . . . . . . . . . . . . . . . . . . . . . . . . . . . . . . . . . . . . . . 5 Accessories supplied . . . . . . . . . . . . . . . . . . . . . . . . . . . . . . . . . . . . . . . . . . . . . . . 6 Optional accessories . . . . . . . . . . . . . . . . . . . . . . . . . . . . . . . . . . . . . . . . . . . . . . . . 8
Warning and Safety instructions . . . . . . . . . . . . . . . . . . . . . . . . . . . . . . . . . . . . . 9
Caring for the environment . . . . . . . . . . . . . . . . . . . . . . . . . . . . . . . . . . . . . . . . . 14
Before using for the first time. . . . . . . . . . . . . . . . . . . . . . . . . . . . . . . . . . . . . . . 15 Setting the water hardness level . . . . . . . . . . . . . . . . . . . . . . . . . . . . . . . . . . . . . . 16 Cleaning and heating up for the first time . . . . . . . . . . . . . . . . . . . . . . . . . . . . . . . 17
Use . . . . . . . . . . . . . . . . . . . . . . . . . . . . . . . . . . . . . . . . . . . . . . . . . . . . . . . . . . . . 19 Before each use. . . . . . . . . . . . . . . . . . . . . . . . . . . . . . . . . . . . . . . . . . . . . . . . . . . 19 Procedure in brief: . . . . . . . . . . . . . . . . . . . . . . . . . . . . . . . . . . . . . . . . . . . . . . . . 20 Select the function . . . . . . . . . . . . . . . . . . . . . . . . . . . . . . . . . . . . . . . . . . . . . . . . . 20 Function chart . . . . . . . . . . . . . . . . . . . . . . . . . . . . . . . . . . . . . . . . . . . . . . . . . . . . 21 Altering the recommended temperature . . . . . . . . . . . . . . . . . . . . . . . . . . . . . . . . 22 Altering the recommended temperature permanently. . . . . . . . . . . . . . . . . . . . . . 23 Setting the cooking time . . . . . . . . . . . . . . . . . . . . . . . . . . . . . . . . . . . . . . . . . . . . 25 Starting a function . . . . . . . . . . . . . . . . . . . . . . . . . . . . . . . . . . . . . . . . . . . . . . . . . 26 Interrupting a function . . . . . . . . . . . . . . . . . . . . . . . . . . . . . . . . . . . . . . . . . . . . . . 28 Altering a function . . . . . . . . . . . . . . . . . . . . . . . . . . . . . . . . . . . . . . . . . . . . . . . . . 28 At the end of cooking time. . . . . . . . . . . . . . . . . . . . . . . . . . . . . . . . . . . . . . . . . . . 29 Insufficient water / water container not in place . . . . . . . . . . . . . . . . . . . . . . . . . . 30 Protection from overheating. . . . . . . . . . . . . . . . . . . . . . . . . . . . . . . . . . . . . . . . . . 31 Safety lock . . . . . . . . . . . . . . . . . . . . . . . . . . . . . . . . . . . . . . . . . . . . . . . . . . . . . . . 32
Practical tips. . . . . . . . . . . . . . . . . . . . . . . . . . . . . . . . . . . . . . . . . . . . . . . . . . . . . 33 Suitable containers . . . . . . . . . . . . . . . . . . . . . . . . . . . . . . . . . . . . . . . . . . . . . . . . 33 Cooking charts. . . . . . . . . . . . . . . . . . . . . . . . . . . . . . . . . . . . . . . . . . . . . . . . . . . . 35
Reheating . . . . . . . . . . . . . . . . . . . . . . . . . . . . . . . . . . . . . . . . . . . . . . . . . . . . . . . 39
Defrosting . . . . . . . . . . . . . . . . . . . . . . . . . . . . . . . . . . . . . . . . . . . . . . . . . . . . . . . 40
2

Contents
Defrosting . . . . . . . . . . . . . . . . . . . . . . . . . . . . . . . . . . . . . . . . . . . . . . . . . . . . . . . 41
Bottling . . . . . . . . . . . . . . . . . . . . . . . . . . . . . . . . . . . . . . . . . . . . . . . . . . . . . . . . . 42 Preparing a whole meal . . . . . . . . . . . . . . . . . . . . . . . . . . . . . . . . . . . . . . . . . . . . . 43
Meal planning . . . . . . . . . . . . . . . . . . . . . . . . . . . . . . . . . . . . . . . . . . . . . . . . . . . . 44
Blanching . . . . . . . . . . . . . . . . . . . . . . . . . . . . . . . . . . . . . . . . . . . . . . . . . . . . . . . 45 Blanching with steam. . . . . . . . . . . . . . . . . . . . . . . . . . . . . . . . . . . . . . . . . . . . . . . 45 Disinfecting baby bottles . . . . . . . . . . . . . . . . . . . . . . . . . . . . . . . . . . . . . . . . . . . . 45
Cleaning and care . . . . . . . . . . . . . . . . . . . . . . . . . . . . . . . . . . . . . . . . . . . . . . . . 46 General notes . . . . . . . . . . . . . . . . . . . . . . . . . . . . . . . . . . . . . . . . . . . . . . . . . . . . 46 Appliance front. . . . . . . . . . . . . . . . . . . . . . . . . . . . . . . . . . . . . . . . . . . . . . . . . . . . 47 Drip tray, rack and cooking containers . . . . . . . . . . . . . . . . . . . . . . . . . . . . . . . . . 47 Removable door and drip plate. . . . . . . . . . . . . . . . . . . . . . . . . . . . . . . . . . . . . . . 48 Cooking compartment . . . . . . . . . . . . . . . . . . . . . . . . . . . . . . . . . . . . . . . . . . . . . . 49 Runners . . . . . . . . . . . . . . . . . . . . . . . . . . . . . . . . . . . . . . . . . . . . . . . . . . . . . . . . . 49 Connecting valve . . . . . . . . . . . . . . . . . . . . . . . . . . . . . . . . . . . . . . . . . . . . . . . . . . 50 O-Ring . . . . . . . . . . . . . . . . . . . . . . . . . . . . . . . . . . . . . . . . . . . . . . . . . . . . . . . . . . 52 Descaling. . . . . . . . . . . . . . . . . . . . . . . . . . . . . . . . . . . . . . . . . . . . . . . . . . . . . . . . 53
Problem solving guide. . . . . . . . . . . . . . . . . . . . . . . . . . . . . . . . . . . . . . . . . . . . . 56
Electrical connection. . . . . . . . . . . . . . . . . . . . . . . . . . . . . . . . . . . . . . . . . . . . . . 58 After sales service . . . . . . . . . . . . . . . . . . . . . . . . . . . . . . . . . . . . . . . . . . . . . . . . . 60 Data plate . . . . . . . . . . . . . . . . . . . . . . . . . . . . . . . . . . . . . . . . . . . . . . . . . . . . . . . 60
3
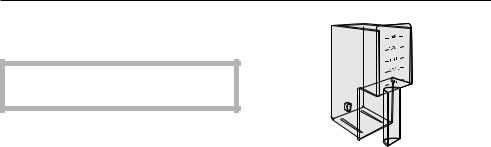
Description of the appliance
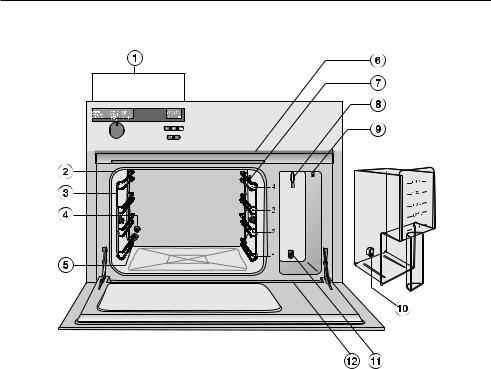
Illustration of the appliance
aControl panel
bRubber door seal
cSide runners with 4 levels
dTemperature sensor
eOutlet for air in the cooking compartment
fVentilation outlet
gSteam inlet
hWater container contact
iWater return feed
jWater container connection valve
kValve for connecting the water container to the appliance
lDrip channel
4
Description of the appliance
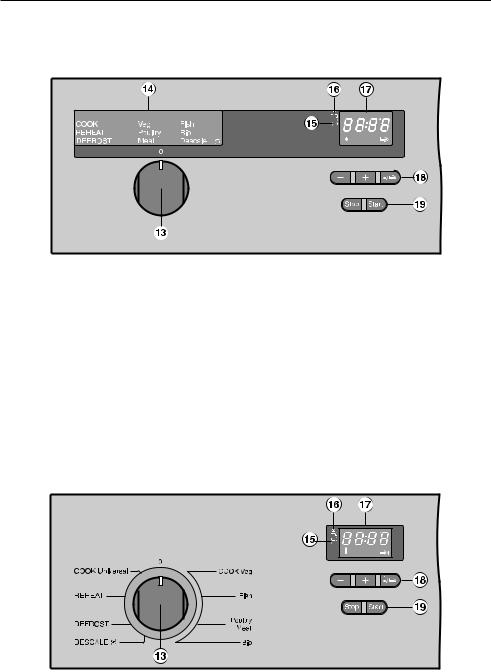
Control panel
DG 155-1
mFunction selector switch
Displays for:
nOperating functions (only on DG 155-1)
oDescale k
pInsufficient water p
qTemperature and Temperature symbol z Time and time symbol g
DG 163 / DG 163-1
Buttons with light bars for:
r- Decrease
+ Increase
z / gTemperature/Cooking time
sStop and Start
5
Description of the appliance
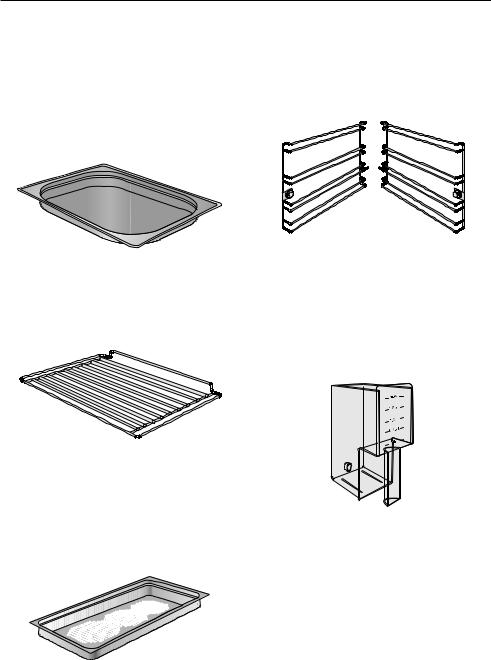
Accessories supplied
Your appliance is supplied with the following accessories. All the accessories can be ordered at extra cost.
Drip tray (net capacity 1.7 l) |
Side runners |
For catching excess liquids
Gastronorm container GN 1/2
Cookery book
Rack
To place cooking containers on
Water container
2 cooking containers DGGL 1, perforated (net capacity 0.9 l)
For steaming
Gastronorm container GN 1/3
6
Description of the appliance
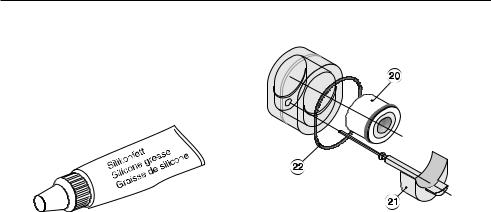
Silicone grease |
Connecting valve |
For lubricating the O-Rings on the connecting valve of the water container. See "O-Ring" section of "Cleaning and care" for more details
with
Valve insert t, white
Rubber pad u, grey
O-Ring v, black
These parts can be ordered individually or together as a repair kit.
7

Description of the appliance
Optional accessories
Stainless steel containers
|
|
|
|
Container |
Net capacity in |
Height in cm |
Gastronorm size |
|
litres |
|
|
|
|
|
|
DGG 2 |
2.0 |
6 |
GN 1/3 |
solid |
|
|
|
|
|
|
|
DGG 3 |
3.1 |
6 |
GN 1/2 |
solid |
|
|
|
|
|
|
|
DGGL 4 |
3.1 |
6 |
GN 1/2 |
perforated |
|
|
|
|
|
|
|
DGGL 5 |
2.0 |
6 |
GN 1/3 |
perforated |
|
|
|
|
|
|
|
DGGL 6 |
2.8 |
10 |
GN 1/3 |
perforated |
|
|
|
|
|
|
|
DGG 7 |
2.8 |
10 |
GN 1/3 |
solid |
|
|
|
|
|
|
|
|
|
|
|
Lid - DGD |
Tool |
|
For removing and inserting the valve |
|
insert |
Can be ordered individually, or together with the parts for the connecting valve as a repair kit.
8

Warning and Safety instructions
Installation and connection
The appliance may be connected via a plug and fused socket.
However, if the appliance is to be connected to an isolator switch this must be done by a suitably qualified and competent person in accordance with local and national safety regulations. The manufacturer cannot be held responsible for the consequences of incorrect installation or connection.
The electrical safety of this appliance can only be guaranteed
when continuity is complete between the appliance and an effective earthing system which complies with local and national safety regulations.
It is imperative that this basic safety requirement is tested and where there is any doubt, the electrical system of the house should be tested by a qualified electrician.
The manufacturer cannot be held responsible for the consequences of an inadequate earthing system (e.g. electric shock).
Do not connect the appliance to the mains electrical supply by an extension lead. Extension leads do not
guarantee the required safety of the appliance.
This equipment is not designed for maritime use or for use in mobile
installations such as caravans, aircraft etc. However it may be suitable for such usage subject to a risk assessment of the installation being carried out by a suitably qualified engineer.
Do not install the appliance too high. It should be at a suitable
height for all users to be able to safely access all cooking levels and containers. Otherwise any spillages could cause burns or scalding.
9

Warning and Safety instructions
Correct usage
Before using the appliance for the first time, read the operating
instructions carefully. They contain important notes on the safety, the operation and care of the appliance. This way you will avoid the risk of accidents and damage to the appliance.
For safety reasons this appliance must only be operated as a built-in
appliance. This is necessary to ensure that all electrical components are shielded.
This appliance is intended exclusively for domestic use. It
should not be used for commercial purposes.
Only use the appliance to prepare food in the home. Any other usage is at the owner"s own risk and could be
dangerous. The manufacturer cannot be held responsible for damage caused by improper use of the appliance.
Wipe out the oven interior with an absorbent cloth after each use,
and do not forget to wipe down the ventilation outlet and the drip channel.
Leave the door open until the moisture in the cooking
compartment has dissipated and the interior is dry.
If the appliance is not going to be used for a longer period of time,
e.g. whilst on holiday, it should be thoroughly cleaned beforehand to prevent the build up of odours etc.
Refer to the section "Before using for the first time" and carry out the procedure as described. Leave the door open afterwards.
10
Warning and Safety instructions
Safety with children
The appliance must be installed at such a height that small children
cannot reach the appliance door which gets hot during use.
Use the safety lock to prevent children operating the appliance or
altering the settings.
The appliance is only intended for use by adults who have read these
operating instructions.
This appliance is not a toy. Keep children well away from it and do
not allow them to play with it or with the controls. They will not understand the potential danger of touching a hot appliance. They should be supervised at all times when you are working with it.
The appliance becomes very hot during use and remains hot for
some time after switching off. To safeguard against burning, keep children out of the vicinity of the appliance until it has cooled down.
Warning: Take care in the area around the hinges. Danger of
injury. Keep children well away.
Do not allow children to lean against the open oven door, nor to
sit on it or swing on it.
Food packaging (e.g. cling film, polystyrene) and plastic wrappings
must be kept out of the reach of babies and young children. Danger of suffocation. Dispose of all packaging safely as soon as possible.
11

Warning and Safety instructions
Protection from damage
Do not heat up unopened tins of food in the oven as pressure will build up in the tin and it will explode damaging the cooking compartment.
There is also a danger of personal injury and scalding.
Do not leave cooked foods standing for an unneccessary
length of time in the oven. This is to prevent condensation building up which could cause corrosion to the appliance.
Do not use metallic containers or utensils in the oven which are likely
to rust. This can cause corrosion.
When descaling the oven only use descaling agents with a citric acid
base. Do not use vinegar or agents containing vinegar as this is corrosive and would damage the appliance. Follow the manufacturer"s safety instructions on the packaging.
Do not use a steam cleaner to clean this appliance. The steam
from the cleaning appliance could reach the live electrical components and cause a short circuit. Pressurised steam could also cause permanent damage to the surface and to other components, for which the manufacturer cannot accept liability.
Do not lean or sit on the open door of the appliance, or place heavy
items on it. The door can support a maximum weight of 8 kg.
Protection from burning and injury
When in use, the appliance, particularly the inner side of the
door as well as the outer side of the appliance in the region of the ventilation outlet, becomes very hot and remains so for a while after the oven has been switched off.
Wear oven gloves when working with a hot appliance.
When handling cooking containers take care not to let the contents
spill over. Ensure that you do not come into contact with hot steam. There is a danger of scalding.
12

Warning and Safety instructions
With a damaged appliance
In the event of damage or a defect, switch off the appliance immedi-
ately. Disconnect completely from the electricity supply. Contact the Service department.
The appliance is only completely isolated from the electricity supply when:
- it is switched off at the wall socket and the plug removed (pull on the plug, not the cable), or the mains fuse is withdrawn, or the screw-out fuse is removed in countries where this is applicable.
Ensure that current is not supplied to the appliance while maintenance or repair work is being carried out.
Repairs may only be carried out by a suitably qualified and competent
person to ensure safety. Repairs by unauthorised personnel could be dangerous. Tampering with electrical connections or components and mechanical parts is highly dangerous to the user and can cause operational faults. On no account open the outer casing of the appliance.
While the appliance is under guarantee repairs should only be
undertaken by a service engineer authorised by the manufacturer. Otherwise the guarantee is invalidated.
General notes
When using an electric socket near the steam oven, care should be
taken that the cable of the electrical appliance does not come into contact with the steam oven door. The insulation on the cable could become damaged, giving rise to an electric shock hazard.
Warning: Take care in the area around the hinges. Danger of
injury.
Always ensure that food is sufficiently cooked or reheated.
Many factors will affect the overall cooking time, including the size and amount of food, its temperature, changes to the recipe and the shape and size of cooking container. Some foods may contain micro organisms which are only destroyed by thorough cooking. Therefore when cooking or reheating foods, e.g. poultry, it is particularly important that food is fully cooked through. If in doubt select a longer cooking or reheating time.
Do not use plastic containers. They may melt at high temperatures. The
oven could then be damaged.
In countries which may be subject to infestation by cockroaches or
other vermin, pay particular attention to keeping the appliance and its surroundings in a clean condition at all times. Any damage which might be caused by cockroaches or other vermin will not be covered by the appliance guarantee.
13

Caring for the environment
Disposal of the packaging material
The transport and protective packing has been selected from materials which are environmentally friendly for disposal and can normally be recycled.
Ensure that any plastic wrappings, bags etc. are disposed of safely and kept out of the reach of babies and young children. Danger of suffocation!
Rather than just throwing these materials away, please ensure that they are offered for recycling
Disposal of old appliances
Old appliances contain materials which can be reclaimed or recycled. Please contact your dealer, your local waste collection centre or scrap merchant about potential recycling schemes.
Before disposing of an old appliance, switch off at the mains electricity supply. Cut off and render any plug useless. Cut off the cable directly behind the appliance to prevent misuse. This should be done by a competent person. Ensure that the appliance presents no danger to children while being stored for disposal.
14

Before using for the first time
Do not be worried if your appliance makes some unusual noises. They occur when the steam generating unit is being filled or emptied out and when pumping is taking place.
When the appliance is switched on the fan which extracts steam from the oven can also be heard. The fan will continue running for a while after the oven has been switched off.
Please stick the data plate supplied with the appliance documentation into the space provided at the end of this operating instruction booklet.
Keep these instructions in safe place for reference, and pass them on to any future user.
15

Before using for the first time
Setting the water hardness level
The steam oven is set at the factory to water hardness setting IV (4) .
If your water is harder or softer than this you can adjust the setting, if this has not already been done by the Service Department.
Please ensure that the function selector is at "0".
Procedure:
^Press and hold the - button.
^Turn the function selector either clockwise or anti-clockwise to DESCALE k.
4 1 will appear in the display.
The 1 indicates the type of operation. The 4 shows the pre-set water hardness setting.
^Select water hardness setting III (3), II (2) or I (1) as required by pressing - or + .
The water hardness setting you have selected will be stored in memory as soon as the function selector is turned to another position.
You can use the test strip supplied to check the water hardness level or your local water supplier will advise you on the water hardness of your area.
The water hardness is shown as settings I to IV equivalent to the German scale 1 to>21 °dH (20 - 380 mg/l).
|
|
|
|
Setting |
Display |
°dH |
mg/l |
|
|
|
|
|
|
|
|
I |
1 |
1-7 °dH |
<20-130 mg/l |
|
|
|
|
II |
2 |
8-14 °dH |
140-250 mg/l |
|
|
|
|
III |
3 |
15-21 °dH |
270-380 mg/l |
|
|
|
|
IV |
4 |
>21 °dH |
>380 mg/l |
|
|
|
|
|
|
|
|
16

Before using for the first time
Cleaning and heating up for the first time
For the appliance to be fully functional, it is necessary before using it for the first time to run the DESCALE operation k, without adding descaling agent.
This process sets the appliance for the boiling temperature of water, which will vary depending on the altitude in your area.
If this is not done too much steam will be released from the appliance during use.
Procedure:
^Fill the water container with 1.0 l water, place it in the appliance and close the door.
^Select DESCALE k with the function selector.
The following will be displayed:
^ Press Start.
The time will count down from the starting point of 33 minutes as shown in the display.
Do not adjust the function selector during this period as otherwise the descaling programme will have to be started from the beginning again.
An audible tone will sound when there are 8 minutes remaining and the following will alternate in the display:
^Empty out the water container, re-fill it with 1.0 l of fresh water, place it in the steam oven and close the door.
^Press Start.
The above procedure must be repeated twice more when the audible tone sounds.
Do not be alarmed at the amount of steam emitted.
17

Before using for the first time
When the time has counted down you will see the following display:
^Turn the function selector to "0".
^Wait until the appliance has pumped the residual water back into the water container and then open the door.
Take care. Hot steam will escape when the door is opened.
^Remove, empty and thoroughly dry out the water container.
^Wipe out the oven interior with an absorbent cloth and leave the door open until the moisture in the cooking compartment has dissipated. Remember to wipe down the ventilation outlet and the drip channel.
See the section on Descaling for further information.
18
Use
Before each use
^ Fill the water container.
Only use mains tap water. Never use distilled or mineral water.
The water level must be between the 1.0 l and 1.25 l markings.
On no account exceed the "max" (maximum) level marker.
1.0 l water is enough for a cooking time of approximately 20 minutes, 1.25 l for a cooking time of approximately 60 minutes when cooking about 4 servings of food.
^Always place the drip tray onto the lowest shelf runner to catch any moisture that may build up during cooking.
^Push the water container into the appliance until it connects.
19

Use
Procedure in brief:
To use the appliance the following steps need to be carried out:
ASelect the function
BAlter the recommended temperature if necessary
CSet the cooking time
DPress Start
The appearance of a light bar between the buttons prompts you to set the next appropriate step.
The set-up steps are described in more detail below.
Select the function
Procedure:
^Turn the function selector to the required function, e.g. COOK - Veg.
The recommended temperature, e.g. 100 °C will appear in the display for a short time.
If you are happy with the temperature recommended proceed to "Setting the cooking time". Otherwise follow the instructions in "Altering the recommended temperature".
20
 Loading...