


 Loading...
HP Photosmart Premium Fax C309 series

Contents
1 |
HP Photosmart Premium Fax C309 series Help.............................................................................................................. |
3 |
2 |
Finish setting up the HP Photosmart |
|
|
Add the HP Photosmart to a network................................................................................................................................... |
5 |
|
Set up a Bluetooth connection........................................................................................................................................... |
10 |
|
Set up the HP Photosmart for faxing.................................................................................................................................. |
12 |
3 |
Get to know the HP Photosmart |
|
|
Printer parts........................................................................................................................................................................ |
29 |
|
Control panel features........................................................................................................................................................ |
31 |
|
Control panel features (HP Photosmart Premium Fax C309b series)................................................................................ |
32 |
|
Display icons...................................................................................................................................................................... |
33 |
5 |
|
|
|
Print documents................................................................................................................................................................. |
43 |
|
Print photos........................................................................................................................................................................ |
44 |
|
Print on a CD/DVD............................................................................................................................................................. |
49 |
|
Print a creative project........................................................................................................................................................ |
52 |
|
Print a Web page................................................................................................................................................................ |
55 |
|
Print forms and templates (Quick Forms)......................................................................................................................... |
56 |
6 |
Scan |
|
|
Scan to a computer............................................................................................................................................................ |
61 |
|
Scan to a memory card or USB storage device................................................................................................................. |
63 |
7 |
Copy |
|
|
Copy text or mixed documents........................................................................................................................................... |
67 |
8 |
Copy (HP Photosmart Premium Fax C309b series) |
|
|
Copy text or mixed documents........................................................................................................................................... |
73 |
9 |
Reprint photos.................................................................................................................................................................. |
77 |
10 |
Fax |
|
|
Send a fax.......................................................................................................................................................................... |
79 |
|
Receive a fax...................................................................................................................................................................... |
84 |
11 |
Save photos |
|
|
Save photos to your computer........................................................................................................................................... |
85 |
|
Back up photos to a USB storage device........................................................................................................................... |
86 |
12 |
Work with cartridges |
|
|
Check the estimated ink levels........................................................................................................................................... |
87 |
|
Order ink supplies.............................................................................................................................................................. |
88 |
|
Replace the cartridges....................................................................................................................................................... |
88 |
|
Cartridge warranty information........................................................................................................................................... |
90 |
13 |
Solve a problem |
|
|
HP support.......................................................................................................................................................................... |
91 |
|
Setup troubleshooting........................................................................................................................................................ |
94 |
|
Print quality troubleshooting............................................................................................................................................. |
101 |
|
Print troubleshooting........................................................................................................................................................ |
128 |
|
Memory card troubleshooting........................................................................................................................................... |
132 |
|
Scan troubleshooting........................................................................................................................................................ |
135 |
|
Copy troubleshooting....................................................................................................................................................... |
138 |
|
Fax troubleshooting.......................................................................................................................................................... |
146 |
|
Errors................................................................................................................................................................................ |
185 |
Contents
1

Contents
15 Technical information |
|
Notice............................................................................................................................................................................... |
225 |
Cartridge chip information................................................................................................................................................ |
225 |
Specifications................................................................................................................................................................... |
226 |
Environmental product stewardship program................................................................................................................... |
228 |
Regulatory notices............................................................................................................................................................ |
232 |
Regulatory wireless statements....................................................................................................................................... |
235 |
Regulatory telecommunication notices............................................................................................................................. |
236 |
Index...................................................................................................................................................................................... |
241 |
2

1HP Photosmart Premium Fax C309 series Help
For information about the HP Photosmart, see:
•Finish setting up the HP Photosmart
•Get to know the HP Photosmart
•Scan
•Copy
•Copy (HP Photosmart Premium Fax C309b series)
•Reprint photos
•Fax
•Save photos
•Work with cartridges
•Technical information
HP Photosmart Premium Fax C309 series Help
HP Photosmart Premium Fax C309 series Help |
3 |
Chapter 1
series |
Fax Premium Photosmart HP |
Help |
C309 |
|
|
4 HP Photosmart Premium Fax C309 series Help

2Finish setting up the HP Photosmart
•Add the HP Photosmart to a network
•Set up a Bluetooth connection
•Set up the HP Photosmart for faxing
Add the HP Photosmart to a network
•Wired (Ethernet) network
•Wireless with a router (infrastructure network)
•Wireless without a router (ad hoc connection)
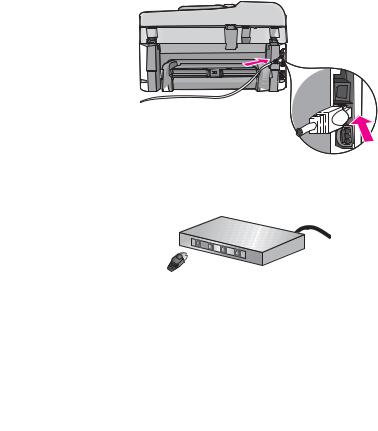
Wired (Ethernet) network
Before you connect the HP Photosmart to a network, make sure you have all of the required materials.
A functional Ethernet network that includes a router, switch, or hub with an Ethernet port.
CAT-5 Ethernet cable.
Although standard Ethernet cables look similar to standard telephone cables, they are not interchangeable. There is a different number of wires in each one, and each has a different connector. An Ethernet cable connector (also called an RJ-45 connector) is wider and thicker and always has 8 contacts on the end. A phone connector has between 2 and 6 contacts.
A desktop computer or laptop on the same network.
 NOTE: The HP Photosmart supports networks with automatic speed negotiation capable of 10 or 100 Mbps.
To connect the HP Photosmart to the network
1. Remove the yellow plug from the back of the HP Photosmart.
2. Connect the Ethernet cable to the Ethernet port on the back of the HP Photosmart.
Finish setting up the HP Photosmart
Finish setting up the HP Photosmart |
5 |
Chapter 2
3. Connect the other end of the Ethernet cable to an available port on your Ethernet router or switch.
Photosmart HP the up setting Finish
4. Once you have connected the HP Photosmart to the network, install the software.
Related topics
•Install the software for a network connection
Wireless with a router (infrastructure network)
To connect the HP Photosmart to an integrated wireless WLAN 802.11 network, you will need the following:
A wireless 802.11 network that includes a wireless router or access point.
A desktop computer or laptop with either wireless networking support, or a network interface card (NIC). The computer must be connected to the wireless network that you intend to install the HP Photosmart on.
Broadband Internet access (recommended) such as cable or DSL.
If you connect the HP Photosmart on a wireless network that has Internet access, HP recommends that you use a wireless router (access point or base station) that uses Dynamic Host Configuration Protocol (DHCP).
Network name (SSID).
WEP key or WPA Passphrase (if needed).
To connect the HP Photosmart to wireless network
▲Do one of the following:
Use Windows Connect Now a. Turn on wireless radio.
Press Setup.
Highlight Network and press OK.
Highlight Wireless Radio and press OK.
Highlight On and press OK.
b. Insert memory with your network settings. c. Connect to wireless network.
Highlight Yes, set up printer on network using wireless settings on memory device and press OK.
Press OK to print a network configuration page.
d. Install software.
6 Finish setting up the HP Photosmart
Use Wireless Setup Wizard
a. Write down your network name (SSID) and WEP key or WPA passphrase. b. Turn on wireless radio.
Press Setup.
Highlight Network and press OK.
Highlight Wireless Radio and press OK.
Highlight On and press OK. c. Start Wireless Setup Wizard.
Highlight Wireless Setup Wizard and press OK. d. Connect to wireless network.
The setup wizard searches for available networks, and then displays list of detected network names (SSIDs).
Highlight your network name and press OK
e. Follow prompts.
Follow the prompts on display to complete connection.
Press OK to print a network configuration page.
f. Install software.
Related topics
•Install the software for a network connection
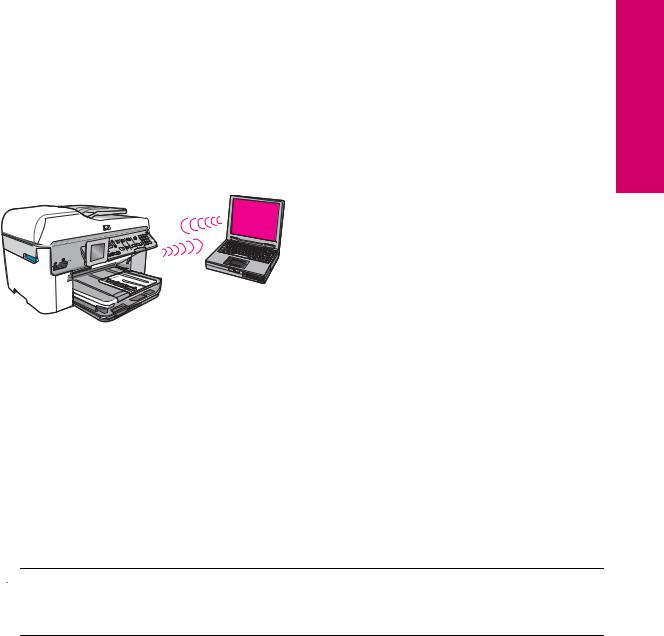
Wireless without a router (ad hoc connection)
Use this section if you want to connect the HP Photosmart to a wireless-capable computer without using a wireless router or access point.
There are two methods you may use to connect the HP Photosmart to your computer using an ad hoc wireless network connection. Once connected, you can install the HP Photosmart software.
▲Turn on the wireless radio for the HP Photosmart and the wireless radio on your computer. On your computer, connect to the network name (SSID) hpsetup, which is the default ad hoc network created by the
HP Photosmart.
If the HP Photosmart was previously configured for a different network, use Restore Network Defaults to restore the default ad hoc profile of hpsetup.
OR
▲Use an ad hoc network profile on your computer to connect to the product. If your computer is not currently configured with an ad hoc network profile, consult the Help file for your computer Operating System for the proper method to create an ad hoc profile on your computer. Once the ad hoc network profile has been created, run the Wireless Setup Wizard from the Network menu on the HP Photosmart and select the ad hoc network profile you created on your computer.
 NOTE: An ad hoc connection can be used if you do not have a wireless router or access point but do have a wireless radio on your computer. However, an ad hoc connection may result in a lower level of network security and possibly reduced performance when compared to an infrastructure network connection using a wireless router or access point.
Finish setting up the HP Photosmart
Add the HP Photosmart to a network |
7 |

Photosmart HP the up setting Finish
Chapter 2
To connect the HP Photosmart to a Windows computer with an ad hoc connection, the computer must have a wireless network adapter and an ad hoc profile.
To create a network profile
 NOTE: The product comes configured with a network profile with hpsetup as the network name (SSID). However, for security and privacy HP recommends you create a new network profile on your computer as described here.
1.In the Control Panel, double-click Network Connections.
2.On the Network Connections window, right-click the Wireless Network Connection. If you see Enable on the pop-up menu, select it. Otherwise, if you see Disable on the menu, the wireless connection is already enabled.
3.Right-click the Wireless Network Connection icon, and then click Properties.
4.Click the Wireless Networks tab.
5.Select the Use Windows to configure my wireless network settings check box.
6.Click Add, and then do the following:
a. In Network name (SSID) box, type in a unique network name of your choice.
 NOTE: The network name is case sensitive, so it is important to remember any uppercase (capital) and lowercase (small) letters.
b. If there is a Network Authentication list, select Open. Otherwise, go to the next step. c. In the Data encryption list, select WEP.
 NOTE: It is possible to create a network that does not use a WEP key. However, HP recommends using a WEP key in order to secure your network.
d. Make sure that the check box is not selected next to The key is provided for me automatically. If it is selected, click the check box to clear it.
e. In the Network key box, type a WEP key that has exactly 5 or exactly 13 alphanumeric (ASCII) characters. For example, if you enter 5 characters, you might enter ABCDE or 12345. Or, if you enter 13 characters, you might enter ABCDEF1234567. (12345 and ABCDE are examples only. Select a combination of your choosing.)
Alternatively, you can use HEX (hexadecimal) characters for the WEP key. A HEX WEP key must be 10 characters for 40 bit encryption, or 26 characters for 128 bit encryption.
f. In the Confirm network key box, type the same WEP key you typed in the previous step.
 NOTE: You must remember the exact uppercase (capital) and lowercase (small) letters. If you enter your WEP key incorrectly on the product, the wireless connection will fail.
g. Write down the WEP key exactly as you typed it, including uppercase and lowercase letters.
h. Select the check box for This is a computer-to-computer (ad hoc) network; wireless access points are not used.
i. Click OK to close the Wireless network properties window, and then click OK again. j. Click OK again to close the Wireless Network Properties Connection window.
Using the LAN card configuration program, create a network profile that has the following values:
•Network name (SSID): Mynetwork (example only)
 NOTE: You should create a network name that is unique and easy for you to remember. Just remember that the network name is case-sensitive. Therefore, you must remember which letters are uppercase and lowercase.
•Communication mode: ad hoc
•Encryption: enabled
To connect to a wireless ad hoc network 1. Press Setup.
8 Finish setting up the HP Photosmart
2.Press the down arrow button until Network is highlighted, and then press OK.
3.Press the down arrow button to highlight Wireless Setup Wizard, and then press OK.
This runs the Wireless Setup Wizard. The setup wizard searches for available networks, and then displays a list of detected network names (SSIDs). The infrastructure networks appear first in the list, followed by available ad hoc networks. The networks with the strongest signal appear first, the weakest appear last.
4.On the display, look for the network name you created on your computer (for example, Mynetwork).
5.Use the arrow buttons to highlight the network name, and then press OK. If you found your network name and selected it, go on to step 6.
If you do not see your network name in the list a. Select Enter a New Network Name (SSID).
The visual keyboard appears.
b. Enter the SSID. Use the arrow buttons on the control panel to highlight a letter or number on the visual keyboard, and then press OK to select it.
 NOTE: You must enter the exact uppercase (capital) and lowercase (small) letters. Otherwise, the wireless connection will fail.
c. When you are finished entering the new SSID, use the arrow buttons to highlight Done on the visual keyboard, and then press OK.
 TIP: If the product is unable to discover the network based on the network name you entered, you will see the following prompts. You may want to move the product closer to the computer and try running the Wireless Setup Wizard again to automatically discover the network.
d. Press the down arrow button until Ad Hoc is highlighted, and then press OK.
e. Press the down arrow button until Yes, my network uses WEP encryption is highlighted, and then press OK. The visual keyboard displays.
If you do not want to use WEP encryption, press the down arrow button until No, my network does not use encryption is highlighted, and then press OK. Go to step 7.
6.If prompted, enter your WEP key as follows. Otherwise go to step 7.
a. Use the arrow buttons to highlight a letter or number on the visual keyboard, and then press OK to select it.
 NOTE: You must enter the exact uppercase (capital) and lowercase (small) letters. Otherwise, the wireless connection will fail.
b. When you are finished entering the WEP key, use the arrow buttons to highlight Done on the visual keyboard.
7.Press OK again to confirm.
The product will attempt to connect to the SSID. If a message says you entered an invalid WEP key, check the key you wrote down for your new network, follow the prompts to correct the WEP key, and then try again.
8.When the product connects successfully to the network, go to your computer to install the software.
 NOTE: You can print the Wireless Network Test report at the end of a successful Wireless Setup Wizard connection which can help identify any potential future issues with the network setup.
Related topics
•Install the software for a network connection
Install the software for a network connection
Use this section to install the HP Photosmart software on a computer connected to a network. Before you install the software, make sure you have connected the HP Photosmart to a network.
Finish setting up the HP Photosmart
Add the HP Photosmart to a network |
9 |

Photosmart HP the up setting Finish
Chapter 2
 NOTE: 1 If your computer is configured to connect to a series of network drives, make sure that your computer is currently connected to these drives before installing the software. Otherwise, the HP Photosmart software installer might try to use one of the reserved drive letters and you will not be able to access that network drive on your computer.
NOTE: 2 Installation time can range from 20 to 45 minutes depending on your operating system, the amount of available space, and the processor speed of your computer.
To install the Windows HP Photosmart Software
1.Quit all applications running on your computer, including any virus detection software.
2.Insert the Windows CD that came with the product into the CD-ROM drive on your computer and follow the onscreen instructions.
3.If a dialog box about firewalls appears, follow the instructions. If you see firewall pop-up messages, you must always accept or allow the pop-up messages.
4.On the Connection Type screen, select Through the network, and then click Next.
The Searching screen appears as the Setup program searches for the product on the network.
5.On the Printer Found screen, verify that the printer description is correct.
If more than one printer is found on the network, the Printers Found screen appears. Select the product you want to connect.
6.Follow the prompts to install the software.
When you have finished installing the software, the product is ready for use.
7.If you disabled any virus detection software on your computer, make sure to enable it again.
8.To test your network connection, go to your computer and print a self-test report to the product.
Set up a Bluetooth connection
A Bluetooth connection provides a quick and easy way to print images from a Bluetooth-enabled computer without using a cable. With a Bluetooth connection you can access many of the same printing features as with a USB connection. For example, you can check the printer status, as well as the estimated amount of ink remaining in your ink cartridges.
 NOTE: The only software functionality available with a Bluetooth connection is printing. Scanning and softwarebased copying cannot be done over a Bluetooth connection.
You must have Windows Vista or Windows XP and either the Microsoft Bluetooth® Protocol Stack or the Widcomm Bluetooth® Protocol Stack installed in order to connect the HP Photosmart. It is possible to have both the Microsoft Stack and the Widcomm Stack on your computer, but you use only one of them to connect the product.
•Microsoft stack If you have Windows Vista or Windows XP with Service Pack 2 installed on your computer, then your computer has the Microsoft Bluetooth® Protocol Stack. The Microsoft stack allows you to install an external Bluetooth® adapter automatically. If your Bluetooth® adapter supports the Microsoft stack but it does not install automatically, then you do not have the Microsoft stack on your computer. Check the documentation that came with the Bluetooth® adapter to see if it supports the Microsoft stack.
•Widcomm stack: If you have an HP computer with Bluetooth® built in, or if you have installed an HP bt450, then your computer has the Widcomm stack. If you have an HP computer and plug in an HP bt450, it will install automatically using the Widcomm stack.
To connect the HP Photosmart with a Bluetooth connection, you will need the following:
A Bluetooth (compatible HCRP or SPP profile) capable device (such as a PDA, camera phone, or computer)
Some Bluetooth products exchange device addresses when they communicate with each other, so you might also need to find out the device address of the HP Photosmart in order to establish a connection.
To find out the device address of the product 1. Press Setup.
10 Finish setting up the HP Photosmart

2.Press the down arrow button until Bluetooth Menu is highlighted, and then press OK.
 NOTE: It is required that the Bluetooth Radio is turned on to enable the Bluetooth options in the Bluetooth Menu.
3.Press the down arrow button until Device Address is highlighted, and then press OK. The Device Address appears, which is read only.
4.Make a note of the device address. You might need it later.
To install and print using the Microsoft stack |
|
||||||
1. |
Make sure that you have installed the product software on the computer. |
|
|||||
|
|
|
|
|
|
|
|
|
|
|
|
NOTE: The purpose of installing the software is to make sure the printer driver is available for the |
|
||
|
|
|
|
||||
|
|
|
|
||||
|
|
|
|
Bluetooth® connection. Therefore, if you have already installed the software, you do not need to reinstall it. |
Photosmart |
||
|
|
|
|
If you want both a USB and a Bluetooth® connection to the HP Photosmart, install the USB connection first. |
|||
|
|
|
|
|
|||
|
|
|
|
For more information, see the Setup Guide. However, if you do not want a USB connection, select Directly |
|
||
|
|
|
|
to the computer on the Connection Type screen. Also, on the Connect Your Device Now screen, select |
|
||
|
|
|
|
the check box next to If you are unable to connect your device now... at the bottom of the screen. |
the HP |
||
|
|
|
|
||||
2. |
If you are using an external Bluetooth® adapter for your computer, make sure your computer is started and then |
||||||
|
attach the Bluetooth® adapter to a USB port on the computer. If you have Windows Vista or Windows XP with |
up |
|||||
|
Service Pack 2 installed, the Bluetooth® drivers are installed automatically. If you are prompted to select a |
||||||
|
setting |
||||||
|
If your computer has Bluetooth® built in, just make sure the computer is started. |
||||||
|
Bluetooth® profile, select HCRP. |
Finish |
|||||
3. |
On the Windows taskbar, click Start, and then click Printers and Faxes (or click Control Panel, and then |
||||||
|
|||||||
|
Printers). |
|
|||||
4. |
Click Add a printer). |
|
|||||
5. |
Click Next, and then select A Bluetooth Printer. |
|
|||||
6. |
Follow the onscreen instructions to finish the installation. |
|
|||||
7. |
Print as you would to any printer. |
|
|||||
To install and print using the Widcomm stack
1. Make sure that you have installed the HP Photosmart software on the computer.
 NOTE: The purpose of installing the software is to make sure the printer driver is available for the Bluetooth® connection. Therefore, if you have already installed the software, you do not need to reinstall it. If you want both a USB and a Bluetooth® connection to the HP Photosmart, install the USB connection first. For more information, see the Setup Guide. However, if you do not want a USB connection, select Directly to the computer on the Connection Type screen. Also, on the Connect Your Device Now screen, select the check box next to If you are unable to connect your device now... at the bottom of the screen.
2.Click the My Bluetooth Places icon on the desktop or in the taskbar.
3.Click View devices in range.
4.Once the available printers are discovered, double-click the name of HP Photosmart to finish the installation.
5.Print as you would to any printer.
Set up a Bluetooth connection |
11 |

Chapter 2
Photosmart HP the up setting Finish
Set up the HP Photosmart for faxing
Before you begin setting up the HP Photosmart for faxing, determine which kind of phone system your country/ region uses. The instructions for setting up the HP Photosmart for faxing differ depending on whether you have a serialor parallel-type phone system.
•If you do not see your country/region listed in the table below, you probably have a serial-type phone system. In a serial-type phone system, the connector type on your shared telephone equipment (modems, phones, and answering machines) does not allow a physical connection to the "2-EXT" port on the HP Photosmart. Instead, all equipment must be connected at the telephone wall jack.
 NOTE: In some countries/regions that use serial-type phone systems, the phone cord that came with the HP Photosmart might have an additional wall plug attached to it. This enables you to connect other telecom devices to the wall jack where you plug in the HP Photosmart.
•If your country/region is listed in the table below, you probably have a parallel-type telephone system. In a parallel-type phone system, you are able to connect shared telephone equipment to the phone line by using the "2-EXT" port on the back of the HP Photosmart.
 NOTE: If you have a parallel-type phone system, HP recommends you use the 2-wire phone cord supplied with the HP Photosmart to connect the HP Photosmart to the telephone wall jack.
Countries/regions with a parallel-type phone system
Argentina |
Australia |
Brazil |
|
|
|
Canada |
Chile |
China |
|
|
|
Colombia |
Greece |
India |
|
|
|
Indonesia |
Ireland |
Japan |
|
|
|
Korea |
Latin America |
Malaysia |
|
|
|
Mexico |
Philippines |
Poland |
|
|
|
Portugal |
Russia |
Saudi Arabia |
|
|
|
Singapore |
Spain |
Taiwan |
|
|
|
Thailand |
USA |
Venezuela |
|
|
|
Vietnam |
|
|
|
|
|
If you are unsure which kind of telephone system you have (serial or parallel), check with your telephone company.
See the following sections to set up the HP Photosmart for faxing:
•Choose the correct fax setup for your home or office
•Select your fax setup case
•Additional fax setup information
Choose the correct fax setup for your home or office
To fax successfully, you need to know what types of equipment and services (if any) share the same phone line with the HP Photosmart. This is important because you might need to connect some of your existing office equipment directly to the HP Photosmart, and you might also need to change some fax settings before you can fax successfully.
To determine the best way to set up the HP Photosmart in your home or office, first read through the questions in this section and record your answers. Next, refer to the table in the following section and choose the recommended setup case based on your answers.
12 Finish setting up the HP Photosmart

Make sure to read and answer the following questions in the order they are presented.
1.Do you have a digital subscriber line (DSL) service through your telephone company? (DSL might be called ADSL in your country/region.)
Yes, I have DSL.
No.
If you answered Yes, proceed directly to Case B: Set up the HP Photosmart with DSL. You do not need to continue answering questions.
If you answered No, please continue answering questions.
2.Do you have a private branch exchange (PBX) phone system or an integrated services digital network (ISDN) system?
If you answered Yes, proceed directly to Case C: Set up the HP Photosmart with a PBX phone system or an ISDN line. You do not need to continue answering questions.
If you answered No, please continue answering questions.
3.Do you subscribe to a distinctive ring service through your telephone company that provides multiple phone numbers with different ring patterns?
Yes, I have distinctive ring.
No.
If you answered Yes, proceed directly to Case D: Fax with a distinctive ring service on the same line. You do not need to continue answering questions.
If you answered No, please continue answering questions.
Are you unsure if you have distinctive ring? Many phone companies offer a distinctive ring feature that allows you to have several phone numbers on one phone line.
When you subscribe to this service, each phone number will have a different ring pattern. For example, you can have single, double, and triple rings for the different numbers. You might assign one phone number with a single ring to your voice calls, and another phone number with double rings to your fax calls. This allows you to tell the difference between voice and fax calls when the phone rings.
4.Do you receive voice calls at the same phone number you will use for fax calls on the HP Photosmart?
Yes, I receive voice calls.
No.
Please continue answering questions.
5.Do you have a computer dial-up modem on the same phone line as the HP Photosmart?
Yes, I have a computer dial-up modem.
No.
Are you unsure if you use a computer dial-up modem? If you answer Yes to any of the following questions, you are using a computer dial-up modem:
•Do you send and receive faxes directly to and from your computer software applications through a dial-up connection?
•Do you send and receive e-mail messages on your computer through a dial-up connection?
•Do you access the Internet from your computer through a dial-up connection?
Please continue answering questions.
6.Do you have an answering machine that answers voice calls at the same phone number you will use for fax calls on the HP Photosmart?
Yes, I have an answering machine.
No.
Please continue answering questions.
7.Do you subscribe to a voice mail service through your telephone company at the same phone number you will use for fax calls on the HP Photosmart?
Yes, I have a voice mail service.
No.
After you have completed answering the questions, proceed to the following section to select your fax setup case.
Select your fax setup case
Finish setting up the HP Photosmart
Set up the HP Photosmart for faxing |
13 |

Chapter 2
Select your fax setup case
Now that you have answered all the questions about the equipment and services that share the phone line with the HP Photosmart, you are ready to choose the best setup case for your home or office.
From the first column in the following table, choose the combination of equipment and services applicable to your home or office setting. Then look up the appropriate setup case in the second or third column based on your phone system. Step-by-step instructions are included for each case in the sections that follow.
If you have answered all the questions in the previous section and have none of the described equipment or services, choose "None" from the first column in the table.
 NOTE: If your home or office setup is not described in this section, set up the HP Photosmart as you would a regular analog phone. Make sure you use the phone cord supplied in the box to connect one end to your telephone wall jack and the other end to the port labeled 1-LINE on the back of the HP Photosmart. If you use another phone cord, you might experience problems sending and receiving faxes.
|
|
Other equipment/services sharing |
Recommended fax setup for parallel- |
Recommended fax setup for serial- |
Finish |
|
|||
|
your fax line |
type phone systems |
type phone systems |
|
|
|
|||
|
|
|
|
|
setting |
|
None |
Case A: Separate fax line (no voice calls |
Case A: Separate fax line (no voice calls |
|
(You answered No to all questions.) |
received) |
received) |
|
|
|
|||
|
|
|
|
|
|
|
|
|
|
up |
|
DSL service |
Case B: Set up the HP Photosmart with |
Case B: Set up the HP Photosmart with |
|
|
DSL |
DSL |
|
HPthe |
|
(You answered Yes to question 1 only.) |
||
|
|
|
||
|
|
|
|
|
PBX or ISDN system |
Case C: Set up the HP Photosmart with |
Case C: Set up the HP Photosmart with |
||
Photosmart |
|
(You answered Yes to question 2 only.) |
a PBX phone system or an ISDN line |
a PBX phone system or an ISDN line |
|
|
|
||
|
|
|
|
|
|
|
|
|
|
|
|
Distinctive ring service |
Case D: Fax with a distinctive ring service |
Case D: Fax with a distinctive ring |
|
|
(You answered Yes to question 3 only.) |
on the same line |
service on the same line |
|
|
|
|
|
|
|
|
|
|
|
|
Voice calls |
Case E: Shared voice/fax line |
Case E: Shared voice/fax line |
|
|
|||
|
|
(You answered Yes to question 4 only.) |
|
|
|
|
|
|
|
|
|
Voice calls and voice mail service |
Case F: Shared voice/fax line with voice |
Case F: Shared voice/fax line with voice |
|
|
(You answered Yes to questions 4 and 7 |
||
|
|
only.) |
|
|
|
|
|
|
|
|
|
Computer dial-up modem |
Case G: Fax line shared with computer |
Not applicable. |
|
|
(You answered Yes to question 5 only.) |
dial-up modem (no voice calls received) |
|
|
|
|
|
|
|
|
|
|
|
|
|
Voice calls and computer dial-up modem |
Case H: Shared voice/fax line with |
Not applicable. |
|
|
(You answered Yes to questions 4 and 5 |
computer dial-up modem |
|
|
|
only.) |
|
|
|
|
|
|
|
|
|
Voice calls and answering machine |
Case I: Shared voice/fax line with |
Not applicable. |
|
|
(You answered Yes to questions 4 and 6 |
answering machine |
|
|
|
only.) |
|
|
|
|
|
|
|
|
|
Voice calls, computer dial-up modem, |
Case J: Shared voice/fax line with |
Not applicable. |
|
|
and answering machine |
computer dial-up modem and answering |
|
|
|
(You answered Yes to questions 4, 5, and |
machine |
|
|
|
6 only.) |
|
|
|
|
|
|
|
|
|
Voice calls, computer dial-up modem, |
Case K: Shared voice/fax line with |
Not applicable. |
|
|
and voice mail service |
computer dial-up modem and voice mail |
|
|
|
(You answered Yes to questions 4, 5, and |
|
|
|
|
7 only.) |
|
|
|
|
|
|
|
Related topics
•Additional fax setup information
14 Finish setting up the HP Photosmart
Case A: Separate fax line (no voice calls received)
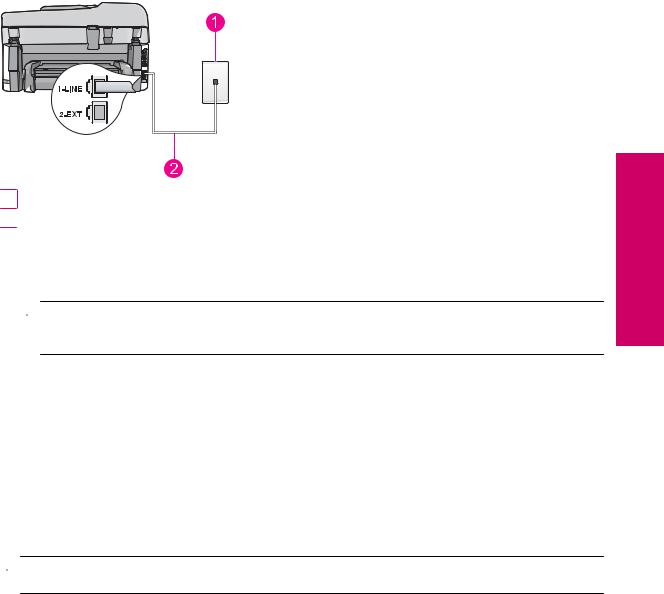
If you have a separate phone line on which you receive no voice calls, and you have no other equipment connected on this phone line, set up the HP Photosmart as described in this section.
Back view of the HP Photosmart
1Telephone wall jack
2Use the phone cord supplied in the box with the HP Photosmart to connect to the "1-LINE" port
To set up the HP Photosmart with a separate fax line
1.Using the phone cord supplied in the box with the HP Photosmart, connect one end to your telephone wall jack, then connect the other end to the port labeled 1-LINE on the back of the HP Photosmart.
 NOTE: If you do not use the supplied cord to connect from the telephone wall jack to the HP Photosmart, you might not be able to fax successfully. This special phone cord is different from the phone cords you might already have in your home or office.
2.Turn on the Auto Answer setting.
3.(Optional) Change the Rings to Answer setting to the lowest setting (two rings).
4.Run a fax test.
When the phone rings, the HP Photosmart will answer automatically after the number of rings you set in the Rings to Answer setting. Then it will begin emitting fax reception tones to the sending fax machine and receive the fax.
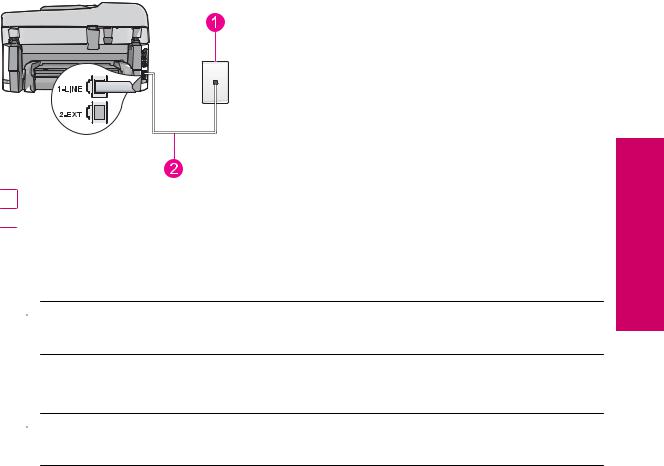
Case B: Set up the HP Photosmart with DSL
If you have a DSL service through your telephone company, use the instructions in this section to connect a DSL filter between the telephone wall jack and the HP Photosmart. The DSL filter removes the digital signal that can interfere with the HP Photosmart, so the HP Photosmart can communicate properly with the phone line. (DSL might be called ADSL in your country/region.)
 NOTE: If you have a DSL line and you do not connect the DSL filter, you will not be able to send and receive faxes with the HP Photosmart.
Finish setting up the HP Photosmart
Set up the HP Photosmart for faxing |
15 |

Photosmart HP the up setting Finish
Chapter 2
Back view of the HP Photosmart
1Telephone wall jack
2DSL filter and cord supplied by your DSL provider
3Use the phone cord supplied in the box with the HP Photosmart to connect to the "1-LINE" port
To set up the HP Photosmart with DSL
1.Obtain a DSL filter from your DSL provider.
2.Using the phone cord supplied in the box with the HP Photosmart, connect one end to your telephone wall jack, then connect the other end to the port labeled 1-LINE on the back of the HP Photosmart.
 NOTE: If you do not use the supplied cord to connect from the telephone wall jack to the HP Photosmart, you might not be able to fax successfully. This special phone cord is different from the phone cords you might already have in your home or office.
3.Connect the DSL filter cord to the telephone wall jack.
 NOTE: If you have other office equipment or services attached to this phone line, such as a distinctive ring service, answering machine, or voice mail, see the appropriate section in this section for additional setup guidelines.
4.Run a fax test.
Case C: Set up the HP Photosmart with a PBX phone system or an ISDN line
If you are using either a PBX phone system or an ISDN converter/terminal adapter, make sure you do the following:
•If you are using either a PBX or an ISDN converter/terminal adaptor, connect the HP Photosmart to the port that is designated for fax and phone use. Also, make sure that the terminal adapter is set to the correct switch type for your country/region, if possible.
 NOTE: Some ISDN systems allow you to configure the ports for specific phone equipment. For example, you might have assigned one port for telephone and Group 3 fax and another port for multiple purposes. If you have problems when connected to the fax/phone port of your ISDN converter, try using the port designated for multiple purposes; it might be labeled "multi-combi" or something similar.
•If you are using a PBX phone system, set the call waiting tone to "off".
 NOTE: Many digital PBX systems include a call-waiting tone that is set to "on" by default. The call waiting tone will interfere with any fax transmission, and you will not be able to send or receive faxes with the
HP Photosmart. Refer to the documentation that came with your PBX phone system for instructions on how to turn off the call-waiting tone.
•If you are using a PBX phone system, dial the number for an outside line before dialing the fax number.
•Make sure you use the supplied cord to connect from the telephone wall jack to the HP Photosmart. If you do not, you might not be able to fax successfully. This special phone cord is different from the phone cords you might already have in your home or office. If the supplied phone cord is too short, you can purchase a coupler from your local electronics store and extend it.
16 Finish setting up the HP Photosmart
Case D: Fax with a distinctive ring service on the same line
If you subscribe to a distinctive ring service (through your telephone company) that allows you to have multiple phone numbers on one phone line, each with a different ring pattern, set up the HP Photosmart as described in this section.
Back view of the HP Photosmart
1Telephone wall jack
2Use the phone cord supplied in the box with the HP Photosmart to connect to the "1-LINE" port
To set up the HP Photosmart with a distinctive ring service
1.Using the phone cord supplied in the box with the HP Photosmart, connect one end to your telephone wall jack, then connect the other end to the port labeled 1-LINE on the back of the HP Photosmart.
 NOTE: If you do not use the supplied cord to connect from the telephone wall jack to the HP Photosmart, you might not be able to fax successfully. This special phone cord is different from the phone cords you might already have in your home or office.
2.Turn on the Auto Answer setting.
3.Change the Distinctive Ring setting to match the pattern that the telephone company assigned to your fax number.
 NOTE: By default, the HP Photosmart is set to answer all ring patterns. If you do not set the Distinctive Ring to match the ring pattern assigned to your fax number, the HP Photosmart might answer both voice calls and fax calls or it might not answer at all.
4.(Optional) Change the Rings to Answer setting to the lowest setting (two rings).
5.Run a fax test.
The HP Photosmart will automatically answer incoming calls that have the ring pattern you selected (Distinctive Ring setting) after the number of rings you selected (Rings to Answer setting). Then it will begin emitting fax reception tones to the sending fax machine and receive the fax.
Finish setting up the HP Photosmart
Set up the HP Photosmart for faxing |
17 |
Photosmart HP the up setting Finish
Chapter 2
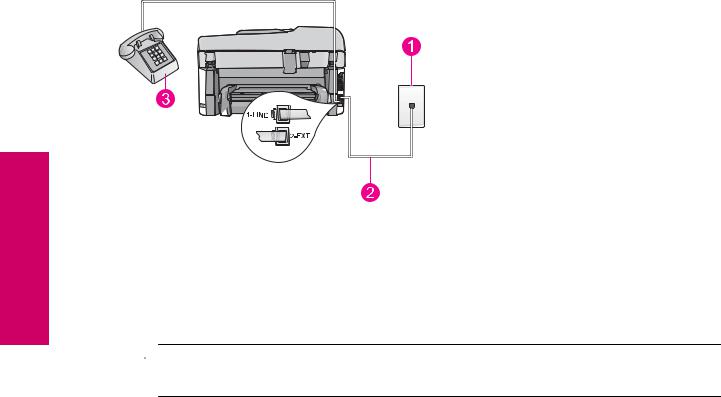
Case E: Shared voice/fax line
If you receive both voice calls and fax calls at the same phone number, and you have no other office equipment (or voice mail) on this phone line, set up the HP Photosmart as described in this section.
Back view of the HP Photosmart
1 |
Telephone wall jack |
|
|
2 |
Use the phone cord supplied in the box with the HP Photosmart to connect to the "1-LINE" port |
|
|
3 |
Telephone (optional) |
|
|
To set up the HP Photosmart with a shared voice/fax line
1.Using the phone cord supplied in the box with the HP Photosmart, connect one end to your telephone wall jack, then connect the other end to the port labeled 1-LINE on the back of the HP Photosmart.
 NOTE: If you do not use the supplied cord to connect from the telephone wall jack to the HP Photosmart, you might not be able to fax successfully. This special phone cord is different from the phone cords you might already have in your home or office.
2.Now you need to decide how you want the HP Photosmart to answer calls, automatically or manually:
•If you set up the HP Photosmart to answer calls automatically, it answers all incoming calls and receives faxes. The HP Photosmart will not be able to distinguish between fax and voice calls in this case; if you suspect the call is a voice call, you will need to answer it before the HP Photosmart answers the call. To set up the HP Photosmart to answer calls automatically, turn on the Auto Answer setting.
•If you set up the HP Photosmart to answer faxes manually, you must be available to respond in person to incoming fax calls or the HP Photosmart cannot receive faxes. To set up the HP Photosmart to answer calls manually, turn off the Auto Answer setting.
3.Run a fax test.
4.Plug your phone into the telephone wall jack.
5.Do one of the following, depending on your phone system:
•If you have a parallel-type phone system, remove the white plug from the port labeled 2-EXT on the back of the HP Photosmart, and then connect a phone to this port.
•If you have a serial-type phone system, you might plug your phone directly on top of the HP Photosmart cable which has a wall plug attached to it.
If you pick up the phone before the HP Photosmart answers the call and hear fax tones from a sending fax machine, you will need to answer the fax call manually.
Case F: Shared voice/fax line with voice mail
If you receive both voice calls and fax calls at the same phone number, and you also subscribe to a voice mail service through your telephone company, set up the HP Photosmart as described in this section.
18 Finish setting up the HP Photosmart
 NOTE: You cannot receive faxes automatically if you have a voice mail service at the same phone number you use for fax calls. You must receive faxes manually; this means you must be available to respond in person to incoming fax calls. If you want to receive faxes automatically instead, contact your telephone company to subscribe to a distinctive ring service, or to obtain a separate phone line for faxing.
Back view of the HP Photosmart
1Telephone wall jack
2Use the phone cord supplied in the box with the HP Photosmart to connect to the "1-LINE" port
To set up the HP Photosmart with voice mail
1.Using the phone cord supplied in the box with the HP Photosmart, connect one end to your telephone wall jack, then connect the other end to the port labeled 1-LINE on the back of the HP Photosmart.
 NOTE: If you do not use the supplied cord to connect from the telephone wall jack to the HP Photosmart, you might not be able to fax successfully. This special phone cord is different from the phone cords you might already have in your home or office.
2.Turn off the Auto Answer setting.
3.Run a fax test.
You must be available to respond in person to incoming fax calls, or the HP Photosmart cannot receive faxes.
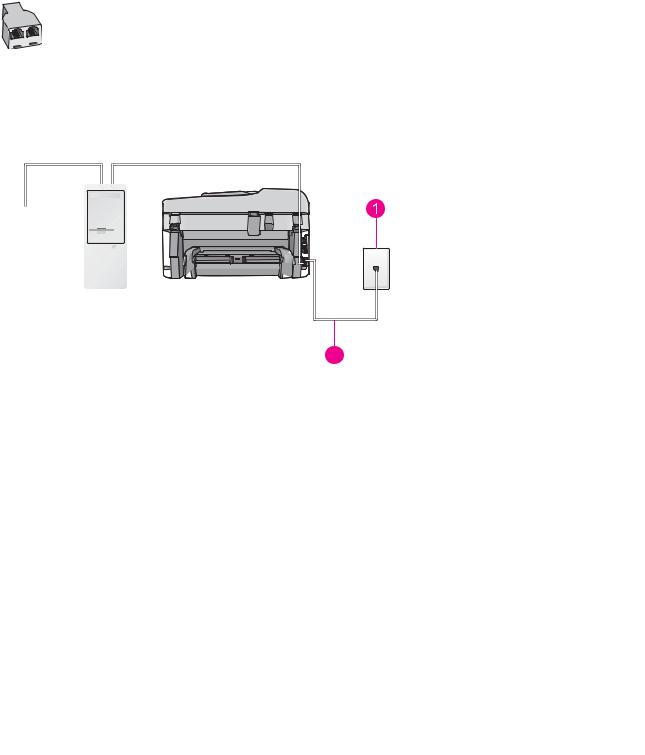
Case G: Fax line shared with computer dial-up modem (no voice calls received)
If you have a fax line on which you receive no voice calls, and you also have a computer dial-up modem connected on this line, set up the HP Photosmart as described in this section.
Finish setting up the HP Photosmart
Set up the HP Photosmart for faxing |
19 |

Photosmart HP the up setting Finish
Chapter 2
Since your computer dial-up modem shares the phone line with the HP Photosmart, you will not be able to use both your modem and the HP Photosmart simultaneously. For example, you cannot use the HP Photosmart for faxing if you are using your computer dial-up modem to send an e-mail or access the Internet.
Back view of the HP Photosmart
1Telephone wall jack
2Use the phone cord supplied in the box with the HP Photosmart to connect to the "1-LINE" port
3Computer with modem
To set up the HP Photosmart with a computer dial-up modem
1.Remove the white plug from the port labeled 2-EXT on the back of the HP Photosmart.
2.Find the phone cord that connects from the back of your computer (your computer dial-up modem) to a telephone wall jack. Disconnect the cord from the telephone wall jack and plug it into the port labeled 2-EXT on the back of the HP Photosmart.
3.Using the phone cord supplied in the box with the HP Photosmart, connect one end to your telephone wall jack, then connect the other end to the port labeled 1-LINE on the back of the HP Photosmart.
 NOTE: If you do not use the supplied cord to connect from the telephone wall jack to the HP Photosmart, you might not be able to fax successfully. This special phone cord is different from the phone cords you might already have in your home or office.
4.If your modem software is set to receive faxes to your computer automatically, turn off that setting.
 NOTE: If you do not turn off the automatic fax reception setting in your modem software, the HP Photosmart will not be able to receive faxes.
5.Turn on the Auto Answer setting.
6.(Optional) Change the Rings to Answer setting to the lowest setting (two rings).
7.Run a fax test.
When the phone rings, the HP Photosmart will answer automatically after the number of rings you set in the Rings to Answer setting. Then it will begin emitting fax reception tones to the sending fax machine and receive the fax.
Case H: Shared voice/fax line with computer dial-up modem
If you receive both voice calls and fax calls at the same phone number, and you also have a computer dial-up modem connected on this phone line, set up the HP Photosmart as described in this section.
Since your computer dial-up modem shares the phone line with the HP Photosmart, you will not be able to use both your modem and the HP Photosmart simultaneously. For example, you cannot use the HP Photosmart for faxing if you are using your computer dial-up modem to send an e-mail or access the Internet.
There are two different ways to set up the HP Photosmart with your computer based on the number of phone ports on your computer. Before you begin, check your computer to see if it has one or two phone ports.
•If your computer has only one phone port, you will need to purchase a parallel splitter (also called a coupler), as shown below. (A parallel splitter has one RJ-11 port on the front and two RJ-11 ports on the back. Do not
20 Finish setting up the HP Photosmart
use a 2-line phone splitter, a serial splitter, or a parallel splitter which has two RJ-11 ports on the front and a plug on the back.)
Example of a parallel splitter
•If your computer has two phone ports, set up the HP Photosmart as described below.
Back view of the HP Photosmart
Finish setting up the HP Photosmart
1 |
Telephone wall jack |
|
|
2 |
"IN" phone port on your computer |
|
|
3 |
"OUT" phone port on your computer |
|
|
4 |
Telephone |
|
|
5 |
Computer with modem |
|
|
6 |
Use the phone cord supplied in the box with the HP Photosmart to connect to the "1-LINE" port |
|
|
To set up the HP Photosmart on the same phone line as a computer with two phone ports
1.Remove the white plug from the port labeled 2-EXT on the back of the HP Photosmart.
2.Find the phone cord that connects from the back of your computer (your computer dial-up modem) to a telephone wall jack. Disconnect the cord from the telephone wall jack and plug it into the port labeled 2-EXT on the back of the HP Photosmart.
3.Connect a phone to the "OUT" port on the back of your computer dial-up modem.
4.Using the phone cord supplied in the box with the HP Photosmart, connect one end to your telephone wall jack, then connect the other end to the port labeled 1-LINE on the back of the HP Photosmart.
 NOTE: If you do not use the supplied cord to connect from the telephone wall jack to the HP Photosmart, you might not be able to fax successfully. This special phone cord is different from the phone cords you might already have in your home or office.
5. If your modem software is set to receive faxes to your computer automatically, turn off that setting.
 NOTE: If you do not turn off the automatic fax reception setting in your modem software, the HP Photosmart will not be able to receive faxes.
Set up the HP Photosmart for faxing |
21 |
Photosmart HP the up setting Finish
Chapter 2
6.Now you need to decide how you want the HP Photosmart to answer calls, automatically or manually:
•If you set up the HP Photosmart to answer calls automatically, it answers all incoming calls and receives faxes. The HP Photosmart will not be able to distinguish between fax and voice calls in this case; if you suspect the call is a voice call, you will need to answer it before the HP Photosmart answers the call. To set up the HP Photosmart to answer calls automatically, turn on the Auto Answer setting.
•If you set up the HP Photosmart to answer faxes manually, you must be available to respond in person to incoming fax calls or the HP Photosmart cannot receive faxes. To set up the HP Photosmart to answer calls manually, turn off the Auto Answer setting.
7.Run a fax test.
If you pick up the phone before the HP Photosmart answers the call and hear fax tones from a sending fax machine, you will need to answer the fax call manually.
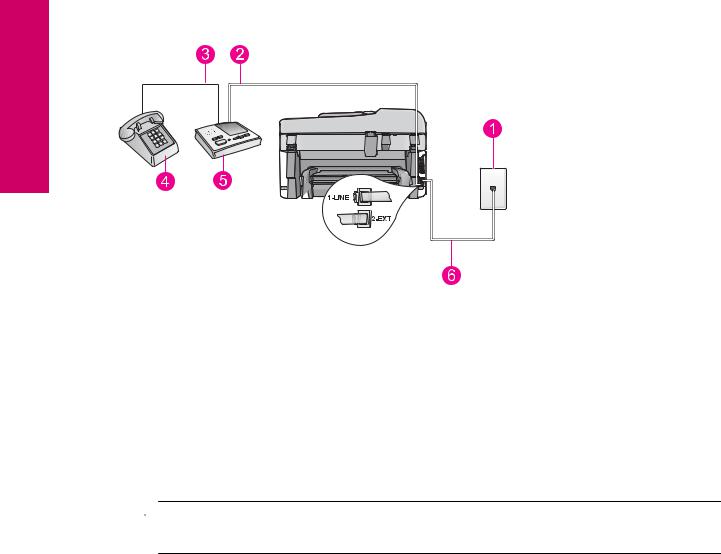
Case I: Shared voice/fax line with answering machine
If you receive both voice calls and fax calls at the same phone number, and you also have an answering machine that answers voice calls at this phone number, set up the HP Photosmart as described in this section.
Back view of the HP Photosmart
1 |
Telephone wall jack |
|
|
2 |
"IN" port on your answering machine |
|
|
3 |
"OUT" port on your answering machine |
|
|
4 |
Telephone (optional) |
|
|
5 |
Answering machine |
|
|
6 |
Use the phone cord supplied in the box with the HP Photosmart to connect to the "1-LINE" port |
|
|
To set up the HP Photosmart with a shared voice/fax line with answering machine
1.Remove the white plug from the port labeled 2-EXT on the back of the HP Photosmart.
2.Unplug your answering machine from the telephone wall jack, and connect it to the port labeled 2-EXT on the back of the HP Photosmart.
 NOTE: If you do not connect your answering machine directly to the HP Photosmart, fax tones from a sending fax machine might be recorded on your answering machine, and you probably will not be able to receive faxes with the HP Photosmart.
22 Finish setting up the HP Photosmart

3.Using the phone cord supplied in the box with the HP Photosmart, connect one end to your telephone wall jack, then connect the other end to the port labeled 1-LINE on the back of the HP Photosmart.
 NOTE: If you do not use the supplied cord to connect from the telephone wall jack to the HP Photosmart, you might not be able to fax successfully. This special phone cord is different from the phone cords you might already have in your home or office.
4.(Optional) If your answering machine does not have a built-in phone, for convenience you might want to connect a phone to the back of your answering machine at the "OUT" port.
 NOTE: If your answering machine does not let you connect an external phone, you can purchase and use a parallel splitter (also known as a coupler) to connect both the answering machine and telephone to the HP Photosmart. You can use standard phone cords for these connections.
5.Turn on the Auto Answer setting.
6.Set your answering machine to answer after a low number of rings.
7.Change the Rings to Answer setting on the HP Photosmart to the maximum number of rings supported by your device. (The maximum number of rings varies by country/region.)
8.Run a fax test.
When the phone rings, your answering machine will answer after the number of rings you have set, and then play your recorded greeting. The HP Photosmart monitors the call during this time, "listening" for fax tones. If incoming fax tones are detected, the HP Photosmart will emit fax reception tones and receive the fax; if there are no fax tones, the HP Photosmart stops monitoring the line and your answering machine can record a voice message.
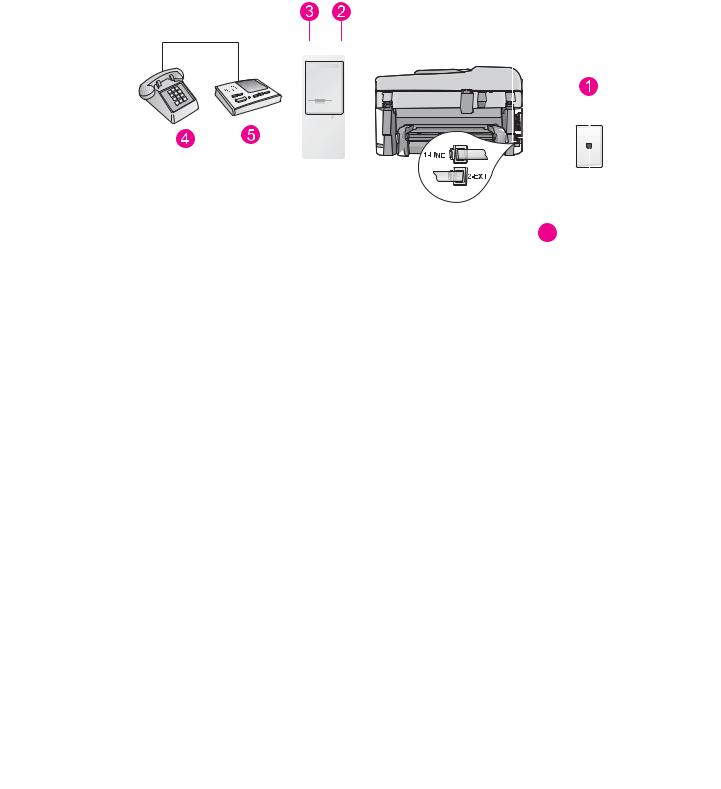
Case J: Shared voice/fax line with computer dial-up modem and answering machine
If you receive both voice calls and fax calls at the same phone number, and you also have a computer dial-up modem and answering machine connected on this phone line, set up the HP Photosmart as described in this section.
Since your computer dial-up modem shares the phone line with the HP Photosmart, you will not be able to use both your modem and the HP Photosmart simultaneously. For example, you cannot use the HP Photosmart for faxing if you are using your computer dial-up modem to send an e-mail or access the Internet.
There are two different ways to set the HP Photosmart with your computer based on the number of phone ports on your computer. Before you begin, check your computer to see if it has one or two phone ports.
•If your computer has only one phone port, you will need to purchase a parallel splitter (also called a coupler), as shown below. (A parallel splitter has one RJ-11 port on the front and two RJ-11 ports on the back. Do not use a 2-line phone splitter, a serial splitter, or a parallel splitter which has two RJ-11 ports on the front and a plug on the back.)
Example of a parallel splitter
Finish setting up the HP Photosmart
Set up the HP Photosmart for faxing |
23 |
Chapter 2
•If your computer has two phone ports, set up the HP Photosmart as described below.
Back view of the HP Photosmart
setting Finish |
|
|
|
|
|
|
|
|
|
|
|
|
|
|
|
|
|
|
|
|
|
|
|
|
|
|
|
|
|
|
|
|
|
|
|
|
|
|
|
||
|
|
|
|
|
|
|
|
|
|
|
|
|
|
|
|
|
|
|
||
|
|
|
|
|
|
|
|
|
|
|
|
|
|
|
|
|
|
|
||
|
|
|
|
|
|
|
|
|
|
|
|
|
|
|
|
|
|
|
||
|
|
|
|
|
|
|
|
|
|
|
|
|
|
|
|
|
|
|
||
|
|
|
|
|
|
|
|
|
|
|
|
|
|
|
|
|
|
|
||
|
|
|
|
|
|
|
|
|
|
|
|
|
|
|
|
|
|
|
||
|
|
|
|
|
|
|
|
|
|
|
|
|
|
|
|
|
|
|
||
|
|
|
|
|
|
|
|
|
|
|
|
|
|
|
|
|
|
|
||
|
|
|
|
|
|
|
|
|
|
|
|
|
|
|
|
|
|
|||
|
|
|
|
|
|
|
|
|
|
|
|
|
|
|
|
|
|
|
||
|
|
|
|
|||||||||||||||||
1 |
Telephone wall jack |
|||||||||||||||||||
up |
|
|
|
|
||||||||||||||||
2 |
"IN" phone port on your computer |
|||||||||||||||||||
the |
|
|
|
|
||||||||||||||||
3 |
"OUT" phone port on your computer |
|||||||||||||||||||
HP |
|
|
|
|
|
|
|
|
|
|
|
|
|
|
|
|
|
|
|
|
4 |
Telephone (optional) |
|||||||||||||||||||
Photosmart |
||||||||||||||||||||
|
|
|
|
|||||||||||||||||
7 |
Use the phone cord supplied in the box with the HP Photosmart to connect to the "1-LINE" port |
|||||||||||||||||||
|
5 |
Answering machine |
||||||||||||||||||
|
6 |
Computer with modem |
||||||||||||||||||
|
|
|
|
|
|
|
|
|
|
|
|
|
|
|
|
|
|
|
|
|
To set up the HP Photosmart on the same phone line as a computer with two phone ports
1.Remove the white plug from the port labeled 2-EXT on the back of the HP Photosmart.
2.Find the phone cord that connects from the back of your computer (your computer dial-up modem) to a telephone wall jack. Disconnect the cord from the telephone wall jack and plug it into the port labeled 2-EXT on the back of the HP Photosmart.
3.Unplug your answering machine from the telephone wall jack, and connect it to the “OUT” port on the back of your computer modem.
This allows a direct connection between the HP Photosmart and your answering machine, even though the computer modem is connected first in line.
 NOTE: If you do not connect your answering machine in this way, fax tones from a sending fax machine might be recorded on your answering machine, and you might not be able to receive faxes with the
HP Photosmart.
4.Using the phone cord supplied in the box with the HP Photosmart, connect one end to your telephone wall jack, then connect the other end to the port labeled 1-LINE on the back of the HP Photosmart.
 NOTE: If you do not use the supplied cord to connect from the telephone wall jack to the HP Photosmart, you might not be able to fax successfully. This special phone cord is different from the phone cords you might already have in your home or office.
5.(Optional) If your answering machine does not have a built-in phone, for convenience you might want to connect a phone to the back of your answering machine at the "OUT" port.
 NOTE: If your answering machine does not let you connect an external phone, you can purchase and use a parallel splitter (also known as a coupler) to connect both the answering machine and telephone to the HP Photosmart. You can use standard phone cords for these connections.
24 Finish setting up the HP Photosmart

6.If your modem software is set to receive faxes to your computer automatically, turn off that setting.
 NOTE: If you do not turn off the automatic fax reception setting in your modem software, the HP Photosmart will not be able to receive faxes.
7.Turn on the Auto Answer setting.
8.Set your answering machine to answer after a low number of rings.
9.Change the Rings to Answer setting on the HP Photosmart to the maximum number of rings supported by your device. (The maximum number of rings varies by country/region.)
10.Run a fax test.
When the phone rings, your answering machine will answer after the number of rings you have set, and then play your recorded greeting. The HP Photosmart monitors the call during this time, "listening" for fax tones. If incoming fax tones are detected, the HP Photosmart will emit fax reception tones and receive the fax; if there are no fax tones, the HP Photosmart stops monitoring the line and your answering machine can record a voice message.
Case K: Shared voice/fax line with computer dial-up modem and voice mail
If you receive both voice calls and fax calls at the same phone number, use a computer dial-up modem on the same phone line, and subscribe to a voice mail service through your telephone company, set up the HP Photosmart as described in this section.
 NOTE: You cannot receive faxes automatically if you have a voice mail service at the same phone number you use for fax calls. You must receive faxes manually; this means you must be available to respond in person to incoming fax calls. If you want to receive faxes automatically instead, contact your telephone company to subscribe to a distinctive ring service, or to obtain a separate phone line for faxing.
Since your computer dial-up modem shares the phone line with the HP Photosmart, you will not be able to use both your modem and the HP Photosmart simultaneously. For example, you cannot use the HP Photosmart for faxing if you are using your computer dial-up modem to send an e-mail or access the Internet.
There are two different ways to set up the HP Photosmart with your computer based on the number of phone ports on your computer. Before you begin, check your computer to see if it has one or two phone ports.
•If your computer has only one phone port, you will need to purchase a parallel splitter (also called a coupler), as shown below. (A parallel splitter has one RJ-11 port on the front and two RJ-11 ports on the back. Do not use a 2-line phone splitter, a serial splitter, or a parallel splitter which has two RJ-11 ports on the front and a plug on the back.)
Example of a parallel splitter
Finish setting up the HP Photosmart
Set up the HP Photosmart for faxing |
25 |

Chapter 2
•If your computer has two phone ports, set up the HP Photosmart as described below.
Back view of the HP Photosmart
setting Finish |
|
|
|
|
|
|
|
|
|
|
|
|
|
|
|
|
|
|
|
|
|
|
|
|
|
|
|
|
|
|
|
|
|
|
|
|
|
|
|
|
|
||
|
|
|
|
|
|
|
|
|
|
|
|
|
|
|
|
|
|
|
|
||
|
|
|
|
|
|
|
|
|
|
|
|
|
|
|
|
|
|
|
|
||
|
|
|
|
|
|
|
|
|
|
|
|
|
|
|
|
|
|
|
|
||
|
|
|
|
|
|
|
|
|
|
|
|
|
|
|
|
|
|
|
|
||
|
|
|
|
|
|
|
|
|
|
|
|
|
|
|
|
|
|
|
|
||
|
|
|
|
|
|
|
|
|
|
|
|
|
|
|
|
|
|
|
|
||
|
|
|
|
|
|
|
|
|
|
|
|
|
|
|
|
|
|
|
|
||
|
|
|
|
|
|
|
|
|
|
|
|
|
|
|
|
|
|
|
|
||
|
|
|
|
|
|
|
|
|
|
|
|
|
|
|
|
|
|
|
|
||
|
|
|
|
|
|
|
|
|
|
|
|
|
|
|
|
|
|
|
|||
|
|
|
|
|
|
|
|
|
|
|
|
|
|
|
|
|
|
|
|
||
|
|
|
|
||||||||||||||||||
1 |
Telephone wall jack |
||||||||||||||||||||
up |
|
|
|
|
|||||||||||||||||
2 |
"IN" phone port on your computer |
||||||||||||||||||||
the |
|
|
|
|
|||||||||||||||||
3 |
"OUT" phone port on your computer |
||||||||||||||||||||
HP |
|
|
|
|
|
|
|
|
|
|
|
|
|
|
|
|
|
|
|
|
|
4 |
Telephone |
||||||||||||||||||||
Photosmart |
|||||||||||||||||||||
|
|
|
|
|
|
|
|
|
|
|
|
|
|
|
|
|
|
|
|
||
5 |
Computer with modem |
||||||||||||||||||||
|
|||||||||||||||||||||
|
|
|
|
|
|||||||||||||||||
|
6 |
Use the phone cord supplied in the box with the HP Photosmart to connect to the "1-LINE" port |
|||||||||||||||||||
|
|
|
|
|
|
|
|
|
|
|
|
|
|
|
|
|
|
|
|
|
|
To set up the HP Photosmart on the same phone line as a computer with two phone ports 1. Remove the white plug from the port labeled 2-EXT on the back of the HP Photosmart.
2. Find the phone cord that connects from the back of your computer (your computer dial-up modem) to a telephone wall jack. Disconnect the cord from the telephone wall jack and plug it into the port labeled 2-EXT on the back of the HP Photosmart.
3. Connect a phone to the "OUT" port on the back of your computer dial-up modem.
4. Using the phone cord supplied in the box with the HP Photosmart, connect one end to your telephone wall jack, then connect the other end to the port labeled 1-LINE on the back of the HP Photosmart.
 NOTE: If you do not use the supplied cord to connect from the telephone wall jack to the HP Photosmart, you might not be able to fax successfully. This special phone cord is different from the phone cords you might already have in your home or office.
5. If your modem software is set to receive faxes to your computer automatically, turn off that setting.
 NOTE: If you do not turn off the automatic fax reception setting in your modem software, the HP Photosmart will not be able to receive faxes.
6. Turn off the Auto Answer setting.
7. Run a fax test.
You must be available to respond in person to incoming fax calls, or the HP Photosmart cannot receive faxes.
Additional fax setup information
For additional fax setup information, in specific countries/regions, see the Fax Configuration Web site listed below.
Austria |
www.hp.com/at/faxconfig |
|
|
Germany |
www.hp.com/de/faxconfig |
|
|
Switzerland (French) |
www.hp.com/ch/fr/faxconfig |
|
|
26 Finish setting up the HP Photosmart
(continued)
Switzerland (German) |
www.hp.com/ch/de/faxconfig |
|
|
|
|
|
|
|
|
United Kingdom |
www.hp.com/uk/faxconfig |
|
|
|
|
|
|
|
|
Spain |
www.hp.com/es/faxconfig |
|
|
|
|
|
|
|
|
The Netherlands |
www.hp.com/nl/faxconfig |
|
|
|
|
|
|
|
|
Belgium (France) |
www.hp.com/be/fr/faxconfig |
|
|
|
|
|
|
|
|
Belgium (Dutch) |
www.hp.com/be/nl/faxconfig |
|
|
|
|
|
|
|
|
Portugal |
www.hp.com/pt/faxconfig |
|
|
|
|
|
|
|
|
Sweden |
www.hp.com/se/faxconfig |
|
|
|
|
|
|
|
|
Finland |
www.hp.com/fi/faxconfig |
|
|
|
|
|
|
|
|
Denmark |
www.hp.com/dk/faxconfig |
|
|
|
|
|
|
|
|
Norway |
www.hp.com/no/faxconfig |
|
|
|
|
|
|
Photosmart |
|
Italy |
www.hp.com/it/faxconfig |
|
||
Ireland |
www.hp.com/ie/faxconfig |
|
|
|
France |
www.hp.com/fr/faxconfig |
|
|
|
|
|
|
HP |
|
South Africa |
www.hp.com/za/faxconfig |
|||
|
the |
|||
|
|
|
||
Poland |
www.hp.pl/faxconfig |
|||
|
up |
|||
|
|
|
||
|
|
|||
Russia |
www.hp.ru/faxconfig |
|
setting |
|
|
|
|
||
North America |
www.hp.com/us/faxsetup |
|||
|
|
|
Finish |
|
|
|
|
||
|
|
|
|
Set up the HP Photosmart for faxing |
27 |

Chapter 2
Photosmart HP the up setting Finish
28 Finish setting up the HP Photosmart
Loading...