


 Loading...
HP Photosmart C4200 All-in-One series
Basics Guide
Guide d'utilisation

Hewlett-Packard Company notices
The information contained in this document is subject to change without notice.
All rights reserved. Reproduction, adaptation, or translation of this material is prohibited without prior written permission of Hewlett-Packard, except as allowed under copyright laws. The only warranties for HP products and services are set forth in the express warranty statements accompanying such products and services. Nothing herein should be construed as constituting an additional warranty. HP shall not be liable for technical or editorial errors or omissions contained herein.
© 2007 Hewlett-Packard Development Company, L.P.
Windows, Windows 2000, and Windows XP are U.S. registered trademarks of Microsoft Corporation.
Windows Vista is either a registered trademark or trademark of Microsoft Corporation in the United States and/or other countries.
Intel and Pentium are trademarks or registered trademarks of Intel Corporation or its subsidiaries in the United States and other countries.
Avis publiés par la société Hewlett-Packard
Les informations contenues dans ce document peuvent faire l'objet de modifications sans préavis.
Tous droits réservés. La reproduction, l'adaptation ou la traduction de ce matériel est interdite sans l'accord écrit préalable de Hewlett-Packard, sauf dans les cas permis par la législation relative aux droits d'auteur. Les seules garanties relatives aux produits et services HP sont décrites dans les déclarations de garantie expresse accompagnant lesdits produits et services. Aucun élément de ce document ne constitue une garantie supplémentaire. Hewlett-Packard ne saurait être tenu pour responsable des erreurs ou omissions techniques ou rédactionnelles de ce document.
© 2007 Hewlett-Packard Development Company, L.P.
Windows, Windows 2000 et Windows XP sont des marques déposées de Microsoft Corporation aux Etats-Unis.
Windows Vista est une marque déposée ou une marque de Microsoft Corporation aux Etats-Unis et/ou dans d'autres pays.
Intel et Pentium sont des marques ou des marques déposées d'Intel Corporation ou de ses filiales aux Etats-Unis et dans d'autres pays.

HP Photosmart C4200 All-in-One
series
Basics Guide
English

English
Contents
1 HP All-in-One overview |
|
|
|
The HP All-in-One at a glance.................................................................................................... |
5 |
|
Control panel buttons................................................................................................................. |
6 |
|
Find more information................................................................................................................. |
7 |
|
Load originals and load paper.................................................................................................... |
7 |
|
Avoid paper jams........................................................................................................................ |
8 |
|
Make a copy............................................................................................................................... |
9 |
|
Scan an image............................................................................................................................ |
9 |
|
Print 10 x 15 cm (4 x 6 inch) photos........................................................................................... |
9 |
|
Replace the print cartridges...................................................................................................... |
10 |
|
Clean the HP All-in-One........................................................................................................... |
13 |
|
Clean the glass................................................................................................................... |
13 |
|
Clean the lid backing.......................................................................................................... |
13 |
2 |
Troubleshooting and support |
|
|
Uninstall and reinstall the software........................................................................................... |
15 |
|
Hardware setup troubleshooting............................................................................................... |
15 |
|
Clear paper jams...................................................................................................................... |
18 |
|
Print cartridge troubleshooting.................................................................................................. |
19 |
|
Support process....................................................................................................................... |
19 |
3 |
Technical information |
|
|
System requirements................................................................................................................ |
20 |
|
Product specifications............................................................................................................... |
20 |
|
Print cartridge yield................................................................................................................... |
20 |
|
Regulatory notices.................................................................................................................... |
20 |
|
Warranty................................................................................................................................... |
22 |
4 HP Photosmart C4200 All-in-One series

1 HP All-in-One overview
Use the HP All-in-One to quickly and easily accomplish tasks such as making a copy, scanning documents, or printing photos from a memory card. You can access many HP All-in-One functions directly from the control panel, without turning on your computer.
 NOTE: This guide introduces basic operations and troubleshooting, as well as provides information for contacting HP support and ordering supplies.
The onscreen Help details the full range of features and functions, including use of the HP Photosmart software that came with the HP All-in-One.
The HP All-in-One at a glance
English
Label Description
1Control panel
2On button
3Memory card slots
4Input tray
5Tray extender
6Paper-width guide
7Print cartridge door
8Glass
9Lid backing
10Rear door
11Rear USB port
HP All-in-One overview |
5 |
Chapter 1
(continued)
Label Description
12Power connection*
*Use only with the power adapter supplied by HP.
Control panel buttons
English
|
|
|
|
|
|
|
|
|
|
|
|
|
|
|
|
|
|
|
|
|
|
|
|
|
|
|
|
|
|
|
|
|
|
|
|
|
|
|
|
|
|
|
|
|
|
|
|
|
|
|
|
|
|
|
|
|
|
|
|
|
|
|
|
|
|
|
|
|
|
|
|
|
|
|
|
|
|
|
|
|
|
|
|
|
|
|
|
|
|
|
|
|
|
|
|
|
|
|
|
|
|
|
|
|
|
|
|
|
|
|
|
|
|
|
|
|
|
|
|
|
|
|
|
|
|
|
|
|
|
|
|
|
|
|
|
|
|
|
|
|
|
|
|
|
|
|
|
|
|
|
|
|
|
|
|
|
|
|
|
|
|
|
|
|
|
|
|
|
|
|
|
|
|
|
|
|
|
|
|
|
|
|
|
|
|
|
|
|
|
|
|
|
|
|
|
|
|
|
|
|
|
|
|
|
|
|
|
|
|
|
|
|
|
|
|
|
|
|
|
|
|
|
|
|
|
|
|
|
|
|
|
|
|
|
|
|
|
|
|
|
|
|
|
|
|
|
|
|
|
|
|
|
|
|
|
|
|
|
|
|
|
|
|
|
|
|
|
|
|
|
|
|
|
|
|
|
|
|
|
|
|
|
|
|
|
|
|
Label |
Icon |
|
|
|
|
|
|
|
Name and Description |
||||||||
|
|
|
|
|
|
|
|
|
|
|
|||||||
1 |
|
|
|
|
|
|
|
|
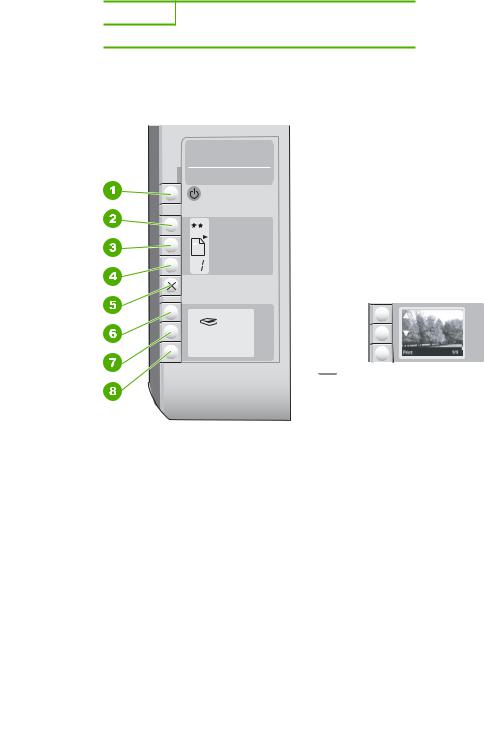
On button: Turns the HP All-in-One on or off. When the HP |
||||||||
|
|
|
|
|
|
|
|
|
All- in-One is off, a minimal amount of power is still used by the |
||||||||
|
|
|
|
|
|
|
|
|
device. To completely remove power, turn the HP All-in-One |
||||||||
|
|
|
|
|
|
|
|
|
off, and then unplug the power cord. |
||||||||
|
|
|
|
|
|
|
|
|
|
|
|||||||
2 |
|
|
|
|
|
|
|
|
Quality button: Changes the copy quality or the quality of |
||||||||
|
|
|
|
|
|
|
|
|
photos you print from a memory card. The default quality for |
||||||||
|
|
|
|
|
|
|
|
|
both plain and photo papers is two stars. However, the quality |
||||||||
|
|
|
|
|
|
|
|
|
produced varies depending on the paper type. For plain paper, |
||||||||
|
|
|
|
|
|
|
|
|
two stars represents normal quality. For photo paper, two stars |
||||||||
|
|
|
|
|
|
|
|
|
represents best quality. |
||||||||
|
|
|
|
|
|
|
|
|
|
|
|||||||
3 |
|
|
|
|
|
|
|
|
Size button: Changes the image size to 100% (Actual Size), |
||||||||
|
|
|
|
|
|
|
|
|
fits it to the page (Resize to Fit), or prints borderless images |
||||||||
|
|
|
|
|
|
|
|
|
(Borderless). The default setting is 100% for plain paper and |
||||||||
|
|
|
|
|
|
|
|
|
borderless for photo paper. |
||||||||
|
|
|
|
|
|
|
|
|
|
|
|||||||
4 |
|
|
|
|
|
|
|
|
Copies button: Specifies the desired number of copies. |
||||||||
|
|
|
|
|
|
|
|
|
|
|
|||||||
5 |
|
|
|
|
|
|
|
|
Cancel button: Stops a task (such as scanning or copying) or |
||||||||
|
|
|
|
|
|
|
|
|
resets settings (such as Quality and Copies). |
||||||||
|
|
|
|
|
|
|
|
|
|
|
|
|
|
|
|
|
|
6 HP Photosmart C4200 All-in-One series

(continued)
Label |
Icon |
Name and Description |
|
|
|
6 |
|
Scan button: Starts a scan. When a memory card is inserted, |
|
|
this button advances to the next photo on the memory card |
|
|
when pressed. |
|
|
|
7 |
|
Start Copy Black button: Starts a black-and-white copy. In |
|
|
certain situations (for example, after clearing a paper jam), this |
|
|
button resumes printing. When a memory card is inserted, this |
|
|
button acts as a previous image button. |
|
|
|
8 |
|
Start Copy Color button: Starts a color copy. In certain |
|
|
situations (for example, after clearing a paper jam), this button |
|
|
resumes printing. When a memory card is inserted, this button |
|
|
starts printing the image currently on the display. |
|
|
|
Find more information
A variety of resources, both printed and onscreen, provide information about setting up and using the HP All-in-One.
•Setup Guide
The Setup Guide provides instructions for setting up the HP All-in-One and installing software. Make sure you follow the steps in the Setup Guide in order.
If you have problems during setup, see Troubleshooting in the last section of the Setup Guide, or see “Troubleshooting and support” on page 15 in this guide.
•Onscreen Help
The onscreen Help provides detailed instructions on features of the HP All-in-One that are not described in this User Guide, including features that are only available using the software you installed with the HP All-in-One.
•www.hp.com/support
If you have Internet access, you can get help and support from the HP Web site. This Web site offers technical support, drivers, supplies, and ordering information.
Load originals and load paper
You can copy or scan up to letteror A4-size originals by loading them on the glass.
To load an original on the scanner glass
1.Lift the lid on the HP All-in-One.
2.Load your original print side down on the right front corner of the glass.
 TIP: For more help on loading an original, refer to the engraved guides along the edge of the glass.
English
Find more information |
7 |

Chapter 1
English
3. Close the lid.
To load 10 x 15 cm (4 x 6 inch) photo paper in the input tray
1.Remove all paper from the input tray.
2.Insert the stack of photo paper into the far-right side of the input tray with the short edge forward and the print side down. Slide the stack of photo paper forward until it stops.
If the photo paper you are using has perforated tabs, load the photo paper so that the tabs are closest to you.
 TIP: For more help on loading small-size photo paper, refer to the guides engraved in the base of the input tray for loading photo paper.
3.Slide the paper-width guide inward until it stops at the edge of the paper.
Do not overload the input tray; make sure the stack of paper fits within the input tray and is no higher than the top of the paper-width guide.
Avoid paper jams
To help avoid paper jams, follow these guidelines.
•Remove printed papers from the output tray frequently.
•Prevent curled or wrinkled paper by storing all unused paper flat in a resealable bag.
•Ensure that paper loaded in the input tray lays flat and the edges are not bent or torn.
•Do not combine different paper types and paper sizes in the input tray; the entire stack of paper in the input tray must be the same size and type.
8 HP Photosmart C4200 All-in-One series

•Adjust the paper-width guide in the input tray to fit snugly against all paper. Make sure the paper-width guide does not bend the paper in the input tray.
•Do not overload the input tray; make sure the stack of paper fits within the input tray and is no higher than the top of the paper-width guide.
•Do not force paper too far forward in the input tray.
•Use paper types that are recommended for the HP All-in-One.
Make a copy
You can make quality copies from the control panel.
To make a copy from the control panel
1.Make sure you have paper loaded in the input tray.
2.Load your original print side down on the right front corner of the glass.
3.Press Start Copy Black or Start Copy Color to begin copying.
Scan an image
For original documents or images placed on the glass, you can start a scan from your computer or from the HP All-in-One. This section explains the second option: how to scan from the control panel of the HP All-in-One to a computer.
To use the scan features, the HP All-in-One and computer must be connected and turned on. The HP Photosmart Software must also be installed and running on your computer prior to scanning. To verify that the HP Photosmart Software is running on a Windows computer, look for the HP Digital Imaging Monitor icon in the system tray at the lower right side of the screen, near the time.
 NOTE: Closing the HP Digital Imaging Monitor icon in the Windows system tray can cause the HP All-in-One to lose some of its scan functionality. If this happens, you can restore full functionality by restarting your computer.
To scan to a computer
1.Load your original print side down on the right front corner of the glass.
2.Ensure that there are no memory cards inserted in the memory card slots on the HP All-in-One.
3.Press Scan.
A preview image of the scan appears on your computer, where you can edit it. Any edits that you make apply to the current scan session only.
The HP Photosmart Software has many tools that you can use to edit your scanned image. You can improve the overall image quality by adjusting the brightness, sharpness, color tone, and saturation. You can also crop, straighten, rotate, or resize the image.
4.Make any edits to the preview image, and then click Accept when you are finished.
Print 10 x 15 cm (4 x 6 inch) photos
You can select specific photos on your memory card to print as 10 x 15 cm (4 x 6 inch) photos.
English
Make a copy |
9 |

Chapter 1
English
To print one or more 10 x 15 cm (4 x 6 inch) photos
1.Insert your memory card into the appropriate slot on the HP All-in-One. The most recent image on the card appears on the display.
2.Load 10 x 15 cm (4 x 6 inch) photo paper in the input tray.
3.Press the buttons next to the  and
and  icons on the display to scroll through the photos on your memory card until the photo you want to print appears.
4.Do one of the following:
•For faster printing with slightly reduced resolution, leave the Quality setting at best resolution (as indicated by the two star icons on the display).
•For maximum resolution, press the Quality button until three star icons appear on the display.
•For the fastest printing, but with reduced resolution, press the Quality button until the one star icon appears on the display.
5.Leave the default Size setting as Borderless.
6.Press the Copies button until the number of copies you want to print appears on the display.
7.Press the Print button.
 TIP: While the photo is printing, you can continue scrolling through the photos on your memory card. When you see a photo you want to print, you can press the Print button to add that photo to the print queue.
Replace the print cartridges
Follow these instructions to replace print cartridges. Following these instructions might also help solve print quality issues related to the cartridges.
 NOTE: When the ink level for the print cartridge is low, a message appears on your computer screen. You can also check the ink levels by using the software installed with the HP All-in-One.
When you receive a low-ink warning message, make sure you have a replacement print cartridge available. You should also replace the print cartridges when you see faded text or if you experience print quality issues related to the print cartridges.
To order print cartridges for the HP All-in-One, go to www.hp.com/buy/supplies. If prompted, choose your country/region, follow the prompts to select your product, and then click one of the shopping links on the page.
10 HP Photosmart C4200 All-in-One series
To replace the print cartridges |
|
||
1. |
Make sure the HP All-in-One is on. |
|
|
|
|
|
|
|
|
CAUTION: If the HP All-in-One is off when you open the print cartridge door to |
|
|
|
access the print cartridges, the HP All-in-One will not release the cartridges for |
|
|
|
changing. You might damage the HP All-in-One if the print cartridges are not |
|
|
|
docked safely when you try to remove them. |
|
|
|
|
|
2. |
Make sure you have letter or A4 unused plain white paper loaded in the input tray. |
|
|
3. |
Open the print cartridge door. |
|
|
|
The print carriage moves to the far right side of the HP All-in-One. |
English |
|
|
|
|
|
4.Wait until the print carriage is idle and silent, and then lightly press down on a print cartridge to release it.
If you are replacing the tri-color print cartridge, remove the print cartridge from the slot on the left.
If you are replacing the black or photo print cartridge, remove the print cartridge from the slot on the right.
1Print cartridge slot for the tri-color print cartridge
2Print cartridge slot for the black and photo print cartridges
5.Pull the print cartridge toward you out of its slot.
6.If you are removing the black print cartridge in order to install the photo print cartridge, store the black print cartridge in the print cartridge protector or an airtight plastic container.
7.Remove the new print cartridge from its packaging and, being careful to touch only the black plastic, gently remove the plastic tape by using the pink pull tab.
Replace the print cartridges |
11 |

Chapter 1
English
1 |
Copper-colored contacts |
|
|
2 |
Plastic tape with pink pull tab (must be removed before installing) |
|
|
3 |
Ink nozzles under tape |
|
|
 CAUTION: Do not touch the copper-colored contacts or ink nozzles. Touching these parts can result in clogs, ink failure, and bad electrical connections.
8.Slide the new print cartridge forward into the empty slot. Then gently push the upper part of the print cartridge forward until it clicks into the socket.
If you are installing the tri-color print cartridge, slide it into the left slot.
If you are installing a black or photo print cartridge, slide it into the right slot.
9. Close the print cartridge door.
12 HP Photosmart C4200 All-in-One series

If you installed a new print cartridge, the HP All-in-One prints a print cartridge alignment page.
10. When prompted, ensure plain white paper is loaded in the input tray, then press the button next to OK.
 NOTE: If you have colored paper loaded in the input tray when you align the print cartridges, the alignment will fail. Load unused plain white paper into the input tray, and then try the alignment again.
11. Place the page print side down on the scanner glass and then press the button next
to OK to scan the page. |
English |
|
When the On button stops flashing, the alignment is complete and the page can be |
||
|
||
removed. |
|
Clean the HP All-in-One
To ensure that your copies and scans remain clear, you might need to clean the glass and lid backing. You might also want to dust the exterior of the HP All-in-One.
Clean the glass
Fingerprints, smudges, hair, and dust on the main glass surface slow down performance and affect the accuracy of the copy and scan features.
To clean the glass
1.Turn off the HP All-in-One, unplug the power cord, and raise the lid.
2.Clean the glass with a soft cloth or sponge slightly moistened with a nonabrasive glass cleaner.
 CAUTION: Do not use abrasives, acetone, benzene, or carbon tetrachloride on the glass, since they can damage it. Do not place or spray liquid directly on the glass. The liquid might seep under the glass and damage the device.
3.Dry the glass with a dry, soft, lint-free cloth to prevent spotting.
4.Plug in the power cord, and then turn on the HP All-in-One.
Clean the lid backing
Minor debris can accumulate on the white document backing located underneath the lid of the HP All-in-One.
To clean the lid backing
1.Turn off the HP All-in-One, unplug the power cord, and raise the lid.
2.Clean the white document backing with a soft cloth or sponge slightly moistened with a mild soap and warm water.
Wash the backing gently to loosen debris. Do not scrub the backing.
3.Dry the backing with a dry, soft, lint-free cloth.
 CAUTION: Do not use paper-based wipes, as these might scratch the backing.
Clean the HP All-in-One |
13 |
Loading...