


 Loading...
HP Photosmart C4600 All-in-One series
Basics Guide
Hewlett-Packard Company notices
The information contained in this document is subject to change without notice.
All rights reserved. Reproduction, adaptation, or translation of this material is prohibited without prior written permission of Hewlett-Packard, except as allowed under copyright laws. The only warranties for HP products and services are set forth in the express warranty statements accompanying such products and services. Nothing herein should be construed as constituting an additional warranty. HP shall not be liable for technical or editorial errors or omissions contained herein.
© 2009 Hewlett-Packard Development Company, L.P.
Windows, Windows 2000, and Windows XP are U.S. registered trademarks of Microsoft Corporation.
Windows Vista is either a registered trademark or trademark of Microsoft Corporation in the United States and/or other countries.
Intel and Pentium are trademarks or registered trademarks of Intel Corporation or its subsidiaries in the United States and other countries.

Contents
1 |
HP Photosmart overview |
|
|
The HP Photosmart at a glance................................................................................................. |
2 |
|
Control panel buttons................................................................................................................. |
3 |
|
Find more information................................................................................................................. |
4 |
|
Load originals and load paper.................................................................................................... |
4 |
|
Avoid paper jams........................................................................................................................ |
7 |
|
Print 10 x 15 cm (4 x 6 inch) photos........................................................................................... |
7 |
|
Scan an image............................................................................................................................ |
8 |
|
Make a copy............................................................................................................................... |
9 |
|
Replace the print cartridges........................................................................................................ |
9 |
|
Clean the HP Photosmart......................................................................................................... |
12 |
2 |
Troubleshooting and support |
|
|
Uninstall and reinstall the software........................................................................................... |
14 |
|
Hardware setup troubleshooting............................................................................................... |
15 |
|
Clear paper jams...................................................................................................................... |
17 |
|
Print cartridge troubleshooting.................................................................................................. |
18 |
|
Support process....................................................................................................................... |
18 |
3 |
Technical information |
|
|
System requirements................................................................................................................ |
19 |
|
Product specifications............................................................................................................... |
19 |
|
Regulatory notices.................................................................................................................... |
19 |
|
Warranty................................................................................................................................... |
20 |
Contents
1
1 HP Photosmart overview
Use the HP Photosmart to quickly and easily accomplish tasks such as making a copy, scanning documents, or printing photos from a memory card. You can access many HP Photosmart functions directly from the control panel, without turning on your computer.
 NOTE: This guide introduces basic operations and troubleshooting, as well as provides information for contacting HP support and ordering supplies.
The Electronic Help details the full range of features and functions, including use of the HP Photosmart Software that came with the HP Photosmart.
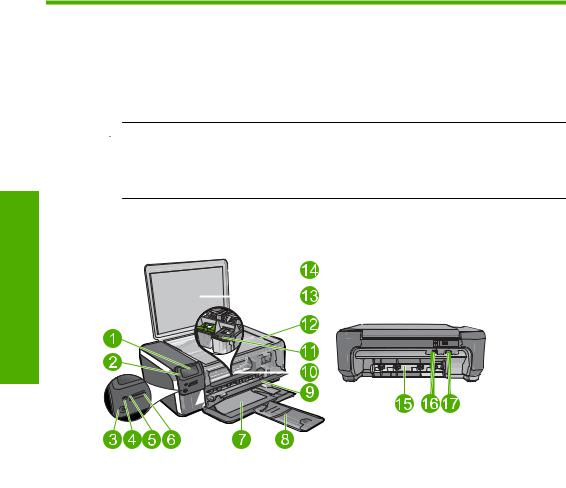
The HP Photosmart at a glance
overview Photosmart HP
Label |
Description |
|
|
1 |
Color graphics display (also referred to as the display) |
|
|
2 |
Control panel |
|
|
3 |
On button |
|
|
4 |
Photo light |
|
|
5 |
Memory card slot for Memory Stick cards |
|
|
6 |
Memory card slot for Secure Digital and xD cards |
|
|
7 |
Paper tray |
|
|
8 |
Paper tray extender (also referred to as the tray extender) |
|
|
9 |
Cartridge door |
|
|
10 |
Cartridge access area |
|
|
11 |
Print carriage |
2 HP Photosmart overview
(continued)
Label |
Description |
|
|
12 |
Glass |
|
|
13 |
Lid-backing |
|
|
14 |
Lid |
|
|
15 |
Rear door |
|
|
16 |
Rear USB port |
|
|
17 |
Power connection (Use only with the power adapter supplied by HP.) |
|
|
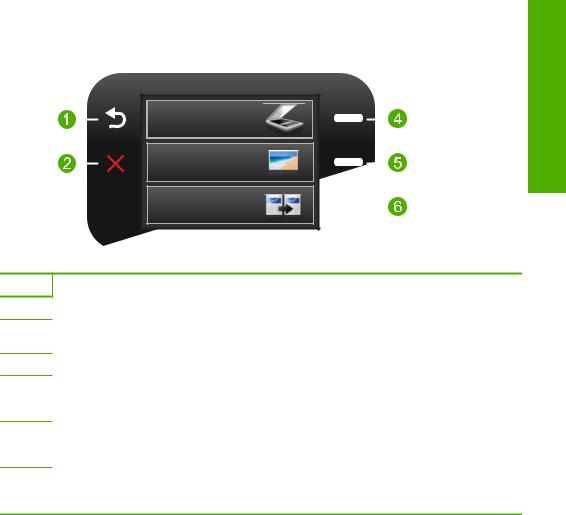
Control panel buttons
The following diagram and related table provide a quick reference to the HP Photosmart control panel features.
HP Photosmart overview
 2.
2.
Label |
Name and Description |
1Back: Returns to the previous screen.
2Cancel: Stops the current operation, restores default settings, and clears the current photo selection.
3OK: Selects a menu setting, value, or photo.
4Scan: From the Home screen, opens the Scan Menu. When viewing screens other than the Home screen, selects options related to the current display.
5Photo: From the Home screen, opens the Photo Menu. When viewing screens other than the Home screen, selects options related to the current display.
6Copy: From the Home screen, opens the Copy Menu. When viewing screens other than the Home screen, selects options related to the current display.
Control panel buttons |
3 |

Chapter 1
Find more information
A variety of resources, both printed and electronic provide information about setting up and using the HP Photosmart.
Start Here guide
The Start Here guide provides instructions for setting up your HP Photosmart and installing software. Make sure you follow the steps in the Start Here guide in order.
If you have problems during setup, see Troubleshooting in the last section of the Start Here guide, or see “Troubleshooting and support” on page 14 in this guide.
overview Photosmart HP
Electronic Help
The Electronic Help provides detailed instructions on features of your HP Photosmart that are not described in this guide, including features that are only available using the software you installed with your HP Photosmart. The Electronic Help also provides regulatory and environmental information.
To access the Electronic Help
•Windows: Click Start > All Programs > HP > Photosmart C4600 series > Help.
•Macintosh: Open the HP Device Manager and click the ? icon. Next, click the main menu and select Photosmart C4600 series.
HP Web site
If you have Internet access, you can get help and support from the HP Web site at www.hp.com/support. This Web site offers technical support, drivers, supplies, and ordering information.
Load originals and load paper
You can load different types and sizes of paper in the HP Photosmart, including letter or A4 paper, photo paper, transparencies, and envelopes. For more information, see the Electronic Help.
To load an original on the glass
1.Lift the lid to the open position.
2.Load your original print side down on the right front corner of the glass.
 TIP: For more help on loading an original, refer to the engraved guides along the edge of the glass.
4 HP Photosmart overview

3. Close the lid.
To load full-size paper
1. Slide the paper-width guide to its outermost position.
 NOTE: If you are using letter or A4 paper or smaller, make sure the tray extender is open all the way. When you use legal-size paper, leave the tray extender closed.
 TIP: Tap a stack of paper on a flat surface to align the edges. Make sure all the paper in the stack is the same size and type and free of rips, dust, wrinkles, and curled or bent edges.
2.Insert the stack of paper into the paper tray with the short edge forward and the print side down. Slide the stack of paper forward until it stops.
HP Photosmart overview
Load originals and load paper |
5 |
Loading...