


HP Photosmart D7300 series
User Guide

www.hp.com/support
021 672 280 |
|
|
Argentina (Buenos Aires) |
54-11-4708-1600 |
|
Argentina |
0-800-555-5000 |
|
Australia |
www.hp.com/support/ |
|
australia |
||
|
||
Österreich |
www.hp.com/support |
|
17212049 |
|
|
België |
www.hp.com/support |
|
Belgique |
www.hp.com/support |
|
Brasil (Sao Paulo) |
55-11-4004-7751 |
|
Brasil |
0-800-709-7751 |
|
Canada (Mississauga Area) |
(905) 206-4663 |
|
Canada |
1-800-474-6836 |
|
Central America & |
www.hp.com/support |
|
The Caribbean |
||
|
||
Chile |
800-360-999 |
|
|
www.hp.com/support/ |
|
|
china |
|
Colombia (Bogotá) |
571-606-9191 |
|
Colombia |
01-8000-51-4746-8368 |
|
Costa Rica |
0-800-011-1046 |
|
Česká republika |
810 222 222 |
|
Danmark |
www.hp.com/support |
|
Ecuador (Andinatel) |
1-999-119 |
|
800-711-2884 |
||
|
||
Ecuador (Pacifitel) |
1-800-225-528 |
|
|
800-711-2884 |
|
(02) 6910602 |
|
|
El Salvador |
800-6160 |
|
España |
www.hp.com/support |
|
France |
www.hp.com/support |
|
Deutschland |
www.hp.com/support |
|
|
+ 30 210 6073603 |
|
|
801 11 75400 |
|
|
800 9 2654 |
|
Guatemala |
1-800-711-2884 |
|
|
www.hp.com/support/ |
|
|
hongkong |
|
Magyarország |
06 40 200 629 |
|
India |
www.hp.com/support/ |
|
india |
||
|
||
Indonesia |
www.hp.com/support |
|
+971 4 224 9189 |
|
|
+971 4 224 9189 |
|
|
+971 4 224 9189 |
|
|
+971 4 224 9189 |
|
|
+971 4 224 9189 |
|
Ireland |
www.hp.com/support |
1-700-503-048 |
|
Italia |
www.hp.com/support |
Jamaica |
1-800-711-2884 |
|
www.hp.com/support/ |
|
|
Japan |
|
0800 222 47 |
|
|
|
www.hp.com/support/ |
|
|
korea |
|
Luxembourg |
www.hp.com/support |
|
Malaysia |
www.hp.com/support |
|
Mauritius |
(262) 262 210 404 |
|
México (Ciudad de México) |
55-5258-9922 |
|
México |
01-800-472-68368 |
|
081 005 010 |
|
|
Nederland |
www.hp.com/support |
|
New Zealand |
www.hp.com/support |
|
Nigeria |
1 3204 999 |
|
Norge |
www.hp.com/support |
|
24791773 |
|
|
Panamá |
1-800-711-2884 |
|
Paraguay |
009 800 54 1 0006 |
|
Perú |
0-800-10111 |
|
Philippines |
www.hp.com/support |
|
Polska |
22 5666 000 |
|
Portugal |
www.hp.com/support |
|
Puerto Rico |
1-877-232-0589 |
|
República Dominicana |
1-800-711-2884 |
|
Reunion |
0820 890 323 |
|
România |
0801 033 390 |
|
( ) |
095 777 3284 |
|
( -) |
812 332 4240 |
|
800 897 1415 |
|
|
Singapore |
www.hp.com/support/ |
|
singapore |
||
|
||
Slovensko |
0850 111 256 |
|
South Africa (international) |
+ 27 11 2589301 |
|
South Africa (RSA) |
086 0001030 |
|
Rest of West Africa |
+ 351 213 17 63 80 |
|
Suomi |
www.hp.com/support |
|
Sverige |
www.hp.com/support |
|
Switzerland |
www.hp.com/support |
|
|
www.hp.com/support/ |
|
|
taiwan |
|
|
www.hp.com/support |
|
071 891 391 |
|
|
Trinidad & Tobago |
1-800-711-2884 |
|
Türkiye |
+90 212 444 71 71 |
|
|
(044) 230-51-06 |
|
600 54 47 47 |
|
|
United Kingdom |
www.hp.com/support |
|
United States |
www.hp.com/support |
|
Uruguay |
0004-054-177 |
|
Venezuela (Caracas) |
58-212-278-8666 |
|
Venezuela |
0-800-474-68368 |
|
Viêt Nam |
www.hp.com/support |
Copyrights and trademarks
© 2006 Hewlett-Packard Development Company, L.P.
The information contained herein is subject to change without notice. Reproduction, adaptation, or translation without prior written permission is prohibited, except as allowed under the copyright laws.
Hewlett-Packard Company notices
The information contained in this document is subject to change without notice.
All rights reserved. Reproduction, adaptation, or translation of this material is prohibited without prior written permission of Hewlett-Packard, except as allowed under copyright laws.
The only warranties for HP products and services are set forth in the express warranty statements accompanying such products and services. Nothing herein should be construed as constituting an additional warranty. HP shall not be liable for technical or editorial errors or omissions contained herein.
Trademarks
HP, the HP logo, and Photosmart are property of Hewlett-Packard Development Company, L.P.
The Secure Digital logo is a trademark of the SD Association.
Microsoft and Windows are registered trademarks of Microsoft Corporation. CompactFlash, CF, and the CF logo are trademarks of the CompactFlash Association (CFA).
Memory Stick, Memory Stick Duo, Memory Stick PRO, and Memory Stick PRO Duo are trademarks or registered trademarks of Sony Corporation. MultiMediaCard is a trademark of Infineon Technologies AG of Germany, and is licensed to the MMCA (MultiMediaCard Association). Microdrive is a trademark of Hitachi Global Storage Technologies. xD-Picture Card is a trademark of Fuji Photo Film Co., Ltd., Toshiba Corporation, and Olympus Optical Co., Ltd.
Mac, the Mac logo, and Macintosh are registered trademarks of Apple Computer, Inc.
iPod is a trademark of Apple Computer, Inc.
Bluetooth is a trademark owned by its proprietor and used by HewlettPackard Company under license. PictBridge and the PictBridge logo are trademarks of the Camera & Imaging Products Association (CIPA).
Other brands and their products are trademarks or registered trademarks of their respective holders.
Regulatory model identification number
For regulatory identification purposes, your product is assigned a Regulatory Model Number. The Regulatory Model Number for your product is VCVRA-0603. This regulatory number should not be confused with the marketing name (HP Photosmart D7300 series, etc.) or product numbers (Q7057A, etc.).
For complete listing of regulatory notices see your onscreen help.
Energy consumption - Energy Star®
Hewlett-Packard Company is committed to providing quality products in a environmentally sound manner. For information about the HP's environmental product stewardship program see the onscreen help.
Contents
1 |
Welcome................................................................................................................. |
3 |
|
Special features....................................................................................................... |
3 |
|
Accessing the onscreen HP Photosmart printer help.............................................. |
3 |
|
Printer parts............................................................................................................. |
4 |
|
Optional accessories............................................................................................... |
7 |
|
Printer menu............................................................................................................ |
7 |
|
Print.................................................................................................................. |
8 |
|
Save................................................................................................................. |
8 |
|
Share................................................................................................................ |
8 |
|
Settings............................................................................................................ |
8 |
2 Get ready to print................................................................................................. |
11 |
|
|
Load paper............................................................................................................ |
11 |
|
Choose the right paper................................................................................... |
11 |
|
Load your paper............................................................................................. |
11 |
|
Insert ink cartridges............................................................................................... |
13 |
|
Purchasing replacement ink cartridges.......................................................... |
13 |
|
Ink cartridge tips............................................................................................. |
14 |
|
Inserting or replacing the ink cartridges......................................................... |
14 |
|
Insert memory cards.............................................................................................. |
16 |
|
Supported file formats.................................................................................... |
17 |
|
Inserting a memory card................................................................................. |
17 |
|
Memory card types......................................................................................... |
17 |
|
Removing a memory card.............................................................................. |
18 |
3 Printing photos without a computer.................................................................. |
21 |
|
|
Printing photos....................................................................................................... |
21 |
|
Print photos from a memory card................................................................... |
21 |
|
Print photos from a digital camera................................................................. |
23 |
|
Print photos from an iPod............................................................................... |
24 |
|
Photo layouts......................................................................................................... |
25 |
|
Improving photo quality......................................................................................... |
26 |
|
Getting creative..................................................................................................... |
27 |
4 |
Getting connected............................................................................................... |
31 |
|
Connecting to other devices.................................................................................. |
31 |
|
Saving photos to a computer................................................................................. |
33 |
|
Connecting through HP Photosmart Share........................................................... |
33 |
5 Printing from a computer.................................................................................... |
35 |
|
|
Using creative options in the printer software....................................................... |
35 |
|
HP Photosmart Premier................................................................................. |
35 |
|
HP Photosmart Essential............................................................................... |
35 |
|
HP Photosmart Share.................................................................................... |
36 |
|
Set print preferences............................................................................................. |
36 |
|
Open the electronic help................................................................................ |
37 |
|
HP Real Life technologies features....................................................................... |
37 |
6 |
Care and maintenance........................................................................................ |
39 |
|
Clean and maintain the printer.............................................................................. |
39 |
HP Photosmart D7300 series User Guide |
1 |
|
Clean the outside of the printer...................................................................... |
39 |
|
Aligning the printer......................................................................................... |
39 |
|
Print a sample page....................................................................................... |
39 |
|
Automatically clean the printhead.................................................................. |
40 |
|
Manually clean the ink cartridge contacts...................................................... |
40 |
|
Print a self test report..................................................................................... |
41 |
|
Update the software.............................................................................................. |
42 |
|
Store and transport the printer and ink cartridges................................................. |
43 |
|
Store and transport the printer....................................................................... |
43 |
|
Store and transport the ink cartridges............................................................ |
43 |
|
Maintain the quality of photo paper....................................................................... |
43 |
7 |
Troubleshooting.................................................................................................. |
45 |
|
Printer hardware problems.................................................................................... |
45 |
|
Printing problems................................................................................................... |
46 |
|
Error messages..................................................................................................... |
50 |
|
Paper errors................................................................................................... |
50 |
|
Ink cartridge errors......................................................................................... |
52 |
|
Memory card errors........................................................................................ |
55 |
|
Computer and connectivity printing errors..................................................... |
58 |
8 |
HP support........................................................................................................... |
59 |
|
Support process.................................................................................................... |
59 |
|
HP support by phone............................................................................................. |
59 |
|
Phone support period..................................................................................... |
59 |
|
Placing a call.................................................................................................. |
59 |
|
After the phone support period....................................................................... |
60 |
|
Additional warranty options................................................................................... |
60 |
A |
Specifications...................................................................................................... |
61 |
|
System requirements............................................................................................. |
61 |
|
Printer specifications............................................................................................. |
61 |
B |
HP Warranty......................................................................................................... |
65 |
Index............................................................................................................................ |
67 |
|
2 |
HP Photosmart D7300 series |
1 Welcome
Thank you for purchasing an HP Photosmart D7300 series printer! With this new photo printer you can print beautiful photos, save photos to a computer, and create fun and easy projects with or without a computer.
This guide primarily explains how to print without connecting a computer. To learn how to print from a computer, install the printer software and view the electronic Help. For an overview of using a computer and the printer together, see Printing from a computer. For information about installing the software, see the Quick Start guide.
Home users can learn how to:
●Print borderless photos from the printer or from a computer
●Choose a photo layout
●Convert a color photo to black and white, or apply a color effect such as Sepia or Antique
The printer comes with the following documentation:
●Quick Start Guide: The Quick Start Guide explains how to set up the printer, install the printer software, and print your first photo.
●User Guide: The User Guide is the book you are reading. This guide describes the basic features of the printer, explains how to use the printer without connecting a computer, and contains hardware troubleshooting information.
●Onscreen help: The onscreen HP Photosmart printer help describes how to use the printer with a computer and contains software troubleshooting information.
Special features
New features and media make it easier than ever to produce high-quality photos:
●When you use the new HP Advanced Photo Paper (also called HP Photo Paper in some countries/regions), special sensors in the printer detect a mark on the back of the paper and automatically select the optimal print settings. For more information about this new paper, see Choose the right paper.
●HP Real Life technologies make it easy for you to get better photos. Automatic red eye removal and adaptive lighting to enhance detail in shadows are just a few of the many technologies included. You can explore the many editing and enhancing options from both the control panel and from the printer software. To access these features from the control panel, see Improving photo quality. To learn how to find them in the software, see HP Real Life technologies features.
Accessing the onscreen HP Photosmart printer help
After you have installed the HP Photosmart printer software on a computer, you can view the onscreen HP Photosmart printer help:
●Windows PC: From the Start menu, select Programs (in Windows XP, select All Programs) > HP > HP Photosmart D7300 series > Photosmart Help.
●Macintosh: Select Help > Mac Help in the Finder, then select Help Center >
HP Photosmart Premier help > HP Photosmart printer help.
HP Photosmart D7300 series User Guide |
3 |

Chapter 1
Printer parts
Front of printer
1On: Press this button to turn on the printer.
2Top cover: Lift this cover to access the ink cartridges and to clear paper jams. To lift the cover, grasp the top cover below the HP logo and pull upward.
3Touch Screen Display: Use this screen to view and print photos, menus, and messages.
4Output tray: Use this tray to catch your printouts. Lift this tray to access the photo tray.
5Main tray: Pull out this tray and load paper, transparencies, envelopes, or other media with the side to be printed facing down.
6Photo tray: Lift the output tray and load small-size paper up to 10 x 15 cm (4 x 6 inch) into the photo tray for printing with the side to be printed facing down. The paper may be tabbed or untabbed.
7Memory card slots: Insert memory cards here. For a list of supported memory cards, see Insert memory cards.
8Camera port: Connect a PictBridge™ digital camera, the optional HP Bluetooth® wireless printer adapter, or an iPod.
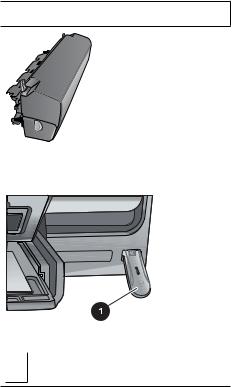
Back of printer
1Power cord connection: Use this port to connect the power cord included with the printer.
2USB port: Use this port to connect the printer to a computer.
3Rear access door: Remove this door to clear paper jams or to install the optional HP Automatic Two-sided Printing Accessory. See Optional accessories.
4 |
HP Photosmart D7300 series |

Main and Output trays
1Paper-width guide: Adjust this guide to fit close to the edge of the paper in the main tray.
2Output tray: Use this tray to catch your printouts. Lift this tray to access the photo tray.
3Output tray extender: Pull towards you to extend the output tray to catch your printouts.
4Main tray: Pull out this tray and load plain paper, transparencies, envelopes, or other media with the side to be printed facing down.
5Main tray grip: Pull toward you to extend the Main tray.
6Paper-length guide: Adjust this guide to fit close to the end of the paper in the main tray.
Photo tray
1Paper-width guide: Adjust this guide to fit close to the edge of the paper in the photo tray.
2Paper-length guide: Adjust this guide to fit close to the end of the paper in the photo tray.
HP Photosmart D7300 series User Guide |
5 |

Chapter 1
Control panel
1On: Turn on the printer or put it into power save mode.
2Print Preview: View a preview of the selected photo or photos.
3Print: Print the selected photos from the inserted memory card, or from a camera connected to the front camera port.
4Cancel: Deselect photos, exit a menu, or stop an action you have requested.
5Rotate: Rotate a photo or a crop box.
6Zoom (+)(-): Zoom in or out of a photo or crop box. You can also press Zoom (-) to view photos four at a time when viewing a photo at normal magnification.
7Autocorrect: Automatically enhances and applies lighting, contrast, focus and red eye removal features to all printed photos.
Indicator lights
1On light: Solid blue if the printer is on, otherwise it is off.
2Print light: Solid blue when the printer is on and ready to print, flashes blue when the printer is printing or busy with self-maintenance.
3Attention light: Flashes when there is an error condition. See the touch screen display for instructions or information about the error. For more information, see The Attention light is on.
4Autocorrect light: Solid blue when the Autocorrect function is turned on.
5Memory Card light: Solid blue if a memory card is inserted, flashes if the printer is accessing a memory card, off if no memory card is inserted or if more than one card is inserted. Turns on when there is a problem that requires user action. See the printer screen for instructions.
6 |
HP Photosmart D7300 series |
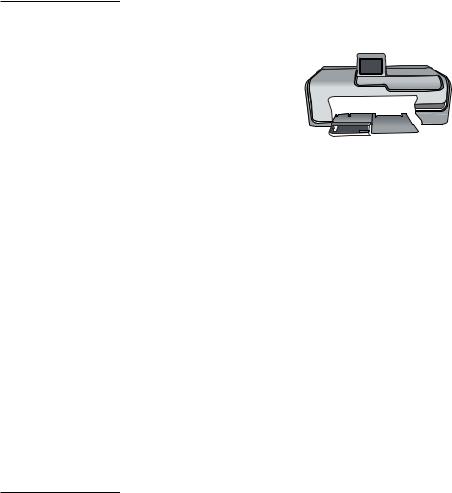
Optional accessories
There are several optional accessories available for the printer that enhance its portability for printing anywhere, anytime. The appearance of the accessories may vary from what is shown.
To purchase supplies, go to:
●www.hpshopping.com (U.S.)
●www.hp.com/go/supplies (Europe)
●www.hp.com/jp/supply_inkjet (Japan)
●www.hp.com/paper (Asia/Pacific)
Accessory name |
Description |
This accessory automatically flips each
page to print on both sides. You will save
money (two-sided printing reduces paper
consumption) and time (no need to
remove the paper and reinsert it to print on
the back), plus you will make bulky
documents more manageable.
This accessory may not be available in all
HP Automatic Two-sided Printing countries/regions.
Accessory
The HP Bluetooth® wireless printer adapter goes into the camera port on the front of the printer. This adapter lets you use Bluetooth wireless technology for
printing from many Bluetooth-enabled
devices, including digital cameras,
camera phones, and PDAs.
For more information on printing with this accessory, go to www.hp.com/go/
HP Bluetooth® wireless printer adapter bluetooth.
1Insert the Bluetooth adapter into the front camera port
Printer menu
Touch the home icon in the upper left-hand corner to access the home screen. You can access all of the functions from the home screen as well as setup menus.
HP Photosmart D7300 series User Guide |
7 |
Chapter 1
Wizard: Use the wizard to guide you through the printing process. 4×6: Use to print 4×6 inch (10 × 15 cm) photographs. Enlargement: Use Enlargement to print different photo sizes.
All: Select to print all the photos from the memory card inserted in the printer.
Other Projects: Use Other Projects to print panoramic, HP CD/DVD Tattoos, wallet prints, and passport photos.
–Panorama Prints: Select to turn panoramic printing On or Off (default). Select On to print all selected photos with a 3:1 aspect ratio; load 10 x 30 cm (4 x 12 inch) paper before printing.
–HP CD/DVD Tattoos: Select to print labels for CD/DVDs.
–Wallet Prints: Use to print wallet-sized photos.
–Passport Photos: Select to print a passport photo.
Save
Touch the Save button to save selected images to a connected PC.
Share
Use the Share button to select and share photos through HP Photosmart Share.
Settings
●Tools: Use tools to display the ink gauge, adjust the print quality, print a sample page, print a test page, and to clean and align cartridges.
–Display Ink Gauge: Use to enable an ink supply gauge on the home screen.
–Print quality: Choose either Best (default) or Normal print quality.
–Print sample page: Select to print a sample page, which is useful for checking the print quality of the printer. This feature is not available in all printer models.
–Print test page: Select to print a test page containing information about the printer that can help in troubleshooting problems.
–Clean Printhead: Select to clean the print head when white lines or streaks appear in your printouts. After the cleaning finishes, the printer prints a self test report. You have the option to clean the print head again if the report shows print quality problems.
–Align printer: Select to align the printer when white lines or streaks appear in your printouts.
●Bluetooth
–Device address: Some devices with Bluetooth wireless technology require you to enter the address of the device they are trying to locate. This menu option shows the printer address.
–Device name: You can select a name for the printer that appears on other devices with Bluetooth wireless technology when they locate the printer.
–Passkey: When the Bluetooth Security level of the printer is set to High, you must enter a passkey to make the printer available to other Bluetooth devices. The default passkey is 0000.
–Visibility: Select Visible to all (default) or Not visible. When Visibility is set to Not visible, only devices that know the printer address can print to it.
–Security level: Select Low (default) or High. The Low setting does not require users of other devices with Bluetooth wireless technology to enter the printer
8 |
HP Photosmart D7300 series |
passkey. High requires users of other devices with Bluetooth wireless technology to enter the printer passkey.
–Reset Bluetooth options: Select to reset all items in the Bluetooth menu to their default values.
●Help Menu: Use the help menu for instructions about using the printer.
–Cartridges: Select to see an animation of how to install an ink cartridge.
–Main Tray Loading: Select to read main tray paper loading instructions.
–Photo Tray Loading: Select to read photo tray paper loading instructions.
–Paper jams: Select to see an animation of how to clear a paper jam.
–Camera connect: Select to read instructions on how to connect a PictBridge camera to the printer.
●Preferences
–Print paper size: Touch Ask before print to select the paper type and size each time you print (default).
–Paper Type: Touch Automatic (default) and the printer will automatically detect the paper type and size when you print.
–Date Stamp: Use this option to include the date and/or time on your printed photos.
–Colorspace: Choose a colorspace. The Auto-select default tells the printer to use the Adobe RGB colorspace, if available. The printer defaults to sRGB if Adobe RGB is not available.
–PictBridge Tray Select: Use to select the default paper tray for printing through the PictBridge connection.
–Audio Feedback: Use to enable an audible tone when a button is touched or pressed.
–Video enhancement: Select On (default) or Off. When you select On, the quality of photos printed from video clips will be improved.
–Restore Factory Defaults: Restores factory settings for all menu items except
Select language and Select country/region (under Language in
Preference menu) and Bluetooth settings (under Bluetooth in the main printer menu). This setting does not affect HP Instant Share or Network defaults.
HP Photosmart D7300 series User Guide |
9 |
Chapter 1
10 |
HP Photosmart D7300 series |
2 Get ready to print
This section includes the following topics:
●Load paper
●Insert ink cartridges
●Insert memory cards
Load paper
Learn how to choose the right paper for your print job and how to load it into the input tray for printing.
Choose the right paper
Use HP Advanced Photo Paper. It is especially designed to work with the inks in your printer to create beautiful photos. Other photo papers will produce inferior results.
For a list of available HP-designed photo paper, or to purchase supplies, go to:
●www.hpshopping.com (U.S.)
●www.hp.com/eur/hpoptions (Europe)
●www.hp.com/jp/supply_inkjet (Japan)
●www.hp.com/paper (Asia/Pacific)
The printer is set by default to print the best quality photos on HP Advanced Photo Paper. If you print on a different type of paper, be sure to change the paper type from the printer menu. See Printer menu.
Load your paper
Paper loading tips:
●Load paper with the side to be printed facing down.
●You can print photos and documents on a wide variety of paper sizes, from 8 x 13 cm (3 x 5 inch) up to 22 x 61 cm (8.5 x 24 inch). The 10 x 15 cm (4 x 6 inch) photo paper is available with and without tabs.
●Before loading paper, pull the out main paper tray and slide out the paper-width and paper-length guides to make room for the paper. After loading paper, adjust the guides to fit close to the edges of the paper without bending the paper. When finished loading paper, push the main tray back in all the way.
●Load only one type and size of paper at a time in the same tray.
●After loading paper, extend the output tray extension to catch your printed pages.
Use the directions in the following table to load the most commonly used paper sizes into the printer.
Paper type |
How to load |
Tray to load |
|
|
|
|
|
Any supported photo |
1. |
Extend the main tray. |
Load the main tray |
or plain paper media |
2. |
Slide the paper-width and |
|
|
|
paper-length guides to their |
|
|
|
outermost positions. |
|
HP Photosmart D7300 series User Guide |
11 |

Chapter 2 (continued)
Paper type |
How to load |
Tray to load |
|
|
3. |
Load paper with the side to |
|
|
|
be printed facing down. |
|
|
|
Check that the stack of |
|
|
|
paper is no higher than the |
|
|
|
top of the paper-length |
|
|
|
guide. |
|
|
4. |
Adjust the paper-width and |
|
|
|
paper-length guides inward |
|
|
|
until they stop at the edges |
|
|
|
of the paper. |
|
|
5. |
Push the main tray all the |
|
|
|
way in. |
|
Load paper and adjust guides inward
1 |
Paper-width guide |
2 |
Paper-length guide |
|
|
|
Push in the main tray |
||
|
|
|
|
|
|
|
|
|
1 |
Push in the main tray all the way |
|
|
|
|
|
|
|
Photo paper up to |
1. |
Lift the output tray and |
Load the photo tray |
||
10 x 15 cm |
|
extend the main paper tray. |
|
|
|
(4 x 6 inch) with or |
2. |
Adjust the paper-width and |
|
|
|
without tabs, Hagaki |
|
paper-length guides |
|
|
|
cards, A6 cards, L- |
|
outward to make room for |
|
|
|
size cards |
|
the paper. |
|
|
|
|
3. |
Load up to 20 sheets of |
|
|
|
|
|
paper into the photo tray |
|
|
|
|
|
with the print side down. If |
|
|
|
|
|
you are using tabbed |
|
|
|
|
|
paper, insert the paper so |
|
|
|
|
|
the tab is closer to you. |
|
|
|
|
4. |
Adjust the paper-width and |
|
|
|
|
|
paper-length guides inward |
|
|
|
|
|
until they stop at the edges |
|
|
|
|
|
of the paper. |
|
|
|
12 |
HP Photosmart D7300 series |
(continued)
Paper type |
How to load |
Tray to load |
|||||
|
|
|
|
|
|
|
|
|
5. |
Push in the photo tray. |
|
|
|
|
|
|
6. |
Close the output tray. |
|
|
|
|
|
|
|
|
|
|
|
|
|
|
|
|
|
|
|
|
|
Lift the output tray and adjust guides outward
1 |
Output tray |
2 |
Paper-width guide |
3 |
Paper-length guide |
Load photo paper and adjust guides inward
1 |
Paper-width guide |
2 |
Paper-length guide |
Insert ink cartridges
The first time you set up and use your HP Photosmart printer printer, make sure to install the ink cartridges that were shipped with your printer. The ink in these ink cartridges is specially formulated to mix with the ink in the print head assembly.
Purchasing replacement ink cartridges
When purchasing replacement cartridges, refer to the cartridge numbers that appear on the back cover of this guide. These cartridge numbers may vary by country/region.
HP Photosmart D7300 series User Guide |
13 |
Chapter 2
Note If you have already used the printer several times and you have installed the HP Photosmart printer software, you can also find the cartridge numbers in the printer software. Windows users: Right-click the HP Digital Imaging Monitor icon in the Windows taskbar, and select Launch/Show HP Solution Center.
Select Settings, then Print Settings, and then Printer Toolbox. Click the Estimated Ink Levels tab, and then click Ink Cartridge Information. To order ink cartridges, click Shop Online. Mac users: Click HP Photosmart Premier in the Dock. Choose Maintain Printer from the Settings pop-up menu. Click Launch Utility, and then choose Supplies Status from the pop-up menu.
Ink cartridge tips
HP Vivera Inks deliver true-to-life photo quality and exceptional fade resistance resulting in vivid colors that last for generations! HP Vivera Inks are specially-formulated and scientifically tested for quality, purity and fade resistance.
For best print quality, HP recommends that you install all retail ink cartridges before the install-by date stamped on the box.
For optimum printing results, HP recommends using only genuine HP ink cartridges. Genuine HP ink cartridges are designed and tested with HP printers to help you easily produce great results, time after time.
Note HP cannot guarantee the quality or reliability of non-HP ink. Printer service or repairs required as a result of printer failure or damage attributable to the use of non-HP ink will not be covered under warranty.
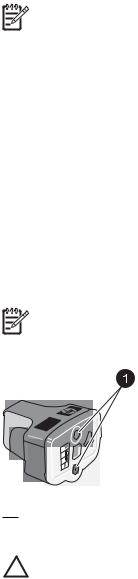
Ink cartridge
1 Do not insert objects into these holes
Caution To prevent ink loss or spillage: leave the ink cartridges installed while transporting the printer, and avoid leaving used ink cartridge(s) out of the printer for extended lengths of time.
Inserting or replacing the ink cartridges
1.Make sure the power is on, then lift the top cover. Make sure all packing material has been removed from inside the printer.
14 |
HP Photosmart D7300 series |

2.Squeeze the gray tab below an ink cartridge slot to release the gray latch inside the printer, then lift the latch.
The ink cartridge areas are color-coded for easy reference. Lift the latch below the appropriate color to insert or replace a cartridge. From left to right, the ink cartridges are black, yellow, light cyan, cyan, light magenta, and magenta.
1Ink cartridge latch for the black ink cartridge
2Ink cartridge area for the color ink cartridges
3.If you are replacing a cartridge, remove the old cartridge by pulling it toward you out of its slot.
Recycle the old cartridge. The HP Inkjet Supplies Recycling Program is available in many countries/regions and lets you recycle used ink cartridges free of charge. For more information, go to www.hp.com/hpinfo/globalcitizenship/environment/recycle/ inkjet.html.
4.Remove the new ink cartridge from its packaging, and while holding it by the handle, slide the ink cartridge into the empty slot.
Make sure you insert the ink cartridge into the slot that has the same shaped icon and color as the new cartridge. The copper-colored contacts should be facing the printer as the ink cartridge is inserted.
HP Photosmart D7300 series User Guide |
15 |

Chapter 2
Note The first time you set up and use the printer, make sure to install the ink cartridges that were shipped with your printer. The ink in these ink cartridges is specially formulated to mix with the ink in the print head assembly.
5.Press down on the gray latch until it clicks into place.
6.Repeat steps 2 through 5 for each ink cartridge you are replacing.
You must install all six cartridges. The printer will not work if an ink cartridge is missing.
7.Close the top cover.
The touch screen displays six ink drop icons showing the approximate ink level for each cartridge when low ink levels are detected.
Note If you are using non-HP ink, a question mark appears instead of the ink drop in the icon for that cartridge. The printer cannot detect the amount of ink remaining in ink cartridges that contain non-HP ink.
Insert memory cards
After you have taken pictures with a digital camera, you can remove the memory card from the camera and insert it into the printer to view and print your photos. The printer can read the following types of memory cards: CompactFlash™, Memory Sticks, Microdrive™, MultiMediaCard™, Secure Digital™, and xD-Picture Card™.
Caution Using any other type of memory card may damage the memory card and the printer.
To learn about other ways of transferring photos from a digital camera to the printer, see Connecting to other devices.
16 |
HP Photosmart D7300 series |

(continued)
Supported file formats
The printer can recognize and print the following file formats directly from a memory card: JPEG, uncompressed TIFF, Motion JPEG AVI, Motion-JPEG QuickTime, and MPEG-1. If your digital camera saves photos and video clips in other file formats, save the files to your computer and print them using a software program. For more information, see the electronic Help.
Inserting a memory card
Memory card slots
1 |
xD-Picture Card |
2 |
Compact Flash I and II, Microdrive |
3 |
Memory Stick |
4 |
Secure Digital, MultiMediaCard (MMC) |
Memory card types
Find your memory card in the following table and use the instructions to insert the card into the printer.
Guidelines:
●Insert only one memory card at a time.
●Gently push the memory card into the printer until it stops. The memory card slot allows for only a portion of the card to insert into the printer; do not try to force the memory card all the way into the printer.
●When the memory card is inserted correctly, the memory card light flashes and then remains solid green.
Caution 1 Inserting the memory card any other way may damage the card and the printer.
Caution 2 Do not pull out a memory card while the memory card light is flashing green. For more information, see Removing a memory card.
HP Photosmart D7300 series User Guide |
17 |
Chapter 2
Memory card |
How to insert the memory card |
|
|
|
|
CompactFlash |
● |
Front label faces up, and if the label has an arrow, the arrow points |
|
|
toward the printer |
|
● |
Edge with metal pinholes goes into the printer first |
Memory Stick |
● |
Angled corner is on the left |
||
|
|
|
● Metal contacts face down |
|
|
|
|
||
|
|
|
● |
If you are using a Memory Stick Duo or Memory Stick PRO Duo |
|
|
|
|
card, attach the adapter that came with the card before you insert |
|
|
|
|
the card into the printer |
Microdrive |
● |
Front label faces up, and if the label has an arrow, the arrow points |
|
|
toward the printer |
|
● |
Edge with metal pinholes goes into the printer first |
|
|
|
|
|
|
|
|
|
|
MultiMediaCard |
● |
Angled corner is on the right |
||
|
|
|
● |
Metal contacts face down |
Secure Digital |
● |
Angled corner is on the right |
|
|
|
● |
Metal contacts face down |
|
|
|
|
|
|
|
|
xD-Picture Card |
● |
Curved side of card points toward you |
|
● |
Metal contacts face down |
Removing a memory card
Wait until the Memory Card light stops flashing, then gently pull the memory card to remove it from the printer.
18 |
HP Photosmart D7300 series |

Caution Do not pull out a memory card while the Memory Card light is flashing. A flashing light means that the printer is accessing the memory card. Removing a memory card while it is being accessed may damage the printer and the memory card or corrupt the information on the memory card.
HP Photosmart D7300 series User Guide |
19 |
 Loading...