


 Loading...
HP Photosmart A640 series
User Guide

Contents
1 HP Photosmart A640 series User Guide................................................................................ |
5 |
|
2 |
Get started |
|
|
How do I?.................................................................................................................................... |
7 |
|
Find more information................................................................................................................. |
7 |
|
The Photosmart at a glance...................................................................................................... |
8 |
|
Control panel buttons and indicator lights.................................................................................. |
9 |
|
The HP TouchSmart screen....................................................................................................... |
9 |
|
Use the touch screen.......................................................................................................... |
10 |
|
Use the stylus..................................................................................................................... |
10 |
|
Photosmart Menu............................................................................................................... |
12 |
|
The touch screen frame...................................................................................................... |
12 |
|
Thumbnail view and 1-up view........................................................................................... |
14 |
|
Photo icons......................................................................................................................... |
15 |
|
Setup Menu.............................................................................................................................. |
15 |
|
How to use the Setup Menu............................................................................................... |
16 |
|
Setup menu options............................................................................................................ |
17 |
3 |
Paper basics |
|
|
Choose the best paper for the job............................................................................................ |
21 |
|
Load your paper....................................................................................................................... |
21 |
4 Print from a Bluetooth device |
|
|
|
What you need for a Bluetooth connection............................................................................... |
25 |
|
Connect the HP Photosmart A640 series to your Bluetooth device......................................... |
25 |
|
Print photos from a Bluetooth device........................................................................................ |
26 |
5 Print without a computer |
|
|
|
Print from a memory card......................................................................................................... |
27 |
|
Supported memory cards................................................................................................... |
28 |
|
Insert a memory card.......................................................................................................... |
28 |
|
Print photos from a memory card or USB device............................................................... |
29 |
|
Remove a memory card..................................................................................................... |
32 |
|
Save photos from a memory card to another device................................................................ |
32 |
|
Print from a PictBridge-certified camera or device................................................................... |
32 |
Contents
1

Contents
Get creative.............................................................................................................................. |
33 |
Add frames......................................................................................................................... |
34 |
Add captions....................................................................................................................... |
34 |
Draw on photos.................................................................................................................. |
36 |
Add clip art.......................................................................................................................... |
37 |
Use Design Gallery............................................................................................................. |
37 |
Specialty printing projects................................................................................................... |
38 |
Create albums.............................................................................................................. |
39 |
Create Greeting Cards.................................................................................................. |
41 |
Passport photos............................................................................................................ |
42 |
Panoramic photos......................................................................................................... |
42 |
Photo stickers............................................................................................................... |
43 |
Create Photo Layouts................................................................................................... |
44 |
Video Frame prints....................................................................................................... |
44 |
Enhance or edit your photos..................................................................................................... |
45 |
Use Photo Fix..................................................................................................................... |
45 |
Crop a photo....................................................................................................................... |
45 |
Remove red-eye from your photos..................................................................................... |
46 |
Use Pet Eye Fix.................................................................................................................. |
46 |
Adjust photo brightness...................................................................................................... |
46 |
Touch up a photo................................................................................................................ |
46 |
Create and view slide shows.................................................................................................... |
47 |
6 Print from a computer |
|
Printer software......................................................................................................................... |
49 |
Transfer photos to a computer................................................................................................. |
49 |
Enhance your photos................................................................................................................ |
51 |
Change the print settings for the print job................................................................................. |
52 |
Change the print quality...................................................................................................... |
52 |
Change the paper type....................................................................................................... |
53 |
Change the paper size....................................................................................................... |
53 |
Print photos.............................................................................................................................. |
54 |
Print borderless photos....................................................................................................... |
54 |
Print photos with a border................................................................................................... |
55 |
Print panoramic photos....................................................................................................... |
56 |
Print on index cards and other small media....................................................................... |
57 |
7 Maintenance |
|
Align the print cartridge............................................................................................................. |
59 |
Clean the print cartridge automatically..................................................................................... |
59 |
View estimated ink levels......................................................................................................... |
60 |
View printer status.............................................................................................................. |
60 |
Insert or replace the print cartridge........................................................................................... |
60 |
Get print cartridge ordering information.................................................................................... |
62 |
Print a test page....................................................................................................................... |
63 |
Print a sample page.................................................................................................................. |
63 |
Store the printer and print cartridge.......................................................................................... |
63 |
Store the printer.................................................................................................................. |
63 |
Store the print cartridge...................................................................................................... |
63 |
Remove ink from your skin and clothing................................................................................... |
64 |
2

Contents |
|
|
8 |
Troubleshooting |
|
|
Software installation issues...................................................................................................... |
65 |
|
The installation failed.......................................................................................................... |
65 |
|
The Found New Hardware Wizard appears when I connect the printer to a Windows |
|
|
computer............................................................................................................................. |
66 |
|
The printer does not appear in Printers and Faxes (Windows only)................................... |
67 |
|
The installation did not start automatically.......................................................................... |
67 |
|
Printing and hardware issues................................................................................................... |
69 |
|
The printer is plugged in, but it will not turn on................................................................... |
69 |
|
The printout did not appear................................................................................................ |
71 |
|
The computer and printer lost communication................................................................... |
71 |
|
The printer would not print when it was connected to the computer with a USB cable |
|
|
through another USB device.............................................................................................. |
72 |
|
An Unknown device message appeared (Windows only).................................................. |
72 |
|
The document or photo did not print using the selected default print settings................... |
73 |
|
The printer did not print borderless photos......................................................................... |
74 |
|
Could not save photos from the computer to the memory card.......................................... |
74 |
|
A blank page came out of the printer.................................................................................. |
75 |
|
Parts of the printed document are missing or are in the wrong place................................ |
75 |
|
Print quality is poor............................................................................................................. |
75 |
|
Bluetooth printing problems...................................................................................................... |
76 |
|
My Bluetooth device cannot find the printer....................................................................... |
76 |
9 Shop for ink supplies............................................................................................................. |
79 |
|
10 HP support and warranty |
|
|
|
Check the HP support Web site first......................................................................................... |
81 |
|
HP support by phone................................................................................................................ |
81 |
|
Phone support period......................................................................................................... |
81 |
|
Placing a call....................................................................................................................... |
82 |
|
After the phone support period........................................................................................... |
82 |
|
Additional warranty options...................................................................................................... |
82 |
11 |
Specifications |
|
|
System requirements................................................................................................................ |
83 |
|
Printer specifications................................................................................................................ |
83 |
12 Regulatory and environmental information |
|
|
|
Regulatory notices.................................................................................................................... |
85 |
|
Regulatory model identification number............................................................................. |
85 |
|
FCC statement.................................................................................................................... |
86 |
|
VCCI (Class B) compliance statement for users in Japan.................................................. |
86 |
|
Notice to users in Japan about power cord........................................................................ |
86 |
|
Notice to users in Korea..................................................................................................... |
87 |
|
LED indicator statement..................................................................................................... |
87 |
Contents
3

Contents
Environmental product stewardship program........................................................................... |
87 |
Eco-Tips.............................................................................................................................. |
87 |
Paper use........................................................................................................................... |
88 |
Plastics............................................................................................................................... |
88 |
Material safety data sheets................................................................................................. |
88 |
Recycling program.............................................................................................................. |
88 |
HP inkjet supplies recycling program................................................................................. |
88 |
Power consumption............................................................................................................ |
88 |
Disposal of Waste Equipment by Users in Private Households in the European Union.... |
90 |
Chemical Substances......................................................................................................... |
90 |
Toxic and hazardous substance table................................................................................ |
91 |
EU Declaration of Conformity................................................................................................... |
91 |
A Software installation............................................................................................................... |
93 |
4
1HP Photosmart A640 series User Guide
Guide
HP Photosmart A640 series User
Welcome to the HP Photosmart A640 series User Guide! For more information about the Photosmart printer, see:
•Get started
•Paper basics
•Print without a computer
•Print from a computer
•Maintenance
•Shop for ink supplies
•HP support and warranty
•Specifications
•Regulatory and environmental information
HP Photosmart A640 series User Guide |
5 |

Chapter 1
User series A640 Photosmart HP
Guide
6 HP Photosmart A640 series User Guide

2 Get started
This section provides introductory information about the HP Photosmart A640 series printer. This section contains the following topics:
•How do I?
•Find more information
•The Photosmart at a glance
•Control panel buttons and indicator lights
•The HP TouchSmart screen
•Setup Menu
How do I?
Click any of the following links to get more information on how to perform creative and common tasks using the Photosmart printer and software.
•Print borderless photos
•Print photos with a border
•Load your paper
•Insert or replace the print cartridge
•Transfer photos to a computer
Find more information
Your new HP Photosmart A640 series printer comes with the following documentation:
|
|
|
|
|
|
|
|
|
|
|
|
|
|
|
|
|
|
|
|
|
|
|
|
Setup instructions: The setup instructions explain how to set up |
|
|
|
|
|
|
|
|
|
|
|
|
|
|
|
|
|
|
|
|
|
|
|
||
|
|
|
|
|
|
|
|
|
|
|
|
|
|
|
|
|
|
|
|
|
|
|
|
the printer, install the Photosmart software, and print a photo. |
|
|
|
|
|
|
|
|
|
|
|
|
|
|
|
|
|
|
|
|
|
|
|
||
|
|
|
|
|
|
|
|
|
|
|
|
|
|
|
|
|
|
|
|
|
|
|
|
Read this document first. This document may be called Quick Start |
|
|
|
|
|
|
|
|
|
|
|
|
|
|
|
|
|
|
|
|
|
|
|
||
|
|
|
|
|
|
|
|
|
|
|
|
|
|
|
|
|
|
|
|
|
|
|
|
Guide or Setup Guide, depending on your country/region, |
|
|
|
|
|
|
|
|
|
|
|
|
|
|
|
|
|
|
|
|
|
|
|
||
|
|
|
|
|
|
|
|
|
|
|
|
|
|
|
|
|
|
|
|
|
|
|
|
language, or printer model. |
|
|
|
|
|
|
|
|
|
|
|
|
|
|
|
|
|
|
|
|
|
|
|
||
|
|
|
|
|
|
|
|
|
|
|
|
|
|
|
|
|
|
|
|
|
|
|
||
|
|
|
|
|
|
|
|
|
|
|
|
|
|
|
|
|
|
|
|
|
|
|
|
|
|
|
|
|
|
|
|
|
|
|
|
|
|
|
|
|
|
|
|
|
|
|
|
|
|
|
|
|
|
|
|
|
|
|
|
|
|
|
|
|
|
|
|
|
|
|
|
|
|
|
|
|
|
|
|
|
|
|
|
|
|
|
|
|
|
|
|
|
|
|
|
|
|
|
Help from your device: Help is available from your device and |
|
? |
|
|
|
|
|
|
|
|
|
|
|
|
|
|
|
|
|
contains additional information on select topics. |
|||||
|
|
|
|
|
|
|
|
|
|
|
|
|
|
|
|
|
|
Touch the question mark icon on the printer screen to get help on |
||||||
|
|
|
|
|
|
|
|
|
|
|
|
|
|
|
|
|
|
the current task. You can also view Help topics in the Setup menu. |
||||||
|
|
|
|
|
|
|
|
|
|
|
|
|
|
|
|
|
|
|
|
|
|
|
|
See How to use the Setup Menu for information on accessing |
|
|
|
|
|
|
|
|
|
|
|
|
|
|
|
|
|
|
|
|
|
|
|
|
these help topics. |
|
|
|
|
|||||||||||||||||||||
|
www.hp.com/support |
|
If you have Internet access, you can get help and support from the |
|||||||||||||||||||||
|
|
|
|
|
|
|
|
|
|
|
|
|
|
|
|
|
|
|
|
|
|
|
|
HP Web site. This Web site offers product documentation, |
|
|
|
|
|
|
|
|
|
|
|
|
|
|
|
|
|
|
|
|
|
|
|
|
technical support, drivers, supplies, and ordering information. |
|
|
|
|
|
|
|
|
|
|
|
|
|
|
|
|
|
|
|
|
|
|
|
|
|
Get started
Get started |
7 |
Chapter 2
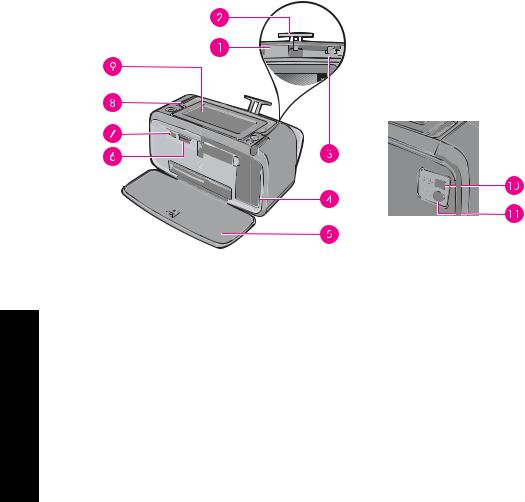
The Photosmart at a glance
Figure 2-1 Front and rear views
started Get
|
|
|
|
|
|
|
|
Label |
Description |
||
|
|
||
1 |
Input tray: Load paper here. Open the output tray first. The input tray |
||
|
opens automatically when you open the output tray. |
||
2 |
Input tray extension: Pull out to support paper. |
||
|
|
||
3 |
Paper-width guide: Move to the width of the current paper to position |
||
|
the paper properly. |
||
4 |
Print cartridge door: Open to insert or remove the HP 110 Tri-color |
||
|
Inkjet print cartridge. |
||
5 |
Output tray (open): The printer deposits prints here. The input tray |
||
|
opens automatically when you open the output tray. |
||
6 |
Memory card slots: Insert memory cards here. |
||
|
|
||
7 |
Camera port: Connect a PictBridge digital camera or a USB flash/ |
||
|
thumb drive here. |
||
8 |
Handle: Extend to carry the printer. |
||
|
|
||
9 |
Printer screen: Lift up to adjust the viewing angle. You can preview |
||
|
photos, make selections from the printer menu, and more from this |
||
|
screen. |
||
|
|
||
10 |
USB port: Connect the printer to a computer using a USB cable |
||
|
(purchased separately) here. |
||
11 |
Power cord connection: Connect the power cord here. |
||
|
|
|
|
8 Get started
Control panel buttons and indicator lights
Figure 2-2 Control panel and indicator lights
Label |
Description |
|
|
1 |
On: Press to turn the printer on or off. The On button will glow when |
|
the power is on. |
|
|
2 |
Memory card and PictBridge light: This light flashes and then |
|
remains lit after a memory card is correctly inserted or when a |
|
supported device is attached to the camera port. It flashes when the |
|
printer is communicating with a memory card or attached device or |
|
when a connected computer is performing a read, write, or delete |
|
operation. |
|
|
3 |
Attention light: Flashing if there is an error or if some user action is |
|
required. |
|
|
4 |
Bluetooth light: Solid if the Bluetooth radio is on. |
|
|
The HP TouchSmart screen
This section describes how to use the touch screen and stylus to interact with the printer.
•Use the touch screen
•Use the stylus
•Photosmart Menu
•The touch screen frame
•Thumbnail view and 1-up view
•Photo icons
Get started
The HP TouchSmart screen |
9 |

Chapter 2
Use the touch screen
started Get
Use your fingers on the touch screen for most operations, such as menu navigation or selecting options in the touch screen frame. For more information, see The touch screen frame. The printer chirps once for each button press. You can change the volume of the sounds or turn them off in the Preferences menu. You can also use the stylus for these activities, but it is designed primarily for drawing and entering captions through the touch screen keyboard. For more information, see Use the stylus.
 CAUTION: To prevent damage to the touch screen, never use any sharp objects or any device other than the stylus that comes with the printer or an approved replacement.
Use the stylus
Use the stylus to touch icons on the printer screen, make selections from the printer menus, or select photos for printing. You can also use the stylus to draw on a photo, type a caption on a photo using the touch screen keyboard, and for other creative tasks. For more information, see Get creative.
 NOTE: The onscreen keyboard for entering captions is not available in all languages. In some languages, the printer displays Latin alphabet characters only on the keyboard.
10 Get started
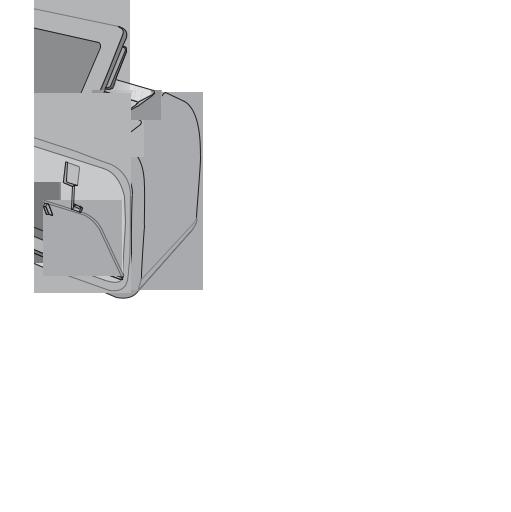
There are two stylus storage areas on the printer: a slot that stores the stylus until you need to use it and a hole where you can rest the stylus and keep it handy.
Figure 2-3 Stylus storage areas
Label |
Description |
|
|
1 |
Stylus well: Place the stylus here to keep it handy while you work |
|
with your photos. |
2 |
Stylus storage slot: Securely store the stylus here when moving the |
|
printer or between sessions. |
Get started
The HP TouchSmart screen |
11 |
Chapter 2
Photosmart Menu
The following options are available in the Photosmart menu when you insert a memory card or touch the Home icon on the touch screen frame.
|
|
1 |
Bluetooth indicator light: Indicates whether bluetooth is on or off. |
|
|
|
2 |
Ink level: Indicates the amount of ink estimated to be remaining in the print cartridge. |
|
|
|
3 |
Setup icon: Touch to open the setup menu. |
|
|
|
4 |
View and Print: Lets you view, edit, and print photos on a memory card. You can also select |
|
|
|
|
a creative project (frames, caption, design gallery, etc) for your photos, by selecting a photo |
|
|
|
|
and touching Effect. |
|
|
|
5 |
Bluetooth: Touch to search nearby Bluetooth device. |
|
|
|
|
|
|
Get |
|
6 |
Slideshow: Lets you play your favorite photos as a slide show on the printer touch screen. |
|
|
|
For more information, see Create and view slide shows. |
||
started |
|
|
|
|
7 |
Create: Lets you select a creative project (albums, greeting cards, photo layouts, etc) for your |
|||
|
|
|||
|
|
|
photos. For more information, see Get creative. |
|
|
|
|
|
|
|
|
|
|
The touch screen frame
The touch screen frame borders the photo viewing area of the HP TouchSmart screen, and provides quick access to the navigational buttons.
 NOTE: The touch screen frame buttons are visible only when the printer is turned on and you have made a selection from the Photosmart menu. Also, only the buttons relevant to the current mode or task will be lit.
12 Get started

Figure 2-4 Touch screen frame
Label |
Description |
|
|
1 |
Home: Touch to access the Photosmart menu. |
|
|
2 |
Cancel: Touch to stop a print action. |
|
|
3 |
Arrows: Touch to navigate through photos or Create menus. |
|
|
4 |
Back: Touch to return to the previous menu or view. |
|
|
5 |
Quick Scroll: Touch to get a scroll bar that helps you scroll through |
|
your photos quickly. |
|
|
Get started
The HP TouchSmart screen |
13 |
started Get
Chapter 2
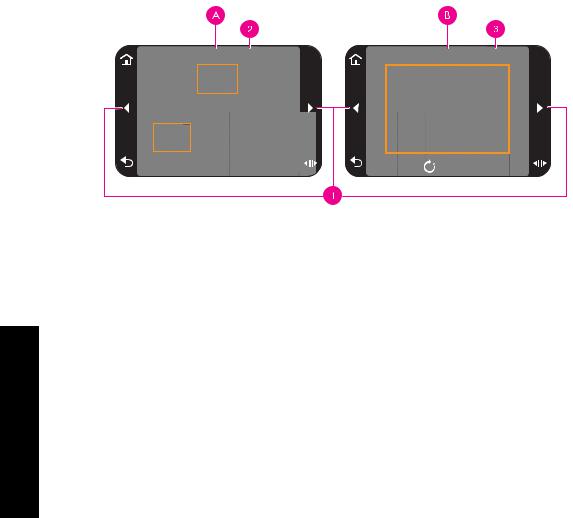
Thumbnail view and 1-up view
You can view photos on your memory card in thumbnail view or 1-up view.
|
|
|
|
|
|
|
|
|
|
|
|
A |
|
Thumbnail view |
|||
|
|
|
|||
B |
|
1-up view |
|||
|
|
|
|||
1 |
|
Arrow keys |
|||
|
|
|
|||
2 |
|
Number of photos selected |
|||
|
|
|
|||
3 |
|
Current photo number of the total number of photos present on the memory card |
|||
|
|
|
|
|
|
To view photos in thumbnail view
1.Insert a memory card. For more information, see Print from a memory card.
2.Touch View and Print on the Photosmart menu.
This will open the photos on your memory card in thumbnail view. Touch the arrow keys to scroll through your photos.
To view photos in 1-up view
1.Insert a memory card. For more information, see Print from a memory card.
2.Touch View and Print on the Photosmart menu.
3.Touch any photo to view it in 1-up view.
Touch the arrow keys to scroll through your photos.
14 Get started

Photo icons
Photo icons appear on photos and video clips in thumbnail and 1-up views. Some icons show the status of a photo or video clip. Others can affect the photo or video clip when touched.
Table 2-1 Photo icons
|
Photo icon |
|
Description |
|
|
|
|
|
|
|
|
|
|
Print status: Indicates the photo is printing, and how many copies of |
|
|
|
X1 |
the photo will be printed. |
|
|
|
|
|
|
|
|
|
|
|
|
|
|
Copies: Touch a photo in 1-up view to select it for printing and to |
|
|
|
|
|
|
|
|
|
display the copies scroll bar. Touch the scroll bar to change the |
|
2 |
|
|
|
|
|
|
number of copies to be printed. |
|
|
|
|
|
|
|
|
|
|
|
|
|
|
|
|
|
|
|
|
Selection box: Appears on the photo or video frame selected for |
|
|
|
|
printing. |
|
|
|
|
|
|
|
|
|
Rotate: Touch in 1-up view to rotate the photo 90 degrees clockwise |
|
|
|
|
for each touch of the icon. |
|
|
|
|
|
|
|
|
|
Red-eye: Indicates a photo in 1-up view that has red-eye removed. |
|
|
|
|
The icon flashes on a photo undergoing red-eye removal. |
|
|
|
|
|
Related topics
View estimated ink levels
Setup Menu
The Setup Menu contains many options for changing print settings, aligning print cartridges, and more.
This section contains the following topics:
•How to use the Setup Menu
•Setup menu options
Get started
Setup Menu |
15 |

Chapter 2
How to use the Setup Menu
This section describes how to use the Setup Menu.
To use the setup menu
1.Touch Home on the touch screen frame to return to the Photosmart menu, if necessary.
2.Touch the Setup icon on the Photosmart menu to open the Setup Menu.
1 Setup icon
started Get
16 Get started

3.Touch a menu name to open the options under that menu. Options that are not accessible are dimmed.
Touch the question mark icon for help on that screen.
 Setup Menu
Tools
Preferences
Bluetooth
Help
4.Touch an option to open it or to perform the operation it indicates.
5.To exit a menu, touch  .
.
Setup menu options
Tools |
|
|
• |
Print Test Page |
|
|
Touch to print a test page that contains information about the printer. The test page |
|
|
helps in troubleshooting problems. |
|
• |
Print Sample Page |
|
|
Touch to print a sample page. The sample page is useful for checking the print quality |
|
|
of the printer. |
|
• |
Printer Status |
started |
|
Touch to see the status of the printer. The printer status window displays information |
|
|
|
|
|
on the ink levels, and the estimated time remaining for the initiated print job. |
Get |
|
|
|
• Align Cartridge: Touch to align the print cartridge, which ensures high print quality prints. Do this if colors in the printouts are misaligned, or if the alignment page does not print correctly when you install a new print cartridge.
• Clean Cartridge: Touch to clean the print cartridge. After cleaning, you will be asked if you want to continue to second-level cleaning (touch Yes or No), and if you touch Yes another cleaning cycle is completed. Next you will be asked if you want to continue to third-level cleaning (touch Yes or No).
Setup Menu |
17 |

Chapter 2
started Get
Preferences
•Sound: Touch to change the sound volume to High, Medium (default), Low, or
Off.
•Print Preview: Touch to change the print preview to On (default) or Off. This will provide a preview of the image when you touch Print. Touch Print again to print the image.
•Photo Fix: Touch to turn Photo Fix enhancements On (default) or Off. For more information, see Use Photo Fix.
•Red Eye Removal: Touch to turn red eye removal to On (default) or Off. For more information, see Remove red-eye from your photos.
•Print Quality: Touch to change the print quality. Choose between Best (default),
Normal, or Fast Normal print quality.
•Paper Type: Touch to change the type of paper on which to print. Choose between HP Advanced Photo (default), HP Premium Photo, Other, Plain, or
Other, Photo. HP recommends using HP Advanced Photo Paper for best results. If you are printing on non-HP paper or other media, choose Other so that the printer sets itself appropriately.
•Date/Time: Touch to show a date/time stamp on your printed photos. Touch Date/ Time, Date only, or Off (default).
•Colorspace: Touch to choose a colorspace (a three-dimensional mathematical model for organizing color). The colorspace you select affects the colors in your printed photos. Select Adobe RGB, sRGB, or Auto-select (default). The Autoselect default tells the printer to use the Adobe RGB colorspace, if available. The printer defaults to sRGB if Adobe RGB is not available.
•Borderless: Touch to turn borderless printing On (default) or Off. When borderless printing is turned off, all pages print with a narrow white border around the outside edges of the paper.
•Software Install Mode: Touch to change the software install mode. Select On (default), and the embedded HP quick connect software will automatically install when you connect the printer to a computer with a USB cable. For more information, see Software installation. Select Off if you are using the printer with the HP Wireless Printing Upgrade Kit or an HP Jet Direct box. Also select Off if you want to connect the printer to your computer to transfer photos only, and do not want to install the software and print from the computer to the printer.
•Enable Faster Browsing: Touch to change the mode between On (default) or Off.
•Demo Mode: Touch to turn Demo Mode On or Off (default). When Demo Mode is on, the printer displays sample images a user can edit and print. If no interaction with the demo takes place within two minutes, a slideshow starts with information about printer features.
•Restore Defaults: Touch to restore printer defaults: Yes or No (default). Touching Yes restores the original factory preferences.
•Language: Touch to change the language used on the printer screen.
18 Get started
Bluetooth
◦Bluetooth Radio: Select On to turn on Bluetooth Radio.
◦Passkey: When the Bluetooth Security Level of the printer is set to High, you must enter a passkey to make the printer available to other Bluetooth devices. The default passkey is 0000.
◦Device Name: You can select a name for the printer that appears on other devices with Bluetooth wireless technology when they locate the printer.
◦Device Address: Some devices with Bluetooth wireless technology require you to enter the address of the device they are trying to locate. This menu option shows the printer address.
◦Visibility: Select Visible to all (default) or Not visible. When Visibility is set to Not visible, only devices that know the printer address can print to it.
◦Security Level: Select Low (default) or High. The Low setting does not require users of other devices with Bluetooth wireless technology to enter the printer passkey. High requires users of other devices with Bluetooth wireless technology to enter the printer passkey.
◦Reset Bluetooth: Select to reset all items in the Bluetooth menu to their default values.
Help
•Bluetooth Printing Tips: Touch to read the bluetooth printing tips.
•Photo Printing Tips: Touch to read the top seven printing tips.
•Printer Features: Touch to see information about printer features.
•Print from Imaging devices: Touch to see information about printing from imaging devices.
•Creative Options: Touch to see information about the Create aspects of the printer.
•Troubleshooting: Touch to see information on troubleshooting.
•Printing from the Computer: Touch to read how to print from your computer.
•Getting Assistance: Touch to read how to obtain help with the printer.
Get started
Setup Menu |
19 |

Chapter 2
started Get
20 Get started

3 Paper basics
Learn how to choose the right paper for your print job and how to load it into the input tray for printing.
•Choose the best paper for the job
•Load your paper
Choose the best paper for the job
Use HP Advanced Photo Paper. It is especially designed to work with the inks in your printer to create beautiful photos. Other photo papers might produce inferior results.
For a list of available HP-designed inkjet paper, or to purchase supplies, go to:
•www.hpshopping.com (U.S.)
•www.hpshopping.ca (Canada)
•www.hp.com/eur/hpoptions (Europe)
•www.hp.com (All other countries/regions)
The printer is set by default to print the best quality photos on HP Advanced Photo Paper. If you print on a different type of paper, be sure to change the paper type. For information on changing the paper type in the printer menu, see Load your paper. For information on changing the paper type when printing from a computer, see Change the print settings for the print job.
Load your paper
Paper loading tips
•You can print photos on small media, such as 10 x 15 cm (4 x 6 inch) or 13 x 18 cm (5 x 7 inch) photo paper, panoramic photo paper (4 x 12 inch), index cards, L-size cards, or Hagaki cards. Use plain paper, such as index cards, only for drafts or when print quality is not important.
•Before loading paper, slide out the paper-width guide to make room for the paper. After loading paper, set the paper width guide gently against the edge of the paper, so that it guides the paper in straight.
•Load only one type and size of paper at a time. Do not mix paper types or sizes in the input tray.
Paper basics
Paper basics |
21 |
Chapter 3
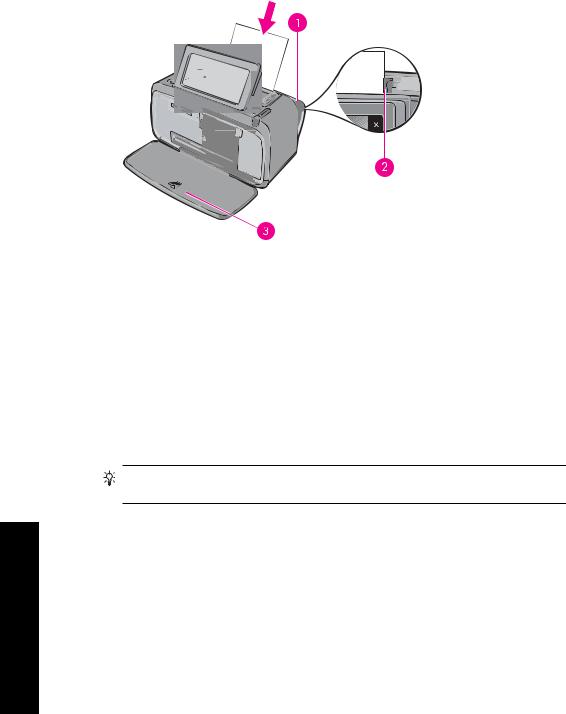
To load paper
1. Open the output tray. The input tray opens automatically.
|
|
|
|
|
|
|
|
1 |
Input tray |
|
|
|
|
|
|
2 |
Paper-width guide |
|
|
|
|
|
|
3 |
Output tray |
|
|
|
|
|
|
basics Paper
2.Load up to 20 sheets of photo paper with the print side or glossy side facing the front of the printer. If you are using tabbed paper, load the paper so tab feeds in last. When loading, slide the paper to the left side of the input tray and push the paper down firmly until it stops.
3.Adjust the paper-width guide to fit close to the edge of the paper without bending the paper.
To change the paper type
TIP: If you are printing on a paper type other than the recommended HP Advanced Photo Paper, be sure to change the paper type setting to improve the results.
1.Touch the Setup icon to display the Setup Menu. For more information, see Setup Menu.
2.Touch Preferences, and use the arrow keys to navigate to and touch Paper Type.
3.Select one of the following paper types:
•HP Advanced Photo Paper (default)
•HP Premium Photo Paper
•Other, Plain
•Other, Photo
If you are printing from a computer, change the paper type and other printer settings in the print dialog box. For more information, see Print from a computer and Change the print settings for the print job.
22 Paper basics

You can select from a greater number of paper sizes when you print from a computer than when you print without a computer. When you print without a computer, the printer senses the paper size being used and scales the image to fit on the paper size being used.
Paper basics
Load your paper |
23 |

Chapter 3
basics Paper
24 Paper basics

4 Print from a Bluetooth device
This section describes how to print from any device with Bluetooth wireless technology, a short-range communications technology that enables a wide range of devices to connect with each other without the clutter of cables.
This section contains the following topics:
•What you need for a Bluetooth connection
•Connect the HP Photosmart A640 series to your Bluetooth device
•Print photos from a Bluetooth device
 NOTE: For more information on Bluetooth wireless technology and HP, go to www.hp.com/go/bluetoothphotoprint.
Print from a Bluetooth device
What you need for a Bluetooth connection
To connect the HP Photosmart A640 series with a Bluetooth connection, you will need the following:
A Bluetooth (compatible HCRP or SPP profile) capable device (such as a PDA, camera phone)
Some Bluetooth products exchange device addresses when they communicate with each other, so you might also need to find out the device address of the HP Photosmart A640 series in order to establish a connection.
To find out the device address of the product
1.On the Home Screen, touch Setup.
2.Touch Bluetooth.
 NOTE: It is required that the Bluetooth Radio is turned on to enable the Bluetooth options in the Bluetooth Menu.
3.Touch Device Address.
The Device Address appears, which is read only.
4.Make a note of the device address. You might need it later.
Connect the HP Photosmart A640 series to your Bluetooth device
If you have a PDA or a mobile phone with Bluetooth wireless technology, you can connect to the HP Photosmart and send photos to the product wirelessly.
Print from a Bluetooth device |
25 |

Chapter 4
device Bluetooth a from Print
To connect to and print from other Bluetooth devices
1.Make sure that you have installed the necessary software on the Bluetooth device.
2.Have the HP Photosmart search for available Bluetooth devices.
 NOTE: It is required that the Bluetooth Radio is turned on to enable the Bluetooth options in the Bluetooth Menu.
3.Select your device from the list of available Bluetooth devices.
 NOTE: Some mobile phones need to be paired with the HP Photosmart before you can print. The default passkey for pairing with the HP Photosmart is 0000.
4.Send the print job from the Bluetooth device to the product. See the documentation for your Bluetooth device for specific instructions on starting a print job.
Print photos from a Bluetooth device
The basic procedure for printing from any device with Bluetooth wireless technology is the same. For more detailed instructions, see the documentation that came with your Bluetooth device.
To print from a Bluetooth device
1.Turn on the Bluetooth radio
Touch Setup.
Touch Bluetooth.
Touch Bluetooth Radio, and then touch On.
2.Have the device you are printing from search for available Bluetooth printers.
On the Homescreen, touch Bluetooth.
3.Select the HP Photosmart A640 series printer when it appears on the device.
4.Send the print job from the Bluetooth device to the printer. See the documentation for your Bluetooth device for specific instructions on starting a print job.
 NOTE: For information on adjusting the printer's Bluetooth settings, see the Help menu section in Setup Menu.
26 Print from a Bluetooth device
5 Print without a computer
This section contains the following topics:
•Print from a memory card
•Save photos from a memory card to another device
•Print from a PictBridge-certified camera or device
•Get creative
•Enhance or edit your photos
•Create and view slide shows
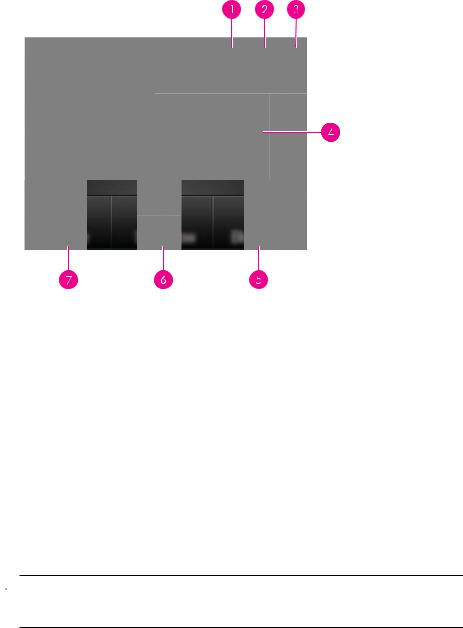
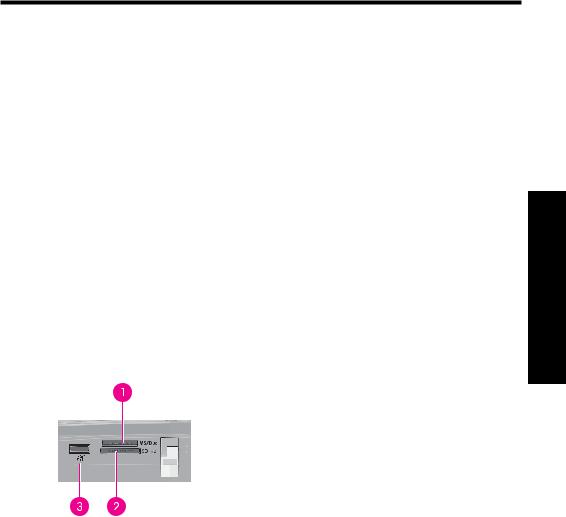
Print from a memory card
This section explains how to print digital photos that are stored on a memory card. You can select photos while the memory card is in the camera (Digital Print Order Format, or DPOF) or while the memory card is in the printer. Printing from a memory card requires no computer and does not drain your digital camera's batteries.
•Supported memory cards
•Insert a memory card
•Print photos from a memory card or USB device
•Remove a memory card
Label |
Description |
|
|
1 |
Memory Stick or Memory Stick Pro or Memory Stick Duo or Memory |
|
Stick PRO Duo |
|
|
2 |
xD-Picture Card, Secure Digital, Mini SD, SDHC, MultiMediaCard |
|
(MMC), or Secure MMC and transflash cards with the appropriate |
|
adapters |
|
|
3 |
Front USB port/Pictbridge: For digital cameras and removable drives |
|
|
Print without a computer
Print without a computer |
27 |
Loading...