


Photosmart C4680
Table of contents
 Loading...
HP Photosmart C4600 series


Contents
1 HP Photosmart C4600 series Help..........................................................................................3
2 Get to know the HP Photosmart
Printer parts................................................................................................................................5
Control panel features................................................................................................................6
4Print
Print documents........................................................................................................................13
Print photos..............................................................................................................................14
Print envelopes.........................................................................................................................21
Print on specialty media...........................................................................................................21
Print a Web page......................................................................................................................22
5Scan
Scan to a computer..................................................................................................................27
Scan to a memory card............................................................................................................28
6Copy
Copy text or mixed documents.................................................................................................31
7 Reprint photos........................................................................................................................35
8 Save photos............................................................................................................................37
9 Work with cartridges
Check the estimated ink levels.................................................................................................39
Replace the cartridges..............................................................................................................40
Order ink supplies.....................................................................................................................42
Cartridge warranty information.................................................................................................43
10 Solve a problem
HP support................................................................................................................................45
Uninstall and reinstall the software...........................................................................................48
Setup troubleshooting...............................................................................................................49
Print quality troubleshooting.....................................................................................................58
Print troubleshooting.................................................................................................................73
Memory card troubleshooting...................................................................................................77
Copy troubleshooting................................................................................................................81
Scan troubleshooting................................................................................................................85
Errors........................................................................................................................................87
Contents
12 Technical information
Notice......................................................................................................................................123
Specifications.........................................................................................................................123
Environmental product stewardship program.........................................................................125
Regulatory notices..................................................................................................................128
Index............................................................................................................................................133
1

Contents
2

1 HP Photosmart C4600 series Help
For information about the HP Photosmart, see:
Get to know the HP Photosmart” on page 5
•“
Print” on page 13
•“
Scan” on page 27
•“
Copy” on page 31
•“
Reprint photos” on page 35
•“
Save photos” on page 37
•“
Work with cartridges” on page 39
•“
Technical information” on page 123
•“
HP Photosmart C4600 series Help
HP Photosmart C4600 series Help 3

HP Photosmart C4600 series Help
Chapter 1
4 HP Photosmart C4600 series Help
2 Get to know the HP Photosmart
• Printer parts
Control panel features
•
Printer parts
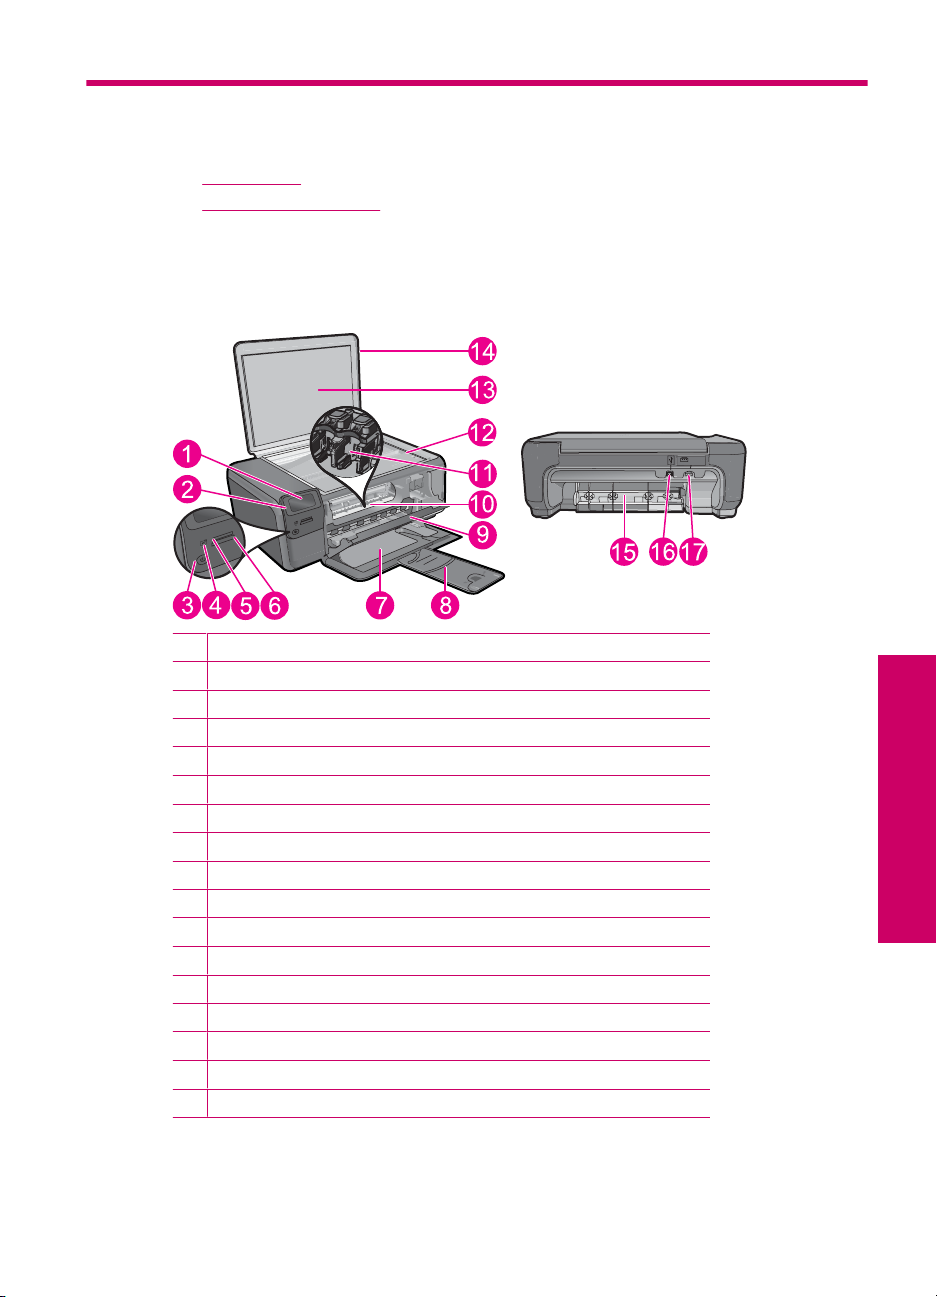
Figure 2-1 Printer parts
1 Color graphics display (also referred to as the display)
2 Control panel
3 On button
4 Photo light
5 Memory card slot for Memory Stick cards
6 Memory card slot for Secure Digital and xD cards
7 Paper tray
8 Paper tray extender (also referred to as the tray extender)
9 Cartridge door
10 Cartridge access area
11 Print carriage
12 Glass
13 Lid-backing
14 Lid
15 Rear door
16 Rear USB port
17 Power connection (Use only with the power adapter supplied by HP.)
Get to know the HP Photosmart
Get to know the HP Photosmart 5

Chapter 2
Control panel features
Figure 2-2 Control panel features
Scan
Photo
2.
1 Back: Returns to the previous screen.
2 Cancel: Stops the current operation, restores default settings, and clears the current photo
selection.
3 OK: Selects a menu setting, value, or photo.
4 Scan: From the Home screen, opens the Scan Menu. When viewing screens other than the
Home screen, selects options related to the current display.
5 Photo: From the Home screen, opens the Photo Menu. When viewing screens other than the
Home screen, selects options related to the current display.
Get to know the HP Photosmart
6 Copy: From the Home screen, opens the Copy Menu. When viewing screens other than the
Home screen, selects options related to the current display.
Copy
6 Get to know the HP Photosmart

3 Paper basics
You can load many different types and sizes of paper in the HP Photosmart, including
letter or A4 paper, photo paper, transparencies, and envelopes.
By default, the HP Photosmart is set to detect the size and type of paper you load in the
input tray automatically and then adjust its settings to generate the highest quality output
for that paper. If you are using special papers, such as photo paper, transparency film,
envelopes, or labels, or if you experience poor print quality using the automatic setting,
you can manually set the paper size and type for print and copy jobs.
This section contains the following topics:
•
Recommended papers for photo printing
Recommended papers for printing
•
Load media
•
Recommended papers for photo printing
If you want the best print quality, HP recommends using HP papers that are specifically
designed for the type of project you are printing.
Depending on your country/region, some of these papers might not be available.
HP Advanced Photo Paper
This thick photo paper features an instant-dry finish for easy handling without smudging.
It resists water, smears, fingerprints, and humidity. Your prints have a look and feel
comparable to a store-processed photo. It is available in several sizes, including A4, 8.5
x 11 inch, 10 x 15 cm (4 x 6 inch) (with or without tabs), 13 x 18 cm (5 x 7 inch), and two
finishes - glossy or soft gloss (satin matte). For longer-lasting photos, it is acid-free.
NOTE: Sensors in your Auto Sense-enabled HP Photosmart scan the Auto Sense
marks and automatically adjust printer settings—including paper type, print quality,
and size—for faster printing and outstanding quality. You will even get an alert if your
paper is loaded incorrectly. When you print using tabbed photo papers, Auto Sense
technology will ensure your printer adjusts to avoid printing on the tab.
To ensure you have HP photo papers with Auto sense look for this symbol on the package:
HP Everyday Photo Paper
Print colorful, everyday snapshots at a low cost, using paper designed for casual photo
printing. This affordable, photo paper dries quickly for easy handling. Get sharp, crisp
images when you use this paper with any inkjet printer. It is available in semi-gloss finish
in several sizes, including A4, 8.5 x 11 inch, and 10 x 15 cm (4 x 6 inch) (with or without
tabs). For longer-lasting photos, it is acid-free.
Paper basics 7
Paper basics

Chapter 3
HP Photo Value Pack
HP Photo Value Packs conveniently package original HP cartridges and HP Advanced
Photo Paper to save you time and take the guesswork out of printing affordable
professional photos with your HP Photosmart. Original HP inks and HP Advanced Photo
Paper have been designed to work together so your photos are long lasting and vivid,
print after print. Great for printing out an entire vacation’s worth of photos or multiple prints
to share.
To order HP papers and other supplies, go to
choose your country/region, follow the prompts to select your product, and then click one
of the shopping links on the page.
NOTE: At this time, some portions of the HP Web site are available in English only.
Recommended papers for printing
If you want the best print quality, HP recommends using HP papers that are specifically
designed for the type of project you are printing.
Depending on your country/region, some of these papers might not be available.
HP Advanced Photo Paper
This thick photo paper features an instant-dry finish for easy handling without smudging.
It resists water, smears, fingerprints, and humidity. Your prints have a look and feel
comparable to a store-processed photo. It is available in several sizes, including A4, 8.5
x 11 inch, 10 x 15 cm (4 x 6 inch) (with or without tabs), 13 x 18 cm (5 x 7 inch), and two
finishes - glossy or soft gloss (satin matte). It is acid-free for longer lasting documents.
www.hp.com/buy/supplies. If prompted,
Paper basics
8 Paper basics
HP Everyday Photo Paper
Print colorful, everyday snapshots at a low cost, using paper designed for casual photo
printing. This affordable, photo paper dries quickly for easy handling. Get sharp, crisp
images when you use this paper with any inkjet printer. It is available in semi-gloss finish
in several sizes, including A4, 8.5 x 11 inch, and 10 x 15 cm (4 x 6 inch) (with or without
tabs). For longer-lasting photos, it is acid-free.
HP Brochure Paper or HP Superior Inkjet Paper
These papers are glossy-coated or matte-coated on both sides for two-sided use. They
are the perfect choice for near-photographic reproductions and business graphics for
report covers, special presentations, brochures, mailers, and calendars.
HP Premium Presentation Paper or HP Professional Paper
These papers are heavy two-sided matte papers perfect for presentation, proposals,
reports, and newsletters. They are heavyweight for an impressive look and feel.
HP Bright White Inkjet Paper
HP Bright White Inkjet Paper delivers high-contrast colors and sharp text. It is opaque
enough for two-sided color usage with no show-through, which makes it ideal for
newsletters, reports, and flyers. It features ColorLok Technology for less smearing, bolder
blacks, and vivid colors.

HP Printing Paper
HP Printing Paper is a high-quality multifunction paper. It produces documents that look
and feel more substantial than documents printed on standard multipurpose or copy
paper. It features ColorLok Technology for less smearing, bolder blacks, and vivid colors.
It is acid-free for longer lasting documents.
HP Office Paper
HP Office Paper is a high-quality multifunction paper. It is suitable for copies, drafts,
memos, and other everyday documents. It features ColorLok Technology for less
smearing, bolder blacks, and vivid colors. It is acid-free for longer lasting documents.
HP Iron-On Transfers
HP Iron-on Transfers (for color fabrics or for light or white fabrics) are the ideal solution
for creating custom T-shirts from your digital photos.
HP Premium Inkjet Transparency Film
HP Premium Inkjet Transparency Film make your color presentations vivid and even more
impressive. This film is easy to use and handle and dries quickly without smudging.
HP Photo Value Pack
HP Photo Value Packs conveniently package original HP cartridges and HP Advanced
Photo Paper to save you time and take the guesswork out of printing affordable
professional photos with your HP Photosmart. Original HP inks and HP Advanced Photo
Paper have been designed to work together so your photos are long lasting and vivid,
print after print. Great for printing out an entire vacation’s worth of photos or multiple prints
to share.
ColorLok
HP recommends plain papers with the ColorLok logo for printing and copying of everyday
documents. All papers with the ColorLok logo are independently tested to meet high
standards of reliability and print quality, and produce documents with crisp, vivid color,
bolder blacks, and dry faster than ordinary plain papers. Look for papers with the ColorLok
logo in a variety of weights and sizes from major paper manufacturers.
To order HP papers and other supplies, go to www.hp.com/buy/supplies. If prompted,
choose your country/region, follow the prompts to select your product, and then click one
of the shopping links on the page.
Recommended papers for printing 9
Paper basics

Chapter 3
NOTE: At this time, some portions of the HP Web site are available in English only.
Load media
▲ Do one of the following:
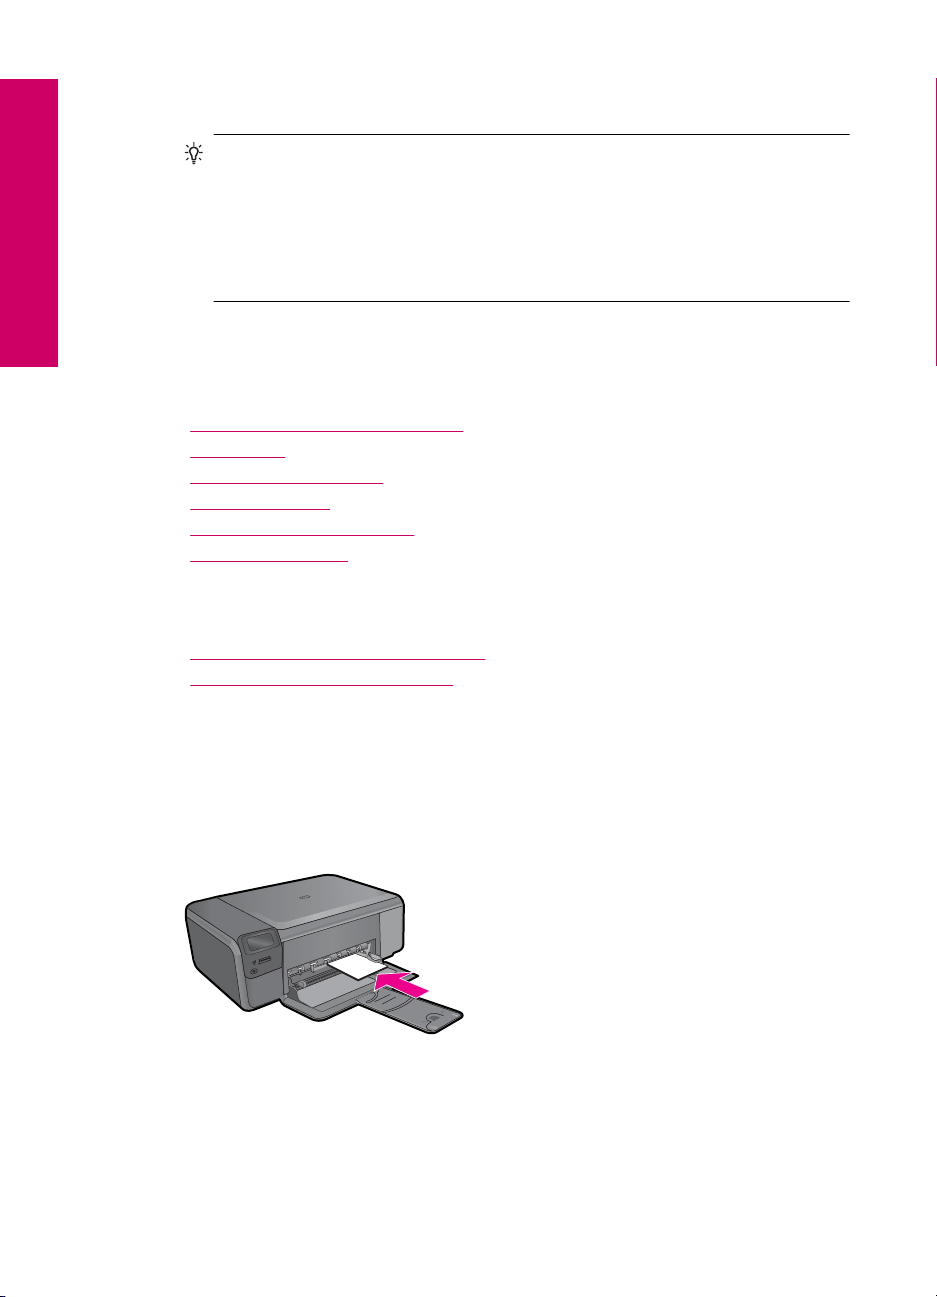
Load small-size paper
a. Lower paper tray.
b. Load paper.
Slide paper-width guide outwards.
❑
Insert stack of photo paper into paper tray with short edge forward and print
❑
side down.
Paper basics
10 Paper basics
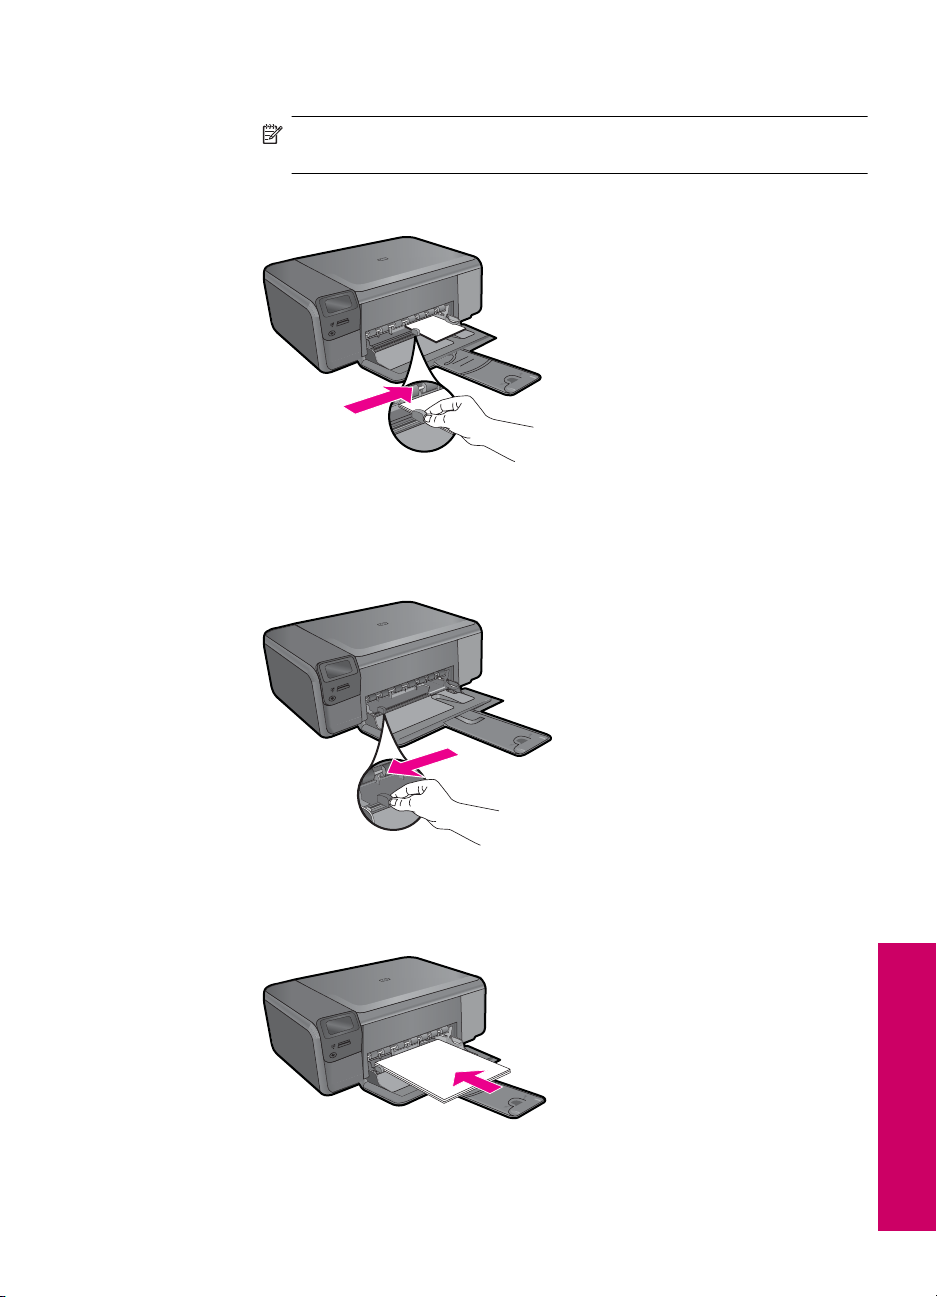
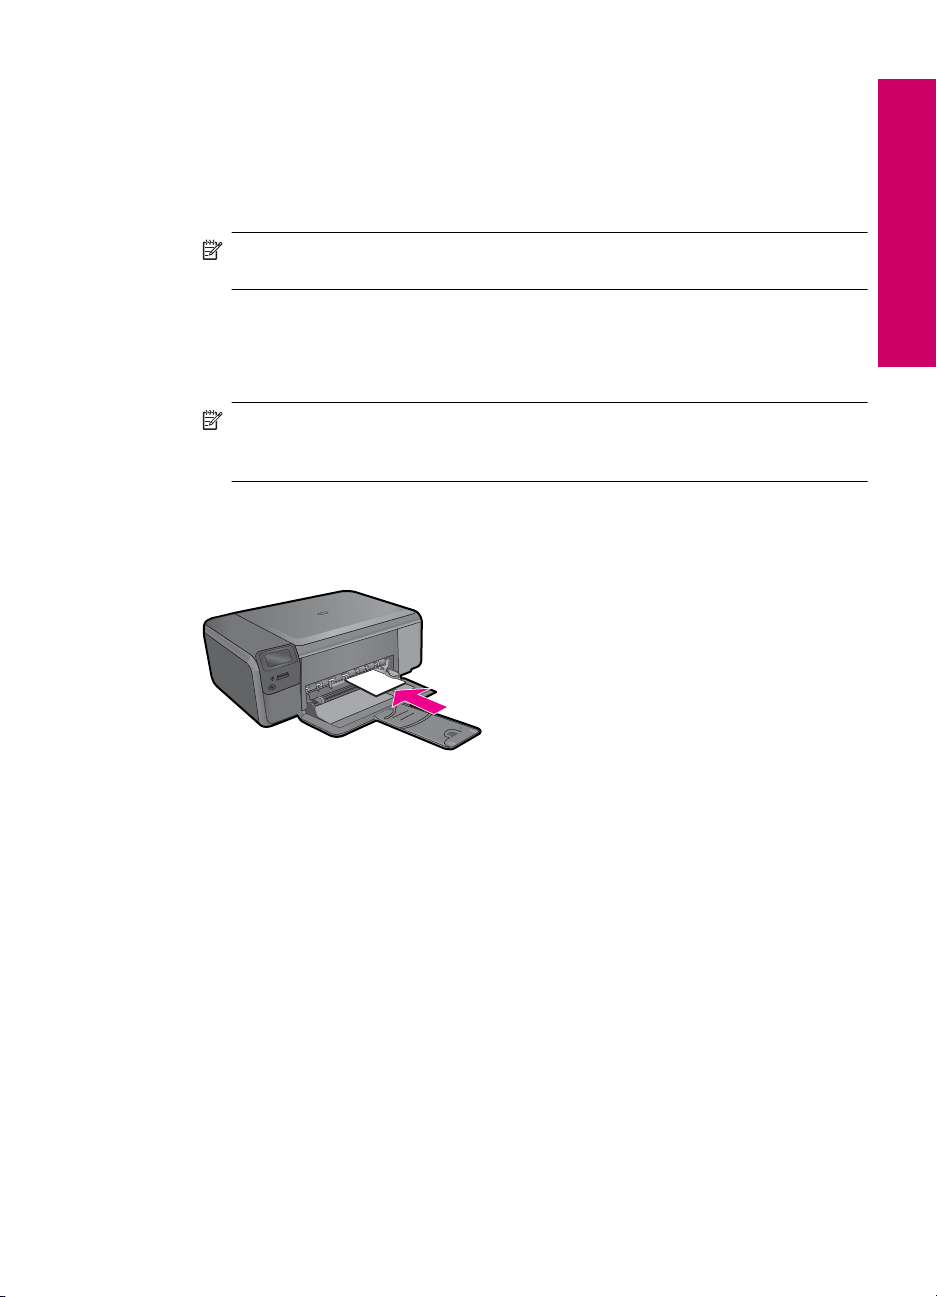
Slide stack of paper forward until it stops.
❑
NOTE: If the photo paper you are using has perforated tabs, load photo
paper so that tabs are closest to you.
Slide paper-width guide inward until it stops at edge of paper.
❑
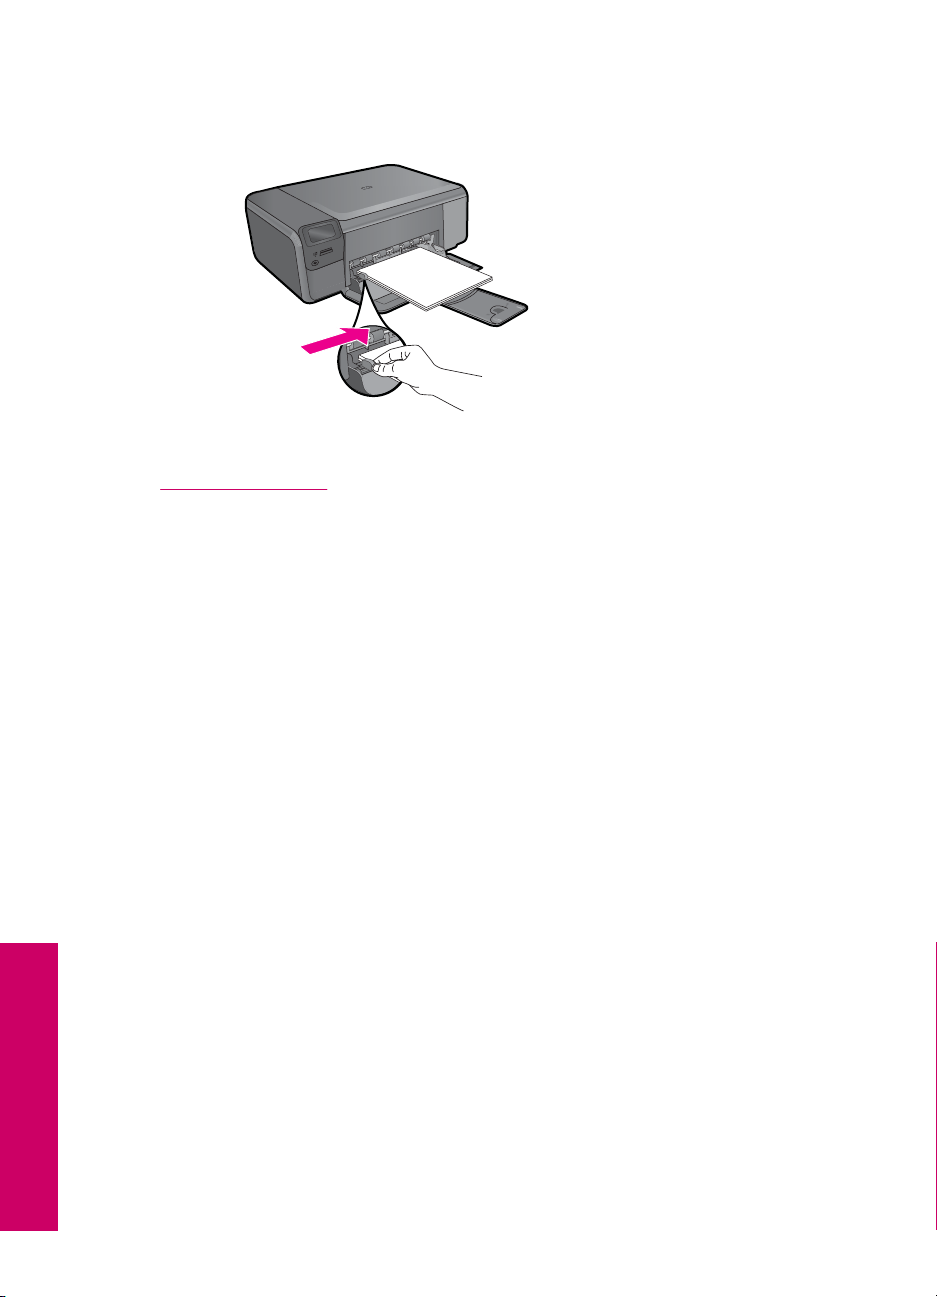
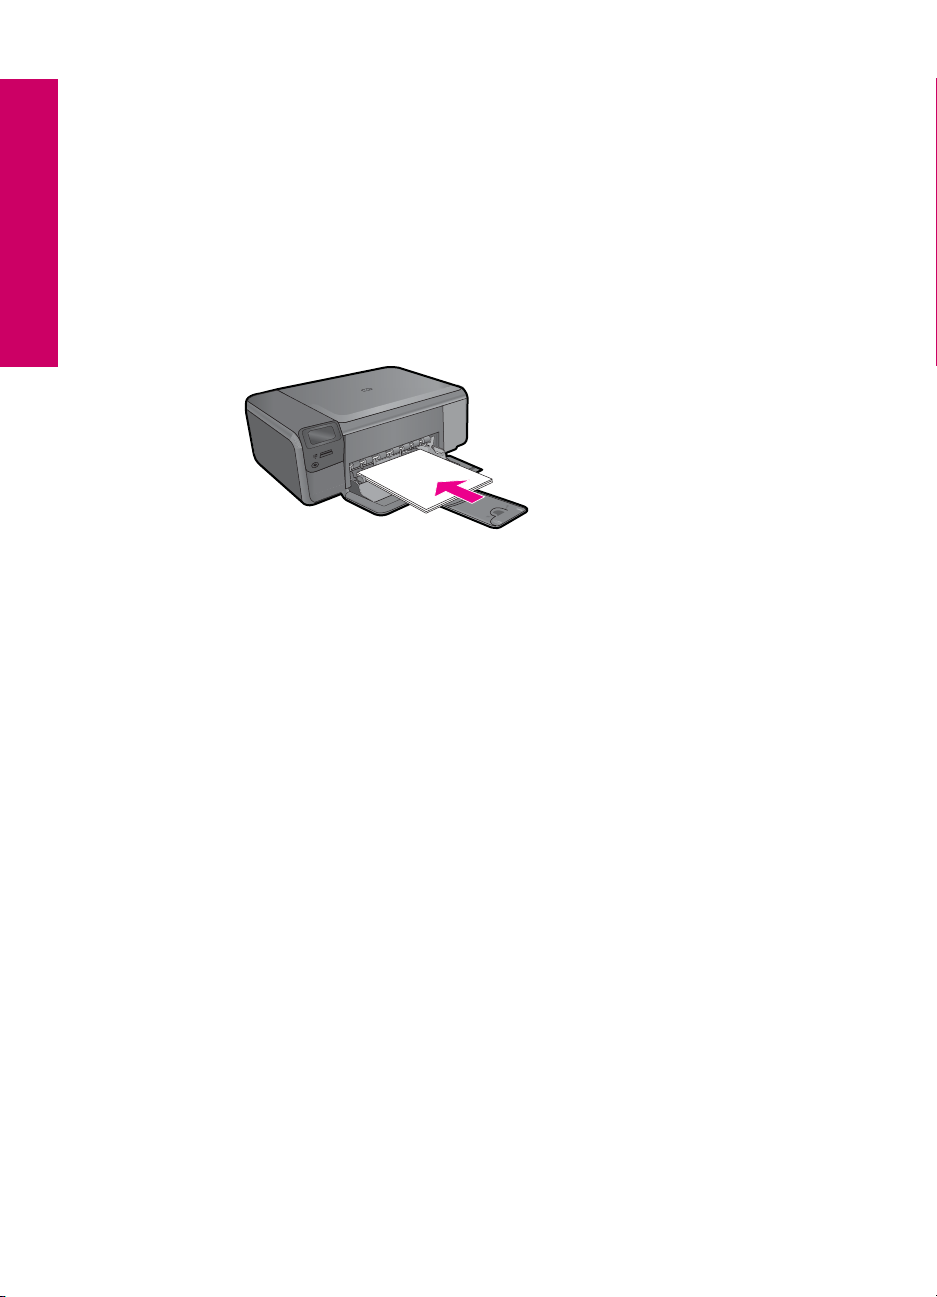
Load full-size paper
a. Lower paper tray.
Slide paper-width guide outwards.
❑
b. Load paper.
Insert stack of paper into paper tray with short edge forward and print side
❑
down.
Paper basics
Load media 11
Chapter 3
Slide stack of paper forward until it stops.
❑
Slide paper-width guide inward until it stops at edge of paper.
❑
Related topics
Information on paper” on page 12
“
Information on paper
The HP Photosmart is designed to work well with most paper types. Test a variety of
paper types before buying a large quantity. Find a paper type that works well and is easy
to purchase. HP papers are designed for the best quality results. In addition, follow these
tips:
• Do not use paper that is too thin, that has a slick texture, or that stretches easily. It
can feed incorrectly through the paper path, causing paper jams.
• Store photo media in its original packaging inside a resealable plastic bag on a flat
surface in a cool, dry place. When you are ready to print, remove only the paper you
plan to use immediately. When you have finished printing, return any unused photo
paper to the plastic bag.
• Do not leave unused photo paper in the input tray. The paper might start to curl, which
might reduce the quality of your printouts. Curled paper can also cause paper jams.
• Always hold photo paper by the edges. Fingerprints on photo paper can reduce print
quality.
• Do not use paper that is heavily textured. It can cause graphics or text to print
improperly.
• Do not combine different paper types and paper sizes in the input tray; the entire stack
of paper in the input tray must be the same size and type.
• Store printed photos under glass or in a storage book to prevent bleeding over time
from high humidity.
Paper basics
12 Paper basics
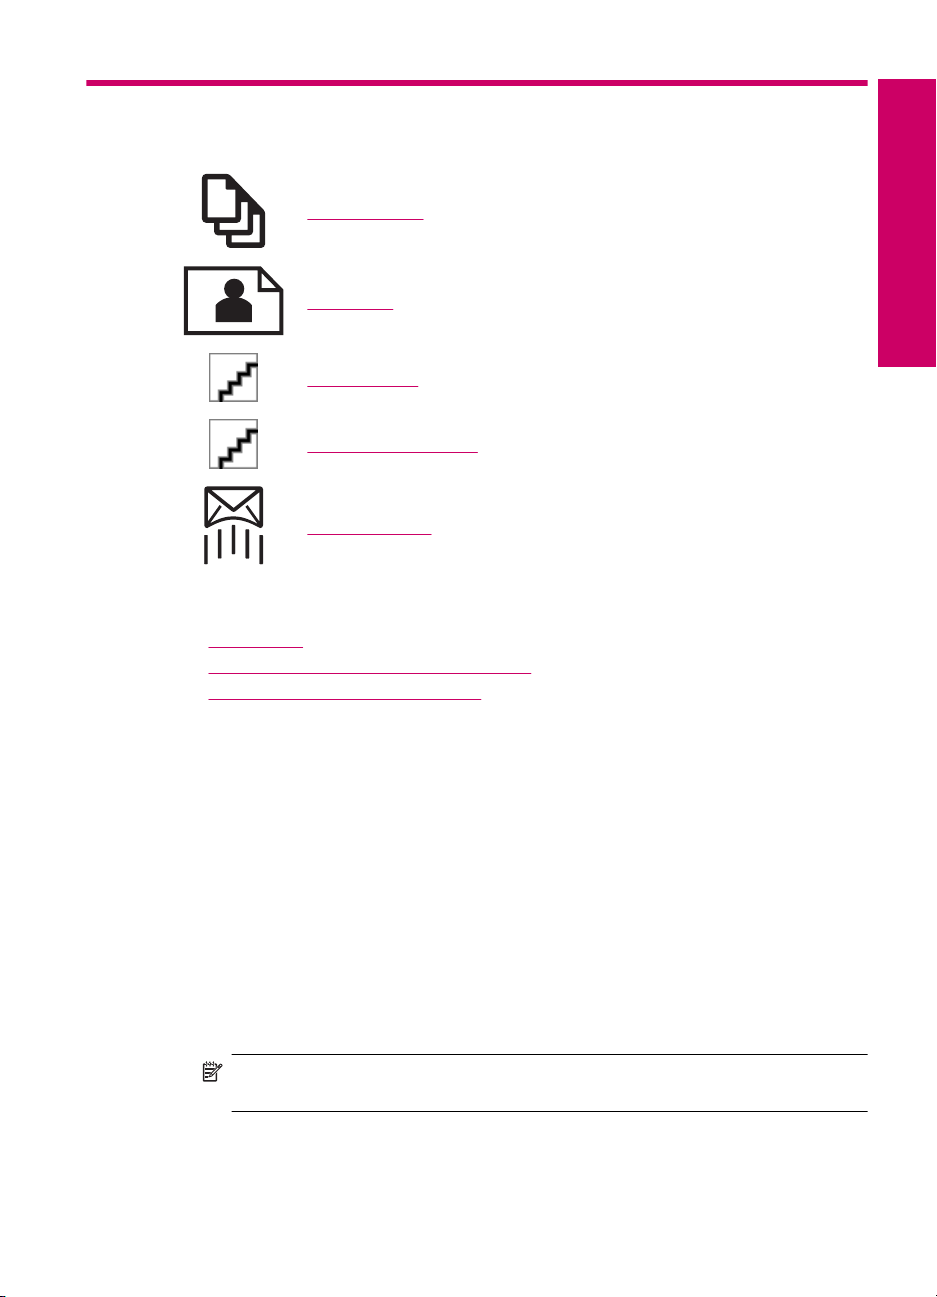
4Print
“Print documents” on page 13
“Print photos” on page 14
“Print envelopes” on page 21
“Print on specialty media” on page 21
“Print a Web page” on page 22
Related topics
Load media” on page 10
•“
Recommended papers for photo printing” on page 7
•“
Recommended papers for printing” on page 8
•“
Print documents
Most print settings are automatically handled by the software application. You need to
change the settings manually only when you change print quality, print on specific types
of paper or transparency film, or use special features.
To print from a software application
1. Make sure you have paper loaded in the input tray.
2. On the File menu in your software application, click Print.
3. Make sure the product is the selected printer.
4. If you need to change settings, click the button that opens the Properties dialog box.
Depending on your software application, this button might be called Properties,
Options, Printer Setup, Printer, or Preferences.
NOTE: When printing a photo, you must select options for the specific photo
paper and photo enhancement.
Print 13
Chapter 4
5. Select the appropriate options for your print job by using the features available in the
Print
6. Click OK to close the Properties dialog box.
7. Click Print or OK to begin printing.
Related topics
•“
•“
•“
•“
•“
•“
Print photos
Advanced, Printing Shortcuts, Features, and Color tabs.
TIP: You can easily select the appropriate options for your print job by choosing
one of the predefined print tasks on the Printing Shortcuts tab. Click a type of
print task in the Printing Shortcuts list. The default settings for that type of print
task are set and summarized on the Printing Shortcuts tab. If necessary, you
can adjust the settings here and save your custom settings as a new printing
shortcut. To save a custom printing shortcut, select the shortcut and click Save
As. To delete a shortcut, select the shortcut and click Delete.
Recommended papers for printing” on page 8
Load media” on page 10
View the print resolution” on page 24
Printing shortcuts” on page 24
Set the default print settings” on page 25
Stop the current job” on page 121
•“Print photos saved on your computer” on page 14
Print photos from a memory card” on page 17
•“
Print photos saved on your computer
To print a borderless image
1. Remove all paper from the input tray.
2. Place the photo paper print side down on the right side of the input tray.
3. On the File menu in your software application, click Print.
4. Make sure the product is the selected printer.
5. Click the button that opens the Properties dialog box.
Depending on your software application, this button might be called Properties,
Options, Printer Setup, Printer, or Preferences.
14 Print
6. Click the Features tab.
7. In the Size list, click the size of photo paper loaded in the input tray.
If a borderless image can be printed on the specified size, the Borderless printing
check box is enabled.
8. In the Paper Type drop-down list, click More, and then select the appropriate paper
type.
NOTE: You cannot print a borderless image if the paper type is set to Plain
paper or to a type of paper other than a photo paper.
9. Select the Borderless printing check box if it is not already checked.
If the borderless paper size and paper type are not compatible, the product software
displays an alert and allows you to select a different type or size.
10. Click OK, and then click Print or OK in the Print dialog box.
NOTE: Do not leave unused photo paper in the input tray. The paper might start
to curl, which could reduce the quality of your printout. Photo paper should be flat
before printing.
To print a photo on photo paper
1. Load paper in the input tray.
Print
2. On the File menu in your software application, click Print.
3. Make sure the product is the selected printer.
4. Click the button that opens the Properties dialog box.
Depending on your software application, this button might be called Properties,
Options, Printer Setup, Printer, or Preferences.
5. Click the Features tab.
6. In the Basic Options area, from the Paper Type drop-down list, select More. Then,
select the appropriate photo paper type.
7. In the Resizing Options area, from the Size drop-down list, select More. Then, select
the appropriate paper size.
If the paper size and paper type are not compatible, the printer software displays an
alert and allows you to select a different type or size.
Print photos 15

Print
Chapter 4
8. In the Basic Options area, select a high print quality, such as Best, from the Print
Quality drop-down list.
NOTE: To achieve the highest dpi resolution, you can use the Maximum dpi
setting with supported types of photo paper. If Maximum dpi is not listed in the
Print quality drop-down list, you can enable it from the Advanced tab. For more
information, see “
Print using Maximum dpi” on page 23.
9. In the HP Real Life Technologies area, click the Photo fix drop-down list and select
from the following options:
• Off: applies no HP Real Life Technologies to the image.
• Basic: enhances low-resolution images; moderately adjusts image sharpness.
10. Click OK to return to the Properties dialog box.
11. (Optional) If you want to print the photo in black and white, click the Color tab and
select the Print in grayscale check box. From the drop-down list, select one of the
following options:
• High Quality: uses all the available colors to print your photo in grayscale. This
creates smooth and natural shades of gray.
• Black Ink Only: uses black ink to print your photo in grayscale. The gray shading
is created by varying patterns of black dots, which might result in a grainy image.
12. Click OK, and then click Print or OK in the Print dialog box.
NOTE: Do not leave unused photo paper in the input tray. The paper might start to
curl, which could reduce the quality of your printout. Photo paper should be flat before
printing.
16 Print
Related topics
Recommended papers for photo printing” on page 7
•“
Load media” on page 10
•“
Print using Maximum dpi” on page 23
•“
View the print resolution” on page 24
•“
Printing shortcuts” on page 24
•“
Set the default print settings” on page 25
•“
Stop the current job” on page 121
•“
Print photos from a memory card
▲ Do one of the following:
Print photo on small-size paper
a. Load paper.
Load up to 10 x 15 cm (4 x 6 inch) photo paper in paper tray.
❑
b. Select project type.
Press button next to Photo on Home screen.
❑
Press button next to Memory Card Print.
❑
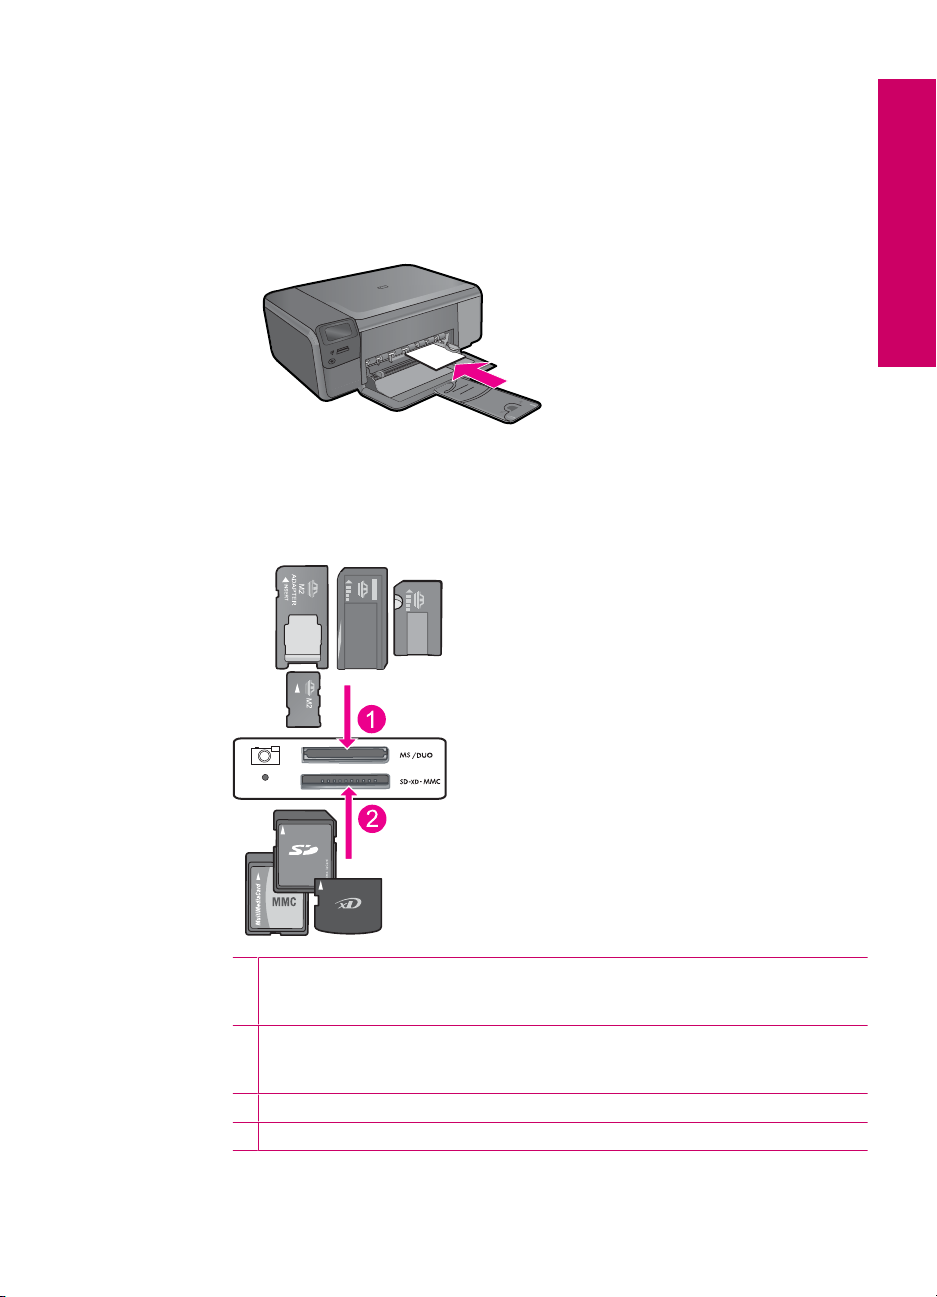
c. Insert memory.
Print
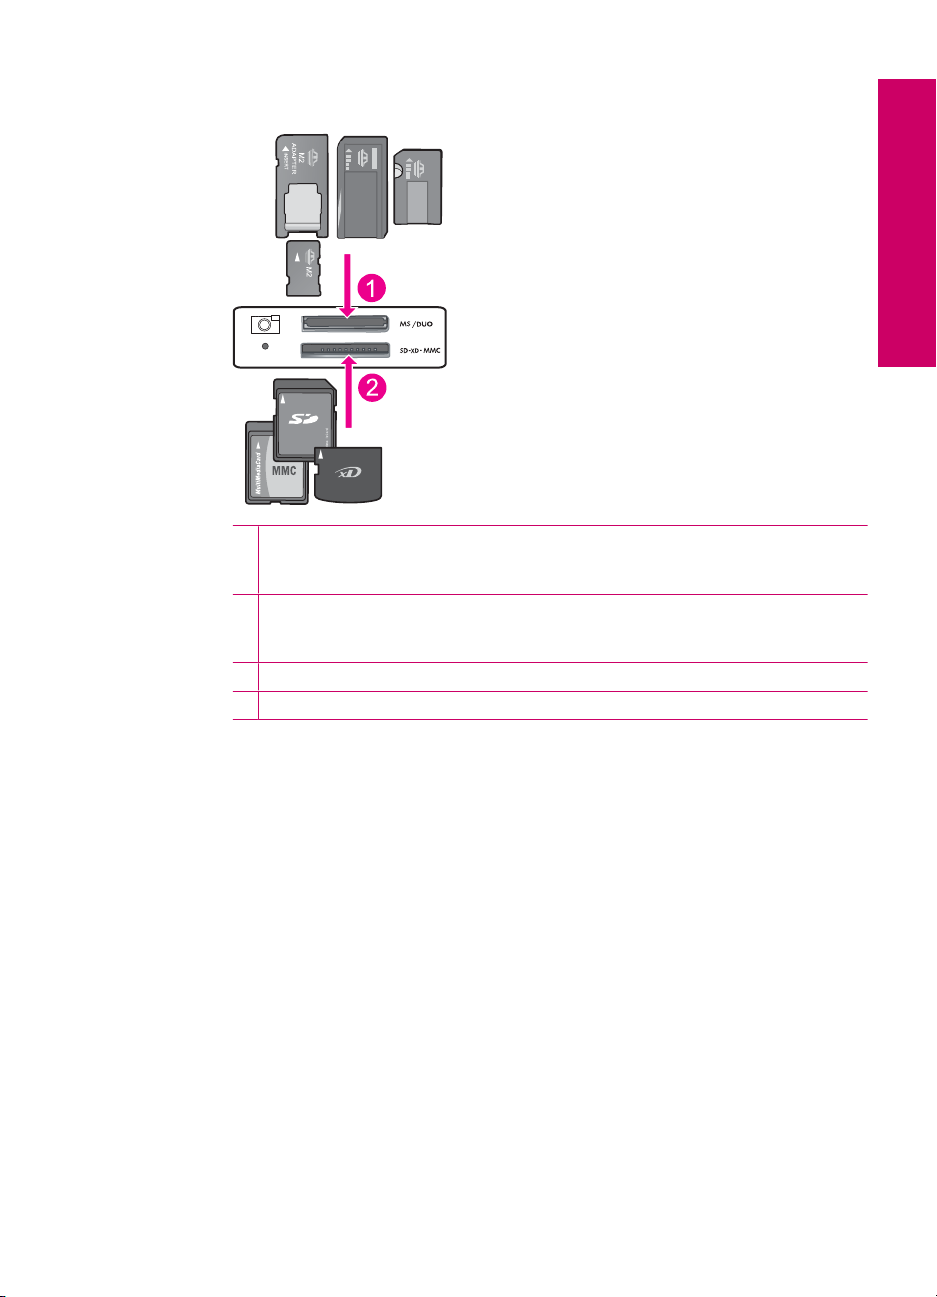
1 Memory Stick, Memory Stick Pro, Memory Stick Select, Memory Stick Magic Gate,
Memory Stick Duo or Pro Duo (adapter optional), Memory Stick Pro-HG Duo (adapter
optional), or Memory Stick Micro (adapter required)
2 MultiMediaCard (MMC), MMC Plus, Secure MultiMedia Card, MMC Mobile (RS-MMC;
adapter required), Secure Digital (SD), Secure Digital Mini, Secure Digital High
Capacity (SDHC), TransFlash MicroSD Card (adapter required), or xD-Picture card
3 CompactFlash (CF) types I and II
4 Front USB port (for storage devices)
Print photos 17
Print
Chapter 4
d. Select photo.
Press button next to Select.
❑
Press same button to increase number of copies.
❑
Press OK.
❑
e. Print photo.
Press OK.
❑
Print photo on full-size paper
a. Load paper.
Load full-size photo paper in paper tray.
❑
b. Select project type.
Press the button next to Photo on Home screen.
❑
Press the button next to Memory Card Print.
❑
18 Print
c. Insert memory.
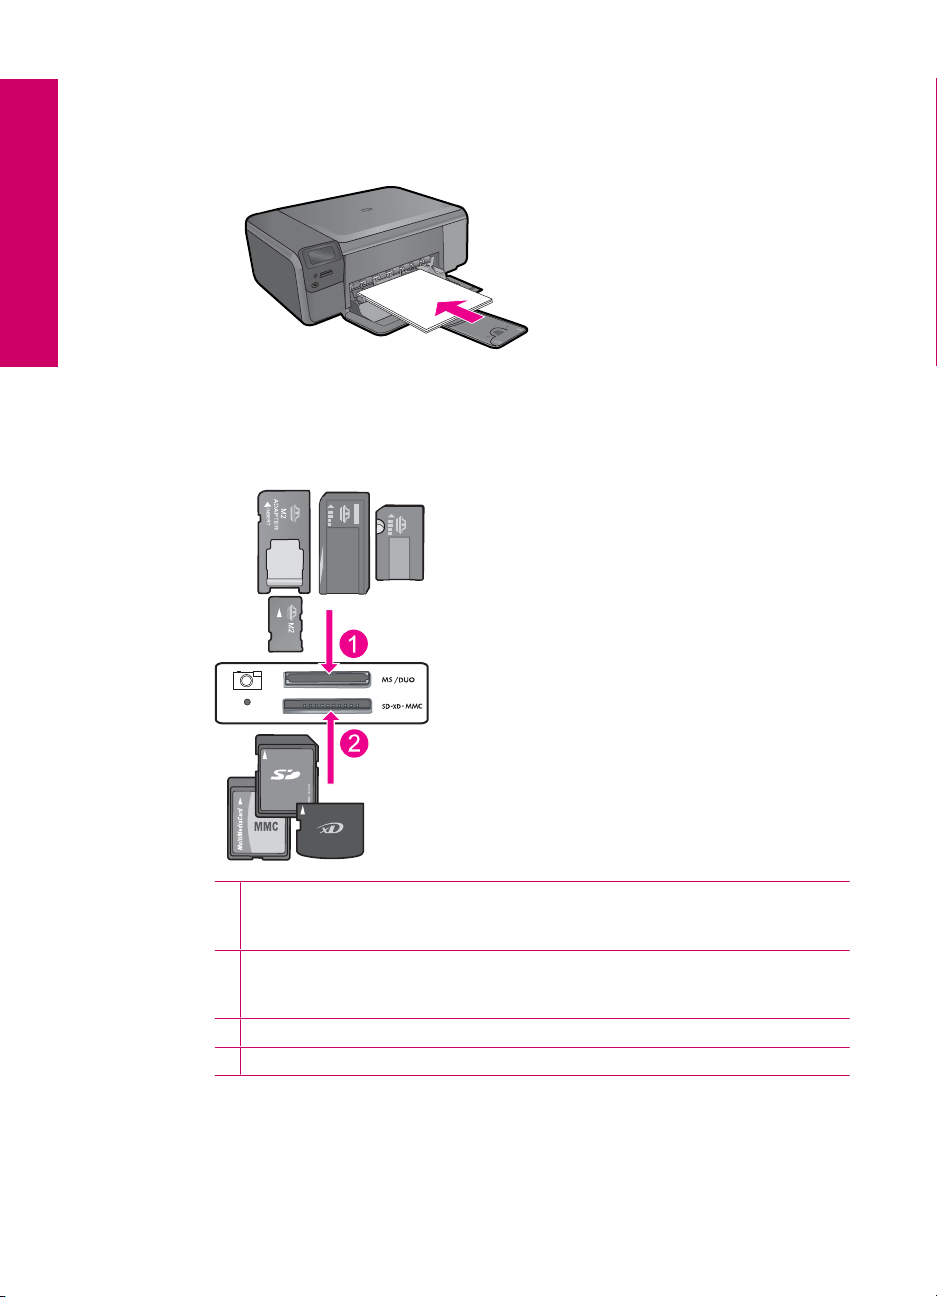
1 Memory Stick, Memory Stick Pro, Memory Stick Select, Memory Stick Magic Gate,
Memory Stick Duo or Pro Duo (adapter optional), Memory Stick Pro-HG Duo (adapter
optional), or Memory Stick Micro (adapter required)
2 MultiMediaCard (MMC), MMC Plus, Secure MultiMedia Card, MMC Mobile (RS-MMC;
adapter required), Secure Digital (SD), Secure Digital Mini, Secure Digital High
Capacity (SDHC), TransFlash MicroSD Card (adapter required), or xD-Picture card
3 CompactFlash (CF) types I and II
4 Front USB port (for storage devices)
Print
d. Select photo.
Press button next to Select.
❑
Press same button to increase the number of copies.
❑
Press OK.
❑
Press button next to Photo Size.
❑
Press button next to 8.5 x 11 to change paper size.
❑
e. Print photo.
Press Print.
❑
Print photos 19
Print
Chapter 4
Print passport photos
a. Load paper.
Load full-size photo paper in paper tray.
❑
b. Select project type.
Press button next to Photo on Home screen.
❑
Press button next to Passport Photo Print.
❑
c. Insert memory.
20 Print
1 Memory Stick, Memory Stick Pro, Memory Stick Select, Memory Stick Magic Gate,
Memory Stick Duo or Pro Duo (adapter optional), Memory Stick Pro-HG Duo (adapter
optional), or Memory Stick Micro (adapter required)
2 MultiMediaCard (MMC), MMC Plus, Secure MultiMedia Card, MMC Mobile (RS-MMC;
adapter required), Secure Digital (SD), Secure Digital Mini, Secure Digital High
Capacity (SDHC), TransFlash MicroSD Card (adapter required), or xD-Picture card
3 CompactFlash (CF) types I and II
4 Front USB port (for storage devices)
d. Select photo.
Press button next to Select.
❑
Press same button to increase number of copies.
❑
Press OK.
❑
Press button next to 2 x 2 inches to select paper size.
❑
e. Print photo.
Press OK.
❑
Related topics
Recommended papers for photo printing” on page 7
•“
Stop the current job” on page 121
•“
Print envelopes
With the HP Photosmart, you can print on a single envelope, a group of envelopes, or
label sheets designed for inkjet printers.
To print a group of addresses on labels or envelopes
1. Print a test page on plain paper first.
2. Place the test page on top of the label sheet or envelope, and hold both up to the
light. Check the spacing for each block of text. Make adjustments as needed.
3. Load the labels or envelopes into the main input tray.
CAUTION: Do not use envelopes with clasps or windows. They can get stuck in
the rollers and cause paper jams.
4. Slide the paper-width guide inward against the stack of labels or envelopes until the
guide stops.
5. If you are printing on envelopes, do the following:
a. Display the print settings, and click the Features tab.
b. In the Resizing Options area, click the appropriate envelope size in the Size list.
6. Click OK, and then click Print or OK in the Print dialog box.
Print
Related topics
Paper basics” on page 7
•“
View the print resolution” on page 24
•“
Printing shortcuts” on page 24
•“
Set the default print settings” on page 25
•“
Stop the current job” on page 121
•“
Print on specialty media
To reverse an image for iron-on transfers
1. On the File menu in your software application, click Print.
2. Make sure the product is the selected printer.
3. Click the button that opens the Properties dialog box.
Depending on your software application, this button might be called Properties,
Options, Printer Setup, Printer, or Preferences.
Print on specialty media 21

Print
Chapter 4
4. Click the Features tab.
5. In the Paper Type drop-down list, click More, and then select HP Iron-on Transfer
from the list.
6. If the selected size is not what you want, click an appropriate size in the Size list.
7. Click the Advanced tab.
8. In the Features area, select the Mirror Image check box.
9. Click OK, and then click Print or OK in the Print dialog box.
NOTE: To prevent jams, manually feed the iron-on transfer sheets into the input
tray one sheet at a time.
To print on transparencies
1. Load the transparency into the input tray.
2. On the File menu in your software application, click Print.
3. Make sure the product is the selected printer.
4. Click the button that opens the Properties dialog box.
Depending on your software application, this button might be called Properties,
Options, Printer Setup, Printer, or Preferences.
5. Click the Features tab.
6. In the Basic Options area, from the Paper Type drop-down list, select More. Then
select the appropriate paper type.
TIP: If you want to make notations on the back of the transparencies and erase
them later without scratching the original, click the Advanced tab, and select the
Mirror Image check box.
7. In the Resizing Options area, from the Size drop-down list, select More. Then, select
an appropriate size.
8. Click OK, and then click Print or OK in the Print dialog box.
NOTE: The product automatically waits for transparencies to dry before
releasing them. Ink dries slower on film than on plain paper. Make sure you allow
enough time for the ink to dry before handling the transparency.
Related topics
Paper basics” on page 7
•“
View the print resolution” on page 24
•“
Printing shortcuts” on page 24
•“
Set the default print settings” on page 25
•“
Stop the current job” on page 121
•“
Print a Web page
You can print a Web page from your Web browser on the HP Photosmart.
If you use Internet Explorer 6.0 or higher for Web browsing, you can use HP Smart Web
Printing to ensure simple, predictable web printing with control over what you want and
how you want it printed. You can access HP Smart Web Printing from the toolbar in
22 Print

Internet Explorer. For more information about HP Smart Web Printing, see the help file
provided with it.
To print a Web page
1. Make sure you have paper loaded in the main input tray.
2. On the File menu in your Web browser, click Print.
The Print dialog box appears.
3. Make sure the product is the selected printer.
4. If your Web browser supports it, select the items on the Web page that you want to
include in the printout.
For example, in Internet Explorer, click the Options tab to select options such as As
laid out on screen, Only the selected frame, and Print all linked documents.
5. Click Print or OK to print the Web page.
TIP: To print Web pages correctly, you might need to set your print orientation to
Landscape.
Print using Maximum dpi
Use maximum dpi mode to print high-quality, sharp images.
To get the most benefit from maximum dpi mode, use it to print high-quality images such
as digital photographs. When you select the maximum dpi setting, the printer software
displays the optimized dots per inch (dpi) that the HP Photosmart printer will print. Printing
in maximum dpi is supported on the following paper-types only:
• HP Premium Plus Photo Paper
• HP Premium Photo Paper
• HP Advanced Photo Paper
• Photo Hagaki cards
Printing in maximum dpi takes longer than printing with other settings and requires a large
amount of disk space.
Print
To print in Maximum dpi mode
1. Make sure you have paper loaded in the input tray.
2. On the File menu in your software application, click Print.
3. Make sure the product is the selected printer.
4. Click the button that opens the Properties dialog box.
Depending on your software application, this button might be called Properties,
Options, Printer Setup, Printer, or Preferences.
5. Click the Advanced tab.
6. In the Features area, select the Enable maximum dpi setting check box.
7. Click the Features tab.
8. In the Paper Type drop-down list, click More, and then select the appropriate paper
type.
Print using Maximum dpi 23
Chapter 4
9. In the Print Quality drop-down list, click Maximum dpi.
NOTE: To find out what dpi the product will print based on the paper type and
print quality settings you selected, click Resolution.
10. Select any other print settings that you want, and then click OK.
Related topics
“
View the print resolution” on page 24
Print
View the print resolution
The printer software displays the print resolution in dots per inch (dpi). The dpi varies
according to the paper type and print quality that you select in the printer software.
To view the print resolution
1. Make sure you have paper loaded in the input tray.
2. On the File menu in your software application, click Print.
3. Make sure the product is the selected printer.
4. Click the button that opens the Properties dialog box.
Depending on your software application, this button might be called Properties,
Options, Printer Setup, Printer, or Preferences.
5. Click the Features tab.
6. In the Paper Type drop-down list, select the type of paper that you have loaded.
7. In the Print Quality drop-down list, select the appropriate print quality setting for your
project.
8. Click the Resolution button to view the print resolution dpi for the paper type and
print quality combination you selected.
Printing shortcuts
Use printing shortcuts to print with print settings that you use often. The printer software
has several specially designed printing shortcuts that are available in the Printing
Shortcuts list.
NOTE: When you select a printing shortcut the appropriate printing options are
automatically displayed. You can leave them as is, change them, or create your own
shortcuts for commonly used tasks.
Use the Printing Shortcuts tab for the following print tasks:
• General Everyday Printing: Print documents quickly.
• Photo Printing–Borderless: Print to the top, bottom, and side edges of 10 x 15 cm
(4 x 6 inch) and 13 x 18 cm (5 x 7 inch) HP Photo Papers.
• Paper-saving Printing: Print two-sided documents with mutliple pages on same
sheet to reduce paper usage.
• Photo Printing–With White Borders: Print a photo with a white border around the
edges.
24 Print

• Fast/Economical Printing: Produce draft-quality printouts quickly.
• Presentation Printing: Print high-quality documents, including letters and
transparencies.
• Two-sided (Duplex) Printing: Print two-sided pages with the HP Photosmart
manually.
To create a printing shortcut
1. On the File menu in your software application, click Print.
2. Make sure the product is the selected printer.
3. Click the button that opens the Properties dialog box.
Depending on your software application, this button might be called Properties,
Options, Printer Setup, Printer, or Preferences.
4. Click the Printing Shortcuts tab.
5. In the Printing Shortcuts list, click a printing shortcut.
The print settings for the selected printing shortcut are displayed.
6. Change the print settings to those you want in the new printing shortcut.
7. Click Save as and type a name for the new printing shortcut, and then click Save.
The printing shortcut is added to the list.
To delete a printing shortcut
1. On the File menu in your software application, click Print.
2. Make sure the product is the selected printer.
3. Click the button that opens the Properties dialog box.
Depending on your software application, this button might be called Properties,
Options, Printer Setup, Printer, or Preferences.
4. Click the Printing Shortcuts tab.
5. In the Printing Shortcuts list, click the printing shortcut that you want to delete.
6. Click Delete.
The printing shortcut is removed from the list.
Print
NOTE: Only the shortcuts that you have created can be deleted. The original HP
shortcuts cannot be deleted.
Set the default print settings
If there are settings that you frequently use for printing, you might want to make them the
default print settings so they are already set when you open the Print dialog box from
within your software application.
To change the default print settings
1. In the HP Solution Center, click Settings, point to Print Settings, and then click
Printer Settings.
2. Make changes to the print settings, and click OK.
Set the default print settings 25

Print
Chapter 4
26 Print
5 Scan
•“Scan to a computer” on page 27
Scan to a memory card” on page 28
•“
Scan and reprint photos” on page 35
•“
Scan to a computer
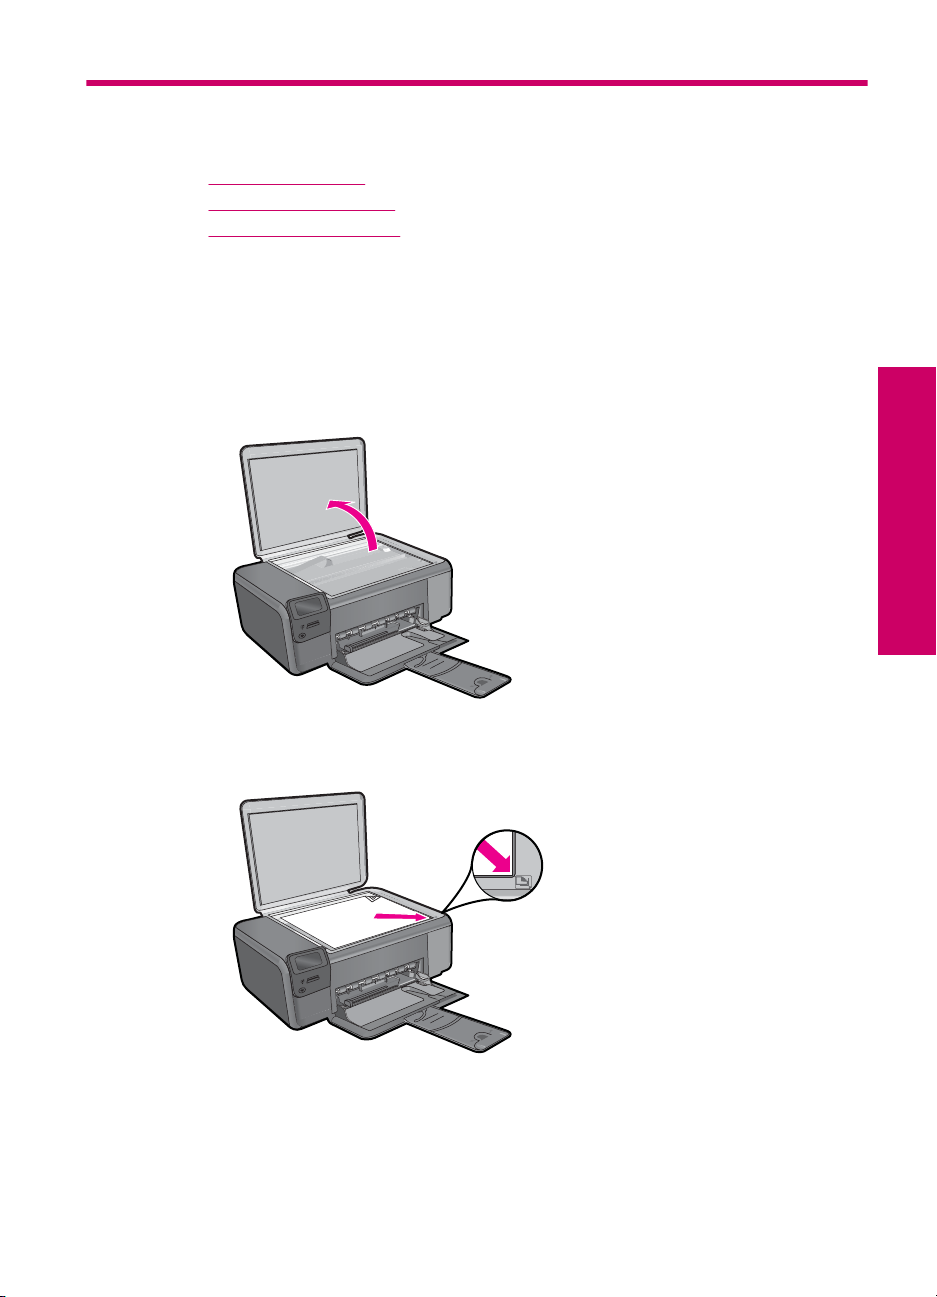
To scan to a computer
1. Load original.
a. Lift lid on product.
Scan
b. Load original print side down on right front corner of glass.
Scan 27
Chapter 5
c.Close lid.
2. Connect to computer.
3. Start scan.
a. Press button next to Scan.
b. Press button next to Scan to PC.
Related topics
Stop the current job” on page 121
“
Scan to a memory card
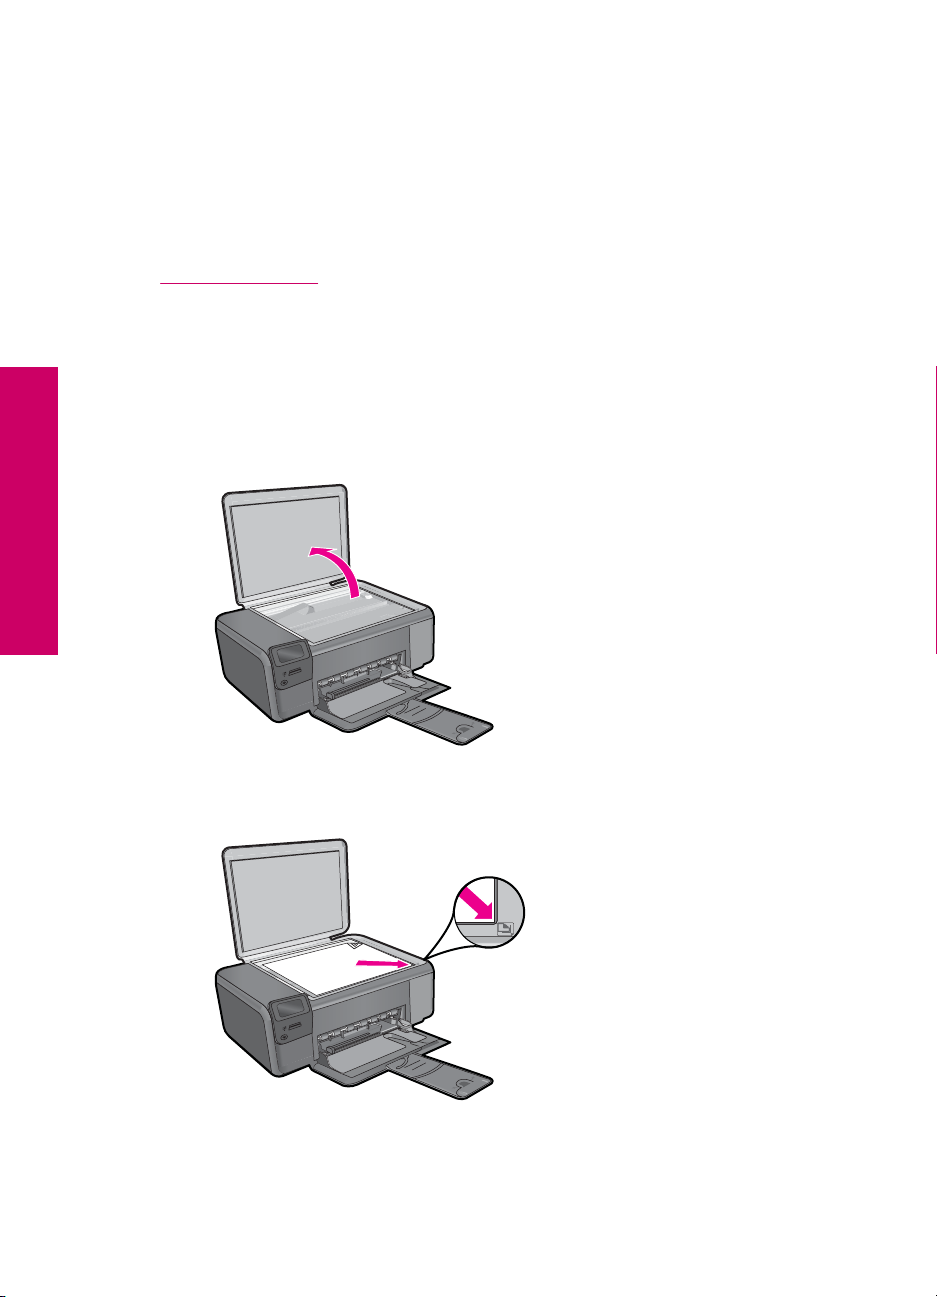
To save a scan to a memory card
1. Load original.
a. Lift lid on product.
Scan
28 Scan
b. Load original print side down on right front corner of glass.
Loading...