


 Loading...
HP Photosmart A320 series
Basics Guide
Вводное руководство

Hewlett-Packard Company notices
The information contained in this document is subject to change without notice.
All rights reserved. Reproduction, adaptation, or translation of this material is prohibited without prior written permission of Hewlett-Packard, except as allowed under copyright laws. The only warranties for HP products and services are set forth in the express warranty statements accompanying such products and services. Nothing herein should be construed as constituting an additional warranty. HP shall not be liable for technical or editorial errors or omissions contained herein.
© 2007 Hewlett-Packard Development Company, L.P.
Windows, Windows 2000, and Windows XP are U.S. registered trademarks of Microsoft Corporation.
Windows Vista is either a registered trademark or trademark of Microsoft Corporation in the United States and/or other countries.
Intel and Pentium are trademarks or registered trademarks of Intel Corporation or its subsidiaries in the United States and other countries. The Bluetooth trademarks are owned by its proprietor and used by Hewlett-Packard Company under license.
Уведомления компании Hewlett-Packard
Сведения, содержащиеся в настоящем документе, могут быть изменены без предварительного уведомления.
С сохранением всех прав. Воспроизведение, адаптация и перевод без предварительного письменного разрешения запрещены, за исключением случаев, предусмотренных законодательством по защите авторских прав.
Компания HP не предоставляет каких-либо гарантий на изделия и услуги, кроме явно указанных в гарантийных обязательствах, прилагаемых к изделиям и услугам. Никакая часть данного документа не может рассматриваться как дополнительные гарантийные обязательства. Компания HP не несет ответственности за технические или редакторские ошибки и упущения в настоящем документе.
© Компания Hewlett-Packard Development, 2007 г
Windows, Windows 2000 и Windows XP являются зарегистрированными в США торговыми марками корпорации Microsoft.
Windows Vista является зарегистрированной торговой маркой или торговой маркой корпорации Microsoft в США и/или в других странах.
Intel и Pentium являются товарными марками или зарегистрированными товарными марками корпорации Intel или ее филиалов в США и других странах.
Торговые марки Bluetooth принадлежат ее владельцу и используются компанией Hewlett-Packard по лицензии.

HP Photosmart A320 series printer
HP Photosmart A320 series
English

English
Contents
1 |
Welcome |
|
|
Printer parts................................................................................................................................ |
5 |
2 |
Print basics |
|
|
Print from a PictBridge-certified camera..................................................................................... |
6 |
|
Print from a computer................................................................................................................. |
7 |
|
Install the software and connect the USB cable................................................................... |
7 |
3 |
Troubleshooting and support |
|
|
Printer hardware problems......................................................................................................... |
8 |
|
Printing problems........................................................................................................................ |
9 |
|
Support process....................................................................................................................... |
10 |
|
Regulatory model identification number VCVRA-0707............................................................. |
11 |
|
Environmental statements........................................................................................................ |
11 |
|
Find more information............................................................................................................... |
11 |
|
Printer specifications................................................................................................................ |
12 |
|
HP Warranty............................................................................................................................. |
13 |
4 |
Indicator lights........................................................................................................................ |
14 |
4 HP Photosmart A320 series printer

1 Welcome
Thank you for your HP Photosmart purchase! Read this guide to learn the basics of printing beautiful photos with your new printer. For more in-depth information about the printer, see “Find more information” on page 11.
 NOTE: Read the Setup Guide first to set up your HP Photosmart A320 series printer.
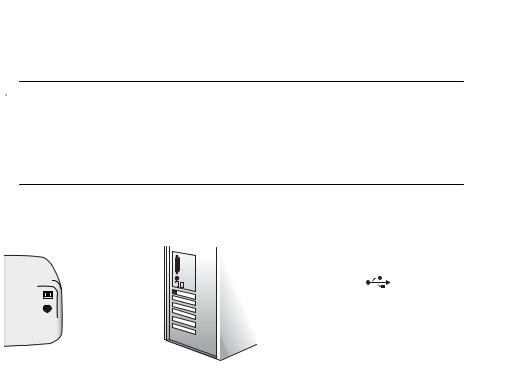
Printer parts
Figure 1-1 Front view (open) and rear view
1OK: Press to turn Red Eye reduction and other automatic photo quality enhancing features on or off. To find more information on these features, see “Find more information”
on page 11. Also, press to resume a print job after an error.
2 |
On: Press to turn the printer on or off, or to cancel a print job that is in progress. |
3 |
Handle: Extend to carry the printer. |
4Input tray: Load paper in this tray. The input tray opens automatically when you open the output tray. To close the input tray, you must first close the output tray. Supported paper sizes and types: 10 x 15 cm (4 x 6 inch) photo paper, 10 x 15 cm (4 x 6 inch) or smaller index cards, L-size cards, A6 cards, or Hagaki cards. For best print quality, use HP Advanced Photo Paper. Load only one type and size of paper at a time, and do not load more than 20 sheets at once. Load with the print side or glossy side facing the front of the printer. To find more information on loading or purchasing paper, see “Find more information”
on page 11.
5 |
Input tray extension: Pull out to support paper. |
6 |
Paper-width guide: Move to the width of the current paper to position the paper properly. |
7PictBridge port: Connect either a PictBridge-certified device (such as a PictBridge digital camera, camera phone, or video camera) or the optional HP Bluetooth wireless printer adapter to this port.
English
Welcome 5

Chapter 2
English
(continued)
8USB cable holder: Store the USB cable for your PictBridge camera here for easy access.
9Print cartridge door: Open to insert or remove the HP 110 Tri-color Inkjet print cartridge. For more information about replacing the print cartridge, see “Find more information”
on page 11.
NOTE: For best print quality, do not allow photos to stack in the output tray. Expose the printed surface of each photo to the air for 3 minutes after printing to allow the colors to fully develop.
10Output tray (open): Lower this tray before printing. Collect your printed photos from this tray. When you open the output tray, the input tray opens automatically.
11USB port: Connect the printer to a computer here, using a USB cable. For more information on printing from a computer, see “Print from a computer” on page 7.
12Power cord connection: Connect the power cord here.
 TIP: For information about the printer lights, see “Indicator lights” on page 14.
2 Print basics
Print from a PictBridge-certified camera
You can print photos directly from a PictBridge camera or other PictBridge device by connecting the camera or device to the printer via a USB cable. When you print from your digital camera, the printer uses the settings that you selected on the camera. For more information, see the documentation that came with your camera.
 NOTE: Although this chapter describes the procedure for printing from a PictBridgecertified digital camera, the procedure for printing from other PictBridge devices— such as camera phones and video phones—is very similar. Review the documentation that came with your PictBridge device for specific information. HP is not able to provide technical support for non-HP cameras.
To print using a PictBridge-certified camera
1.Turn on your PictBridge-certified digital camera. Make sure the USB configuration is set to Digital Camera, so that your camera is able to successfully connect to the printer and print photos.
2.Load HP Advanced Photo Paper into the printer.
3.Connect your camera to the PictBridge port on the top of the printer using the USB cable for the camera. The PictBridge light turns solid green when the connection is established.
4.Use the menu on your camera image display to select and print photos. The On light and the PictBridge light on the printer flash while the photos are printing.
Important: Your photos are instantly dry, and can be handled immediately after they are printed. However, HP recommends that you leave the printed surface of your photos exposed to the air for 3 minutes after printing to allow the colors to fully develop before you stack them with other photos or place them in albums.
6 HP Photosmart A320 series printer
Print from a computer
Printing from a computer gives you more options than printing from a PictBridge or Bluetooth device. Before printing from your computer, you must install the HP Photosmart software and connect the printer to the computer using an USB cable.
 NOTE: The USB 2.0 cable required for printing (mini Type B male to Type A male) from a computer might not be included in the box with the printer, so you might need to purchase it separately. Use a USB cable of less than 3 meters (10 feet) in length to minimize injected noise due to potentially high electromagnetic fields.
NOTE: For information on printing from Bluetooth devices, see “Find more information” on page 11.
Install the software and connect the USB cable
English
|
|
|
|
|
|
|
|
|
|
|
|
|
|
|
|
|
|
|
|
|
|
|
|
|
|
|
|
|
|
|
|
|
|
|
|
|
|
|
|
|
|
|
|
|
|
|
|
|
|
|
|
|
|
|
|
|
|
|
|
|
|
|
|
|
|
|
|
|
|
|
|
|
|
|
|
|
|
|
|
|
|
|
|
|
|
|
|
|
|
|
|
|
|
|
|
|
|
|
|
|
|
|
|
|
|
|
|
Windows users |
Mac users |
||||||||||
|
|
|
|
|
|
||||||
Important: Do not connect a USB cable until |
1. |
Connect one end of the USB cable to the |
|||||||||
you are prompted. |
|
USB port on the back of the printer, and |
|||||||||
1. Insert the HP Photosmart CD included with |
|
connect the other end to the USB port on |
|||||||||
|
your computer. |
||||||||||
|
the printer into your computer's CD-ROM |
|
|||||||||
|
2. |
Insert the HP Photosmart CD included with |
|||||||||
|
drive. If the Install Wizard does not appear, |
||||||||||
|
locate the setup.exe file on the CD-ROM |
|
the printer into your computer's CD-ROM |
||||||||
|
drive and double-click it. Wait several |
|
drive. |
||||||||
|
minutes while the files load. |
3. |
On your desktop, double-click the |
||||||||
2. Click Next and follow the onscreen |
|
HP Photosmart CD icon. |
|||||||||
|
instructions. |
4. |
Double-click the HP Installer icon, and |
||||||||
3. When prompted, connect one end of the |
|
follow the instructions on each installation |
|||||||||
|
USB cable to the USB port on the back of |
|
screen to install the printer software. |
||||||||
|
the printer, and connect the other end to the |
5. |
When the Congratulations screen appears, |
||||||||
|
USB port on your computer. |
|
click OK. |
||||||||
4. Follow the onscreen instructions until the |
|
|
|
|
|
|
|||||
|
installation is finished and restart your |
|
|
|
|
|
|
||||
|
computer. |
|
|
|
|
|
|
||||
|
|
|
|
|
|
|
|
|
|
|
|
You need to transfer your photos to the computer before you can use them with the HP Photosmart software. The online printer Help provides more information on the various print settings available when you print from a computer. For more information on accessing the online printer Help, see “Find more information” on page 11.
Print from a computer |
7 |

Chapter 3
English
3 Troubleshooting and support
Before contacting HP support, read this section for basic troubleshooting tips, consult the section “Find more information” on page 11 for a listing of more comprehensive troubleshooting resources, or go to the online support services at www.hp.com/support.
Printer hardware problems
The Attention light is flashing red or the buttons on the control panel do not respond.
Cause: The printer requires attention. Try the following solutions.
Solution:
•Check your connected camera or computer for instructions.
•Consult “Indicator Lights” on page 14.
•Turn off the printer, unplug the power cord, and wait 30 seconds. Plug the power cord back in, and then turn the printer back on again.
One or more printer lights are flashing
Solution: See “Indicator Lights” on page 14.
The printer is plugged in, but it will not turn on.
Solution:
•The printer may have drawn too much power. Turn off the printer, unplug the power cord, and wait 30 seconds. Plug the power cord back in, and then turn the printer back on again.
•The printer may be plugged into a power strip that is turned off. Turn on the power strip, and then turn on the printer.
•The printer may be plugged into an incompatible power source. If you are traveling abroad, make sure the power source in the country/region you are visiting complies with the power requirements and power cord of the printer.
8 HP Photosmart A320 series printer

Printing problems
Paper does not feed into the printer correctly.
Solution:
• Make sure that the paper-width guide fits close to the edge of the paper without bending the paper.
• There may be too much paper loaded in the input tray. Remove some paper and try printing again.
• If sheets of photo paper stick together, try loading one sheet at a time. |
English |
|
|
• If you are using the printer in an extremely highor lowhumidity environment, |
|
insert the paper as far as it will go into the input tray, and load one sheet of photo |
|
paper at a time. |
|
• If you are using photo paper that is curled, place the paper in a plastic bag and |
|
gently bend it in the opposite direction of the curl until the paper lies flat. If the |
|
problem persists, use paper that is not curled. |
|
• The paper may be too thin or too thick. Try using HP-designed photo paper. |
|
|
|
The image printed at an angle or is off-center. |
|
Solution: |
|
•The paper may not be loaded correctly. To find information on paper loading, see “Find more information” on page 11.
•The print cartridge may need to be aligned. To find information on aligning the print cartridge, see “Find more information” on page 11.
The paper jammed while printing.
Solution:
•If the paper came part way through the front of the printer, gently pull the paper towards you to remove it.
•If the paper did not come part way through the front of the printer, try removing it from the back of the printer:
•Remove the paper from the input tray.
•Gently pull the jammed paper to remove it from the back of the printer.
•If you cannot grasp the edge of the jammed paper to remove it, try the following:
•Turn off the printer.
•Turn on the printer. The printer checks for paper in the paper path and will automatically eject the jammed paper.
•Press OK to continue.
 TIP: If you experience paper jams while printing, try loading one sheet of photo paper at a time. Insert the paper as far as it will go into the input tray.
Printing problems |
9 |

Chapter 3
English
Print quality is poor or I see unexpected results.
Solution:
•The print cartridge may be running out of ink. See the online printer Help.
•Make sure you are printing on the correct side of the paper and using HP Advanced Photo Paper for best results.
•Try turning the Red Eye reduction feature on or off (press the OK button on the top of the printer). To find more information about the Red Eye reduction feature and other photo quality enhancement features built into the printer, see “Find more information” on page 11.
•You may have let photos stack in the output tray or placed them in an album before the colors fully developed. HP recommends exposing the printed surface of each photo to the air for 3 minutes after printing.
•The print cartridge may need to be aligned and/or cleaned. Some HP cameras contain a Maintenance menu, from which you can align or clean the print cartridge as follows:
•Make sure HP Advanced Photo Paper is loaded in the printer.
•Connect the camera to the printer.
•On your camera image display, select the alignment or cleaning option from the Maintenance menu. You can also print test pages, useful for troubleshooting purposes, from the Maintenance menu.
If your camera does not have a Maintenance menu, see the online printer Help or the printer User Guide for information on how to clean and align the print cartridge, and how to print test pages. See “Find more information” on page 11 to learn how to access the online printer Help or the User Guide.
Support process
If you have a problem, follow these steps:
1.Check the documentation that came with the HP Photosmart.
2.Visit the HP online support Web site at www.hp.com/support. HP online support is available to all HP customers. It is the fastest source for up-to-date device information and expert assistance and includes the following features:
•Fast access to qualified online support specialists
•Software and driver updates for the HP Photosmart
•Valuable HP Photosmart and troubleshooting information for common problems
•Proactive device updates, support alerts, and HP newsgrams that are available when you register the HP Photosmart
10 HP Photosmart A320 series printer
3.For Europe only: Contact your local point of purchase. If the HP Photosmart has a hardware failure, you will be asked to bring it back to your local point of purchase. (Service is provided at no charge during the device limited warranty period. After the warranty period, you will be quoted a service charge.)
4.Call HP support. Support options and availability vary by device, country/region, and language.
For a list of support phone numbers, see the phone number list on the inside of the back cover.
Regulatory model identification number VCVRA-0707
For regulatory identification purposes, the product is assigned a Regulatory Model Number. The Regulatory Model Number for the product is VCVRA-0707. This regulatory number should not be confused with the marketing name (HP Photosmart A320 series) or product number (Q8516A).
English
Environmental statements
For Environmental Stewardship information, see the onscreen Help.
Find more information
Your new HP Photosmart A320 series printer comes with the following documentation:
•Setup Guide: Read this document first to learn how to setup the printer.
•Basics Guide: This is the book you are reading. It provides basic information about the printer.
•Printer User Guide: For more in-depth information about the printer, consult this guide. In some countries/regions, the User Guide is provided on an included User Manual CD. If no User Manual CD was included with your printer, you can access the User Guide in your language by visiting HP’s support Web site at www.hp.com/ support, or, on a Windows computer, by installing the User Guide when you install the printer software. If you have already installed the software, and you did not choose to install the documentation at that time, you can access the documentation as follows:
From the Start menu, select Programs or All Programs, point to HP,
HP Photosmart A320 series, and then click Install Photosmart Manual in Other Languages.
•Online Printer Help: This documentation installs on your computer when you install the computer software, and provides comprehensive use and troubleshooting
Regulatory model identification number VCVRA-0707 |
11 |

English
Chapter 3
information. To install the HP Photosmart software and documentation, see “Install the software” on page 7.
To access the online printer Help after installation:
•Windows: From the Start menu, select Programs or All Programs, point to HP, HP Photosmart A320 series, and then click Help.
•Mac: Choose Help, Mac Help in the Finder, and then choose Library,
HP Photosmart Printer Help.
•Camera or camera phone documentation (only if a camera or camera phone came in the box with your printer): Consult your camera/camera phone documentation for information specific to your camera.
Printer specifications
Category |
Specifications |
|
|
Environmental |
Maximum range during operation: 5–40 ºC (41–104 ºF), 5– |
Specifications |
90% RH |
|
Recommended range during operation: 15–35 ºC (59–95 ºF), |
|
20–80% RH |
Power Consumption |
U.S. |
|
Printing: 11.5 W. Idle, no camera connected: 3.7 W |
|
Idle, camera connected: 3.6 W. |
|
Off: 3.6 W |
|
Rest of world |
|
Printing: 12.5 W. Idle, no camera connected: 3.6 W |
|
Idle, camera connected: 3.5 W |
|
Off: 3.5 W |
|
|
Power Supply Model |
HP Part # 0957–2121 (North America), 100-240 Vac (±10%) |
Number |
50/60 Hz (±3 Hz) |
|
HP Part # 0957–2120 (Rest of world), 100-240 Vac (±10%) 50/60 Hz |
|
(±3 Hz) |
|
|
12 HP Photosmart A320 series printer

HP Warranty
English
|
|
|
|
|
|
|
|
HP Warranty |
13 |
|
|
|
|
|
|
|
|
||
|
|
|
|
|
|
|
|
||
|
|
|
|
|
|
|
|
Loading...