


 Loading...
HP Photosmart C4700 series

Contents
1 |
HP Photosmart C4700 series Help.......................................................................................... |
3 |
2 |
Finish setting up the HP Photosmart |
|
|
Add the HP Photosmart to a network ........................................................................................ |
5 |
|
Set up a USB connection ........................................................................................................ |
10 |
3 |
Get to know the HP Photosmart |
|
|
Printer parts ............................................................................................................................. |
11 |
|
Control panel features ............................................................................................................. |
12 |
4 |
How do I?................................................................................................................................. |
13 |
6 |
|
|
|
Print documents ....................................................................................................................... |
21 |
|
Print photos ............................................................................................................................. |
22 |
|
Print envelopes ........................................................................................................................ |
27 |
|
Print on specialty media .......................................................................................................... |
28 |
|
Print a Web page ..................................................................................................................... |
29 |
7 |
Scan |
|
|
Scan to a computer ................................................................................................................. |
33 |
|
Scan to a memory card ........................................................................................................... |
34 |
8 |
Copy |
|
|
Copy text or mixed documents ................................................................................................ |
38 |
9 |
Reprint photos........................................................................................................................ |
43 |
10 |
Save photos............................................................................................................................ |
45 |
11 |
Work with cartridges |
|
|
Check the estimated ink levels ................................................................................................ |
47 |
|
Replace the cartridges ............................................................................................................. |
48 |
|
Order ink supplies .................................................................................................................... |
50 |
|
Cartridge warranty information ................................................................................................ |
51 |
12 |
Solve a problem |
|
|
HP support ............................................................................................................................... |
53 |
|
Setup troubleshooting .............................................................................................................. |
54 |
|
Print troubleshooting ................................................................................................................ |
60 |
|
Print quality troubleshooting .................................................................................................... |
64 |
|
Memory card troubleshooting .................................................................................................. |
65 |
|
Copy troubleshooting ............................................................................................................... |
67 |
|
Scan troubleshooting ............................................................................................................... |
68 |
|
Errors ....................................................................................................................................... |
69 |
Contents
1

14 Technical information |
|
Notice ..................................................................................................................................... |
105 |
Specifications ........................................................................................................................ |
105 |
Environmental product stewardship program ........................................................................ |
106 |
Regulatory notices ................................................................................................................. |
110 |
Regulatory wireless statements ............................................................................................. |
114 |
Index............................................................................................................................................ |
117 |
Contents
2

1 HP Photosmart C4700 series Help
For information about the HP Photosmart, see:
•“Finish setting up the HP Photosmart” on page 5
•“Get to know the HP Photosmart” on page 11
•“How do I?” on page 13
•“Print” on page 21
•“Scan” on page 33
•“Copy” on page 37
•“Reprint photos” on page 43
•“Save photos” on page 45
•“Work with cartridges” on page 47
•“Technical information” on page 105
HP Photosmart C4700 series Help
HP Photosmart C4700 series Help |
3 |

Chapter 1
Help series C4700 Photosmart HP
4 HP Photosmart C4700 series Help

2Finish setting up the HP Photosmart
•Add the HP Photosmart to a network
•Set up a USB connection
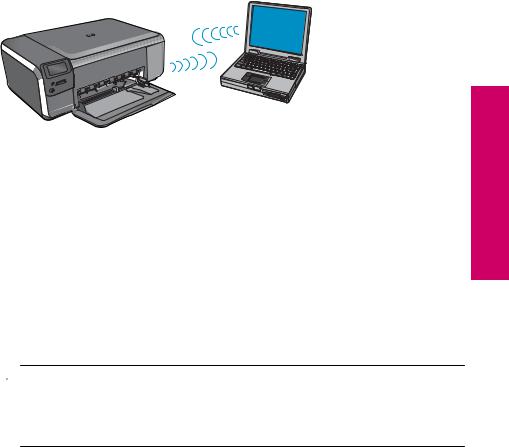
Add the HP Photosmart to a network
•“WiFi Protected Setup (WPS)” on page 5
•“Wireless with a router (infrastructure network)” on page 6
•“Wireless without a router (ad hoc connection)” on page 7
WiFi Protected Setup (WPS)
To connect the HP Photosmart to a wireless network using WiFi Protected Setup (WPS), you will need the following:
A wireless 802.11 network that includes a WPS-enabled wireless router or access point.
A desktop computer or laptop with either wireless networking support, or a network interface card (NIC). The computer must be connected to the wireless network that you intend to install the HP Photosmart on.
To connect the HP Photosmart using WiFi Protected Setup (WPS)
1.Do one of the following:
Use Push Button (PBC) method a. Set up wireless connection.
On the Home Screen, press button next to Scan.
Press button next to Wireless Menu.
Press button next to WPS.
Press button next to Push Button.
Press corresponding button on WPS-enabled router or other networking device.
Press OK.
b. Install software.
 NOTE: The product begins a timer for approximately two minutes in which the corresponding button on the networking device needs to be pressed.
Use PIN method
a. Set up wireless connection.
On the Home Screen, press button next to Scan.
Press button next to Wireless Menu.
Finish setting up the HP Photosmart
Finish setting up the HP Photosmart |
5 |

Chapter 2
Press button next to WPS.
Press button next to PIN. The device displays a PIN.
Enter the PIN on WPS-enabled router or other networking device.
Press OK.
b. Install software.
 NOTE: The product begins a timer for approximately two minutes in which the PIN needs to be entered on the networking device.
2. View the animation for this topic.
Related topics
“Install the software for a network connection” on page 9
Wireless with a router (infrastructure network)
The HP Photosmart Software CD and included USB setup cable provide an easy way to connect the HP Photosmart to your wireless network.
For optimal performance and security in your wireless network, HP recommends you use a wireless router or access point (802.11) to connect the product and the other network elements. When network elements are connected through a wireless router or access point, this is called an infrastructure network.
Photosmart HP the up setting Finish
To connect the HP Photosmart to an integrated wireless WLAN 802.11 network, you will need the following:
A wireless 802.11 network that includes a wireless router or access point.
A desktop computer or laptop with either wireless networking support, or a network interface card (NIC). The computer must be connected to the wireless network that you intend to install the HP Photosmart on.
Broadband Internet access (recommended) such as cable or DSL.
If you connect the HP Photosmart on a wireless network that has Internet access, HP recommends that you use a wireless router (access point or base station) that uses Dynamic Host Configuration Protocol (DHCP).
Network name (SSID).
WEP key or WPA Passphrase (if needed).
6 Finish setting up the HP Photosmart
To connect the product
1.Insert the product Software CD in the computer CD-ROM drive.
2.Follow the instructions on the screen.
When you are prompted, connect the product to the computer using the USB setup cable included in the box. The product will attempt to connect to the network. If the connection fails, follow the prompts to correct the problem, and then try again.
3.When the setup is finished, you will be prompted to disconnect the USB cable and test the wireless network connection. Once the product connects successfully to the network, install the software on each computer that will use the product over the network.
Related topics
“Install the software for a network connection” on page 9
Wireless without a router (ad hoc connection)
Use this section if you want to connect the HP Photosmart to a wireless-capable computer without using a wireless router or access point.
There are two methods you may use to connect the HP Photosmart to your computer using an ad hoc wireless network connection. Once connected, you can install the HP Photosmart software.
▲Turn on the wireless radio for the HP Photosmart and the wireless radio on your computer. On your computer, connect to the network name (SSID) hpsetup, which is the default ad hoc network created by the HP Photosmart.
OR
▲Use an ad hoc network profile on your computer to connect to the product. If your computer is not currently configured with an ad hoc network profile, consult the Help file for your computer Operating System for the proper method to create an ad hoc profile on your computer. Once the ad hoc network profile has been created, insert the installation CD that came with the product and install the software. Connect to the ad hoc network profile you created on your computer.
 NOTE: An ad hoc connection can be used if you do not have a wireless router or access point but do have a wireless radio on your computer. However, an ad hoc connection may result in a lower level of network security and possibly reduced performance when compared to an infrastructure network connection using a wireless router or access point.
Finish setting up the HP Photosmart
Add the HP Photosmart to a network |
7 |

Chapter 2
Photosmart HP the up setting Finish
To connect the HP Photosmart to a Windows computer with an ad hoc connection, the computer must have a wireless network adapter and an ad hoc profile. Create a network profile for a Windows Vista or Windows XP computer using the directions below.
 NOTE: If you have an operating system other than Windows Vista or Windows XP, HP recommends that you use the configuration program that came with your wireless LAN card. To find the configuration program for your wireless LAN card, access your computer's list of programs.
To create a network profile
 NOTE: The product comes configured with a network profile with hpsetup as the network name (SSID). However, for security and privacy HP recommends you create a new network profile on your computer as described here.
1.In the Control Panel, double-click Network Connections.
2.On the Network Connections window, right-click the Wireless Network Connection. If you see Enable on the pop-up menu, select it. Otherwise, if you see Disable on the menu, the wireless connection is already enabled.
3.Right-click the Wireless Network Connection icon, and then click Properties.
4.Click the Wireless Networks tab.
5.Select the Use Windows to configure my wireless network settings check box.
6.Click Add, and then do the following:
a. In Network name (SSID) box, type in a unique network name of your choice.
 NOTE: The network name is case sensitive, so it is important to remember any uppercase (capital) and lowercase (small) letters.
b. If there is a Network Authentication list, select Open. Otherwise, go to the next step.
c. In the Data encryption list, select WEP.
d. Make sure that the check box is not selected next to The key is provided for me automatically. If it is selected, click the check box to clear it.
e. In the Network key box, type a WEP key that has exactly 5 or exactly 13 alphanumeric (ASCII) characters. For example, if you enter 5 characters, you might enter ABCDE or 12345. Or, if you enter 13 characters, you might enter ABCDEF1234567. (12345 and ABCDE are examples only. Select a combination of your choosing.)
Alternatively, you can use HEX (hexadecimal) characters for the WEP key. A HEX WEP key must be 10 characters for 40 bit encryption, or 26 characters for 128 bit encryption.
f. In the Confirm network key box, type the same WEP key you typed in the previous step.
 NOTE: You must remember the exact uppercase (capital) and lowercase (small) letters. If you enter your WEP key incorrectly on the product, the wireless connection will fail.
g. Write down the WEP key exactly as you typed it, including uppercase and lowercase letters.
8 Finish setting up the HP Photosmart
h. Select the check box for This is a computer-to-computer (ad hoc) network; wireless access points are not used.
i. Click OK to close the Wireless network properties window, and then click OK again.
j. Click OK again to close the Wireless Network Properties Connection window.
To connect the product
1.Insert the product Software CD in the computer CD-ROM drive.
2.Follow the instructions on the screen.
When you are prompted, connect the product to the computer using the USB setup cable included in the box. The product will attempt to connect to the network. If the connection fails, follow the prompts to correct the problem, and then try again.
3.When the setup is finished, you will be prompted to disconnect the USB cable and test the wireless network connection. Once the product connects successfully to the network, install the software on each computer that will use the product over the network.
Related topics
“Install the software for a network connection” on page 9
Install the software for a network connection
Use this section to install the HP Photosmart software on a computer connected to a network. Before you install the software, make sure you have connected the
HP Photosmart to a network. If the HP Photosmart has not been connected to a network, follow the onscreen instructions during the software installation to connect the product to the network.
 NOTE: If your computer is configured to connect to a series of network drives, make sure that your computer is currently connected to these drives before installing the software. Otherwise, the HP Photosmart software installer might try to use one of the reserved drive letters and you will not be able to access that network drive on your computer.
NOTE: Installation time can range from 20 to 45 minutes depending on your operating system, the amount of available space, and the processor speed of your computer.
To install the Windows HP Photosmart Software on a networked computer
1.Quit all applications running on your computer.
2.Insert the Windows CD that came with the product into the CD-ROM drive on your computer and follow the onscreen instructions.
 NOTE: If the HP Photosmart is not connected to a network, when prompted, connect the product to the computer using the USB setup cable included in the box. The product will then attempt to connect to the network.
3.If a dialog box about firewalls appears, follow the instructions. If you see firewall popup messages, you must always accept or allow the pop-up messages.
Finish setting up the HP Photosmart
Add the HP Photosmart to a network |
9 |

Chapter 2
4.On the Connection Type screen, select an appropriate option, and then click Next. The Searching screen appears as the Setup program searches for the product on the network.
5.On the Printer Found screen, verify that the printer description is correct.
If more than one printer is found on the network, the Printers Found screen appears. Select the product you want to connect.
6.Follow the prompts to install the software.
When you have finished installing the software, the product is ready for use.
7.To test your network connection, go to your computer and print a self-test report to the product.
Photosmart HP the up setting Finish
Set up a USB connection
The HP Photosmart supports a rear USB 2.0 High Speed port for connection to a computer.
If you use a USB cable to connect the HP Photosmart to a computer on a network, you can set up printer sharing on your computer. This enables other computers on the network to print to the HP Photosmart, using your computer as the host.
The host computer (your computer, connected directly to the HP Photosmart by a USB cable) has full software functionality. Other computers, which are referred to as the clients, have access only to the print features. HP recommends up to 5 computers for the best performance. You must perform other functions from the host computer or from the control panel on the HP Photosmart.
To connect the product with the USB cable
▲Refer to the setup instructions that came with your product for information on connecting to a computer with a USB cable.
 NOTE: Do not connect the USB cable to the product until you are prompted to do so.
To enable printer sharing on a Windows computer
▲Refer to the user guide that came with your computer or see the Windows onscreen Help.
10 Finish setting up the HP Photosmart

3Get to know the HP Photosmart
•Printer parts
•Control panel features
Printer parts
Figure 3-1 Printer parts
1 |
Color graphics display (also referred to as the display) |
|
|
|
|
|
|
|
|
|
|
2 |
Control panel |
|
|
||
|
|
|
|
|
|
3 |
On button |
|
|
||
|
|
|
|
|
|
4 |
Photo light |
|
|
||
|
|
|
|
|
|
5 |
Memory card slot for Memory Stick cards |
|
|
||
|
|
|
|
|
|
6 |
Memory card slot for Secure Digital and xD cards |
|
|
||
|
|
|
|
|
|
7 |
Paper tray |
|
|
||
|
|
|
|
|
|
8 |
Paper tray extender (also referred to as the tray extender) |
|
|
||
|
|
|
|
|
|
9 |
Cartridge door |
|
|
||
|
|
|
|
|
|
10 |
Cartridge access area |
|
|
||
|
|
|
|
|
|
11 |
Print carriage |
|
|
|
|
12 |
Glass |
|
|
||
|
|
|
|
Photosmart |
|
13 |
Lid-backing |
|
|||
|
|
|
|
||
14 |
Lid |
||||
|
|
||||
|
|
|
|
|
|
15 |
Rear door |
|
|
||
|
|
|
|
|
|
16 |
Rear USB port |
|
HP |
||
|
|
|
|
||
17 |
Power connection (Use only with the power adapter supplied by HP.) |
||||
|
Get to know the |
||||
|
|
|
|
||
|
Get to know the HP Photosmart |
11 |
|||
|
|
||||
|
|
||||
Chapter 3
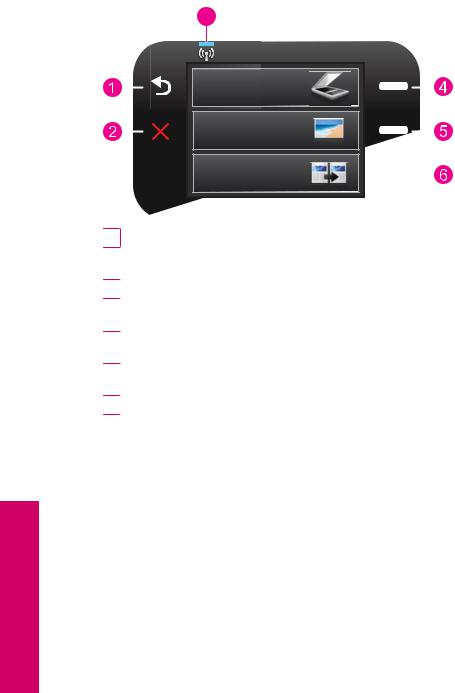
Control panel features
Figure 3-2 Control panel features
7 |
 2.
2.
1Back: Returns to the previous screen.
2Cancel: Stops the current operation, restores default settings, and clears the current photo selection.
3OK: Selects a menu setting, value, or photo.
4Scan: From the Home screen, opens the Scan Menu. When viewing screens other than the Home screen, selects options related to the current display.
5Photo: From the Home screen, opens the Photo Menu. When viewing screens other than the Home screen, selects options related to the current display.
6Copy: From the Home screen, opens the Copy Menu. When viewing screens other than the Home screen, selects options related to the current display.
7Wireless network indicator light: Indicates that the wireless radio is on.
Photosmart HP the know to Get
12 Get to know the HP Photosmart

4 How do I?
This section contains links to commonly performed tasks, such as printing photos, scanning, and making copies.
•“Print photos from a memory card” on page 24
•“Print on specialty media” on page 28
•“Save photos” on page 45
•“Load media” on page 18
•“Replace the cartridges” on page 48
•“Scan to a computer” on page 33
•“Scan to a memory card” on page 34
How do I?
How do I? |
13 |

Chapter 4
I? do How
14 How do I?

5 Paper basics
You can load many different types and sizes of paper in the HP Photosmart, including letter or A4 paper, photo paper, transparencies, and envelopes.
This section contains the following topics:
•“Recommended papers for photo printing” on page 15
•“Recommended papers for printing” on page 16
•“Load media” on page 18
•“Information on paper” on page 20
Recommended papers for photo printing
If you want the best print quality, HP recommends using HP papers that are specifically designed for the type of project you are printing.
Depending on your country/region, some of these papers might not be available.
HP Advanced Photo Paper
This thick photo paper features an instant-dry finish for easy handling without smudging. It resists water, smears, fingerprints, and humidity. Your prints have a look and feel comparable to a store-processed photo. It is available in several sizes, including A4, 8.5 x 11 inch, 10 x 15 cm (4 x 6 inch) (with or without tabs), 13 x 18 cm (5 x 7 inch), and two finishes - glossy or soft gloss (satin matte). It is acid-free for longer lasting documents.
HP Everyday Photo Paper
Print colorful, everyday snapshots at a low cost, using paper designed for casual photo printing. This affordable, photo paper dries quickly for easy handling. Get sharp, crisp images when you use this paper with any inkjet printer. It is available in semi-gloss finish in several sizes, including A4, 8.5 x 11 inch, and 10 x 15 cm (4 x 6 inch) (with or without tabs). For longer-lasting photos, it is acid-free.
Paper basics
HP Photo Value Pack
HP Photo Value Packs conveniently package original HP cartridges and HP Advanced Photo Paper to save you time and take the guesswork out of printing affordable professional photos with your HP Photosmart. Original HP inks and HP Advanced Photo Paper have been designed to work together so your photos are long lasting and vivid, print after print. Great for printing out an entire vacation’s worth of photos or multiple prints to share.
To order HP papers and other supplies, go to www.hp.com/buy/supplies. If prompted, choose your country/region, follow the prompts to select your product, and then click one of the shopping links on the page.
 NOTE: At this time, some portions of the HP Web site are available in English only.
Paper basics |
15 |

Chapter 5
Recommended papers for printing
If you want the best print quality, HP recommends using HP papers that are specifically designed for the type of project you are printing.
Depending on your country/region, some of these papers might not be available.
basics Paper
HP Advanced Photo Paper
This thick photo paper features an instant-dry finish for easy handling without smudging. It resists water, smears, fingerprints, and humidity. Your prints have a look and feel comparable to a store-processed photo. It is available in several sizes, including A4, 8.5 x 11 inch, 10 x 15 cm (4 x 6 inch) (with or without tabs), 13 x 18 cm (5 x 7 inch), and two finishes - glossy or soft gloss (satin matte). It is acid-free for longer lasting documents.
HP Everyday Photo Paper
Print colorful, everyday snapshots at a low cost, using paper designed for casual photo printing. This affordable, photo paper dries quickly for easy handling. Get sharp, crisp images when you use this paper with any inkjet printer. It is available in semi-gloss finish in several sizes, including A4, 8.5 x 11 inch, and 10 x 15 cm (4 x 6 inch) (with or without tabs). For longer-lasting photos, it is acid-free.
HP Brochure Paper or HP Superior Inkjet Paper
These papers are glossy-coated or matte-coated on both sides for two-sided use. They are the perfect choice for near-photographic reproductions and business graphics for report covers, special presentations, brochures, mailers, and calendars.
HP Premium Presentation Paper or HP Professional Paper
These papers are heavy two-sided matte papers perfect for presentation, proposals, reports, and newsletters. They are heavyweight for an impressive look and feel.
HP Iron-On Transfers
HP Iron-on Transfers (for color fabrics or for light or white fabrics) are the ideal solution for creating custom T-shirts from your digital photos.
HP Premium Inkjet Transparency Film
HP Premium Inkjet Transparency Film makes your color presentations vivid and even more impressive. This film is easy to use and handle, and dries quickly without smudging.
HP Photo Value Pack
HP Photo Value Packs conveniently package original HP cartridges and HP Advanced Photo Paper to save you time and take the guesswork out of printing affordable professional photos with your HP Photosmart. Original HP inks and HP Advanced Photo Paper have been designed to work together so your photos are long lasting and vivid, print after print. Great for printing out an entire vacation’s worth of photos or multiple prints to share.
16 Paper basics

ColorLok
HP recommends plain papers with the ColorLok logo for printing and copying of everyday documents. All papers with the ColorLok logo are independently tested to meet high standards of reliability and print quality, and produce documents with crisp, vivid color, bolder blacks, and dry faster than ordinary plain papers. Look for papers with the ColorLok logo in a variety of weights and sizes from major paper manufacturers.
To order HP papers and other supplies, go to www.hp.com/buy/supplies. If prompted, choose your country/region, follow the prompts to select your product, and then click one of the shopping links on the page.
 NOTE: At this time, some portions of the HP Web site are available in English only.
Paper basics
Recommended papers for printing |
17 |
Chapter 5
basics Paper
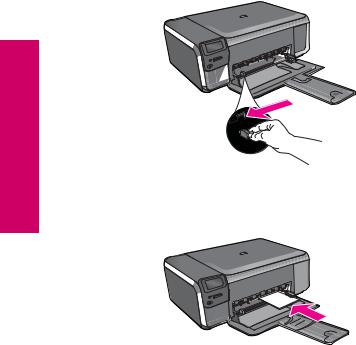
Load media
1.Do one of the following:
Load small-size paper a. Lower paper tray.
Slide paper-width guide outwards.
b. Load paper.
Insert stack of photo paper into paper tray with short edge forward and print side down.
18 Paper basics

Slide stack of paper forward until it stops.
 NOTE: If the photo paper you are using has perforated tabs, load photo paper so that tabs are closest to you.
Slide paper-width guide inward until it stops at edge of paper.
Load full-size paper a. Lower paper tray.
Slide paper-width guide outwards.
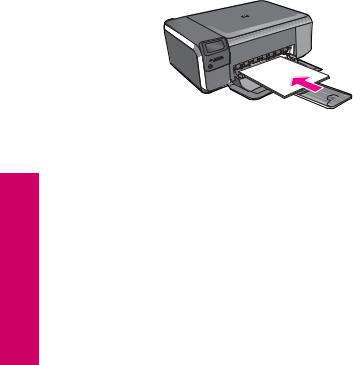
b. Load paper.
Insert stack of paper into paper tray with short edge forward and print side down.
Paper basics
Load media |
19 |

Chapter 5
Slide stack of paper forward until it stops.
Slide paper-width guide inward until it stops at edge of paper.
basics Paper
2. View the animation for this topic.
Related topics
“Information on paper” on page 20
Information on paper
The HP Photosmart is designed to work well with most paper types. Test a variety of paper types before buying a large quantity. Find a paper type that works well and is easy to purchase. HP papers are designed for the best quality results. In addition, follow these tips:
•Do not use paper that is too thin, that has a slick texture, or that stretches easily. It can feed incorrectly through the paper path, causing paper jams.
•Store photo media in its original packaging inside a resealable plastic bag on a flat surface in a cool, dry place. When you are ready to print, remove only the paper you plan to use immediately. When you have finished printing, return any unused photo paper to the plastic bag.
•Do not leave unused photo paper in the paper tray. The paper might start to curl, which might reduce the quality of your printouts. Curled paper can also cause paper jams.
•Always hold photo paper by the edges. Fingerprints on photo paper can reduce print quality.
•Do not use paper that is heavily textured. It can cause graphics or text to print improperly.
•Do not combine different paper types and paper sizes in the paper tray; the entire stack of paper in the paper tray must be the same size and type.
•For best results, do not allow printed photos to stack up in the paper tray.
•Store printed photos under glass or in a storage book to prevent bleeding over time from high humidity.
20 Paper basics

6 Print
“Print documents” on page 21
“Print photos” on page 22
“Print envelopes” on page 27
“Print on specialty media” on page 28
“Print a Web page” on page 29
Related topics
•“Load media” on page 18
•“Recommended papers for photo printing” on page 15
•“Recommended papers for printing” on page 16
Print documents
Most print settings are automatically handled by the software application. You need to change the settings manually only when you change print quality, print on specific types of paper or transparency film, or use special features.
To print from a software application
1.Make sure you have paper loaded in the paper tray.
2.On the File menu in your software application, click Print.
3.Make sure the product is the selected printer.
4.If you need to change settings, click the button that opens the Properties dialog box. Depending on your software application, this button might be called Properties,
Options, Printer Setup, Printer, or Preferences.
 NOTE: When printing a photo, you must select options for the specific photo paper and photo enhancement.
Print 21

Chapter 6
5.Select the appropriate options for your print job by using the features available in the
Advanced, Printing Shortcuts, Features, and Color tabs.
 TIP: You can easily select the appropriate options for your print job by choosing one of the predefined print tasks on the Printing Shortcuts tab. Click a type of print task in the Printing Shortcuts list. The default settings for that type of print task are set and summarized on the Printing Shortcuts tab. If necessary, you can adjust the settings here and save your custom settings as a new printing shortcut. To save a custom printing shortcut, select the shortcut and click Save As. To delete a shortcut, select the shortcut and click Delete.
6.Click OK to close the Properties dialog box.
7.Click Print or OK to begin printing.
Related topics
•“Recommended papers for printing” on page 16
•“Load media” on page 18
•“View the print resolution” on page 30
•“Printing shortcuts” on page 31
•“Set the default print settings” on page 32
•“Stop the current job” on page 103
Print photos
•“Print photos saved on your computer” on page 22
•“Print photos from a memory card” on page 24
Print photos saved on your computer
To print a photo on photo paper
1.Remove all paper from the paper tray.
2.Place the photo paper print side down on the right side of the paper tray.
3.Slide the paper-width guide inward until it stops at the edge of the paper.
4.On the File menu in your software application, click Print.
5.Make sure the product is the selected printer.
22 Print

6.Click the button that opens the Properties dialog box.
Depending on your software application, this button might be called Properties,
Options, Printer Setup, Printer, or Preferences.
7.Click the Features tab.
8.In the Basic Options area, from the Paper Type drop-down list, select More. Then, select the appropriate photo paper type.
9.In the Resizing Options area, from the Size drop-down list, select More. Then, select the appropriate paper size.
If the paper size and paper type are not compatible, the printer software displays an alert and allows you to select a different type or size.
10.(Optional) Select the Borderless printing check box if it is not already checked.
If the borderless paper size and paper type are not compatible, the product software displays an alert and allows you to select a different type or size.
11.In the Basic Options area, select a high print quality, such as Best, from the Print Quality drop-down list.
 NOTE: To achieve the highest dpi resolution, you can use the Maximum dpi setting with supported types of photo paper. If Maximum dpi is not listed in the Print quality drop-down list, you can enable it from the Advanced tab. For more information, see “Print using Maximum dpi” on page 30.
12.In the HP Real Life Technologies area, click the Photo fix drop-down list and select from the following options:
•Off: applies no HP Real Life Technologies to the image.
•Basic: enhances low-resolution images; moderately adjusts image sharpness.
13.Click OK to return to the Properties dialog box.
14.Click OK, and then click Print or OK in the Print dialog box.
 NOTE: Do not leave unused photo paper in the paper tray. The paper might start to curl, which could reduce the quality of your printout. For best results, do not allow printed photos to stack up in the paper tray.
Related topics
•“Recommended papers for photo printing” on page 15
•“Load media” on page 18
•“Print using Maximum dpi” on page 30
•“View the print resolution” on page 30
•“Printing shortcuts” on page 31
•“Set the default print settings” on page 32
•“Stop the current job” on page 103
Print photos |
23 |

Chapter 6
Print photos from a memory card
1.Do one of the following:
Print photo on small-size paper a. Load paper.
Load up to 10 x 15 cm (4 x 6 inch) photo paper in paper tray.
b. Select project type.
Press button next to Photo on Home screen.
Press button next to Memory Card Print.
c. Insert memory device.
1Memory Stick, Memory Stick Pro, Memory Stick Select, Memory Stick Magic Gate, Memory Stick Duo or Pro Duo (adapter optional), Memory Stick Pro-HG Duo (adapter optional), or Memory Stick Micro (adapter required)
2MultiMediaCard (MMC), MMC Plus, Secure MultiMedia Card, MMC Mobile (RS-MMC; adapter required), Secure Digital (SD), Secure Digital Mini, Secure Digital High Capacity (SDHC), TransFlash MicroSD Card (adapter required), or xD-Picture card
24 Print

d. Select photo.
Press button next to Select.
Press OK.
Press button next to Prints to increase number of copies. e. Print photo.
Press OK.
Print photo on full-size paper a. Load paper.
Load full-size photo paper in paper tray.
b. Select project type.
Press button next to Photo on Home screen.
Press button next to Memory Card Print.
c. Insert memory device.
1Memory Stick, Memory Stick Pro, Memory Stick Select, Memory Stick Magic Gate, Memory Stick Duo or Pro Duo (adapter optional), Memory Stick Pro-HG Duo (adapter optional), or Memory Stick Micro (adapter required)
2MultiMediaCard (MMC), MMC Plus, Secure MultiMedia Card, MMC Mobile (RS-MMC; adapter required), Secure Digital (SD), Secure Digital Mini, Secure Digital High Capacity (SDHC), TransFlash MicroSD Card (adapter required), or xD-Picture card
Print photos |
25 |
Chapter 6
d. Select photo.
Press button next to Select.
Press OK.
Press button next to 4 x 6 Photo until size changes to 8.5 x 11 Photo.
Press button next to Prints to increase number of copies.
e. Print photo.Press OK.
Print passport photos a. Load paper.
Load full-size photo paper in paper tray.
b. Select project type.
Press button next to Photo on Home screen.
Press button next to Passport Photo Print.
26 Print

c. Insert memory device.
1Memory Stick, Memory Stick Pro, Memory Stick Select, Memory Stick Magic Gate, Memory Stick Duo or Pro Duo (adapter optional), Memory Stick Pro-HG Duo (adapter optional), or Memory Stick Micro (adapter required)
2MultiMediaCard (MMC), MMC Plus, Secure MultiMedia Card, MMC Mobile (RS-MMC; adapter required), Secure Digital (SD), Secure Digital Mini, Secure Digital High Capacity (SDHC), TransFlash MicroSD Card (adapter required), or xD-Picture card
d. Select photo.
Press button next to Select.
Press OK.
Press button next to Prints to increase number of copies. e. Print photo.
Press OK.
2.View the animation for this topic.
Related topics
•“Recommended papers for photo printing” on page 15
•“Stop the current job” on page 103
Print envelopes
With the HP Photosmart, you can print on a single envelope, a group of envelopes, or label sheets designed for inkjet printers.
Print envelopes |
27 |

Chapter 6
To print a group of addresses on labels or envelopes
1.Print a test page on plain paper first.
2.Place the test page on top of the label sheet or envelope, and hold both up to the light. Check the spacing for each block of text. Make adjustments as needed.
3.Load the labels or envelopes into the paper tray.
 CAUTION: Do not use envelopes with clasps or windows. They can get stuck in the rollers and cause paper jams.
4.Slide the paper-width guide inward against the stack of labels or envelopes until the guide stops.
5.If you are printing on envelopes, do the following:
a. Display the print settings, and click the Features tab.
b. In the Resizing Options area, click the appropriate envelope size in the Size list.
6.Click OK, and then click Print or OK in the Print dialog box.
Related topics
•“Paper basics” on page 15
•“View the print resolution” on page 30
•“Printing shortcuts” on page 31
•“Set the default print settings” on page 32
•“Stop the current job” on page 103
Print on specialty media
|
To reverse an image for iron-on transfers |
||
|
1. |
On the File menu in your software application, click Print. |
|
|
2. |
Make sure the product is the selected printer. |
|
|
3. |
Click the button that opens the Properties dialog box. |
|
|
|
Depending on your software application, this button might be called Properties, |
|
|
|
Options, Printer Setup, Printer, or Preferences. |
|
|
4. |
Click the Features tab. |
|
5. |
In the Paper Type drop-down list, click More, and then select HP Iron-on Transfer |
||
|
from the list. |
||
6. |
If the selected size is not what you want, click an appropriate size in the Size list. |
||
|
|||
|
7. |
Click the Advanced tab. |
|
|
8. |
In the Features area, select the Mirror Image check box. |
|
|
9. |
Click OK, and then click Print or OK in the Print dialog box. |
|
 NOTE: To prevent jams, manually feed the iron-on transfer sheets into the paper tray one sheet at a time.
To print on transparencies
1.Load the transparency into the paper tray.
2.On the File menu in your software application, click Print.
28 Print
Loading...