


 Loading...
HP Photosmart A310 series
User Guide

Support phone list
The following support phone list is continued on the inside back cover of this guide.
Copyrights and trademarks
© 2006 Hewlett-Packard Development Company, L.P.
Hewlett-Packard Company notices
The information contained in this document is subject to change without notice.
All rights reserved. Reproduction, adaptation, or translation of this material is prohibited without prior written permission of Hewlett-Packard, except as allowed under copyright laws.
The only warranties for HP products and services are set forth in the express warranty statements accompanying such products and services. Nothing herein should be construed as constituting an additional warranty. HP shall not be liable for technical or editorial errors or omissions contained herein.
Trademarks
HP, the HP logo, and Photosmart are property of HewlettPackard Development Company, L.P.
Microsoft and Windows are registered trademarks of Microsoft Corporation.
Mac, the Mac logo, and Macintosh are registered trademarks of Apple Computer, Inc.
The Bluetooth word mark and logos are owned by the Bluetooth SIG, Inc. and any use of such marks by Hewlett-Packard Company is under license.
PictBridge and the PictBridge logo are trademarks of the Camera & Imaging Products Association (CIPA).
Other brands and their products are trademarks or registered trademarks of their respective holders.
Environmental statements
For Environmental Stewardship information, see the electronic Help.
Regulatory model identification number VCVRA-0604
For regulatory identification purposes, the product is assigned a Regulatory Model Number. The Regulatory Model Number for the product is VCVRA-0604. This regulatory number should not be confused with the marketing name (HP Photosmart A310 series) or product number (Q8471A).
Contents |
|
|
1 |
Welcome............................................................... |
3 |
|
Find more information ........................................... |
3 |
|
Printer parts .......................................................... |
4 |
|
Optional accessories ........................................... |
11 |
|
Use the optional battery ...................................... |
12 |
2 |
Paper basics....................................................... |
15 |
|
Choose and load paper ....................................... |
15 |
|
Use HP Advanced Photo Paper ................... |
15 |
|
Load your paper ........................................... |
15 |
3 |
Print basics......................................................... |
19 |
|
Print from a PictBridge-certified camera ............. |
19 |
|
Improve the quality of your photos using Photo |
|
|
Fix ....................................................................... |
21 |
4 Print from Bluetooth devices or your |
|
|
|
computer............................................................. |
23 |
|
Print from a Bluetooth device .............................. |
23 |
|
Make the Bluetooth connection .................... |
23 |
|
Print .............................................................. |
23 |
|
Print from a computer ......................................... |
24 |
|
Transfer photos from your camera to a |
|
|
computer ....................................................... |
25 |
|
About the HP Photosmart software suite |
|
|
....................................................................... |
26 |
5 Maintain and transport the printer................... |
27 |
|
|
Replace the print cartridge .................................. |
27 |
|
Clean and maintain the printer ............................ |
30 |
|
Clean the outside of the printer .................... |
30 |
|
Automatically clean the print cartridge .......... |
31 |
|
Print a test page ........................................... |
32 |
|
Manually clean the print cartridge |
|
|
contacts ........................................................ |
34 |
1
|
Align the print cartridge ................................. |
35 |
|
Update the HP Photosmart printer driver |
|
|
software .............................................................. |
36 |
|
Store the printer and print cartridge .................... |
38 |
|
Store the printer ............................................ |
38 |
|
Store the print cartridge ................................ |
38 |
|
Maintain the quality of photo paper ..................... |
39 |
|
Transport the printer ........................................... |
40 |
6 |
Troubleshooting................................................. |
43 |
|
Printer hardware problems .................................. |
43 |
|
Printing problems ................................................ |
48 |
|
Bluetooth printing problems ................................ |
54 |
|
PictBridge camera error messages ..................... |
56 |
7 |
Specifications .................................................... |
61 |
|
System requirements .......................................... |
61 |
|
Printer specifications ........................................... |
61 |
8 |
HP support ......................................................... |
65 |
|
Support process .................................................. |
65 |
|
HP support by phone .......................................... |
66 |
|
Phone support period ................................... |
66 |
|
Placing a call ................................................ |
66 |
|
After the phone support period ..................... |
67 |
|
Additional warranty options ................................. |
67 |
|
HP Warranty ....................................................... |
68 |
A |
Install the software............................................ |
69 |
B |
Indicator lights................................................... |
71 |
Index.......................................................................... |
77 |
|
2 |
HP Photosmart A310 series |
1 Welcome
Thank you for your HP Photosmart purchase! To get the maximum use out of your new printer, read this guide. Learn how to:
●Quickly and easily print beautiful photos directly from any PictBridge device—including digital cameras, camera phones, and video cameras.
●Print photos from any Bluetooth device— wirelessly!—with an optional Bluetooth adapter.
●Connect the printer to a computer, and take advantage of the photo editing, storing, sharing, and creative project capabilities of the included HP Photosmart software.
●Get higher quality photos with the help of the builtin HP Real Life Technologies, which correct redeye, color, and contrast problems with the touch of a button.
●Take your portable, lightweight photo printer to social events to print and share photos instantly.
Find more information
Your new HP Photosmart A310 series printer comes with the following documentation:
●Setup Guide: The setup instructions that explain how to set up the printer and install the
HP Photosmart software. Read this document first.
Welcome |
3 |
●Printer User Guide: This is the book you are reading. This guide describes the basic features of the printer, explains how to use the printer without connecting it to a computer, and contains hardware troubleshooting information.
●Camera or camera phone documentation (only if a camera or camera phone came in the box with your printer): The documentation that came with your camera explains how to use the camera to take pictures and includes troubleshooting and maintenance information. In addition, the camera image display provides information.
●Electronic Help: The electronic Help describes how to use the printer with a computer and contains software troubleshooting information.
After you have installed the HP Photosmart software on your computer (see page 69), you can view the electronic Help on your computer. The Help displays on your computer screen and describes how to use the printer with a computer and how to troubleshoot software problems.
To access the electronic Help:
–Windows: From the Start menu, select
Programs or All Programs, point to HP, HP Photosmart A310 series, and then click Help.
–Mac: Choose Help, Mac Help in the Finder, and then choose Library, HP Photosmart Printer Help.
Printer parts
This section gives an overview of the parts of your printer, and provides references to sections where the parts and functions are described in more detail.
4 |
HP Photosmart A310 series |
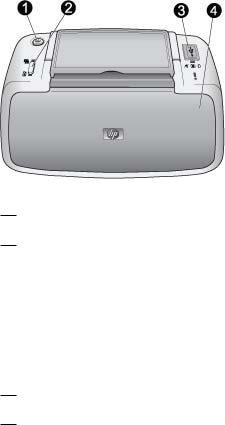
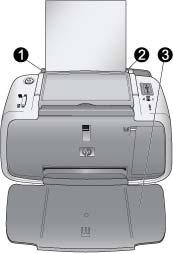
Front view (closed)
1On: Press to turn the printer on or off, or to cancel a print job that is in progress.
2OK: Press to turn Photo Fix on or off, or to resume a print job after an error.
3PictBridge port: Connect either a PictBridge-certified device (such as a PictBridge digital camera, camera phone, or video camera), or the optional HP Bluetooth wireless printer adapter to this port.
For information on printing from a PictBridge device, see page 19.
For information on printing wirelessly using Bluetooth technology, see page 23.
4Output tray (closed): Open this to print. The input tray opens automatically when you open the output tray.
Welcome |
5 |
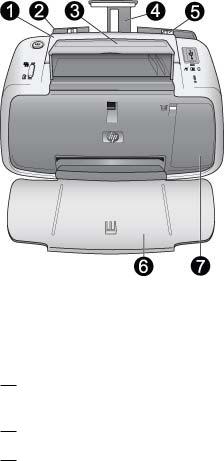
Front view (open)
1Handle: Extend to carry the printer.
2Input tray: Load paper here. The input tray opens automatically when you open the output tray. To close the input tray, you must first close the output tray. For more information about loading paper, see page 15.
3USB cable holder: Store the USB cable for your PictBridge camera in here for easy access.
4Input tray extension: Pull out to support paper.
5Paper-width guide: Move to the width of the current paper to position the paper properly.
6 |
HP Photosmart A310 series |
6Output tray (open): The printer deposits prints here. When you open the output tray, the input tray opens automatically.
7Print cartridge door: Open to insert or remove the
HP 110 Tri-color Inkjet print cartridge. Close to print. For more information about replacing the print cartridge, see page 27.
Rear of printer
1USB port: Connect the printer to a computer here, using a USB cable. For more information on printing from a computer, see page 24.
2Power cord connection: Connect the power cord here.
Welcome |
7 |
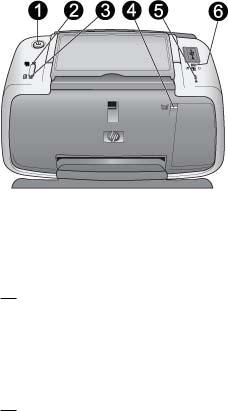
Indicator lights
1On light: Solid green if the printer is on. Flashing green if the printer is busy or the optional battery is low. Slowly flashing green if the optional battery is charging.
2Photo Fix light: Solid green if Photo Fix is turned on. For information about the Photo Fix feature, see page 21.
3Resume light: Flashing green if the printer is out of paper or if there is a paper jam. Indicates that the OK button should be pressed to resume printing after the error is cleared.
4Print Cartridge light: Solid red if the print cartridge is low on ink. Flashing red if there is a print cartridge error, if the print cartridge is missing, or if the print cartridge door is open.
5Attention light: Solid or flashing red if there is a printer error, such as a paper jam, that must be addressed before you can continue printing.
For troubleshooting information, see page 43.
8 |
HP Photosmart A310 series |

For more information about the indicator lights, see page 71.
6PictBridge light: Solid green if a PictBridge camera is connected to the PictBridge port. Flashing green if the printer is printing a photo from your camera. Do not disconnect your camera if the light is flashing green.
Tip For more information about the indicator lights, see page 71. For troubleshooting information, see page 43.
Welcome |
9 |

Bottom of printer
1Battery compartment button: Slide to release the compartment cover.
2Battery compartment cover: Open this cover on the bottom of the printer to insert the optional
HP Photosmart Internal Battery.
3Internal battery compartment: Insert the optional HP Photosmart Internal Battery here.
4Internal Battery: You must purchase the battery separately.
See page 11 for more information.
10 |
HP Photosmart A310 series |
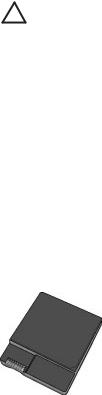
Caution Always make sure to unplug the printer power cord before opening the battery compartment cover. Do not touch the coppercolored contacts on the battery or the contacts inside the battery compartment.
Optional accessories
There are several optional accessories available for the printer that enhance its portability for printing anywhere, anytime. The appearance of the accessories may vary from what is shown. To purchase accessories, go to:
●www.hp.com/eur/hpoptions (Europe)
●www.hp.com, choose your country/region, and then click Buy or Online Shopping (All other countries/ regions)
For camera accessories, see the documentation that came with your camera.
HP Photosmart Internal Battery
The HP Photosmart Internal Battery lets you take the printer with you wherever you go. For more information, see page 12.
Welcome |
11 |
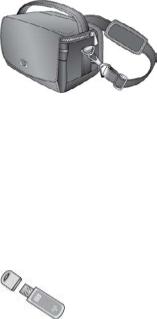
HP Photosmart Carrying Case
The lightweight, durable HP Photosmart Carrying Case holds and protects the printer and its accessories for hassle-free printing on the go.
Note You will need to transport your digital camera, camera phone, or video camera in a separate carrying case. See the documentation that came with your camera or other device for accessories information.
HP Bluetooth wireless printer adapter
The HP Bluetooth wireless printer adapter, model bt450, plugs into the PictBridge port on the top of the printer and lets you use Bluetooth wireless technology for printing. For more information about using Bluetooth wireless technology, see page 23.
Use the optional battery
A fully-charged HP Photosmart Internal Battery has sufficient charge to print approximately 75 photos.
12 |
HP Photosmart A310 series |
When the battery power is low, the On and Attention lights flash. When the battery charge is completely depleted, the printer will shut down and any print jobs that are in progress will be cancelled.
To recharge the battery, leave it inside the printer and connect the printer to an AC power source. If the printer is turned on, the On light slowly flashes green to indicate that the battery is charging. The printer does not need to be turned on to charge the battery.
The battery should fully charge in approximately four hours when the printer is not in use. The first time a battery is charged and when the battery has been fully discharged, it could take up 12 hours to recharge.
Note If the printer is operating solely on battery power, it automatically shuts down after 8 minutes of inactivity to conserve battery power.
Welcome |
13 |
14 |
HP Photosmart A310 series |
2 Paper basics
Choose and load paper
Learn which is the recommended HP paper for use with the printer, and learn how to load it into the input tray for printing.
Use HP Advanced Photo Paper
Always use HP Advanced Photo Paper with the HP Photosmart A310 series printer. It is especially
designed to work with the inks in your printer to create beautiful photos.
To purchase HP Advanced Photo Paper or other supplies, go to:
●www.hp.com/eur/hpoptions (Europe)
●www.hp.com, choose your country/region, and then click Buy or Online Shopping (All other countries/ regions)
Load your paper
Paper loading tips:
●You can print on 10 x 15 cm (4 x 6 inch) photo paper, 10 x 15 cm (4 x 6 inch) or smaller index cards, L-size cards, A6 cards, or Hagaki cards 100 x 148 mm (3.9 x 5.8 inch).
●Before loading paper, slide out the paper-width guide to make room for the paper.
●Load only one type and size of paper at a time. Do not mix paper types or sizes in the input tray.
Paper basics |
15 |
●Do not load more than 20 sheets of 10 x 15 cm (4 x 6 inch) photo paper.
●If you are using tabbed paper, load the paper so the tab feeds in last.
●In dry conditions photo paper can curl. To prevent curling, store photo paper in a plastic bag, not in the input tray of the printer.
1 |
Input tray |
2 |
Paper-width guide |
3 |
Output tray |
16 |
HP Photosmart A310 series |
To load paper
1.Open the output tray. The input tray opens automatically.
2.Load up to 20 sheets of photo paper with the print side or glossy side facing the front of the printer. If you are using tabbed paper, load the paper so tab feeds in last. When loading, slide the paper to the left side of the input tray and push the paper down firmly until it stops.
3.Adjust the paper-width guide to fit close to the edge of the paper without bending the paper.
Paper basics |
17 |
18 |
HP Photosmart A310 series |
3 Print basics
Printing photos directly from your camera is the easiest and fastest way to turn your digital photos into outstanding prints.
This section describes how to print from digital cameras using a direct USB connection and PictBridge technology, and how to improve the quality of your prints using the printer's built-in Photo Fix feature.
Note Although this chapter describes the procedure for printing from a PictBridge digital camera, the procedure for printing from other PictBridge devices—such as camera phones and video phones—is very similar. Review the documentation that came with your PictBridge device for specific information.
Print from a PictBridge-certified camera
You can print photos by connecting a PictBridgecertified digital camera directly to the PictBridge port on the top of the printer with a USB cable. When you print from your digital camera, the printer uses the settings that you selected on the camera. For more information, see the documentation that came with your camera.
Make sure you have turned on the printer and inserted a HP 110 Tri-color Inkjet print cartridge before you try to print.
Print basics |
19 |
Note If you connect a non-HP camera and encounter problems while printing, see the documentation that came with your camera. HP is not able to provide technical support for non-HP cameras.
To print using a PictBridge-certified camera
1.Turn on your PictBridge digital camera. Make sure the USB configuration is set to Digital Camera, so that your camera is able to successfully connect to the printer and print photos.
2.Load photo paper into the printer.
The printer automatically prints using the best quality settings for HP Advanced Photo Paper. To change the paper type or quality settings, print your photos from a computer. For more information on printing from a computer, see the electronic Help.
Note If you are printing from an HP Photosmart E427 digital camera, you can print using Normal print quality for faster prints. The print quality may be noticeably lower, especially if you are not using HP Advanced Photo Paper. Print quality is best when Best print quality is selected.
3.Connect your camera to the PictBridge port on the top of the printer using the USB cable for the camera. The PictBridge light turns solid green when the connection is established.
4.Use the menu on your camera image display to select and print photos. The On light and the PictBridge light flash while the photos are printing.
Important: Your photos are instantly dry, and can be handled immediately after they are printed. However, HP recommends that you leave the printed surface of your photos exposed to the air for 5–10 minutes after
20 |
HP Photosmart A310 series |
printing, to allow the colors to fully develop before you stack them with other photos or place them in albums.
Improve the quality of your photos using Photo Fix
The printer uses Photo Fix to enhance your photos with HP Real Life technologies. Photo Fix will:
●Sharpen blurred photos.
●Improve the dark areas of a photo without affecting the light areas of the photo.
●Reduce red-eye that can occur in photos taken with a flash.
●Improve the overall brightness, color, and contrast of photos.
Photo Fix is turned on by default when you turn on the printer. The Photo Fix light is solid green when the feature is turned on.
HP recommends leaving Photo Fix on, but if your photos do not print correctly, or if you want to print a photo without the Photo Fix improvements, turn Photo Fix off.
To turn off Photo Fix, press OK. The Photo Fix light turns off. Photo Fix remains off until you press OK again, or turn the printer off and on again.
Print basics |
21 |
22 |
HP Photosmart A310 series |
Loading...