


 Loading...
HP Photosmart 7520 Series

Contents
1 |
HP Photosmart 7520 Series Help................................................................................................................................... |
3 |
2 |
Get to Know the HP Photosmart |
|
|
Printer parts.......................................................................................................................................................................... |
5 |
|
Control panel features.......................................................................................................................................................... |
6 |
|
Tips for getting to know the printer....................................................................................................................................... |
7 |
3 |
How do I?.......................................................................................................................................................................... |
9 |
4 |
|
|
|
Print photos from a memory card....................................................................................................................................... |
11 |
|
Select Print Media.............................................................................................................................................................. |
13 |
|
Load media......................................................................................................................................................................... |
13 |
|
Recommended papers for photo printing .......................................................................................................................... |
16 |
|
Recommended papers for printing and copying................................................................................................................. |
16 |
|
Tips for print success.......................................................................................................................................................... |
17 |
5 |
Copy and scan |
|
|
Scan to a computer, memory device, or email................................................................................................................... |
19 |
|
Copy text or mixed documents........................................................................................................................................... |
20 |
|
Tips for copy and scan success......................................................................................................................................... |
21 |
6 |
Use Web Services |
|
|
Print with HP ePrint............................................................................................................................................................ |
23 |
|
Use HP Print Apps.............................................................................................................................................................. |
24 |
|
Visit the HP ePrintCenter website...................................................................................................................................... |
24 |
|
Tips for using Web Services............................................................................................................................................... |
24 |
7 |
Fax |
|
|
Send a fax.......................................................................................................................................................................... |
25 |
|
Receive a fax...................................................................................................................................................................... |
29 |
|
Set up speed-dial entries.................................................................................................................................................... |
32 |
|
Change fax settings............................................................................................................................................................ |
33 |
|
Fax and digital phone services........................................................................................................................................... |
36 |
|
Fax over Internet Protocol.................................................................................................................................................. |
37 |
|
Use reports......................................................................................................................................................................... |
37 |
8 |
Work with cartridges |
|
|
Check the estimated ink levels........................................................................................................................................... |
41 |
|
Clean cartridges automatically........................................................................................................................................... |
41 |
|
Align printer........................................................................................................................................................................ |
41 |
|
Replace the cartridges....................................................................................................................................................... |
42 |
|
Order ink supplies.............................................................................................................................................................. |
44 |
|
Cartridge warranty information........................................................................................................................................... |
44 |
|
Tips for working with ink..................................................................................................................................................... |
45 |
9 |
Connectivity |
|
|
Add the HP Photosmart to a network................................................................................................................................. |
47 |
|
Change from a USB connection to a wireless network...................................................................................................... |
48 |
|
Connect a new printer........................................................................................................................................................ |
49 |
|
Change network settings.................................................................................................................................................... |
49 |
|
Wireless Direct................................................................................................................................................................... |
49 |
|
Tips for setting up and using a networked printer.............................................................................................................. |
50 |
|
Advanced printer management tools (for networked printers)........................................................................................... |
50 |
10 |
Solve a problem |
|
|
Get more help..................................................................................................................................................................... |
53 |
1
|
Register the product........................................................................................................................................................... |
53 |
|
Clear the paper jam............................................................................................................................................................ |
53 |
|
Clear carriage jam.............................................................................................................................................................. |
55 |
|
Solve print problem............................................................................................................................................................ |
55 |
|
Solve copy and scan problem............................................................................................................................................ |
55 |
|
Solve networking problem.................................................................................................................................................. |
56 |
|
HP support by phone.......................................................................................................................................................... |
56 |
|
Additional warranty options................................................................................................................................................ |
57 |
|
Cartridge supply upgrade................................................................................................................................................... |
57 |
|
Prepare printer................................................................................................................................................................... |
57 |
|
Check cartridge access door.............................................................................................................................................. |
57 |
|
Printhead failure................................................................................................................................................................. |
57 |
|
Printer failure...................................................................................................................................................................... |
58 |
|
Ink cartridge problem.......................................................................................................................................................... |
58 |
|
SETUP cartridges............................................................................................................................................................... |
59 |
11 |
Technical information |
|
|
Notice................................................................................................................................................................................. |
61 |
|
Cartridge chip information.................................................................................................................................................. |
61 |
|
Specifications..................................................................................................................................................................... |
62 |
|
Environmental product stewardship program..................................................................................................................... |
63 |
|
Regulatory notices.............................................................................................................................................................. |
69 |
12 |
Additional fax setup |
|
|
Set up faxing (parallel phone systems).............................................................................................................................. |
77 |
|
Serial-type fax setup........................................................................................................................................................... |
96 |
|
Test fax setup..................................................................................................................................................................... |
97 |
Index........................................................................................................................................................................................ |
99 |
|
2

1 HP Photosmart 7520 Series Help
Click the links below for information about the HP Photosmart:
•Get to Know the HP Photosmart
•How do I?
•Copy and scan
•Work with cartridges
•Fax
•Load media
•Clear the paper jam
HP Photosmart 7520 Series Help |
3 |
Chapter 1
4 HP Photosmart 7520 Series Help

2Get to Know the HP Photosmart
•Printer parts
•Control panel features
•Tips for getting to know the printer
Printer parts
•Front view of the printer
1 |
Lid |
|
|
2 |
Lid Backing |
|
|
3 |
Glass |
|
|
4 |
Color graphics display (also referred to as the display) |
|
|
5 |
Memory Card slots LED |
|
|
6 |
Memory Card slots |
|
|
7 |
USB Drive slot |
|
|
8 |
Photo tray |
|
|
9 |
Paper-width guide for the photo tray |
|
|
10 |
Paper tray extender (also referred to as the tray extender) |
|
|
11 |
Paper-width guide for the main tray |
|
|
12 |
Main tray (also referred to as the input tray) |
|
|
13 |
Output tray |
|
|
14 |
Wireless LED |
|
|
15 |
On button |
|
|
16 |
Cartridge door |
|
|
17 |
Automatic document feeder |
|
|
18 |
Automatic document feeder tray |
|
|
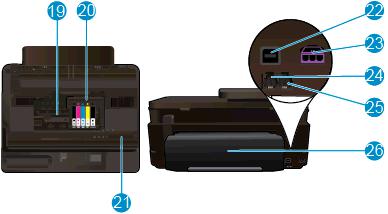
•Top and rear views of the printer
Get to Know the HP Photosmart |
5 |
Chapter 2
19 |
Cartridge access area |
|
|
20 |
Printhead assembly |
|
|
21 |
Model number location |
|
|
22 |
Rear USB port |
|
|
23 |
Power connection (Use only with the power adapter supplied by HP). |
|
|
24 |
Two-sided printing accessory |
|
|
Control panel features
The touch screen display shows menus, photos, and messages. You can touch and drag your finger horizontally to scroll through photos and vertically through menu options.
6 Get to Know the HP Photosmart
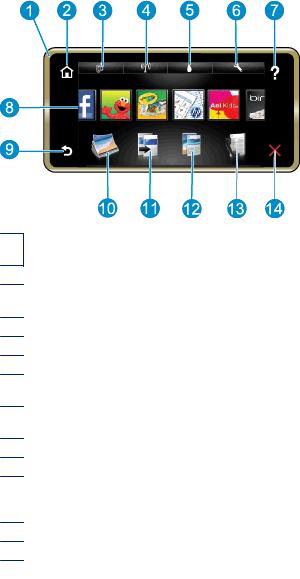
1Display: The touch screen display shows menus, photos, and messages. You can flick horizontally through photos and vertically through list menus.
2Home: Returns to the Home screen (the default screen when you turn on the product.
3Web Services: Opens the Web Services menu, which displays status details. You can also change settings and, if Web Services is enabled, print out a report..
4Wireless Settings: Opens the Wireless menu where you can see wireless properties and change wireless settings.
5Ink Levels: Opens the Ink Levels menu showing estimated ink levels.
6Settings: Opens the Settings menu where you can change product settings and perform maintenance functions.
7Help: From the Help screen, lists the topics for which help is available. From other screens, provides help applicable to the current screen.
8Apps: Provide quick and easy way to access and print information from the Apps, such as maps, coupons, coloring pages, and puzzles.
9Back: Returns to the previous screen on the display.
10Photo: Opens the Photo menu where you can view, edit, print, and save your photos.
11Copy: Opens the Copy menu where you can preview your copy, edit for size and darkness, select black or color, and select the number of copies. You can also change settings to make 2-sided copies, or select size, quality, and paper type.
12Scan: Opens the Choose Scan Destination menu, where you can select a destination for your scan.
13Fax: Displays a screen where you can send a fax, or choose fax settings.
14Cancel: Stops the current operation.
Tips for getting to know the printer
Use the following tips to get to know the printer:
•Learn how to manage print apps for printing recipes, coupons, and other content from the web. Click here to go online for more information.
Tips for getting to know the printer |
7 |
Chapter 2
8 Get to Know the HP Photosmart
3 How do I?
This section contains links to commonly performed tasks, such as printing photos, scanning, and making copies.
• |
Scan to a computer, memory device, or email |
• |
Replace the cartridges |
• |
Copy text or mixed documents |
• |
Load media |
• |
Clear the paper jam |
• |
Use Web Services |
How do I? |
9 |
Chapter 3
10 How do I?
4 Print
Print photos from a memory card
Related topics
•Load media
•Tips for print success
Print photos from a memory card
Do one of the following:
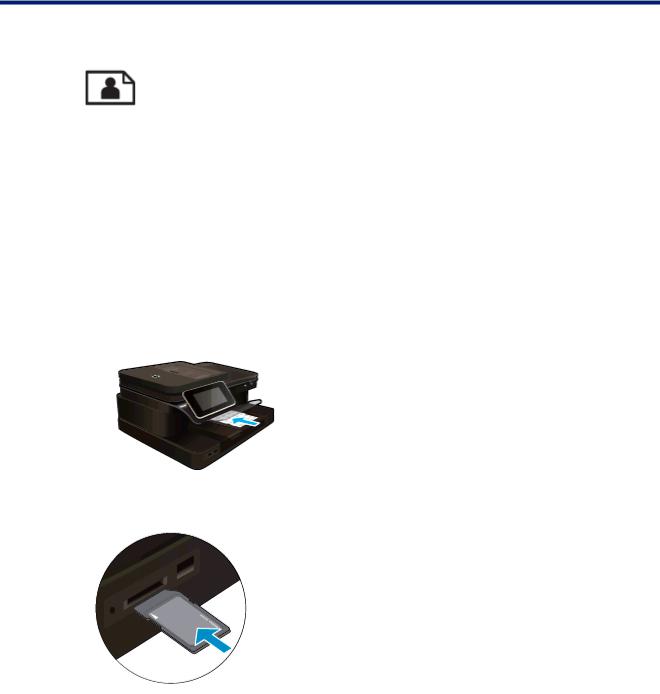
Print photo on small-size paper
1.Load paper.
▲Load up to 10 x 15 cm (4 x 6 inch) photo paper print side down in photo tray.
Load photo paper in the photo tray
2.Insert a memory device.
Insert a memory device
3.Select photo.
a. Touch Photo on the Home screen. b. Touch View & Print.
c. |
Flick left or right to scroll through the photos. |
d. |
Touch photo you want to print. |
e. |
Touch up arrow to increase number of copies. |
4.Print photo.
a. |
Touch Print to preview print job. |
b. |
Touch Print. |
Print 11
Chapter 4
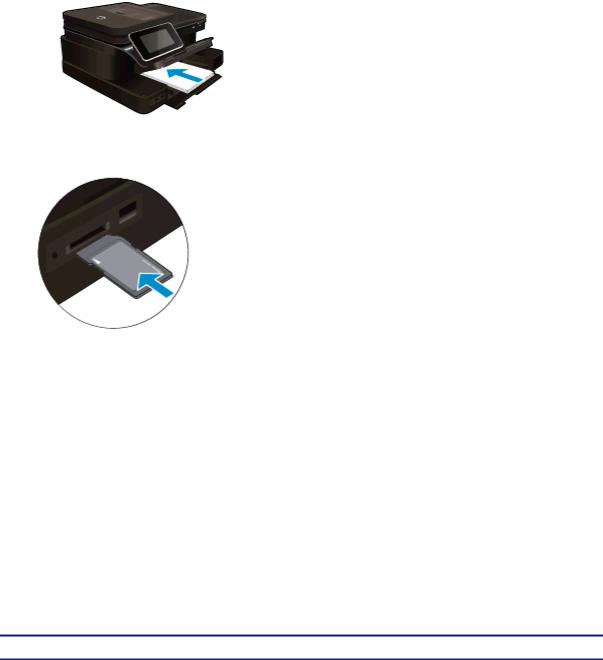
Print photo on full-size paper
1.Load paper.
▲Load full-size photo paper print side down in the main input tray.
Load paper
2.Insert a memory device.
Insert a memory device
3.Select photo.
a. Touch Photo on the Home screen. b. Touch View & Print.
c. |
Flick left or right to scroll through the photos. |
d. |
Touch photo you want to print. |
e. |
Touch up arrow to increase number of copies. |
4.Change page layout.
a. |
Touch Print to preview print job. |
b. |
Touch Print Settings to change print settings. |
c. |
Touch Layout. |
d. |
Touch 8.5x11. |
5.Print photo.
▲ Touch Print.
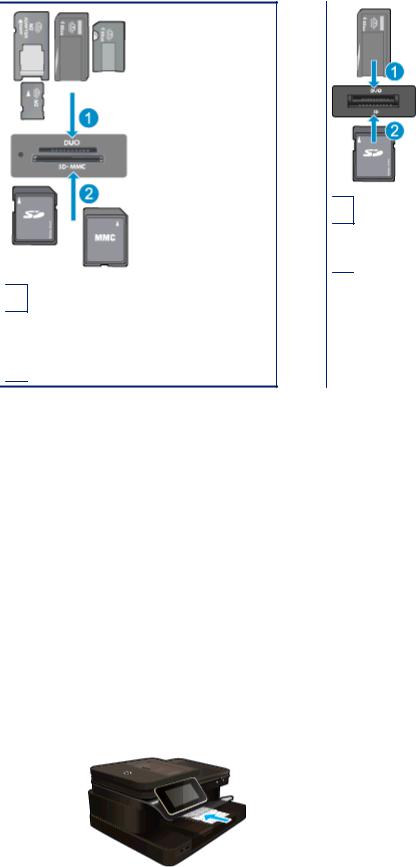
Memory cards and slots
Your printer has one of the following configurations and supports the memory card types listed below.
12 Print
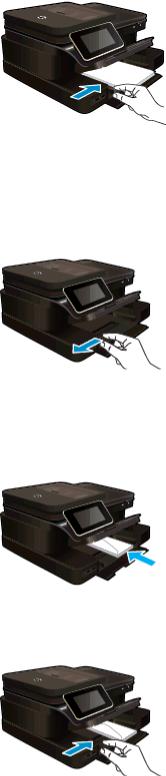
Memory cards and slots (continued)
- Or -
1 Memory Stick Duo or Pro Duo, Memory Stick Pro-HG Duo, or Memory Stick Micro (adapter required)
2 Secure Digital (SD), Secure Digital Mini, Secure Digital High Capacity (SDHC), Secure Digital Extended Capacity (SDXC), or TransFlash MicroSD Card (adapter required),
1Memory Stick Duo or Pro Duo, Memory Stick Pro-HG Duo, or Memory Stick Micro (adapter required)
2MultiMedia Card (MMC), MMC Plus, Secure MultiMedia Card, MMC Mobile (RS-MMC; adapter required), Secure Digital (SD), Secure Digital Mini, Secure Digital High Capacity (SDHC), Secure Digital Extended Capacity (SDXC), or TransFlash MicroSD Card (adapter required),
Select Print Media
The printer is designed to work well with most types of office media. Use HP media for optimum print quality. Visit the HP Web site at www.hp.com for more information about HP media.
HP recommends plain papers with the ColorLok logo for printing and copying of everyday documents. All papers with the ColorLok logo are independently tested to meet high standards of reliability and print quality, and produce documents with crisp, vivid color, bolder blacks and dry faster than ordinary plain papers. Look for papers with the ColorLok logo in a variety of weights and sizes from major paper manufacturers.
To purchase HP papers, go to Shop for Products and Services and select ink, toner and paper.
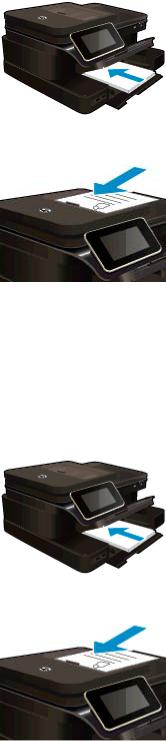
Load media
▲Do one of the following:
Load 10 x 15 cm (4 x 6 inch) paper a. Raise photo tray lid.
Raise photo tray lid and slide paper-width guide outwards. b. Load paper.
Insert stack of photo paper into photo tray with short edge forward and print side down.
Load media |
13 |

Chapter 4
Slide stack of paper forward until it stops.
 NOTE: If the photo paper you are using has perforated tabs, load photo paper so that tabs are closest to you.
Slide paper-width guide inward until it stops at edge of paper.
c. Lower photo tray lid.
Load A4 or 8.5 x 11 inch paper a. Raise the photo tray.
Slide paper-width guide outwards.
Remove all paper from the main input tray. b. Load paper.
Insert stack of paper into main input tray with short edge forward and print side down.
Slide stack of paper forward until it stops.
Slide paper-width guide inward until it stops at edge of paper.
14 Print
Lower the photo tray.
Load envelopes
a. Raise the photo tray.
Slide paper-width guide outwards.
Remove all paper from the main input tray. b. Load envelopes.
Insert one or more envelopes into far-right side of main input tray, with envelope flaps on left and facing up.
Slide stack of envelopes forward until it stops.
Slide paper-width guide inward against stack of envelopes until it stops.
Lower the photo tray.
Related topics
•Tips for print success
Load media |
15 |
Chapter 4
Recommended papers for photo printing
If you want the best print quality, HP recommends using HP papers that are specifically designed for the type of project you are printing. Depending on your country/region, some of these papers might not be available.
Paper |
Description |
|
|
HP Premium Plus Photo Paper |
HP’s best photo paper is heavyweight for producing |
|
professional-quality photos. Features an instant-dry finish for |
|
easy handling without smudging. It resists water, smears, |
|
fingerprints, and humidity. It is available in several sizes, |
|
including A4, 8.5 x 11 inch, 10 x 15 cm (4 x 6 inch), 13 x 18 |
|
cm (5 x 7 inch) and two finishes – high gloss or soft gloss |
|
(satin matte). It is acid-free for longer lasting documents. |
|
|
HP Advanced Photo Paper |
This thick photo paper features an instant-dry finish for easy |
|
handling without smudging. It resists water, smears, |
|
fingerprints, and humidity. Your prints have a look and feel |
|
comparable to a store processed photo. It is available in |
|
several sizes, including A4, 8.5 x 11 inch, 10 x 15 cm (4 x 6 |
|
inch), 13 x 18 cm (5 x 7 inch) and two finishes – glossy or |
|
soft gloss (satin matte). It is acid-free for longer lasting |
|
documents. |
|
|
HP Everyday Photo Paper |
Print colorful, everyday snapshots at a low cost, using paper |
|
designed for casual photo printing. This affordable, photo |
|
paper dries quickly for easy handling. Get sharp, crisp |
|
images when you use this paper with any inkjet printer. |
|
Available in glossy finish in 8.5 x 11 inch, A4, 4 x 6 inch and |
|
10 x 15 cm. It is acid-free for longer lasting documents. |
|
|
HP Photo Value Packs |
HP Photo Value Packs conveniently package Original HP ink |
|
cartridges and HP Advanced Photo Paper to save you time |
|
and take the guesswork out of printing affordable Lab-quality |
|
photos with your HP printer. Original HP inks and HP |
|
Advanced Photo Paper have been designed to work together |
|
so your photos are long lasting and vivid, print after print. |
|
Great for printing out an entire vacation’s worth of photos or |
|
multiple prints to share. |
|
|
Recommended papers for printing and copying
Depending on your country/region, some of these papers might not be available.
Paper |
Description |
|
|
HP Brochure Paper and HP Professional Paper 180gsm |
These papers are glossy-coated or matte-coated on both |
|
sides for two-sided use. They are the best choice for |
|
producing professional-quality marketing materials such as |
|
brochures and mailers as well as business graphics for report |
|
covers and calendars. |
|
|
HP Premium Presentation120gsm Paper and HP |
These papers are heavy two-sided matte papers perfect for |
Professional Paper 120gsm |
presentation, proposals, reports and newsletters. They are a |
|
professional weight for an impressive look and feel. |
|
|
HP Bright White Inkjet Paper |
HP Bright White Inkjet Paper delivers high-contrast colors |
|
and sharp text. It is opaque enough for two-sided color usage |
|
with no showthrough, which makes it ideal for newsletters, |
|
reports, and flyers. It features ColorLok Technology for less |
|
smearing, bolder blacks and vivid colors. |
|
|
HP Printing Paper |
HP Printing Paper is a high-quality multifunction paper. It |
|
produces documents that look and feel more substantial than |
|
documents printed on standard multipurpose or copy paper. |
|
It features ColorLok Technology for less smearing, bolder |
|
blacks and vivid colors. |
|
|
16 Print
(continued)
Paper |
Description |
|
|
HP Office Paper |
HP Office Paper is a high-quality multifunction paper. It is |
|
suitable for copies, drafts, memos and other everyday |
|
documents. It features ColorLok Technology for less |
|
smearing, bolder blacks and vivid colors. |
|
|
HP Office Recycled Paper |
HP Office Recycled Paper is a high-quality multifunction |
|
paper made with 30% recycled fiber. It features ColorLok |
|
Technology for less smearing, bolder blacks and vivid colors. |
|
|
HP Iron-On Transfers |
HP Iron-on Transfers (for color fabrics or for light or white |
|
fabrics) are the ideal solution for creating custom T-shirts |
|
from your digital photos. |
|
|
Tips for print success
Use the following tips to print successfully.
Print tips
•Use genuine HP cartridges. Genuine HP cartridges are designed for and tested with HP printers to help you produce great results, time after time.
•Make sure the cartridges have sufficient ink. To check the estimated ink levels, touch the Ink Levels icon on the printer display.
•Load a stack of paper, not just one page. Use clean and flat paper of the same size. Make sure only one type of paper is loaded at a time.
•Adjust the paper-width guide in the input tray to fit snugly against all paper. Make sure the paper-width guide does not bend the paper in the input tray.
•Set the print quality and paper size settings according to the type and size of paper loaded in the input tray.
•If you want to print a black and white document using black ink only, do one of the following according to your operating system.
◦On Windows: Open your printer software, click Set Preferences. On the Paper/Quality tab, click
Advanced. Select Black Ink Only from the Print in Grayscale drop-down list under Printer Features.
◦On Mac: From the Print dialog box, choose the Paper Type/Quality pane, click Color Options, and then choose Grayscale from the Color pop-up menu.
If the Print dialog does not show printer options, click the blue disclosure triangle next to the printer name (Mac OS X v10.6) or Show Details (Mac OS X v10.7). Use the pop-up menu toward the bottom of the dialog to choose the Paper Type/Quality pane.
•Use print preview to check margins. Do not let the margin settings for the document exceed the printable area of the printer.
•Learn how to share your photos online and order prints. Click here to go online for more information.
•Learn how to print documents from computer. Click here to go online for more information.
•Learn how to print photos saved on your computer. Learn about print resolution and how to set the maximum DPI. Click here to go online for more information.
•Learn how to print envelopes from computer. Click here to go online for more information.
•Learn more about managing apps for printing recipes, coupons, and other content on the HP ePrintCenter website. Click here to go online for more information.
•Learn how to print from anywhere by sending an email and attachments to your printer. Click here to go online for more information.
Tips for print success |
17 |
Chapter 4
18 Print
5Copy and scan
•Scan to a computer, memory device, or email
•Copy text or mixed documents
•Tips for copy and scan success
Scan to a computer, memory device, or email
To scan to a computer, memory device, or email.
1.Load the original.
a. Lift the lid on the product.
b. Load original print side down on the right front corner of glass.
c. Close the lid.
2.Start scan.
a. |
On the Home screen, touch Scan. |
b. |
Select the destination by touching either Computer, USB Flash Drive, Memory Card or E-mail. |
|
If you are scanning to a computer and the printer is network-connected, a list of available computers |
|
appears. Select the computer on which you want the scan saved. |
|
For scanning to a USB Drive, insert a USB Drive in the slot. |
|
For scanning to a Memory Card, insert a Memory Card in the slot. |
c. |
Touch Scan. |
Related topics
•Tips for copy and scan success
Copy and scan |
19 |
Chapter 5
Copy text or mixed documents
▲Do one of the following:
1-sided copy
a. Load paper.
Load full-size paper in the main input tray.
b. Load original.
Load original print side up into the automatic document feeder.
c. Specify number of copies.
Touch Copy on Home screen. The Copy preview appears.
Touch the screen to set the number of copies. d. Start copy.
Touch B&W or Color.
2-sided copy
a. Load paper.
Load full-size paper in the main input tray.
b. Load original.
Load original print side up into the automatic document feeder.
20 Copy and scan
c. |
Specify 2-sided option. |
|
|
Touch Copy on Home screen. |
|
|
|
The Copy preview appears. |
|
Touch Print Settings. |
|
|
|
The Copy Settings menu appears. |
|
Touch 2-Sided. |
|
|
|
Touch On. |
d. |
Specify number of copies. |
|
|
Use the touch screen to set the number of copies. |
|
e. |
Start copy. |
|
|
Touch B&W or Color. |
|
f. |
Copy the second original. |
|
|
Load second page into the automatic document feeder and touch OK. |
|
Related topics
•Tips for copy and scan success
Learn more about using the automatic document feeder to scan your documents. Click here to go online for more information.
Tips for copy and scan success
Use the following tips to copy and scan successfully:
•Keep the glass and the back of the lid clean. The scanner may interpret anything it detects on the glass as part of the image.
•Load your original, print side down, on the right front corner of the glass or, print side up, into the automatic document feeder. Learn how to use the automatic document feeder for scanning and copying. Click here to go online for more information.
•To make a large copy of a small original, scan the original into the computer, resize the image in the scanning software, and then print a copy of the enlarged image.
•To avoid incorrect or missing scanned text, make sure the brightness is set appropriately in the software.
•If the document to be scanned has a complex layout, select framed text as the scan document setting in the software. With this setting, the text layout and formatting are retained.
•If the scanned image is incorrectly cropped, turn off the autocropping feature in the software and crop the scanned image manually.
Tips for copy and scan success |
21 |
Chapter 5
22 Copy and scan

6Use Web Services
•Print with HP ePrint
•Use HP Print Apps
•Visit the HP ePrintCenter website
•Tips for using Web Services
Print with HP ePrint
HP’s free ePrint service provides an easy way to print from email. Just email a document or photo to the email address assigned to your printer when you enable Web Services, and both the email message and recognized attachments will print.
•Your printer needs to have a wireless network connection to the Internet. You won't be able to use ePrint via a USB connection to a computer.
•Attachments might print differently from the way they appear in the software program that created them, depending on the original fonts and layout options used.
•Free product updates are provided with ePrint. Some updates might be required to enable certain functionality.
Related topics
•Your printer is protected How to get started with ePrint
Your printer is protected
To help prevent unauthorized email, HP assigns a random email address to your printer, never publicizes this address, and by default does not respond to any sender. ePrint also provides industry-standard spam filtering and transforms email and attachments to a print-only format to reduce the threat of virus or other harmful content. However, the ePrint service does not filter email based on content, so it cannot prevent objectionable or copyrighted material from being printed.
Go to the HP ePrintCenter website for more information and specific terms and conditions: www.hp.com/go/ ePrintCenter.
How to get started with ePrint
To use ePrint, connect your printer to an active wireless network with Internet access, set up an account on HP ePrintCenter, and add your printer to the account.
To get started with ePrint
1.Enable Web services.
a. |
Touch the ePrint button on the control panel. |
b. |
Accept the terms of use, and then follow the onscreen instructions to enable Web Services. |
|
The ePrint information sheet prints, containing a printer code. |
c. |
Go to www.hp.com/go/ePrintCenter, click the Sign In button, and then click the Sign Up link at the top |
|
of the window that appears. |
d. |
When prompted, enter the printer code to add your printer. |
2.Touch ePrint on the control panel. From the Web Services Summary screen, get your printer's email address.
3.Compose and send email to your printer's email address from your computer or mobile device, anywhere and anytime. Both the email message and recognized attachments will print.
Use Web Services |
23 |
Chapter 6
Use HP Print Apps
Print pages from the web, without using a computer, by setting up Print Apps, a free service from HP. You can print coloring pages, calendars, puzzles, recipes, maps, and more, depending on the apps available in your country/region.
Touch the Get More icon on the Print Apps screen to connect to the Internet and add more apps. You need to have Web Services enabled in order to use apps.
Go to the HP ePrintCenter website for more information and specific terms and conditions: www.hp.com/go/ ePrintCenter.
Visit the HP ePrintCenter website
Use HP’s free ePrintCenter website to set up increased security for ePrint and specify the email addresses that are allowed to send email to your printer. You can also get Product Updates, more Print Apps, and other free services.
Go to the HP ePrintCenter website for more information and specific terms and conditions: www.hp.com/go/ ePrintCenter.
Tips for using Web Services
Use the following tips to print apps and use ePrint.
Tips for printing apps and using ePrint
•Learn how to share your photos online and order prints. Click here to go online for more information.
•Learn about apps for printing recipes, coupons, and other content from the web, simply and easily. Click here to go online for more information.
•Learn how to print from anywhere by sending an email and attachments to your printer. Click here to go online for more information.
•If you have enabled Auto Power-Off, you should disable Auto Power-Off to use ePrint. See Auto PowerOff for more information.
24 Use Web Services

7 Fax
You can use the printer to send and receive faxes, including color faxes. You can schedule faxes to be sent at
a later time and set up speed-dials to send faxes quickly and easily to frequently used numbers. From the printer control panel, you can also set a number of fax options, such as resolution and the contrast between lightness and darkness on the faxes you send.
 NOTE: Before you begin faxing, make sure you have set up the printer correctly for faxing. You might have already done this as part of the initial setup, by using either the control panel or the HP software provided with the printer. You can verify the fax is set up correctly by running the fax setup test from the control panel. For more information on the fax test, see Test fax setup.
This section contains the following topics:
•Send a fax
•Receive a fax
•Set up speed-dial entries
•Change fax settings
•Fax and digital phone services
•Fax over Internet Protocol
•Use reports
Send a fax
You can send a fax in a variety of ways. Using the printer control panel, you can send a black-and-white or color fax. You can also send a fax manually from an attached phone. This allows you to speak with the recipient before sending the fax.
This section contains the following topics:
•Send a standard fax
•Send a standard fax from the computer
•Send a fax manually from a phone
•Send a fax using monitor dialing
•Send a fax from memory
•Schedule a fax to send later
•Send a fax in Error Correction Mode
Send a standard fax
You can easily send a singleor multiple-page black-and-white or color fax by using the printer control panel.
 NOTE: If you need printed confirmation that your faxes were successfully sent, fax confirmation must be enabled.
TIP: You can also send a fax manually from a phone or by using monitor dialing. These features allow you to control the pace of your dialing. They are also useful when you want to use a calling card to charge the call and you have to respond to tone prompts while dialing.
To send a standard fax from the printer control panel
1.Load your original print-side down in the right-front corner of the glass or print-side up in the Automatic Document Feeder.
2.Touch Fax.
Fax 25

Chapter 7
3.Enter the fax number by using the keypad.

 TIP: To add a pause in the fax number you are entering, touch * repeatedly, until a dash (-) appears on
 the display.
4.Touch Black or Color.
If an original is loaded in the automatic document feeder, the document is sent to the number you entered. If no original is detected in the automatic document feeder, a message appears that promts you to make a slection.
TIP: If the recipient reports issues with the quality of the fax you sent, you can try changing the resolution or contrast of your fax.
Send a standard fax from the computer
You can send a document on your computer as a fax, without printing a copy and faxing it from the printer.
 NOTE: Faxes sent from your computer by this method use the printer’s fax connection, not your Internet connection or computer modem. Therefore, make sure the printer is connected to a working telephone line and that the fax function is set up and functioning correctly.
To use this feature, you must install the printer software using the installation program provided on the HP software CD provided with the printer.
Windows
1.Open the document on your computer that you want to fax.
2.On the File menu in your software application, click Print.
3.From the Name list, select the printer that has “fax” in the name.
4.To change settings (such as selecting to send the document as a black fax or a color fax), click the button that opens the Properties dialog box. Depending on your software application, this button might be called
Properties, Options, Printer Setup, Printer, or Preferences.
5.After you have changed any settings, click OK.
6.Click Print or OK.
7.Enter the fax number and other information for the recipient, change any further settings for the fax, and then click Send Fax. The printer begins dialing the fax number and faxing the document.
Mac OS X
1.Open the document on your computer that you want to fax.
2.From the File menu in your software application, click Print.
3.Select the printer that has “(Fax)” in the name.
4.Select Fax Recipients from the pop-up menu below the Orientation setting.
 NOTE: If you cannot find the pop-up menu, try clicking the disclosure triangle next to the Printer selection.
5.Enter the fax number and other information in the boxes provided, and then click Add to Recipients.
6.Select the Fax Mode and any other fax options you want, and then click Send Fax Now to begin dialing the fax number and faxing the document.
Send a fax manually from a phone
Sending a fax manually allows you to make a phone call and talk with the recipient before you send the fax. This is useful if you want to inform the recipient that you are going to send them a fax before sending it. When you send a fax manually, you can hear the dial tones, telephone prompts, or other sounds through the handset on your telephone. This makes it easy for you to use a calling card to send your fax.
Depending on how the recipient has their fax machine set up, the recipient might answer the phone, or the fax machine might take the call. If a person answers the phone, you can speak with the recipient before sending the
26 Fax

fax. If a fax machine answers the call, you can send the fax directly to the fax machine when you hear the fax tones from the receiving fax machine.
To send a fax manually from an extension phone
1.Load your original print-side down in the right-front corner of the glass or print-side up in the Automatic Document Feeder.
2.Touch Fax.
3.Dial the number by using the keypad on the phone that is connected to the printer.
 NOTE: Do not use the keypad on the control panel of the printer when manually sending a fax. You must use the keypad on your phone to dial the recipient's number.
4.If the recipient answers the telephone, you can engage in a conversation before sending your fax.
 NOTE: If a fax machine answers the call, you will hear fax tones from the receiving fax machine. Proceed to the next step to transmit the fax.
5.When you are ready to send the fax, touch Send Fax Manually.
 NOTE: If prompted, select Fax Black or Fax Color.
If you were speaking with the recipient before sending the fax, inform the recipient that they should press Start on their fax machine after they hear fax tones.
The telephone line is silent while the fax is transmitting. At this point, you can hang up the telephone. If you want to continue speaking with the recipient, remain on the line until the fax transmission is complete.
Send a fax using monitor dialing
Monitor dialing allows you to dial a number from the printer control panel as you would dial a regular telephone. When you send a fax using monitor dialing, you can hear the dial tones, telephone prompts, or other sounds through the speakers on the printer. This enables you to respond to prompts while dialing, as well as control the pace of your dialing.
TIP: If you are using a calling card and do not enter your PIN fast enough, the printer might start sending fax tones too soon and cause your PIN not to be recognized by the calling card service. If this is the case, you can create a speed dial entry to store the PIN for your calling card. For more information, see Set up speeddial entries.
 NOTE: Make sure the volume is turned on to hear a dial tone.
To send a fax using monitor dialing from the printer control panel
1.Load your original print-side down in the right-front corner of the glass or print-side up in the Automatic Document Feeder.
2.Touch Fax, and then touch Black or Color.
If the printer detects an original loaded in the automatic document feeder, you hear a dial tone.
3.When you hear the dial tone, enter the number by using the keypad on the printer control panel.
4.Follow any prompts that might occur.

 TIP: If you are using a calling card to send a fax and you have your calling card PIN stored as a speed
dial, when prompted to enter your PIN, touch |
(Speed Dial) to select the speed dial entry where |
you have your PIN stored. |
|
Your fax is sent when the receiving fax machine answers.
Send a fax from memory
You can scan a black-and-white fax into memory and then send the fax from memory. This feature is useful if the fax number you are trying to reach is busy or temporarily unavailable. The printer scans the originals into memory and sends them once it is able to connect to the receiving fax machine. After the printer scans the pages into memory, you can immediately remove the originals from the document feeder tray or scanner glass.
Send a fax |
27 |

Chapter 7
 NOTE: You can only send a black-and-white fax from memory.
To send a fax from memory
1.Load your original print-side down in the right-front corner of the glass or print-side up in the Automatic Document Feeder.
2.Touch Fax, and then touch Settings.
3.Touch Scan and Fax.
4.
Enter the fax number by using the keypad, touch |
(Speed Dial) to select a speed dial, or touch |
(Call History) to select a previously dialed or received number.
5.Touch Start Fax.
The printer scans the originals into memory and sends the fax when the receiving fax machine is available.
Schedule a fax to send later
You can schedule a black-and-white fax to be sent within the next 24 hours. This enables you to send a black- and-white fax late in the evening, when phone lines are not as busy or phone rates are lower, for example. The printer automatically sends your fax at the specified time.
You can only schedule one fax to be sent at a time. You can continue to send faxes normally, however, while a fax is scheduled.
 NOTE: You can only send scheduled faxes in black-and-white.
To schedule a fax from the printer control panel
1.Load your original print-side down in the right-front corner of the glass or print-side up in the Automatic Document Feeder.
2.Touch Fax, and then touch Settings.
3.Touch Send Fax Later.
4.Enter the send time by touching up and down arrows, touch AM or PM, and then touch Done.
5.
Enter the fax number by using the keypad, touch |
(Speed Dial) to select a speed dial, or touch |
(Call History) to select a previously dialed or received number.
6.Touch Start Fax.
The printer scans all pages and the scheduled time appears on the display. The fax is sent at the scheduled time.
To cancel a scheduled fax
1.Touch the Fax, then touch Settings.
2.Touch Send Fax Later.
3.Touch Cancel Scheduled Fax.
Send a fax in Error Correction Mode
Error Correction Mode (ECM) prevents loss of data due to poor phone lines by detecting errors that occur during transmission and automatically requesting retransmission of the erroneous portion. Phone charges are unaffected, or might even be reduced, on good phone lines. On poor phone lines, ECM increases sending time and phone charges, but sends the data much more reliably. The default setting is On. Turn ECM off only if it increases phone charges substantially, and if you can accept poorer quality in exchange for reduced charges.
28 Fax
Loading...