


photo printing guide
hp photosmart 130

contents |
|
|
1 |
welcome.............................................................................. |
1 |
|
finding information............................................................................................. |
2 |
|
viewing the printer help ...................................................................................... |
3 |
2 |
getting started ..................................................................... |
5 |
|
quick reference.................................................................................................. |
5 |
|
front and back of printer ............................................................................. |
10 |
|
front of printer with paper tray open............................................................. |
11 |
|
control panel ............................................................................................. |
12 |
|
LCD.......................................................................................................... |
13 |
|
LCD icons ................................................................................................. |
14 |
|
setting up your printer....................................................................................... |
17 |
|
unpacking your printer................................................................................ |
17 |
|
connecting the power adapter ..................................................................... |
18 |
|
turning the printer on or off ......................................................................... |
19 |
|
loading paper ........................................................................................... |
20 |
|
installing or removing the print cartridge ....................................................... |
23 |
contents
i

contents
ii
3 printing from memory cards............................................... |
27 |
types of memory cards supported ....................................................................... |
27 |
inserting a memory card .................................................................................. |
28 |
inserting a CompactFlash memory card ......................................................... |
29 |
inserting a SmartMedia memory card............................................................ |
30 |
inserting a Memory Stick memory card.......................................................... |
31 |
inserting a Secure Digital memory card ......................................................... |
32 |
inserting a MultiMediaCard memory card...................................................... |
33 |
reading the memory card status.......................................................................... |
33 |
using the setup LCD .......................................................................................... |
36 |
printing your photos.......................................................................................... |
38 |
selecting the photo size ............................................................................... |
39 |
selecting photos to print............................................................................... |
40 |
selecting the number of copies...................................................................... |
44 |
examples ................................................................................................... |
45 |
printing an index page...................................................................................... |
47 |
canceling a print job......................................................................................... |
49 |
clearing print settings ........................................................................................ |
49 |

4 printing from DPOF files ..................................................... |
51 |
|
|
printing from a DPOF file ............................................................................ |
51 |
|
exiting DPOF mode.......................................................................................... |
53 |
|
returning to DPOF mode ................................................................................... |
54 |
5 |
care and maintenance........................................................ |
55 |
|
transporting your printer ................................................................................... |
55 |
|
storing your printer and supplies........................................................................ |
56 |
|
storing your printer..................................................................................... |
56 |
|
storing the print cartridge............................................................................ |
56 |
|
storing paper............................................................................................. |
57 |
|
cleaning your printer ........................................................................................ |
57 |
|
printing a test page.......................................................................................... |
57 |
6 |
troubleshooting.................................................................. |
61 |
|
reading the status indicators.............................................................................. |
61 |
|
printer light ............................................................................................... |
62 |
|
memory card light ...................................................................................... |
63 |
|
status LCD ................................................................................................. |
64 |
contents
iii

contents
interpreting error conditions ............................................................................... |
66 |
printer problems ......................................................................................... |
66 |
memory card problems................................................................................ |
67 |
print cartridge problems .............................................................................. |
70 |
paper problems .......................................................................................... |
71 |
saving to PC problems................................................................................. |
72 |
other printing problems ..................................................................................... |
73 |
getting additional help ...................................................................................... |
78 |
specifications ......................................................................... |
79 |
copyright and trademarks ...................................................... |
81 |
index..................................................................................... |
83 |
iv

1 welcome
Thank you for purchasing an HP Photosmart printer! With your new, easy-to-use, compact photo printer you can:
•Print beautiful photos from your digital camera’s memory card without a computer.
•Print an index page that shows all the photos on your digital camera’s memory card.
•Print 10x15 cm photos quickly and easily.
To begin setting up your printer, see “setting up your printer” on page 17.
This guide describes how to use your new printer without connecting it to a computer. It includes a quick reference to get you acquainted with your new printer, and plenty of detailed printing and troubleshooting information.
You can connect your printer to your computer to save your photos to the hard drive, enhance your photos, share your photos with friends and family via email, and use your photos in creative projects. For information on using your printer with a computer, see the HP Photosmart Printer Help installed with the HP Photosmart printer software.
welcome
1

welcome
finding information
|
Setup Guide |
Follow the instructions to quickly and easily set up your printer |
|
|
|
|
Photo Printing Guide |
Use this guide to learn about using your printer without |
|
(you are here!) |
connecting it to a computer |
|
|
|
|
Printer Help |
Use this information, installed with the printer software, to |
|
|
learn about using your printer with a computer |
|
|
|
|
Software Setup & |
Use this booklet to learn about the printer’s warranty, review |
|
Product Support |
regulatory information, and find out where to get help if you |
|
booklet |
need it |
|
|
|
2

viewing the printer help
For information on using the printer with your computer, view the Printer Help installed with the HP Photosmart printer software.
To view the Printer Help:
1.From the Windows Start menu, select Programs.
2.Select Hewlett-Packard.
3.Select HP Photosmart 130, 230, 7150, 7345, 7350, 7550 series.
4.Click HP Photosmart Printer Help.
5.When the HP Photo & Imaging Software Help opens, select HP Photosmart Printer Help.
6.Select HP Photosmart 130.
welcome
3

welcome
4
2 getting started
quick reference
To print... |
Use this paper... |
||
|
|
|
|
|
|
borderless photos |
glossy photo paper, with tab |
|
|
||
|
|
|
10x16.5 cm |
|
|
|
|
photos with a border on the bottom edge glossy photo paper, without tab 10x15 cm
test and calibration pages |
plain index cards |
|
10x15 cm |
started getting
5
getting started
There is a difference between index cards and index pages
index card = card-weight paper
Use plain, 10x15 cm index cards for printing test pages.
index page = a print showing numbered images of the photos on your memory card
Print an index page to help you select which photos you want to print.
There is a difference between paper size and photo size
You can print on these sizes of paper: |
You can print your photos in any of these sizes: |
||
• |
10x15 cm |
• |
10x15 cm |
• 10x16.5 cm (with 1.25 cm tab) |
• |
6x8 cm |
|
• |
Hagaki (100x148 mm) |
• |
1.5x2 cm |
|
|
|
|
6
Printing photos is easy! Load photo paper, install the print cartridge, insert a camera memory
card containing photos, then...
Ready...
Use XTab to move the cursor to the area where you want to change a setting. Try it!
X
Use Scroll Up (+) or Scroll Down (-) to scroll through the available choices for each setting.
started getting
7
getting started
|
|
|
|
|
|
|
|
|
|
Set... |
|
|
|
|
|
|
|
|
|
|
|
|
|
|
|
|
|
|
|
10x15 cm |
|
|
|
|
|
|
|
|
|
|
|
|
|
|
|
|
|
||
6x8 cm |
|
|
|
|
|
|
|
|
Tip: You can also |
|
|
|
|
|
|
|
|
||
|
|
|
|
|
|
|
|
||
|
|
|
|
|
|
|
|
||
1.5x2 cm |
|
|
|
|
|
|
|
||
|
|
|
|
|
|
|
|||
|
|
|
|
|
|
|
choose to print a |
||
|
|
|
|
|
|
|
|
|
|
1. Set photo size - |
2. Press XTab to |
3. Set photos to print - |
range of photos, or |
|
multiple copies. |
||||
When the cursor is |
move to the next |
Use Scroll Up (+) or |
Selecting the 1.5x2 |
|
blinking under this |
area. |
Scroll Down (-) to scroll |
||
cm size prints all of the |
||||
area, use Scroll Up (+) |
|
to the number of the |
||
|
photos on the memory |
|||
and Scroll Down (-) to |
|
photo you want to |
||
|
card. |
|||
pick the size you |
|
print. Then press Print. |
||
want your photos. |
|
|
|
8
Print!
Press the Print button and enjoy your photos!
X
started getting
9
getting started
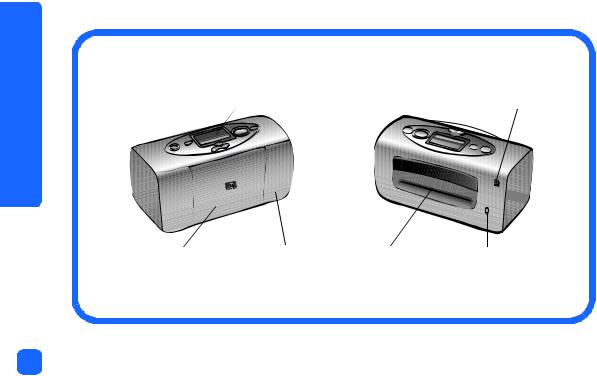
front and back of printer
Front view |
Control panel |
Back view |
USB port |
|
|
Paper tray door |
Print cartridge door |
Rear paper path |
Power adapter connection |
Important: Make sure the rear paper path is clear of any obstructions.
10
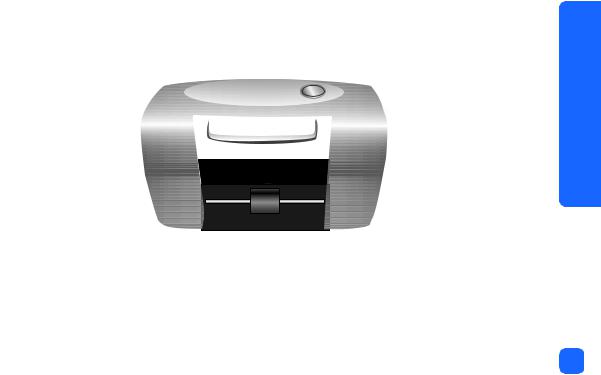
front of printer with paper tray open
Memory card light
CompactFlash memory card 
 slot
slot 


Secure Digital/ |
MultiMediaCard |
memory card slot |
Output guide |
Paper width guide
SmartMedia memory  card slot
Memory Stick  memory card slot
Paper tray
started getting
11

getting started
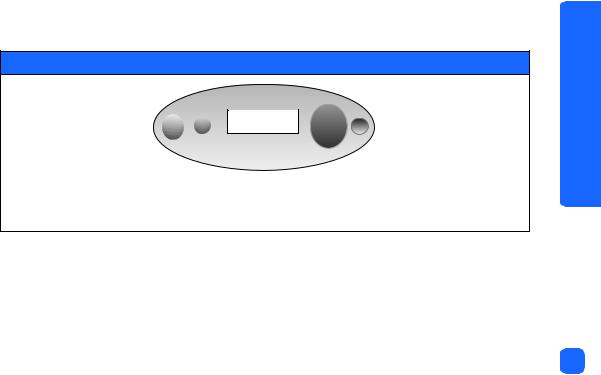
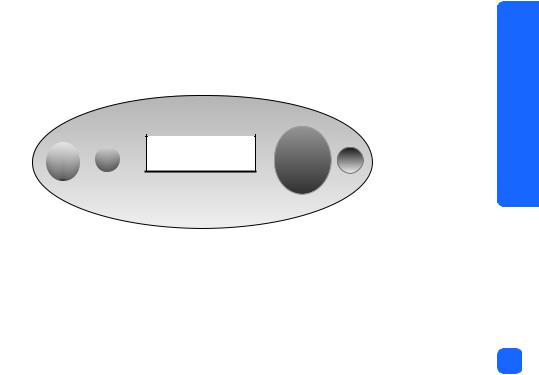
control panel
|
LCD |
Printer light |
|
Read this window to see the |
If this light is green, the printer is on |
Power |
status of your printer and the |
(blinking means the printer is busy); if this |
current print settings |
print light is red, the printer needs attention |
Press this button |
|
to turn the printer |
|
on or off |
Press this button to |
|
start printing the |
|
selected photos from |
|
a memory card |
|
X |
|
Cancel |
|
Press this button to |
|
stop printing or reset |
|
the print settings |
Save |
|
|
|
Press this button to save photo and |
Scroll Up (+)/Scroll Down (-) |
XTab |
|
other files from a memory card to |
|||
Press and hold these buttons |
Press this button to move from |
||
the computer’s hard drive when |
|||
to scroll through print settings |
one section to the next when |
||
you have the printer connected to |
|||
as you are selecting them |
selecting print settings |
||
a computer |
|||
|
|
12

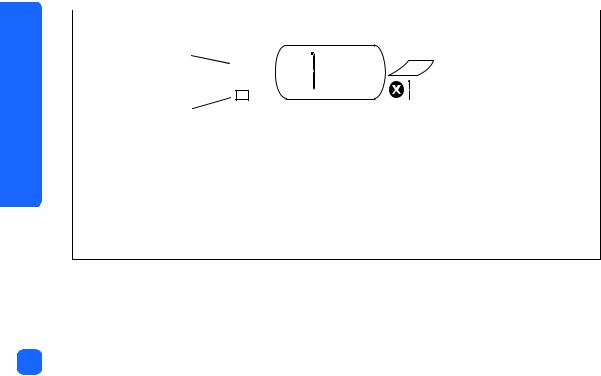
LCD
Note: The LCD icons are described on the following pages.
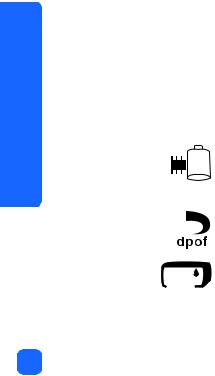
Attention icon |
Number of photos |
Memory card icon |
DPOF icon |
Status LCD |
|
Paper and Print |
|
|
Cartridge icon |
Setup LCD |
|
Paper Count icon |
|
More Paper icon |
|
|
|
|
|
|
Cursor |
Photo Size section |
Choose Photos section |
Copies section |
started getting
13
getting started
LCD icons
The icons on the top portion of the LCD indicate the status of different printer areas.
Icon |
|
|
|
Description |
|||||
|
|
|
|
|
|
|
|
|
|
Attention icon |
/ |
Indicates something is wrong and the printer needs attention. |
|||||||
|
|
|
|
|
|
|
|
|
|
Number of photos |
|
|
|
Indicates the number of photos available on the memory card. |
|||||
|
|
|
|
|
|
|
|
|
|
Memory card |
|
|
|
Indicates a memory card is inserted. If you inserted a memory card |
|||||
icon |
|
|
|
|
|
and this icon does not appear, the memory card may not be inserted |
|||
|
|
|
|
|
|||||
|
|
|
|
|
|
|
|
|
correctly. If the icon is blinking, there is a problem with the memory |
|
|
|
|
|
|
|
|
|
|
|
|
|
|
|
|
|
|
|
card. |
|
|
|
|
|
|
|
|
|
|
DPOF icon |
|
|
|
Indicates a digital print order format (DPOF) file is on the memory |
|||||
|
|
|
|
|
|
|
|
|
card. |
|
|
|
|
|
|
|
|
|
|
Paper and |
|
|
|
Indicates the status of the paper and print cartridge. If the ink drop is |
|||||
|
|
|
|
blinking, there is a problem with the print cartridge. If the paper |
|||||
|
|
|
|
||||||
Cartridge icon |
|
|
|
|
|
|
|
|
section (the lines at the bottom of the icon) is blinking, there is a |
|
|
|
|
|
|||||
|
|
|
|
|
|
|
|
|
problem with the paper. |
|
|
|
|
|
|
|
|
|
|
14
The bottom portion of the LCD is where you select the photo size, photo number or range, and number of copies to be printed.
|
Tip: |
Use XTab to move from one section to the next, left to right. Use Scroll Up (+) or Scroll |
||||||||
|
|
|
|
|
|
Down (-) to change settings within a section. |
||||
|
|
|
|
|
|
|
|
|
|
|
|
|
Section/Icon |
Description |
|||||||
|
|
|
|
|
|
|
|
|
|
|
|
|
Photo Size section |
These three icons indicate the selected photo size. As you move through the |
|||||||
|
|
|
|
|
|
|
|
10x15 cm |
photo size selections, the corresponding icon displays to indicate the |
|
|
|
|
|
|
|
|
|
currently selected photo size. Selecting to print 1.5x2 cm size, prints all of the |
||
|
|
|
|
|
|
|
|
|
|
|
|
|
|
|
|
|
|
|
6x8 cm |
photos on the card. |
|
|
|
|
|
|
|
|
|
|||
|
|
|
|
|
|
|
|
|
||
|
|
|
|
|
|
|
|
|
||
|
|
|
|
|
|
|
|
1.5x2 cm |
|
|
|
|
|
|
|
|
|
|
|
||
|
|
|
|
|
|
|
|
|
||
|
|
|
|
|
|
|
|
|
|
|
|
|
|
|
|
|
|
|
|
|
|
|
|
Choose Photos section |
This section indicates the photo number or range of photos to be printed. |
|||||||
|
|
|
|
|
|
|
|
|
|
|
|
|
|
|
|
|
|
|
|
|
|
|
|
Copies section |
This section indicates the number of copies of each photo to print. |
|||||||
|
|
|
|
|
|
|
|
|
|
|
|
|
|
|
|
|
|
|
|
|
|
|
|
Cursor |
|
|
|
|
The cursor appears below the section you are working in. When you press |
|||
|
|
|
|
|
|
|
|
|
|
XTab, the cursor moves to the next section. |
|
|
|
|
|
|
|
|
|
|
|
|
|
|
|
|
|
|
|
|
|
|
started getting
15

getting started
Section/Icon |
Description |
||||
|
|
|
|
|
|
Paper Count icon |
The Paper Count icon shows the number of sheets of paper needed to |
||||
More Paper icon |
complete the print job with the current settings. The maximum number of |
||||
pages the paper stack can show is six. If the print job requires more than six |
|||||
|
|
|
|
||
|
|
|
|
pages, the More Paper icon appears next to the paper stack. |
|
|
|
|
|
|
|
|
|
|
|
|
|
|
|
|
|
|
|
16

setting up your printer
unpacking your printer
Make sure you have the following items:
|
|
Print cartridge |
Printer |
HP #57 |
Sample index cards |
|
|
Sample photo paper |
|
|
Power adapter |
Setup Guide |
|
|
|
|
Adapter plugs |
Software and Printer |
|
Software Setup & Product |
Help on CD |
Photo Printing Guide |
Support booklet |
Important: Place the printer on a flat, stable surface. Make sure you place the printer at least 10 inches away from a wall or any obstruction to allow space for the paper to move during printing.
started getting
17
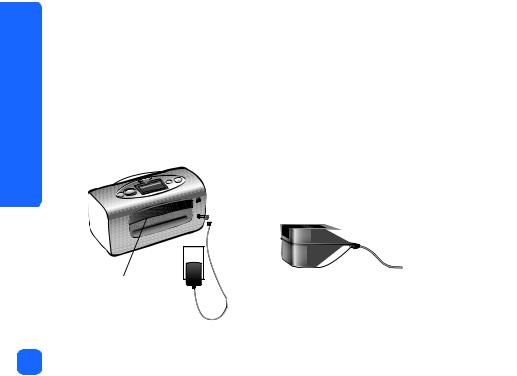
connecting the power adapter
1. Insert the small end of the power adapter into the power adapter connection on the back
|
|
of the printer. Make sure it is connected firmly. |
||
started |
2. |
Unfold the two metal prongs on the power adapter. |
||
3. |
Connect the adapter plug for your area to the power adapter. |
|||
|
||||
getting |
4. Plug the power adapter into a working electrical outlet. |
|||
|
Important: Make sure the power adapter cord does not block the rear paper path. |
|||
|
|
|||
|
|
|
3. |
|
|
|
1. |
2. |
|
Rear paper path
18
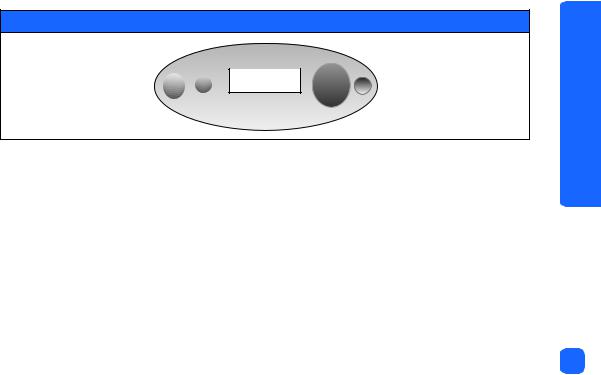
turning the printer on or off
Press the Power button on the top of the printer.
The printer light turns green when the printer is turned on. The printer takes about 10 seconds to power up.
Power button |
Print button |
|
X
Printer light
started getting
19

getting started
loading paper
You can print color photos on 10x15 cm photo paper (with or without a tear-off tab), plain paper, or index cards. For best printing results, use HP Photo Paper. HP papers can be found at most computer and office supply stores or on the Web at: www.hpshopping.com (U.S.)
www.hp-go-supplies.com (Europe), www.jpn.hp.com/supply/inkjet (Japan), www. hp.com/paper
(Asia Pacific).
Your printer supports the following paper types:
Name or type |
Size |
Use for |
|
|
|
HP Premium Photo |
10x16.5 cm |
Mediumto high-resolution snapshots, photo album prints, |
Paper |
(1.25 cm tab) |
photos to archive, and borderless prints |
|
|
|
HP Photo Paper |
10x16.5 cm |
Photos to share with friends, snapshots to enclose with |
|
(1.25 in tab) |
letters and cards, reprints, digital photography and |
|
business photos |
|
|
|
|
|
|
|
plain index cards |
10x15 cm |
Print cartridge calibration pages, test pages, draft prints, |
|
|
children’s projects, and photo index pages (to conserve |
|
|
photo paper) |
|
|
|
Hagaki cards |
100x148 mm |
Photos and index pages |
|
|
|
20

Name or type |
Size |
Use for |
|
|
|
other brands of photo |
10x15 cm |
Photos and index pages |
paper |
|
With papers other than HP Premium, you may experience |
|
|
paper feeding or ejecting problems. Try loading fewer |
|
|
sheets of paper at a time and be sure the edges of the |
|
|
paper stack are even. |
|
|
|
Note: As it prints, the printer pulls the paper straight through the paper slot, out the back, and then through to the front again. Be sure the rear paper path of the printer is at least 10 inches away from any obstruction.
started getting
21

getting started
To load paper:
1.Open the paper tray door.
2.Place a stack of paper on the paper tray and slide it underneath the output guide.
•The printer prints on the side of the paper that is facing up. If you are using photo paper, load the paper with the glossy side up. If you are using tabbed paper, load the paper into the tray so the tab feeds into the printer first.
Output guide
Paper width guide
guide
•Load 10 - 20 sheets of photo paper or index cards. (For information, see the loading instructions that come with your photo paper.)
•Use one type and size of paper at a time. Do not mix paper types or sizes in the paper tray.
3.Move the paper width guide on the paper tray to fit close to the left edge of the paper without bending the paper. This allows the paper to feed into the printer correctly so that your photos will print straight.
22

installing or removing the print cartridge
To get the best performance from your printer, use only genuine HP factory-filled print cartridges.
Caution: Make sure you are using the correct print cartridge (HP #57). Damage to the printer or cartridge resulting from the modification or refilling of HP print cartridges is specifically excluded from HP warranty coverage.
You can install and remove the print cartridge while the printer is either on or off. When you insert a new print cartridge for the first time, the printer automatically prints a calibration page. If you remove the print cartridge and reinsert it, another calibration page will not print. To conserve photo paper, you can print the calibration page on an index card.
Note: If the printer is off when you change the print cartridge, the calibration page prints when you turn the printer on.
started getting
23
getting started
To install the print cartridge:
1.Take the new print cartridge out of its package and pull the tab to remove the clear plastic tape.
Note: Do NOT touch the ink nozzles or the copper contacts on the print cartridge. Touching these parts may cause print cartridge failure.
Copper contacts
Ink nozzles 
2. Open the print cartridge door by pulling the door down.
24
 Loading...