


HL800
HL1400
ML-134319
ML-134335
Page 1 - English
Page 43 - French
Page 90 - German
INSTALLATION AND OPERATION MANUAL MANUEL D’INSTALLATION ET D’UTILISATION INSTALLATIONS UND BEDIENUNGSANLEITUNG
F-34947 Rev A (Sept 2006)
1
English / Contents
|
Section |
Page |
Safety Information |
1.0 |
4 |
Safety Guidelines |
1.1 |
4 |
Warning Symbols |
1.2 |
4 |
Liability |
1.3 |
5 |
Foreword |
2.0 |
5 |
General Information |
3.0 |
5 |
Caring for our Environment |
4.0 |
5 |
Packaging Material |
4.1 |
5 |
Disposal of your old appliance |
4.2 |
5 |
Safety Instructions |
5.0 |
6 |
Dust Hazard |
5.1 |
6 |
Never |
5.2 |
6 |
Always |
5.3 |
7 |
Using the Mixer |
6.0 |
7 |
Operating for the First Time |
6.1 |
7 |
Mixer Component Identification |
Fig. 1 |
8 |
Standard Timer Controls |
6.2 |
9 |
Recipe Timer Controls |
6.2 |
10 |
Bowl Placement |
6.3 |
10 |
Agitator |
6.4 |
11 |
Hold to run operation |
6.5 |
11 |
Power bowl lift |
6.6 |
12 |
Prepare for Mixing |
6.7 |
12 |
Operating Notes |
6.8 |
13 |
Timer Operation |
6.9 |
13 |
Recipe Mode – To enter and Exit |
6.9 |
15 |
Reviewing Recipe Steps |
6.9 |
15 |
Running a Recipe |
6.9 |
16 |
Interrupting a Recipe |
6.9 |
16 |
Entering a Special Function |
6.9 |
17 |
Enter The Access Code |
6.9 |
17 |
Programming a Recipe [Set…rECP] |
6.9 |
18 |
Programming a Pause |
6.9 |
18 |
Making a Recipe Active or Inactive [Atth…rECP] |
6.9 |
19 |
Setting the Access Code [Set…CodE] |
6.9 |
19 |
2
Unloading |
6.10 |
20 |
Wire Guard Cage |
6.11 |
20 |
Remove and Cleaning the Wire Guard Cage |
6.12 |
21 |
Re-Fitting the Wire Guard Cage |
6.13 |
22 |
Mixing capacity |
7.0 |
22 |
Mixing Capacity Chart – HL800 |
7.1 |
25 |
Mixing Capacity Chart – HL1400 |
7.2 |
26 |
Mixer Agitators |
8.0 |
28 |
Splash Cover and bowl extension ring |
8.2 |
29 |
Bowl Scraper Attachment |
8.3 |
29 |
Bowl truck |
8.4 |
30 |
Cleaning |
9.0 |
31 |
Cleaning after Use |
9.1 |
32 |
Installation and commissioning |
10.0 |
31 |
Overall Dimensions (HL800) |
Fig. 8 |
31 |
Overall Dimensions (HL1400) |
Fig. 9 |
32 |
Technical Information |
Table 1 |
33 |
Unpacking and Handling |
10.1 |
33 |
Location |
10.2 |
34 |
Electrical Installation |
10.3 |
35 |
Electrical Connection |
10.4 |
35 |
Operator Training |
10.5 |
35 |
Mixer Maintenance |
11.0 |
35 |
Lubrication |
11.1 |
36 |
Slideways |
11.1.1 |
36 |
Bowl Locking Mechanism |
11.1.2 |
36 |
Planetary seal |
11.1.3 |
36 |
Transmission oil |
11.1.4 |
36 |
Adjustments |
11.2 |
37 |
Agitator Clearance |
11.2.1 |
37 |
To Measure the Agitator Clearance |
11.2.2 |
37 |
Interlock Safety System |
11.3 |
38 |
Transmission belt |
11.4 |
38 |
Fault Finding |
12.0 |
38 |
Recommended Spares |
13.0 |
39 |
Notes |
14.0 |
41 |
Service Contact Numbers |
15.0 |
42 |
© Hobart 2006
3

1.0 SAFETY INFORMATION.
The procedures and precautions contained in this manual are understood to apply to the machinery only when it is used in the prescribed manner. If the machinery is used other than in the recommended manner, the operator will be responsible for his/her own safety and for the safety of the other persons who may be involved.
The information in this manual has been prepared to assist the operator to understand, maintain, and operate the mixer. In order to prevent accidents, read, understand and follow all the precautions and warnings contained in this manual before installation or operating for the first time. This manual must be studied to obtain a clear understanding of the mixer and its capabilities.
1.1 SAFETY GUIDELINES.
Ensure sufficient precautions are observed during manual handling of the mixer particularly when moving into position on installation. Reference must be made to manual handling regulations. The mixer weights are given in Table 1.
•Do not hose or pressure clean this appliance. It is vital to adhere to the cleaning instructions detailed in Section 9 of this manual.
•Do not remove any covers or loosen any fittings whilst the machine is operating.
•Ensure this manual is kept in an easily accessible place for future reference near the mixer.
•All operators must be trained in the safe operation of the mixer and attachments.
•Ensure that the electrical supply has been isolated before attempting to service or move the mixer.
•Rotating machinery and electricity are potentially hazardous and may cause injury if sufficient precautions are not taken prior to operating or servicing the machine.
•Always have your mixer regularly serviced; at least twice a year, depending on frequency of use.
•When mixing products that develop dust care must be taken. Mix the ingredients using the STIR facility until the dust is eliminated.
•Exposure to dust (including flour) may be harmful to health causing rhinitis (running noses), watering eyes and possibly occupational asthma.
1.2 WARNING SYMBOLS.
To identify the safety messages in this manual, the following symbols have been used
The "Warning" symbol is found primarily where the corresponding information is important for the safe use of the machinery.
The electrical hazard symbol is used when there are risks of an electrical nature. Prior to servicing the machinery, always disconnect the power cable from the mains supply.
4

1.3 LIABILITY.
Installations and repairs which are not carried out by Authorised technicians or the use of other than original spare parts, and any technical alterations to the machine, may affect the warranty set out in the standard conditions of sale.
2.0 FOREWORD.
Hobart reserves the right to alter the design of their products without prior notice. Whilst every effort is made to ensure this publication reflects the latest design, the Company cannot guarantee full compliance.
Take pride in your HL800/HL1400 Mixer - keep it clean and in good mechanical and electrical condition.
3.0 GENERAL INFORMATION.
The information and instructions contained in this manual may not cover all details or variations in the equipment, nor provide for every eventuality to arise with installation, operation, or maintenance. If additional information is required, please contact your local Hobart office.
The HL800/HL1400 Mixers are designed to mix food products as detailed on the specification chart (Sections 7.1 and 7.2, pages 25 and 26).
The Legacy™ 80-litre mixer is a heavy duty mixer which features a 3-horsepower motor, SmartTimer™ and power bowl lift as standard equipment.
The LegacyTM 140-quart mixer is a heavy-duty mixer which features a 5-horsepower motor, digital SmartTimerTM and power bowl lift as standard equipment.
A programmable Recipe Timer is optional.
Both models have four mix speeds and stir speed.
The machine is rated to operate on the electrical supplies shown in Table 1, page 33.
The bowl support and the guard are interlocked so that when either is not in their correct operating positions, the mixer will not work.
4.0CARING FOR OUR ENVIRONMENT.
4.1PACKAGING MATERIAL.
The pallet and protective packing material have been selected from materials that are environmentally friendly for disposal or can normally
be recycled. Instead of throwing them away, please ensure they are recycled.
4.2 DISPOSAL OF YOUR OLD APPLIANCE.
Old appliances contain materials that can be recycled. Please contact your local waste collection centre; scrap merchant or local Hobart office about potential recycling schemes.
5
5.0SAFETY INSTRUCTIONS.
A FULLY TRAINED AND COMPETENT PERSON MUST ONLY USE THE AGITATORS AND/OR MIXER.
The following instructions must be observed when using the mixer.
Note: The mixer must only be used for the purpose it was designed and inline with the supplied operating instructions.
When maneuvering or lifting a bowl and contents with a total weight in excess of 25kg a bowl truck must be used (refer to recommended spare parts Section 13, page 39 for bowl truck part number).
5.1 DUST HAZARD.
In order to minimise any dust hazard follow the instructions detailed below.
When mixing ingredients care must be taken to avoid the inhalation of dust particles e.g. flour. Reference should be made to product supplier's data sheets to ensure adequate precautions/protections are taken.
Items such as flour must be added in such a manner to avoid dust particles being dispersed into the local atmosphere.
Carefully slit the bag whilst holding in the lower part of the bowl. When mixing dry ingredient use the lowest speed to minimise dust emission. Use a splash cover to reduce dust emissions (refer to the recommended spare parts Section 13, page 39 for the cover part number). Mix the ingredients in the bowl using the lowest speed until the risk of producing any dust is eliminated. Fit suitable dust extraction equipment.
5.2NEVER.
•Operate the mixer or agitators if a fault develops or the mixer is unsafe.
•Wear loose clothing.
•Attempt to reach into the bowl when mixing.
•Access rotating parts.
•Fit the agitator to the mixer without a bowl in place.
•Leave the agitator on machine without the bowl being fitted.
•Use excessive force when operating which could affect the stability of the mixer.
•Operate the mixer if parts are disassembled.
•Over ride the safety switches fitted to the mixer.
•Open the guard to stop machine.
•Use the bowl lift to stop machine.
•Use the mixer in an unsafe condition.
•Clean the mixer with scouring powder or a scouring pad.
•Clean aluminium agitators in dishwashers.
•Inhale mixing ingredient dust particles.
6

5.3ALWAYS.
•Use the mixer in a well-lit area.
•Ensure the bowl, agitator and guard are correctly fitted to the mixer.
•Disconnect the mains electricity supply before cleaning the mixer.
•Clean the mixer daily.
•Stop mixer before adding more ingredients.
•Use the stop button to stop machine.
•Clean the bowl and agitators after use.
•Clean the mixer using mild soap and water.
•Service the mixer and agitators at least twice a year depending on the frequency of use.
•Use the mixer as intended and inline with the operating instructions.
•Use the correct reduced size equipment (bowl and agitators).
6.0USING THE MIXER.
6.1OPERATING FOR THE FIRST TIME.
Check lubrication before use.
This mixer is shipped with oil in the transmission. Check the oil level before starting the mixer.
•Electrically isolate the mixer.
•Remove the top cover.
•Unscrew the dipstick using a 3/8” hexagon Allen key and check the oil level. The oil level must be between the two grooves on the dipstick. Refer to Fig. 1 for the dip stick position.
This food mixer is only for professional use by suitably trained persons. Ensure operators have read and understood this manual and have received adequate training. MOVING AGITATOR IN BOWL, KEEP HANDS, CLOTHING AND UTENSILS OUT WHILE IN OPERATION. DO NOT USE WITHOUT INTERLOCKED GUARD.
The Legacy™ mixer is equipped with SmartTimer™ controls and a power bowl lift. Other operating parts (Fig.1, page 8) and their functions are described throughout the Operation section.
The Wire Cage Guard must be in position or the mixer will not operate.
The bowl must stay in locked position on the Bowl Support or the mixer will not operate.
If the Bowl Support is not all the way up (mix position), the mixer will not operate unless the START button is pressed and held.
If the Bowl Support is not in the mix position and the START button is pressed and held, the mixer will operate only in STIR speed.
7
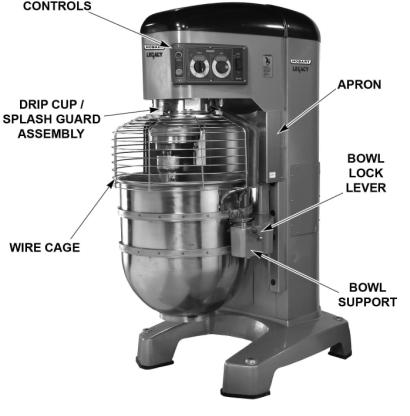
Fig. 1.
MIXER COMPONENT IDENTIFICATION
8
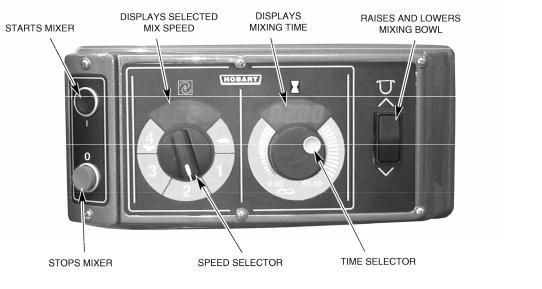
6.2 CONTROLS.
STANDARD TIMER CONTROLS
Model HL800 and HL1400 (With Four Mix Speeds Plus Stir Speed)
FM34947-2
Fig. 2.
Mixer Speeds (Model HL800 and HL1400)
STIR (Slow) |
This speed is for incorporating ingredients at the start of each |
|
|
|
mixing process. |
SPEED 1 |
(Low) |
This speed is for heavy mixtures such as pizza dough, heavy batters |
|
|
and potatoes. |
SPEED 2 |
(Medium-low) |
This speed is for mixing cake batters, mashing potatoes and |
|
|
developing bread dough. |
SPEED 3 |
(Medium-high) |
This speed is for incorporating air into light batches, as well as |
|
|
finishing whipped items. |
SPEED 4 |
(High) |
This speed is for maximum and accelerated air incorporation into |
|
|
light batches. |
9
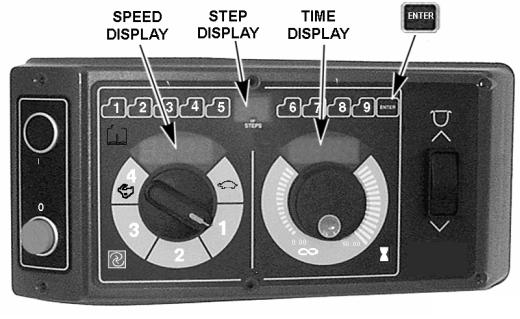
Programmable Recipe Timer (Optional)
FM34947-3
Fig. 3
Timer Specifications (Model HL800 and HL1400)
•Maximum number of programmable recipes: 9 recipes.
•Maximum number of steps allowed for each recipe: 6 steps.
•Maximum time allowed for each step in a recipe: 30 minutes.
For additional information on use of the programmable recipe timer, refer to pages 15 through 20.
6.3 BOWL PLACEMENT.
The bowl is heavy and must be correctly handled and lifted correctly to avoid personal injury. If the total weight of the bowl and ingredient weights are more than 25kg a bowl truck must be used. Refer to the recommended spare parts Section 13, page 39 for the bowl truck part number. Table 1 (page 33) details the weights of bowls and agitators.
The bowl must be installed before the agitator is installed.
To install the bowl, fully lower the bowl support. Position the bowl so the alignment pins on the left side of the bowl support fit in the holes in the bowl. Swing the bowl into the locked position on bowl support.
10
6.4 AGITATOR.
To install an agitator, the bowl must be on the bowl support and fully lowered.
•To Install
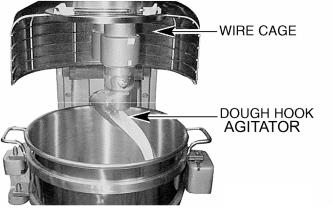
1.Open the wire cage.
2.Place the agitator inside the bowl and line up the horizontal slot on the agitator with the agitator shaft pins.
3.Slide the agitator up the agitator shaft until it stops and latches.
•To Remove
1.Open the wire cage.
2.Lower the bowl by pressing and holding the down arrow on the bowl switch.
3.Hold the agitator and pull the plunger of the agitator out (Fig. 4). Slide agitator down off the agitator shaft.
FM34947-4
Fig. 4
6.5 HOLD-TO-RUN OPERATION.
Use extreme caution whilst operating the hold to run facility when the bowl is not in the upper position.
The Legacy™ mixer has a hold-to-run STIR feature that allows the mixer to be operated in a STIR mode with the bowl in the down position. This allows the agitator to be gradually engaged with the ingredients improving the blending and reducing the dust emission. The start button must be continuously held to operate the mixer in the STIR mode. The bowl can be raised or lowered at the same time whilst the agitator is rotating.
11
6.6 POWER BOWL LIFT.
CAUTION: Before lowering the bowl onto a bowl truck, always unlock bowl and swing bowl out slightly.
To raise the bowl, the bowl must be in the locked position. Push and hold the up arrow on the bowl switch.
To lower the bowl, push and hold the down arrow on the bowl switch.
To Raise the Bowl While Mixing
To raise the bowl while the agitator is mixing the product (when required by recipe or when using the Bowl Scraper Attachment):
1.Close the wire cage, and then select a mixing speed on the SPEED dial.
2.Select a count-down time or HOLD for continuous count-up mixing.
3.While pressing and holding the up arrow on the bowl switch, press and hold the START button.
4.When the bowl reaches the mix position, release the START button. The mixer automatically changes to the selected mixing speed.
6.7 PREPARE FOR MIXING.
1.Place the mixing bowl on the bowl support.
2.Pour ingredients into the bowl.
3.Swing the bowl back to the locked position.
4.Place the agitator inside the bowl, and then attach it to the agitator shaft (Fig 4, page 11).
5.Return the wire cage to front-centre position.
6.Push and hold the up arrow on the bowl switch until the bowl reaches the mix position and stops.
7.The mixer is now ready for mixing. (See Timer Operation)
FM34947-5
Fig. 5
12
6.8OPERATING NOTES.
•STIR is to be used for incorporating ingredients. Do not use it to develop products.
•If the mixer is stopped during a mixing operation, the timer also stops. The timer starts again where it left off when the START button is pressed.
•The SPEED window will display the current SPEED selection.
•Turn the TIME selector clockwise to take the mixer out of the hold mode.
6.9TIMER OPERATION.
Using the Count-Up Mode (Continuous Mixing)
1.Turn the SPEED dial to select a mix speed (the SPEED setting can be changed at any time during the mixing operation).
NOTE: STIR is to be used for incorporating ingredients. Do not use to develop dough products.
2.Set the timer on hold by turning the TIME selector counter clockwise until "Hold" appears in the TIME window.
3.Press the START button to begin mixing. The timer starts counting forward from 00:00.
NOTE: If the wire cage is opened at any time, the mixing operation will stop. To resume the mixing operation, close the wire cage and press the START button.
4.Use the STOP button to stop the mixer; the mixing time is displayed in the TIME window.
5.Press the START button to resume mixing if needed.
NOTE: When the timer reaches 50:00 minutes, it will rollover to 00:01 and continue counting until the STOP button is pressed.
Using the Count-Down Mode (Timed Mixing)
1.Turn the SPEED dial to select a mix speed.
a.If the count-up mode was used for the previous batch, the desired time needs to be entered.
b.If the count-down mode was used for the previous batch, the previous time will be displayed. If a different time is needed, turn the TIME selector to the desired time.
2.Press the START button to begin mixing; the timer starts counting down from the set time.
a.To stop the mixer at any time, press the STOP button. To resume mixing, press the START button. For example: The mixer is started at SPEED 1 for 30 seconds and is stopped after 10 seconds. Pressing the START button will resume the mixing operation.
b.If the mixer is stopped and a new time setting is entered, pressing the START button saves the new time setting on the current speed selection. For example: The mixer is started at SPEED 1 for 30 seconds and is stopped after 10 seconds. Turning the time
13
selector enters a new time. The new time will replace the initial 30 seconds for SPEED 1 after the START button is pressed.
c.If the time is changed while mixing, the mixer will operate until the new time expires. The adjustment to the time will not be stored.
d.If speed is changed while mixing, the time will change to the previous time for the selected speed and count down.
NOTE: If the wire cage is opened at any time, the mixing operation will stop. To resume the mixing operation, close the wire cage and press the START button.
3.When the timer reaches 00:00, the mixer stops; a beeper sounds for 3 seconds. The countdown timer displays the last-entered time.
14
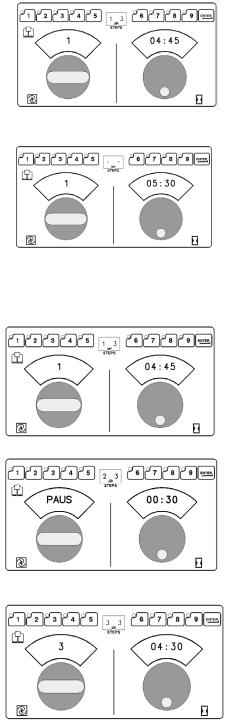
Recipe Mode — To Enter and Exit
•To enter recipe mode, press any recipe button. The recipe button lights to indicate you are in Recipe Mode, and the display shows the speed and time for the first step of the recipe.
•If the recipe button light blinks, the recipe is inactive. Refer to special functions to activate or de-activate recipe buttons.
•To exit Recipe Mode, press the lighted Recipe Button. The light on the recipe button goes off, indicating you are in Standard Timer Mode. The previous time setting for the shown speed will display.
Reviewing Recipe Steps
This allows you to view a recipe without running the mixer. For example, a three step recipe is shown.
•Select the recipe. The speed and time for the first step of the recipe are displayed.
•Press the ENTER to display the next recipe step. Repeatedly pressing the ENTER cycles through all the recipe steps.
•Pressing START will begin mixing step 1 of the recipe, regardless of the step displayed.
15

Running a Recipe
• Select the desired recipe by pressing the recipe button. The button lights and step one of the recipe displays.
• Press START.
• The mixer begins to run step one of the programmed recipe. The timer display indicates the mixer speed and counts down the remaining time.
• When the time expires, the mixer automatically switches to the speed and time for the next recipe step and continues mixing. Mixing steps run in succession at the programmed speed and time.
• If a Pause step is programmed in the recipe, the mixer stops and the time
display counts down the pause time to 00:00 and beeps.
• After a Pause step, the speed display for the next step flashes; press START when ready to resume mixing.
• The mixer stops after the last step.
• The timer displays revert back to step one for that
|
recipe (as shown at the top of this page). Run the |
|
same recipe again by pressing START or select a |
|
different recipe. |
|
• Mixing can be stopped at any time by pressing STOP. |
Interrupting a Recipe |
• The speed display flashes to indicate the Program is |
interrupted, and the timer displays the remaining time. |
|
|
Press START to résumé mixing. |
|
• If you do not wish to resume mixing, press the |
|
recipe button twice until it is not lit — this returns |
|
to Standard Timer Mode. |
|
Timer will beep between steps and at end of step. |
16
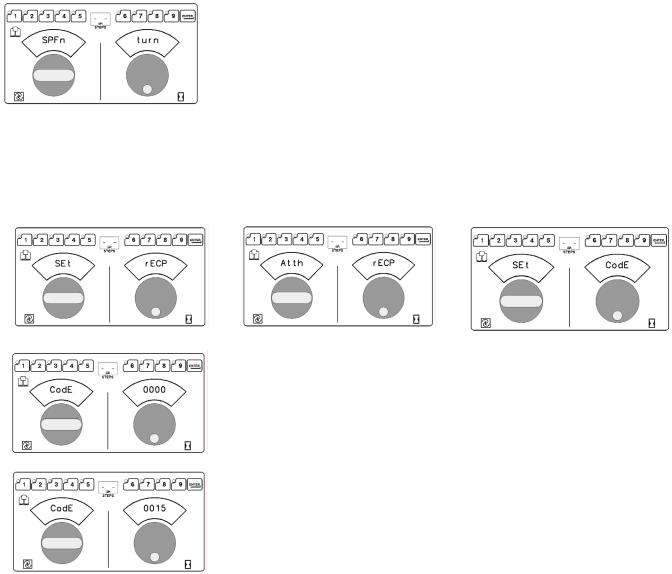
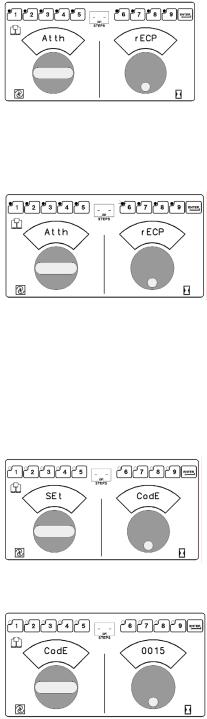
Entering a Special Function
Special Function Mode allows you to access three user resettable parameters:
•Programming Recipes, (SEt . . .rECP),
•Making Recipes Active or Inactive, (Atth . . .
rECP) and
•Setting the User Access Code (SEt . . . Code).
[There are also other parameters for service use viewable in Special Functions.] Refer to the table.
FUNCTION |
USED BY |
|
SEL . . |
Unit |
Service Technician |
LASt . . . |
Err |
Service Technician |
Err . . . |
Log |
Service Technician |
totL . . . HrS |
Service Technician |
|
LASt . . . HrS |
Service Technician |
|
CAP . . . HrS |
Service Technician |
|
RUN . . . DiAg |
Service Technician |
|
SEt . . . CodE |
Authorized Operator |
|
SEt . . . rECP |
Authorized Operator |
|
Atth . . . rECP |
Authorized Operator |
|
|
|
|
•Begin from Standard Timer Mode . . . (If you are in Recipe Mode, exit by pressing the lighted Recipe button to return to Standard Timer Mode.)
•With no Recipe buttons lighted, press Enter for 5 seconds. SPFn . . . turn displays indicating Special Functions.
•There is a one minute timeout in Special Functions Mode: After one minute of inactivity the control will automatically return to Standard Timer Mode.
•Turn the Timer Dial to select one of the special functions: SEt . . .rECP, Atth . . .rECP or SEt . . .CodE,.
Press ENTER.
Enter the Access Code
•You must enter the code to change any recipe parameters.
•CodE . . . 0000 displays.
•Turn the timer dial to the applicable access code and press ENTER. The default access code is 0015. Refer to the next three pages for the applicable function.
•If the incorrect code has been entered, no is displayed in the Step Display.
17
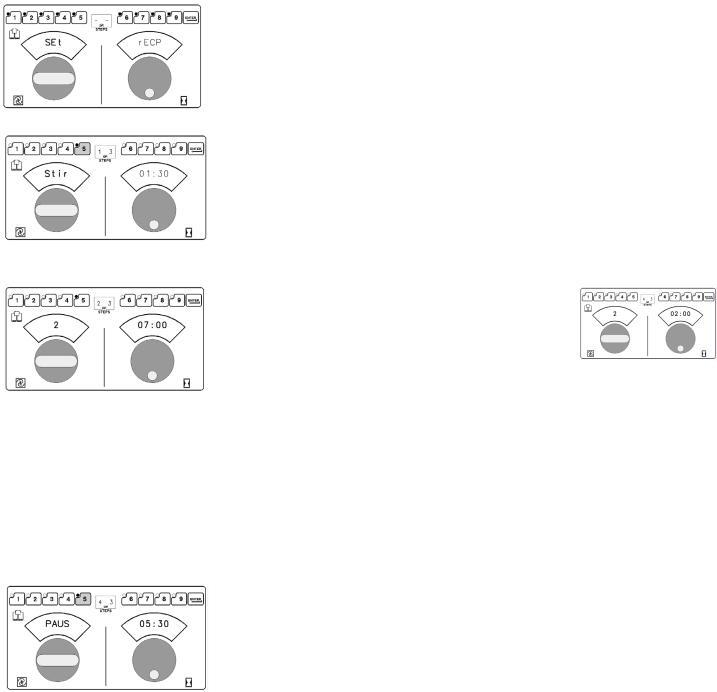
Programming a Recipe [SEt . . . rECP]
This function allows you to program any of 9 mixer recipes with up to 6 steps in each recipe. Follow instructions in Entering a Special Function on the previous page to enter SEt . . .rECP.
After entering the Access Code, the display of SEt . . . rECP indicates that you can now program a recipe.
All active recipe keys are lit continuously; inactive recipe keys blink.
• Press the recipe key you want to program (1–9). It stays lit.
• Set the speed and mix time for step one by turning the speed and time dials; press ENTER to go to the next step. If the recipe was previously programmed, step 1 of X displays to indicate the first of up to 6 steps programmed for this recipe. The example shows that Stir speed was previously programmed for 1 minute and 30 seconds.
• Set the speed and time for each step of the recipe, then press ENTER to go to the next step. Repeat for each step.
• If you add more steps than were previously programmed, the step display does not updat until the recipe has been saved. The step displa can show step 4 of 3 during programming.
• Turn timer dial counter clockwise to End to terminate the recipe. This sets the previous step as the last step.
|
• Turn timer dial counter clockwise to End to terminate the |
|
recipe. This sets the previous step as the last step. |
|
• To save the recipe, press the lit recipe button. |
|
• Continue programming other recipes; or press ENTER for |
Programming a Pause |
5 seconds to exit SEt . . . rECP and return to standard |
Timer Mode. |
|
|
• If you need to stop mixing to add ingredients or to rest |
|
the dough, you can program a Pause step. Turn the |
|
Speed dial to the top (PAUS displays); set the timer dial |
|
for that amount of time; press ENTER. |
|
• The mixer cannot be restarted while the pause step is |
|
counting down. If programming a Pause to add |
|
ingredients, its best to set the Pause Time for a short |
|
amount of time. |
|
• Pause cannot be entered in first or last step of a recipe. |
18
NOTE: If a recipe step is programmed wrong, exit SEt . . . rECP and re-program the entire recipe.
Making a Recipe Active or Inactive [Atth . . . rECP]
This function allows you to change the status of a recipe from Active to Inactive or vice versa. A recipe that has inactive status will not run.
Follow instructions in Entering a Special Function on page 16 to enter Atth . . .rECP.
After entering the Access Code, the display of Atth . . .
rECP indicates that you can change the status of a recipe.
All active recipe buttons are lit continuously; inactive recipe keys blink.
•Press any lighted recipe button to deactivate the recipe; the recipe button blinks.
•Press any blinking recipe button to activate the recipe; it becomes lit continuously.
•Press ENTER for 5 seconds to exit Atth . . . rECP and return to Standard Timer Mode.
Setting the Access Code [SEt . . . CodE]
This function allows you to change the factory-set access code, 0015, to any number from 0000 to 9999. We recommend that you keep the 0015 access code.
Follow instructions in Entering a Special Function on page 16 to enter SEt . . .CodE.
•Turn the timer dial to the current code number and press
ENTER.
19

•The step display now reads nu..
•Turn the timer dial to the new code number and press ENTER.
•Set…CodE displays. Press ENTER for 5 seconds to exit Set. . .CodE and return to Standard Timer Mode.
•Make a record of the new access code.
If you lose the code, it can be restored to the factory-set default code 0015. Disconnect power to the mixer. Press the enter key while powering up the mixer again. This resets all factory defaults. Programmed recipes will be lost.
6.10 UNLOADING.
1. Unlock the bowl and swing-out slightly. Press and hold the down arrow on the bowl switch to lower the bowl.
2. Open the wire cage assembly.
3. Remove the agitator from the agitator shaft.
4. Remove the bowl from the bowl support.
6.11 WIRE GUARD CAGE.
The wire cage can be rotated out of the way to add ingredients or to access the bowl and agitator.
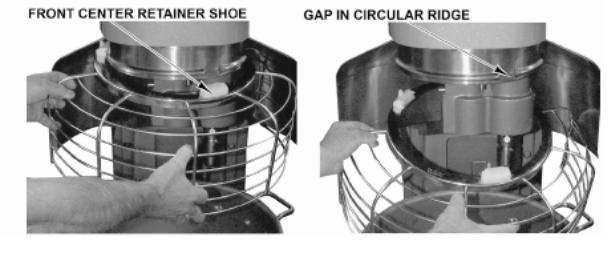
Note how the grooves on the nylon retainer shoes allow the Wire Cage to ride around the circular ridge of the planetary drip cup.
•To open the wire cage, rotate it to your left.
•To close the wire cage, rotate it to your right until it stops in the front-center, closed position.
20

Fig. 6
6.12REMOVE AND CLEANING THE WIRE GUARD CAGE.
1.Lower the bowl. Remove the agitator and bowl.
2.While holding the wire cage securely with both hands, rotate it to your left until the frontcenter retainer shoe reaches the gap in the circular ridge of the planetary drip cup.
3.Lower the front of the wire cage and move the wire cage slightly to the rear so the rear retainer shoes clear the ridge of the drip cup. The wire cage can now be removed.
21
FM34947-7
Fig. 7
4.Wash the wire cage in a sink, rinse with clear water, and dry with a clean cloth.
5.The stainless steel splash guard can be wiped off and/or washed with a cloth or sponge using warm, soapy water. Rinse with clear water and dry with a clean cloth.
6.13 RE-FITTING THE WIRE GUARD CAGE.
1.Position the ring of the wire cage so the front-center retainer shoe is positioned below the gap in the circular ridge of the planetary drip cup.
2.Position the grooves so the rear retainer shoes straddle the circular ridge on the planetary drip cup.
3.Lift the front of the wire cage so the front-center retainer shoe passes up through the gap in the circular ridge on the planetary drip cup.
4.Rotate the wire cage to your right until all three retainer shoes straddle the ridge on the drip cup.
5.Continue rotating the wire cage so the opening is to the front of the mixer (to install the agitators) or until it stops at the front-center position.
7.0MIXING CAPACITY.
MIXER CAPACITY
The Mixer Capacity Chart is a guide for controlling the batch sizes in your formulations. The capacities listed take into account the amount of product, which can be contained in the various sized bowls. The listed capacities are the maximum recommended batch sizes. If the combined weight of the bowl and ingredients is greater than 25kg a bowl truck must be used. Recipes for dough used to establish the batch sizes in the Mixer Capacity Chart are listed below:
Do not exceed the specified mix quantity.
The maximum capacity of the mixer bowls are:
22
HL800 (full size): 75.7 liters
HL1400 (full size): 132.5 liters
|
HEAVY BREAD |
MEDIUM PIZZA |
RAISED DONUT |
|
INGREDIENT |
DOUGH |
DOUGH |
DOUGH |
|
Flour |
100.0% |
100.0% |
100.0% |
|
Water |
55.0 |
50.0 |
65.0 |
|
Yeast |
2.0 |
1.0 |
5.0 |
|
Salt |
2.5 |
1.5 |
2.5 |
|
Sugar |
5.0 |
- 0 - |
15.0 |
|
Shortening |
5.0 |
- 0 - |
15.0 |
|
Oil |
-0- |
2.0 |
-0- |
|
Non-Fat Dry Milk |
6.0 |
- 0 - |
8.0 |
|
Total |
175.5% |
154.5% |
210.5% |
|
The ingredient percentages are based on a flour content of 100 percent to simplify using the recipes to make various sized batches and compute the moisture absorption ratio.
The flour used in the recipes is hard wheat flour, enriched and bleached. It contains 11 to 12 percent protein content and 12 percent moisture content.
Flour, which has lower moisture content, will decrease the moisture absorption, cause difficulty in proper gluten hydration, and make a heavier load on your mixer. Flours containing high quality protein, such as high gluten flour, result in dough, which can be very difficult to mix. If high gluten flour is used, reduce the batch quantity noted on the Mixer
Capacity Chart by 10 percent to prevent overloading of the mixer.
The temperature of the water used in the recipes is 18°C to 23.0°C. Cooler water temperatures will cause the dough to be harder to mix. If you plan to mix doughs using cold water, the batch size may need to be reduced by 15 to 20%.
Also considered and noted on the Mixer Capacity Chart is the moisture absorption ratio (AR). This is the ratio of the weight of water to the weight of flour expressed as a percentage.
AR = weight of water ÷ weight of flour * 100%
The absorption ratio gives an indication of the relative "heaviness" or "wetness" of a batch. In fact, the capacities listed on the Mixer Capacity Chart for the products listed below are based on the following absorption ratios:
23
PRODUCT |
ABSORPTION RATIO |
Heavy Bread Dough |
55% |
Medium Bread Dough |
60% |
Light Bread Dough |
65% |
Thin Pizza Dough |
40% |
Medium Pizza Dough |
50% |
Thick Pizza Dough |
60% |
Raised Donut Dough |
65% |
Whole Wheat Dough |
70% |
When mixing any of the above products with an absorption ratio lower than listed, decrease the batch size proportionately to assure efficient mixing of the product and thus eliminate the possibility of overloading your mixer. For example: An HL800 mixer has a thin pizza dough capacity of 38.6 kg at first speed based on an AR of 40% according to the Mixer Capacity Chart. If the batch has an AR of 30%, reduce the batch size to compensate for the difference. Compute the size of the reduction as follows:
1. Divide the AR of the batch to be |
|
30% Actual AR |
|
mixed by the AR listed on the Mixer |
= 75% |
||
Capacity Chart. |
|
40% Rated |
AR |
2. Multiply the rated batch size by |
38.6 kg. Rated Batch Size |
||
the percentage obtained in step 1. |
|
x 75% |
|
The result is the maximum batch |
|
28.9 kg. Maximum Capacity |
|
size of the HL800 mixer for pizza |
|
for 30% AR Dough |
|
dough with 30% AR. |
|
|
|
Another factor often overlooked is the ability of your mixer to operate at a different speed.
To prevent overloading, use the recommended mix speed from the Mixer Capacity Chart.
Because of the toughness of a 40% AR thin pizza dough, a maximum mix time of 5 minutes on first speed is recommended. To mix 50% AR or lower doughs on second speed on model HL800 and HL1400, reduce the batch size by 50%.
The speed of the mixer, length of mix time, room temperature and ingredient temperatures all affect dough temperature. To achieve the desired final dough temperature, you may need to adjust the water temperature.
For batch size capacities on other bread doughs not mentioned on the Mixer Capacity Chart, follow the batch size recommendation for listed bread dough with a similar absorption ratio.
24
7.1MIXER CAPACITY CHART – HL800
Recommended Maximum Capacities—dough capacities based on 21°C water and 12% flour moisture.
PRODUCT |
AGITATORS |
HL800 MIXER |
|
||
SUITABLE FOR |
|
||||
|
OPERATION |
|
|
|
|
CAPACITY OF BOWL (LITRE LIQUID) |
75.7 litre |
56.8 litre |
|
37.8 litre |
|
(80 qt.) |
(60 qt.) |
|
(40 qt.) |
||
|
|
|
|||
Egg Whites |
D |
1.9 litre |
1.9 litre |
|
1.7 litre |
|
|
(2 qts.) |
(2 qts.) |
|
(1.7 qts.) |
Mashed Potatoes |
B & C |
27.2 kg |
18.2 kg |
|
13.6 kg |
|
|
(60 lbs.) |
(40 lbs.) |
|
(30 lbs.) |
Mayonnaise (Qts. of Oil) |
B or C or D |
28.4 litre |
17.0 litre |
|
12.3 litre |
|
|
(30 qts.) |
(18 qts.) |
|
(13 qts.) |
Meringue (Qty. of Water) |
D |
2.8 litre |
1.4 litre |
|
1.4 litre |
|
|
(3 qts.) |
(1.5 qts.) |
|
(1.5 qts.) |
Waffle or Hot Cake Batter |
B |
30.3 litre |
22.7 litre |
|
15.1 litre |
|
|
(32 qts.) |
(24 qts.) |
|
(16 qts.) |
Whipped Cream |
D or C |
15.1 litre |
12.9 litre |
|
8.5 litre |
|
|
(16 qts.) |
(12 qts.) |
|
(9 qts.) |
Cake, Angel Food |
C or I |
60 |
45 |
|
30 |
(8-10 oz. cake) |
|
||||
Cake, Box or Slab |
B or C |
45.3 kg |
22.7 kg |
|
18.1 kg |
|
|
(100 lbs.) |
(50 lbs.) |
|
(40 lbs.) |
Cake, Cup |
B or C |
40.8 kg |
27.3 kg |
|
20.4 kg |
|
|
(90 lbs.) |
(60 lbs.) |
|
(45 lbs.) |
Cake, Layer |
B or C |
40.8 kg |
27.3 kg |
|
20.4 kg |
|
|
(90 lbs.) |
(60 lbs.) |
|
(45 lbs.) |
Cake, Pound |
B |
45.3 kg |
25.0 kg |
|
18.1 kg |
|
|
(100 lbs.) |
(55 lbs.) |
|
(40 lbs.) |
Cake, Short (Sponge) |
C or I |
36.3 kg |
20.5 kg |
|
11.3 kg |
|
|
(80 lbs.) |
(45 lbs.) |
|
(25 lbs.) |
Cake, Sponge |
C or I |
29.5 kg |
16.4 kg |
|
18.1 kg |
|
|
(65 lbs.) |
(36 lbs.) |
|
(40 lbs.) |
Cookies, Sugar |
B |
27.3 kg |
18.1 kg |
|
13.6 kg |
|
|
(60 lbs.) |
(40 lbs.) |
|
(30 lbs.) |
Dough, Bread or Roll |
ED |
77.1 kg |
36.3 kg |
|
20.4 kg |
(Lt.-Med.) 60% AR§ |
(170 lbs.)* |
(80 lbs.)* |
|
(45 lbs.)* |
|
Dough, Heavy Bread |
ED |
63.5 kg |
27.3 kg |
|
15.9 kg |
55% AR§ |
(140 lbs.)* |
(60 lbs.)* |
|
(35 lbs.) □ |
|
Dough, Pie |
B & P |
34.0 kg |
22.7 kg |
|
15.9 kg |
|
|
(75 lbs.) |
(50 lbs.) |
|
(35 lbs.) |
Dough, Thin Pizza 40% AR |
ED |
38.6 kg |
18.2 kg |
|
11.3 kg |
(max. mix time 5 min.)§╪ |
|
(85 lbs.)□ |
(40 lbs.)□ |
|
(25 lbs.)□ |
Dough, Med. Pizza 50% |
ED |
70.3 kg |
31.8 kg |
|
14.5 kg |
AR §╪ |
|
(155 lbs.)□ |
(70 lbs.) □ |
|
(32 lbs.) □ |
Dough, Thick Pizza 60% |
ED |
70.3 kg |
31.8 kg |
|
20.4 kg |
AR §╪ |
|
(155 lbs.)* |
(70 lbs.)* |
|
(45 lbs.)* |
25
Dough, Raised Donut |
|
ED |
|
27.3 kg |
13.6 kg |
11.3 kg |
65% AR |
|
|
(60 lbs.)† |
(30 lbs.) † |
(25 lbs.) † |
|
Dough, Whole Wheat |
|
ED |
|
68.0 kg |
31.8 kg |
20.4 kg |
70% AR |
|
|
(150 lbs.) |
(70 lbs.) |
(45 lbs.)□ |
|
Eggs & Sugar for Sponge |
|
B & C or I |
|
18.1 kg |
10.9 kg |
8.2 kg |
Cake |
|
|
|
(40 lbs.) |
(24 lbs.) |
(18 lbs.) |
Icing, Fondant |
|
B |
|
29.5 kg |
16.4 kg |
11.3 kg |
|
|
|
|
(65 lbs.) |
(36 lbs.) |
(25 lbs.) |
Icing, Marshmallow |
|
C or I |
|
4.5 kg |
2.3 kg |
2.0 kg |
|
|
|
|
(10 lbs.) |
(5 lbs.) |
(4.5 lbs.) |
Shortening & Sugar, |
|
B |
|
29.5 kg |
21.8 kg |
15.9 kg |
Creamed |
|
|
(65 lbs.) |
(48 lbs.) |
(35 lbs.) |
|
Pasta, Basic Egg Noodle |
|
ED |
|
29.5 kg |
13.6 kg |
6.8 kg (15 |
(max. mix time 5 min.) |
|
|
(65 lbs.)□ |
(30 lbs.) |
lbs.) □ |
|
|
|
|
||||
ABBREVIATIONS - AGITATORS |
NOTE: %AR (% Absorption Ratio) = Water |
|||||
SUITABLE FOR OPERATION |
weight divided by flour weight. Capacity depends |
|||||
B - Flat Beater |
on moisture content of dough. Above capacities |
|||||
C - Wing Whip |
based on 12% flour moisture at 21°C water |
|||||
D - Wire Whip |
temperature. |
|
|
|
||
ED - Dough Hook |
|
|
|
|
|
|
I - Wire Whip |
§ If high gluten flour is used, reduce above dough |
|||||
P - Pastry Knife |
batch size by 10%. |
|
|
|||
1st Speed |
╪2nd speed should never be used on 50% AR or |
|||||
* 2nd Speed |
||||||
† 3rd Speed |
lower products with the exception of the HL800 & |
|||||
|
|
HL1400. The HL800 and HL1400 require a 50% |
||||
reduction in batch size to mix in speed 2 with 50% or less AR doughs.
Use of ice requires a 10% reduction in batch size.
7.2MIXER CAPACITY CHART – HL1400
Recommended Maximum Capacities—dough capacities based on 21°C water and 12% flour moisture.
PRODUCT |
AGITATORS |
|
HL1400 MIXER |
|
||
SUITABLE FOR |
|
|
||||
|
OPERATION |
|
|
|
|
|
CAPACITY OF BOWL (LITRE LIQUID) |
132.5 litre |
75.7 litre |
56.8 litre |
37.8 litre |
||
(140 qt.) |
(80 qt.) |
(60 qt) |
(40 qt.) |
|||
|
|
|||||
Egg Whites |
D |
3.8 litre |
1.9 litre |
1.9 litre |
1.7 litre |
|
|
|
(4 qts.) |
(2 qts.) |
(2 qts.) |
(1.7 qts.) |
|
26
Mashed Potatoes |
B & C |
45.4 kg |
27.2 kg |
18.2 kg |
13.6 kg |
|
|
|
(100 lbs.) |
(60 lbs.) |
(40 lbs.) |
(30 lbs.) |
|
Mayonnaise (Qts. of Oil) |
B or C or D |
47.3 litre |
28.4 litre |
17.0 litre |
12.3 litre |
|
|
|
(50 qts.) |
(30 qts.) |
(18 qts.) |
(13 qts.) |
|
Meringue (Qty. of Water) |
D |
4.7 litre |
2.8 litre |
1.4 litre |
1.4 litre |
|
|
|
(5 qts.) |
(3 qts.) |
(1.5 qts.) |
(1.5 qts.) |
|
Waffle or Hot Cake Batter |
B |
- - - - - - |
30.3 litre |
22.7 litre |
15.1 litre |
|
|
|
(32 qts.) |
(24 qts.) |
(16 qts.) |
||
|
|
|
||||
Whipped Cream |
D or C |
28.4 litre |
15.1 litre |
12.9 litre |
8.5 litre |
|
|
|
(30 qts.) |
(16 qts.) |
(12 qts.) |
(9 qts.) |
|
Cake, Angel Food |
C or I |
120 |
60 |
45 |
30 |
|
(8-10 oz. cake) |
||||||
Cake, Box or Slab |
B or C |
83.9 kg |
45.3 kg |
22.7 kg |
18.1 kg |
|
|
|
(185 lbs.) |
(100 lbs.) |
(50 lbs.) |
(40 lbs.) |
|
Cake, Cup |
B or C |
74.8 kg |
40.8 kg |
27.3 kg |
20.4 kg |
|
|
|
(165 lbs.) |
(90 lbs.) |
(60 lbs.) |
(45 lbs.) |
|
Cake, Layer |
B or C |
74.8 kg |
40.8 kg |
27.3 kg |
20.4 kg |
|
|
|
(165 lbs.) |
(90 lbs.) |
(60 lbs.) |
(45 lbs.) |
|
Cake, Pound |
B |
83.9 kg |
45.3 kg |
25.0 kg |
18.1 kg |
|
|
|
(185 lbs.) |
(100 lbs.) |
(55 lbs.) |
(40 lbs.) |
|
Cake, Short (Sponge) |
C or I |
68.0 kg |
36.3 kg |
20.5 kg |
11.3 kg |
|
|
|
(150 lbs.) |
(80 lbs.) |
(45 lbs.) |
(25 lbs.) |
|
Cake, Sponge |
C or I |
63.5 kg |
29.5 kg |
16.4 kg |
18.1 kg |
|
|
|
(140 lbs.) |
(65 lbs.) |
(36 lbs.) |
(40 lbs.) |
|
Cookies, Sugar |
B |
45.3 kg |
27.3 kg |
18.1 kg |
13.6 kg |
|
|
|
(100 lbs.) |
(60 lbs.) |
(40 lbs.) |
(30 lbs.) |
|
Dough, Bread or Roll |
ED |
95.3 kg |
77.1 kg |
36.3 kg |
20.4 kg |
|
(Lt.-Med.) 60% AR§ |
(210 lbs.)* |
(170 lbs.)* |
(80 lbs.)* |
(45 lbs.)* |
||
Dough, Heavy Bread |
ED |
79.4 kg |
63.5 kg |
27.3 kg |
15.9 kg |
|
55% AR§ |
(175 lbs.)* |
(140 lbs.)* |
(60 lbs.)* |
(35 lbs.) □ |
||
Dough, Pie |
B & P |
56.7 kg |
34.0 kg |
22.7 kg |
15.9 kg |
|
|
|
(125 lbs.) |
(75 lbs.) |
(50 lbs.) |
(35 lbs.) |
|
Dough, Thin Pizza 40% AR |
ED |
61.2 kg |
38.6 kg |
18.2 kg |
11.3 kg |
|
§╪ (max. mix time 5 min.) |
(135 lbs.)□ |
(85 lbs.)□ |
(40 lbs.)□ |
(25 lbs.)□ |
||
Dough, Med. Pizza 50% |
ED |
86.2 kg |
70.3 kg |
31.8 kg |
14.5 kg |
|
AR §╪ |
|
(190 lbs.)□ |
(155 lbs.)□ |
(70 lbs.)□ |
(32 lbs.)□ |
|
Dough, Thick Pizza 60% |
ED |
86.2 kg |
70.3 kg |
31.8 kg |
20.4 kg |
|
AR §╪ |
|
(190 lbs.)* |
(155 lbs.)* |
(70 lbs.)* |
(45 lbs.)* |
|
Dough, Raised Donut |
ED |
45.3 kg |
27.3 kg |
13.6 kg |
11.3 kg |
|
65% AR |
(100 lbs.)† |
(60 lbs.)† |
(30 lbs.)† |
(25 lbs.)† |
||
Dough, Whole Wheat |
ED |
83.9 kg |
68.0 kg |
31.8 kg |
20.4 kg |
|
70% AR |
(185 lbs.) |
(150 lbs.) |
(70 lbs.) |
(45 lbs.)□ |
||
Eggs & Sugar for Sponge |
B & C or I |
34.0 kg |
18.1 kg |
10.9 kg |
8.2 kg |
|
Cake |
|
(75 lbs.) |
(40 lbs.) |
(24 lbs.) |
(18 lbs.) |
|
Icing, Fondant |
B |
45.3 kg |
29.5 kg |
16.4 kg |
11.3 kg |
|
|
|
(100 lbs.) |
(65 lbs.) |
(36 lbs.) |
(25 lbs.) |
|
Icing, Marshmallow |
C or I |
9.1 kg |
4.5 kg |
2.3 kg |
2.0 kg |
|
|
|
(20 lbs.) |
(10 lbs.) |
(5 lbs.) |
(4.5 lbs.) |
|
Shortening & Sugar, |
B |
54.4 kg |
29.5 kg |
21.8 kg |
15.9 kg |
|
Creamed |
(120 lbs.) |
(65 lbs.) |
(48 lbs.) |
(35 lbs.) |
||
Pasta, Basic Egg Noodle |
ED |
45.3 kg |
29.5 kg |
13.6 kg |
6.8 kg |
|
(max. mix time 5 min.) |
(100 lbs.) |
(65 lbs.) □ |
(30 lbs.) |
(15 lbs.) □ |
||
|
27
ABBREVIATIONS - AGITATORS |
NOTE: %AR (% Absorption Ratio) = Water weight divided by |
SUITABLE FOR OPERATION |
flour weight. Capacity depends on moisture content of dough. |
B - Flat Beater |
Above capacities based on 12% flour moisture at 21°C water |
C - Wing Whip |
temperature. |
D - Wire Whip |
|
ED - Dough Hook |
§ If high gluten flour is used, reduce above dough batch size |
I - Wire Whip |
by 10%. |
P - Pastry Knife |
|
□1st Speed |
╪2nd speed should never be used on 50% AR or lower |
* 2nd Speed |
products with the exception of the HL800 & HL1400. The |
† 3rd Speed |
HL800 and HL1400 require a 50% reduction in batch size to |
|
mix in speed 2 with 50% or less AR doughs. |
|
Use of ice requires a 10% reduction in batch size. |
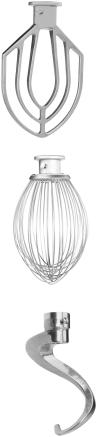
8.0 MIXER AGITATORS.
AGITATORS AND THEIR USES
Hobart Quick Release ™ agitators are available for the Legacy mixers and for the type of product that is being mixed.
The B Flat Beater is a multi-purpose agitator used for mashing potatoes or other vegetables, and mixing cakes, batters or icings. It is also used in industrial applications for any product requiring a creaming or rubbing action and uniform dispersion of ingredients. Use first speed for starting most operations; medium speed for finishing.
The D Wire Whip is designed for maximum blending of air into light products. Uses include: whipping cream, beating egg whites, mixing very light icings, meringues and all similar applications. The D Wire Whip is most commonly used in third and fourth speed.
The ED Dough Hook is used for mixing most bread, roll and
pizza dough, which require folding, and stretching action for best development. These agitators are suitable for use on all yeast raised doughs and should be operated in first, second or third speed.
28
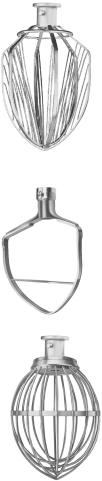
The C Wing Whip is used for whipping material that is too heavy for the D Wire Whip. The heavy frame permits its use for light creaming and beating. It is often used for whipping or blending potatoes, butter, and mayonnaise or light icings. It is generally used in first and second speed for whipping heavy products like potatoes or in third or fourth speed for light products such as mayonnaise or icings.
The P Pastry Knife combines shortening with flour, and is ideal for light pastry shells (patty shells), flaky pie dough and similar mixes. The cutting action of the knife practically eliminates rubbing and allows delicate ingredients to be combined without over development. The P Pastry Knife is suitable for stirring operations in low speeds and for fast cutting operations in medium speeds. You should not use the
P Pastry Knife at high speed if you want the pastry to have a flaky texture.
The I Wire Whip makes sponge cakes and mixes marshmallow and icing for heavy whipping.
8.2 SPLASH COVER AND BOWL EXTENSION RING
Splash Covers and Bowl Extension Rings provide a means for minimizing dust emissions and reducing splashing for certain mixes at higher speeds. Splash covers fit under the Bowl Guard. The stainless steel Bowl Extension Ring is also available. Splash Covers and Bowl Extensions, while convenient accessories, should not be used to increase the mixing capacity beyond the recommended maximum. The best functioning of Hobart mixers requires room at the top of the bowl for aeration and manipulation. Follow the Hobart Mixer
Capacity Chart of the best quality of mix. Splash Covers on larger mixers have a smaller diameter opening at the top due to their inverted cone shape. Overloading the mixer while a splash cover is in use reduces aeration because of restriction in the area where air enters the batch.
8.3 BOWL SCRAPER ATTACHMENT.
The mixer Bowl Scraper Attachment is available for the HL800/HL1400 Mixer full and half size bowls. This attachment scrapes the sides of the bowl as the agitator rotates to re-introduce material into the mixture. The scraper must only be used with the whip or flat beater agitators.
29

8.4 BOWL TRUCK.
When maneuvering or lifting a bowl and contents with a total weight in excess of 25 kg a bowl truck must be used.
Bowl Trucks or dollies provide convenience, save time, and reduce effort in handling large batches. Remove heavy batches of dough or batter from the mixer by unlocking the bowl and lowering on to the Bowl Truck. Carefully roll the truck away to make room for the next batch. Move the material to another location where it is to be used, or refrigerate between mixing and further processing. Bowl Trucks save time, reduce handling, and improve workflow. These are all valuable tools in a work place.
9.0 CLEANING.
CLEANING NEW MIXER BOWLS AND ACCESSORIES
Before using the first time, thoroughly wash new mixer bowls and agitators (beaters,
whips, dough hooks and pastry knives). Wash in hot water and a mild detergent solution, rinsing with either a mild soda or vinegar solution, and thoroughly rinse with clear water.
Also follow this cleaning procedure for bowls and agitators before whipping egg whites or whole eggs.
9.1 CLEANING AFTER USE.
After use, clean the mixing bowl, agitators and attachment with hot water, using a suitable non-abrasive detergent and soft bristle brush. (Flushing the bowl with hot water immediately after use will ease the cleaning).
Note: Do not clean the aluminium agitators in a dishwasher.
Clean the mixer with a hot damp cloth; thoroughly wipe the bowl support arms and all exterior surfaces. The guard should be cleaned as follows.
Cleaning the guard.
The guard should be cleaned at the end of each day. Once the guard is removed (see Section 6.12 page 21) it can be cleaned with hot water, using a suitable non-abrasive detergent and soft bristle brush. The stainless steel splashguard can be wiped off and/or washed with a cloth or sponge them using warm soapy water. Rinse with clean water and dry with a clean cloth.
30
 Loading...