


N50 MIXER page 3 – English
I
N
S
T
R
U
C
T
I
O
N
S
N50 MIXER page 21 – French
PLANETENRÜHRMASCHINE
MIT ANSATZNABE page 37 – German
HOBART INTERNATIONAL, INC.
701 S. RIDGE AVENUE
TROY, OHIO 45374-0001
PLE200388 - A3 - 9 - 97
F-23138 (6-98)

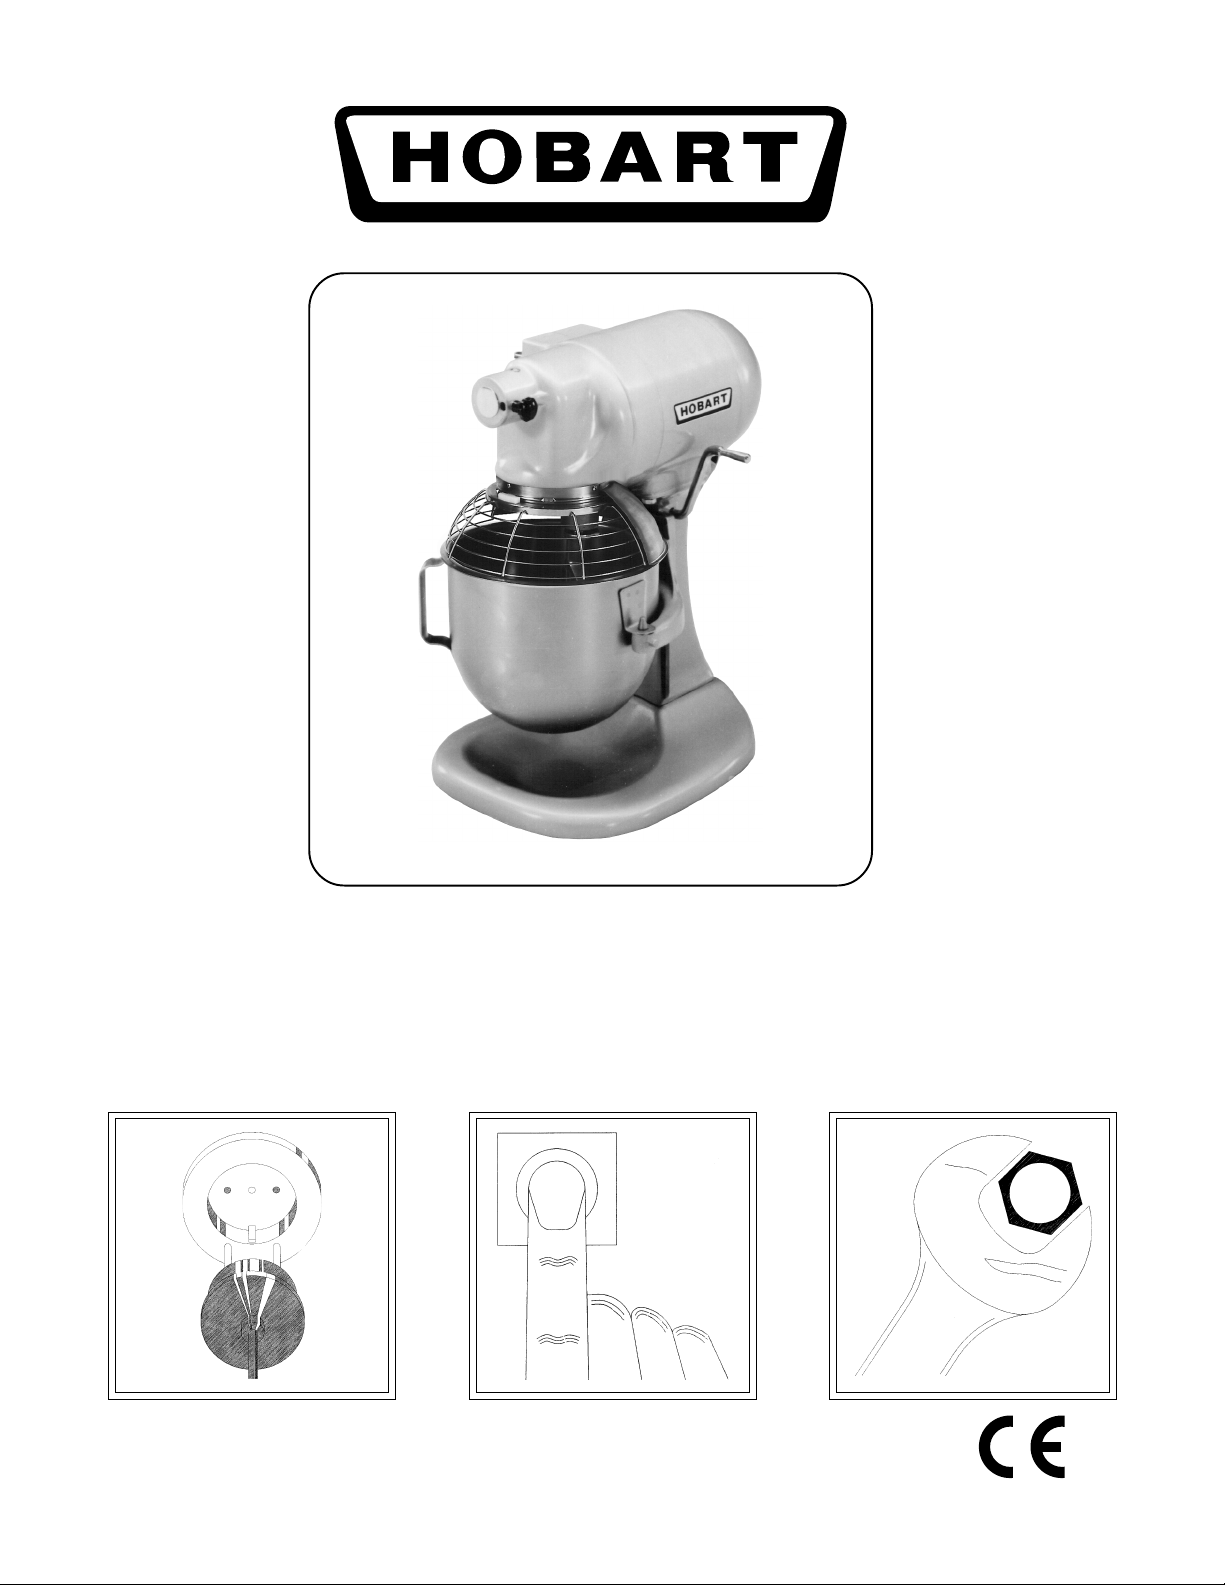
N50
INSTALLATION OPERATION MAINTENANCE
PLE200388 - A3 - 9 - 97
F-23138 (6-98)

– 4 –

Contents
Safety Information ...................................................................................................................................................6
Warning Symbols....................................................................................................................................................6
Liability ....................................................................................................................................................................7
Hygiene ...................................................................................................................................................................7
Foreword .................................................................................................................................................................7
General Information................................................................................................................................................7
Mixer Dimensions. Figure 1 ...................................................................................................................................8
Technical Information. Table 1 ..............................................................................................................................9
Installation ...............................................................................................................................................................9
Unpacking......................................................................................................................................................9
Location .........................................................................................................................................................9
Electrical Supply and Connection ..............................................................................................................10
Commissioning and Operating Instructions ........................................................................................................10
Mixer Operation ....................................................................................................................................................11
Mixer Component Identification. Figure 2 .................................................................................................11
Mixing Chart-Kitchen Capacities. Table 2.................................................................................................12
Mixing Chart-Bakery Capacities. Table 3..................................................................................................13
Mixer Speed Settings..................................................................................................................................13
Mixer Agitators......................................................................................................................................................13
Types of Agitators. Figure 3 .......................................................................................................................14
Cleaning Procedure (Mixer and Attachments)....................................................................................................14
Cleaning Before First Use ..........................................................................................................................14
Cleaning After Use......................................................................................................................................14
Agitator Spring Position. Figure 4........................................................................................................................14
Using the Attachment Facility ..............................................................................................................................15
Fitting an Attachment..................................................................................................................................15
Specific Attachment Safety ..................................................................................................................................16
Juice Extractors...........................................................................................................................................16
Food Grinders and Mincers........................................................................................................................16
Can Openers ...............................................................................................................................................16
Slicers and Shredders ................................................................................................................................16
Grain Mills....................................................................................................................................................17
Spaghetti Makers ........................................................................................................................................17
Servicing and Replacement of Components.......................................................................................................17
Fault Finding .........................................................................................................................................................18
Recommended Spares.........................................................................................................................................18
Service Information and Addresses ....................................................................................................................19
© HOBART CORPORATION, 1998
– 5 –

SAFETY INFORMATION.
The information in this manual has been prepared to assist the operator to understand,
maintain and operate the N50 mixer. Before installation or operating for the first time, this
manual must be studied to obtain a clear understanding of the mixer and its capabilities.
To prevent accidents, read, understand and follow all the precautions and warnings contained
in this manual before operating or carrying out any of the cleaning/maintenance operations.
For warning information see the section below, the section on ‘commissioning and operation’,
and ‘using attachments’. The procedures and precautions contained in this manual are
understood to apply to the machinery only when it is used in the authorized manner. If the
machinery is used other than in the authorized manner, the operator will be responsible for
his/her own safety and for the safety of the other persons who may be involved.
• Ensure this manual is kept in an easily accessible place for future reference near the mixer.
• All operators must be trained in the safe operation of the mixer and attachments.
• Do not remove any covers or loosen any fittings while the mixer is operating.
• Ensure the electrical supply has been isolated before attempting to service or move the
mixer.
• Rotating machinery and electricity are potentially hazardous and may cause injury if
sufficient precautions are not taken prior to operating or servicing the machine.
• Always have your mixer and attachments regularly serviced at least twice a year,
depending on the frequency of use.
• Do not hose or pressure clean this appliance. Follow the cleaning instructions detailed in
this manual.
WARNING SYMBOLS.
To identify the safety messages in this manual, the following symbols have been used:
The “Warning” symbol is found primarily where the corresponding information is
important for the safe use of the machinery.
The electrical hazard symbol is used when there are risks of an electrical nature.
Prior to servicing the machinery, always disconnect the power cable from the
mains supply.
– 6 –

LIABILITY.
Installations and repairs which are not carried out by authorized technicians or the use of
non-original spare parts, or any technical alterations to the machine, may affect the
warranty set out in the standard conditions of sale. This does not affect your statutory
rights. Continued product improvement is a Hobart policy, therefore, specifications may
change without notice.
HYGIENE.
It is the responsibility of the mixer operator to maintain the machine in a clean condition to the
highest standards of hygiene to prevent the formation of harmful bacteria. Regular attention
and cleaning will achieve this result.
A good standard of personal hygiene is important for mixer operators. Hair and clothing must
be neat and clean. Hands and fingernails must be thoroughly washed before work commences.
Jewellery should not be worn.
FOREWORD.
Hobart reserves the right to alter the design of its products without prior notice. While every
effort is made to ensure this publication reflects the latest design, the Company cannot
guarantee full compliance.
Take pride in your N50 mixer—keep it clean and in good mechanical and electrical condition.
The information and instructions contained in this manual may not cover all details or variations
in the equipment, nor provide for every eventuality to arise with installation, operation, or
maintenance. If additional information is required, please contact your local Hobart sales
office.
GENERAL INFORMATION.
The N50 mixer is designed to mix food products as detailed on the specification charts (Tables
2 and 3), standing on a standard height work top. The mixer is generally manufactured from
die cast zinc alloy components and a steel rear cover all finished with a standard Hobart paint.
The machine is rated to operate on the electrical supplies shown in Table 1. The mixer is fitted
with a ‘no volt release’ safety feature to prevent automatic re-starting after a supply failure or
disconnection from the mains. The bowl support and guard are interlocked so that when either
are not in their correct operating positions, the mixer will not work. The standard mixer is
delivered with a guard, bowl and ‘B’ beater.
– 7 –
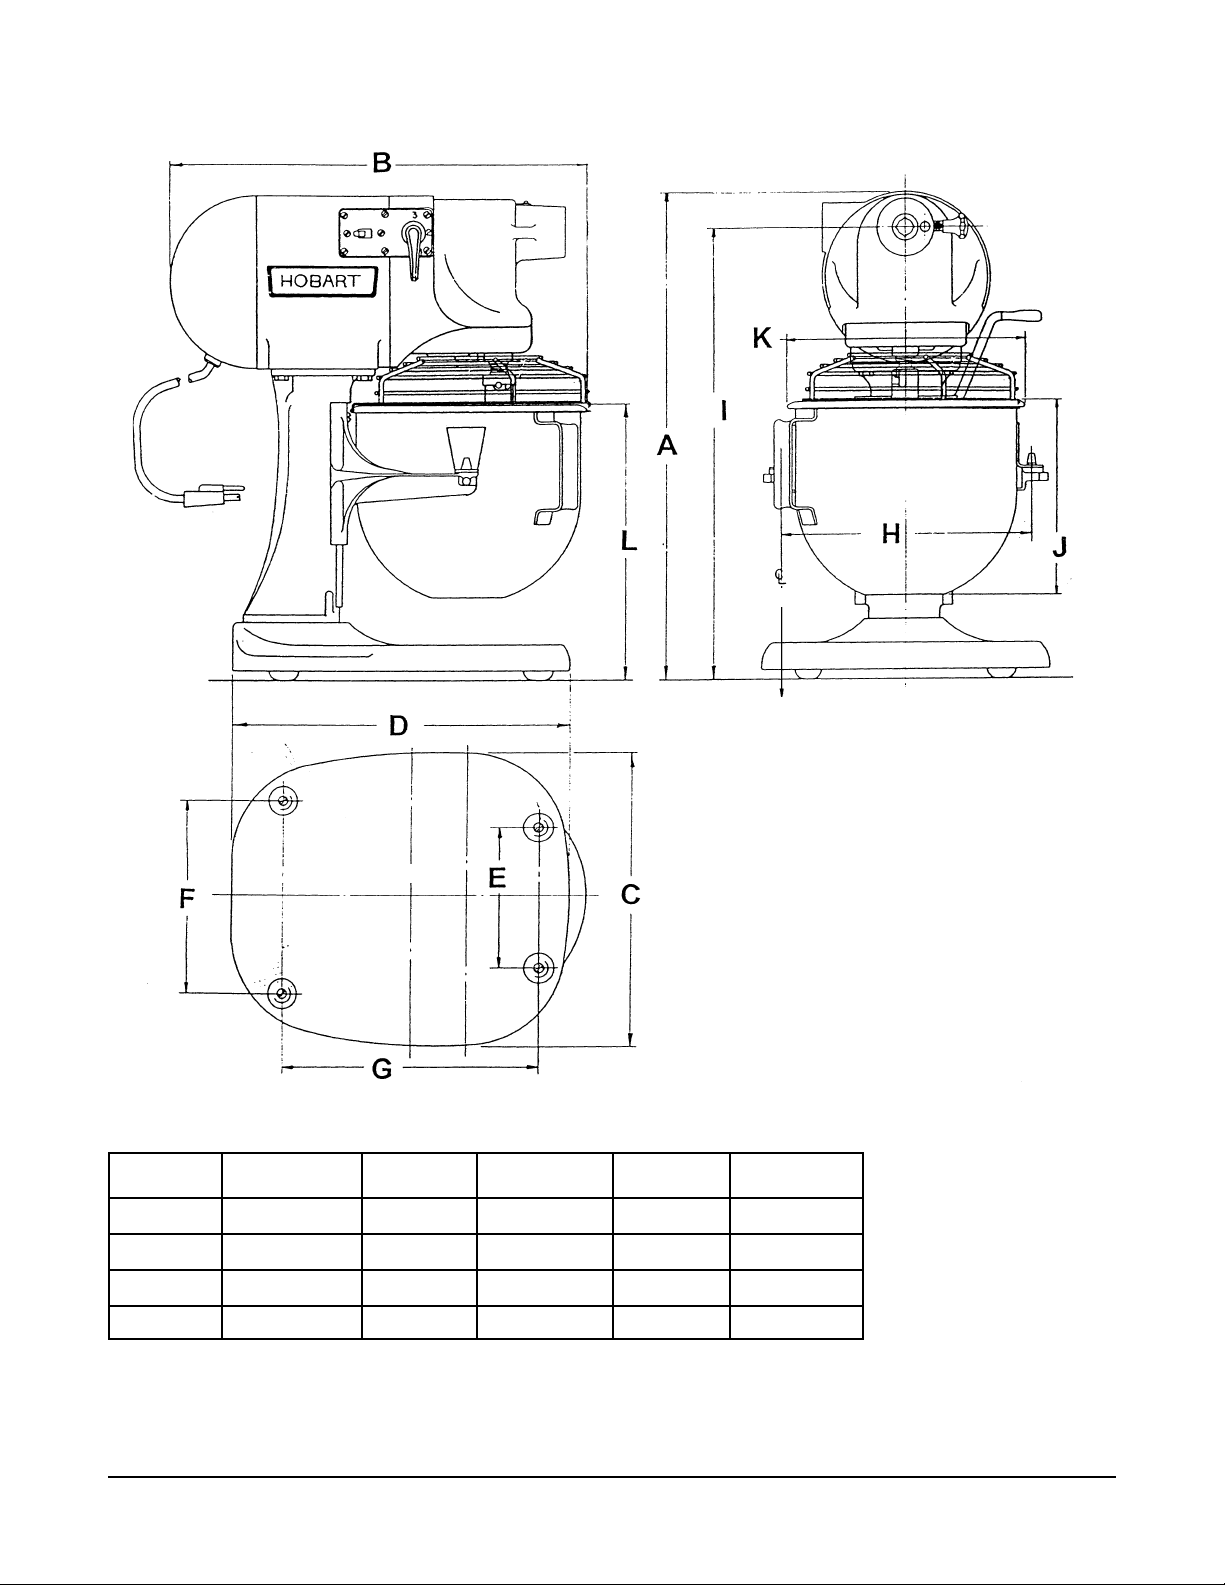
PLAN OF BASE
BOWL PIN
Position Dimension Position Dimension Position Dimension
A 432 E 128.5 I 398.5
B 381 F 178 J 176
C 263.5 G 236.5 K 222
D 311 H 228.5 L 247.5
All dimensions in mm.
FIGURE 1. N50 MIXER DIMENSIONS.
– 8 –

TABLE 1. TECHNICAL INFORMATION.
Description Units Value
Electrical supply range 230 volts, 50 Hz, single phase
Motor power kW (HP) 0.13 (1/6)
Maximum speed of rotating part RPM 1425
Full load current Amps 1.7
Locked rotor current Amps 12.5
Maximum ambient temperature
Attachment hub drive size Number 10
Mixer weight including agitator Kg (Lbs) 21.5 (46)
and bowl (empty)
Bowl weight (empty) Kg (Lbs) 0.74 (1.6)
Noise level dB(A) Less than 70
Shipping weight Kg (Lbs) 25.7 (55)
Shipping dimensions (carton) L x W x H mm 505 x 375 x 470
Storage conditions. Maximum
temperature and humidity.
o
C40
o
C, % RH 38, 85
INSTALLATION.
There are no specific requirements for the installation of the mixer. The mixer is supplied with
a mains electricity plug. Ensure the following sections are read before operation.
UNPACKING.
Carefully unpack the machine. Do not use a sharp knife to cut into the box as damage to the
machine may occur. Check for possible shipping damage. If the unit is found to be damaged,
save the packaging material and contact your nearest Hobart sales office. Refer to Table 1 for
mixer weights prior to lifting.
LOCATION.
Select a suitable flat level counter top that can support the weight of the mixer and
bowl contents when full (see Table 1 for mixer weights). The mixer stands on
rubber feet and does not need to be secured to the work surface. Ensure there
is sufficient space around the mixer to enable safe operation of the bowl lift
handle, attachment hub and removal/replacement of the mixing bowl. Servicing
may be more difficult because of reduced clearances and you should always check that
equipment specifications permit the close proximity of other equipment. Refer to Figure 1 for
the overall dimensions of the mixer.
– 9 –

ELECTRICAL SUPPLY AND CONNECTION.
The electrical installation of the mixer must be in accordance with the current
edition of the IEE regulations for electrical equipment in buildings, Electricity at
Work Act 1989 and must conform to the requirements of the Local Electricity
Board.
The technical data shown in Table 1 details the electrical requirements for the mixer. Ensure
that the electrical supply agrees with the machine specification, prior to connection.
It is recommended the mixer is connected to a suitable external electrical isolator (see Table
1 for electrical data) fitted with a residual current device (RCD) rated at 30mA, to provide short
circuit and earth leakage protection.
The mixer is supplied with a cable and plug (which conforms to BS1363) and fitted with a
5A fuse (UK only).
COMMISSIONING AND OPERATING INSTRUCTIONS.
SAFETY INSTRUCTIONS.
THE ATTACHMENT AND/OR MIXER MUST ONLY BE USED BY A FULLY
TRAINED AND COMPETENT PERSON.
The following instructions must be observed when using the mixer:
• Do not change speed while the mixer is operating.
• Do not wear loose clothing.
• Do not use the mixer or attachment if a fault develops or the machine is unsafe.
• Do not access rotating parts.
• Do not use excessive force when operating which could affect the stability of the mixer.
• Do not operate the mixer if parts are disassembled.
• Always use the attachment and/or mixer in a well lit area.
• Always ensure the bowl, bowl clamps, agitator, attachment and guard are correctly fitted
to the machine.
• Always disconnect the mains electricity supply before cleaning.
• Always use the toggle switch ‘O’ to stop mixer.
• Always clean the bowl, agitators and attachments after use.
• Always clean mixer daily.
• Always service the mixer and attachments at least twice a year depending on the frequency
of use.
– 10 –
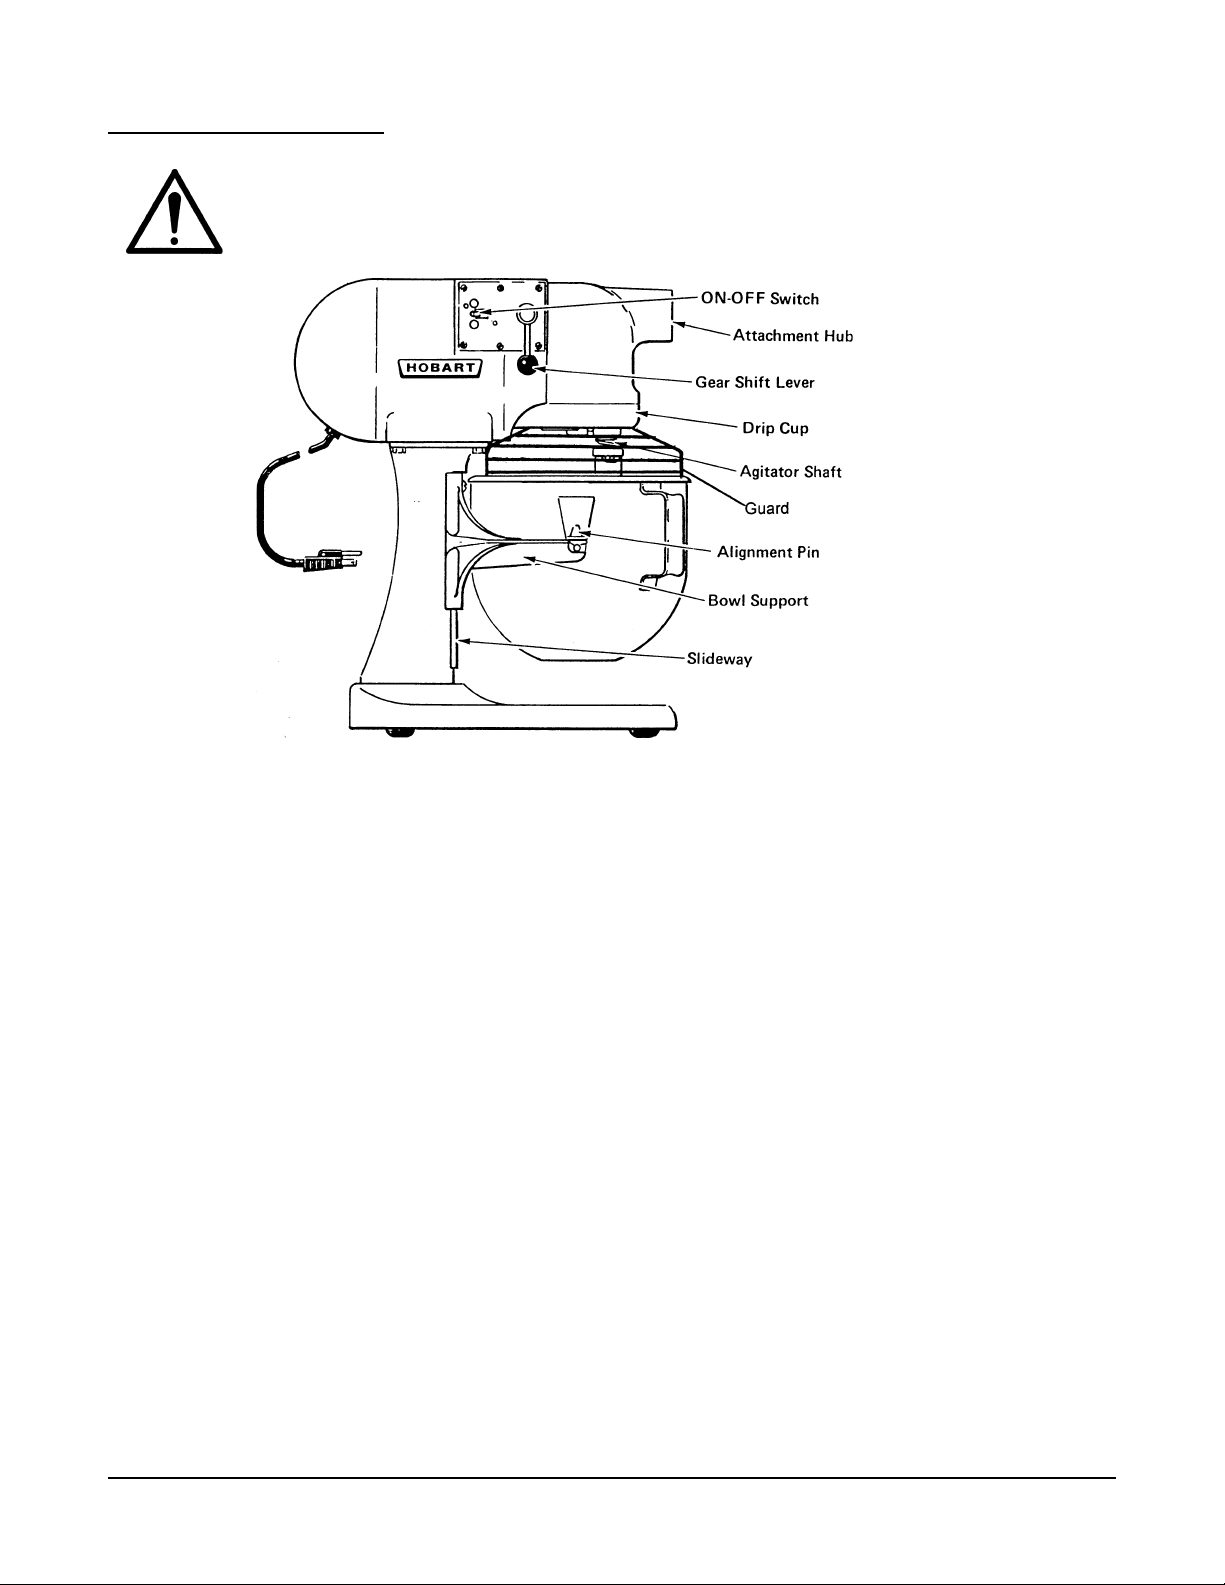
MIXER OPERATION.
This machine is only for professional use by suitably trained persons.
Ensure operators have read and understood this manual and have received
adequate training.
FIGURE 2. MIXER COMPONENT IDENTIFICATION.
Refer to Figure 2 for the mixer component identification.
• Thoroughly clean the bowl and agitator as described in the cleaning section.
• Ensure the mixer is switched off.
• Ensure the guard is fitted to the hub if an attachment is not in use.
• Lower bowl support by using the bowl lift handle.
• Place the required agitator in the bowl and lift bowl onto the bowl support.
• Position the bowl by aligning the pin on the back of the bowl with the retainer situated on
the bowl support. Engage the alignment pins on the bowl support into the bowl ‘ears’, and
secure in place with the hinged bowl clamps.
• Slide the agitators onto the agitator shaft turning clockwise to engage the drive pin in the
“L” slot.
• Add ingredients to the bowl.
• Place the guard on top of the bowl and raise the bowl using the bowl lift handle.
(NOTE: An electrical interlock prevents the mixer starting if the bowl support and guard
are not in the normal operating position.)
– 11 –

• Select the desired speed and start the machine by moving the switch to the start position
‘I’. Note the mixer speed must not be changed while the machine is operating. Stop the
mixer before changing speed.
• When mixing is complete:
• Stop the mixer using the stop switch.
• Lower the bowl support and remove the guard.
• Remove the agitator from the agitator shaft.
• Remove the bowl and agitator from the mixer to empty.
MIXING CHART.
The following charts (Tables 2 and 3) show the maximum recommended capacities for the
mixer.
With high gluten flour reduce the dough batch size by 10%.
Ensure the correct agitator is selected.
Dough capacities are based on water at a temperature of 21°C and a 12% flour moisture
content. If colder water is used, the mixing capacity will need to be reduced. Colder water
temperatures result in a dough which is harder to mix.
Ensure the correct speed is selected.
DO NOT EXCEED THE SPECIFIED MIX QUANTITY.
Overloading the mixer can be detrimental to the quality of the finished product
and affect the life expectancy of the machine. Always refer to the mixing chart.
TABLE 2. Kitchen Capacities - Single Batch
Type of Product Quantity Recommended Recommended
Agitator Speeds
Egg Whites 0.23 litres ‘D’ Whip 1 to 3
Mashed Potatoes 1.36 kg ‘B’ Beater 1 to 2
Mayonnaise (Oil) 1.36 litres ‘D’ Whip 1 to 3
Meringue (Water) 0.11 litres ‘D’ Whip 1 to 3
Waffle or Hot Cake Batter 1.82 litres ‘D’ Whip 1 to 2
Whipped Cream 1.36 litres ‘D’ Whip 1 to 3
– 12 –

TABLE 3. Bakery Capacity - Single Batch
Type of Product Quantity Recommended Recommended
Agitator Speeds
Cake, Box or Slab 1.82 kg ‘B’ Beater 1 to 2
Cake, Layer 1.36 kg ‘B’ Beater 1 to 2
Cake, Pound 1.36 kg ‘B’ Beater 1 to 2
Cake, Short (Sponge) 1.36 kg ‘B’ Beater 1 to 3
Dough (Light-Medium) 1.82 kg (60% A/R)
(1.1 kg flour 0.72 litre water) ‘E’ Hook 1
Dough (Pizza) 0.91 kg (40% A/R)
(0.65 kg flour 0.26 litre water) ‘E’ Hook 1
Pie Pastry 1.36 kg ‘E’ Hook 1
Egg & Sugar for
Sponge Cake 0.91 kg ‘D’ Whip 1 to 3
Icing, Fondant 0.91 kg ‘D’ Whip 1 to 3
Icing, Marshmallow 0.23 kg ‘D’ Whip 1 to 3
Shortening & Sugar 1.36 kg ‘D’ Whip 1 to 3
(Creamed)
A/R absorption ratio.
MIXER SPEED SETTINGS.
The selected mixer speeds will be determined by the mix type and quantity. As a general guide,
the mixer speeds for some applications are as follows:
Speed 1 (slow): For heavy mixtures such as bread dough, heavy batters and potatoes.
Speed 2 (medium): For light dough which must rise quickly, cake batters and some whipping
operations.
Speed 3 (fast): For light work such as whipping cream, beating eggs and mixing thin
batters.
MIXER AGITATORS.
The agitators available for the mixer are designed for the specific duties as follows:
The ‘B’ Beater is a multi-purpose agitator for mashing potatoes and other cooked vegetables,
mixing cakes, batters, and icings. Use first speed for starting most operations, increasing to
speed 2 for finishing where applicable.
The ‘D’ Whip is designed for maximum blending of air into light products. It can be used for
whipping cream, beating egg whites, and mixing very light egg whites. The whip is commonly
used on speeds two and three.
– 13 –
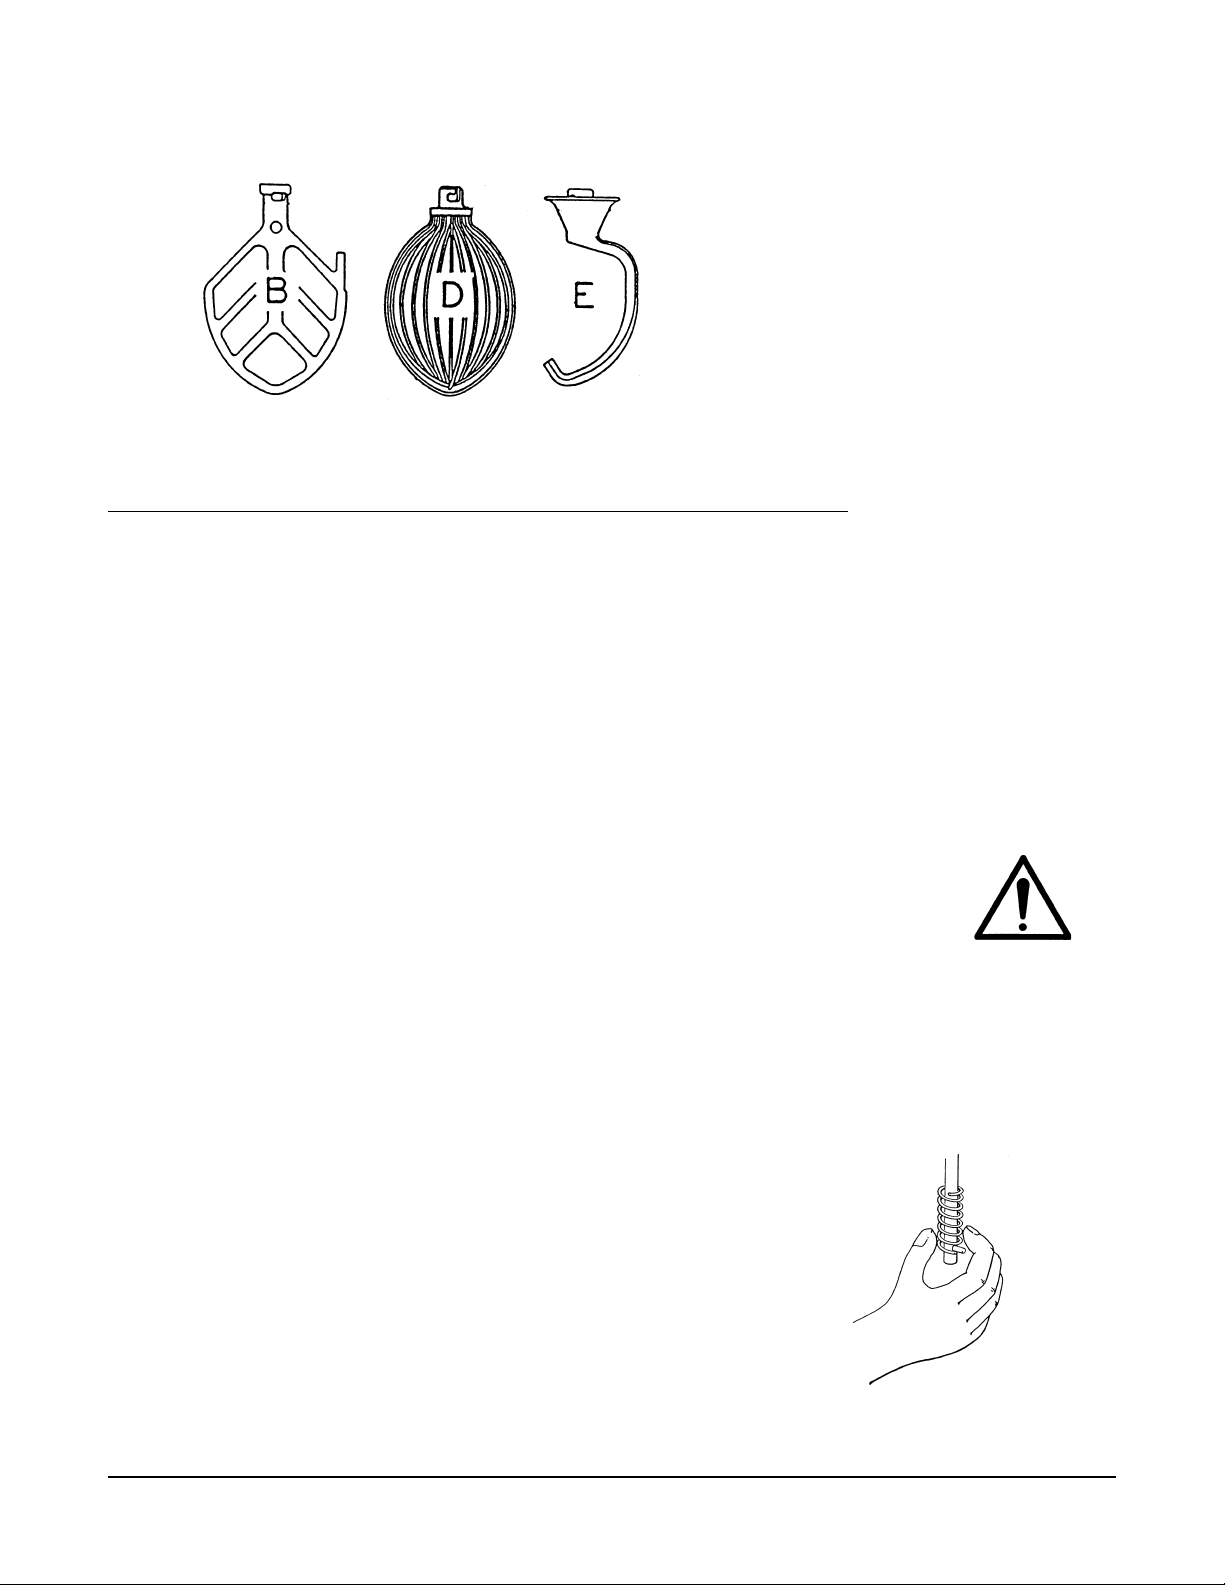
The ‘E’ Dough Hook is used for mixing bread, roll and pizza dough which require a folding and
stretching action for optimum development. The dough hook should be used predominantly on
speed 1.
FIGURE 3. AGITATOR TYPES.
CLEANING PROCEDURE (MIXER AND ATTACHMENT).
• Do not hose or pressure clean this mixer.
• DO NOT USE ANY ABRASIVE CLEANERS.
• Ensure that the machine is disconnected from the mains electrical power supply prior to
cleaning.
• Note: Do not clean aluminum agitators in a dishwasher.
• Refer to attachment manufacturer’s specific cleaning instructions.
CLEANING BEFORE INITIAL USE.
Before using for the first time, thoroughly wash new mixer bowls, agitators and
attachments. Wash in hot water and a mild detergent solution, rinse with either
a mild soda or vinegar solution, and then rinse thoroughly with water. This
procedure should also be followed for bowls and agitators before whipping egg
whites or whole eggs.
CLEANING AFTER USE.
After each use, clean the mixing bowl, agitators and attachments with hot water, using a
suitable non-abrasive detergent and soft bristle brush. (Flushing the bowl with hot water
immediately after use will ease the cleaning of the bowl.)
The agitator spring is removable for cleaning as shown
in Figure 4. Slip the lower end of the spring underneath
the agitator pin on the planetary shaft and screw in an
anti-clockwise direction until the spring can be
removed. Following cleaning, replace the spring by
reversing this procedure. All coils of the spring should
be above the agitator pin. DO NOT OPERATE
AGITATORS WITHOUT THE SPRING FITTED.
FIGURE 4. AGITATOR SPRING.
– 14 –

Clean the mixer with a hot damp cloth, thoroughly wipe the bowl arms and all exterior surfaces.
The drip cup should be removed and cleaned periodically (at least once per week depending
on use) and wiped clean. Do not operate the mixer without the drip cup.
USING THE ATTACHMENT FACILITY.
SAFETY INSTRUCTIONS
The following instructions must be observed when using the mixer with attachments.
THE ATTACHMENT AND/OR MIXER SHOULD ONLY BE USED BY A FULLY
TRAINED AND COMPETENT PERSON.
• Do not fit an attachment while the mixer is operating.
• Do not wear loose clothing.
• Do not use the mixer or attachment if a fault develops or the machine is unsafe.
• Do not access rotating parts.
• Do not use excessive force when operating the attachment which could affect the
stability of the mixer.
• Do not operate the mixer if parts are disassembled.
• Always use the attachment and/or mixer in a well lit area.
• Always ensure the attachment is operating at the correct speed.
• Always ensure the bowl, bowl clamps, attachment and guard are correctly fitted to the
machine.
• Always use the toggle switch ‘O’ to stop mixer.
• Always disconnect the mains electricity supply before cleaning.
• Always clean the attachments after use and refer to the attachment manufacturer’s
cleaning instructions.
• Always service your mixer and attachments regularly; at least twice a year depending
on the frequency of use.
• Only use attachments approved by Hobart.
FITTING AN ATTACHMENT.
To install an attachment, ensure the electricity supply is isolated. Loosen the thumb screw
situated on the attachment hub (see Figure 1). Swivel the hub guard to one side and insert the
attachment into the hub. Ensure the square shank of the attachment locates in the square drive
of the mixer. Secure the attachment by tightening the thumb screw.
The selected mixer speeds will be determined by the type of attachment fitted.
– 15 –

SPECIFIC ATTACHMENT SAFETY.
Hobart cannot control the use of different manufacturers’ attachments on the
N50 mixer, however, a range of manufacturers’ attachments have been examined
and the following general safety precautions are applicable. Please also refer to
safety information provided elsewhere in this manual and the attachment
manufacturer’s safety information.
Juice extractors.
• Take extreme care of exposed rotating parts.
• Do not exert an excessive force on the rotating reamer which might affect the stability
of the mixer.
• Ensure the attachment is operated at the correct speed.
• Follow the manufacturer’s cleaning instructions.
Food grinders and mincers.
• Take extreme care of exposed rotating parts, particularly the worm and knife.
• Ensure the meat does not contain pieces of bone.
• Cut meat into strips for speed of feeding.
• Do not use excessive force when feeding meat into the mincer/grinder.
• Do not use fingers or implements other than the stomper provided to feed food into the
hopper.
• Ensure the attachment is operated at the correct speed.
• Do not clear the grinding disc with fingers.
• Do not clear the grinding disc while the machine is operating.
• Do not overtighten the front grinding disc locking nut.
• Follow the manufacturer’s cleaning instructions.
Can openers.
• Take extreme care of exposed rotating parts.
• Do not use to open pressurized containers.
• Do not use to open flammable liquid containers.
• Take care of sharp metal can parts.
• Ensure the attachment is operated at the correct speed.
• Follow the manufacturer’s cleaning instructions.
Slicers and shredders.
• Take extreme care of exposed rotating parts.
• Do not use fingers or implements to feed food into the hopper.
• Use caution when fitting or removing the shredder or slicer blades to the drive shaft.
• Do not attempt to clear the rotating blades with fingers or implements.
• Do not fit blade while attachment drive is rotating.
• Only slice/shred vegetable and salad products.
• Follow the manufacturer’s cleaning instructions.
– 16 –

Grain mills.
• Take extreme care of exposed rotating parts, particularly the worm and burs.
• Do not use fingers or implements to feed grain into the hopper.
• Ensure the attachment is operated at the correct speed.
• Caution: External surfaces may be hot during and after use.
• Do not look directly into the hopper while operating; grain kernels can pop out.
• Do not overload; allow the grain mill to cool between batches
• Do not operate the grain mill with the burs rubbing.
• Do not clear the grinding bur with fingers.
• Do not clear the worm or bur while the machine is operating.
• Do not overtighten the front adjusting nut.
• Follow the manufacturer’s cleaning instructions.
Spaghetti makers.
• Take extreme care of exposed rotating parts.
• Do not use fingers or implements to feed dough into the hopper.
• Ensure the attachment is operated at the correct speed.
• Follow the manufacturer’s cleaning instructions.
SERVICING AND REPLACEMENT OF COMPONENTS.
SERVICING SHOULD BE CARRIED OUT BY A HOBART TRAINED
AND COMPETENT PERSON.
Do not remove any covers or loosen any fittings while the mixer is operating. Ensure the
electrical supply has been isolated before attempting to service or move the mixer.
The motor and transmission are packed with a special grease which will last for several years.
When replacement is needed, contact your local Hobart Service Centre (also see section for
recommended spares).
The bowl slideways should be lubricated occasionally with a small amount of light food grade
oil, applied with the finger tip, to prevent corrosion and ensure smooth operation.
It is recommended that the mixer is serviced regularly, depending on the frequency of use, but
at least twice yearly.
The planetary must only be lubricated with food grade grease (part number: SU-E-4-14)
available from your local Hobart Service Centre.
– 17 –

FAULT FINDING.
Fault Possible cause Remedy
Machine fails to start. Blown fuse. Check and replace faulty
fuse.
Bowl support is not in the correct Place bowl in up position.
operating position.
Bowl guard is not in the correct Place guard in position.
operating position.
Speed selection lever not in correct Set to required speed
operating position. position.
Check gear level position. If not Move gear lever to
correctly engaged, mixer will not desired speed.
start.
Check that electrical supply is Plug in and switch on.
switched on.
Machine still fails to operate. Call local service centre.
Motor starts but Gear selection lever incorrectly Move to the correct speed.
shaft fails to turn. positioned.
If planetary shaft still fails to turn. Call local service centre.
RECOMMENDED SPARE PARTS.
Item Description Part number Qty
1 Bowl S-78575-2 1
2 ‘E’ dough hook D-478548 1
3 ‘D’ wire whip P-77764 1
4 ‘B’ flat beater (aluminum) P-9033 1
5 ‘B’ flat beater (stainless steel) R-62458 1
6 Guard, wire cage 478114 1
7 Agitator shaft spring V-111227 1
8 Drip cup P-21625-3 1
9 Thumb screw, attachment hub A-16951-4 1
10 End cover R-120433-2 1
11 Rubber foot 271650 4
12 Bowl retaining pin B-240185 2
13 Bowl clamp, LH C-291444-1 1
14 Bowl clamp, RH C-291444-2 1
15 Spring washer, bowl clamp B-291263 6
16 Lubricating grease, planetary and gearbox SU-E-4-14 0.6kg
– 18 –

SERVICE INFORMATION AND ADDRESSES.
Hobart trained service technicians, strategically located at the listed Hobart branches, are
prepared to give you fast, efficient and reliable service. Protect your investment by having a
Hobart inspection contract which assures the continued, efficient operation of your Hobart
mixer, spares and accessories.
ADDRESSES
London & Home Counties Midland & Wales
The Hobart Manufacturing Company Ltd The Hobart Manufacturing Company Ltd
11 Railton Road Ace Business Park
Kempston Mackadown Lane, Kitts Green
Bedford MK42 7PW Birmingham B33 0LD
Tel: 01234 841220 Tel: 0121 789 8228
Northern Scotland & Northern Ireland
The Hobart Manufacturing Company Ltd The Hobart Manufacturing Company Ltd9
Clayton Wood Bank 17 Shotts Street
West Park Ring Road Queenslie Industrial Estate
Leeds LS16 6QX Glasgow G33 4JB
Tel: 0113 275 9727 Tel: 0141 774 3456
Southern Spares
The Hobart Manufacturing Company Ltd The Hobart Manufacturing Company Ltd
Unit 1240 Park Avenue West Southgate Way
Aztec West, Almondsbury Orton Southgate
Bristol BS12 4SG Peterborough PE2 6GN
Tel: 01454 616048 Tel: 01733 392200
Continued product improvement is a Hobart policy, specifications may change without notice.
The Hobart Manufacturing Company Limited
Hobart House,
51 The Bourne,
Southgate,
London
N14 6RT
Tel: 0181 920 2800
Fax 0181 886 0450
PLE200388 - A3 - 9 - 97
– 19 –


N50
INSTALLATION UTILISATION MAINTENANCE
PLE200388

– 22 –

Sommaire
Avertissement .......................................................................................................................................................24
Symboles d’attention - mise en garde.................................................................................................................24
Responsabilité ......................................................................................................................................................25
Hygiène .................................................................................................................................................................25
Avant-propos.........................................................................................................................................................25
Généralités............................................................................................................................................................25
Dimensions............................................................................................................................................................26
Informations techniques .......................................................................................................................................27
Installation .............................................................................................................................................................27
Déballage .....................................................................................................................................................27
Emplacement...............................................................................................................................................2 7
Raccordement électrique............................................................................................................................28
Instructions opératoires........................................................................................................................................28
Utilisation...............................................................................................................................................................29
Identification des parties techniques .........................................................................................................29
Tableau de capacité cuisine.......................................................................................................................30
Tableau de capacité Pâtisserie..................................................................................................................31
Sélecteur de vitesse .............................................................................................................................................31
Les outils ...............................................................................................................................................................31
Outils............................................................................................................................................................31
Procédure de lavage ............................................................................................................................................32
Lavage avant première utilisation..............................................................................................................32
Lavage après utilisation..............................................................................................................................32
Position du ressort d’outil.....................................................................................................................................32
Utilisation de la prise accessoire .........................................................................................................................33
Montage d’accessoire.................................................................................................................................33
Attention particulière sur les accessoires ...........................................................................................................34
Presse fruits ................................................................................................................................................34
Hachoirs.......................................................................................................................................................34
Ouvre-boîtes................................................................................................................................................34
Coupe-légumes et râpes ............................................................................................................................34
Moulins à grains ..........................................................................................................................................35
Service et interventions........................................................................................................................................35
Identifications de pannes .....................................................................................................................................36
Pièces détachées .................................................................................................................................................36
– 23 –

AVERTISSEMENT
Les informations contenues dans ce manuel vous permettront de comprendre, entretenir et
utiliser le N 50. Avant toute opération, installation ou utilisation, cette brochure doit être étudiée
et comprise par le personnel utilisateur.
Afin d’éviter les accidents, lisez et suivez les précautions d’emploi contenues dans ce manuel.
Pour les informations de mise en garde, reportez-vous au paragraphe ci-dessous, notamment
pour les raccordements, utilisation et accessoires.
Les conseils d’utilisation et de précautions contenus dans cette notice sont donnés pour une
utilisation appropriée de la machine.
Si la machine était utilisée à d’autres fins, I’opérateur ou d’autres personnes impliquées,
seraient entièrement responsables.
• Assurez-vous que ce manuel soit à la disposition des utilisateurs,
• Tous les utilisateurs doivent être formés aux pratiques de sécurité et de manipulations
des accessoires,
• Assurez-vous que la machine ait été déconnectée avant d’intervenir (incident).
• Les pièces, accessoires en mouvement, sont des dangers potentiels et peuvent causer
des dommages corporels si les précautions n’étaient pas prises en compte,
• Il est conseillé de vérifier la machine, ainsi que les accessoires 2 fois par an,
• N’utilisez pas de jet d’eau pour nettoyer la machine. Suivez les instructions spécifiques
à l’entretien.
SYMBOLES D’ATTENTION
« ATTENTION »
Ce symbole se trouvera partout où une attention particulière doit être accordée
à la sécurité.
Ce symbole indique un risque électrique.
(débranchez la machine avant toute intervention sur le réseau).
– 24 –

RESPONSABILITE
Les installations et réparations non effectuées par un professionnel agréé, ainsi que toute
modification technique réalisée sur l’appareil, peuvent entraîner l’annulation de la garantie
et de la responsabilité du fabricant. HOBART se réserve tous les droits de modification sur
la machine, ainsi que sur la notice.
HYGIENE
Il est de la responsabilité des utilisateurs d’entretenir le matériel afin de lutter contre toute
prolifération bactérienne.
Une hygiène du personnel utilisant le matériel doit être respectée avant toute opération.
AVANT-PROPOS
Ce manuel contenant les informations et instructions ne recouvre pas tous les détails des
accessoires, ou techniques.
Pour de plus amples informations, veuillez contacter votre agence HOBART.
GENERALITES
Le batteur-mélangeur N 50 est destiné à pétrir, mélanger des matières alimentaires détaillées
dans les tableaux 2 et 3. Il sera positionné sur un plan de travail stable. Le N 50 est construit
de différents métaux finis, peint de couleur << gris HOBART3.
La machine est conçue pour fonctionner sur le réseau électrique 230 V comme décrit au
tableau 1 (informations techniques).
Le batteur est protégé par un système NVR (« no volt release ») qui empêche la machine de
se remettre en route après un incident (coupure de courant, sécurité de bol)...
Le bol, ainsi que sa protection, sont montés avec une sécurité qui ne permet la bonne marche
que si le tout est bien monté.
Le N 50 est livré avec un bol, 1 batteur plat, 1 crochet, 1 fouet.
>>
– 25 –

Ergot de maintien de bol
Plan du socle
Position Dimension Position Dimension Position Dimension
A 432 E 128.5 I 398.5
B 381 F 178 J 176
C 263.5 G 236.5 K 222
D 311 H 228.5 L 247.5
Les dimensions sont en mm.
FIGURE 1. - N50 - DIMENSIONS
– 26 –

TABLEAU 1. INFORMATIONS TECHNIQUES
DESCRIPTION UNITES DE VALEURS
MESURE
Tension 230V 50Hz 1 + T
Puissance moteur KW (HP) 0,13 (1/6)
Vitesse maximum de pièces en
mouvement
Température de travail maximum C° 40
Dimension de prise d’accessoire N° 10
Poids N50 avec outil + bol (à vide) Kg 21,5
Poids du bol Kg 0,740
Niveau de bruit Db(A) Inférieur à 70
Poids N50 + emballage Kg 25,7
Dimensions du colisage L x p x h mm 505 x 375 x 470
Conditions de stockage T°C-% °C. % H 38.85
maximum Humid.
TPM 1425
A 1,7
A 12,5
INSTALLATION
L’installation du batteur-mélangeur ne demande rin de spécial.
Il est fourni avec un câble et une prise électrique.
DEBALLAGE
Déballez avec attention la machine; n’utilisez pas de cutter ou outils pouvant endommager
le matériel.
EMPLACEMENT
Prévoyez une surface de dépose plane et stable pouvant supporter le poids
du matériel. La machine ne nécessite pas d’être fixée au support; le socle
possède des patins en caoutchouc antidérapants.
Assurez-vous qu’il y ait assez d’espace pour manoeuvrer le levier de bol et la rotation de
la protection ainsi que les accessoires éventuels. Une intervention technique sera difficile
si les distances et espaces de sécurité ne sont pas respectés (fig. 1).
– 27 –

RACCORDEMENT ELECTRIQUE
L’installation électrique du N 50 doit être réalisée conformément aux normes en
vigueur.
Les données techniques du tableau 1 détaillent les besoins électriques.
Vérifiez que les indications portées sur la plaque signalétique de l’appareil correspondent à
celles qui figurent à l’armoire électrique du local et au schéma électrique.
S’assurer que les fusibles du local ont des valeurs suffisantes pour I’alimentation du batteur.
INSTRUCTIONS OPERATOIRES
INFORMATIONS DE SECURITE
La prise accessoires et / ou le batteur ne doivent être utilisés que par des
Utilisateurs formés sur la machine.
Ces instructions doivent être suivies lors du fonctionnement:
• Ne pas changer de vitesse pendant le fonctionnement,
• Prenez garde aux vêtements (tour de cou, cordon de tablier), qui peuvent être entraînés,
• N’utilisez pas la machine si elle vous semble être hors service ou mal fonctionner,
• Ne rien introduire dans les parties en rotation,
• Ne pas surcharger la machine en fonctionnement, ce qui pourrait affecter sa stabilité,
• Ne pas utiliser la machine si une partie n’est pas montée,
• Toujours vérifier si la machine se trouve sur un emplacement correct,
• Toujours vous assurer que le bol, le crochet de bol, batteur plat, accessoires et protections
soient correctement assemblés,
• Toujours débrancher la machine avant son nettoyage,
• Toujours positionner le bouton sur « O » pour arrêter la machine,
• Toujours nettoyer le bol, accessoires après usage,
• Toujours nettoyer la machine une fois par jour,
• Toujours réviser 2 fois/an la machine et les accessoires.
– 28 –

UTILISATION
Avant utilisation, veuillez vous assurer que l’utilisateur en ait les
compétences.
Bouton marche / arrêt
Prise accessoires
Manette de vitesse
Goulotte de récupération
Manchon d’arrêt
Protection
Ergôt de fixation bol
Support bol
Guide support bol
FIGURE 2. IDENTIFICATION DES PIECES
• Nettoyez le bol et l’outil avant leur mise en place,
• Vérifier que le batteur soit en position « 0 »,
• Vérifiez que la protection soit montée, si un accessoire n’est pas monté,
• Descendez le support bol à I’aide du levier.
• Placez l ‘outil correspondant au travail dans le bol et le tout sur le support bol,
• Alignez le bol dans les ergôts, le rentrer, le crocheter,
• Positionner l’outil sur le manchon d’entraînement, engager la baïonnette dans l’orifice en
« L » de l’outil,
• Placez les ingrédients dans le bol,
• Positionnez la protection, relevez le bol. Une sécurité de bol sera effective si le tout n’est
pas bien positionné.
– 29 –

• Sélectionnez la vitesse en position désirée,
• Démarrez la machine par le bouton marche / arrêt. Ne changez pas de vitesse lors du
fonctionnement, arrêtez la machine, changez de vitesse et redémarrer,
• Quand la préparation est réalisée:
• Utilisez le bouton marche / arrêt pour arrêter,
• Descendez le bol à l’aide du levier, tournez la protection,
• Démontez l’outil du manchon,
• Enlevez le bol et l’outil pour accéder au produit alimentaire.
TABLEAU DE CHARGE D’UTILISATION
Les tableaux suivants sont donnés pour des charges maximum autorisées pour le N 50.
Dans le cas d’utilisation de farine riche en gluten, réduisez le poids de 10 %.
Assurez-vous de l’emploi du bon outil.
Les capacités de travail, en farine, sont données pour une température de 21°C et
une farine à 12 % d’humidité.
En cas d’utilisation d’eau froide, il faut réduire le poids de la préparation. L’eau froide
durçit la mixture. Assurez-vous que la vitesse de malaxage soit bien étudiée.
NE PAS DEPASSER LES QUANTITES PREVUES
Surcharger le batteur induit une baisse de performance, un mauvais Résultat de
produit et réduit la longévité du matériel.
Référez-vous au tableau de charge.
TABLEAU 2. CAPACITES CUISINE
TYPE DE PRODUIT QUANTITE
Blancs d’oeufs 0.23 L Fouet 1 à 3
Purée de pommes de terre 1.36 kg Batteur plat 1 à 2
Mayonnaise (huile) 1.36 L Fouet 1 à 3
Meringue 0.11 L Fouet 1 à 3
Pâte à gauffres 1.82 L Fouet 1 à 2
Crème fraiche 1.36 L Fouet 1 à 3
OUTIL
RECOMMANDE
VITESSE
RECOMMANDEE
– 30 –

TABLEAU 3. Capacites Patisserie
Vitesse
Type de Produit Quantite Recommande
cake, pain d’épices
Recommandee
Outil
Blancs d’oeufs 1,82 kg Batteur plat 1 à 2
Quatre quart 1,36 kg Batteur plat 1 à 2
Pudding 1,36 kg Batteur plat 1 à 2
Pâte à tuiles 1,82 kg Batteur plat 1 à 3
1,82 kg
Pâte pain légère (1.1 kg farine 1
+0.72 l.eau)
0,91 kg
Pâte pain lourde (1.1 kg farine crochet 1
+0.26 l.eau)
Pâte sucrée (tarte) 1,36 kg crochet 1
Pâte à génoise 0,91 kg fouet 1 à 3
Fondant 0,91 kg fouet 1 à 3
Guimauve 0,23 kg fouet 1 à 3
Meringue 1,36 kg fouet 1 à 3
SELECTEUR DE VITESSE
La sélection de vitesse est déterminée par le type de produit et sa quantité. Voici après
décrit, quelques applications:
• Vitesse 1 ( lente ) – pour préparations lourdes commpe une pâte à pain , pommes
de terre, produits à broyer,
• Vitesse 2 (moyenne) – pour pâtes légères comme crêpes, beignets, pâte à tuiles,
certaines pâtes à « souffler »,
• Vitesse 3 (rapide) – pour le travail de produits légers, liquides, comme la crème
fraîche, blancs d’oeufs.
LES OUTILS
Les outils disponibles sont décrits ci-dessous:
• Le batteur plat: outil très polyvalent pour broyer en purée, mélanger des pâtes molles,
mélange de sucre, beurre, farine. Les préparations sont généralement démarrées en
ère
1
vitesse et finies en 2
ème
vitesse,
• Le fouet inox: il a été dessiné et créé spécifiquement pour insuffler de l’air aux
préparations telles que crème fouettée, oeufs en neige. Le fouet est souvent employé
en vitesse 2 et 3.
– 31 –

• Le crochet: il est conçu pour pétrir les pâtes lourdes comme la pâte à pain, pain ou lait,
pizza, qui demandent de l’étirement et une élasticité finale. Le vitesse prédominante
utilisée la 1
ère
.
FIG. 3. OUTILS
PROCEDURE D’ENTRETIEN
• Ne pas utiliser de jet d’eau
• Ne pas utiliser d’abrasif
• Vérifiez que la machine est débranchée
• Note: ne pas laver les outils en lave-vaisselle utilisant des produits lessiviels contenant de
la soude ou détergent puissant.
NETTOYAGE AVANT PREMIERE UTILISATION
Avant la première utilisation du N 50, laver les ustensiles et accessoires.
Utiliser de l’eau chaude additionnée de produit détergent doux; rincer avec de
l’eau chaude vinaigrée. Cette procédure est à réaliser aussi avant de travailler
des blancs d’oeufs.
NETTOYAGE APRES UTILISATION
Nettoyez le bol, les accessoires, ustensiles en eau chaude savonneuse, sans utiliser d’abrasif,
mais à l’aide d’une brosse. Rincer immédiatement à l’eau très chaude, sécher et stocker à
l’abri de la poussière.
Un ressort de maintien d’outil est situé sur le manchon d’entraînement.
Il est possible de l’enlever afin de le nettoyer.
Le faire pivoter sur l’axe, le dégageant ainsi vers le bras.
Après l’avoir nettoyé, le replacer sur l’axe. Ce ressort doit être
positionné au-dessus de l’ergot du manchon.
NE PAS MONTER LES OUTILS SUR LE MANCHON SANS QUE
LE RESSORT NE SOIT PLACE.
– 32 –
FIG 4. RESSORT D’OUTIL

Nettoyer le bâti du N50 avec un support éponge humide ainsi que les bras support. L’essuyer
à l’aide d’un essuie-tout à usage unique.
La gouttière collectant les graisses doit être enlevée régulièrement pour être nettoyée.
Essuyer de même la partie où s’engage cette gouttière.
Ne pas utiliser le N 50 sans cette gouttière.
UTILISATION DE LA PRISE ACCESSOIRES
INFORMATIONS SUR LA SECURITE
SEULES LES PERSONNES FORMEES ET COMPETENTES SONT
HABILITEES A UTILISER LES ACCESSOIRES.
• N’accouplez pas d’accessoire lors du fonctionnement,
• Ne portez pas de vêtements pendants (tours de cou. cordons...),
• N’utilisez pas la machine si elle vous semble être hors service ou mal fonctionner,*
• Ne rien introduire dans les parties en rotation,
• Ne pas surcharger la machine lors du fonctionnement de l’accessoire, ce qui pourrait
affecter la stabilité,
• Ne pas utiliser la machine si toutes les parties ne sont pas assemblées,
• Toujours vérifier si la machine se trouve sur un emplacement correct,
• Toujours vérifier que la vitesse utilisée est adaptée,
• Toujours utiliser le bouton marche/arrêt pour arrêter la machine,
• Toujours débrancher l’appareil avant le nettoyage,
• Toujours nettoyer les accessoires après usage, selon le conseil du fabricant d’accessoires
et de produits,
• Toujours vérifier 2 fois / an l’ensemble mixer / accessoires.
• N’utilisez que des accessoires HOBART.
MONTAGE D’ACCESSOIRES
Pour monter un accessoire sur la prise, vérifiez qu’il soit débranché. Dévissez la vis pour
libérer le bouchon de la prise de montage (voir Fig. 1). Enlevez le bouton de protection,
engagez l’accessoire et veillez à ce que le guide sur l’accessoire rentre bien dans le guide de
la prise. Revissez fermement sur l’accessoire. La vitesse sera sélectionnée par rapport au
type de produit à travailler.
– 33 –

ATTENTION PARTICULIERE SUR LES ACCESSOIRES
HOBART ne peut pas contrôler tous les différents fournisseurs d’accessoires sur
le N 50. Certains sont contrôlés et les précautions d’usage sont applicables.
Nous vous prions de vous référer aux instructions du fournisseur, ainsi qu’à
HOBART.
Presse agrumes
• Observez la prudence lors de la rotation des pièces,
• N’exercez pas trop de pression sur le fruit plaqué sur le cône d’extraction, ceci affecterait
la stabilité de l’appareil,
• Assurez-vous de la bonne vitesse de rotation,
• Nettoyez selon procédure déjà citée.
Hâchoirs
• Prenez garde aux pièces coupantes, notamment les couteaux de la grille,
• Assurez-vous que la viande à traiter ne comporte pas d’os ou de parties cartilagineuses,
• Morcelez la viande en lanières 20 mm x 20 mm approx,
• Ne pas exercer une trop forte pression sur le poussoir,
• Ne pas introduire les doigts dans la goulotte de remplissage,
• Assurez-vous de la bonne vitesse de rotation. Une trop grande vitesse échauffe la viande
et lui fait perdre ses qualités,
• Ne pas gratter la grille lors du fonctionnement,
• Ne pas démonter l’anneau de fixation lors du fonctionnement,
• Nettoyer selon procédure déjà citée.
Ouvre-boîtes
• Prenez garde aux pièces en rotation,
• N’utilisez pas cet accessoire pour des boîtes pressurisées,
• N’utilisez pas cet accessoire pour des conteners de produits inflammables,
• Prenez garde au bord tranchant de la boîte de conserve,
• Assurez-vous de la bonne vitesse de rotation,
• Nettoyez selon procédure déjà citée,
• Il est conseillé de laver ou d’essuyer la boîte, partie qui sera coupée afin de limiter
l’introduction de salissures durant l’uverture.
Coupe-légumes, râpes
• Prenez garde aux pièces en rotation,
• N’introduisez pas les doigts dans la goulotte d’admission,
• Lors du montage et démontage, prenez garde au tranchant des disques de découpe,
• Ne tentez pas de nettoyer les disques en rotation avec les doigts,
• Ne montez pas les disques alors que l’axe d’entraînement est en rotation,
• Ne coupez que des légumes, fruits, fromage (râpé),
• Nettoyez selon procédure déjà citée.
– 34 –

Moulin à grains
• Prenez garde aux pièces en rotation,
• N’utilisez pas les doigts pour emplir la goulotte à grains,
• Assurez-vous de la bonne vitesse,
• Attention: le moulin peut chauffer durant le broyage,
• Ne placez pas le visage au-dessus du moulin lors de l’utilisation, des grains peuvent sauter
au visage,
• Ne surchargez pas le moulin: observez des temps de repos entre les remplissages,
• Ne nettoyez pas l’intérieur du moulin en fonctionnement,
• Ne serrez pas trop l’anneau de fixation frontal du moulin (serrage moteur),
• Nettoyez selon procédure déjà citée.
SERVICE ET ENTRETIEN
LES OPERATIONS DE MAINTENANCE SONT A EXECUTER
EXCLUSIVEMENT PAR UN TECHNICIEN HOBART OU FORME
PAR HOBART.
– Ne pas démonter, enlever les capots ou pièces lors du fonctionnement du N50,
– Assurez-vous que l’appareil soit débranché avant toute intervention ou déplacement,
– Le moteur et sa transmission sont graissés pour de nombreuses années. Pour en remettre,
veuillez contacter votre service HOBART le plus proche,
– Le guide du support bol doit être occasionnellement lubrifié avec une huile mécanique (pas
d’huile de cuisine) alimentaire, afin de permettre la bonne translation mais aussi de
prévenir la corrosion,
– Il est recommandé de réviser l’appareil 2 fois par an, et selon l’utilisation,
– Le planétaire doit être graissé uniquement avec un type de graisse fourni par HOBART.
– 35 –

IDENTIFICATION DE PANNE
PANNE CAUSE POSSIBLE REMEDE
Fusible H.S. Remplacer
Support bol mal placé Réajuster le bol
Protection mal fermée Réajuster la protection
Manette de vitesse placée Repositionner la vitesse
entre 2 sélections
Appareil débranché ou Vérifier les connexions
déconnecté en amont
Le bol n’est pas relevé en Relever à l’aide du levier
position de travail
Le moteur fonctionne La vitesse est mal sélectionnée Repositionner la vitesse
sans entraîner l’outil
<<
Si rien ne fonctionne Appeler le SAV
PIECES DETACHEES RECOMMANDEES
PIECE DESCRIPTION N° DE PIECE QTE
1 Bol S-78575-2 1
2 Crochet A-78818 1
3 Fouet P-77764 1
4 Batteur plat (aluminium) P-69033 1
5 Batteur plat (inox) R-62458 1
6 Protection 478114 1
7 Ressort de manchon d’entraînement V-111227 1
8 Gouttière à graisse P-21625-3 1
9 Vis pour bouchon de prise accessoires A-16951-4 1
10 Bouchon de prise accessoires R-120433-2 1
11 Patins caoutchouc 650 4
12 Ergôt de maintien de bol B-240185 2
13 Crochet maintien de bol LH C-291444-1 1
14 Crochet maintien de bol RH C-291444-2 1
15 Ressort, crochet de bol B-291263 6
16
Graisse de lubrification, planétaire + boîte
SV-E-4-14 0.6kg
– 36 –

N50
INSTALLATION BETRIEB WARTUNG
F-23138 (6-98)
PLE200388

– 38 –

Planetenrührmaschine N50
mit Ansatznabe
Inhalt: Seite
1. Sicherheitshinweise ...................................................................................................... 40
1.1 Haftung........................................................................................................................... 40
1.2 Hygiene .......................................................................................................................... 40
2. Bestimmungsgemäße Verwendung ............................................................................ 41
2.1 Allgemeine Hinweise ..................................................................................................... 41
2.2 Abmessungen ................................................................................................................ 42
Bild 1. N 50 Abmessungen.................................................................................................. 42
2.3 Technische Daten.......................................................................................................... 43
Tabelle 1. Technische Daten ............................................................................................... 43
3. Installation ...................................................................................................................... 43
3.1 Auspacken...................................................................................................................... 43
3.2 Aufstellen ....................................................................................................................... 43
3.3 Elektrischer Anschluss .................................................................................................. 43
4. Betrieb ............................................................................................................................. 44
4.1 Allgemeine Hinweise ..................................................................................................... 44
Bild 2. Aufbau....................................................................................................................... 44
4.2 Bei Beginn der Arbeit .................................................................................................... 45
4.3 Nach Beendigung der Arbeit......................................................................................... 45
4.4 Anwendungshinweise.................................................................................................... 45
Tabelle 2. Einsatz in der Küche .......................................................................................... 46
Tabelle 3. Einsatz in der Bäckerei / Konditorei .................................................................. 46
4.5 Geschwindigkeitseinstellungen..................................................................................... 46
4.6 Rührwerkzeuge.............................................................................................................. 46
Bild 3. Rührwerkzeuge......................................................................................................... 47
5. Reinigung........................................................................................................................ 47
5.1 Reinigung vor der ersten Inbetriebnahme.................................................................... 47
5.2 Reinigung nach dem Gebrauch .................................................................................... 47
Bild 4. Rührwerkzeug-Druckfeder ....................................................................................... 47
6. Betrieb von Ansatzgeräten........................................................................................... 48
6.1 Generelle Sicherheitshinweise ..................................................................................... 48
6.2 Befestigen der Ansatzgeräte......................................................................................... 48
6.3 Spezielle Sicherheitshinweise für die Verwendung von Ansatzgeräten..................... 49
6.3.1 Zitruspresse ................................................................................................................ 49
6.3.2 Fleischwolf .................................................................................................................. 49
6.3.3 Dosenöffner ................................................................................................................ 49
6.3.4 Gemüseschneider....................................................................................................... 50
6.3.5 Getreidemühle ............................................................................................................ 50
6.3.6 Nudelvorsatz............................................................................................................... 50
7. Wartung und Reparatur ................................................................................................ 50
7.1 Fehlersuche ................................................................................................................... 51
7.2 Ersatzteile ...................................................................................................................... 51
– 39 –

1. Sicherheitshinweise
Diese Broschüre enthält wichtige Informationen für bestimmungsgemäße
Verwendung, Installation, Betrieb, Reinigung und Wartung.
Bitte lesen Sie deshalb den Inhalt vor der ersten Inbetriebnahme sorgfältig
durch.
Um Unfälle zu vermeiden, sind insbesondere die in dieser Anleitung
enthaltenen Sicherheitshinweise zu beachten.
Zur besseren Kennzeichnung der Sicherheitshinweise werden folgende Symbole
verwendet:
Das Symbol „Achtung“ findet sich überall dort, wo entsprechende Hinweise
für den sicheren Betrieb der Maschine gegeben werden. Lesen Sie bitte diese
Passagen besonders sorgfältig.
Das Symbol „elektrische Gefahr“ wird dann verwendet, wenn eine elektrische
Gefährdung möglich ist. Vor Reinigungs- und Wartungsarbeiten ist
grundsätzlich der Netzstecker zu ziehen.
• Diese Bedienungsanleitung muß allen Benutzern zugänglich sein.
• Alle Benutzer müssen mit dem sicheren Betrieb dieser Maschine vertraut gemacht werden.
• Entfernen oder lösen Sie keine Teile, während die Maschine in Betrieb ist.
• Bei Reinigungs- und Wartungsarbeiten ist der Netzstecker zu ziehen.
• Elektrizität, sowie rotierende Teile sind gefährlich. Deshalb sind die entsprechenden
Sicherheitshinweise zu beachten.
• Die Maschine und die Ansatzgeräte sollten regelmäBig gewartet werden. (mindestens
zwei mal pro Jahr).
• Die Maschine nicht mit dem Schlauch oder Hochdruckreiniger abspritzen. Befolgen Sie die
Reinigungshinweise.
1.1 Haftung
Installationen und Reparaturen, die nicht von autorisierten Fachleuten vorgenommen werden,
sowie jegliche technische Veränderung an der Maschine, die nicht vom Hersteller genehmigt
ist, führen zum Erlöschen der Garantie und Produkthaftung durch den Hersteller.
1.2 Hygiene
Es liegt in der Verantwortung des Betreibers, daß die Maschine in einem hygienisch
einwandfreien Zustand gehalten wird. Deshalb sollte sie regelmäßig gereinigt werden. (siehe
auch Kapitel „Reinigung“)
– 40 –

2. BestimmungsgemäßeVerwendung
Diese Planetenrührmaschine ist dafür bestimmt, Nahrungsmittel, wie in Tabelle 2 und 3
aufgeführt, zu rühren.
Die Maschine ist mit einer Ansatznabe für den Betrieb verschiedener Ansatzgeräte
ausgestattet.
Das Gerät ist für die Aufstellung auf einem Tisch (Standardhöhe für Arbeitstische)
vorgesehen.
Halten Sie Ihre Planetenrührmaschine hygienisch sauber und in einem mechanisch
und elektrisch einwandfreien Zustand.
2.1 Allgemeine Hinweise
Die technischen Daten finden Sie in Tabelle 1. Die Maschine ist mit einer Wiedereinschaltsperre
ausgerüstet. Dadurch wird der automatische Wiederanlauf, z.B. nach einem Stromausfall
verhindert. Der Rührkessel ist mit einem Schutzgitter gegen Zugriff gesichert. Die Maschine
kann nur betrieben werden, wenn Kessel und Schutzgitter sich in Arbeitsstellung befinden.
Verwendete Werkstoffe:
• Maschinengehäuse Zinkdruckguß, grau lackiert (PU-Lack)
• Hintere Motorabdeckung Stahlblech, grau lackiert (PU-Lack)
• Kessel, Schutzgitter und Ölauffangring Chrom-Nickelstahl
• Rührwerkzeuge Aluminium bzw. Chrom-Nickelstahl
Zur Standardausrustüng gehört der ”B“-Flachrüher. Die hier gemachten Ausführungen
können nicht alle Detailfragen abdecken. Falls zusätzliche Informationen benötigt werden,
dann wenden Sie sich bitte an Ihre nächste HOBART-Niederlassung.
– 41 –

2.2 Abmessungen
PAßSTIFT
DRAUFSICHT
Pos. Maß Pos. Maß Pos. Maß
A 432 E 128,5 I 398,5
B 381 F 178 J 176
C 263,5 G 236,5 K 222
D 311 H 228,5 L 247,5
alle Maße in mm.
Bild 1. N 50 Abmessungen
– 42 –

2.3 Technische Daten
Tabelle 1. Technische Daten
Beschreibung Einheiten Daten
elektrische Versorgung 230V,50Hz,1Ph,N,PE
Absicherung A 10
Motorleistung kW (PS) O,13 (1/6)
maximale Drehzahl des Motors min
Drehzahl des Planetenantriebes (Stufe 1 /2/ 3) min
Drehzahl derAnsatznabe (Stufe 1 /2/ 3) min
-1
-1
-1
1425
139 / 285 / 591
61 / 125 / 259
Nennstrom A 1,7
Strom bei blockiertem Rotor A 12,5
maximale Umgebungstemperatur °C 40
Größe der Ansatznabe Nr. 10
Bruttogewicht kg (Lbs) 25,7 (55)
Nettogewicht incl. Flachrührer und Kessel kg (Lbs) 21,5 (46)
Gewicht des Kessels (leer) kg (Lbs) 0,74 (1,6)
Kesselinhalt Liter 5
arbeitsplatzbezogener Emissionswert dB(A) < 70
Abmessungen der Verpackung L x B x H 505 x 375 x 470
(mm)
Lagerbedingungen:
Maximale Temperatur und Luftfeuchte °C, % RF 38, 85
3. Installation
Zur Installation des Gerätes sind keine speziellen Kenntnisse erforderlich.
Die Maschine wird mit Anschlußkabel und Stecker geliefert.
Bitte beachten Sie die nachfolgenden Kapitel vor der ersten Inbetriebnahme.
3.1 Auspacken
Verpackung und Maschine auf Transportschäden überprüfen.
Die Maschine vorsichtig aus dem Karton nehmen.
3.2 Aufstellen
Stellen Sie die Maschine auf einen geeigneten Arbeitstisch. Das Gerät besitzt
Gummifüße und braucht nicht befestigt zu werden. Achten Sie darauf, daß um
die Maschine genügend Platz für die Bedienung vorhanden ist.
3.3 Elektrischer Anschluss
Die Maschine wird mit Kabel und Stecker geliefert. Leistungsangaben des
Typenschildes mit denen der Hausversorgung vergleichen
Bauseitige Absicherung gemäß Typenschild.
– 43 –

4. Betrieb
4.1 Allgemeine Hinweise
Sicherheitshinweis:
Das Gerät darf nur von eingewiesenem Personal bedient werden. Die in
dieser Bedienungsanleitung enthaltenen Hinweise sind zu beachten:
• Gangwechsel nur bei Stillstand der Maschine.
• Keine abstehende Kleidung tragen.
• Bei evtl. auftretenden Fehlern darf das Gerät nicht betrieben werden.
• Keine rotierenden Teile berühren.
• Keine übermäBige Kraft anwenden, das Gerät könnte kippen, verrutschen oder
herunterfallen.
• Das Gerät nicht betreiben, wenn Teile entfernt worden sind.
• Das Gerät nur bei ausreichender Beleuchtung betreiben.
• Kessel, Rührwerkzeug, Schutzgitter und ggf. Ansatzgerät auf korrekten Sitz prüfen.
• Vor dem Reinigen Netzstecker ziehen.
• Zum Ausschalten den Schalter auf „O“ stellen.
• Nach dem Betrieb sind Kessel, Rührwerkzeug und ggf. Ansatzgerät zu reinigen.
• Das Gerät nach Bedarf, mindestens aber einmal täglich reinigen.
Bild 2. Aufbau
EIN-AUS-Schalter
Ansatznabe
Gangwählhebel
Ölauffangring
Wellenzapfen
Schutzgitter
Paßstift
Kesselhalterung
Gleitschienen
– 44 –

4.2 Bei Beginn der Arbeit
• Gerät ausschalten.
• Kessel und Werkzeuge sorgfältig reinigen (siehe Kapitel „Reinigung“).
• Wenn kein Ansatzgerät benutzt wird, ist die Ansatznabe mit der zugehörigen Kappe zu
verschließen.
• Die Kesselhalterung mit dem Hebel absenken.
• Das gewünschte Rührwerkzeug in den Kessel legen und den Kessel einsetzen.
• Dazu den hinteren Stift des Kessels in die entsprechende Aufnahme der Kesselhalterung
einführen.
• Der Kessel muß in die seitlichen Paßstifte der Kesselhalterung einrasten.
• Die Kesselsicherungen schließen.
• Das Rührwerkzeug auf den Wellenzapfen schieben und im Uhrzeigersinn in die L-förmige
Aufnahme drehen.
• Die zu rührende Masse in den Kessel eingeben.
• Das Schutzgitter auf den Kessel aufsetzen und den Kessel mittels Hebel in die obere
Position bringen.
• Die gewünschte Geschwindigkeit wählen und die Maschine durch Betätigung des
Schalters in Pos. „I“ einschalten.
Anmerkung: Ein Sicherheitsendschalter verhindert, daß die Maschine gestartet werden
kann, falls sich der Kessel oder das Schutzgitter nicht in der Arbeitsposition
befindet. Während der Motor läuft, darf die Geschwindigkeit nicht verändert
werden.
Vor dem Umschalten muß das Gerät zuerst ausgeschaltet werden.
4.3 Nach Beendigung der Arbeit
• Das Gerät ausschalten.
• Kessel absenken und Schutzgitter abnehmen.
• Das Rührwerkzeug herausnehmen.
• Kessel und Rührwerkzeug zum Entleeren herausnehmen.
4.4 Anwendungshinweise
In den Tabellen 2 und 3 werden die maximalen Mengen für die jeweiligen Produkte, sowie die
zugehörigen Rührwerkzeuge und die zu verwendenden Geschwindigkeiten angegeben.
Die angegebenen Mengen nicht überschreiten.
Uberlastung kann die Produktqualität sowie die Lebensdauer der Maschine
negativ beeinflussen.
• Stellen Sie sicher, daß das richtige Rührwerkzeug verwendet wird.
• Die richtige Geschwindigkeit wählen.
– 45 –

Tabelle 2. Einsatz in der Küche
Produkt Menge empfohlenes empfohlene
Rührwerkzeug Geschwindigkeit
Eiweiß 0,4 l Rührbesen ”D“ 1 bis 3
Kartoffelpüree 1,3 kg Flachrührer ”B“ 1 bis 2
Mayonnaise 1,3 l Rührbesen ”D“ 1 bis 3
Hackfleischmassen 1,3 kg Flachrührer ”B“ 1 bis 2
Pfannkuchenteig 1,8 l Rührbesen ”D“ 1 bis 2
Sahne 1 l Rührbesen ”D“ 1 bis 3
Tabelle 3. Einsatz in der Bäckerei / Konditorei
Produkt Menge empfohlenes empfohlene
Rührwerkzeug Geschwindigkeit
Wiener Masse / Bisquit 2 kg Rührbesen ”D“ 1 bis 2
Hefeteig 1,3 kg Knethaken ”E“ 1
Mürbeteig 1,5 kg Knethaken ”E“ 1
Butter / Margarine 1,3 kg Flachrührer ”B“ 1 bis 2
Fondant 1 kg Rührbesen ”D“ 1 bis 2
4.5 Geschwindigkeitseinstellungen
Die Geschwindigkeit des Rührwerkzeuges ist entsprechend den zu bearbeitenden Produkten
auszuwählen.
Generell gilt folgendes:
• Geschwindigkeit 1 (langsam) Für schwere, feste Teige.
• Geschwindigkeit 2 (mittel) Für leichte Teige, Massen und zum Aufschlagen.
• Geschwindigkeit 3 (schnell) Für Produkte wie Schlagsahne, Eiweiß,
Mayonnaise etc..
4.6 Rührwerkzeuge
Die unterschiedlichen Rührwerkzeuge sind für folgende Arbeiten vorgesehen:
• Der Flachrührer „B“ ist ein Universalwerkzeug, zum Mischen und Rühren von gekochten
Produkten oder Hackfleischmassen.
Er dient auch zum Rühren von Kuchenmassen.
Zu Beginn sollte die Geschwindigkeit 1 gewählt werden.
Wenn nötig, kann gegen Ende auf Geschwindigkeit 2 erhöht werden.
– 46 –

• Der Rührbesen „D“ soll möglichst viel Luft in das Produkt einmischen. Er wird verwendet
zum Aufschlagen von Sahne, Eiweiß, Mayonnaise etc.. Die Geschwindigkeiten 2 und 3
eignen sich für diese Arbeiten besonders gut.
• Der Knethaken „E“ dient zum Kneten von schweren Teigen wie Brotteig, Hefeteig und
Nudelteig. Diese Produkte erfordern eine hohe Knetwirkung für optimale Ergebnisse. Die
Geschwindigkeit 1 ist zu bevorzugen.
Bild 3 Rührwerkzeuge
5. Reinigung
• Vor Beginn der Reinigungsarbeiten Netzstecker ziehen.
• Maschine nicht mit dem Wasserschlauch oder Hochdruckreiniger abspritzen.
• Keine Scheuermittel verwenden.
• Beachten Sie die Reinigungshinweise der Ansatzgerätehersteller.
5.1 Reinigung vor der ersten Inbetriebnahme
Vor der ersten Verwendung müssen der Kessel, die Rührwerkzeuge und die
Ansatzgeräte gründlich gereinigt werden. Die Teile sind in warmem Wasser,
welchem ein milder Reiniger zugesetzt wird, zu waschen. Anschließend
müssen die Teile mit klarem Wasser gespült werden.
5.2 Reinigung nach dem Gebrauch
Nach jeder Verwendung sind Kessel, Rührwerkzeuge und Ansatzgeräte zu reinigen. Die
Reinigung ist in der gleichen Weise durchzuführen, wie im vorhergehenden Kapitel beschrieben.
Die Druckfeder für das Rührwerkzeug ist zur Reinigung herausnehmbar (siehe Bild 4).
Schieben Sie das untere Ende der Feder unter dem Mitnehmerstift durch und drehen Sie die
Feder entgegen dem Uhrzeigersinn nach unten heraus. Nach dem Reinigen muß die Feder
in umgekehrter Weise wieder montiert werden. Alle Windungen müssen sich oberhalb des
Mitnehmerstiftes befinden.
Die Maschine niemals ohne diese Druckfeder betreiben.
– 47 –
Bild 4. Rührwerkzeug-Druckfeder

Reinigen Sie das Maschinengehäuse mit einem warmen, feuchten Tuch. Reinigen Sie auch
die Kesselhalterung und alle anderen außen liegenden Oberflächen. Der Ölauffangring sollte
regelmäßig entfernt und gereinigt werden (einmal pro Woche).
Das Gerät nicht ohne den Ölauffangring betreiben.
6. Betrieb von Ansatzg eräten
6.1 Generelle Sicherheitshinweise
Die folgenden Sicherheitshinweise sind für den Betrieb von Ansatzgeräten
zu beachten:
Das Gerät darf nur von eingewiesenem Personal bedient werden.
• Niemals ein Ansatzgerät montieren oder demontieren, während die Maschine läuft.
• Keine abstehende Kleidung tragen.
• Bei evtl. auftretenden Fehlern darf das Gerät nicht betrieben werden.
• Keine rotierenden Teile berühren.
• Keine übermäßige Kraft anwenden, das Gerät könnte kippen, verrutschen oder
herunterfallen.
• Das Gerät nicht betreiben, wenn Teile entfernt worden sind.
• Das Gerät nur bei ausreichender Beleuchtung betreiben.
• Kessel, Schutzgitter und Ansatzgerät auf korrekten Sitz prüfen.
• Zum Ausschalten den Schalter auf „O“ stellen.
• Vor dem Reinigen Netzstecker ziehen.
• Nach dem Betrieb ist das Ansatzgerät entsprechend den Herstellerhinweisen zu reinigen.
• Das Gerät täglich reinigen.
• Nur Ansatzgeräte verwenden, welche von HOBART zugelassen sind.
6.2 Befestigen der Ansatzgeräte
Um ein Ansatzgerät zu montieren, muß die Maschine ausgeschaltet sein.
• Lösen der Rändelschraube.
• Kappe aus Ansatznabe herausnehmen.
• Ansatzgerät einsetzen. Darauf achten, daß der Vierkant korrekt in seiner Aufnahme sitzt.
• Rändelschraube festdrehen.
• Die geeignete Geschwindigkeit wählen.
– 48 –

6.3 Spezielle Sicherheitshinweise für die Verwendung von Ansatzgeräten
Es liegt außerhalb des Einflußbereiches von HOBART, daß verschiedene
Hersteller Ansatzgeräte für diese Maschine anbieten. Die nachfolgend
aufgetührten Ansatzgeräte sind für die Verwendung mit der N50 geeignet.
Bitte benützen Sie, auch im Hinblick auf die Sicherheit der Benutzer, nur diese
Geräte.
Die Bedienungsanleitung des jeweiligen Ansatzgeräteherstellers ist zu
befolgen.
Bei Verwendung von anderen Ansatzgeräten erlöschen die Garantieansprüche
sowie die Produkthaftung durch HOBART.
6.3.1 Zitruspresse
• Vorsicht bei der Handhabung an dem frei laufenden Rotor.
• Drücken Sie die Früchte nicht zu fest auf den Rotor.
Das Gerät könnte sonst kippen.
• Arbeiten Sie mit der richtigen Geschwindigkeit.
6.3.2 Fleischwolf
• Seien Sie besonders vorsichtig beim Arbeiten, speziell an der umlaufenden Förderschnecke
und dem Messer.
• Entfernen Sie die Knochen aus dem Fleisch.
• Schneiden Sie das Fleisch in Streifen. Es läßt sich dadurch besser zuführen.
• Drücken Sie das Produkt nicht zu stark in den Einfüllschacht.
Das Gerät könnte kippen
• Verwenden Sie nur den mitgelieferten Stopfer (auf keinen Fall die Finger oder andere
Gegenstände) um das Produkt nachzustopfen.
• Arbeiten Sie mit der richtigen Geschwindigkeit.
• Die Lochscheibe nicht während des Betriebes herausnehmen.
• Die Überwurfmutter nicht zu fest anziehen.
6.3.3 Dosenöffner
• Fassen Sie nicht an die rotierenden Teile.
• Keine Behälter öffnen, die unter Druck stehen.
• Keine Behälter öffnen, welche brennbare Flüssigkeiten oder Gase beinhalten.
• Vorsicht an scharfen Blechkanten.
• Arbeiten Sie mit der richtigen Geschwindigkeit.
– 49 –

6.3.4 Gemüseschneider
• Fassen Sie nicht an die rotierenden Teile.
• Nicht mit den Fingern oder sonstigen Gegenständen nachstopfen.
• Seien Sie vorsichtig beim wechseln der Schneidwerkzeuge.
• Nur zum Schneiden von Gemüse, Salat, Nüssen, Käse etc. verwenden.
• Arbeiten Sie mit der richtigen Geschwindigkeit.
6.3.5 Getreidemühle
• Vorsicht an den rotierenden Teilen, speziell Förderschnecke und Mahlwerk.
• Nicht mit den Fingern oder sonstigen Gegenständen nachstopfen.
• Arbeiten Sie mit der richtigen Geschwindigkeit.
• Während des Betriebes nicht direkt in den Einfüllschacht hineinschauen.
Getreidekörner könnten herausgeschleudert werden.
• Die Justierschraube für das Mahlwerk nicht zu stark anziehen.
6.3.6 Nudelvorsatz
• Vorsicht an den rotierenden Teilen.
• Den Teig nicht mit den Fingern oder sonstigen Gegenständen nachstopfen.
• Arbeiten Sie mit der richtigen Geschwindigkeit.
7. Wartung und Reparatur
Wartungs- und Reparaturarbeiten dürfen nur von autorisierten
Kundendiensttechnikern durchgeführt werden.
Bevor irgendwelche Wartungs- oder Reparaturarbeiten durchgeführt werden, ist der Netzstecker
zu ziehen.
Der Motor und das Getriebe sind mit Spezialfett geschmiert, welches für einige Jahre
ausreicht.
Sollte ein Austausch notwendig werden, kann dieser vom HOBART-Kundendienst durchgeführt
werden.
Die Gleitschienen des Kesselhebers sind gelegentlich zu reinigen und dünn mit Fett
einzuschmieren.
Es dürfen nur Schmiermittel entsprechend USDA Typ H1 verwendet werden. (Für den Einsatz
im Lebensmittelbereich).
– 50 –

7.1 Fehlersuche
Fehler mögliche Ursache Maßnahme
Maschine läßt sich bauseitige Sicherung defekt prüfen und ggf.
nicht starten Sicherung austauschen
Kessel ist nicht in Arbeitsposition Kessel hochfahren
Schutzgitter sitzt nicht richtig Schutzgitter korrekt
aufsetzen
Gangwählhebel ist nicht richtig prüfen und auf richtige
eingerastet Geschwindigkeit
einstellen
keine Spannung vorhanden Spannungsversorgung
prüfen und evtl. Fehler
beheben
Maschine läuft immer noch nicht an Kundendienst rufen
Motor läuft, aber die Gangwählhebel ist nicht richtig prüfen und auf richtige
Antriebswelle dreht eingerastet Geschwindigkeit
nicht einstellen
Antriebswelle dreht sich immer noch Kundendienst rufen
nicht
7.2 Ersatzteile
Teil Benennung Teil Nr. Menge
1 Kessel 78575-2 1
2 Knethaken ”E“ 78818 1
3 Rührbesen ”D“ 77764 1
4 Flachrührer ”B“ (Aluminium) 9033 1
5 Flachrührer ”B“ (CrNi) 62458 1
6 Schutzgitter 478114 1
7 Druckfeder 111227 1
8 Ölauffangring 21625-3 1
9 Rändelschraube 16951-4 1
10 Motorabdeckung 120433-2 1
11 Gummifüße 271650 4
12 Paßstifte 240185 2
13 Kesselsicherung links 291444-1 1
14 Kesselsicherung rechts 291444-2 1
15 Federscheibe für Kesselsicherungen 291263 6
16 Schmierfett für Getriebe SU-E-4-14 0,6 kg
17 Kappe 1
– 51 –

FORM 23138 (6-98)
 Loading...