


THE EDGE SERIES SLICER
MODEL
EDGE12-11 (120/60/1 voltage)
EDGE13-11 (120/60/1 voltage)
701 S. RIDGE AVE NUE
TROY, OHIO 45374- 0001
937 332-3000
www.hobartcorp.com
FORM 35283 Rev. C (January 2017)

TABLE OF CONTENTS
GENERAL ............................................................................................................................................. 3
INSTALLATION ..................................................................................................................................... 3
Unpacking ........................................................................................................................................ 3
Electrical .......................................................................................................................................... 4
OPERATION .......................................................................................................................................... 4
Safety .............................................................................................................................................. 4
Slicing .............................................................................................................................................. 4
CLEANING ............................................................................................................................................ 5
Cleaning And Sanitizing ................................................................................................................... 5
Cleaning Surface and Parts: ...................................................................................................... 5
Cleaning Meat Grip and Product Tray: ...................................................................................... 5
Cleaning Knife and Slice Deector: ........................................................................................... 6
Cleaning Ring Guard: ............................................................................................................... 6
Cleaning Sharpening Stone: ...................................................................................................... 6
Gasket Inspection (Fig. 9) ............................................................................................................... 7
MAINTENANCE .................................................................................................................................... 8
Knife Sharpening ............................................................................................................................. 8
Lubrication ....................................................................................................................................... 8
TROUBLESHOOTING .......................................................................................................................... 8
Service ............................................................................................................................................. 8
© HOBART, 2017
– 2 –

Installation, Operation and Care of
EDGE SERIES SLICER
SAVE THESE INSTRUCTIONS
GENERAL
The Edge Series slicer is equipped with a 1/2 Hp. motor. The slicer Knife is chrome-plated forged carbon
steel. The Slicer Base, Product Tray, Knife Cover, Ring Guard, and Gauge Plate are made of smooth nish
anodized cast aluminum for easy cleaning. The rear-mounted Meat Grip is hinged on a rod with extension
behind the Product Tray. The top-mounted knife Sharpener is removable for cleaning. A cord and plug is
furnished as standard equipment.
The Edge slicer must be thoroughly cleaned, rinsed and sanitized after installation and before being used.
Refer to CLEANING on page 5.
INSTALLATION
UNPACKING
The slicer was inspected before leaving the factory. The carrier assumes full responsibility for safe delivery
upon acceptance of the shipment. Check for possible shipping damage immediately after receipt.
If the slicer is found to be damaged, complete the following steps:
1. Carrier must be notied within ve business days of receipt.
2. Carrier’s local terminal must be notied immediately upon discovery (note the time, date, and who
was spoken to), and follow up and conrm with written or electronic communication.
3. All original packing materials must be kept for inspection purposes.
4. The slicer cannot have been moved, installed,
or modied.
5. Notify Hobart customer care at (800) 333-7447.
Prior to installing the slicer, test the electrical service
to make sure that it agrees with the specications on
the machine data plate. The data plate is located on
the right side of the slicer base.
The Product Tray is secured to the slicer by turning
the Knob (Fig. 2) below the Product Tray clockwise
until snug.
Mount the Sharpener on top of the slicer (Fig. 1)
by lowering it onto its post. The Sharpener can be
removed for cleaning.
The Slice Deector (Fig. 1) should already be mounted
below the knife.
– 3 –
(R) refers to removable part.
Fig. 1

ELECTRICAL
This machine comes with a three-prong grounding plug. The outlet to which this
plug is connected must be properly grounded. If the receptacle is not the proper grounding type,
contact an electrician.
ELECTRICAL DATA
Minimum Circuit Ampacity
Model Volts / Hertz / Phase Machine Amps
Maximum Protective Device
AMPS
EDGE12 120 / 60 / 1 4.0 15
EDGE13 120 / 60 / 1 4.0 15
Compiled in accordance with the National Electrical Code, NFPA 70, latest edition.
OPERATION
SAFETY
SAFETY DEVICES INCORPORATED IN THIS SLICER MUST BE IN THEIR CORRECT OPERATING
POSITION ANY TIME THE SLICER IS IN USE.
The Knife Cover should already be secured in place
with the Knife Cover Knob on the left side tightened
clockwise (Fig. 1). The Ring Guard is not removable.
The Meat Grip (Fig. 4) helps secure product in position
and must be used when slicing short ends to keep your
hand(s) away from the knife.
When the slicer is not running, the Index Knob (Fig.
2) must be turned fully clockwise so the Gauge Plate
covers the Knife edge.
Always UNPLUG the Power Cord before cleaning or
moving the Slicer.
Rotating knife. Unplug machine
power cord before cleaning, servicing or removing
parts. Replace parts before use.
Fig. 2
(R) refers to removable part.
SLICING
With the Gauge Plate fully closed, pull the Product Tray forward until it stops. With the Meat Grip out of
the way, place the product to be sliced on the Product Tray. Set the Meat Grip against the product. Turn
the slicer on by pressing the Switch ON (Fig. 2).
If the Meat Grip is not needed, store it out of the way by lifting it to the top of the Meat Grip Rod and
rotating it 270° behind the Product Tray. Allow it to rest on the small notch of the upper Product Tray slot.
Adjust the Gauge Plate to obtain the desired slice thickness by turning the Index Knob (Fig. 2) to vary the
9
slice thickness from paper thin to
/16" thick. Use the Carriage Handle (Fig. 2) to move the carriage back
and forth to slice.
– 4 –

CLEANING
CLEANING AND SANITIZING
Thoroughly clean, rinse and sanitize the slicer after each day’s use or after being idle for an extended time.
The slicer knife is very sharp. Exercise extreme caution when working near the knife.
Unplug the machine power cord and turn index knob fully clockwise to close the
gauge plate before cleaning the slicer.
NOTE: Sanitizer concentration shall comply with Section 4-501.114, Manual and Mechanical Warewashing
Equipment, Chemical Sanitation – Temperature, pH, Concentration, and Hardness of the FDA Food Code.
If a chemical sanitizer other than chlorine, iodine, or quaternary ammonium is used, it shall be applied in
accordance with the EPA-registered label use instructions.
Cleaning Surface and Parts:
Frequency: The slicer shall be cleaned and sanitized at intervals to comply with national, state and/or
local health codes.
Disassemble all removable slicer parts including Product Tray, Meat Grip, Meat Grip Rod, Slice Deector,
Knife Cover, Knife Cover Knob, and Sharpening Stone (See Fig. 1 and 2). Wash all surfaces of the machine
with warm soapy water, a towel and mild detergent. Also, wash surfaces where food or liquid can accumulate
or where there is frequent hand contact including handles, knobs and the control panel. Use generous
amounts of soapy water on the sharpener hardware and knife hub. Clean all removable parts with water,
a towel and mild detergent (refer to Page 7). Rinse with water and clean towel. Sanitize and let air dry.
• Excessive amounts of sanitizer and use of products not formulated for aluminum may void your
Hobart warranty.
• DO NOT wash any slicer components in a dishwasher.
• DO NOT hose down slicer or splash excessively with water.
• Use ONLY products formulated to be safe on stainless steel or aluminum.
• DO NOT exceed chemical manufacturer’s recommended concentrations for detergent or sanitizer.
• DO NOT clean any parts of the slicer with a steel pad.
Cleaning Meat Grip and Product Tray:
Turn Index Knob fully clockwise until Gauge Plate is in closed position. Pull Product Tray to home position.
Unscrew knob on Product Tray and lift to remove (Fig. 3). Unscrew Meat Grip Knob in order to extract
Meat Grip Rod from the Product Tray (Fig. 4). Set aside rod and Meat Grip. Wash surface area, Product
Tray, Meat Grip and Meat Grip Rod with water, a towel and mild detergent. Rinse, sanitize and let air dry.
To replace the Product Tray, lower the tray onto the carriage and tighten the knob clockwise until snug.
Thread Meat Grip Rod into Product Tray extension and then insert into Meat Grip. Tighten rod clockwise
until snug.
Fig. 3 Fig. 4
– 5 –

Cleaning Knife and Slice Deector:
With Meat Grip and Product Tray removed, turn Index Knob fully closed. Unscrew the Knife Cover Knob
(Fig. 5). Push the knob to remove Knife Cover. Remove both the Knife Cover and the Knife Cover Knob.
Remove the Slice Deector (Fig. 6) by unscrewing the stainless steel knob. Wash, rinse and sanitize the
Knife Cover Knob, Knife Cover, Slice Deector and both sides of the Knife by wiping outward from the
center. Allow to air dry.
Fig. 5 Fig. 6
Cleaning Ring Guard:
Work a moistened paper towel between the Ring Guard and Knife. Insert the towel at the base of the Ring
Guard (Fig. 7). Manually rotate the Knife to wipe Ring Guard and the edge of Guard Plate.
To replace the Knife Cover, insert the Knife Cover Knob into its hole (lower left side) and position the
Knife Cover over the center hole so the guide pin ts the hole in the rim and the hub ts the center hole.
Tighten the Knife Cover Knob (Fig. 5) so the threads at the end of the rod screw into the threaded hub
underneath the Knife Cover.
Cleaning Sharpening Stone:
Each time the Sharpener is used, the sharpening stones should be examined for cleanliness. Scrub stones
with a stiff bristle brush. Rinse with clean water and sanitize.
Reassemble the Sharpener by lowering it onto the sharpener post (Fig. 8).
NOTE: Do not exceed chemical manufacturer’s recommended concentrations for detergent or sanitizer.
Do not exceed 200 parts per million concentration of available chlorine (1 tablespoon of 5.25% sodium
hypochlorite bleach with 1 gallon of water). Concentrations greater than 200 ppm accelerate corrosion of
metals. Maximum exposure to sanitizing solution varies with temperature and concentration. Rinse with
clean water.
NOTE: Failure to follow use, care and maintenance instructions may void your Hobart warranty.
– 6 –
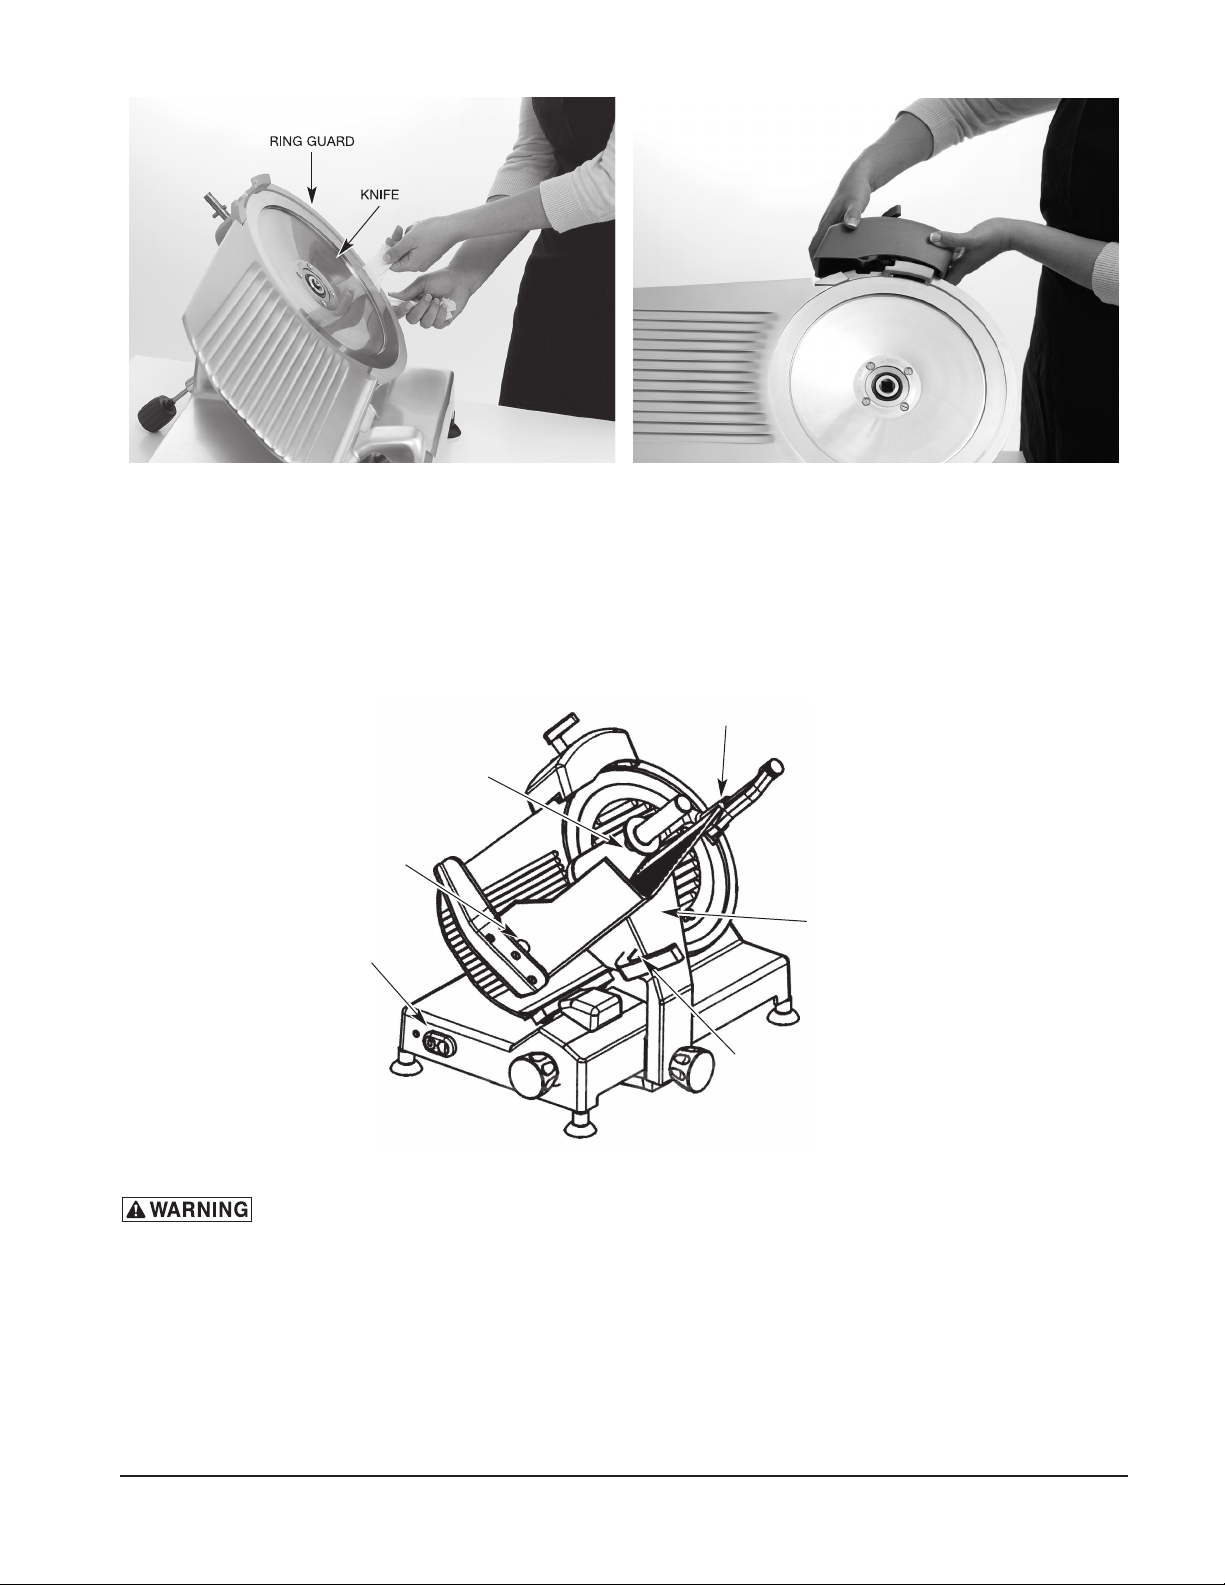
Fig. 7 Fig. 8
PROTECTION ON
THE SWITCH
GASKET BETWEEN
THE PRODUCT TABLE
GASKET INSPECTION (FIG. 9)
The recommended interval between inspections shall not exceed six months for components that are
detached for cleaning and sanitizing (all the gaskets in the images).
The inspections must be made by the manufacturer or its authorized service agent.
THE PRODUCT TABLE
AND THE EXTENSION
GASKET BETWEEN HANDLE/SPACER
AND SPACER/MEAT PUSHER
GASKET
BETWEEN THE
PRODUCT TABLE
AND THE
THUMB GUARD
GASKET BETWEEN THE
HANDLE AND THE
PRODUCT TABLE SUPPORT
GASKET BETWEEN
AND THE SUPPORT
Fig. 9
The slicer must be removed from service until repaired by the manufacturer or its
authorized service agent if any gasket or seal is found to be damaged, or missing.
– 7 –

MAINTENANCE
KNIFE SHARPENING
The Knife will provide long service in normal food store or kitchen use. However, in high volume
applications where it is a practice to sharpen the Knife frequently or even daily, the Knife will be
expended in a shorter time.
Sharpen only when necessary. Prolonged or sharpening too frequently results in unnecessary
knife wear.
Unplug machine power cord.
Turn the Index Knob fully clockwise to close the Gauge Plate. Remove the Knife Cover by unscrewing
the Knob and lifting it off the slicer.
Turn the slicer ON. Pull the Sharpener Handle (Fig. 10) forward for 15 seconds and release. Turn the
slicer off. Unplug machine power cord. Clean and sanitize the slicer as outlined in the cleaning section
after sharpening the Knife. Replace the Knife Cover.
Fig. 10
LUBRICATION
Maintain smooth slicing by applying a few drops of mineral oil on the Carriage Slide Rod underneath the
slicer base. Do not use vegetable oil.
TROUBLESHOOTING
Make sure that the circuit breaker has not tripped or the fuse blown.
SERVICE
Contact your local Hobart-authorized service ofce for any repairs or adjustments needed on this equipment.
FORM 35283 Rev. C (January 2017) PRINTED IN U.S.A.
– 8 –

LA TRANCHEUSE SÉRIE EDGE
MODÈLE
EDGE12-11 (tension 120/60/1 )
EDGE13-11 (tension 120/60/1 )
701 S. RIDGE AVENUE
TROY, OHIO 45374-0001
937-332-3000
www.hobartcorp.com
FORM 35283 Rév. C (Janvier 2017)

TABLE DES MATIÈRES
GÉNÉRALITÉS ..................................................................................................................................... 3
INSTALLATION ..................................................................................................................................... 3
Déballage ........................................................................................................................................ 3
Électricité ......................................................................................................................................... 4
FONCTIONNEMENT ............................................................................................................................. 4
Sécurité ........................................................................................................................................... 4
Trancher .......................................................................................................................................... 4
NETTOYAGE ......................................................................................................................................... 5
Nettoyage et désinfection ................................................................................................................ 5
Nettoyage des surfaces et des pièces : .................................................................................... 5
Nettoyage de la prise pour la viande et le plateau à produit : ................................................... 5
Nettoyage du couteau et du déecteur de coupe : ................................................................... 6
Nettoyage de la protection du disque : ..................................................................................... 6
Nettoyage de la pierre d'affûtage : ............................................................................................ 6
Inspection du joint d'étanchéité (Fig. 9) ........................................................................................... 7
ENTRETIEN .......................................................................................................................................... 8
Affûtage du couteau ........................................................................................................................ 8
Lubrication ..................................................................................................................................... 8
DÉPANNAGE ........................................................................................................................................ 8
Réparation ....................................................................................................................................... 8
© HOBART, 2017
– 2 –

Installation, fonctionnement et entretien de la
POIGNÉE DU
(A)
trancheuse SÉRIE EDGE
CONSERVEZ CES INSTRUCTIONS
GÉNÉRALITÉS
La trancheuse série Edge est équipée d'un moteur 1/2 HP. Le couteau de la trancheuse est en acier
carbone forgé, chromé. La base de la trancheuse, le plateau, le cache-couteau, la protection du disque
et la plaque graduée sont fabriqués en fonte d'aluminium anodisé pour faciliter le nettoyage. La prise pour
la viande montée à l'arrière est articulée sur une tige avec rallonge derrière le plateau à produit. L'affûteur
de couteau monté sur le dessus est amovible pour le nettoyage. Un cordon et une che sont livrés avec
l'équipement standard.
La trancheuse Edge doit être soigneusement nettoyée, rincée et désinfectée après l'installation et avant
d'être utilisée. Vous reporter à la page 5, NETTOYAGE.
INSTALLATION
DÉBALLAGE
La trancheuse a été inspectée avant de quitter l'usine. La société de transport assume l'entière responsabilité
de livrer en bon état la marchandise avant son acceptation. Sur réception, vériez immédiatement s'il y
a présence de dommages ayant pu être causés par la livraison.
Si la trancheuse s'avère endommagée, suivez les étapes ci-dessous :
1. La société de transport doit être avisée dans les cinq jours ouvrables suivant la réception.
2. Le terminus local de la société de transport doit être immédiatement avisé des dommages constatés
(notez l'heure, la date et le nom de l'interlocuteur), et assurez le suivi et la conrmation par écrit et
par courriel.
3. Les matériaux d'emballage d'origine doivent
être conservés à des ns d'inspection.
4. La trancheuse ne doit pas avoir été déplacée,
installée ou modiée.
AFFÛTEUR (A)
PLATEAU À PRODUIT
5. Avisez le service à la clientèle de Hobart au
(800) 333-7447.
Avant d'installer la trancheuse, vériez l'alimentation
électrique pour vous assurer qu'elle correspond aux
CHARIOT
spécications sur la plaque signalétique de la machine.
La plaque signalétique se trouve sur le côté droit de
la base de la trancheuse.
Le plateau à produit est xé à la trancheuse en
tournant dans le sens horaire le bouton (Fig. 2) sous
le plateau à produit.
Monter l'affûteur sur le dessus de la trancheuse (Fig. 1)
en l'abaissant sur son montant. L'affûteur peut être
retiré pour le nettoyage.
Le déecteur de coupe (Fig. 1) doit déjà être monté
sous le couteau.
– 3 –
BOUTON DE
CACHE-COUTEAU (A)
Fig. 1
DÉFLECTEUR
DE COUPE (A)
(A) signie pièce amovible.

(A)
ÉLECTRICITÉ
AVERTISSEMENT
AVERTISSEMENT
Cettemachineestlivréeavecunechedemiseàlaterreàtroislames.Laprise
danslaquelleestbranchéelachedoitêtrecorrectementmiseàlaterre.Silaprisen'apaslebon
typedemiseàlaterre,contactezunélectricien.
DONNÉES ÉLECTRIQUES
Intensité admissible minimale du circuit
Dispositifdeprotectionmaximale
AMPÈRES
Modèle
Volts/Hertz/
Phase
Ampèresdela
machine
EDGE12 120 / 60 / 1 4,0 15
EDGE13 120 / 60 / 1 4,0 15
Compilée conformément à la dernière édition du code national de l'électricité, NFPA 70.
FONCTIONNEMENT
SÉCURITÉ
LES DISPOSITIFS DE SÉCURITÉ INTÉGRÉS DANS CETTE TRANCHEUSE DOIVENT ÊTRE DANS
LA BONNE POSITION D'OPÉRATION CHAQUE FOIS QU'ON UTILISE LA TRANCHEUSE.
Le cache-couteau doit déjà être bien xé en place avec le bouton du cache-couteau sur le côté gauche
et serré dans le sens horaire (Fig. 1). La protection du
disque n'est pas amovible.
LEVIER D'AFFÛTEUR
CACHE-COUTEAU (A)
La prise pour la viande (Fig. 4) aide à xer le produit
en position et doit être utilisée lorsqu'on tranche des
extrémités courtes pour éloigner les mains du couteau.
PLAQUE GRADUÉE
TIGE DE PRISE
DE LA VIANDE
PLATEAU À PRODUIT
Lorsque la trancheuse ne fonctionne pas, le bouton
index (Fig. 2) doit être complètement tourné dans le
BRAS DE SUPPORT
sens horaire an que la plaque graduée couvre le
tranchant du couteau.
COMMUTATEUR
POIGNÉE DU
CHARIOT
Toujours DÉBRANCHER le cordon d'alimentation avant
de nettoyer ou de déplacer la trancheuse.
Couteau rotatif. Débrancher
le cordon d'alimentation avant de procéder au
nettoyage,àl'entretienoude retirerdes pièces.
Reposerlespiècesavantl'utilisation.
TRANCHER
BOUTON D'INDEX
Fig. 2
PLATEAU DE
PRODUIT BOUTEAU
DE PLATEAU
(A) signie pièce amovible.
Avec la plaque graduée complètement fermée, tirer le plateau à produit vers l'avant jusqu'à l'arrêt. Lorsque
la prise pour la viande est hors du chemin, placer le produit à trancher sur le plateau pour produit. Faire
reposer le produit contre la prise pour la viande. Actionner la trancheuse en appuyant sur le bouton de
mise en marche (Fig. 2).
Si la prise pour la viande n'est pas nécessaire, la ranger en la soulevant jusqu'en haut du montant de la
prise pour la viande et en la tournant à 270 ° derrière le plateau à produit. La laisser reposer sur la petite
encoche de la fente supérieure du plateau à produit.
Ajuster la plaque graduée pour obtenir l'épaisseur de tranche désirée en tournant le bouton Index (Fig. 2)
entre l'épaisseur d'une feuille de papier à
chariot de l'arrière vers l'avant et trancher.
9
/16 po. Utiliser la poignée du chariot (Fig. 2) pour déplacer le
– 4 –

NETTOYAGE
AVERTISSEMENT
AVERTISSEMENT
NETTOYAGE ET DÉSINFECTION
Bien nettoyer, rincer et désinfecter la trancheuse après chaque utilisation ou après une inactivité prolongée.
Lecouteaudelatrancheuseesttrèstranchant.Fairepreuved'extrêmeprudence
lorsqu'ontravailleàproximitéducouteau.
Débrancherlecordond'alimentationdelamachineettournerleboutonIndex
complètementdanslesenshorairepourfermerlaplaquegraduéeavantdenettoyerlatrancheuse.
REMARQUE : La concentration de désinfectant doit être conforme à l'article 4-501.114, équipement manuel
et mécanique, désinfection chimique - température, pH, concentration, et la dureté du Code alimentaire
de la FDA. Si un désinfectant chimique autre que le chlore, l'iode ou l'ammonium quaternaire est utilisé,
il doit être utilisé conformément aux directives d'utilisation sur l'étiquette enregistrée EPA.
Nettoyagedessurfacesetdespièces:
Fréquence : La trancheuse doit être nettoyée et désinfectée à intervalles pour se conformer aux codes
sanitaires nationaux, fédéraux et/ou locaux.
Démonter toutes les pièces amovibles incluant le plateau à produit, la prise pour la viande, la tige de
prise pour la viande, le déecteur de coupe, le cache-couteau, le bouton du cache-couteau et la pierre à
aiguiser (voir les gures 1 et 2). Laver toutes les surfaces de la machine avec de l'eau savonneuse chaude,
un linge et du détergent doux. De plus, laver les surfaces où la nourriture ou le liquide peut s'accumuler,
aux endroits où il y a des contacts fréquents avec les mains comme les poignées, boutons et panneau
de contrôle. Utiliser une quantité généreuse d'eau savonneuse sur le matériel d'affûtage et le moyeu du
couteau. Nettoyer toutes les pièces amovibles avec de l'eau, un linge et du détergent doux (vous reporter
à la page 7). Rincer avec de l'eau et un linge propre. Désinfecter et laisser sécher à l'air.
• Des quantités excessives de désinfectant et l'utilisation de produits non formulés pour l'aluminium
peut annuler la garantie Hobart.
• NE PAS laver aucun composant de la trancheuse dans un lave-vaisselle.
• NE PAS arroser la trancheuse ni éclabousser en excès avec de l'eau.
• Utiliser UNIQUEMENT des produits formulés sans risque pour l'acier inoxydable ou l'aluminium.
• NE PAS dépasser les concentrations chimiques recommandées du fabricant relatives au détergent
ou au désinfectant.
• NE PAS nettoyer les pièces de la trancheuse avec un tampon en acier.
Nettoyagedelaprisepourlaviandeetleplateauàproduit:
Tourner le bouton Index complètement dans le sens horaire jusqu'à ce que la plaque graduée soit en
position fermée. Tirer le plateau à produit en position de repos. Dévisser le bouton sur le plateau à produit
et le soulever pour le retirer (Fig. 3). Dévisser le bouton de poignée à viande an d'extraire le montant de
la prise pour la viande du plateau à produit (Fig. 4). Mettre de côté le montant et la prise pour la viande.
Laver la surface, le plateau à produit, la prise pour la viande et le montant de la prise pour la viande avec
de l'eau, un linge et un détergent doux. Rincer, désinfecter et laisser sécher à l'air.
Fig. 3 Fig. 4
– 5 –

Pour reposer le plateau à produit, abaisser le plateau sur le chariot et bien serrer le bouton dans le sens
horaire. Visser le montant de la prise pour la viande sur la rallonge du plateau à produit, puis insérer dans
la prise pour la viande. Bien serrer le montant dans le sens horaire.
Nettoyageducouteauetdudéecteurdecoupe:
Avec la prise pour la viande et le plateau à produit retirés, fermer complètement le bouton Index. Dévisser le
bouton du cache-couteau (Fig. 5). Pousser le bouton pour retirer le cache-couteau. Retirer le cache-couteau
ainsi que le bouton du cache-couteau. Retirer le déecteur de coupe (Fig. 6) en dévissant le bouton en
acier inoxydable. Laver, rincer et désinfecter le bouton du cache-couteau, le cache-couteau, le déecteur
de coupe et les deux côtés du couteau en essuyant du centre vers l'extérieur. Laisser sécher à l'air.
DÉFLECTEUR DE COUPE
BOUTON DE CACHE-COUTEAU
Fig. 5 Fig. 6
Nettoyagedelaprotectiondudisque:
Travailler avec une serviette en papier humidiée entre la protection du disque et le couteau. Insérer la
serviette à la base de la protection du disque et le couteau (Fig. 7). Tourner manuellement le couteau
pour essuyer la protection du disque et le bord de la plaque de protection.
Pour reposer le cache-couteau, insérer le bouton du cache-couteau dans son trou (côté gauche inférieur)
et positionner le cache-couteau au-dessus du trou du centre an que le tenon de guidage s'ajuste au trou
dans le rebord et le moyeu dans le trou du centre. Serrer le bouton du cache-couteau (Fig. 5) an que les
lets au bout de la tige vissent dans le moyeu leté sou le cache-couteau.
Nettoyagedelapierred'affûtage:
Chaque fois que l'affûteur est utilisé, il faut examiner la propreté de la pierre d'affûtage. Frotter les pierres
avec une brosse à soies dures. Rincer avec de l'eau propre et désinfecter.
Remonter l'affûteur en l'abaissant sur le montant de l'affûteur (Fig. 8).
REMARQUE : NE PAS dépasser les concentrations chimiques recommandées du fabricant relatives au
détergent ou au désinfectant. Ne pas dépasser une concentration de 200 parties par million pour le chlore
(une (1) cuillère à table d'hypochlorite de sodium à 5,25 % dans un (1) gallon d'eau). Des concentrations
supérieures à 200 ppm accélèrent la corrosion des métaux. L'exposition maximale à la solution désinfectante
varie en fonction de la température et de la concentration. Rincer à l'eau propre.
REMARQUE : Le défaut de suivre les directives d'utilisation, de soin et d'entretien peut annuler la garantie
Hobart.
– 6 –

PROTECTION DU DISQUE
AVERTISSEMENT
PROTECTION SUR
L'INTERRUPTEUR
JOINT ENTRE LA TABLE DE
JOINT ENTRE LA TABLE
COUTEAU
Fig. 7 Fig. 8
INSPECTIONDUJOINTD'ÉTANCHÉITÉ(FIG.9)
L'intervalle recommandé entre les inspections de nettoyage et de désinfection ne doit pas dépasser six
mois pour les composants qui sont xés (tous les joints d'étanchéité dans les images).
Les inspections doivent être effectuées par le fabricant ou un agent de service autorisé.
PRODUIT ET LA RALLONGE
JOINT D'ÉTANCHÉITÉ ENTRE LA
POIGNÉE/ENTRETOISE ET
L'ENTRETOISE/POUSSOIR
À VIANDE
JOINT ENTRE LA TABLE
DE PRODUIT ET LE
GARDE-POUCE
DE PRODUIT ET LE
SUPPORT
JOINT ENTRE LA POIGNÉE
ET LE SUPOORT DE TABLE
À PRODUIT
Fig.9
Latrancheusedoitêtreretiréeduservicejusqu'àsaréparationparlefabricant
ouunagentdeserviceautorisésiunjointoujointd'étanchéitéestendommagéoumanquant.
– 7 –

ENTRETIEN
AVERTISSEMENT
AFFÛTAGE DU COUTEAU
Le couteau procurera un service de longue durée dans un magasin d'alimentation ou une cuisine normale.
Cependant, pour une utilisation à grande demande où l'affûtage du couteau se fait fréquemment voire
quotidiennement, le couteau s'usera plus vite.
Affûter seulement lorsque nécessaire. Un affûtage prolongé ou trop fréquent entraîne l'usure inutile du
couteau.
Débrancherlecordond'alimentationdelamachine.
Tourner le bouton Index complètement dans le sens horaire pour fermer la plaque graduée. Retirer le
cache-couteau en dévissant le bouton et en le soulevant de la trancheuse.
Mettre la trancheuse sous tension. Tirer la poignée de l'affûteur (Fig. 10) vers l'avant pendant 15 secondes
et relâcher. Mettre la trancheuse hors tension. Débrancher le cordon d'alimentation de la machine. Nettoyer
et désinfecter la trancheuse comme décrit sous la section de nettoyage après l'affûtage du couteau.
Reposer le cache-couteau.
POIGNÉE DE
L'AFFÛTEUR
Fig. 10
LUBRIFICATION
Maintenir un découpage régulier en enduisant quelques gouttes d'huile minérale sur la tige de la glissière
du chariot sous la base de la trancheuse. Ne pas utiliser de l'huile végétale.
DÉPANNAGE
S'assurer que le disjoncteur ne s'est pas déclenché ou que le fusible n'est pas grillé.
RÉPARATION
Contactez votre bureau de service local Hobart autorisé pour les réparations ou réglages à effectuer sur
cet équipement.
FORMULAIRE 35283 Rév. C(janvier2017) IMPRIMÉAUXÉ.-U.
– 8 –

REBANADORA SERIE EDGE
MODELO
EDGE12-11 (voltaje 120/60/1)
EDGE13-11 (voltaje 120/60/1)
701 S. RIDGE AVENUE
TROY, OHIO 45374-0001
937 332-3000
www.hobartcorp.com
FORMULARIO 35283 rev. C (enero de 2017)

CONTENIDO
GENERAL ............................................................................................................................................. 3
INSTALACIÓN ....................................................................................................................................... 3
Desembalaje .................................................................................................................................... 3
Especicaciones eléctricas .............................................................................................................. 4
FUNCIONAMIENTO .............................................................................................................................. 4
Seguridad ........................................................................................................................................ 4
Rebanado ........................................................................................................................................ 4
LIMPIEZA .............................................................................................................................................. 5
Limpieza y desinfección .................................................................................................................. 5
Limpieza de supercies y piezas: .............................................................................................. 5
Limpieza del agarre de carne y la bandeja para productos: ...................................................... 5
Limpieza de la cuchilla y el deector de la rebanadora: ............................................................ 6
Limpieza del protector en forma de anillo: ................................................................................ 6
Limpieza de la piedra de alar: .................................................................................................. 6
Inspección de la junta (Fig. 9) ......................................................................................................... 7
MANTENIMIENTO ................................................................................................................................ 8
Alado de la cuchilla ........................................................................................................................ 8
Lubricación ...................................................................................................................................... 8
RESOLUCIÓN DE PROBLEMAS ......................................................................................................... 8
Servicio ............................................................................................................................................ 8
© HOBART, 2017
– 2 –

Instalación, operación y cuidado de la
L
REBANADORA SERIE EDGE
GUARDE ESTAS INSTRUCCIONES
GENERAL
La rebanadora serie Edge está equipada con un motor de 1/2 HP. La cuchilla de la rebanadora es de acero
semiduro y enchapado en cromo. La base de la rebanadora, la bandeja para productos, la cubierta de la
cuchilla, el protector en forma de anillo y la placa del medidor son de aluminio fundido anodizado con un
acabado suave para una limpieza más sencilla. El agarre de carne posterior se monta por medio de una
bisagra en una barra con una extensión detrás de la bandeja para productos. El alador de la cuchilla
superior puede extraerse para su limpieza. Se incluyen un cable y un enchufe como equipamiento estándar.
La rebanadora Edge debe limpiarse, enjuagarse y desinfectarse exhaustivamente después de la instalación
y antes de cada uso. Consulte LIMPIEZA en la página 5.
INSTALACIÓN
DESEMBALAJE
La rebanadora se inspeccionó antes de salir de la fábrica. El transportista asume plena responsabilidad por
la entrega segura después de aceptar el envío. Verique inmediatamente después de recibir el producto
que no haya daños producidos durante el envío.
Si se determina que la rebanadora está dañada, siga estos pasos:
1. Notique al transportista antes de transcurridos cinco días después de recibir el producto.
2. Notique de inmediato a la terminal local del transportista al descubrir el daño (apunte la hora, la
fecha y con quién habló) y haga un seguimiento y conrme la comunicación de manera escrita o
electrónica.
3. Conserve todo el embalaje original para nes de inspección.
4. No mueva, instale ni modique la rebanadora.
5. Notique al servicio de atención al cliente de
Hobart al (800) 333-7447.
AFILADOR (R)
BANDEJA PARA
PRODUCTOS (R)
Antes de instalar la rebanadora, pruebe el servicio
eléctrico para asegurarse de que coincida con las
especicaciones que se indican en la placa de datos
de la máquina. La placa de datos está ubicada en el
MANIJA DE
CARRO
lado derecho de la base de la rebanadora.
La bandeja para productos se ja en la rebanadora
girando en sentido horario la perilla (Fig. 2) ubicada
debajo de la bandeja hasta que esté ajustada.
Monte el alador en la parte superior de la rebanadora
(Fig. 1) haciéndolo descender en su poste. El alador
puede quitarse para su limpieza.
El deector de la rebanadora (Fig. 1) ya debe estar
montado debajo de la cuchilla.
– 3 –
PERILLA DE LA CUBIERTA
DE LA CUCHILLA (R)
DEFLECTOR DE LA
REBANADORA (R)
(R) hace referencia a una pieza extraíble.
Fig. 1

AGARRE
ESPECIFICACIONES ELÉCTRICAS
ADVERTENCIA
ADVERTENCIA
Esta máquina incluye un enchufe de conexión a tierra de tres patas. La toma a
la que va conectada este enchufe debe tener la conexión a tierra correspondiente. Si la toma no
tiene la conexión a tierra adecuada, comuníquese con un electricista.
DATOS ELÉCTRICOS
Ampacidad mínima del circuito
AMPERIOS máximos del
dispositivo de protección
Modelo
Voltios/Hercios/
Fase
Amperios de la
máquina
EDGE12 120 / 60 / 1 4,0 15
EDGE13 120 / 60 / 1 4,0 15
Compilado de acuerdo con el Código Eléctrico Nacional, NFPA 70, última edición.
FUNCIONAMIENTO
SEGURIDAD
LOS DISPOSITIVOS DE SEGURIDAD INCORPORADOS EN ESTA REBANADORA DEBEN ESTAR EN
LA POSICIÓN DE OPERACIÓN CORRECTA SIEMPRE QUE SE ESTÉ USANDO LA REBANADORA.
La cubierta de la cuchilla ya debe estar asegurada en su lugar, con la perilla de la cubierta de la cuchilla
del lado izquierdo ajustada en sentido de las agujas
del reloj (Fig. 1). El protector en forma de anillo no
PALANCA DEL AFILADOR
CUBIERTA DE LA
CUCHILLA (R)
puede extraerse.
El agarre de carne (Fig. 4) ayuda a jar el producto en
su posición y debe usarse al rebanar extremos cortos
para mantener las manos alejadas de la cuchilla.
Cuando la rebanadora no está en funcionamiento,
la perilla de índice (Fig. 2) debe estar girada
completamente en sentido de las agujas del reloj para
PLACA DEL MEDIDOR
INTERRUPTOR
BARRA DEL
DE CARNE
BANDEJA PARA
PRODUCTOS (R)
BRAZO DE SOPORTE
MANIJA DEL
CARRO
que la placa del medidor cubra el lo de la cuchilla.
Siempre DESENCHUFE el cable de alimentación antes
de limpiar o mover la rebanadora.
Cuchilla giratoria. Desenchufe
el cable de alimentación de la máquina antes de
limpiar, realizar tareas de servicio o quitar piezas.
Vuelva a colocar las piezas antes de usar la máquina.
PERILLA DE ÍNDICE
(R) hace referencia a una pieza extraíble.
Fig. 2
PERILLA DE LA
BANDEJA PARA
PRODUCTOS
REBANADO
Con la placa del medidor completamente cerrada, empuje hacia adelante la bandeja para productos hasta
que haga tope. Con el agarre de carne fuera, coloque el producto que desea rebanar en la bandeja para
productos. Coloque el agarre de carne contra el producto. Presione el interruptor ON para encender la
rebanadora (Fig. 2).
Si no se necesita el agarre de carne, quítelo del medio elevándolo hacia la parte superior de la barra del
agarre de carne y rotándolo 270° detrás de la bandeja para productos. Apóyelo sobre la pequeña muesca
de la ranura de la bandeja para productos superior.
Ajuste la placa del medidor para obtener el grosor deseado de la feta girando la perilla de índice (Fig. 2)
para variar el grosor de la feta desde muy delgada hasta un grosor de 9/16". Use la manija del carro (Fig. 2)
para mover el carro hacia atrás y hacia adelante para rebanar.
– 4 –

LIMPIEZA
ADVERTENCIA
ADVERTENCIA
LIMPIEZA Y DESINFECCIÓN
Lave, enjuague y desinfecte exhaustivamente la rebanadora después de cada día de uso o después de
un tiempo extendido de inactividad.
La cuchilla de la rebanadora tiene mucho lo. Sea extremadamente cuidadoso
al trabajar cerca de la cuchilla.
Desenchufe el cable de la alimentación de la máquina y gire la perilla de índice totalmente
en sentido de las agujas del reloj para cerrar la placa del medidor antes de limpiar la rebanadora.
NOTA: La concentración de desinfectante debe cumplir con la sección 4-501.114, Temperatura, pH,
concentración y dureza de equipos de lavado de utensilios manuales y mecánicos y desinfección química
del Código de Alimentos de la Administración de Medicamentos y Alimentos (FDA). Si se utiliza un
desinfectante químico que no sea cloro, iodo o amonio cuaternario, debe aplicarse de acuerdo con las
instrucciones de uso en la etiqueta registrada por la Agencia de Protección Ambiental.
Limpieza de supercies y piezas:
Frecuencia: La rebanadora debe limpiarse y desinfectarse en intervalos regulares para cumplir con los
códigos de salud nacionales, estatales y/o locales.
Desarme todas las piezas extraíbles de la rebanadora, entre ellas la bandeja para productos, el agarre
de carne, la barra del agarre de carne, el deector de la rebanadora, la cubierta de la cuchilla, la perilla
de la cubierta de la cuchilla y la piedra de alar (consulte Fig. 1 y 2). Lave todas las supercies de la
máquina con agua tibia enjabonada, una toalla y detergente suave. Además, lave las supercies donde
puedan acumularse alimentos o líquidos, o donde haya un contacto frecuente con las manos, entre ellas
manijas, perillas y el panel de control. Aplique cantidades generosas de agua enjabonada en las piezas
del alador y el eje de la cuchilla. Limpie todas las piezas extraíbles con agua, una toalla y detergente
suave (consulte Pág. 7). Enjuague con agua y una toalla limpia. Desinfecte y deje secar al aire.
• Las cantidades excesivas de desinfectante y el uso de productos no formulados para aluminio
pueden anular su garantía de Hobart.
• NO lave ningún componente de la rebanadora en un lavaplatos.
• NO utilice una manguera ni salpique excesivamente con agua.
• Use ÚNICAMENTE productos formulados para una aplicación segura sobre acero inoxidable o aluminio.
• NO supere las concentraciones recomendadas por el fabricante de detergente o desinfectante.
• NO limpie ninguna pieza de la rebanadora con una esponja de acero.
Limpieza del agarre de carne y la bandeja para productos:
Gire la perilla de índice completamente en sentido de las agujas del reloj hasta que la placa del medidor
esté en la posición cerrada. Coloque la bandeja para productos en su posición inicial. Desenrosque la
perilla en la bandeja para productos y tire hacia arriba para extraerla (Fig. 3). Desenrosque la perilla del
agarre de carne para poder extraer la barra del agarre de carne de la bandeja para productos (Fig. 4).
Coloque a un lado la barra y el agarre de carne. Lave la supercie, la bandeja para productos, el agarre
de carne y la barra del agarre de carne con agua, una toalla y detergente suave. Enjuague, desinfecte
y deje secar al aire.
Fig. 3 Fig. 4
– 5 –

Para volver a colocar la bandeja para productos, haga descender la bandeja en el carro y ajuste la perilla
en sentido de las agujas del reloj hasta que esté ajustada. Enrosque la barra del agarre para carne en la
extensión de la bandeja del producto y, luego, insértela en el agarre de carne. Ajuste la barra en sentido
de las agujas del reloj hasta que esté ajustada.
Limpieza de la cuchilla y el deector de la rebanadora:
Con el agarre de carne y la bandeja para productos fuera de la máquina, gire la perilla de índice hasta la
posición completamente cerrada. Desenrosque la perilla de la cubierta de la cuchilla (Fig. 5). Empuje la
perilla para quitar la cubierta de la cuchilla. Quite la cubierta de la cuchilla y la perilla de la cubierta de la
cuchilla. Quite el deector de la rebanadora (Fig. 6) desenroscando la perilla de acero inoxidable. Lave,
enjuague y desinfecte la perilla de la cubierta de la cuchilla, la cubierta de la cuchilla, el deector de la
rebanadora y ambos lados de la cuchilla desde el centro hacia afuera. Deje secar al aire.
DEFLECTOR DE LA REBANADORA
PERILLA DE LA CUBIERTA
DE LA CUCHILLA
Fig. 5 Fig. 6
Limpieza del protector en forma de anillo:
Pase una toalla de papel humedecida entre el protector en forma de anillo y la cuchilla. Inserte la toalla
en la base del protector en forma de anillo (Fig. 7). Rote manualmente la cuchilla para limpiar el protector
en forma de anillo y el borde de la placa del protector.
Para volver a colocar la cubierta de la cuchilla, inserte la perilla de la cubierta de la cuchilla en su oricio
(lado inferior izquierdo) y posicione la cubierta de la cuchilla sobre el oricio central de forma tal que el
perno guía quepa en el borde del oricio y el eje quepa en el oricio central. Ajuste la perilla de la cubierta
de la cuchilla (Fig. 5) de forma tal que las roscas del extremo del tornillo de la barra se atornillen en el
eje roscado ubicado debajo de la cubierta de la cuchilla.
Limpieza de la piedra de alar:
Cada vez que se utiliza el alador, deben examinarse las piedras de alar para vericar que estén limpias.
Frote las piedras con un cepillo de cerdas rígidas. Enjuague con agua limpia y desinfecte.
Para volver a armar el alador, hágalo descender sobre el poste del alador (Fig. 8).
NOTA: No supere las concentraciones recomendadas por el fabricante de detergente o desinfectante. No
supere la concentración de 200 partes por millón de cloro disponible (1 cucharada grande de amoníaco
con hipoclorito de sodio al 5,25 % con 1 galón de agua). Las concentraciones superiores a 200 ppm
aceleran la corrosión de los metales. La exposición máxima a la solución desinfectante varía según la
temperatura y la concentración. Enjuague con agua limpia.
NOTA: Si no se siguen las instrucciones de uso, cuidado y mantenimiento, su garantía de Hobart puede
anularse.
– 6 –

PROTECTOR EN FORMA DE ANILLO
ADVERTENCIA
PROTECCIÓN EN
EL INTERRUPTOR
JUNTA ENTRE LA TABLA PARA
A
PARA PRODUCTOS Y EL
CUCHILLA
Fig. 7 Fig. 8
INSPECCIÓN DE LA JUNTA (FIG. 9)
El intervalo recomendado entre inspecciones no debe superar los seis meses para componentes que se
extraen para su limpieza y desinfección (todas las juntas incluidas en las imágenes).
Las inspecciones deben estar a cargo del fabricante o de su agente de servicio autorizado.
PRODUCTOS Y LA EXTENSIÓN
JUNTA ENTRE LA MANIJA/
ESPACIADOR Y EL
ESPACIADOR/IMPULSOR
DE CARNE
JUNTA ENTRE LA TABLA
PARA PRODUCTOS
Y EL PROTECTOR
PARA DEDOS
JUNTA ENTRE LA MANIJA
Y EL SOPORTE DE LA
TABLA PARA PRODUCTOS
JUNTA ENTRE LA TABL
SOPORTE
Fig. 9
Si se detecta alguna junta o sello dañado o ausente, la rebanadora debe quitarse
de servicio hasta su reparación por parte del fabricante o su agente de servicio autorizado.
– 7 –

MANTENIMIENTO
ADVERTENCIA
AFILADO DE LA CUCHILLA
La cuchilla tiene una vida útil de servicio prolongada si se la utiliza normalmente en tiendas de comidas
o cocinas. Sin embargo, en aplicaciones de alto volumen donde se tiene como práctica alar la cuchilla
con frecuencia, e incluso diariamente, la cuchilla se gastará en un período más corto.
Afílela solo cuando sea necesario. El alado prolongado o muy frecuente provoca un desgaste innecesario
en la cuchilla.
Desenchufe el cable de alimentación de la máquina.
Gire completamente en sentido de las agujas del reloj la perilla de índice para cerrar la placa del medidor.
Quite la cubierta de la cuchilla desenroscando la perilla y elevándola para retirarla de la rebanadora.
Encienda la rebanadora. Empuje hacia adelante la manija del alador (Fig. 10) durante 15 segundos y
suéltela. Apague la rebanadora. Desenchufe el cable de alimentación de la máquina. Después de alar
la cuchilla, limpie y desinfecte la rebanadora según se describe en la sección Limpieza. Vuelva a colocar
la cubierta de la cuchilla.
MANIJA DEL
AFILADOR
Fig. 10
LUBRICACIÓN
Para que el rebanado siga siendo uniforme, aplique algunas gotas de aceite mineral en la barra de
deslizamiento del carro, debajo de la base de la rebanadora. No utilice aceite vegetal.
RESOLUCIÓN DE PROBLEMAS
Asegúrese de que el disyuntor no se haya disparado o que no se haya quemado el fusible.
SERVICIO
Comuníquese con una ocina de servicio local autorizada por Hobart para realizar cualquier tipo de
reparaciones o ajustes necesarios en el equipo.
FORMULARIO 35283 rev. C (enero de 2017) IMPRESO EN EE. UU.
– 8 –
 Loading...