


Hobart EPCP-5HTi Service Manual

HT Access System
Supervisor Manual
ML-44242 EPCP-5HTi
ML-44243 EPCP-5HTs
ML-44244 EPCP-5HTx
701 S. RIDGE AVENUE
TROY, OHIO 45374
www.hobartcorp.com
F-35554 (December 2014)


HT Access System Supervisor Manual
TABLE OF CONTENTS
Chapter 1: Introduction. . . . . . . . . . . . . . . . . . . . . . . . . . . . . . . . . . . . . . . . . . . . . . . . . . . . . . . . . . . . . . .1-1
Welcome. . . . . . . . . . . . . . . . . . . . . . . . . . . . . . . . . . . . . . . . . . . . . . . . . . . . . . . . . . . . . .1-2
Verify Correctness of Weight & Price . . . . . . . . . . . . . . . . . . . . . . . . . . . . . . . . . . . . . . .1-2
FCC Note . . . . . . . . . . . . . . . . . . . . . . . . . . . . . . . . . . . . . . . . . . . . . . . . . . . . . . . . . . . . .1-3
How to Use This Manual . . . . . . . . . . . . . . . . . . . . . . . . . . . . . . . . . . . . . . . . . . . . . . . . .1-3
Chapter 2: Understanding The System. . . . . . . . . . . . . . . . . . . . . . . . . . . . . . . . . . . . . . . . . . . . . . . . . . .2-1
Electrical Connections . . . . . . . . . . . . . . . . . . . . . . . . . . . . . . . . . . . . . . . . . . . . . . . . . . .2-2
Communication Connections . . . . . . . . . . . . . . . . . . . . . . . . . . . . . . . . . . . . . . . . . . . . . .2-2
Display Icons . . . . . . . . . . . . . . . . . . . . . . . . . . . . . . . . . . . . . . . . . . . . . . . . . . . . . . . . . .2-3
Help . . . . . . . . . . . . . . . . . . . . . . . . . . . . . . . . . . . . . . . . . . . . . . . . . . . . . . . . . . . . . . . . .2-5
Supervisor Mode Overview . . . . . . . . . . . . . . . . . . . . . . . . . . . . . . . . . . . . . . . . . . . . . . .2-6
Shutting Down the System . . . . . . . . . . . . . . . . . . . . . . . . . . . . . . . . . . . . . . . . . . . . . . . .2-8
Reboot Button. . . . . . . . . . . . . . . . . . . . . . . . . . . . . . . . . . . . . . . . . . . . . . . . . . . . . . . . . .2-9
Chapter 3: Setting Up Your System . . . . . . . . . . . . . . . . . . . . . . . . . . . . . . . . . . . . . . . . . . . . . . . . . . . . .3-1
Setting Up Store Information . . . . . . . . . . . . . . . . . . . . . . . . . . . . . . . . . . . . . . . . . . . . . .3-3
Setting Up Scale Operation . . . . . . . . . . . . . . . . . . . . . . . . . . . . . . . . . . . . . . . . . . . . . . .3-4
Setting Up Flashkeys . . . . . . . . . . . . . . . . . . . . . . . . . . . . . . . . . . . . . . . . . . . . . . . . . . .3-24
Setting Up Label Types . . . . . . . . . . . . . . . . . . . . . . . . . . . . . . . . . . . . . . . . . . . . . . . . .3-37
Setting Up Operator ID’s . . . . . . . . . . . . . . . . . . . . . . . . . . . . . . . . . . . . . . . . . . . . . . . .3-46
Updating Firmware. . . . . . . . . . . . . . . . . . . . . . . . . . . . . . . . . . . . . . . . . . . . . . . . . . . . .3-53
Email Alerts . . . . . . . . . . . . . . . . . . . . . . . . . . . . . . . . . . . . . . . . . . . . . . . . . . . . . . . . . .3-56
Setting Up Product Default Values . . . . . . . . . . . . . . . . . . . . . . . . . . . . . . . . . . . . . . . .3-57
Running a Configuration Report . . . . . . . . . . . . . . . . . . . . . . . . . . . . . . . . . . . . . . . . . .3-63
Setup Utility . . . . . . . . . . . . . . . . . . . . . . . . . . . . . . . . . . . . . . . . . . . . . . . . . . . . . . . . . .3-65
Move Layout. . . . . . . . . . . . . . . . . . . . . . . . . . . . . . . . . . . . . . . . . . . . . . . . . . . . . . . . . .3-69
Change Fields. . . . . . . . . . . . . . . . . . . . . . . . . . . . . . . . . . . . . . . . . . . . . . . . . . . . . . . . .3-70
Frequent Shopper Settings . . . . . . . . . . . . . . . . . . . . . . . . . . . . . . . . . . . . . . . . . . . . . . .3-71
Label Rotation Overrides . . . . . . . . . . . . . . . . . . . . . . . . . . . . . . . . . . . . . . . . . . . . . . . .3-72
Chapter 4: Setting Up the Database . . . . . . . . . . . . . . . . . . . . . . . . . . . . . . . . . . . . . . . . . . . . . . . . . . . . .4-1
Understanding the Database. . . . . . . . . . . . . . . . . . . . . . . . . . . . . . . . . . . . . . . . . . . . . . .4-2
Setting Up Classes . . . . . . . . . . . . . . . . . . . . . . . . . . . . . . . . . . . . . . . . . . . . . . . . . . . . .4-12
Setting Up Products . . . . . . . . . . . . . . . . . . . . . . . . . . . . . . . . . . . . . . . . . . . . . . . . . . . .4-15
Modifying Product Information . . . . . . . . . . . . . . . . . . . . . . . . . . . . . . . . . . . . . . . . . . .4-25
Setting Up Support Files. . . . . . . . . . . . . . . . . . . . . . . . . . . . . . . . . . . . . . . . . . . . . . . . .4-30
Chapter 5: Merchandising Programs . . . . . . . . . . . . . . . . . . . . . . . . . . . . . . . . . . . . . . . . . . . . . . . . . . . .5-1
Setting Up Your Scale for Merchandising Program. . . . . . . . . . . . . . . . . . . . . . . . . . . . .5-2
Setting Up For a Specific PLU. . . . . . . . . . . . . . . . . . . . . . . . . . . . . . . . . . . . . . . . . . . . .5-3
F-35554 (December 2014) i Table of Contents

HT Access System Supervisor Manual
Chapter 6: Configuring a Barcode . . . . . . . . . . . . . . . . . . . . . . . . . . . . . . . . . . . . . . . . . . . . . . . . . . . . . .6-1
Understanding EAN Configuration . . . . . . . . . . . . . . . . . . . . . . . . . . . . . . . . . . . . . . . . .6-2
Setting Up Your System for EAN Barcodes . . . . . . . . . . . . . . . . . . . . . . . . . . . . . . . . . .6-7
GS1 Barcode Methods . . . . . . . . . . . . . . . . . . . . . . . . . . . . . . . . . . . . . . . . . . . . . . . . . .6-10
Setting the GS1 Barcode . . . . . . . . . . . . . . . . . . . . . . . . . . . . . . . . . . . . . . . . . . . . . . . .6-11
Chapter 7: Using Transactions . . . . . . . . . . . . . . . . . . . . . . . . . . . . . . . . . . . . . . . . . . . . . . . . . . . . . . . . .7-1
Understanding Transactions. . . . . . . . . . . . . . . . . . . . . . . . . . . . . . . . . . . . . . . . . . . . . . .7-2
Configuring Transaction Types . . . . . . . . . . . . . . . . . . . . . . . . . . . . . . . . . . . . . . . . . . . .7-3
Viewing Transactions. . . . . . . . . . . . . . . . . . . . . . . . . . . . . . . . . . . . . . . . . . . . . . . . . . . .7-5
Voiding Transactions . . . . . . . . . . . . . . . . . . . . . . . . . . . . . . . . . . . . . . . . . . . . . . . . . . . .7-8
COMM Interface Settings . . . . . . . . . . . . . . . . . . . . . . . . . . . . . . . . . . . . . . . . . . . . . . .7-10
Scale Management Settings . . . . . . . . . . . . . . . . . . . . . . . . . . . . . . . . . . . . . . . . . . . . . .7-11
Chapter 8: Backup & Restore. . . . . . . . . . . . . . . . . . . . . . . . . . . . . . . . . . . . . . . . . . . . . . . . . . . . . . . . . .8-1
Understanding the Backup & Restore Functions . . . . . . . . . . . . . . . . . . . . . . . . . . . . . . .8-2
Using the Import Function . . . . . . . . . . . . . . . . . . . . . . . . . . . . . . . . . . . . . . . . . . . . . . . .8-3
Using the Export Function . . . . . . . . . . . . . . . . . . . . . . . . . . . . . . . . . . . . . . . . . . . . . . . .8-5
Using the Backup Function . . . . . . . . . . . . . . . . . . . . . . . . . . . . . . . . . . . . . . . . . . . . . . .8-6
Using the Restore Function . . . . . . . . . . . . . . . . . . . . . . . . . . . . . . . . . . . . . . . . . . . . . . .8-7
Using the Merge Function . . . . . . . . . . . . . . . . . . . . . . . . . . . . . . . . . . . . . . . . . . . . . . . .8-8
Chapter 9: Setting Up COOL. . . . . . . . . . . . . . . . . . . . . . . . . . . . . . . . . . . . . . . . . . . . . . . . . . . . . . . . . .9-1
Understanding COOL. . . . . . . . . . . . . . . . . . . . . . . . . . . . . . . . . . . . . . . . . . . . . . . . . . . .9-2
Setting Up COOL For Operator Use . . . . . . . . . . . . . . . . . . . . . . . . . . . . . . . . . . . . . . . .9-2
Appendix A . . . . . . . . . . . . . . . . . . . . . . . . . . . . . . . . . . . . . . . . . . . . . . . . . . . . . . . . . . . . . . . . . . . . . . A-1
Using the Text Editor . . . . . . . . . . . . . . . . . . . . . . . . . . . . . . . . . . . . . . . . . . . . . . . . . . . A-2
Label Information. . . . . . . . . . . . . . . . . . . . . . . . . . . . . . . . . . . . . . . . . . . . . . . . . . . . . . A-3
Cutting Test Quick Operation Guide . . . . . . . . . . . . . . . . . . . . . . . . . . . . . . . . . . . . . . . A-5
Network Information . . . . . . . . . . . . . . . . . . . . . . . . . . . . . . . . . . . . . . . . . . . . . . . . . . . A-7
Glossary of Common Terms . . . . . . . . . . . . . . . . . . . . . . . . . . . . . . . . . . . . . . . . . . . . . A-7
Index: . . . . . . . . . . . . . . . . . . . . . . . . . . . . . . . . . . . . . . . . . . . . . . . . . . . . . . . . . . . . . . . . . . . . . . . . . . . . I-1
©
Hobart, A division of ITW Food Equipment Group LLC 2014
Table of Contents ii F-35554 (December 2014)

HT Access System Supervisor Manual
Chapter 1: Introduction
Welcome . . . . . . . . . . . . . . . . . . . . . . . . . . . . . . . . . . . . . . . . . . . . . . . . . . . . . . . . . . . . . . . . . . . . . . . . . . . . . . . . . . 1-2
FCC Note . . . . . . . . . . . . . . . . . . . . . . . . . . . . . . . . . . . . . . . . . . . . . . . . . . . . . . . . . . . . . . . . . . . . . . . . . . . . . . . . . 1-3
Verify Correctness of Weight & Price . . . . . . . . . . . . . . . . . . . . . . . . . . . . . . . . . . . . . . . . . . . . . . . . . . . . . . . . . . . 1-2
How to Use This Manual . . . . . . . . . . . . . . . . . . . . . . . . . . . . . . . . . . . . . . . . . . . . . . . . . . . . . . . . . . . . . . . . . . . . . 1-3
Online Viewing. . . . . . . . . . . . . . . . . . . . . . . . . . . . . . . . . . . . . . . . . . . . . . . . . . . . . . . . . . . . . . . . . . . . . . . . . . . 1-3
Manual Terminology . . . . . . . . . . . . . . . . . . . . . . . . . . . . . . . . . . . . . . . . . . . . . . . . . . . . . . . . . . . . . . . . . . . . . . 1-4
Supervisor Manual Overview. . . . . . . . . . . . . . . . . . . . . . . . . . . . . . . . . . . . . . . . . . . . . . . . . . . . . . . . . . . . . . . . 1-5
F-35554 (December 2014) 1-1 Introduction
HT Access System Supervisor Manual
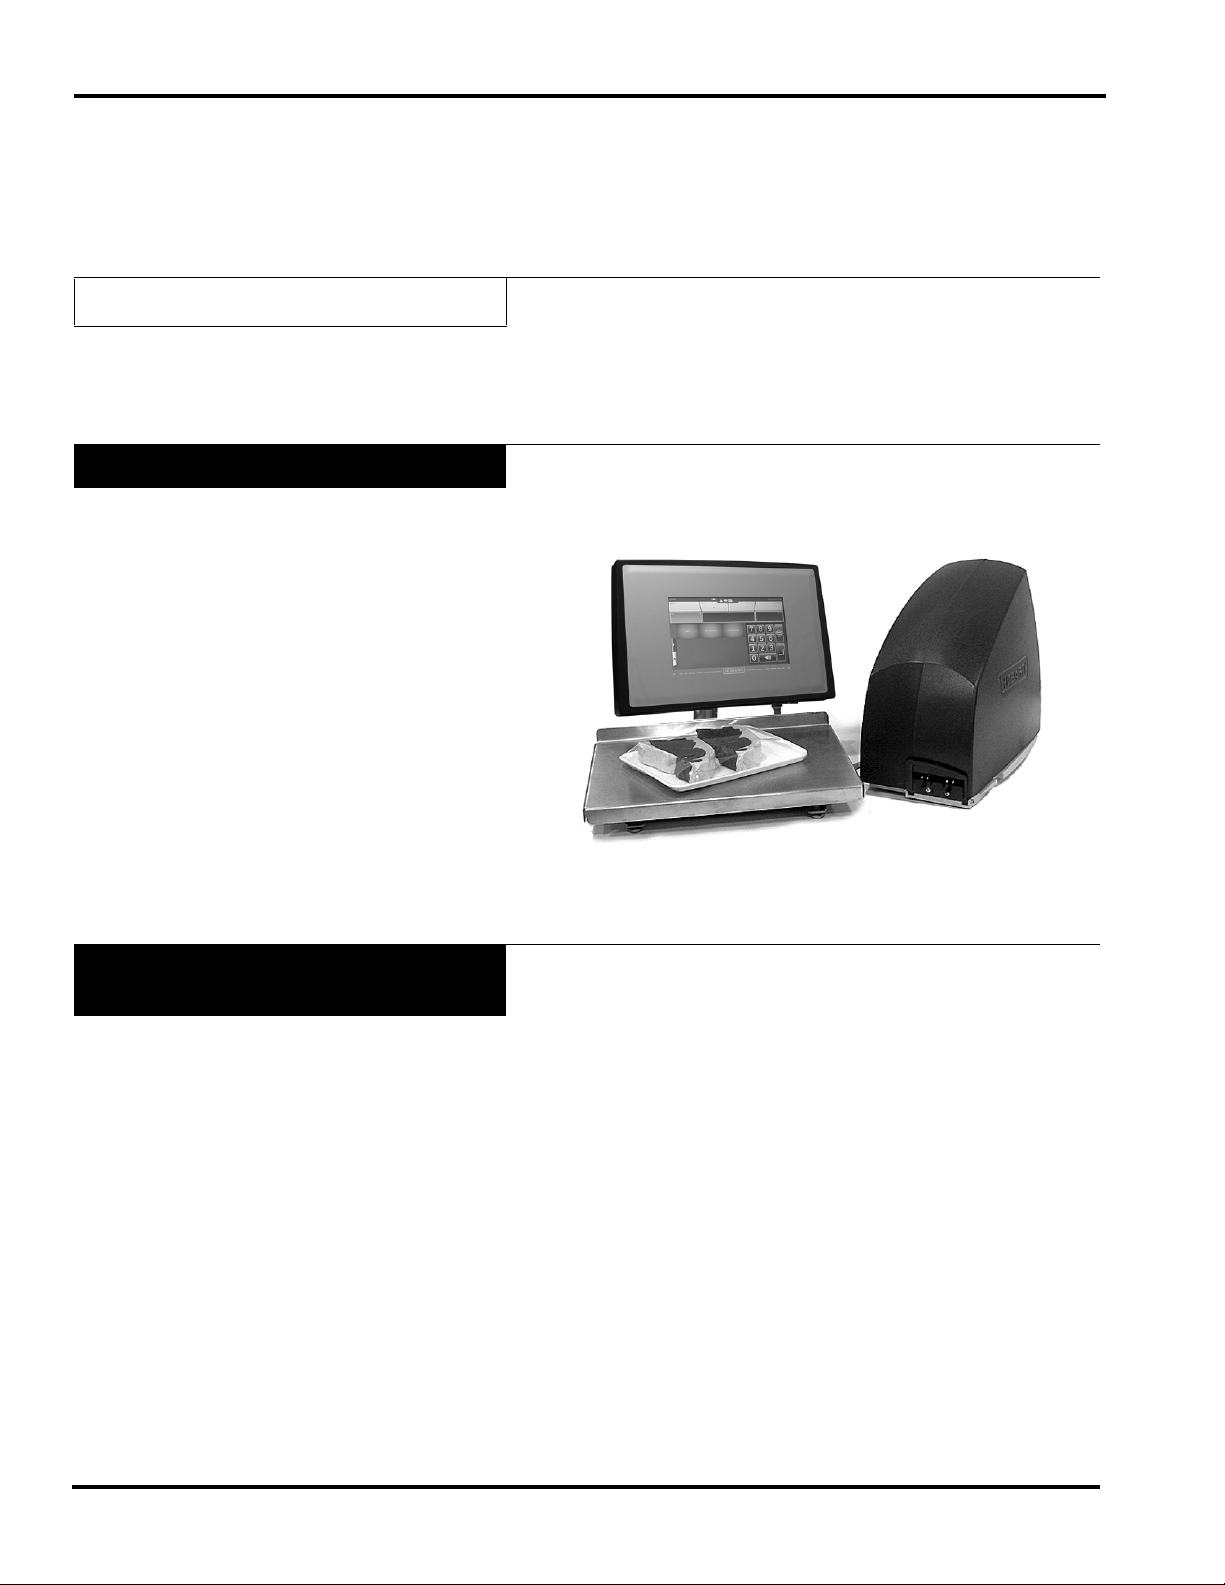
HT Access System
SAVE THESE INSTRUCTIONS
Introduction
Welcome The HT Access System was designed as a meat room or produce
The following selections are available in this chapter:
Welcome
Verify Correctness of Weight & Price
FCC Note
How to Use This Manual
back room scale. It gives you merchandising capabilities with
multiple fonts, graphics, and label types.
Verify Correctness of
Weight & Price
HT Access System
All data appears on the touch screen.
Routinely verify label information. Check the multiplication of
price per pound times weight, and check the scale weight against
printed label weight. Weigh the same package several times to
verify outcome consistency. Packages that weigh near the middle
of the 0.005 lb increment will normally vary up or down by
0.005 lb. Scale weight resolution is 0.005 lb up to a weight of 12
lb. Above 12 lb the scale resolution is reduced to .01 lb. W eigher
resolution is based on weigher model. The AWS weigher model
can be configured for dual range(0.005) or for 0.01. The configuration is done by your local Hobart Service Representative. All
other weigher models are 0.01 resolution. Contact your local
Hobart Service Representative if the scale repeatedly shows
errors or does not weigh accurately.
Introduction 1-2 F-35554 (December 2014)

FCC Note
HT Access System Supervisor Manual
This equipment has been tested and found to comply with the
limits for a Class A digital device, pursuant to Part 15 of the FCC
rules. These limits are designed to provide reasonable protection
against harmful interference when the equipment is oper ate d in a
commercial environment. This equipment generates, uses and can
radiate radio frequency energy and, if not installed and used in
accordance with the operator manual, may cau se harmful interfer ence to radio communications. Operation of this equipment in a
residential area is likely to cause harmful interference, in which
case, the user will be required to correct the interference at their
own expense.
NOTE: NO MODIFICATIONS: Modifications to this device
shall not be made without the written consent of the Hobart Corporation and their parent company, ITW. Unauthorized modifications may void the authority granted under Federal
Communications Commission Rules permitting the operation of
this device.
How to Use This Manual
Online Viewing
Hobart uses specific formats throughout the manuals for you to
easily identify key selections. These formats are described in the
following topics:
Online Viewing
Manual Terminology
Supervisor Manual Overview
If you are viewing this manual online or from a CD, you have the
advantage of using the cross-referencing feature that is built into
the document. Links are shown in italicized text and are crossreferenced.
For example, the text may say:
Appendix A
When you move your mouse directly over the text, the cursor
changes to a pointing hand. This indicates a cross-reference. If
you click on this text, you will be taken to that section of the
document.
Use the back arrow on the top of your screen to return to your
starting point.
F-35554 (December 2014) 1-3 Introduction

HT Access System Supervisor Manual
Manual Terminology
This manual uses the following terminology for keystrokes and
data manipulation procedures:
• The word TYPE means to touch a series of keys on the
Numeric Keypad or QWERTY Keyboard.
• The word TOUCH means to activate an entry shown on the
display screen.
• The word SELECT means to choose one item from a list
brought up on the current screen.
• The word SWIPE means to touch the screen or the area
below the screen and drag in a direction.
The following special instructions are used in the manual:
NOTE: A Note is information that you need to know, but is not
an actual step in the process.
A NOTICE is information to alert you that you
may be doing something that will permanently alter your
system.
A WARNING indicates a hazardous
situation which, if not avoided, could result in death or
serious injury.
Introduction 1-4 F-35554 (December 2014)

Supervisor Manual
Overview
HT Access System Supervisor Manual
Refer to the following sections for information on setting up and
using the HT Access System.
Chapter 2: Understanding The System explains the HT
Access System, including electrical and communication connections and mechanical features .
Chapter 3: Setting Up Your System tells you how to create
and/or edit important system information in the HT Access
System, such as: operator data, label information, production
planning, scale operation and communications, store information, etc.
Chapter 4: Setting Up the Database is where you define your
products and classes, then learn how to maintain them.
Chapter 5: Merchandising Programs describes how to prop-
erly set up and maintain your in-store discount program(s),
such as Frequent Shopper.
Chapter 6: Configuring a Barcode tells you how to configur e
UPC, EAN13, and EAN128 barcodes and GS1 databar.
Chapter 7: Using Transactions tells you how to use the
Transactions function for reporting purposes.
Chapter 8: Backup & Restore is where you find the steps to
save your data to a backup file or restore your data.
Chapter 9: Setting Up COOL explains COOL (Country of
Origin Labeling) and how to set up COOL text.
Appendix A provides you with detailed information on sub-
jects that are briefly covered in the manual.
The Index provides an alphabetical listing of the topics in this
manual and their corresponding page numbers.
F-35554 (December 2014) 1-5 Introduction

HT Access System Supervisor Manual
Introduction 1-6 F-35554 (December 2014)

HT Access System Supervisor Manual
Chapter 2:Understanding The System
Electrical Connections . . . . . . . . . . . . . . . . . . . . . . . . . . . . . . . . . . . . . . . . . . . . . . . . . . . . . . . . . . . . . . . . . . . . . . . 2-2
Communication Connections . . . . . . . . . . . . . . . . . . . . . . . . . . . . . . . . . . . . . . . . . . . . . . . . . . . . . . . . . . . . . . . . . . 2-2
Display Icons . . . . . . . . . . . . . . . . . . . . . . . . . . . . . . . . . . . . . . . . . . . . . . . . . . . . . . . . . . . . . . . . . . . . . . . . . . . . . . 2-3
Help. . . . . . . . . . . . . . . . . . . . . . . . . . . . . . . . . . . . . . . . . . . . . . . . . . . . . . . . . . . . . . . . . . . . . . . . . . . . . . . . . . . . . . 2-5
Supervisor Mode Overview . . . . . . . . . . . . . . . . . . . . . . . . . . . . . . . . . . . . . . . . . . . . . . . . . . . . . . . . . . . . . . . . . . . 2-6
Accessing Supervisor Mode. . . . . . . . . . . . . . . . . . . . . . . . . . . . . . . . . . . . . . . . . . . . . . . . . . . . . . . . . . . . . . . . . 2-6
Shutting Down the System . . . . . . . . . . . . . . . . . . . . . . . . . . . . . . . . . . . . . . . . . . . . . . . . . . . . . . . . . . . . . . . . . . . . 2-8
Reboot Button. . . . . . . . . . . . . . . . . . . . . . . . . . . . . . . . . . . . . . . . . . . . . . . . . . . . . . . . . . . . . . . . . . . . . . . . . . . . . . 2-9
F-35554 (December 2014) 2-1 Understanding the System

HT Access System Supervisor Manual
Understanding the System
The HT Access System can store information on thousands of
products. Retail store information required for product handling
and processing, such as PLU number, UPC number , Pricing, Tare,
and Shelf Life can be added. Consumer information describing
products, such as NutriFacts, Safe Handling, Expanded Text,
Recipes, Cooking Instructions, and Merchandising Graphics can
also be added.
The scale should be installed and/or moved only
by a qualified Hobart Service Technician. The system can
operate in a temperature range from 14°F to 104°F (-10°C to
40°C).
The following topics are explained:
Electrical Connections
Communication Connections
Display Icons
Help
Supervisor Mode Overview
Shutting Down the System
Reboot Button
Electrical Connections
Communication Connections
A power cord is provided and connects to the back of the printer.
Electric power of 120 V., 60 Hz., 1 phase (2-wire plus ground) is
required.
There are several ports that are available.
• Two Type A USB 2.0 Ports
• RJ-45 Jack for an Ethernet Connector (TCP/IP)
Understanding the System 2-2 F-35554 (December 2014)
Display Icons
HT Access System Supervisor Manual
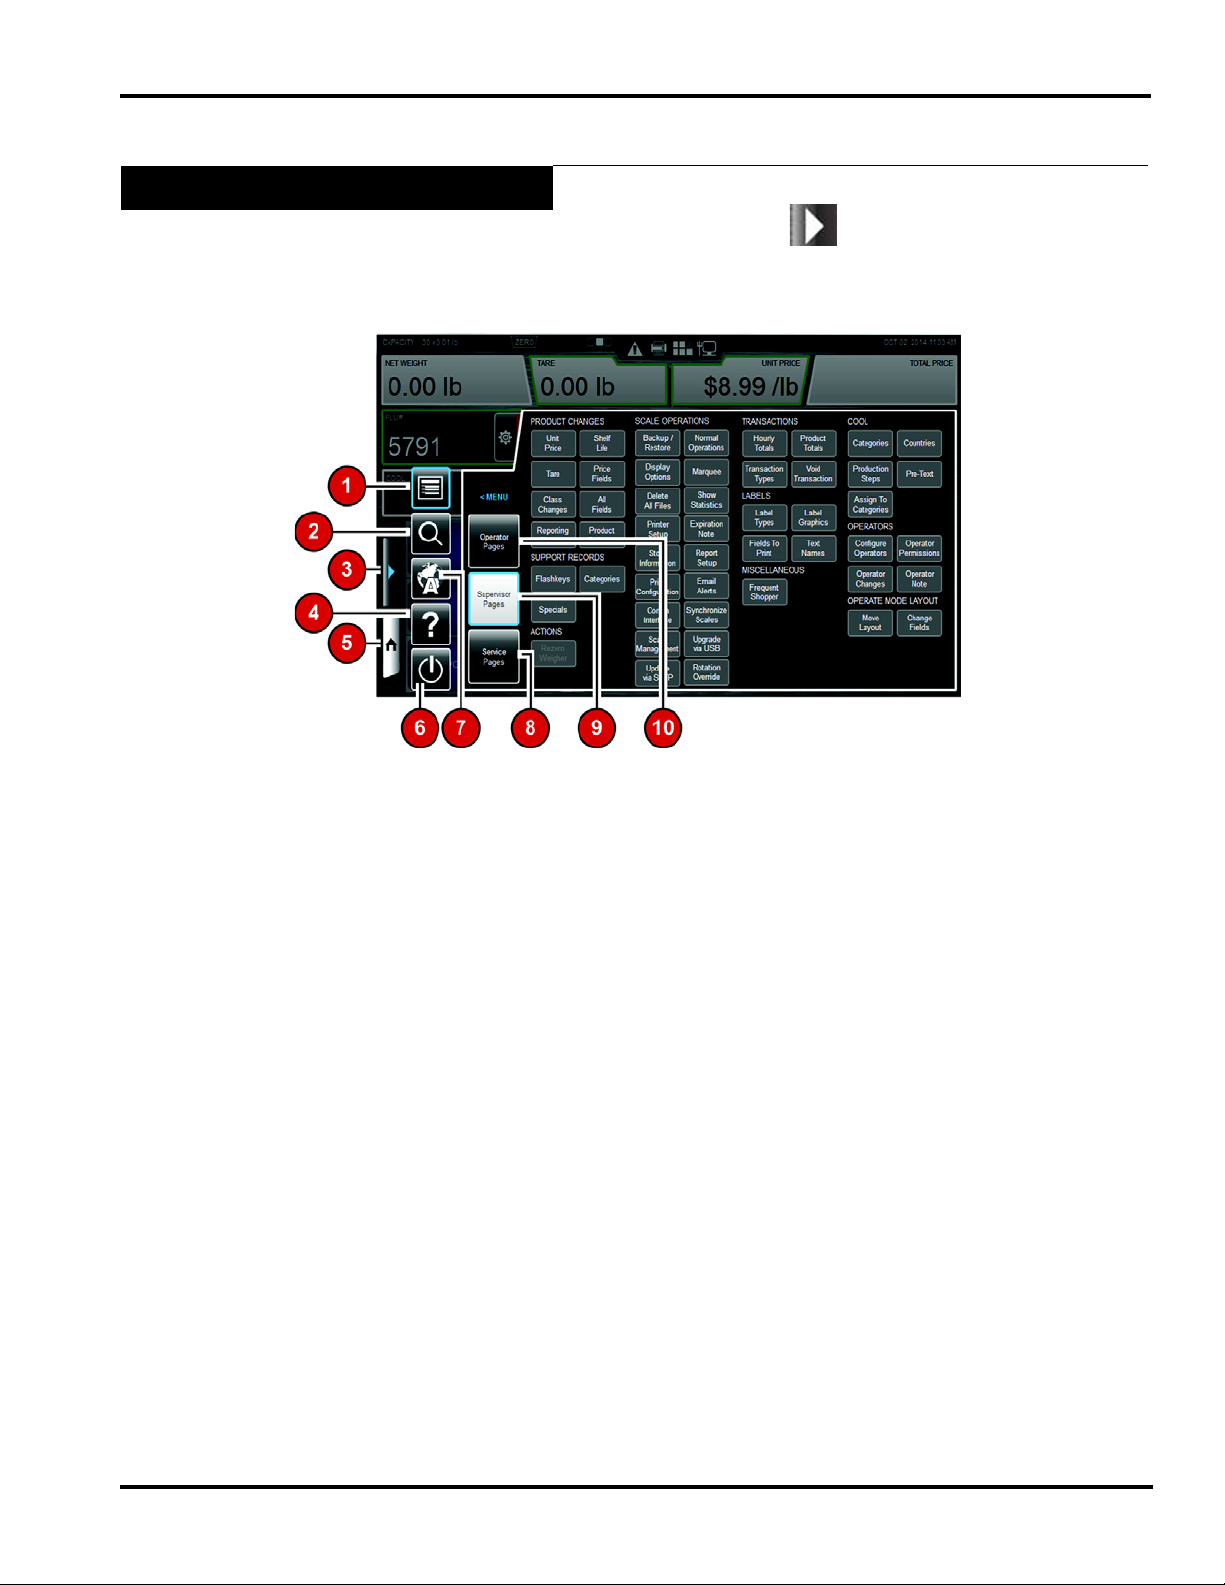
The Display Icons provide access to various features of the scale.
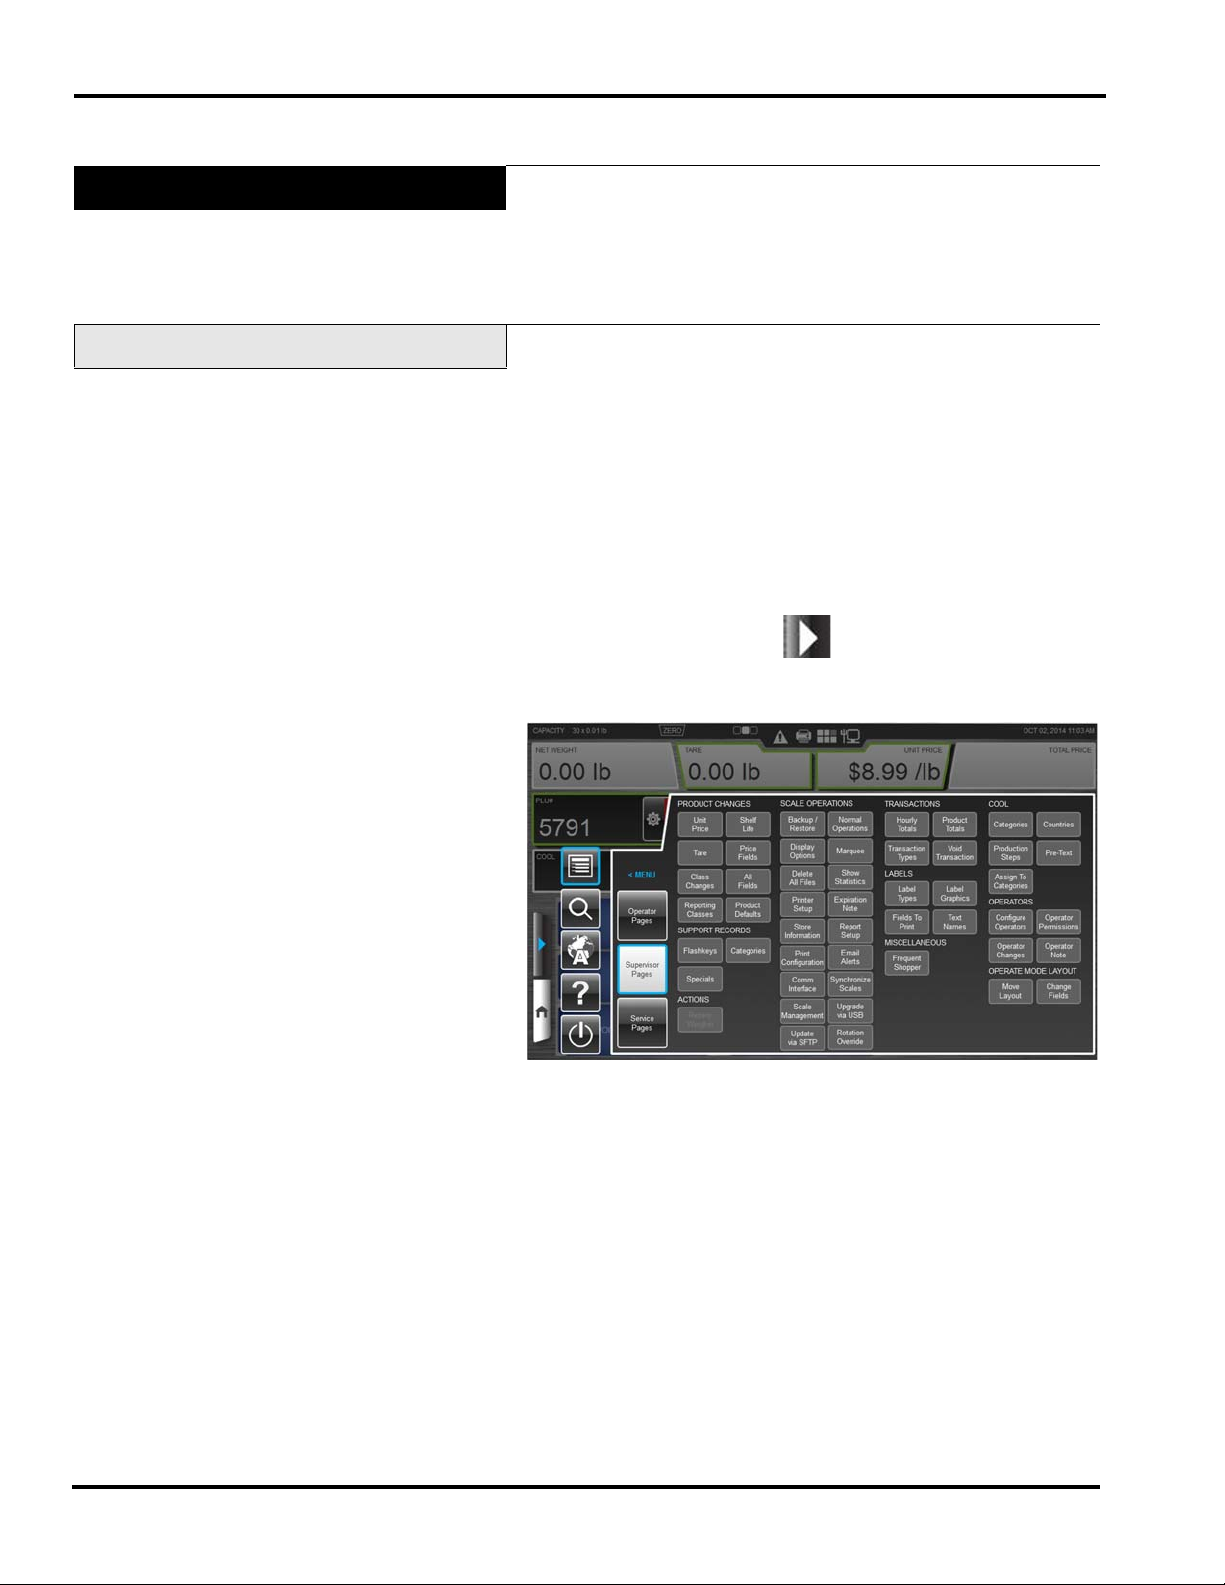
TOUCH the Menu Icon . You should now see the Menu
Window. The Operator Pages Window is the default. TOUCH
Supervisor Pages to show the Supervisor Pages Window.
The following items will appear on the Menu Window. See the
Icon Features table for detailed information about each feature.
1. Menu Pages
2. Search
3. Menu Icon
4. Help
5. Home Icon
6. Shutdown
7. Language Toggle
8. Service Pages
9. Supervisor Pages
10. Operator Pages
A blue highlight around the box indicates the feature is selected.
F-35554 (December 2014) 2-3 Understanding the System
HT Access System Supervisor Manual
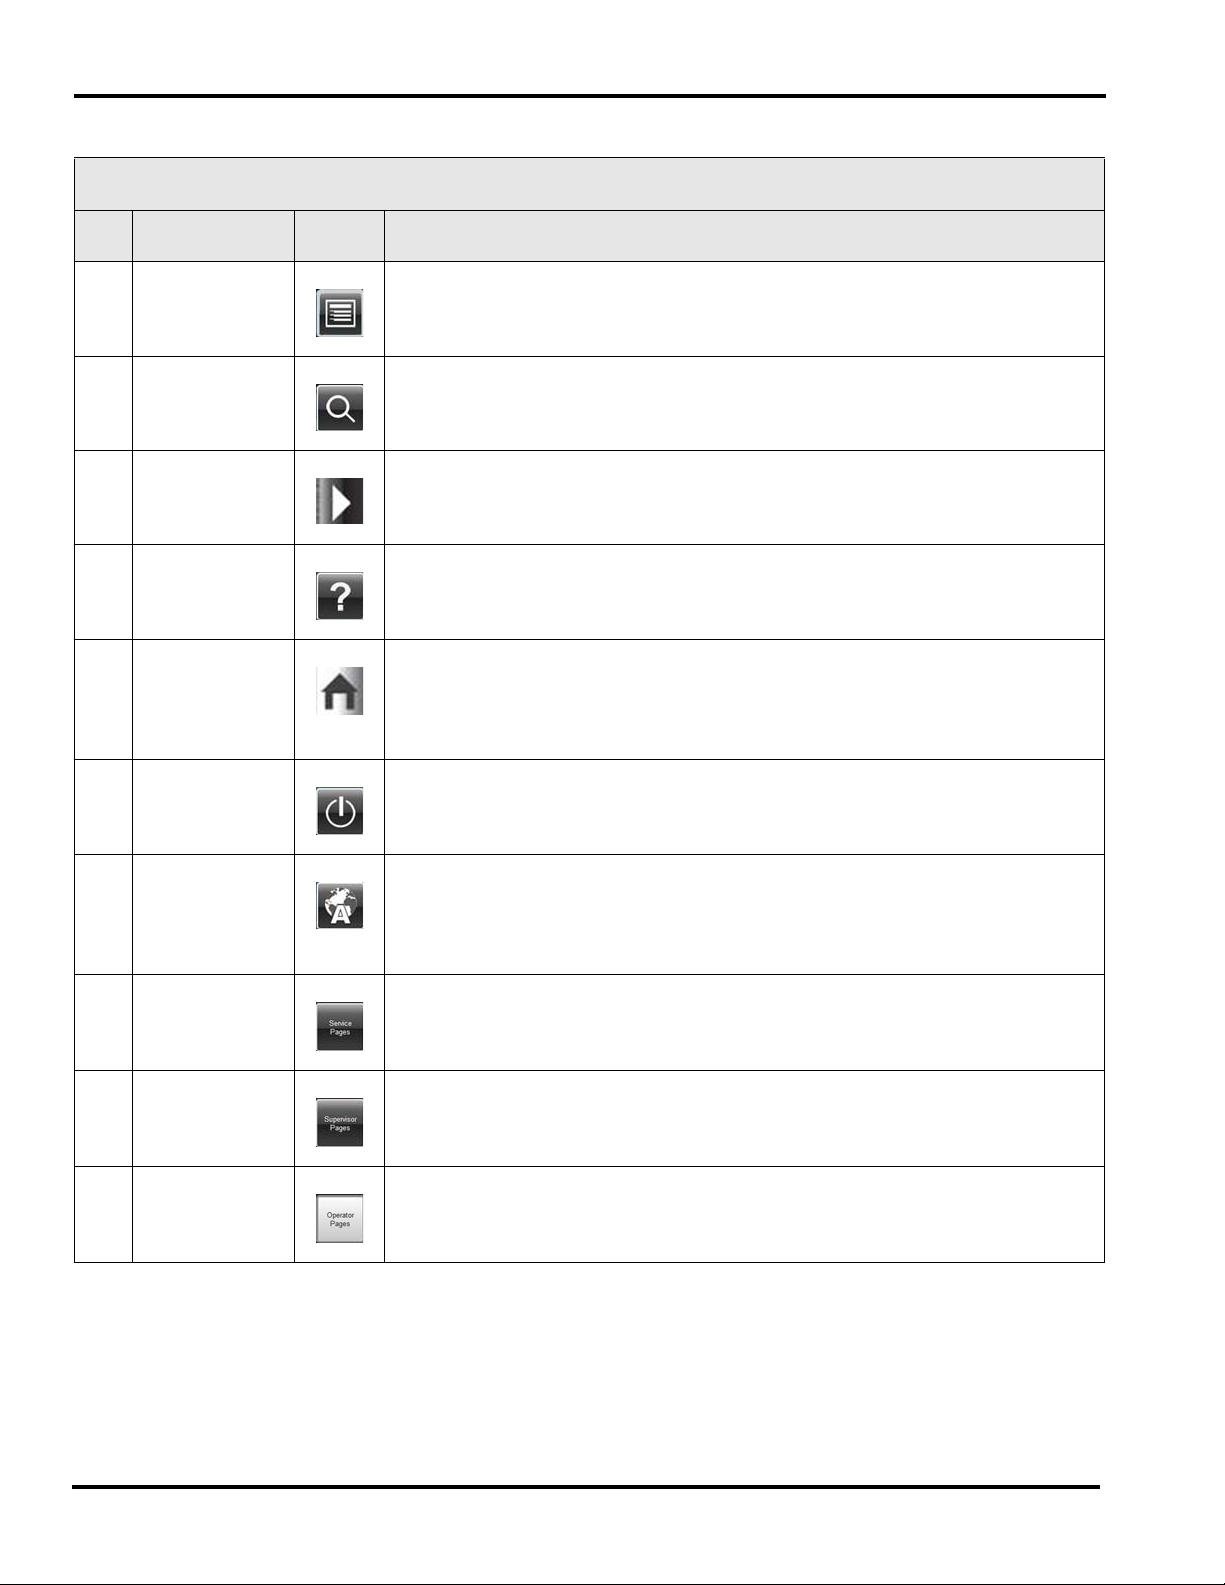
Icon Features
No. Feature Icon Description
1. Menu Pages Indicates the Default screen to access Operator Pages, Supervisor Pages, or
Service Pages.
2. Search TOUCH this icon to search for a PLU by name, number, or key word. See HT
Access System Operator Manual for more detailed information.
3. Menu Icon TOUCH this icon to access additional scale features.
4. Help TOUCH this icon to access the Operator Manual and training videos.
5. Home Icon TOUCH this icon to return you to the main page. The main page can either be
the left or center screen. This is configured in supervisor mode. If the Home Icon
has a small square with an arrow in it, that means that a multimedia file is open.
TOUCH the icon to access the multimedia.
6. Shutdown TOUCH this icon to shutdown or reboot the operating system. See Shutting
Down the System for more information.
7. Language
Toggle
TOUCH this icon to toggle between the available languages on the system. The
system can be configured to toggle between English/Spanish or English/French.
If you have questions about this feature, contact your local Hobart
Representative.
8. Service Pages This feature is only available to authorized Hobart Service Representatives.
9. Supervisor
TOUCH this box to access supervisor level functions.
Pages
10. Operator Pages TOUCH this box to access various operator functions. See HT Access System
Operator Manual for more detailed information.
Understanding the System 2-4 F-35554 (December 2014)
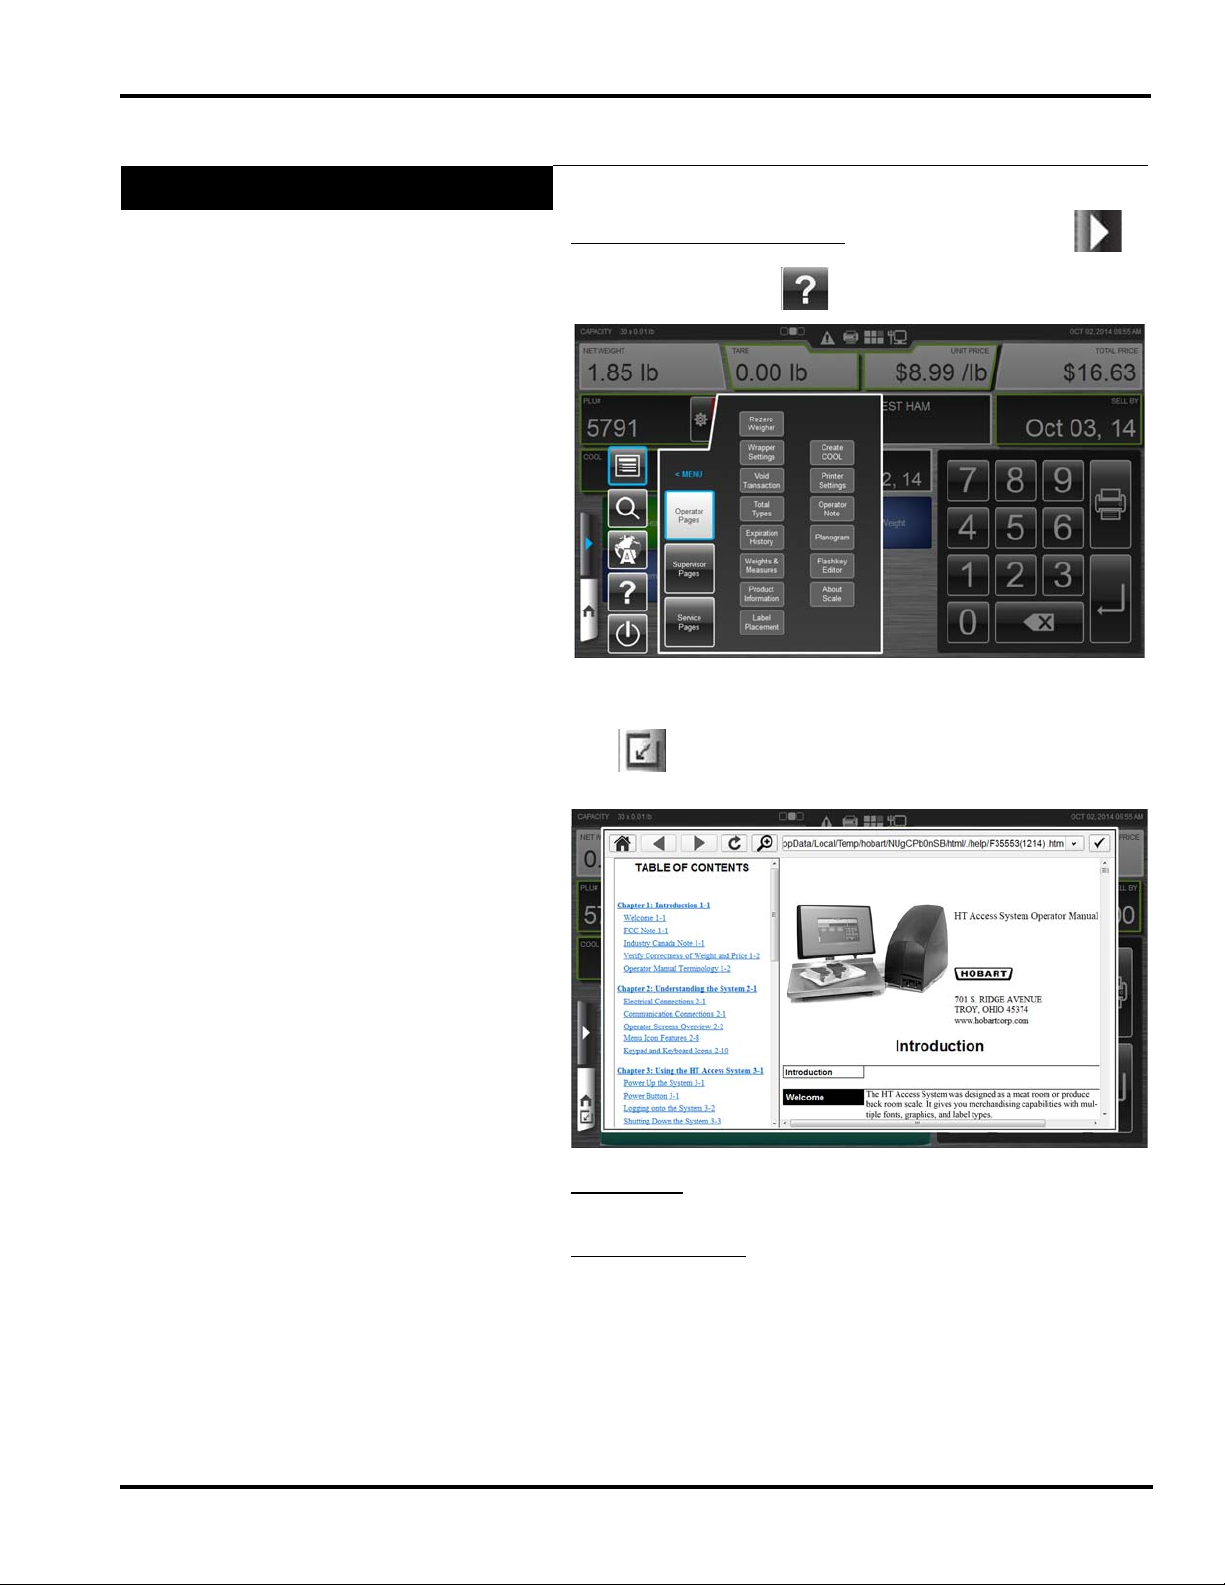
Help
HT Access System Supervisor Manual
The Operator Manual is loaded on the system.
To access the Operator Manual
: TOUCH the Menu Icon .
TOUCH the Help Icon .
You should now see the Operator Manual and the Multimedia
icon will appear on the Home button. Multimedia files are
items such as videos or manuals.
To minimize
: TOUCH the Home button. The Multimedia icon
should stay on the Home button.
To exit this window
: TOUCH the check mark in upper right
corner.
F-35554 (December 2014) 2-5 Understanding the System
HT Access System Supervisor Manual
Supervisor Mode Overview
The purpose of Supervisor mode is so you, the supervisor, can set
up parameters to oversee and manage the operation of the HT
Access System according to your business preferences. It can be
password-protected, so only those who are supposed to be
making these types of changes will be allowed to do so.
Accessing Supervisor Mode
Supervisor Mode can be accessed from the console or from a
computer. To access the Supervisor Mode remotely, specific
Hobart software is required. Please contact your local Hobart
Sales Representative for assistance.
If Supervisor Mode is password-protected, then you will need an
operator ID with Supervisor permission or a Supervisor USB key
(see Setting Up Operator ID’s). Please contact your local Hobart
Sales Representative for assistance.
To access the Supervisor Mode:
1. TOUCH the Menu Icon .
2. TOUCH the Supervisor Pages icon. You should now see the
Supervisor Pages Box.
NOTE: If necessary, TOUCH the "ALL FUNCTIONS" area to
display all available functions.
Understanding the System 2-6 F-35554 (December 2014)
HT Access System Supervisor Manual
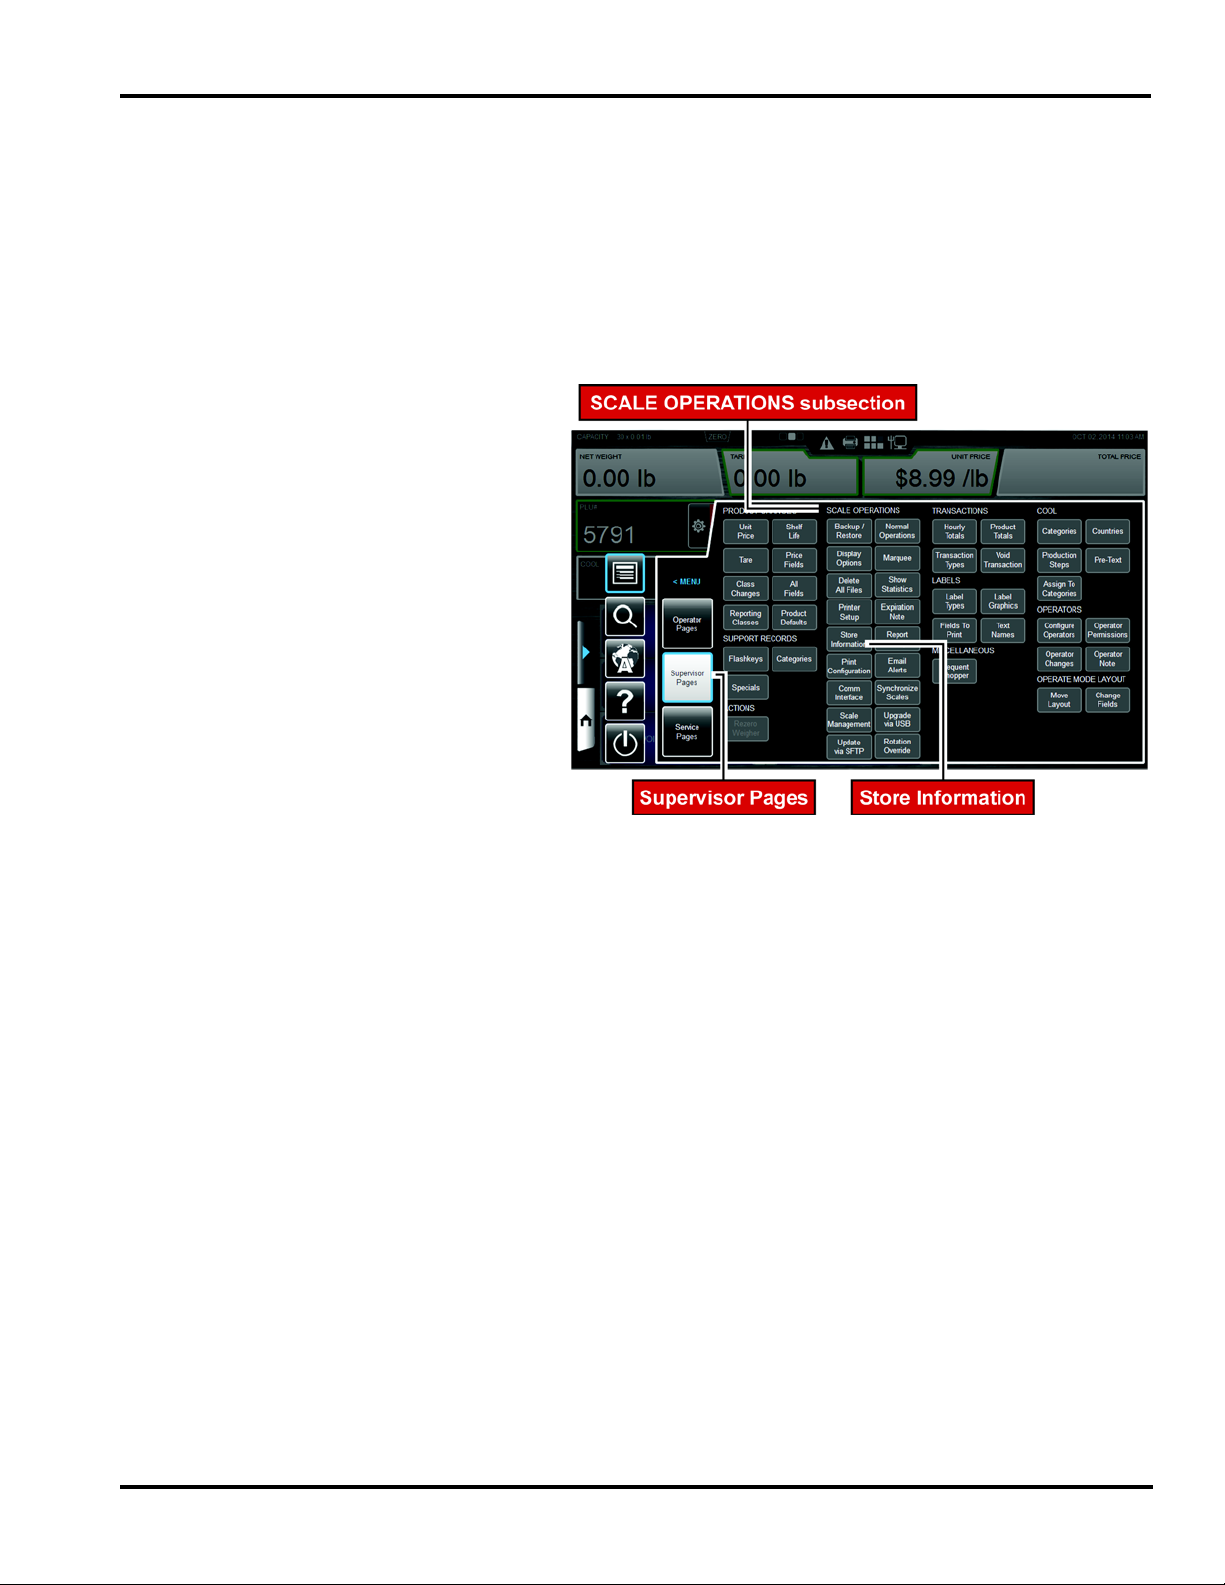
The Supervisor Pages Box is divided into subsections. This
manual will refer to these subsections when directing you to
access various screens. For example if the manual states:
To set up the Store Information:
From the Supervisor Pages Box SCALE OPERATIONS subsec-
tion, TOUCH Store Information. The following screen shows the
location.
F-35554 (December 2014) 2-7 Understanding the System
HT Access System Supervisor Manual
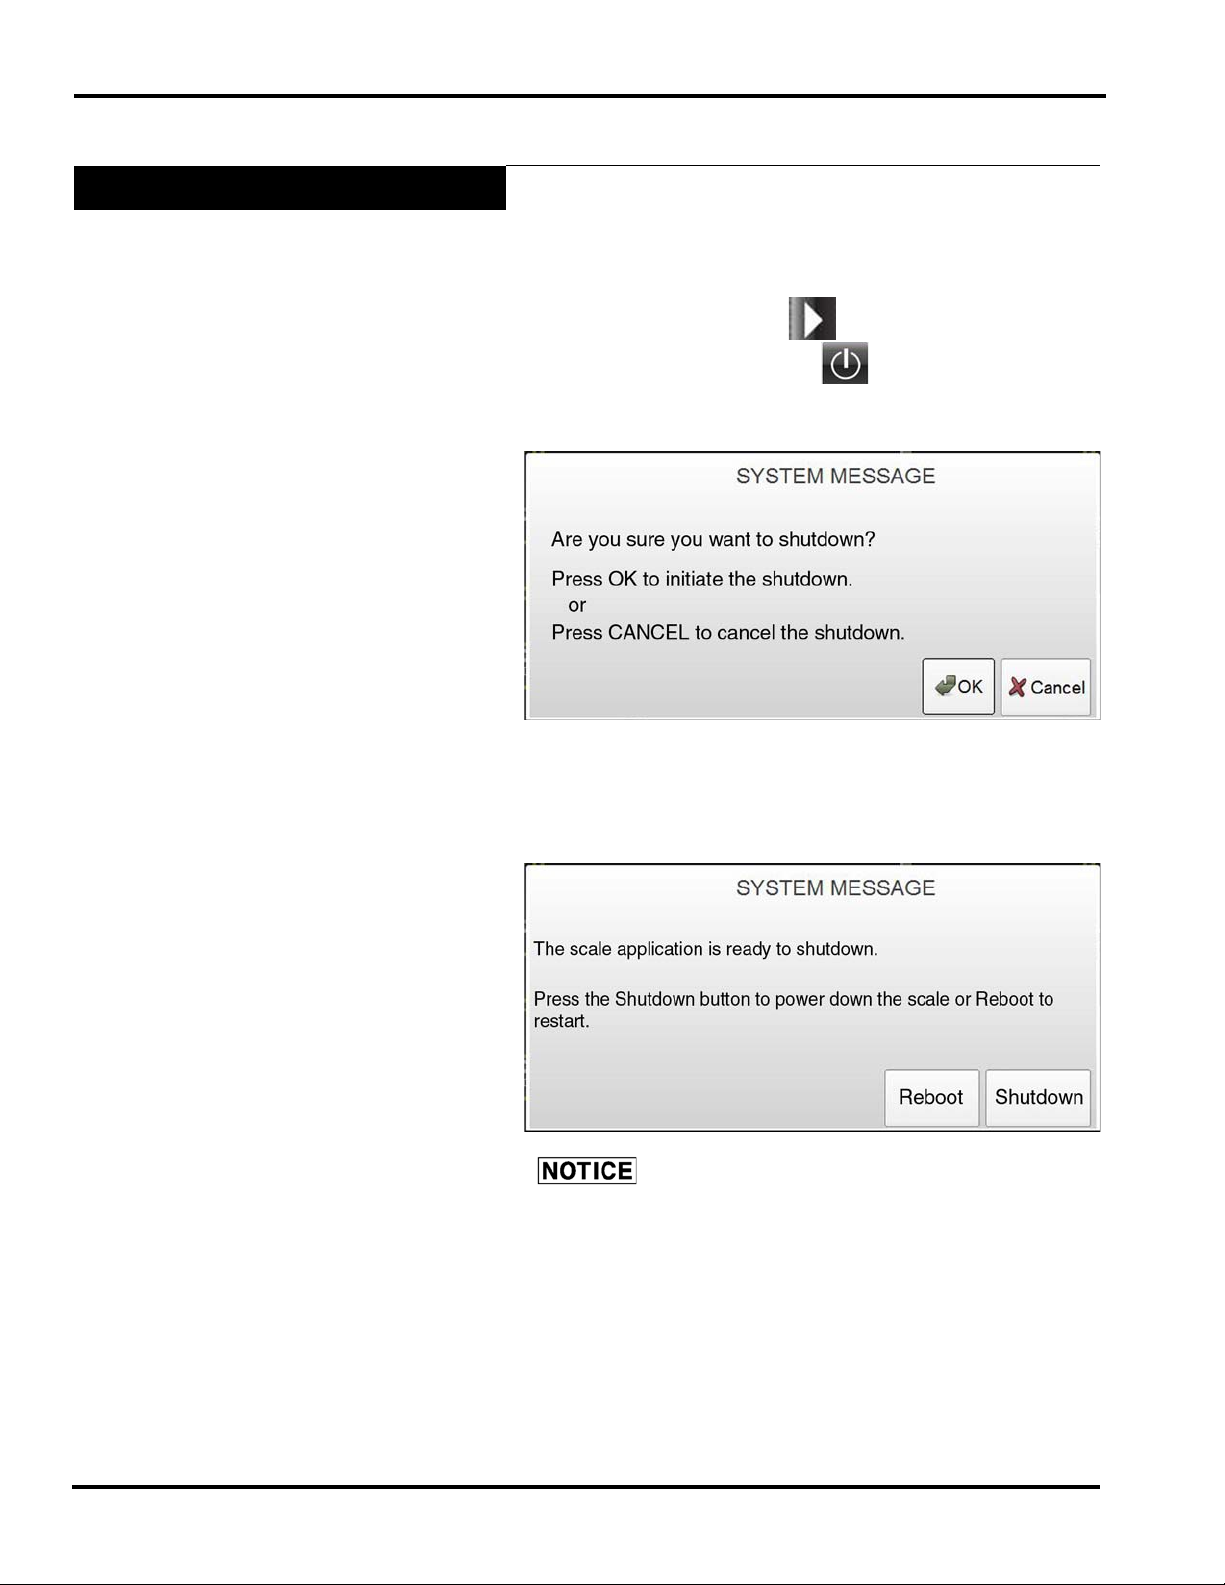
Shutting Down the System
The Shutdown feature is designed to stop all internal functions. A
proper shutdown MUST be executed prior to disconnecting
power.
To Shutdown the System:
1. TOUCH the Menu Icon .
2. TOUCH the Shutdown Icon .
3. Screen will appear and ask “Are you sure you want to
shutdown?
4. TOUCH OK.
5. When the system is ready to shutdown, a screen will appear
and say, “The scale application is ready to shutdown. Press
the Shutdown button to power down the scale or Reboot to
restart.” TOUCH Shutdown.
DO NOT disconnect power to the system during
shutdown.
6. Wait for the console to shutdown (the screen will go
black).
7. Remove power by using the on/off switch on the back of
the printer.
NOTE: In the unlikely event the system stops responding, use
the Reboot Button to reboot the system.
Understanding the System 2-8 F-35554 (December 2014)
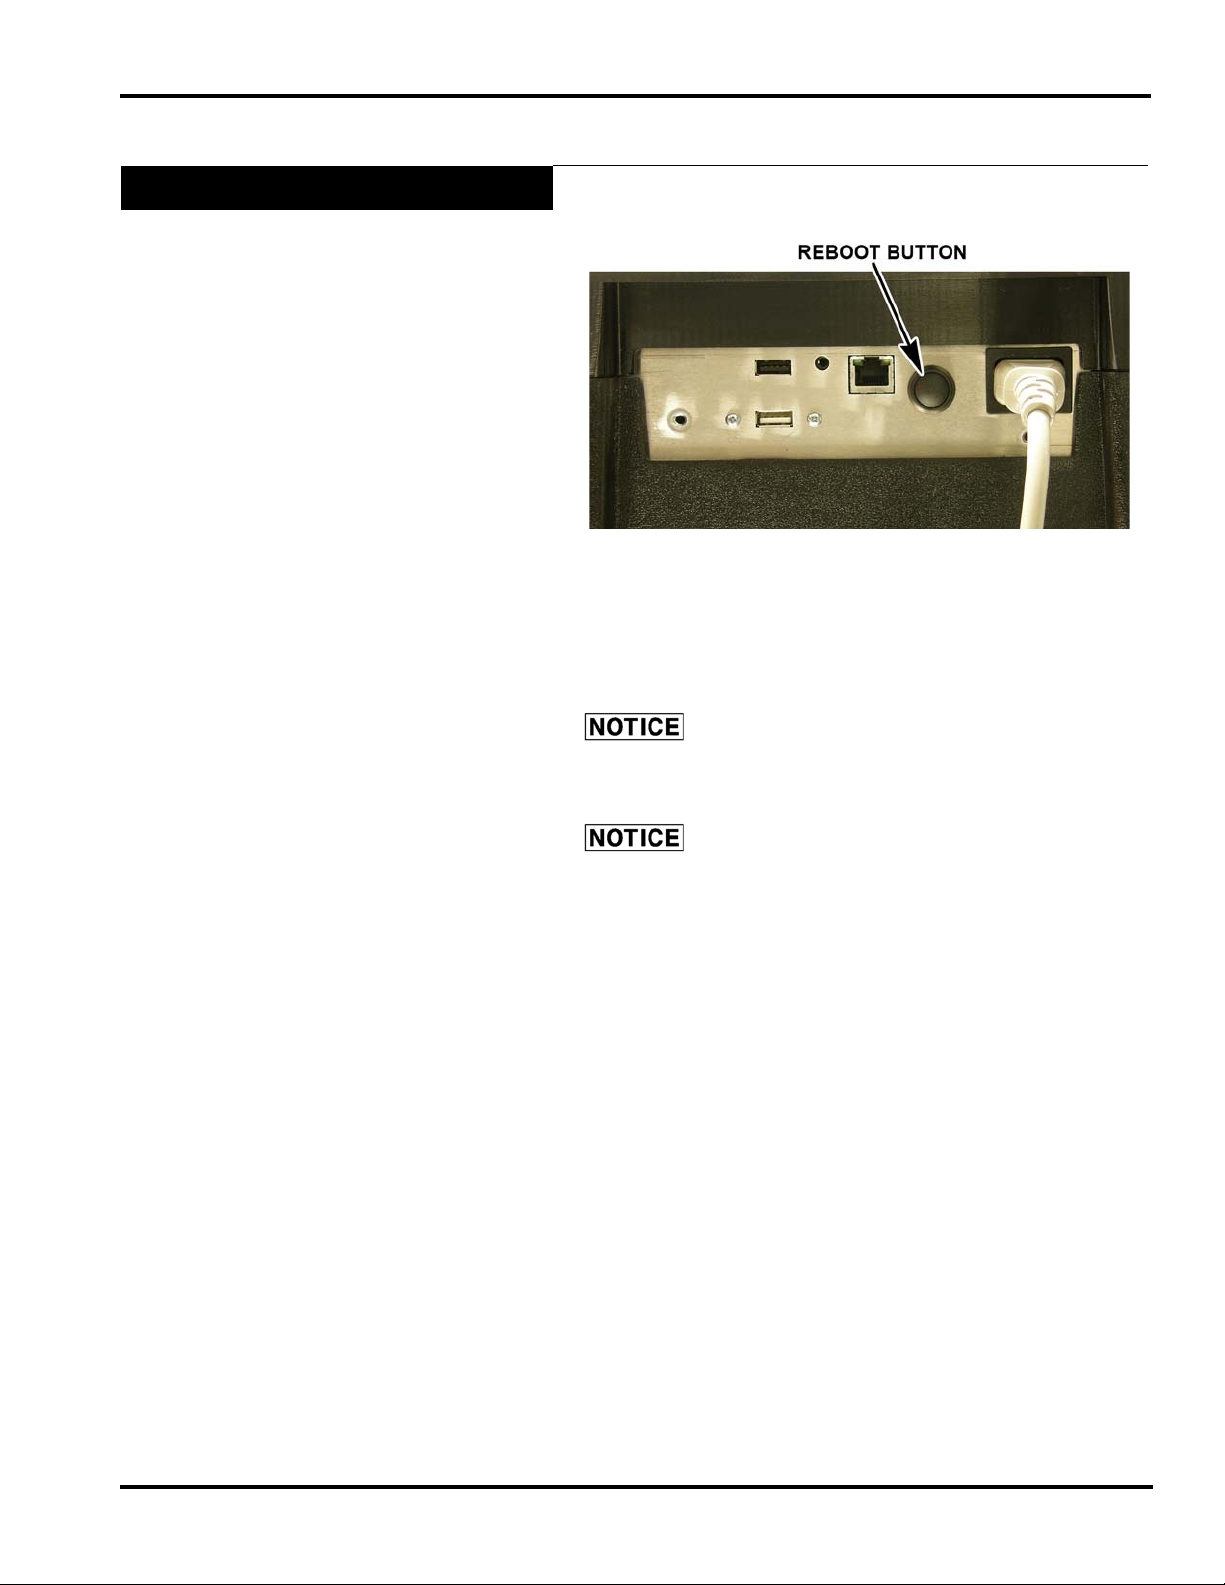
Reboot Button
HT Access System Supervisor Manual
Located on the console is the Reboot Button.
In the unlikely event the system stops responding, use the Reboot
Button to reboot the system.
Press and hold the Reboot Button. A screen will appear and say,
“The scale is rebooting.”
Pressing the Reboot Button should only be used
when the system has stopped responding.
The reset switch on the console shuts down the
operating system only. Power will still be supplied to the
console. Do not remove power from the system by unplugging
it. Always use the on/off switch on the back of the printer to
power down the system.
F-35554 (December 2014) 2-9 Understanding the System

HT Access System Supervisor Manual
Understanding the System 2-10 F-35554 (December 2014)

HT Access System Supervisor Manual
Chapter 3: Setting Up Your System
Setting Up Store Information . . . . . . . . . . . . . . . . . . . . . . . . . . . . . . . . . . . . . . . . . . . . . . . . . . . . . . . . . . . . . . . . . . 3-3
Setting Up Scale Operation . . . . . . . . . . . . . . . . . . . . . . . . . . . . . . . . . . . . . . . . . . . . . . . . . . . . . . . . . . . . . . . . . . . 3-4
Viewing Scale Statistics . . . . . . . . . . . . . . . . . . . . . . . . . . . . . . . . . . . . . . . . . . . . . . . . . . . . . . . . . . . . . . . . . . . . 3-4
Setting Up Normal Scale Operation. . . . . . . . . . . . . . . . . . . . . . . . . . . . . . . . . . . . . . . . . . . . . . . . . . . . . . . . . . . 3-5
Table of Normal Operations Product Tab . . . . . . . . . . . . . . . . . . . . . . . . . . . . . . . . . . . . . . . . . . . . . . . . . . . . 3-6
Table of Normal Operations Scale Access Tab . . . . . . . . . . . . . . . . . . . . . . . . . . . . . . . . . . . . . . . . . . . . . . . . 3-9
Table of Normal Operations System Tab. . . . . . . . . . . . . . . . . . . . . . . . . . . . . . . . . . . . . . . . . . . . . . . . . . . . 3-11
Table of Normal Operations Flashkeys Tab. . . . . . . . . . . . . . . . . . . . . . . . . . . . . . . . . . . . . . . . . . . . . . . . . . 3-12
Table of Normal Operations Network Tab. . . . . . . . . . . . . . . . . . . . . . . . . . . . . . . . . . . . . . . . . . . . . . . . . . . 3-13
Table of Normal Operations Features Tab . . . . . . . . . . . . . . . . . . . . . . . . . . . . . . . . . . . . . . . . . . . . . . . . . . . 3-15
Table of Normal Operations Wrapper Tab. . . . . . . . . . . . . . . . . . . . . . . . . . . . . . . . . . . . . . . . . . . . . . . . . . . 3-17
By Count Calculation Methods . . . . . . . . . . . . . . . . . . . . . . . . . . . . . . . . . . . . . . . . . . . . . . . . . . . . . . . . . . . 3-18
Delete All Files. . . . . . . . . . . . . . . . . . . . . . . . . . . . . . . . . . . . . . . . . . . . . . . . . . . . . . . . . . . . . . . . . . . . . . . . . . 3-19
Setting Sealer Belt On/Off Times. . . . . . . . . . . . . . . . . . . . . . . . . . . . . . . . . . . . . . . . . . . . . . . . . . . . . . . . . . . . 3-20
Printer Setup. . . . . . . . . . . . . . . . . . . . . . . . . . . . . . . . . . . . . . . . . . . . . . . . . . . . . . . . . . . . . . . . . . . . . . . . . . . . 3-22
Display Options . . . . . . . . . . . . . . . . . . . . . . . . . . . . . . . . . . . . . . . . . . . . . . . . . . . . . . . . . . . . . . . . . . . . . . . . . 3-23
Setting Up Flashkeys . . . . . . . . . . . . . . . . . . . . . . . . . . . . . . . . . . . . . . . . . . . . . . . . . . . . . . . . . . . . . . . . . . . . . . . 3-24
Sample Flashkey Configuration. . . . . . . . . . . . . . . . . . . . . . . . . . . . . . . . . . . . . . . . . . . . . . . . . . . . . . . . . . . . . 3-25
Adjusting the Flashkey Grid. . . . . . . . . . . . . . . . . . . . . . . . . . . . . . . . . . . . . . . . . . . . . . . . . . . . . . . . . . . . . . . . 3-28
Adding/Deleting Flashkeys . . . . . . . . . . . . . . . . . . . . . . . . . . . . . . . . . . . . . . . . . . . . . . . . . . . . . . . . . . . . . . . . 3-30
Specials. . . . . . . . . . . . . . . . . . . . . . . . . . . . . . . . . . . . . . . . . . . . . . . . . . . . . . . . . . . . . . . . . . . . . . . . . . . . . . . . 3-33
Categories. . . . . . . . . . . . . . . . . . . . . . . . . . . . . . . . . . . . . . . . . . . . . . . . . . . . . . . . . . . . . . . . . . . . . . . . . . . . . . 3-35
Setting Up Label Types. . . . . . . . . . . . . . . . . . . . . . . . . . . . . . . . . . . . . . . . . . . . . . . . . . . . . . . . . . . . . . . . . . . . . . 3-37
Understanding Label Types and Label Terms . . . . . . . . . . . . . . . . . . . . . . . . . . . . . . . . . . . . . . . . . . . . . . . . . . 3-37
Understanding Label Stock . . . . . . . . . . . . . . . . . . . . . . . . . . . . . . . . . . . . . . . . . . . . . . . . . . . . . . . . . . . . . . 3-38
Understanding Label Sizes. . . . . . . . . . . . . . . . . . . . . . . . . . . . . . . . . . . . . . . . . . . . . . . . . . . . . . . . . . . . . . . 3-38
Understanding Label Types . . . . . . . . . . . . . . . . . . . . . . . . . . . . . . . . . . . . . . . . . . . . . . . . . . . . . . . . . . . . . . 3-39
Understanding Label Families. . . . . . . . . . . . . . . . . . . . . . . . . . . . . . . . . . . . . . . . . . . . . . . . . . . . . . . . . . . . 3-39
Using the Labels Subsection . . . . . . . . . . . . . . . . . . . . . . . . . . . . . . . . . . . . . . . . . . . . . . . . . . . . . . . . . . . . . . . 3-39
Selecting Fields to Print on a Label. . . . . . . . . . . . . . . . . . . . . . . . . . . . . . . . . . . . . . . . . . . . . . . . . . . . . . . . 3-40
Setting Up Label Text Names . . . . . . . . . . . . . . . . . . . . . . . . . . . . . . . . . . . . . . . . . . . . . . . . . . . . . . . . . . . . 3-41
Viewing Label Types . . . . . . . . . . . . . . . . . . . . . . . . . . . . . . . . . . . . . . . . . . . . . . . . . . . . . . . . . . . . . . . . . . . 3-42
Using Label Graphics. . . . . . . . . . . . . . . . . . . . . . . . . . . . . . . . . . . . . . . . . . . . . . . . . . . . . . . . . . . . . . . . . . . 3-43
Using Security Labels . . . . . . . . . . . . . . . . . . . . . . . . . . . . . . . . . . . . . . . . . . . . . . . . . . . . . . . . . . . . . . . . . . 3-44
Using Custom Label Types . . . . . . . . . . . . . . . . . . . . . . . . . . . . . . . . . . . . . . . . . . . . . . . . . . . . . . . . . . . . . . . . 3-44
Adding a Custom Label Type. . . . . . . . . . . . . . . . . . . . . . . . . . . . . . . . . . . . . . . . . . . . . . . . . . . . . . . . . . . . . . . 3-44
Deleting a Custom Label Type. . . . . . . . . . . . . . . . . . . . . . . . . . . . . . . . . . . . . . . . . . . . . . . . . . . . . . . . . . . . . . 3-45
Setting Up Operator ID’s . . . . . . . . . . . . . . . . . . . . . . . . . . . . . . . . . . . . . . . . . . . . . . . . . . . . . . . . . . . . . . . . . . . . 3-46
Understanding Access Levels . . . . . . . . . . . . . . . . . . . . . . . . . . . . . . . . . . . . . . . . . . . . . . . . . . . . . . . . . . . . . . 3-46
Assigning Operator ID’s. . . . . . . . . . . . . . . . . . . . . . . . . . . . . . . . . . . . . . . . . . . . . . . . . . . . . . . . . . . . . . . . . . . 3-48
Deleting Operator ID’s. . . . . . . . . . . . . . . . . . . . . . . . . . . . . . . . . . . . . . . . . . . . . . . . . . . . . . . . . . . . . . . . . . . . 3-49
Setting Operator Permissions. . . . . . . . . . . . . . . . . . . . . . . . . . . . . . . . . . . . . . . . . . . . . . . . . . . . . . . . . . . . . . . 3-50
Creating Operator Notes. . . . . . . . . . . . . . . . . . . . . . . . . . . . . . . . . . . . . . . . . . . . . . . . . . . . . . . . . . . . . . . . . . . 3-51
Viewing Operator Changes . . . . . . . . . . . . . . . . . . . . . . . . . . . . . . . . . . . . . . . . . . . . . . . . . . . . . . . . . . . . . . . . 3-52
Updating Firmware. . . . . . . . . . . . . . . . . . . . . . . . . . . . . . . . . . . . . . . . . . . . . . . . . . . . . . . . . . . . . . . . . . . . . . . . . 3-53
VIA SFTP. . . . . . . . . . . . . . . . . . . . . . . . . . . . . . . . . . . . . . . . . . . . . . . . . . . . . . . . . . . .
VIA USB . . . . . . . . . . . . . . . . . . . . . . . . . . . . . . . . . . . . . . . . . . . . . . . . . . . . . . . . . . . . . . . . . . . . . . . . . . . . . . 3-55
Email Alerts . . . . . . . . . . . . . . . . . . . . . . . . . . . . . . . . . . . . . . . . . . . . . . . . . . . . . . . . . . . . . . . . . . . . . . . . . . . . . . 3-56
Setting Up Product Default Values. . . . . . . . . . . . . . . . . . . . . . . . . . . . . . . . . . . . . . . . . . . . . . . . . . . . . . . . . . . . . 3-57
Product Default Values Screens . . . . . . . . . . . . . . . . . . . . . . . . . . . . . . . . . . . . . . . . . . . . . . . . . . . . . . . . . . . . . 3-58
. . . . . . . . . . . . . . . . . . 3-54
F-35554 (December 2014) 3-1 Setting Up Your System

HT Access System Supervisor Manual
Running a Configuration Report. . . . . . . . . . . . . . . . . . . . . . . . . . . . . . . . . . . . . . . . . . . . . . . . . . . . . . . . . . . . . . . 3-63
Report Setup . . . . . . . . . . . . . . . . . . . . . . . . . . . . . . . . . . . . . . . . . . . . . . . . . . . . . . . . . . . . . . . . . . . . . . . . . . . . 3-64
Setup Utility . . . . . . . . . . . . . . . . . . . . . . . . . . . . . . . . . . . . . . . . . . . . . . . . . . . . . . . . . . . . . . . . . . . . . . . . . . . . . . 3-65
Move Layout . . . . . . . . . . . . . . . . . . . . . . . . . . . . . . . . . . . . . . . . . . . . . . . . . . . . . . . . . . . . . . . . . . . . . . . . . . . . . . 3-69
Change Fields . . . . . . . . . . . . . . . . . . . . . . . . . . . . . . . . . . . . . . . . . . . . . . . . . . . . . . . . . . . . . . . . . . . . . . . . . . . . . 3-70
Frequent Shopper Settings. . . . . . . . . . . . . . . . . . . . . . . . . . . . . . . . . . . . . . . . . . . . . . . . . . . . . . . . . . . . . . . . . . . . 3-71
Label Rotation Overrides . . . . . . . . . . . . . . . . . . . . . . . . . . . . . . . . . . . . . . . . . . . . . . . . . . . . . . . . . . . . . . . . . . . . 3-72
Setting Up Your System 3-2 F-35554 (December 2014)
Setting Up Your System
HT Access System Supervisor Manual
Before you begin adding to your product database, you should set
up your system. This section explains:
Setting Up Store Information
Setting Up Scale Operation
Setting Up Flashkeys
Setting Up Label Types
Setting Up Operator ID’s
Updating Firmware
Email Alerts
Setting Up Product Default Values
Running a Configuration Report
Setup Utility
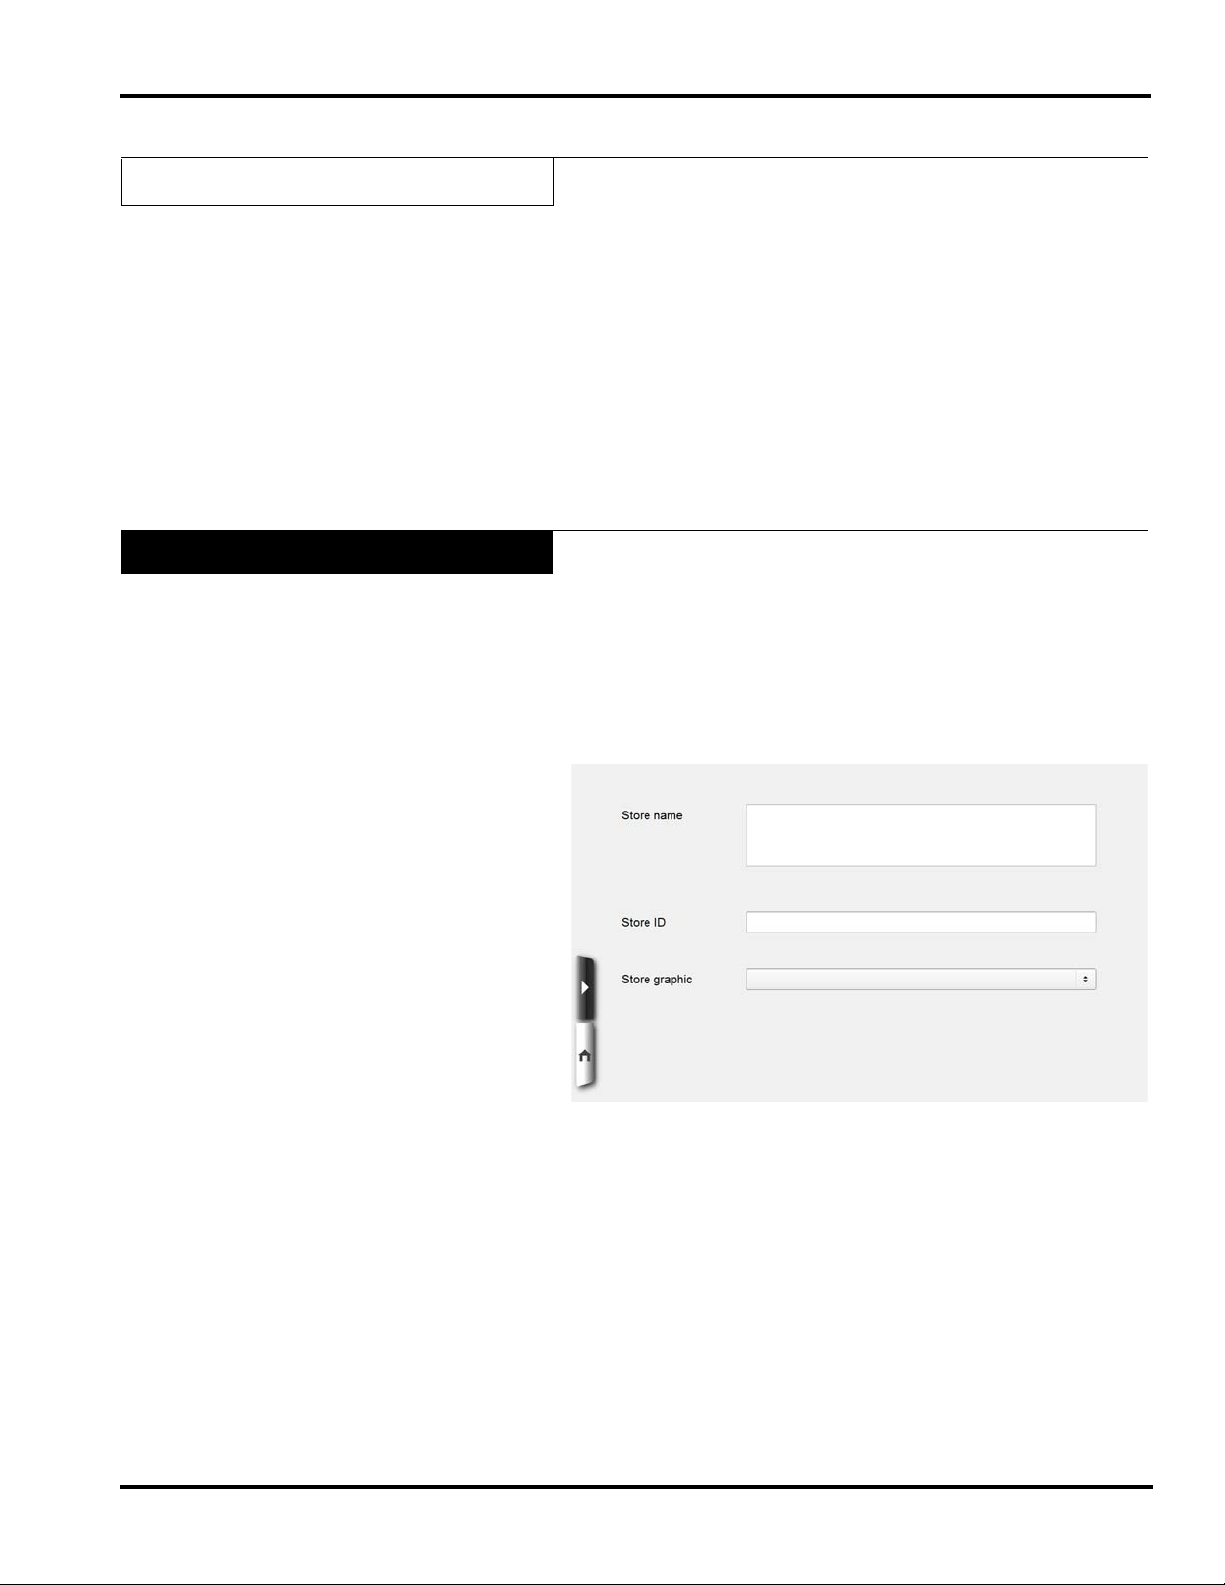
Setting Up Store Information
The Store Information option enables you to assign the Store
name, Store ID number and Store graphic to your system which
will be printed on designated label types.
To set up the Store Information:
1. From the Supervisor Pages Box SCALE OPERATIONS
subsection, TOUCH Store Information. You should now be
on the Store Information Screen.
2. TOUCH the Store name field.
3. TYPE the Store name.
4. TOUCH the Store ID field.
5. TYPE the Store ID number and TOUCH Enter.
6. TOUCH the Store graphic field and SELECT the desired
Store graphic. This is the graphic that will print on the label
if the label type used has space for a store graphic. More
information on graphics can be found in Using the Labels
Subsection.
7. Refer to the Table of Contents to perform your next
procedure, or return the scale to Operate mode.
F-35554 (December 2014) 3-3 Setting Up Your System
HT Access System Supervisor Manual
Setting Up Scale Operation
This section is where you determine how the system works on a
daily basis. This information does not change per product, class
or label type, it remains constant.
Here you will learn the following:
Viewing Scale Statistics
Setting Up Normal Scale Operation
Delete All Files
Setting Sealer Belt On/Off Times
Printer Setup
Display Options
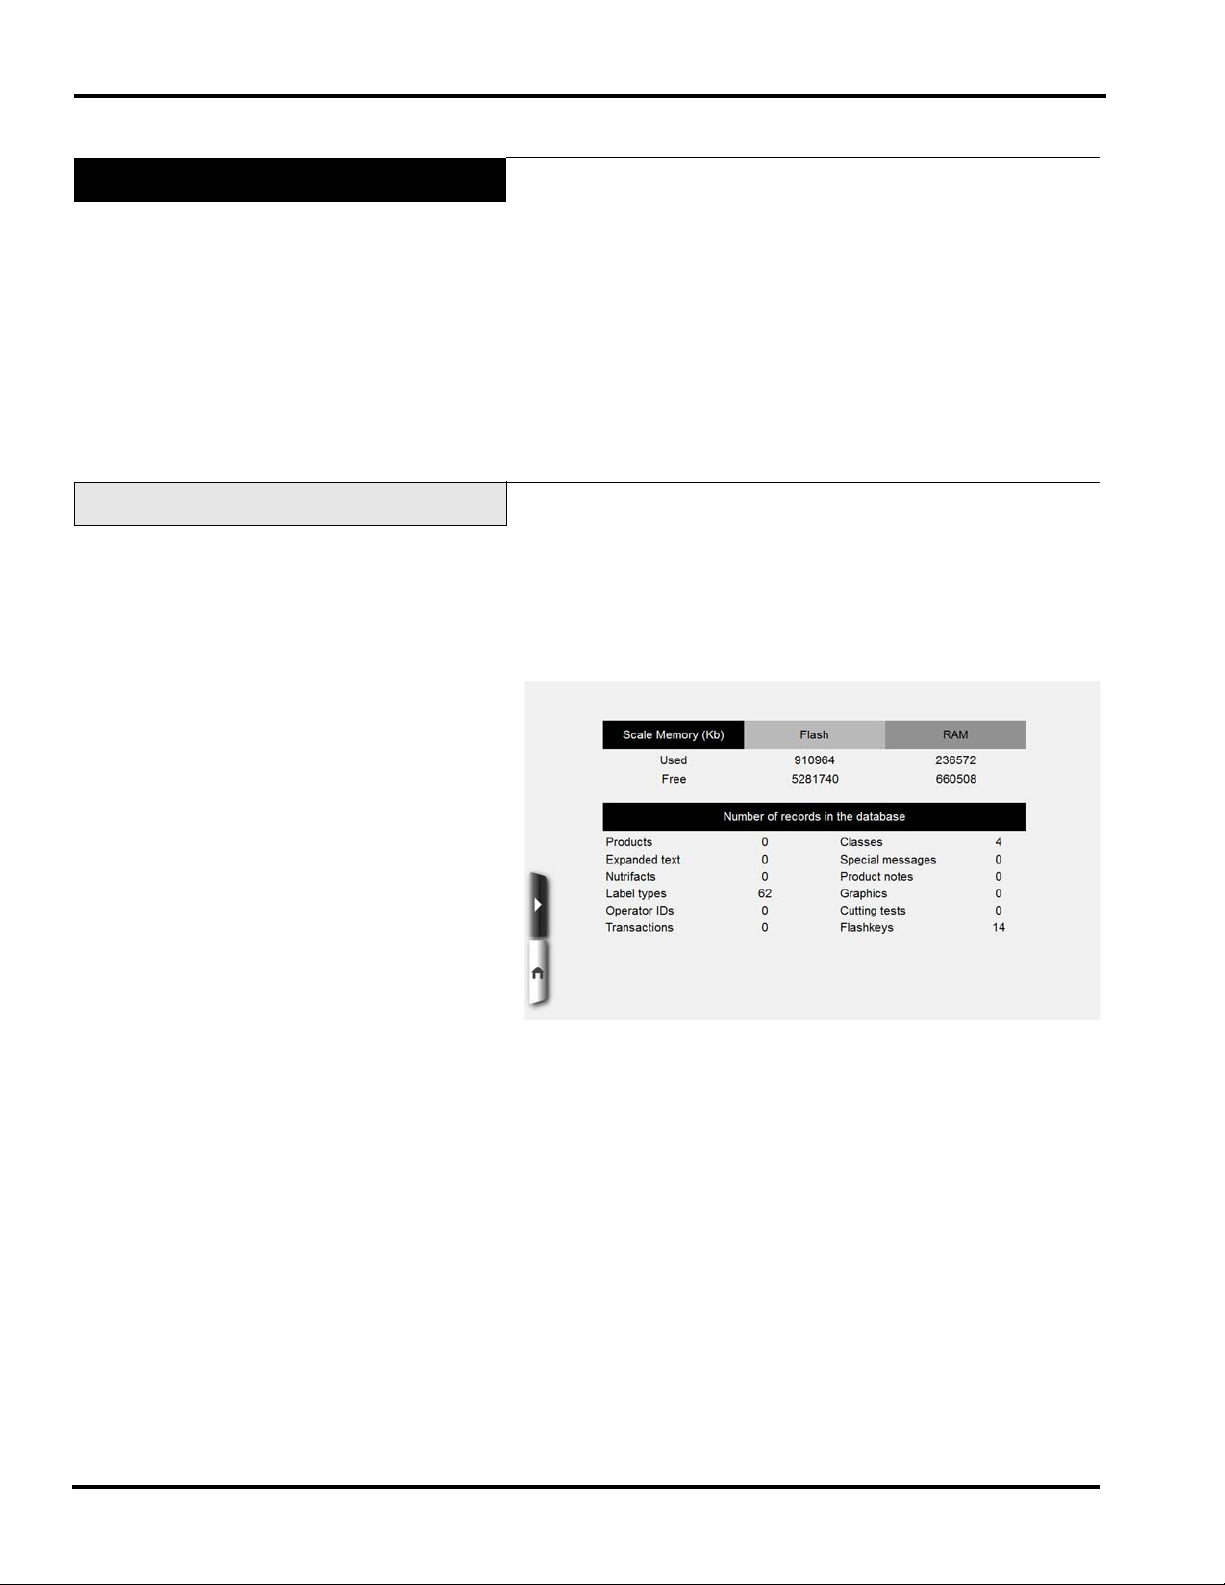
Viewing Scale Statistics
This option allows you to view the basic statistics of the scale
such as the records in the Scale database.
To view the Statistics Screen:
1. From the Supervisor Pages Box SCALE OPERATIONS
subsection, TOUCH Show Statistics. You should now be on
the Show Statistics Screen.
2. Refer to the Table of Contents to perform your next
procedure, or return the scale to Operate mode.
Setting Up Your System 3-4 F-35554 (December 2014)
Setting Up Normal Scale
Operation
HT Access System Supervisor Manual
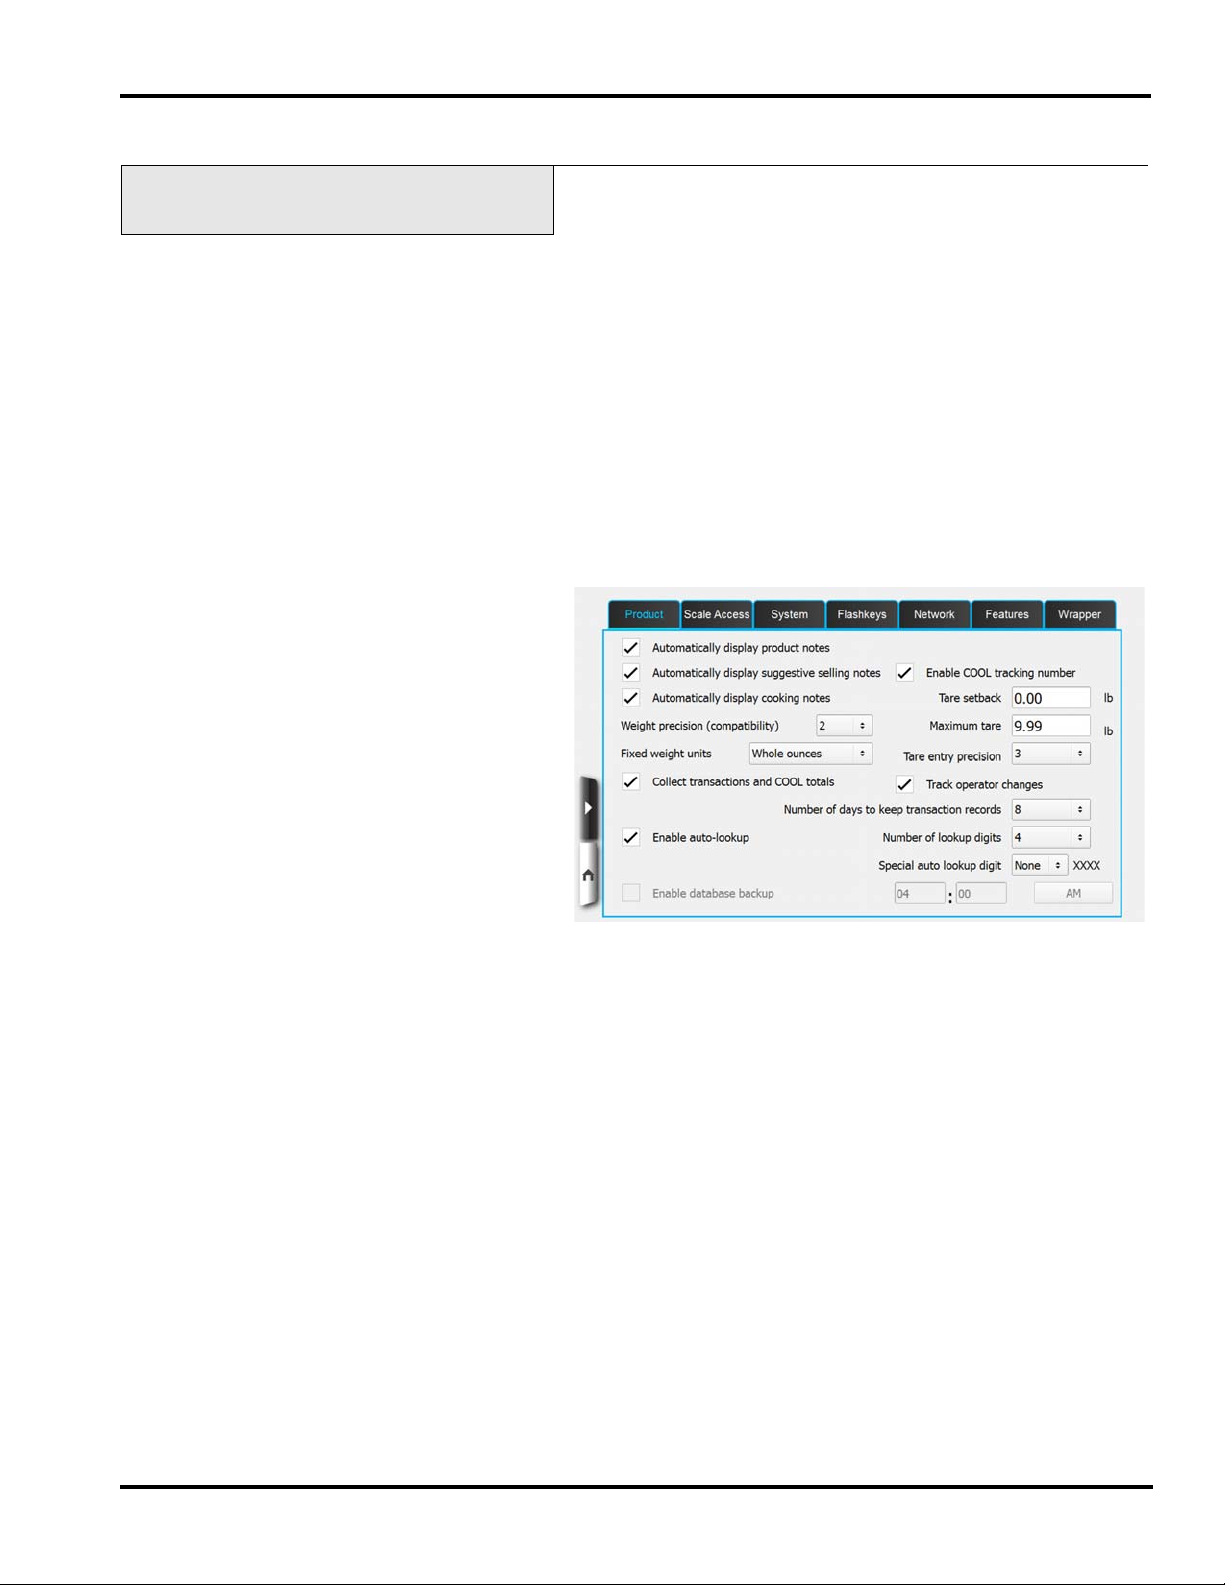
Use the Set Up Normal Scale Operation option to specify the
types of Totals you wish to collect, plus other configuration
options, such as Enable Auto Lookup, etc.
NOTE: Blue text in Tab field indicates which Tab is active.
NOTE: Not all options shown in this section will be available
with all system configurations. Some features will be disabled
unless a valid license is active.
To set up Normal Scale Operation:
1. From the Supervisor Pages Box SCALE OPERATIONS
subsection, TOUCH Normal Operations. You should now be
on the Normal Operations Product Tab Screen.
2. TOUCH the check box to select the desired function
–OR–TOUCH the desired field and select the desired
function. Use the following table to make your decisions.
F-35554 (December 2014) 3-5 Setting Up Your System
HT Access System Supervisor Manual
Table of Normal Operations Product Tab
Function Description Values
Automatically display
product notes
Automatically display
suggestive selling notes
Automatically display
cooking notes
Enable COOL tracking
number
Weight Precision
(compatibility)
Specifies whether product notes are
automatically displayed or not if the
PLU has this section filled.
Specifies whether suggestive selling
notes are automatically displayed or
not if the PLU has this section filled.
Specifies whether cooking notes are
automatically displayed or not if the
PLU has this section filled.
Enables the use of COOL Tracking
numbers.
Specifies whether the incoming tare
data from backup restore or scale
management is 2 digit precision or 3
digit precision.
Checked Product notes are automati-
cally displayed.
Blank Product notes are not auto-
matically displayed.
Checked
Suggestive selling notes are
automatically displayed.
Blank
Suggestive selling notes are
not automatically displayed.
Checked
Cooking notes are automatically displayed.
Blank
Cooking notes are not automatically displayed.
Checked
Use of COOL Tracking
number on.
Blank
Use of COOL Tracking
number off.
Value Range
2 or 3 decimal places.
Fixed Weight Units Enables Fixed W eight amounts to be
entered as whole or tenth ounces.
T are Setback Value Determines how the tare is to be cal-
culated depending on your database
configuration.
Maximum Tare Determines the maximum tare value
allowed.
Tare Entry Precision Determines the number of digits the
operator enters for tare.
Collect transactions and
COOL totals
Specifies whether totals are
collected or not.
Number of days to keep transaction
records.
Track operator changes Tracks changes to product made by
operators while in Operate mode.
Whole Ounces
Tenths of an Ounce
Contact your local Hobart representative for
the correct tare setback value.
This value will vary depending on the use of
the scale.
Contact your local Hobart representative for
the correct value.
Value Range
2 or 3 decimal places.
Checked Totals are collected.
Blank Totals are not
collected.
Value Range
Checked
Blank
1 to 15
Changes are tracked.
Changes are not tracked.
Setting Up Your System 3-6 F-35554 (December 2014)
HT Access System Supervisor Manual
Table of Normal Operations Product Tab (Cont.)
Function Description Values
Enable Auto-Lookup Enables you to set the number of
digits required for the system to
automatically look up product
information.
Number of digits to begin Auto
Lookup. Must be set to highest
value of PLU digits used.
Special Auto Lookup
Digit
Enable database backup
Enables you to set the time for the
system to automatically backup the
DataBase.
NOTE: Enable database backup
should not be set for a time the scale
is in use by operators or when
scheduled to receive pricing
updates. The scale cannot perform
normal operations during this time.
Backup time.
Checked Auto lookup is turned on.
Blank
Value Range 3 to 6
Value Range None, 1 to 9
Check Database is compressed.
Blank Database is not compressed.
Value Range 1 to 12 AM or PM
Auto lookup is turned off.
F-35554 (December 2014) 3-7 Setting Up Your System
HT Access System Supervisor Manual
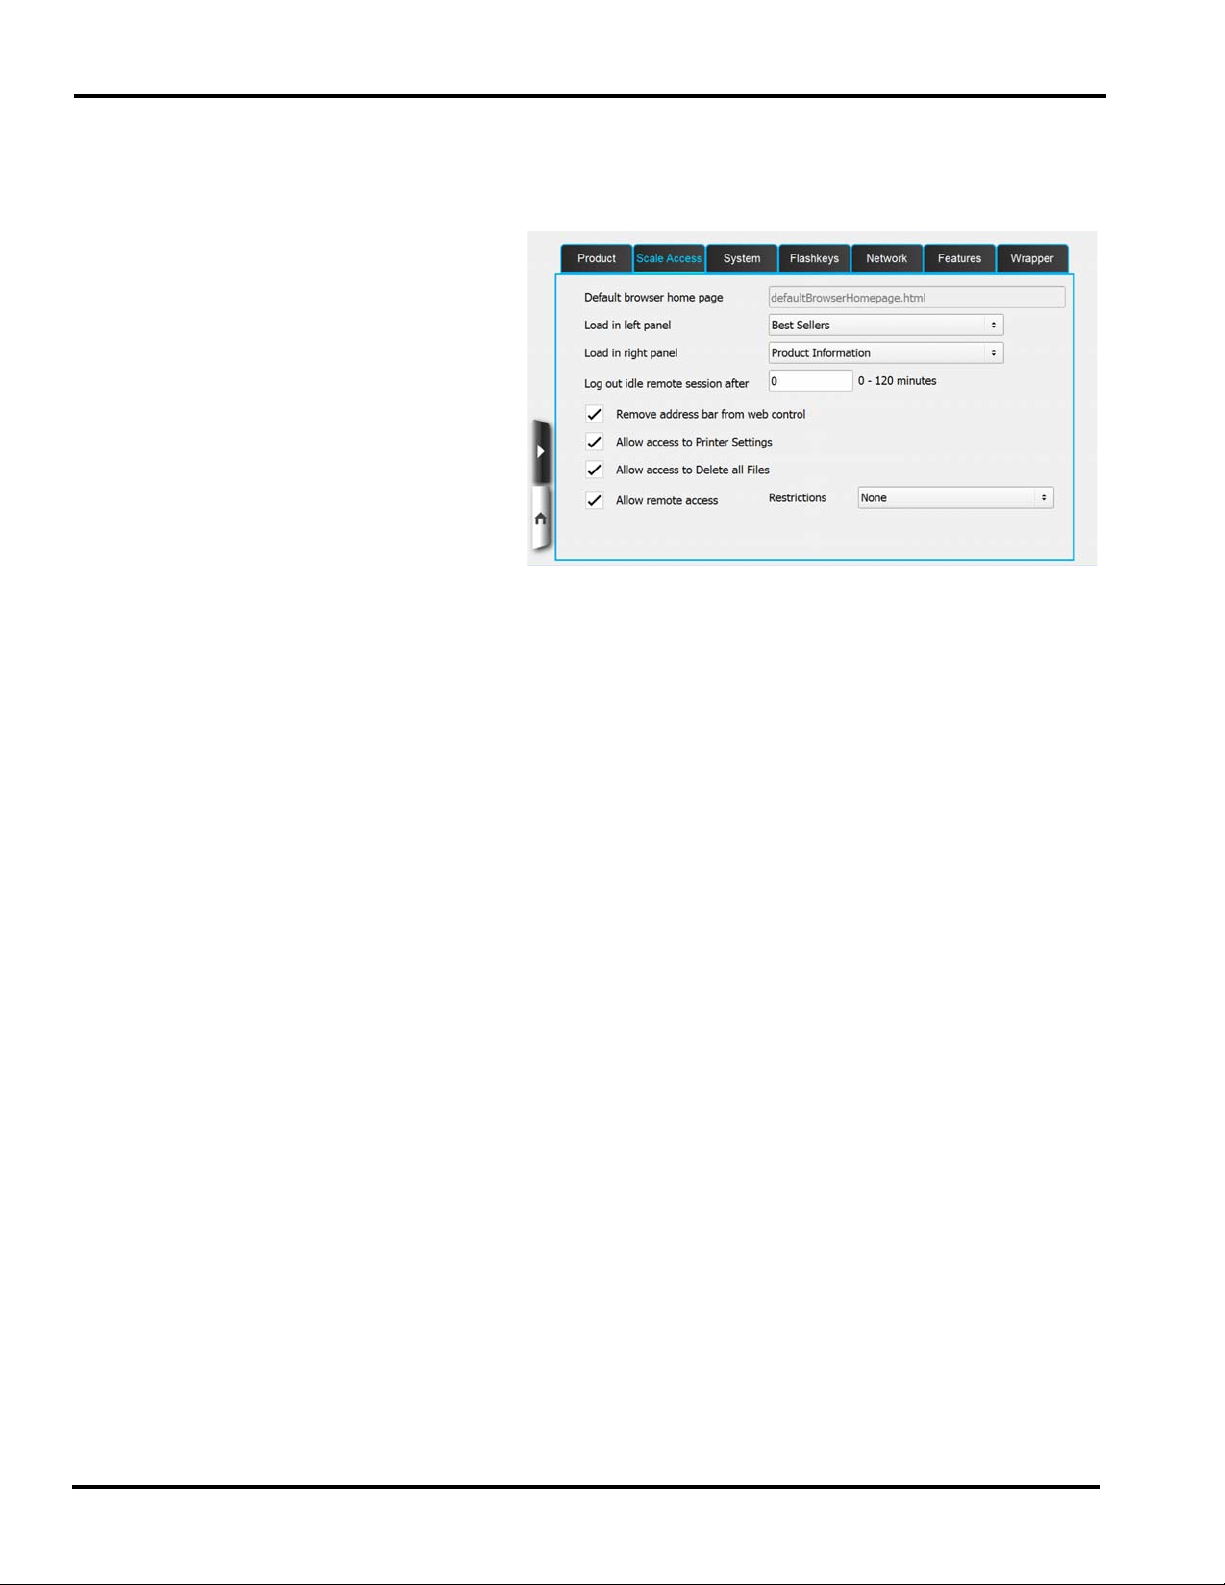
3. TOUCH the Scale Access Tab. You should now be on the
Normal Operations Scale Access Tab Screen.
4. TOUCH the check box to select the desired function
–OR–TOUCH the desired field and select the desired
function. Use the following table to make your decisions.
Setting Up Your System 3-8 F-35554 (December 2014)

HT Access System Supervisor Manual
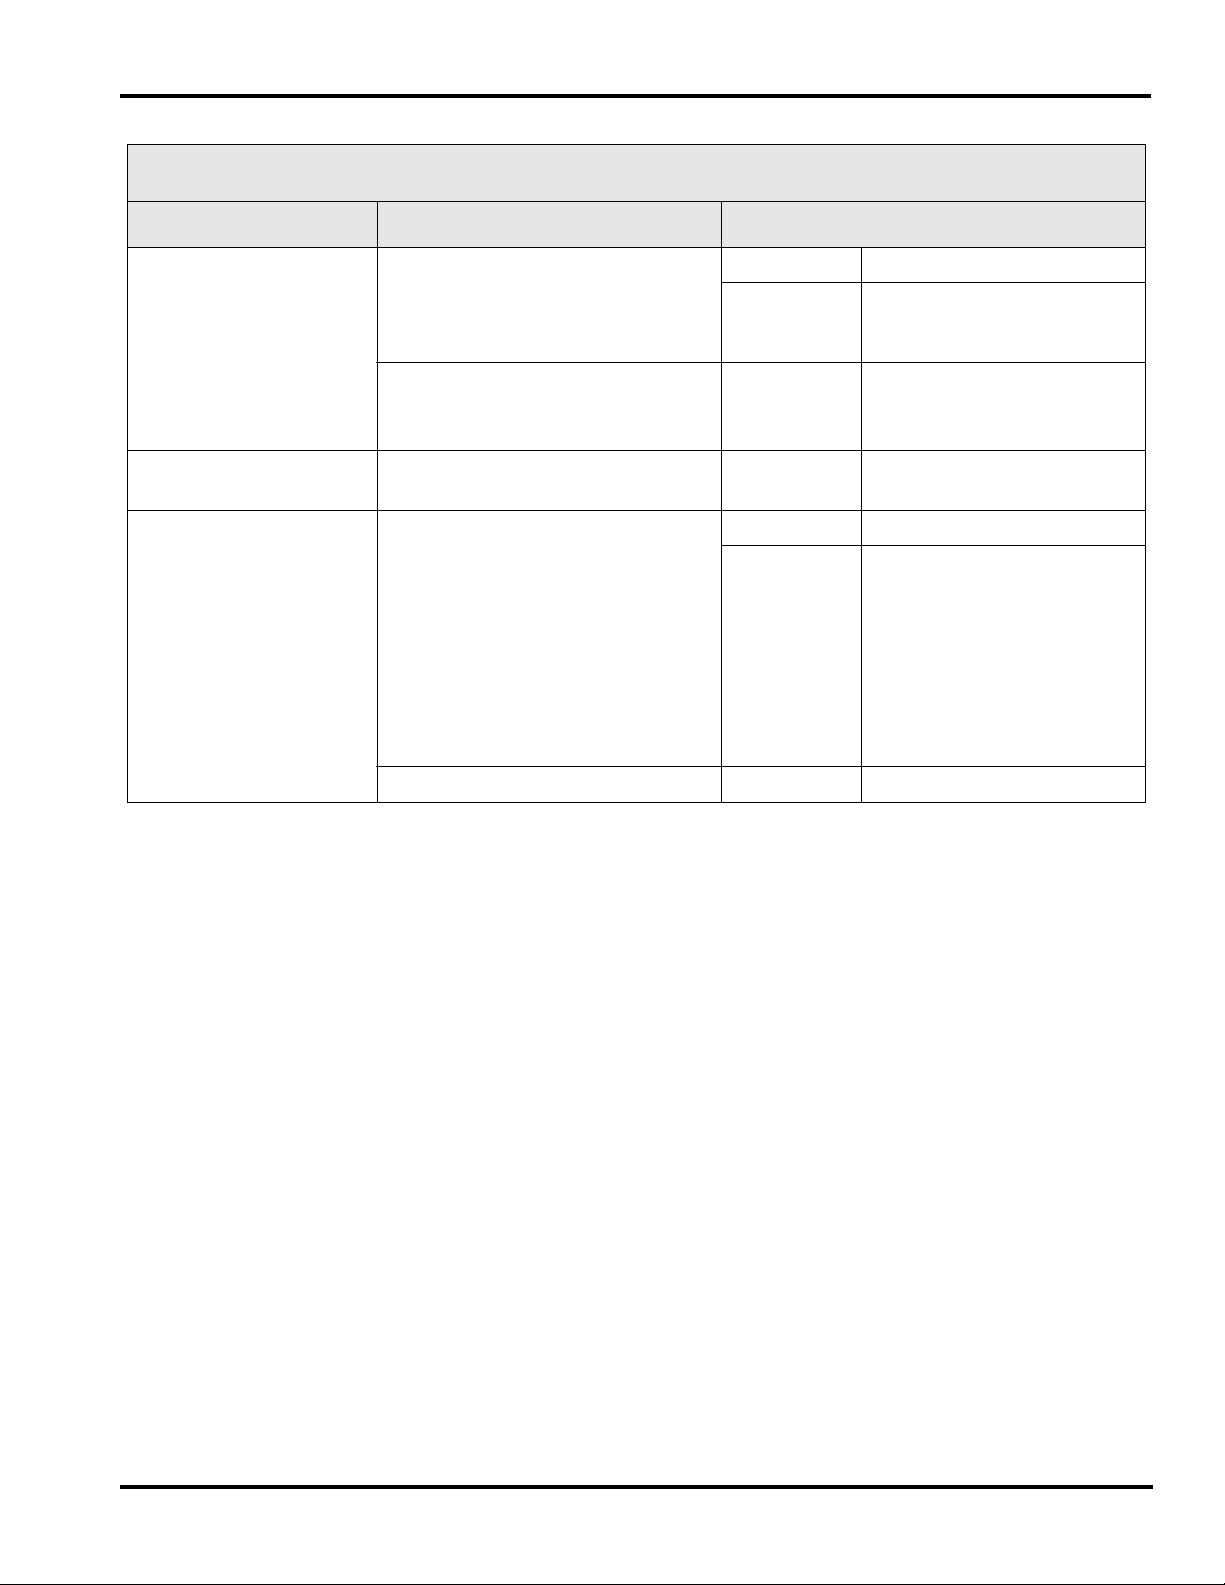
Table of Normal Operations Scale Access Tab
Function Description Values
Default Browser home
page
Enables you to set the Browser
home page to the desired address.
Load in Left panel Determines what function loads in
the Left Operator Screen.
Load in Right panel Determines what function loads in
the Right Operator Screen.
Log out idle remote
session after
Enables you to determine the length
of time the scale will allow an idle
remote access connection before it
will terminate the connection to that
session.
Remove address bar from
web control
Allow access to Printer
Settings
Allow access to Delete
all files
Locks the address bar of the
browser.
Specifies whether Printer Settings
are available to the operators.
Enables Supervisor to delete all
files.
TOUCH the Default Browser home page
field and TYPE the address you desire.
• Flashkeys
• Best Sellers
•Web Control
• Product Information
• Wrapper Settings
• Label Placement
TOUCH the minutes field and TYPE the
number of minutes between 1-120. A value
of 0 equals infinite time.
Checked Address bar locked.
Blank Address bar editable.
Checked Function available.
Blank Function not available.
Checked Function available.
Blank Function not available.
Allow Remote access Specifies whether this scale can be
accessed via remote access.
Restrictions Used with Remote access check
box.
Checked Function available.
Blank Function not available.
•None
• Operator ID
• Username/Password
F-35554 (December 2014) 3-9 Setting Up Your System

HT Access System Supervisor Manual
5. TOUCH System Tab. You should now be on the Normal
Operations System Tab Screen.
6. TOUCH the check box to select the desired function
–OR–TOUCH the desired field and select the desired
function. Use the following table to make your decisions.
Setting Up Your System 3-10 F-35554 (December 2014)
 Loading...