

M
I
N
O
S
T
D
R
E
D
U
C
C
LXGe SERIES GLASSWASHER
LAVE-VERRE DE LA GAMME LXGe
’
E
I
M
O
LXGe SERIES
GLASSWASHER
LAVE-VERRE
DE LA GAMME LXGe
LAVAVAJILLAS DE
LA SERIE LXGe
P
L
N
E
S
O
I
LAVAVAJILLAS DE LA SERIE LXGe
MODELS
MODÈLES
MODELOS
LXGePR ML-130255
ML-130256
LXGeR ML-130257
ML-130258
701 S. RIDGE AVENUE
TROY, OHIO 45374-0001
937 332-3000
www.hobartcorp.com
FORM 47526 Rev. A (January 2015)

© HOBART CORPORATION, 2015
– 2 –

TABLE OF CONTENTS
GENERAL .........................................................................................................................................6
INSTALLATION .................................................................................................................................7
Unpacking ................................................................................................................................... 7
Location ......................................................................................................................................7
Leveling ....................................................................................................................................... 7
Water Requirements ...................................................................................................................7
Plumbing Connections ................................................................................................................ 8
Before First Use .........................................................................................................................8
Electrical Connection ..................................................................................................................9
Electrical Data ............................................................................................................................. 9
Connection Method ..................................................................................................................10
Detergent and Rinse Aid ...........................................................................................................11
Chemical Sanitizer (LXGePR) ...................................................................................................12
Checking Sanitizer Concentration ............................................................................................ 12
Deliming Solution ...................................................................................................................... 12
Priming Chemical Pumps .......................................................................................................... 13
Installation Diagram (LXGePR, short) ........................................................................................ 14
Installation Diagram (LXGePR, tall)............................................................................................15
Installation Diagram (LXGeR, short) ..........................................................................................16
Installation Diagram (LXGeR, tall) .............................................................................................. 17
PROGRAMMING.............................................................................................................................18
Manager Mode Programming ...................................................................................................18
Programming Instructions ......................................................................................................... 18
Menu Display Prompts .............................................................................................................. 18
LXGe advansys Manager Mode Programming Card .................................................................19
Parameters Menu Table ............................................................................................................21
OPERATION ....................................................................................................................................23
Operating the LXGeR Glasswasher ........................................................................................... 23
Diagnostic/Error Messages .......................................................................................................24
Wash/Rinse Cycle Times (LXGePR and LXGeR) .......................................................................25
Preparation ..............................................................................................................................25
Do's and Don'ts For Your New Hobart Glasswasher ................................................................26
CLEANING ...................................................................................................................................... 27
MAINTENANCE ..............................................................................................................................28
Deliming .................................................................................................................................... 28
Lubrication ................................................................................................................................28
TROUBLESHOOTING ..................................................................................................................... 29
– 3 –

TABLE DES MATIÈRES
DESCRIPTION GÉNÉRALE ............................................................................................................. 31
INSTALLATION ............................................................................................................................... 32
Déballage .................................................................................................................................. 32
Emplacement ............................................................................................................................32
Mise de niveau .......................................................................................................................... 32
Besoins en eau ..........................................................................................................................32
Raccordements de plomberie ................................................................................................... 33
Avant la première utilisation ......................................................................................................34
Connexions électriques ............................................................................................................. 34
Données électriques .................................................................................................................34
Méthode de connexion .............................................................................................................35
Doseurs à détergent et aide au rinçage ....................................................................................36
Assainissement chimique (LXGePR) .........................................................................................37
Concentration de l’assainisseur chimique .................................................................................37
Solution de détartrage ..............................................................................................................37
Amorçage des doseurs chimiques ............................................................................................ 38
Schéma d’installation (LXGePR, petit) ......................................................................................39
Schéma d'installation (LXGePR, grand) ....................................................................................40
Schéma d’installation (LXGeR, petit) ......................................................................................... 41
Schéma d'installation (LXGeR, grand) .......................................................................................42
PROGRAMMATION ........................................................................................................................43
Programmation du mode de gestion ......................................................................................... 43
Instructions de programmation ................................................................................................. 43
Touches de navigation .............................................................................................................. 43
Carte de programmation du mode de gestion du modèle LXGe Advansys ..............................44
Grille du menu des paramètres ................................................................................................. 46
UTILISATION ..................................................................................................................................48
Faire fonctionner le lave-verre LXGeR ....................................................................................... 48
Messages de diagnostics et d’erreurs ......................................................................................49
Durée des cycles de lavage/rinçage (LXGePR et LXGeR) ......................................................... 50
Préparation ...............................................................................................................................50
Choses À FAIRE et NE PAS FAIRE avec votre nouveau lave-verre Hobart ............................... 51
NETTOYAGE ................................................................................................................................... 52
ENTRETIEN .....................................................................................................................................53
Détartrage .................................................................................................................................53
Lubrication ..............................................................................................................................53
DÉPANNAGE ..................................................................................................................................54
– 4 –

ÍNDICE
GENERAL .......................................................................................................................................56
INSTALACIÓN.................................................................................................................................57
Desempaque ............................................................................................................................. 57
Ubicación .................................................................................................................................. 57
Nivelación .................................................................................................................................57
Requisitos de agua ...................................................................................................................57
Conexiones de plomería ...........................................................................................................58
Antes del primer uso ................................................................................................................. 59
Conexión eléctrica ....................................................................................................................59
Datos eléctricos ........................................................................................................................59
Método de conexión .................................................................................................................60
Detergente y enjuague ..............................................................................................................61
Desinfectante químico (LXGePR) .............................................................................................62
Revisión de la concentración del desinfectante ....................................................................... 62
Solución para descalcicar ....................................................................................................... 62
Llenado de las bombas de químicos ........................................................................................63
Diagrama de instalación (LXGePR, pequeño) ...........................................................................64
Diagrama de instalación (LXGePR, grande) .............................................................................65
Diagrama de instalación (LXGeR, pequeño) .............................................................................. 66
Diagrama de instalación (LXGeR, grande) .................................................................................67
PROGRAMACIÓN ........................................................................................................................... 68
Programación en modo de Administrador ................................................................................68
Instrucciones de programación ................................................................................................. 68
Indicaciones en la pantalla del menú ........................................................................................68
Tarjeta de programación, modo de Administrador advansys LXGe ..........................................69
Tabla del menú de parámetros .................................................................................................. 71
OPERACIÓN ................................................................................................................................... 73
Operación del lavavajillas LXGeR ..............................................................................................73
Mensajes de error/diagnóstico .................................................................................................. 74
Tiempos del ciclo de lavado/enjuague (LXGePR y LXGeR) ....................................................... 75
Preparación ..............................................................................................................................75
Qué hacer y qué no hacer con su nuevo lavavajillas Hobart ..................................................... 76
LIMPIEZA ........................................................................................................................................ 77
MANTENIMIENTO ...........................................................................................................................78
Descalcicación ........................................................................................................................ 78
Lubricación ...............................................................................................................................78
SOLUCIÓN DE PROBLEMAS .........................................................................................................79
– 5 –
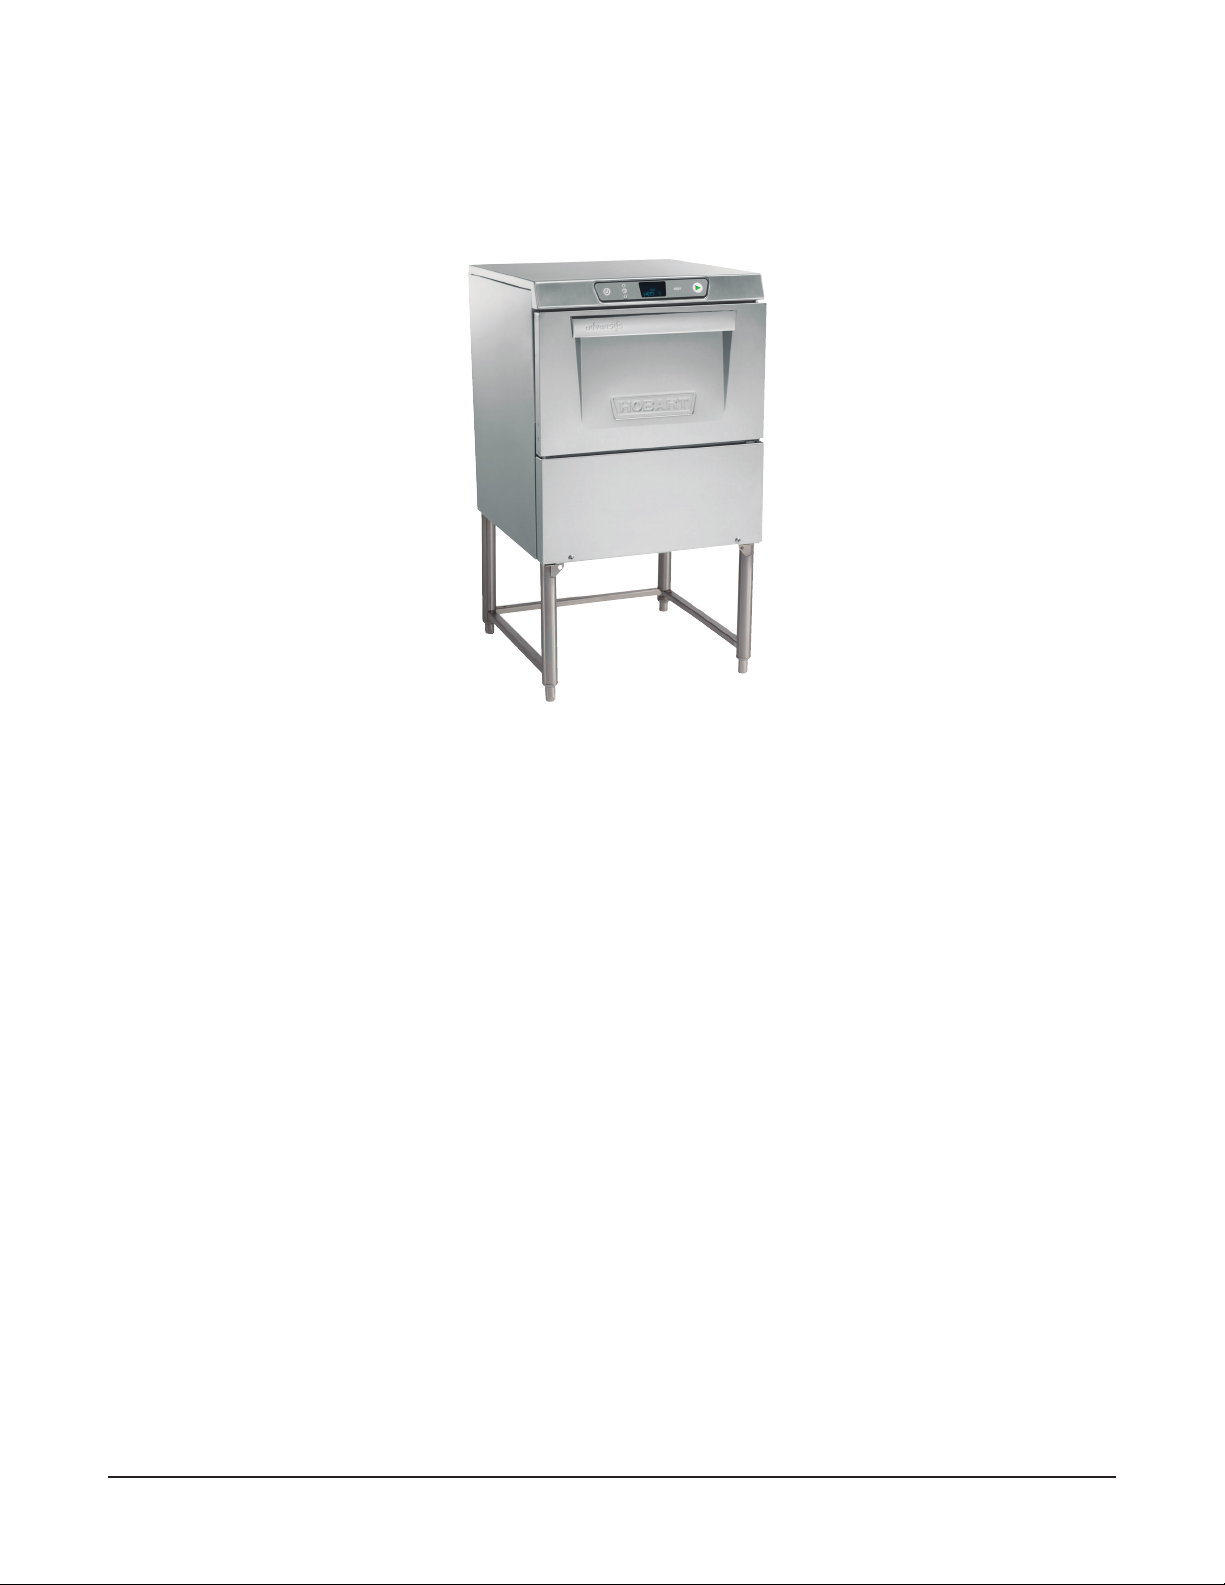
Installation, Operation and Care of
LXGe SERIES GLASSWASHERS
SAVE THESE INSTRUCTIONS
GENERAL
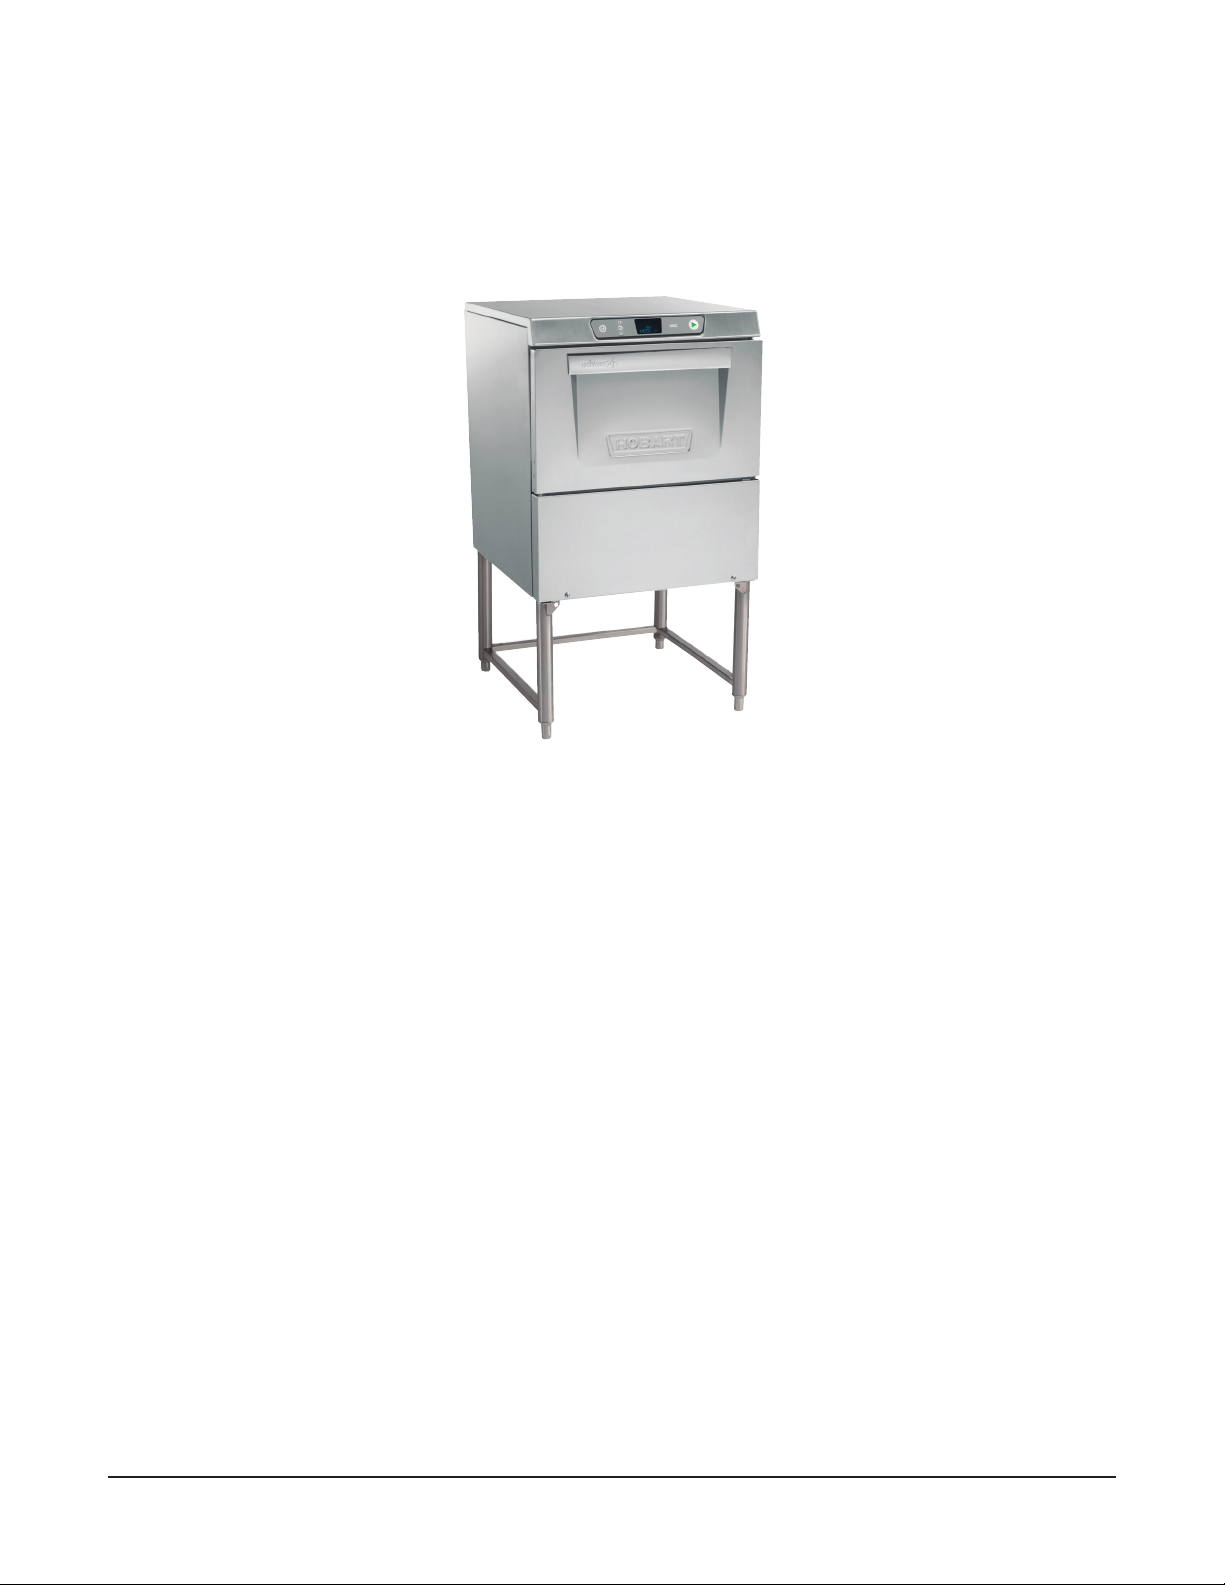
The LXGe Series glasswashers are fully automatic and front-loading. The LXGe series glasswashers
are capable of doing 24 to 38 racks per hour, depending on model.
All LXGe Series glasswashers shut down automatically 4 hours after last use to conserve energy.
The LXGeR glasswashers include Sense-A-Temp™ to insure proper hot water temperature during rinse.
Standard equipment includes one glass/wine rack, electronic controls, drain pump, rinse pump, chemical
pumps, ll hose, and drain hose.
MODEL DESCRIPTION
LXGePR Fresh water rinse; low-temperature, chemical-sanitizing models for use
with 6% sodium hypochlorite solution (bleach) as the sanitizing agent*.
Note: If 8.40% bleach is to be used, contact Hobart Service or your
chemical supplier to change the sanitizer pump settings. (Charges may
apply)
LXGeR Fresh water rinse with an internal energy recovery unit and a built-in 70°F
rise booster heater. Recommended incoming water temperature 55°F to
80°F.
* - Sanitizing agent must be used in accordance with the EPA-registered label use instructions.
– 6 –

INSTALLATION
UNPACKING
Immediately after unpacking the glasswasher, check for possible shipping damage. If this machine
is found to be damaged, save packaging material and contact the carrier within 15 days of delivery.
LOCATION
Prior to installation, verify that the electrical supply agrees with the specications on the machine data
plate, which is located on the top of the door.
Steam generated from normal operation may escape from the door. Wood, laminates, veneers, etc. are
unsuitable materials for use in areas exposed to glasswasher steam and detergents. Stainless steel
or other moisture-resistant shields are recommended for surfaces adjacent to LXGe sides and top.
LEVELING
The machine must be level to operate properly. Place the glasswasher in its operating location. Level
the machine before any connections are made. Using a carpenter's level placed diagonally on the
rack tracks, level the machine front to back and side to side by threading the adjustable feet in or out.
WATER REQUIREMENTS
Proper water quality can improve glass washing performance by reducing spotting, enhancing
effectiveness of labor and extending equipment life. Water conditions vary from one location to another.
The recommended proper water treatment for effective and efcient use of this equipment will also
vary depending on the local water conditions. Ask your municipal water supplier for details about your
local water conditions prior to installation.
Recommended water hardness is 3 grains of hardness per gallon or less. Higher hardness may cause
excessive formation of lime scale. Water hardness above 3 grains per gallon requires water treatment.
Water treatment has been shown to reduce costs associated with machine cleaning, reduce deliming
of the glasswasher, and reduce detergent usage in the glasswasher.
High iron levels in the water supply can cause staining and may require an iron lter. High
chloride levels in the water supply can cause pitting and may require a chloride removal system. Contact
your local water treatment professional for proper water treatment.
Sediment may require a particulate lter. Dissolved solids may require water treatment such as a water
softener, reverse osmosis system, etc. Contact your local water treatment professional for proper water
treatment.
If an inspection of the glasswasher or booster heater reveals lime buildup after the equipment has been
in service, water treatment is recommended. If a water softener is already in place, ensure there is a
sufcient level of salt. Contact your local Hobart Service ofce for specic recommendations.
– 7 –
A water hammer arrestor (meeting ASSE-1010 Standard or equivalent) should be installed (supplied
by others) in the common water supply line at the service connection.
The plumber connecting this machine is responsible for making certain that water lines are THOROUGHLY
FLUSHED OUT BEFORE connecting to the glasswasher. This "ush-out" is necessary to remove all
foreign matter, such as chips (resulting from cutting or threading of pipes) pipe joint compound from the
lines; or, if soldered ttings are used, bits of solder or cuttings from the tubing. Debris, if not removed,
may lodge in the glasswasher's plumbing components and render them inoperative. Manual valves
or solenoid valves fouled by foreign matter and any expenses resulting from this fouling are NOT the
responsibility of the manufacturer and associated repair costs are not covered under warranty.
Water supply requirements are as follows:
MODEL TEMPERATURE
LXGePR 120°F Minimum
LXGeR 55°F Minimum, 85°F Maximum
NOTE: On LXGeR installations, if cold water supply temperature is consistently above 80°F or if excessive
water vapor or steam is entering the room after the condensing cycle is complete, contact Hobart Service
to increase condensing time.
Required owing water pressure to the glasswasher is 15-65 PSIG. If pressures higher than 65 PSIG are
present, a pressure regulating valve must be installed in the water line to the glasswasher (by others).
If owing pressure is less than 15 psi, improper machine operation may result. All LXGe glasswashers
are equipped with a pumped rinse system; therefore, a water pressure gauge is not required and is
not supplied with the machine.
The water pressure regulator must have a relief bypass. Failure to use the proper type
of pressure regulator may result in damage to the unit.
A manual shutoff valve (not supplied) should be installed upstream of the ll hose to accommodate
servicing the machine.
It is recommended that a line strainer (not supplied) be installed in the supply line between the manual
shutoff valve (not supplied) and the connection point on the machine. Make plumbing connections with
1
⁄2" minimum copper piping OD (3⁄4" recommended), with a 3⁄4" male garden hose tting (not supplied).
See installation diagrams, pages 14-17.
PLUMBING CONNECTIONS
Plumbing connections must comply with applicable sanitary, safety, and plumbing
codes.
Drain
5
A drain hose,
⁄8" inside diameter and 6' long, is provided. This should be securely plumbed into a
drain. Use care not to kink hose. See installation diagrams, pages 14-17. Drain must have a minimum
ow capacity of 5 gallons per minute.
BEFORE FIRST USE
This machine must be cleaned after installation and before being put into operation. (See Cleaning)
– 8 –
ELECTRICAL CONNECTION
Electrical and grounding connections must comply with the applicable portions of
the National Electrical Code and/or other local electrical codes.
Disconnect the electrical power to the machine and follow lockout/tagout procedures.
ELECTRICAL DATA
Complied in accordance with the National Electrical Code NFPA-70, latest addition.
For supply connections, use copper wire only rated at 90°C minimum.
ledoM esahP/ztreH/stloV
LXGePR 1/06/021
LXGeR
tiucriCylppuSmuminiM
yticapmArotcudnoC
20 20
40 40120/208-240(3W)/60/1*
evitcetorPmumixaM
yticapmAeciveD
*The (3W) systems require three power wires that include a current carrying neutral. An additional
fourth wire must be provided for machine ground.
Refer to the top of the door of the machine and the electrical label on the back side of the lower front
panel for proper selection.
– 9 –
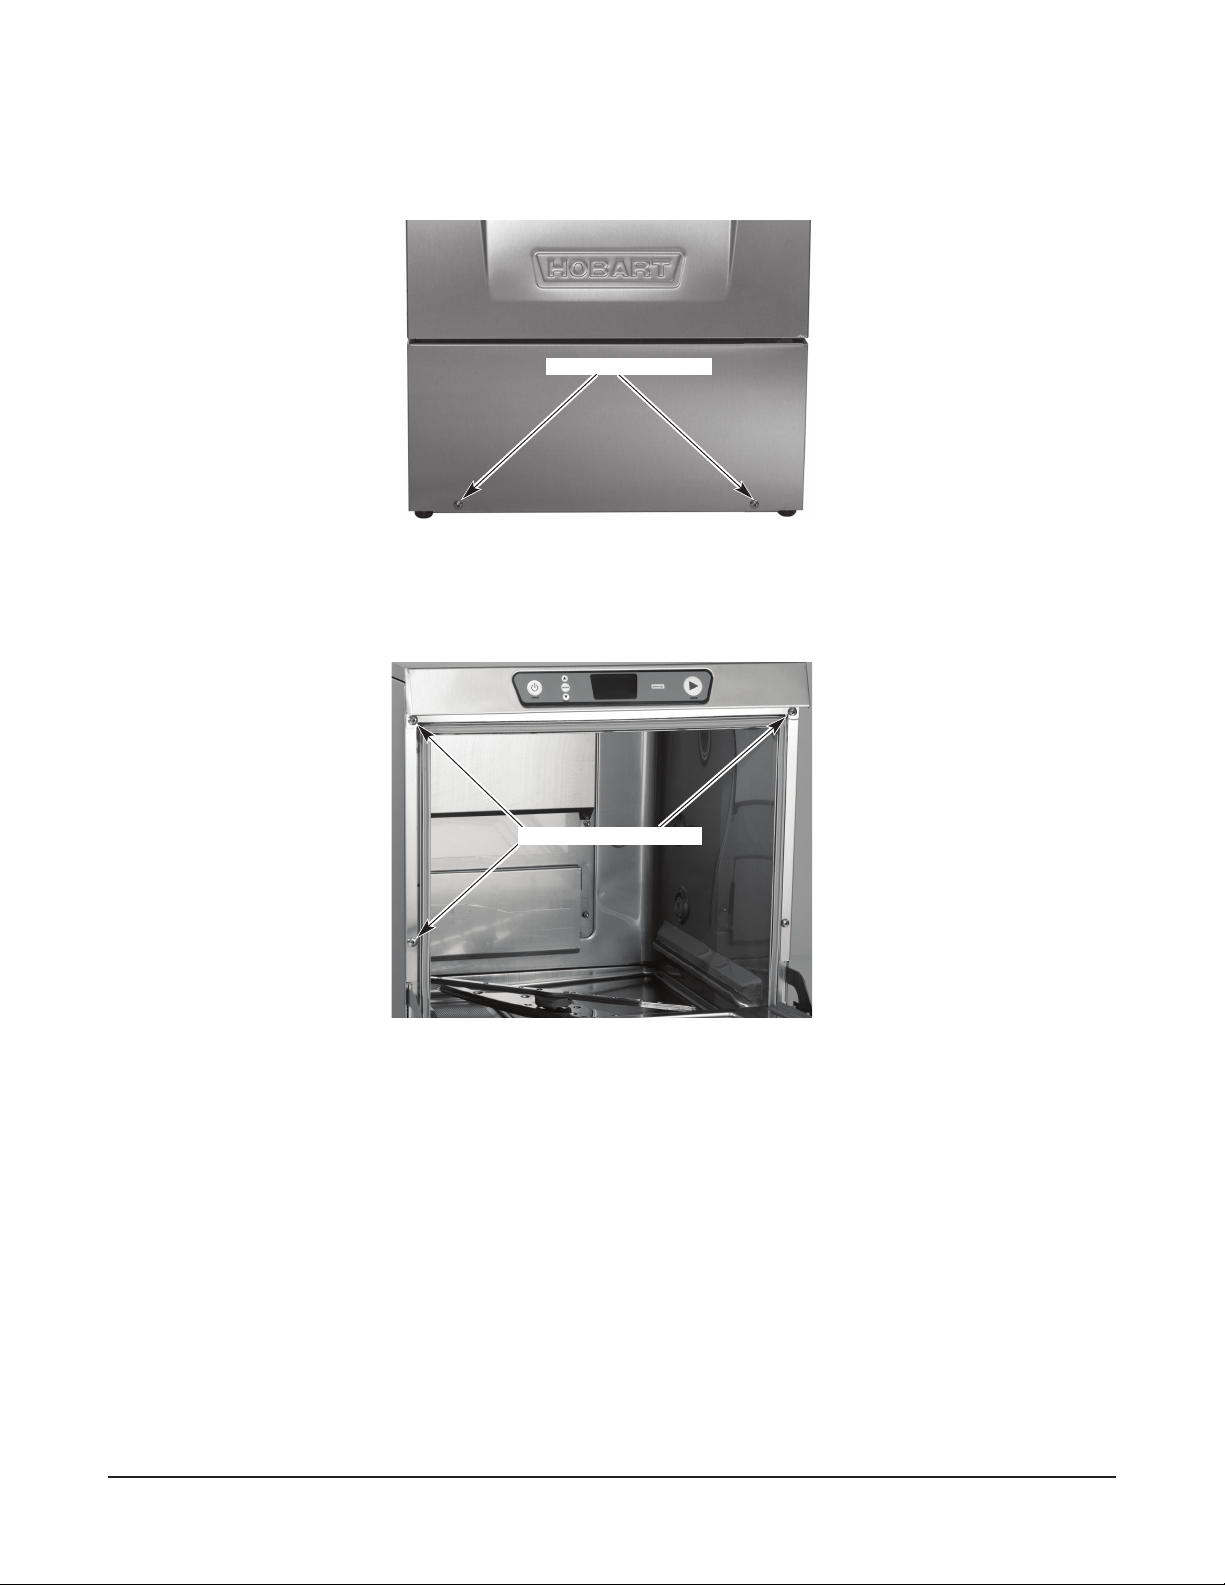
Connection Method
1. Remove the lower front panel by removing the two screws at the bottom of the panel (Fig. 1).
REMOVE TWO SCREWS
Fig. 1
2. Open door of glasswasher and remove the two left screws and the top right screw (Fig. 2). Pull
top of unit forward approximately 1” and remove the left side panel.
REMOVE THREE SCREWS
Fig. 2
– 10 –
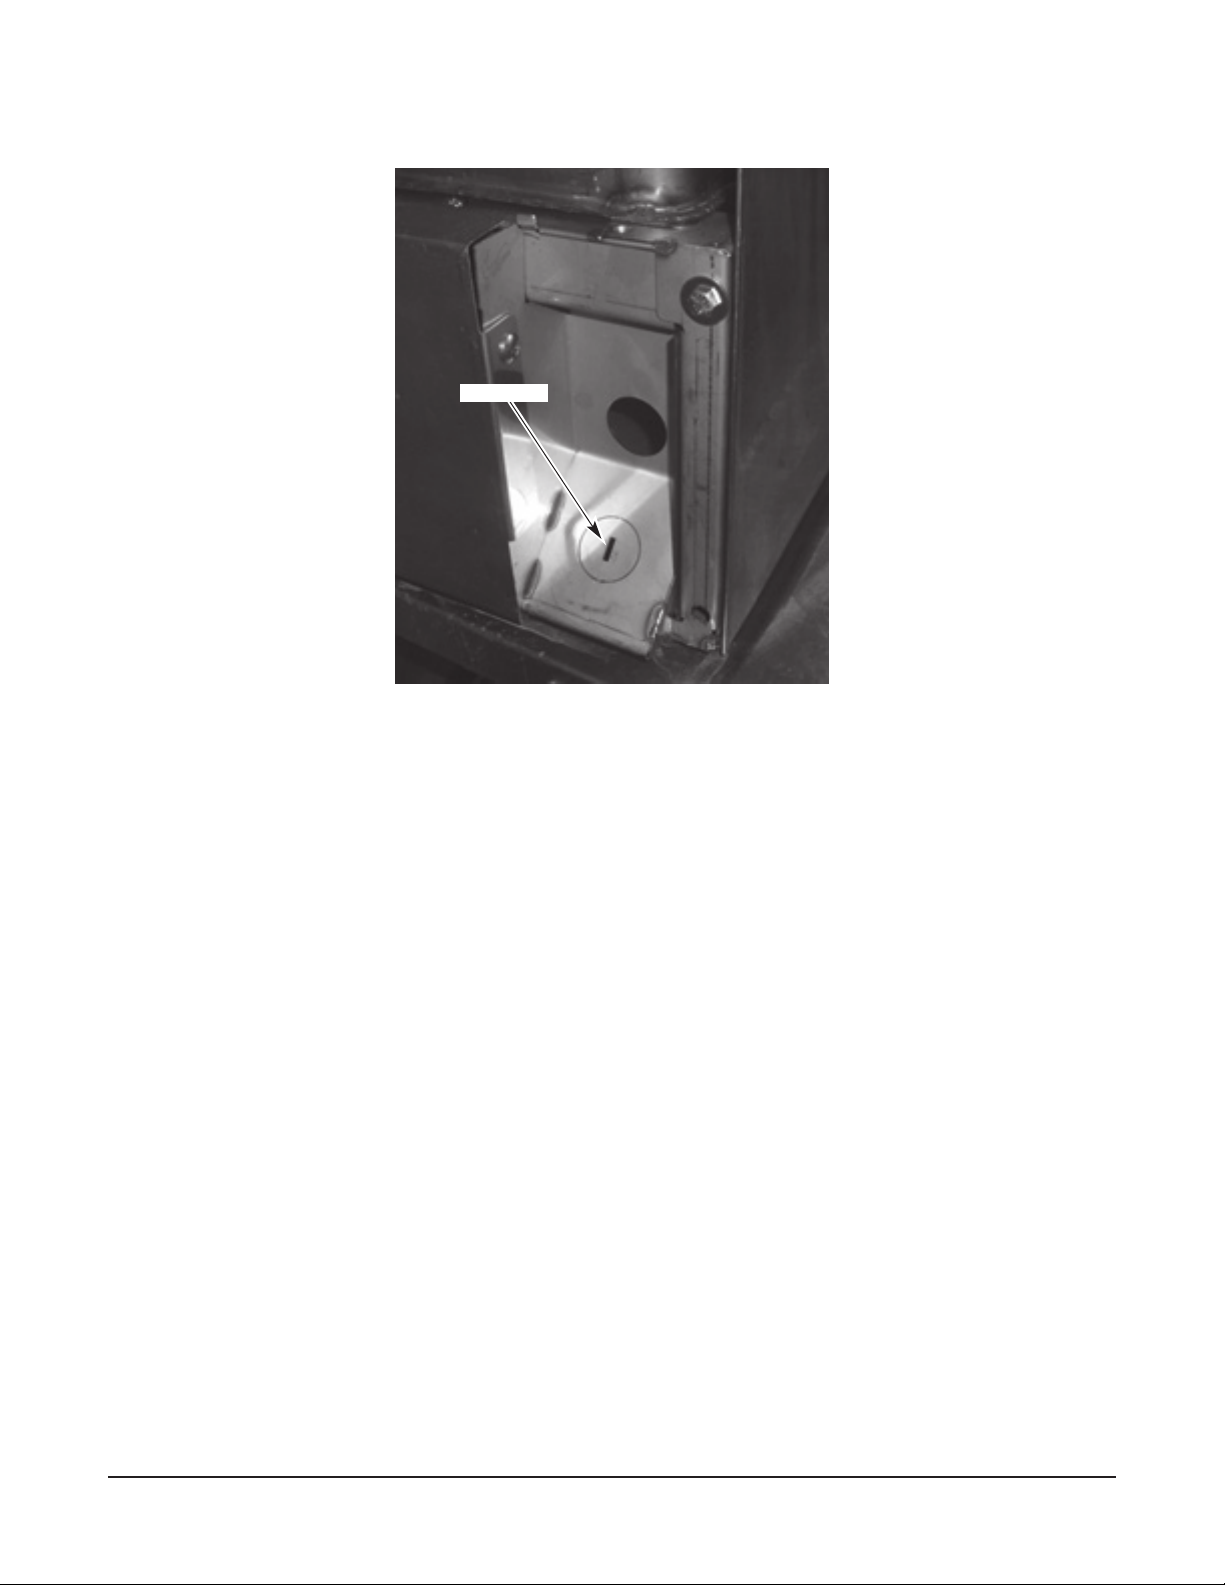
3. A hole for 1” trade size conduit is supplied at the lower right in the back of the machine (Fig. 3).
If necessary due to space requirements, remove the knockout and use a 45° tting.
KNOCKOUT
Fig. 3
4. Install 1” trade size conduit and tting. Leave at least four feet of electrical line between wall
connection and machine. This allows machine to be pulled away from the wall for cleaning and/
or servicing.
5. Feed wires thru base of unit to front of unit. At least 24” and not more than 28” of the required
wire size must extend from the end of the conduit tting.
6. Make electrical connections according to wiring diagram supplied with the machine and secure
wires to the machine service connection. Keep excess wire in the base of the unit to a minimum.
7. Replace the left side panel, top of unit, and lower front panel. Re-install the three screws located
behind the door and the two screws at the bottom of the front panel.
DETERGENT AND RINSE AID
Use only commercial-grade detergents recommended by your chemical professional. Do not use
detergents formulated for residential glasswashers.
The detergent and rinse aid pump "ON" times are factory-set. If adjustments are required, contact your
local Hobart Service Ofce or your chemical supplier.
Place the detergent and rinse aid containers (which are obtained from an independent supplier) under
the glasswasher.
Remove the detergent bottle cap and put the red delivery tube in the detergent container by snapping
the bottle connector onto the container.
Remove the rinse aid bottle cap and place the blue delivery tube in the rinse aid container by snapping
the bottle connector onto the container.
Be sure to push the delivery tubes completely to the bottom of each container. Check to make sure
there are no obstructions or kinks in the delivery tubes.
– 11 –
CHEMICAL SANITIZER (LXGePR)
Items such as pewter, aluminum and silver will be attacked by sodium hypochlorite
(bleach). Therefore, chemical-sanitizing glasswashers should not be used to wash such items.
The LXGePR chemical sanitizer pump is factory-set for use with 6% sodium hypochlorite solution.
If 8.40% sodium hypochlorite solution is to be used, contact your local Hobart Service Ofce.
On LXGePR models, place a sanitizer approved for potable water rinse machines under the glasswasher
no higher than 10 inches off the oor. Do not pre-mix sanitizing solution with water or any other liquid.
Never premix a wetting agent with the sanitizing solution. Mixing may cause
hazardous gas to form.
Remove the sanitizer bottle cap and place the white delivery tube in the sanitizer container by snapping
the bottle connector onto the container. Be sure to push the delivery tube completely to the bottom of the
container. Check to make sure there are no obstructions or kinks in the delivery tube.
Frequently check your sanitizer bottle to make sure there is a sufcient chemical supply.
CHECKING SANITIZER CONCENTRATION
Verify there is sufcient chemical supply in the sanitizer bottle and that the delivery tube standpipe is
inserted completely to the bottom of the chemical container. Place a glass rack, with glasses, in the
machine.
On LXGePR models, the PuriRinse feature must be deactivated to properly check the sanitizer concentration.
To deactivate PuriRinse, press and hold the WASH key for ve seconds until wash cycle starts.
Follow the directions precisely that are on the litmus paper vial and test the water on the surface of the
bottom of the glasses. Concentration should be 50 p.p.m. minimum to 100 p.p.m. maximum.
If reading is incorrect, contact your local Hobart Service Ofce or chemical provider for adjustments.
DELIMING SOLUTION
All LXGePR and LXGeR models are equipped with an automatic deliming system. At installation, a
qualied Hobart Service technician or your chemical supplier must adjust the total water hardness
setting to properly set the delime intervals.
Remove the deliming agent bottle cap and put the black delivery tube in the container by snapping the
bottle connector onto the container.
Be sure to push the delivery tube completely to the bottom of the container. Check to make sure there
are no obstructions or kinks in the delivery tube.
– 12 –

PRIMING CHEMICAL PUMPS
When a chemical becomes empty, the priming operation starts automatically the next time the machine
is turned on or a wash cycle is started. Note that the initial prime time for all pumps (Detergent, Rinse
Agent, and Sanitizer) is 60 seconds. If the chemical is not sensed within 60 seconds, the add chemical
indicator will ash. After the chemical is sensed, the indicator in the display turns off; and the pump
continues to prime for 10 seconds to allow the chemicals to reach the machine. If all chemicals are
empty, the sanitizer will prime rst followed by detergent. Only one chemical pump will run at a time.
If chemicals are not sensed after three consecutive priming operations, the add chemical indicator will
ash and priming is cancelled. The next time a wash cycle is started, the add chemical indicator will
continue to ash. Verify that the chemical bottles are not empty and that the delivery tubes are inserted
completely to the bottom of the containers.
The priming operation can be reset by turning the glasswasher off, then back on.
If the chemical bottles are not empty and the delivery tubes are inserted correctly, then the chemical
sensor or pumps may have malfunctioned; contact your local Hobart Service Ofce.
– 13 –

Mixing may cause hazardous gas to form.
Do not pre-mix other chemicals and sodium hypochlorite (liquid bleach).
Required owing water pressure to the dishmachine is 15-65 PSIG. If pressures
higher than 65 PSIG are present, a pressure regulating valve must be installed in the water line to the
dishmachine (by others).
Pressure guage not provided on pumped rinse machines.
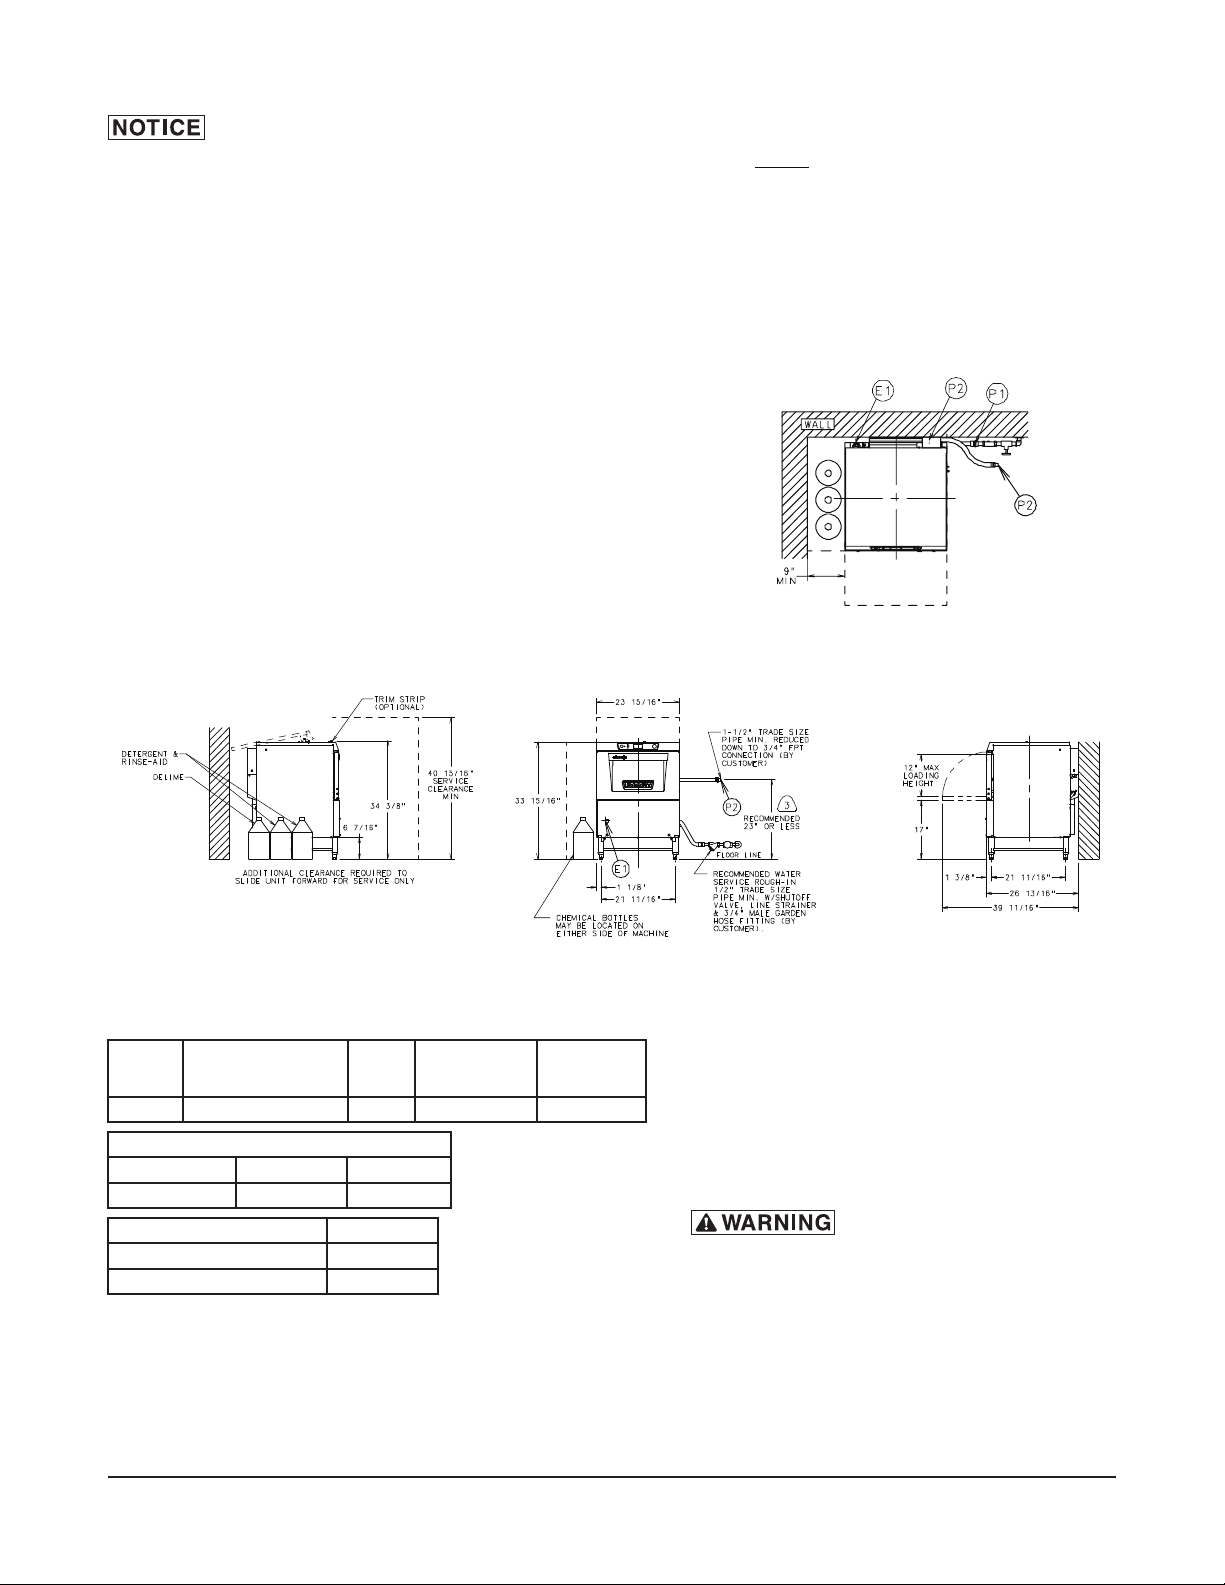
Important: The chemical containers should be placed no higher than 16" above oor.
If chemical containers are to be placed in cabinet adjacent to machine, a 1/2" dia. hole is required in
the cabinet to run chemical supply line.
Use only 6% or 8.4% sodium hypochlorite (liquid bleach) as sanitizing chemical to insure proper
operation of dishmachine.
Certain materials including silver plate, aluminum and pewter are attacked by sodium hypochlorite
(liquid bleach).
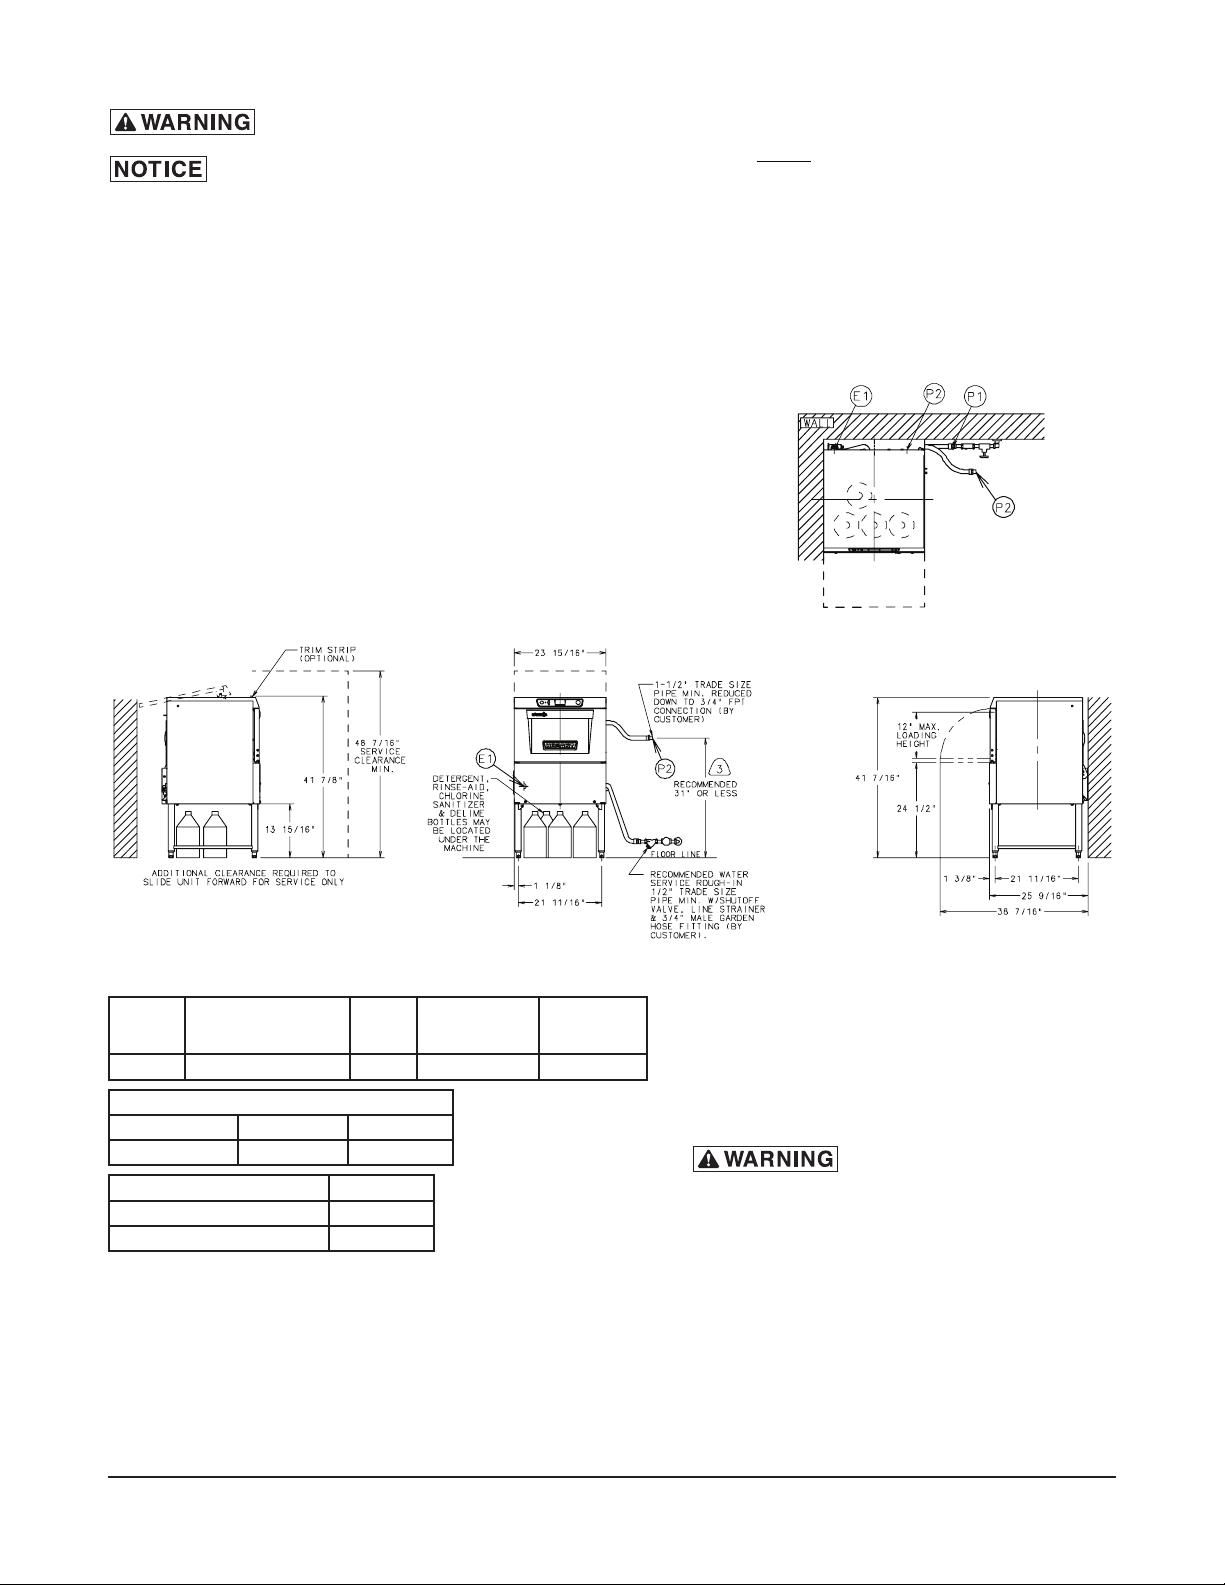
NOTES:
1. All vertical machine dimensions taken from oor may be increased by .875" or decreased by .375".
2. Moist air escapes from the door.
Use only moisture resistant materials adjacent to dishmachine sides and top.
3. A vent hood is not recommended above the undercounter dishmachine since it does not produce
excessive vapors.
PLUMBING NOTES:
1. Water hammer arrestor (meeting ASSE-1010 standard or equivalent) to be supplied (by others) in
common water supply line at service connection.
2. Recommended water hardness to be 3 grains or less for best results.
3. If drain hose is looped above a sink, the loop must not exceed 44" AFF.
CONNECTION INFORMATION
(AFF = ABOVE FINISHED FLOOR)
LEGEND
E1 ELECTRICAL CONNECTION: 1-3/8" DIA. HOLE
FOR 1" TRADE SIZE CONDUIT; 10-5/8" AFF.
P1 SINGLE FILL AND RINSE CONNECTION:
3/4" FEMALE GARDEN HOSE FITTING ON 6' LONG
HOSE SUPPLIED WITH MACHINE;
120°F WATER MIN. FOR LXGePR, 140°F
RECOMMENDED.
P2 DRAIN CONNECTION: 5/8" BARB FITTING WITH
6' LONG HOSE SUPPLIED WITH MACHINE.
MODEL VOLTS/HERTZ/PHASE
LXGePR 120/60/1 15.4 20 20
HEAT OUTPUT, BTU/HR
MODEL LATENT SENSIBLE
LXGePR 1900 800
SHIPPING WEIGHTS LXGePR
NET WEIGHT OF MACHINE 150 LBS
DOMESTIC SHIPPING WEIGHT 170 LBS
RATED
AMPS
MIN SUPPLY
CKT CONDUCT
AMPACITY
MAX
PROTECTIVE
DEVICES
INSTALLATION DIAGRAM (LXGePR, short)
ACCESSORY CORD KITS AVAILABLE FOR ALL MACHINES
NOTE: FOR SUPPLY CONNECTIONS, USE COPPER WIRE ONLY
RATED AT 90°C MINIMUM.
Electrical and grounding
connections must comply with the applicable portions of
the National Electrical Code and/or other local electrical
codes.
Plumbing connections must comply with applicable
sanitary, safety and plumbing codes. Drain and ll line
congurations vary, some methods are shown on this
drawing.
– 14 –
Mixing may cause hazardous gas to form.
Do not pre-mix other chemicals and sodium hypochlorite (liquid bleach).
Required owing water pressure to the dishmachine is 15-65 PSIG. If pressures
higher than 65 PSIG are present, a pressure regulating valve must be installed in the water line to the
dishmachine (by others).
Pressure guage not provided on pumped rinse machines.
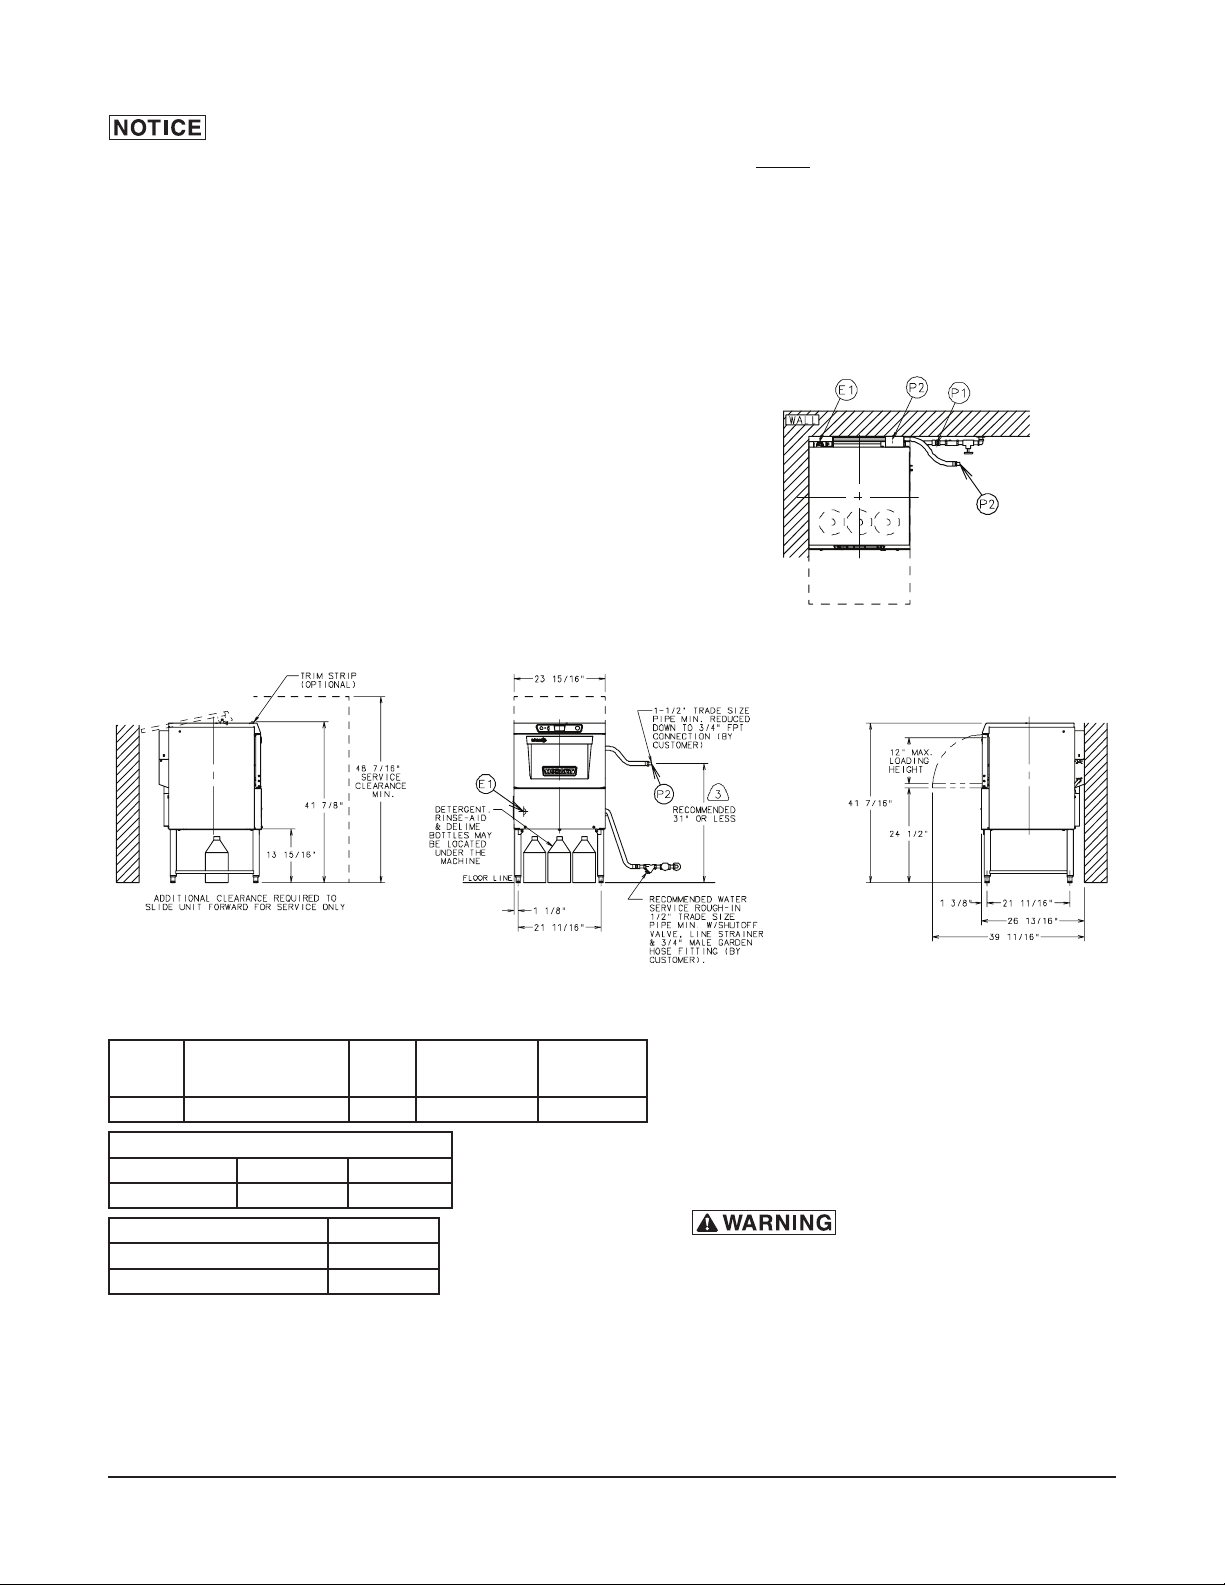
Important: The chemical containers should be placed no higher than 24" above oor.
If chemical containers are to be placed in cabinet adjacent to machine, a 1/2" dia. hole is required in
the cabinet to run chemical supply line.
Use only 6% or 8.4% sodium hypochlorite (liquid bleach) as sanitizing chemical to insure proper
operation of dishmachine.
Certain materials including silver plate, aluminum and pewter are attacked by sodium hypochlorite
(liquid bleach).
NOTES:
1. All vertical machine dimensions taken from oor may be increased by .875" or decreased by .375".
2. Moist air escapes from the door.
Use only moisture resistant materials adjacent to dishmachine sides and top.
3. A vent hood is not recommended above the undercounter dishmachine since it does not produce
excessive vapors.
PLUMBING NOTES:
1. Water hammer arrestor (meeting ASSE-1010 standard or equivalent) to be supplied (by others) in
common water supply line at service connection.
2. Recommended water hardness to be 3 grains or less for best results.
3. If drain hose is looped above a sink, the loop must not exceed 51" AFF.
CONNECTION INFORMATION
(AFF = ABOVE FINISHED FLOOR)
LEGEND
E1 ELECTRICAL CONNECTION: 1-3/8" DIA. HOLE
FOR 1" TRADE SIZE CONDUIT; 18-1/8" AFF.
P1 SINGLE FILL AND RINSE CONNECTION:
3/4" FEMALE GARDEN HOSE FITTING ON 6' LONG
HOSE SUPPLIED WITH MACHINE;
120°F WATER MIN. FOR LXGePR, 140°F
RECOMMENDED.
P2 DRAIN CONNECTION: 5/8" BARB FITTING WITH
6' LONG HOSE SUPPLIED WITH MACHINE.
MODEL VOLTS/HERTZ/PHASE
LXGePR 120/60/1 15.4 20 20
HEAT OUTPUT, BTU/HR
MODEL LATENT SENSIBLE
LXGePR 1900 800
SHIPPING WEIGHTS LXGePR
NET WEIGHT OF MACHINE 150 LBS
DOMESTIC SHIPPING WEIGHT 170 LBS
RATED
AMPS
MIN SUPPLY
CKT CONDUCT
AMPACITY
MAX
PROTECTIVE
DEVICES
INSTALLATION DIAGRAM (LXGePR, tall)
– 15 –
ACCESSORY CORD KITS AVAILABLE FOR ALL MACHINES
NOTE: FOR SUPPLY CONNECTIONS, USE COPPER WIRE ONLY
RATED AT 90°C MINIMUM.
Electrical and grounding
connections must comply with the applicable portions of
the National Electrical Code and/or other local electrical
codes.
Plumbing connections must comply with applicable
sanitary, safety and plumbing codes. Drain and ll line
congurations vary, some methods are shown on this
drawing.
higher than 65 PSIG are present, a pressure regulating valve must be installed in the water line to the
Required owing water pressure to the dishmachine is 15-65 PSIG. If pressures
dishmachine (by others).
Pressure gauge not provided on pumped rinse machines.
If chemical containers are to be placed in cabinet adjacent to machine, a 1/2" dia. hole is required in
the cabinet to run chemical supply line.
NOTES:
1. All vertical machine dimensions taken from oor may be increased by .875" or decreased by .375".
2. Moist air escapes from the door.
Use only moisture resistant materials adjacent to dishmachine sides and top.
3. A vent hood is not recommended above the undercounter dishmachine since it does not produce
excessive vapors.
PLUMBING NOTES:
1. Water hammer arrestor (meeting ASSE-1010 standard or equivalent) to be supplied (by others) in
common water supply line at service connection.
2. Recommended water hardness to be 3 grains or less for best results.
3. If drain hose is looped above a sink, the loop must not exceed 44" AFF.
CONNECTION INFORMATION
(AFF = ABOVE FINISHED FLOOR)
LEGEND
E1 ELECTRICAL CONNECTION: 1-3/8" DIA. HOLE
FOR 1" TRADE SIZE CONDUIT; 10-5/8" AFF.
P1 SINGLE FILL AND RINSE CONNECTION:
3/4" FEMALE GARDEN HOSE FITTING ON 6' LONG
HOSE SUPPLIED WITH MACHINE;
55-85°F (COLD) RECOMMENDED FOR LXGeR.
P2 DRAIN CONNECTION: 5/8" BARB FITTING WITH
6' LONG HOSE SUPPLIED WITH MACHINE.
MODEL VOLTS/HERTZ/PHASE
LXGeR 120/208-240(3W)/60/1* 30.5 40 40
HEAT OUTPUT, BTU/HR
MODEL LATENT SENSIBLE
LXGeR 1100 2000
SHIPPING WEIGHTS LXGeR
NET WEIGHT OF MACHINE 165 LBS
DOMESTIC SHIPPING WEIGHT 185 LBS
RATED
AMPS
MIN SUPPLY
CKT CONDUCT
AMPACITY
PROTECTIVE
DEVICES
INSTALLATION DIAGRAM (LXGeR, short)
MAX
– 16 –
* THIS SYSTEM REQUIRES THREE POWER WIRES WHICH INCLUDES
A CURRENT CARRYING NEUTRAL, AN ADDITIONAL FOURTH WIRE
MUST BE PROVIDED FOR MACHINE GROUND.
ACCESSORY CORD KITS AVAILABLE FOR ALL MACHINES
NOTE: FOR SUPPLY CONNECTIONS, USE COPPER WIRE ONLY
RATED AT 90°C MINIMUM.
Electrical and grounding
connections must comply with the applicable portions of
the National Electrical Code and/or other local electrical
codes.
Plumbing connections must comply with applicable
sanitary, safety and plumbing codes. Drain and ll line
congurations vary, some methods are shown on this
drawing.
higher than 65 PSIG are present, a pressure regulating valve must be installed in the water line to the
Required owing water pressure to the dishmachine is 15-65 PSIG. If pressures
dishmachine (by others).
Pressure gauge not provided on pumped rinse machines.
If chemical containers are to be placed in cabinet adjacent to machine, a 1/2" dia. hole is required in
the cabinet to run chemical supply line.
NOTES:
1. All vertical machine dimensions taken from oor may be increased by .875" or decreased by .375".
2. Moist air escapes from the door.
Use only moisture resistant materials adjacent to dishmachine sides and top.
3. A vent hood is not recommended above the undercounter dishmachine since it does not produce
excessive vapors.
PLUMBING NOTES:
1. Water hammer arrestor (meeting ASSE-1010 standard or equivalent) to be supplied (by others) in
common water supply line at service connection.
2. Recommended water hardness to be 3 grains or less for best results.
3. If drain hose is looped above a sink, the loop must not exceed 51" AFF.
CONNECTION INFORMATION
(AFF = ABOVE FINISHED FLOOR)
LEGEND
E1 ELECTRICAL CONNECTION: 1-3/8" DIA. HOLE
FOR 1" TRADE SIZE CONDUIT; 18-1/8" AFF.
P1 SINGLE FILL AND RINSE CONNECTION:
3/4" FEMALE GARDEN HOSE FITTING ON 6' LONG
HOSE SUPPLIED WITH MACHINE;
55-85°F (COLD) RECOMMENDED FOR LXGeR.
P2 DRAIN CONNECTION: 5/8" BARB FITTING WITH
6' LONG HOSE SUPPLIED WITH MACHINE.
MODEL VOLTS/HERTZ/PHASE
LXGeR 120/208-240(3W)/60/1* 30.5 40 40
HEAT OUTPUT, BTU/HR
MODEL LATENT SENSIBLE
LXGeR 1100 2000
SHIPPING WEIGHTS LXGeR
NET WEIGHT OF MACHINE 165 LBS
DOMESTIC SHIPPING WEIGHT 185 LBS
RATED
AMPS
MIN SUPPLY
CKT CONDUCT
AMPACITY
PROTECTIVE
DEVICES
INSTALLATION DIAGRAM (LXGeR, tall)
MAX
– 17 –
* THIS SYSTEM REQUIRES THREE POWER WIRES WHICH INCLUDES
A CURRENT CARRYING NEUTRAL, AN ADDITIONAL FOURTH WIRE
MUST BE PROVIDED FOR MACHINE GROUND.
ACCESSORY CORD KITS AVAILABLE FOR ALL MACHINES
NOTE: FOR SUPPLY CONNECTIONS, USE COPPER WIRE ONLY
RATED AT 90°C MINIMUM.
Electrical and grounding
connections must comply with the applicable portions of
the National Electrical Code and/or other local electrical
codes.
Plumbing connections must comply with applicable
sanitary, safety and plumbing codes. Drain and ll line
congurations vary, some methods are shown on this
drawing.

PROGRAMMING
MANAGER MODE PROGRAMMING
The LXGe series glasswasher’s microprocessor allows customization options for machine operation.
To activate or change these features, the programming edit mode must be entered.
The manager programming mode requires a MANAGER CODE to be entered to access the options
listed in the PARAMETERS MENU. The manager code is 1001.
PROGRAMMING INSTRUCTIONS
All customization is performed through the on-screen menu using the UP Arrow, MENU/DOWN Arrow,
and the ENT keys located on the keypad at the top of the machine (Fig. 4).
Fig. 4
MENU DISPLAY PROMPTS
The following prompts are used inside the menus:
• The UP arrow and MENU/DOWN arrow keys are used to change parameter values and to navigate
the menu.
• The ENT key is used to accept a value, to perform a specied action, or to enter a submenu.
• The text just to the right of the '>' symbol on the display screen shows what action or command
will occur if the ENT key is pressed.
– 18 –
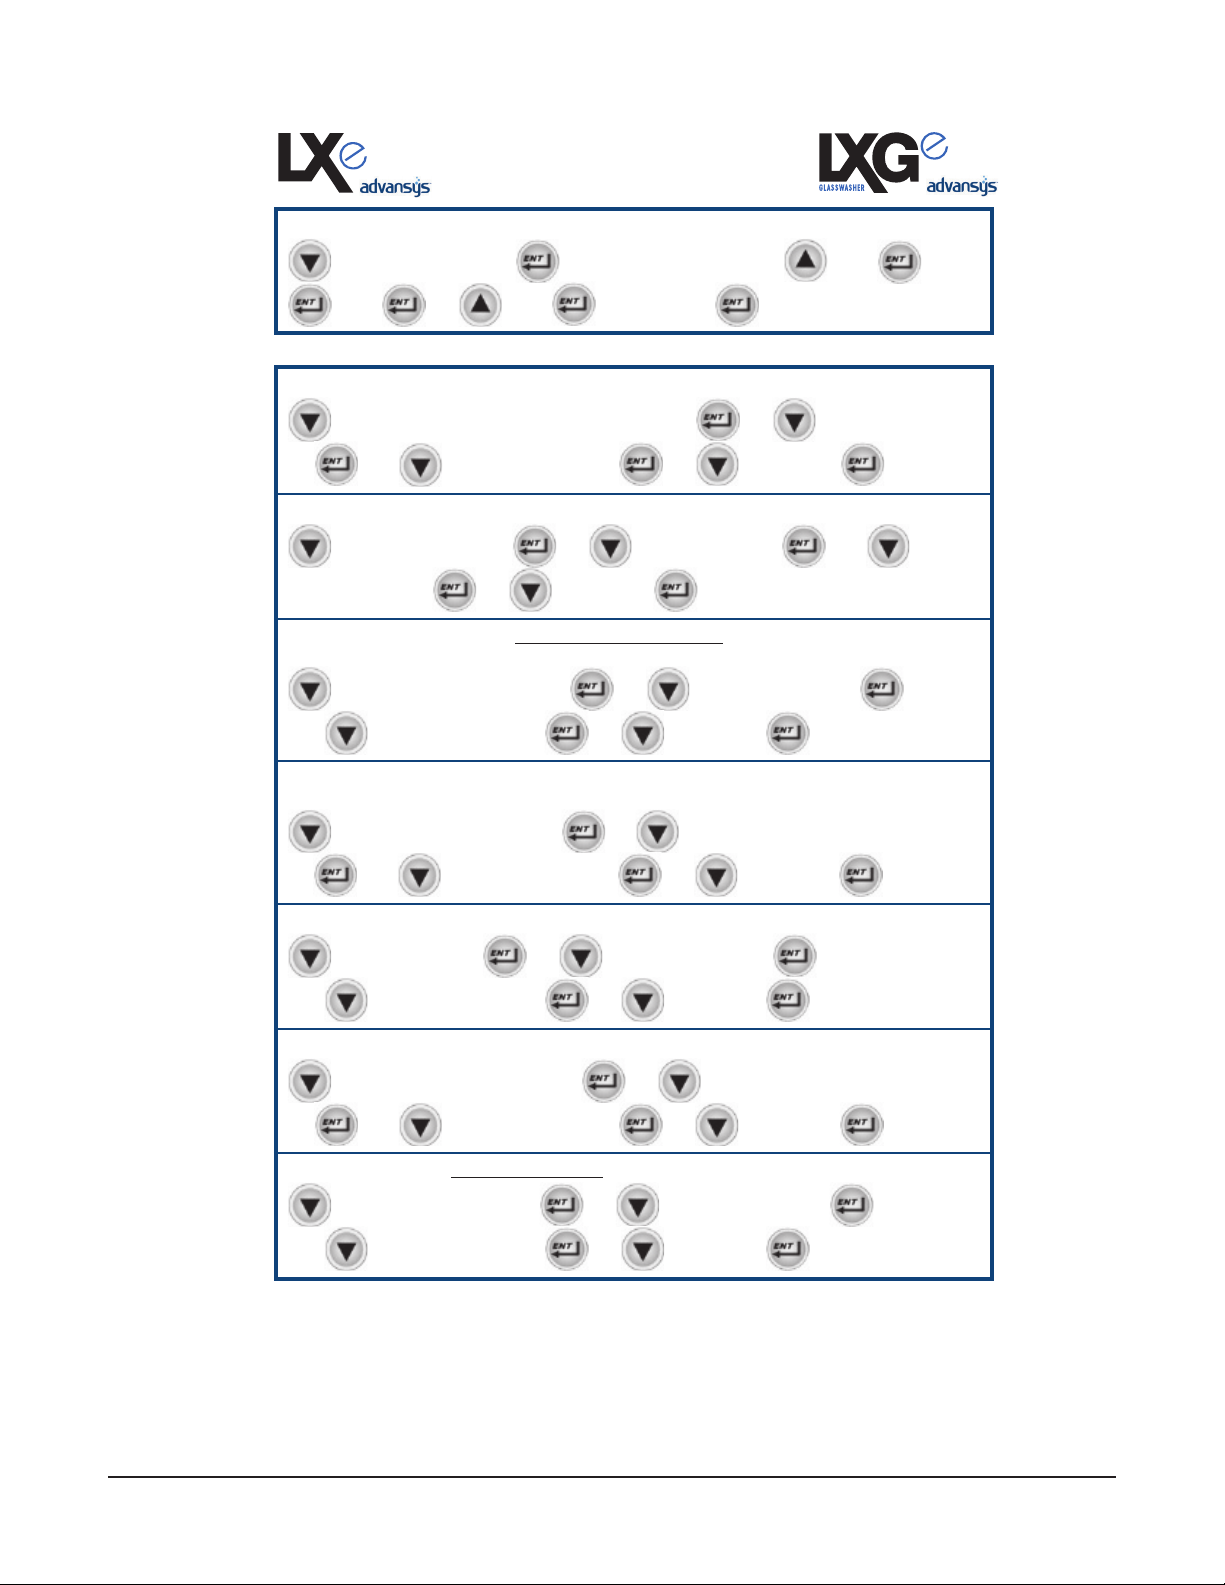
Manager Mode
UNDERCOUNTER
Programming Card
CHANGING PARAMETERS ENTER MANAGER SECURITY CODE: 1001
MANAGER MENU
➜
(for 0)
➜
➜ ➜
(for 1)
ENTER SECURITY CODE
Edit Parameters
➜
(for 1)
➜
CHANGING PARAMETERS IS REQUIRED TO CHANGE ALL CODES BELOW
CHEMICAL PUMP
until DETERGENT PUMP or RINSE AID PUMP
➜
➜
OR
➜
enable or disable the detergent pump or rinse aid pump.
➜ ➜
until EXIT MENU
➜ ➜
until EXIT
to enable or disable
➜
WASH CYCLE allows the customization of total run time.
until CYCLE TIME
➜
until EXIT MENU
➜ ➜
➜ ➜
until EXIT
to choose cycle,
➜
➜
OR
➜
LOW TEMP ALARMS for hot machines only: (parameter) enables or disables alert indicating
that the final rinse temperature has been below the minimum temperature for a period of time.
OR
➜
until LOW TEMP ALARMS
➜
until EXIT MENU
➜ ➜
➜ ➜
to enable or disable
until EXIT
➜
➜
WASH ARM ALARM enables or disables an alarm that alerts the operator that the wash arms
may be clogged or blocked.
➜
until WASH ARM ALARM
➜
OR
➜
➜ ➜
until EXIT MENU
➜ ➜
to disable, Visual, or Audio & Visual
until EXIT
➜
DELIME enables or disables the delime reminder alert.
OR
➜
until DELIME
➜
➜ ➜
until EXIT MENU
➜ ➜
to enable or disable
until EXIT
➜
➜
TEMPERATURE UNITS allows the choice of Fahrenheit or Celsius.
until TEMPERATURE UNITS
➜
➜
OR ➜
➜ ➜
until EXIT MENU
➜ ➜
to choose Fahrenheit or Celsius
until EXIT
➜
POTABLE RINSE for cold machines only enables or disables the potable water rinse option.
OR
➜
until POTABLE RINSE
➜
until EXIT MENU
➜ ➜
➜ ➜
to enable or disable
until EXIT
➜
➜
– 19 –
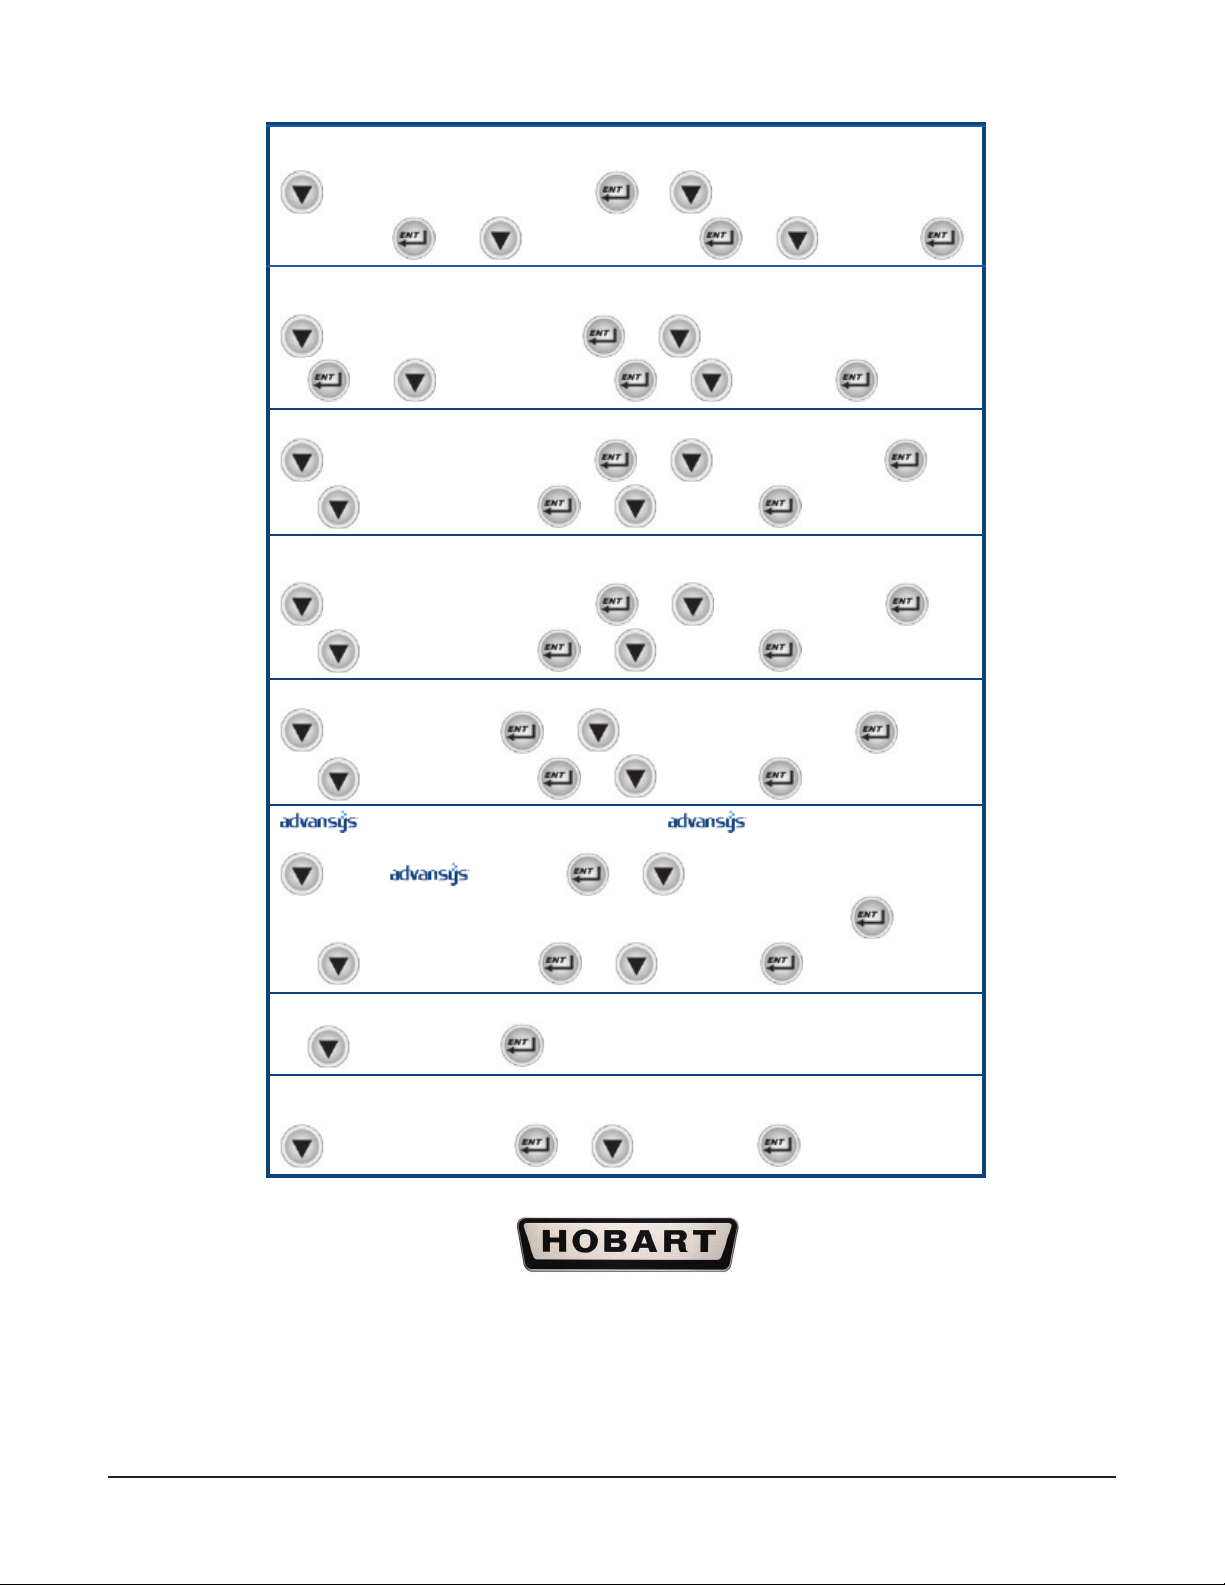
DIRTY WATER INDICATOR disables or gives a choice of how many cycles the machine will
run between dirty water alert and refresh cycles.
until DIRTY WATER INDICATOR
➜
➜ ➜
to Disable, 20 cycles, 40 cycles,
or 60 cycles
➜
OR ➜
until EXIT MENU
➜ ➜
until EXIT
➜
ENERGY SAVER MODE disables or gives choice of how many hours before the unit will
stay on before entering energy saving mode.
until ENERGY SAVING MODE
➜
➜
OR ➜
➜ ➜
until EXIT MENU
➜ ➜
to Disabled, 1 Hour, 2 Hours, or 3 Hours
until EXIT
➜
ADD CHEMICAL ALERT enable or disable the audio alert of missing chemicals.
OR
➜
until ADD CHEM AUDIO ALERT
➜
until EXIT MENU
➜ ➜
➜ ➜
to enable or disable
until EXIT
➜
➜
END CYCLE AUDIO ALERT enable or disable the unit creating an audio alert at the end of
each wash cycle.
OR
➜
until END CYCLE AUDIO ALERT
➜
until EXIT MENU
➜ ➜
➜ ➜
to enable or disable
until EXIT
➜
➜
LANGUAGE allows the choice of English, French or Spanish language.
OR
until LANGUAGE
➜
until EXIT MENU
➜
➜ ➜
➜ ➜
to English, French or Spanish
until EXIT
➜
➜
of options.
until BUTTON
➜
➜ ➜
One Normal Wash, One Heavy Wash (LXe only), Run Delime Cycle, or Energy Saver
OR
until EXIT MENU
➜
➜
➜
EXIT MENU TO MAIN MANAGER MENU
until EXIT MENU
➜
➜
to: Clean Sump, One Light Wash,
until EXIT
➜
➜
DELIME NOW allows for a single delime cycle to be run from the menu at anytime.
BUTTON allows the customization of the button to be used for a variety
Note: this operation takes 20-45 minutes depending on conditions.
until DELIME NOW
➜
➜ ➜
to YES or NO
➜
(this will exit menu)
701 South Ridge Avenue, Troy, OH 45374-0001
– 20 –
Parameter
Name
Advansys
Models
(LXGePR,
LXGeR)
PARAMETERS MENU TABLE
Description
Possible
Values
Default
Value
Detergent
Pump
Rinse Aid
Pump
Wash Cycle
Low Temp
Alarms
Wash Arm
Alert
Delime
Temperature
Units
Potable Rinse
✓
✓
✓
LXGeR
Only
✓
✓
✓
LXGePR
Only
Enables or disables the detergent pump.
Enables or disables the rinse aid pump.
Sets the cycle duration. Light or Normal Light
Enables or disables a visual alert on the
display that indicates that the Final Rinse water
temperature is below the required minimum of
180°F (82°C). When enabled, a message will
display notifying the user of this condition after
three consecutive cycles do not reach the required
nal rinse temperature. However, machine
operation will not change and ware will continue
to wash as expected. After the temperature
increases past the minimum, the message stops.
When disabled, there will be no extra message
indicating a low temperature event; however, the
temperature display will still show the current Final
Rinse water temperature.
Enables Visual Alert, Audio and Visual Alert,
or disables an alert that is displayed when the
machine detects a wash arm that is clogged or
blocked such that ware wash results could be
affected.
Enables or disables the alert to delime option.
Sets the display units to either Fahrenheit or
Celcius.
On LXGePR machines, this setting enables or
disables the PuriRinse option that sprays fresh
water after the sanitization cycle to remove the
sanitizer from the ware.
Disabled or
Enabled
Disabled or
Enabled
Disabled or
Enabled
Disabled,
Visual, or
Audio and
Visual
Disabled or
Enabled
Fahrenheit or
Celcius
Disabled or
Enabled
Enabled
Enabled
Disabled
Disabled
Enabled
Fahrenheit
Enabled
– 21 –
Parameter
Name
Dirty Water
Indicator
Energy Saver
Mode
Add Chemical
Alert
End Cycle
Audio Alert
Language
Advansys
Button
Advansys
Models
(LXGePR,
LXGeR)
✓
✓
✓
✓
✓
✓
Description
On Advansys machines, this setting allows for
a reminder for the operator to be notied that 20,
40, or 60 cycles have passed and a special water
refresh cycle is recommended. This cycle will
drain a portion of the wash water and refresh it
with fresh hot water.
On Advansys machines, this setting will control
when the machine will turn the heaters off in order
to save energy when not in use.
Enables or disables an audible alert if chemical is
not being detected.
Enables or disables an audible alert at the end of
a cycle.
Sets the language on the display to either English
or French.
Choose function for Advansys button.
Possible
Values
Disabled,
20, 40, or 60
cycles
Disabled, 1, 2,
or 3 hours
Disabled,
Visual, or
Audio and
Visual
Disabled or
Enabled
English (US)
or French
(Canada)
1. Not
programmed
2. Clean the
sump
3. One light
wash
4. One normal
wash
5. Run delime
cycle
6. Energy
saver
Default
Value
Disabled
2 hours
Audio and
Visual
Disabled
English (US)
Not
Programmed
From
Factory
Exit Menu
✓
Press ENT to exit the Parameters Menu and
return to the Manager Menu. Any settings that
were changed are saved.
– 22 –

OPERATING THE LXGe GLASSWASHER
DO THIS DISPLAY SHOWS REMARKS
Press ON. Model number. Glasswasher performs self-
check. This takes 5 seconds.
FILL and ll icon lit; sump temperature displayed when ma-
chine is lling.
Glasswasher lls with water.
When lled, pump turns on for
10 seconds.
WARMING UP and warming up
icon are displayed when booster
is preheating on models LXGeR.
This preheat could take up to
15 minutes.
During ll, sump temperature is
displayed.
Open door; slide rack of dishes
into glasswasher. Close door.
Press WASH. WASH and wash icon lit; sump
READY lit and sump temperature displayed.
temperature displayed during
wash cycle.
RINSE and rinse icon lit; rinse
temperature displayed during
rinse cycle.
If door is opened during ll
cycle, ll will stop. After door is
closed, the process continues
where it stopped.
When lled, machine will maintain an idle state. Heat is maintained in both sump and/or
booster.
Detergent will be added automatically during wash cycle.
Rinse Aid and Sanitizer will be
added automatically during rinse
cycle. (NOTE: Sanitizer only
used on LXGePR models.)
Machine initiates a wash and
rinse cycle.
If door is opened during wash,
rinse, or drain cycle, cycle will
continue at point where door
was opened upon closing door.
When cycle is complete, reload
machine for next wash/rinse
cycle; or, if not in use, machine
will maintain idle mode.
At the end of the day, press
POWER.
READY lit and sump temperature displayed.
DRAIN and SHUTDOWN IN
PROGRESS are displayed; then
the display shuts down.
– 23 –
If POWER is pressed during
cycle, machine will drain and
shut down.
Machine will drain and shut
down if the four hour idle shutdown time is reached.
When POWER key is pressed,
machine will drain and shut
down.
DIAGNOSTIC/ERROR MESSAGES
Error Display Description
Door Open Door Open
WASH ARM ALERT
Clogged/
Blocked Wash
Arm
Low Rinse
Temperature
Low Rinse
Temperature
(10 In A Row)
Wash
Thermistor
Error
Booster
Thermistor
Error
Final Rinse
Thermistor
Error
- Remove & clean arm
- Check nozzles
- Replace arm
- Close door
LOW RINSE TEMP
LOW RINSE TEMP
Check Water Input
WASH TEMP SENSOR
Service Required
(Service Phone Number)
OPEN or SHORT
BOOSTER TEMP SENSOR
Service Required
(Service Phone Number)
OPEN or SHORT
RINSE TEMP SENSOR
Service Required
(Service Phone Number)
OPEN or SHORT
Displayed when the door of the machine
is opened.
Displayed if wash arm is blocked or
clogged which would result in poor wash
results. Follow on-screen instructions.
After two consecutive low temperatures,
if problem occurs on the third
consecutive cycle, the error will display.
The machine will continue to run cycles.
If the Low Rinse Temperature error
occurs for 10 consecutive cycles, the
error will change. The machine will
continue to run cycles.
Error displayed if wash temperature
probe is out of range. The machine will
continue to run cycles.
Error displayed if booster temperature
probe is out of range. The machine will
continue to run cycles. (LXGeR only)
Error displayed if nal rinse temperature
probe is out of range. The machine will
continue to run cycles.
Low Water In
Booster (Time
Out Within Any
Cycle)
Drain Error
Sump Level
Error
Booster Level
Error
FILL ERROR
Service Required
(Service Phone Number)
DRAIN ERROR
Service Required
(Service Phone Number)
SUMP LEVEL SENSOR
Service Required
(Service Phone Number)
OPEN or SHORT
BOOSTER LEVEL SENSOR
Service Required
(Service Phone Number)
OPEN or SHORT
Error displayed if the unit times out
before the unit is completely lled. The
machine will not operate and will only
allow power down.
Error displayed if the water level in the
unit will not come up. The machine will
not operate and will only allow power
down.
Error displayed if sump pressure switch
is out of range. The machine will not
operate and will only allow power down.
Error displayed if booster pressure switch
is out of range. The machine will not
operate and will only allow power down.
– 24 –

WASH/RINSE CYCLE TIMES (LXGePR) WASH/RINSE CYCLE TIMES (LXGeR)
COARSESTRAINER
FINESTRAINER
Wash 56 Seconds ** Wash 56 Seconds *, **
Drain 18 Seconds Max Drain 18 Seconds Max
Rinse 8 Seconds Rinse 8 Seconds
Dwell 10 Seconds Dwell 5 Seconds
PuriRinse 7 Seconds Condense 105 Seconds Max
* Maximum wash time may vary, depending on operation voltage and incoming water temperature
for 70
°F rise on LXGeR machines.
** Wash cycle time can be adjusted to a 56- or 85- second cycle.
PREPARATION
Make sure the coarse (Fig. 6) and ne (Fig. 7) strainers are in place and free of debris. Ensure that the
coarse strainer is installed with the handle towards the front of the machine. Check both wash arms
and rinse arms to make sure they spin freely and are not clogged.
Fig. 6 Fig. 7
– 25 –

Check to see if any detergent, rinse aid or sanitizer chemicals need to be replenished. Use only
commercial-type detergents, as prescribed by your chemical professional.
DO'S AND DON'TS FOR YOUR NEW HOBART GLASSWASHER
DO assure proper water hardness.
DO prescrape dishes thoroughly.
DO use only detergents recommended by your chemical professional.
DO at the end of the day, thoroughly clean the machine, rinse and dry. (Leave door open.)
DO use only products formulated to be safe on stainless steel.
DO NOT use detergents formulated for residential glasswashers.
DO NOT allow food soil to accumulate on the tank bottom.
DO NOT exceed chemical manufacturer's recommended concentrations for detergent, sanitizer, rinse
aid or lime scale remover.
DO NOT use steel wool to clean ware or glasswasher surface.
DO NOT allow foreign objects to enter the unit, especially metallic contaminants.
– 26 –

CLEANING
This machine must be cleaned at least once each working day. Use only products formulated to be safe
on stainless steel.
1. Press POWER. The machine will drain. When the display is no longer lit, open the door and remove
any debris from the bottom of the tank. Do not allow food soil to accumulate on the tank bottom.
2. Remove the lower rinse arm by pressing in on the buttons located on the sides of the center hub
and pull off (Fig. 8). Remove the lower wash arm by pulling the arm off the shaft. Remove the
upper rinse and wash arms in the same manner. Remove the coarse and ne strainers (see Figs.
6 and 7). Thoroughly clean these items in a sink. Remove debris from wash/rinse arm nozzles.
RINSE ARM
CENTER HUB
BUTTONS
LXGePR & LXGeR
Fig. 8
3. With a damp cloth, wipe the interior of the machine. DO NOT use steel wool. Wipe the exterior
of the machine. Remove any remaining debris with a mild cleanser formulated for stainless steel
and a soft cloth or brush.
4. Replace the ne and coarse strainers. Reinstall the lower wash arm by pushing it down on the
shaft. Press in on the buttons located on the sides of the center hub, place the rinse arm on the
shaft, and release. Spin arms to make sure they spin freely. Repeat this procedure with the upper
wash and rinse arms.
5. Use a soft, damp cloth or sponge and mild cleanser to clean the control keypad and display. DO
NOT use abrasive or harsh cleaners or scouring pads.
6. Leave the door ajar overnight to allow the interior to air out and dry. The door design allows for
the door to remain partially open and can be used to vent the machine at the end of the day.
– 27 –

MAINTENANCE
Maintenance and regular care is important to maintain optimal results with your Hobart glasswasher.
DELIMING
Deliming solution, rinse agents or any other kind of acid must not come in contact
with bleach or rinse solution containing bleach used in chemical-sanitizing machines. Mixing
may cause hazardous gas to form. This entire procedure must be followed step by step for safe
and satisfactory results.
Do not allow the deliming agent to remain in the machine longer than recommended by the
deliming agent manufacturer.
DELIME THE GLASSWASHER ON A REGULAR BASIS AS REQUIRED. The regularity will depend
on mineral content of the supply water. Deliming should be done when you can see clear signs of lime
deposits (a white, chalky substance) on the inside walls and on the wash arms. All LXGe glasswashers
are equipped with an automatic delime cycle reminder and are equipped with an internal delime pump
which will automatically pump the required amount of deliming agent into the unit.
If deliming is necessary, a deliming agent (such as Lime-A-Way ® or LSR ®) should be used for best results.
After the preprogrammed number of cycles has expired, the control will indicate the delime request
by displaying DELIME RECOMMENDED and will prompt ‘Would you like to delime now?’. You must
enter ‘Yes’ or ‘No’ to proceed with a delime cycle or to continue with normal machine operation. If ‘No’
is selected, the machine will continue to notify the operator at each start-up and power down until the
delime cycle is completed. To delime the unit:
1. Press the MENU/DOWN Arrow key until the ‘>’ symbol is shown to the left of ‘Yes’ and press the
ENT key.
2. Remove dish rack from machine.
3. Remove strainers from machine and clean. Replace strainer, empty rack and close door.
4. Ensure delimer chemical container is not empty. Be sure to push the delivery tube standpipe
completely to the bottom of the container. Check to make sure there are no obstructions or kinks
in the delivery tube.
5. Press ENT key to enter the delime mode. The machine will drain and rell with fresh water.
6. The unit will automatically enter the wash mode for 10 minutes, then will begin two rinse and drain
operations after the ll cycle is complete.
7. After the deliming operation is completed, power to the control will be turned off.
8. Inspect the interior of the machine for lime deposits. If necessary, another delime cycle can be
initiated by entering the Manager Programming Mode.
LUBRICATION
The pump motor has permanently sealed bearings and requires no lubrication.
– 28 –
TROUBLESHOOTING
This section outlines various symptoms and possible causes that may be encountered in the event of
abnormal machine operation. If symptoms persist after possible causes have been checked, service
may be required.
Symptom Possible Causes
No machine operation (no display). 1. Machine OFF - turn machine ON.
2. Blown fuse or circuit breaker off at power supply.
3. Cord not plugged in (corded models only)
No machine operation (with display). 1. Display: "DOOR OPEN" - open and close door. If
problem persists, contact your local Hobart Service
Ofce.
2. See "Machine will not ll or will not ll high enough".
Glasses not clean. 1. Strainers clogged causing inadequate water supply
to pump - clean according to instructions. (See
CLEANING.)
2. Obstruction in wash arm(s) or wash arms will
not turn - clean according to instructions. (See
CLEANING.)
3. Wash and/or rinse arms will not turn - check that
they spin freely.
4. Detergent dispenser may be clogged.
5. Soil quantity - scrape dishes before cycle.
6. Improper rack loading. (See PREPARATION.)
7. Low water - check water supply.
8. Water temperature too low - note wash temperature
on display during WASH; should be above 120°F for
chemical sanitizing machines and above 150°F for
high temperature machines.
9. Incoming water supply turned off.
Spotting of silverware, glasses, or
dishes.
Chemicals not feeding. 1. Low on chemicals - check levels.
Food soils remain in glasswasher.
Appearance of rust in machine. 1. Ensure steel wool is not used to clean machine.
1. Improperly loaded racks.
2. Water temperature too low.
3. Improper type or concentration of detergent contact your chemical representative.
4. Hard water - install a water softener; use a rinse
agent.
5. Insufcient ll - check water supply.
2. Air leak at feeder hose connections - check insertion
of quick connect ttings and wire ties at tube to tube
connections.
3. Tubes kinked - check for smooth bends.
Follow daily cleaning instructions. (See CLEANING.)
2. May be due to high iron content in water supply.
– 29 –
Symptom Possible Causes
Unexpected results on
glasses or other ware.
Low temperature readings. 1. Low water supply temperature - make sure it meets
1. Etching - usually caused by any combination of high
temperatures, soft water, soft glass, or high alkaline
washing solutions.
2. Tarnishing - avoid washing silver, silver plates, and
pewter in chemical sanitizing machines.
3. Pitting - stainless steel may pit with lengthy contact
of foods containing salt, fruit juices, vinegar, etc.
Wash immediately.
4. Black or gray marks - may have been rubbed with
aluminum.
5. Brown stains - may be due to high iron content in
water supply.
6. Chipping - improper loading or glasses are too
delicate.
7. Wooden ware damage - avoid washing in glasswasher.
8. Rust on cast iron - seasoning is lost in glasswasher.
Avoid washing in glasswasher.
9. Plastic ware distortion - high temperatures. Check
plastic ware's instructions.
the recommended minimum temperature.
2. Rapid cycle use - if incoming water temperature is
low and cycle use rate is high, the hot water supply
may be insufcient to meet the demand.
3. Heavy ware load cools wash water - do not overload
racks.
4. Booster heater or sump heater set low - contact your
local Hobart Service Ofce.
Machine will not ll or will not
ll high enough.
Machine lls too high or
leaks from door.
Machine will not drain. 1. Drain pipes restricted - check glasswasher drain line
Some water occasionally drips out
of rinse arms (high temperature
glasswashers only).
1. Low water pressure - check for clogged hose
strainer; ensure the site water pressure meets
minimum ow pressures.
2. No water ow - main water supply valves may not be
working.
1. Machine not level. (see LEVELING.)
2. Fill solenoid valve leaking - power the glasswasher
OFF; if water continues to ow into the machine,
contact your local Hobart Service Ofce.
for kinks; ensure proper drain rate is allowed from
plumbing.
2. Power machine OFF. Wait several seconds and
then power back ON. Repeat this procedure twice
if necessary. If problem persists, contact your local
Hobart Service Ofce.
This is normal due to expansion of water being heated in
the booster tank.
– 30 –
Installation, fonctionnement et entretien des
LAVE-VERRE DE LA GAMME LXGe
CONSERVEZ CE MODE D’EMPLOI
DESCRIPTION GÉNÉRALE
Les lave-verre de la gamme LXGe sont entièrement automatiques à chargement frontal. Les lave-verres
de la série LXGe sont capables de traiter entre 24 et 38paniers à l’heure.
Dans le but de conserver l’énergie, tous les lave-verre de la gamme LXGe s’arrêtent
automatiquement 4 heures après la dernière utilisation.
Tous les lave-verre de la série LXGe sont équipés du surchauffeur Sense-A-Temp
température d’eau chaude adéquate lors du rinçage.
Les appareils sont livrés de série avec un panier pour verres à vin, des commandes électroniques,
une pompe de vidange, une pompe de rinçage, des doseurs de produits chimiques, un boyau de
remplissage et un boyau de vidange.
MODÈLE DESCRIPTION
LXGePR Ce sont des modèles à assainissement chimique fonctionnant à basse
température et dont le rinçage se fait à l’eau fraîche; l’agent d’assainissement
est une solution d'hypochlorite de sodium à 6% (javellisant). REMARQUE:
si vous devez utiliser un javellisant à 8,4%, veuillez contacter le Service de
l’entretien Hobart ou votre fournisseur de produits chimiques pour modier les
réglages du doseur d’assainissement (il se peut qu’il y ait des frais).
LXGeR Rinçage à l’eau fraîche avec un surchauffeur intégré capable d’élever
la température de 70°F (39°C). Cela permet une température d’eau de
distribution à 110°F (43°C)
MD
assurant une
* - L’agent d’assainissement doit être utilisé en conformité avec les directives de l’étiquette EPA enregistrée.
– 31 –

INSTALLATION
DÉBALLAGE
Aussitôt après avoir déballé le lave-verre, vériez si des dommages peuvent être survenus lors de
l’expédition. Si cet appareil a été endommagé, conservez le matériel d’emballage et contactez le
transporteur dans les 15jours suivant la livraison.
EMPLACEMENT
Avant l’installation, assurez-vous que la source électrique concorde avec les spécications de la
plaque signalétique de l’appareil qui se trouve au-dessus de la porte.
Pendant l’utilisation normale, il se peut que de la vapeur s’échappe par la porte. Les bois stratiés,les
placages, etc. sont des matériaux inadéquats pour utilisation dans des endroits exposés à lavapeur
d’un lave-verre et aux détergents. Il est recommandé d’utiliser de l’acier inoxydable ou un autre
bouclier résistant à l’humidité sur les surfaces à proximité des côtés et du dessus de l’appareil LXGe.
MISE DE NIVEAU
Pour bien fonctionner, l’appareil doit être mis de niveau. Placez le lave-verre à l’endroit où il doit
être utilisé. Mettez l’appareil de niveau avant de faire quelque raccordement que ce soit. À l’aide
d’un niveau de charpentier posé en diagonale sur les rails du panier, mettez l’appareil de niveau de
l’avant vers l’arrière et d’un côté à l’autre en vissant ou dévissant les pieds réglables.
BESOINS EN EAU
Une bonne qualité d’eau peut améliorer les performances de lavage en réduisant les taches, en
rehaussant l’efcacité du travail et en augmentant la durée de vie de l’appareil. Les conditions de
l’eau varient d’un endroit à l’autre. Le système de traitement d’eau approprié à recommander pour
une utilisation efcace et efciente de cet équipement variera lui aussi selon les conditions de l’eau
locale. Avant l’installation, demandez les détails sur la condition de l’eau locale à votre fournisseur
d’eau municipal.
La dureté d’eau recommandée est de 3grains par gallon US (20,58ppm) ou moins. Une dureté d’eau
plus élevée peut être cause d’une formation excessive de calcaire. Une dureté d’eau au-dessus de
3grains/gal US (20,58ppm) exige que l’eau soit traitée. Il a été démontré que le traitement de l’eau
réduit les coûts reliés au nettoyage du lave-verre, diminue le détartrage du lave-verre, de même que la
quantité de détergent utilisée.
ATTENTION Une source d’eau à haute teneur en fer peut causer des taches et peut rendre
nécessaire la mise en place d’un système de ltration du fer. Un niveau de chlorure élevé dans l’eau peut
être cause de piqûres et il peut être nécessaire d’installer un système de traitement des chlorures.
Pour une eau traitée adéquatement, consultez votre professionnel local de traitement de l’eau.
Les sédiments peuvent nécessiter un ltre spécial. Les matières dissoutes peuvent exiger un
traitement d’eau, tel qu’un adoucisseur, un système à osmose inversée, etc. Pour une eau traitée
adéquatement, consultez votre professionnel local de traitement de l’eau.
Si l’inspection du lave-verre ou du surchauffeur révèle une accumulation de calcaire après que
l’équipement ait été mis en service, le traitement de l’eau est recommandé. S’il y a déjà un
adoucisseur d’eau en place, assurez-vous que le niveau de sel est sufsant. Contactez le bureau
Hobart de votre région pour des recommandations particulières.
– 32 –

Un antibélier (conforme à la norme ASSE-10 ou équivalent) devrait être mis en place (par un tiers)
dans la conduite d’alimentation de l’eau générale au point de raccordement.
Le plombier qui raccorde cet appareil est responsable de s’assurer que les conduites d’eau SOIENT
PARFAITEMENT RINCÉES AVANT de les raccorder au lave-verre. Ce «rinçage» est nécessaire pour
retirer toutes les matières étrangères, telles que les copeaux provenant de la coupe ou du letage
des tuyaux et la pâte à joint dans les conduites; ou, si des joints soudés sont utilisés, les débris du
soudage ou du coupage des tuyaux. Les débris qui n’auraient pas été retirés peuvent venir se loger
dans les composants de la plomberie du lave-verre et les rendre inopérants. Les robinets manuels
ou électromagnétiques endommagés par des corps étrangers et tous les frais qui en résulteraient ne
sont PAS la responsabilité du fabricant et ne sont pas couverts par la garantie.
Les besoins en alimentation d’eau sont les suivants:
MODÈLE TEMPÉRATURE
LXGePR Minimale 120°F (49°C)
LXGeR Minimale 55°F (12,7°C), maximale 85°F (29°C)
REMARQUE: quand il s’agit d’une installation d’un appareil LXGeR et si la température de
l’alimentation d’eau froide se situe systématiquement au-dessus de 80°F (26,7°C) ou si des
vapeurs d’eau ou de la vapeur pénètrent dans la salle après la n du cycle de condensation,
contactez le Service de l’entretien de Hobart pour faire relever le temps de condensation.
La pression dynamique requise de l’eau au lave-verre est de 15 à 65lb/po² (103,4kPa à 448,1kPa).
Si des pressions supérieures à 65lb/po² (448,1kPa) sont présentes, il faut installer un régulateur de
pression sur la conduite d’eau de distribution au lave-verre (par un tiers). Si la pression dynamique est
inférieure à 15lb/po² (103,4kPa), un mauvais fonctionnement de l’appareil peut se produire. Tous les
lave-verre LXGe sont dotés d’un système de rinçage par pompage; un manomètre de pression n’est
donc pas nécessaire et n’est pas livré avec l'appareil.
ATTENTION Le régulateur de pression doit être équipé d’un dispositif de dérivation. La
non-utilisation d’un type de régulateur adéquat peut entraîner des dommages à l’appareil.
Un robinet d’arrêt manuel (non livré) devrait être installé en amont du boyau de remplissage pour
faciliter l’entretien de l'appareil.
Il est recommandé d’installer un ltre à tamis (non livré) sur la conduite d’alimentation d’eau
entre le robinet d’arrêt manuel (non livré) et le point de raccordement de l’appareil. Il faut faire les
raccordements avec un tuyau de cuivre d’un diamètre extérieur minimal de ½po (12,7mm) [¾po
(19mm) recommandé] et un raccord de boyau d’arrosage mâle de ¾po (19mm) (non livré). Voir les
schémas d’installation aux pages14 et 17.
RACCORDEMENTS DE PLOMBERIE
!
AVERTISSEMENT
Les raccordements de plomberie doivent se faire en conformité avec
les codes d’hygiène, de sécurité et de plomberie en vigueur.
Vidange
Un boyau de vidange d’un diamètre interne de 5/8po (15,8mm) et d’une longueur de 6pi (1829mm)
est livré avec l’appareil. Il devrait être raccordé solidement à un point de vidange. Faites attention de
ne pas entortiller le boyau. Voir les schémas d’installation aux pages14 et 17. Le système de vidange
doit avoir une capacité d’écoulement de 5gal US/minute (18,9l/m).
– 33 –

AVANT LA PREMIÈRE UTILISATION
Cette machine doit être nettoyée après l'installation et avant de la mettre en marche. (vous reporter
àNettoyage)
CONNEXIONS ÉLECTRIQUES
!
Les connexions électriques et de mise à la terre doivent être conformes
AVERTISSEMENT
aux sections pertinentes du Code national de l’électricité et de tous les autres codes électriques
en vigueur.
Déconnectez le courant électrique à l’appareil et observez les normes
!
AVERTISSEMENT
de verrouillage et d’étiquetage.
DONNÉES ÉLECTRIQUES
En conformité au Code national de l’électricité NFPA-70, édition la plus récente.
Pour les connexions à la source, n’utilisez que du l de cuivre d’une capacité
ATTENTION
nominale minimale de 90°C.
Modèle Volts/Hertz/Phase Courant minimal admissible du
circuit d’alimentation (Ampères)
LXGePR 120/60/1 20 20
LXGeR
120/208-240(3F)/60/1* 40 40
Courant maximal admissible du
dispositif de protection (Ampères)
*Les systèmes (3F) exigent 3ls d’alimentation comprenant un l neutre sous tension. Un quatrième
l supplémentaire est nécessaire pour la mise à la terre de l’appareil.
Pour une sélection adéquate, veuillez vous référer au dessus de la poignée de la porte de l’appareil
et à l’étiquette électrique se trouvant au dos du panneau inférieur avant.
– 34 –

Méthode de connexion
1. Enlevez le panneau inférieur avant en retirant les deux vis au bas du panneau (g.1).
REMOVE TWO SCREWS
RETIREZ LES DEUX VIS
Fig.1
2. Ouvrez la porte du lave-verre et retirez les deux vis de gauche et la vis en haut du côté droit
(g.2). Tirez le dessus de l’appareil vers l’avant pour qu’il sorte d’environ 1po (25,4mm) et
enlevez le panneau latéral gauche.
RETIREZ LES TROIS VIS
REMOVE THREE SCREWS
Fig.2
– 35 –

3. Un trou d’une grosseur commerciale de 1po (25,4mm) est percé du côté droit inférieur à
l’arrière de l'appareil (g.3). Si le manque d’espace l’exige, retirez la débouchure et utilisez un
raccord de 45°.
KNOCKOUT
DÉBOUCHURE
Fig.3
4. Installez un raccord de conduit de la taille commerciale de 1po (25,4mm). Laissez une longueur
de l d’au moins quatre pieds (1210mm) entre la connexion murale et l’appareil. L'appareil peut
ainsi être tiré du mur pour procéder au nettoyage ou à l'entretien.
5. Passez les ls à travers la base jusqu’à l’avant de l’appareil. À partir du raccord de conduit, la
longueur de l requise doit être d’au moins 24po (600mm) et ne pas dépasser 28po (710mm).
6. Faites les connexions électriques selon le schéma de câblage livré avec l’appareil et xez les
ls au point de connexion de l’appareil. L’excédent de l dans la base de l'appareil doit être le
plus court possible.
7. Remettez en place le panneau latéral gauche, le dessus et le panneau inférieur avant. Revissez
les trois vis situées derrière la porte et les deux vis au bas du panneau inférieur avant.
DÉTERGENT ET AGENT DE RINÇAGE
N’utilisez que du détergent de classe commerciale recommandé par votre professionnel en produits
chimiques. Ne pas utiliser les détergents conçus pour les lave-verre domestiques.
Le temps D’ACTIVATION des doseurs à détergent et agent de rinçage est xé en usine. Si des
ajustements sont nécessaires, contactez le bureau du Service de l’entretien Hobart de votre région
ou votre fournisseur de produits chimiques.
Posez les contenants de détergent et d’agent de rinçage (fournis par un tiers) sous le lave-verre.
Retirez la capsule du contenant de détergent et insérez-y le tube de distribution rouge en pinçant le
raccord de bouteille sur le contenant.
Retirez la capsule du contenant d’agent de rinçage et insérez-y le tube de distribution bleu.
Assurez-vous d’enfoncer les tubes jusqu’au fond de chacun des contenants. Vériez s’il n’y a pas
d’obstructions ou d’angles de cassure dans les tubes de distribution.
– 36 –

ASSAINISSEMENT CHIMIQUE (LXGePR)
ATTENTION
Certains articles de métal tels que l’étain, l’aluminium et l’argent seront
attaqués par l’hypochlorite de sodium (javellisant). Il est en conséquence déconseillé de laver
de tels articles dans un lave-verre à assainissement chimique.
Le doseur à produits chimiques du modèle LXGePR est préréglé en usine pour des solutions
d’hypochlorite de sodium d’une teneur de 6 %.
ATTENTION
S’il faut utiliser une solution d’hypochlorite de sodium d’une teneur de 8,4%,
contactez le bureau du Service de l’entretien Hobart de votre région.
Pour le modèle LXGePR, posez une bouteille d’un gallon US (3,78l) d’hypochlorite de sodium d’une
teneur de 6,0% ou 8,4% sous le lave-verre qui ne dépasse pas une hauteur de 10po (254mm) à
partir du sol. Ne pas prémélanger une solution d’assainissement avec de l’eau ou tout autre liquide.
!
AVERTISSEMENT
Ne prémélangez jamais un agent mouillant avec une solution
d’assainissement. Le mélange pourrait causer la formation d’un gaz dangereux.
Retirez la capsule du contenant de détergent et insérez-y le tube de distribution blanc en pinçant
le raccord de la bouteille sur le contenant. Assurez-vous d’enfoncer le tube de distribution jusqu’au
fond du contenant. Vériez s’il n’y a pas d’obstructions ou d’angles de cassure dans le tube de
distribution.
Vériez souvent votre bouteille d’assainisseur pour vous assurer que le niveau de produit chimique est
sufsant.
POUR VÉRIFIER LA CONCENTRATION DE L’ASSAINISSEUR
Assurez-vous qu’il y ait sufsamment de produit chimique dans la bouteille d’assainisseur et que
le tube vertical de distribution soit bien enfoncé jusqu’au fond du contenant. Glissez un panier à
verres, avec des verres, dans l’appareil.
Pour vérier correctement la concentration de l’assainisseur pour les modèles LXGePR, la fonction
PuriRinse doit être désactivée. Pour ce faire, appuyez sur la touche LAVAGE (WASH) pendant
5secondes jusqu’au début du cycle de lavage.
Suivez précisément les instructions contenues sur le acon de papier réactif et testez l’eau à la
surface du fond des verres. La concentration devrait se situer entre un minimum de 50ppm et un
maximum de 100ppm.
Si votre lecture est incorrecte, contactez le bureau du Service de l’entretien Hobart de votre région
ou votre fournisseur de produits chimiques pour procéder à des ajustements.
SOLUTION DE DÉTARTAGE
Tous les modèles LXGePR et LXGeR sont dotés d’un système de détartrage automatique. Lors de
l’installation, un technicien qualié du Service de l’entretien Hobart ou votre fournisseur de produits
chimiques doit régler la dureté totale de l’eau pour xer les intervalles de détartrage.
Retirez la capsule de la bouteille de l’agent de détartrage et insérez-y le tube de distribution noir
dans le contenant en pinçant le raccord de bouteille dans le contenant.
Assurez-vous d’enfoncer le tube de distribution vertical jusqu’au fond du contenant. Vériez s’il n’y
a pas d’obstructions ou d’angles de cassure dans le tube de distribution.
– 37 –

AMORÇAGE DES DOSEURS CHIMIQUES
Lorsqu’un contenant de produit chimique se vide, le processus d’amorçage s’engage
automatiquement lors de la prochaine mise en marche de l'appareil ou lors du début d’un cycle de
lavage. Prendre note que la durée de l’amorçage de tous les doseurs (détergent, agent de rinçage
et assainisseur) est de 60secondes. Si le produit chimique n’est pas détecté dans les 60secondes,
l’indicateur d’ajout de produits chimiques clignotera. Quand le produit chimique a été détecté,
l’indicateur sur l’afcheur s’arrête; et l’amorçage du doseur se poursuit pendant 10secondes pour
permettre au produit chimique de se rendre jusqu’à l’appareil. Si tous les contenants de produits
chimiques sont vides, le doseur d’assainisseur s’amorce en premier, suivi de celui du détergent. Un
seul doseur de produits chimiques sera en fonction à la fois.
Si les produits chimiques ne sont pas détectés après trois séances d’amorçage consécutives,
l’indicateur d’ajout de produits chimiques clignote et l’amorçage est annulé. Au début du prochain
cycle de lavage, l’indicateur d’ajout de produits chimiques continuera de clignoter. Assurez-vous que
les bouteilles ne soient pas vides et que les tubes soient bien enfoncés jusqu’au fond des contenants.
L’amorçage peut être réinitialisé en mettant le lave-verre à l’arrêt, puis en marche.
Si les bouteilles de produits chimiques ne sont pas vides, et que les tubes sont enfoncés
correctement, alors les capteurs de produits chimiques ou les doseurs peuvent être défectueux;
contactez le bureau du Service de l’entretien Hobart.
– 38 –

!
Ne prémélangez pas d’autres produits chimiques avec
AVERTISSEMENT
de l’hypochlorite de sodium (javellisant liquide). Le mélange pourrait causer la formation d’un
gaz dangereux.
ATTENTION
La pression dynamique requise à l'appareil est de 15 à 65lb/po²
(103,4 à 448kPa). Si la pression dépasse 65lb/po² (448kPa), il faut installer un régulateur de
pression dans la conduite d’eau vers l’appareil (par un tiers).
Les appareils dont le rinçage est effectué à l'aide d'une pompe ne sont pas livrés avec un
manomètre de pression.
Important: Les contenants de produits chimiques ne devraient pas être posés à une hauteur de
plus de 16po (406,4mm) au-dessus du sol.
Si les contenants de produits chimiques doivent être placés dans une armoire adjacente à l’appareil,
un trou de ½po (12,7mm) est nécessaire pour le passage de la ligne de produit chimique.
Pour assurer le bon fonctionnement de votre lave-verre, n’utilisez que de l’hypochlorite de sodium
(javellisant liquide) dont la teneur est de 6% ou 8,4%.
Certains matériaux tels que les assiettes en argent, l’aluminium et l’étain seront attaqués par
l’hypochlorite de sodium (javellisant).
NOTES:
1. Toutes les dimensions verticales à partir du sol ni peuvent être allongées de 0,875 po (22,3 mm)
ou raccourcies de 0,375 po (9,5 mm).
2. De l’air humide s’échappe par la porte.
N’employez que des matériaux résistants à l’humidité sur les surfaces adjacentes aux côtés et
au-dessus du lave-verre.
3. Il n’est pas recommandé d’installer une hotte de ventilation au-dessus d’un appareil sous-
comptoir, car l’émission de vapeur n’est pas excessive.
NOTES DE PLOMBERIE:
1. Un antibélier (conforme à la norme ASSE-1010 ou équivalent) doit être installé (par un tiers) sur la
conduite d’alimentation d’eau commune au point de raccordement.
2. Pour obtenir les meilleurs résultats, la dureté d’eau recommandée doit être de 3grains ou moins
par gallon US (20,58ppm).
3. Si le boyau de vidange est installé en boucle au-dessus d’un évier, sa hauteur ne doit pas
dépasser 44po (1 117,6mm) ASF.
DÉTERGENT
ET AGENT DE
RINÇAGE
ASSAINISSEUR AU
CHLORE LXGePR
SEULEMENT
DÉTARTRANT (UN
DÉGAGEMENT
PLUS GRAND
PEUT ÊTRE
REQUIS)
BANDE COUVRE-JOINT
(EN OPTION)
34 3/8PO
67/16PO
DÉGAGEMENT SUPPLÉMENTAIRE
REQUIS POUR GLISSER L’APPAREIL
VERS L’AVANT POUR ENTRETIEN
SEULEMENT
4015/16PO
DÉGAGEMENT
MIN. POUR
ENTRETIEN
3315/16PO
2315/16PO
11/8PO
2111/16PO
LES BOUTEILLES DE
PRODUITS CHIMIQUES
PEUVENT ÊTRE POSÉES
D’UN CÔTÉ OU DE L’AUTRE
DE L'APPAREIL
RENSEIGNEMENTS DE RACCORDEMENT
(ASF = AU-DESSUS DU SOL FINI)
LÉGENDE
E1 CONNEXION ÉLECTRIQUE: TROU DE 13/8PO DE
DIAMÈTRE POUR CONDUIT COMMERCIAL DE 1PO;
105/8PO ASF.
P1 RACCORDEMENT SIMPLE POUR REMPLISSAGE
ET RINÇAGE: RACCORD FEMELLE DE ¾ PO POUR
TUYAU D’ARROSAGE SUR BOYAU DE 6PI LIVRÉ AVEC
L’APPAREIL;
TEMP. MIN. DE L’EAU POUR LXGePR, 120°F (49°C),
140°F (60°C) RECOMMANDÉ.
P2 RACCORD DE VIDANGE: RACCORD DE TUYAU ANNELÉ DE
5/8PO SUR UN BOYAU DE 6PI LIVRÉ AVEC L’APPAREIL.
MUR
9PO
MIN.
RACCORDEMENT À
UN TUYAU DE TAILLE
COMMERCIALE MIN. DE
1½PO RÉDUIT À ¾PO
FPT (PAR LE CLIENT)
RECOMMANDÉ
23PO OU MOINS
LIGNE DE SOL
PLAN DE RACCORDEMENT
D’EAU RECOMMANDÉ: TUYAU
DE TAILLE COMMERCIALE
DE ½PO AVEC UN ROBINET
D’ARRÊT, UN FILTRE À TAMIS
ET UN RACCORD MÂLE
DE ¾PO POUR BOYAU
D’ARROSAGE (PAR LE CLIENT)
HAUTEUR MAX.
DE CHARGEMENT
12PO
17PO
1 3/8PO
21 11/16PO
259/16PO
387/16PO
MODÈLE VOLTS/HERTZ/PHASE
INTENSITÉ
(A)
COURANT
MINIMAL
ADMISSIBLE
DU CIRCUIT
D’ALIMENTATION
(AMPÈRES)
COURANT
MAXIMAL
ADMISSIBLE DU
DISPOSITIF DE
PROTECTION
(AMPÈRES)
LXGePR 120/60/1 15,4 20 20
DÉGAGEMENT DE CHALEUR EN BTU/H
MODÈLE LATENTE SENSIBLE
LXGePR 1900 800
POIDS D’EXPÉDITION LXGePR
POIDS NET DE L’APPAREIL 150lb (68kg)
POIDS À L’EMBARQUEMENT 170lb (77,1kg)
SCHÉMA D’INSTALLATION (LXGePR, petit)
– 39 –
DES TROUSSES DE CÂBLES DE CONNEXION SONT LIVRABLES
AVEC TOUS LES APPAREILS.
REMARQUE: POUR LES CONNEXIONS D’ALIMENTATION,
N’UTILISEZ QUE DES CÂBLES DE CUIVRE D’UNE RÉSISTANCE
MINIMALE DE 90°C.
!
AVERTISSEMENT
Les connexions électriques et de mise à la terre doivent être
en conformité avec les parties pertinentes du Code national de
l’électricité et avec tous les autres codes électriques locaux.
Les raccordements de plomberie doivent se faire en conformité
avec les codes d’hygiène, de sécurité et de plomberie. La
conguration des lignes de vidange et de remplissage peut
varier. Certains exemples sont illustrés dans ce dessin.

!
Ne prémélangez pas d’autres produits chimiques avec
AVERTISSEMENT
de l’hypochlorite de sodium (javellisant liquide). Le mélange pourrait causer la formation d’un
gaz dangereux.
ATTENTION
La pression dynamique requise à l'appareil est de 15 à 65lb/po²
(103,4 à 448kPa). Si la pression dépasse 65lb/po² (448kPa), il faut installer un régulateur de
pression dans la conduite d’eau vers l’appareil (par un tiers).
Les appareils dont le rinçage est effectué à l'aide d'une pompe ne sont pas livrés avec un
manomètre de pression.
Important: Les contenants de produits chimiques ne devraient pas être posés à une hauteur de
plus de 24po (609,6mm) au-dessus du sol.
Si les contenants de produits chimiques doivent être placés dans une armoire adjacente à l’appareil,
un trou de ½po (12,7mm) est nécessaire pour le passage de la ligne de produit chimique.
Pour assurer le bon fonctionnement de votre lave-verre, n’utilisez que de l’hypochlorite de sodium
(javellisant liquide) dont la teneur est de 6% ou 8,4%.
Certains matériaux tels que les assiettes en argent, l’aluminium et l’étain seront attaqués par
l’hypochlorite de sodium (javellisant).
NOTES:
1. Toutes les dimensions verticales à partir du sol ni peuvent être allongées de 0,875 po (22,3 mm)
ou raccourcies de 0,375 po (9,5 mm).
2. De l’air humide s’échappe par la porte.
N’employez que des matériaux résistants à l’humidité sur les surfaces adjacentes aux côtés et
au-dessus du lave-verre.
3. Il n’est pas recommandé d’installer une hotte de ventilation au-dessus d’un appareil sous-
comptoir, car l’émission de vapeur n’est pas excessive.
NOTES DE PLOMBERIE:
1. Un antibélier (conforme à la norme ASSE-1010 ou équivalent) doit être installé (par un tiers) sur la
conduite d’alimentation d’eau commune au point de raccordement.
2. Pour obtenir les meilleurs résultats, la dureté d’eau recommandée doit être de 3grains ou moins
par gallon US (20,58ppm).
3. Si le boyau de vidange est installé en boucle au-dessus d’un évier, sa hauteur ne doit pas
dépasser 51po (1 295,4mm) ASF.
BANDE COUVRE-JOINT
(EN OPTION)
417/8PO
1315/16PO
DÉGAGEMENT SUPPLÉMENTAIRE REQUIS
POUR GLISSER L’APPAREIL VERS L’AVANT
POUR ENTRETIEN SEULEMENT
487/16PO
DÉGAGEMENT
MIN. POUR
ENTRETIEN
DÉTERGENT,
AGENT DE RINÇAGE,
ASSAINISSEUR AU
CHLORE ET BOUTEILLES
DE SOLUTION DE
DÉTARTRAGE PEUVENT
ÊTRE POSÉS SOUS
L’APPAREIL
2315/16PO
3315/16PO
11/8PO
2111/16PO
RACCORDEMENT À UN TUYAU
DE TAILLE COMMERCIALE
MIN. DE 1½PO RÉDUIT À
¾POFPT (P
RECOMMANDÉ
31PO OU MOINS
LIGNE DE SOL
PLAN DE RACCORDEMENT D’EAU
RECOMMANDÉ: TUYAU DE TAILLE
COMMERCIALE DE ½PO AVEC UN
ROBINET D’ARRÊT, UN FILTRE À
TAMIS ET UN RACCORD MÂLE DE
¾PO POUR BOYAU D’ARROSAGE
(PAR LE CLIENT)
RENSEIGNEMENTS DE RACCORDEMENT
(ASF = AU-DESSUS DU SOL FINI)
LÉGENDE
E1 CONNEXION ÉLECTRIQUE: TROU DE 13/8PO DE
DIAMÈTRE POUR CONDUIT COMMERCIAL DE 1PO;
18-1/8PO ASF.
P1 RACCORDEMENT SIMPLE POUR REMPLISSAGE
ET RINÇAGE: RACCORD FEMELLE DE ¾ PO POUR
TUYAU D’ARROSAGE SUR BOYAU DE 6PI LIVRÉ AVEC
L’APPAREIL;
TEMP. MIN. DE L’EAU POUR LXGePR, 120°F (49°C),
140°F (60°C) RECOMMANDÉ.
P2 RACCORD DE VIDANGE: RACCORD DE TUYAU ANNELÉ DE
5/8PO SUR UN BOYAU DE 6PI LIVRÉ AVEC L’APPAREIL.
MUR
AR LE CLIENT)
HAUTEUR MAX.
DE CHARGEMENT
12PO
417/16PO
241/2PO
13/8PO
2111/16PO
259/16PO
38 7/16PO
MODÈLE VOLTS/HERTZ/PHASE
INTENSITÉ
(A)
COURANT
MINIMAL
ADMISSIBLE
DU CIRCUIT
D’ALIMENTATION
(AMPÈRES)
COURANT
MAXIMAL
ADMISSIBLE DU
DISPOSITIF DE
PROTECTION
(AMPÈRES)
LXGePR 120/60/1 15,4 20 20
DÉGAGEMENT DE CHALEUR EN BTU/H
MODÈLE LATENTE SENSIBLE
LXGePR 1900 800
POIDS D’EXPÉDITION LXGePR
POIDS NET DE L’APPAREIL 150lb (68kg)
POIDS À L’EMBARQUEMENT 170lb (77,1kg)
SCHÉMA D’INSTALLATION (LXGePR, grand)
– 40 –
DES TROUSSES DE CÂBLES DE CONNEXION SONT LIVRABLES
AVEC TOUS LES APPAREILS.
REMARQUE: POUR LES CONNEXIONS D’ALIMENTATION,
N’UTILISEZ QUE DES CÂBLES DE CUIVRE D’UNE RÉSISTANCE
MINIMALE DE 90°C.
!
AVERTISSEMENT
Les connexions électriques et de mise à la terre doivent être
en conformité avec les parties pertinentes du Code national de
l’électricité et avec tous les autres codes électriques locaux.
Les raccordements de plomberie doivent se faire en conformité
avec les codes d’hygiène, de sécurité et de plomberie. La
conguration des lignes de vidange et de remplissage peut
varier. Certains exemples sont illustrés dans ce dessin.

ATTENTION
La pression dynamique requise à l'appareil est de 15 à 65lb/po²
(103,4 à 448kPa). Si la pression dépasse 65lb/po² (448kPa), il faut installer un régulateur de
pression dans la conduite d’eau vers l’appareil (par un tiers).
Les appareils dont le rinçage est effectué à l'aide d'une pompe ne sont pas livrés avec un
manomètre de pression.
Important: Les contenants de produits chimiques ne devraient pas être posés à une hauteur de
plus de 10po (254mm) au-dessus du sol.
Si les contenants de produits chimiques doivent être placés dans une armoire adjacente à l’appareil,
un trou de ½po (12,7mm) est nécessaire pour le passage de la ligne de produit chimique.
NOTES:
1. Toutes les dimensions verticales à partir du sol ni peuvent être allongées de 0,875 po (22,3 mm)
ou raccourcies de 0,375 po (9,5 mm).
2. De l’air humide s’échappe par la porte.
N’employez que des matériaux résistants à l’humidité sur les surfaces adjacentes aux côtés et
au-dessus du lave-verre.
3. Il n’est pas recommandé d’installer une hotte de ventilation au-dessus d’un appareil sous-comptoir,
car l’émission de vapeur n’est pas excessive.
NOTES DE PLOMBERIE:
1. Un antibélier (conforme à la norme ASSE-1010 ou équivalent) doit être installé (par un tiers) sur la
conduite d’alimentation d’eau commune au point de raccordement.
2. Pour obtenir les meilleurs résultats, la dureté d’eau recommandée doit être de 3grains ou moins
par gallon US (20,58ppm).
3. Si le boyau de vidange est installé en boucle au-dessus d’un évier, sa hauteur ne doit pas
dépasser 44po (1117,6mm) ASF.
RENSEIGNEMENTS DE RACCORDEMENT
(ASF = AU-DESSUS DU SOL FINI)
LÉGENDE
E1 CONNEXION ÉLECTRIQUE: TROU DE 13/8PO DE
DIAMÈTRE POUR CONDUIT COMMERCIAL DE 1PO;
105/8PO ASF.
P1 RACCORDEMENT SIMPLE POUR REMPLISSAGE
ET RINÇAGE: RACCORD FEMELLE DE ¾ PO POUR
TUYAU D’ARROSAGE SUR BOYAU DE 6PI LIVRÉ AVEC
L’APPAREIL;
55-85°F (13-29°C) (FROID) RECOMMANDÉ POUR LXGeR.
P2 RACCORD DE VIDANGE: RACCORD DE TUYAU ANNELÉ DE
5/8PO SUR UN BOYAU DE 6PI LIVRÉ AVEC L’APPAREIL.
MUR
9PO
MIN.
DÉTERGENT
ET AGENT DE
RINÇAGE
DÉTARTRANT (UN
DÉGAGEMENT
PLUS GRAND
PEUT ÊTRE
REQUIS)
34 3/8PO
6 7/16 PO
DÉGAGEMENT SUPPLÉMENTAIRE REQUIS
POUR GLISSER L’APPAREIL VERS L’AVANT
POUR ENTRETIEN SEULEMENT
MODÈLE VOLTS/HERTZ/PHASE
BANDE COUVRE-JOINT
(EN OPTION)
4015/16PO
DÉGAGEMENT
MIN. POUR
ENTRETIEN
INTENSITÉ
(A)
3315/16PO
COURANT
MINIMAL
ADMISSIBLE
DU CIRCUIT
D’ALIMENTATION
(AMPÈRES)
2315/16PO
2111/16PO
LES BOUTEILLES DE PRODUITS
CHIMIQUES PEUVENT ÊTRE
POSÉES D’UN CÔTÉ OU DE
L’AUTRE DE L'APPAREIL
COURANT
MAXIMAL
ADMISSIBLE DU
DISPOSITIF DE
PROTECTION
(AMPÈRES)
LXGeR 120/208-240(3F)/60/1* 30,5 40 40
DÉGAGEMENT DE CHALEUR EN BTU/H
MODÈLE LATENTE SENSIBLE
LXGeR 1100 2000
POIDS D’EXPÉDITION LXGeR
POIDS NET DE L’APPAREIL 165lb (74,8kg)
POIDS À L’EMBARQUEMENT 185lb (84 kg)
11/8PO
RACCORDEMENT À
UN TUYAU DE TAILLE
COMMERCIALE MIN. DE
1½PO RÉDUIT À ¾PO
FPT (PAR LE CLIENT)
RECOMMANDÉ
23PO OU MOINS
LIGNE DE SOL
PLAN DE RACCORDEMENT
D’EAU RECOMMANDÉ: TUYAU
DE TAILLE COMMERCIALE
DE ½PO AVEC UN ROBINET
D’ARRÊT, UN FILTRE À TAMIS
ET UN RACCORD MÂLE
DE ¾PO POUR BOYAU
D’ARROSAGE (PAR LE CLIENT)
HAUTEUR MAX.
DE CHARGEMENT
12PO
17PO
13/8PO
2111/16PO
2613/16PO
3911/16PO
* CE SYSTÈME EXIGE 3FILS D’ALIMENTATION Y COMPRIS UN FIL
NEUTRE SOUS TENSION; UN QUATRIÈME FIL DOIT ÊTRE FOURNI
POUR LA MISE À LA TERRE DE L’APPAREIL.
DES TROUSSES DE CÂBLES DE CONNEXION SONT LIVRABLES
AVEC TOUS LES APPAREILS.
REMARQUE: POUR LES CONNEXIONS D’ALIMENTATION,
N’UTILISEZ QUE DES CÂBLES DE CUIVRE D’UNE RÉSISTANCE
MINIMALE DE 90°C.
!
AVERTISSEMENT
Les connexions électriques et de mise à la terre doivent être
en conformité avec les parties pertinentes du Code national de
l’électricité et avec tous les autres codes électriques locaux.
Les raccordements de plomberie doivent se faire en conformité
avec les codes d’hygiène, de sécurité et de plomberie. La
conguration des lignes de vidange et de remplissage peut
varier. Certains exemples sont illustrés dans ce dessin.
SCHÉMA D’INSTALLATION (LXGeR, petit)
– 41 –
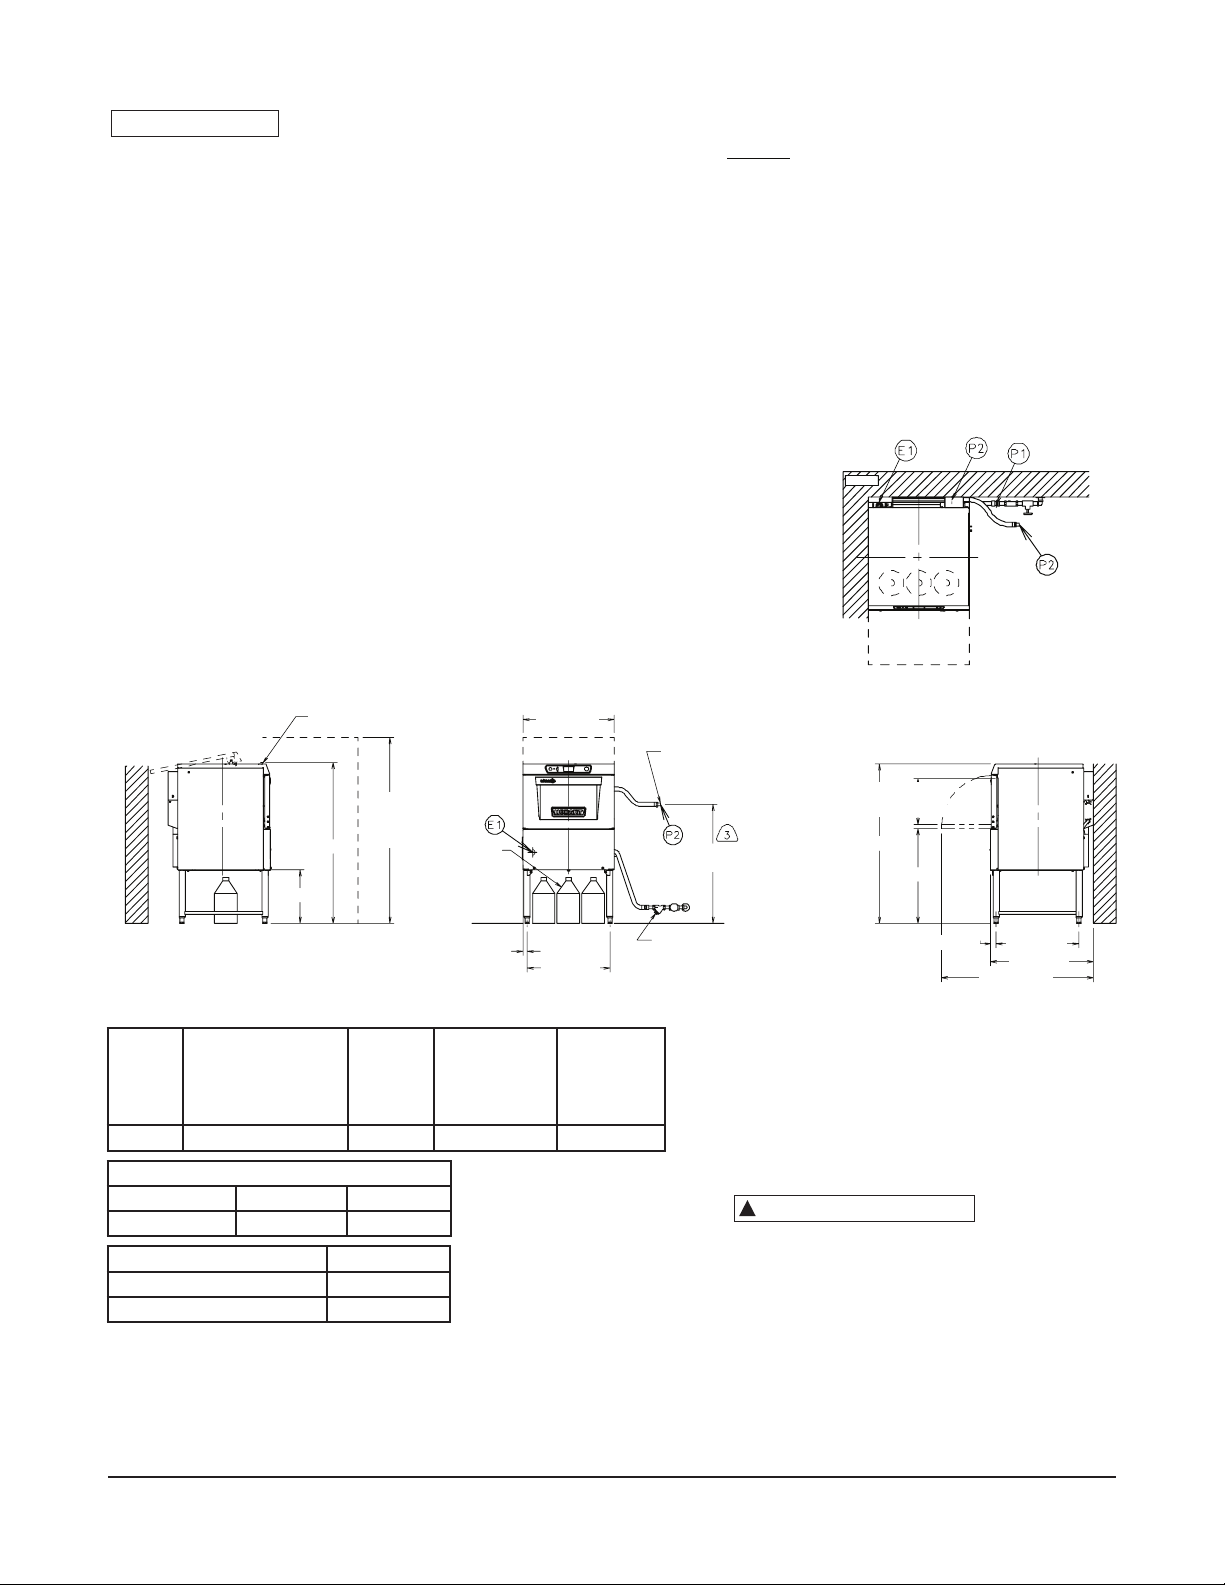
ATTENTION
La pression dynamique requise à l'appareil est de 15 à 65lb/po²
(103,4 à 448kPa). Si la pression dépasse 65lb/po² (448kPa), il faut installer un régulateur de
pression dans la conduite d’eau vers l’appareil (par un tiers).
Les appareils dont le rinçage est effectué à l'aide d'une pompe ne sont pas livrés avec un
manomètre de pression.
Important: Les contenants de produits chimiques ne devraient pas être posés à une hauteur de
plus de 10po (254mm) au-dessus du sol.
Si les contenants de produits chimiques doivent être placés dans une armoire adjacente à l’appareil,
un trou de ½po (12,7mm) est nécessaire pour le passage de la ligne de produit chimique.
NOTES:
1. Toutes les dimensions verticales à partir du sol ni peuvent être allongées de 0,875 po (22,3 mm)
ou raccourcies de 0,375 po (9,5 mm).
2. De l’air humide s’échappe par la porte.
N’employez que des matériaux résistants à l’humidité sur les surfaces adjacentes aux côtés et
au-dessus du lave-verre.
3. Il n’est pas recommandé d’installer une hotte de ventilation au-dessus d’un appareil sous-comptoir,
car l’émission de vapeur n’est pas excessive.
NOTES DE PLOMBERIE:
1. Un antibélier (conforme à la norme ASSE-1010 ou équivalent) doit être installé (par un tiers) sur la
conduite d’alimentation d’eau commune au point de raccordement.
2. Pour obtenir les meilleurs résultats, la dureté d’eau recommandée doit être de 3grains ou moins
par gallon US (20,58ppm).
3. Si le boyau de vidange est installé en boucle au-dessus d’un évier, sa hauteur ne doit pas
dépasser 51po (1295,4mm) ASF.
RENSEIGNEMENTS DE RACCORDEMENT
(ASF = AU-DESSUS DU SOL FINI)
LÉGENDE
E1 CONNEXION ÉLECTRIQUE: TROU DE 13/8PO DE
DIAMÈTRE POUR CONDUIT COMMERCIAL DE 1PO;
18-1/8PO ASF.
P1 RACCORDEMENT SIMPLE POUR REMPLISSAGE
ET RINÇAGE: RACCORD FEMELLE DE ¾ PO POUR
TUYAU D’ARROSAGE SUR BOYAU DE 6PI LIVRÉ AVEC
L’APPAREIL;
55-85°F (13-29°C) (FROID) RECOMMANDÉ POUR LXGeR.
P2 RACCORD DE VIDANGE: RACCORD DE TUYAU ANNELÉ DE
5/8PO SUR UN BOYAU DE 6PI LIVRÉ AVEC L’APPAREIL.
MUR
BANDE COUVRE-JOINT
(EN OPTION)
417/8PO
1315/16PO
DÉGAGEMENT SUPPLÉMENTAIRE REQUIS
POUR GLISSER L’APPAREIL VERS L’AVANT
POUR ENTRETIEN SEULEMENT
MODÈLE VOLTS/HERTZ/PHASE
487/16PO
DÉGAGEMENT
MIN. POUR
ENTRETIEN
INTENSITÉ
(A)
DÉTERGENT,
AGENT DE RINÇAGE
ET BOUTEILLES
DE SOLUTION DE
DÉTARTRAGE PEUVENT
ÊTRE POSÉS SOUS
L’APPAREIL
LIGNE DE SOL
COURANT
MINIMAL
ADMISSIBLE
DU CIRCUIT
D’ALIMENTATION
(AMPÈRES)
2315/16PO
11/8PO
2111/16PO
COURANT
MAXIMAL
ADMISSIBLE DU
DISPOSITIF DE
PROTECTION
(AMPÈRES)
LXGeR 120/208-240(3F)/60/1* 30,5 40 40
DÉGAGEMENT DE CHALEUR EN BTU/H
MODÈLE LATENTE SENSIBLE
LXGeR 1100 2000
POIDS D’EXPÉDITION LXGeR
POIDS NET DE L’APPAREIL 165lb (74,8kg)
POIDS À L’EMBARQUEMENT 185lb (84 kg)
RACCORDEMENT À UN TUYAU
DE TAILLE COMMERCIALE MIN.
DE 1½PO RÉDUIT À ¾PO FPT
(PAR LE CLIENT)
RECOMMANDÉ
31PO OU MOINS
PLAN DE RACCORDEMENT D’EAU
RECOMMANDÉ: TUYAU DE TAILLE
COMMERCIALE DE ½PO AVEC UN ROBINET
D’ARRÊT, UN FILTRE À TAMIS ET UN
RACCORD MÂLE DE ¾PO POUR BOYAU
D’ARROSAGE (PAR LE CLIENT)
HAUTEUR MAX.
DE CHARGEMENT
12PO
417/16PO
241/2PO
13/8PO 2111/16PO
2613/16PO
3911/16PO
* CE SYSTÈME EXIGE 3FILS D’ALIMENTATION Y COMPRIS UN FIL
NEUTRE SOUS TENSION; UN QUATRIÈME FIL DOIT ÊTRE FOURNI
POUR LA MISE À LA TERRE DE L’APPAREIL.
DES TROUSSES DE CÂBLES DE CONNEXION SONT LIVRABLES
AVEC TOUS LES APPAREILS.
REMARQUE: POUR LES CONNEXIONS D’ALIMENTATION,
N’UTILISEZ QUE DES CÂBLES DE CUIVRE D’UNE RÉSISTANCE
MINIMALE DE 90°C.
!
AVERTISSEMENT
Les connexions électriques et de mise à la terre doivent être
en conformité avec les parties pertinentes du Code national de
l’électricité et avec tous les autres codes électriques locaux.
Les raccordements de plomberie doivent se faire en conformité
avec les codes d’hygiène, de sécurité et de plomberie. La
conguration des lignes de vidange et de remplissage peut
varier. Certains exemples sont illustrés dans ce dessin.
SCHÉMA D’INSTALLATION (LXGeR, grand)
– 42 –

PROGRAMMATION
PROGRAMMATION DU MODE DE GESTION
Le microprocesseur des lave-verre de la gamme LXGe offre des choix de fonctionnement
personnalisé. Pour l’activation ou la modication de ces caractéristiques, il faut entrer en mode
édition de la programmation.
Le mode de programmation de gestion exige qu’un CODE DE GESTION soit saisi pour avoir accès à
la liste d’options du MENU DES PARAMÈTRES. Le code de gestion est le 1001.
INSTRUCTIONS DE PROGRAMMATION
Toute personnalisation s’accomplit à l’écran en utilisant les touches de déplacement vers le HAUT
ou le BAS et par la touche ENT qui se retrouvent sur le clavier en haut de l’appareil (g.4).
MARCHE
DÉPLACEMENT
VERS LE HAUT
MENU/DÉPLACEMENT
VERS LE BAS
AFFICHEUR LAVAGE
ENTRER
Fig.4
TOUCHE ADVANSYS
TOUCHES POUR L’AFFICHAGE DES MENUS
Les touches suivantes sont utilisées à l’intérieur des menus:
• Les touches de déplacement vers le HAUT et de MENU/DÉPLACEMENT VERS LES BAS servent
à modier la valeur des paramètres et à naviguer à travers les menus.
• La touche ENT sert à accepter une valeur, à effectuer une action spécique ou à se déplacer
vers un sous-menu.
• Le texte à côté du symbole ‘>’ afché à l’écran indique quelle action ou commande surviendra si
on appuie sur la touche ENT.
– 43 –

SOUS-COMPTOIR
Carte de Programmation
L
du Mode de Gestion
POUR MODIFIER LES PARAMÈTRES,
MENU DE GESTION
➜
(pour 0)
➜
➜ ➜
(pour 1)
ENTRER CODE D’ACCÈS
Modifier paramètres
SAISIR LE CODE DE SÉCURITÉ DE GESTION: 1001
➜
(pour 1)
AVAVAJILLAS
➜
IL FAUT ENTRER EN MODIFICATIONS DES PARAMÈTRES
POUR CHANGER TOUS LES CODES CI-DESSOUS
DOSEURS CHIMIQUES
Jusqu’à DOSEUR À DÉTERSIF ou DOSEUR DE RINÇAGE
➜
OU ➜
Jusqu’à QUITTER
CYCLE DE LAVAGE
Jusqu’à CYCL E DE LAVAGE
➜
Jusqu’à QUITTER
➜ ➜
ALARME DE BASSE TEMP.
ou désactive l’alerte aver tissant que la température du rinçage final s’est trouvée en dessous de la température
minimale pendant un certain temps.
Jusqu’à ALARMES BASSE T EMP.
➜
OU
➜
Jusqu’à QUITTER
–activation ou désactivation des doseurs à détergent ou agent de rinçage.
Pour Désactivé ou Activé
➜
➜
➜
➜ ➜
Jusqu’à QUITTER
–pour la personnalisation de la durée totale du cycle.
➜ ➜
Jusqu’à QUITTER
Pour choisir un cycle
➜
➜
OU ➜
–pour assainissement à l’eau chaude seulement: (ce paramètre) active
➜ ➜
➜ ➜
Jusqu’à QUITTER
Pour Désactivé ou Activé
➜
➜
➜
ALARME DU BRAS DE LAVAGE– active ou désactive une alarme qui avertit l’opérateur que les bras de
lavage pourraient être obstrués ou bloqués.
Jusqu’à ALARMES BRAS L AV.
➜
OU
➜
Jusqu’à QUITTER
DÉTARTRAGE
Jusqu’à DÉTARTRAGE
➜
OU
➜
Jusqu’à QUITTER
–active ou désactive l’alerte du rappel de détar trage.
➜ ➜
➜ ➜
➜ ➜
➜ ➜
UNITÉS DE TEMPÉRATURE
Jusqu’à FORM AT DE TEMP.
OU
➜
➜
Jusqu’à QUITTER
➜ ➜
➜ ➜
–alterne entre les degrés Fahrenheit et Celsius.
Pour Désactivé, Visuelle, Audio et
Jusqu’à QUITTER
Pour Désactivé ou Activé
Jusqu’à QUITTER
Pour choisir entre Fahrenheit et Celsius
Jusqu’à QUITTER
➜
➜
➜
➜
visuelle
➜
➜
RINÇAGE À L’EAU POTABLE–pour les appareils à l’eau froide seulement– active ou désactive l’option de
rinçage à l’eau potable.
OU
➜
Jusqu’à RINÇ., EAU POTABLE
➜
Jusqu’à QUITTER
➜ ➜
➜ ➜
Pour Désactivé ou Activé
Jusqu’à QUITTER
➜
➜
– 44 –
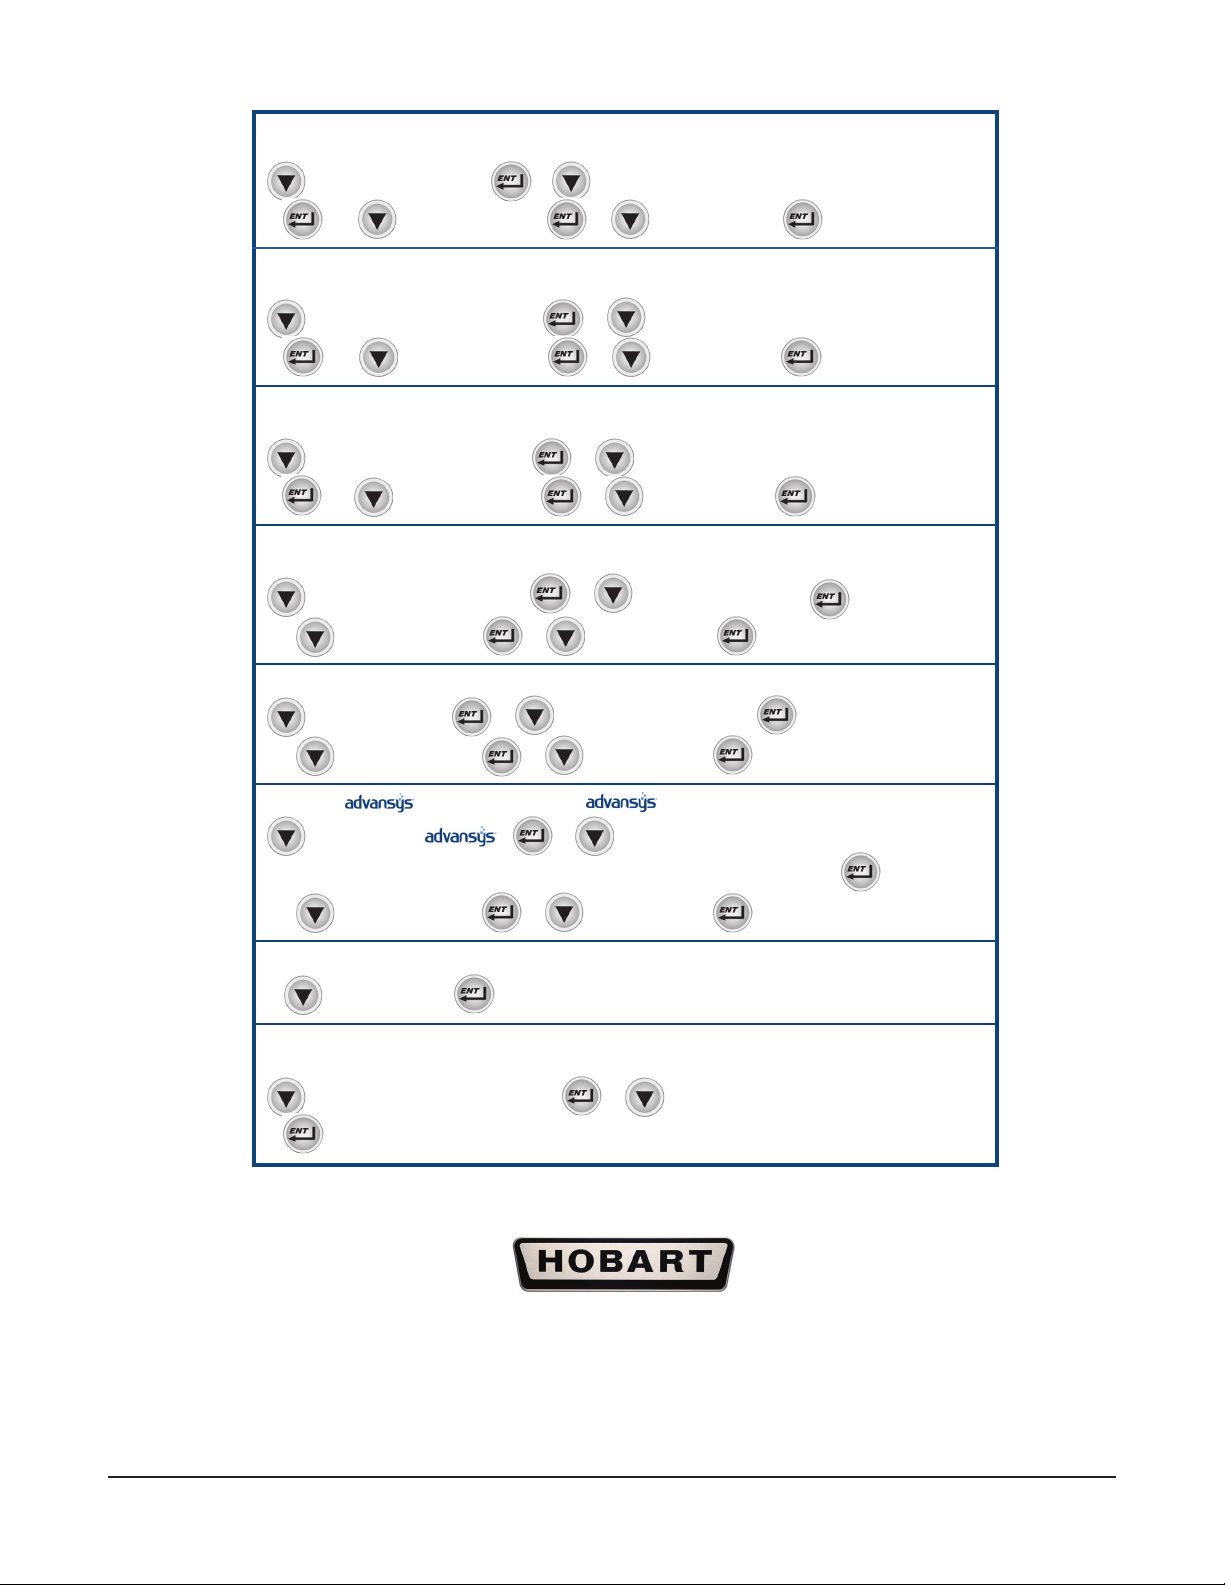
INDICATEUR D’EAU SOUILLÉE–pour désactiver ou offrir un choix du nombre de cycles que
l'appareil effectue entre l’alerte d’eau souillée et les cycles de régénération.
Jusqu’à INDIC. D’EAU US.
➜
➜ ➜
Pour désactiver, 20cycles, 40cycles, ou 60cycles
➜
OU ➜
Jusqu’à QUITTER
MODE ÉCOÉNERGÉTIQUE
➜ ➜
–pour désactiver ou offrir un choix du nombre d’heures pendant
Jusqu’à QUITTER
➜
lesquelles l’appareil reste allumé avant d’entrer en mode d’économie d’énergie.
Jusqu’à MODE ÉCOÉNERGÉTIQUE
➜
➜
OU ➜
Jusqu’à QUITTER
➜ ➜
➜ ➜
ALERTE AJOUTER DES PRODUITS CHIMIQUES
Vers désactivé, 1heure, 2heures, ou 3heures
Jusqu’à QUITTER
➜
–active ou désactive l’alerte sonore
indiquant qu’il y a pénurie de produits chimiques.
Jusqu’à ALERTE < PROD CHIM
➜
OU
➜
➜
Jusqu’à QUITTER
➜ ➜
➜ ➜
ALERTE SONORE DE FIN DE CYCLE
Pour désactiver, visuelle, audio e t
Jusqu’à QUITTER
➜
–active ou désactive la création d’une alerte sonore à la fin de
chaque cycle de lavage.
Jusqu’à AL ERTE FIN DE CYCLE
➜
OU
➜
LANGUE
Jusqu’à LANGUE
➜
OU
➜ ➜
Jusqu’à QUITTER
➜ ➜
–permet de choisir la langue anglaise, française ou espagnole.
Anglais, français ou espagnol
Jusqu’à QUITTER
➜
➜ ➜
➜ ➜
Pour Activé ou Désactivé
Jusqu’à QUITTER
Jusqu’à QUITTER
➜
➜
➜
➜
visuelle
TOUCHE Pour personnaliser la touche pour diverses options.
Jusqu’à BOUTON
➜
un lavage léger, un lavage moyen, un lavage lourd (L Xe seulement), partir détartrage, ou écoénergie
OU
➜
Jusqu’à QUITTER
➜
➜
➜
➜
Pour: non programmé, laver cuve lavage,
Jusqu’à QUITTER
➜
QUITTER MENU VERS LE MENU PRINCIPAL DE GESTION
➜
DÉTARTRER MAINTENANT
menu. Remarque: cette opération dure de 20 à 45minutes selon les circonstances.
➜
Jusqu’à QUITTER
Jusqu’à DÉTARTRER MAINTENANT
➜
(pour quitter le menu)
➜
–permet le lancement d’un cycle de détartrage en tout temps à partir du
➜ ➜
Vers OU I ou NON
701 South Ridge Avenue, Troy, OH 45374-0001
➜
– 45 –
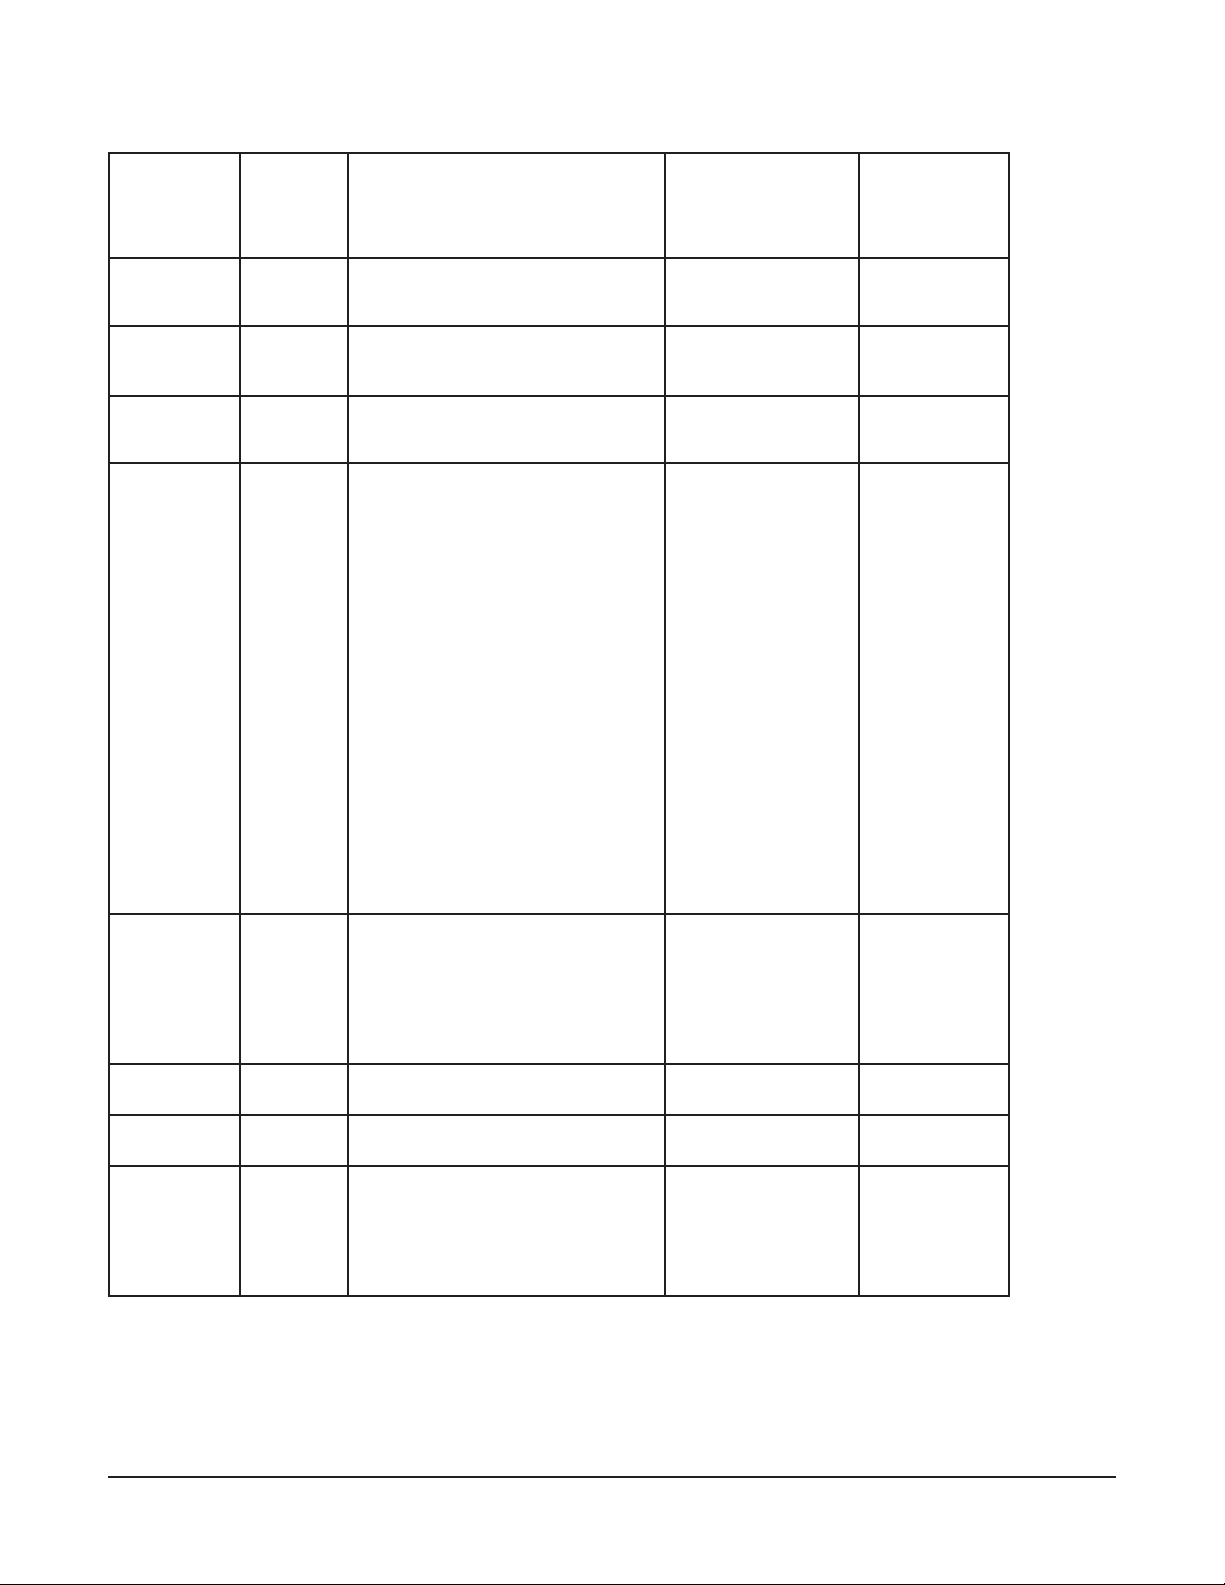
Nom du
paramètre
GRILLE DU MENU DES PARAMÈTRES
Modèles
Advansys
(LXGePR,
LXGeR)
Description Valeurs possibles
Valeur par
défaut
Doseur de
détergent
Doseur
d’agent de
rinçage
Cycle de
lavage
Alarme de
basse temp.
Alerte du
bras de
lavage
Détartrage
Unités de
température
Rinçage à
l’eau potable
✓
✓
✓
LXGeR
seulement
✓
✓
✓
LXGePR
seulement
Active ou désactive le doseur de
détergent
Active ou désactive le doseur
d’agent de rinçage
Pour régler la durée du cycle
Active ou désactive une alerte
visuelle sur l’afcheur indiquant
que la température de l’eau du
rinçage nal se trouve en dessous
du seuil minimal requis de 180 °F
(82 °C). Si activée, un message
sur l’afcheur avertit l’utilisateur
de cette situation après 3 cycles
consécutifs sans atteindre la
température requise au rinçage
nal. Le fonctionnement de
l'appareil ne change cependant
pas et la vaisselle continuera
d’être lavée comme prévu. Dès
que la température augmente
au-delà du minimum requis,
le message s’arrête. Lorsque
désactivée, aucun autre
message ne signale un écart de
température; par contre l’afcheur
continue d’indiquer la température
actuelle du rinçage nal.
Active une alerte visuelle, une
alerte sonore et visuelle, ou
désactive une alerte afchée
quand l'appareil détecte que le
bras de lavage est obstrué ou
bloqué de telle façon que le lavage
pourrait en être affecté.
Active ou désactive l’alerte de
l’option de détartrage
Pour régler la température afchée
en degrés Fahrenheit ou Celsius
Ce réglage active ou désactive
sur les appareils LXGePR
l’option PuriRinse qui pulvérise
de l’eau fraîche après le cycle
d’assainissement pour rincer
l’assainisseur resté sur la vaisselle.
Activé ou désactivé Activé
Activé ou désactivé Activé
Léger, normal ou
lourd
Activée ou
désactivée
Désactivée, visuelle,
ou sonore et visuelle
Activée ou
désactivée
Fahrenheit ou
Celsius
Activé ou désactivé Activé
Normal
Désactivée
Sonore et
visuelle
Activée
Fahrenheit
– 46 –
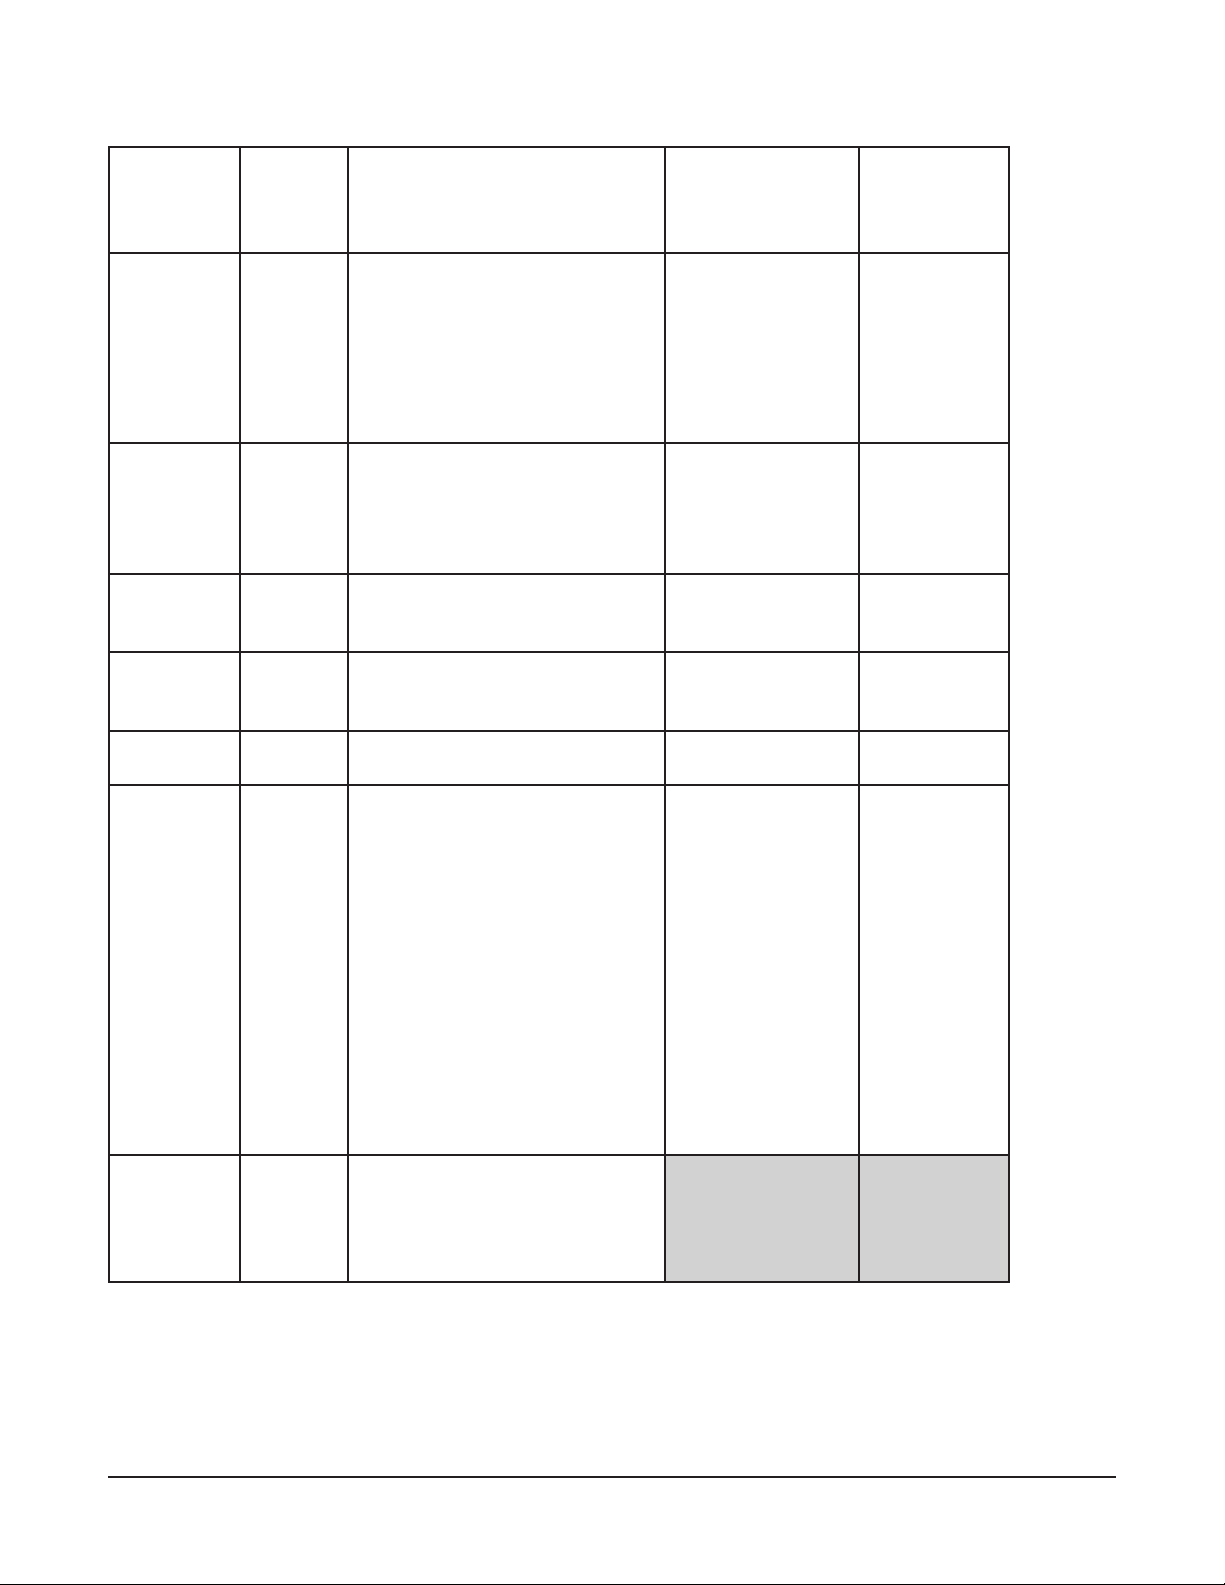
Nom du
paramètre
Indicateur
d’eau souillée
Mode
économie
d’énergie
Alerte Ajouter
des produits
chimiques
Alerte sonore
de n de
cycle
Langue
Touche
Advansys
Modèles
Advansys
(LXGePR,
LXGeR)
✓
✓
✓
✓
✓
✓
Description Valeurs possibles
Ce réglage, sur les appareils
Advansys, permet de rappeler à
l’utilisateur qu’il s’est écoulé 20,
40 ou 60 cycles et qu’il est temps
d’engager un cycle spécial de
régénération de l’eau. Ce cycle
envoie à la vidange une partie de
l’eau de lavage pour la remplacer
par de l’eau chaude fraîche.
Ce réglage des appareils
Advansys contrôle le délai
d’extinction des éléments
électriques pour économiser
de l’énergie quand ils sont hors
service
Active ou désactive une alerte
sonore si les produits chimiques
ne sont pas détectés
Active ou désactive une alerte
sonore à la n d’un cycle
Règle la langue afchée en
anglais ou en français
Pour choisir une fonction de la
touche Advansys
Désactivé, 20, 40,
ou 60 cycles
Désactivé, 1, 2, ou
3 heures
Désactivée, visuelle,
ou sonore et visuelle
Activée ou
désactivée
Anglais (US) ou
français (Canada)
1. Non programmée
2. Nettoyer la cuve
3. Un lavage léger
4. Un lavage normal
5. Engager un cycle
de détartrage
6. Économie
d’énergie
Valeur par
défaut
Désactivée
2 heures
Sonore et
visuelle
Désactivée
Anglais (US)
Aucune
programmation
en usine
Quitter menu
✓
Appuyez sur ENT pour quitter
le menu des paramètres et
revenir au menu de gestion. Tous
les réglages modiés seront
sauvegardés.
– 47 –

POUR FAIRE FONCTIONNER LE LAVE-VERRE
FAITES CECI L’AFFICHEUR INDIQUE REMARQUES
Appuyez sur MARCHE Le numéro de modèle Le lave-verre procède à
un autocontrôle qui dure
5 secondes.
Ouvrez la porte; glissez un
panier de vaisselle dans
l'appareil. Refermez la porte.
Appuyez sur LAVAGE
(WASH)
Lorsqu’un cycle est terminé,
rechargez l'appareil pour
un autre cycle de lavage/
rinçage; ou, s'il est en
pause, l'appareil se
maintient en attente.
À la n de la journée,
appuyez sur le bouton
MARCHE
Le voyant REMPLISSAGE (FILL)
et le symbole de remplissage
s’allument; lorsque l'appareil se
remplit, la température du fond de
cuve est afchée.
Le mot RÉCHAUFFEMENT et le
symbole de réchauffement sont
afchés quand le surchauffeur est
en réchauffement sur le modèle
LXGeR. Ce réchauffement peut
durer jusqu’à 15 minutes.
Pendant le remplissage, la
température du fond de cuve est
afchée.
Le voyant PRÊT et la température
du fond de cuve sont afchés.
Le mot LAVAGE et le symbole de
lavage s’allument; la température
du fond de cuve est afchée
pendant le cycle de lavage.
Le mot RINÇAGE et le symbole de
rinçage s’allument; la température
du rinçage est afchée pendant le
cycle de rinçage.
Le mot PRÊT est allumé et la
température du fond de la cuve est
afchée.
L’afcheur indique VIDANGE et
ARRÊT EN MARCHE; ensuite
l’afcheur s’éteint.
Le lave-verre se remplit d’eau.
Une fois plein, la pompe se met
en marche pendant 10 secondes.
Si la porte est ouverte pendant
le cycle de remplissage, le cycle
s’arrête. Après la fermeture de
la porte, le cycle reprend là où il
s’est arrêté.
Une fois rempli, l’appareil se met
en mode d’attente. La chaleur
sera maintenue à la fois dans
le fond de la cuve et dans le
surchauffeur.
Le détergent est ajouté
automatiquement pendant le
cycle de lavage.
L’agent de rinçage
et l’assainisseur sont
automatiquement ajoutés
pendant le cycle de rinçage.
(REMARQUE : l'assainisseur
n’est injecté qu’avec les modèles
LXGePR).
L’appareil enclenche un cycle de
lavage et de rinçage.
Si la porte est ouverte pendant le
lavage, le rinçage ou la vidange,
le cycle, à la fermeture de la
porte, reprend au point où il
se trouvait quand celle-ci a été
ouverte.
Si vous appuyez sur le bouton
MARCHE pendant le cycle,
l'appareil se vidange et s’éteint.
L’appareil se vidange et s’arrête
si la période de maintien de
quatre heures est atteinte.
Après avoir appuyé sur la touche
MARCHE, l’appareil se vidange
et s’éteint.
– 48 –

DIAGNOSTICS/MESSAGES D’ERREUR
Erreur Afchage Description
Porte ouverte Porte ouverte S’afche si la porte est ouverte.
Bras de lavage
obstrué/bloqué
Basse
température de
rinçage
Basse
température de
rinçage
(10 cycles
d’aflée)
Erreur du
thermistor de
lavage
Erreur du
thermistor du
surchauffeur
Erreur du
thermistor du
rinçage nal
Bas niveau
d’eau dans le
surchauffeur
(arrêt dans
n’importe quel
cycle)
Erreur de
vidange
Erreur du
niveau du fond
de cuve
Erreur du
niveau
d’eau du
surchauffeur
ALERTE BRAS DE LAVAGE
− Retirer et nettoyer le bras
− Vérier les gicleurs
− Replacer le bras
− Fermer la porte
BASSE TEMP. DE RINÇAGE
BASSE TEMP. DE RINÇAGE
Vérier l’eau de distribution
CAPTEUR DE TEMP. DE
LAVAGE
Entretien nécessaire (N
o
de tél.
du service)
OUVERT OU COURT-CIRCUIT
CAPTEUR DE LA TEMP. DU
SURCHAUFFEUR
Entretien nécessaire
o
(N
de tél. du service)
OUVERT OU COURT-CIRCUIT
CAPTEUR DE TEMP. DU
RINÇAGE
Entretien nécessaire (N
o
de tél.
du service)
OUVERT OU COURT-CIRCUIT
ERREUR DE REMPLISSAGE
Entretien nécessaire
o
(N
de tél. du service)
ERREUR DE VIDANGE
Entretien nécessaire
o
(N
de tél. du service)
CAPTEUR DE FOND DE CUVE
Entretien nécessaire
(No de tél. du service)
OUVERT OU COURT-CIRCUIT
CAPTEUR DU NIVEAU D’EAU
DU SURCHAUFFEUR
Entretien nécessaire
o
(N
de tél. du service)
OUVERT OU COURT-CIRCUIT
S’afche si le bras de lavage est
obstrué ou bloqué, ce qui serait
la cause de mauvais résultats
de lavage. Veuillez suivre les
instructions à l’écran.
Si le problème se produit pendant
trois cycles consécutifs à basse
température, ce message d’erreur
s’afche. L’appareil continue malgré
tout de fonctionner.
Si l’erreur de basse température se
produit pendant 10 cycles d’aflée,
l’erreur change. L’appareil continue
malgré tout de fonctionner.
Cette erreur s’afche si la sonde de
température de lavage devient horsnormes. L’appareil continue malgré
tout de fonctionner.
Cette erreur s’afche si la sonde
de la température du surchauffeur
devient hors-normes. L’appareil
continue malgré tout de fonctionner.
(LXGeR seulement).
Cette erreur s’afche si la sonde
de la température du rinçage nal
devient hors-normes. L’appareil
continue malgré tout de fonctionner.
Cette erreur s’afche si l’appareil
s’arrête avant la n du remplissage.
L'appareil ne fonctionnera plus et
seul son arrêt est possible.
Cette erreur s’afche si le niveau
d’eau de l’appareil ne monte pas.
L'appareil ne fonctionnera plus et
seul son arrêt est possible.
Cette erreur s’afche si le pressostat
du fond de la cuve devient horsnormes. L'appareil ne fonctionnera
plus et seul son arrêt est possible.
Cette erreur s’afche si le pressostat
du surchauffeur devient horsnormes. L'appareil ne fonctionnera
plus et seul son arrêt est possible.
– 49 –

DURÉE DU CYCLE DE
COARSESTRAINER
FINESTRAINER
LAVAGE/RINÇAGE (LXGePR)
DURÉE DU CYCLE DE
LAVAGE/RINÇAGE (LXGeR)
Lavage 56secondes ** Lavage 56secondes *, **
Vidange max. 18secondes Vidange max. 18secondes
Rinçage 8secondes Rinçage 8secondes
Attente 10secondes Attente 5secondes
PuriRinse 7secondes Condensation max. 105secondes
* Le temps maximal de lavage peut varier selon la tension de fonctionnement et la température de
l’eau de distribution quand il faut élever la température des appareils LXGeR de 70°F (39°C).
** La durée du cycle de lavage peut être xée à 56 ou 85secondes.
PRÉPARATION
Assurez-vous que le ltre à gros grains (g.6) et le ltre n (g.7) sont bien en place et libres de
tout débris. Veillez à ce que la poignée du ltre à gros grains soit tournée vers l’avant de l’appareil.
Vériez si les bras de lavage et de rinçage tournent facilement et ne sont pas obstrués.
FILTRE À GROS GRAINS FILTRE FIN
Fig.6 Fig.7
– 50 –

Vériez s’il y a sufsamment de détergent, d’agent de rinçage et d’assainisseur. Utilisez uniquement
les détergents destinés aux appareils commerciaux comme recommandés par votre spécialiste en
produits chimiques.
CHOSES À FAIRE ET À NE PAS FAIRE AVEC VOTRE NOUVEAU LAVE-VERRE HOBART
ASSUREZ-VOUS que la dureté de l’eau est adéquate.
RINCEZ À FOND les verres avant le lavage.
UTILISEZ uniquement les détergents recommandés par votre spécialiste en produits chimiques.
NETTOYEZ et RINCEZ À FOND l’appareil à la n de chaque journée et FAITES LE SÉCHER (en laissant
la porte ouverte).
UTILISEZ uniquement des produits conçus pour traiter l’acier inoxydable.
N’utilisez PAS les détergents conçus pour les lave-verre domestiques.
NE LAISSEZ PAS de résidus d’aliments s’accumuler au fond de la cuve.
N’ALLEZ PAS au-delà des concentrations de détergent, désinfectant ou produit de détartrage
recommandées par le fabricant.
NE NETTOYEZ PAS la vaisselle ou le lave-verre avec de la laine d’acier.
NE LAISSEZ PAS entrer de corps étrangers dans le lave-verre, tout particulièrement les débris métalliques.
– 51 –

NETTOYAGE
Nettoyez cet appareil au moins une fois par jour d’utilisation. N’utilisez que des produits destinés à
traiter l’acier inoxydable.
1. Appuyez sur le bouton MARCHE. L’appareil se vidange. Lorsque le voyant s’éteint, ouvrez
la porte et éliminez tout déchet dans le fond de la cuve. Évitez l’accumulation de restes
d’aliments au fond de la cuve.
2. Retirez le bras de rinçage inférieur en appuyant sur les boutons situés sur les côtés du moyeu
central et tirez vers vous (g.8). Enlevez le bras de lavage inférieur en retirant le bras de son
axe. Retirez les bras de rinçage et de lavage supérieurs de la même façon. Enlevez le ltre à
gros grains et le ltre n (voir g.6 et 7). Nettoyez soigneusement ces pièces dans un évier.
Retirez les débris pris dans les gicleurs des bras de lavage et de rinçage.
BOUTONS SUR
RINSE ARM
LE MOYEU CENTRAL
CENTER HUB
DU BRAS DE RINÇAGE
BUTTONS
(LXGePR et LXGeR)
LXGePR & LXGeR
Fig.8
3. À l’aide d’un chiffon humide, essuyez l’intérieur de l'appareil. N’utilisez PAS de laine d’acier.
Essuyez l’extérieur de l’appareil. Retirez tout débris restant avec un nettoyant doux conçu
pour traiter l’acier inoxydable et un linge ou une brosse à soies douces.
4. Remettez le ltre à gros grains et le ltre n en place. Réinstallez le bras de lavage inférieur
en le poussant sur son arbre. Appuyez sur les boutons situés sur les côtés du moyeu central,
placez le bras de rinçage sur l’arbre et relâchez les boutons. Faites tourner les bras pour vous
assurer qu’ils sont bien en place. Refaites la même procédure pour les bras de lavage et de
rinçage supérieurs.
5. Pour nettoyer le clavier de commande et l’afcheur, utilisez un linge humide doux ou une
éponge imbibée d’un nettoyant doux. N'utilisez PAS de nettoyants abrasifs ou forts ou de
tampons à récurer.
6. Laissez la porte ouverte toute la nuit pour permettre à l’intérieur de s’aérer et de sécher. La
porte est conçue de telle façon qu’elle puisse rester partiellement ouverte et elle peut être
utilisée pour ventiler l’appareil à la n de la journée.
– 52 –

ENTRETIEN
Pour obtenir en tout temps des résultats optimaux de votre lave-verre Hobart, il est important de
l’entretenir et d’en prendre soin régulièrement.
DÉTARTRAGE
!
AVERTISSEMENT
Aucune solution de détartrage, ni produit de rinçage ou autres
acides ne doivent entrer en contact avec un agent de blanchiment ou une solution de rinçage
contenant un agent de blanchiment destiné aux lave-verre à désinfection chimique. Cela
pourrait provoquer la formation de gaz dangereux. Pour obtenir de meilleurs résultats et par
mesure de sécurité, veuillez suivre les directives ci-dessous à la lettre.
ATTENTION
Évitez de laisser dans l'appareil la solution de détartrage plus longtemps que la
durée recommandée par le fabricant.
DÉTARTREZ RÉGULIÈREMENT LE LAVE-VERRE SELON LES BESOINS. La fréquence du
détartrage dépend de la teneur en sels minéraux de l’eau de distribution. Procédez au détartrage
en présence de dépôts de tartre (substance blanche crayeuse) sur les parois internes et les bras de
lavage. Tous les lave-verre LXGe sont pourvus d’un aide-mémoire automatique de cycle de détartrage
et sont équipés d’un doseur de détartrage interne qui injecte automatiquement la quantité d’agent de
détartrage requise dans l'appareil.
®
Si un détartrage s’avère nécessaire, utilisez un produit de détartrage (tel que Lime-A-Way® ou LSR
pour obtenir de meilleurs résultats.
Une fois que le nombre de cycles préprogrammés est effectué, l’indicateur DÉTARTRAGE RECOMMANDÉ
apparaît sur l’afcheur et vous demande « Voulez-vous détartrer maintenant? ». Vous devez répondre
« Oui » ou « Non » pour commencer un cycle de détartrage ou continuer à utiliser l'appareil normalement.
Si vous choisissez de répondre « Non », l’appareil continue d’avertir l’utilisateur à chaque mise en marche
et à chaque arrêt jusqu’à ce qu’un cycle de détartrage soit lancé. Pour détartrer l'appareil :
1. Appuyez sur la touche DÉPLACEMENT VERS LE BAS/MENU jusqu'à`ce que le symbole ‘>’
apparaisse à gauche du ‘Oui’ et appuyez sur la touche ENT.
2. Sortez les paniers du lave-verre.
3. Retirez les ltres de l’appareil pour les nettoyer. Replacez les ltres, videz le panier et fermez la porte.
4. Assurez-vous que le contenant de produits de détartrage des modèles LXGePR et LXGeR ne
soit pas vide. Veillez à ce que le tuyau de distribution droit soit bien enfoncé jusqu’au fond du
contenant. Vériez pour qu’il n’y ait pas d’obstruction ou de plis de cassure dans le tube de
distribution.
5. Appuyez sur la touche ENT pour entrer en mode de détartrage. L’appareil se vidange et se
remplit d’eau fraîche.
6. L'appareil entre automatiquement en mode de lavage pendant 10 minutes pour ensuite commencer
deux opérations de rinçage et de vidange après avoir terminé le cycle de remplissage.
7. Une fois le détartrage terminé, le module de commande s'éteint.
8. Inspectez l’intérieur de l'appareil pour voir s’il reste des dépôts de calcaire. S’il y a lieu, un autre
cycle de détartrage peut être entrepris en entrant en mode de programmation de gestion.
)
LUBRIFICATION
Le moteur est équipé de roulements à billes à graissage permanent et ne requiert donc aucune lubrication.
– 53 –

DÉPANNAGE
Cette section décrit différents symptômes et causes possibles susceptibles de se développer lors
d'un fonctionnement anormal de l’appareil. Faites appel au Service de l’entretien si les symptômes
persistent après en avoir vérié les causes possibles.
Symptôme Causes possibles
L'appareil ne fonctionne pas (pas
d’afchage).
L'appareil ne fonctionne pas
(l’afchage est allumé).
Les verres ne sont pas propres. 1. Les ltres sont obstrués, ce qui cause une alimentation
1. L'appareil est éteint – le mettre en marche.
2. Le fusible d'alimentation est grillé ou le disjoncteur
d'alimentation s’est déclenché.
3. Le cordon d’alimentation n’est pas branché (modèles livrés
avec cordon seulement).
1. Afchage: «PORTE OUVERTE» – ouvrez et refermez la porte.
Si le problème persiste, appelez le Service de l’entretien Hobart
de votre région.
2. Voir «L’appareil ne se remplit pas ou ne se remplit pas
sufsamment».
insufsante de l’eau à la pompe – nettoyez-les selon les
instructions. (Voir NETTOYAGE).
2. Obstructions dans le(s) bras de lavage ou les bras de lavage
ne tournent pas – nettoyez-les selon les instructions. (Voir
NETTOYAGE).
3. Les bras de lavage ou de rinçage ne tournent pas – assurezvous qu’ils tournent librement.
4. Le doseur à détergent est peut-être bouché.
5. Saleté accumulée – prérincez la vaisselle avant le cycle.
6. Chargement du panier incorrect – voir PRÉPARATION.
7. Bas niveau d’eau – vériez l’alimentation en eau.
8. La température de l’eau est trop basse – notez la température
de l’eau sur l’afcheur pendant le LAVAGE; elle devrait être
supérieure à 120°F (49°C) pour les appareils à assainissement
chimiques, et à 150°F (65,5°C) pour les appareils à
assainissement à l’eau chaude.
9. Le robinet d'alimentation en eau est fermé.
Taches sur les couverts, les verres ou
la vaisselle.
Les produits chimiques ne sont pas
injectés.
Des débris alimentaires sont restés
dans le lave-verre.
Il y a des traces de rouille à l’intérieur
de l’appareil.
1. Les paniers ne sont pas chargés correctement.
2. La température de l’eau est trop basse.
3. Type ou concentration des détergents incorrects.
4. Eau dure – installez un adoucisseur d’eau; utilisez un agent de
rinçage.
5. Remplissage insufsant – vériez l'alimentation en eau.
1. Bas niveaux de produits chimiques – vériez les niveaux.
2. Fuite d’air aux raccordements des tubes de distribution –
vériez l’insertion des raccords rapides et le serrage des
attache-ls sur les connexions des différents tubes.
3. Les tubes sont pliés – veillez à les placer de façon à obtenir des
courbes douces.
Observez les instructions de nettoyage quotidiennes. (Voir
NETTOYAGE).
1. Assurez-vous de ne pas utiliser de laine d’acier pour le
nettoyage de l'appareil.
2. Cela peut être dû à une eau à haute teneur en fer.
– 54 –

Symptômes Causes possibles
Résultats de lavage inattendus. 1. Attaque chimique – elle est généralement causée par toute
combinaison de haute température, d’eau douce, de verre
mou, ou de solutions de lavage à haute teneur alcaline.
2. Ternissement – évitez de laver des articles en argent et en
étain dans les lave-verre à désinfection chimique.
3. Piqûres – l’acier inox peut être piqué au contact prolongé
avec des aliments contenant du sel, du jus de fruits, du
vinaigre, etc. Lavez immédiatement.
4. Marques noires ou grises – frottement possible sur de
l’aluminium.
5. Taches brunes – peuvent être causées par une eau à haute
teneur en fer.
6. Ébrèchement – chargement incorrect ou les verres sont trop
fragiles.
7. Ustensiles en bois endommagés – ne pas laver au lave-verre.
8. Rouille sur la fonte – le culottage se perd au lave-verre. Évitez
de laver au lave-verre.
9. Déformation de la vaisselle de plastique – températures
élevées. Vériez les instructions d’utilisation de la vaisselle de
plastique.
Lectures de basses températures. 1. Température de l’eau de distribution basse – assurez-
vous que la température soit conforme au seuil minimal
recommandé.
2. Succession rapide de cycles – si la température de l’eau
de distribution est basse et que les cycles se succèdent
rapidement, il se peut que la quantité d’eau d’arrivée ne soit
pas sufsante pour répondre à la demande.
3. Des paniers chargés lourdement refroidissent l’eau de lavage
– ne surchargez pas les paniers.
4. Le réglage de la chaleur du surchauffeur ou du fond de
la cuve est trop bas – contactez le bureau du Service de
l’entretien Hobart de votre région.
L'appareil ne se remplit pas ou ne se
remplit pas sufsamment.
L’appareil se remplit trop ou l’eau
coule par la porte.
L'appareil ne se vidange pas. 1. Les tuyaux de vidange sont entravés – vériez la conduite de
De l’eau gicle occasionnellement des
bras de rinçage (lave-verre à haute
température seulement).
1. Pression d’eau basse – vériez si le ltre du boyau n’est pas
obstrué; assurez-vous que la pression domestique rencontre
les pressions minimales requises.
2. Pas de circulation d’eau – les robinets d’alimentation d’eau ne
fonctionnent peut-être pas.
1. L'appareil n’est pas de niveau. (voir MISE DE NIVEAU).
2. L’électrovalve de remplissage coule – éteignez l’appareil; si
l’eau continue à entrer dans l’appareil, contactez le bureau
du Service de l’entretien Hobart de votre région.
vidange pour déceler les entortillages; assurez-vous que la
plomberie est conçue pour un débit de vidange approprié.
2. Mettez l'appareil à l’ARRÊT. Attendez plusieurs secondes et
remettez-le en MARCHE. Répétez cette procédure deux fois
si nécessaire. Si le problème persiste, contactez le bureau
du Service de l’entretien Hobart de votre région.
Cette situation est normale à cause de l’expansion de l’eau
chauffée dans le réservoir du surchauffeur.
– 55 –

Instalación, operación y cuidado de los
LAVAVAJILLAS DE LA SERIE LXGe
GUARDE ESTAS INSTRUCCIONES
GENERAL
Los lavavajillas de la serie LXGe son máquinas totalmente automáticas y de carga frontal. Los lavavajillas de la
serie LXGe son capaces de procesar 24 a 38 charolas por hora, según el modelo.
Todos los lavavajillas de la serie LXGe se apagan automáticamente después de 4 horas de uso para ahorrar energía.
Los lavavajillas LXGe incluyen Sense-A-Temp™ para garantizar una temperatura adecuada del agua caliente
durante el enjuague.
El equipo estándar incluye una canastilla de vajillas y copas, controles electrónicos, bomba de drenaje, bomba
de enjuague, bombas de químicos, manguera de llenado y manguera de drenaje.
MODELO DESCRIPCIÓN
LXGePR Enjuague con agua nueva; modelos para desinfección con químicos a baja
temperatura, para usarse con solución de hipoclorito de sodio (cloro) al 6% como
agente desinfectante*.
Nota: Si se usará cloro al 8,40%, contacte al Servicio de Hobart o al proveedor
de sustancias químicas para cambiar los ajustes de la bomba del desinfectante.
(Pueden aplicarse cargos).
LXGeR Enjuague con agua nueva con unidad de recuperación de energía interna y un
sobre-calentador integrado que eleva la temperatura del agua de entrada a 180°F.
Temperatura del agua de entrada recomendada de 55°F a 85°F.
* - El agente desinfectante se debe usar según las instrucciones de uso en la etiqueta registrada en EPA.
– 56 –

INSTALACIÓN
DESEMPAQUE
Inmediatamente después de desempacar el lavavajillas, compruebe la existencia de posibles daños por
transporte. Si se comprueba que esta máquina se ha dañado, guarde el material de embalaje y comuníquese
con el transportista a más tardar a los 15 días de la entrega.
UBICACIÓN
Antes de la instalación, compruebe que el suministro eléctrico coincida con las especicaciones de la placa de
datos de la máquina, que se encuentra en la parte superior de la puerta.
El vapor generado durante el funcionamiento es normal y puede salir por la puerta. Madera, laminados, chapas de
madera, etc. no son materiales adecuados para su uso en zonas expuestas a vapor y detergentes del lavavajillas.
Se recomiendan protecciones de acero inoxidable o resistentes a la humedad para supercies adyacentes a los
lados y encima del LXGe.
NIVELACIÓN
La máquina debe estar nivelada para funcionar correctamente. Ubique el lavavajillas en su lugar de funcionamiento.
Nivele la máquina antes de realizar cualquier conexión. Con un nivel de carpintero colocado en diagonal en los
rieles de la canastilla, nivele la máquina de adelante hacia atrás y de lado a lado atornillando las patas ajustables
hacia adentro o afuera.
REQUISITOS DE AGUA
Una calidad del agua adecuada puede mejorar el rendimiento de lavado de vajillas, al reducir las manchas,
mejorar la ecacia del trabajo y prolongar la vida del equipo. Las condiciones del agua varían de un lugar a otro.
El tratamiento de agua adecuado y recomendado para un uso ecaz y eciente de este equipo también variará
según las condiciones del agua. Pregunte al proveedor de agua municipal para obtener más detalles sobre sus
condiciones locales de agua antes de la instalación.
La dureza del agua recomendada es 3 granos de dureza por galón o menos. Una mayor dureza puede provocar
una formación excesiva de cal. La dureza del agua sobre los 3 granos por galón requiere tratamiento del
agua. Se ha demostrado que el tratamiento del agua reduce los costos relacionados con la limpieza, merma la
descalcicación del lavavajillas y reduce el consumo de detergente en el lavavajillas.
AVISO
hierro. Los altos niveles de cloruro en el agua de suministro pueden causar picaduras y será necesario un sistema
de extracción de cloro. Comuníquese con el profesional de tratamiento del agua local para un tratamiento del
agua adecuado.
El sedimento puede requerir un ltro de partículas. Los sólidos disueltos pueden requerir tratamiento del agua
como un suavizador de agua, sistema de ósmosis inversa, etc. Comuníquese con un profesional local de
tratamiento del agua para su tratamiento adecuado.
Si la inspección del lavavajillas o el sobrecalentador muestra acumulación de cal después de haber usado el
equipo, se recomienda el tratamiento de agua. Si ya hay un suavizador de agua instalado, asegúrese de que hay
un nivel suciente de sal. Comuníquese con la Ocina de Servicio local de Hobart para pedir recomendaciones
especícas.
Los altos niveles de hierro en el suministro de agua pueden causar manchas y requerir un ltro de
– 57 –
Un amortiguador de golpe de ariete (que cumpla con la norma ASSE-1010 o equivalente) debe instalarse
(suministrado por otros) en la línea de suministro de agua común en la conexión del servicio.
El plomero que conecte esta máquina es responsable de asegurar que las tuberías de agua estén COMPLETAMENTE
ENJUAGADAS ANTES de conectarlas al lavavajillas. Este “enjuague” es necesario para quitar todo material
extraño, tal como astillas (procedentes de tuberías cortadas o enroscadas) compuestos en los empalmes o si
se usan conexiones soldadas, trozos de soldadura o recortes de los tubos. Los escombros, si no se eliminan,
pueden alojarse en los componentes de la tubería del lavavajillas e inutilizarlos. Las válvulas manuales o las
válvulas solenoides contaminadas por cuerpos extraños y cualquier material derivado de esta suciedad no son
responsabilidad del fabricante y los costos de reparación relacionados no están cubiertos por la garantía.
Las necesidades de suministro de agua son las siguientes:
MODELO TEMPERATURA
LXGeR 55 °F mínimo, 85 °F máximo
NOTA: En las instalaciones de LXGeR, si la temperatura del agua fría está siempre sobre los 80 °F o si está
entrando un exceso de vapor al tanque de lavado después de haber terminado el ciclo de condensación, contacte
al Servicio de Hobart para aumentar el tiempo de condensación.
La presión de agua requerida para este lavavajillas es de 15 a 65 psig. Si hay presiones superiores a 65 psig,
se debe instalar una válvula reguladora de presión en la línea de agua al lavavajillas (por otros). Si la presión
que uye es inferior a 15 psi, causará un mal funcionamiento de la máquina. Todos los lavavajillas LXGe están
equipados con un sistema de enjuague por bomba; por lo tanto, un manómetro de agua no es necesario y no
se suministra con la máquina.
AVISO
El regulador de presión del agua debe tener un desvío de descarga. El hecho de no usar el tipo
adecuado de regulador de presión puede causar daños a la unidad.
Se debe instalar una válvula de cierre manual (no suministrada) antes de la manguera de llenado para permitir
el servicio a la máquina.
Se recomienda la instalación de un colador de línea (no suministrado) en la línea de alimentación entre la válvula
de cierre manual (no suministrada) y el punto de conexión en la máquina. Haga las conexiones de plomería con
1
tubería de cobre de mínimo
⁄2" de diámetro externo (3⁄4" recomendado), con una conexión de manguera de jardín
de 3⁄4" (no suministrada). Consulte los diagramas de instalación, páginas 14-17.
CONEXIONES DE PLOMERÍA
!
ADVERTENCIA
Las conexiones de plomería deben cumplir con los códigos sanitarios, de seguridad
y plomería.
Drenaje
Se suministra una manguera de drenaje de 5⁄8" de diámetro y 6' de largo. Debe conectarse rmemente en el
drenaje. Tenga cuidado de no estrangular la manguera. Consulte los diagramas de instalación, páginas 14-17.
El drenaje debe tener una capacidad de ujo mínima de 5 galones por minuto.
– 58 –

ANTES DE UTILIZARLO POR PRIMERA VEZ
Esta máquina debe limpiarse después de su instalación y antes de entrar en funcionamiento.
(Véase Limpieza).
CONEXIÓN ELÉCTRICA
!
ADVERTENCIA
Las conexiones eléctricas y a tierra deben cumplir con las normas
correspondientes del Código Eléctrico Nacional y/u otros códigos eléctricos locales.
!
ADVERTENCIA
Desconecte la máquina de la corriente eléctrica y siga los procedimientos de
bloqueo/etiquetado.
DATOS ELÉCTRICOS
Cumplimiento de conformidad con el Código Eléctrico Nacional NFPA-70, última adición.
AVISO
Para conexiones eléctricas, utilice cable de cobre clasicado para 90 °C como mínimo.
Modelo Voltios/Hertz/Fases
LXGePR
LXGeR
1/06/021
Ampacidad mínima del conductor
del circuito de suministro
20 20
40 40120/208-240(3W)/60/1*
Ampacidad máxima del
dispositivo protector
* Los sistemas (3W) requieren tres cables de alimentación que incluyen un neutro que lleva corriente.
Debe proporcionarse un cuarto cable adicional para la conexión a tierra de la máquina.
Consulte la parte superior de la manija de la puerta de la máquina y la etiqueta eléctrica en la parte
posterior del panel frontal inferior para una selección adecuada.
– 59 –
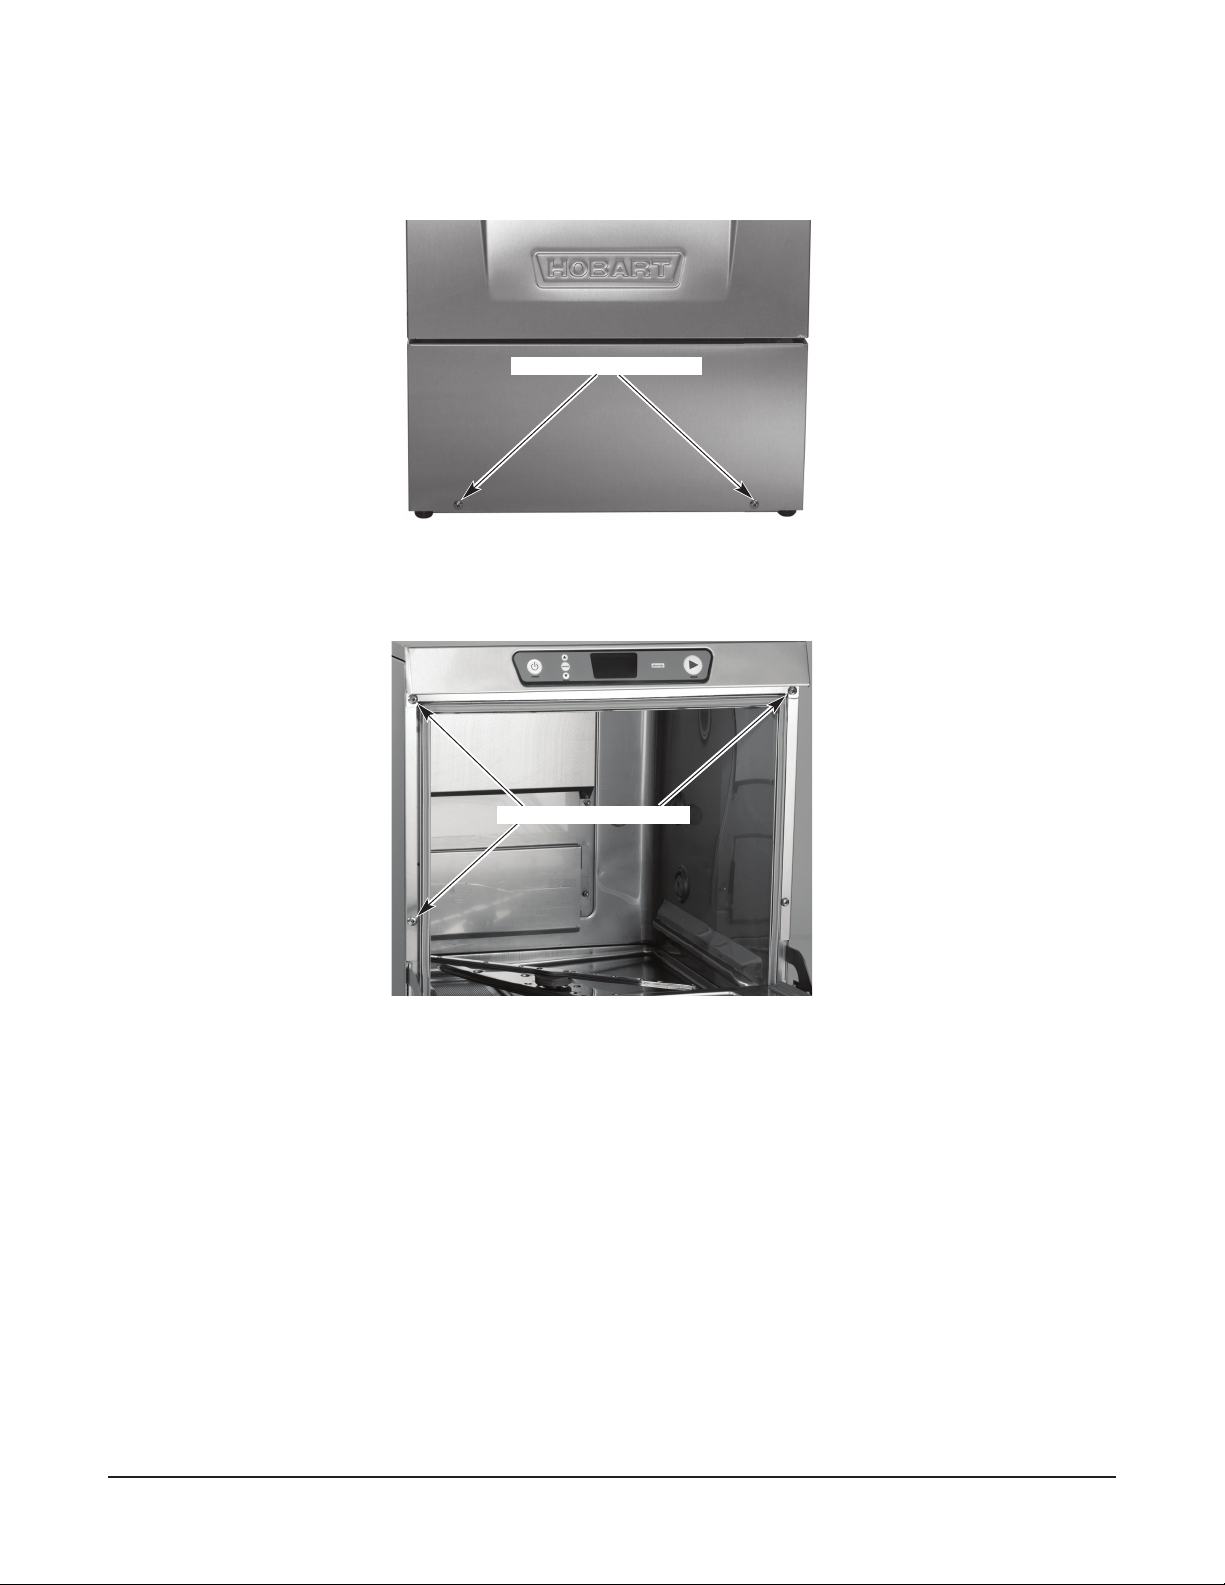
Método de conexión
1. Retire el panel frontal inferior; para hacerlo, quite los dos tornillos en la parte inferior del panel (Fig. 1).
RETIRAR DOS TORNILLOS
Fig. 1
2. Abra la puerta del lavavajillas y retire los dos tornillos izquierdos y el tornillo superior derecho (Fig. 2). Jale
la parte superior de la unidad hacia adelante más o menos 1" y retire el panel lateral izquierdo.
RETIRAR TRES TORNILLOS
Fig. 2
– 60 –
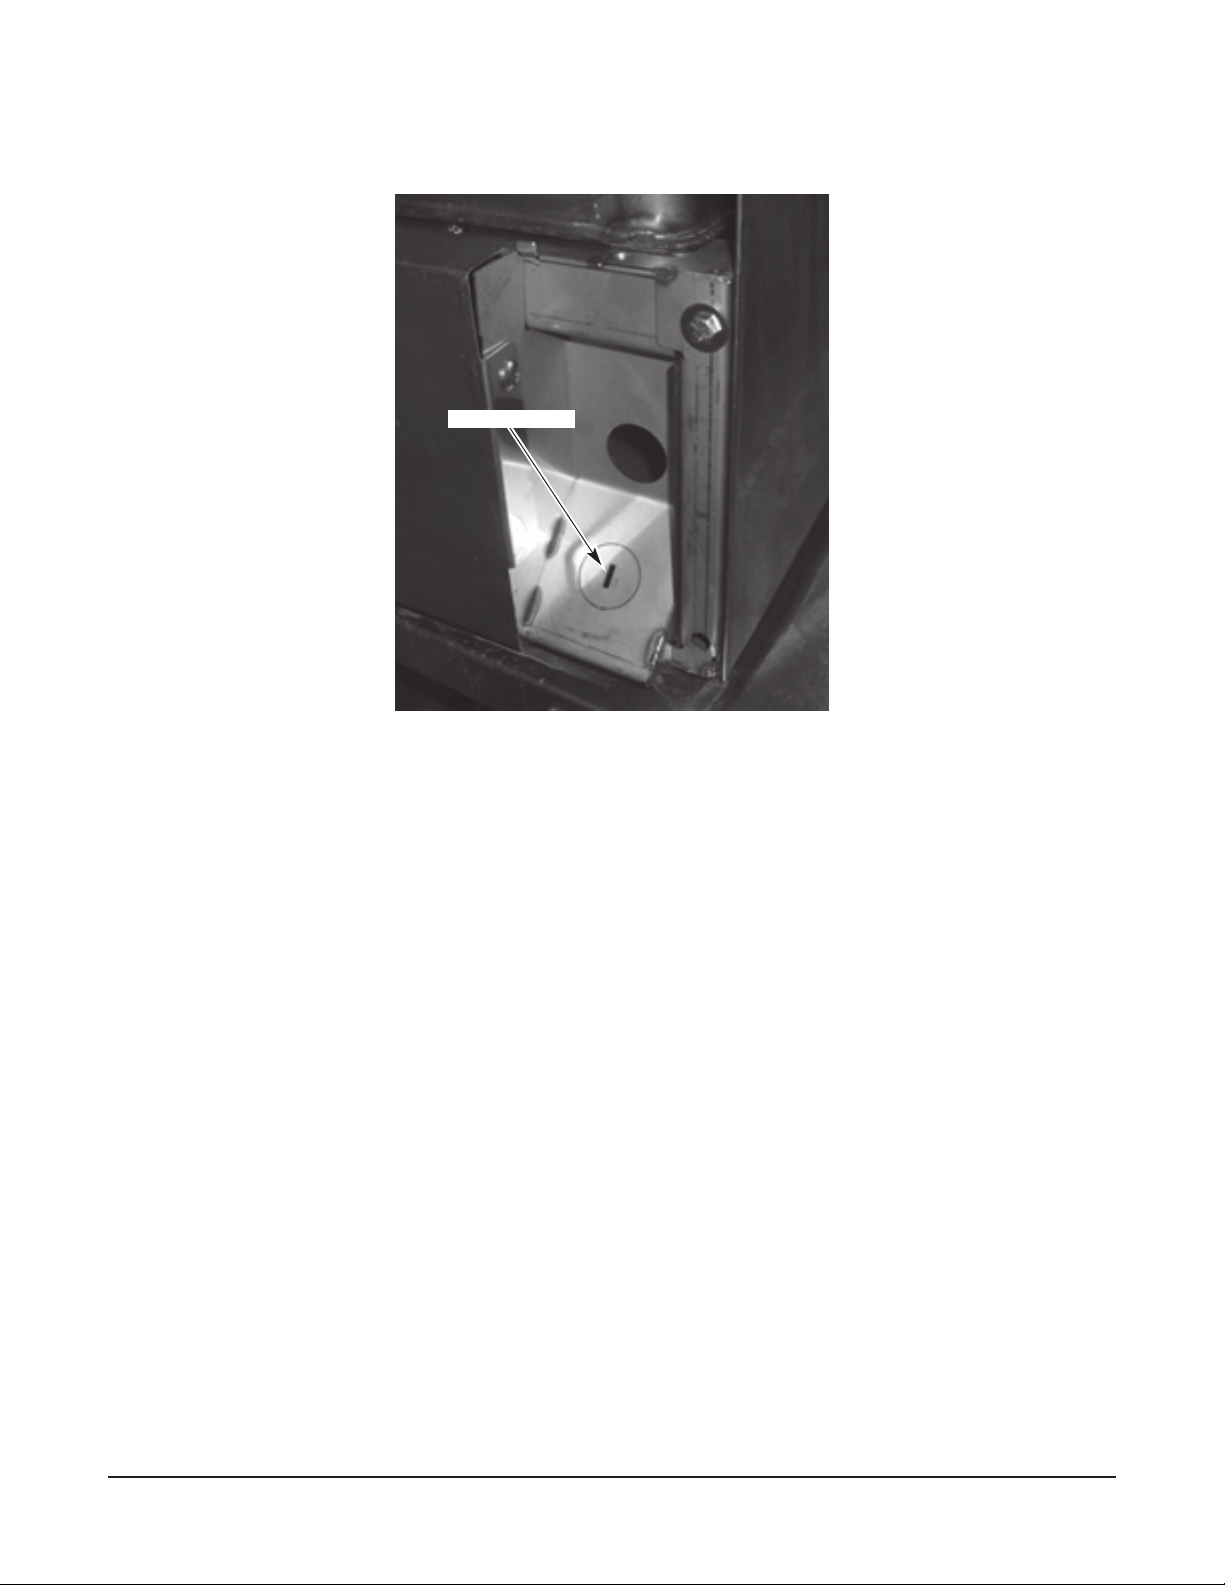
3. Se suminista un agujero para un conductor de tamaño industrial de 1" en la esquina inferior derecha en
la parte posterior de la máquina (Fig. 3). Si necesita más espacio, retire el prepunzonado y use un acople
de 45°.
PREPUNZONADO
Fig. 3
4. Instale el conducto de tamaño comercial de 1" y el acople. Deje al menos cuatro pies de cable entre la
conexión de la pared y la máquina. Esto permite que la máquina se retire de la pared para su limpieza y/o
mantenimiento.
5. Inserte los cables a través del acople hacia el frente de la unidad. Al menos 24" y no más de 28" de cable.
6. Realice las conexiones eléctricas según el diagrama suministrado con el equipo y asegure los cables a las
conexiones de servicio de la máquina. Mantenga al mínimo el exceso de cable en la base de la unidad.
7. Vuelva a instalar el panel lateral izquierdo, la parte superior de la unidad y el panel frontal inferior. Reinstale
los tres tornillos situados detrás de la puerta y los dos tornillos de la parte inferior del panel frontal.
DETERGENTE Y ENJUAGUE
Utilice solo detergentes de grado comercial recomendados por un profesional químico. No use detergentes
formulados para lavavajillas residenciales.
Los tiempos de “encendido” de la bombas de detergente y enjuague se ajustan en la fábrica. Si se requieren
ajustes, comuníquese con la Ocina de Servicio local de Hobart o su proveedor de productos químicos.
Coloque los recipientes de detergente y enjuague (que se obtienen de un proveedor de químicos) debajo del
lavavajillas (lo más cerca a la máquina).
Retire la tapa del recipiente de detergente y coloque el tubo rojo del equipo dentro del recipiente de detergente.
Retire la tapa del recipiente del abrillantador y enjuague y coloque el tubo azul del equipo dentro del recipiente
del abrillantador y enjuague.
Asegúrese de empujar los tubos de suministro por completo hasta el fondo de cada recipiente. Asegúrese de
que no haya obstrucciones ni estrangulamiento en los tubos de suministro.
– 61 –
DESINFECTANTE QUÍMICO (LXGePR)
El hipoclorito de sodio (cloro) atacará materiales tales como peltre, aluminio y plata. Por lo tanto, los
lavavajillas con desinfección química no deben usarse para lavar estos materiales. LA BOMBA DE
DESINFECCIÓN QUÍMICA DEL LXGePR SE AJUSTA DE FÁBRICA PARA USARSE CON SOLUCIÓN DE
HIPOCLORITO DE SODIO AL 6%.
AVISO
Si se usará solución de hipoclorito de sodio al 8,40%, comuníquese con la Ocina de Servicio local de
Hobart.
En los modelos LXGePR, coloque un desinfectante aprobado para máquinas de enjuague con agua potable debajo
del lavavajillas (lo más cerca a la máquina) que no esté a más de 10 pulgadas encima del suelo. No premezcle la
solución desinfectante con agua ni cualquier otro líquido.
!
ADVERTENCIA
Nunca premezcle un humectante con una solución desinfectante. La mezcla puede
causar la formación de gases peligrosos.
Retire la tapa del recipiente de desinfectante y coloque el tubo blanco del equipo dentro del recipiente de
desinfectante. Asegúrese de empujar el tubo hasta el fondo de cada recipiente. Asegúrese de que no haya
obstrucciones ni estrangulamientos en los tubos.
Revise con frecuencia el recipiente de desinfectante para garantizar la desinfección.
REVISIÓN DE LA CONCENTRACIÓN DEL DESINFECTANTE
Verique que haya suciente químico desinfectante y que el tubo esté insertado completamente en el recipiente
del desinfectante. Coloque una canastilla de vasos de vidrio en la máquina.
En los modelos LXGePR, la función PuriRinse debe estar desactivada para revisar correctamente la concentración
del desinfectante. Para desactivar PuriRinse, mantenga pulsada la tecla LAVAR por cinco segundos hasta que
inicie el ciclo de lavado.
Siga las instrucciones que están en el frasco con papel tornasol y pruebe el agua sobre la supercie del fondo
de los vasos. La concentración debe ser de 50 ppm como mínimo a 100 ppm como máximo.
Si la lectura es incorrecta, comuníquese con la Ocina de Servicio local de Hobart o su proveedor de sustancias
químicas para hacer ajustes.
SOLUCIÓN PARA DESCALCIFICAR
Todos los modelos LXGeR y LXGePR están equipados con un sistema automático de descalcicación. Durante
la instalación, un técnico de servicio calicado de Hobart o el proveedor de productos químicos debe ajustar la
dureza del agua total para establecer correctamente los intervalos de descalcicación.
Retire la tapa del recipiente de desincrustante y coloque el tubo negro del equipo dentro del recipiente. Asegúrese
de empujar el tubo hasta el fondo de cada recipiente. Asegúrese de que no haya obstrucciones ni estrangulamientos
en los tubos.
– 62 –

LLENADO DE LAS BOMBAS DE QUÍMICOS.
Cuando se vacía un producto químico, el llenado se inicia automáticamente la próxima vez que se encienda la
máquina o se haya iniciado un ciclo de lavado. Observe que el tiempo de llenado inicial para todas las bombas
(detergente, enjuague y desinfectante) es de 60 segundos. Si la sustancia química no se detecta en 60 segundos,
el indicador de agregar químico destellará. Después de detectar la sustancia química, el indicador en la pantalla
se apagará y la bomba continuará llenándose durante 10 segundos para permitir que los productos químicos
lleguen a la máquina. Si todas las sustancias químicas están vacías, el desinfectante se llenará primero y luego
el detergente. Solo una bomba de químicos funcionará a la vez.
Si las sustancias químicas no se detectan después de tres operaciones de llenado consecutivas, el indicador de
agregar químico destellará y se cancelará el llenado. La próxima vez que se inicie un ciclo de lavado, el indicador
de agregar químico seguirá destellando. Compruebe que los recipientes de sustancias químicas no estén vacíos
y que los tubos de suministro estén insertados completamente en el fondo de los recipientes.
La operación de llenado puede restaurarse al apagar el lavavajillas y luego encenderlo.
Si los recipientes de sustancias químicas no están vacíos y los tubos de suministro están insertados correctamente,
el sensor químico o las bombas podrían estar funcionando mal; comuníquese con la Ocina de Servicio local
de Hobart.
– 63 –

!
40 15/16"
DETERGENTE Y
ENJUAGUE
DESINFECTANTE
CON CLORO
DESCALCIFICADOR
(PUEDE REQUERIRSE
ESPACIO ADICIONAL)
ESPACIO ADICIONAL NECESARIO PARA DESLIZAR LA
UNIDAD HACIA ADELANTE SOLO PARA SERVICIO
MOLDURA
(OPCIONAL)
ESPACIO
MÍN. DE
SERVICIO
LOS FRASCOS DE SUSTANCIAS QUÍMICAS
PUEDEN UBICARSE EN CUALQUIER LADO DE
LA MÁQUINA
1-1/2" TUBERÍA DE TAMAÑO
COMERCIAL MÍN. REDUCIDO A
CONEXIÓN FTP DE 3/4" (POR EL
CLIENTE)
LÍNEA DEL SUELO
RECOMENDADO
23” O MENOS
SERVICIO DE AGUA SUGERIDO,
TUBERÍA DE TAMAÑO COMERCIAL
1/2" MÍN. CON VÁLVULA DE CIERRE,
FILTRO DE LÍNEA Y ACOPLE PARA
MANGUERA DE JARDÍN MACHO DE
3/4" (POR EL CLIENTE).
ALTURA DE
CARGA
MÁX. 12”
34 3/8"
33 15/16"
23 15/16"
1 1/8"
21 1/16"
6 7/16"
17"
1 3/8"
21 11/16"
25 9/16"
38 7/16"
ADVERTENCIA
No premezcle otras sustancias químicas con el hipoclorito de
sodio (cloro líquido). La mezcla puede causar la formación de gases peligrosos.
AVISO
hay presiones superiores a 65 psig, una válvula reguladora de presión se debe instalar en la línea de
La presión del agua que uye requerida para este lavavajillas es de 15 a 65 psig. Si
agua al lavavajillas (por otros).
Manómetro de presión no provisto en máquinas de enjuague bombeadas.
Importante: Los recipientes de sustancias químicas se deben colocar a no más de 16" sobre el piso.
Si los recipientes de sustancias químicas se colocarán en el gabinete junto a la máquina, se requerirá
un agujero de 1/2" de diámetro en el gabinete para que funcione la línea de suministro de productos
químicos.
Use solo hipoclorito de sodio (cloro líquido) al 6% u 8,4% como químico desinfectante para asegurar
el funcionamiento correcto del lavavajillas.
Ciertos materiales incluyendo la chapa de plata, aluminio y estaño son atacados por el hipoclorito
de sodio (cloro líquido).
NOTAS:
1. Todas las dimensiones de la máquina vertical tomadas del suelo pueden aumentarse en
.875"odisminuirse en .375".
2. Se escapa aire húmedo de la puerta.
Solo use materiales resistentes a la humedad a los lados y encima del lavavajillas.
3. No se recomienda una cubierta de ventilación sobre el lavavajillas empotrado ya que no produce
vapores en exceso.
NOTAS DE PLOMERÍA:
1. Amortiguador de golpe de ariete (que cumpla con la norma ASSE-1010 o equivalente) a suministrarse
(por otros) en la línea de suministro de agua común en conexión con el servicio.
2. La dureza del agua recomendada será de 3 granos o menos para obtener mejores resultados.
3. Si la manguera de drenaje se enrolla sobre un fregadero, el lazo no debe exceder 44" AFF.
INFORMACIÓN DE CONEXIÓN
(AFF = SOBRE EL PISO ACABADO)
LEYENDA
E1 CONEXIÓN ELÉCTRICA: AGUJERO DE 1-3/8"
DE DIÁMETRO PARA CONDUCTO DE TAMAÑO
INDUSTRIAL DE 1"; 10-5/8" AFF.
P1 CONEXIÓN DE LLENADO SIMPLE Y ENJUAGUE:
ACOPLE DE MANGUERA DE JARDÍN HEMBRA
DE 3/4" EN MANGUERA DE 6' DE LARGO
SUMINISTRADO CON LA MÁQUINA;
120 °F MÍN. DE AGUA PARA LXGePR, 140 °F
RECOMENDADO.
P2 CONEXIÓN DEL DRENAJE: 5/8" ACOPLE
CON GANCHO MANGUERA DE 6' DE LARGO
SUMINISTRADA CON LA MÁQUINA.
PARED
AMPACIDAD
MODELO VOLTIOS/HERTZ/FASES
AMPERIOS
NOMINALES
MÍNIMA DEL
CONDUCTOR
DEL CIRCUITO
DE SUMINISTRO
MÁX.
DISPOSITIVOS
PROTECTORES
LXGePR 120/60/1 15.4 20 20
SALIDA DE CALOR, BTU/HR
MODELO LATENTE SENSIBLE
LXGePR 1900 800
PESOS DE ENVÍO LXGePR
PESO NETO DE LA MÁQUINA 150 LBS
PESO DE ENVÍO NACIONAL 170 LBS
DIAGRAMA DE INSTALACIÓN (LXGePR, pequeño)
– 64 –
KITS DE ACCESORIOS Y CABLES PARA TODAS LAS MÁQUINAS
NOTA: PARA CONEXIONES A LA RED ELÉCTRICA, USE SOLO
CABLE DE COBRE CLASIFICADO A 90 °C COMO MÍNIMO.
!
ADVERTENCIA
y a tierra deben cumplir con las partes aplicables del
Código Eléctrico Nacional y/u otros códigos locales
eléctricos.
Las conexiones de plomería deben cumplir con los códigos
sanitarios, de seguridad y plomería . Las conguraciones
de drenaje y la línea de llenado varían, algunos métodos se
muestran en este dibujo.
Las conexiones eléctricas

!
48 7/16"
41 7/8"
13 15/16"
1 1/8"
21 11/16"
23 15/16"
ESPACIO ADICIONAL NECESARIO PARA DESLIZAR LA
UNIDAD HACIA ADELANTE SOLO PARA SERVICIO
MOLDURA
(OPCIONAL)
ESPACIO
MÍN. DE
SERVICIO
DETERGENTE, ENJUAGUE,
DESINFECTANTE CON
CLORO Y RECIPIENTES DE
DESCALCIFICADOR
PUEDEN UBICARSE
DEBAJO DE LA MÁQUINA
1-1/2" TUBERÍA DE
TAMAÑO COMERCIAL
MÍN. REDUCIDO A
CONEXIÓN FTP DE 3/4"
(POR EL CLIENTE)
LÍNEA DEL SUELO
RECOMENDADO
31” O MENOS
SERVICIO DE AGUA SUGERIDO,
TUBERÍA DE TAMAÑO COMERCIAL 1/2" MÍN. CON VÁLVULA DE
CIERRE, FILTRO DE LÍNEA Y
ACOPLE PARA MANGUERA DE
JARDÍN MACHO DE 3/4" (POR EL
CLIENTE).
ALTURA DE
CARGA
MÁX. 12”
41 7 /16"
24 1 /2"
1 3 /8" 21 11 /16"
25 9 /16"
38 7 /16"
ADVERTENCIA
No premezcle otras sustancias químicas con el hipoclorito de
sodio (cloro líquido). La mezcla puede causar la formación de gases peligrosos.
AVISO
hay presiones superiores a 65 psig, una válvula reguladora de presión se debe instalar en la línea de
La presión del agua que uye requerida para este lavavajillas es de 15 a 65 psig. Si
agua al lavavajillas (por otros).
Manómetro de presión no provisto en máquinas de enjuague bombeadas.
Importante: Los recipientes de sustancias químicas se deben colocar a no más de 24" sobre el piso.
Si los recipientes de sustancias químicas se colocarán en el gabinete junto a la máquina, se requerirá
un agujero de 1/2" de diámetro en el gabinete para que funcione la línea de suministro de productos
químicos.
Use solo hipoclorito de sodio (cloro líquido) al 6% u 8,4% como químico desinfectante para asegurar
el funcionamiento correcto del lavavajillas.
Ciertos materiales incluyendo la chapa de plata, aluminio y estaño son atacados por el hipoclorito
de sodio (cloro líquido).
NOTAS:
1. Todas las dimensiones de la máquina vertical tomadas del suelo pueden aumentarse en
.875"odisminuirse en .375".
2. Se escapa aire húmedo de la puerta.
Solo use materiales resistentes a la humedad a los lados y encima del lavavajillas.
3. No se recomienda una cubierta de ventilación sobre el lavavajillas empotrado ya que no produce
vapores en exceso.
NOTAS DE PLOMERÍA:
1. Amortiguador de golpe de ariete (que cumpla con la norma ASSE-1010 o equivalente) a suministrarse
(por otros) en la línea de suministro de agua común en conexión con el servicio.
2. La dureza del agua recomendada será de 3 granos o menos para obtener mejores resultados.
3. Si la manguera de drenaje se enrolla sobre un fregadero, el lazo no debe exceder 51" AFF.
INFORMACIÓN DE CONEXIÓN
(AFF = SOBRE EL PISO ACABADO)
LEYENDA
E1 CONEXIÓN ELÉCTRICA: AGUJERO DE 1-3/8"
DE DIÁMETRO PARA CONDUCTO DE TAMAÑO
INDUSTRIAL DE 1"; 18-1/8" AFF.
P1 CONEXIÓN DE LLENADO SIMPLE Y ENJUAGUE:
ACOPLE DE MANGUERA DE JARDÍN HEMBRA
DE 3/4" EN MANGUERA DE 6' DE LARGO
SUMINISTRADO CON LA MÁQUINA;
120 °F MÍN. DE AGUA PARA LXGePR, 140 °F
RECOMENDADO.
P2 CONEXIÓN DEL DRENAJE: 5/8" ACOPLE
CON GANCHO MANGUERA DE 6' DE LARGO
SUMINISTRADA CON LA MÁQUINA.
PARED
MODELO VOLTIOS/HERTZ/FASES
LXGePR 120/60/1 15.4 20 20
SALIDA DE CALOR, BTU/HR
MODELO LATENTE SENSIBLE
LXGePR 1900 800
PESOS DE ENVÍO LXGePR
PESO NETO DE LA MÁQUINA 150 LBS
PESO DE ENVÍO NACIONAL 170 LBS
KITS DE ACCESORIOS Y CABLES PARA TODAS LAS MÁQUINAS
NOTA: PARA CONEXIONES A LA RED ELÉCTRICA, USE SOLO
CABLE DE COBRE CLASIFICADO A 90 °C COMO MÍNIMO.
!
ADVERTENCIA
AMPERIOS
NOMINALES
AMPACIDAD
MÍNIMA DEL
CONDUCTOR
DEL CIRCUITO
DE SUMINISTRO
MÁX.
DISPOSITIVOS
PROTECTORES
y a tierra deben cumplir con las partes aplicables del
Código Eléctrico Nacional y/u otros códigos locales
eléctricos.
Las conexiones de plomería deben cumplir con los códigos
sanitarios, de seguridad y plomería . Las conguraciones
de drenaje y la línea de llenado varían, algunos métodos se
DIAGRAMA DE INSTALACIÓN (LXGePR, grande)
– 65 –
muestran en este dibujo.
Las conexiones eléctricas

AVISO
DETERGENTE Y
ENJUAGUE
DESCALCIFICADOR
(PUEDE
REQUERIRSE
ESPACIO
ADICIONAL)
MOLDURA
(OPCIONAL)
40 15/16"
ESPACIO
MÍN. DE
SERVICIO
33 15/16"
1 1/8"
21 11/16"
LOS FRASCOS DE SUSTANCIAS
QUÍMICAS PUEDEN UBICARSE EN
CUALQUIER LADO DE LA MÁQUINA
23 15/16"
9"
MÍN.
PARED
E1
P2
P1
P2
1-1/2" TUBERÍA DE
TAMAÑO COMERCIAL
MÍN. REDUCIDO A
CONEXIÓN FTP DE 3/4"
(POR EL CLIENTE)
ALTURA
DE CARGA
MÁX. 12”
17"
1 3/8"
39 11/16"
26 13/16"
21 11/16"
RECOMENDADO
23” O MENOS
E1
P2
3
LÍNEA DEL SUELO
SERVICIO DE AGUA SUGERIDO,
TUBERÍA DE TAMAÑO
COMERCIAL 1/2" MÍN. CON
VÁLVULA DE CIERRE, FILTRO DE
LÍNEA Y ACOPLE PARA
MANGUERA DE JARDÍN MACHO
DE 3/4" (POR EL CLIENTE).
ACOPLE DE MANGUERA (POR
EL CLIENTE). (AGUA FRÍA)
34 3/8 "
6 7/16 "
ESPACIO ADICIONAL NECESARIO PARA DESLIZAR LA
UNIDAD HACIA ADELANTE SOLO PARA SERVICIO
hay presiones superiores a 65 psig, una válvula reguladora de presión se debe instalar en la línea de
La presión del agua que uye requerida para este lavavajillas es de 15 a 65 psig. Si
agua al lavavajillas (por otros).
Manómetro de presión no provisto en máquinas de enjuague bombeadas.
Si los recipientes de sustancias químicas se colocarán en el gabinete junto a la máquina, se requerirá
un agujero de 1/2" de diámetro en el gabinete para que funcione la línea de suministro de productos
químicos.
NOTAS:
1. Todas las dimensiones de la máquina vertical tomadas del suelo pueden aumentarse en
.875"odisminuirse en .375".
2. Se escapa aire húmedo de la puerta.
Solo use materiales resistentes a la humedad a los lados y encima del lavavajillas.
3. No se recomienda una cubierta de ventilación sobre el lavavajillas empotrado ya que no produce
vapores en exceso.
NOTAS DE PLOMERÍA:
1. Amortiguador de golpe de ariete (que cumpla con la norma ASSE-1010 o equivalente) a suministrarse
(por otros) en la línea de suministro de agua común en conexión con el servicio.
2. La dureza del agua recomendada será de 3 granos o menos para obtener mejores resultados.
3. Si la manguera de drenaje se enrolla sobre un fregadero, el lazo no debe exceder 44" AFF.
INFORMACIÓN DE CONEXIÓN
(AFF = SOBRE EL PISO ACABADO)
LEYENDA
E1 CONEXIÓN ELÉCTRICA: AGUJERO DE 1-3/8"
DE DIÁMETRO PARA CONDUCTO DE TAMAÑO
INDUSTRIAL DE 1"; 10-5/8" AFF.
P1 CONEXIÓN DE LLENADO SIMPLE Y ENJUAGUE:
ACOPLE DE MANGUERA DE JARDÍN HEMBRA
DE 3/4" EN MANGUERA DE 6' DE LARGO
SUMINISTRADO CON LA MÁQUINA;
55-85° F (FRÍO) RECOMENDADO PARA LXGeR.
P2 CONEXIÓN DEL DRENAJE: 5/8" ACOPLE
CON GANCHO MANGUERA DE 6' DE LARGO
SUMINISTRADA CON LA MÁQUINA.
PARED
AMPACIDAD
MÍNIMA DEL
MODELO VOLTIOS/HERTZ/FASES
AMPERIOS
NOMINALES
CONDUCTOR
DEL CIRCUITO
DE SUMINISTRO
DISPOSITIVOS
PROTECTORES
LXGeR 120/208-240(3W)/60/1* 30.5 40 40
SALIDA DE CALOR, BTU/HR
MODELO LATENTE SENSIBLE
LXGeR 1100 2000
PESOS DE ENVÍO LXGeR
PESO NETO DE LA MÁQUINA 165 LBS
DIAGRAMA DE INSTALACIÓN (LXGeR, pequeño)
– 66 –
PESO DE ENVÍO NACIONAL 185 LBS
MÁX.
* ESTE SISTEMA REQUIERE TRES CABLES DE ALIMENTACIÓN
NOTA: PARA CONEXIONES A LA RED ELÉCTRICA, USE SOLO
ADVERTENCIA
y a tierra deben cumplir con las partes aplicables del
Código Eléctrico Nacional y/u otros códigos locales
eléctricos.
Las conexiones de plomería deben cumplir con los códigos
sanitarios, de seguridad y plomería . Las conguraciones
de drenaje y la línea de llenado varían, algunos métodos se
muestran en este dibujo.
QUE INCLUYE UN NEUTRO QUE LLEVA CORRIENTE, UN CUARTO
CABLE ADICIONAL DEBE PROPORCIONARSE PARA LA CONEXIÓN
A TIERRA DE LA MÁQUINA.
KITS DE ACCESORIOS Y CABLES PARA TODAS LAS MÁQUINAS
CABLE DE COBRE CLASIFICADO A 90 °C COMO MÍNIMO.
!
Las conexiones eléctricas

AVISO
ESPACIO ADICIONAL NECESARIO PARA DESLIZAR LA
UNIDAD HACIA ADELANTE SOLO PARA SERVICIO
LÍNEA DEL SUELO
MOLDURA
(OPCIONAL)
RECOMENDADO
31” O MENOS
41 7 / 8"
1 1 / 8"
21 11 / 16"
23 15/16 PO
13 15 / 16"
ESPACIO
MÍN. DE
SERVICIO
48 7 / 16"
SERVICIO DE AGUA SUGERIDO,
TUBERÍA DE TAMAÑO COMERCIAL 1/2" MÍN. CON VÁLVULA
DE CIERRE, FILTRO DE LÍNEA Y
ACOPLE PARA MANGUERA DE
JARDÍN MACHO DE 3/4" (POR
EL CLIENTE). (AGUA FRÍA)
1-1/2" TUBERÍA DE TAMAÑO
COMERCIAL MÍN. REDUCIDO
A CONEXIÓN FTP DE 3/4"
(POR EL CLIENTE)
ALTURA
DE CARGA
MÁX. 12”
DETERGENTE,
ENJUAGUE, Y RECIPIEN-
TES DE DESCALCIFICA-
DOR PUEDEN UBICARSE
DEBAJO DE LA MÁQUINA
41 7 / 16"
24 1 / 2"
1 3 / 8"
21 11 / 16"
26 13 / 16"
39 11 / 16"
hay presiones superiores a 65 psig, una válvula reguladora de presión se debe instalar en la línea de
La presión del agua que uye requerida para este lavavajillas es de 15 a 65 psig. Si
agua al lavavajillas (por otros).
Manómetro de presión no provisto en máquinas de enjuague bombeadas.
Si los recipientes de sustancias químicas se colocarán en el gabinete junto a la máquina, se requerirá
un agujero de 1/2" de diámetro en el gabinete para que funcione la línea de suministro de productos
químicos.
NOTAS:
1. Todas las dimensiones de la máquina vertical tomadas del suelo pueden aumentarse en
.875"odisminuirse en .375".
2. Se escapa aire húmedo de la puerta.
Solo use materiales resistentes a la humedad a los lados y encima del lavavajillas.
3. No se recomienda una cubierta de ventilación sobre el lavavajillas empotrado ya que no produce
vapores en exceso.
NOTAS DE PLOMERÍA:
1. Amortiguador de golpe de ariete (que cumpla con la norma ASSE-1010 o equivalente) a suministrarse
(por otros) en la línea de suministro de agua común en conexión con el servicio.
2. La dureza del agua recomendada será de 3 granos o menos para obtener mejores resultados.
3. Si la manguera de drenaje se enrolla sobre un fregadero, el lazo no debe exceder 51" AFF.
INFORMACIÓN DE CONEXIÓN
(AFF = SOBRE EL PISO ACABADO)
LEYENDA
E1 CONEXIÓN ELÉCTRICA: AGUJERO DE 1-3/8"
DE DIÁMETRO PARA CONDUCTO DE TAMAÑO
INDUSTRIAL DE 1"; 18-1/8" AFF.
P1 CONEXIÓN DE LLENADO SIMPLE Y ENJUAGUE:
ACOPLE DE MANGUERA DE JARDÍN HEMBRA
DE 3/4" EN MANGUERA DE 6' DE LARGO
SUMINISTRADO CON LA MÁQUINA;
55-85° F (FRÍO) RECOMENDADO PARA LXGeR.
P2 CONEXIÓN DEL DRENAJE: 5/8" ACOPLE
CON GANCHO MANGUERA DE 6' DE LARGO
SUMINISTRADA CON LA MÁQUINA.
PARED
MODELO VOLTIOS/HERTZ/FASES
LXGeR 120/208-240(3W)/60/1* 30.5 40 40
SALIDA DE CALOR, BTU/HR
MODELO LATENTE SENSIBLE
LXGeR 1100 2000
PESOS DE ENVÍO LXGeR
PESO NETO DE LA MÁQUINA 165 LBS
PESO DE ENVÍO NACIONAL 185 LBS
AMPERIOS
NOMINALES
DIAGRAMA DE INSTALACIÓN (LXGeR, grande)
AMPACIDAD
MÍNIMA DEL
CONDUCTOR
DEL CIRCUITO
DE SUMINISTRO
MÁX.
DISPOSITIVOS
PROTECTORES
– 67 –
* ESTE SISTEMA REQUIERE TRES CABLES DE ALIMENTACIÓN
QUE INCLUYE UN NEUTRO QUE LLEVA CORRIENTE, UN CUARTO
CABLE ADICIONAL DEBE PROPORCIONARSE PARA LA CONEXIÓN
A TIERRA DE LA MÁQUINA.
KITS DE ACCESORIOS Y CABLES PARA TODAS LAS MÁQUINAS
NOTA: PARA CONEXIONES A LA RED ELÉCTRICA, USE SOLO
CABLE DE COBRE CLASIFICADO A 90 °C COMO MÍNIMO.
!
ADVERTENCIA
Las conexiones eléctricas
y a tierra deben cumplir con las partes aplicables del
Código Eléctrico Nacional y/u otros códigos locales
eléctricos.
Las conexiones de plomería deben cumplir con los códigos
sanitarios, de seguridad y plomería . Las conguraciones
de drenaje y la línea de llenado varían, algunos métodos se
muestran en este dibujo.
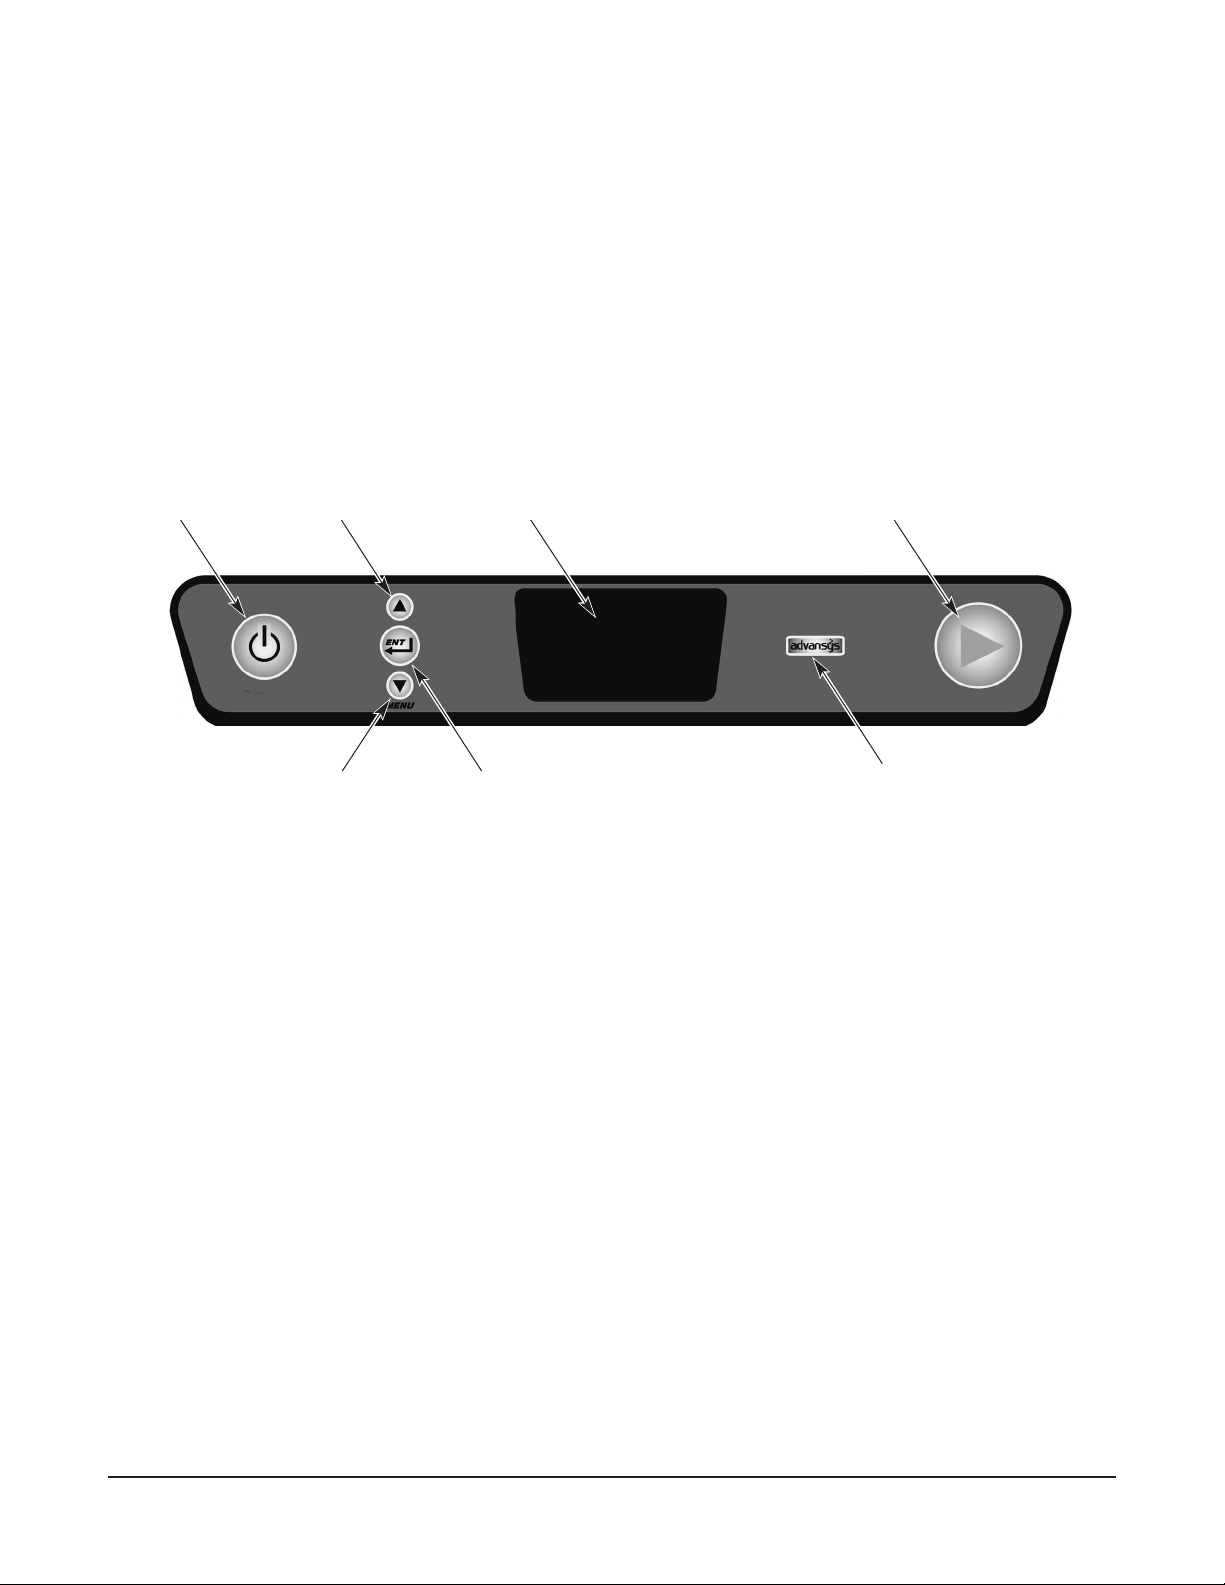
PROGRAMACIÓN
PROGRAMACIÓN EN MODO DE ADMINISTRADOR
El microprocesador de la máquina permite varias opciones de funcionamiento. Para activar o cambiar estas
funciones, debe entrar al modo de programación.
El modo de programación del Administrador requiere que se introduzca un CÓDIGO DEL ADMINISTRADOR
para acceder a las opciones que aparecen en el MENÚ DE PARÁMETROS. El código del administrador es 1001.
INSTRUCCIONES DE PROGRAMACIÓN
Todos los cambios se realizarán a través del menú en pantalla mediante los botones FLECHA ARRIBA, FLECHA
ABAJO/MENÚ e INTRO situados en el teclado en la parte superior de la máquina (Fig. 4).
LAVARPANTALLAENCENDER FLECHA ARRIBA
FLECHA ABAJO/MENÚ INTRO
Fig. 4
BOTÓN ADVANSYS
INDICACIONES EN LA PANTALLA DEL MENÚ
Las indicaciones siguientes se utilizan dentro de los menús:
• Las teclas de echa ARRIBA y echa ABAJO/MENÚ se utilizan para cambiar los valores de los parámetros
y para navegar por el menú.
• La tecla ENT (INTRO) se utiliza para aceptar un valor, realizar una acción especíca o para entrar a un submenú.
• El texto a la derecha del símbolo ‘>’ en la pantalla de visualización muestra qué acción o comando se
producirá si se presiona la tecla ENT (INTRO).
– 68 –

SE REQUIERE CAMBIAR LOS PARÁMETROS PARA CAMBIAR TODOS LOS CÓDIGOS ABAJO
ALARMA DE BRAZO DE LAVADO
activa o desactiva una alarma que alerta al operador de
que los brazos de lavado pueden estar obstruidos o bloqueados.
➜
hasta ALARMA DE BRAZO DE LAVADO
➜
➜
a desactivar Visual o Audio y Visual
➜
ENJUAGAR POTABLE
solo para máquinas en frío, activa/desactiva la opción de enjuague con agua potable.
➜
hasta ENJUAGAR POTABLE
➜
➜
para activar o desactivar
➜
Tarjeta de programación,
modo de Administrador
➜ ➜ ➜ ➜
➜
CÓMO CAMBIAR PARÁMETROS
INGRESE CÓD. SEGURIDAD DEL ADMINISTRADOR: 1001
MENÚ DEL
ADMINISTRADOR
INGRESE CÓDIGO
DE SEGURIDAD
(para 1)
(para 0)
➜
(para 1) Editar parámetros
BOMBA QUÍMICA
activa o desactiva la bomba de detergente o la bomba de enjuague.
➜
hasta BOMBA DE DETERGENTE o ENJUAGUE
➜ ➜
para activar o desactivar
➜
O
➜
hasta SALIR DEL MENÚ
➜
➜
hasta SALIR
➜
➜
O
hasta SALIR DEL MENÚ
➜
➜
hasta SALIR
➜
➜
O
hasta SALIR DEL MENÚ
➜
➜
hasta SALIR
➜
➜
➜
O
hasta SALIR DEL MENÚ
➜
➜
hasta SALIR
➜
ALARMAS DE TEMPERATURA BAJA
solo para máquinas en caliente: (parámetros) activa o desactiva
una alerta que indica que la temperatura nal de enjuague estuvo abajo de la temperatura mínima por un periodo.
➜
hasta ALARMAS DE BAJA TEMP.
➜
➜
para activar o desactivar
➜
O
➜
hasta SALIR DEL MENÚ
➜
➜
hasta SALIR
➜
➜
➜
O
hasta SALIR DEL MENÚ
➜
➜
hasta SALIR
➜
DESCALCIFICAR
activa o desactiva el recordatorio de descalcicar.
➜
hasta DESCALCIFICAR
➜
➜
para activar o desactivar
➜
UNIDADES DE TEMPERATURA
permite elegir entre grados Fahrenheit o Celsius.
➜
hasta UNID. TEMPERATURA
➜ ➜
para elegir Fahrenheit o Celsius
EMPOTRADO
CICLO DE LAVADO
permite la personalización del tiempo de ejecución total.
➜
hasta TIEMPO DEL CICLO
➜
➜
para elegir ciclo,
➜ ➜
O
hasta SALIR DEL MENÚ
➜ ➜
hasta SALIR
➜
L
AVAVAJILLAS
– 69 –

INDICADOR DE AGUA SUCIA desactiva o da una opción de cuántos ciclos hará la máquina
entre los ciclos de alerta de sucia alerta y refrescar.
➜
o 60 ciclos
hasta INDICADOR DE AGUA SUCIA
O
➜
➜
hasta SALIR DEL MENÚ
➜
➜
➜
a Desactivar, 20 ciclos, 40 ciclos
➜
hasta SALIR
➜
MODO DE AHORRO DE ENERGÍA desactiva o da la opción de cuántas horas quedará
encendida la unidad antes de entrar al modo de ahorro de energía.
o 3 horas
hasta MODO DE AHORRO DE ENERGÍA
➜
➜
O
➜
hasta SALIR DEL MENÚ
➜
➜
➜
➜
a Desactivado, 1 hora, 2 horas
hasta SALIR
➜
ALERTA DE AGREGAR QUÍMICOS activa o desactiva la alerta sonora de químicos faltantes.
O
hasta ALERTA SONORA DE
➜
AGREGAR QUÍMICOS
➜
hasta SALIR DEL MENÚ
➜ ➜
➜
➜
para activar o desactivar
hasta SALIR
➜
➜
ALERTA SONORA DE CICLO FINAL activa o desactiva la unidad que crea una alerta
sonora al nal de cada ciclo de lavado.
O
hasta ALERTA SONORA DE
➜
CICLO FINAL
➜
hasta SALIR DEL MENÚ
➜
➜
➜
➜
para activar o desactivar
hasta SALIR
➜
➜
IDIOMA permite elegir el idioma inglés, francés o español
hasta IDIOMA
➜
➜
➜
a inglés, francés o español
➜
O
hasta SALIR DEL MENÚ
➜
➜ ➜
hasta SALIR
➜
BOTÓN permite la personalización del botón a usarse para diversas
de opciones.
hasta BOTÓN
➜
➜ ➜
Un lavado normal, Un lavado fuerte (sólo LXe), Ciclo para descalcicar o Ahorro de energía
O
➜
hasta SALIR DEL MENÚ
➜
➜
SALIR DEL MENÚ AL MENÚ DEL ADMINISTRADOR PRINCIPAL
➜
hasta SALIR DEL MENÚ
➜
a: Limpiar depósito, Un lavado suave,
hasta SALIR
➜
➜
DESCALCIFICAR YA permite ejecutar un ciclo para descalcicar del menú en cualquier
momento. Nota: esta operación puede tomar de 20 a 45 minutos según las condiciones.
hasta DESCALCIFICAR YA
➜
➜ ➜
a SÍ o NO
➜
(saldrá del menú)
701 South Ridge Avenue, Troy, OH 45374-0001
– 70 –
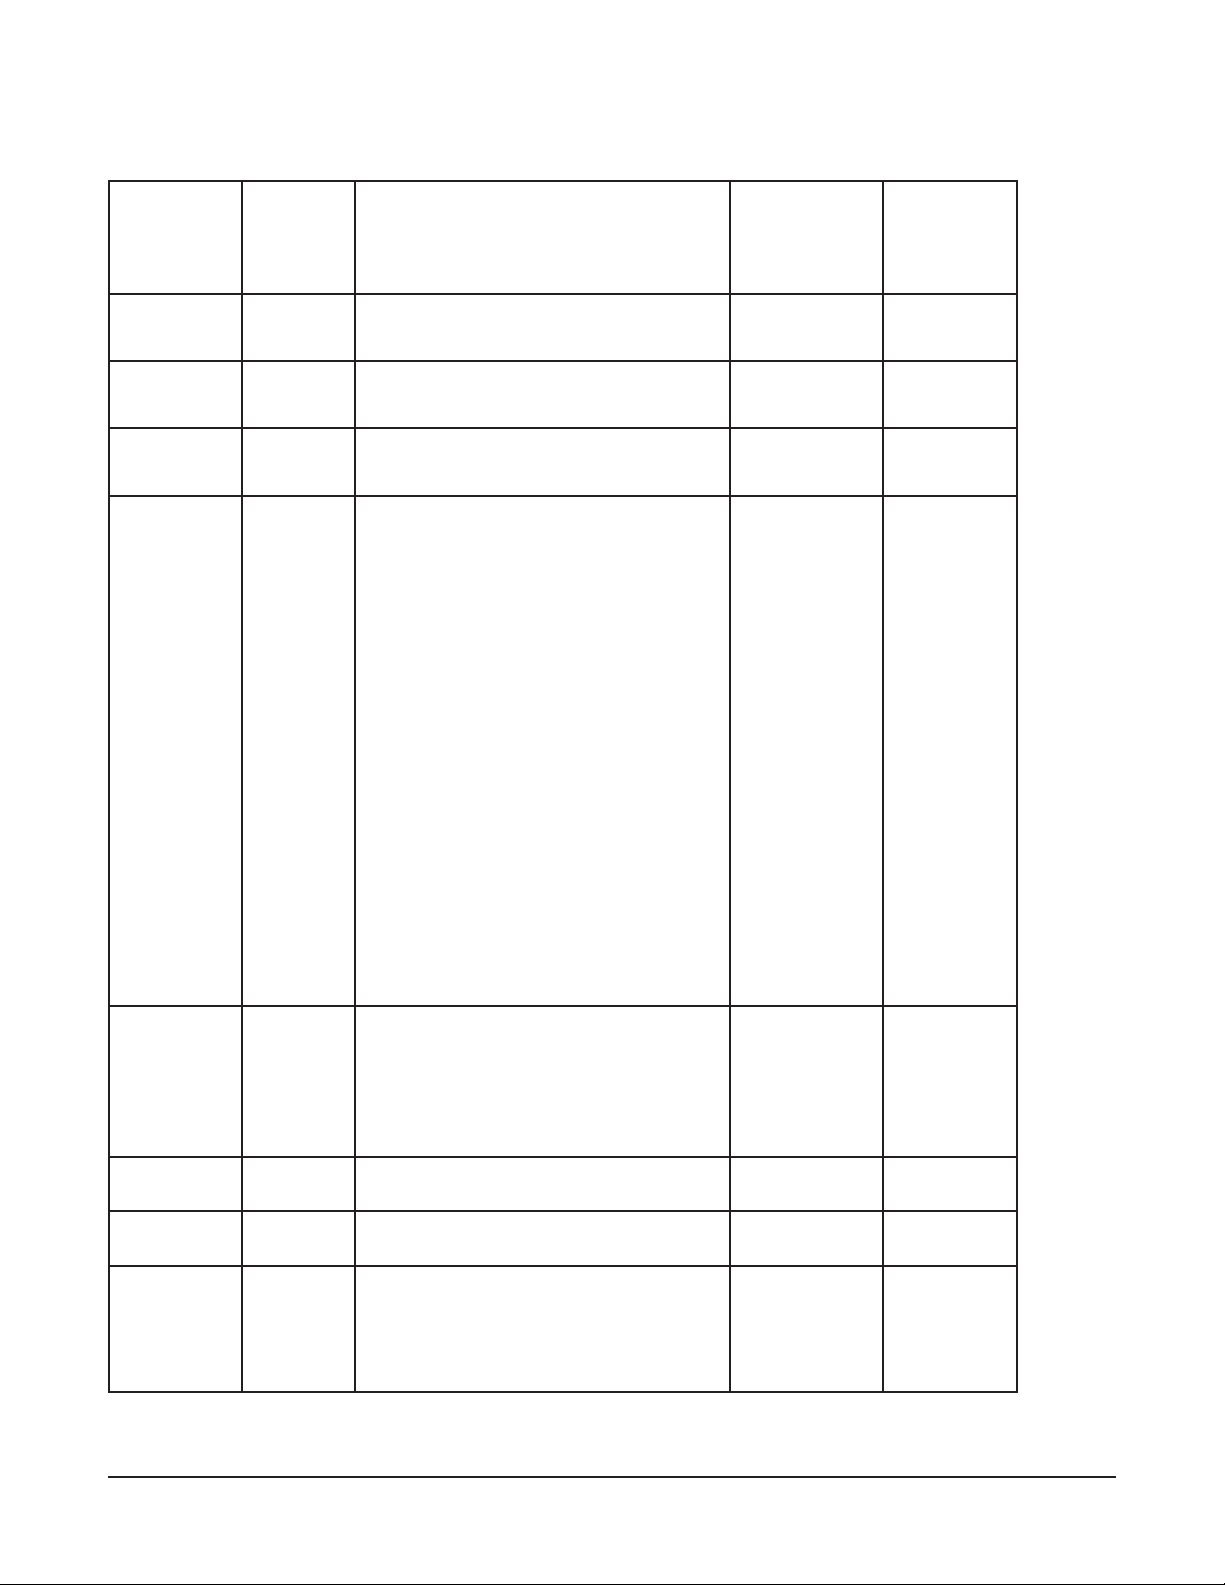
TABLA DEL MENÚ DE PARÁMETROS
Nombre del
parámetro
Bomba del
detergente
Bomba de
enjuague
Ciclo de
lavado
Alarmas
de baja
temperatura
Alerta del
brazo de
lavado
Descalcicar
Unidades de
temperatura
Enjuague
potable
Modelos
Advansys
(LXGePR,
LXGeR)
✓
✓
✓
Solo
LXGeR
✓
✓
✓
Solo
LXGePR
Descripción
Activa o desactiva la bomba del
detergente.
Activa o desactiva la bomba de
enjuague.
Fija la duración del ciclo.
El LXGeR sólo activa o desactiva una
alerta visual en la pantalla que indica
que la temperatura del enjuague nal
está por debajo del mínimo exigido de
180 °F (82 °C). Cuando está activada,
se mostrará un mensaje que notica
al usuario de esta condición después
de tres ciclos consecutivos cuando
no se alcance la temperatura nal de
enjuague requerida. Sin embargo,
el funcionamiento de la máquina no
cambiará y el lavavajillas seguirá
lavando como se espera. Después de
que la temperatura aumente y pase
a la mínima, se detendrá el mensaje.
Si está desactivado, no habrá un
mensaje adicional que indique una
baja temperatura; sin embargo, la
visualización de la temperatura todavía
mostrará la temperatura del agua de
enjuague actual y nal.
Activa la alerta visual, sonora y visual,
o desactiva la alerta que se muestra
cuando la máquina detecta un brazo de
lavado que está atascado o bloqueado
donde el lavavajillas podría resultar
afectado.
Activa o desactiva la alerta de la opción
de descalcicar.
Establece las unidades de la pantalla en
grados Fahrenheit o Celsius.
En las máquinas LXGePR, este
parámetro activa o desactiva la opción
PuriRinse que rocía agua nueva tras el
ciclo de desinfección para eliminar el
desinfectante del lavavajillas.
Valores
posibles
Desactivado o
Activado
Desactivado o
Activado
Suave, Normal
o Fuerte
Desactivado o
Activado
Desactivado
Visual o
Audio y Visual
Desactivado o
Activado
Fahrenheit o
Celsius
Desactivado o
Activado
Valor
predetermi-
nado
Activado
Activado
Normal
Desactivado
Audio y
Visual
Activado
Fahrenheit
Activado
– 71 –

Nombre del
parámetro
Indicador de
agua sucia
Modo de
ahorro de
energía
Alerta de
agregar
químicos
Alerta
sonora de
nal del ciclo
Idioma
Modelos
Advansys
(LXGePR,
LXGeR)
✓
✓
✓
✓
✓
Descripción
En las máquinas de Advansys, esta
opción permite un recordatorio para que
el operador sepa que han pasado 20,
40 o 60 ciclos y se recomienda un ciclo
de refresco de agua especial. Este ciclo
drenará una parte del agua de lavado y
la refrescará con agua nueva caliente.
En las máquinas Advansys, esta
conguración controlará cuándo
apagará la máquina los calentadores a
n de ahorrar energía cuando no esté
en uso.
Activa o desactiva una alarma audible si
no se detecta una sustancia química.
Activa o desactiva una alarma sonora al
nal de un ciclo.
Establece el idioma de la pantalla en
inglés o francés.
Valores
posibles
Desactivado,
20, 40 o 60
ciclos
Desactivado, 1,
2 o 3 horas
Desactivado
Visual o
Audio y Visual
Desactivado o
Activado
Inglés (EE.UU.)
o francés
(Canadá)
Valor
predetermi-
nado
Desactivado
2 horas
Audio y
Visual
Desactivado
Inglés
(EE.UU.)
Botón
Advansys
Salir del
menú
✓
✓
Seleccione la función para el botón
Advansys.
Pulse ENT (INTRO) para salir del menú
de Parámetros y volver al menú del
Administrador. Todos los ajustes que se
han cambiado se guardan.
1. No
programado
2. Limpiar el
tanque
3. Una lavada
suave
4. Una lavada
normal
5. Ejecutar
ciclo para
descalcicar
6. Ahorro de
energía
No
programado
de la fábrica
– 72 –

OPERACIÓN DEL LAVAVAJILLAS LXGeR
HAGA ESTO LA PANTALLA MUESTRA COMENTARIOS
Presione ENCENDER. Modelo. El lavavajillas realiza una
autorevisión. Esto toma 5 segundos.
LLENAR y el icono de llenar se
iluminará; la temperatura del tanque
se muestra cuando la máquina se
está llenando.
El lavavajillas se llena de agua.
Cuando está llena, la bomba se
encenderá por 10 segundos.
CALENTAMIENTO y el icono
de calentamiento y el icono de
calentamiento se encenderá
cuando el sobrecalentador se esté
precalentando. en los modelos
LXGeR. Este precalentamiento
puede durar hasta 15 minutos.
Durante el llenado, se muestra la
temperatura del depósito.
Abra la puerta; deslice la canastilla
en el lavavajillas. Cierre la puerta.
Pulse LAVAR. LAVAR y el icono de lavar de
Cuando haya terminado el ciclo,
Retire la canastillla limpia y cargue
la máquina con otra canastilla para
lavar; o si no se usa, la máquina
entrará al modo de inactividad.
Al nal del día, presione
ENCENDER.
LISTO se encenderá y se mostrará
la temperatura del tanque.
encenderá; la temperatura del
tanque se muestra en el ciclo de
lavado.
ENJUAGAR y el icono de enjuagar
encendidos; la temperatura del
depósito se muestra en el ciclo de
lavado.
LISTO se encenderá y se mostrará
la temperatura del tanque.
Se mostrarán DRENAJE y
APAGADO EN MARCHA; luego la
pantalla se apagará.
Si la puerta se abre durante el ciclo
de llenado, el llenado se detendrá.
Después de cerrar la puerta, el
proceso continúa donde se detuvo.
Cuando está llena, la máquina
se mantendrá en estado de
inactividad. El calor se mantiene
tanto en el depósito como en el
sobrecalentador.
El detergente se agregará
automáticamente durante el ciclo
de lavado.
El agente de Enjuague y el
Desinfectante se agregarán
automáticamente durante el
ciclo de enjuague. (NOTA: el
desinfectante solo se usa en los
modelos LXGePR).
La máquina inicia un ciclo de
lavado y enjuague.
Si se abre la puerta durante el ciclo
de lavado, enjuague o drenaje, El
ciclo continuará donde se quedó al
momento de cerrar la puerta.
Si ENCENDER se pulsa durante
el ciclo, la máquina se drenará y
apagará.
La máquina se drenará y apagará
si se llegó al tiempo de apagado
por inactividad de cuatro horas.
Si se pulsa la tecla ENCENDER, la
máquina se drenará y apagará.
– 73 –
MENSAJES DE ERROR/DIAGNÓSTICO
Error Pantalla Descripción
Puerta abierta Puerta abierta
ALERTA DEL BRAZO DE
Brazo de lavado
atascado/
bloqueado
Temperatura de
enjuague baja
LAVADO
- Retirar y limpiar brazo
- Revisar boquillas
- Cambiar brazo
- Cerrar puerta
TEMP. DE ENJUAGUE BAJA
Se muestra cuando la puerta de la máquina
está abierta.
Se muestra si el brazo de lavado está
atascado o bloqueado, lo que podría causar
un lavado pobre. Siga las instrucciones en
pantalla.
Después de dos temperaturas bajas
consecutivas, si el problema se produce en el
tercer ciclo, se mostrará un error. La máquina
continuará ejecutando ciclos.
Temperatura de
enjuague baja
(10
Sucesivamente)
Error de
Termistor
en lavado
Error de
Termistor en
sobrecalentador
Error de
Termistor en
enjuague nal
Poca agua en el
sobrecalentador
(Interrupción en
cualquier ciclo)
Error de drenaje
TEMP. DE ENJUAGUE BAJA
Revisar entrada de agua
SENSOR DE TEMPERATURA
DE LAVADO
Servicio requerido
(Número de teléfono de servicio)
ABIERTO o CORTO
SENSOR DE TEMPERATURA
DEL SOBRECALENTADOR
Servicio requerido
(Número de teléfono de servicio)
ABIERTO o CORTO
SENSOR DE TEMPERATURA
DE ENJUAGUE
Servicio requerido
(Número de teléfono de servicio)
ABIERTO o CORTO
ERROR DE LLENADO
Servicio requerido
(Número de teléfono de servicio)
ERROR DE DRENAJE
Servicio requerido
(Número de teléfono de servicio)
Si se produce el error de Baja temperatura de
enjuague en 10 ciclos consecutivos, el error
cambiará. La máquina continuará ejecutando
ciclos.
Aparece un error si la sonda de temperatura
de lavado está fuera de rango. La máquina
continuará ejecutando ciclos.
Aparece un error si la sonda de temperatura
del sobrecalentador está fuera de rango. La
máquina continuará ejecutando ciclos. (solo
el LXGeR).
Aparece un error si la sonda de temperatura
de enjuague nal está fuera de rango. La
máquina continuará ejecutando ciclos.
Aparecerá un error si la unidad se interrumpe
antes de que esté completamente llena. La
máquina no funcionará y solo permitirá el
apagado.
Error que aparece cuando el nivel de agua en
la unidad no sube. La máquina no funcionará
y solo permitirá el apagado.
Error en nivel del
depósito
Error en nivel del
sobrecalentador
SENSOR DEL NIVEL DEL
DEPÓSITO
Servicio requerido
(Número de teléfono de servicio)
ABIERTO o CORTO
SENSOR DEL NIVEL DEL
SOBRECALENTADOR
Servicio requerido
(Número de teléfono de servicio)
ABIERTO o CORTO
Aparece un error si el interruptor de presión
del depósito está fuera de rango. La máquina
no funcionará y solo permitirá el apagado.
Aparece un error si el interruptor de presión
del sobrecalentador está fuera de rango.
La máquina no funcionará y solo permitirá el
apagado.
– 74 –

TIEMPOS DEL CICLO DE LAVADO/ENJUAGUE
COLADOR GRUESO
COLADOR FINO
(LXGePR)
TIEMPOS DEL CICLO DE LAVADO/ENJUAGUE
(LXGeR)
Lavado 85 segundos* Lavado 85 segundos *, **
Drenaje 18 segundos máx. Drenaje 18 segundos máx.
Enjuague 8 segundos Enjuague 8 segundos
Pausa 10 segundos Pausa 5 segundos
Enjuague 7 segundos Condensar 105 segundos máx.
* La absorción máxima puede variar, según el voltaje de operación y la temperatura de entrada de agua para
un aumento de 70 °F en las máquinas LXGeR.
** El tiempo del ciclo de lavado se puede ajustar a un ciclo de 56 u 85 segundos.
PREPARACIÓN
Asegúrese de que los coladores gruesos (Fig. 6) y nos (Fig. 7) estén en su lugar y sin residuos. Asegúrese de
que el colador grueso esté instalado con el mango hacia el frente de la máquina. Compruebe ambos brazos de
lavado y enjuague para asegurarse de que giren libremente y no estén obstruidos.
Fig. 6 Fig. 7
– 75 –

Compruebe si algún detergente, enjuague o sustancia química desinfectante tiene que rellenarse.
QUÉ HACER Y QUÉ NO HACER CON SU NUEVO LAVAVAJILLAS HOBART
SÍ: Garantice la dureza del agua adecuada.
SÍ: Prelave los platos completamente.
SÍ: Utilice solo detergentes recomendados por el profesional químico.
SÍ: Al nal del día, limpie a fondo la máquina y luego enjuáguela y séquela. (Deje la puerta abierta).
SÍ: Utilice solo los productos formulados para ser seguros en acero inoxidable.
NO: Use detergentes formulados para lavavajillas residenciales.
NO: Permita que se acumulen restos de comida en el fondo del depósito.
NO: Supere las concentraciones químicas recomendadas por el fabricante del detergente, desinfectante, enjuague
o desincrustante.
NO: Utilice un estropajo de acero para limpiar la supercie del lavavajillas.
NO: Permita que objetos extraños entren a la unidad, especialmente contaminantes metálicos.
– 76 –
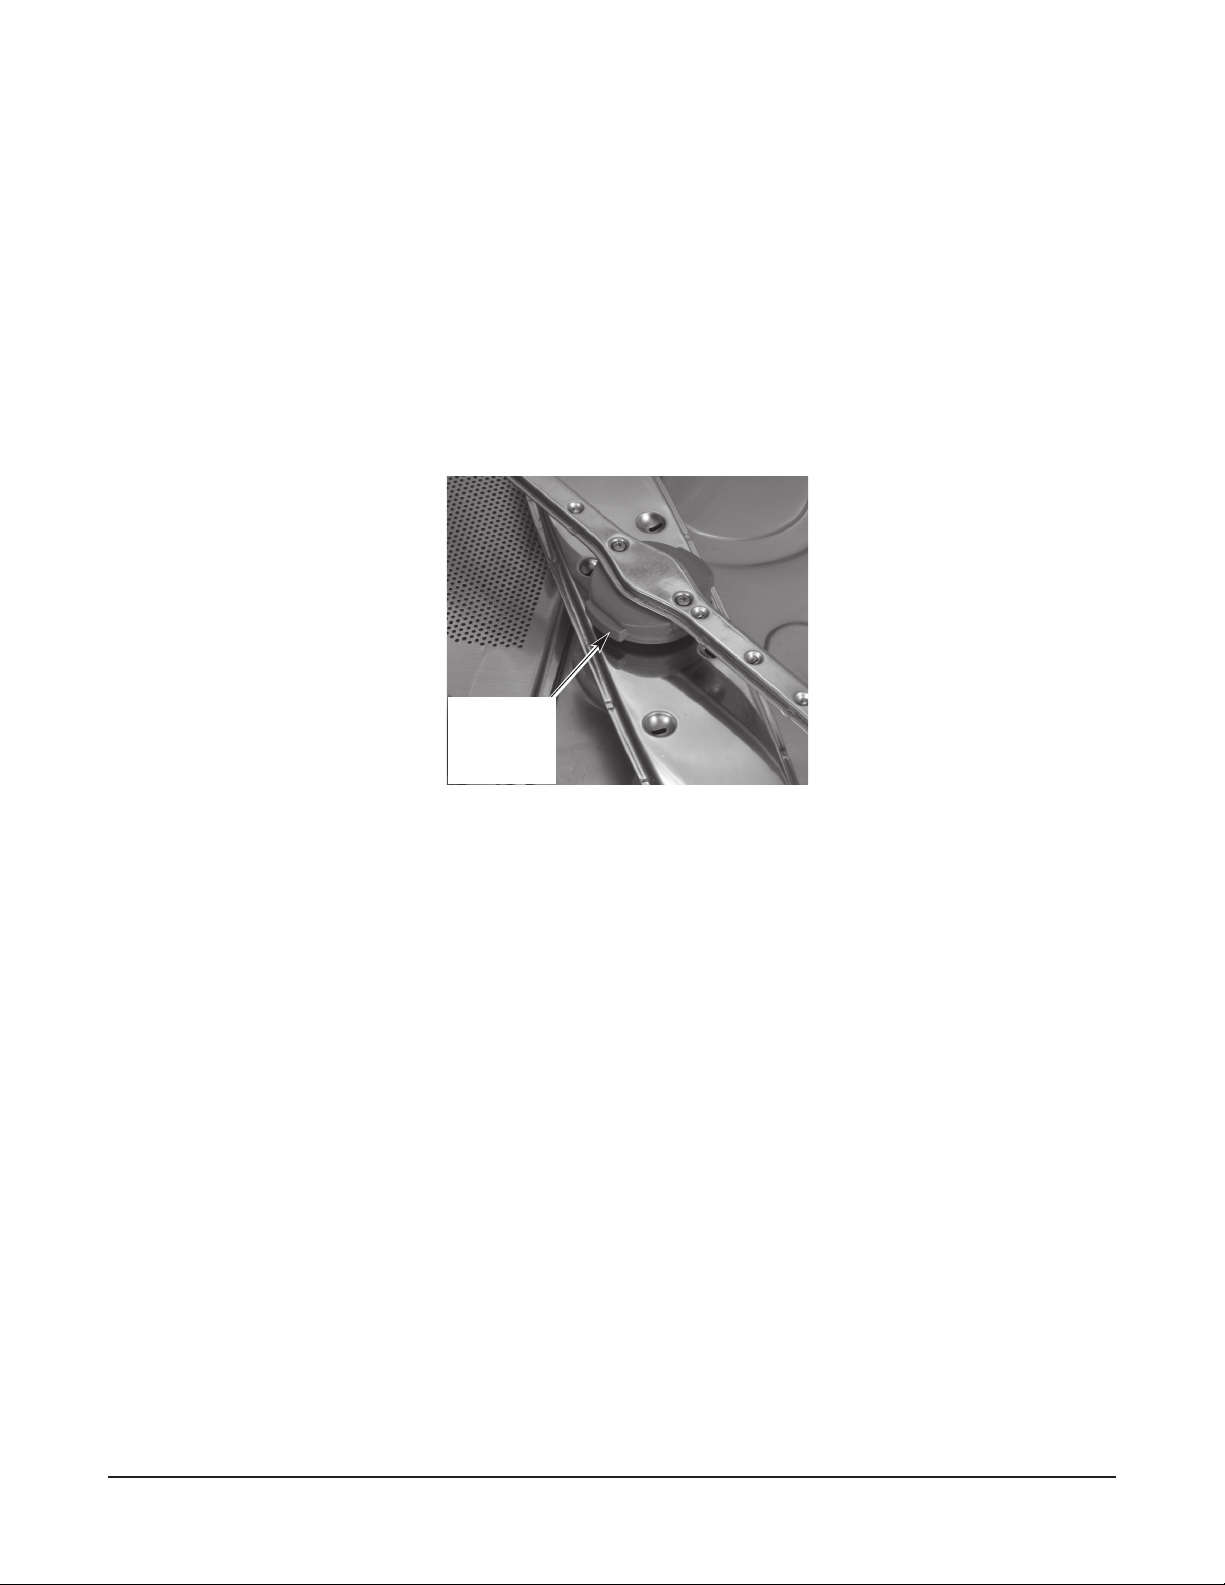
LIMPIEZA
Esta máquina se debe limpiar al menos una vez por día de trabajo. Utilice solo los productos formulados para
ser seguros en acero inoxidable.
1. Presione ENCENDER. La máquina se drenará. Cuando la pantalla ya no esté iluminada, abra la puerta y retire
cualquier residuo del fondo del depósito. No permita que se acumulen restos de comida en el fondo del depósito.
2. Retire el brazo de enjuague inferior al pulsar los botones ubicados a los lados del concentrador central
y despréndalo (Fig. 8). Retire el brazo de lavado inferior al desprender el brazo del eje. Retire los brazos
de lavado y enjuague superiores de la misma manera. Retire los coladores de gruesos y nos (consulte
las Figs. 6 y 7). Limpie a fondo estos artículos en un fregadero. Retire los residuos de las boquillas de
los brazos de lavado y enjuague.
BOTONES DEL
CENTRO DEL
BRAZO DE
ENJUAGUE
(LXGePR y
LXGeR)
Fig. 8
3. Con un trapo húmedo, limpie el interior de la máquina. NO use estropajo de acero. Limpie el exterior de
la máquina. Retire cualquier residuo restante con un limpiador suave formulado para acero inoxidable y
un trapo suave o cepillo.
4. Sustituya los coladores de nos y gruesos. Reinstale el brazo de lavado inferior al presionarlo hacia abajo
en el eje. Presione los botones ubicados a los lados del concentrador central, coloque el brazo de enjuague
en el eje y libérelo. Gire los brazos para cerciorarse que giran libremente. Repita este procedimiento con
los brazos de lavado y enjuagues superiores.
5. Use un trapo suave y húmedo, o una esponja y un limpiador suave para limpiar el teclado de control y la
pantalla. NO use limpiadores abrasivos o fuertes o estropajos.
6. Deje la puerta entreabierta durante la noche para permitir que el interior reciba aire y se seque. El diseño
de la puerta permitirá que la puerta quede entreabierta y pueda usarse para ventilar la máquina el nal del
día.
– 77 –

MANTENIMIENTO
El mantenimiento y el cuidado regulares son importantes para obtener resultados óptimos con el lavavajillas Hobart.
DESCALCIFICACIÓN
!
ADVERTENCIA
no deben entrar en contacto con cloro o una solución de enjuague que contenga cloro utilizado en
máquinas con sustancias químicas y de desinfección. La mezcla puede causar la formación de gases
peligrosos. Todo este procedimiento debe seguirse paso por paso para obtener resultados seguros y
satisfactorios.
La solución de descalcicación, los agentes de enjuague o cualquier clase de ácido
AVISO
por el fabricante del agente de descalcicación.
DESCALCIFIQUE EL LAVAVAJILLAS CON REGULARIDAD SEGÚN SEA NECESARIO. La regularidad dependerá
del contenido de minerales del agua de suministro. La descalcicación debe hacerse cuando pueda ver señales
claras de depósitos de cal (una sustancia blanca y caliza) en el interior de las paredes y en los brazos de lavado.
Todos los modelos LXGe están equipados con un recordatorio del ciclo para descalcicar automático. Se
recomienda que la descalcicación se haga cuando se ilumine DESCALCIFICACIÓN RECOMENDADA y están
provistos de una bomba de descalcicación interna que bombeará automáticamente la cantidad requerida de
agente de descalcicación en la unidad.
Si la descalcicación es necesaria, debe usarse un agente de descalcicación (tal como Lime-A-Way® o LSR®)
para obtener mejores resultados.
Después de haber expirado la cantidad de ciclos preprogramados, el control indicará la solicitud de descalcicación
al mostrar DESCALCIFICACIÓN RECOMENDADA y mostrará “¿Desea descalcicar ya?”. Debe ingresar “Sí” o
“No” para proceder con un ciclo de descalcicación o para continuar con el funcionamiento normal de la máquina.
Si se selecciona “No”, la máquina continuará noticándole al operador en cada inicio y apagado hasta que se
haya completado el ciclo para descalcicar. Para descalcicar la unidad:
1. Pulse la tecla ABAJO/MENÚ hasta que se muestre el símbolo “>” a la izquierda de “Sí” y pulse la tecla ENT (INTRO).
2. Retire la canastilla de platos de la máquina.
3. Retire los coladores de la máquina y límpielos. Sustituya el colador, vacíe la canastilla y cierre la puerta.
4. Asegúrese de que el recipiente con la sustancia química descalcicante no esté vacío. Asegúrese de
5. Pulse la tecla ENT (INTRO) para entrar al modo de descalcicación. La máquina se drenará y llenará de
6. La unidad entrará automáticamente al modo de lavado durante 10 minutos, luego comenzará las dos
7. Después de haberse completado el proceso de descalcicación, se apagará el control.
8. Inspeccione el interior de la máquina por si hay depósitos de cal. Si es necesario, podrá iniciarse otro ciclo
No permita que el agente de descalcicación permanezca en la máquina más tiempo del recomendado
empujar el tubo vertical de suministro por completo en la parte inferior de cada recipiente. Asegúrese de
que no haya obstrucciones ni estrangulamientos en el tubo de suministro.
agua nueva.
operaciones de enjuague y drenaje después de terminar el ciclo de relleno.
para descalcicar al entrar al Modo de Programación del Administrador.
LUBRICACIÓN
El motor de la bomba tiene rodamientos sellados permanentemente y no requiere de lubricación.
– 78 –
SOLUCIÓN DE PROBLEMAS
Esta sección detalla varios síntomas y causas posibles que pueden encontrarse en el caso de un
funcionamiento anormal de la máquina. Si los síntomas persisten después de haber revisado las causas
posibles, será necesario un mantenimiento.
Síntoma Causas posibles
La máquina no funciona (pantalla
apagada).
La máquina no funciona (pantalla
encendida).
Los platos no se limpian. 1. Los coladores están tapados lo que causa un suministro de agua
1. Máquina apagada - encienda la máquina.
2. Fusible quemado o disyuntor apagado en la fuente de
alimentación.
3. Cable no enchufado (solo modelos con cable).
1. Pantalla: “PUERTA ABIERTA” - abra y cierre la puerta. Si el
problema persiste, comuníquese con la Ocina de Servicios local
de Hobart.
2. Consulte “Máquina no llena o no llena lo suciente”.
inadecuado a la bomba - limpie de acuerdo a las instrucciones.
(Consulte LIMPIEZA).
2. La obstrucción en el/los brazo(s) de lavado no permitirán que giren
- limpie de acuerdo a las instrucciones. (Consulte LIMPIEZA).
3. Los brazos de lavado y/o limpieza no giran - compruebe de que
giran libremente.
4. El dispensador de detergente puede estar tapado.
5. Acumulación de restos - friegue los platos antes del ciclo.
6. Carga inadecuada de las canastillas. (Consulte PREPARACIÓN).
7. Poca agua - compruebe el suministro de agua.
8. La temperatura del agua está muy baja - observe la temperatura
de lavado en pantalla durante el LAVADO; debe estar sobre
los 120 °F para las máquinas de desinfección con sustancias
químicas y sobre los 150 °F para las máquinas de alta
temperatura.
9. Suministro de agua entrante apagado.
Manchas en los cubiertos, vasos o
platos.
Las sustancias químicas no se
están suministrando.
Restos de comida permanecen en
el lavavajillas.
Apariencia de óxido en la máquina. 1. Asegure de no usar un estropajo de acero para limpiar la máquina.
1. Canastillas cargadas inapropiadamente
2. Temperatura de agua muy baja.
3. Tipo o concentración inapropiados de detergente - comuníquese
con el representante de productos químicos.
4. Agua dura - instale un suavizador de agua; use un agente de
enjuague.
5. Llenado insuciente - compruebe el suministro de agua.
1. Poca cantidad de sustancias químicas - compruebe los niveles.
2. Fuga de aire en las conexiones de la manguera de suministro compruebe la inserción de los acoples de conexión rápida y los
amarres de cables en el tubo a las conexiones de los tubos.
3. Tubos estrangulados - compruebe que los dobleces sean
uniformes.
Siga las instrucciones de limpieza diariamente. (Consulte LIMPIEZA).
2. Puede deberse al alto contenido de hierro en el agua.
– 79 –

Síntoma Causas posibles
Resultados inesperados en
las vajillas u otros platos.
1. Marcas - usualmente causado por cualquier combinación de
altas temperaturas, agua suave, vidrio suave o soluciones de
lavado altamente alcalinas.
2. Manchado - evite lavar plata, chapa de plata, y estaño en
máquinas de desinfección con sustancias químicas.
3. Picadura - el acero inoxidable puede picarse con el contacto
prolongado de alimentos que contienen sal, jugos de frutas,
vinagre, etc. Lavar inmediatamente.
4. Marcas negras o grises - puede haberse frotado con aluminio.
5. Manchas pardas - puede deberse al alto contenido de hierro en el
agua.
6. Astillado - la carga inapropiada o las vajillas son muy delicadas.
7. Pieza de madera dañada - evite lavarlo en el lavavajillas.
8. Óxido en hierro fundido - se perdió el templado con el lavavajillas.
Evite lavarlo en el lavavajillas.
9. Distorsión de la pieza de plástico - altas temperaturas.
Compruebe las instrucciones de la pieza de plástico.
Lecturas de temperatura baja. 1. Temperatura de suministro de agua baja - asegúrese de que
cumpla con la temperatura mínima recomendada.
2. Uso del ciclo rápido - si la temperatura del agua entrante es baja
y la frecuencia de uso del ciclo es alta, el suministro de agua
caliente podría ser insuciente para cumplir con la demanda.
3. La carga de piezas pesadas enfrían el agua de lavado - no
sobrecargue los estantes.
4. El calentador del reforzante o el calentador del depósito se
ajustaron a bajo - contacte a la Ocina de Servicio local de
Hobart.
La máquina no llena o no
llena lo suciente.
1. Baja presión de agua - compruebe si el colador de la manguera
está tapado; asegúrese de que la presión del agua del sitio
cumpla con las presiones de ujo mínimas.
2. Sin ujo de agua - las válvulas de suministro de agua principales
quizás no estén trabajando.
La máquina se llena mucho o
tiene fugas de la puerta.
1. Máquina no nivelada. (Consulte NIVELACIÓN).
2. La válvula solenoide de llenado tiene fuga - apague el lavavajillas;
si el agua sigue uyendo en la máquina, contacte a la Ocina de
Servicio local de Hobart.
La máquina no drena. 1. El drenaje de los tubos está restringido - compruebe si la línea
de drenaje del lavavajillas está estrangulada; asegúrese que la
velocidad de drenaje apropiada sea permitida de la plomería.
2. Apague la máquina. Espere varios segundos y luego encienda
la máquina. Repita este procedimiento si es necesario. Si el
problema persiste, comuníquese con la Ocina de Servicio local
de Hobart.
Ocasionalmente gotea algo
de agua desde los brazos de
Esto es normal debido a la expansión del agua calentada en el
depósito del reforzante.
enjuague (solo en lavavajillas de
alta temperatura).
FORM 47526 Rev. A (January 2015) PRINTED in U.S.A.
Imprimé aux É.-U.
IMPRESO en EE.UU.
– 80 –
 Loading...