


THE EDGE12 SLICER
MODEL
EDGE12-1 (120/60/1 voltage) ML-136246
EDG E12 SL ICE R
EDGE12-2 (220/50/1 voltage) ML-136247
701 S. RIDGE AVE NUE
TROY, OHIO 45374- 0001
937 332-3000
www.hobartcorp.com
FORM 35283 Rev. B (September 2015)

TABLE OF CONTENTS
GENERAL .......................................... 3
INSTALLATION ...................................... 3
Unpacking ..................................... 3
Electrical ...................................... 4
OPERATION ........................................ 4
Safety ........................................ 4
Slicing ........................................ 5
Cleaning ...................................... 5
MAINTENANCE ..................................... 8
Knife Sharpening ............................... 8
Lubrication .................................... 8
TROUBLESHOOTING ................................. 8
Service ....................................... 8
© HOBART, 2012
– 2 –
Installation, Operation and Care of
EDGE12 SLICER
SAVE THESE INSTRUCTIONS
GENERAL
The Edge12 slicer is equipped with a 1⁄2 hp motor. The slicer Knife is chrome-plated forged carbon
steel. The
nish anodized cast aluminum for easy cleaning. The rear-mounted
with extension behind the
A cord and plug is furnished as standard equipment.
The Edge12 slicer must be thoroughly cleaned, rinsed and sanitized after installation and before
being used. Refer to Cleaning, page 5.
UNPACKING
Immediately after unpacking the slicer, check for
possible shipping damage. If the slicer is found to
be damaged, save the packaging material and contact
the carrier within 5 days of delivery.
Slicer BaSe, product tray, Knife cover, ring guard and gauge plate are made of smooth
Meat grip is hinged on a rod
product tray. The top-mounted knife Sharpener is removable for cleaning.
INSTALLATION
Prior to installing the slicer, test the electrical
service to make sure that it agrees with the
specications on the machine data plate. The data
plate is located on the right side of the slicer base.
product tray is secured to the slicer by turning
The
KnoB below the product tray clockwise until
the
snug (Fig. 2).
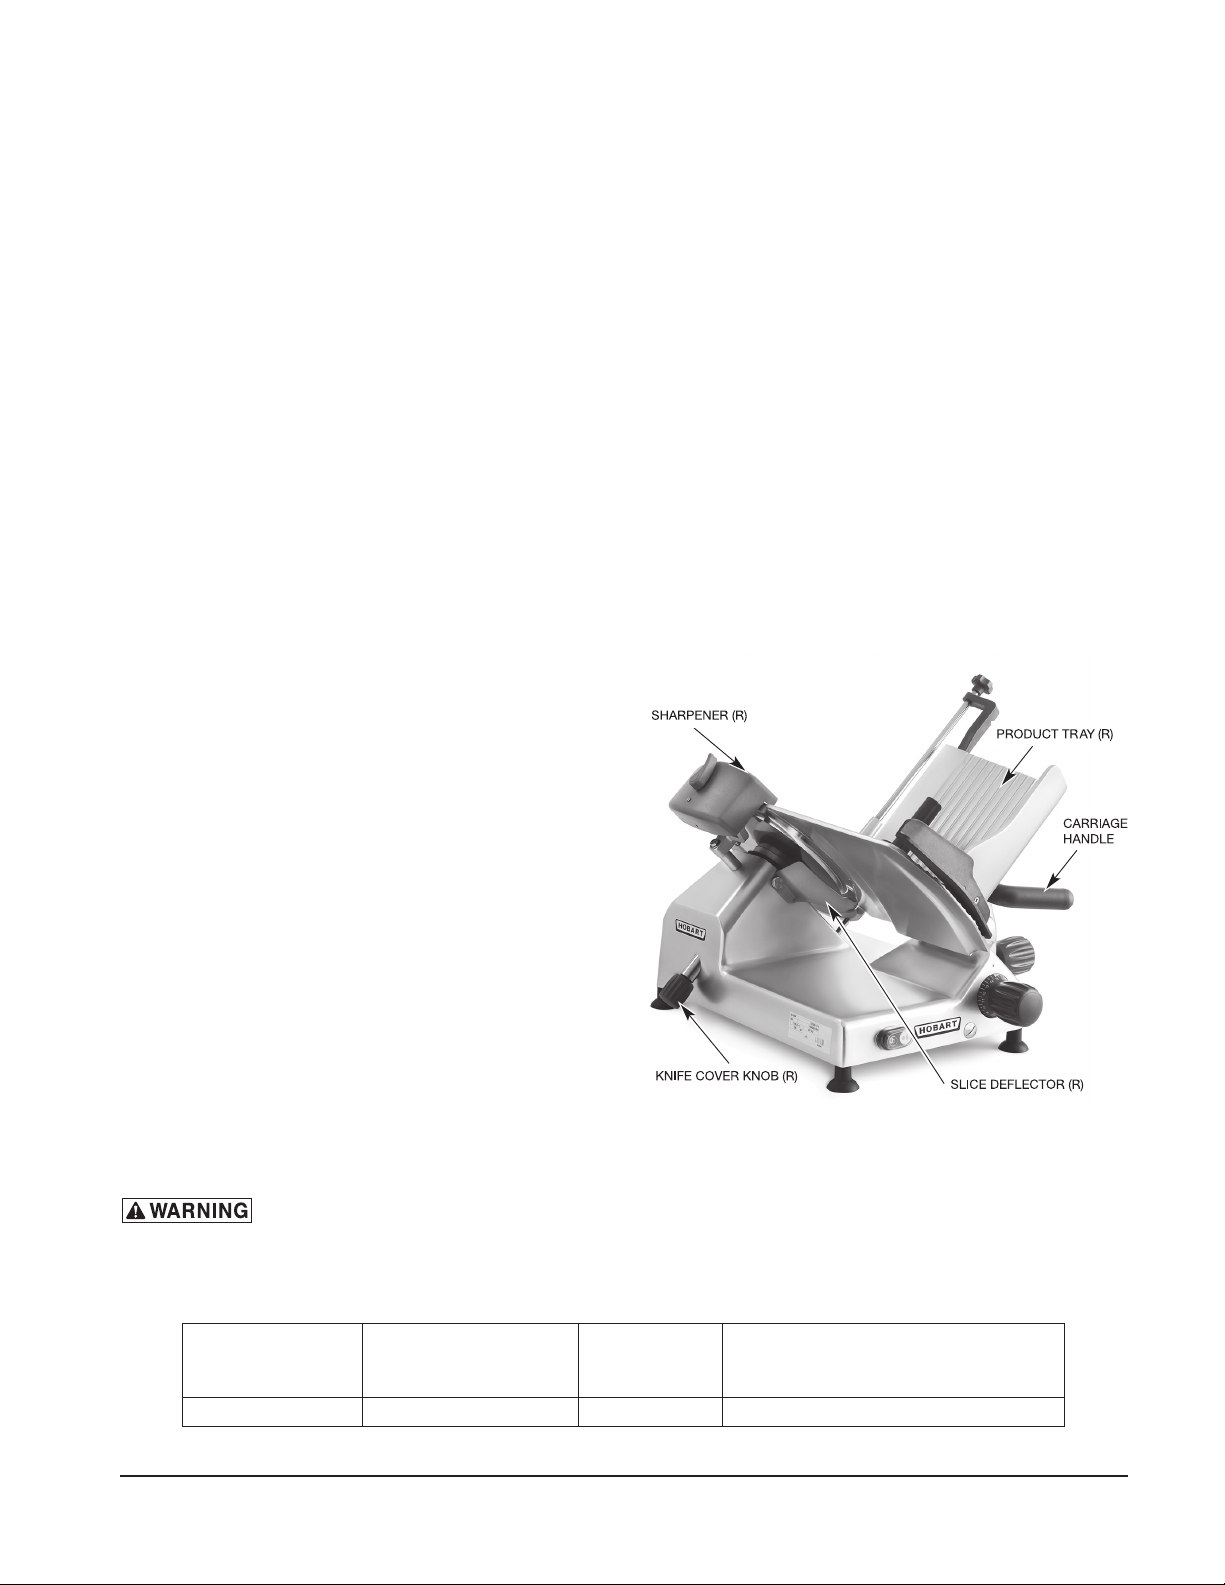
Mount the Sharpener on top of the slicer (Fig. 1)
by lowering it onto its post. The
removed for cleaning.
The Slice deflector (Fig. 1) should already be
mounted below the knife.
ELECTRICAL
This machine comes with a three-prong grounding plug. The outlet to which this
plug is connected must be properly grounded. If the receptacle is not the proper grounding type,
contact an electrician.
Model Volts / Hertz / Phase
EDGE12 120 / 60 / 1 4.0 15
Compiled in accordance with the National Electrical Code, NFPA 70, latest edition.
Sharpener can be
ELECTRICAL DATA
Machine
Amps
Fig. 1
Minimum Circuit Ampacity
Maximum Protective Device
AMPS
(R) refers to removable part.
– 3 –
– 3 –

OPERATION
SAFETY
SAFETY DEVICES INCORPORATED IN THIS SLICER MUST BE IN THEIR CORRECT OPERATING
POSITION ANY TIME THE SLICER IS IN USE.
Knife cover should already be secured in place with the Knife cover KnoB on the left side tightened
The
clockwise (Fig. 1). The
The Meat grip (Fig. 4) helps secure product in position and must be used when slicing short ends to
keep your hand(s) away from the knife.
When the slicer is not running, the index KnoB
(Fig. 2) must be turned fully clockwise so the
gauge plate covers the Knife edge.
Always UNPLUG the power cord before cleaning
or moving the Slicer.
Rotating knife. Unplug machine
power cord before cleaning, servicing or
removing parts. Replace parts before use.
SLICING
ring guard is not removable.
With the
ray forward until it stops. With the Meat grip
t
gauge plate fully closed, pull the product
out of the way, place the product to be sliced on
product tray. Set the Meat grip against the
the
product. Turn the slicer on by pressing the
Switch
Fig. 2
(R) refers to removable part.
ON (Fig. 2).
If the
and rotating it 270° behind the
t
Meat grip is not needed, store it out of the way by lifting it to the top of the Meat grip rod
product tray. Allow it to rest on the small notch of the upper product
ray slot.
Adjust the gauge plate to obtain the desired slice thickness by turning the index KnoB (Fig. 2) to vary
9
the slice thickness from paper thin to
⁄16" thick. Use the carriage handle (Fig. 2) to move the carriage
back and forth to slice.
CLEANING AND SANITIZING
Thoroughly clean, rinse and sanitize the slicer after each day’s use or after being idle for an extended
time.
The slicer knife is very sharp. Exercise extreme caution when working near the knife.
Unplug the machine power cord and turn index knob fully clockwise to close the
gauge plate before cleaning the slicer.
Note: Sanitizer concentration shall comply with Section 4-501.114, Manual and Mechanical Warewash-
ing Equipment, Chemical Sanitation – Temperature, pH, Concentration, and Hardness of the FDA Food
Code. If a chemical sanitizer other than chlorine, idine, or quaternary ammonium is used, it shall be
applied in accordance with the EPA-registered label use instructions.
– 4 –

Cleaning Surface and Parts:
Frequency: The slicer shall be cleaned and sanitized at intervals to comply with national, state
and/or local health codes.
Disassemble all removable slicer parts including
eflector, Knife cover, Knife cover KnoB and Sharpening Stone (See Fig. 1 and 2). Wash all sur-
d
product tray, Meat grip, Meat grip rod, Slice
faces of the machine with warm soapy water, a towel and mild detergent. Also, wash surfaces where
food or liquid can accumulate or where there is frequent hand contact including handles, knobs and
the control panel. Use generous amounts of soapy water on the sharpener hardware and knife hub.
Clean all removable parts with water, a towel and mild detergent (refer to Page 7). Rinse with water
and clean towel. Sanitize and let air dry.
• Excessive amounts of sanitizer and use of products not formulated for aluminum may void your
Hobart warranty.
• DO NOT wash any slicer components in a dishwasher.
• DO NOT hose down slicer or splash excessively with water.
• Use ONLY products formulated to be safe on stainless steel or aluminium.
• DO NOT exceed chemical manufacturer’s recommended concentrations for detergent or sanitizer.
• DO NOT clean any parts of the slicer with a steel pad.
Cleaning Meat Grip and Product Tray:
index KnoB fully clockwise until gauge plate is in closed position. Pull product tray to home
Turn
position. Unscrew knob on
extract
Meat grip rod from the product tray (Fig. 4). Set aside rod and Meat grip. Wash surface area,
product tray and lift to remove (Fig. 3). Unscrew Meat grip KnoB in order to
product tray, Meat grip and Meat grip rod with water, a towel and mild detergent. Rinse, sanitize and
let air dry.
To replace the
Thread
Meat grip rod into product tray extension and then insert into Meat grip. Tighten rod clock-
wise until snug.
product tray, lower the tray onto the carriage and tighten the knob clockwise until snug.
Fig. 3 Fig. 4
– 5 –

Cleaning Knife and Slice Deector:
With Meat grip and product tray removed, turn index KnoB fully closed. Unscrew the Knife cover KnoB
(Fig. 5). Push the knob to remove
Remove the
Knife cover KnoB, Knife cover, Slice deflector and both sides of the Knife by wiping outward
the
Slice deflector (Fig. 6) by unscrewing the stainless steel knob. Wash, rinse and sanitize
Knife cover. Remove both the Knife cover and the Knife cover KnoB.
from the center. Allow to air dry.
Fig. 5 Fig. 6
Cleaning Ring Guard:
Work a moistened paper towel between the
ring guard and Knife. Insert the towel at the base of the
ring guard (Fig. 7). Manually rotate the Knife to wipe ring guard and the edge of guard plate.
To replace the Knife cover, insert the Knife cover KnoB into its hole (lower left side) and position the
Knife cover over the center hole so the guide pin ts the hole in the rim and the hub ts the center hole.
Tighten the
underneath the
Knife cover KnoB (Fig. 5) so the threads at the end of the rod screw into the threaded hub
Knife cover.
Cleaning Sharpening Stone:
Each time the
Sharpener is used, the sharpening stones should be examined for cleanliness. Scrub
stones with a stiff bristle brush. Rinse with clean water and sanitize.
Reassemble the
Sharpener by lowering it onto the sharpener post (Fig. 8).
NOTE: Do not exceed chemical manufacturer’s recommended concentrations for detergent or
sanitizer. Do not exceed 200 parts per million concentration of available chlorine (1 tablespoon of
5.25% sodium hypochlorite bleach with 1 gallon of water). Concentrations greater than 200 ppm
accelerate corrosion of metals. Maximum exposure to sanitizing solution varies with temperature
and concentration. Rinse with clean water.
NOTE: Failure to follow use, care and maintenance instructions may void your Hobart warranty.
– 6 –

Fig. 7 Fig. 8
PROTECTION ON
THE SWITCH
GASKET BETWEEN
THE PRODUCT TABLE
GASKET INSPECTION
GASKET BETWEEN HANDLE/SPACER
AND SPACER/MEAT PUSHER
GASKET
BETWEEN THE
PRODUCT TABLE
AND THE
THUMB GUARD
THE PRODUCT TABLE
AND THE EXTENSION
GASKET BETWEEN
AND THE SUPPORT
GASKET BETWEEN THE
HANDLE AND THE
PRODUCT TABLE SUPPORT
Fig. 8
The recommended interval between inspections shall not exceed six months for components
that are detached for cleaning and sanitizing (all the gaskets in the images).
The inspections must be made by the manufacturer or its authorized service agent.
The slicer must be removed from service until repaired by the manufacturer or its
authorized service agent if any gasket or seal is found to be damaged, or missing.
– 7 –

MAINTENANCE
KNIFE SHARPENING
The Knife will provide long service in normal food store or kitchen use. However, in high volume
applications where it is a practice to sharpen the
expended in a shorter time.
Sharpen only when necessary. Prolonged or sharpening too frequently results in unnecessary
knife wear.
Unplug machine power cord.
Turn the index KnoB fully clockwise to close the gauge plate. Remove the Knife cover by unscrewing
KnoB and lifting it off the slicer.
the
Turn the slicer ON. Pull the Sharpener handle (Fig. 10) forward for 5 seconds and release. Turn the
slicer off. Unplug machine power cord. Clean and sanitize the slicer as outlined in the cleaning section
after sharpening the
Knife. Replace the Knife cover.
Knife frequently or even daily, the Knife will be
Fig. 10
LUBRICATION
Maintain smooth slicing by applying a few drops of mineral oil on the
the slicer base. Do not use vegetable oil.
carriage Slide rod underneath
TROUBLESHOOTING
Make sure that the circuit breaker has not tripped or the fuse blown.
SERVICE
Contact your local Hobart-authorized service ofce for any repairs or adjustments needed on this
equipment.
FORM 35283 Rev. B (September 2015) PRINTED IN U.S.A.
– 8 –

O
D
E
D'
E
M
P
L
O
I
M
LA TRANCHEUSE EDGE12
TR ANC HEUSE EDG E12
MODÈLE
EDGE12-1 (TENSION 120/60/1) ML-136246
EDGE12-2 (TENSION 220/50/1) ML-136247
701 S. RIDGE AVE NUE
TROY, OHIO 45374- 0001
937 332-3000
www.hobartcorp.com
FORMULAIRE 35283 Rév. B (septembre 2015)

TABLE DES MATIÈRES
GÉNÉRAL ............................................................................................................................................. 3
INSTALLATION ..................................................................................................................................... 3
Déballage ........................................................................................................................................ 3
Données électriques ........................................................................................................................ 3
UTILISATION ......................................................................................................................................... 4
Sécurité ........................................................................................................................................... 4
Tranchage ........................................................................................................................................ 4
Nettoyage ........................................................................................................................................ 4
ENTRETIEN .......................................................................................................................................... 8
Affûtage de la lame .......................................................................................................................... 8
Lubrication ..................................................................................................................................... 8
DÉPANNAGE ........................................................................................................................................ 8
Service de l'entretien ....................................................................................................................... 8
© HOBART, 2012
– 2 –

Installation, utilisation et entretien
DE LA TRANCHEUSE EDGE12
CONSERVEZ CES INSTRUCTIONS
GÉNÉRAL
La trancheuse Edge12 est équipée d'un moteur de ½ HP (375 watts). La lame de la trancheuse est en
acier au carbone forgé et chromé. Le ni satiné du caisson, porte-produit, couvre-lame, de l'anneau de
protection et de la plaque d'épaisseur est fait d'aluminium moulé oxydé anodiquement et facile à nettoyer.
La poignée de saisie de la viande montée à l'arrière est articulée sur une tige avec une extension derrière
le porte-produit. L'Affûteuse xée sur le dessus de l'appareil peut être retirée pour nettoyage. Un cordon
et avec che est livré de série.
La trancheuse Edge12 doit être nettoyée, rincée et désinfectée soigneusement après son installation et
avant chaque utilisation. Voir la rubrique Nettoyage à partir de la page 4.
INSTALLATION
DÉBALLAGE
Dès après le déballage de la trancheuse, vériez si elle
peut avoir subi des dommages pendant le transport.
Si tel est le cas, conservez le matériel d'emballage et
contactez le transporteur dans les 5 jours suivant la
livraison.
Avant d'installer la trancheuse, vérier l'alimentation
électrique pour vous assurer qu'elle concorde avec les
données de la plaque signalétique. Celle-ci se trouve
du côté droit du caisson de l'appareil.
Le porte-produit est xé sur la trancheuse en tournant
le bouton du dessous dans le sens horaire jusqu'à ce
qu'il soit bien serré (Fig. 2).
Fixez l'affûteuse sur le dessus de l'appareil (Fig. 1) en
l'abaissant sur son support. Elle peut être retirée pour
nettoyage.
Le déecteur de tranches (Fig. 1) devrait être déjà xé
sous la lame.
DONNÉES ÉLECTRIQUES
Cet appareil est livré avec une che de mise à la terre à trois broches. La prise dans
laquelle elle est branchée doit être correctement mise à la terre. Si ce n'est pas le cas, contactez
un électricien.
DONNÉES ÉLECTRIQUES
Intensité minimale du circuit
Modèle Volts / Hertz / Phase Intensité (A)
EDGE12 120 / 60 / 1 4,0 15
Établies en conformité avec le Code national électrique, norme NFPA 70, édition la plus récente.
Dispositif de protection maximal
Le (A) fait référence aux pièces amovibles.
Fig. 1
A
– 3 –

UTILISATION
SÉCURITÉ
LES DISPOSITIFS DE SÉCURITÉ INTÉGRÉS À CETTE TRANCHEUSE DOIVENT TOUJOURS ÊTRE
FIXÉS CORRECTEMENT À LEUR POSITION DE FONCTIONNEMENT LORSQUE LA TRANCHEUSE
EST EN MARCHE.
Couvre-lame devrait déjà être xé en place en serrant dans le sens horaire le Bouton du Couvre-lame
Le
situé du côté gauche (Fig. 1). L'anneau de protection n'est pas amovible.
Serre-viande (Fig. 4) aide à xer le produit en position
Le
et doit être utilisé quand on tranche des petits bouts de
façon à tenir votre (vos) main(s) éloignée(s) de la lame.
Lorsque la trancheuse n'est pas en marche, le B
d'épaiSSeur (Fig. 2) doit être complètement tourné vers
la droite de sorte que la
tranchant de la
lame.
plaque d'épaiSSeur couvre le
outon
Il faut TOUJOURS débrancher le Cordon d'alimentation
avant de nettoyer ou de déplacer la trancheuse.
Lame rotative. Débranchez le cordon d'alimentation de l'appareil avant le nettoyage,
l'entretien ou le retrait des pièces. Remettez les
pièces en place avant l'utilisation.
TRANCHAGE
plaque d'épaiSSeur entièrement fermée, tirez le porte-
La
roduit vers vous jusqu'à ce qu'il s'arrête. Après avoir
p
libéré le
Serre-viande, posez le produit à trancher sur le
Le (A) fait référence aux pièces amovibles
Fig. 2
porte-produit. Fixez le Serre-viande sur le produit. Allumez la trancheuse en appuyant sur le Commutateur
(Fig. 2).
Si vous n'avez pas besoin du
Serre-viande, rangez-le hors du chemin en l'élevant au-dessus de la
tige du Serre-viande et en le faisant pivoter de 270°derrière le porte-produit. Laissez-le reposer sur la
petite encoche d'arrêt supérieure du
Réglez la
plaque pour obtenir l'épaisseur de tranche désirée en tournant le Bouton d'épaiSSeur (Fig. 2)
pour couper des tranches nes comme du papier jusqu'à une épaisseur de
cher, servez-vous de la
poignée du Chariot pour lui imprimer un mouvement de va et vient.
porte-produit.
9
⁄16 po (14 mm). Pour tran-
NETTOYAGE ET DÉSINFECTION
Nettoyez à fond, rincez et désinfectez la trancheuse après chaque jour de service ou lorsqu'elle n'a pas
été utilisée depuis quelque temps.
La lame de la trancheuse est très tranchante. Soyez extrêmement prudent quand
vous travaillez près de la lame.
Avant de nettoyer la trancheuse, débranchez le cordon d'alimentation électrique
et tournez le bouton d'ajustement complètement vers la droite pour fermer la plaque d'épaisseur.
Remarque: la concentration du désinfectant doit être conforme à la section 4-501,114 du Code alimentaire
FDA traitant de l'assainissement chimique de l'équipement de lavage de vaisselle manuel et mécanique,
quant à la température, le pH, la concentration et la dureté. Si un assainisseur chimique autre que le
chlore, l'iode ou l'ammonium quaternaire est utilisé, il doit l'être en conformité avec les instructions de
l'étiquette enregistrée auprès de l'EPA (Agence de protection de l'environnement).
– 4 –

Nettoyage des surfaces et des pièces :
Fréquence : la trancheuse sera nettoyée et désinfectée à des intervalles assez rapprochés pour être
conforme au code national, aux codes des états et/ou aux codes locaux.
Retirez toutes les pièces amovibles de la trancheuse y compris le P
éFleCteur de tranCheS, le Couvre-lame et son Bouton de Serrage, ainsi que la Pierre d'aFFûtage (Voir
D
orte-produit, le Serre-viande, le
Fig. 1 et 2). Lavez toutes les surfaces de l'appareil avec de l'eau chaude savonneuse, une serviette et
un détergent doux. Lavez également les surfaces où des aliments ou des liquides peuvent s'accumuler
ou les endroits fréquemment touchés par les mains, ce qui inclut les poignées, les boutons et les com-
mandes. Utilisez beaucoup d'eau savonneuse sur les éléments de montage de l'affûteuse et l'axe de
la lame. Nettoyez toutes les pièces amovibles avec de l'eau, une serviette et un détergent doux (référez-vous à la page 7). Rincez avec de l'eau et un chiffon propre. Désinfectez et laissez sécher à l'air.
• L'utilisation de trop de désinfectant et de produits non formulés pour l'aluminium peut entraîner
l'annulation de votre garantie Hobart.
• NE LAVEZ aucun des composants de la trancheuse au lave-vaisselle.
• NE LAVEZ pas la trancheuse au boyau ou ne l'aspergez pas d'eau de façon excessive.
• NE LAVEZ AUCUN des composants de la trancheuse au lave-vaisselle.
• N’UTILISEZ QUE des produits formulés pour nettoyer l’inox et l’aluminium en toute sécurité.
• NE DÉPASSEZ PAS la concentration des détergents et désinfectants recommandée par le fabricant
des ces produits chimiques.
• Aucune des pièces de la trancheuse NE DOIT être nettoyée à la laine d’acier.
Nettoyage du serre-viande et du porte produit :
Tournez le B
position fermée. Tirez le P
produit et soulevez-le pour le retirer (Fig. 3). Dévissez le Bouton du Serre-viande pour extraire la Tige
erre-viande du Porte-produit (Fig. 4). Mettez la tige et le Serre-viande de côté. Lavez la surface,
du S
orte-produit, le Serre-viande et la Tige du Serre-viande avec de l'eau, une serviette et un détergent
le P
outon de réglage complètement à droite jusqu'à ce que la Plaque d'épaiSSeur soit en
orte-produit vers vous en position maison. Dévissez le bouton du Porte-
doux. Rincez, désinfectez et laissez sécher à l'air libre.
Pour remettre le P
droite jusqu'à ce qu'il soit serré. Passez la T
produit et insérez-la dans le Serre-viande. Vissez la tige vers la droite jusqu'à ce qu'elle soit serrée.
orte-produit en place, abaissez-le sur le chariot et faites tourner le bouton vers la
ige du Serre-viande dans la barre d'extension du Porte-
Fig. 3
– 5 –
Fig. 4

Nettoyage de la lame et du déecteur de tranches :
Après avoir retiré le Serre-viande et le Porte-produit, fermez complètement le Bouton d'épaiSSeur.
Dévissez le Bouton du Couvre-lame (Fig. 5). Poussez le bouton pour retirer le Couvre-lame. Retirez le
ouvre-lame et son Bouton. Retirez le DéFleCteur de tranCheS (Fig. 6) en dévissant le bouton en inox.
C
Lavez, rincez et désinfectez le C
deux côtés de la L
ame en essuyant du centre vers les bords. Laissez sécher à l'air.
ouvre-lame et son Bouton, le DéFleCteur de tranCheS, ainsi que les
Fig. 5 Fig. 6
Nettoyage de l'anneau de protection :
Passez une serviette en papier mouillée entre l’Anneau de proteCtion et la Lame. Insérez la serviette
à la base de l’A
proteCtion et le bord de la Plaque de proteCtion.
nneau de proteCtion (Fig. 7). Faites tourner la Lame à la main pour essuyer l’Anneau de
Pour remettre le Couvre-lame en place, insérez le Bouton du Couvre-lame dans son orice (côté inférieur gauche) et posez le C
s'engage dans le trou du rebord et que le moyeu s'ajuste dans l'orice central. Serrez le B
ouvre-lame (Fig. 5) pour que les lets au bout de la tige vissent dans le moyeu leté sous le Couvre-
C
lame.
ouvre-lame par-dessus le trou central de sorte que la cheville de guidage
outon du
Nettoyage de la pierre d'affûtage :
À chaque utilisation de l’affûteuse, il faut examiner les pierres pour voir si elles sont propres. Frottez les
pierres avec une brosse à poils rigides. Rincez-les à l’eau claire et désinfectez-les.
Remettez l'affûteuse en place en la faisant descendre sur son poteau de support (Fig. 8).
REMARQUE : ne dépassez pas la concentration des détergents et des assainisseurs recommandée
par le fabricant des produits chimiques. Ne dépassez pas la concentration de chlore actif de 200 ppm
[1 cuillerée à table (15 ml) d'hypochlorite de sodium dans 1 gallon US d'eau (3,78 l)]. Les concentrations
supérieures à 200 ppm accélèrent la corrosion des métaux. Le temps d'exposition maximal à des solu-
tions d'assainissement varie avec la température et la concentration. Rincez à l'eau propre.
REMARQUE : le défaut de vous conformer aux instructions d'utilisation, de soins et d'entretien peut
annuler votre garantie Hobart.
– 6 –

Fig. 7 Fig. 8
INSPECTION DES JOINTS
Fig. 8
Les intervalles recommandés entre l'inspection des composants retirés pour nettoyage et désinfection
ne doivent pas dépasser 6 mois (tous les joints illustrés).
Les inspections doivent être effectuées par le fabricant ou le mandataire autorisé à faire l'entretien de
ses appareils.
Si tout joint ou scellement se trouve endommagé où perdu, la trancheuse doit
être retirée du service jusqu'à ce qu'elle ait été réparée par le fabricant ou le mandataire autorisé
à en faire l'entretien.
– 7 –

ENTRETIEN
AFFÛTAGE DE LA LAME
Si elle est utilisée normalement dans un magasin d'alimentation ou une cuisine, la Lame durera long-
temps. Dans les applications à volume élevé cependant, où il est de coutume d'affûter la L
ou même quotidiennement, elle deviendra usée plus rapidement.
Il ne faut affûter que si cela s'avère nécessaire; des affûtages prolongés ou trop fréquents auront pour
résultat d'user la lame inutilement.
Débranchez le cordon électrique de l'appareil.
Tournez le Bouton de réglage complètement vers la droite pour fermer la Plaque d'épaiSSeur. Retirez le
ouvre-lame en dévissant son Bouton de Serrage et en le soulevant hors de la trancheuse. Lavez soi-
C
gneusement la zone autour de la L
Faites attention de ne pas laisser le gras de la viande passer de la
ame, les surfaces de la Lame découvertes et les rebords de celle-ci.
lame vers l'AFFûteuSe.
Branchez le cordon électrique de l'appareil. Allumez la trancheuse. Tirez la Poignée de l'aFFûteuSe (Fig.
10) vers l'avant pendant 5 secondes et relâchez-la. Éteignez l'appareil. Débranchez le cordon d'alimentation de l'appareil. Essuyez la trancheuse avec un chiffon humide propre pour retirer toutes les particules
de meulage. Remettez le C
ouvre-lame en place.
ame souvent
Fig. 10
LUBRIFICATION
Pour conserver un tranchage sans à-coups, appliquez quelques gouttes d'huile minérale sur le T
CouliSSement du chariot sous le caisson de la trancheuse. N'utilisez pas d'huile végétale.
ige de
DÉPANNAGE
Vériez si le disjoncteur ne s'est pas déclenché ou si un fusible n'est pas grillé.
SERVICE D'ENTRETIEN
Pour toute réparation ou réglage de cet appareil, contactez le bureau du Service de l'entretien Hobart
autorisé dans votre région.
FORMULAIRE 35283 Rév. B (septembre 2015) IMPRIMÉ AUX É.-U.
– 8 –
 Loading...