


rt
GPSMAP 295
Quick Start Guide
Read
This
First!
1

Quick Start
Unit Features
Color LCD Display
On-screen information is referred to as a “page”. Press the PAGE key to select a different screen.
Power/Data Connector 
(Back Side / Top) Connections for power, ground, serial data in and serial data out.
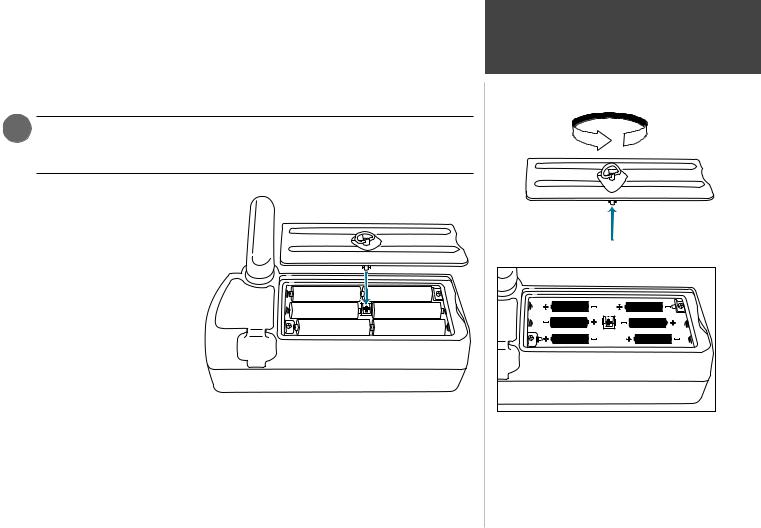
Battery Door
(Back Side) To open, turn metal D-ring counterclockwise 1/4 turn and pull battery door away from unit.
PA |
|
|
GE |
|
|
|
M |
|
Q |
ARK |
|
EN |
||
UIT |
||
|
TER |
OUT
IN
WPT |
MEN |
|
U |
ROUTE |
NRST |
|
Power/Backlight Key
Press and hold to turn on/off. Press momentarily to adjust screen backlight and contrast.
Rocker Keypad
Moves the cursor, pans the map page and enters data.
2
The GPSMAP 295 operates on 6 AA batteries or an external power source (from 10-35 volts DC). AA batteries are installed in the compartment on the back of the unit. These batteries provide up to three hours of continuous use. Rechargeable NiCad or lithium batteries may also be used.
1 The on-screen battery level indicator is calibrated for alkaline batteries, and will not be accurate when using NiCad or lithium batteries. A setting is provided for NiCad batteries. See the Pilot’s Guide for instructions on setting the indicator to NiCad batteries.
To install the batteries:
1.Flip up the metal D-ring on the battery cover, and turn the D-ring 1/4 turn counterclockwise. Lift the cover away from the rear of the unit.
2.Install the batteries and replace the battery cover. When installing the batteries, observe the polarity markings engraved inside the battery compartment.
+ |
+ |
+ |
+ |
+ |
+ |
3.Lock the battery cover in place by rotating the D-ring 1/4 turn clockwise.
Battery life varies due to a variety of factors, including temperature and backlighting level. Lithium AA batteries will provide longer life in colder ambient temperatures. For your convenience, all user-created waypoints, flight plans and settings are retained while you’re changing the AA batteries.
Quick Start
Battery Installation
Rotate the metal D-ring to remove the battery cover.
Observe the polarity markings engraved in the battery compartment for proper battery installation. Improper battery installation may cause battery leakage and personal injury or damage to your GPSMAP 295.
3

Quick Start
Cigarette Lighter Adapter
A cigarette lighter adapter is provided with your GPSMAP 295. For extended operation, you may wish to use this adapter and leave the batteries installed as a backup power source. External power from 10 to 35 volts DC may be applied to the unit.
To connect the cigarette lighter adapter:
1.Lift the rubber weathercap from the power/data connector at the top rear of the unit (see left).
2.Observe the groove on the round 4-pin female connector on the cigarette lighter adapter. Align the notch on the power/data connector with this groove and press the female connector firmly into place.
3.Connect the cigarette lighter plug into a suitable power source.
.
Connect the cigarette lighter adapter to the power/data connector on the top rear of the unit.
A fuse is located under the threaded tip of the cigarette lighter plug. An indication on the Satellite Status Page shows when external power is supplied to the unit (see bottom left). If this indication does not appear, verify that the external power source is on and connected, then check the condition of the fuse.
1
Be sure to route the cigarette lighter cable in a manner which does not interfere with vehicle operation! Failure to route the cable AWAY FROM vehicle controls may result in an accident.
When using external power, the on-screen battery level indicator is replaced by an external power icon.
4

The Global Positioning System (GPS) consists of a network of 24 satellites which circle the earth twice a day in a very precise orbit and transmit information back to Earth. The GPSMAP 295 must continuously “see” at least three satellites to calculate your position and track your movement. At times, additional satellites may be needed to determine a position.
By using an almanac (a timetable of satellite numbers and their orbits) stored in the receiver’s memory, the GPSMAP 295 can determine the distance and position of any GPS satellite and use this information to compute your position. Your GPS receiver can only see satellites above the horizon, so it needs to know what satellites to look for at any given time. To use this almanac data, your GPS needs to either be told its general location (be “initialized”) or given the opportunity to find itself.
The first time you use your GPSMAP 295, it may take several minutes to get a position fix. Because the GPSMAP 295 relies on satellite signals to provide you with navigation guidance, the receiver needs to have an unobstructed, clear view of the sky for best performance. In a nutshell, the GPS receiver’s view of the sky will generally determine how fast you get a position fix—or if you get a fix at all. GPS signals are relatively weak and do not travel through rocks, buildings, people, metal or heavy tree cover, so remember to keep a clear view of the sky at all times for best performance.
Once the GPSMAP 295 has calculated a position fix, you’ll usually have anywhere from five to twelve satellites in view. The receiver will then continuously select the best satellites in view to update your position. If some of the satellites in view get blocked, or “shaded”, the receiver can simply use an alternate satellite to maintain the position fix. Although a GPS receiver needs four satellites (or more) to provide a three-dimensional (3D) fix, it can maintain a two-dimensional (2D) fix with only three satellites. A three-dimensional fix includes latitude, longitude and altitude; whereas a two-dimensional fix includes only latitude and longitude.
Quick Start
What is GPS?
The GPS antenna’s view of the sky will determine how fast you get a position fix, or if you obtain a fix at all. GPS signals do not pass through obstructions made of wood or metal.
The 24 GPS satellites are constantly moving, orbiting the earth twice a day. In order to calculate your position, the GPS receiver needs to continuously “see” at least three satellites.
5
 Loading...