


GPSMAP 182/182C/232
chartplotting receivers
owner’s manual and reference guide
(GPSMAP 232 and 182C shown)


© 2003 Garmin Ltd. or its subsidiaries
Garmin International, Inc., 1200 East 151st Street, Olathe, KS 66062, U.S.A.
Tel. 913/397.8200 or 800/800.1020 |
Fax 913/397.8282 |
Garmin (Europe) Ltd., Unit 5, The Quadrangle, Abbey Park Industrial Estate, Romsey SO51 9DL, U.K. |
|
Tel. 44/1794.519944 |
Fax 44/1794.519222 |
Garmin Corporation, No. 68, Jangshu 2nd Road, Shijr, Taipei County, Taiwan |
|
Tel. 886/2.2642.9199 |
Fax 886/2.2642.9099 |
All rights reserved. Except as expressly provided herein, no part of this manual may be reproduced, copied, transmitted, disseminated, downloaded or stored in any storage medium, for any purpose without prior written consent of Garmin. Garmin hereby grants permission to download a single copy of this manual onto a hard drive or other electronic storage medium to be viewed for personal use, provided that such electronic or printed copy of this manual or revision must contain the complete text of this copyright notice and provided further that any unauthorized commercial distribution of this manual is strictly prohibited.
Information in this manual is subject to change without notice. Garmin reserves the right to change or improve its products and to make changes in the content without obligation to notify any person or organization of such changes. Visit the Garmin web site (www.garmin.com) for current updates and supplemental information concerning the use and operation of this and other Garmin products.
June 2003 |
Part Number 190-00215-10 Rev. A |
Printed in Taiwan |
Introduction
Foreword
,
GARMIN®, Autolocate®, GPSMAP®, TracBack®, DCG®, See-Thru®, MapSource®, and BlueChart® are registered trademarks of Garmin Ltd. or its subsidiaries and may not be used without the express permission of Garmin.
i

Introduction
Preface/Registration/
Software License Agreement
Customer Service Product Registration
Help us better support you by completing our on-line registration today!
Have the serial number of your GPSMAP 182/ 182C/232 handy and connect to our web site (www.garmin.com). Look for the Product Registration link on the Home page. Also, be sure to record your serial number in the area provided on page iv of this manual.
NOTE: If you have previously registered a Garmin product purchase, we invite you to re-register using our NEW on-line system. Many services provided by our new product registration system are now being automated and re-registering your purchase ensures you the best possible support from Garmin.
ii
Preface
Congratulations on choosing one of the most advanced marine navigation systems available! The Garmin GPSMAP 182/182C/232 models utilize the proven performance of Garmin GPS and full featured mapping to create unsurpassed marine navigation chartplotters.
This manual covers instructions for the GPSMAP 182, GPSMAP 182C (color), and GPSMAP 232. Unit operation and specifications will be the same on all three models unless otherwise specified. For GSD 20 sonar related operations, refer to “GSD 20 Sounder Module with Garmin Chartplotters” (190-00241-03). To get the most out of your new navigation system, take the time to go through this owner’s manual and learn the operating procedures for your unit. This manual is broken down into two parts for your convenience.
Part One introduces you to the GPSMAP 182/182C/232 and provides a Getting Started tour so that you may become more familiar with the unit. This section will provide you with a basic working knowledge necessary to use the unit to its fullest potential.
Part Two is divided into sections that provide detailed references to the advanced features and operations of the GPSMAP 182/182C/232. This allows you to concentrate on a specific topic quickly and look up detailed information about the GPSMAP 182/182C/232.
Software License Agreement
BY USING THE GPSMAP 182/182C/232, YOU AGREE TO BE BOUND BY THE TERMS AND CONDITIONS OF THE FOLLOWING SOFTWARE LICENSE AGREEMENT. PLEASE READ THIS AGREEMENT CAREFULLY.
Garmin grants you a limited license to use the software embedded in this device (the “Software”) in binary executable form in the normal operation of the product. Title, ownership rights and intellectual property rights in and to the Software remain in Garmin.
You acknowledge that the Software is the property of Garmin and is protected under the United States of America copyright laws and international copyright treaties. You further acknowledge that the structure, organization and code of the Software are valuable trade secrets of Garmin and that the Software in source code form remains a valuable trade secret of Garmin. You agree not to decompile, disassemble, modify, reverse assemble, reverse engineer or reduce to human readable form the Software or any part thereof or create any derivative works based on the Software. You agree not to export or re-export the Software to any country in violation of the export control laws of the United States of America.

The GPS system is operated by the United States government, which is solely responsible for its accuracy and maintenance. The system is subject to changes which could affect the accuracy and performance of all GPS equipment. Although the Garmin GPSMAP 182/182C/232 is a precision electronic NAVigation AID (NAVAID), any NAVAID can be misused or misinterpreted and, therefore, become unsafe.
The electronic chart is an aid to navigation and is designed to facilitate the use of authorized government charts, not replace them. Only official government charts and notices to mariners contain all information needed for safe navigation – and, as always, the user is responsible for their prudent use.
Use the GPSMAP 182/182C/232 at your own risk. To reduce the risk of unsafe operation, carefully review and understand all aspects of this Owner’s Manual—and thoroughly practice operation using the simulator mode prior to actual use. When in actual use, carefully compare indications from the GPSMAP 182/182C/232 to all available navigation sources, including the information from other NAVAIDs, visual sightings, charts, etc. For safety, always resolve any discrepancies before continuing navigation.
FCC Compliance
The GPSMAP 182/182C/232 complies with Part 15 of the FCC interference limits for Class B digital devices FOR HOME OR OFFICE USE. These limits are designed to provide reasonable protection against harmful interference in a residential installation, and are more stringent than “outdoor” requirements. Operation of this device is subject to the following conditions: (1) This device may not cause harmful interference, and (2) this device must accept any interference received, including interference that may cause undesired operation. This equipment generates, uses and can radiate radio frequency energy and, if not installed and used in accordance with the instructions, may cause harmful interference to radio communications. However, there is no guarantee that interference will not occur in a particular installation. If this equipment does cause harmful interference
to radio or television reception, which can be determined by turning the equipment off and on, the user is encouraged to try to correct the interference by one or more of the following measures: Reorient or relocate the receiving antenna. Increase the separation between the equipment and receiver. Connect the equipment into an outlet on a circuit different from that to which the receiver is connected. Consult the dealer or an experienced radio/TV technician for help.
The GPSMAP 182/182C/232 does not contain any user-serviceable parts. Repairs should only be made by an authorized Garmin service center. Unauthorized repairs or modifications could result in permanent damage to the equipment, and void your warranty and your authority to operate this device under Part 15 regulations.
Introduction
,Warnings and Precautions
MAP DATA INFORMATION: One of the goals of Garmin is to provide customers with the most complete and accurate cartography that is available to us at a reasonable cost. We use a combination of governmental and private data sources, which we identify (as required) in product literature and copyright messages displayed to the consumer. Virtually all data sources contain inaccurate or incomplete data to some degree. This is particularly true outside the United States, where complete and accurate digital data is either not available or prohibitively expensive.
CAUTION: IT IS THE USER’S RESPONSIBILITY TO USE THIS PRODUCT PRUDENTLY. THIS PRODUCT IS INTENDED TO BE USED ONLY AS A NAVIGATIONAL AID AND MUST NOT BE USED FOR ANY PURPOSE REQUIRING PRECISE MEASUREMENT OF DIRECTION, DISTANCE, LOCATION, OR TOPOGRAPHY.
WARNING: This product, its packaging, and its components contain chemicals known to the State of California to cause cancer, birth defects, or reproductive harm. This Notice is being provided in accordance with California’s Proposition 65. If you have any questions or would like additional information, please refer to our web site at http: //www.garmin.com/prop65.
iii

Introduction
Warranty and
Serial Number
Serial Number
Use this area to record the serial number (8-digit number located on the back of the unit) in case it is lost, stolen, or needs service. Be sure to keep your original sales receipt in a safe place or attach a photocopy inside the manual.
Serial Number: |
|
* |
* |
,
The Garmin GPSMAP 182/182C/232 has no user-service- able parts. Should you ever encounter a problem with your unit, please take it to an authorized Garmin dealer for repairs.
The GPSMAP 182/182C/232 is fastened shut with screws. Any attempt to open the case to change or modify the unit in any way will void your warranty and may result in permanent damage to the equipment.
iv
LIMITED WARRANTY
This Garmin product is warranted to be free from defects in materials or workmanship for one year from the date of purchase. Within this period, Garmin will at its sole option, repair or replace any components that fail in normal use. Such repairs or replacement will be made at no charge to the customer for parts or labor, provided that the customer shall be responsible for any transportation cost. This warranty does not cover failures due to abuse, misuse, accident or unauthorized alteration or repairs.
THE WARRANTIES AND REMEDIES CONTAINED HEREIN ARE EXCLUSIVE AND IN LIEU OF ALL OTHER WARRANTIES EXPRESS OR IMPLIED OR STATUTORY, INCLUDING ANY LIABILITY ARISING UNDER ANY WARRANTY OF MERCHANTABILITY OR FITNESS FOR A PARTICULAR PURPOSE, STATUTORY OR OTHERWISE. THIS WARRANTY GIVES YOU SPECIFIC LEGAL RIGHTS, WHICH MAY VARY FROM STATE TO STATE.
IN NO EVENT SHALL GARMIN BE LIABLE FOR ANY INCIDENTAL, SPECIAL, INDIRECT OR CONSEQUENTIAL DAMAGES, WHETHER RESULTING FROM THE USE, MISUSE, OR INABILITY TO USE THIS PRODUCT OR FROM DEFECTS IN THE PRODUCT. Some states do not allow the exclusion of incidental or consequential damages, so the above limitations may not apply to you.
Garmin retains the exclusive right to repair or replace the unit or software or offer a full refund of the purchase price at its sole discretion. SUCH REMEDY SHALL BE YOUR SOLE AND EXCLUSIVE REMEDY FOR ANY BREACH OF WARRANTY.
To obtain warranty service, contact your local Garmin authorized dealer. Or call Garmin Customer Service at one of the numbers shown below, for shipping instructions and an RMA tracking number. The unit should be securely packed with the tracking number clearly written on the outside of the package. The unit should then be sent, freight charges prepaid, to any Garmin warranty service station. A copy of the original sales receipt is required as the proof of purchase for warranty repairs.
Products sold through online auctions are not eligible for rebates or other special offers from Garmin. Online auction confirmations are not accepted for warranty verification. To obtain warranty service, an original or copy of the sales receipt from the original retailer is required. Garmin will not replace missing components from any package purchased through an online auction.
Garmin International, Inc. |
Garmin (Europe) Ltd. |
||
1200 East 151st Street |
Unit 4, The Quadrangle, Abbey Park Industrial Estate |
||
Olathe, Kansas 66062, U.S.A. |
Romsey, SO51 9DL, U.K. |
||
Phone: |
913/397.8200 |
Phone: |
44/1794.519944 |
USA Only: 800/800.1020 |
FAX: |
44/1794.519222 |
|
FAX: |
913/397.0836 |
|
|

Designed for detailed electronic charting capability, the Garmin GPSMAP 182/182C/232 is a powerful navigation device that can give you the information you need:
Precision Performance
•16-color TFT display with backlighting (GPSMAP 182C only)
•High-contrast, ten-level gray, LCD screen with backing (GPSMAP 182/232 only)
•12-channel parallel receiver tracks and uses up to 12 satellites for fast, accurate positioning
•WAAS Capable — receive signals from the additional set of WAAS (Wide Area Augmentation System) satellites to give you better accuracy.
•Differential-Ready — just add an optional Garmin beacon receiver for better than 5-meter accuracy
•Fully gasketed, high-impact plastic alloy case, waterproof to IEC 529-IPX-7
Advanced Navigating and Plotting
•3000 alphanumeric waypoints with selectable icons and comments
•Built-in Worldwide basemap to 20 miles includes detailed ocean, river and lake coastlines, cities, interstates, US state highways and local thoroughfares
•50 reversible routes with up to 50 (254 GPSMAP 182C) waypoints each
•Uploadable maps using Garmin’s MapSource PC products and BlueChart Data Cards
•Coordinates: Lat/Lon, UTM/UPS, Loran TD, plus 16 grids, including Maidenhead
•TracBack route feature which allows you to quickly retrace your track log to a starting position
•Built-in simulator mode
•Built-in tide information from over 3,000 tide stations around the USA coastline, Alaska, Hawaii, western Canada and several Caribbean Islands
Introduction
Capabilities
Superior Fishfinding Ability (when combined with the GSD 20 Sounder Module)
•Whiteline feature provides a clear image of bottom hardness and structure.
•See-Thru technology which helps separate fish returns from thermoclines and structure.
•Depth Control Gain (DCG) feature automatically adjusts fishfinder sensitivity according to depth
•Four Zoom levels with a moving view window, plus bottom lock.
•Underwater waypoint marking
•Map/Sonar split screen combines navigation and fishfinding ability.
•Fish and Depth alarms.
v

Introduction
Packing List
vi
Before installing and getting started with your unit, please check to see that your package includes the following items. If any parts are missing, please contact your Garmin dealer immediately.
Standard Package:
•GPSMAP 182/182C/232 Unit
•GA 29 Remote Antenna and 30’ cable*
•Internal Antenna, Bail Mount**
•Ferrite Bead Filter Clamp (GPSMAP 182C Only)
•Gimbal Mount and Knobs
•Power/Data Cable
•Owner’s Manual
•Quick Reference Card
•Protective Cover
* Not included with part numbers 010-00238-01 or 010-00259-01 with internal bail mount antenna.
**Not included with part numbers 010-00238-00 or 010-00259-00 with remote antenna.
Optional Accessories:
•US A/C PC Adapter
•EURO A/C PC Adapter
•UK A/C PC Adapter
•Cigarette Lighter Adapter
•BlueChart Marine Data Cards, MapSource CDs, USB Data Card Programmer, and Data Cards
•GSD 20 Remote Sounder Module
•GBR 21 Beacon Receiver for differential corrections
•2nd Mounting Station
•Marine Swivel Mount, 1” RAM® Mount (GPSMAP 182/182C Only)

Introduction . . . . . . . . . . . . . . . . . . . . . . . . . . i-viii
Foreword . . . . . . . . . . . . . . . . . . . . . . . . . . . . . i Preface/Registration/Software License . . . . . . . .ii Warnings and Precautions . . . . . . . . . . . . . . . iii FCC Compliance . . . . . . . . . . . . . . . . . . . . . . iii Warranty and Serial Number . . . . . . . . . . . . . iv Capabilities . . . . . . . . . . . . . . . . . . . . . . . . . . . v Packing List . . . . . . . . . . . . . . . . . . . . . . . . . . vi “How To” Index . . . . . . . . . . . . . . . . . . . . . . viii
Section One: Getting Started . . . . . . . . . . . . |
1-17 |
Keypad Usage, Selecting Options, Entering
Data, Initializing the Receiver, Power
On/Off, Backlighting, Simulator, Description
of Main Pages, Simulated Tour
Section Two: Reference . . . . . . . . . . . . . . . . 18-67
Map Page and Options . . . . . . . . . . . . . . . . . .18 Map Page Configuration . . . . . . . . . . . . . .24 Compass Page and Options . . . . . . . . . . . . . .27 Numbers Page . . . . . . . . . . . . . . . . . . . . . . . .28 Highway Page and Options . . . . . . . . . . . . . .28 Waypoints . . . . . . . . . . . . . . . . . . . . . . . . . . .30 Creating . . . . . . . . . . . . . . . . . . . . . . . . . .30 Reviewing and Editing . . . . . . . . . . . . . . .32 Proximity . . . . . . . . . . . . . . . . . . . . . . . . .35 Going to a Destination . . . . . . . . . . . . . . . . . .37 TracBack . . . . . . . . . . . . . . . . . . . . . . . . . .38 MOB . . . . . . . . . . . . . . . . . . . . . . . . . . . . .40
Routes . . . . . . . . . . . . . . . . . . . . . . . . . . . . . .41
Creating . . . . . . . . . . . . . . . . . . . . . . . . . .41
Route List Page . . . . . . . . . . . . . . . . . . . . .43
Reviewing and Editing . . . . . . . . . . . . . . .44
Active Route Page . . . . . . . . . . . . . . . . . . . . . .48
Find Feature . . . . . . . . . . . . . . . . . . . . . . . . . .49
Main Menu Page . . . . . . . . . . . . . . . . . . . . . . .51
GPS Tab . . . . . . . . . . . . . . . . . . . . . . . . . .52
Tide Tab . . . . . . . . . . . . . . . . . . . . . . . . . .56
Trip Tab . . . . . . . . . . . . . . . . . . . . . . . . . .58
Celestial Tab . . . . . . . . . . . . . . . . . . . . . . .58
Track Tab . . . . . . . . . . . . . . . . . . . . . . . . .59
Time Tab . . . . . . . . . . . . . . . . . . . . . . . . .61
Pages Tab . . . . . . . . . . . . . . . . . . . . . . . . .61
System Tab . . . . . . . . . . . . . . . . . . . . . . . .62
Units Tab . . . . . . . . . . . . . . . . . . . . . . . . .63
Communication Tab . . . . . . . . . . . . . . . . .64
Alarm Tab . . . . . . . . . . . . . . . . . . . . . . . . .67
Appendix A: Loran TD . . . . . . . . . . . . . . . . . . . . |
68 |
Appendix B: DSC . . . . . . . . . . . . . . . . . . . . . . . . |
70 |
Appendix C: Time Offsets . . . . . . . . . . . . . . . . . |
76 |
Appendix D: Messages . . . . . . . . . . . . . . . . . . . |
77 |
Appendix E: Map Datums . . . . . . . . . . . . . . . . . |
79 |
Appendix F: Navigation Terms . . . . . . . . . . . . . . |
81 |
Appendix G: Specifications . . . . . . . . . . . . . . . . |
83 |
Appendix H: Installation . . . . . . . . . . . . . . . . . . |
84 |
Appendix I: Index . . . . . . . . . . . . . . . . . . . . . . . |
90 |
Introduction
Table of Contents
vii

Introduction
“How To” Index
+
The list to the right is provided to help you quickly find some of the more important procedures you will use on your new GPSMAP 182/182C/232.
viii
TO DO THIS: |
SEE PAGE(S): |
Turn the unit on or off . . . . . . . . . . . . . . . . . . . . . . . . . . . . . . . . . . . . . 4, 6, 17 Initialize the GPS receiver (first time use) . . . . . . . . . . . . . . . . . . . . . . . . . . 4-5 Adjust screen backlighting . . . . . . . . . . . . . . . . . . . . . . . . . . . . . . . . . . . . . 6-7 Enter data and select options . . . . . . . . . . . . . . . . . . . . . . . . . . . . . . . . . . . 2-3 Learn how to operate the unit’s function keys. . . . . . . . . . . . . . . . . . . . . . . . . 1 Mark your present location as a waypoint . . . . . . . . . . . . . . . . . . . . . . . 10, 30 Go to a destination . . . . . . . . . . . . . . . . . . . . . . . . . . . . . . . . . . . . 11-14, 37-38 Create and use a route . . . . . . . . . . . . . . . . . . . . . . . . . . . . . . . . . . . . . . 41-47 Learn about the Map page . . . . . . . . . . . . . . . . . . . . . . . . . . . . . . . . 8-9, 18-19 Pan using the map arrow . . . . . . . . . . . . . . . . . . . . . . . . . . . . . . . . . . 9, 19-20 Zoom in or out on the Map page . . . . . . . . . . . . . . . . . . . . . . . . . . . . . . . 9, 20 Reconfigure the Map page display . . . . . . . . . . . . . . . . . . . . . . . . . . . . . 24-26 Access the Main Menu . . . . . . . . . . . . . . . . . . . . . . . . . . . . . . . . . . . . . . 16, 51 Change units of measure (statute, nautical, metric) . . . . . . . . . . . . . . . . 63-64 Change the displayed time (zone) . . . . . . . . . . . . . . . . . . . . . . . . . . . . . . . . 61 Setup Loran TD . . . . . . . . . . . . . . . . . . . . . . . . . . . . . . . . . . . . . . . . . . . 68-69 View tide information. . . . . . . . . . . . . . . . . . . . . . . . . . . . . . . . . . . . . . . 56-57 View celestial information . . . . . . . . . . . . . . . . . . . . . . . . . . . . . . . . . . . . . . 58 Set Alarms . . . . . . . . . . . . . . . . . . . . . . . . . . . . . . . . . . . . . . . . . . . . . . . . . . 67 Use the Find function. . . . . . . . . . . . . . . . . . . . . . . . . . . . . . . . . . . . . . . . . . 49 View a unit message . . . . . . . . . . . . . . . . . . . . . . . . . . . . . . . . . . . . . . . . . . . 77
ZOOM IN Key
The ZOOM IN/IN key adjusts the map scale to display a smaller area with more detail. (Zooms in)
ZOOM OUT Key
The ZOOM OUT/OUT key adjusts the map scale to display a larger area with less detail. (Zooms out)
NAV Key
The NAV key displays the Go To and Follow navigation menu.
PAGE Key
The PAGE key selects the main pages in sequence and returns display from a submenu page.
QUIT Key
The QUIT key returns the display to the previous page and, when entering data, it restores the previous value (cancels data entry).
Getting Started
Keypad Usage
ZOOM |
ZOOM |
IN |
OUT |
NAV |
PAGE |
MENU Key
The MENU key displays a menu of available options for the current page. Press twice to display the Main Menu.
ARROW KEYPAD
The ARROW KEYPAD is used to select (Highlight) menu options and enter data. It also controls cursor movement on the Map Page.
FIND Key
The FIND key actives the find function to search for nearby items and user waypoints.
ENTER/MARK Key
QUIT |
MENU |
Arrow Keypad
The ENTER/MARK key selects a highlighted menu option. When entering data, it allows you to initiate entry, and |
FIND |
ENTER |
|||
MARK |
|||||
then to accept the selected value(s). It also marks the current location as a waypoint when pressed and held for |
|
|
|
||
|
|
|
|
||
more than one second. |
|
|
|
|
|
POWER/ BACKLIGHT Key |
|
MOB |
|||
Power Key |
|
|
|||
|
|||||
The POWER/ BACKLIGHT key turns on/off the unit and display illumination. Also controls Contrast on |
|
|
|
|
|
monochrome untis. |
Always press and release a key to perform its primary |
||||
MOB Key |
|||||
function. Pressing and holding the ENTER/MARK will |
|||||
The MOB (Man OverBoard) key actives the Man OverBoard navigation feature when pressed. |
activate the secondary function. |
1 |
|||

Getting Started
Selecting Options
Options Menu with |
Use the ARROW |
||
highlighted option. |
KEYPAD to highlight |
||
|
|
the next option. Press |
|
|
|
ENTER/MARK to |
|
|
|
activate. |
|
|
|
|
|
|
|
|
|
Pop-up list of options for a highlighted
2field.
How To Select Options and Enter Data
Before moving ahead into the features of the GPSMAP 182/182C/232, you will need to learn basic operations. You can select and activate options and enter data to customize the GPSMAP 182/182C/ 232 to fit your requirements. You can use the ENTER/MARK key and ARROW KEYPAD to select options, enter names and numbers in data fields, and activate your selections.
To select and activate an optional feature:
1.With any page displayed, press the MENU key to pop-up the options menu. The options menu will display a list of optional features which are specific for that particular page. To select any feature on the list of options requires movement of the cursor, which is identified as highlighting, selecting or choosing an item in a list or a field (box) on a page.
2.Use the ARROW KEYPAD to move the cursor (highlight) up and down a list or up, down, and sideways on menus.
3.Once you have moved to the selection desired, press the ENTER/MARK key to either activate the feature or the MENU key to pop-up a sub-menu or list of yet more feature options. Just repeat this process to select an option from the list or press the QUIT key to return to the previous setting.
The QUIT key will move backwards through these steps or when pressed, back to the main page you started on.
To select and activate a function button:
1.When moving about a page with function buttons, like the ‘New Map Waypoint’ page, you will observe functions such as ‘Show Map’, ‘Delete’ and ’OK’. To activate the function, highlight the desired button and press the ENTER/MARK key.

Naming a waypoint or placing any sort of data that has not been predefined requires the use of both the ARROW KEYPAD and the ENTER/MARK key.
To enter a name or number in a data field:
1.Once you have accessed a page with programmable data fields (i.e. ‘ Waypoint Edit’) you can use the ARROW KEYPAD to move the cursor (Highlight) to fields on the page. Use the UP/DOWN arrows to move up or down and the LEFT/RIGHT arrows to move sideways.
2.Pressing the ENTER/MARK key with the field highlighted begins the process for entering data in the form of alphanumeric characters.
3.Use the ARROW KEYPAD UP/DOWN arrows to cycle through numbers 0 to 9, plus/minus symbols, blank space, and the alphabet. Pressing and releasing the keypad moves you character by character through the list. Pressing and holding the keypad moves you rapidly through the list.
4.Use the ARROW KEYPAD LEFT/RIGHT arrows to move to the next character on the line or backwards to edit characters. If there are more than two lines of data, keep pressing to the RIGHT to drop down to the next line.
5.When data entry is completed press ENTER/MARK to accept data, then move to the next programmable field. Not all data fields are programmable, like the date and time. When moving about a page with these type of fields, the cursor will skip over them.
Every field and button on this page can be programmed or activated.
•A waypoint symbol can be selected from a list of symbols.
•A comment can be added.
•The coordinates can be changed.
•The waypoint can be renamed.
•A depth can be entered.
•Option buttons can be activated.
Getting Started
Entering Data
Pressing UP or DOWN on the ARROW KEYPAD changes numbers and letters.
Pressing LEFT or RIGHT on the ARROW KEYPAD moves the cursor along the line or to the next line.
Data Entry Field
Non-programable data fields
3

Getting Started
Initializing the Receiver
GPSMAP 182/ 182C/232 Warning Screen (232 shown)
4
The GPSMAP 182/182C/232’s advanced keypad system is designed to allow for fast, convenient selection of navigation options and data entry. The Getting Started Tour will introduce you to the keypad and provide a ‘hands-on’ lesson in using the GPSMAP 182/182C/232. We strongly encourage you to take the Getting Started tour before using your unit for actual navigation.
The GPSMAP 182/182C/232 Quick Reference Guide contains helpful tips on using the unit and performing various navigation tasks. It’s a good idea to keep the Quick Reference Guide nearby whenever you’re operating your new GPSMAP 182/182C/232.
Initializing the Receiver
The first time you power up your new GPSMAP 182/182C/232, the receiver must be given an opportunity to collect satellite data and establish its present position. To ensure proper initialization, the GPSMAP 182/182C/232 is shipped from the factory in AutoLocate mode, which will allow the receiver to “find itself” anywhere in the world. To speed up the initialization process, we recommend using the graphic initialization process described on the next page, which will usually provide a position fix within a few minutes.
Before you initialize, make sure the GPSMAP 182/182C/232 unit and antenna have been correctly installed on your vessel according to the instructions in Appendix H. The antenna needs to be in a location with a clear and unobstructed view of the sky to receive satellite signals.
To turn the GPSMAP 182/182C/232 on:
1.Press and hold the POWER key until the power tone sounds and the display comes on, then release the POWER key.
A warning page will appear, asking you to read and acknowledge important information regarding the proper use of the unit.
To acknowledge the warning:
1. After reading the warning, press the ENTER/MARK key if you agree.
To graphically initialize the GPSMAP 182/182C/232:
1.Press the MENU key twice for the Main Menu. Press Up or Down on the ARROW KEYPAD until the ‘GPS’ tab is highlighted, then press the MENU key once.
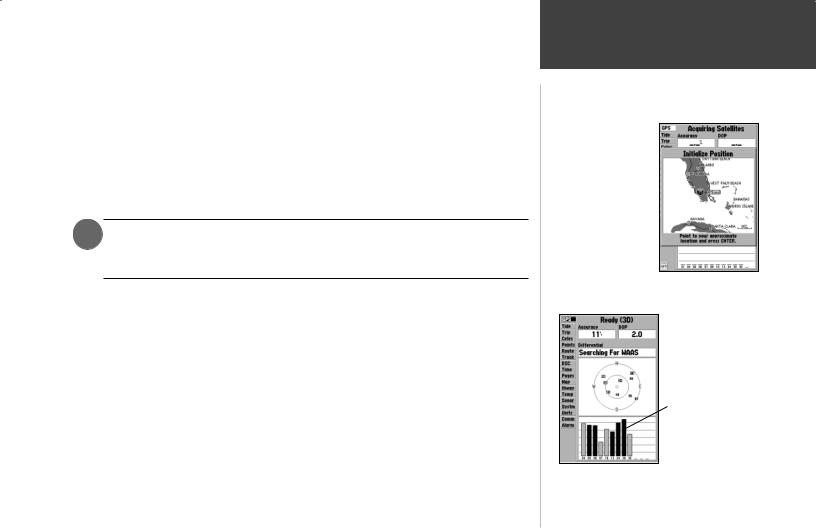
2.Using the ARROW KEYPAD, highlight ‘Initialize Position’ and press ENTER/MARK to initialize the receiver from the map. The Initialize Position Page will appear, prompting you to select your approximate location with the map cursor.
3.Use the ARROW KEYPAD to move the map cursor and point to your approximate location within 200 miles. If you have difficulty identifying your position, press and release the IN key to see the next lower map scale.
4.Once you have determined your approximate location on the map, press the ENTER/MARK key.
,This does not “calibrate”the unit in any way, but rather helps to speed up the initial satellite acquisition. If the unit displays “Ready (2D) or (3D )”during this process, it is not necessary to initialize the unit.
The GPSMAP 182/182C/232 will now begin searching for the appropriate satellites for your region and should acquire a fix within a few minutes. When viewing the ‘GPS’ tab on the Main Menu, a signal strength bar for each satellite in view will appear on the bottom of the page, with the appropriate satellite number under each bar. The progress of satellite acquisition is shown in three stages:
•No signal strength bars— the receiver is looking for the satellites indicated.
•Hollow signal strength bars— the receiver has found the indicated satellite(s) and is collecting data.
•Solid signal strength bars— the receiver has collected the necessary data and the satellite(s) are ready for use.
Once the receiver has collected information from at least three satellites, the top of the screen will display either “Ready (2D or 3D)”, and the GPSMAP 182/182C/232 is ready for use.
Getting Started
Initializing the Receiver
Point to your approximate location and press
ENTER/MARK.
A satellite’s strength bars will turn black when it’s ready for use.
5

Getting Started
Power On/Screen Backlighting
A full-screen GPS Information pop-up page is displayed after you press the ENTER key
to acknowledge the Warning Page. The pop-up page will go away after the unit gets a position fix or you press either ENTER or QUIT. The page can be disabled and enabled on the Pages Tab (see page 61).
Press UP or DOWN on the
ARROW KEYPAD to move the backlighting slider up for brighter or down for dimmer
6backlighting. (182C shown)
GPSMAP 182/182C/232 Getting Started Tour
The Garmin GPSMAP 182/182C/232 is a powerful electronic navigation system that provides detailed map coverage and convenient control of many advanced features right from the screen display. This tour is designed to take you through the basic pages and functions of the system using the simulator mode. Once you’re familiar with the main pages and functions of the unit, refer to the reference section for instructions on performing specific tasks and functions. For GSD 20 sonar related operations, refer to “GSD 20 Sounder Module with Garmin Chartplotters” (190-00241-03).
The Getting Started Tour assumes that the receiver has been properly installed and initialized, and you have not changed any of the default unit settings. If you have changed any settings (position formats, units of measure, etc.), the descriptions and pictures in the tour may not match your configuration.
To turn the GPSMAP 182/182C/232 on:
1.Press and hold the POWER key until the power tone sounds, then release the POWER key. The Warning Page will appear while the unit conducts a self-test.
2.Once the self-test is complete, press the ENTER/MARK key, if you agree, to acknowledge the warning.
The GPS Information Page will appear as the receiver begins acquiring satellites. From this or any other page, you may also adjust the screen backlighting.
The GPSMAP 182/182C/232’s adjustable screen backlighting is controlled with the POWER key, and may be adjusted at any time from any page. The backlight can cycle through minimum, userdefined, and maximum backlight levels by repeatedly pressing the POWER key.
To adjust the backlighting:
1.Press POWER and the Light window will appear.
2.Press POWER again and the user-defined level of backlighting will activate. You may adjust this level by pressing UP or DOWN on the ARROW KEYPAD. If you press POWER one more time, the backlighting will be at the maximum setting.
3.Press ENTER/MARK or QUIT when done.

The backlight will now cycle through minimum, the user-defined, and maximum backlight levels by repeatedly pressing the POWER key. You may also adjust the screen contrast (GPSMAP 182/232 monochrome only).
To adjust the screen contrast:
1.Press POWER and the Light and Contrast window will appear.
2.To decrease or increase the screen contrast, press left or right on the ARROW KEYPAD.
3.Press the ENTER/MARK key to finish.
Each page of the GPSMAP 182/182C/232’s system also features an options page, which gives you access to other functions and features that relate to the specific page you are viewing. To get a feel for how the options pages work, let’s put the GPSMAP 182/182C/232 into simulator mode.
To place the GPSMAP 182/182C/232 in simulator mode:
1.Press the MENU key twice for the Main Menu. Press Up or Down on the ARROW KEYPAD until the ‘GPS’ tab is highlighted, then press the MENU key once.
2.Use the UP or DOWN arrow of the ARROW KEYPAD to highlight the ‘Start Simulator’ option and press ENTER/MARK. Choose ‘No’ to the retail demonstration and press the ENTER/MARK key.
3.Press the ENTER/MARK key to confirm the ‘Running Simulator’ message that appears at the bottom of the display. ‘Simulating’ will appear at the top of the Main pages.
While in Simulator mode, a ‘Running Simulator’ message will appear after 2 minutes of inactivity. Now you’re ready to continue the rest of the simulated tour. Keep in mind that the GPSMAP 182/182C/232 does not track satellites in simulator mode, and this mode should never be used for actual navigation.
All the waypoint and route planning done in simulator mode will still be retained in memory for future use.
Getting Started
Backlighting/
Simulator Mode
To adjust the screen contrast, press LEFT or RIGHT on the ARROW KEYPAD to move the contrast slider. (non-color units)
A “Running Simulator” message |
|
will appear after 2 minutes. |
7 |
|

Getting Started
Map Page
8
The Map Page is one of six main pages used in the GPSMAP 182/182C/232’s system. The six main pages are the Map Page, Sonar Page (If equipped with GSD 20. For GSD 20 sonar related operations, refer to “GSD 20 Sounder Module with Garmin Chartplotters” (190-00241-03)), Compass Page, Numbers Page, Highway Page, and Active Route Page. All five pages are linked together in a simple chain, which allows you to scroll through the pages in either direction using the PAGE and QUIT keys.
Map Page |
Sonar Page |
Compass Page |
Numbers Page |
Highway Page |
Active Route Page |
|
PAGE |
|
|
QUIT |
|
The GPSMAP 182/182C/232’s Map Page combines digital chartplotting with a user-selectable display of navigation data and a built-in worldwide database. It will also be the page you use most to create and edit waypoints and routes. Before we take off on our practice route, let’s take a brief look at its various features and displays.
The map display shows your “boat” as a triangle marker on an electronically generated chart. Geographic names, roads, markers and buoys that are provided by the optional BlueChart or MapSource data are also shown. It also displays your track, routes and nearby waypoints. An on-screen cursor
lets you pan to other map areas, determine the range and bearing to a position, and perform various waypoint and route functions.
The data window, located at the top of the page, provides a user-selectable display of various navigation data, including speed over ground, distance to the next navigation point, compass ribbon and current position coordinates. The current map scale setting is located at the bottom right of the page.

Using the Map Cursor
Working from the Map Page is a simple process that centers around the use of the cursor. Controlled by the ARROW KEYPAD, the cursor is an important tool that can be used to pan to other map locations, mark and edit waypoints and routes, and review position data of on-screen map items and waypoints.
To get a feel for using the Map Page and using the cursor, try the following exercise:
1.Use the IN/OUT keys to set the map scale to the 50 nm setting. Your boat should be near the center of the map, at the receiver’s last known position. (If your boat isn’t where it should be, make sure that you have initialized the receiver and acquired a position as described on pages 1-2.)
2.Use the ARROW KEYPAD to move the cursor. Notice how another data field appears, showing the bearing and distance from your boat to the cursor, along with the latitude/longitude of the cursor.
3.Press the QUIT key to remove the cursor and re-center your boat on the map display.
As you become more familiar with the cursor, you’ll see that the map display actively scrolls or ‘pans’, letting you explore areas around the world and create waypoints and routes. Wherever you move the cursor, you’ll always be just one QUIT keystroke away from returning the map to your present position.
Now that you’ve seen how the Map Page can be used to monitor your present location, let’s take a minute to learn how to mark and store your present position as a waypoint. (Since you’re in simulator mode, the present position displayed will be the last position calculated by the receiver, which should be the spot where you’ve initialized the unit.) This will also give you an opportunity to see how the GPSMAP 182/182C/232’s keypad and ENTER/MARK key are used for data entry and changing the waypoint name and symbol.
Getting Started
Map Cursor
Current position
Map Scale
Distance
Bearing
Cursor Coordinates
Map Cursor
9

Getting Started
Marking Waypoints
Press ENTER/MARK after entering the name
You can choose from a list of useful symbols.
There are two Diver Down waypoint symbols to select from: the International version and the U.S. version.
10
To mark your present position:
1.Hold down the ENTER/MARK key until the ‘New Waypoint’ window appears then release the key. The window will show a default three-digit waypoint name/number (001), symbol (dot), and position. You can leave the name as the auto-assigned number, but for this exercise, lets change the name to ‘DOCK’.
2.Use the ARROW KEYPAD to highlight the waypoint name field (001) and press ENTER/MARK. You will see that just the first ‘0’ is now highlighted.
3.Press LEFT on the ARROW KEYPAD to clear the name field.
4.Press UP or DOWN on of the ARROW KEYPAD until the letter ‘D’ appears, and then press RIGHT to go to the next space to the right, then UP or DOWN again until ‘O’ appears. Repeat this until you have entered the name ‘DOCK’. If you make a mistake and select an incorrect character, simply press LEFT on the ARROW KEYPAD to backspace the cursor and then UP or DOWN to correct the entry. (If you accidentally press ENTER/MARK before you are done, simply press ENTER/MARK again and move the highlight to where you left off.)
5.After you have entered all the letters, press ENTER/MARK to confirm the name.
6.To access the waypoint symbol page, highlight the waypoint symbol field which is to the left of the waypoint’s name and press ENTER/MARK. Note: The default symbol is a dot.
7.You will see an alphabetical list of available waypoint symbols to choose from. Press the ARROW KEYPAD UP or DOWN until you highlight the ‘ANCHOR’ symbol. You will see a scroll bar on the right of the window indicating your current position on the entire list of symbols.
8.Press ENTER/MARK to confirm the ‘ANCHOR’ symbol.
9.Highlight ‘OK’ at the bottom of the window and press ENTER/MARK again to confirm the ‘OK’ prompt and save the waypoint.
The waypoint is now stored in memory. Note that waypoints may also be created graphically from the map display or by manually entering position coordinates. Each of these techniques is described in the reference section of the manual and/or on your GPSMAP 182/182C/232 Quick Reference Guide.
Going to a Destination
GPS is all about marking positions as waypoints and navigating to them using the receiver’s steering guidance and map displays. We’ve already seen how to use the ENTER/MARK key to store our present position, so it’s time to move on to the fun part—going to a destination.
The NAV key, located on the keypad above the QUIT key, is the primary tool used to select a destination waypoint, TracBack, or a route to navigate. The NAV key can be used in two primary ways:
•Pressing NAV once displays a list of options from which you can select ‘Go To Point’, ‘Follow Route’, ‘Follow Track’, or ‘Stop Navigation’.
•Highlighting an on-screen waypoint or map item as a destination directly from the Map Page and pressing NAV allows you to graphically select points to “Go To”.
For our simulated trip, you’re going to select a pre-programmed tour route using the first method. This will also show how the MENU key is used throughout the GPSMAP 182/182C/232 system to provide tab style options and functions. Let’s start by changing the position to where the practice route is located.
To change the GPSMAP 182/182C/232 position in simulator mode:
1.Press the MENU key twice to display the list of Main Menu tab items.
2.Use the UP or DOWN arrow of the ARROW KEYPAD to highlight the ‘Systm’ tab.
3.Highlight ‘Set Position’ in the simulator setup window and press ENTER/MARK.
4.From the Initialize Position page, press the MENU key. You will see ‘Enter As Text’ highlighted, then press ENTER/MARK.
5.On the Enter Position window, press ENTER/MARK then use the ARROW KEYPAD to enter N34°56.800’, W076°24.066’ and press ENTER/MARK when done, then press QUIT to return to the Map Page.
Getting Started
Using the NAV Key
Text entry for simulator position.
For future practice, you may skip steps 3 and 4 and point to a location from the Initialize Position page.
11

Getting Started
Simulated Tour
You can also Invert a route to follow it in reverse.
The Set Position, Track Control, Track and Speed fields will only show while in simulator mode.
12
To activate the practice route stored in memory for navigation:
1.Press NAV. The option list page will appear. (If we were selecting a single waypoint to navigate to rather than a route, we could highlight the waypoint on the map, press NAV and then press
ENTER/MARK.)
2.Use the ARROW KEYPAD to highlight the ‘Follow Route’ option. Press ENTER/MARK to confirm.
3.The Select Route page will appear, with the ‘GPSMAP TOUR’ route highlighted.
4.Press ENTER/MARK then highlight ‘Activate’ and press ENTER/MARK again.
To zoom in to a closer map scale:
1. Repeatedly press the IN key until you select the 3 nm scale.
You may also hold the IN or OUT keys down to quickly scroll through the map scales. The Map Page should now display five waypoints chained together in a simple route, with your boat at the first route waypoint.
A data field at the top of the page will now display the speed, distance to the second route waypoint, your position coordinates and a compass ribbon which shows you which way to go. To get started, let’s enter a speed for our vessel, which we can do from the Main Menu Page.
To enter a boat speed:
1.Press the MENU key twice to display the Main Menu Page.
2.Use the ARROW KEYPAD to highlight the ‘Systm’ tab, then press RIGHT then DOWN until the field below the word ‘Speed’ is highlighted and press ENTER/MARK.
3.Use the ARROW KEYPAD to enter a speed of 60 knots.
4.Press ENTER/MARK to finish, and QUIT until you return to the Map Page.
Once a speed has been entered, you’ll notice that the map will automatically begin to move slowly, keeping your boat centered on the display. The direction of movement, also called ‘track’, will be controlled by the simulator.

You’ll now have a clearer picture of the route you are navigating. Keep in mind that whenever you do exceed the usable range of the built-in database or the optional MapSource or BlueChart data in use, the range field will display ‘OVERZOOM’ to indicate that you should exercise extreme caution using the map data. Press the IN key to zoom into the 2 nm scale. Now that you’ve zoomed in a little closer to your route, you can pan ahead of your vessel with the cursor to review map items and create on-screen waypoints. Try moving the cursor to highlight the ‘TOUR3’ waypoint— just use the ARROW KEYPAD to move the cursor as close as possible to the waypoint. (To move the cursor in small increments, try
a series of short key presses.)
Once the cursor is over the TOUR3 waypoint, you’ll notice that the waypoint symbol and name will become highlighted. The data field at the top of the page will display the waypoint name, the range and bearing from your present position, and the coordinates for the waypoint.
To review the waypoint page for a selected waypoint:
1.Press the ENTER/MARK key.
2.To return to the Map Page, press ENTER/MARK again or press QUIT.
The cursor can also be used to create new waypoints right from the map display.
To create a new waypoint using the cursor:
1.Use the ARROW KEYPAD to move the cursor as close as possible to the following position: N35º 02.914; W 076º 26.152’ (Use the data window to verify the cursor position.)
2.Press and release the ENTER/MARK key to capture the cursor position. Do not hold the button down, as doing so will mark your present position, not the map position.
3.Use the ARROW KEYPAD to highlight the waypoint symbol field to the left of the waypoint name/number.
4.Press ENTER/MARK to access the symbol page.
5.Press UP or DOWN on the ARROW KEYPAD to select the ‘Shipwreck’ symbol and press
ENTER/MARK to confirm.
6.Highlight ‘OK’ at the bottom and ENTER/MARK again to finish.
Getting Started
Reviewing/Creating
Map Waypoints
The waypoint will ‘highlight’ when the cursor is moved over it.
Waypoint numbering will start with 001 and continually count up, even if the waypoint name has been deleted.
13
Getting Started
Compass/Numbers
Navigation Pages
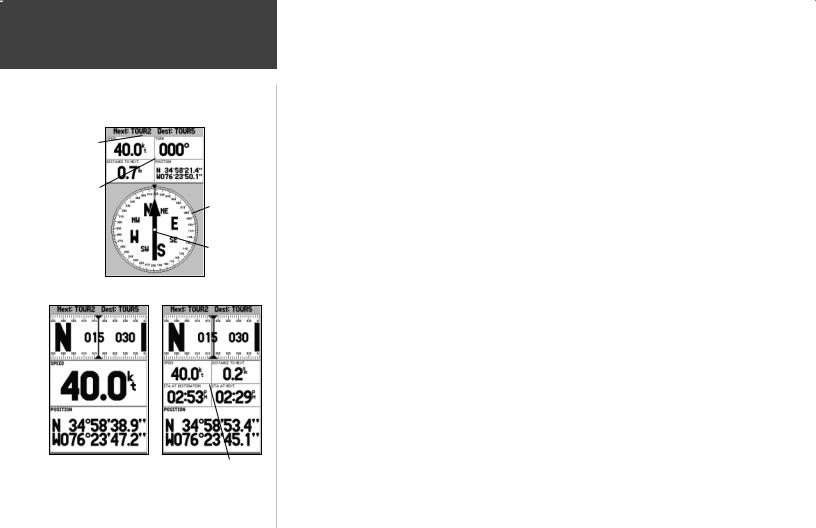
Current
Destination
Data Fields
Compass Ring
Pointer Arrow
Compass Page
14 |
Numbers Page |
Numbers Page with |
|
split numbers |
Now that we’re navigating to an actual destination, let’s move on to the GPSMAP 182/182C/232 navigation pages by pressing the PAGE key.
The Compass Page provides graphic steering guidance to a destination waypoint, with an emphasis on the bearing to your destination and current direction of travel. The middle of the page features a rotating ‘compass ring’ that shows your course over ground (track) while you’re moving, and a bearing pointer that indicates the direction of the destination (bearing) relative to the course over ground.
The compass ring and pointer arrow work independently to show—at a glance—the direction of your movement and the direction to your destination. For instance, if the arrow points up, you are going directly to the waypoint. If the arrow points any direction other than up, turn toward the arrow until it points up—then continue in that direction.
The current speed, distance to the next waypoint, turn angle and current position are displayed at the top of the screen. This page provides better steering guidance when travelling at slower speeds and/or when making frequent directional changes. When you are not navigating to a waypoint, the compass will show your direction of travel as you move but the arrow will not appear.
Press PAGE to see the next page appearing in the main sequence, the Numbers Page. The Numbers Page allows for precision navigation to 1 degree of steerage. The default page will display 3 large numbers fields. You may customize the Numbers Page to display the size and number of fields along with the type data you wish to see. (See pages 22-23 for changing the types of data.)
To split the data fields:
1.Press MENU, then press ENTER/MARK. Highlight the ‘SPEED’ data field and press MENU.
2.Highlight ‘Split Numbers’, then press ENTER/MARK. You will now see four new data fields. Press QUIT when done.
3.To return to the original configuration, repeat the above steps, but instead of ‘Split Number’, select either ‘Merge Numbers’ or ‘Defaults’. Press QUIT when done.
Let’s move on to the Highway Page by pressing the PAGE key.

The GPSMAP 182/182C/232’s Highway Page also provides graphic steering guidance to a destination waypoint, placing greater emphasis on the straight-line desired course and the distance and direction you are off course. As you head toward your destination, the middle of the screen provides visual guidance to your waypoint on a moving graphic “highway.” Your present position is at the bottom center of the highway display. The line down the middle of the highway represents your desired course. As you navigate toward a waypoint, the highway will actually move—indicating the direction you’re off course. To stay on course, simply steer toward the center of the highway or “keep it on the road”. The four default data fields at the top of the page indicate ‘Speed’ and ‘Distance To Next’ point, along with ‘To Course’ which shows the bearing to get you back on course and ‘Time To Next’ point. Additionally, a compass ribbon is displayed to show your current heading along with a dark, vertical bar which will indicate the direct bearing to the navigation point. When the dark, vertical indicator (or arrow) lines up with the lighter red bar in the middle, you are heading directly to the navigation point. Use the Highway Page as your primary navigation page (in lieu of the Compass Page) when your main concern is following a defined course.
Whenever the GPSMAP 182/182C/232 is in simulator mode, you can also adjust your speed and course from the Highway Page using the ARROW KEYPAD. As you head toward each waypoint in the tour route, try adjusting your boat speed and course to get a feel for how the highway works.
To adjust the simulated boat speed/heading from the Highway Page:
1.Press the UP arrow of the ARROW KEYPAD to increase the speed in 10 knot/kph/mph increments. Press the DOWN arrow to decrease the speed in the same increments. Press the LEFT and RIGHT arrows of the ARROW KEYPAD to steer the boat.
Notice that as you get off course, the highway will move to give you graphic guidance to get back on course. You can zoom in or out on the Highway display for a smaller or larger view. Five available settings range from 1X to 16X, with a default setting of 8X. The current scale will appear in the bottom right of the display.
To zoom in or out on the highway display:
1. Press either the IN or OUT key to increase or decrease the zoom scale.
Getting Started
Highway Page
Current
Waypoint
Data Fields
Desired Course
Present Position
Zoom Scale
Steer towards the center of the highway or towards the black vertical bar on the compass ribbon to get back on course.
15

Getting Started
Active Route Page/
Main Menu Page
You may choose from several different types of data.
Current
Waypoint
Active Route Page
16
The main pages’ data fields may also be configured to display several different information categories (see pages 22-23 for the complete list). On the Highway Page, let’s change the ‘TIME TO NEXT’ field
to ‘TIME OF DAY’.
To change a data field:
1.Press the MENU key to display the Highway Page options.
2.Press DOWN on the ARROW KEYPAD, highlight ‘Change Numbers’ and press ENTER/MARK.
3.Once the menu window disappears, use the ARROW KEYPAD and highlight ‘TIME TO NEXT’, then press ENTER/MARK.
4.On the alphabetical list of options, press the ARROW KEYPAD UP or DOWN until you highlight ‘TIME
OF DAY’ and press ENTER/MARK. (You will see a scroll bar on the right side of the window indicating your current position on the entire list of options.)
5.Press the QUIT key when done.
Press PAGE to see the last page appearing in the main sequence, which is the Active Route Page. Whenever you have activated a route or Follow Track, this page will show each waypoint name along with useful data for each point. As you navigate the route, the information will automatically update to indicate the next point along the route. For more detailed information on the Active Route Page, see page 48.
As you’ve seen, the primary pages provide map and navigation information. The tour’s last page is the Main Menu page, which allows access to the GPSMAP 182/182C/232’s waypoint, route and planning functions, as well as various operational and navigation setup features, and celestial and tide data.
The Main Menu is available from any page, and is accessed through the MENU key.
To access the main menu page:
1. Press the MENU key twice.
The Main Menu page lists 18 menu ‘tabs’ that are divided into categories by function. You can view a particular menu by simply highlighting the desired tab, which will then show any secondary submenu tabs and options for that tab.

To get a basic feel for how the Main Menu page works, let’s delete the two waypoints you created during the simulated tour. This will ensure that you have a clean slate once you start navigating in your home waters.
To select the Points (Waypoint) submenu tab:
1.Use the ARROW KEYPAD to highlight the ‘Points’ menu tab. You will see a list of stored waypoints appear to the right of the Main Menu list.
2.Press to the right one time on the ARROW KEYPAD and you will see the ‘User’ tab highlighted.
3.Press down on the ARROW KEYPAD until waypoint 001 with the shipwreck symbol is highlighted.
4.You may delete the waypoint by either pressing MENU, then highlighting ‘Delete Waypoint’ or press ENTER/MARK and then highlight ‘Delete’ from the Waypoint Edit page.
5.Press ENTER/MARK to delete the waypoint, then ENTER/MARK again to confirm. Repeat the above steps to delete the ‘Dock’ waypoint also.
Congratulations! You’ve now gone through the basic operation of the Garmin GPSMAP 182/ 182C/232. Your new digital chartplotter is a powerful tool with many advanced features not covered in the Getting Started tour. For detailed instructions on using these features or performing a specific task, please refer to the Quick Reference Guide or the appropriate reference section of this manual. If equipped with GSD 20, refer to the “GSD 20 Sounder Module with Garmin Chartplotters” (190-
00241-03) for sonar operations. The unit is still in Simulator mode for practice, but will automatically return to it’s ‘Normal’ operation mode when you shut it off and turn it back on.
To turn the GPSMAP 182/182C/232 off:
1.Press and hold the POWER key for about 2 seconds, until the screen is blank.
2.When the screen is blank, release the POWER key.
The next section of the manual describes the pages and functions of the GPSMAP 182/182C/232 in detail. If you are unable to locate a specific option or function, please refer to the index on pages 90-92. Thank you for choosing the Garmin GPSMAP 182/182C/232 navigation unit. We hope it will be a useful and fun tool for you wherever you go!
Getting Started
Deleting Waypoints/
Powering Off Unit
Submenu Tabs
Main Menu
17

Reference
Map Page
|
|
Data Fields |
|
|
|
|
User |
|
|
|
|
Land |
|
|
Waypoint |
Map |
|
|
|
Item |
|
|
Boat Icon |
|
|
|
|
Water |
|
|
Navaids |
|
|
|
|
|
|
|
Map Scale |
Geographic Name |
|
||
Map Page shown using optional
MapSource data.
18
Map Page
The GPSMAP 182/182C/232’s Map Page provides a comprehensive display of electronic cartography, plotting and navigational data. When using the unit with the optional BlueChart data or MapSource software, the map display shows your boat on a digital chart, complete with geographic names, map items, navaids and a host of other chart features. It also plots your track and displays any routes and waypoints you create. An on-screen cursor lets you pan and scroll to other map areas, determine the distance and bearing to a position, and perform various route and waypoint functions.
When the cursor is active, an additional data window will appear below the data fields to indicate the position, range and bearing to the cursor or a selected waypoint or map item. The map scale displays at the bottom right of the page.
The (ZOOM) IN and (ZOOM) OUT keys, combined with the ARROW KEYPAD, let you select zoom ranges and move the cursor. Two basic map operating modes, position mode and cursor mode, determine what cartography is shown on the map display. Position mode pans the cartography to keep the present position marker within the display area, while cursor mode pans the cartography to keep the cursor within the display area.
The GPSMAP system will always power up in the position mode, with your vessel centered on the map display.
•When sufficient map coverage is not available to keep the boat centered, the boat icon will move toward the edge of the display.
When the ARROW KEYPAD is pressed, the GPSMAP 182/182C/232 will enter cursor mode. In cursor mode:
•The cursor can be moved over the map display using the ARROW KEYPAD.
•Whenever the cursor reaches the edge of the display, the map will scroll forward under the cursor. Keep in mind that the boat icon will move with the map scrolling and may go off the display screen (you may not be able to see your present position).

•When the cursor is stationary, a fixed coordinate position will appear in the position field. Note that the distance and bearing will change as the boat’s position changes.
•Whenever you zoom in cursor mode, the cursor will be centered on screen.
•To return to position mode, press the QUIT key.
) |
When the cursor reaches the edge of the map, the unit may pause as it loads new |
|
map data. |
|
|
Using the Cursor
The cursor allows you to pan away from your present position and scroll to other map areas around the world (even outside of your current detail coverage). As you pan past the edge of the current map display, the screen will actively scroll forward to provide continuous map coverage. You will see an hourglass symbol by the pointer while the unit is busy drawing new map detail.
To move the cursor:
1. Press the ARROW KEYPAD to move the cursor in an up, down, left or right direction.
As you move the cursor, the distance and bearing from your present position to the cursor will be displayed in the data window, along with the cursor’s position coordinates. Keep in mind that when the cursor is stationary, the distance and bearing from your present position will change as your boat moves. The cursor may also be used to ‘snap’ to on-screen waypoints and map items, allowing you to review a selected position directly from the map display.
To select an on-screen waypoint or map item with the cursor:
1.Use the ARROW KEYPAD to move the cursor to the desired waypoint or map item (if there are several waypoints grouped closely together, zoom in closer for a better view).
2.When a waypoint or map item is selected, it will become highlighted on screen, with the name and position displayed. Press ENTER/MARK to show details of the map item. When using BlueChart or MapSource data, additional information tabs will appear. Use the ARROW KEYPAD to highlight the individual tabs to display the information and additional options.
Reference
Map Page Cursor
Move the cursor over an item on the map to highlight it.
Additional information
 tabs.
tabs.
Pressing ENTER/MARK while highlighting a map item will bring up additional details and options.
Option buttons
19
Reference
Map Page Cursor
and Zooming
Creating New Map Waypoint
Using Built-In Basemap
Using BlueChart/MapSource Data
20 |
Overzoom, no additional data |
To eliminate the cursor and re-center your position on-screen:
1. Press the QUIT key.
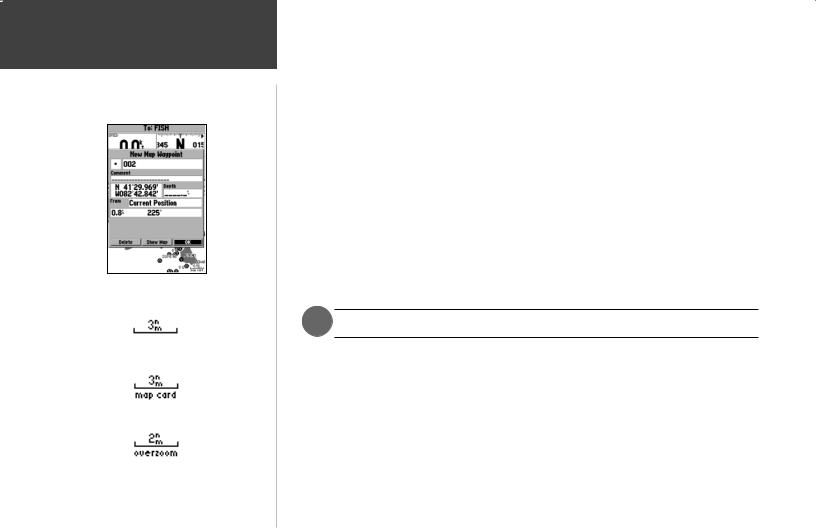
The cursor may also be used to create new waypoints directly from the map.
To create a waypoint with the cursor:
1.Use the ARROW KEYPAD to move the cursor to the desired map position.
2.Press the ENTER/MARK key and the ‘New Map Waypoint’ window will appear. If the cursor is on a map item, you will get a new window with details about the item when ENTER/MARK is pressed. Press ENTER/MARK again on the highlighted ‘Create Wpt’ option.
3.Press ENTER/MARK to confirm the new waypoint using the default three-digit name and symbol.
Selecting Map Scales
The map display has 28 available range scales from 20 ft. to 800 mi. (5 m to 1200 km). The map scale is controlled by the IN and OUT keys, with the current scale displayed at the bottom right of the data window.
To select a map scale:
1. Press the OUT key to zoom out and the IN key to zoom in.
) The scale value represents the distance from one end of the scale bar to the other.
The GPSMAP 182/182C/232’s system has a built-in worldwide database to 20 mi, with more detailed coverage available through the use of the optional BlueChart or MapSource data. The GPSMAP 182/182C/232 will display cartography as long as there is chart information available for the range you’ve selected. Map coverage will conform to the following conditions:
•When the selected zoom range is covered by either the internal database, BlueChart, or MapSource data, cartography will be displayed.
•When the selected zoom range is covered by both the internal database and BlueChart/MapSource data, cartography will be displayed using the data with the best resolution.
•When the selected zoom range exceeds the resolution of the data in use, overzoom cartography will be displayed and an ‘overzoom’ warning will appear below the scale field.
 Loading...