


V11HA20040DA
Table of contents
 Loading...
User's Guide

Contents
2
Notations Used in This Guide 5
Introduction to Your Projector 8
Projector Parts and Functions .......................................................... 9
Projector Parts - Front/Top........................................................................................................... 9
Projector Parts - Rear.................................................................................................................... 10
Projector Parts - Base ................................................................................................................... 10
Projector Parts - Control Panel................................................................................................. 11
Projector Parts - Remote Control ............................................................................................ 12
Setting Up the Projector 14
Projector Placement ........................................................................ 15
Projector Setup and Installation Options............................................................................. 16
Projection Distance....................................................................................................................... 17
Projector Connections ..................................................................... 18
Connecting to a Streaming Media Player ............................................................................ 18
Connecting to Video Sources ................................................................................................... 20
Connecting Headphones............................................................................................................ 21
Connecting to Bluetooth
®
Audio Devices ............................................................................ 22
Bluetooth Specifications ....................................................................................................... 23
Installing Batteries in the Remote Control.................................... 24
Remote Control Operation ........................................................................................................ 24
Using Basic Projector Features 26
Turning On the Projector ................................................................ 27
Turning Off the Projector ................................................................ 28
Selecting the Language for the Projector Menus ......................... 29
Projection Modes ............................................................................. 30
Changing the Projection Mode Using the Menus ............................................................ 30
Adjusting the Image Height............................................................ 31
Image Shape..................................................................................... 32
Auto V-Keystone ............................................................................................................................ 32
Correcting the Image Shape Horizontally with the Horizontal Keystone
Buttons .............................................................................................................................................. 32
Correcting the Image Shape with the Keystone Button ................................................ 33
Correcting the Image Shape with Quick Corner ............................................................... 34
Focusing the Image Using the Focus Lever ................................... 36
Resizing the Image with Zoom ....................................................... 37
Image Aspect Ratio .......................................................................... 38
Changing the Image Aspect Ratio.......................................................................................... 38
Available Image Aspect Ratios ................................................................................................. 39
Projected Image Appearance with Each Aspect Mode .................................................. 39
Adjusting Image Quality (Color Mode).......................................... 40
Changing the Color Mode ......................................................................................................... 40
Available Color Modes................................................................................................................. 40
Turning On Automatic Luminance Adjustment................................................................ 40
Adjusting the Sharpness ................................................................. 42
Adjusting the Image Color .............................................................. 43
Adjusting the Color Temperature ........................................................................................... 43
Adjusting the RGB Offset and Gain ........................................................................................ 43
Adjusting the Hue, Saturation, and Brightness.................................................................. 44
Adjusting the Gamma ................................................................................................................. 45
Adjusting the Light Source Brightness .......................................... 47
Saving Settings to Memory and Using Saved Settings ............... 48
Controlling the Volume with the Volume Buttons ....................... 49
Changing the Sound Mode ............................................................. 50
Available Sound Modes .............................................................................................................. 50

Contents
3
Adjusting Projector Features 51
HDMI Link Features ......................................................................... 52
Operating the Connected Devices Using the HDMI Link Features............................ 52
Shutting Off the Image and Sound Temporarily (A/V Mute)....... 54
Projector Security Features............................................................. 55
Locking the Projector's Buttons............................................................................................... 55
Unlocking the Projector's Buttons .................................................................................... 55
Installing a Security Cable .......................................................................................................... 56
Adjusting the Menu Settings 57
Using the Projector's Menus ........................................................... 58
Using the Displayed Keyboard ....................................................... 59
Available Text Using the Displayed Keyboard ................................................................... 59
Image Quality Settings - Image Menu............................................ 60
Projector Feature Settings - Settings Menu .................................. 61
Projector Information Display - Info Menu ................................... 64
Info Menu - Projector Info Menu ............................................................................................. 64
Projector Reset Options - Reset Menu ........................................... 66
Maintaining the Projector 67
Projector Maintenance .................................................................... 68
Cleaning the Projection Window.................................................... 69
Cleaning the Projector Case............................................................ 70
Air Filter and Vent Maintenance .................................................... 71
Cleaning the Air Filter and Vents ............................................................................................ 71
Replacing the Air Filter................................................................................................................ 71
Solving Problems 73
Projection Problems......................................................................... 74
Projector Indicator Status ............................................................... 75
Solving Projector Power-On or Power-Off Problems ................... 77
Solving Projector Power Problems ......................................................................................... 77
Solving Projector Shutdown Problems ................................................................................. 77
Solving Image Problems ................................................................. 78
Solving Missing Image Problems ............................................................................................ 78
Adjusting an Image that is not Rectangular ....................................................................... 78
Adjusting a Fuzzy or Blurry Image .......................................................................................... 79
Fixing Partial Image Problems.................................................................................................. 79
Adjusting an Image that Contains Noise or Static............................................................ 79
Adjusting an Image with Incorrect Brightness or Colors ............................................... 80
Adjusting an Upside-down Image .......................................................................................... 80
Solving Missing or Low Audio Problems ....................................... 81
Solving Bluetooth Problems ........................................................... 82
Solving Remote Control Operation Problems............................... 83
Solving HDMI Link Problems .......................................................... 84
Appendix 85
Optional Accessories and Replacement Parts............................... 86
Mounts............................................................................................................................................... 86
Replacement Parts ........................................................................................................................ 86
Screen Size and Projection Distance .............................................. 87
Supported Monitor Display Resolutions........................................ 89
Projector Specifications................................................................... 90
Connector Specifications............................................................................................................ 90
External Dimensions........................................................................ 91

Contents
4
List of Safety Symbols and Instructions ........................................ 92
Laser Safety Information................................................................. 94
Laser Warning Labels................................................................................................................... 94
Glossary............................................................................................. 96
Notices............................................................................................... 97
FCC Compliance Statement ...................................................................................................... 97
Indication of the manufacturer and the importer in accordance with
requirements of EU directive .................................................................................................... 98
Restriction of Use........................................................................................................................... 98
Trademarks ...................................................................................................................................... 98
Copyright Notice ........................................................................................................................... 99
Copyright Attribution .................................................................................................................. 99
Notations Used in This Guide
Safety Symbols
The projector and its manuals use graphical symbols and labels to indicate content that tells you how to use the projector safely.
Read and carefully follow the instructions that are marked with these symbols and labels to avoid injury to persons or damage to property.
Warning
This symbol indicates information that, if ignored, could possibly result in personal injury or even death.
Caution
This symbol indicates information that, if ignored, could possibly result in personal injury or physical damage due to incorrect handling.
General Information Notations
Attention
This label indicates procedures that may result in damage or injury if sufficient care is not taken.
This label indicates additional information that may be useful to know.
button
Indicates the buttons on the remote control or the control panel.
Example: button
Menu/Setting name Indicates projector menu and setting names.
Example:
Select the Image menu.
s Image > Color
This label indicates links to the related pages.
s
This label indicates the projector's current menu level.
Using the Manual to Search for Information
The PDF manual allows you to search for information you are looking for by keyword, or jump directly to specific sections using the bookmarks. You can also print only
the pages you need. This section explains how to use a PDF manual that has been opened in Adobe Reader X on your computer.
Searching by keyword
Click Edit > Advanced Search. Enter the keyword (text) for information you want to find in the search window, and then click Search. Hits are displayed as a list. Click
one of the displayed hits to jump to that page.
Jumping directly from bookmarks
Click a title to jump to that page. Click + or > to view the lower level titles in that section. To return to the previous page, perform the following operation on your
keyboard.
• Windows: Hold down Alt, and then press ←.
• Mac OS: Hold down the command key, and then press ←.
Printing only the pages you need
You can extract and print only the pages you need. Click Print in the File menu, and then specify the pages you want to print in Pages in Pages to Print.
• To specify a series of pages, enter a hyphen between the start page and the end page.
Example: 20-25

• To specify pages that are not in series, divide the pages with commas.
Example: 5, 10, 15

Introduction to Your Projector
See these sections to learn more about your projector.
gg Related Links
• "Projector Parts and Functions" p.9
Projector Parts and Functions
9
The following sections explain the projector parts and their functions.
gg Related Links
• "Projector Parts - Front/Top" p.9
• "Projector Parts - Rear" p.10
• "Projector Parts - Base" p.10
• "Projector Parts - Control Panel" p.11
• "Projector Parts - Remote Control" p.12
Projector Parts - Front/Top
Name Function
A
Audio Out port cover Open to connect headphones.
B
Cable path Pass an HDMI cable connecting the projector and
video equipment through here.
C
Power inlet Connects the power cord to the projector.
D
Air exhaust vents Exhaust vents for air used to cool the projector
internally.
Caution
While projecting, do not put your face or
hands near the air exhaust vent, and do not
place objects that may become warped or
damaged by heat near the vent. Hot air from
the air exhaust vent could cause burns,
warping, or accidents to occur.
E
Air intake vent (air
filter)
Takes in air to cool the projector internally.
F
Projection window Images are projected from the lens inside the projector.
G
Remote receiver Receives signals from the remote control.
H
Focus lever Adjusts the image focus.
I
Control panel Operates the projector.
J
Security slot The security slot is compatible with the Microsaver
Security System manufactured by Kensington.
K
Air intake vent Takes in air to cool the projector internally.
L
Rear cover Open to connect a streaming media player or other
video equipment.
gg Related Links
• "Remote Control Operation" p.24
• "Projector Parts - Control Panel" p.11
• "Focusing the Image Using the Focus Lever" p.36
• "Connecting to Video Sources" p.20
• "Connecting Headphones" p.21
• "Installing a Security Cable" p.56
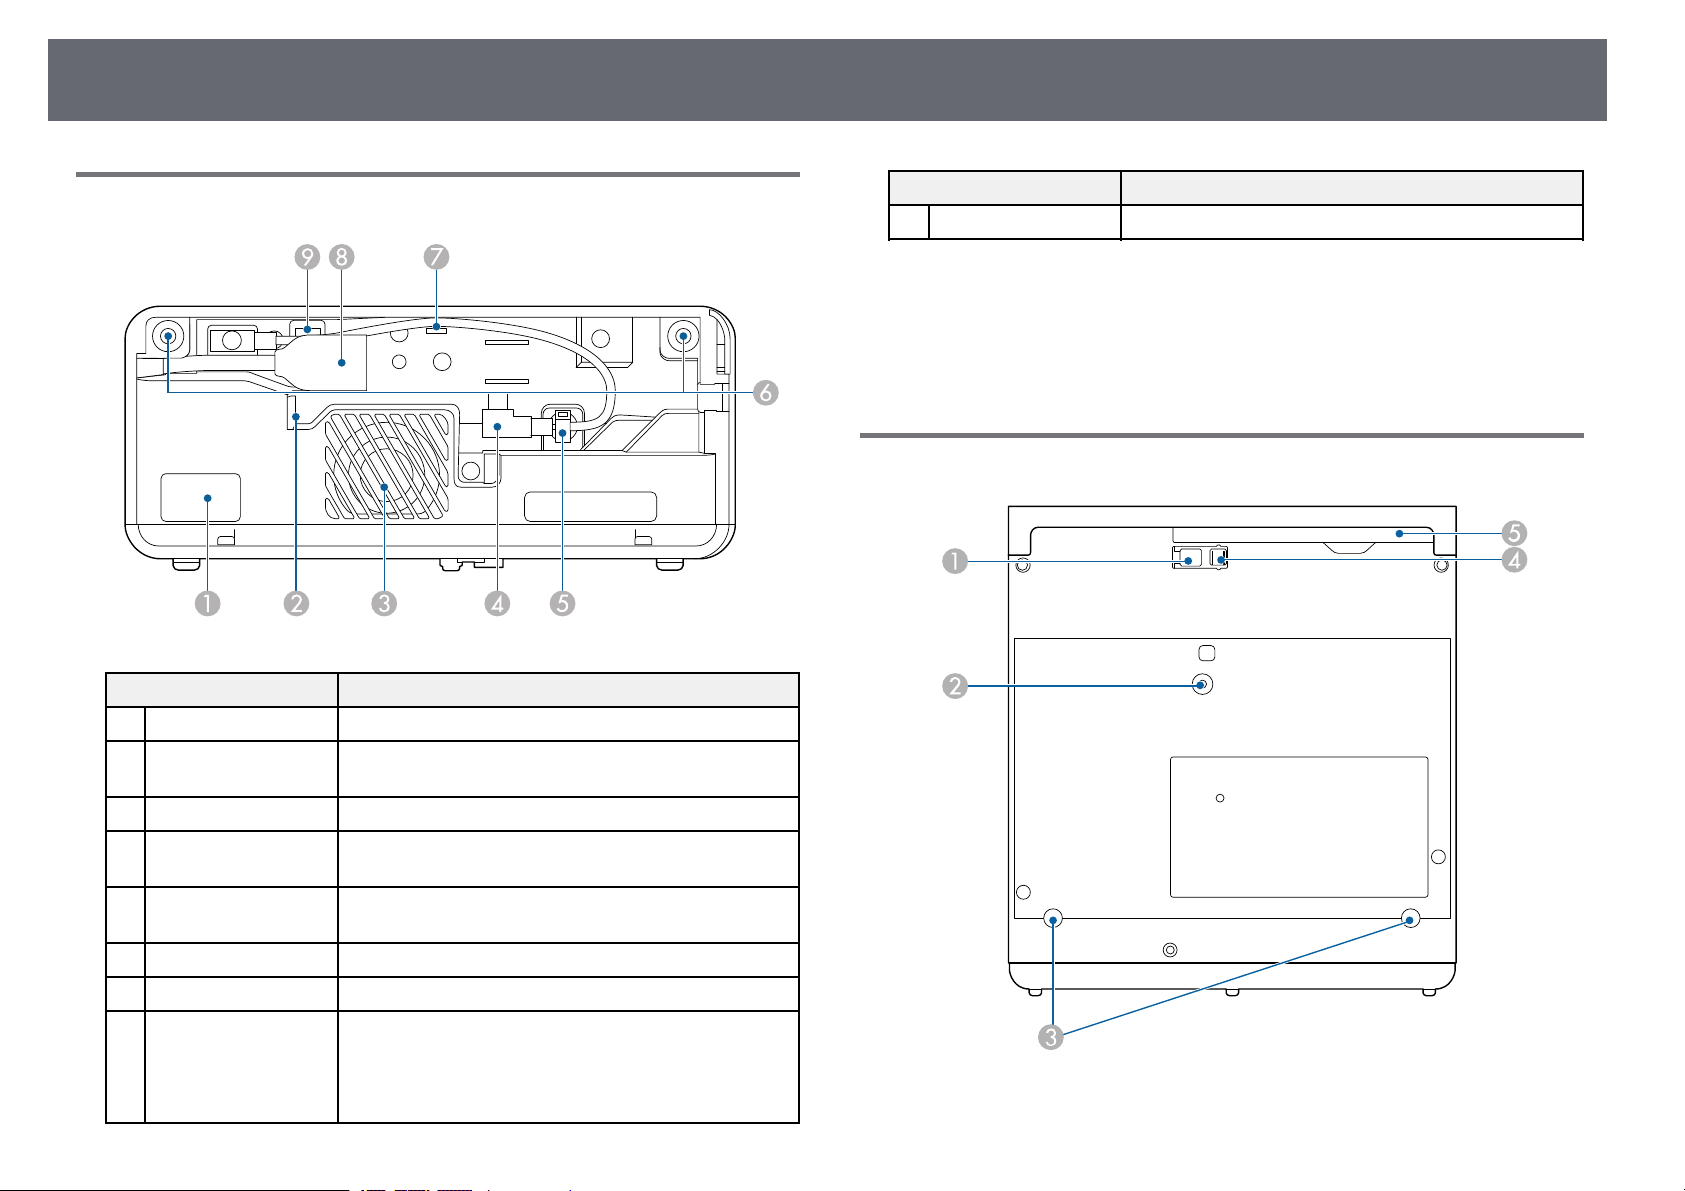
Projector Parts and Functions
10
Projector Parts - Rear
Name Function
A
Remote receiver Receives signals from the remote control.
B
Air exhaust vent Exhaust vents for air used to cool the streaming media
player.
C
Speaker Outputs audio.
D
Power supply USB
cable
Connects to a streaming media player to power it.
E
Cable clamp Pass the power supply USB cable through here to
secure it.
F
Rear cover slots Slots to install the rear cover.
G
Cable hook Pass the power supply USB cable through here.
H
HDMI port with an
extension cable
Inputs video signals from a streaming media player or
other HDMI compatible video equipment.
This projector is compatible with HDCP.
You cannot remove this extension cable.
Name Function
I
Service port This port is not normally used.
gg Related Links
• "Remote Control Operation" p.24
• "Connecting to Video Sources" p.20
• "Connecting to a Streaming Media Player" p.18
Projector Parts - Base

Projector Parts and Functions
11
Name Function
A
Foot release lever Press the foot release lever to extend and retract the
front adjustable foot.
B
Ceiling Mount / Floor
Stand fixing point or
Lighting Track Mount
fixing point
Attach the optional Ceiling Mount / Floor Stand or
Lighting Track Mount here.
C
Rear feet (Ceiling
Mount / Floor Stand
fixing points or
Lighting Track Mount
fixing points)
Loosen these feet by turning them counterclockwise,
and then remove them to attach the optional Ceiling
Mount / Floor Stand or Lighting Track Mount.
D
Front adjustable foot When setup on a surface such as a desk, extend the foot
to adjust the position of the image.
E
Air filter cover Open to access the air filter.
gg Related Links
• "Air Filter and Vent Maintenance" p.71
• "Adjusting the Image Height" p.31
Projector Parts - Control Panel
Name Function
A
Power button Turns the projector on or off.
B
Focus lever Adjusts the image focus.
C
Indicators Indicates the projector's status.
D
Volume up/down
buttons
Adjusts the volume for the speaker and headphones.
You can also control the volume for Bluetooth audio
devices connected to the projector.
E
Horizontal keystone
buttons
Displays the Keystone screen allowing you to correct
horizontal keystone distortion.
gg Related Links
• "Projector Indicator Status" p.75
• "Correcting the Image Shape Horizontally with the Horizontal Keystone
Buttons" p.32
• "Turning On the Projector" p.27
• "Focusing the Image Using the Focus Lever" p.36
• "Controlling the Volume with the Volume Buttons" p.49
Projector Parts and Functions
12
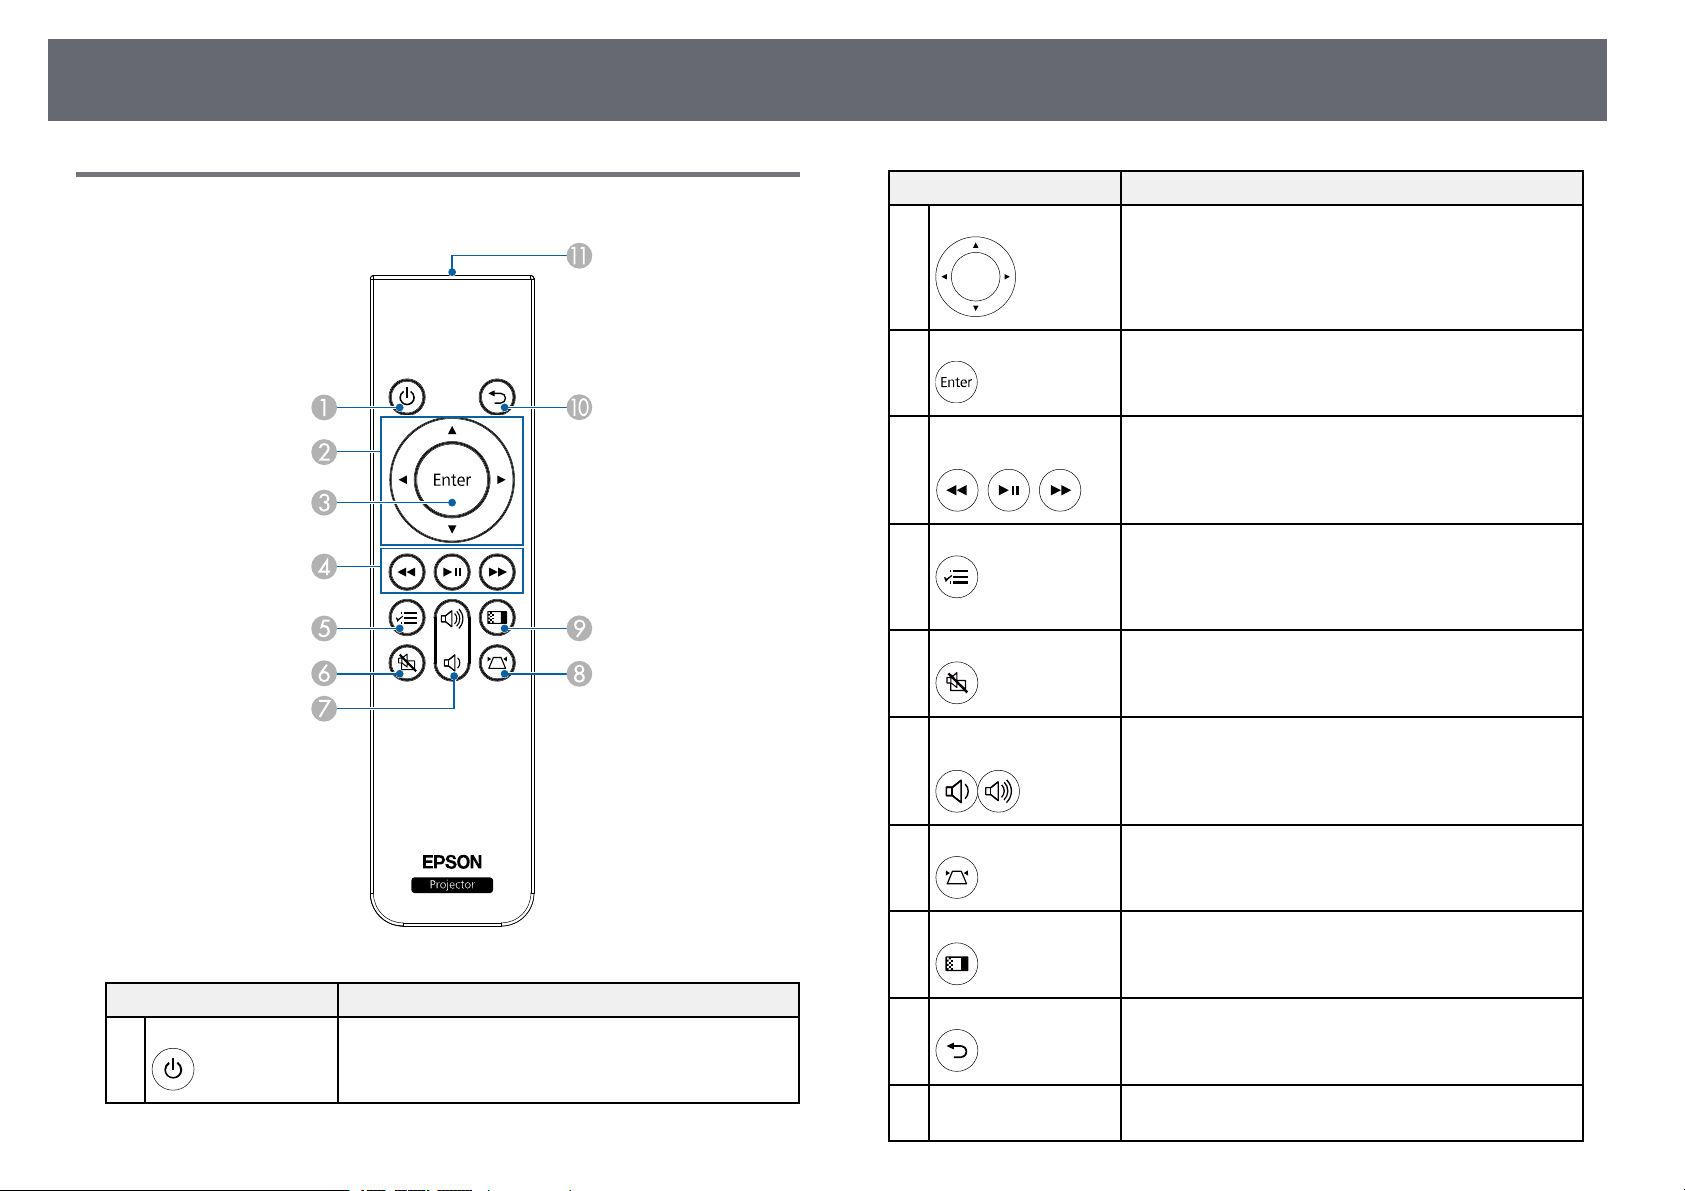
Projector Parts - Remote Control
Name Function
A
Power button Turns the projector on or off.
Name Function
B
Arrow buttons Selects menu items while displaying the projector's
menu.
C
Enter button Enters the current selection and moves to the next level
while displaying the projector's menu.
D
Playback control
buttons
Controls playback of the connected streaming media
player or video equipment that supports the HDMI
CEC standard.
E
Menu button Displays and closes the projector's menu. You can use
the projector's menus to adjust the settings that control
how your projector works.
Hold down this button to display the Bluetooth menu.
F
A/V Mute button Turns the video and audio on or off temporarily.
G
Volume up/down
buttons
Adjusts the volume for the speaker and headphones.
You can also control the volume for Bluetooth audio
devices connected to the projector.
H
Keystone button Displays the Keystone adjustment screen or the Quick
Corner screen.
I
Color Mode button Changes the color mode.
J
Esc button Stops the current function.
Moves back to the previous menu level while
displaying the projector's menu.
K
Remote control light
emitting area
Outputs remote control signals.

Projector Parts and Functions
13
gg Related Links
• "Adjusting Image Quality (Color Mode)" p.40
• "Correcting the Image Shape with the Keystone Button" p.33
• "Correcting the Image Shape with Quick Corner" p.34
• "Turning On the Projector" p.27
• "Controlling the Volume with the Volume Buttons" p.49
• "Shutting Off the Image and Sound Temporarily (A/V Mute)" p.54
• "Using the Projector's Menus" p.58

Setting Up the Projector
Follow the instructions in these sections to set up your projector.
gg Related Links
• "Projector Placement" p.15
• "Projector Connections" p.18
• "Installing Batteries in the Remote Control" p.24
Projector Placement
15
You can place the projector on almost any flat surface to project an image.
You can also install the projector in a mount if you want to use it in a fixed
location. An optional Ceiling Mount / Floor Stand is required when installing
the projector on a ceiling, a wall, or a floor.
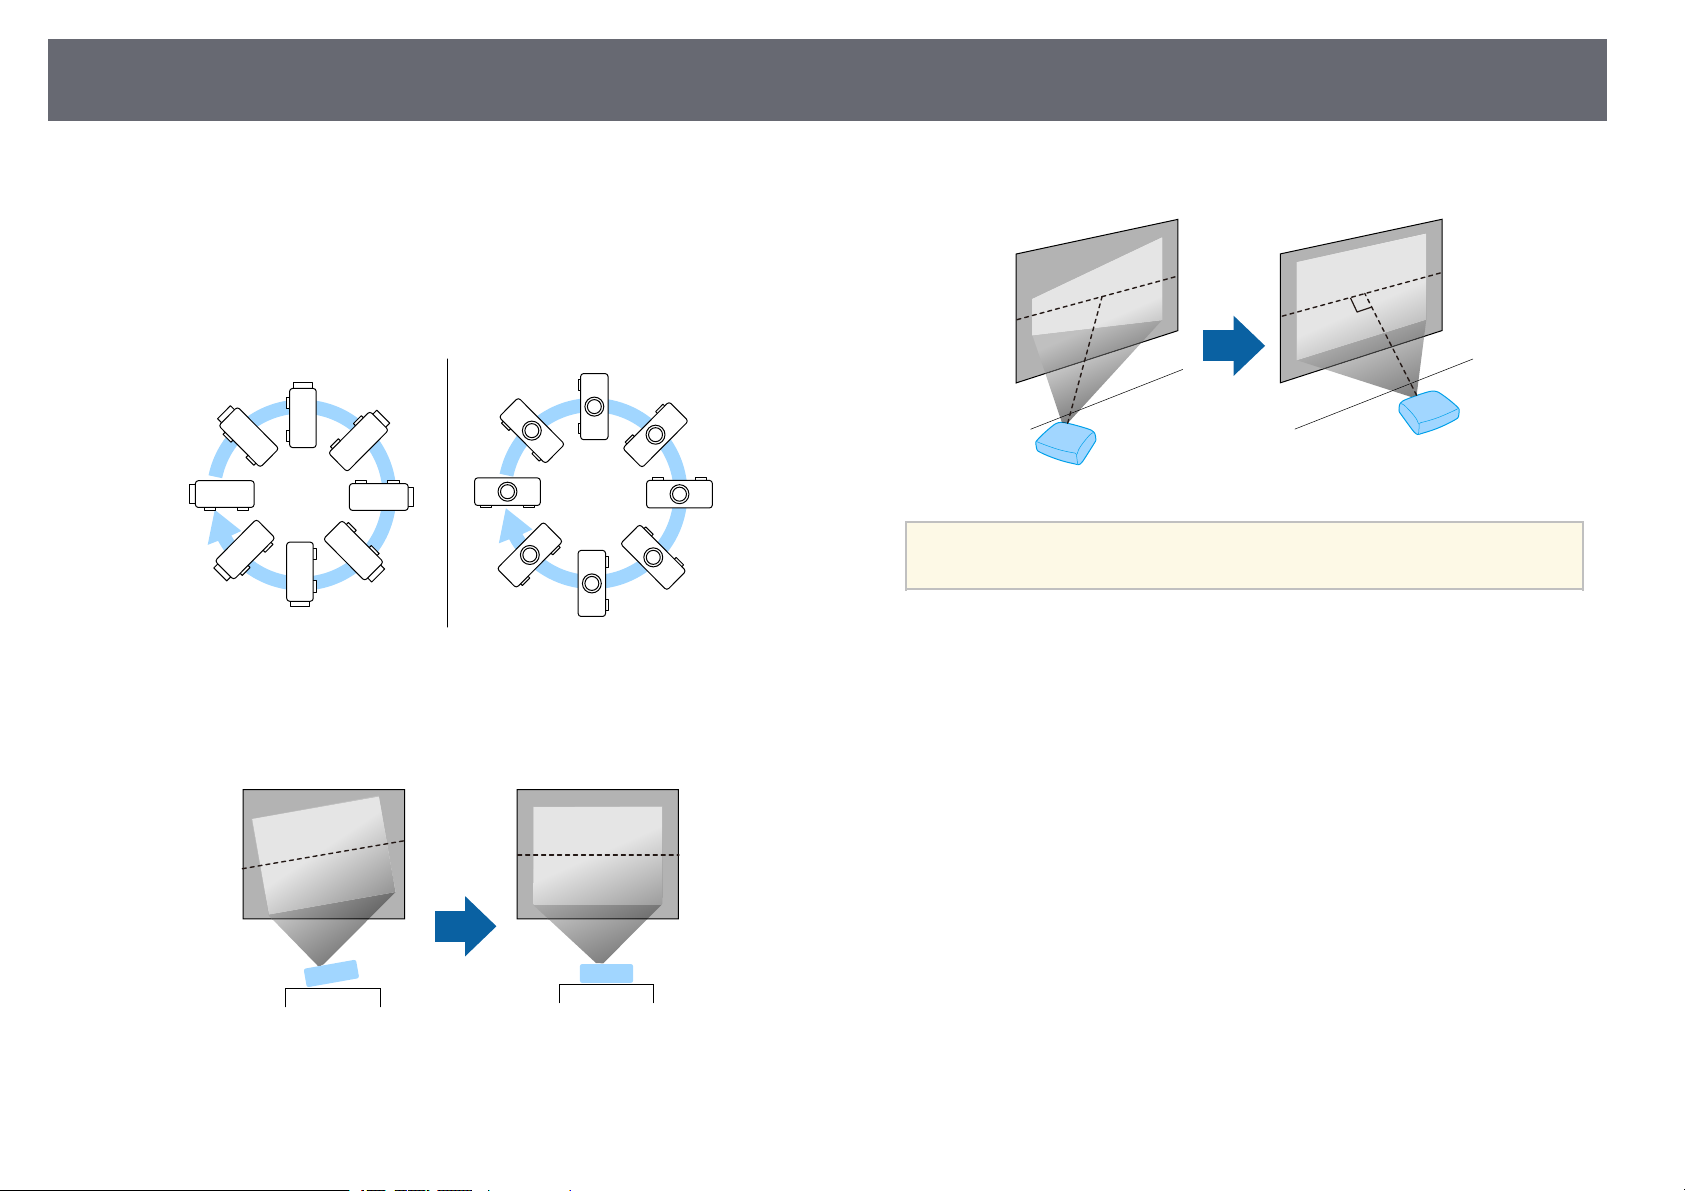
The projector can be installed at various angles. There is no vertical or
horizontal limit to how the projector can be installed.
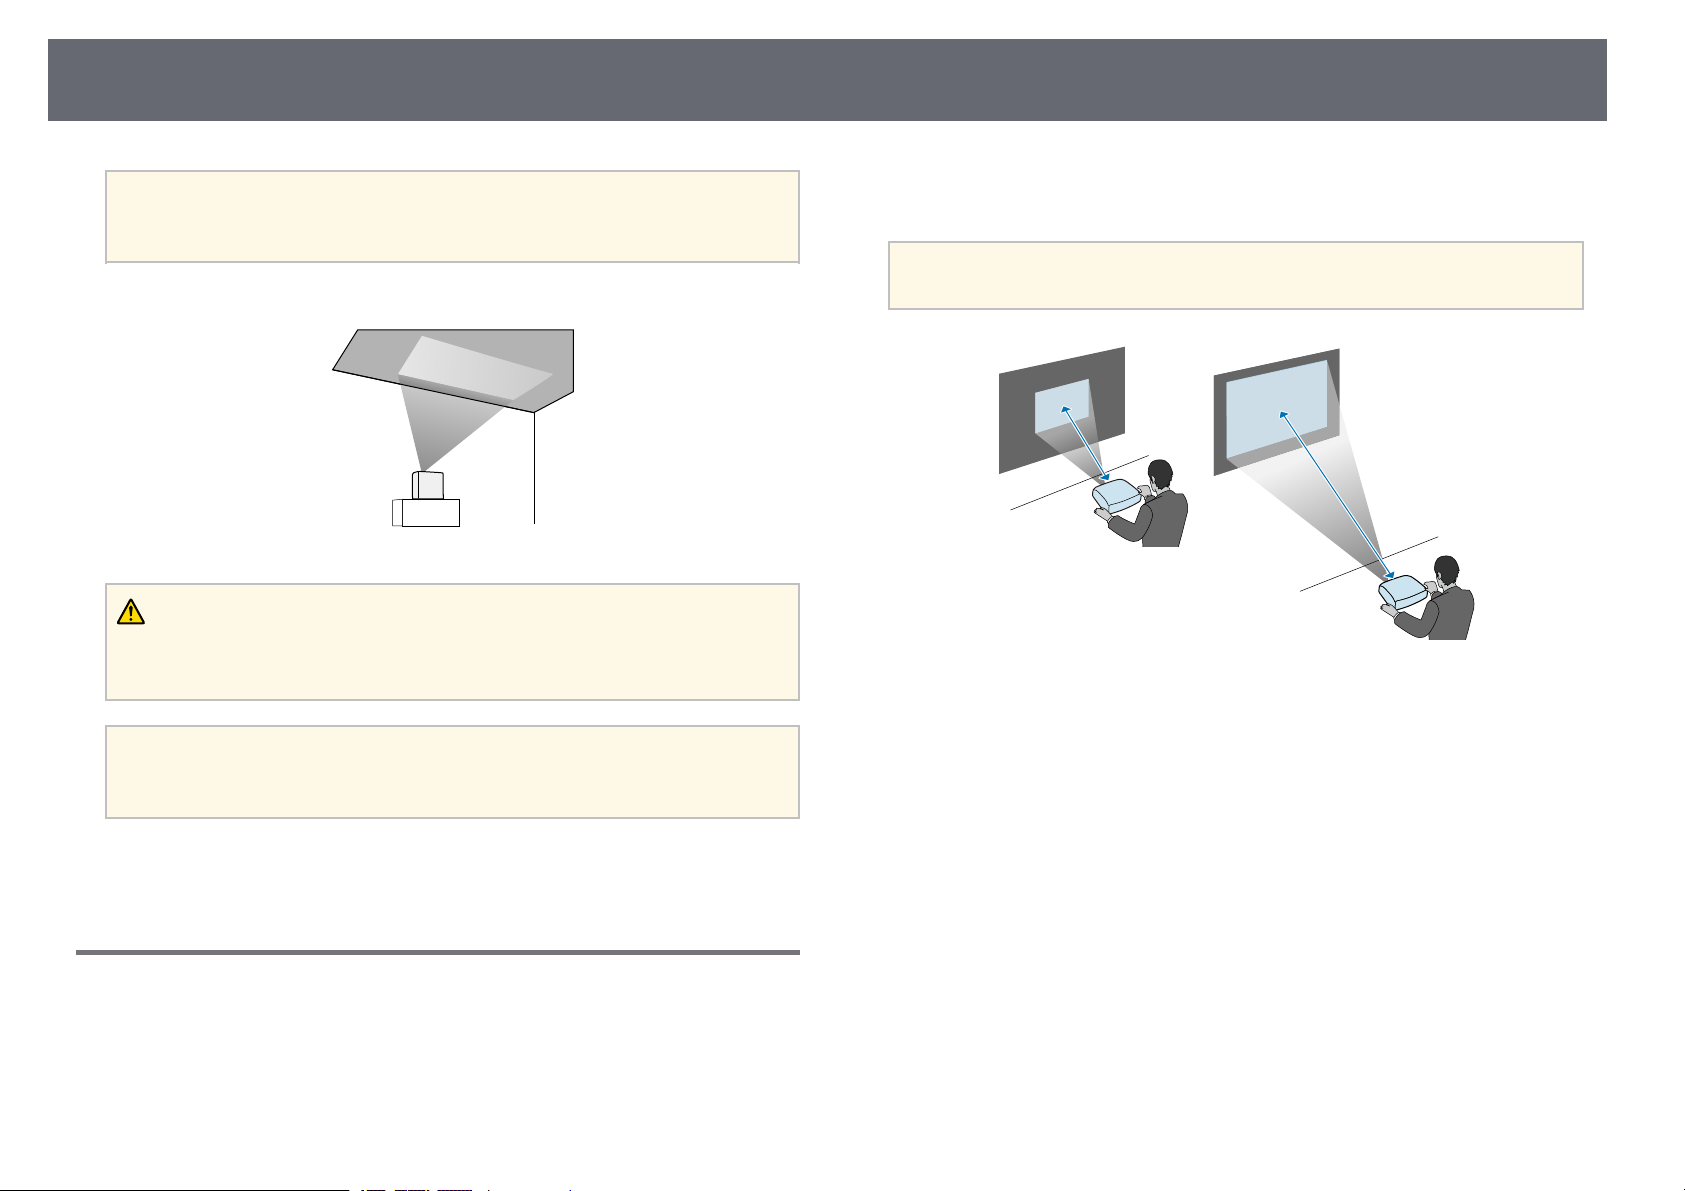
Note the following points when selecting a projector location:
• Place the projector on a sturdy, level surface or install it using a compatible
mount.
• Leave plenty of space around and under the projector for ventilation, and
do not place it on top of or next to anything that could block the vents.
• Place the projector parallel to the screen.
a
If you cannot install the projector parallel to the screen, correct
keystone distortion using the projector controls.
Projector Placement
16
Warning
• You must install a ceiling mount when suspending the projector from a ceiling.
If you do not install the projector correctly, it could fall and cause damage or
injury.
• Do not use adhesives on the ceiling mount fixing points to prevent the screws
from loosening, or use lubricants, oils, or similar substances on the projector; the
projector case may crack causing it to fall from its ceiling mount. This could
cause serious injury to anyone under the ceiling mount and could damage the
projector.
• Do not cover the projector's air intake or air exhaust vents. If the vents are
covered, the internal temperature could rise and cause a fire.
• Do not install the projector on an unstable surface or in a location beyond the
weight specifications of the projector. Otherwise, it could fall or topple causing
an accident and injury.
• When installing the projector in a high position, take measures to prevent falling
by using belts to ensure safety in an emergency, such as an earthquake, and to
prevent accidents. If it is not installed correctly, it could fall causing an accident
and injury.
• Do not install the projector in locations exposed to high humidity and dust, such
as on a kitchen counter, in the kitchen, or near a humidifier, or in locations
exposed to oil smoke or steam. Doing so could cause fire or electric shock. In
addition, the oil content could cause the projector’s outer case to deteriorate and
could cause the projector to fall off from the ceiling where it is suspended.
Attention
• If you are using the projector at altitudes above 1500 m, set the High Altitude
Mode setting to On in the projector's menu to ensure the projector's internal
temperature is regulated properly.
s Settings > Installation > High Altitude Mode
• Try not to setup the projector in locations subject to high humidity and dust, or
in locations subject to smoke from fires or tobacco smoke.
• If the internal temperature of the projector gets too high due to the installation
environment, select the Rear Bay Cooling setting in the projector menu to cool
the streaming media player connected to the projector.
s Settings > Operation > Rear Bay Cooling
gg Related Links
• "Projector Setup and Installation Options" p.16
• "Projection Distance" p.17
• "Image Shape" p.32
• "Projector Feature Settings - Settings Menu" p.61
• "Adjusting the Image Height" p.31
• "Resizing the Image with Zoom" p.37
• "Focusing the Image Using the Focus Lever" p.36
Projector Setup and Installation Options
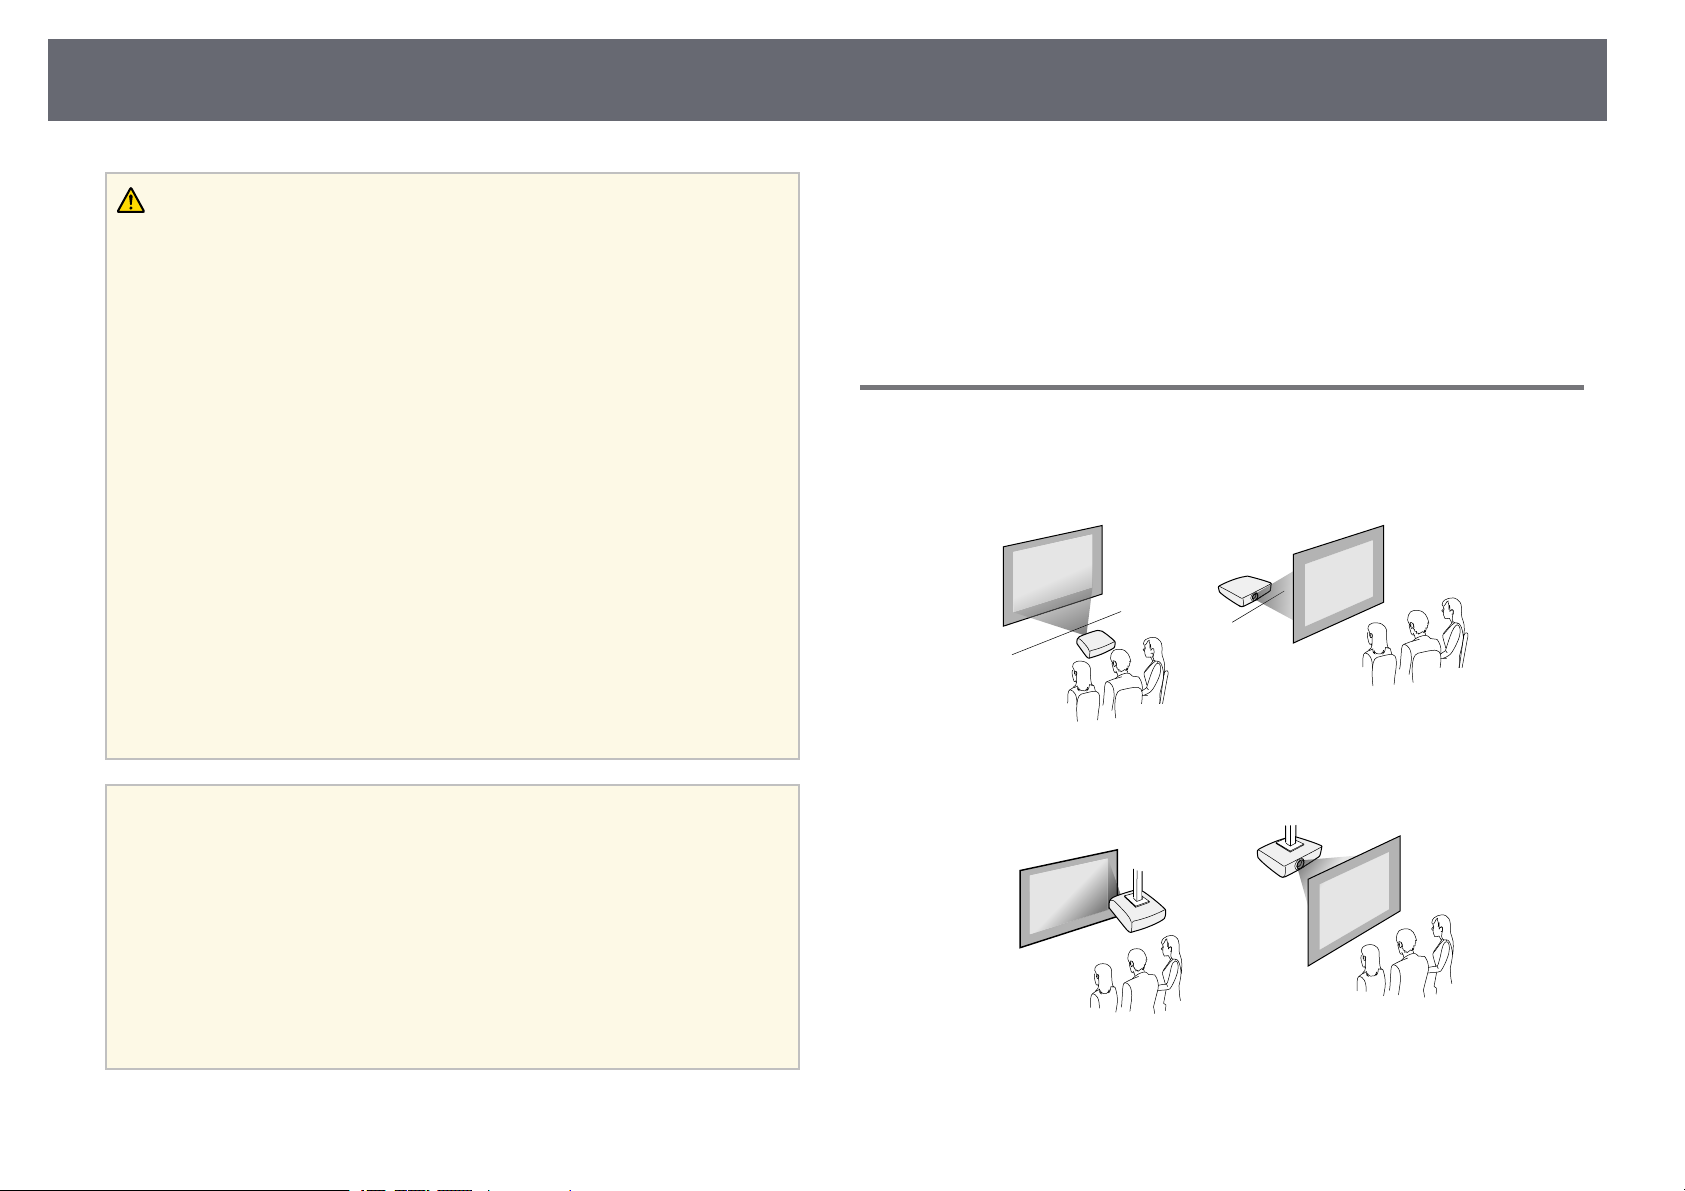
You can set up or install your projector in the following ways:
Front/Rear
Front Ceiling/Rear Ceiling
Projector Placement
17
a
If you project from the ceiling or from the rear, select the correct
Projection setting and, if necessary, adjust the OSD Rotation setting.
s Settings > Installation > OSD Rotation
Projecting Images onto a Ceiling
Warning
Do not cover the projection window. If the window is covered, the internal
temperature could rise and cause a fire.
Attention
When projecting images onto a ceiling, make sure that the rear cover is replaced
correctly.
gg Related Links
• "Projection Modes" p.30
Projection Distance
The distance at which you place the projector from the screen determines the
approximate size of the image. The image size increases the farther the
projector is from the screen, but can vary depending on the zoom factor,
aspect ratio, and other settings.
See the Appendix for details about how far to place the projector from the
screen based on the size of the projected image.
a
When correcting keystone distortion, your image is slightly smaller.
gg Related Links
• "Screen Size and Projection Distance" p.87
Projector Connections
18
See these sections to connect the projector to a variety of projection sources.
Attention
Check the shape and orientation of the connectors on any cable you plan to
connect. Do not force a connector into a port if it does not fit. The device or your
projector could be damaged or could malfunction.
a
See the Quick Start Guide for a list of cables supplied with your
projector. Purchase optional or commercially available cables when
necessary.
gg Related Links
• "Connecting to a Streaming Media Player" p.18
• "Connecting to Video Sources" p.20
• "Connecting Headphones" p.21
• "Connecting to Bluetooth® Audio Devices" p.22
Connecting to a Streaming Media Player
You can connect your streaming media player to the projector's HDMI port.
By connecting the power supply USB cable, you can power the streaming
media player from the projector.
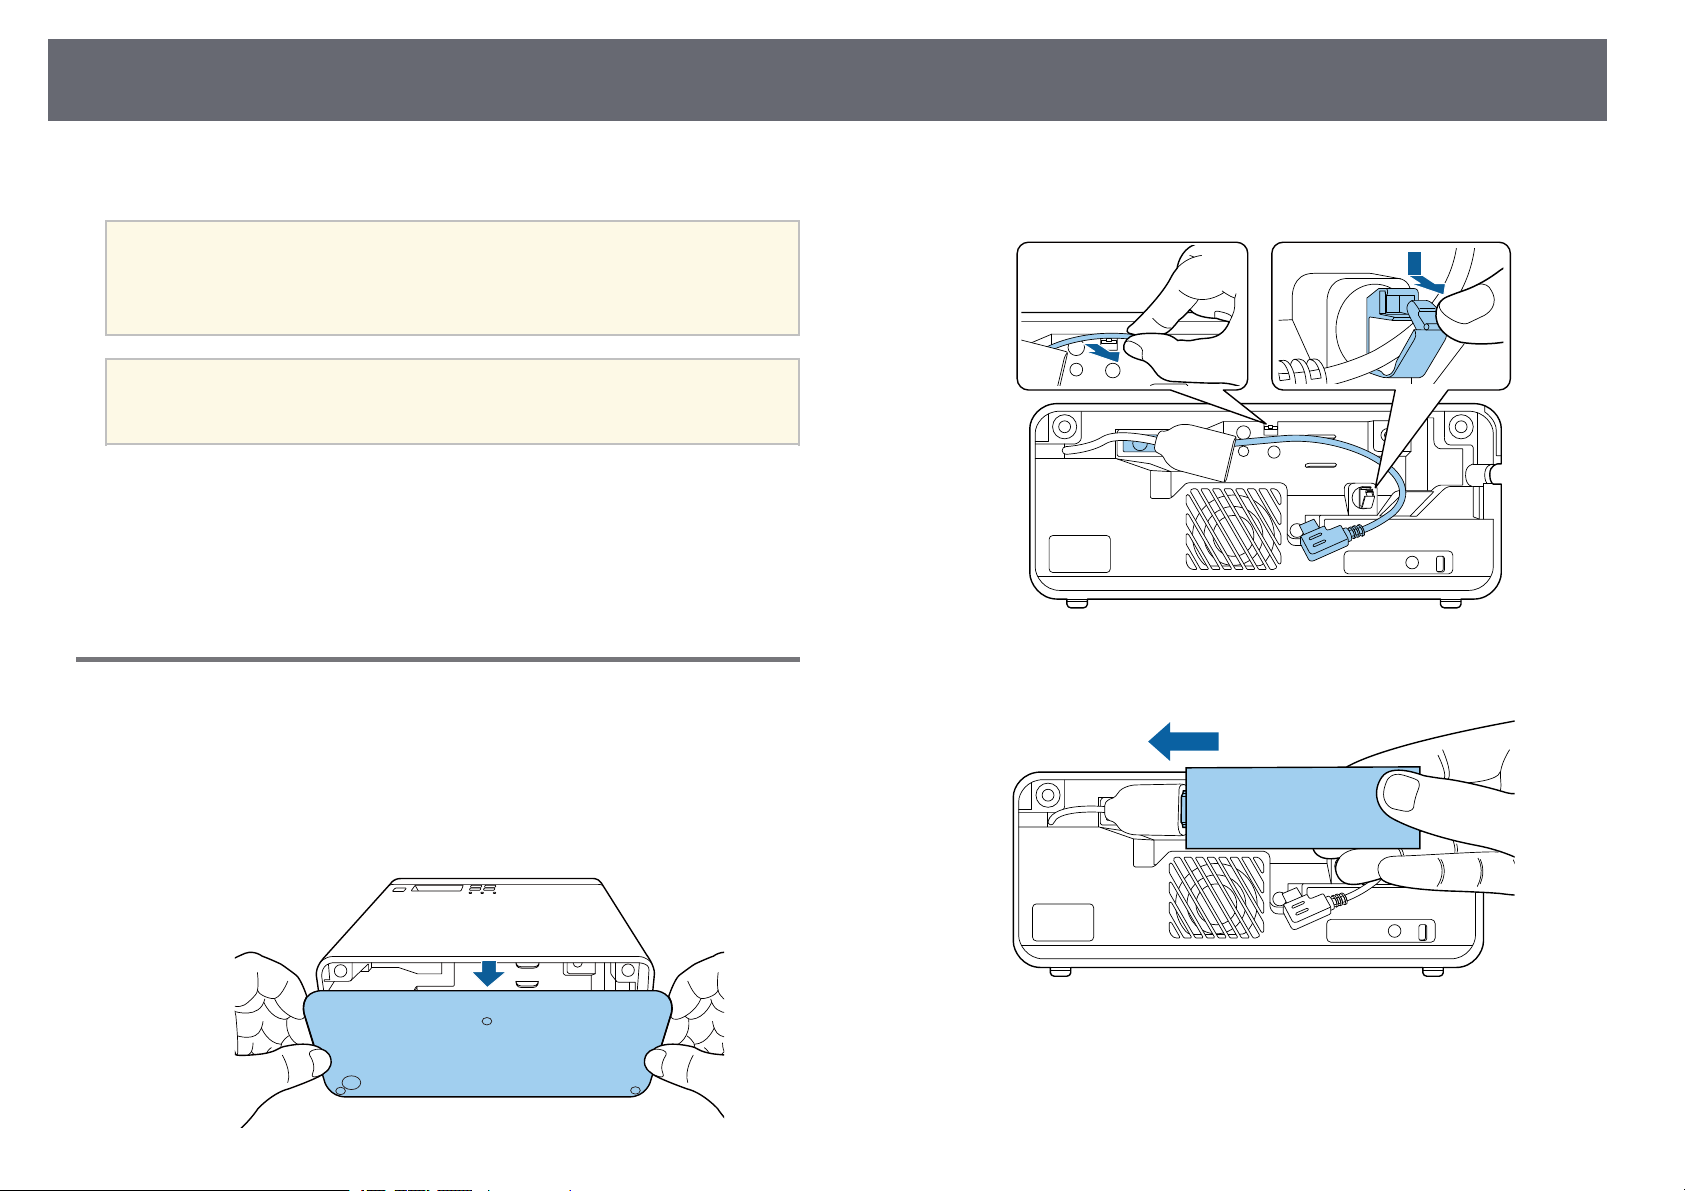
a
Remove the rear cover from the projector.
b
Release the power supply USB cable from the cable hook and cable
clamp.
c
Connect your streaming media player to the projector's HDMI port.
Projector Connections
19
d
Connect the power supply USB cable to the streaming media player's
USB port (Type-B).
• USB port on the side
• USB port at the bottom
e
Pass the power supply USB cable through the cable hook and cable
clamp, and then close the cable clamp to secure the cable.
• USB port on the side
• USB port at the bottom
Projector Connections
20
f
Place the streaming media player as shown.
• USB port on the side
• USB port at the bottom
g
Replace the rear cover.
a
If your streaming media player supports the HDMI CEC standard, you
can operate some of the player's functions by using the projector's
remote control. See your streaming media player's manual for details.
Connecting to Video Sources
If your video source has an HDMI port, you can connect it to the projector
using an HDMI cable and send the image source's audio with the projected
image.
Attention
Do not turn on the video source before connecting it to the projector. Doing so
could damage the projector.
a
• If the port on the device you connect has an unusual shape, use the
cable supplied with the device or an optional cable to connect to the
projector.
• Some video equipment is capable of outputting different types of
signals. See your video equipment manual to confirm what type of
signals can be output.
a
Remove the rear cover from the projector.
b
Connect the HDMI cable to your video source's HDMI output port.

Projector Connections
21
c
Connect the other end to the projector's HDMI port.
d
Pass the HDMI cable through the cable path as shown.
e
Replace the rear cover.
Connecting Headphones
You can connect headphones to the projector's Audio Out port. You can
control the volume using the projector's remote control.
Attention
The projector's Audio Out port only supports 3-pin headphones. If you use any
other headphones, audio may not be output normally.
a
Open the Audio Out port cover.
b
Connect the stereo headphone's mini-jack cable to the projector's
Audio Out port.
Projector Connections
22
Caution
Do not start a playback at a high volume setting. Sudden loud noises may cause
hearing loss.
Always lower the volume before powering off, so that you can power on and then
gradually increase the volume.
Connecting to Bluetooth
®
Audio Devices
You can connect your projector to Bluetooth audio devices (A2DP compliant)
such as speakers or headphones to output audio from streaming media player
or other video equipment connected to the projector.
a
• There is a delay in the audio output from any Bluetooth audio
devices.
• Bluetooth audio devices are not supported in some countries and
regions.
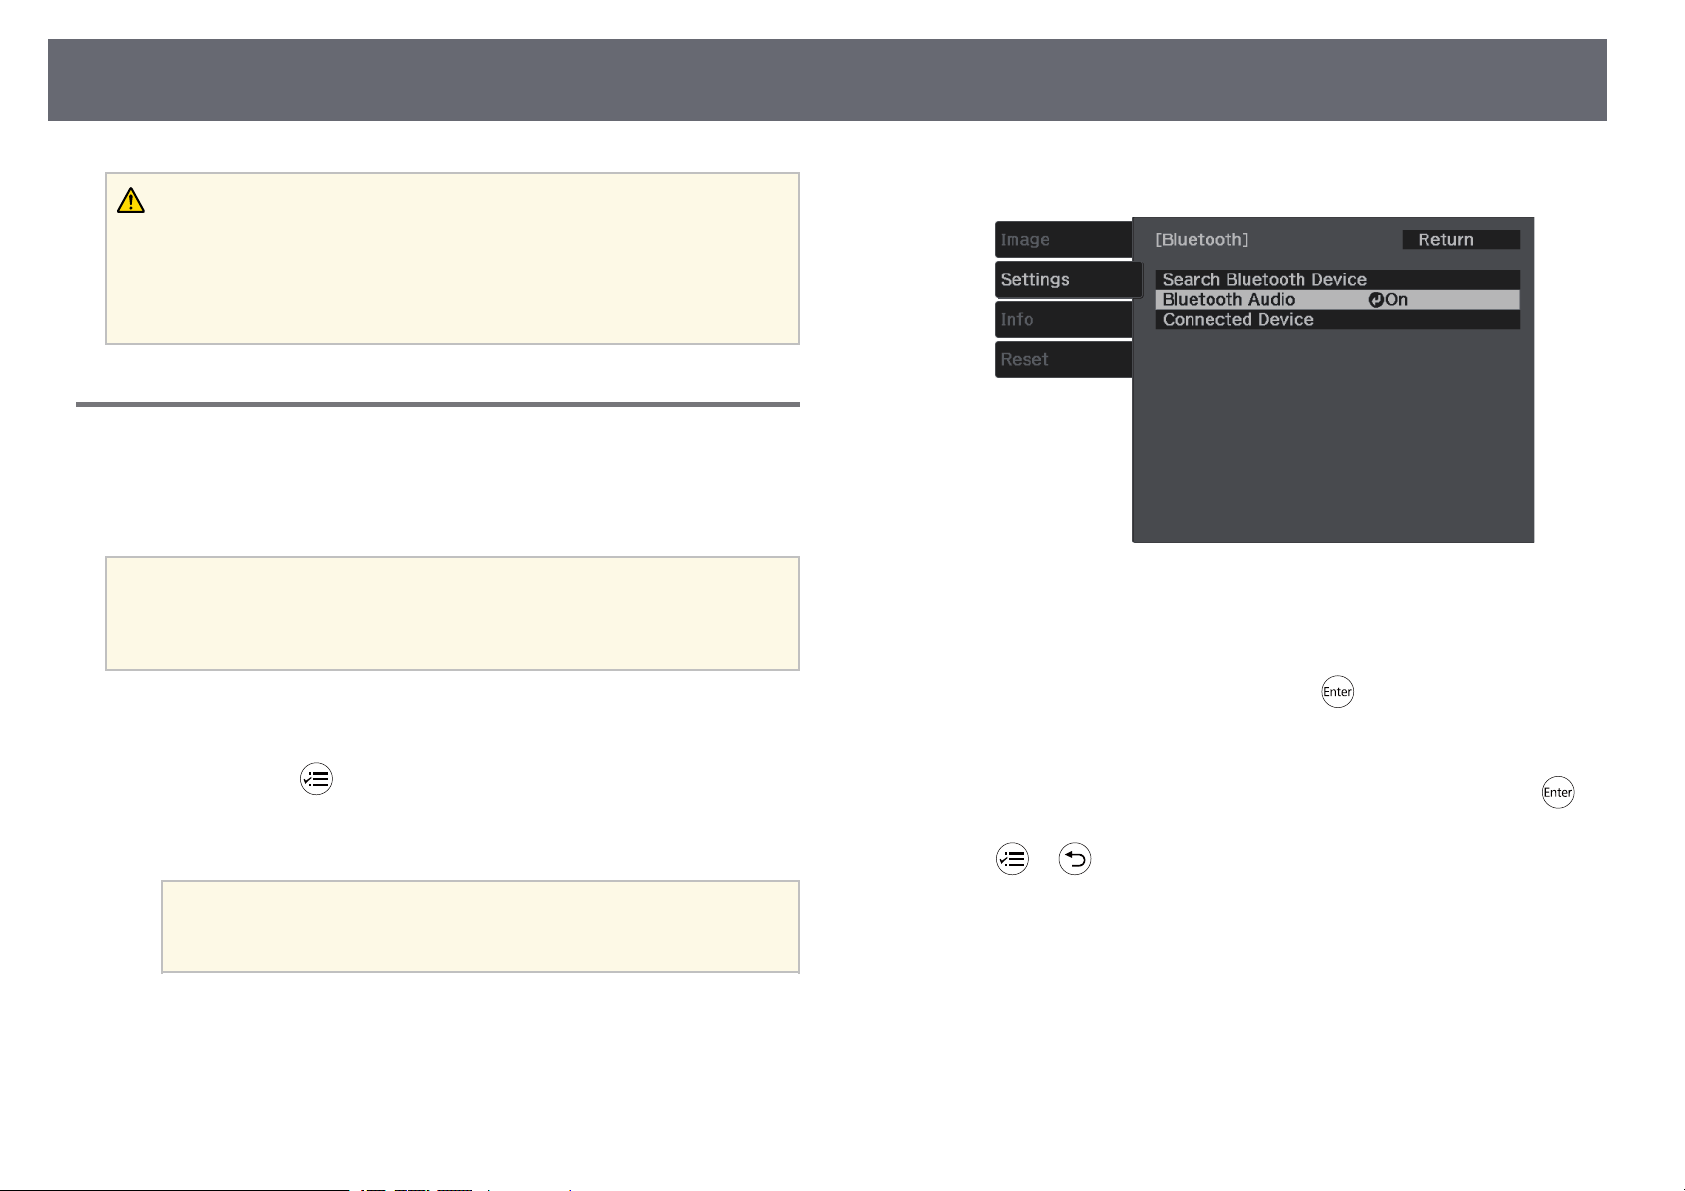
a
Turn on the projector and display an image.
b
Hold down the button on the remote control for about two
seconds.
The Bluetooth screen is displayed.
a
You can also select Bluetooth settings in the projector's Settings
menu.
s Settings > Sound > Bluetooth
c
Select On as the Bluetooth Audio setting.
d
Turn on "pairing mode" on the Bluetooth audio device you want to
connect to. See your Bluetooth audio device manual for details.
e
Select Search Bluetooth Device and press .
A list of available devices is displayed.
f
Select the Bluetooth audio device you want to connect to and press .
g
Press or to exit the menus.
The next time you turn on the projector, the last connected device is
automatically connected to the projector. To change the connected device,
repeat from steps 4.
gg Related Links
• "Bluetooth Specifications" p.23
Projector Connections
23
Bluetooth Specifications
Version Bluetooth Ver. 3.0
Output Class 2
Communication distance Approx. 10 m
Supported profiles A2DP
Content protection SCMS-T
Frequency used 2.4 GHz band (2.402 to 2.480 GHz)
Supported codecs SBC, Qualcomm
®
aptX
™
audio
Warning
Do not use the device near any medical equipment or equipment that is
automatically controlled, such as automatic doors or fire alarms. Electromagnetic
interference from the device may cause such equipment to malfunction and cause
an accident.
a
• Connect a Bluetooth device that supports copyright protection
(SCMS-T).
• You may not be able to connect depending on the standard and type
of device.
• Even when connecting within the specified communication distance,
connections can be lost due to the status of the signal.
• The communication method for Bluetooth uses the same frequency
(2.4 GHz) as wireless LAN (IEEE802.11b/g) or microwave ovens.
Therefore, if these devices are used at the same time, radio wave
interference may occur, the audio may be interrupted, or
communication may not be possible. If you do need to use these
devices at the same time, make sure there is enough distance between
them and the Bluetooth device.
• You cannot connect multiple Bluetooth devices to the projector at
the same time.
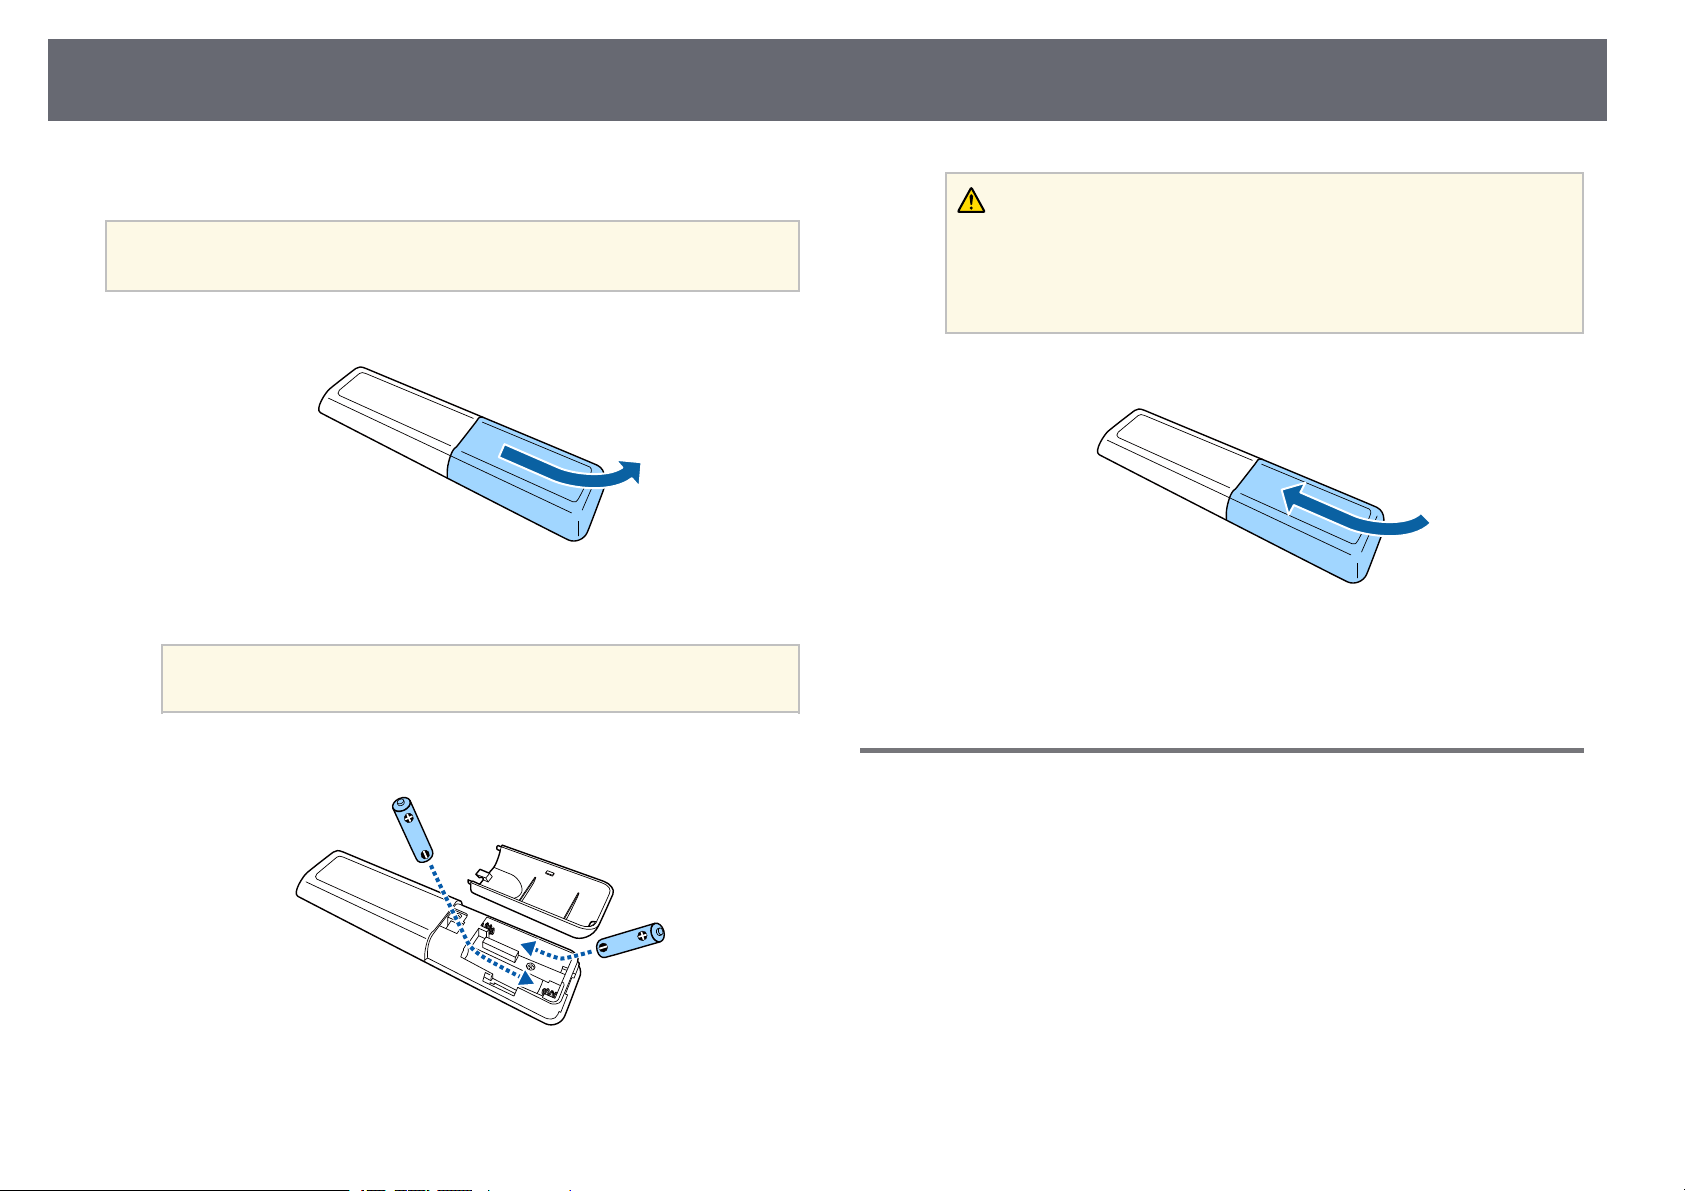
Installing Batteries in the Remote Control
24
The remote control uses the two AAA batteries that came with the projector.
Attention
Make sure you read the Safety Instructions before handling the batteries.
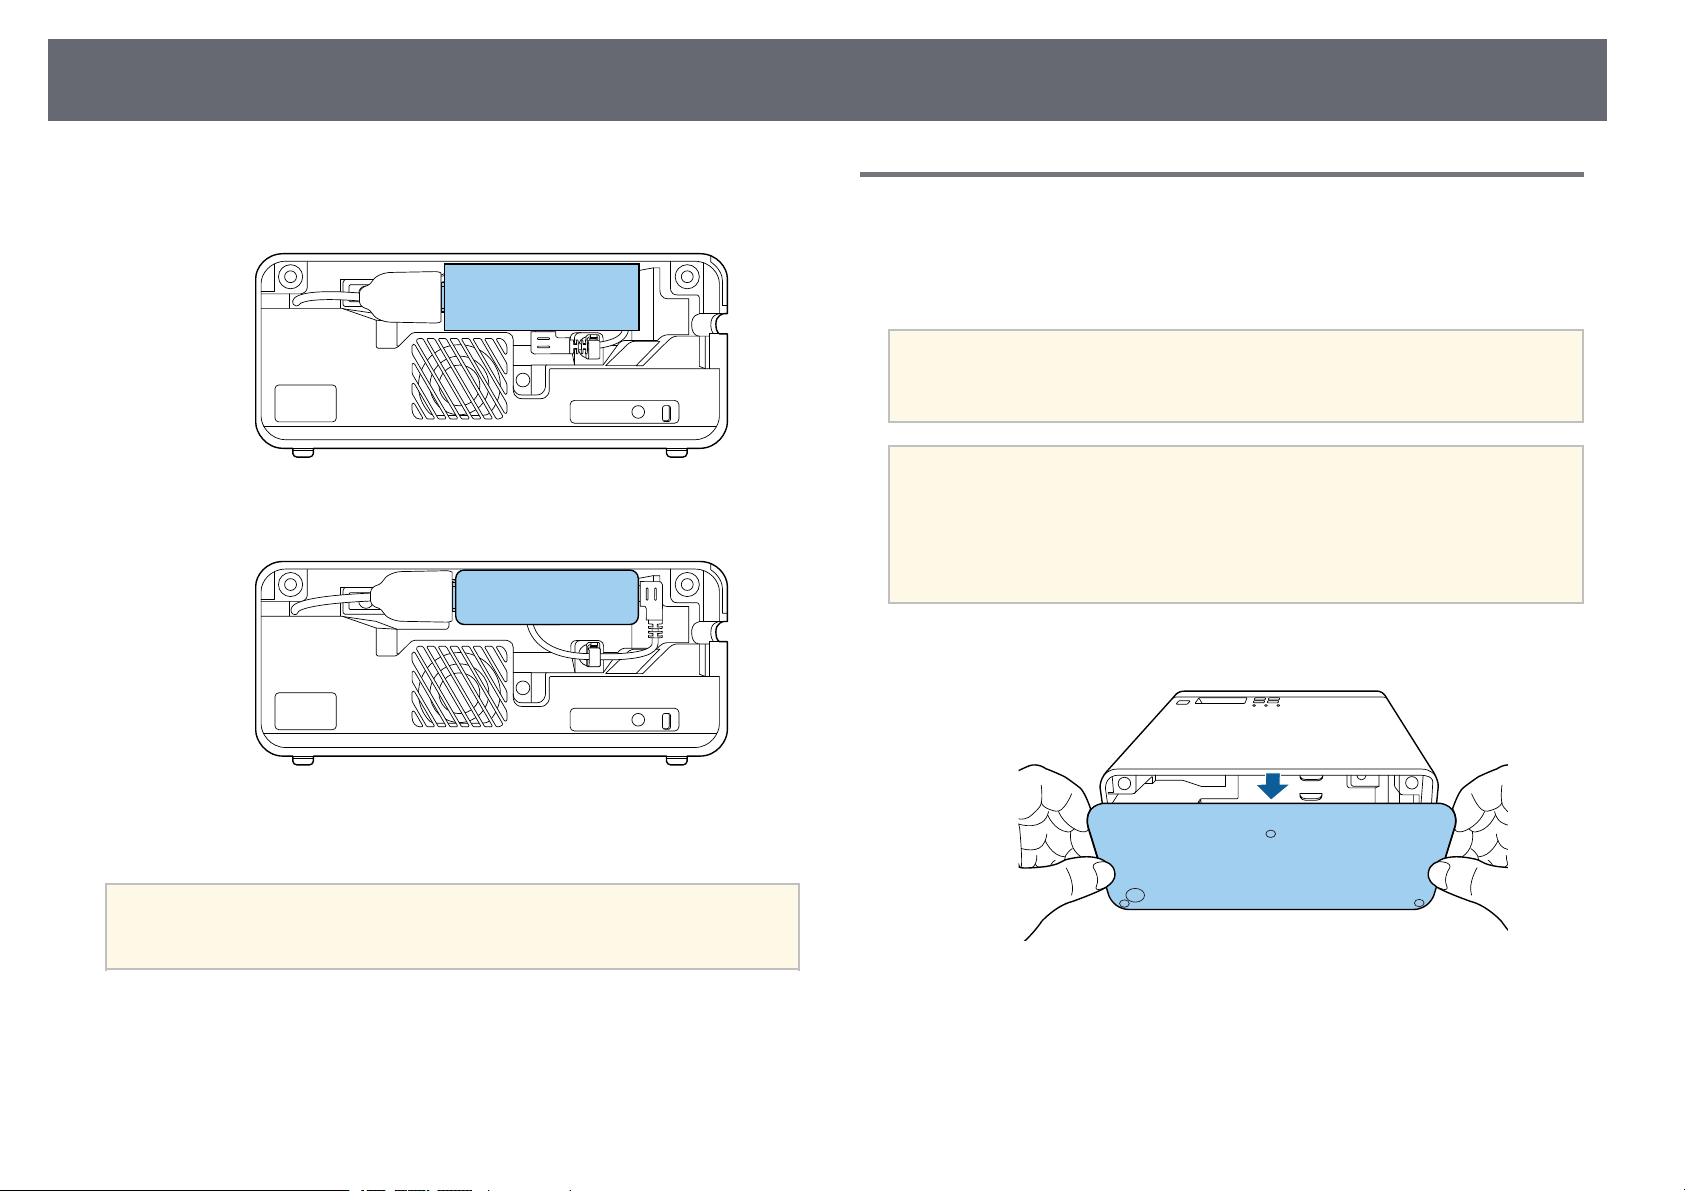
a
Remove the battery cover as shown.
b
Remove the old batteries, if necessary.
a
Dispose of used batteries according to local regulations.
c
Insert the batteries with the + and – ends facing as shown.
Warning
Check the positions of the (+) and (–) marks inside the battery holder to
ensure the batteries are inserted the correct way. If the batteries are not used
correctly, they could explode or leak causing a fire, injury, or damage to the
product.
d
Replace the battery cover and press it down until it clicks into place.
gg Related Links
• "Remote Control Operation" p.24
Remote Control Operation
The remote control lets you control the projector from almost anywhere in
the room.
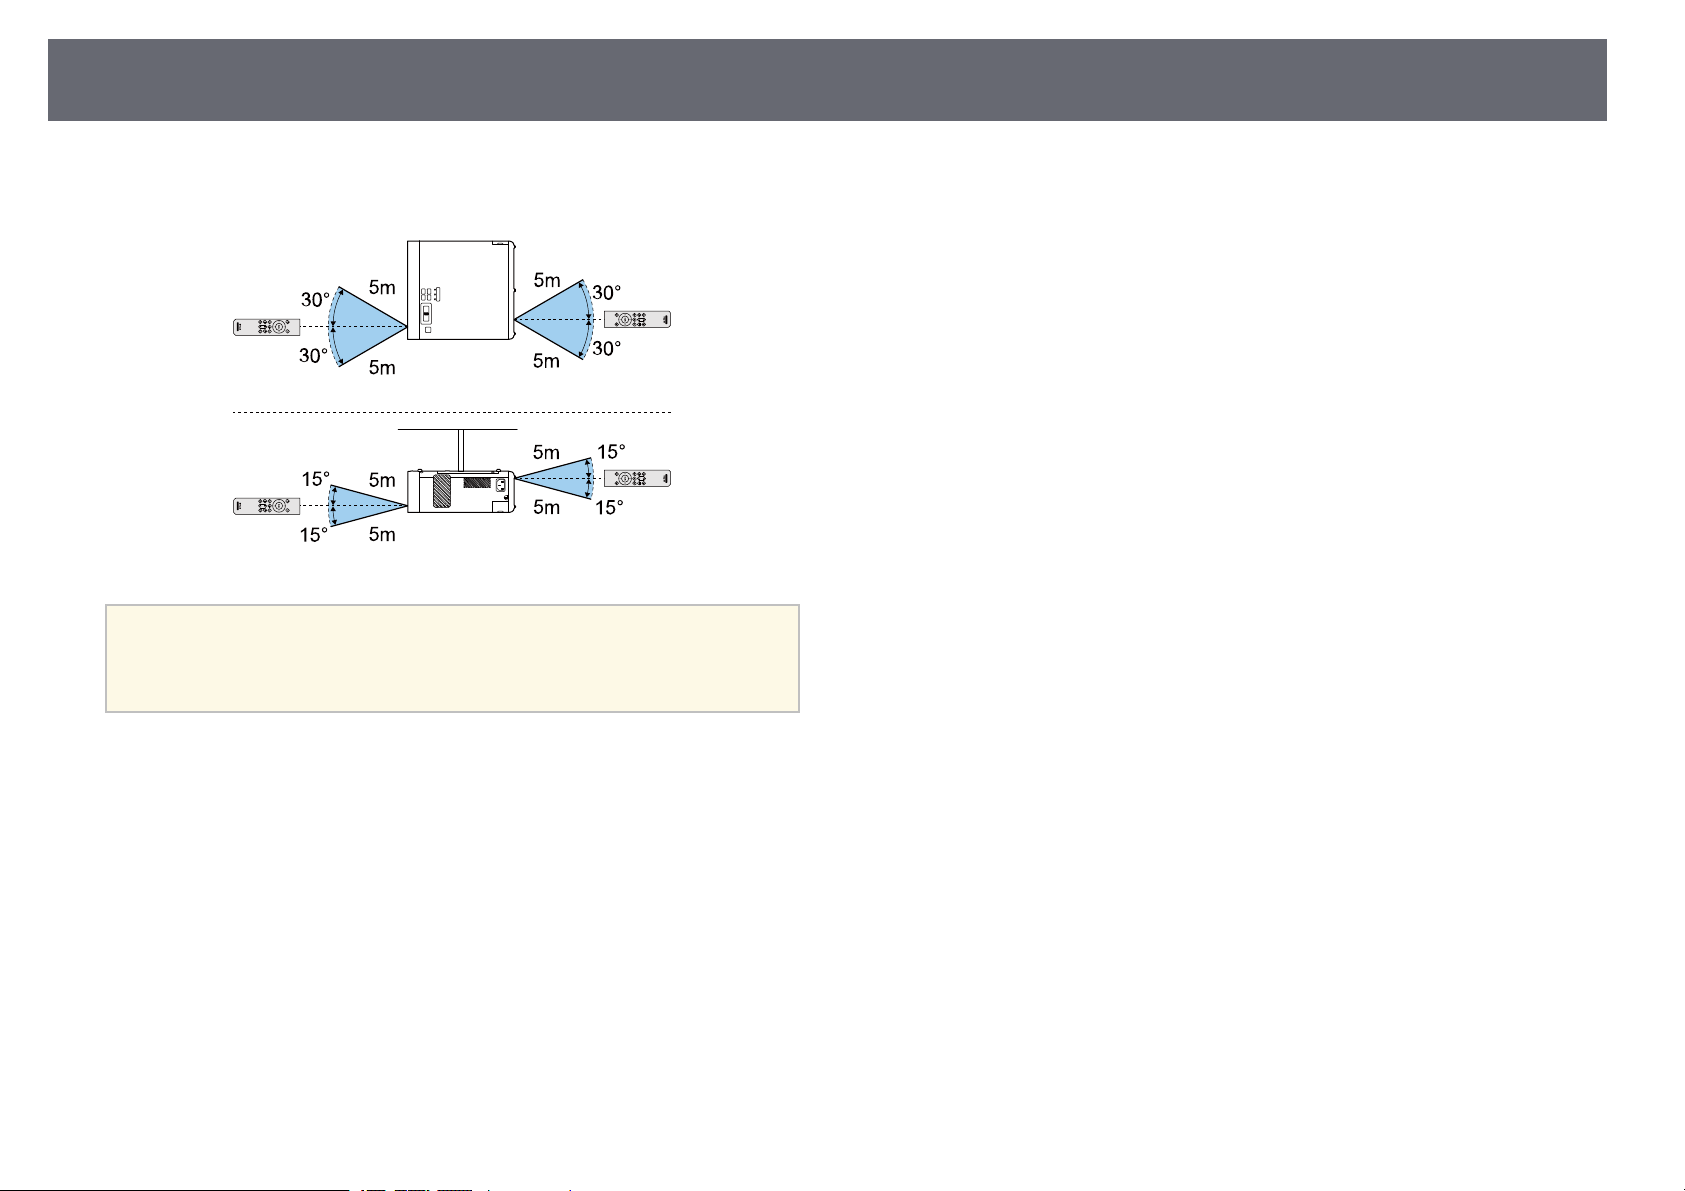
Installing Batteries in the Remote Control
25
Make sure that you aim the remote control at the projector's receivers within
the distance and angles listed here.
a
Avoid using the remote control in conditions with bright fluorescent
lights or in direct sunlight, or the projector may not respond to
commands. If you are not going to use the remote control for a long
time, remove the batteries.

Using Basic Projector Features
Follow the instructions in these sections to use your projector's basic features.
gg Related Links
• "Turning On the Projector" p.27
• "Turning Off the Projector" p.28
• "Selecting the Language for the Projector Menus" p.29
• "Projection Modes" p.30
• "Adjusting the Image Height" p.31
• "Image Shape" p.32
• "Focusing the Image Using the Focus Lever" p.36
• "Resizing the Image with Zoom" p.37
• "Image Aspect Ratio" p.38
• "Adjusting Image Quality (Color Mode)" p.40
• "Adjusting the Sharpness" p.42
• "Adjusting the Image Color" p.43
• "Adjusting the Light Source Brightness" p.47
• "Saving Settings to Memory and Using Saved Settings" p.48
• "Controlling the Volume with the Volume Buttons" p.49
• "Changing the Sound Mode" p.50
Turning On the Projector
27
Turn on the streaming media player or video equipment you want to use after
you turn on the projector.
a
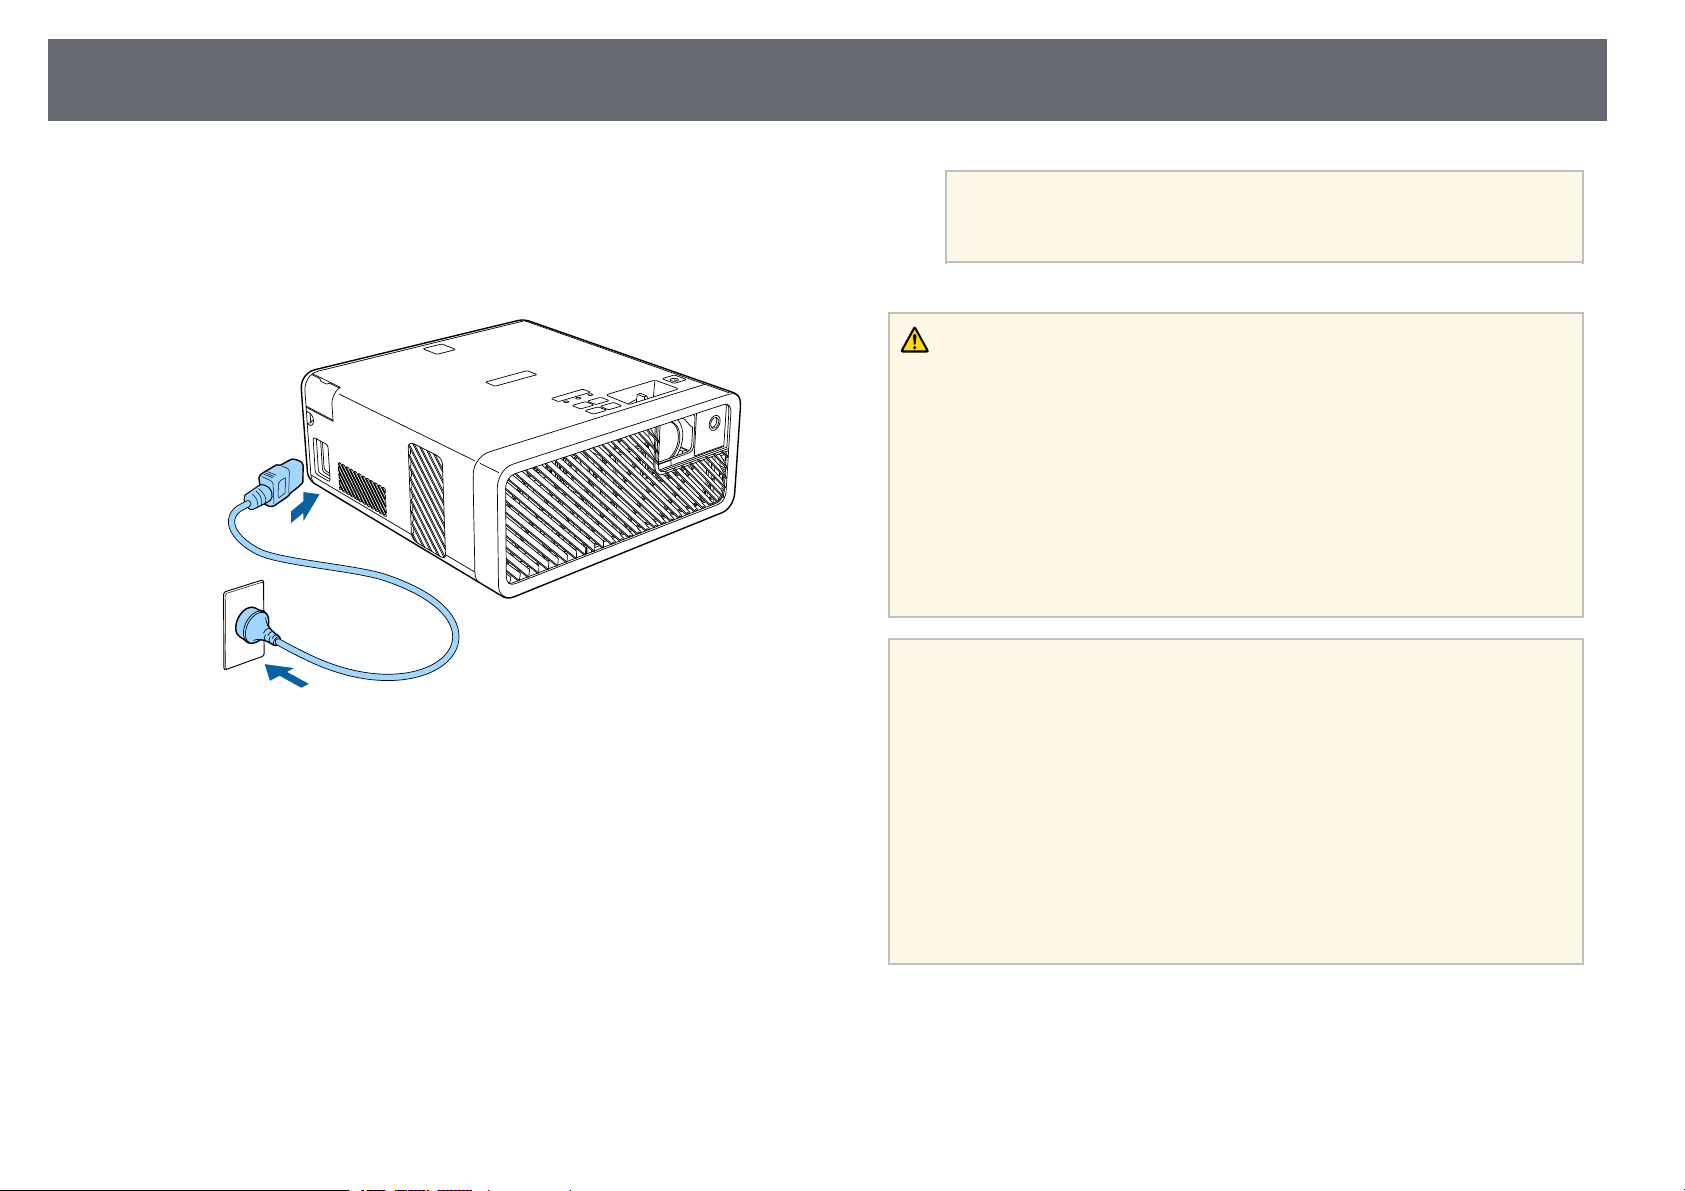
Connect the power cord to the projector's power inlet and plug it into
an electrical outlet.
The projector's power indicator turns blue. This indicates that the
projector is receiving power, but is not yet turned on (it is in standby
mode).
b
Press the power button on the control panel or remote control to turn
on the projector.
The status indicator flashes blue as the projector warms up. Once the
projector is warmed up, the status indicator stops flashing and turns
blue.
The first time you turn on the projector, the Welcome Guide screen is
displayed. The Welcome Guide shows product features and tips on
how to use the projector.
a
If you want to display the Welcome Guide screen again, select
Welcome Guide in the projector's Settings menu.
s Settings > Display > Welcome Guide
Warning
• Never look into the projector lens when the light source is on. This can damage
your eyes and is especially dangerous for children.
• When turning on the projector at a distance using the remote control, make sure
there is no one looking into the lens.
• During projection, do not block the light from the projector with a book or other
objects. If the light from the projector is blocked, the area on which the light
shines becomes hot which could cause it to melt, burn, or start a fire. Also, the
lens may get hot due to the reflected light which could cause the projector to
malfunction. To stop projection, use the A/V Mute function, or turn off the
projector.
a
• When the Direct Power On setting is set to On in the projector's
Settings menu, the projector turns on as soon as you plug it in. Note
that the projector also turns on automatically in cases such as
recovering from a power outage.
s Settings > Operation > Direct Power On
• This projector provides a Child Lock function to prevent children
from accidentally turning the power on and a Control Panel Lock
function to prevent accidental operations and so on.
s Settings > Operation > Child Lock
s Settings > Operation > Control Panel Lock
• When using at an altitude of 1500 m or more, set High Altitude
Mode to On.
s Settings > Installation > High Altitude Mode
gg Related Links
• "Projector Feature Settings - Settings Menu" p.61
Turning Off the Projector
28
Turn off the projector after use.
a
• Turn off this product when it is not in use to prolong the life of the
projector. Light source life varies depending on the environmental
conditions and usage. Brightness decreases over time.
a
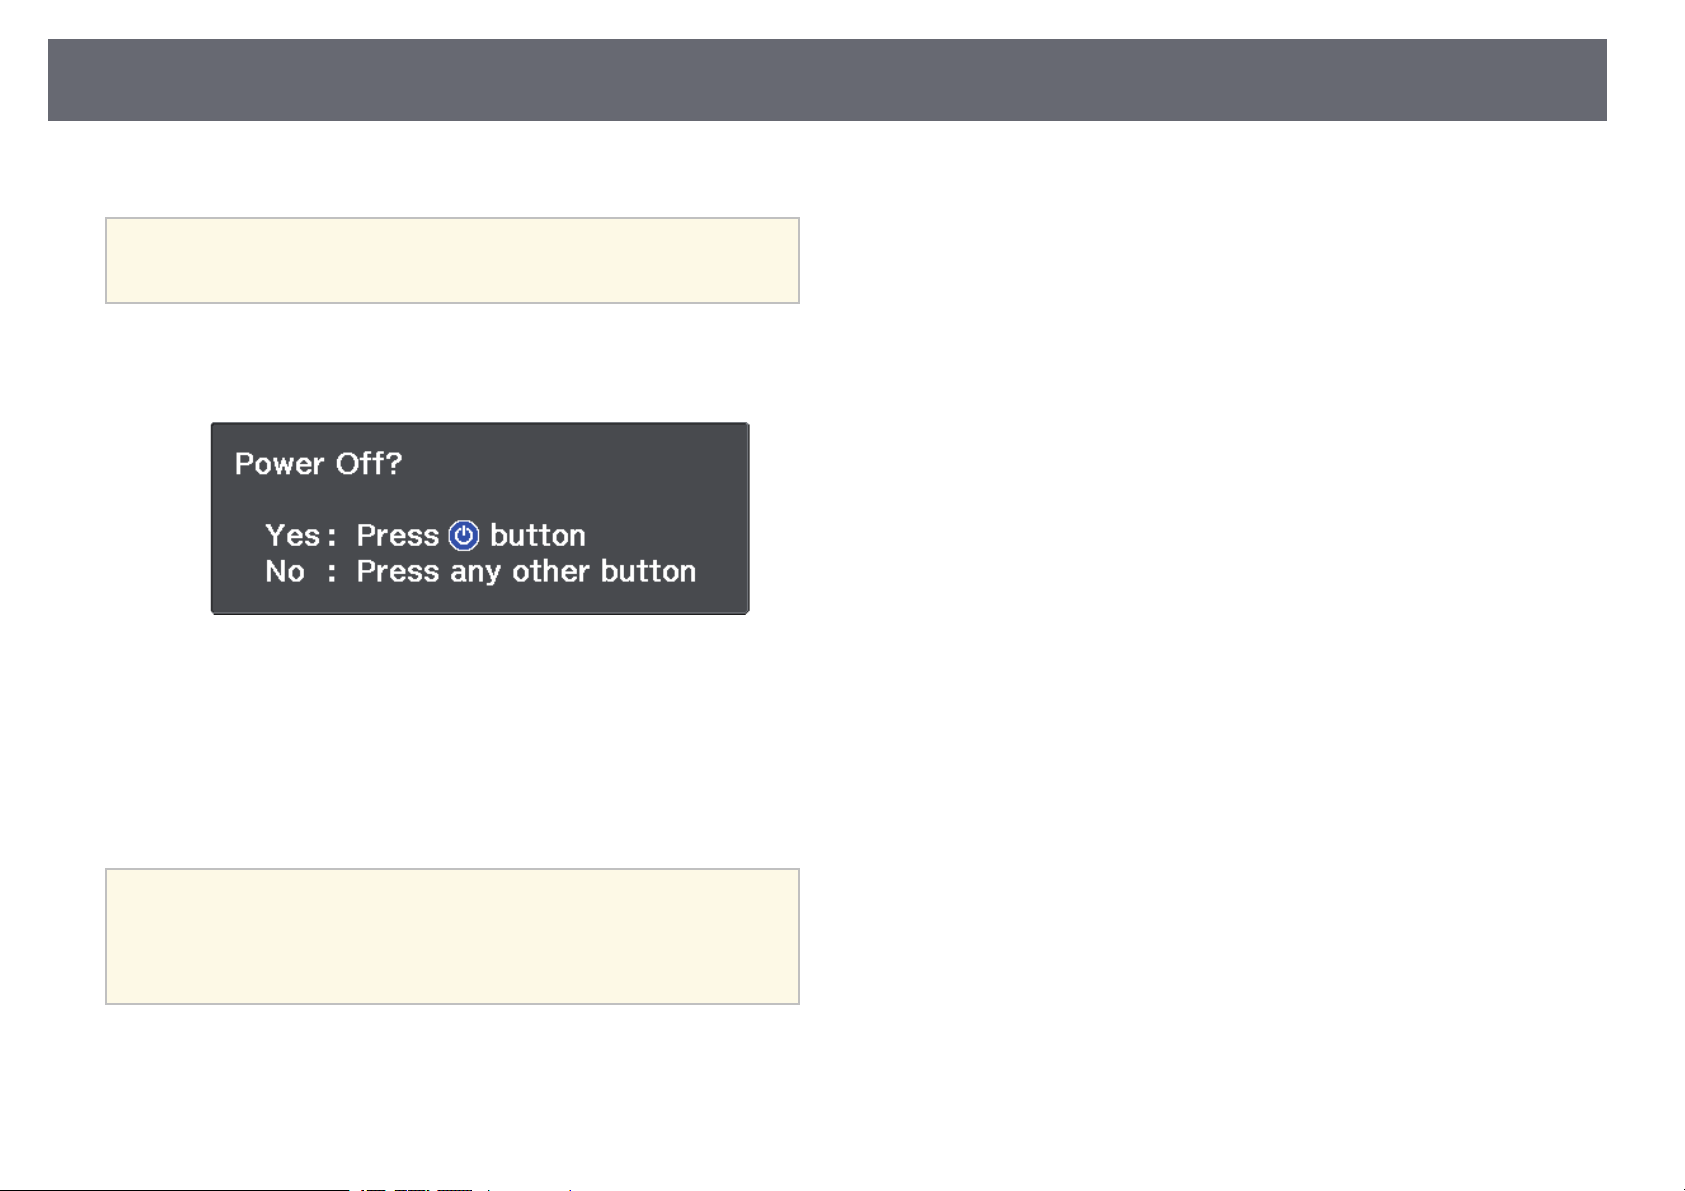
Press the power button on the control panel or remote control.
The projector displays a shutdown confirmation screen.
b
Press the power button again. (To leave it on, press any other button.)
The light source turns off, and the status indicator turns off.
c
To transport or store the projector, make sure the power indicator is
blue (but not flashing) and the status indicator is off, then unplug the
power cord.
a
You can keep supplying power to the streaming media player even if
the projector is in standby mode by selecting On as the USB Power in
Standby setting. This lets the device start earlier, or perform updates
automatically over a network if necessary.
s Settings > Operation > USB Power in Standby
gg Related Links
• "Projector Feature Settings - Settings Menu" p.61
Selecting the Language for the Projector Menus
29
If you want to view the projector's menus and messages in another language,
you can change the Language setting.
a
Turn on the projector.
b
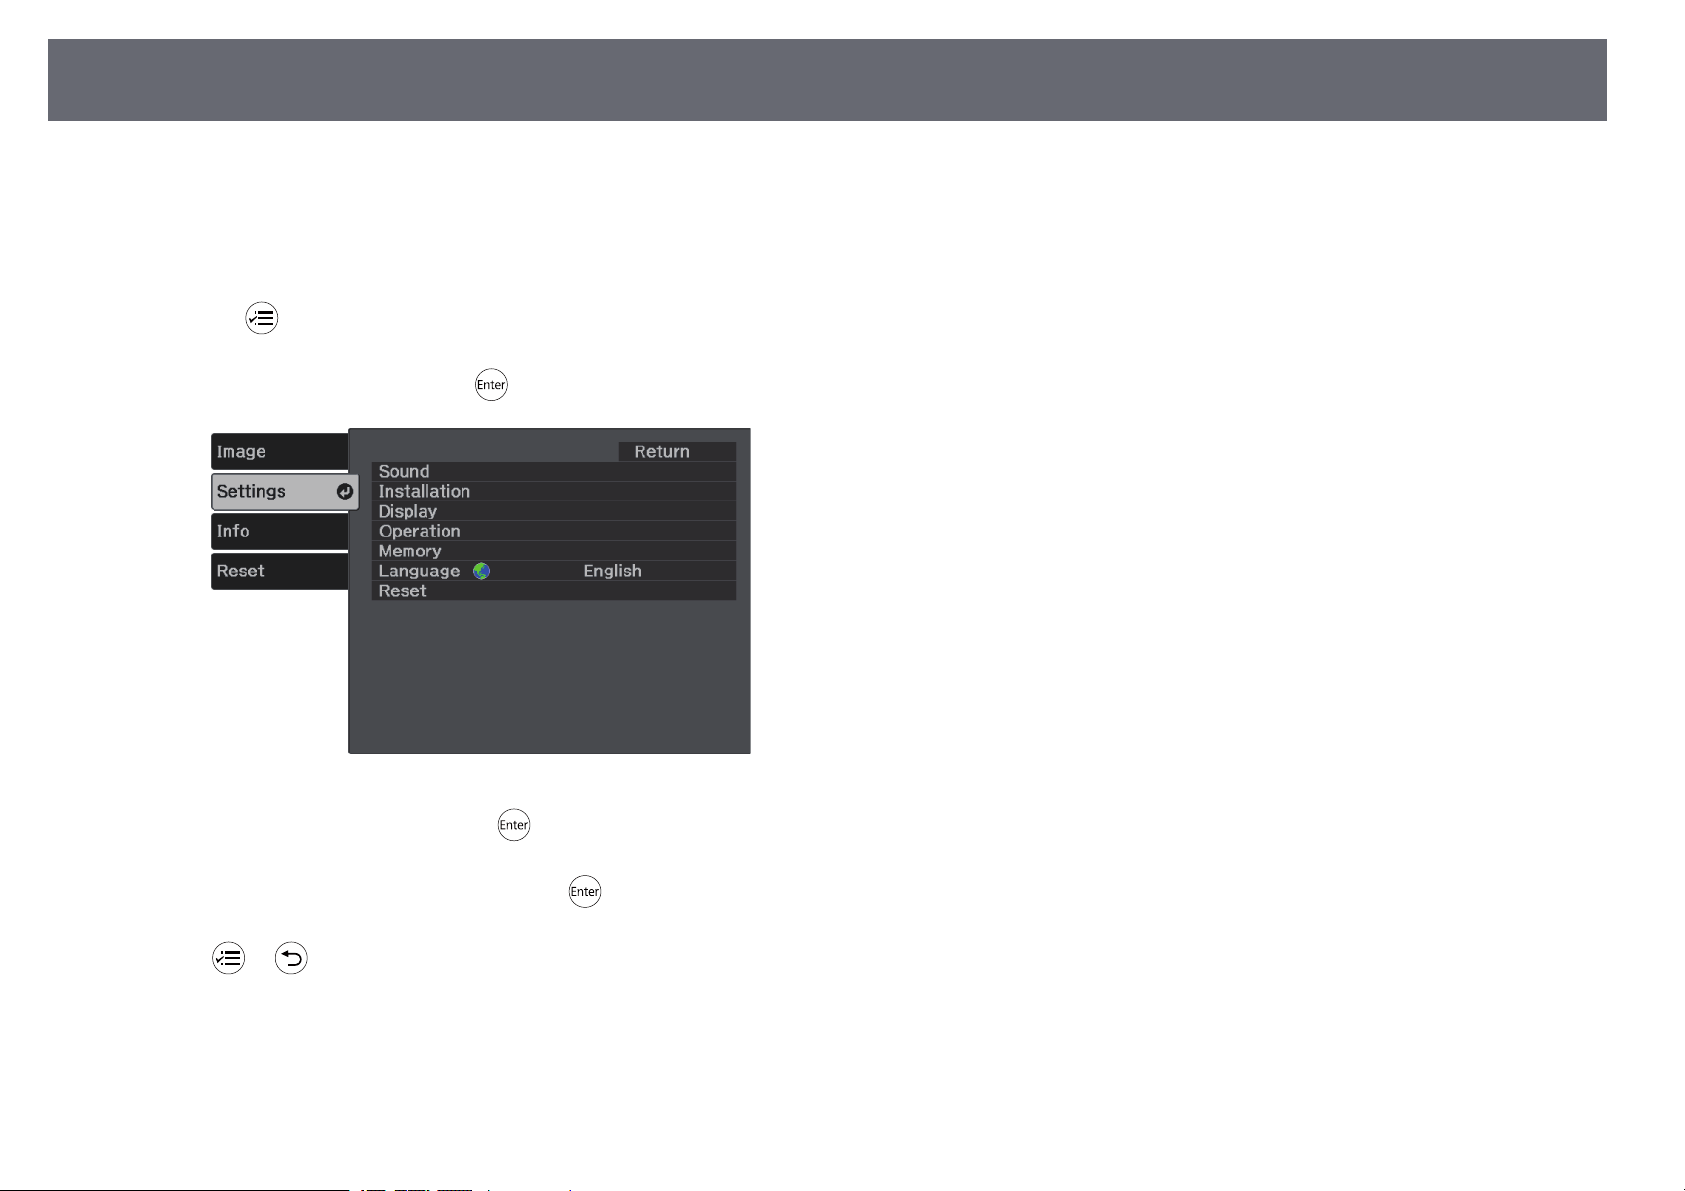
Press the button on the remote control.
c
Select the Settings menu and press .
d
Select the Language setting and press .
e
Select the language you want to use and press .
f
Press or to exit the menus.
Projection Modes
30
Depending on how you positioned the projector, you may need to change the
projection mode so your images project correctly.
• Front (default setting) lets you project from a table in front of the screen.
• Front/Upside Down flips the image over top-to-bottom to project upside-
down from a ceiling or wall mount.
• Rear flips the image horizontally to project from behind a translucent
screen.
• Rear/Upside Down flips the image over top-to-bottom and horizontally to
project from a ceiling or wall mount and behind a translucent screen.
gg Related Links
• "Changing the Projection Mode Using the Menus" p.30
• "Projector Setup and Installation Options" p.16
Changing the Projection Mode Using the Menus
You can change the projection mode to flip the image over top-to-bottom
and/or left-to-right using the projector menus.
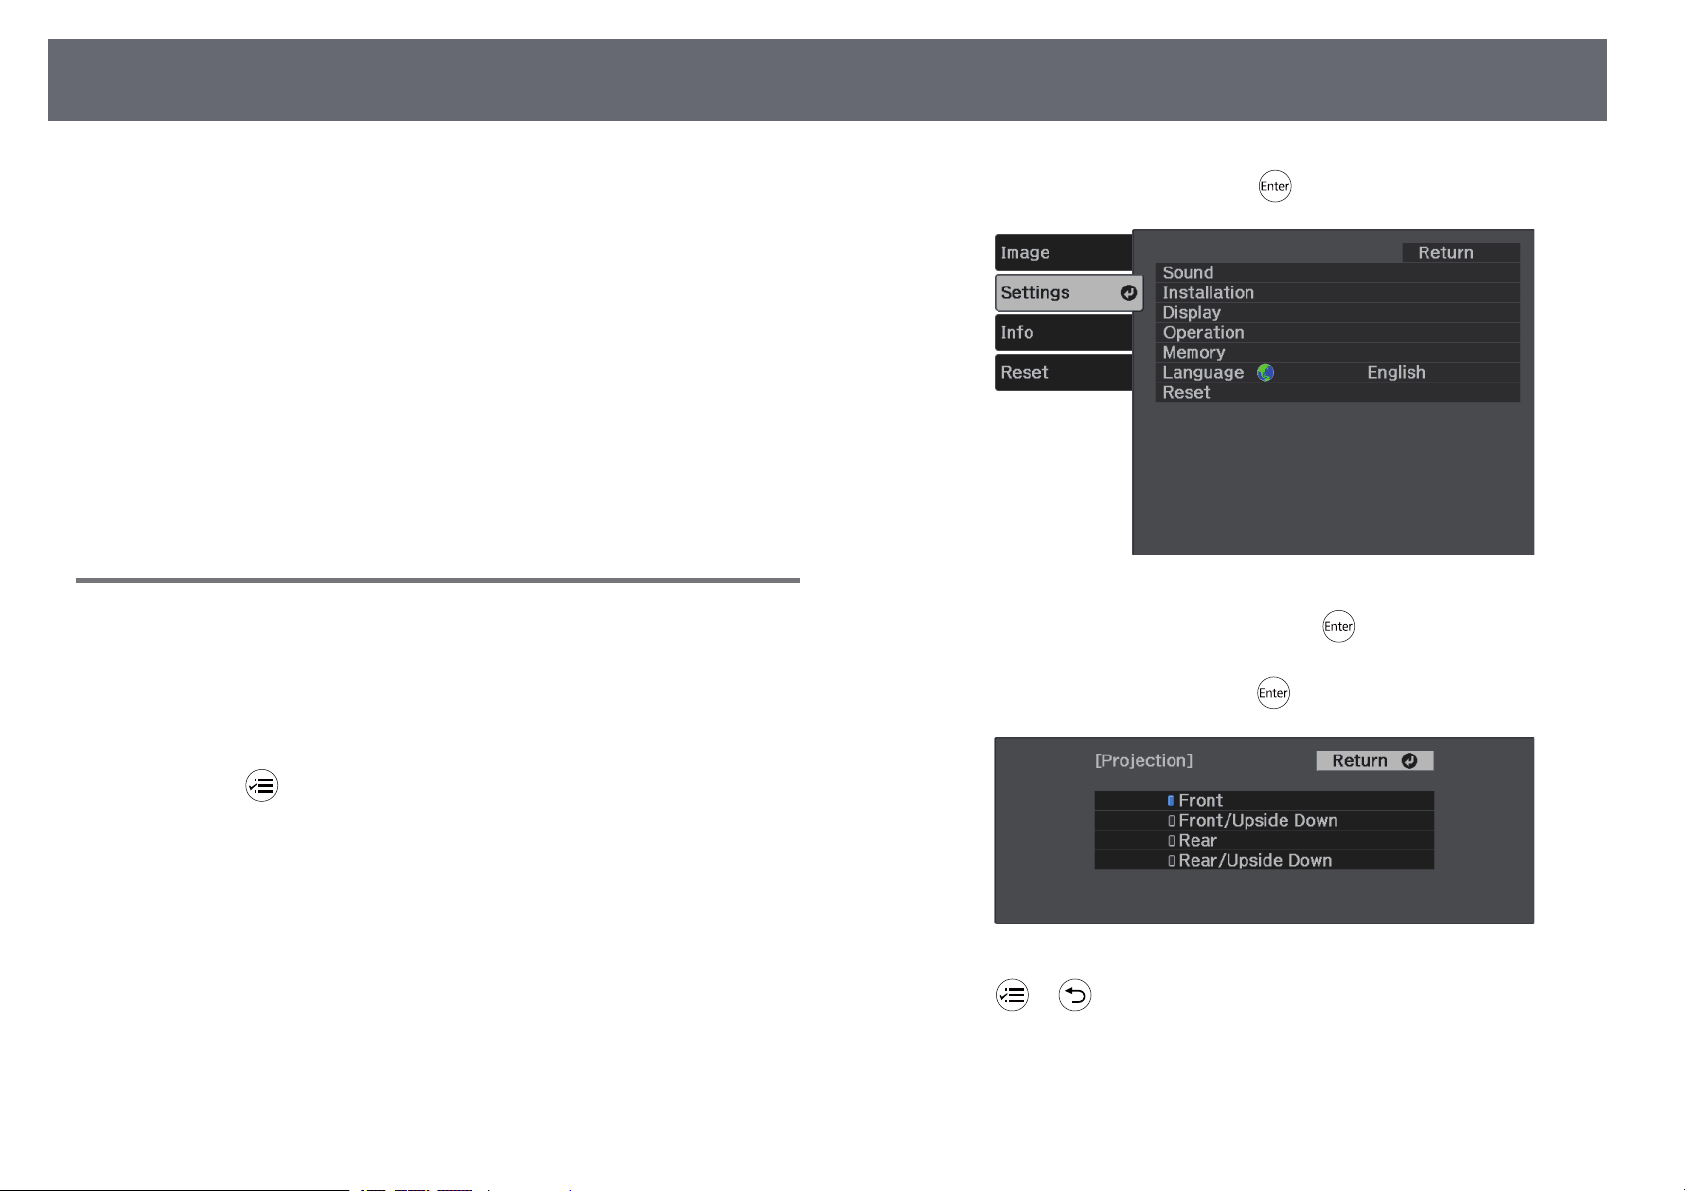
a
Turn on the projector and display an image.
b
Press the button on the remote control.
c
Select the Settings menu and press .
d
Select Installation > Projection and press .
e
Select a projection mode and press .
f
Press or to exit the menus.
Loading...