


 Loading...
TM-P60
Technical Reference guide
EPSON |
English |
Rev. D |
405018203

TM-P60 Technical Reference Guide
CAUTIONS
This document shall apply only to the product(s) identified herein.
No part of this document may be reproduced, stored in a retrieval system, or transmitted in any form or by any means, electronic, mechanical, photocopying, recording, or otherwise, without the prior written permission of Seiko Epson Corporation.
The contents of this document are subject to change without notice. Please contact us for the latest information.
While every precaution has been taken in the preparation of this document, Seiko Epson Corporation assumes no responsibility for errors or omissions.
Neither is any liability assumed for damages resulting from the use of the information contained herein.
Neither Seiko Epson Corporation nor its affiliates shall be liable to the purchaser of this product or third parties for damages, losses, costs, or expenses incurred by the purchaser or third parties as a result of: accident, misuse, or abuse of this product or unauthorized modifications, repairs, or alterations to this product, or (excluding the U.S.) failure to strictly comply with Seiko Epson Corporation's operating and maintenance instructions.
Seiko Epson Corporation shall not be liable against any damages or problems arising from the use of any options or any consumable products other than those designated as Original EPSON Products or EPSON Approved Products by Seiko Epson Corporation.
TRADEMARKS
EPSON® and ESC/POS® are registered trademarks of Seiko Epson Corporation.
Microsoft® Windows® and Windows NT® are registered trademarks of Microsoft Corporation.
General Notice: Other product and company names used herein are for identification purposes only and may be trademarks of their respective companies.
ESC/POS® Proprietary Command System
EPSON took the initiative by introducing ESC/POS, a proprietary POS printer command system including patented commands and enabling versatile POS system construction with high scalability. Compatible with all types of EPSON POS printers and displays, this proprietary control system also offers the flexibility to easily make future upgrades. Its popularity is worldwide.
Rev. D |
i |

The influence on the environment of radio wave radiation
The Radio Frequency module that can be installed in this product radiates the same high frequency energy as some other high frequency devices but the level of the energy radiated from it is suppressed so that it is much lower than the electromagnetic energy radiated from radio equipment like cell phones.
Under some situations and in certain environments, the use of this equipment is sometimes limited by the owner of the building or a representative with responsibility for the group. For example, it may be restricted in the following case:
• Use in an environment where it may cause interference with other devices and services.
If you do not understand the radio device usage policy in a specific group or environment, such as an airport, ask permission before turning on the power of this product.
Note about interference
The Radio Frequency module that can be installed in this product generates, uses, and can radiate radio frequency energy and, if not installed and used in accordance with the instruction manual, may cause harmful interference to radio communications.
If this equipment does cause harmful interference to radio or television reception, which can be determined by turning the equipment off and on, the user is encouraged to try to correct the interference by one or more of the following measures:
•Reorient or relocate the receiving antenna.
•Increase the separation between the equipment and receiver.
•Connect the equipment into an outlet on a circuit different from that to which the receiver is connected.
•Consult your dealer or an experienced radio/TV technician for help.
Never disassemble or modify this product or the installed Radio Frequency module.
Seiko Epson Corporation shall not be liable for interference to radio/TV resulting from changes or modifications to this product or the installed Radio Frequency module not expressly approved by Seiko Epson Corporation.
Other radio equipment sometimes uses the same frequency band that this unit uses. To prevent radio wave interference with other radio equipment, pay attention to the following matters when you use this product:
•The Radio Frequency module that can be installed in this product uses the Industrial Scientific and Medical band (2.4 GHz), DS-SS modulation, and the interference distance is 40 m.
ii |
Rev. D |

TM-P60 Technical Reference Guide
•Other equipment that uses the same frequency band used by the Radio Frequency module that can be installed in this product includes equipment for industry, science and medical treatment, microwave ovens, HomeRF, and radio and other broadcasting equipment (both ones that require a license and ones that do not require a license).
•Confirm that radio and other broadcasting equipment are not used nearby before using this product.
•When trouble occurs, for example, if the Radio Frequency module causes problems such as radio wave interference, consult your dealer.
Note about security
This section describes security concerns when using a wireless LAN by using the Radio Frequency module that can be installed in this product. Please also see “Wireless LAN Security” in Appendix F.
Security is important for the protection of the user’s privacy
A wireless LAN has the advantage that information can be exchanged by using radio waves instead of a cable. However, radio waves are not confined to a cable and can be received in a fairly wide area and through obstacles such as walls, so if security is not used, the following problems may occur.
Communication data can be received by stealth.
A third person can receive private communication data by intercepting the radio waves intentionally. Such a person could receive items such as the following:
•Personal information, such a an ID and password or credit card number
•The contents of e-mail.
•Data which is communicated between the PC and printer.
Illegal access
A third person can access the network and cause damage such as the following:
•Personal information and secret information can be removed.
•Invalid information can be sent as if it were from a legitimate user of the network.
•Intercepted communication contents can be re-written and sent.
•Data and the system can be destroyed by an electronic virus.
This product, the wireless LAN card, and the access point have security mechanisms to counter these problems. If you use the security settings for this product, you can nearly eliminate these problems.
In some cases, the wireless LAN equipment is not set up before it is sold to the user. Therefore, to attempt to prevent security problems, always use all the security settings for the wireless LAN equipment according to the manual.
Rev. D |
iii |

The security functions, however, cannot guarantee 100% security. Please understand this when you use this product.
When you cannot set the security by yourself, please ask your dealer.
Seiko Epson Corporation suggests that the security setting is set by the judgment and the responsibility of user after understanding the possible problems resulting from using this product without the security settings.
For details, see “Wireless LAN Security” in Appendix F.
Revision Information
Revision |
Page |
Altered Items and Contents |
|
|
|
Rev. A |
All pages |
Newly authorized |
|
|
|
|
pp. vii-viii |
EMC and Safety Standards Applied for Europe added. |
|
|
RF Module Standards for Europe added. |
|
p. 1-2 |
Standard parts included with the printer: AC adapter (included |
|
|
only with some models) added. |
Rev. B |
p. 1-3 |
Description of the OT-ST60 (shoulder strap) added. |
|
Installing/replacing roll paper vertically added. |
|
|
p. 2-6 |
|
|
p. 4-2 |
The web address of “epson.pos.com” added. |
|
D-5 |
WEB addresses added. |
|
Appendix F |
Wireless LAN Network Composition added. |
|
|
|
Rev. C |
All pages |
Type of RF module changed. |
|
|
|
Rev. D |
pp. vii,ix-x |
EMC and Safety Standards Applied for Oceania added. |
|
RF Module Standards for Oceania added. |
|
|
|
|
|
|
|
About This Manual
Aim of the Manual
This manual was created to provide information on the TM-P60 printer for anyone who is developing hardware, installations, or programs. Programmers will also want to consult other documents.
Contents of the Manual
Chapter 1, “General Information.” |
General description of features plus |
|
specifications. |
Chapter 2, “Setup.” |
Contains introduction of control methods and |
|
each connection form. |
Chapter 3, “Troubleshooting.” |
Contains troubleshooting information |
iv |
Rev. D |

|
TM-P60 Technical Reference Guide |
Chapter 4, “Application Development |
Contains information on such matters as DIP |
Information.” |
switches, memory switches, error processing for |
|
using TM-P60 |
Appendix A, “The Difference Between |
Comparison between TM-P60 and |
TM-P60 and TM-T88II/III.” |
TM-T88II/III. |
Appendix B, “Wireless LAN Setup |
User’s Manual for TM Net Win Config |
Detailed Information.” |
|
Appendix C, “Character Code Tables.” |
Contains the supported character tables. |
Appendix D, “System Planning.” |
This section provides information for system |
|
planning. |
Appendix E, “FAQ.” |
This section provides frequently asked |
|
questions. |
Appendix F, “Wireless LAN Security.” |
Describes detailed security information. |
Rev. D |
v |

Related Software and Documents
Related software and documents
Software/document name |
Description |
|
|
TM-P60 User’s Manual/ |
This provides basic handling procedures for the end user of the |
|
printer |
|
|
TM-P60 Technical Reference Guide |
This Manual |
|
|
ESC/POS Application Programming Guide |
This provides descriptions in Acrobat format of the commands |
|
used by each TM printer, along with sample programs and other |
|
information about the printers |
|
|
Command Comparison between the TM- |
This provides detailed command comparison information among |
T88II/T88III and the TM-P60 |
the printers. |
|
|
EPSON OPOS ADK |
This is a OCX driver |
|
|
EPSON OPOS ADK Manual |
This provides information for anyone who is programming using |
|
OPOS. This is included in the EPSON OPOS ADK |
|
|
EPSON Advanced Printer Driver |
This is a Windows driver |
|
|
EPSON Advanced Printer Driver Manual |
This provides information for anyone who is programming using |
|
the APD (EPSON Advanced Printer Driver) |
|
|
vi |
Rev. D |

TM-P60 Technical Reference Guide
Safety Precautions
EMC and Safety Standards Applied
Product Name: TM-P60
Model Name: M196A
The following standards are applied only to the printers that are so labeled. (EMC is tested using EPSON power supplies.)
North America: EMI: FCC/ICES-003 Class B
|
Safety: UL 60950/CSA C22.2 No. 60950 |
Europe: |
CE Marking |
Oceania: |
AS/NZS 4771, AS/NZS CISPR Class B |
WARNING
The connection of a non-shielded printer interface cable to this printer will invalidate the EMC standards of this device.
You are cautioned that changes or modifications not expressly approved by Seiko Epson Corporation could void your authority to operate the equipment.
FCC Compliance Statement For American Users
This equipment has been tested and found to comply with the limits for a Class B digital device, pursuant to Part 15 of the FCC Rules. These limits are designed to provide reasonable protection against harmful interference in a residential installation.
This equipment generates, uses, and can radiate radio frequency energy and, if not installed and used in accordance with the instruction manual, may cause harmful interference to radio communications.
However, there is no guarantee that interference will not occur in a particular installation. If this equipment does cause harmful interference to radio or television reception, which can be determined by turning the equipment off and on, the user is encouraged to try to correct the interference by one or more of the following measures:
-Reorient or relocate the receiving antenna.
-Increase the separation between the equipment and receiver.
-Connect the equipment into an outlet on a circuit different from that to which the receiver is connected.
-Consult the dealer or an experienced radio/TV technician for help.
For Canadian Users
This Class B digital apparatus complies with Canadian ICES-003.
Rev. D |
vii |

CE Marking
|
DECLARATION of CONFORMITY |
According to ISO/IEC Guide 22 and EN 45014 |
|
Manufacturer: |
SEIKO EPSON CORPORATION |
Address: |
3-5, Owa 3-chome, Suwa-shi, |
|
Nagano-ken 392-8502 JAPAN |
Representative: |
EPSON Engineering Europe S.A. |
Address: |
Parc Technologique Europarc 60, Rue Auguste |
|
Perret 94043 Creteil Cedex France |
Declares that the Product:
Product Name: Printer
Model Name: M196A
Commercial Name: TM-P60
Conforms to the following Directives and Norms
Directive 1999/5/EC
EN 301 481-1
EN 301 489-17
EN 300 328-2
EN 60950
EN 55022 Class B
EN 55024
IEC 61000-4-2
IEC 61000-4-3
IEC 61000-4-4
IEC 61000-4-5
IEC 61000-4-6
IEC 61000-4-11
FCC
DECLARATION of CONFORMITY
According to 47CFR, Part 2 and 15 for Class B Personal Computers and Peripherals; and/or CPU Boards and Power Supplies used with Class B Personal Computers:
We: |
EPSON AMERICA, INC. |
Located at: |
MS 3-13 |
|
3840 Kilroy Airport Way |
|
Long Beach, CA 90806 |
|
Telephone: 562-290-5254 |
Declare under sole responsibility that the product identified herein, complies with 47CFR Part 2 and 15 of the FCC rules as a Class B digital device. Each product marketed, is identical to the representative unit tested and found to be compliant with the standards. Records maintained continue to reflect the equipment being produced can be expected to be within the variation accepted, due to quantity production and testing on a statistical basis as required by 47CFR §2.909 Operation is subject to the following two conditions: (1) this device may not cause harmful interference, and (2) this device must accept any interference received, including interference that may cause undesired operation.
Trade Name: |
EPSON |
Type of Product: |
Printer |
Model: |
M196A |
viii |
Rev. D |
TM-P60 Technical Reference Guide
RF Module
This equipment contains the following wireless module.
Manufacturer: TOYOTA INDUSTRIES CORPORATION
Type: 6180210
Product Name: WIRELESS LAN CF-CARD
This device complies with Part 15 of the FCC Rules and RSS-210 of the IC Rules. Operation is subject to the following two conditions:
(1)this device may not cause harmful interference, and
(2)this device must accept any interference received, including interference that may cause undesired operation.
USA
NOTICE
This device conforms to Part 15 of the FCC rules.
This device has been tested and found to comply with the limits for a Class B digital device, pursuant to Part 15 of the FCC Rules. These limits are designed to provide reasonable protection against harmful interference in a residential installation. This equipment generates, uses, and can radiate radio frequency energy and, if not installed and used in accordance with the instruction manual, may cause harmful interference to radio communications. However, there is no guarantee that interference will not occur in a particular installation. If this equipment does cause harmful interference to radio or television reception, which can be determined by turning the equipment off and on, the user is encouraged to try to correct the interference by one or more of the following measures:
-Reorient or relocate the receiving antenna.
-Increase the separation between the equipment and receiver.
-Connect the equipment into an outlet on a circuit different from that to which the receiver is connected.
-Consult the dealer or an experienced radio/TV technician for help.
This transmitter must not be co-located or operated in conjunction with any other antenna or transmitter.
FCC WARNING
Changes or modifications not expressly approved by the party responsible for compliance could void the user’s authority to operate the equipment.
Canada
This device conforms to IC, Low Power License-Exempt Radio Communication Devices (RSS-210).
The information such as Certification No., Model Name, and Manufacturer Name are described on the surface of the module.
SAR
The available scientific evidence does not show that any health problems are associated with using low power wireless devices. There is no proof, however, that these low power wireless devices are absolutely safe. Low power wireless devices emit low levels of radio frequency energy (RF) in the microwave range while being used. Whereas high levels of RF can produce health effects (by heating tissue), exposure to low-level RF that does not produce heating effects causes no known adverse health effects. Many studies of low-level RF exposures have not found any biological effects. Some studies have suggested that some biological effects might occur, but such findings have not been confirmed by additional research. The TM-P60 has been tested and found to comply with FCC radiation exposure limits set forth for uncontrolled equipment and meets the FCC radio frequency (RF) Exposure Guidelines in Supplement C to OET65. The maximum SAR value tested for the TM-P60 has been shown to be 0.144W/kg at the body.
Rev. D |
ix |

EUROPE
Hereby, TOYOTA INDUSTRIES CORPORATION declares that this 6180210 is in compliance with the essential requirements and other relevant provisions of Directive 1999/5/EC and 89/336/EEC.
France
In France, using the TM-P60 outdoors is prohibited.
Italy
In Italy, if used outside of own premises, general authorization is required.
The TM-P60 can be Used Only in the Countries Listed Below:
Austria, Belgium, Germany, Luxembourg, Netherlands, Switzerland, France, Italy, Greece, Spain, Portugal, Denmark, Finland, Ireland, Sweden, UK, USA, Canada, Czech Republic, Estonia, Hungary, Lithuania, Latvia, Poland, Slovenia, Slovak Republic, Norway, Australia, and New Zealand.
x |
Rev. D |

TM-P60 Technical Reference Guide
Key to Symbols
The following symbols are used in the documentation for this product. See the specific warnings and cautions at appropriate points throughout this guide.
 WARNING:
Warnings must be followed carefully to avoid serious bodily injury.
 CAUTION:
Cautions must be observed to avoid minor injury to yourself or damage to your equipment.
 Note:
Note:
Notes have important information and useful tips on the operation of your printer.
Safety Precautions
This section presents important information to ensure safe and effective use of this product. Please read this section carefully and store it in an accessible location.
 WARNING:
Shut down your equipment immediately if it produces smoke, a strange odor, or unusual noise. Continued use may lead to fire or electric shock. Immediately unplug the equipment and contact your dealer or a Seiko Epson service center for advice.
Never attempt to repair this product yourself. Improper repair work can be dangerous.
Never disassemble or modify this product. Tampering with this product may result in injury, fire, or electric shock.
Be sure to use the specified power source. Connection to an improper power source may cause fire or shock.
Never insert or disconnect the power plug with wet hands. Doing so may result in severe shock.
Do not allow foreign matter to fall into the equipment. Penetration of foreign objects may lead to fire or shock.
If water or other liquid spills into this equipment, unplug the power cord immediately, and then contact your dealer or a Seiko Epson service center for advice. Continued usage may lead to fire or shock.
Rev. D |
xi |

Do not place multiple loads on the power outlet (wall outlet). Overloading the outlet may lead to fire.
Always supply power directly from a standard domestic power outlet.
Handle the power cord with care. Improper handling may lead to fire or shock.
•Do not modify or attempt to repair the cord.
•Do not place any object on top of the cord.
•Avoid excessive bending, twisting, and pulling.
•Do not place cord near heating equipment.
•Check that the plug is clean before plugging it in.
•Be sure to push the prongs all the way in.
If the cord becomes damaged, obtain a replacement from your dealer or a Seiko Epson service center.
 CAUTION:
Do not connect cables other than as described in this manual. Different connections may cause equipment damage and burning.
Be sure to set this equipment on a firm, stable, horizontal surface. Product may break or cause injury if it falls.
Do not use in locations subject to high humidity or dust levels.
Excessive humidity and dust may cause equipment damage, fire, or shock.
Do not place heavy objects on top of this product. Never stand or lean on this product. Equipment may fall or collapse, causing breakage and possible injury.
To ensure safety, please unplug this product prior to leaving it unused for an extended period.
Do not touch the thermal print head. Wait for the head to cool. The head can be very hot after printing for a long time. Touching them may cause burns.
xii |
Rev. D |

TM-P60 Technical Reference Guide
Contents
Chapter 1 General Information
Features . . . . . . . . . . . . . . . . . . . . . . . . . . . . . . . . . . . . . . . . . . . . . . . . . . . . . . . . 1
General . . . . . . . . . . . . . . . . . . . . . . . . . . . . . . . . . . . . . . . . . . . . . . . . . . . . 1
Printer handling . . . . . . . . . . . . . . . . . . . . . . . . . . . . . . . . . . . . . . . . . . . . . . 1
Printing . . . . . . . . . . . . . . . . . . . . . . . . . . . . . . . . . . . . . . . . . . . . . . . . . . . . . 1
Software . . . . . . . . . . . . . . . . . . . . . . . . . . . . . . . . . . . . . . . . . . . . . . . . . . . . 1
Product Structure . . . . . . . . . . . . . . . . . . . . . . . . . . . . . . . . . . . . . . . . . . . . . . . . 2
Standard Parts Included with the Printer . . . . . . . . . . . . . . . . . . . . . . . . . 2
Related materials for TM-P60 . . . . . . . . . . . . . . . . . . . . . . . . . . . . . . . . . . . 3
Consumables . . . . . . . . . . . . . . . . . . . . . . . . . . . . . . . . . . . . . . . . . . . . . . . . . . . 3
Roll paper . . . . . . . . . . . . . . . . . . . . . . . . . . . . . . . . . . . . . . . . . . . . . . . . . . 3
Product Specifications Overview . . . . . . . . . . . . . . . . . . . . . . . . . . . . . . . . . . . 4
Chapter 2 Setup |
|
Part Name and Basic Operation . . . . . . . . . . . . . . . . . . . . . . . . . . . . . . . . . . . |
1 |
Part names . . . . . . . . . . . . . . . . . . . . . . . . . . . . . . . . . . . . . . . . . . . . . . . . . |
1 |
Control Panel . . . . . . . . . . . . . . . . . . . . . . . . . . . . . . . . . . . . . . . . . . . . . . . |
1 |
LED . . . . . . . . . . . . . . . . . . . . . . . . . . . . . . . . . . . . . . . . . . . . . . . . . . . . . |
2 |
Control Panel Buttons . . . . . . . . . . . . . . . . . . . . . . . . . . . . . . . . . . . . . . |
2 |
Beeper Function . . . . . . . . . . . . . . . . . . . . . . . . . . . . . . . . . . . . . . . . . . . . . |
3 |
Setup Flow . . . . . . . . . . . . . . . . . . . . . . . . . . . . . . . . . . . . . . . . . . . . . . . . . . . . . . |
4 |
Installing/Replacing the Roll Paper . . . . . . . . . . . . . . . . . . . . . . . . . . . . . . . . . |
6 |
Installing or Replacing Roll Paper Vertically . . . . . . . . . . . . . . . . . . . . . . |
6 |
Providing power to the printer . . . . . . . . . . . . . . . . . . . . . . . . . . . . . . . . . . . . . |
8 |
Provide power from the battery . . . . . . . . . . . . . . . . . . . . . . . . . . . . . . . . |
8 |
Installing the battery . . . . . . . . . . . . . . . . . . . . . . . . . . . . . . . . . . . . . . . |
8 |
Charging the battery . . . . . . . . . . . . . . . . . . . . . . . . . . . . . . . . . . . . . . |
9 |
Providing power from the AC adapter unit . . . . . . . . . . . . . . . . . . . . . . . |
9 |
Connecting the AC adapter . . . . . . . . . . . . . . . . . . . . . . . . . . . . . . . |
9 |
Adjusting Various Settings . . . . . . . . . . . . . . . . . . . . . . . . . . . . . . . . . . . . . . . . . |
10 |
How to Confirm Current Settings . . . . . . . . . . . . . . . . . . . . . . . . . . . . . . . |
10 |
DIP switch . . . . . . . . . . . . . . . . . . . . . . . . . . . . . . . . . . . . . . . . . . . . . . . . . . . |
10 |
Memory Switches . . . . . . . . . . . . . . . . . . . . . . . . . . . . . . . . . . . . . . . . . . . . |
11 |
Adjusting Roll paper width . . . . . . . . . . . . . . . . . . . . . . . . . . . . . . . . . . . . . |
13 |
Installing your wireless LAN . . . . . . . . . . . . . . . . . . . . . . . . . . . . . . . . . . . . . . . . |
14 |
Preparing a host PC for setting up a printer . . . . . . . . . . . . . . . . . . . . . . |
15 |
Confirming the current LAN setting of the printer . . . . . . . . . . . . . . . . . . |
15 |
Adjusting the host PC to the printer’s LAN setting . . . . . . . . . . . . . . . . . |
16 |
Connecting a serial interface cable . . . . . . . . . . . . . . . . . . . . . . . . . . . . |
16 |
Confirming the connection between the host PC and printer . . . . . . . |
17 |
When you use the Utility (TMNetWinConfig) to set up |
|
the connection . . . . . . . . . . . . . . . . . . . . . . . . . . . . . . . . . . . . . . . . . . . |
18 |
When you use a browser for setup . . . . . . . . . . . . . . . . . . . . . . . . . . . |
19 |
Adjusting the printer LAN setting for your wireless LAN . . . . . . . . . . . . . |
20 |
When you use the utility (TMNetWinConfig) to set up . . . . . . . . . . . |
20 |
When you use a browser for setup . . . . . . . . . . . . . . . . . . . . . . . . . . . |
23 |
Confirm the connection between your LAN and printer . . . . . . . . . . . |
25 |
Install a Printer Driver in the Host PC / POS Terminal . . . . . . . . . . . . . . . . . . . |
25 |
OPOS . . . . . . . . . . . . . . . . . . . . . . . . . . . . . . . . . . . . . . . . . . . . . . . . . . . . . . |
25 |
Installing and setting up . . . . . . . . . . . . . . . . . . . . . . . . . . . . . . . . . . . . |
25 |
Package contents of EPSON OPOS ADK . . . . . . . . . . . . . . . . . . . . . . |
28 |
Advanced Printer Driver (APD) . . . . . . . . . . . . . . . . . . . . . . . . . . . . . . . . . |
29 |
Rev. D |
xiii |

Installing and Setting Up . . . . . . . . . . . . . . . . . . . . . . . . . . . . . . . . . . . 29
Chapter 3 Troubleshooting
LED Blinking Pattern . . . . . . . . . . . . . . . . . . . . . . . . . . . . . . . . . . . . . . . . . . . . . . 1 Error Types . . . . . . . . . . . . . . . . . . . . . . . . . . . . . . . . . . . . . . . . . . . . . . . . . . 1 Printer Beeps . . . . . . . . . . . . . . . . . . . . . . . . . . . . . . . . . . . . . . . . . . . . . . . . . . . . 2 Beeping Types . . . . . . . . . . . . . . . . . . . . . . . . . . . . . . . . . . . . . . . . . . . . . . . 2 Printer Beeps When the Power is Turned on . . . . . . . . . . . . . . . . . . . . . . . . . . 2 Paper Jam . . . . . . . . . . . . . . . . . . . . . . . . . . . . . . . . . . . . . . . . . . . . . . . . . . . . . 2 To Confirm the Current Setting of the Printer . . . . . . . . . . . . . . . . . . . . . . . . . 3 Self test mode . . . . . . . . . . . . . . . . . . . . . . . . . . . . . . . . . . . . . . . . . . . . . . . 3 Status sheet printing . . . . . . . . . . . . . . . . . . . . . . . . . . . . . . . . . . . . . . . . . . 4 Radio Field Intensity Check Mode . . . . . . . . . . . . . . . . . . . . . . . . . . . . . . . . . . 5 Resetting the printer . . . . . . . . . . . . . . . . . . . . . . . . . . . . . . . . . . . . . . . . . . 6 Hexadecimal Dump Mode . . . . . . . . . . . . . . . . . . . . . . . . . . . . . . . . . . . . . . . 6
Chapter 4 Application Development Information |
|
About wireless communication . . . . . . . . . . . . . . . . . . . . . . . . . . . . . . . . . . . . |
1 |
For Application developing . . . . . . . . . . . . . . . . . . . . . . . . . . . . . . . . . . . |
1 |
For Radio field intensity . . . . . . . . . . . . . . . . . . . . . . . . . . . . . . . . . . . . . . . |
1 |
Operation tested Access point products . . . . . . . . . . . . . . . . . . . . . . . . |
2 |
About the Battery Remaining Amount . . . . . . . . . . . . . . . . . . . . . . . . . . . . . . |
2 |
The battery remaining amount . . . . . . . . . . . . . . . . . . . . . . . . . . . . . . . . . |
2 |
The method to confirm the battery status . . . . . . . . . . . . . . . . . . . . . . . |
2 |
OPOS . . . . . . . . . . . . . . . . . . . . . . . . . . . . . . . . . . . . . . . . . . . . . . . . . . . |
3 |
Advanced Printer Driver . . . . . . . . . . . . . . . . . . . . . . . . . . . . . . . . . . . |
3 |
ESC/POS command . . . . . . . . . . . . . . . . . . . . . . . . . . . . . . . . . . . . . . . |
3 |
Power Management function . . . . . . . . . . . . . . . . . . . . . . . . . . . . . . . . . |
3 |
Beeper function . . . . . . . . . . . . . . . . . . . . . . . . . . . . . . . . . . . . . . . . . . . . . . . . . |
3 |
OPOS . . . . . . . . . . . . . . . . . . . . . . . . . . . . . . . . . . . . . . . . . . . . . . . . . . . . . . |
3 |
Advanced Printer Driver . . . . . . . . . . . . . . . . . . . . . . . . . . . . . . . . . . . . . . |
4 |
ESC/POS command . . . . . . . . . . . . . . . . . . . . . . . . . . . . . . . . . . . . . . . . . . |
4 |
Various Status Categories . . . . . . . . . . . . . . . . . . . . . . . . . . . . . . . . . . . . . . . . . |
4 |
Printer Status on APD . . . . . . . . . . . . . . . . . . . . . . . . . . . . . . . . . . . . . . . . . |
5 |
OPOS . . . . . . . . . . . . . . . . . . . . . . . . . . . . . . . . . . . . . . . . . . . . . . . . . . . . . . |
5 |
Checking the printer state . . . . . . . . . . . . . . . . . . . . . . . . . . . . . . . . . |
5 |
Printer Errors and Status . . . . . . . . . . . . . . . . . . . . . . . . . . . . . . . . . . . . |
6 |
ESC/POS commands . . . . . . . . . . . . . . . . . . . . . . . . . . . . . . . . . . . . . . |
7 |
NV memory . . . . . . . . . . . . . . . . . . . . . . . . . . . . . . . . . . . . . . . . . . . . . . . . . . . . |
7 |
NV Graphics Printing . . . . . . . . . . . . . . . . . . . . . . . . . . . . . . . . . . . . . . . . . . . . . |
8 |
Advanced Printer Driver . . . . . . . . . . . . . . . . . . . . . . . . . . . . . . . . . . . . . . |
8 |
How to print “NV Graphics“ . . . . . . . . . . . . . . . . . . . . . . . . . . . . . . . . |
8 |
Printable bitmap format in APD . . . . . . . . . . . . . . . . . . . . . . . . . . . . . |
8 |
OPOS . . . . . . . . . . . . . . . . . . . . . . . . . . . . . . . . . . . . . . . . . . . . . . . . . . . . . . |
9 |
Printing method . . . . . . . . . . . . . . . . . . . . . . . . . . . . . . . . . . . . . . . . . . |
9 |
LetterQuality . . . . . . . . . . . . . . . . . . . . . . . . . . . . . . . . . . . . . . . . . . . . . |
9 |
Setting of printing position by escape sequence . . . . . . . . . . . . . . |
9 |
Printable bitmap format in OPOS . . . . . . . . . . . . . . . . . . . . . . . . . . . . |
10 |
ESC/POS command . . . . . . . . . . . . . . . . . . . . . . . . . . . . . . . . . . . . . . . . . . |
10 |
Tips for Visual Basic . . . . . . . . . . . . . . . . . . . . . . . . . . . . . . . . . . . . . . . . . . . |
10 |
Appendix A The Difference Between TM-P60 and TM-T88II/III
Can TM-P60 print with TM-T88II/III printer driver? . . . . . . . . . . . . . . . . . . . . . . 1 Can TM-P60 send back status to host PC the same as TM-T88II/III? . . . . . . 1
xiv |
Rev. D |

TM-P60 Technical Reference Guide
Appendix B Wireless LAN Setup Detailed Information
Setting the TCP/IP protocol in Your Operating System . . . . . . . . . . . . . . . . . 1 Windows 2000 . . . . . . . . . . . . . . . . . . . . . . . . . . . . . . . . . . . . . . . . . . . . . . . 1 Windows XP . . . . . . . . . . . . . . . . . . . . . . . . . . . . . . . . . . . . . . . . . . . . . . . . . 2 TMNetWinConfig . . . . . . . . . . . . . . . . . . . . . . . . . . . . . . . . . . . . . . . . . . . . . . . . 4 Install . . . . . . . . . . . . . . . . . . . . . . . . . . . . . . . . . . . . . . . . . . . . . . . . . . . . . . . 4 Installation Environments . . . . . . . . . . . . . . . . . . . . . . . . . . . . . . . . . . . 4 Windows 2000 . . . . . . . . . . . . . . . . . . . . . . . . . . . . . . . . . . . . . . . . . . . . 4 Windows XP . . . . . . . . . . . . . . . . . . . . . . . . . . . . . . . . . . . . . . . . . . . . . . 6 Operating . . . . . . . . . . . . . . . . . . . . . . . . . . . . . . . . . . . . . . . . . . . . . . . . . . 9 IP Address Setting . . . . . . . . . . . . . . . . . . . . . . . . . . . . . . . . . . . . . . . . . 9
Functions . . . . . . . . . . . . . . . . . . . . . . . . . . . . . . . . . . . . . . . . . . . . . . . . . . . 14 Menu Bar . . . . . . . . . . . . . . . . . . . . . . . . . . . . . . . . . . . . . . . . . . . . . . . . 15 Settings . . . . . . . . . . . . . . . . . . . . . . . . . . . . . . . . . . . . . . . . . . . . . . . . . . . . . 20 password . . . . . . . . . . . . . . . . . . . . . . . . . . . . . . . . . . . . . . . . . . . . . . . . 28 Setting Using a Web Browser . . . . . . . . . . . . . . . . . . . . . . . . . . . . . . . . . . . . . . 28 Operation . . . . . . . . . . . . . . . . . . . . . . . . . . . . . . . . . . . . . . . . . . . . . . . . . . 28 Function . . . . . . . . . . . . . . . . . . . . . . . . . . . . . . . . . . . . . . . . . . . . . . . . . . . . 31 Information . . . . . . . . . . . . . . . . . . . . . . . . . . . . . . . . . . . . . . . . . . . . . . 31 Configuration . . . . . . . . . . . . . . . . . . . . . . . . . . . . . . . . . . . . . . . . . . . . 34
Appendix C Character Code Tables
Page 0 (PC437: USA, Standard Europe) . . . . . . . . . . . . . . . . . . . . . . . . . . . . . 1
Page 1 (Katakana) . . . . . . . . . . . . . . . . . . . . . . . . . . . . . . . . . . . . . . . . . . . . . . 2
Page 2 (PC850: Multilingual) . . . . . . . . . . . . . . . . . . . . . . . . . . . . . . . . . . . . . . . 3
Page 3 (PC860: Portuguese) . . . . . . . . . . . . . . . . . . . . . . . . . . . . . . . . . . . . . . . 4
Page 4 (PC863: Canadian-French) . . . . . . . . . . . . . . . . . . . . . . . . . . . . . . . . . 5
Page 5 (PC865: Nordic) . . . . . . . . . . . . . . . . . . . . . . . . . . . . . . . . . . . . . . . . . . . 6
Page 16 (WPC1252) . . . . . . . . . . . . . . . . . . . . . . . . . . . . . . . . . . . . . . . . . . . . . . 7
Page 17 (PC866: Cyrillic #2) . . . . . . . . . . . . . . . . . . . . . . . . . . . . . . . . . . . . . . . 8
Page 18 (PC852: Latin2) . . . . . . . . . . . . . . . . . . . . . . . . . . . . . . . . . . . . . . . . . . 9
Page 19 (PC858: Euro) . . . . . . . . . . . . . . . . . . . . . . . . . . . . . . . . . . . . . . . . . . . . 10
Page 255 (Blank page) . . . . . . . . . . . . . . . . . . . . . . . . . . . . . . . . . . . . . . . . . . . 11
International Character Sets . . . . . . . . . . . . . . . . . . . . . . . . . . . . . . . . . . . . . . 12
Appendix D System Planning
Control Method . . . . . . . . . . . . . . . . . . . . . . . . . . . . . . . . . . . . . . . . . . . . . . . . . 1
Windows Driver (EPSON Advanced Printer Driver) . . . . . . . . . . . . . . . . . 1
General Features of the EPSON Advanced Printer Driver . . . . . . . . 1
EPSON Advanced Printer Driver Components . . . . . . . . . . . . . . . . . 2
EPSON Advanced Printer Driver Support Environment . . . . . . . . . . 2
EPSON OPOS ADK . . . . . . . . . . . . . . . . . . . . . . . . . . . . . . . . . . . . . . . . . . . . 3
General Features of EPSON OPOS ADK (OPOS Control) . . . . . . . . . 3
EPSON OPOS ADK Contents . . . . . . . . . . . . . . . . . . . . . . . . . . . . . . . . 4
EPSON OPOS ADK Supported Environment . . . . . . . . . . . . . . . . . . . . 4
ESC/POS Command . . . . . . . . . . . . . . . . . . . . . . . . . . . . . . . . . . . . . . . . . . 5
How to Get a Driver . . . . . . . . . . . . . . . . . . . . . . . . . . . . . . . . . . . . . . . . . . 5
Appendix E FAQ
Can I use the TM-P60 in the Ad-Hoc mode? . . . . . . . . . . . . . . . . . . . . . . 1
Buzzer sounds when the TM-P60 is turned on. What should I do? . . . . . 1
How to set the buzzer not to sound. . . . . . . . . . . . . . . . . . . . . . . . . . . . . . 1
BATT LED lights or flashes. What should I do? . . . . . . . . . . . . . . . . . . . . . . 1
The Power LED is flashing slowly. What should I do? . . . . . . . . . . . . . . . . 2
The TM-P60 can’t connect to the Wireless LAN. What should I do? . . . 2
Rev. D |
xv |

Wireless LAN parameters for the TM-P60 cannot be set with RS-232 . . 3 Searching on the network takes several minutes. . . . . . . . . . . . . . . . . . 3 Network is disconnected several minutes after it is connected. . . . . . 3 TM-P60 turns off several minutes after it is turned on. . . . . . . . . . . . . . . . 4 Printing is not possible. . . . . . . . . . . . . . . . . . . . . . . . . . . . . . . . . . . . . . . . . 4
Appendix F Wireless LAN Network Composition
Network mode . . . . . . . . . . . . . . . . . . . . . . . . . . . . . . . . . . . . . . . . . . . . . . . . . . 1 Infrastructure Mode . . . . . . . . . . . . . . . . . . . . . . . . . . . . . . . . . . . . . . . . . . 1 Ad Hoc Mode . . . . . . . . . . . . . . . . . . . . . . . . . . . . . . . . . . . . . . . . . . . . . . . 1
Wireless LAN Use . . . . . . . . . . . . . . . . . . . . . . . . . . . . . . . . . . . . . . . . . . . . . . . . 1 Wireless LAN Security . . . . . . . . . . . . . . . . . . . . . . . . . . . . . . . . . . . . . . . . . . . . . 2 Security of a wireless LAN . . . . . . . . . . . . . . . . . . . . . . . . . . . . . . . . . . . . . 2 Security Function Outline . . . . . . . . . . . . . . . . . . . . . . . . . . . . . . . . . . . . . . 2 Outline of Each Security Function . . . . . . . . . . . . . . . . . . . . . . . . . . . . . . 2
xvi |
Rev. D |

TM-P60 Technical Reference Guide
Chapter 1
General Information
1.1 Features
The TM-P60 is a POS printer designed to meet the needs of both retail and hospitality for highspeed, on-the-go thermal printing.
1.1.1General
Compact size with rugged design to ensure top reliablility
Support for 802.11b wireless LAN protocols
Belt clip for maximum mobility
Industry-leading 12-hour battery life. (When power management is enabled)
1.1.2Printer handling
Drop-in paper loading and autocutter for easy use
1.1.3Printing
Clear, crisp high speed thermal receipt printing
1.1.4Software
Command protocol is based on the ESC/POS proprietary command system.
OPOS ADK and Windows printer driver are available.
Automatic status back (ASB) function that automatically transmits changes in printer status.
Current TM-T88 series applications are instantly compatible with the printer
Rev. D |
General Information 1-1 |

1.2 Product Structure
1.2.1 Standard Parts Included with the Printer
This printer is packed with the materials listed below.
User’s Manual
Roll paper: 1 roll
Battery pack unit (LIP-2500), and its User’s manual: 1
AC adapter (included only with some models): 1
 Note:
Note:
To charge the battery, you have to use “PS-10” (AC adapter) or “OT-CH60” (Rapid battery charger). Both are options.
1-2 General Information |
Rev. D |
TM-P60 Technical Reference Guide
1.2.2 Related materials for TM-P60
TM-P60 has the related materials listed in the following table.
Category |
Name |
Description |
|
|
|
|
PS-10 |
This is an exclusive AC adapter for battery charging. It is able to |
|
|
connect to TM-P60 directly. |
|
|
The charging period: 4 hours. |
|
|
|
|
OT-CH60 |
This is an exclusive battery charger. To use it you must take the |
|
|
battery out of the TM-P60. |
|
|
The charging period: 2.5 hours. |
|
|
|
|
OT-RS60 |
This is to connect TM-P60 and host PC with serial connection. |
|
|
|
|
LIP-2500 |
This is a spare battery. It is the as same as ithe ncluded one. |
Options |
|
|
OT-ST60 |
This is a shoulder strap. |
|
|
|
|
Consumables |
Roll Paper |
This is required to print. |
|
|
|
|
User’s Manual |
This manual is packed in the carton box. |
|
|
|
|
Technical Reference Guide |
This Manual. |
|
|
|
|
FAQ about ESC/POS |
This Manual is Quick Reference of ESC/POS command with a |
|
command |
simple sample program & Tips. |
|
|
|
|
ESC/POS Application |
This Manual is a Command Reference Guide of ESC/POS |
|
Programming Guide |
command, including some sample programs & Tips. |
|
|
|
|
Command Comparison |
This provides detailed command comparison information |
|
between the TM-T88II/T88III |
among the printers. |
Manuals |
and the TM-P60 |
|
|
|
|
|
OPOS ADK |
This provides the OCX driver which is based upon OPOS. It has |
Drivers |
|
manuals, sample programs, and TMFlogo utility. |
|
|
|
|
|
|
(WIndows |
Advanced Printer Driver |
This is a Windows Driver. This Driver has a manual, sample |
environment) |
|
programs, and utilities to use the driver. |
|
|
|
|
Memory Switch setting |
This is a utility to adjust the setting (Memory Switch) of this printer. |
|
Utility |
See “2.5.3 Memory Switches” (page 2-11) for details. |
|
|
|
Utilities |
TMFlogo |
This is a utility to store “NV graphics“ into this printer. It helps |
|
printing “NV graphics.” |
|
(Windows |
|
|
|
|
|
|
|
|
environment) |
TMNetWinConfig Ver. 2.0 |
This is a utility to set the wireless LAN property. |
|
|
|
Please contact your dealer to get these.
1.3 Consumables
1.3.1 Roll paper
Roll paper widths are 60 mm and 58 mm {2.36"/2.28"}.
 Note:
Note:
When you use 60mm width roll paper, you have to change the printer setting. See “2.5.4 Adjusting Roll paper width” (page 2-13)
Rev. D |
General Information 1-3 |

1.4 Product Specifications Overview
Print method |
|
Thermal line printing |
Print density |
|
203 dpi × 203 dpi [dpi: dots per 25.4 mm (dots per inch)] |
|
|
|
Printing width (default) |
52.5 mm, 420 dot positions |
|
|
|
|
|
Font |
Font A: 12 × 24, Font B: 10 × 24, Font C: 8 × 16 |
|
|
|
|
Characters per |
Font A: 35, Font B: 42, Font C: 52 |
|
line (default) |
|
|
|
|
|
Character size |
Font A: 1.50 × 3.0, Font B: 1.25 × 3.0, Font C: 1.0 × 2.0 |
|
(W × H) |
|
Print font |
|
|
Character set |
95 Alphanumeric, 48 International, 128 × 10 Graphic |
|
|
|
|
|
Roll paper |
57.5 ± 0.5 mm |
|
dimensions |
(59.5 ± 0.5 mm by removing the spacer installed) |
|
(default) |
|
|
|
|
|
Paper thickness |
50 µm ~ 80 µm |
|
|
|
|
Paper roll spool |
18 mm outside |
|
diameter |
|
|
|
|
|
|
Original: Kanzaki Specialty Paper (USA): |
|
Specified thermal |
P350 (paper thickness: 62 µm) |
Paper |
P310 (paper thickness: 58 µm) |
|
paper |
P300 (paper thickness: 56 µm) |
|
|
|
|
|
|
Maximum 70 mm/s, when number of dots per dot line is 64 dots or |
Print speed |
|
less (printing with a fully charged battery, at 25°C, print density |
|
100%) |
|
|
|
|
Interface |
|
IEEE802.11b, RS-232 |
|
|
|
Receive buffer |
128 bytes |
|
|
|
|
|
|
Lithium-ion battery: Product name: LIP-2500, Trade name: Seiko |
|
|
Epson Corporation |
|
Specified battery |
Output: DC 7.4 V |
|
Capacity: 2200 mAh |
|
|
|
|
Power |
AC adapter |
Output voltage: DC 12 V |
Input voltage: AC 100 V ~ 240 V |
||
consumption |
(option) |
Product name: PS-10, Trade name: Seiko Epson Corporation |
|
|
|
|
Mechanism |
10,000,000 lines printing |
|
|
|
|
Print head |
100,000,000 dots |
Life |
|
|
Autocutter |
500,000 cuts |
|
|
|
|
|
Operation |
5 ~ 45°C, 10 ~ 90% RH |
|
(Printing quality |
|
|
guaranteed) |
|
|
|
|
|
|
Abnormal operations not found when the printer is left under the |
|
|
environment of 25°C, 60% RH for 2 hours after it was left in the |
|
|
following conditions: |
Temperature |
|
High temperature and humidity: 50°C, 90% RH for 120 hours |
|
High temperature: 70°C for 120 hours |
|
/humidity |
Storage |
Low temperature: -25°C for 120 hours |
|
|
|
Overall dimensions (mm) |
103 × 159 × 65 (W × D × H) |
|
|
|
|
Mass (approx.) |
670 g (including LIP-2500 [battery pack] but not roll paper) |
|
|
|
|
1-4 General Information |
Rev. D |

TM-P60 Technical Reference Guide
Chapter 2
Setup
2.1 Part Name and Basic Operation
2.1.1 Part names
RS232C I/F connecter cover
control |
roll paper |
open |
connector for AC |
|
panel |
cover |
button |
||
adapter (option) |
||||
|
|
|
clip
battery cover
2.1.2 Control Panel
The control panel is shown below.
POWER button
FEED
 button
POWER ERROR BATT.
LED LED LED
Rev. D |
Setup 2-1 |

POWER LED
ERROR LED
BATT. LED
FEED button
2.1.2.1 LED
POWER
POWER LED |
Meaning |
|
|
On |
Power is on. |
|
|
Off |
Power is off. |
|
|
Flashing |
The printer is in power-off operation or is in an area where wireless communication is not possible. |
|
|
ERROR
Printer Condition |
ERROR LED |
Meaning |
|
|
|
Power On |
On |
Printer is offline (paper out, power-on initialization, roll paper |
|
|
cover open, power-off operation, or the remaining battery |
|
|
charge is not enough for printer operation when the battery is |
|
|
used to supply the power.) |
|
|
|
|
Off |
Printer is online. |
|
|
|
|
Flashing |
It indicates an error. See “3.1 LED Blinking Pattern” (page 3-1) for |
|
|
troubleshooting |
|
|
|
Power Off, battery installed, and |
On |
Indicates that an abnormality occurred during battery |
AC adapter connected |
|
charging. The battery must be replaced with a new one. |
|
|
|
|
Off |
No problem. |
|
|
|
BATT.
Printer Condition |
BATT. LED |
Meaning |
|
|
|
Power On without AC adapter |
On |
Remaining battery charge is not enough. It must be charged. |
|
|
|
|
Off |
Remaining battery charge is adequate. |
|
|
|
|
Flashing |
Remaining battery charge is below half. |
|
|
|
Power Off and battery installed |
On |
The battery is being charged. |
|
|
|
|
Off |
The battery is fully charged. |
|
|
|
2.1.2.2 Control Panel Buttons
The control panel has a FEED button that you may have to use, although most paper handling functions will be handled by your software.
FEED
Use this button to feed roll paper or to start a roll paper self test, or start printing status sheet. ( See “3.5.1 Self test mode” on page 3-3.)
2-2 Setup |
Rev. D |

TM-P60 Technical Reference Guide
 Note:
Note:
The FEED button can be disabled by using an ESC/POS command. Refer to “ESC/POS Application Programming Guide” for details.
2.1.3 Beeper Function
This printer has a “beeper“ function. This function causes beeping in specified situations. The situations are the following:
The battery remaining is low (Memory switch can enable/disable this function)
The printer can’t find any Access point (wireless LAN). (Memory switch can enable/disable this function)
Roll paper is out (Memory switch can enable/disable this function)
A error has occurred except “printer temperature error.“ (Memory switch can enable/ disable this function)
Start of status sheet printing
The radio field intensity check is started (reply for pressing FEED button)
The radio field intensity check is processing
 Note:
Note:
About memory switch, see “2.5.3 Memory Switches” (page 2-11).
About status sheet, see “2.6.2 Confirming the current LAN setting of the printer” (page 2-15). About radio field intensity check processing, see “3.6 Radio Field Intensity Check Mode” (page 3-5).
The beeper can be beeped by a command from an application program.
See “4.3 Beeper function” (page 4-3)
Rev. D |
Setup 2-3 |
2.2 Setup Flow
You have to set up your printer to use it. And you can adjust some features by customizing them. This section describes the setup.
The setup flow of preparing to use printer is below.
1.Printer setup
Install Roll Paper
Install the battery pack or connect the printer to the AC adapter
(See “2.4 Providing power to the printer” (page 2-8))
2.Adjust various settings (If you need to)
Memory switches
Paper width
(Adjust the spacer & Memory switches)
(See “2.5 Adjusting Various Settings” (page 2-10))
3.Install to your wireless LAN by either method.
Using utility (TMNet WinConfig)
•with wireless LAN
•with serial connection (RS 232C
Using browser
•with wireless LAN
(See “2.6 Installing your wireless LAN” (page 2-14))
When you select Direct control method (ESC/ POS command,) you don’t need to install any drivers.
4.Driver setup
OPOS
APD
(See “2.7 Install a Printer Driver in the Host PC / POS Terminal,” page 2-25)
5. Complete setup
2-4 Setup |
Rev. D |

TM-P60 Technical Reference Guide
 Note:
Note:
A printer may beep when turned on. It is caused by the Access point’s LAN setting not corresponding to the printer. Ignore the beeping. (see “3.2.1 Beeping Types” (page 3-2) for the beeping pattern.)
When you use OPOS (OCX driver from EPSON) or the Advanced Printer Driver, you need to install the driver. When you use ESC/POS commands, you don’t have to install drivers. For information on these drivers, see “D.1 Control Method” (page D-1).
The following sections describe the setup.
Rev. D |
Setup 2-5 |
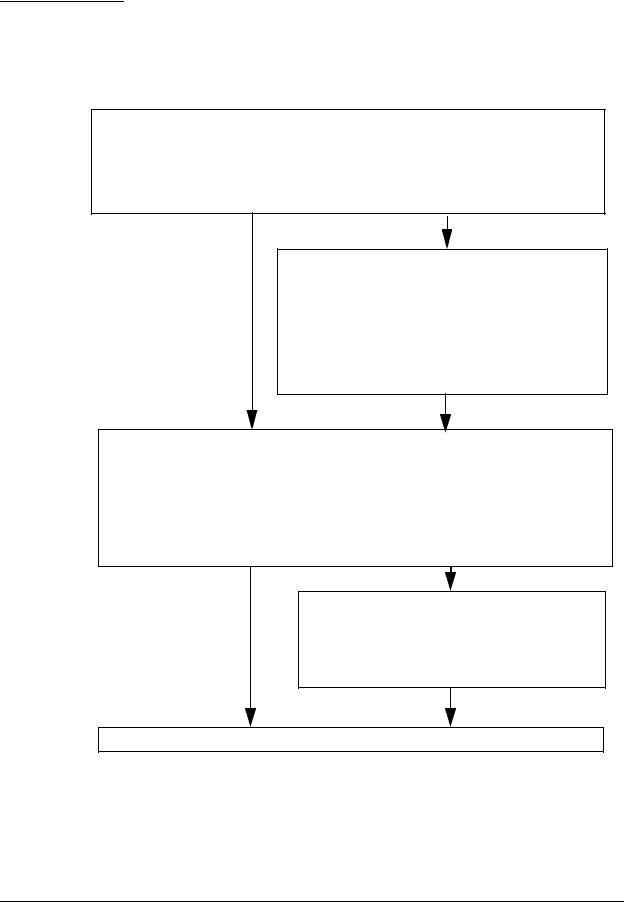
2.3Installing/Replacing the Roll Paper
1.Press the button to open the roll paper cover.
2.Remove the used roll paper core if there is one, and insert the new roll paper.
 Note:
Note:
Note the direction the paper comes off the roll.
Do not use paper rolls that have the paper glued to the core.
3.Pull out some paper, close the cover, and tear off the paper with the manual cutter.
 CAUTION:
Be sure to use roll paper that meets the specifications.
Be sure not to touch the manual cutter. Otherwise your fingers might be injured.
 Note:
Note:
Do not open the roll paper cover during printing or paper feeding. It may cause to make damage for printer.
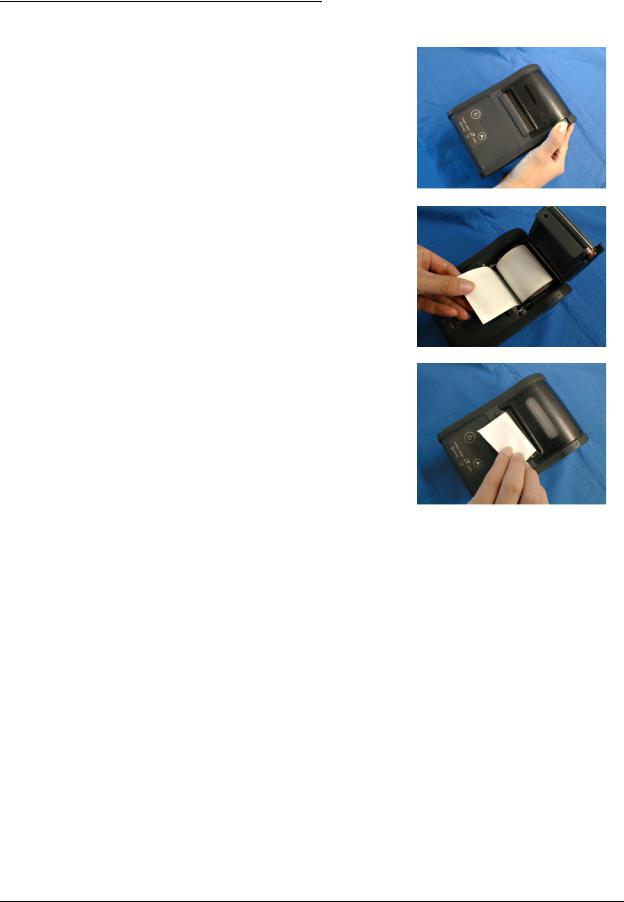
2.3.1 Installing or Replacing Roll Paper Vertically
You can hang the printer vertically on a belt using a clip on the back of the printer or a neck strap provided as an option. When you use the printer vertically, follow the steps below to install roll paper.
1.Press the button to open the roll paper cover.
2.Remove the used roll paper core if there is one.
2-6 Setup |
Rev. D |

TM-P60 Technical Reference Guide
3.Set the new roll paper on the inside of the roll paper cover.
Note:
Note the direction the paper comes off the roll.
4. Pull the leading edge of the roll paper.
5.Align the left edge of the roll paper with the edge of the cover.
6.Close the cover and tear off the paper with the manual cutter.
Rev. D |
Setup 2-7 |
2.4 Providing power to the printer
You can supply power through the battery pack packaged with the printer or the AC adapter provided as an option.
 WARNING:
Be sure to use the battery that came with the printer. Using a battery other than the one specified may cause fire, explosion, leakage, overheating, or other damage.
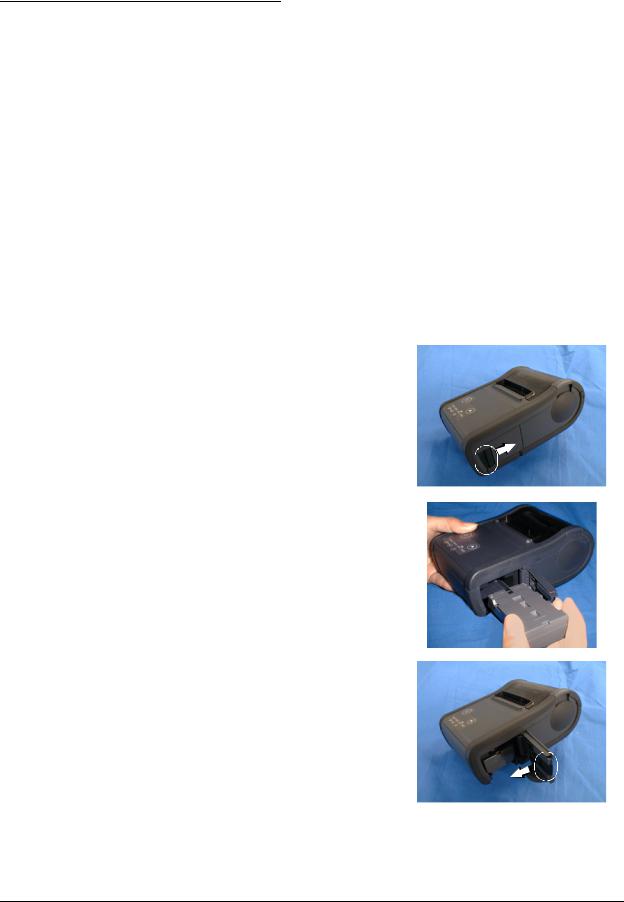
2.4.1 Provide power from the battery
2.4.1.1 Installing the battery
 CAUTION:
There is a risk of explosion if the battery is replaced by an incorrect type. Dispose of used batteries according to the instructions.
1. Slide the battery cover to open it.
2. Install the battery.
3. Close the cover.
2-8 Setup |
Rev. D |
Loading...