


Epson NPD4937-00 EN
Hardware Setup Guide
Hardware Setup Guide
Unpacking
Step. 1
Remove all protective materials.
The illustrations in this manual are for a similar model. Although they may differ from your actual model, the method of operation is the same.
Step. 2
Remove all protective materials.
Installing the Optional Cassette Unit
For the WF-4630/5620/5690 series, an optional cassette unit is sold separately. If you do not have this unit, skip this step.
1

Epson NPD4937-00 EN
Hardware Setup Guide
Lower the product gently onto the unit so that the connector and two pins on the top of the unit fit into the terminal and the holes on the bottom of the product respectively.
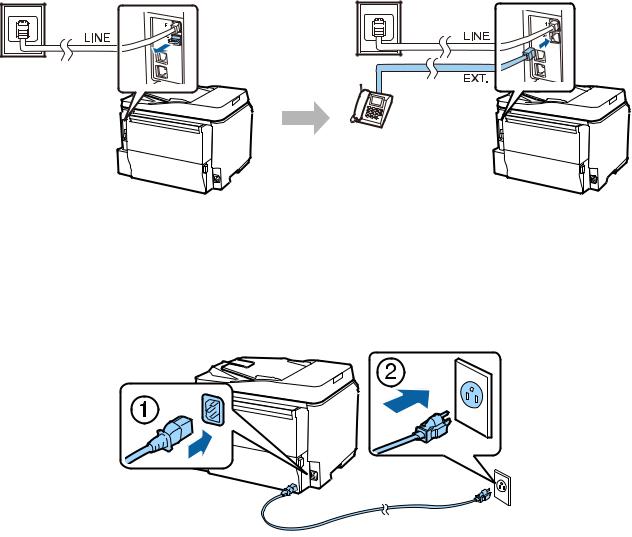
Connecting the Product to a Phone Line
Connect a phone cable to the LINE port on the back of the product. Choose one of the following.
If you do not want to use the fax function, skip this step.
Connecting to PSTN (standard phone |
Connecting to DSL |
Connecting to ISDN |
line ) or PBX |
|
|
aTelephone wall jack or PBX port
If you have a PBX console in the room, connect the telephone cable from the console to the LINE port.
2
Epson |
NPD4937-00 EN |
|
|
Hardware Setup Guide |
|
|
|
|
b |
DSL filter |
|
|
If your DSL modem is equipped with a built-in DSL filter, you do not need a separate DSL filter. |
|
|
|
|
c |
DSL modem |
|
|
|
|
d |
ISDN wall jack |
|
|
|
|
e |
Terminal adapter or ISDN router |
|
|
|
|
|
|
|
|
Depending on the area, a phone cable may be included with the product. If so, use that cable. You may need to |
|
|
connect the phone cable to an adapter provided for your country or region. |
|
|
|
|
Connecting a Phone Device
If you want to share the same phone line with your telephone or answering machine, remove the cap from the EXT port on the back of the product. Then connect a second phone cable to the phone device and to the EXT port.
If you do not want to use the fax function, skip this step.
Turning on the Printer
Step. 1
Connect the power cable and plug it in.
3
 Loading...